
Vinyl Rocket CR1210A - Enceinte musicale Crosley - Free user manual and instructions
Find the device manual for free Vinyl Rocket CR1210A Crosley in PDF.


| Product Type | Portable Vinyl Turntable with Built-in Speakers |
| Brand | Crosley |
| Model | Vinyl Rocket CR1210A |
| Dimensions (W x D x H) | 14.61 x 11.42 x 5.51 inches |
| Weight | 10.14 lbs |
| Power Supply | AC adapter (100-240V) |
| Speed Settings | 33 1/3, 45, 78 RPM |
| Bluetooth | Bluetooth 4.2, range up to 33 ft |
| Speaker Type | Built-in full-range stereo speakers (2x 3W) |
| USB Encoding | Record vinyl to MP3 via USB |
| Headphone Jack | 3.5mm for private listening |
| RCA Output | Line-level output to external speakers |
| Needle Type | Diamond stylus, user-replaceable |
| Drive System | Belt-driven |
| Cabinet Material | Wood veneer with carrying handle |
| Maintenance | Clean stylus with soft brush; replace belt if speed inconsistent |
| Safety Precautions | Do not expose to moisture or extreme temperatures; unplug when not in use |
| Spare Parts Available | Replacement stylus (model NP-6) and drive belt (model DB-1) |
| Reparability | User-serviceable: stylus and belt easily replaced |
| General Information | Portable suitcase design for easy transport; suitable for casual listening |
Frequently Asked Questions - Vinyl Rocket CR1210A Crosley
User questions about Vinyl Rocket CR1210A Crosley
0 question about this device. Answer the ones you know or ask your own.
Ask a new question about this device
Download the instructions for your Enceinte musicale in PDF format for free! Find your manual Vinyl Rocket CR1210A - Crosley and take your electronic device back in hand. On this page are published all the documents necessary for the use of your device. Vinyl Rocket CR1210A by Crosley.
USER MANUAL Vinyl Rocket CR1210A Crosley
Contents
- Introduction Pg 3
- Important safety instructions Pg 4
- Taking delivery / Transit mode Pg 7
- Label magic
- Inserting title cards Pg 12
- Loading records Pg 14
- Playing the Jukebox Pg 18
- Connecting external audio devices Pg 22
- Adding additional speakers Pg 24
- Adjusting amplifier settings Pg 26
- Jukebox lighting adjustment Pg 30
- Bluetooth
- Trouble shooting and error codes Pg 35
Pg 3
Pg
Pg 34

Introduction
Thank you for purchasing a Classic Jukebox from Sound Leisure, the world's premier Jukebox manufacturer. This product has been designed and built to give you many years of enjoyment and trouble free use.
This owner's guide provides all the information you will need to install and operate the Jukebox safely.
About Sound Leisure
Sound Leisure have been manufacturing Jukeboxes in Leeds, UK since 1978. The family owned and run business was originally formed by Alan Black and three generations of the family now work alongside a team of skilled craftsmen and women, all dedicated to manufacturing the finest Jukeboxes in the world.
Important Safety Instructions
- Read these instructions.
- Keep these instructions.
- Heed all warnings.
- Follow all instructions.
- Do not use this apparatus near water.
- Clean only with a dry cloth.
- Do not block any ventilation openings. Install in accordance with the manufacturer's instructions.
- Do not install near any heat sources such as radiators, heat registers, stoves or other apparatus (including amplifiers) that produce heat.
- Do not defeat the safety purpose of the polarized or grounding-type plug. A polarized plug has 2 blades with one wider than the other. A grounding type plug has two blades and a third grounding prong. The wide blade or the third prong are provided for your safety. If the provided plug does not fit into your outlet, consult an electrician for replacement of the obsolete outlet.
- Protect the power cord from being walked on or pinched particularly at plugs, convenience receptacles, and the point where they exit from the apparatus.
- Only use attachments/accessories specified by the manufacturer.
- Use only the cart, stand, bracket or table specified by the manufacturer, or sold with the apparatus. When a cart is used, use caution when moving the cart/apparatus combination to avoid injury from tip-over.
- Unplug this apparatus during lightning storms or when unused for long periods of time.
- Refer all servicing to qualified service personnel. Servicing is required when the apparatus has been damaged in any way, such as if a power-supply cord or plug is damaged, liquid has been spilled or objects have fallen into the apparatus, the apparatus has been exposed to rain or moisture, does not operate normally or has been dropped.
Additionally
- This Jukebox contains high voltage & high temperature parts. Do not attempt to carry out any work that is not specifically instructed in this manual. If the Jukebox fails to operate correctly, switch off the machine and contact Sound Leisure.
- This Jukebox is heavy. DO NOT attempt to lift the unit.
- DO NOT attempt to move the Jukebox with the front glass/door open. The Jukebox is top heavy and may tip forward if moved with the front glass/door open.
- This appliance must be connected to a mains socket with a protective earth connection.
- The mains plug is the designated 'disconnection device' and as such should be readily operable.
- 'WARNING' To reduce the risk of fire or electric shock, do not expose this apparatus to rain or moisture.
- Fuses should be replaced like for like at all times.

High voltage
- Terminals marked with the symbol above are considered hazardous live and external wiring connected to these terminals requires installation by an instructed person or the use of ready made contact leads.
- Jukebox contains transmitter module FCC ID : T9J-RN52
• Refer to Bluetooth section for more information.
• This Jukebox is approved for operation :
below 2000m elevation
between 0°C and 40°C
natural_image
Illustration of a vintage two-wheeled radio unit with visible control panel and buttons (no text or symbols)Lock locations & rear panels
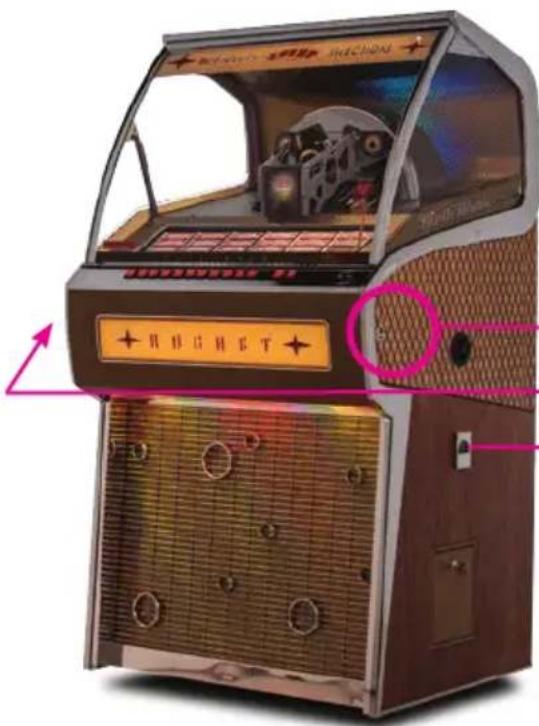
Main cabinet locks.
Please note there is a
lock on both the left and
right of the Jukebox.
Coin reject cup
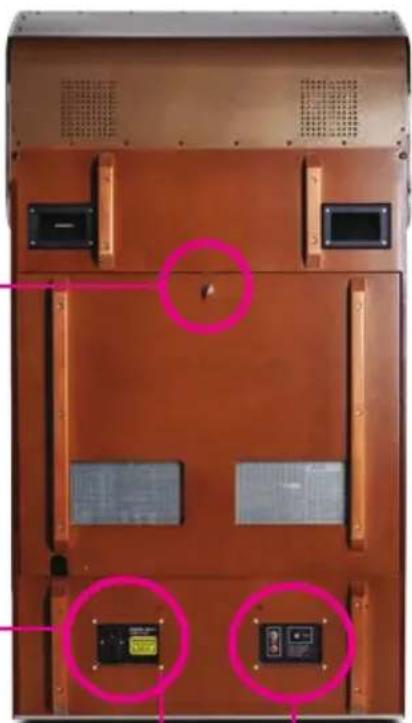
Rear cabinet door lock-
Mains power socket and switch
natural_image
Interior view of a brown electronic device with four labeled buttons and mounting brackets (no readable text or symbols)Earth bond
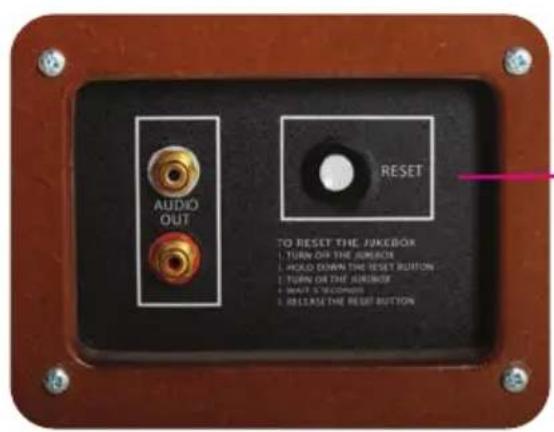
Audio Out
sockets and
RESET button
Taking Delivery / Transit Mode
Once the Jukebox has been positioned in its designated space the following instructions will allow you to prepare it for use. The keys to open the Jukebox will be found in the coin reject cup on the side of the Jukebox. The keys will open the side locks and the rear cabinet lock. See opposite page FIG1.
Transit Mode
Upon delivery the Jukebox player mechanism will be locked in "Transit Mode." The following pages explain how to remove the transit foam, and prepare the Jukebox for use. Please work through this guide in order.
When removing the transit parts, to reduce the risk of accidental damage to the Jukebox mechanism, it is recommended to do so with the Jukebox powered off. Retain all transit parts for future use.
How to remove the transit retaining foam
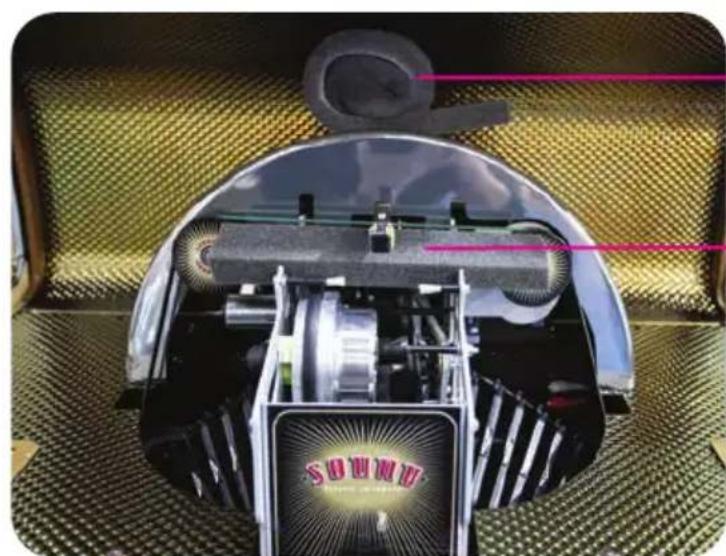
- Locate the transit foam under the playing arm shown in FIG2.
• Gently hold the playing arm and slide the foam out horizontally. - Carefully remove the foam from around the disc basket. Note: Foam will only be located in this area if transported pre loaded with discs
FIG2 :
Mechanism in transit mode showing retaining foam
natural_image
Interior view of a mechanical device with visible internal components and no readable text or symbolsCowling retaining foam.
Gently remove.
Playing arm retaining foam.
Gently lift arm and remove.
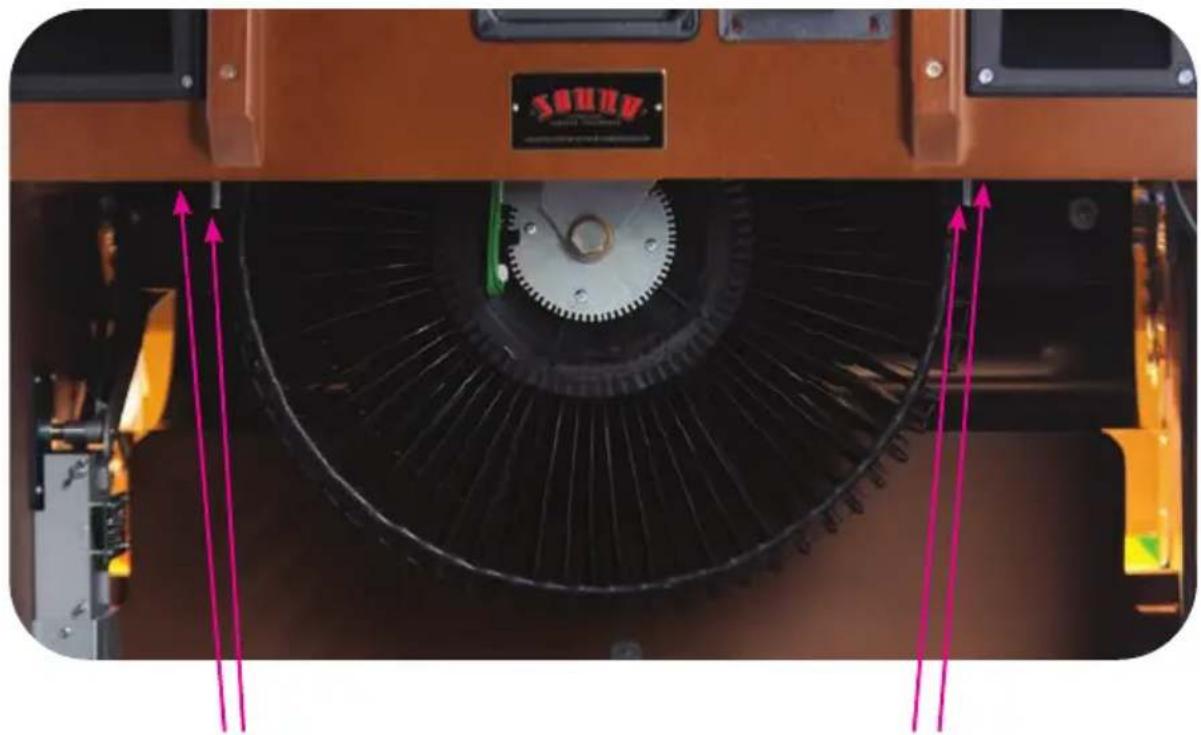
FIG3 : Retaining transit bolt locations (mechanism)
Vinyl Mechanism as seen from the rear of the cabinet.
natural_image
Close-up of a 3D printer's internal structure with visible blades and meshing, no text or symbols present.Location of 4 x retaining bolts and wingnuts.
natural_image
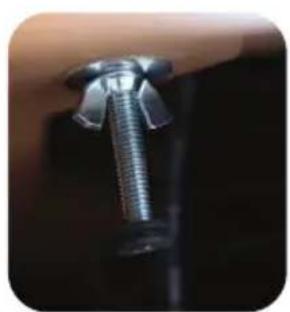
Close-up of a metallic screw fastener inserted into a black cylindrical component (no text or symbols visible)FIG4 : Wingnut positions
Retaining bolt and wing nut shown in position upon delivery.
natural_image
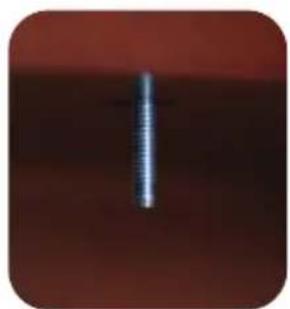
Close-up of a metallic screw with a vertical shaft against a dark red background (no text or symbols visible)Remove wingnut, gromet and washer. Retain these for future use.
The Jukebox player mechanism will be locked into position by 4 wing nuts that are located under the play deck. These must be loosened before initial operation. The loosening of the wingnuts allows the mechanism to float freely and dampen any vibrations which may effect the vinyl playback.
How to locate and loosen the retaining bolt wingnuts
- Unlock and remove the rear cabinet door (shown in FIG1)
- Locate the retaining bolts and wingnuts. Two are located at the front of the mechanism and two at the rear as shown in FIG3.
- Carefully loosen and remove the wingnuts, washers and grommets as shown in FIG4. Retain these for futur use.
- Once the wingnuts have been removed, close the front door of the Jukebox.
- Power on the Jukebox. The location of the mains power switch is shown in FIG1.
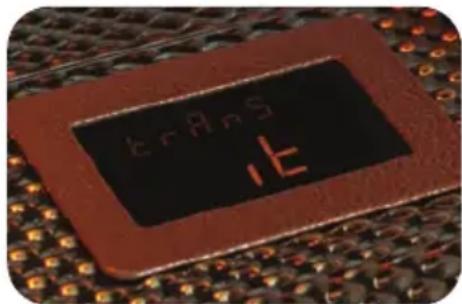
The Jukebox will show "TRANSIT."
- At the rear of the Jukebox press the RESET button once. The location of this button is shown in FIG1.
The Jukebox mechanism will rotate to its playing position. The display will no longer show "TRANSIT."
The Jukebox is now ready for operation.
How to place the Jukebox into transit mode.
If the Jukebox is to be moved any distance, where the mechanism is in danger of moving, it is recommended that the Jukebox be placed into Transit Mode. You will require the retaining foam that was delivered with your Jukebox. The location of the following items listed is shown in Fig3.
- With no discs playing, press and hold the RESET button on the rear of the Jukebox for 5 seconds. The location of this button is shown in FIG1.
The mechanism will park in the transit position and the display will show "TRANSIT."
- Power OFF the Jukebox using the switch on the rear of the Jukebox. The location of the mains power switch is shown in FIG1.
- Open the rear door of the Jukebox and locate the 4 wingnuts secured to the retaining bolts of the Mechanism.
- Tighten the wingnuts against the washers so that they securely hold the mechanism down to the shelf.
- Close and lock the rear door of the Jukebox.
- Open the front glass/door of the Jukebox.
- Replace the retaining foam under the playing arm by carefully holding the playing arm and sliding the foam in from the side.
- Close and lock the front glass/door of the Jukebox.
The Jukebox can now be safely moved.
Label Magic
Sound Leisure has developed the Label Magic title card printing software to facilitate the easy design and printing of title cards for your Sound Leisure Jukebox.

Included in the welcome pack supplied with your Jukebox is a FREE 12 month subscription to Sound Leisure's Label Magic title card printing software.
To get started creating your cards, download your free copy of Label Magic from:
www.label-magic.com/sl
Once you have installed Label magic, use the code printed on the postcard included in your welcome pack to activate your free 12 month subscription.
Once you have printed your title cards follow the steps overleaf for how to insert these in the Jukebox.
Inserting title cards
Title Cards
Perforated blank title cards and Sound Leisure's Label Magic printing software are included in your Jukebox welcome pack. For further details on installing your software and your FREE 12 month subscription code please see the postcard included in the welcome pack or visit :
soundleisure.com/classic-Jukeboxes/accessories/label-magic-title-card-software
This will assist you in designing and printing title cards. Additional cards are available to purchase through our website.
soundleisure.com/classic-jukeboxes/accessories/title-card-labels-45rpm-vinyl
The Jukebox holds 70 vinyl records and can play both sides (A&B). Each title selection has a number for side A and side B. Side A numbers run from 100 - 169. Side B numbers run from 200 - 269.
Once title cards have been printed and removed from the perforated card they can be inserted under the retaining tabs next to the number of the record they relate to.
(TIP - sliding in from left to right is easier)
WARNING : DO NOT FLIP THE TITLE RACK PAGES BY HAND AS THIS CAN DAMAGE THE MOTOR OR SNAP THE PAGE ASSEMBLY! ONLY TURN THE PAGES USING THE RED BUTTONS SITUATED ON THE FAR RIGHT HAND SIDE OF THE BUTTON BANK.
FIG5 : Title cards inserted into title rack
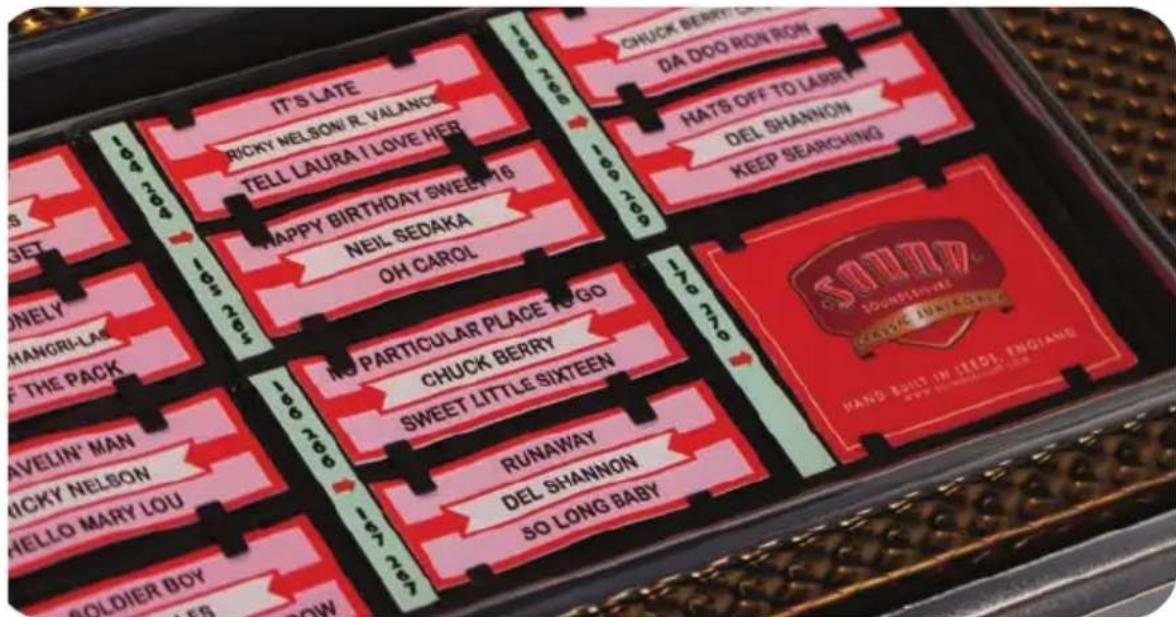
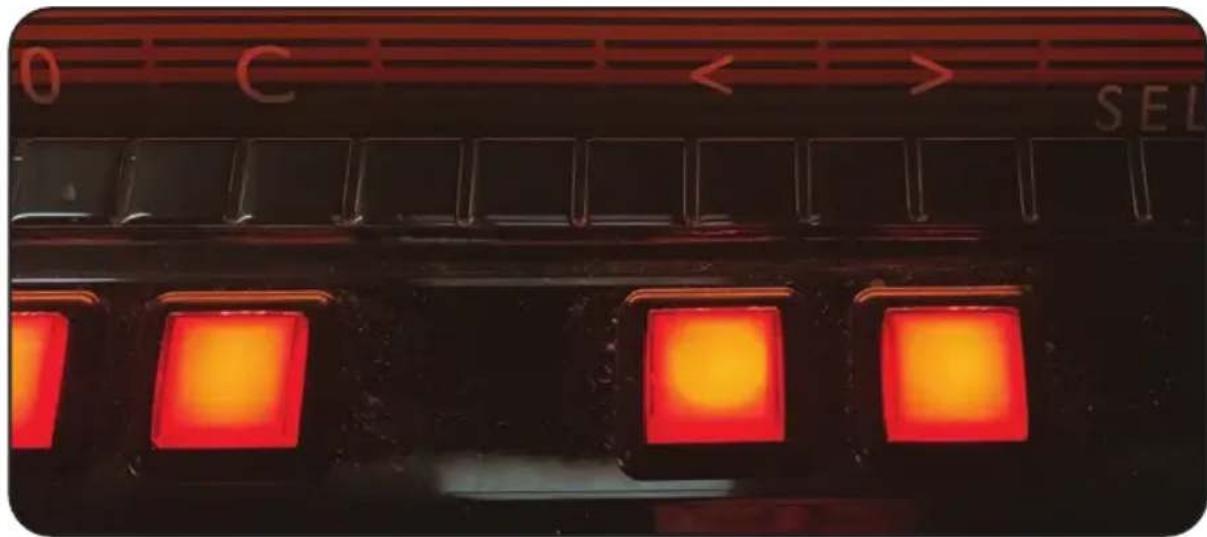
Left and Right (title rack flip) buttons as seen on the Jukebox button bank
WARNING: IF YOU ARE USING THE JUKEBOX WITHOUT A FULL BASKET OF RECORDS PLEASE SPACE OUT RECORDS EVENLY AROUND THE BASKET AS AN UNBALANCED BASKET MAY CAUSE MECHANICAL FAULT.
CAUTION! MOVING PARTS! THE MECHANISM OF THE JUKEBOX CONTAINS MOVING AND ROTATING PARTS. PLEASE BE VERY CAREFUL WHEN LOADING OR OPERATING WITH THE FRONT DOOR OPEN. ENSURE THAT LOOSE CLOTHING, JEWELLERY, LONG HAIR ETC ARE KEPT AWAY FROM THE VINYL MECHANISM AND ROTATING BASKET.
Loading Records
The Jukebox holds 70 vinyl records and can play both sides (A&B). Each record has a number to play side A and another number for side B. Side A numbers run from 100 - 169. Side B numbers run from 200 - 269.
The Jukebox selects a chosen record by rotating the mechanism to the chosen number and then offering that record to the stylus. It is therefore important to make sure the records are inserted in the correct basket number and facing the correct way.
The following pages will instruct you how to load discs into your Jukebox mechanism
FIG6 : Jukebox vinyl mechanism
Vinyl Mechanism as seen from the front
Belt drive / grasp and rotate to the left
Load records from this side
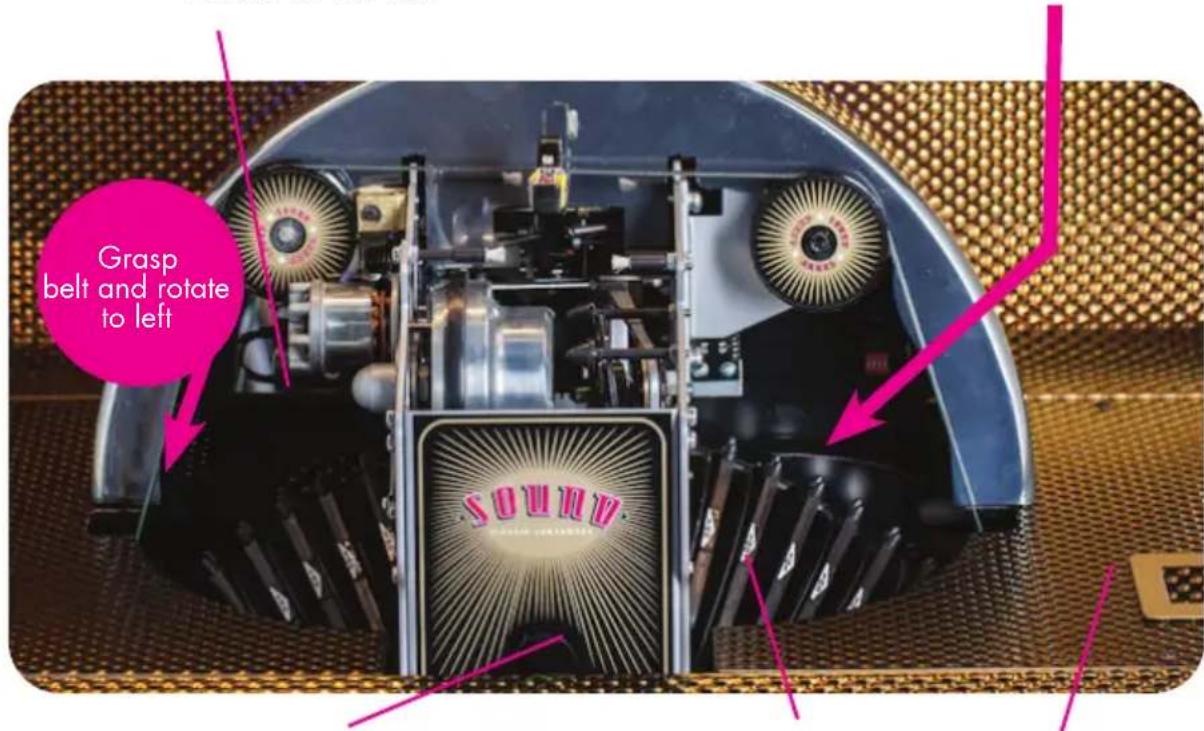
Mousehole containing reject / rotate mechanism button
Record basket - slots numbered
Display
How to load records into the Jukebox
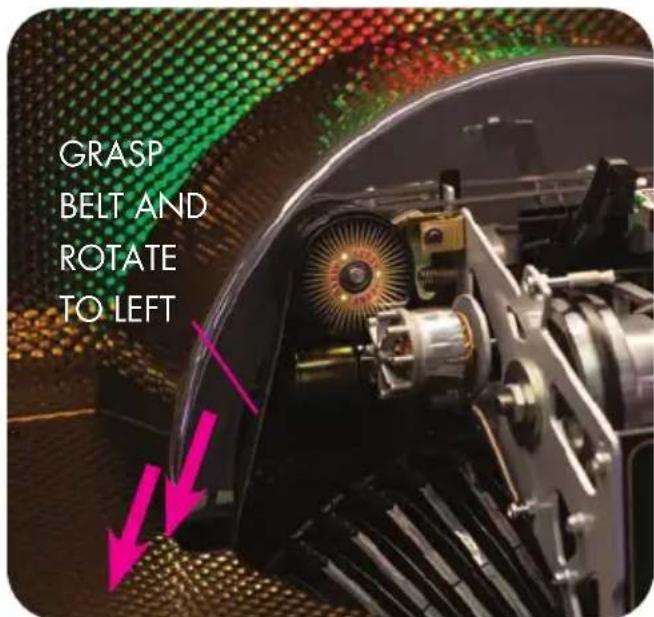
- When the Jukebox is not playing. Rotate the record mechanism by grasping the belt drive and rotating to the left (anticlockwise)
Warning : Doing this will rotate the basket. Please ensure there are no items in the way - such as loose clothing, fingers, jewellery that could become caught as the basket rotates.
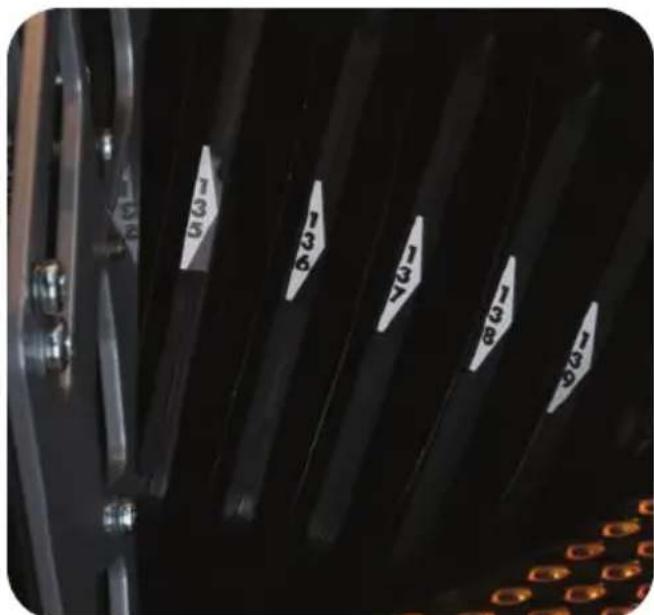
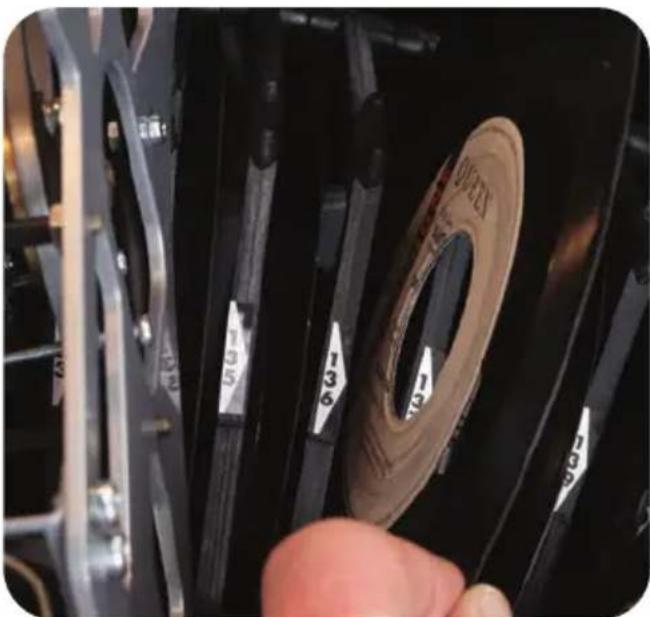
- Release the belt when the required record slot is approximately in the middle of the right hand area of the mechanism. Each slot is numbered and the triangular sticker points towards the specified slot.
natural_image
Close-up of a hand inserting a coin into a mechanical component with metal clamps (no visible text or symbols)- Slide the record into the slot
Side A should be facing towards the left of the slot and side B facing the right. Do not play warped records as this could damage the mechanism.
- Continue to follow these steps until the basket is full.
Warning : If you are using the Jukebox without a full basket of records please space out the records evenly around the basket as an unbalanced basket may cause mechanical fault.
- Each records slot corresponds to a title card selection number (see page 12). It is important to ensure records are in the correct numbered slot and facing the right direction.
- When loading records it is advisable to load sections at a time in order to evenly space and weight the basket.
- Note: the mechanism can play both "dinked" (with a large centre hole) and normal "non dinked" records.
Playing the Jukebox
Making Selections
- When the records and labels are installed, selections can be made using the keyboard at the front of the Jukebox or via the remote control.
- To "flip" the title rack pages press the red buttons located on the far right hand side of the button bank. (FIG5) or by using 'F3' or 'F4' on the remote control. (FIG7)
- To play a record via the Jukebox buttons, select the 3 digit number as specified on the title card. For instance 124 (side A) or 224 (side B) or play both sides of the record (side A & B) by pressing 324.
- If you make a mistake while entering a selection press 'C' on either the remote or Jukebox button bank to re-start the selection process.
Ejecting a track or disc
- To eject an entire disc press 'REJECT DISC' on the remote.
- To reject a single side press 'REJECT TRACK' on the remote.
Display
- The display will show the current playing record. After 10 seconds the display will switch off. Pressing the 'C' button will show which disc/track is currently playing.
Using the remote control
When using the remote control, aim the remote at the Jukebox display as this is where the remote sensor is located.
Selections and additional functionality of the Jukebox can be controlled via the remote control supplied with your Jukebox.
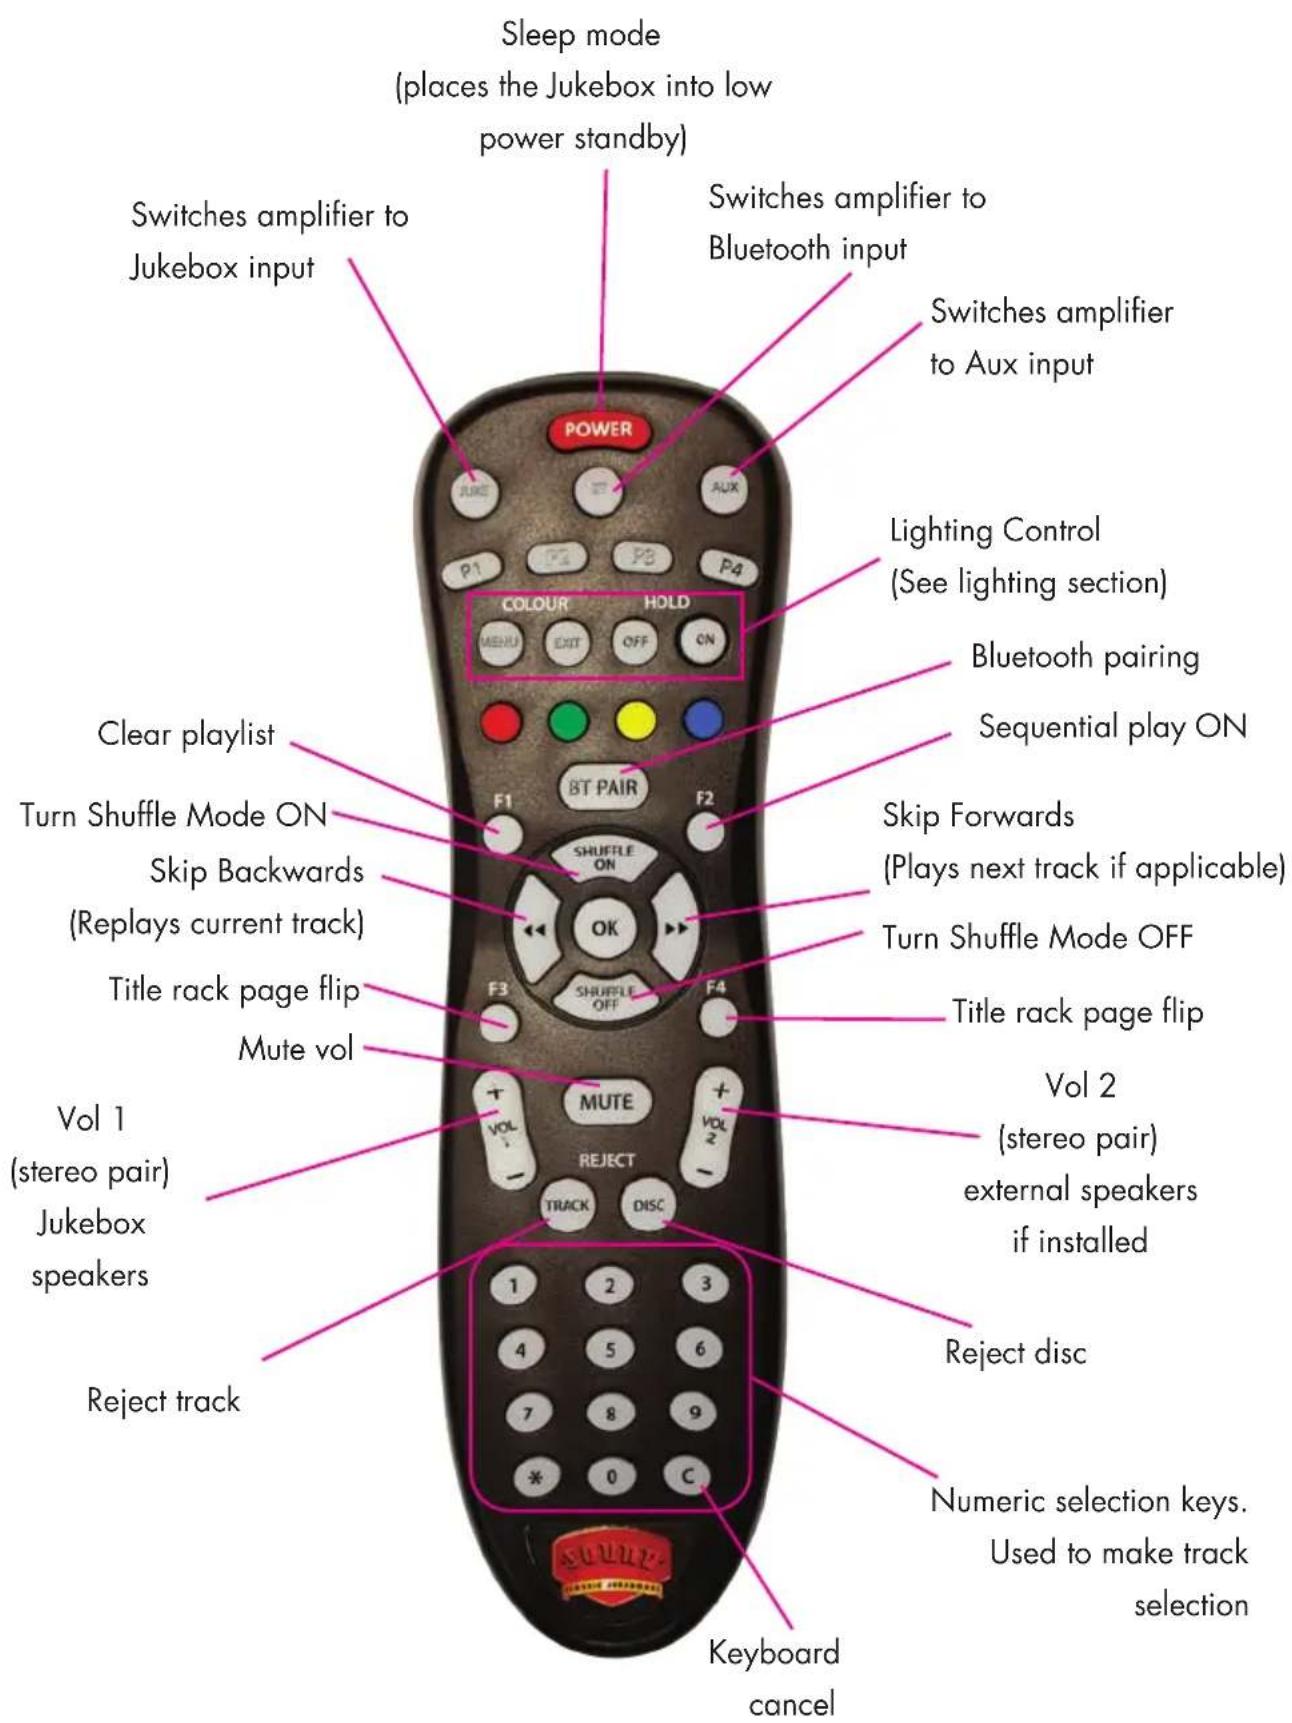
Adjusting Volume
As a precaution against overloading the speakers when switching the Jukebox on, the volume is preset to a low level.
- To raise the volume to the preferred level, select a track, wait until the disc is playing, then adjust the volume using the 'VOL 1' volume keys on the remote control.
- The display will briefly show the volume level as 'L -'. The number will vary dependant on the volume level with 0 for off and 50 for full volume.
- The 'VOL 2' volume keys (on the remote) are used to adjust the volume of the spare amplifier channels, please refer to page 22 "Adding additional speakers".
- Pressing the 'MUTE' key on the remote, will instantly mute the amplifier and the display will show 'L —', to return the volume to the previous level press any of the volume keys.
Powering Off the Jukebox : Sleep Mode
It is recommended that the Jukebox is powered off using the standby procedure and then to “full off” at the mains switch if required. This ensures that discs are ejected and the mechanism is in a safe position. Failure to power the Jukebox down in this way could damage the jukebox mechanism.
To power off the Jukebox
- Press the "POWER" button at the top remote control (FIG 7) If a disc is playing it will be returned to its position in the mechanism stack. The mechanism will then return to its home position at the left hand side. "Sleep" will show on the Jukebox display.
NOTE : Sleep mode is useful if you are going to be using your Jukebox within a day or so. This will conserve power but still “wake” the Jukebox quickly should you wish to use it.
If you are not going to use the Jukebox for a few days then it is recommended to use sleep mode followed by a full power off using the power switch on the back of the Jukebox.
Shuffle Mode
The Jukebox features a random shuffle mode. This feature allows continuous play until the function is disabled. If a manual selection is made when shuffle mode is enabled then the currently playing track will play out before the chosen selection is played. Once the manual selection has been played shuffle mode will continue.
Shuffle mode has two settings : shuffle disc and shuffle side.
Shuffle disc
- This mode will play the entirety of a disc (A&B sides) before randomly selecting another disc and playing. This is to listen to both A&B sides. This setting will continue to play random disc albums until the mode is disabled.
Shuffle side
- Shuffle side mode will play a random A side from a random disc until the mode is disabled.
How to enable or disable Shuffle modes
- The shuffle modes are enabled by pressing the "shuffle on" button on the remote control.
- Pressing the 'SHUFFLE ON' button ONCE enables the Shuffle disc mode. (A&B sides) When enabled the Jukebox display will show: DISC and a small dot will appear in the lower section of the display.
- Pressing the 'SHUFFLE ON' button TWICE enables the shuffle side mode. (A sides only) When enabled the Jukebox display will show : SIDE and a small dot will show in the bottom half of the display.
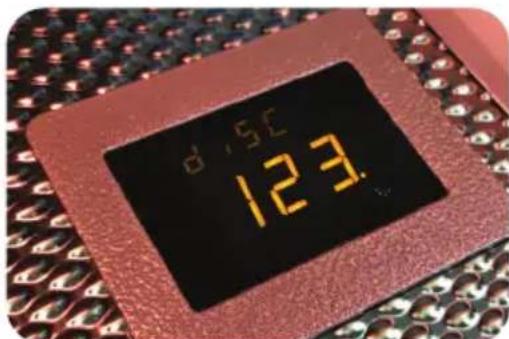
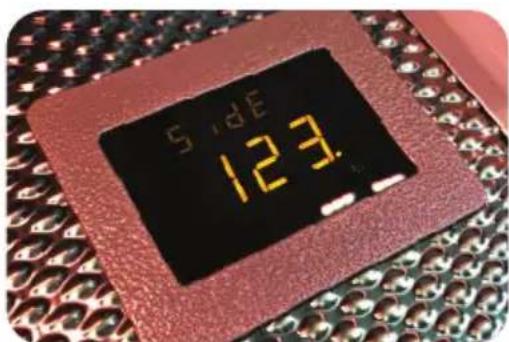
- To disable shuffle mode press the 'SHUFFLE OFF' button on the remote control. The small dot will no longer show to indicate that shuffle mode is not enabled.
Sequential Play
This feature plays the disks in ascending order e.g: 100 - 101 - 102. The mechanism will start from its current position and then play sequentially until the feature is turned off.
- To activate sequential mode press "F2" on the remote control (FIG5).
- "ORDER" will show on the display and a decimal point will denote that a shuffle mode is enabled.
- Sequential mode can be turned off by pressing "F2" again or "SHUFFLE OFF"
- Normal shuffle modes will over ride sequential mode and sequential mode cannot be activated when other shuffle modes are in operation.
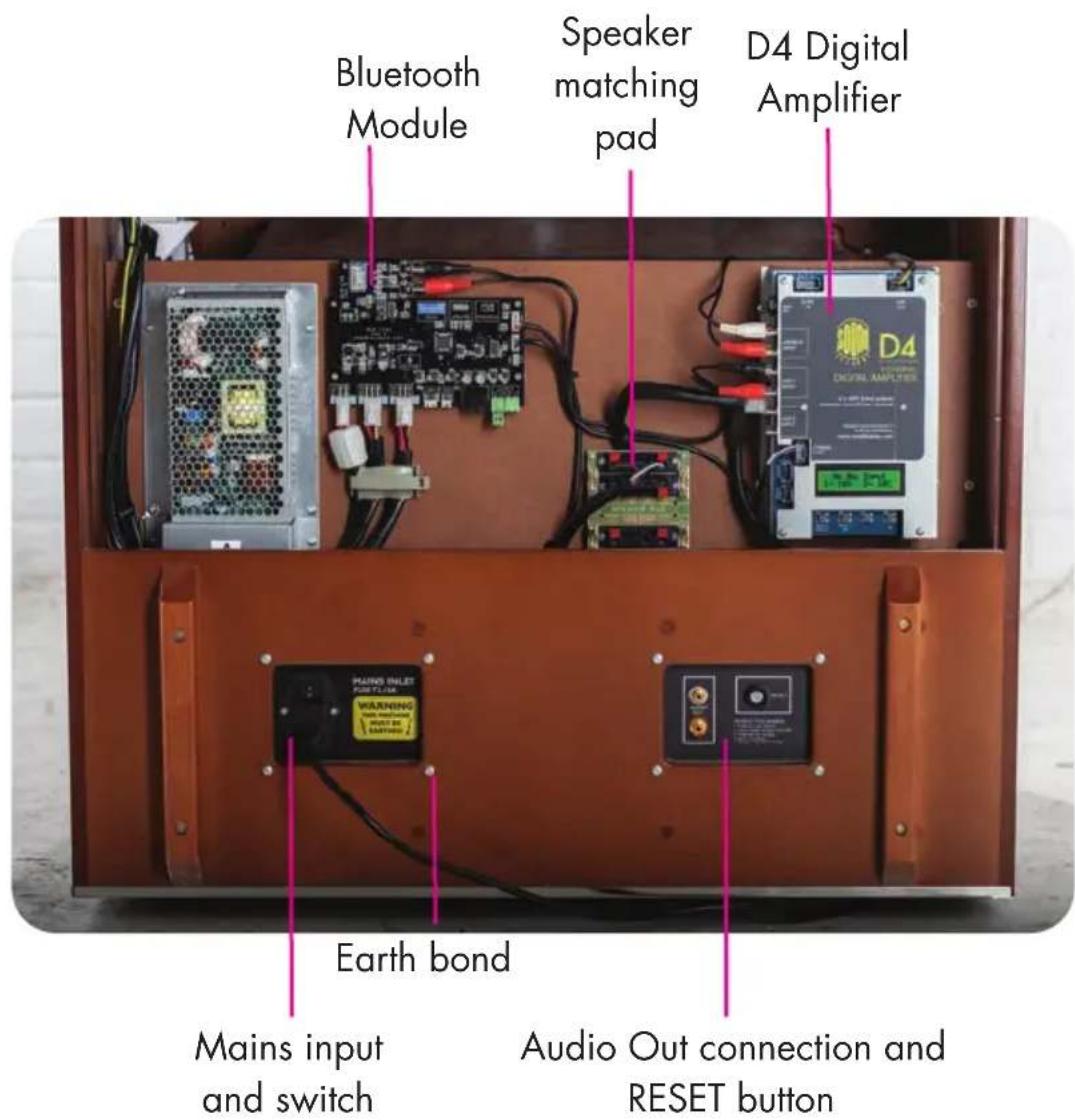
FIG8 : Rear of Jukebox : Door open
Connecting external audio devices
Connecting an audio source to the Jukebox input
Audio sources, such as DAB radios or streaming devices can be connected to Aux 2 input on the D4 amplifier. The Jukebox automatically switches inputs.
- The player mechanism is the default device and will always take priority over any other audio sources.
- If the player mechanism is idle (no disc playing), the Bluetooth will take priority.
- If the player and Bluetooth aren't playing then the Aux 2 input will take priority.
Please note: It is recommended that the audio output level of the connected device is kept at between 3/4 and full and the volume is adjusted using the volume control of the Jukebox.
Connecting to the Jukebox audio output
An audio output is provided to allow the Jukebox to play through another amplifier, such as Surround Sound or Multi-room audio system.
Connect a stereo phono lead to the Audio Out connections located on the rear lower right of the Jukebox. (FIG8)
The audio level is approximately 2Vp-p but will vary depending upon the audio being played.
Adding additional speakers
The D4 Digital Amplifier has 4 independent outputs, configured as 2 stereo pairs. Channels 1 and 2 are used to drive the Jukebox's internal speakers. Channels 3 and 4 (left and right) can be used to connect additional external speakers.
To connect additional external speakers
Please Note : The additional speakers should not present a load lower than 4 Ohms to each amplifier channel, please contact Sound Leisure if you are unsure which speakers are suitable or would like a different speaker set-up to the one described below.
- Locate the speaker matching pad in the rear of the Jukebox cabinet. (FIG8)
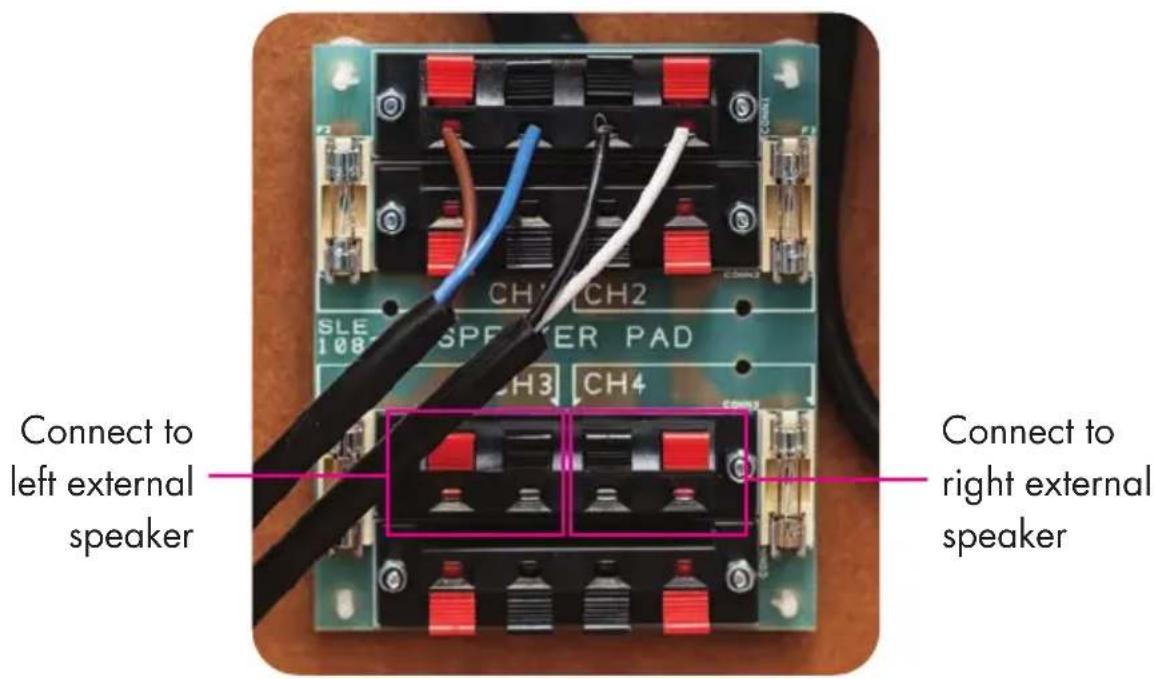
- Connect the left speaker cables to CH3 as denoted in FIG10.
- Connect the right speaker cables to CH4 as denoted in FIG10.
The volume for these speakers is controlled using the VOL 2 keys on the remote control.
FIG9 : View of Sound Leisure D4 Digital Amplifier
Microphone Input 6.35mm Jack
Jukebox input
Auxiliary input I: connected to Bluetooth module
Auxiliary input 2 : for connection to external audio devices
Digital Amp menu selection buttons. Menu down, Menu up, - minus, + plus
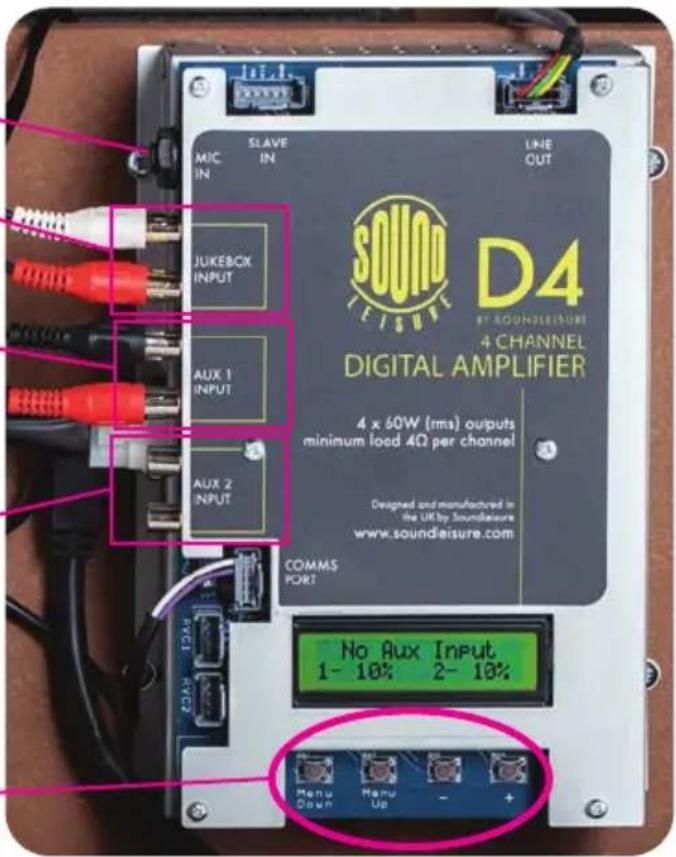
FIG10 : Speaker matching pad
Shown with default Jukebox speakers connected
Adjusting amplifier settings
It is possible to adjust the audio equalisation of the amplifier to suit a specific environment or taste. There are separate settings for the internal Jukebox speakers (Channel 1/2) and any additional speakers that may be connected (Channel 3/4).
Pressing the MENU UP or MENU DOWN buttons on the D4 amplifier will cycle through the available menus. Pressing the '+' or '-' buttons will increment or decrement the value of the current menu. Any changes will be automatically saved. (The location of these buttons is shown in Fig 9 on page 23) If no buttons are pressed for 1 minute, the amplifier will revert back to its default display mode.
Below is a description of the available menus:
• Channel 1 Stereo / Mono Switch
This menu is used to set the amplifier in Stereo or 2 channel Mono. This should be left as 'Stereo'.
- Channel 1 Master
This menu sets the maximum volume level that can be achieved with the remote and should be used to set a maximum level for the Jukebox speakers.
- Channel 1 Bass
This menu sets the bass level of the Jukebox speakers. It can provide a cut or boost of 15dB.
• Channel 1 Middle
This menu sets the middle level of the Jukebox speakers. It can provide a cut or boost of 15dB.
- Channel 1 Treble
This menu sets the treble level of the Jukebox speakers. It can provide a cut or boost of 15dB.
• Channel 1 Microphone Volume
If you wish to use a microphone we recommend a wired low impedance mic. If you wish to use a wireless microphone please contact Sound Leisure.
- Aux Input 1
This Menu sets the master volume level for Auxiliary Input 1. This allows the volume of the Auxiliary input to be balanced against the volume of the player mechanism.
- Aux Input 2
This Menu sets the master volume level for Auxiliary Input 2. See Aux Input 1 for description.
- Aux Input Auto/Manual
Changes from auto input selection to manual input selection.
- Aux Input Time
This menu sets the time that an auxiliary input must be present before the amplifier will make it active. This is defaulted to 2 seconds. The value can be set between 2 and 60 seconds.
• Microphone Voiceover / Karaoke
If karaoke is selected the music and microphone will be heard together. If voiceover is selected whenever the microphone is used the music will be muted, the music will un-mute when the microphone is no longer being used.
- Microphone Bass
This menu sets the Bass level of the microphone input. It can provide a cut or boost of 15dB.
- Microphone Middle
This menu sets the Middle level of the microphone input. It can provide a cut or boost of 15dB.
- Microphone Treble
This menu sets the Treble level of the microphone input. It can provide a cut or boost of 15dB.
- Line Out Master
This menu sets the volume level of the Audio Out.
• Line Out Microphone Volume
This menu sets the volume of the microphone sent to the Audio Out.
• Line Out Voiceover / Karaoke
If karaoke is selected the Audio Out music and microphone will be heard together. If voiceover is selected, whenever the microphone is used the Audio Out music will be muted, the music will un-mute when the microphone is no longer being used.
- Loudness
When switched on the loudness control will provide a dynamic boost to the bass and treble when the Jukebox is used at low volume, the lower the volume the higher the boost. This is a subtle effect that adds clarity to music at low volumes.
- Default Volume
This menu sets the default volume of the Jukebox after power on. Each channel of the amplifier can be assigned its own level.
- Fade In
This sets a 2 second fade in at the start of a record or cd. It is recommended to enable this on a vinyl Jukebox.
Jukebox Lighting Adjustment
It is possible to adjust the lighting of the Jukebox. This is available as one of two systems.
- Standard lighting system - fitted by default.
- Optional Diamond Pack lighting system.
Please note that whilst the Jukebox is in "colour selection mode" and "C" is showing in the display, no other features including disc selection are possible.
The colour election mode must be exited before disc selection is possible.
Standard Lighting
With this lighting system it is possible to control the brightness of the top interior light and the lower grille light.
To adjust the brightness of the top interior light:
- Press the 'COLOUR MENU' button ONCE on the remote control. The LED display will show "COL 1"
- The brightness is set by pressing the button keys 0-9 on the remote. 0 is the lowest setting, 9 is the brightest setting.
- Once the desired brightness is achieved press the 'COLOUR EXIT' button to exit the brightness mode. "COL 1" will no longer be shown on the LED display.
To adjust the brightness of the lower grille light:
- Press the 'COLOUR MENU' button TWICE on the remote control. The LED display will show "COL 2"
- The brightness is set by pressing the button keys 0-9 on the remote. 0 is the lowest setting, 9 is the brightest setting.
- Once the desired brightness is achieved press the 'COLOUR EXIT' button to exit the brightness mode. "COL 2" will no longer be shown on the LED display.
To adjust the colour pattern of the accent light:
The accent light is the lighting behind the mechanism cowling. This can be set to various colours and patterns
- Press the 'COLOUR MENU' button THREE TIMES on the remote control.
- The LED display will show "COL 3"
- The colour pattern is set using the 0-9 buttons on the remote control keypad.
- The pattern types are shown in the table below.
- Once the desired pattern is set, press the 'COLOUR EXIT' button to exit the brightness mode. "COL 3" will no longer be shown on the LED display.
Accent Lighting Patterns
| Pattern number | Accent Light |
| 0 off | |
| 1 fixed red | |
| 2 fixed green | |
| 3 fixed blue | |
| 4 fixed purple | |
| 5 fixed orange | |
| 6 fixed light blue | |
| 7 fixed white | |
| 8 white/blue fade | |
| 9 fade colour | rotation |
Optional Diamond Pack Lighting
If your Jukebox has the optional Diamond Pack Lighting system fitted, It is possible to adjust the colour and brightness of the lighting. There are 10 preset patterns that affect the top interior, bottom grille and name plate areas of the Jukebox.
To Set the colour pattern on your Jukebox.
- Press the 'COLOUR MENU' button ONCE on the remote control. The LED display will show "COL 1"
- Select a pattern using the number keys on the remote from 0 - 9. The patterns are as listed on the following page.
- Once the desired colour pattern is achieved press the 'COLOUR EXIT' button to exit the pattern mode. "COL 1" will no longer be shown on the LED display.
To set the brightness of the Jukebox lighting
- Press the 'COLOUR MENU' button TWICE on the remote control. The LED display will show "COL 2"
- The brightness is set by pressing the button keys 0-9 on the remote. 0 is the lowest setting, 9 is the brightest setting.
- Once the desired brightness is achieved press the 'COLOUR EXIT' button to exit the brightness mode. "COL 2" will no longer be shown on the LED display.
Holding Colour selections
At any point whilst setting the lighting, pressing the 'HOLD ON' button will freeze the colour selection. The lighting will be frozen on that selection until the 'HOLD OFF' button is pressed. Please note that hold does not effect the accent lighting. Accent lighting is controlled using COLOUR 3. Please see the accent lighting section on page 31 for further details.
Diamond Pack Lighting patterns
| Pattern number | Top Light Bottom Light | |
| 0 static amber | static amber | |
| 1 static white | static white | |
| 2 static amber | static white | |
| 3 static amber | slow moving rainbow | |
| 4 static amber | fast moving rainbow | |
| 5 static amber | static red | |
| 6 static amber | static aqua | |
| 7 static amber | colour swipe | |
| 8 colour swipe | colour swipe | |
| 9 static amber | white ping pong |
Bluetooth
The Jukebox allows audio streaming via Bluetooth.
To pair an audio device to the Jukebox.
- Press the BT PAIR button on the Jukebox remote control.
- "BT ON" will show on the Jukebox display.
- Turn on the Bluetooth connection on your audio device and begin searching for devices (refer to your audio device manual for instruction on how to search and pair to a device).
- The Jukebox will show as the name "SoundleisureJB"
- The pairing procedure is only required on the first connection. Once your device is paired, it is possible to reconnect by selecting "SoundleisureJB" from your devices paired list. It is not necessary to press the BT PAIR button again.
- The Jukebox can remember up to 8 paired devices. (Although only one can be playing at a time)
Important Bluetooth Information
Jukebox contains transmitter module FCC ID : T9J-RN52
This equipment has been tested and found to comply with the limits for a Class B digital device, pursuant to part 15 of the FCC Rules. These limits are designed to provide reasonable protection against harmful interference in a residential installation. This equipment generates, uses and can radiate radio frequency energy, and if not installed and used in accordance with the instructions, may cause harmful interference to radio communications. However, there is no guarantee that interference will not occur in a particular installation. If this equipment does cause harmful interference to radio or television reception, which can be determined by turning the equipment off and on, the user is encouraged to try to correct the interference by one or more of the following measures:
- Reorient or relocate the receiving antenna.
- Increase the separation between the equipment and receiver.
- Connect the equipment into a mains outlet on a circuit different from that to which the receiver is connected.
- Consult the dealer or an experienced radio/TV technician for help.
Troubleshooting and error codes
Great care has been taken to ensure your discs are protected whilst in the Jukebox. The mechanism carries out numerous checks to ensure it is running correctly. In the unlikely event of an error the mechanism will freeze position and one of the following error codes will be displayed on the LED.
General errors are as follows :
1.00 : PSU module not detected
2.00 : Display module not detected
3.00 : Amp module not detected
4.00: Mech module not detected
5.00 : Lighting module not detected
Mechanism error codes as follows :
4.01 : Low Voltage
4.02 : Memory Error
4.03 : Lift Motor
4.04 : Scan Motor
4.05 : Turntable Motor
4.06 : Comm Error
4.07 : High Temperature
How to clear an Error Code.
- Open the front glass of the Jukebox.
- Remove any jammed discs from the mechanism.
- Press the reject button located in the mechanism moushole (see FIG6)
- Close the front glass of the Jukebox
- The mechanism will then re-synchronise and resume normal operation.
General Troubleshooting
- Unable to make selections? Ensure that the Jukebox is not in colour selection mode. If it is then "C" will be displayed. Press 'COLOUR EXIT' on the remote control.
If you are unsure how to proceed please contact Sound Leisure:
Email : CDTech@soundleisure.com // Tel : +44 (0) 113 232 1700
NOTES
NOTES
CE Declaration of Conformity
We, Sound Leisure Ltd, UK, declare under our sole responsibility that the following products
Silverage Jukebox Range: CD, 45, LP
To which this declaration relates is in compliance with the essential requirements of:
Radio Equipment Directive 2014/53/EU
Standards EN300 328 V2.1.1
EMC Directive 2014/30/EU
Standards EN 55022 & EN 55024
Low Voltage Directive 2014/35/EU
Standards EN 62368-1:2018
RoHS Directive 2015/863/EU
When installed in accordance with the manufacturers specifications,
Sound Leisure Ltd
Sandleas Way
Leeds
West Yorkshire
England
LS15 8AR
Signed on behalf of Sound Leisure Ltd

Chris Black
Managing Director
Date of issue: 19 ^th August 2020
For any further information or technical support please call Sound Leisure :
Sound Leisure Limited
Sandleas Way
Leeds
LS15 8AR
T: +44 (0) 113 232 1700
F: +44 (0) 113 232 1701
E: letstalk@soundleisure.com
www.soundleisure.com
Twitter : @classicJukebox
Facebook.com/classicJukeboxes
Intagram : @soundleisureJukeboxes


- Contents
- Introduction
- About Sound Leisure
- Important Safety Instructions
- Additionally
- Taking Delivery / Transit Mode
- Transit Mode
- How to remove the transit retaining foam
- How to locate and loosen the retaining bolt wingnuts
- How to place the Jukebox into transit mode.
- Label Magic
- www.label-magic.com/sl
- Inserting title cards
- Loading Records
- How to load records into the Jukebox
- Playing the Jukebox
- Making Selections
- Ejecting a track or disc
- Display
- Using the remote control
- Adjusting Volume
- Powering Off the Jukebox : Sleep Mode
- To power off the Jukebox
- Shuffle Mode
- Shuffle disc
- Shuffle side
- How to enable or disable Shuffle modes
- Sequential Play
- Connecting external audio devices
- Connecting an audio source to the Jukebox input
- Connecting to the Jukebox audio output
- Adding additional speakers
- To connect additional external speakers
- Adjusting amplifier settings
- Below is a description of the available menus:
- • Channel 1 Stereo / Mono Switch
- - Channel 1 Master
- - Channel 1 Bass
- • Channel 1 Middle
- - Channel 1 Treble
- • Channel 1 Microphone Volume
- - Aux Input 1
- - Aux Input 2
- - Aux Input Auto/Manual
- - Aux Input Time
- • Microphone Voiceover / Karaoke
- - Microphone Bass
- - Microphone Middle
- - Microphone Treble
- - Line Out Master
- • Line Out Microphone Volume
- • Line Out Voiceover / Karaoke
- - Loudness
- - Default Volume
- - Fade In
- Jukebox Lighting Adjustment
- Standard Lighting
- To adjust the brightness of the top interior light:
- To adjust the brightness of the lower grille light:
- To adjust the colour pattern of the accent light:
- Optional Diamond Pack Lighting
- To Set the colour pattern on your Jukebox.
- To set the brightness of the Jukebox lighting
- Holding Colour selections
- Bluetooth
- To pair an audio device to the Jukebox.
- Important Bluetooth Information
- Troubleshooting and error codes
- General errors are as follows :
- Mechanism error codes as follows :
- How to clear an Error Code.
- General Troubleshooting
- CE Declaration of Conformity
Brand : Crosley
Model : Vinyl Rocket CR1210A
Category : Enceinte musicale