Cencon 4.1.5 - Electronic lock Dormakaba - Free user manual and instructions
Find the device manual for free Cencon 4.1.5 Dormakaba in PDF.


| Product Type | High-security electronic safe lock management software and hardware system |
| Dimensions | Software only; key box dimensions not specified |
| Weight | Not specified |
| Power Supply | USB-powered key box via PC; requires fully compliant USB 2.0 connection; powered hub recommended for laptops |
| Main Functions | User and lock management, dispatch, activity logging, bank/FLM/route modes, region control, database management with SQL Server or Oracle, smart key authentication |
| Maintenance and Cleaning | Keep key box clean and dry; ensure USB connection is secure; avoid moisture and extreme temperatures |
| Security Features | Smart key password authentication, role-based access (Special Supervisor, Supervisor, Dispatcher), encrypted keys, database user permissions |
| Spare Parts and Repairability | Replacement smart keys (SA, logon, clock set, ReSync), key box, USB cable, installation key; contact Kaba Mas Technical Support |
| General Information | Manufacturer: Dormakaba (formerly Kaba Mas); Version: Cencon 4.1.5; Supported OS: Windows XP SP3, Vista SP2, Windows 7 (32/64 bit); RAM: 4 GB; HDD: 50 MB free; .NET Framework 4; DBMS: Microsoft SQL Server 2008 R2/2012 or Oracle 10g+ |
Frequently Asked Questions - Cencon 4.1.5 Dormakaba
User questions about Cencon 4.1.5 Dormakaba
0 question about this device. Answer the ones you know or ask your own.
Ask a new question about this device
Download the instructions for your Electronic lock in PDF format for free! Find your manual Cencon 4.1.5 - Dormakaba and take your electronic device back in hand. On this page are published all the documents necessary for the use of your device. Cencon 4.1.5 by Dormakaba.
USER MANUAL Cencon 4.1.5 Dormakaba
Kaba Mas, part of the world-wide Kaba group, is the world's leading manufacturer and supplier of high security, electronic safe locks. Its complete line of self powered, battery, and mechanical locks meets virtually every safe lock requirement. Kaba Mas is dedicated to satisfying end-user needs for security, safety, and convenience. We welcome you to the world of Kaba Mas security and Cencon®.
Manual Conventions
Trademarks
Release Notes
Table Of Contents
The Cencon® 4.1.5 Program Package System Requirements Installation Scenarios and Required Processes Before Installing the Cencon Software Software Installation and Setup ODBC Connection Creation (Microsoft SQL) ODBC Connection Creation (Oracle) Database User Permissions (Microsoft SQL) Database User Permissions (Oracle) Set Up New Database (Microsoft SQL) Set Up New Database (Oracle) Update Database Maintenance of Database Reporting on Database Start the Cencon Program Logon to the Cencon System Main Screen Status Bar Prepare System for Operation For Upgrade to New Version of Cencon For New Install of Cencon Remove Previous Cencon Program Beta Expiration
Manual Conventions
This Cencon Getting Started Guide contains information on the installation and set up of the hardware and software required to manage Cencon users and locks. Some conventions that are followed are:
- The Smart Keys needed for a particular operation will be shown beside the flowcharts that describe the operation.
- Input to the PC will be shown in bold type.
- The screen samples may not look exactly as they do on your system depending on which version of the Windows operating system you are using. Some samples in this document are from Windows XP and some are from Windows Vista.
- Highlighted items:
Note
Indicates a point to consider.
Important Note
Indicates information that is very important to know.
Helpful Hint
Indicates a technique or method that works well.
Caution
Indicates the need for care and caution to be observed during a procedure or process.
Warning
Indicates the possibility of loss of data or system integrity.
Before reading the Cencon Getting Started Guide, you should be familiar with basic Windows concepts and techniques. For detailed information, refer to your Windows documentation.
© 1996-2013 Kaba Mas LLC
Document Number 2070.127 Rev. G 02/13 Cencon ^® 4.1.5 Getting Started Guide
Trademarks
The following items are trademarks or registered trademarks of Kaba Mas in the United States and/or other countries.
• Cencon System 2000
- Cencon
• PowerStar Technology
- Smart Key
Adobe and Adobe Reader are registered trademarks of Adobe Systems Incorporated in the United States and/or other countries.
iButton is a registered trademark of Dallas Semiconductor.
Microsoft, Windows, Windows Server are registered trademarks or trademarks of Microsoft Corporation in the United States and/or other countries.
Notice: The information in this manual is subject to change without notice and does not represent a commitment on the part of Kaba Mas. Kaba Mas shall not be liable for technical or editorial errors or omissions contained herein; nor for incidental or consequential damages resulting from the furnishing, performance or use of this material.
© 1996-2013 Kaba Mas LLC
Document Number 2070.127 Rev. G 02/13 Cencon ^® 4.1.5 Getting Started Guide
Cencon® 4.1.5 Getting Started Guide
Cencon Database Setup Utility Release Notes
Version 4.1.5
Changes / New Features
- Added support for using an Oracle database management system to host a Cencon database. Added support for Oracle to require only a limited access logon. Database access to Oracle no longer supports a separate schema, by customer request. The ODBC database access to Oracle must be using a default schema that contains the Cencon database.
- Updated warning for database version. SQL Server 2008 R2 and higher or Oracle 10g and higher is supported. Older database versions are not supported.
- The User must be database server admin to run CenconDBSetupUtility against Microsoft SQL.
- Added various user interface enhancements and additional data checking.
- Windows logon Userids are folded to upper case.
• Empty routes are deleted. - Remove duplicate regions.
- Duplicate Userids are deleted.
- Added additional reporting of DBMS driver and operating system.
- Added primary key to legacy configuration database table for support of hot database backups.
- Added primary key to log archive database table for support of hot database backups.
Fixed Issues
- Removed usage / support for NCrypt encryption library due to compatibility requirement back to Windows Server 2003. This limits the self signed certificate creation to older encryption libraries, which is not as secure. The requirement to continue to support Windows Server 2003 was by customer request.
- Updated Centran Configuration Manager to open Centran browser URL for management interface based on certificate name set.
- Corrected CenconDBSetupUtility not properly handling non default schema for Microsoft SQL database.
- Change table names used in uppercasing Windows logon IDs in CenconDBSetupUtility to include schema qualification as appropriate for database.
© 1996-2013 Kaba Mas LLC
Document Number 2070.127 Rev. G 02/13 Cencon ^® 4.1.5 Getting Started Guide
Cencon® 4.1.5 Getting Started Guide
The Cencon® 4.1.5 Software Package
The following items are required to implement the Cencon ^® 4.1.5 Software:
- Cencon® 4.1.5 Server License Kit: (Single Server Option - p/n 201190.)
- Install source (DVD, USB drive, or download)
- Cencon® 4.1.5 Software (32/64 Bit)
■ Cencon Driver Installer (32/64 Bit)
■ Cencon Database Setup Utility (32/64 Bit)
■ Getting Started Guide (HTML/PDF)
■ Software Reference Manual (HTML/PDF) -
Cencon® 4.1.5 Software Maintenance and Support Agreement (HTML/PDF/DOCX)
-
Cencon® 4.1.5 Single Server License Certificate
- Software Getting Started Guide
- Quick Reference Cards (1 set)
- Cencon Software Maintenance & Support (CSM&S) Agreement Form
。1 Change Key
。7 Cencon Smart Keys:
■ 2 red SA Keys
■ 3 black Logon Keys
■ 1 white Clock Set Key (for Gen2 locks)
■ 1 grey ReSync Key (for Gen2 locks)
• Mode Authorization License(s) (One or more)
- Bank Mode (p/n 201191). Includes 2 green B keys.
- FLM Mode (p/n 201192). Includes 2 blue F keys.
- Route Mode (p/n 201193). Includes 2 yellow R keys.
- Cencon® 4.1.5 Installation Key (p/n 202202) - Orange key programmed for installation. Uniquely coded and tagged per company. Packaged and shipped separately for security reasons.
• Cencon® 4.1.5 Dispatch Kit: (p/n 201181)
- Cencon USB Key Box - Uniquely coded per company.
。USB cable
FCC Notice

CENCON KEY BOX
MODEL 202201
The Cencon Key Box is manufactured by Kaba Mas LLC, 749 W. Short Street, Lexington, KY, 40508, U.S.A., 859-253-4744, HTTP://www.kaba-mas.com. This device complies with Part 15 of the FCC Rules. Operation is subject to the following two conditions: (1) this device may not cause harmful interference, and (2) this device must accept any interference received, including interference that may cause undesired operation.
An Enterprise / Multi-Server License Kit also is available - p/n 201194. This kit option includes all items in the Single Server Option and all 3 Mode Authorization Licenses shown above. A Cencon ^® 4.1.5 Enterprise / Multi-Server License Certificate is provided instead of the Single Server License Certificate. The Installation Key and Dispatch Kits are still required for implementation and are still ordered separately.
If you are missing any of the above items, contact Kaba Mas Technical Support at 1 (800) 950-4744.
Optional Order Items:
- Cencon® 4.1.5 Software Maintenance & Support Agreement
- Cencon On-Site Training for hands-on lock installation and complete lock and software operation.
• CenTran 4.1.5 (XML) Software (p/n 201182)
(See www.KabaMas.com/cencon4 for more information.)
System Requirements
Note
The minimum system requirements identified for Cencon must be met in addition to whatever is required for the PC operating system and the Database Management System. Please refer to the Kaba Mas web site to review the appropriate system requirements at: www.kaba-mas.com/cencon4.
Cencon System Requirements
To use the Cencon program, the following minimum hardware and software requirements must be met:
- IBM compatible PC that is capable of running Windows and has an available USB port for the Cencon Key Box.
Note
The Cencon Key Box requires a fully compliant USB 2.0 connection. Some computers, especially laptops and notebooks, may not provide sufficient power for the Cencon Key Box. In these cases it may be necessary to use a powered USB hub to attach the Cencon Key Box. On laptops or notebooks with "power saving" features that turn off USB power, the computer's Operating System (OS) could disconnect from the Cencon Key Box. In this instance, after awakening the computer and Cencon ^® 4.1.5 software, unplug and re-plug the USB cable between the computer and the Cencon Key Box.
- 4 GB RAM
• DVD Drive if your install source is a DVD disk. The install source can be a DVD, USB drive, or download. - Hard Disk Drive with at least 50 megabytes disk space free
Important Note
If you are upgrading from a previous version of Cencon, you should also allow ample disk space for database growth.
• Windows XP 32 bit Professional (Service Pack 3), Windows Vista 32/64 bit (SP 2), or Windows 7 32/64 bit
- You must be logged into Windows with Admin authority
- An installed Database Management System (DBMS) - Microsoft SQL Server SQL 2008 R2 or 2012 (including the SQL Server Express, Standard, or Enterprise Editions) or Oracle 10g or higher.
- The DBMS installation does not have to be on the same computer as Cencon. You will need to have a valid ODBC connection to the DBMS for Cencon to use.
- The above computer requirements do not include the requirements for the DBMS. If the DBMS is being run on the same computer as Cencon, then the total requirements will be the requirements of Cencon plus those of the DBMS.
- The requirements of the DBMS installation will vary depending on the number of locks and users being used by Cencon and the number of Cencon installations connected to that DBMS.
Note
If you do not have an existing Microsoft SQL Server database, you can download a free copy of the latest Microsoft SQL Server Express Edition from the Microsoft web site at http://www.microsoft.com/express/sql/default.aspx You should also download and install the SQL Server Management Studio.
Be sure to read the sections on system requirements and prerequisites. Contact Kaba Mas Technical Support for additional information.
Note
The Cencon database can be installed on a virtual server as long as minimum system requirements for memory and space allocation are met.
Cencon® 4.1.5 Getting Started Guide
Installation Scenarios and Required Processes
There are 4 different installation scenarios under which the Cencon ^® 4.1.5 Software can be installed. There are unique installation processes for each of the 4 scenarios as follows:
1. New Install
- Recommend contacting Kaba Mas to review system requirements and for database setup support.
• Review Software Maintenance Agreement - Identify Company ID
• Install Cencon USB KeyBox
• Install Cencon USB KeyBox drivers - If you do not already have a database management system (DBMS), download and install Microsoft SQL Server 2012 Express and SQL Server Management Studio Express.
• Create a Database Client ODBC connection - Run the Cencon® 4.1.5 CenconDBSetupUtility to set up the Database
• Install Cencon® 4.1.5 - Start Cencon® 4.1.5 Program and Identify Database Connection
- Add Special Supervisor and Supervisor
- Logon to Cencon® 4.1.5
- Define and Add Regions (if applicable)
- Define and add Bank Branches (if applicable)
- Define and add Customers (if applicable)
- Add additional users
- Customize Authorizations
- Activate Locks
2. Cencon Upgrade to Cencon ^® 4.1.5 with Data Imported from Cencon 1.5.x or lower
- Recommend contacting Kaba Mas to review system requirements and for database setup support.
• Review Software Maintenance Agreement
• Record Current Authorization Levels
• Install Cencon USB Key Box
• Install Cencon USB Key Box drivers - If you do not already have a database management system (DBMS), download and install Microsoft SQL Server 2012 Express and SQL Server Management Studio Express.
• Create a Database Client ODBC connection - Run the Cencon® 4.1.5 CenconDBSetupUtility to create a Database and import the existing Cencon data
• Install Cencon® 4.1.5 Program - Start Cencon® 4.1.5 Program and Identify Database Connection
- Logon to Cencon® 4.1.5 Program
- Define and Merge Regional Databases (if applicable)
- Define and add Bank Branches (if applicable)
- Define and add Customers (if applicable)
- Customize Authorization Levels
3. Cencon Upgrade from Version 2.x to 4.1.5
- Recommend contacting Kaba Mas to review system requirements and for database setup support.
• Install Cencon USB Key Box
• Install Cencon USB Key Box drivers - Upgrade database to at least Microsoft SQL Server 2008 R2 (or 2008 R2 Express) if at a previous version
• Install Cencon® 4.1.5 Program - Run the Cencon® 4.1.5 CenconDBSetupUtility to convert the existing database to the Cencon® 4.1.5 configuration
- Logon to Cencon® 4.1.5 Program
- Define and Merge Regional Databases (if applicable)
- Define and add Bank Branches (if applicable)
- Define and add Customers (if applicable)
- Customize Authorization Levels
4. Cencon ^® 4.1.5 Upgrade from Version 3.0 or 3.1
- Recommend contacting Kaba Mas to review system requirements and for database setup support.
• Install Cencon USB Key Box
• Install Cencon USB Key Box drivers - Upgrade database to at least Microsoft SQL Server 2008 R2 (or 2008 R2 Express) if at a previous version
- Run the Cencon® 4.1.5 CenconDBSetupUtility to convert the existing database to the Cencon® 4.1.5 configuration
• Install Cencon® 4.1.5 Program - Logon to Cencon® 4.1.5 Program
- Define and Merge Regional Databases (if applicable)
- Define and add Bank Branches (if applicable)
- Define and add Customers (if applicable)
- Customize Authorization Levels
© 1996-2013 Kaba Mas LLC
Document Number 2070.127 Rev. G 02/13 Cencon ^® 4.1.5 Getting Started Guide
Cencon® 4.1.5 Getting Started Guide
Before Installing the Cencon Software
Important Note
It is required that you contact Kaba Mas Technical Support at 1(800) 950-4744 before installing or upgrading the Cencon software to review minimum system requirements and database setup (including upgrading the database from a previous version of Cencon), and to perform data validity checks on any current Cencon data.
Review Software Maintenance Agreement
A hard copy of the Cencon Software Maintenance & Support Agreement has been included in the software package. It is recommended that you review the Maintenance Agreement at this time. You also have the option to view and print the Maintenance Agreement when you install the software, and you can also review the Maintenance Agreement online at www.kabamas.com\cencon4.
Company ID
WARNING
Identify Company ID
During the installation process, you will be required to enter a unique four-digit Company ID. If you are a branch of a larger company, this ID must be identical to that used for all other Cencon installations by your company. YOU MUST determine what the four-digit number is before you begin the installation process. Once chosen and input into the system, you should record and secure the Company ID since the number becomes encrypted and cannot be changed.
Important Note
Locks that have been initialized in a different company's system can only be activated in your company's system after having been "shelved" in their original system.
© 1996-2013 Kaba Mas LLC
Document Number 2070.127 Rev. G 02/13 Cencon ^® 4.1.5 Getting Started Guide
Cencon® 4.1.5 Getting Started Guide
Software Installation and Setup
Complete the following steps to install the software:
- Logon to the PC system as a user with Local Admin (or higher) rights in order to successfully install the software.
- Verify that your Windows operating system is at the latest service level. (See your Window's Help and Support function if you need assistance with this.)
Caution
Be extremely cautious in bringing the Windows operating system to the latest service level. With the release of Windows 7, running a Windows Update on a Windows Vista system will update the operating system to Windows 7.
Important
Always run Windows Update to ensure that your system is up to date before installing the Cencon software. The Cencon software requires the .NET 4 framework to be installed on your system. This can be automatically installed by running Windows Update. If your system is not up to date or the .NET 4 framework is not properly installed, the Cencon software will not operate correctly.
- Check the PC Date and Time Properties (date, time, time zone, DST adjustment setting) from the Control Panel to ensure accuracy. Adjust, if necessary, before proceeding.
Note
It is strongly recommended that you close all other applications before installing the Cencon software. It is also recommended that you review the Cencon Reference Manual before installing the software.
- If you have a previous version of Cencon installed, you should ensure that data has been archived in accordance with the customer archive requirements and then backup the current Cencon database.
- If your install source is a DVD, insert the Cencon ^ 4.1.5 Install DVD in the appropriate drive. Your install source can be a DVD, USB drive, or download. If you have autorun enabled on your system, the Cencon ^ 4.1.5 Installation screen will be displayed. Otherwise, double click Autorun.exe from the Cencon ^ 4.1.5 install source (DVD, USB drive, or download) root directory, and the Cencon ^ 4.1.5 Installation screen will be displayed.
The Cencon Version 4.1.5 Software Installation dialog is loaded and the Main Menu is displayed:

- From the Main Menu, click on the Install button.
Depending on your operating system, either the 32 or 64-bit Cencon install screen is displayed:

7. Install the SQL 2008 R2 ODBC Driver
First, install the SQL ODBC Driver on your system if you have not already done so. This SQL ODBC Driver is the SQL Server Native Client 10.0 driver as released with Microsoft SQL Server R2. Using the default SQL ODBC Driver available with Windows will result in slow performance. It is recommended to use the most recent SQL ODBC Driver released by Microsoft. If you have a more recent SQL installation from Microsoft than SQL Server R2, then you should use that SQL ODBC Driver. To install the provided SQL ODBC Driver released with Microsoft SQL Server R2, select the SQL ODBC Driver button.
8. Install the hardware drivers
Note
Cencon ^® 4.1.5 only supports the Cencon Key Box.
Click the Windows Drivers button to install the appropriate hardware drivers using the Cencon driver installation utility:
Cencon Driver Installer 4.1.0.2230 - Introduction
KARA®
MAS
SECURITY. CONTROL. ACCOUNTABILITY.
This installer sets up drivers for the Cencon USB Key Box and the Cencon PCIO PCI Card. If these devices are not present on your system, the drivers are preinstalled for when either of the devices are connected later.

natural_image
Black KARAMAS power switch device with numeric keypad and brand logo (no readable text or symbols beyond branding)You will need administrative logon access on your computer to install the drivers. If this installer is run without administrative access, it will not be able to install the drivers.
Select Next to install drivers for the Cencon USB Key Box and the Cencon PCIO PCI card. You may be prompted to reboot after the installation completes.
Select Cancel to exit without installing drivers.
Next >
Cancel
The driver installation utility generates detailed status information and does not require user input. The completed driver installation display:
Cencon Driver Installer 4.1.0.2231 - Result
RETURN UpdateDriverForPlugAndPlayDevices.
Installation was successful.
Driver package installation successful!
Install completed
RETURN: DriverPackageInstallW (0x0)
Completed setup of Cencon PCIO PCI card virtual device driver successfully.
Installing Cencon PCIO PCI card device driver... (PCIOPCI_device.inf)
ENTER:DriverPackageInstallW
Installing INF file 'D:\Projects\Cencon4Trunk\CenconCDImage\Drivers\Windows_64bit\PCICard_redist\PCIOI
Looking for Model Section [DeviceList.NTamd64]
Installing devices with Id "PCI\VEN_11B0&DEV_0200&SUBSYS_0001176E&REV_00" using INF "D:\Window
ENTER UpdateDriverForPlugAndPlayDevices...
Driver package installation successful!
RETURN UpdateDriverForPlugAndPlayDevices.
Installation was successful.
Driver package installation successful!
Install completed
RETURN: DriverPackageInstallW (0x0)
Completed setup of Cencon PCIO PCI card device driver successfully.
Copying driver DLLs to system directories...
Driver installation successful!
Driver install finished.


Close
Operating System Root Certificate Authority Certificates
If your operating system is very old, such as Server 2003, or is not up to date with the Microsoft operating system updates, you may have to install updated operating system Root Certificate Authority Certificates for the Cencon USB Keybox driver installation to run correctly. An install of these certificates is provided in the
TrustedRootCAUpdates directory on the Cencon install source (DVD, USB drive, or download).
9. Install the Cencon® 4.1.5 Program
Complete the following steps to install the software:
a. From the Install Software Menu click the Cencon button.
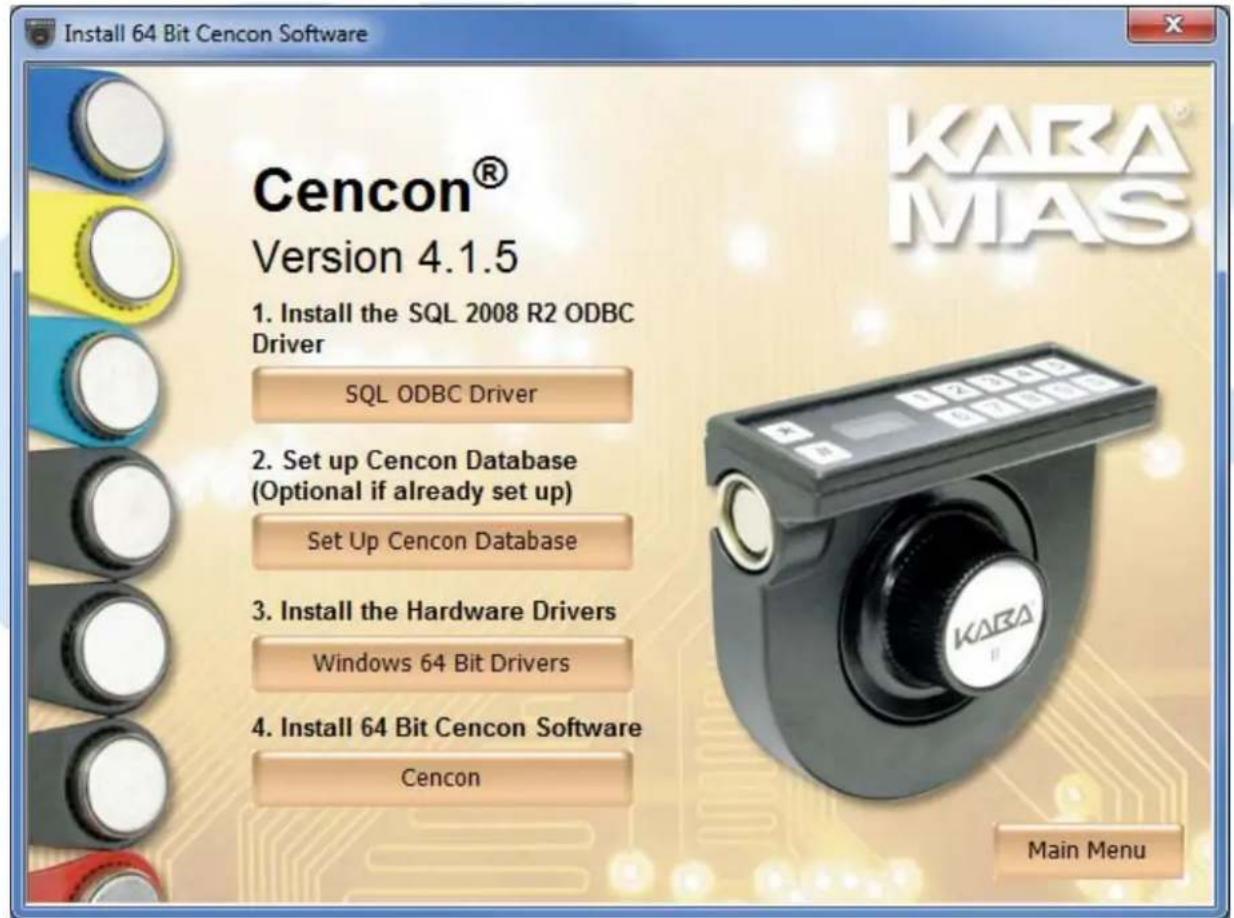
The Cencon® 4.1.5 Setup Wizard screen is displayed. The Setup Wizard is a Windows program that will take you through the rest of the setup process. Once completed, you will be returned to the Cencon Version 4.1.5 Install Program screen.
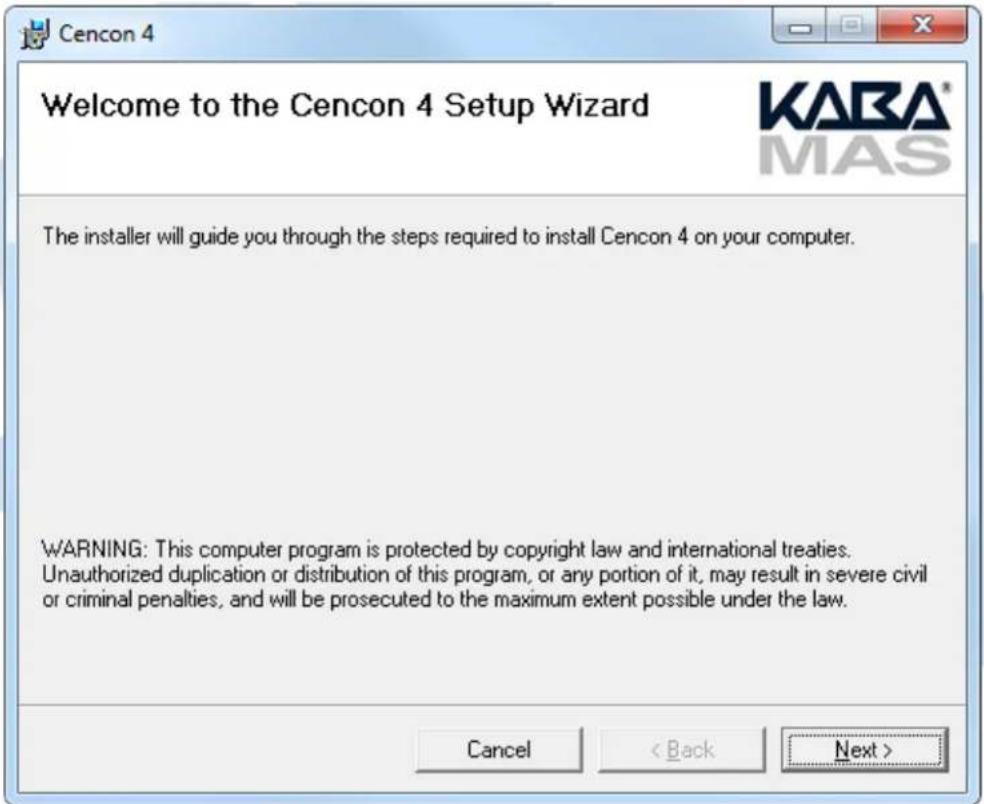
b. Click on Next > to continue with the installation.
The Software License Agreement acceptance screen is displayed.
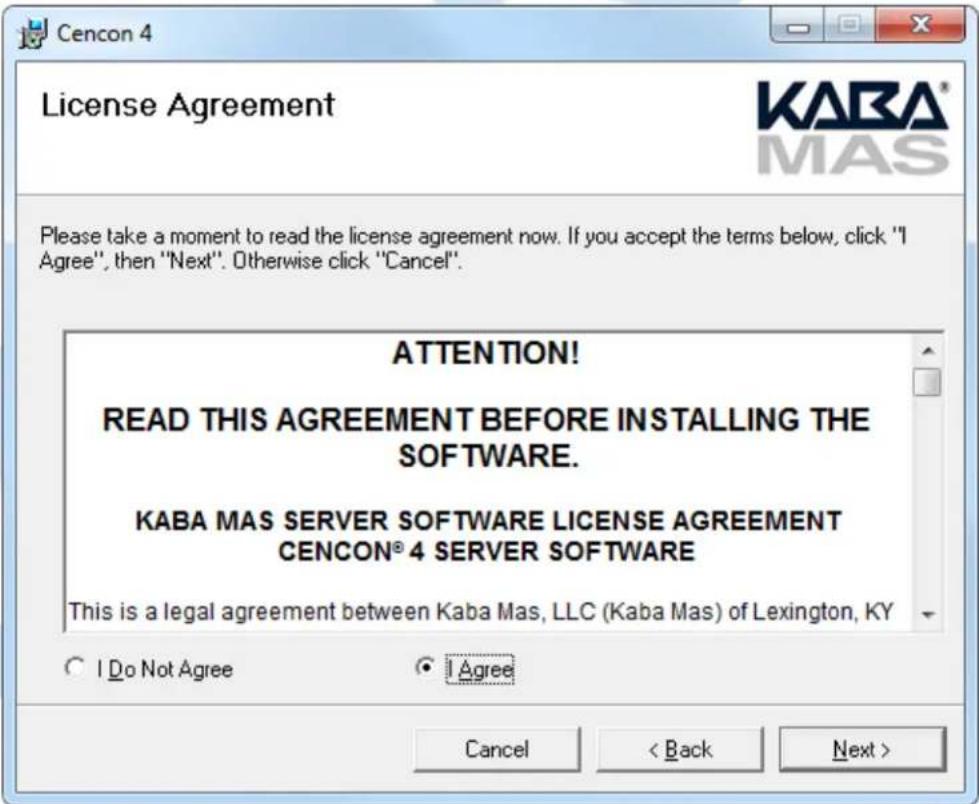
c. Read the Software License Agreement, select "I Agree", and then click on the Next > button to continue.
The Select Installation Folder window is displayed to allow you to select the program folder to which the Cencon ^®
4.1.5 programs will be added.

Installation Directory
The default installation directory is shown. It is recommended that you install the software to the default folder (i.e., Cencon4.) If you want the Cencon ^® 4.1.5 software installed in another directory, click on the Browse button and select the new path.
It is strongly recommended that you not change the installation directory to c:\Program Files on Windows Vista and above.
d. Click on the Next > button to add the programs to the designated folder.
The Confirm Installation screen is displayed:

e. If there is anything you wish to change, click on the
The Installing Cencon ^® 4.1.5 screen displays an indication of the installation progress.

f. Click on the Next > button to continue.
The Installation Complete screen is then displayed indicating that the Cencon ^® 4.1.5 program has been successfully installed:

g. Click on the Close button to return to the Software Install screen.
© 1996-2013 Kaba Mas LLC
Document Number 2070.127 Rev. G 02/13 Cencon ^® 4.1.5 Getting Started Guide
Cencon® 4.1.5 Getting Started Guide
ODBC Connection Creation for SQL Server
ODBC (Open Database Connectivity) is a standard C interface for accessing database management systems (DBMS). The designers of ODBC aimed to make it independent of database systems and operating systems. An application can use ODBC to query data from a DBMS, regardless of the operating system or DBMS it uses.
ODBC accomplishes DBMS independence by using an ODBC driver as a translation layer between the application and the DBMS. The application uses ODBC functions through an ODBC driver manager with which it is linked, and the driver passes the query to the DBMS.
Important Note
If Creating a Cencon 4.1.5 database the ODBC can only be a System DSN and a user with SYSDBA privileges must be used to create the database.
If Updating a Cencon 4.1.5 database the ODBC can only be a System DSN and a user with appropriate privileges must be used to update the database.
- Go to control Panel/Administration Tools/Data Sources
- Select the System DSN tab and Click Add>
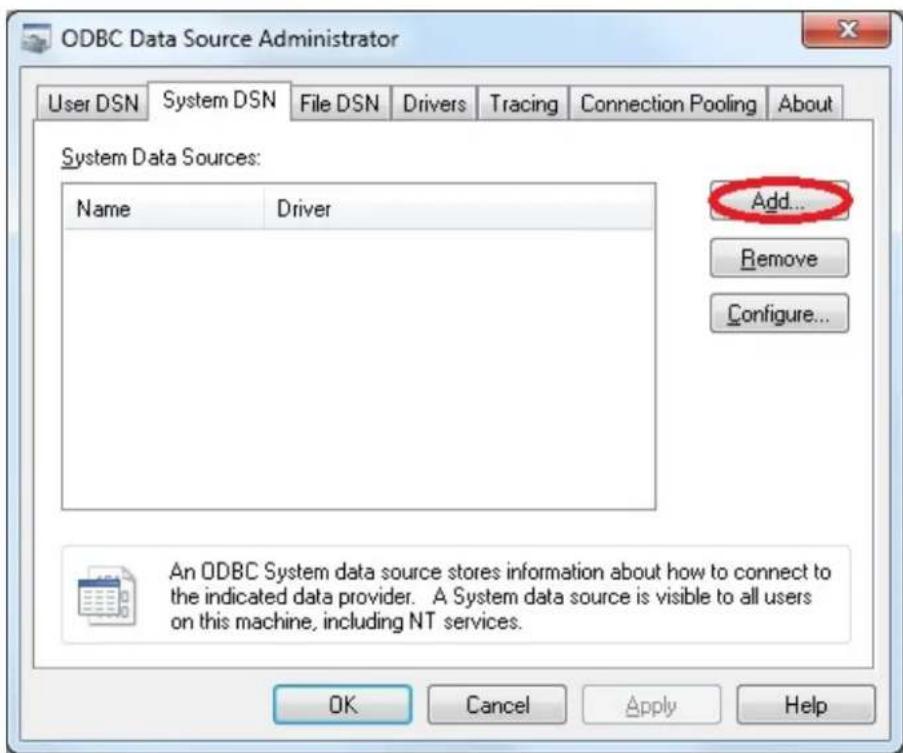
3. Select the driver and click Finish >

Type a name and type or use the drop down to select the server and instance
- Click Next>

5. Click next > no information will change on this form
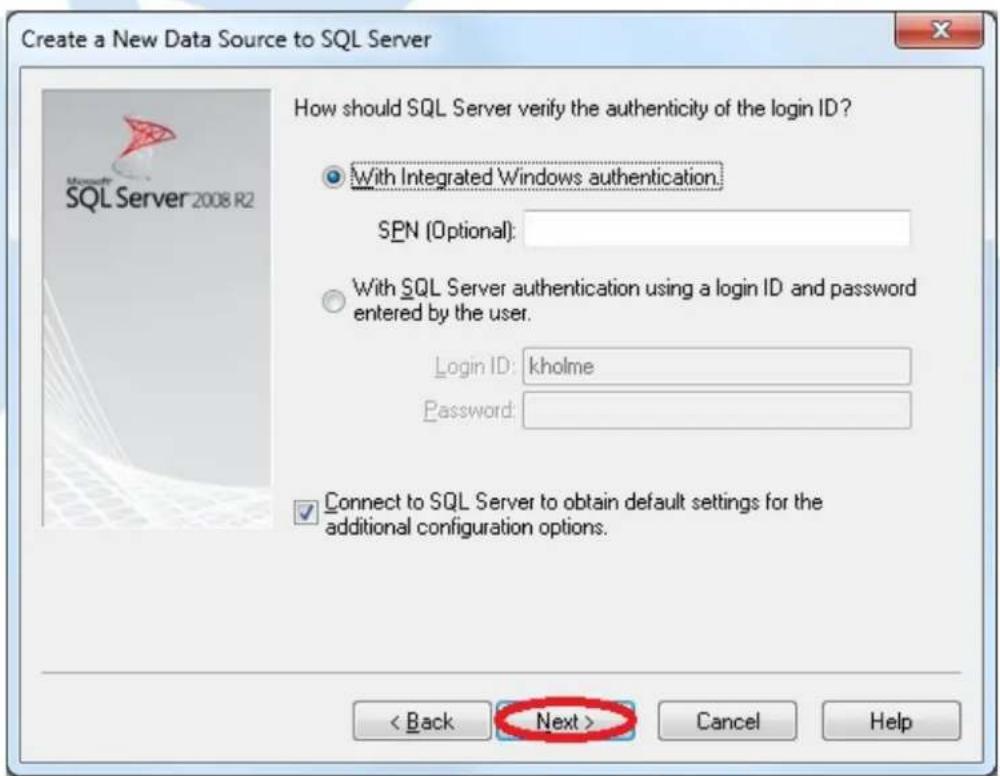
When creating an ODBC connection to create a database for Cencon use Master as the default database.
Note
The Cencon Database Utility will change the ODBC accordingly when creating a new database.
Important Note
If simply adding an ODBC connection to connect to an existing Cencon database change to the appropriate database.
6. Click Next>

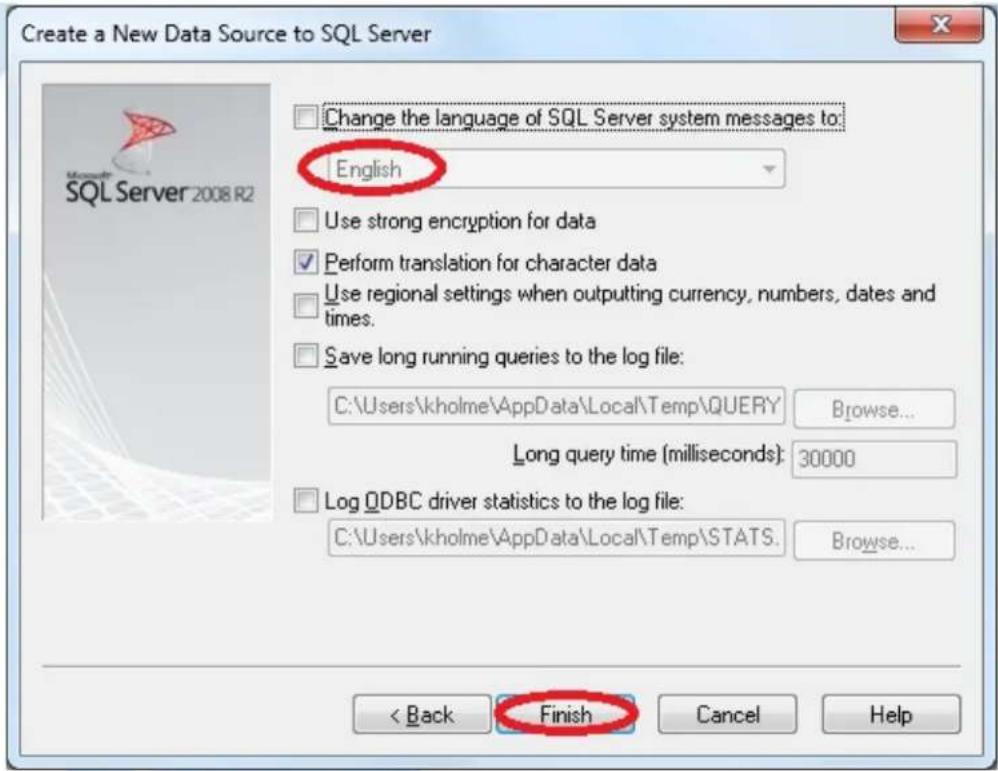
Important Note
Only English is supported
7. Click Finish >
- Click OK >
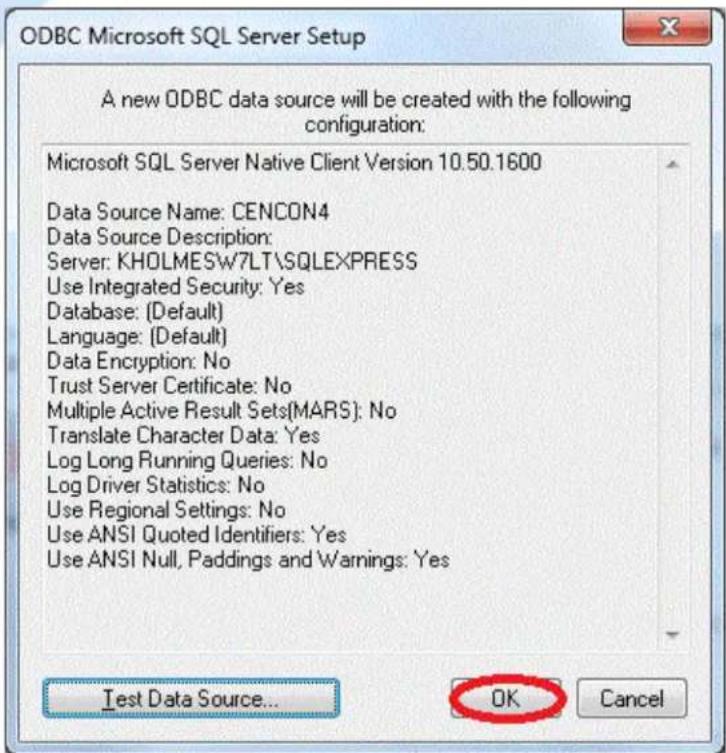
9. Click OK > to close

© 1996-2013 Kaba Mas LLC
Document Number 2070.127 Rev. G 02/13 Cencon ^® 4.1.5 Getting Started Guide
Cencon® 4.1.5 Getting Started Guide
ODBC Connection Creation for Oracle
ODBC (Open Database Connectivity) is a standard C interface for accessing database management systems (DBMS). The designers of ODBC aimed to make it independent of database systems and operating systems. An application can use ODBC to query data from a DBMS, regardless of the operating system or DBMS it uses.
ODBC accomplishes DBMS independence by using an ODBC driver as a translation layer between the application and the DBMS. The application uses ODBC functions through an ODBC driver manager with which it is linked, and the driver passes the query to the DBMS.
Important Note
Use current Oracle ODBC Drivers for 10g instant client or higher.
http://www.oracle.com/technetwork/database/features/instant-client/index-097480.html
Important Note
You can use your existing Oracle ODBC drivers if you already have them set up. You can also use the Oracle instant client drivers provided with the Cencon install. The Oracle instant client driver files are automatically installed to the Cencon install directory for your convenience. This is located under a directory labeled Oracle_instantclient_11_2_XXbit, where XX is either 32 or 64 bit depending on your install. You will still need to go through the Oracle instant client setup:
- Add the path to the Oracle instant client directory to your computers PATH environment variable. Under the Start menu, right click on Computer and select Properties.
- Select Advanced system settings from your computer properties dialog. Your computer System Properties dialog will be displayed.
- Select the Environment Variables button. The Environment Variables dialog will be displayed.
- Scroll through the System variables list at the bottom of the Environment Variables dialog, until you see the variable Path. Select Path from the list.
- Click the Edit... button. The Edit System Variable dialog will be displayed.
- Append the path for the Oracle instant client directory to the Variable value, separated by a ';'.
- Click OK in the Edit System Variable dialog.
- Click OK in the Environment Variables dialog.
- Click OK in the System Properties dialog.
- Open the Oracle instant client directory in a browser window.
-
Run the Oracle ODBC driver install named odbc_install.exe. The Oracle ODBC driver install is text based. You may see a brief command prompt window appear and disappear.
(If you run odbc_install.exe from a command prompt window, you will see a message displayed indicating if the install succeeded or not. Otherwise, the install is invisible.) -
Go to Control Panel/Administration Tools/Data Sources (ODBC):
Note: You may have to right click on Data Sources (ODBC) and select Run as administrator.
- Select the System DSN tab and Click Add >

- Select the Oracle ODBC driver you have installed and click Finish >
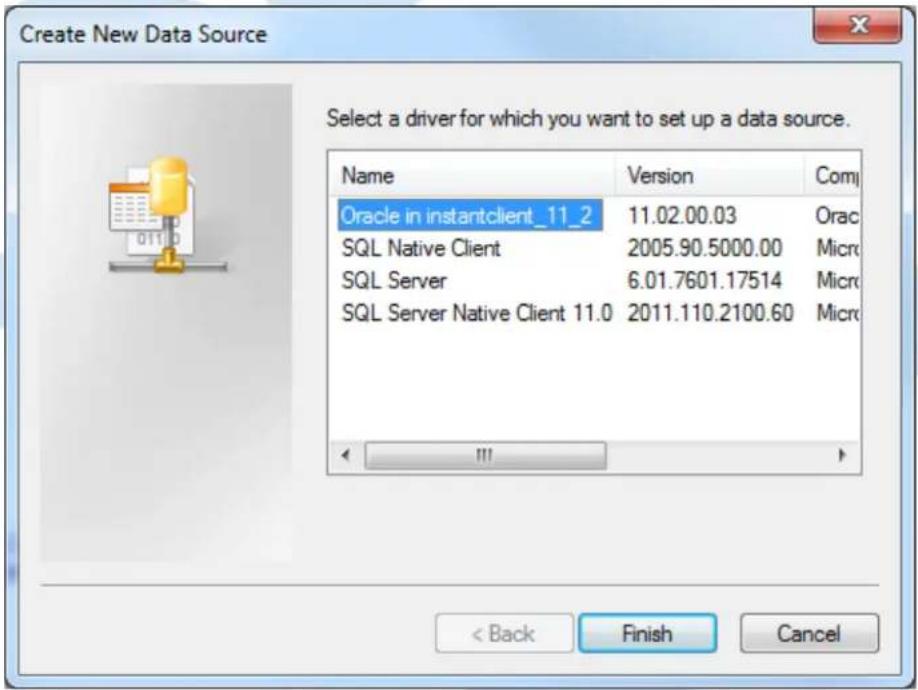
Type a name and type or use the drop down to select the server and instance.
Important Note
You will need to have created an Oracle database user to host the Cencon database. The Oracle database user you create will need to be configured with the minimum permissions as described under the Database User Permissions (Oracle) section.
4. Enter the desired Data Source Name
Enter the IP address of the server / the instance name
Enter User ID. User ID must be the user set up to host the Cencon database.
Click OK> Enter Password
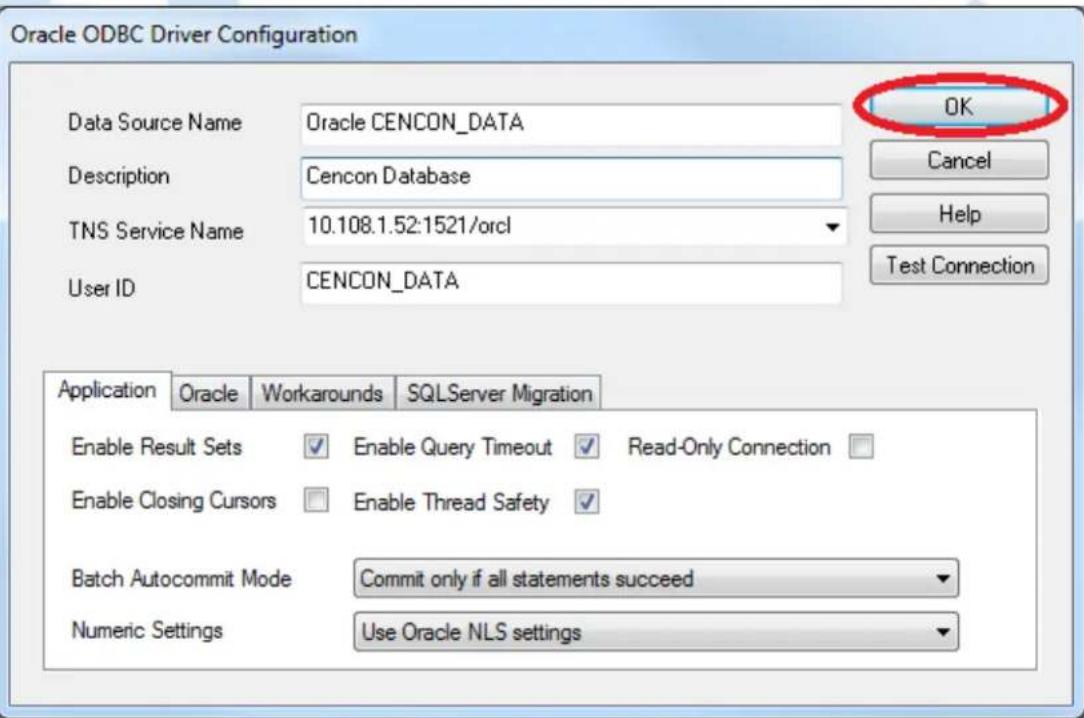
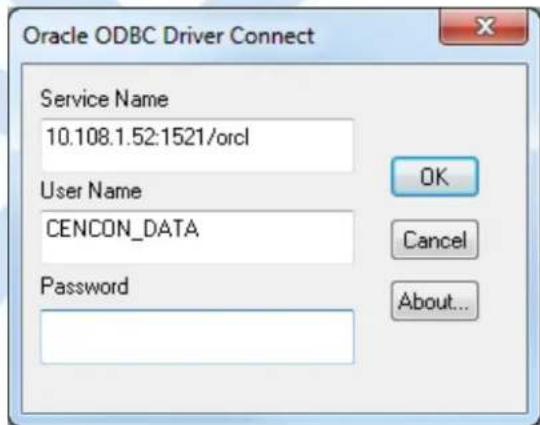
- Click OK > to close
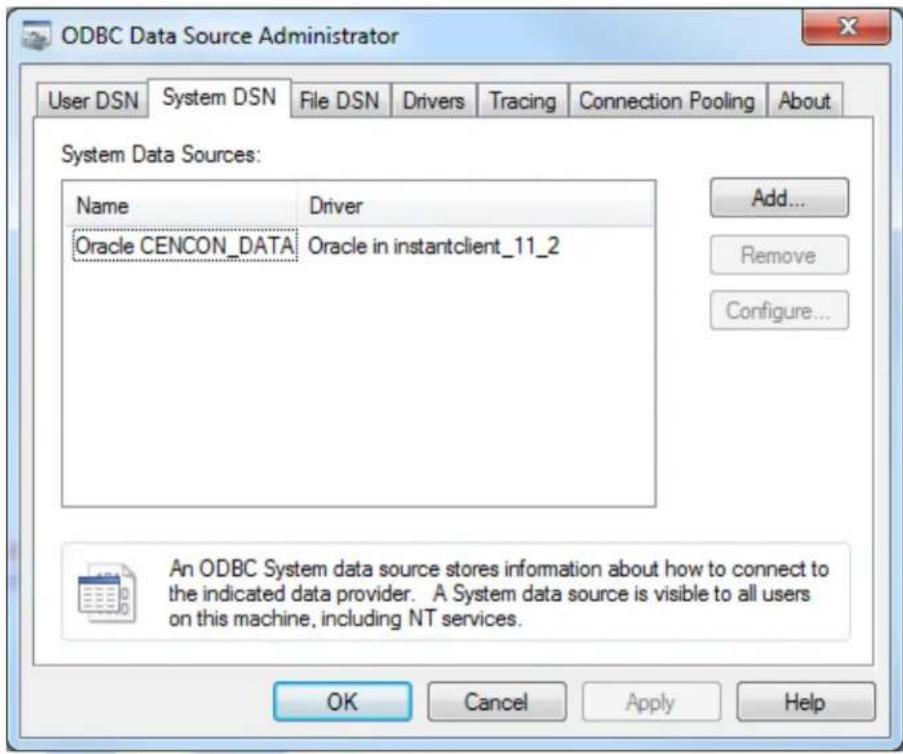
© 1996-2013 Kaba Mas LLC
Document Number 2070.127 Rev. G 02/13 Cencon ^® 4.1.5 Getting Started Guide
Cencon® 4.1.5 Getting Started Guide
Database Permissions for SQL Server
Permissions required for Cencon Client connectivity and utilization
- Go to SQL Server Management Tool
Expand Security right click Logins and select New Login>
Enter SQL or Network Login
Change Default Database to Cencon
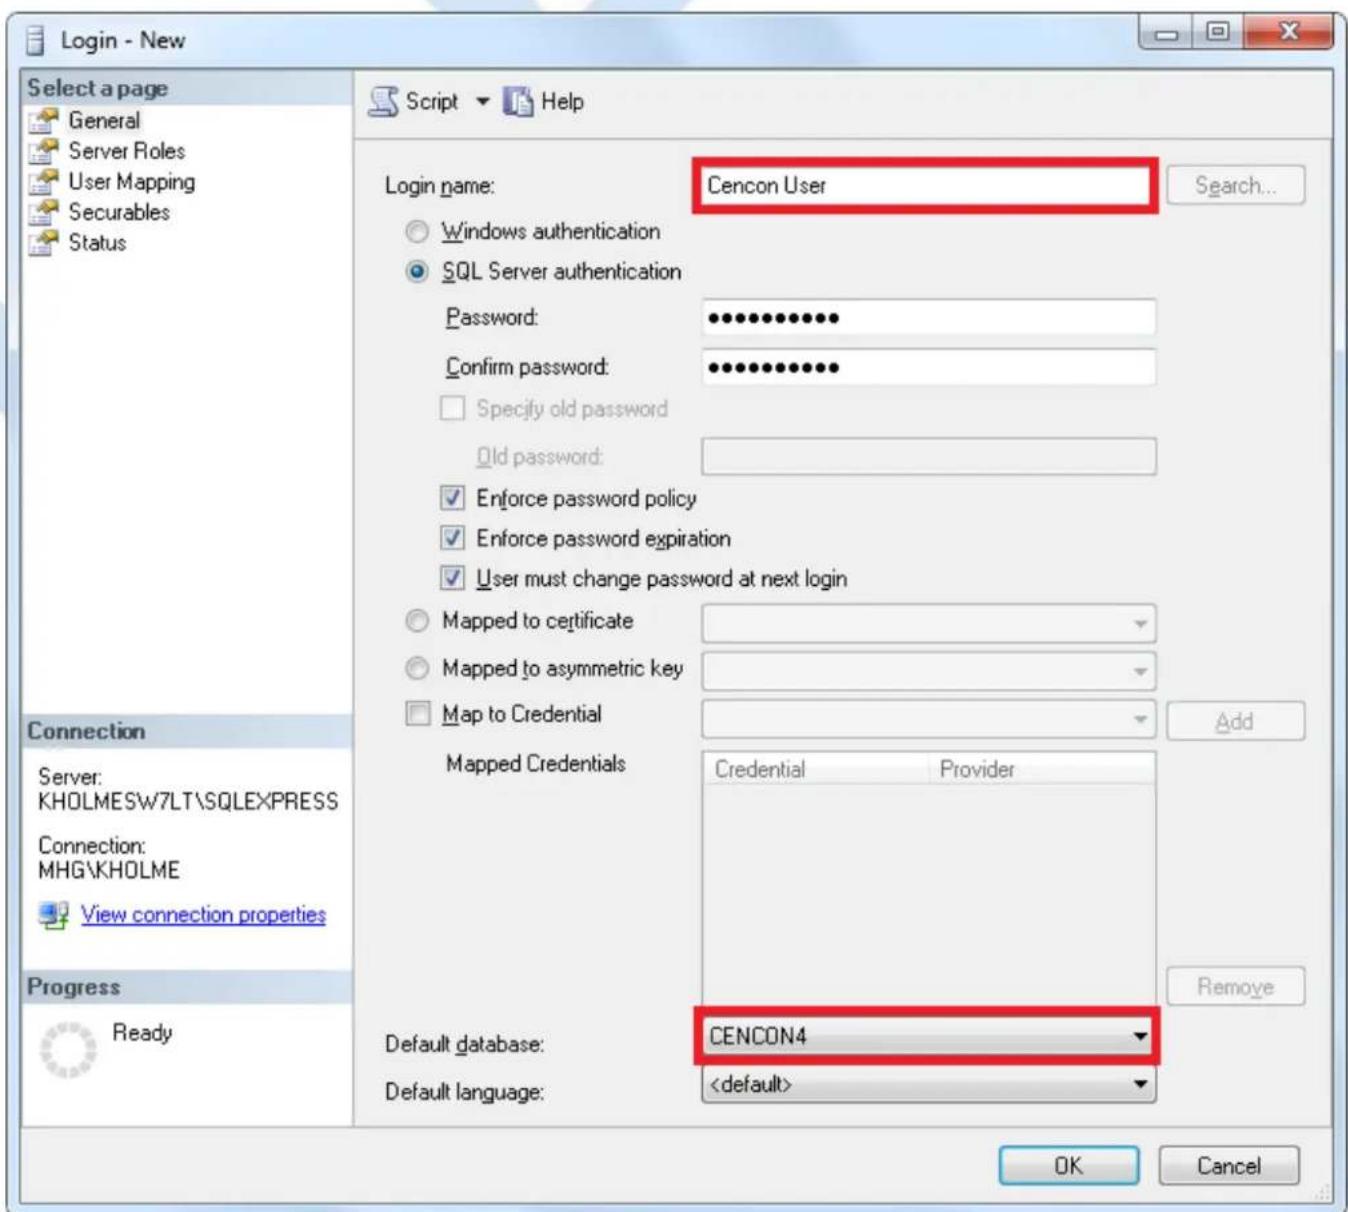
2. Select Server Roles >
Public is selected by default
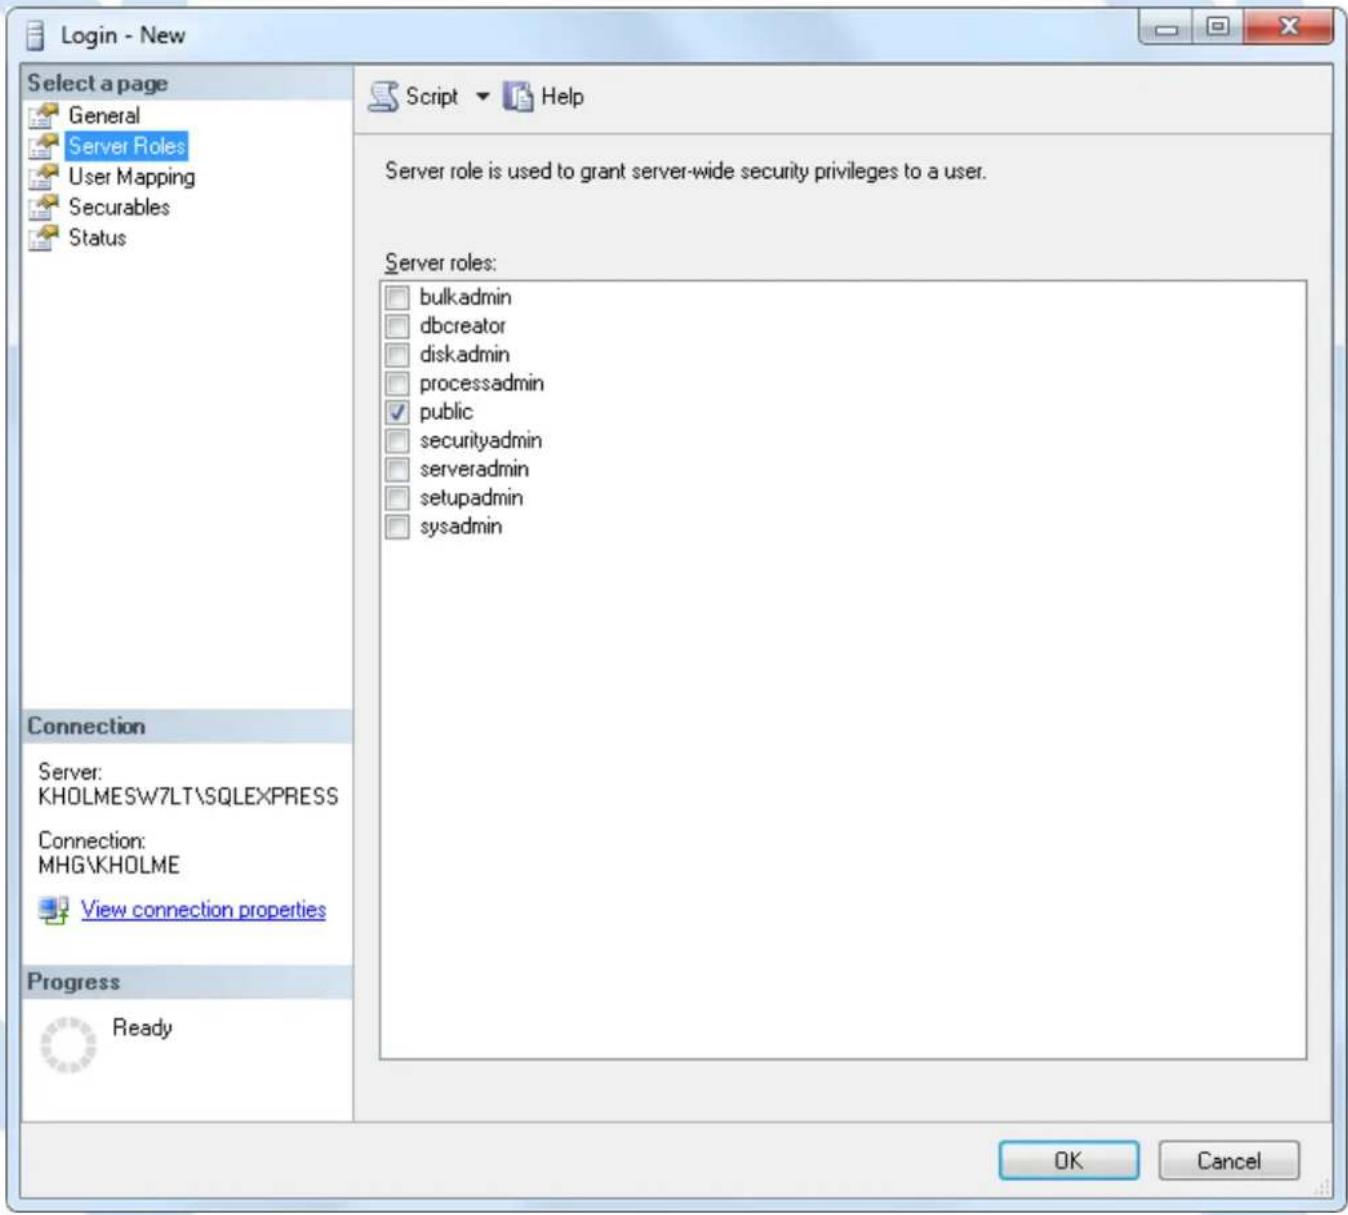
3. Select User Mapping
User mapped to this Login check the Cencon Database.
Under tole membership check the following db_datareader, db_datawriter, db_owner and db_public.
Click OK>

Cencon® 4.1.5 Getting Started Guide
Database Permissions For Oracle
You will need to set up a Oracle Database user to host the Cencon database used by Cencon and Centran. Cencon and Centran must use this Oracle user name to log onto the Oracle Database using the Oracle ODBC Driver.
The Oracle user name should be set up only with the permissions needed for Cencon, Centran, and the CenconDBSetupUtility. These permissions are the minimum required by these applications. You must give the Oracle user the following minimum set of user permissions. You should not assign any additional permissions beyond those listed below.
Role:
- CONNECT
System Privillage:
- CREATE SESSION
- CREATE TABLE
- CREATE VIEW
• CREATE PROCEDURE - CREATE MATERIALIZED VIEW
• ON COMMIT REFRESH
Tablespaces:
Default: USERS
Temporary: TEMP
Quota:
USERS: unlimited
Status:
ACCOUNT_STATUS: unlocked
Cencon, Centran, and the CenconDBSetupUtility do not support setting a database schema for operations against an Oracle database. They will use the default schema defined by the Oracle ODBC connection you set up.
You must use the Oracle user you configured to host the Cencon database as your log with the Oracle ODBC driver.
The listed minimum permissions do not allow Cencon, Centran, or the CenconDBSetupUtility to access any Oracle database objects beyond those within the default schema. With the minimum permissions list above, Cencon, Centran, and the CenconDBSetupUtility will not have any access to any other data on your Oracle database outside of the default schema for the Oracle ODBC database connection.
Example ORACLE SQL To Create User CENCON\_DATA:
CREATE USER "CENCON_DATA" IDENTIFIED BY "Your Password Goes Here" DEFAULT TABLESPACE "USERS" TEMPORARY TABLESPACE "TEMP" PROFILE "DEFAULT"
GO
GRANT "CONNECT" TO "CENCON_DATA" GO
ALTER USER "CENCON_DATA" DEFAULT ROLE ALL GO
GRANT CREATE MATERIALIZED VIEW TO "CENCON_DATA" GO
GRANT CREATE PROCEDURE TO "CENCON_DATA"
GO
GRANT CREATE SESSION TO "CENCON_DATA"
GO
GRANT CREATE TABLE TO "CENCON_DATA"
GO
GRANT CREATE VIEW TO "CENCON_DATA"
GO
GRANT ON COMMIT REFRESH TO "CENCON_DATA"
GO
ALTER USER "CENCON_DATA"
QUOTA UNLIMITED ON "USERS"
© 1996-2013 Kaba Mas LLC
Document Number 2070.127 Rev. G 02/13 Cencon ^® 4.1.5 Getting Started Guide
Cencon® 4.1.5 Getting Started Guide
Set Up New Database (SQL Server)
The Cencon ^® 4.1.5 Database Utility option to create a database adds all databases, stored procedures, and constraints that Cencon ^® 4.1.5 will utilize.
Caution
The Cencon ^® 4.1.5 Database Setup Utility should be run on the same machine where the DBMS is located to maximize performance.
Select Set Up Cencon Database to launch the CenconDBSetupUtility.exe.
NOTE: The CenconDBSetupUtility.exe can also be launched manually by browsing the install source (DVD, USB drive, or download) to the correct folder based on your operating system:
- DBSetupUtility\Windows_32bit\CenconDBSetupUtility.exe, or
-
DBSetupUtility\Windows_64bit\CenconDBSetupUtility.exe
-
Click Set Up Cencon Database >

- Click the Select ODBC Data Source > Select the Machine Data Source tab.
Note
The ODBC can only be a Machine Data Source and a user with SYSDBA privileges must be used to create the database.
Cencon Database Setup Utility 4.1.5.2521


Select or Create an ODBC Connection
Setup Phase
ODBC Connection
ODBC Database
ODBC Schema
Select Operation
Import Cencon 1.5X Data
Import CenBank Data
Assign Import Region
Procedures / Constraints
Authorizations
Data Validation
Database File Size
Confirmation
Perform Operations
Select or Create an Open Database Connectivity (ODBC) connection
Select or Create ODBC Data Source

Cancel
Note
When selecting an ODBC connection this may take a moment to load Data Source information.
Caution
The Cencon ^® 4.1.5 Database Setup Utility should be run on the same machine where the DBMS is located to maximize performance.
3. Review Data then Click Next >
Cencon Database Setup Utility 4.1.5.2521


Select or Create an ODBC Connection
Setup Phase
ODBC Connection
Select Operation
Import Cencon 1.5X Data
Import CenBank Data
Assign Import Region
Procedures / Constraints
Authorizations
Data Validation
Database File Size
Confirmation
Perform Operations
Select or Create an Open Database Connectivity (ODBC) connection
Select or Create ODBC Data Source
Data Source Name:
User ID:
Database Administrator:
Database Management System Name:
Database Management System Version:
Server Name:
Database Name:
Instance Name:
Default Schema Name:
Case Sensitive:
Workstation Time and Zone:
DB Server Time and Zone:
Workstation IP Address:
Database Server IP Address:
Database Setup Version:
Database Setup Utility Version:
Cencon 4
MHG\kholme
Yes
Microsoft SQL Server
10.00.4064
SQLEXPRESS
CENCON4
SQLEXPRESS
dbo
No
2012/02/16 14:50:45: Eastern Standard Time
2012/02/16 14:50:45 : (UTC -5 Hours)
Local
Local
2521
2521
Next >>
Cancel
Note
The database name cannot start with numbers or symbols.
- Type the Database name to be created. Click Next > Click Ok >
Cencon Database Setup Utility 4.1.5.2521


Select or Create an ODBC Schema
Setup Phase
ODBC Connection
ODBC Database
ODBC Schema
Select Operation
Import Cencon 1.5X Data
Import CenBank Data
Assign Import Region
Procedures / Constraints
Authorizations
Data Validation
Database File Size
Confirmation
Perform Operations
Please enter the schema to use for the Cencon database tables, views, procedures and indexes.
Use default schema
Schema Name: (Required) CENCONUSER
Default Schema Name: dbo
Note: For Microsoft DBMS installations, as of Microsoft SQL Server 2005 and all following versions, database schema are not necessarily associated with a specific user.

<< Back
Next >>
Cancel
Note
The ODBC connection has been updated to reflect the database that was entered.

5.Enter a Database user and click Next > Click Ok >

Note
The Cencon Database Utility now reviews the ODBC connection and only allows an Operation that is available for that connection.
6. Click Next >

- If not importing data click Next > If you have 1.5 version data to import see next screen

Import Data From Cencon 1.5.X Data Files
Setup Phase
ODBC Connection
ODBC Database
ODBC Schema
Select Operation
Import Cencon 1.5.X Data
Import CenBank Data
Assign Import Region
Data Validation
Database File Size
Confirmation
Perform Operations
Do you need to import data from Cencon Version 1.5.X files?
Data from the files will be loaded into the database.
Import Cencon Version 1.5X files
<< Back
Next >>
Cancel
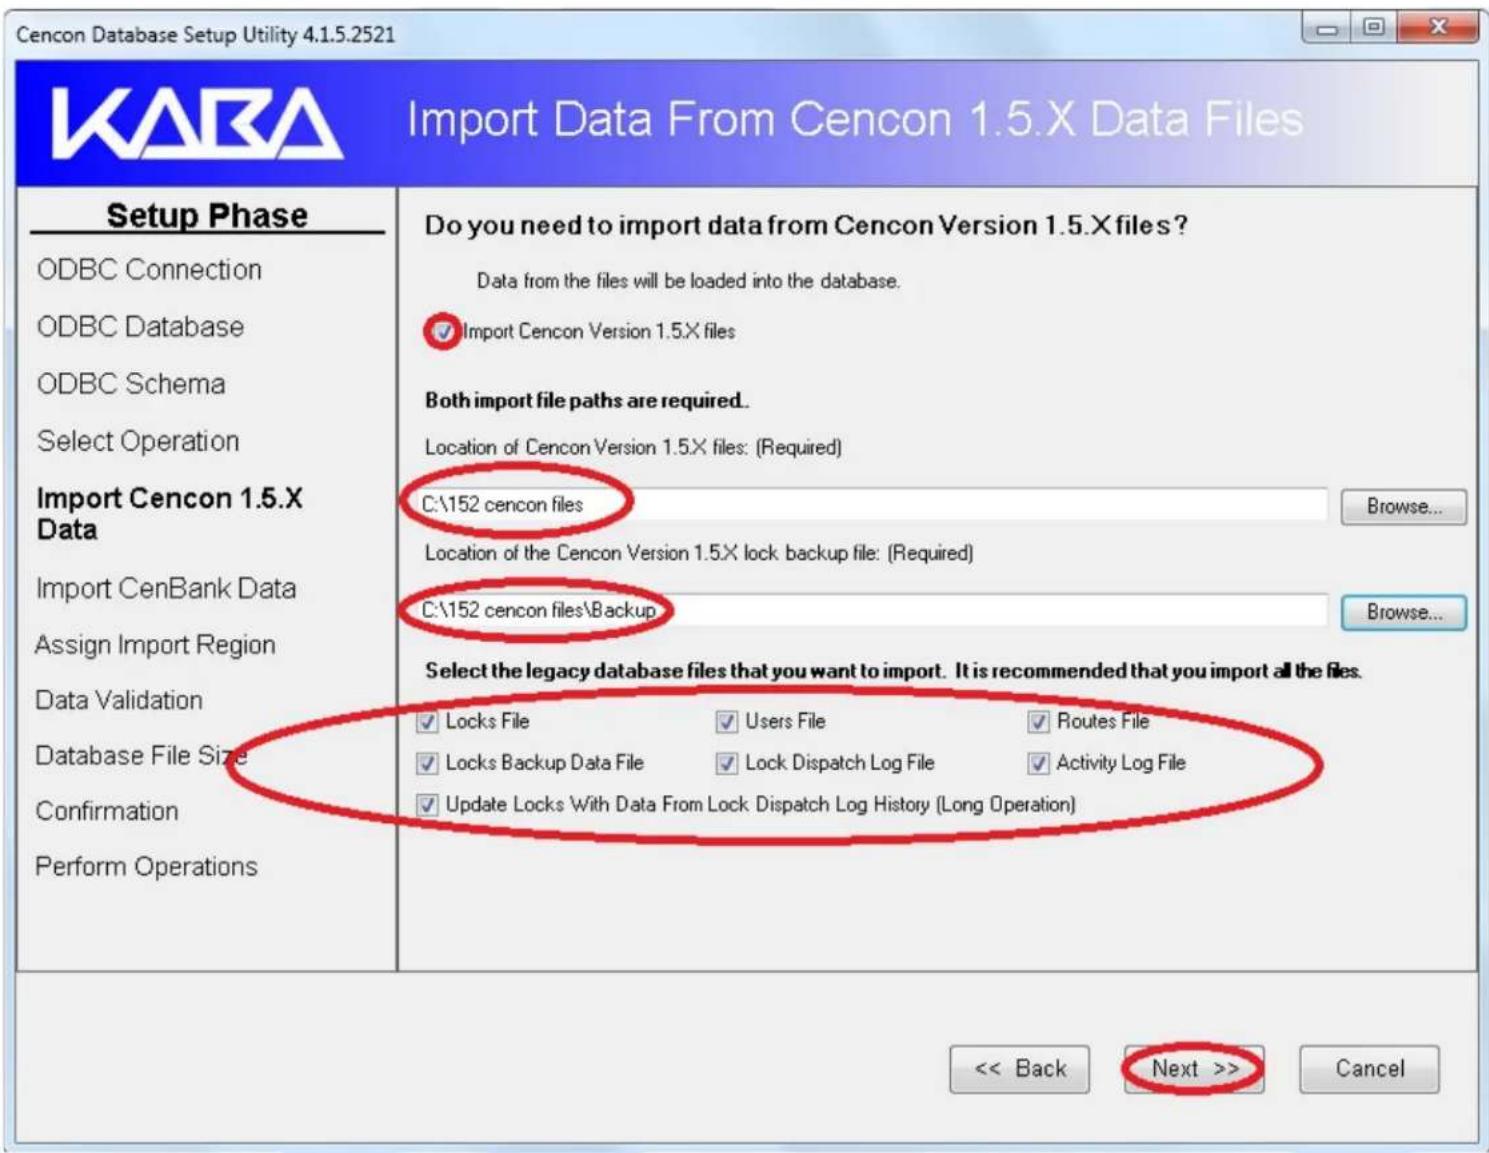
If you have data to import from 1.5 versions of Cencon
Click the check box > Enter or browse to the 1.5 Cencon data. Select what files you want imported
7a.Click Next >

Import Data From Cencon 1.5.X Data Files
Setup Phase
ODBC Connection
ODBC Database
ODBC Schema
Select Operation
Import Cencon 1.5.X Data
Import CenBank Data
Assign Import Region
Data Validation
Database File Size
Confirmation
Perform Operations
Do you need to import data from Cencon Version 1.5.X files?
Data from the files will be loaded into the database.

Import Cencon Version 1.5.X files
Both import file paths are required.
Location of Cencon Version 1.5.X files: (Required)
C:\152 cencon files
Location of the Cencon Version 1.5.X lock backup file: (Required)
C:\152 cencon files\Backup
Browse...
Browse...
Select the legacy database files that you want to import. It is recommended that you import all the files.
Locks File
Locks Backup Data File
√ Update Locks With Data From Lock Dispatch Log History (Long Operation)
Users File
√ Lock Dispatch Log File
√ Routes File
Activity Log File
<< Back
Next >>
Cancel
- If not importing data click Next > If you have Cenbank data to import see next screen

Import Data From CenBank Data Files
Setup Phase
ODBC Connection
ODBC Database
ODBC Schema
Select Operation
Import Cencon 1.5.X Data
Import CenBank Data
Data Validation
Database File Size
Confirmation
Perform Operations
Do you need to import CenBank data files?
This will set up the data from the selected CenBank installation (or multiple installations) in the Cencon database. You will need to select the location of the files to import from.
Do not import CenBank data.
- Import files from a single CenBank Installation from the selected directory.
Import files from multiple CenBank Installations from subdirectories of the selected directory.
<< Back
Next >>
Cancel
If you have data to import from Cenbank
Click the check box for single or multiple Cenbank systems >
Enter or browse to the Cenbank data
8a. Click Next >

Import Data From CenBank Data Files
Setup Phase
ODBC Connection
ODBC Database
ODBC Schema
Select Operation
Import Cencon 1.5.X Data
Import CenBank Data
Assign Import Region
Data Validation
Database File Size
Confirmation
Perform Operations
Do you need to import CenBank data files?
This will set up the data from the selected CenBank installation (or multiple installations) in the Cencon database. You will need to select the location of the files to import from.
Do not import CenBank data.
Import files from a single CenBank Installation from the selected directory.
Import files from multiple CenBank Installations from subdirectories of the selected directory.
Location of CenBank files: (Required)
C:\Cenbank files
Browse...
<< Back
Next >>
Cancel
Important Note
If Not importing data Verify all check boxes are unchecked when creating a database.
If importing data these boxes will be grayed out and mandatory.
- Click Next >
KABA
Select Data Validation Processes
Setup Phase
ODBC Connection
ODBC Database
ODBC Schema
Select Operation
Import Cencon 1.5.X Data
Import CenBank Data
Procedures / Constraints
Authorizations
Data Validation
Database File Size
Confirmation
Perform Operations
Do you need to validate or correct errors with the Cencon locks?
This will scan the locks in the Cencon database and correct any errors that are found. If you are importing data, it is recommended that you also check for errors in the database afterwards.
Validate and Do Corrections On Data For Open Locks (Long Operation)
Do you need to validate the user dispatch counts?
This will scan the users and correct how many locks each user is dispatched to. If you are importing data, it is recommended that you also check for errors in the database afterwards.
Validate and Do Corrections on Data For Dispatched Users (Long Operation)
Do you need to check the user authorization roles?
This will scan the users and correct each user authorization role if it is not set correctly. This validation is recommended if you are upgrading from a previous version of Cencon database..
Validate and Do Corrections On User Authorization Roles
Do you need to check the Collections. Customer IDs and Regions?
This will correct any errors that are found. If you are importing data, it is recommended that you also check for errors in the database afterwards.
Validate and Do Corrections on Collections, Customer IDs, and Regions
<< Back
Next >>
Cancel
Important Note
The purpose for resizing is when importing legacy data the DBMS transaction log may reach its restricted file growth. Increasing the size removes this concern of repeated auto growth.
If this is a new database setup this is not required.
- Uncheck the Increase file size box. Click Next >
This page will increase size of files to increase the speed if needed when processing multiple transactions
This is percentage base calculation. You can edit the size by overwriting the new file size.

Review and Update Database File Size
Setup Phase
ODBC Connection
ODBC Database
ODBC Schema
Select Operation
Import Cencon 1.5.X Data
Import CenBank Data
Assign Import Region
Data Validation
Database File Size
Confirmation
Perform Operations
Do you need to resize your database files prior to doing database operations?
If your database files are too small for the operations, it will slow the operations down while resizing the database with each operation. Increasing your database file size first will improve performance.

Increase Database File Sizes
| Database Name/Catalog | File Size (MB) | Space Used (MR) | Free Space (MB) | New File Size (MR) | |
| ▶ | CENDATA | 2 | 1 | 0 | 2 |
| CENDATA_log | 0 | 0 | 0 | 1 |


- Click Next > This is a summary of information and processes to be performed by the utility.
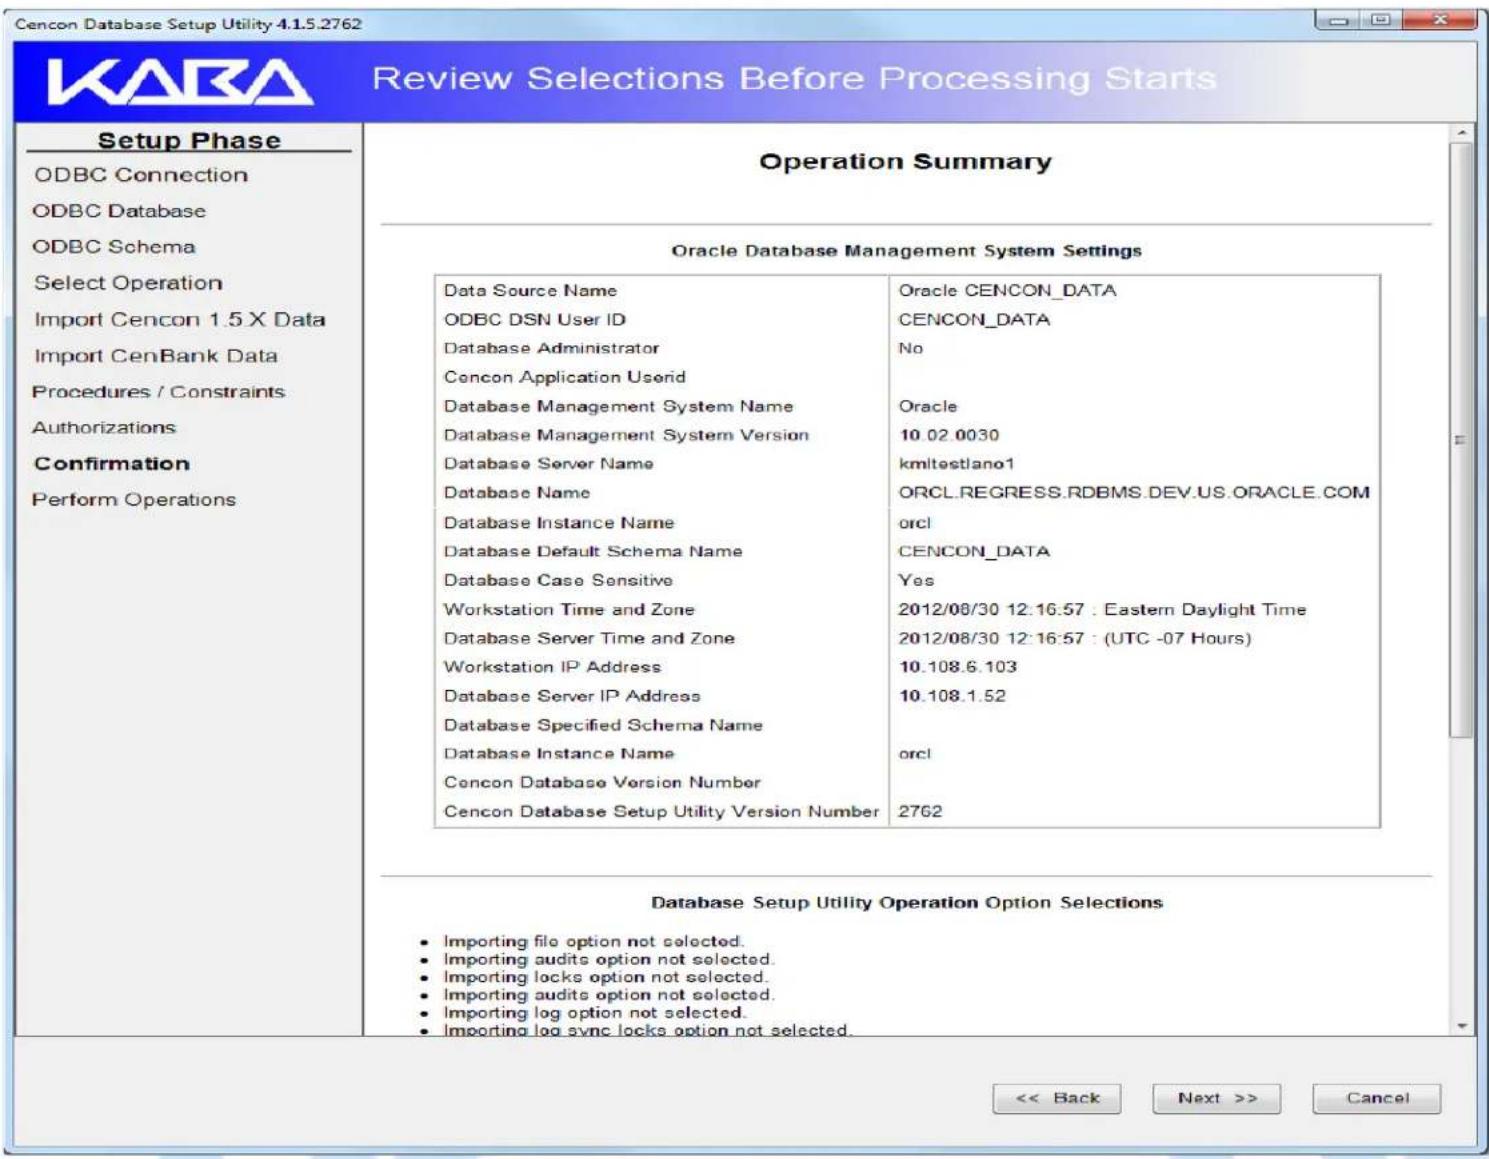
- Click the Next > to perform the database installation. This creates the databases, stored procedures, indexes, and constraints for Cencon.
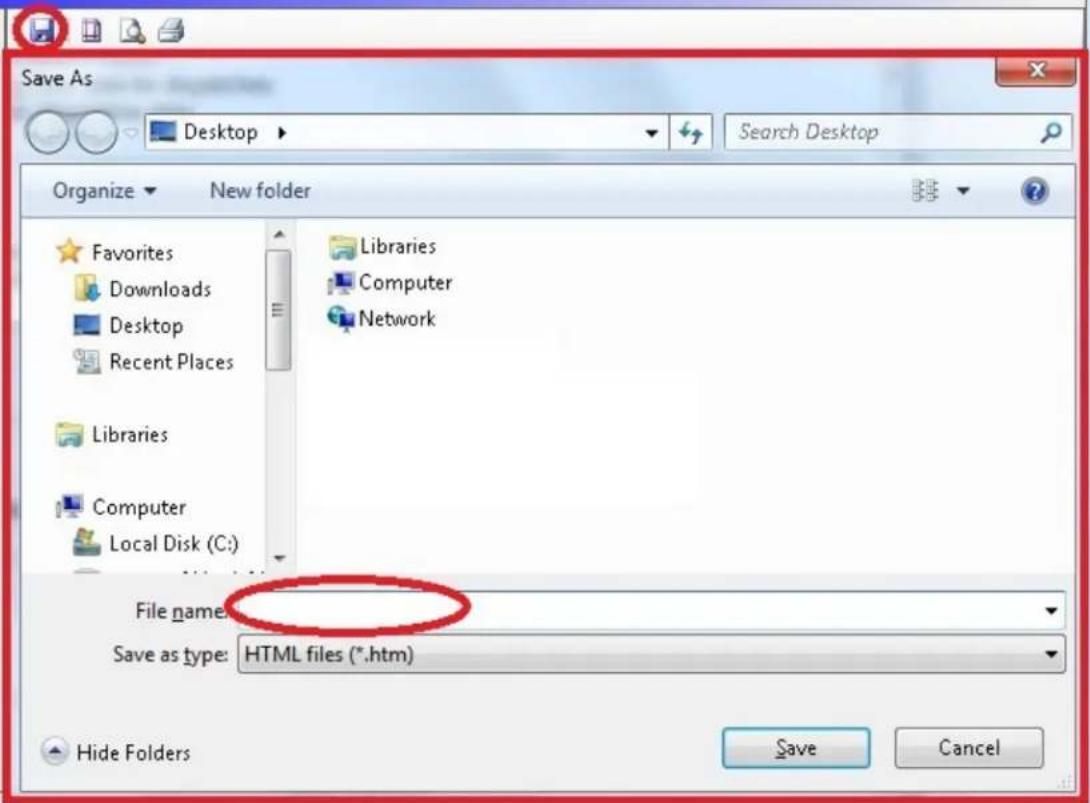
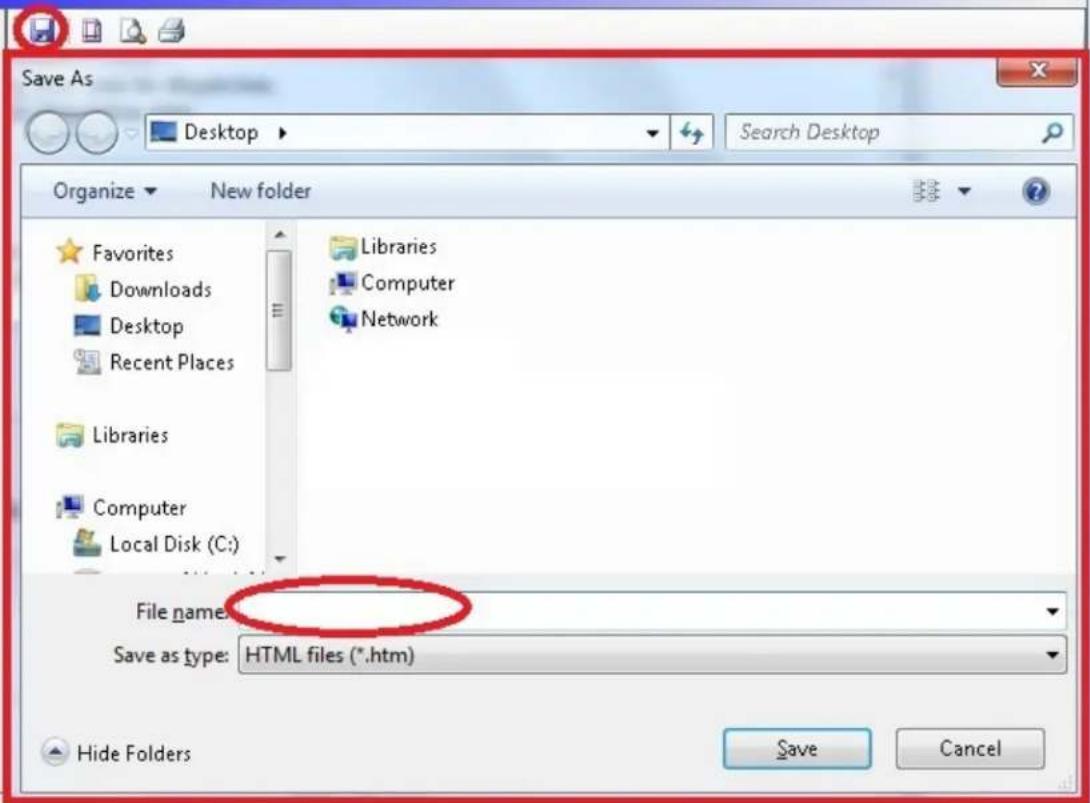
Click the Save icon to save the HTML installation report for later review.
Click Close > close the Cencon ^® 4 Database Setup Utility
Cencon Database Setup Utility 4.1.5.2521


Perform Selected Database Operations
Setup Phase
ODBC Connection
ODBC Database
ODBC Schema
Select Operation
Import Cencon 1.5.X Data
Import CenBank Data
Confirmation
Perform Operations

© 1996-2013 Kaba Mas LLC
Document Number 2070.127 Rev. G 02/13 Cencon® 4.1.5 Getting Started Guide
Cencon® 4.1.5 Getting Started Guide
Set Up New Database (Oracle)
The Cencon ^® 4.1.5 Database Utility option to create a database adds all databases, stored procedures, and constraints that Cencon ^® 4.1.5 will utilize.
Select Set Up Cencon Database to launch the CenconDBSetupUtility.exe.
NOTE: The CenconDBSetupUtility.exe can also be launched manually by browsing the install source (DVD, USB drive, or download) to the correct folder based on your operating system:
- DBSetupUtility\Windows_32bit\CenconDBSetupUtility.exe
- DBSetupUtility\Windows_64bit\CenconDBSetupUtility.exe
1. Click Set Up Cencon Database >

Note
You must have created an Oracle user with the appropriate permissions to host the Cencon database. See the documentation section: Database User Permissions (Oracle)
You must select the ODBC driver connection you configured with the Oracle user you created to host the Cencon database. See the documentation section: ODBC Connection Creation (Oracle)
- Click the Select ODBC Data Source > Select the Machine Data Source tab.


Note
When selecting an ODBC connection this may take a moment to load Data Source information.
- Review Data then Click Next >
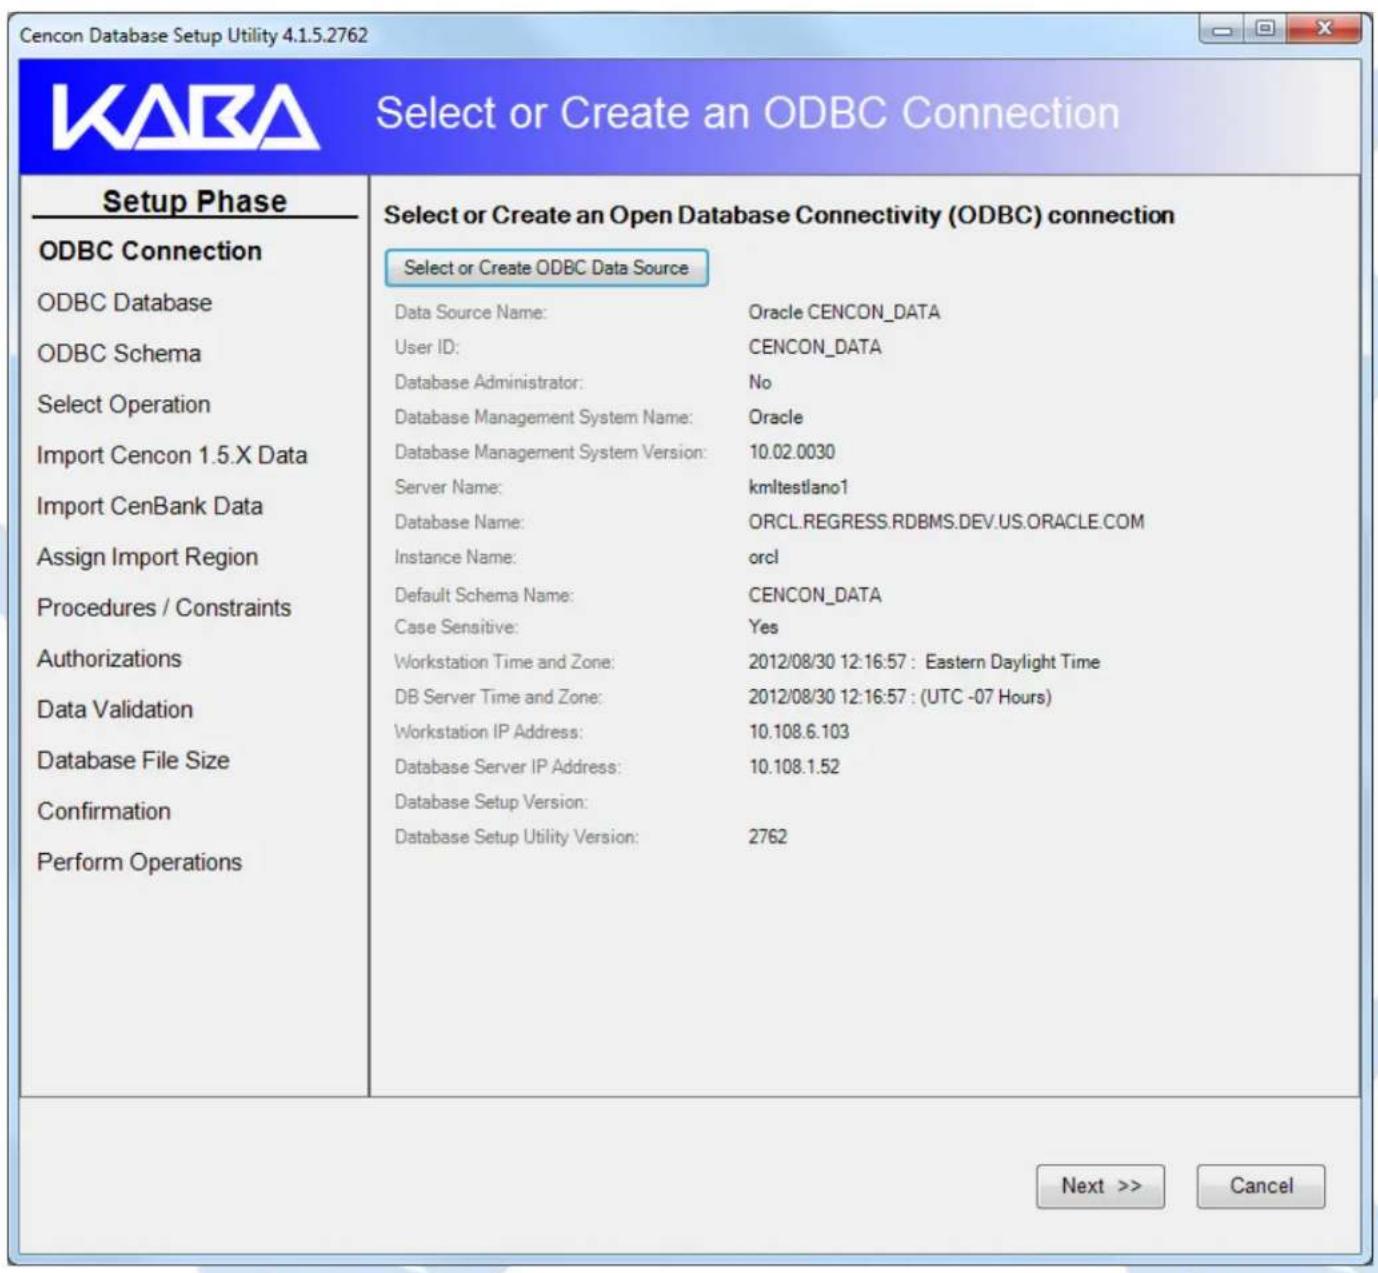

- Select the option Create / Update Cencon database and click on Next.

- If not importing data click Next > If you have 1.5 version data to import see next screen

If you have data to import from 1.5 versions of Cencon Click the check box > Enter or browse to the 1.5 Cencon data. Select what files you want imported
5a.Click Next >

- If not importing data click Next > If you have Cenbank data to import see next screen
KABA
Import Data From CenBank Data Files
Setup Phase
ODBC Connection
ODBC Database
ODBC Schema
Select Operation
Import Cencon 1.5.X Data
Import CenBank Data
Data Validation
Database File Size
Confirmation
Perform Operations
Do you need to import CenBank data files?
This will set up the data from the selected CenBank installation (or multiple installations) in the Cencon database. You will need to select the location of the files to import from.
Do not import CenBank data.
- Import files from a single CenBank Installation from the selected directory.
- Import files from multiple CenBank Installations from subdirectories of the selected directory.
<< Back

Cancel
If you have data to import from Cenbank
Click the check box for single or multiple Cenbank systems >
Enter or browse to the Cenbank data
6a. Click Next >

| Important Note |
| If Not importing data Verify all check boxes are unchecked when creating a database. If importing data these boxes will be grayed out and mandatory. |
7. Click Next >
You will see this screen only if you are upgrading an existing Cencon database. Otherwise you will see the screen in step 8.
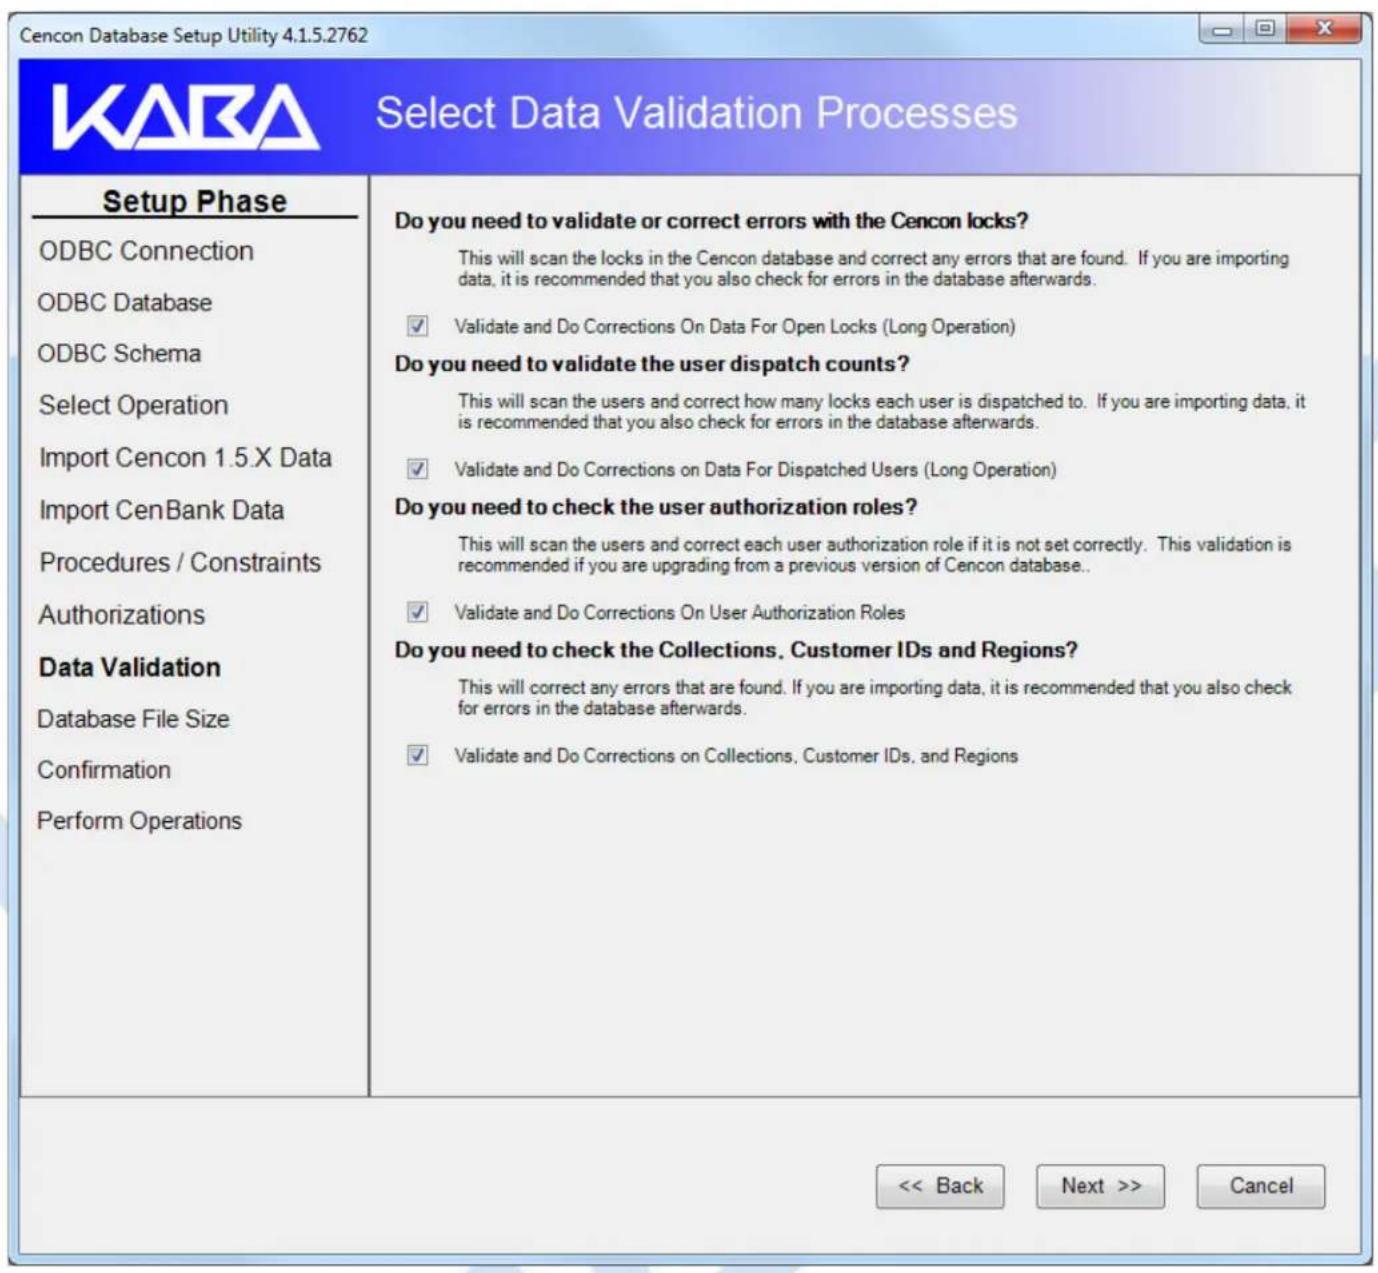
- Click Next > This is a summary of information and processes to be performed by the utility.
KARA
Review Selections Before Processing Starts
Setup Phase
ODBC Connection
ODBC Database
ODBC Schema
Select Operation
Import Cencon 1.5.X Data
Import CenBank Data
Procedures / Constraints
Authorizations
Confirmation
Perform Operations
Operation Summary
Oracle Database Management System Settings
| Data Source Name | Oracle CENCON_DATA |
| ODBC DSN User ID | CENCON_DATA |
| Database Administrator | No |
| Cencon Application Userid | |
| Database Management System Name | Oracle |
| Database Management System Version | 10.02.0030 |
| Database Server Name | kmltestlano1 |
| Database Name | ORCL.REGRESS.RDBMS.DEV.US.ORACLE.COM |
| Database Instance Name | orcl |
| Database Default Schema Name | CENCON_DATA |
| Database Case Sensitive | Yes |
| Workstation Time and Zone | 2012/08/30 12:16:57 : Eastern Daylight Time |
| Database Server Time and Zone | 2012/08/30 12:16:57 : (UTC -07 Hours) |
| Workstation IP Address | 10.108.6.103 |
| Database Server IP Address | 10.108.1.52 |
| Database Specified Schema Name | |
| Database Instance Name | orcl |
| Cencon Database Version Number | |
| Cencon Database Setup Utility Version Number | 2762 |
Database Setup Utility Operation Option Selections
- Importing file option not selected.
- Importing audits option not selected.
- Importing locks option not selected.
- Importing audits option not selected.
- Importing log option not selected
- Importing log sync locks option not selected

This creates the databases, stored procedures, indexes, and constraints for Cencon. This may take several minutes depending on the performance of your database and if you are upgrading a previous version of Cencon database.
Cencon Database Setup Utility 4.1.5.2762


Perform Selected Database Operations
Setup Phase
ODBC Connection
ODBC Database
ODBC Schema
Select Operation
Import Cencon 1.5.X Data
Import CenBank Data
Procedures / Constraints
Authorizations
Confirmation
Perform Operations

Updating log table and log history table union view...
Updating route lock joined with lock table view..
Updating route and route lock and lock table join view...
Updating collection lock joined with lock table view...
Updating collection and collection lock and lock table join view...
Updating user bank branch view..
Updating audit union with audit archive table view.
Updating authorization operation name join authorization definition view...
Updating user combo issued and log dispatch view...
Starting Update of Defined Database Indexes
Creating user table index for user ID and bank branch...
Creating user bank branch view index for user ID and bank branch...
Skipping Import of Legacy Cencon Data
Skipping Import of Legacy CenBank Data From Directories
Skipping Validation of Cencon Data
Updating Cencon Database Configuration Data
Updating Cencon database version information...
Writing configuration data for Cencon...
Skipping Update of Database Audit Event Type Names
Delete Empty Routes
Delete routes which are not associated with any locks.
Setup Complete!
Report Created On: 2012-08-30 12:57:55 (DST)
CenconDBSetupUtility Version 4.1.5.2762
Kaba Mas LLC
Close
- Click the Save icon to save the HTML installation report for later review.
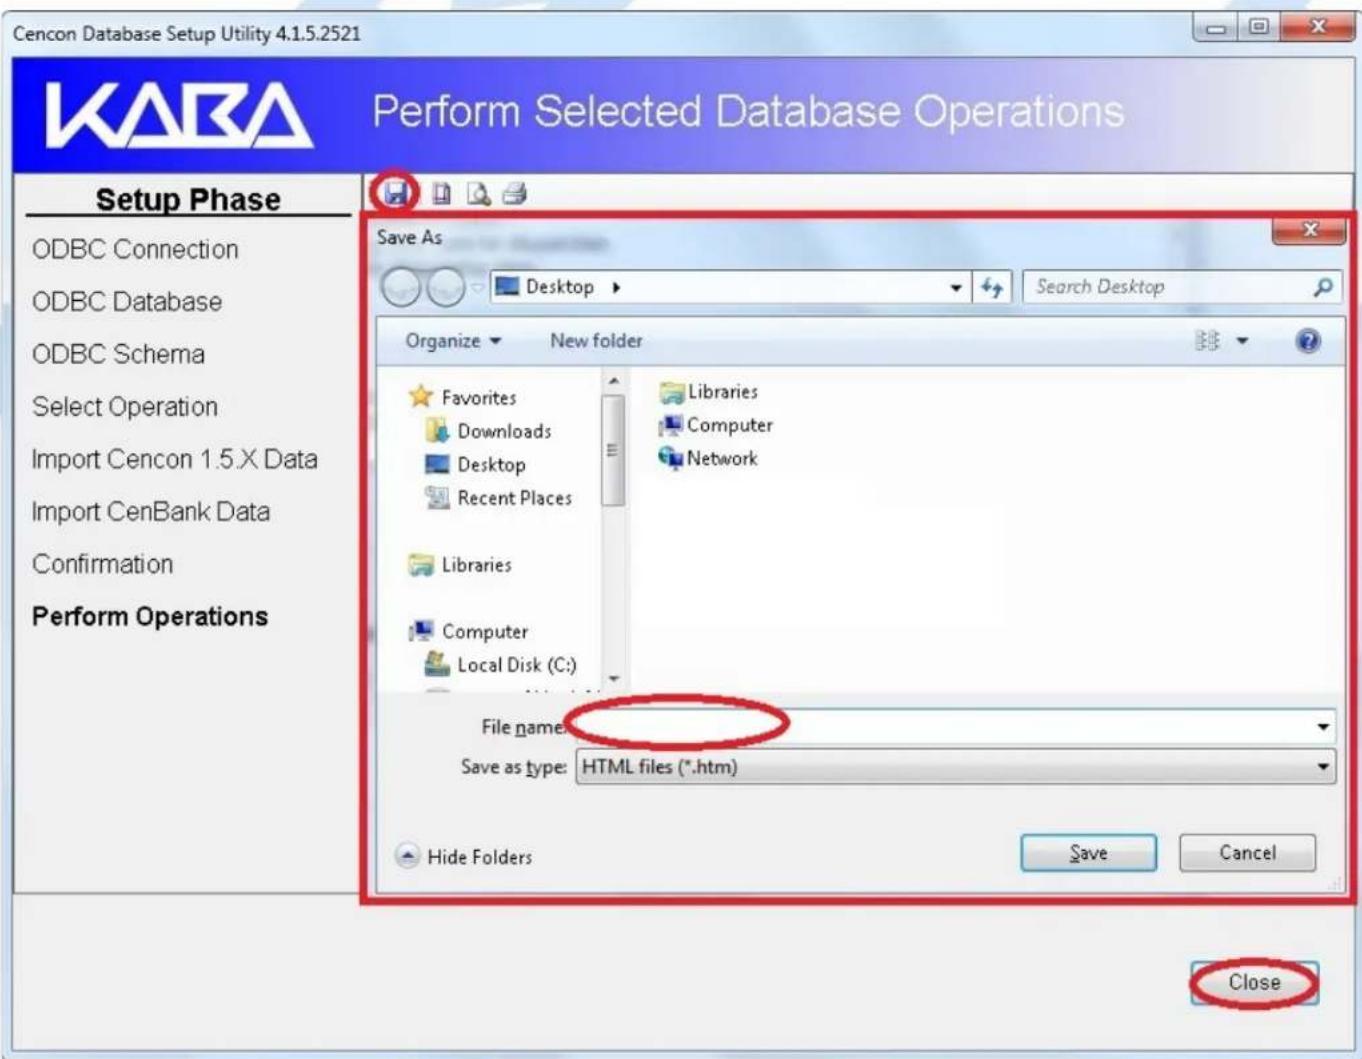
- Click Close to close the Cencon ^® 4.1.5 Database Setup Utility.
Cencon® 4.1.5 Getting Started Guide
Update Cencon Database
The Cencon ^® 4.1.5 Database Setup Utility option to update a database adds any deleted tables, rebuilds stored procedures, and rebuilds constraints that Cencon ^® 4.1.5 will utilize.
Caution
The Cencon ^® 4.1.5 Database Setup Utility should be run on the same machine where the DBMS is located to maximize performance.
Select Set Up Cencon Database to launch the CenconDBSetupUtility.exe.
NOTE: The CenconDBSetupUtility.exe can also be launched manually by browsing the install source (DVD, USB drive, or download) to the correct folder based on your operating system:
- DBSetupUtility\Windows_32bit\CenconDBSetupUtility.exe, or
-
DBSetupUtility\Windows_64bit\CenconDBSetupUtility.exe
-
Click Set Up Cencon Database >

Note
The ODBC can only be a Machine Data Source and a user with SYSDBA privileges must be used to create the database.
- Click Select ODBC Data Source > Select the Machine Data Source tab.
Cencon Database Setup Utility 4.1.5.2521


Select or Create an ODBC Connection
Setup Phase
ODBC Connection
ODBC Database
ODBC Schema
Select Operation
Import Cencon 1.5.X Data
Import CenBank Data
Assign Import Region
Procedures / Constraints
Authorizations
Data Validation
Database File Size
Confirmation
Perform Operations
Select or Create an Open Database Connectivity (ODBC) connection
Select or Create ODBC Data Source

Cancel
Note
When selecting an ODBC connection may take a moment to load Data Source information
Caution
The Cencon ^® 4.1.5 Database Setup Utility should be run on the same machine where the DBMS is located to maximize performance.
3. Review Data then Click Next
Cencon Database Setup Utility 4.1.5.2521


Select or Create an ODBC Connection
Setup Phase
ODBC Connection
Select Operation
Import Cencon 1.5.X Data
Import CenBank Data
Assign Import Region
Procedures / Constraints
Authorizations
Data Validation
Database File Size
Confirmation
Perform Operations
Select or Create an Open Database Connectivity (ODBC) connection
Select or Create ODBC Data Source
Data Source Name:
User ID:
Database Administrator:
Database Management System Name:
Database Management System Version:
Server Name:
Database Name:
Instance Name:
Default Schema Name:
Case Sensitive:
Workstation Time and Zone:
DB Server Time and Zone:
Workstation IP Address:
Database Server IP Address:
Database Setup Version:
Database Setup Utility Version:
Cencon 4
MHG\kholme
Yes
Microsoft SQL Server
10.00.4064
SQLEXPRESS
CENCON4
SQLEXPRESS
dbo
No
2012/02/16 14:50:45: Eastern Standard Time
2012/02/16 14:50:45 : (UTC -5 Hours)
Local
Local
2521
2521
Next >>
Cancel
Note
The Cencon ^® 4.1.5 Database Setup Utility now reviews the ODBC connection and only allows an Operation that is available for that connection.
4. Click Update and Click Next >

Select Database Operation
Setup Phase
ODBC Connection
Select Operation
Import Cencon 1.5X Data
Import CenBank Data
Assign Import Region
Procedures / Constraints
Authorizations
Data Validation
Database File Size
Confirmation
Perform Operations
Select one of the following operations:
Create Cencon database.

Update the existing Cencon database.
Do maintenance of an existing Cencon database. (Does not create missing database tables.)
Report on an existing Cencon database without making changes.
Note: For Update Database and the Maintain Database Operations, all instances of Cencon and Centran which are connected to the selected database must be closed.
<< Back
Next >>
Cancel
- If not importing data click Next > If you have 1.5 version data to import see next screen
Cencon Database Setup Utility 4.1.5.2521


Import Data From Cencon 1.5.X Data Files
Setup Phase
ODBC Connection
ODBC Database
ODBC Schema
Select Operation
Import Cencon 1.5.X Data
Import CenBank Data
Assign Import Region
Data Validation
Database File Size
Confirmation
Perform Operations
Do you need to import data from Cencon Version 1.5.X files?
Data from the files will be loaded into the database.
□ Import Cencon Version 1.5.X files
<< Back
Next >>
Cancel
If you have data to import from 1.5 versions of Cencon
Click the check box > Enter or browse to the 1.5 Cencon data. Select what files you want imported
5a. Click Next >

- If not importing data click Next > If you have Cenbank data to import see next screen

Import Data From CenBank Data Files
Setup Phase
ODBC Connection
ODBC Database
ODBC Schema
Select Operation
Import Cencon 1.5.X Data
Import CenBank Data
Data Validation
Database File Size
Confirmation
Perform Operations
Do you need to import CenBank data files?
This will set up the data from the selected CenBank installation (or multiple installations) in the Cencon database. You will need to select the location of the files to import from.
Do not import CenBank data.
Import files from a single CenBank Installation from the selected directory.
Import files from multiple CenBank Installations from subdirectories of the selected directory.
<< Back
Next >>
Cancel
If you have data to import from Cenbank
Click the check box for single or multiple Cenbank systems >
Enter or browse to the Cenbank data
6a. Click Next >
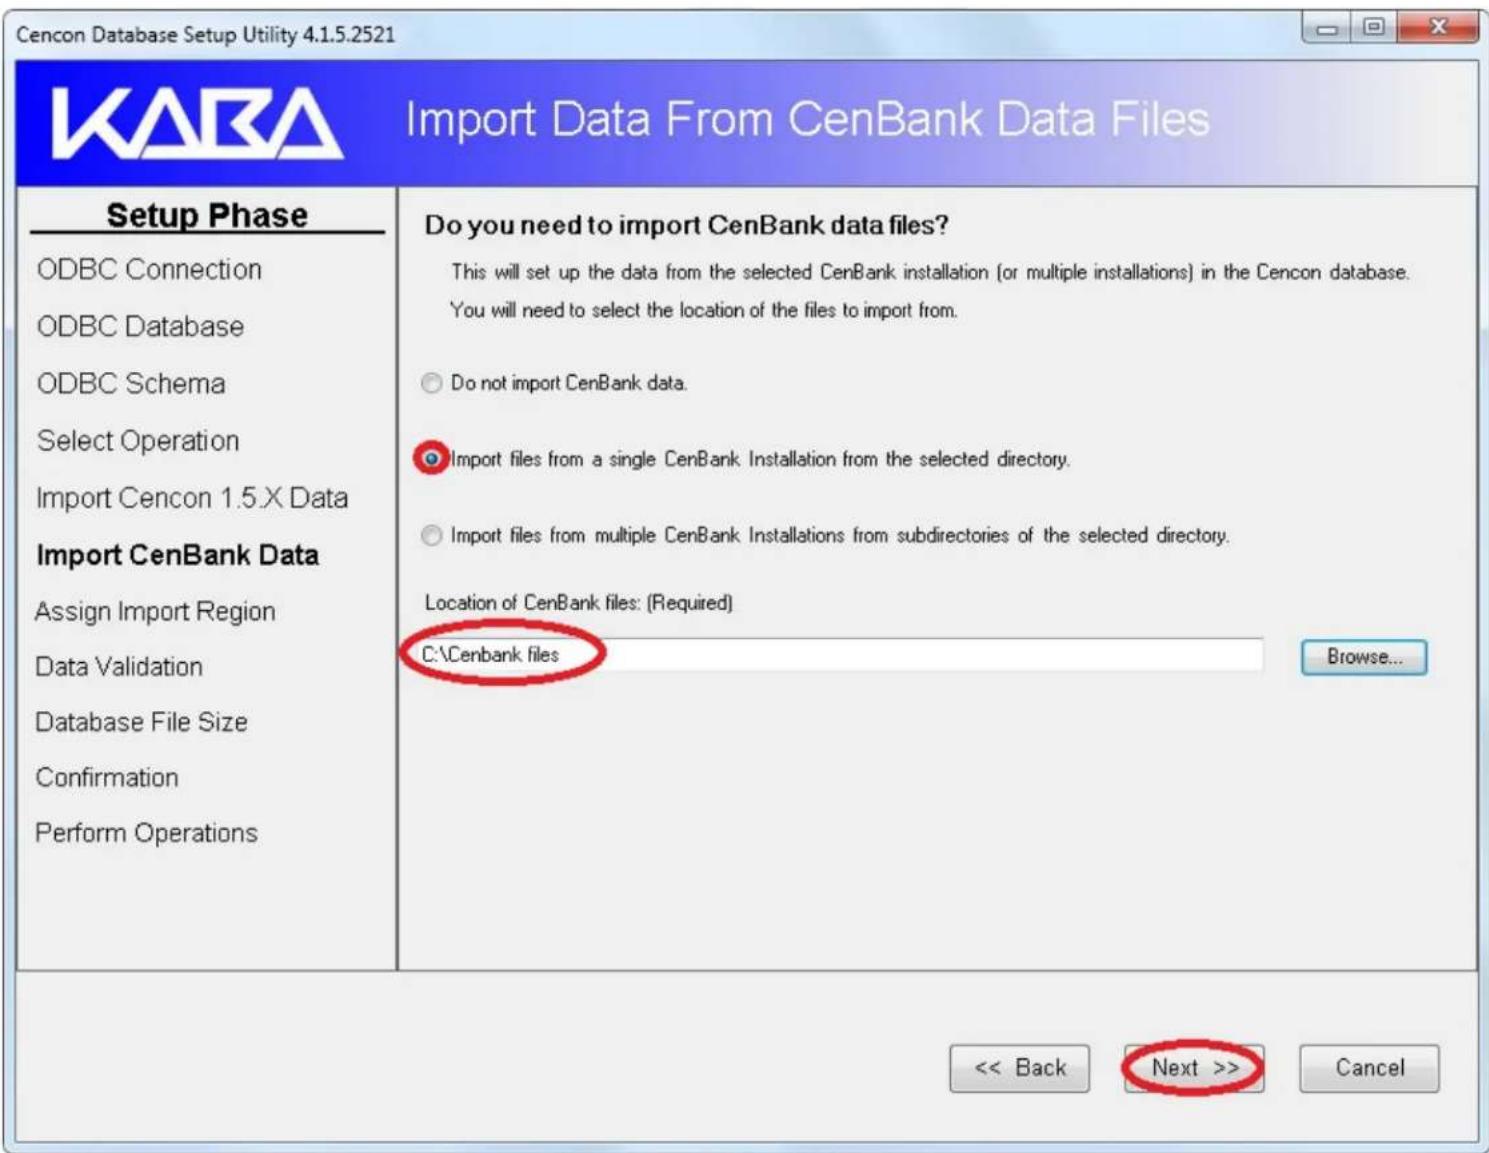
- Click Next > This will update procedures, constraints, triggers, indexes, and column widths.
KABA
Select Database Authorizations Tables Update
Setup Phase
ODBC Connection
Select Operation
Import Cencon 1.5.X Data
Import CenBank Data
Procedures / Constraints
Authorizations
Data Validation
Database File Size
Confirmation
Perform Operations
Do you want any previous user roles for authorizations to be reset?
If these authorizations do not exist, they will automatically be set up.
Reset / Overwrite Existing Authorization Role Definitions
Do you need to update the audit event type names in your database?
This will check that the descriptive event type name is set correctly on each audit based on the type of event.
Update the Audit Event Type Names in the Audit Event table and the Activity Log Tables
Note: For Update Database and the Maintain Database Operations, all instances of Cencon and Centran which are connected to the selected database must be closed.
<< Back
Next >>
Cancel
Warning
This feature will delete any roles that have been created by the end user and will reset the table to factory settings.
Note
Check the box in the event the defaults have been modified from the defaults.
8. Click Next >
KABA
Select Database Authorizations Tables Update
Setup Phase
ODBC Connection
Select Operation
Import Cencon 1.5.X Data
Import CenBank Data
Procedures / Constraints
Authorizations
Data Validation
Database File Size
Confirmation
Perform Operations
Do you want any previous user roles for authorizations to be reset?
If these authorizations do not exist, they will automatically be set up.
☐ Reset / Overwrite Existing Authorization Role Definitions
Do you need to update the audit event type names in your database?
This will check that the descriptive event type name is set correctly on each audit based on the type of event.
Update the Audit Event Type Names in the Audit Event table and the Activity Log Tables
Note: For Update Database and the Maintain Database Operations, all instances of Cencon and Centran which are connected to the selected database must be closed.
<< Back
Next >>
Cancel
Warning
To validate the data check the boxes. This process will take time depending on the amount of data being processed.
Cencon ^® and Centran ^® cannot be used while the Cencon ^® 4.1.5 Database Setup Utility running.
- Click Next >
KARA
Select Data Validation Processes
Setup Phase
ODBC Connection
Select Operation
Import Cencon 1.5.X Data
Import CenBank Data
Procedures / Constraints
Authorizations
Data Validation
Database File Size
Confirmation
Perform Operations
Do you need to validate or correct errors with the Cencon locks?
This will scan the locks in the Cencon database and correct any errors that are found. If you are importing data, it is recommended that you also check for errors in the database afterwards.

Validate and Do Corrections On Data For Open Locks (Long Operation)
Do you need to validate the user dispatch counts?
This will scan the users and correct how many locks each user is dispatched to. If you are importing data, it is recommended that you also check for errors in the database afterwards.

Validate and Do Corrections on Data For Dispatched Users (Long Operation)
Do you need to check the user authorization roles?
This will scan the users and correct each user authorization role if it is not set correctly. This validation is recommended if you are upgrading from a previous version of Cencon database..

Validate and Do Corrections On User Authorization Roles
Do you need to check the Collections, Customer IDs and Regions?
This will correct any errors that are found. If you are importing data, it is recommended that you also check for errors in the database afterwards.

Validate and Do Corrections on Collections, Customer IDs, and Regions
Note: For Update Database and the Maintain Database Operations, all instances of Cencon and Centran which are connected to the selected database must be closed.
<< Back
Next >>
Cancel
Important Note
The purpose for resizing is when importing legacy data the DBMS transaction log may reach its restricted file growth. Increasing the size removes this concern of repeated auto growth.
If this is a new database setup this is not required.
10. Click Next >
This page will increase size of files to increase the speed if needed when processing multiple transactions
This is percentage base calculation. You can edit the size by overwriting the new file size.

Review and Update Database File Size
Setup Phase
ODBC Connection
ODBC Database
ODBC Schema
Select Operation
Import Cencon 1.5.X Data
Import CenBank Data
Assign Import Region
Data Validation
Database File Size
Confirmation
Perform Operations
Do you need to resize your database files prior to doing database operations?
If your database files are too small for the operations, it will slow the operations down while resizing the database with each operation. Increasing your database file size first will improve performance.

Increase Database File Sizes
| Database Name/Catalog | File Size (MB) | Space Used (MR) | Free Space (MB) | New File Size (MR) | ||
| ▶ | CENDATA | 2 | 1 | 0 |  | |
| CENDATA_log | 0 | 0 | 0 | |||
<< Back
Next >>
Cancel
Warning
The Cencon Database should always be backed up regularly. Review DBMS website for back up methodology.
- Click Next > This is a summary of information and processes to be performed by the utility.
A warning to backup data before processing.
Click Yes > to proceed or No to make a backup through your DBMS Interface.
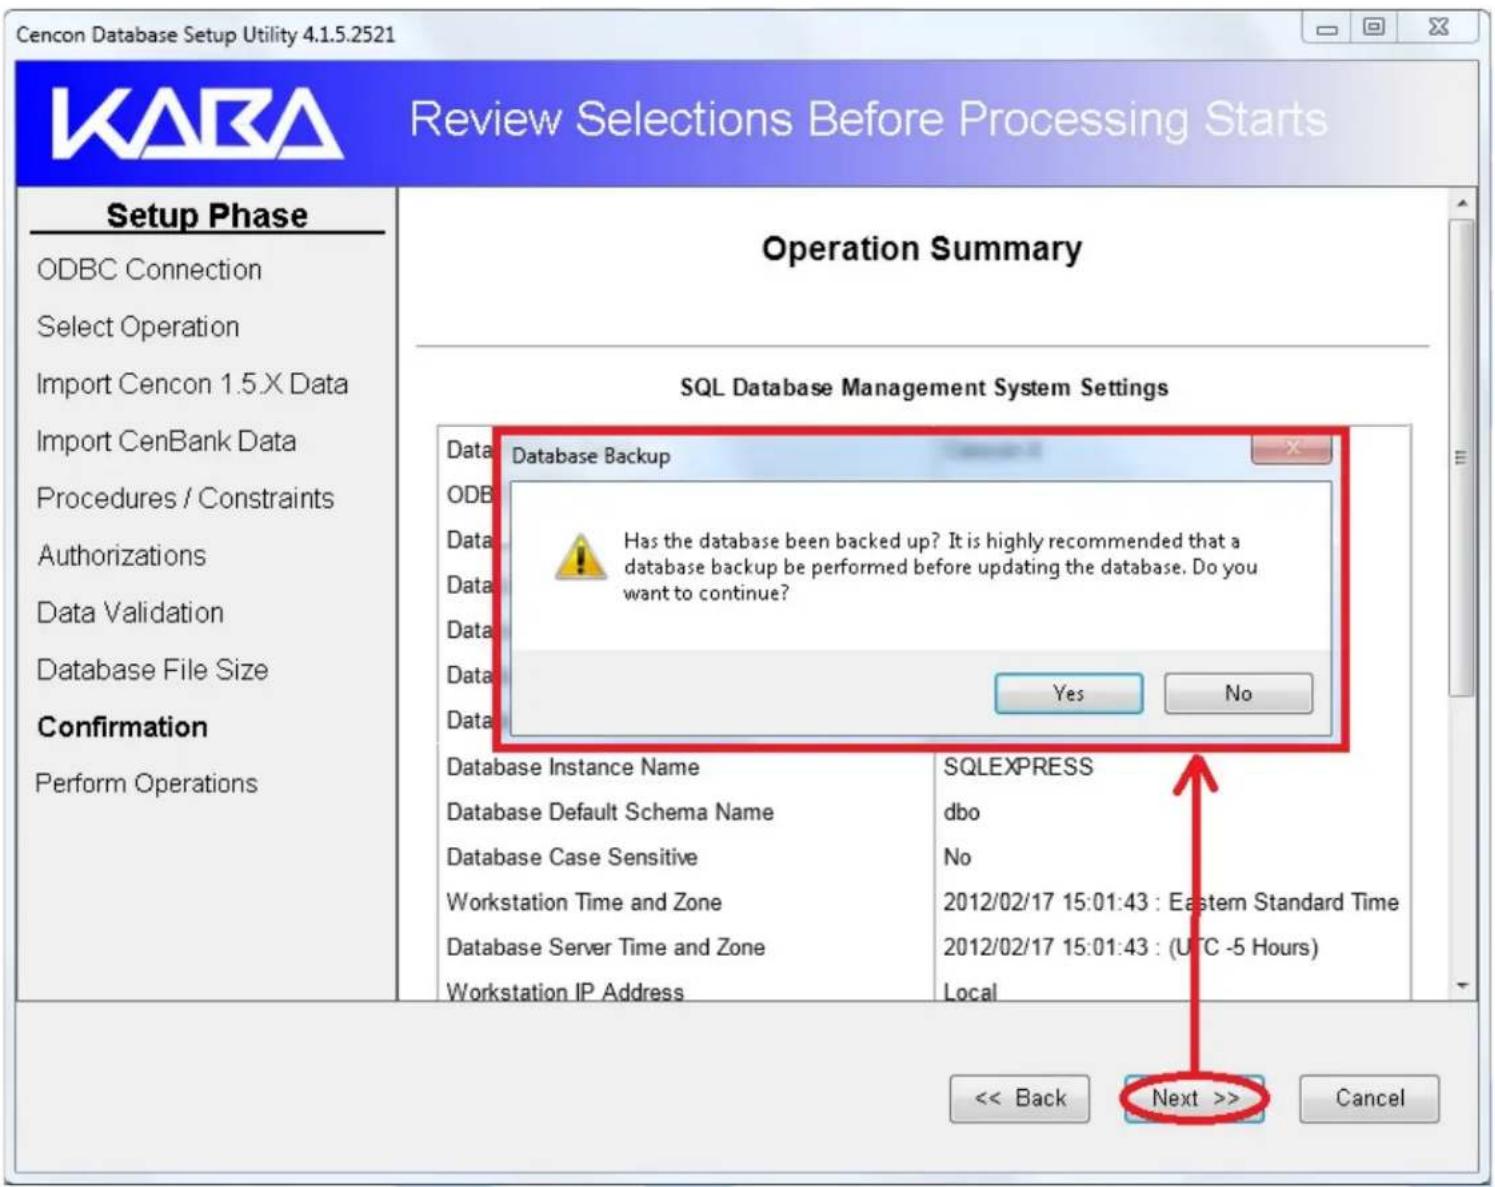
- Click the Next > to perform the database Update. This updates the databases, stored procedures, indexes, and constraints for Cencon.
Click the Save icon to save the HTML update report for later review.
Click Close > close the Cencon ^® 4.1.5 Database Setup Utility
Cencon Database Setup Utility 4.1.5.2521


Perform Selected Database Operations
Setup Phase
ODBC Connection
ODBC Database
ODBC Schema
Select Operation
Import Cencon 1.5.X Data
Import CenBank Data
Confirmation
Perform Operations

© 1996-2013 Kaba Mas LLC
Document Number 2070.127 Rev. G 02/13 Cencon ^® 4.1.5 Getting Started Guide
Cencon® 4.1.5 Getting Started Guide
Maintenance of Database
The Cencon ^® 4.1.5 Database Utility option for Maintenance rewrites procedures, constraints, triggers, indexes, and column widths that Cencon ^® 4.1.5 will Utilize. Only the Update will add missing tables.
Caution
The Cencon ^® 4.1.5 Database Setup Utility should be run on the same machine where the DBMS is located to maximize performance.
Select Set Up Cencon Database to launch the CenconDBSetupUtility.exe.
NOTE: The CenconDBSetupUtility.exe can also be launched manually by browsing the install source (DVD, USB drive, or download) to the correct folder based on your operating system:
- DBSetupUtility\Windows_32bit\CenconDBSetupUtility.exe, or
-
DBSetupUtility\Windows_64bit\CenconDBSetupUtility.exe
-
Click Set Up Cencon Database >

Note
The ODBC can only be a Machine Data Source and a user with SYSDBA privileges must be used to create the database.
- Click Select ODBC Data Source > Select the Machine Data Source tab.

Note
When selecting an ODBC connection may take a moment to load Data Source information
Caution
The Cencon ^® 4.1.5 Database Setup Utility should be run on the same machine where the DBMS is located to maximize performance.
3. Review Data then Click Next
Cencon Database Setup Utility 4.1.5.2521


Select or Create an ODBC Connection
Setup Phase
ODBC Connection
Select Operation
Import Cencon 1.5.X Data
Import CenBank Data
Assign Import Region
Procedures / Constraints
Authorizations
Data Validation
Database File Size
Confirmation
Perform Operations
Select or Create an Open Database Connectivity (ODBC) connection
Select or Create ODBC Data Source
Data Source Name:
Cencon 4
User ID:
MHG\kholme
Database Administrator:
Yes
Database Management System Name:
Microsoft SQL Server
Database Management System Version:
10.00.4064
Server Name:
SQLEXPRESS
Database Name:
CENCON4
Instance Name:
SQLEXPRESS
Default Schema Name:
dbo
Case Sensitive:
No
Workstation Time and Zone:
2012/02/16 14:50:45 : Eastern Standard Time
DB Server Time and Zone:
2012/02/16 14:50:45 : (UTC -5 Hours)
Workstation IP Address:
Local
Database Server IP Address:
Local
Database Setup Version:
2521
Database Setup Utility Version:
2521
Next >>
Cancel
Note
The Cencon Database Utility now reviews the ODBC connection and only allows an Operation that is available for that connection.
4. Click Maintenance and Click Next >
- If not importing data click Next > If you have 1.5 version data to import see next screen

Import Data From Cencon 1.5.X Data Files
Setup Phase
ODBC Connection
ODBC Database
ODBC Schema
Select Operation
Import Cencon 1.5.X Data
Import CenBank Data
Assign Import Region
Data Validation
Database File Size
Confirmation
Perform Operations
Do you need to import data from Cencon Version 1.5.X files?
Data from the files will be loaded into the database.
□ Import Cencon Version 1.5.X files
<< Back
Next >>
Cancel
If you have data to import from 1.5 versions of Cencon
Click the check box > Enter or browse to the 1.5 Cencon data. Select what files you want imported
5a. Click Next >
- If not importing data click Next > If you have Cenbank data to import see next screen

Import Data From CenBank Data Files
Setup Phase
ODBC Connection
ODBC Database
ODBC Schema
Select Operation
Import Cencon 1.5.X Data
Import CenBank Data
Data Validation
Database File Size
Confirmation
Perform Operations
Do you need to import CenBank data files?
This will set up the data from the selected CenBank installation (or multiple installations) in the Cencon database. You will need to select the location of the files to import from.
Do not import CenBank data.
Import files from a single CenBank Installation from the selected directory.
Import files from multiple CenBank Installations from subdirectories of the selected directory.
<< Back
Next >>
Cancel
If you have data to import from Cenbank
Click the check box for single or multiple Cenbank systems >
Enter or browse to the Cenbank data
6a. Click Next >
Cencon Database Setup Utility 4.1.5.2521


Import Data From CenBank Data Files
Setup Phase
ODBC Connection
ODBC Database
ODBC Schema
Select Operation
Import Cencon 1.5.X Data
Import CenBank Data
Assign Import Region
Data Validation
Database File Size
Confirmation
Perform Operations
Do you need to import CenBank data files?
This will set up the data from the selected CenBank installation (or multiple installations) in the Cencon database. You will need to select the location of the files to import from.
Do not import CenBank data.
Import files from a single CenBank Installation from the selected directory.
- Import files from multiple CenBank Installations from subdirectories of the selected directory.
Location of CenBank files: (Required)
C:\Cenbank files
Browse...
<< Back
Next >>
Cancel
- Click Next > This will update procedures, constraints, triggers, indexes, and column widths.
KABA
Select Database Authorizations Tables Update
Setup Phase
ODBC Connection
Select Operation
Import Cencon 1.5.X Data
Import CenBank Data
Procedures / Constraints
Authorizations
Data Validation
Database File Size
Confirmation
Perform Operations
Do you want any previous user roles for authorizations to be reset?
If these authorizations do not exist, they will automatically be set up.
Reset / Overwrite Existing Authorization Role Definitions
Do you need to update the audit event type names in your database?
This will check that the descriptive event type name is set correctly on each audit based on the type of event.
Update the Audit Event Type Names in the Audit Event table and the Activity Log Tables
Note: For Update Database and the Maintain Database Operations, all instances of Cencon and Centran which are connected to the selected database must be closed.
<< Back
Next >>
Cancel
Warning
This feature will delete any roles that have been created by the end user and will reset the table to factory settings.
Note
Check the box in the event the defaults have been modified from the defaults.
8. Click Next >
KABA
Select Database Authorizations Tables Update
Setup Phase
ODBC Connection
Select Operation
Import Cencon 1.5.X Data
Import CenBank Data
Procedures / Constraints
Authorizations
Data Validation
Database File Size
Confirmation
Perform Operations
Do you want any previous user roles for authorizations to be reset?
If these authorizations do not exist, they will automatically be set up.
☐ Reset / Overwrite Existing Authorization Role Definitions
Do you need to update the audit event type names in your database?
This will check that the descriptive event type name is set correctly on each audit based on the type of event.
Update the Audit Event Type Names in the Audit Event table and the Activity Log Tables
Note: For Update Database and the Maintain Database Operations, all instances of Cencon and Centran which are connected to the selected database must be closed.
<< Back
Next >>
Cancel
Warning
To validate the data check the boxes. This process will take time depending on the amount of data being processed.
Cencon ^® 4.1.5 and Centran ^® 4.1.5 cannot be used while the Cencon ^® 4.1.5 Software Database Utility running.
- Click Next >
KABA
Select Data Validation Processes
Setup Phase
ODBC Connection
Select Operation
Import Cencon 1.5.X Data
Import CenBank Data
Procedures / Constraints
Authorizations
Data Validation
Database File Size
Confirmation
Perform Operations
Do you need to validate or correct errors with the Cencon locks?
This will scan the locks in the Cencon database and correct any errors that are found. If you are importing data, it is recommended that you also check for errors in the database afterwards.

Validate and Do Corrections On Data For Open Locks (Long Operation)
Do you need to validate the user dispatch counts?
This will scan the users and correct how many locks each user is dispatched to. If you are importing data, it is recommended that you also check for errors in the database afterwards.

Validate and Do Corrections on Data For Dispatched Users (Long Operation)
Do you need to check the user authorization roles?
This will scan the users and correct each user authorization role if it is not set correctly. This validation is recommended if you are upgrading from a previous version of Cencon database..

Validate and Do Corrections On User Authorization Roles
Do you need to check the Collections, Customer IDs and Regions?
This will correct any errors that are found. If you are importing data, it is recommended that you also check for errors in the database afterwards.

Validate and Do Corrections on Collections, Customer IDs, and Regions
Note: For Update Database and the Maintain Database Operations, all instances of Cencon and Centran which are connected to the selected database must be closed.
<< Back
Next >>
Cancel
Important Note
The purpose for resizing is when importing legacy data the DBMS transaction log may reach its restricted file growth. Increasing the size removes this concern of repeated auto growth.
If this is a new database setup this is not required.
10. Click Next >
This page will increase size of files to increase the speed if needed when processing multiple transactions
This is percentage base calculation. You can edit the size by overwriting the new file size.

Review and Update Database File Size
Setup Phase
ODBC Connection
ODBC Database
ODBC Schema
Select Operation
Import Cencon 1.5.X Data
Import CenBank Data
Assign Import Region
Data Validation
Database File Size
Confirmation
Perform Operations
Do you need to resize your database files prior to doing database operations?
If your database files are too small for the operations, it will slow the operations down while resizing the database with each operation. Increasing your database file size first will improve performance.

Increase Database File Sizes
| Database Name/Catalog | File Size (MB) | Space Used (MR) | Free Space (MB) | New File Size (MR) | |
| ▶ | CENDATA | 2 | 1 | 0 | 2 |
| CENDATA_log | 0 | 0 | 0 | 1 |



Warning
The Cencon Database should always be backed up regularly. Review DBMS website for back up methodology.
- Click Next > This is a summary of information and processes to be performed by the utility.
A warning to backup data before processing.
Click Yes > to proceed or No to make a backup through your DBMS Interface.

- Click the Next > to perform the database Maintenance. This updates stored procedures, indexes, and constraints for Cencon.
Click the Save icon to save the HTML update report for later review.
Click Close > close the Cencon ^® 4.1.5 Database Setup Utility
Cencon Database Setup Utility 4.1.5.2521


Perform Selected Database Operations
Setup Phase
ODBC Connection
ODBC Database
ODBC Schema
Select Operation
Import Cencon 1.5.X Data
Import CenBank Data
Confirmation
Perform Operations
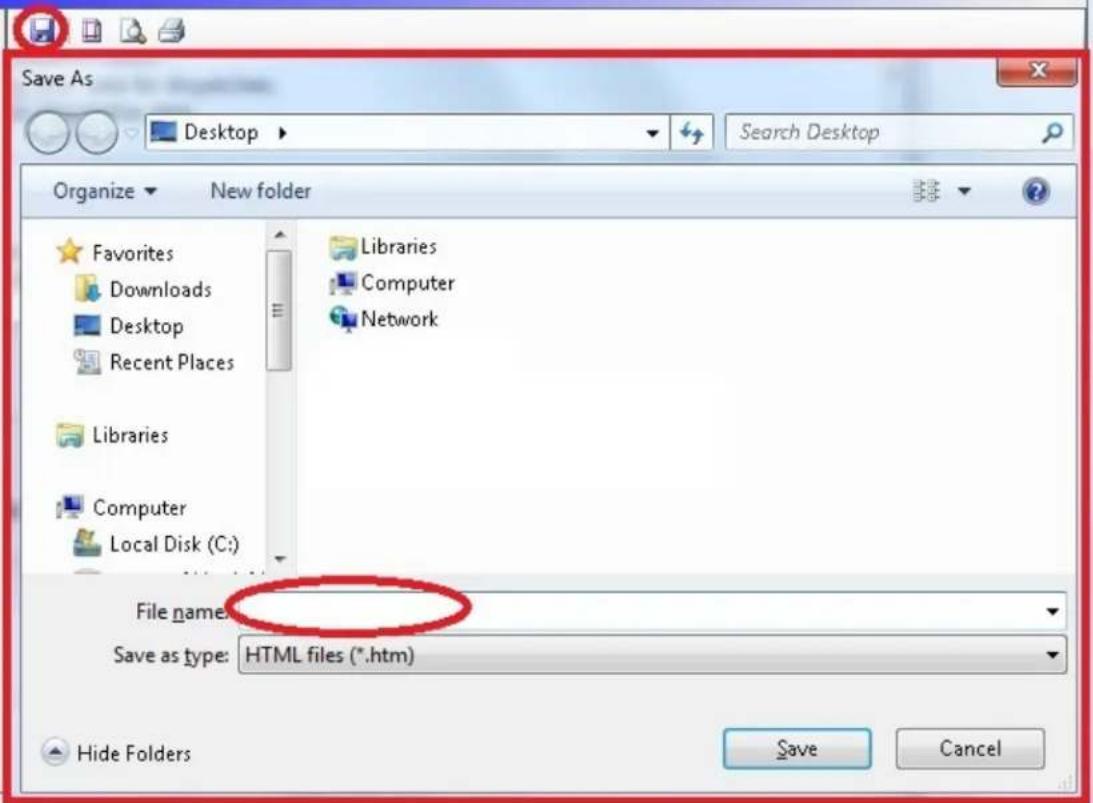
© 1996-2013 Kaba Mas LLC
Document Number 2070.127 Rev. G 02/13 Cencon ^® 4.1.5 Getting Started Guide
Cencon® 4.1.5 Getting Started Guide
Reporting on Database
The Cencon ^® 4.1.5 Database Utility option for Reports reviews and lists on all tables, procedures, constraints, triggers, indexes, and column widths that are currently in the Cencon database.
Caution
The Cencon ^® 4.1.5 Database Setup Utility should be run on the same machine where the DBMS is located to maximize performance.
Select Set Up Cencon Database to launch the CenconDBSetupUtility.exe.
NOTE: The CenconDBSetupUtility.exe can also be launched manually by browsing the install source (DVD, USB drive, or download) to the correct folder based on your operating system:
- DBSetupUtility\Windows_32bit\CenconDBSetupUtility.exe, or
-
DBSetupUtility\Windows_64bit\CenconDBSetupUtility.exe
-
Click Set Up Cencon Database >

Note
The ODBC can only be a Machine Data Source and a user with SYSDBA privileges must be used to create the database.
- Click Select ODBC Data Source > Select the Machine Data Source tab.
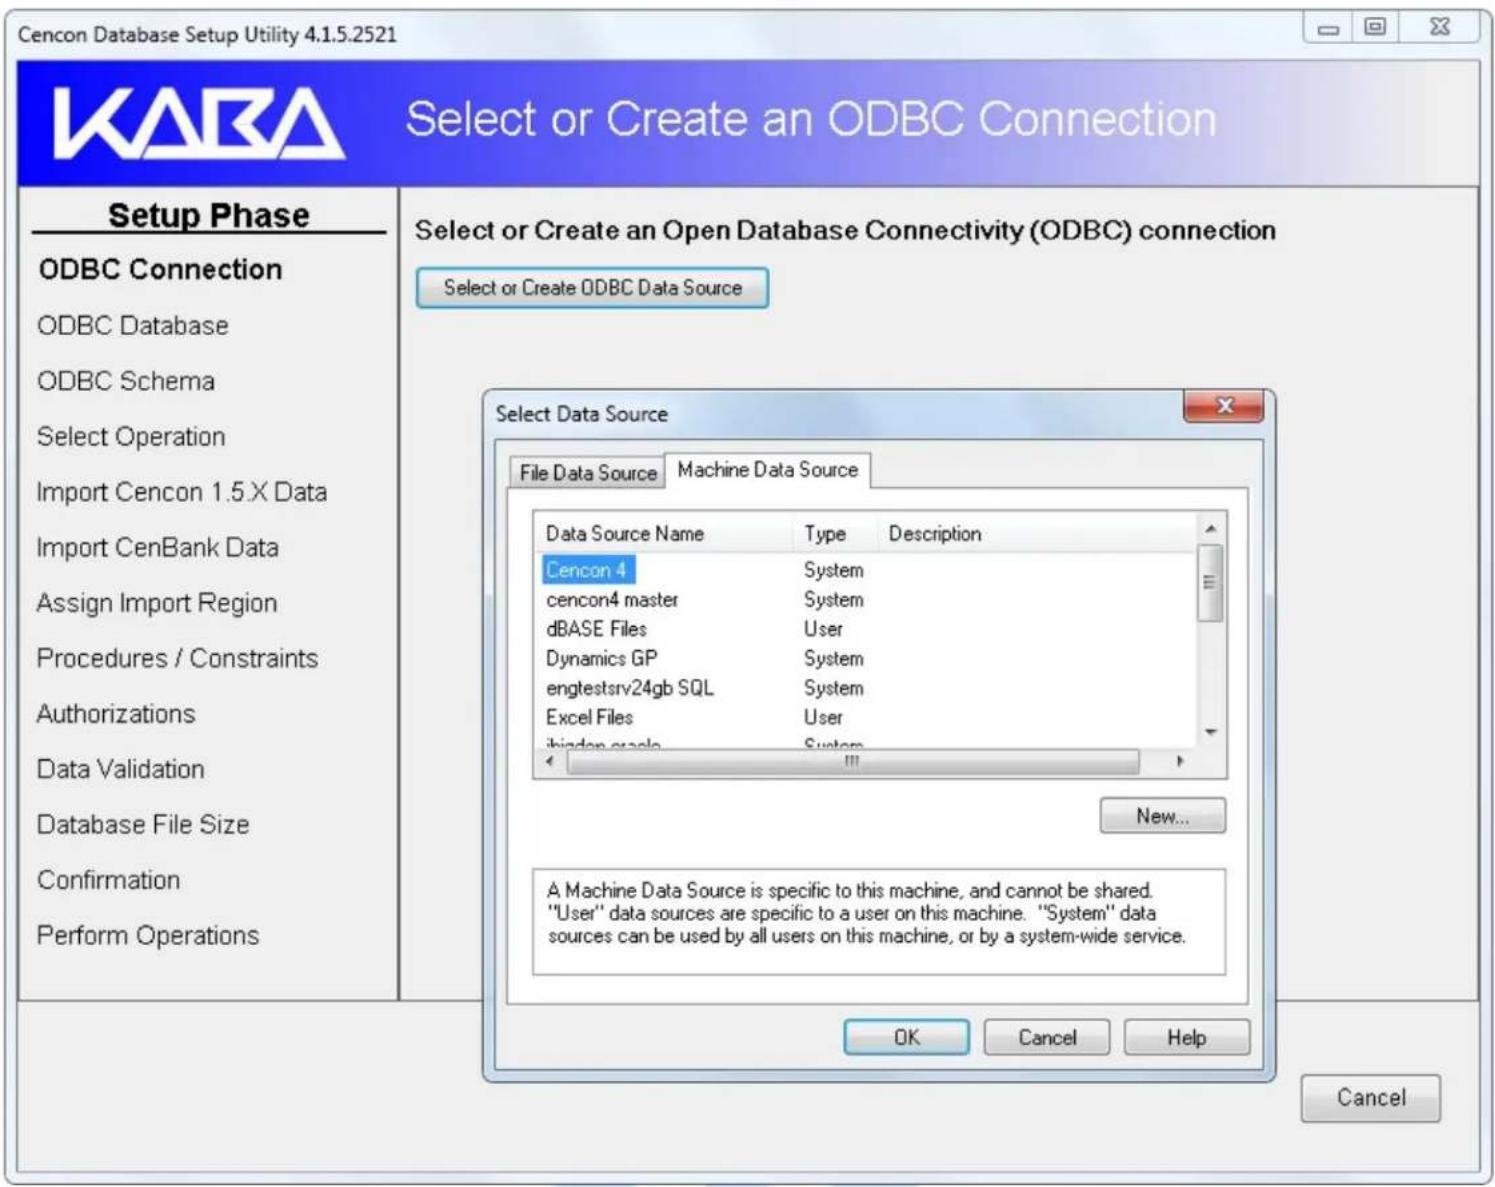
Note
When selecting an ODBC connection may take a moment to load Data Source information
Caution
The Cencon ^® 4.1.5 Database Setup Utility should be run on the same machine where the DBMS is located to maximize performance.
3. Review Data then Click Next
Cencon Database Setup Utility 4.1.5.2521


Select or Create an ODBC Connection
Setup Phase
ODBC Connection
Select Operation
Import Cencon 1.5X Data
Import CenBank Data
Assign Import Region
Procedures / Constraints
Authorizations
Data Validation
Database File Size
Confirmation
Perform Operations
Select or Create an Open Database Connectivity (ODBC) connection
Select or Create ODBC Data Source
Data Source Name:
User ID:
Database Administrator:
Database Management System Name:
Database Management System Version:
Server Name:
Database Name:
Instance Name:
Default Schema Name:
Case Sensitive:
Workstation Time and Zone:
DB Server Time and Zone:
Workstation IP Address:
Database Server IP Address:
Database Setup Version:
Database Setup Utility Version:
Cencon 4
MHG\kholme
Yes
Microsoft SQL Server
10.00.4064
SQLEXPRESS
CENCON4
SQLEXPRESS
dbo
No
2012/02/16 14:50:45: Eastern Standard Time
2012/02/16 14:50:45 : (UTC -5 Hours)
Local
Local
2521
2521
Next >>
Cancel
Note
The Cencon Database Utility now reviews the ODBC connection and only allows an Operation that is available for that connection.
4. Click Reports and Click Next >
Cencon Database Setup Utility 4.1.5.2521


Select Database Operation
Setup Phase
ODBC Connection
Select Operation
Confirmation
Perform Operations
Select one of the following operations:
Create Cencon database.
Update the existing Cencon database.
Do maintenance of an existing Cencon database. (Does not create missing database tables.)
Report on an existing Cencon database without making changes.
<< Back

Cancel
- Click Next > This is a summary of information and processes to be performed by the utility.

- Click the Next > to perform the database Report. This reports of the databases, stored procedures, indexes, and constraints for Cencon.
Click the Save icon to save the HTML report for later review.
Click Close > close the Cencon ^® 4.1.5 Database Setup Utility

© 1996-2013 Kaba Mas LLC
Document Number 2070.127 Rev. G 02/13 Cencon® 4.1.5 Getting Started Guide
Cencon® 4.1.5 Getting Started Guide
Start the Cencon® 4.1.5 Program
To start the Cencon ^® 4.1.5 program:
- Select the Start icon from the Windows task bar.
- Select the Programs menu item.
- Select the Cencon menu item and then the Cencon ^® 4.1.5 icon:

Initial Cencon ^® 4.1.5 Startup screen:

- If you are going to use the Cencon USB Key Box, the first task is to initialize it. Verify that the Cencon USB Key Box is plugged into any USB port on your computer and select Cencon Key Box Settings to display the Configuration Settings screen.
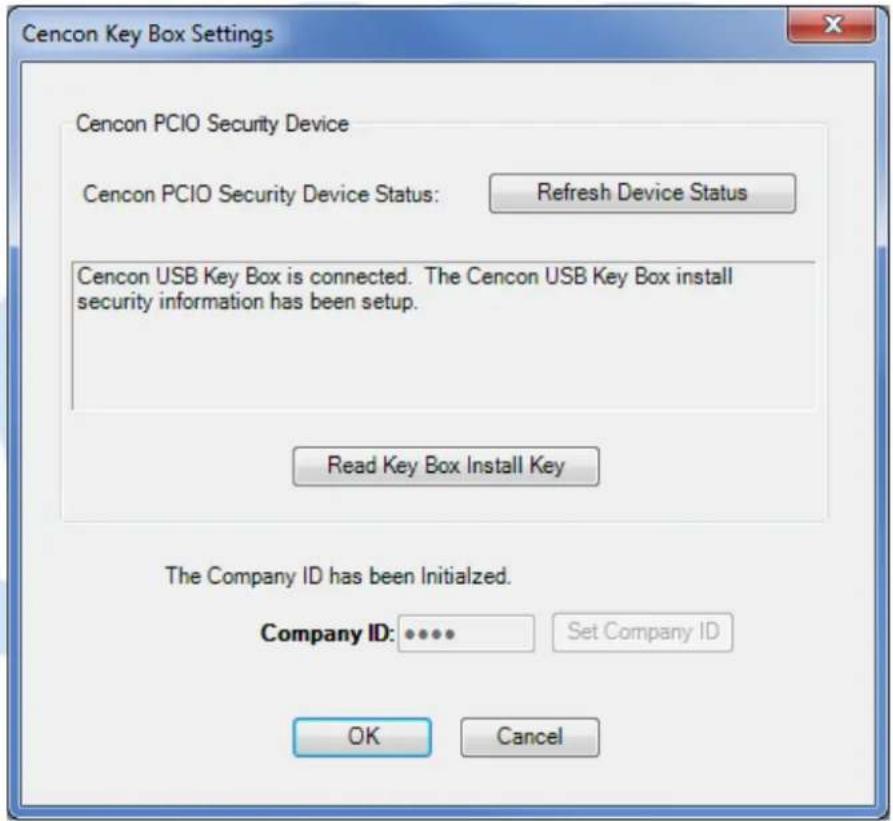
- Enter your Company ID.
The value entered for this field can be any complex four-digit number you wish to identify your company. You should choose a number that is, in some way, meaningful to your company. Record the Company ID and store it in a secure place.
Warning:
Record the Company ID and store it in a secure place. Once this ID is set, it becomes encrypted and it cannot be changed. If you are a branch of a larger company, you must enter the Company ID that has already been chosen for your company. If you are planning to activate locks from a remote PC, the Company ID must be the same on all systems involved in the process.
- Insert the Orange Install Key into the right Key Box reader position (the green LED on the right should be blinking) and press the Read Key Box Install Key button. The following message indicates successful initialization:

Important Note:
Remove the Key Box Install Key and store it in a safe place. You must have this key and the information on the
attached key tag if you ever need to reinstall the Cencon Key Box or order replacement parts. You have a limited number of installs associated with the Key Box Install Key.
- Select Database Connection Settings to access the dialogs which allow you to identify the appropriate Cencon database.

If the input field for Set this ODBC Connection as fixed database logon is checked, Cencon remembers the database connection for the next time the program is loaded.
- Select the button labeled Select ODBC Data Source to select the ODBC connection for the database to be used with the Cencon® 4.1.5 system.
- Select the Catalog tab if you need to modify the database catalog name:

- Select the Schema tab if you need to modify the database schema:

If using the default schema of "dbo" with one of the versions of Microsoft SQL Server, (i.e. Microsoft SQL Server 2008 R2, 2008 R2 Express, 2012, etc) you do not have to update the schema name.
- The following window is displayed when a database is successfully identified:

- Some initialization information must be entered before using Cencon for the first time. Select the Create First Logon for New Cencon Installation icon to start the setup wizard which will walk you through this process:
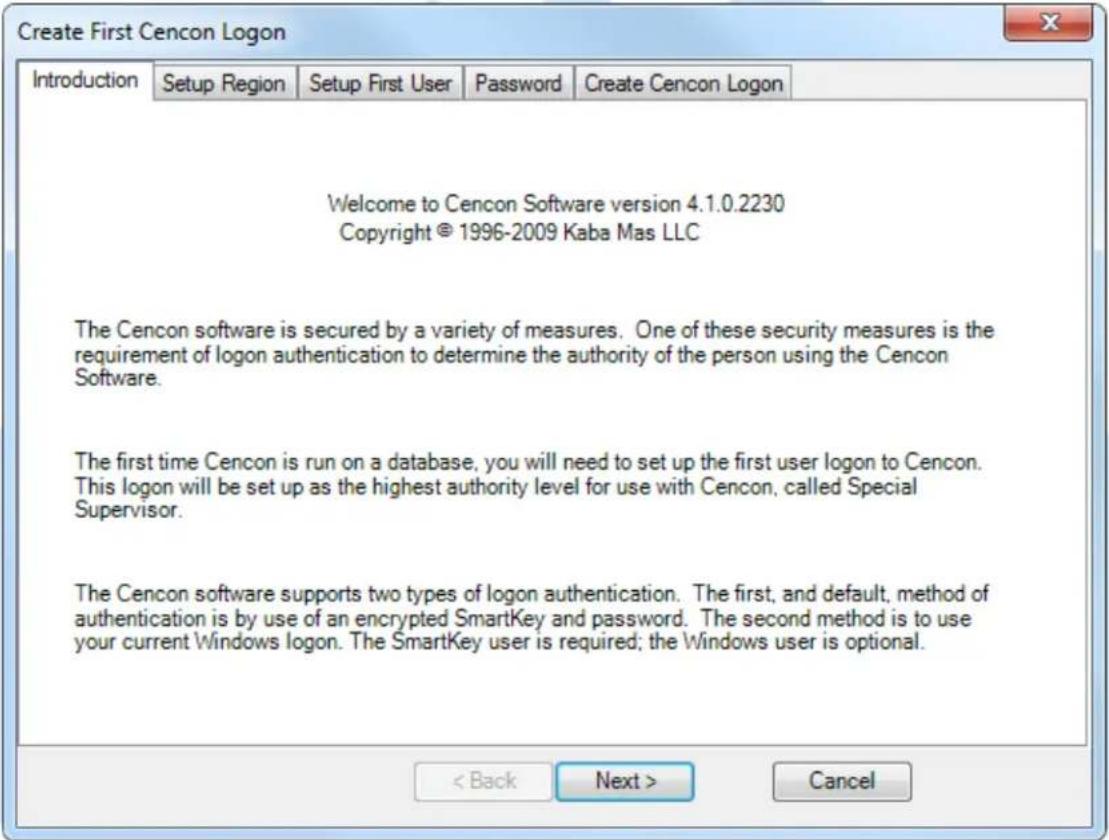
- Click on Next > to continue.
The Setup Region tab allows you to set up the Region Control feature. The Region Control feature allows the grouping of users, locks, and routes into specific regions. Global data access can be given to some users while data access can be limited for other users to only the users, locks and routes in a specific region. Note that this screen does not activate the Cencon region control feature - it defines a global region and assigns it to the initial user in case the region feature is activated at a later time.

- Follow the instructions on the screen to Add an initial region.
- Click on Next > to continue:

Note
Suggested User IDs: User IDs are very critical in the Cencon System. They can be up to sixty-four (64) characters in length. However, if you are using CenTran in conjunction with your Cencon system, you need to consider that the CenTran User ID field is limited to 20 characters. Using "Bill" as a user ID is valid, however, you may have more than one "Bill" in your organization. Using "98709003" as a user ID is also valid but may get confusing. Additionally, in dispatching a person we know as "Bill" using the number "98709003" as the user ID can also be confusing. It is suggested that user IDs be alpha or alphanumeric. It is also suggested that you use "Nicknames". For example, a user can be identified as "FLM1" and use "Bill N" in the Nickname field. Another example could be a user identified as "Tom1" and use "Flemming" (last name) in the Nickname field. Spaces are allowed in ID fields so "Bill Jones" is valid. However you choose to identify users, some thought should be given to it before you begin. Case sensitivity will apply if it has been selected in SQL Server as a requirement for the database.
- Follow the instructions on the screen to create an initial user. Keep in mind that this field may be case sensitive (depending on the SQL Server settings) and recognizes spaces as well as characters.
Caution
Nicknames can be up to sixty-four (64) characters in length. However, if you are using CenTran 3.x (and below) in conjunction with your Cencon system, you need to consider that the CenTran Nickname field is limited to 10 characters. The CenTran 4.1.5 XML schema allows the use of longer names.
- Click on Next > to enter the password for the user.
Note
User Passwords are case sensitive and can be up to sixty-four (64) characters in length. Since the User Passwords for Software Users (black SS, S, and D keys) are used as logon passwords for the software, they should be kept secret.
![Create First Cencon Logon Introduction Setup Region Setup First User Password Create Cencon Logon You will need to select a password for your electronic SmartKey key logon to Cencon. This password is used with your key to log onto Cencon. It can be up to 64 characters long, and can contain only the following characters or numbers: abcdefghijklmnopqrstuvwxyzABCDEFGHIJKLMNOPQRSTUVWXYZABCDEFGHIJKLMNOPQRSTUVWXYZ1234567890~!@#$%^{}-+_=[]0|::>.?" Password: Confirm Password: < Back Next > Cancel](/content/2026/05/828950/images/f88486df336654091e256b781e0ebde638093d4050b4e6249f9d5bd5feed5bd5.jpg)
- Enter a password (and the confirmation) and click on Next >.
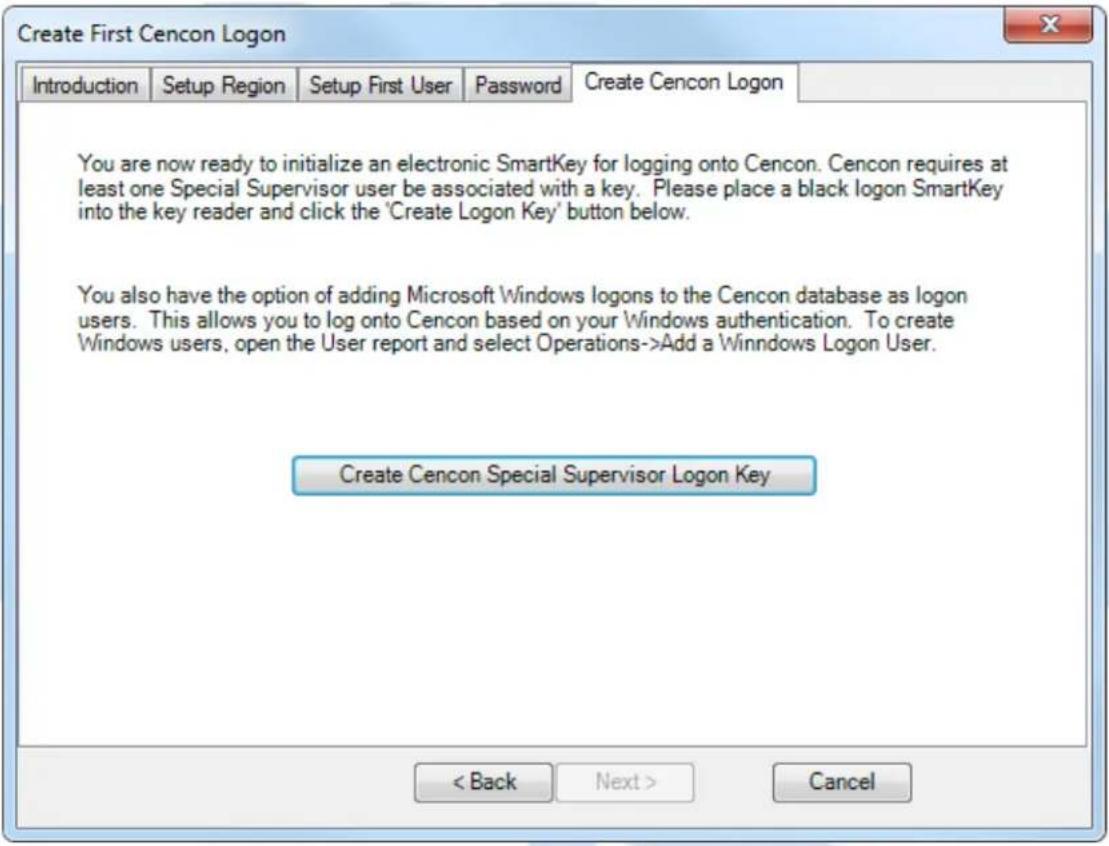
- Place a black logon type key into the right hand position of the Cencon Key Box (note the blinking green LED). Follow the instructions on the screen for creating a user key and optional Windows logon. Press the Finished button when the users have been created.

- Click OK and then Finished to complete the start up process.
- Press Finished to end this part of the start up process.
- You are next given the opportunity to configure settings which affect all users of your Cencon installation. See the Cencon Reference Manual for details. You can return to this function at any time by selecting the Change Configuration Settings icon on the main screen.

- Finally, you can set preferences which apply to the current PC. See the Cencon Reference Manual for details. You can return to this function at any time by selecting the Change Preferences icon on the main screen.

© 1996-2013 Kaba Mas LLC
Document Number 2070.127 Rev. G 02/13 Cencon ^® 4.1.5 Getting Started Guide
Cencon® 4.1.5 Getting Started Guide
Logon to the Cencon ^® 4.1.5 System
The Cencon ^® 4.1.5 startup window controls access to configuration settings and logon:
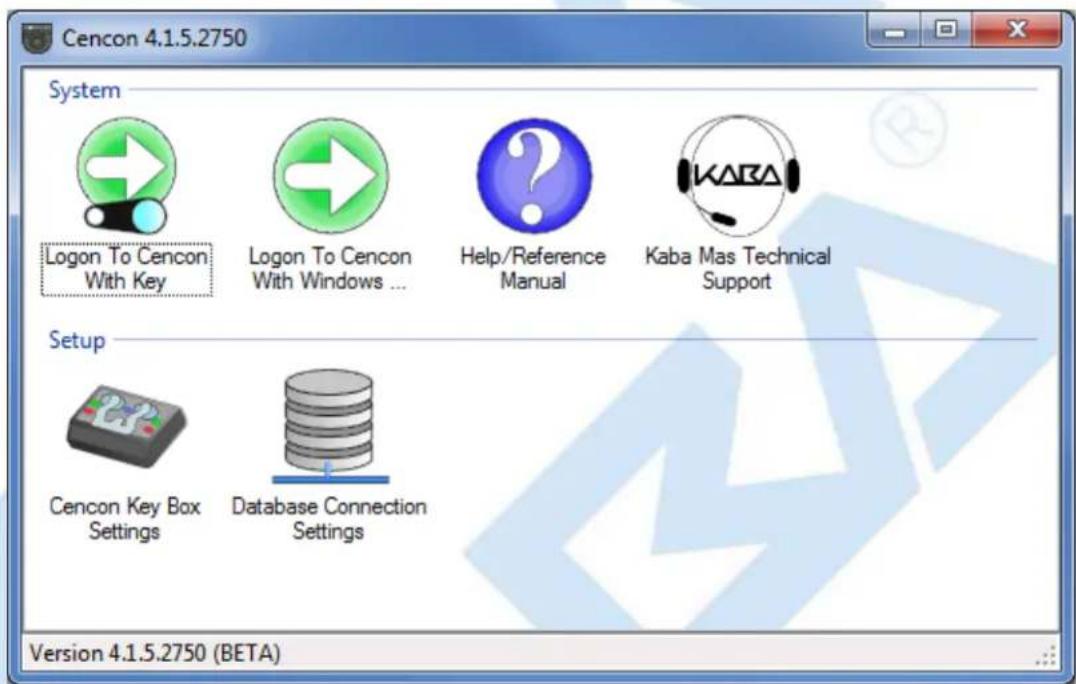
Cencon allows a user to logon using either an authorized Special Supervisor, Supervisor, or Dispatcher key.
Note
Place the logon key in the left key position on the Cencon Key Box.
To logon using a key, select Logon to Cencon with Key. If the key is recognized as valid, enter the password as requested.
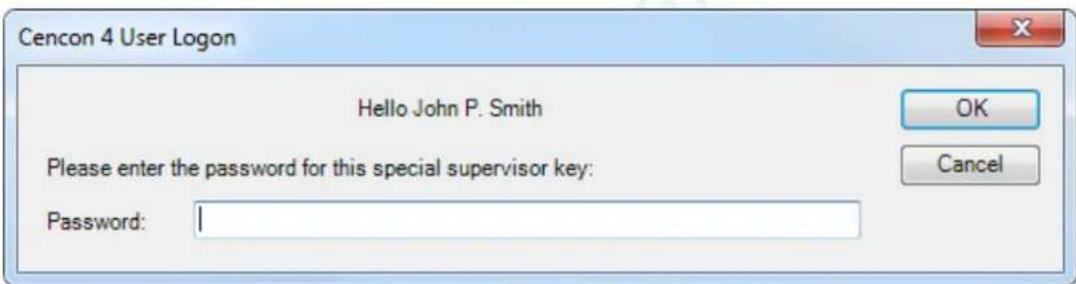
Remember that this field is case sensitive and recognizes spaces as well as characters.
Note
You cannot logon to the system using a nickname, or a user ID. You must use the password specified for the key in the key reader. The key in the key reader identifies the user trying to log onto the Cencon ^® 4.1.5 System.
Hint
If a window is displayed indicating that the User ID doesn't pass authority check, first check to make sure that the appropriate key is in the reader and that the reader is properly connected.
After a successful logon, the Cencon 4.1.5 Main Menu window is displayed. Some of the items in the below window may not be displayed on your system depending on your user authority settings.

The Status Bar is located at the bottom of the Cencon Main Menu screen. Prior to logon, this area displays the Cencon software version information. After logon, this bar displays the name of current logged on user, their assigned role, and region information (if region control is active).
Cencon® 4.1.5 Getting Started Guide
Prepare System for Operation
Before Creating Users and Activating Locks...
Depending on how you are using Cencon, certain information must be predefined so that it is available for selection during the process of creating users and activating locks. This data includes:
- Bank Branches: If you are going to create any Bank users or locks, you must first define the Bank Branches to which they will be assigned using the Bank Branch Report.
- User Types: If want to assign a customized authorization role to any new users, you need to create the new user roles before creating the users. See User Authorization for more information.
- Region Definitions: If you are going to use Region control, you should first define your regions using the Region Report.
- Customer ID: If you are going to assign a Customer ID to your users or locks, you should first define the Customers using the Customer Report.
For New Install of Cencon
The following activities must be performed to prepare the Cencon for operation.
- Add appropriate FLM, Route, and Bank users
- Activate Locks
Please refer to the Cencon Reference Manual (Document # 2071.127), found on the Cencon ^® 4.1.5 Software install source (DVD, USB drive, or download), for detailed instruction.
The Cencon Reference Manual
The Cencon® 4.1.5 Reference Manual is best viewed in your web browser as a normal web page. It can be accessed by pressing the Help button on the main Cencon Window.
You can also open the Cencon ^® 4.1.5 Reference Manual by selecting Start → All Programs → Cencon ^® 4.1.5 → Cencon ^® 4.1.5 Reference Manual.
If you want to print the current page of the manual, select File → Print on you web browser.
If you want to print the entire Reference Manual or this Getting Started Guide:
- If your install source is a DVD, insert the Cencon ^® 4.1.5 Install DVD into the appropriate drive of the PC. Your install source can be a DVD, USB drive, or download.
- Browse to the Documents\Reference\Pdf directory.
- Double click on the PDF version of the reference manual. The PDF version of the reference manual will be displayed in Adobe Acrobat reader.

- Select the Print icon from the Adobe Acrobat Reader tool bar.
Note
If your printer has duplexing capability, you may want to select that as a Print option for the Reference Manual.
Remove Previous Cencon and CenBank Software
If you had a previous Windows based version of the Cencon software installed and have now upgraded to Cencon ^® 4.1.5, you should at some point remove the old version of the software. It is recommended that you ensure the upgrade to the new Cencon ^® 4.1.5 software completed successfully and that all old data has been brought successfully into the new database before you remove the old software.
Note
Removal of the previously installed program will not affect any currently existing data files.
Complete the following steps to remove the previous Cencon programs (this example shows the removal of Cencon 3.0/3.1):
- Select the Start icon in the lower left of the Windows screen.
- Next select the Control Panel icon. The Control Panel Window is displayed:

- Click on the Programs and Features icon. The Programs and Features window is displayed:

- Select Cencon 4.1.5 in the program list and click on Uninstall button on the tool bar.
Note
Removing the currently installed Cencon application and all of its components will not affect any currently existing database information.
A confirmation dialog will appear:
Programs and Features

Are you sure you want to uninstall Cencon 4?

In the future, do not show me this dialog box

No
- Click on the Yes button to continue.
- The Cencon ^® 4.1.5 software program will be removed from the list.
© 1996-2013 Kaba Mas LLC
Document Number 2070.127 Rev. G 02/13 Cencon® 4.1.5 Getting Started Guide
Cencon® 4.1.5 Getting Started Guide
Appendix A - Beta Expiration
The beta versions of Cencon will be assigned an initial expiration date of 180 days past the date of creation by Kaba Mas. When the expiration date is reached Cencon will cease functioning.
The customer will be notified of the number of days left until Cencon expiration via the Cencon window title. For example
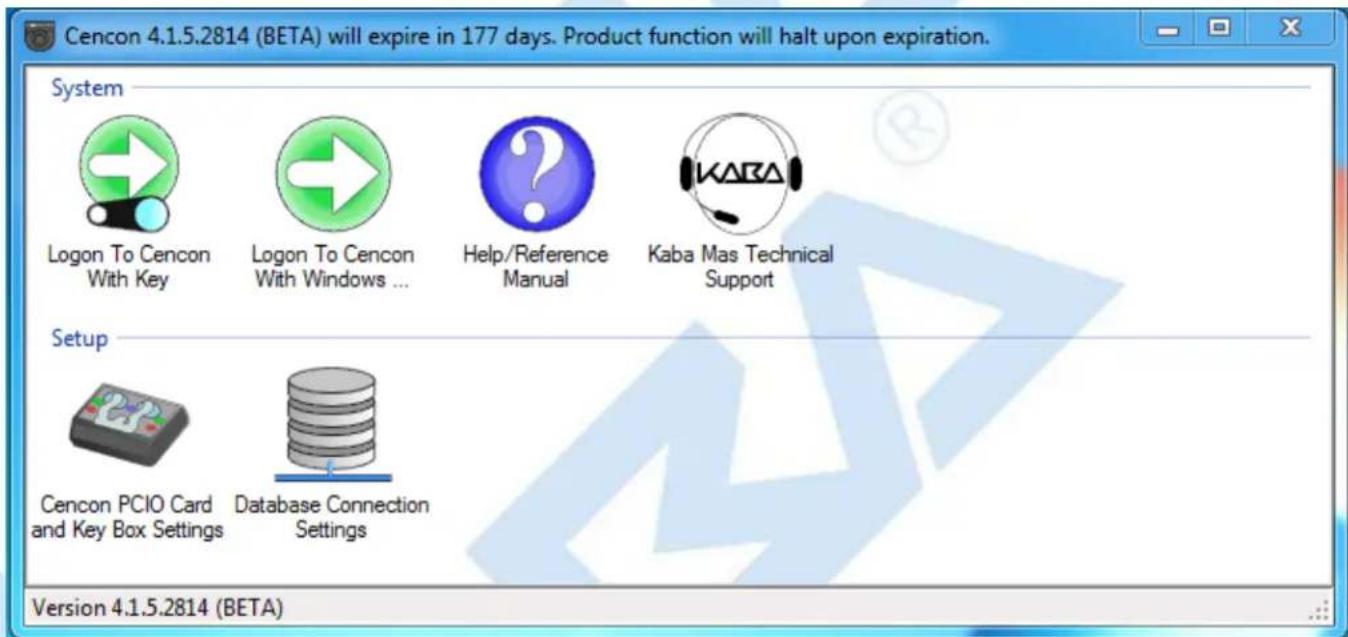
When Cencon is within 60 days of the expiration date, popup messages will be issued when the user logs into Cencon. For example

When Cencon has reached the expiration date the Cencon window title will state that the beta has expired. For example
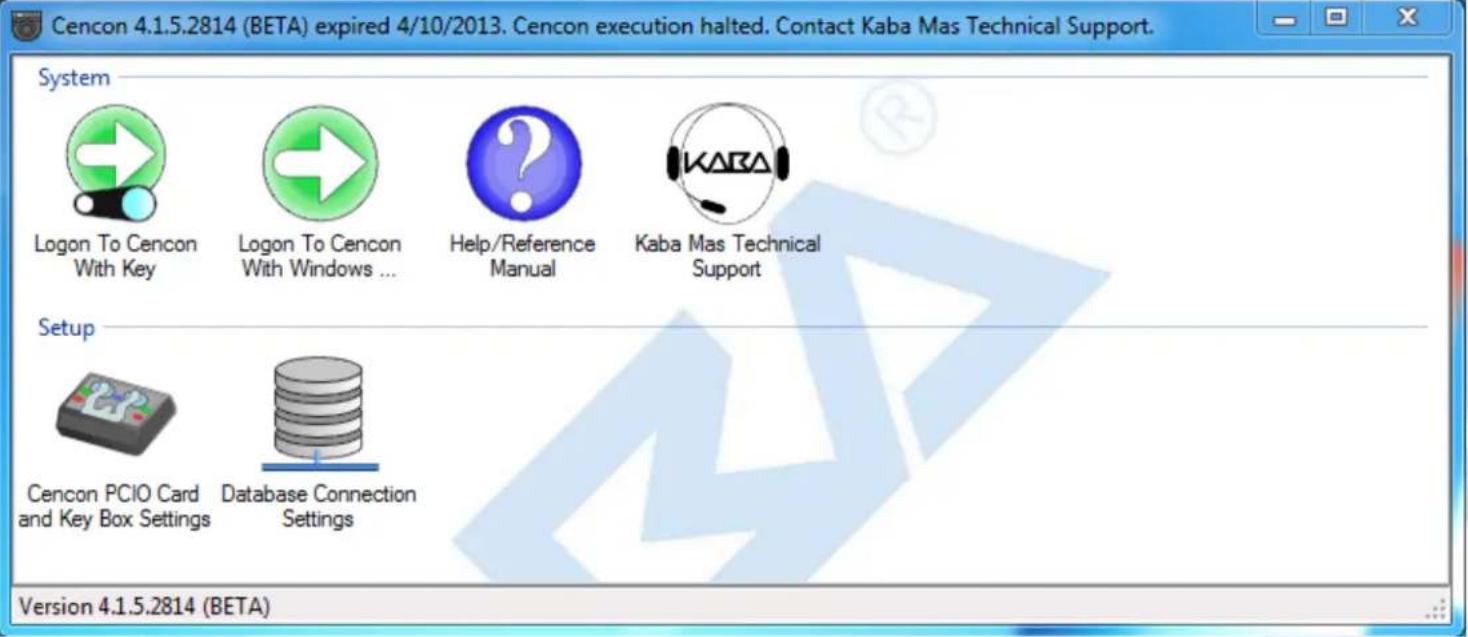
When Cencon has reached the expiration date Cencon logon will be prohibited. When the user attempts to logon to Cencon a popup message will be issued. For example
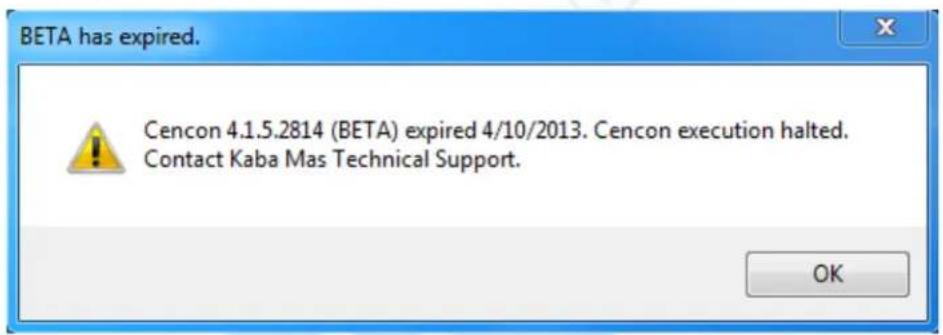
In future Beta releases the customer will be provided with the ability to reset the Cencon expiration date as well as the date on which the warnings begin with help from Kaba Mas Technical Support.
- Table Of Contents
- Manual Conventions
- Note
- Important Note
- Helpful Hint
- Caution
- Warning
- Trademarks
- Cencon® 4.1.5 Getting Started Guide
- Cencon Database Setup Utility Release Notes
- Changes / New Features
- Fixed Issues
- The Cencon® 4.1.5 Software Package
- FCC Notice
- System Requirements
- Cencon System Requirements
- Installation Scenarios and Required Processes
- New Install
- Cencon Upgrade to Cencon ® 4.1.5 with Data Imported from Cencon 1.5.x or lower
- Cencon Upgrade from Version 2.x to 4.1.5
- Cencon ® 4.1.5 Upgrade from Version 3.0 or 3.1
- Before Installing the Cencon Software
- Review Software Maintenance Agreement
- Identify Company ID
- Software Installation and Setup
- Important
- Install the SQL 2008 R2 ODBC Driver
- Install the hardware drivers
- KARA®
- MAS
- Operating System Root Certificate Authority Certificates
- Install the Cencon® 4.1.5 Program
- programs will be added.
- Installation Directory
- ODBC Connection Creation for SQL Server
- Select the driver and click Finish >
- Click next > no information will change on this form
- Click Next>
- Click Finish >
- Click OK > to close
- ODBC Connection Creation for Oracle
- Enter the desired Data Source Name
- Database Permissions for SQL Server
- Select Server Roles >
- Public is selected by default
- Select User Mapping
- Database Permissions For Oracle
- Role:
- System Privillage:
- Tablespaces:
- Quota:
- Status:
- Example ORACLE SQL To Create User CENCON\_DATA:
- Set Up New Database (SQL Server)
- Select or Create an ODBC Connection
- Setup Phase
- ODBC Connection
- Select or Create an Open Database Connectivity (ODBC) connection
- Review Data then Click Next >
- Select or Create an ODBC Schema
- ODBC Schema
- Click Next >
- Import Data From Cencon 1.5.X Data Files
- Import Cencon 1.5.X Data
- Do you need to import data from Cencon Version 1.5.X files?
- Both import file paths are required.
- Select the legacy database files that you want to import. It is recommended that you import all the files.
- Import Data From CenBank Data Files
- Import CenBank Data
- Do you need to import CenBank data files?
- KABA
- Select Data Validation Processes
- Data Validation
- Do you need to validate or correct errors with the Cencon locks?
- Do you need to validate the user dispatch counts?
- Do you need to check the user authorization roles?
- Do you need to check the Collections. Customer IDs and Regions?
- Review and Update Database File Size
- Database File Size
- Do you need to resize your database files prior to doing database operations?
- Perform Selected Database Operations
- Perform Operations
- Set Up New Database (Oracle)
- Click Set Up Cencon Database >
- Click Next >
- KARA
- Review Selections Before Processing Starts
- Confirmation
- Operation Summary
- Database Setup Utility Operation Option Selections
- Starting Update of Defined Database Indexes
- Update Cencon Database
- Review Data then Click Next
- Click Update and Click Next >
- Select Database Operation
- Select Operation
- Select one of the following operations:
- Select Database Authorizations Tables Update
- Authorizations
- Do you want any previous user roles for authorizations to be reset?
- Do you need to update the audit event type names in your database?
- Click Next >
- Do you need to check the Collections, Customer IDs and Regions?
- Click Next >
- Maintenance of Database
- Click Maintenance and Click Next >
- Reporting on Database
- Select or Create ODBC Data Source
- Click Reports and Click Next >
- Start the Cencon® 4.1.5 Program
- Warning:
- Important Note:
- Logon to the Cencon ® 4.1.5 System
- Hint
- Prepare System for Operation
- Before Creating Users and Activating Locks...
- For New Install of Cencon
- The Cencon Reference Manual
- Remove Previous Cencon and CenBank Software
- Appendix A - Beta Expiration
Brand : Dormakaba
Model : Cencon 4.1.5
Category : Electronic lock