
SS250 Control - Remote control TASCAM - Free user manual and instructions
Find the device manual for free SS250 Control TASCAM in PDF.


| Product Type | Remote control application (software) |
| Compatible Devices | iOS (iPad/iPhone), Android, Windows, Mac |
| Supported OS (iOS) | iPadOS 13/14, iOS 12-14 |
| Supported OS (Android) | Android 4.3 - 10.0 |
| Supported OS (Windows) | Windows 7 SP1, 8.1, 10 (32/64 bit) |
| Supported OS (Mac) | macOS 10.11 - 10.15 |
| Main Functions | Transport control, recording/playback, level monitoring, menu settings, browse, playlists, timer events, power management |
| Recording/Playback Control | Play, stop, pause, record, skip, search, mark, cue, review |
| Level Meters | Input and playback level display |
| Menu Settings | Play mode, repeat, auto cue, pitch, key, ducking, timer, etc. |
| Browse Screen | Folder navigation, file rename, copy, delete, create folder |
| Playlist Management | View, create, edit, rename, delete playlists; assign files |
| Timer Events | Create, edit, delete events with start/end time, repeat, type (play, record, stop, download) |
| Power Management | Remote on/off and restart (admin mode) |
| Panel Lock | Double-tap to lock/unlock app screen |
| Network Connection | Wi-Fi or wired, same subnet as SS-CDR250N/SS-R250N |
| Multi-Unit Support | List of units on subnet; one at a time operation |
| File Formats | WAV, MP3 |
| Upload/Download Monitoring | Status icons for file transfers |
| Security | IP password, admin password, app password |
| Supported Media | SD cards, USB flash drives, internal storage |
| Installation Size | Approximately 150 MB (Windows/Mac) |
| License | Freeware, subject to EULA |
| Languages | English (manual), interface language follows OS |
Frequently Asked Questions - SS250 Control TASCAM
User questions about SS250 Control TASCAM
0 question about this device. Answer the ones you know or ask your own.
Ask a new question about this device
Download the instructions for your Remote control in PDF format for free! Find your manual SS250 Control - TASCAM and take your electronic device back in hand. On this page are published all the documents necessary for the use of your device. SS250 Control by TASCAM.
USER MANUAL SS250 Control TASCAM
Conventions used in this manual 2
Trademarks and copyrights....3
Operating environment 3
iOS devices....3
Android devices....3
Windows....3
Mac 3
SS-CDR250N/SS-R250N unit and application versions....3
Installing SS250 CONTROL....4
iOS/Android devices 4
Windows....4
Mac....5
Working with Gatekeeper....6
Connecting the SS-CDR250N/SS-R250N and SS250 CONTROL..7
Screen overviews....8
Changing screens....8
Using app and unit controls together 8
Using multiple apps at the same time....8
Home Screen 8
During playback 8
During recording....10
Settings Window 10
TIME SEARCH window....11
INFORMATION window....11
MENU screen 12
BROWSE Screen 13
PLAYLISTS Screen 15
Current playlist display details 15
Entries in playlist screen details....16
TIMER EVENT Screen 17
Timer event display details....18
Explanation of the TIMER EVENT screen event list....20
Using SS250 CONTROL to manage the power of SS-
CDR250N/SS-R250N units....20
TASCAM SS250 CONTROL is a remote control application for smartphone and tablet devices that can be used to operate the TASCAM SS-CDR250N/SS-R250N by Wi-Fi ^® .
Before using this application, read the Software Use License Agreement and agree to its terms.
Overview
- Enables power management and status monitoring of multiple SS-CDR250N/SS-R250N units on the same subnet
- Enables remote control, changing menu settings and monitoring the status of SS-CDR250N/SS-R250N units
- Transport control possible Supports basic recording, playback, track skipping and searching backward/forward operations, as well as adding and moving between marks
● Enables monitoring of recording and playback levels
- Various menu settings can be made, including the playback mode, repeat and other playback settings
● Monitoring of operations with servers, including file uploading and downloading, is possible
● Enables remote control of the BROWSE screen
- Enables remote control of the playlist screen
● Event lists can be managed and edited
● Monitoring and remote control are possible regardless of where SS-CDR250N/SS-R250N units are installed
- The free application can be downloaded for iOS from the App Store, for Android from Google Play and for Windows and Mac from the TASCAM SS250 CONTROL product page.
- Panel lock function included to prevent accidental operation of the application
Conventions used in this manual
In this manual, we use the following conventions:
- Messages that appear on the iPhone, iPad or Android device are shown in quotes like this: "INFO".
- Information shown on the SS-CDR250N/SS-R250N display is written with a typeface like this: PLAY AREA.
- Smart phones, tablets and computers are called "devices".
- As necessary, additional information is provided under TIP, NOTE and CAUTION headings.
TIP
These are tips about how to use the software.
NOTE
These provide additional explanations and describe special cases.
ATTENTION
Failure to follow these instructions could result in injury, damage to equipment or lost recording data, for example.
TASCAM TASCAM SS250 CONTROL
Trademarks and copyrights
● TASCAM is a trademark of TEAC CORPORATION, registered in the U.S. and other countries.
- Android and Google Play are trademarks of Google Inc.
- Apple, Mac, Mac OS, macOS, iPad and App Store are trademarks of Apple Inc.
● The App Store is a service mark of Apple Inc.
- IOS is a trademark or registered trademark of Cisco in the U.S. and other countries and is used under license.
- Microsoft, Windows, Windows Vista and Windows Media are either registered trademarks or trademarks of Microsoft Corporation in the United States and/or other countries.
- Other company names, product names and logos in this document are the trademarks or registered trademarks of their respective owners.
Operating environment
iOS devices
Supported operating systems
iPadOS.14, iPadOS.13/iOS.14, iOS.13,iOS.12
Android devices
Supported operating systems
Android 4.3 - 10.0
Windows
Supported operating systems
Windows 10 (32bit, 64bit)
Windows 8.1 (32bit, 64bit)
Windows 7 SP1 (32bit, 64bit) or newer
NOTE
It cannot be used with Windows 8, Windows XP or Windows Vista.
Computer hardware requirements
Computer running Windows
CPU
Intel Core i series or newer recommended
Memory
2 GB or more (at least 4 GB recommended)
Open disc space
At least 150 MB
Screen resolution/number of colors
1280×1024 (SXGA) or higher
True Color (32-bit) recommended
Mac
Supported operating systems
macOS Catalina (10.15)
macOS Mojave (10.14)
macOS High Sierra (10.13)
macOS Sierra (10.12)
OS X El Capitan (10.11)
Supported models
Macs with Intel Core i/Core M series processors
Memory
2 GB or more (at least 4 GB recommended)
Open disc space
At least 150 MB
Screen resolution
1280×1024 (SXGA) or higher
SS-CDR250N/SS-R250N unit and application versions
SS-CDR250N/SS-R250N unit: Ver 1.41*
Version of this application
iPadOS/iOS version: 2.0.2
Android/Windows/Mac versions: 2.0.0
* We recommend that you always use the latest firmware for the SS-CDR250N/SS-R250N unit. For the latest firmware, visit the TEAC Global Site (https://teac-global.com/).
TASCAM TASCAM SS250 CONTROL
Installing SS250 CONTROL
iOS/Android devices
- Connect the smartphone or tablet device to the Internet.
- Search for the SS250 CONTROL app on Google Play for an Android device or on the App Store for an iOS device. Then, download and install it.
- Please be aware that you are responsible for any transmission costs related to Internet connection.
Windows
- Connect the computer you are using to the Internet.
- Download the SS250 CONTROL application from the TEAC Global Site (https://teac-global.com).
- Be aware that transmission charges related to using the Internet connection are your responsibility.
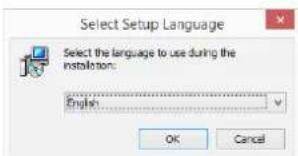
- Decompress the file after downloading, and double-click the "TASCAM_SS250_CONTROL_installer_vXXX_win.exe" file to launch the installer ("XXX" is the version).
When the installer language selection screen opens, select the language you want and click the "OK" button.
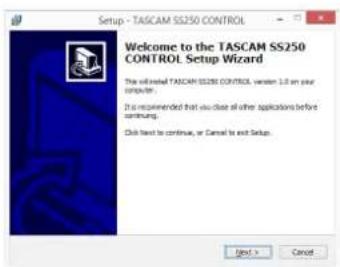
- When the first screen of the installer appears, click the "Next >" button to continue.
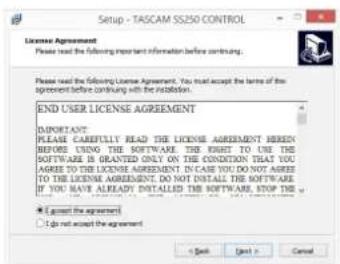
- The software license agreement screen opens.
Select "I accept the agreement" to agree to the license, and click "Next >" to continue.
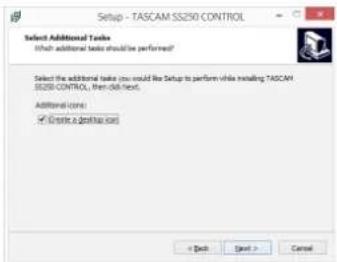
- The shortcut creation screen opens.
Put a check (√) in the box next to "Create a desktop icon" to create a shortcut on the desktop, and click "Next >" to continue.
- The installation confirmation screen opens.
Confirm the installation details, and click the "Install" button.
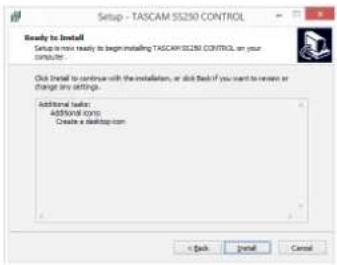
- The installation progress screen opens.
To cancel installation at this time, click the "Cancel" button.
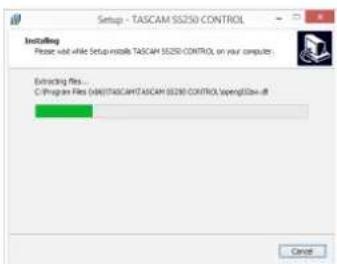
- The installation completion screen opens.
To launch TASCAM SS250 CONTROL immediately, click the "Finish" button.
To launch TASCAM SS250 CONTROL later, remove the check (√) from the box next to "Launch TASCAM SS250 CONTROL", and then click the "Finish" button.
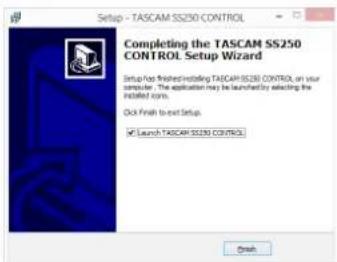
This completes installation of the software.
TASCAM TASCAM SS250 CONTROL
Mac
NOTE
While installing the Mac TASCAM SS250 CONTROL application, a warning message like this might appear: "TASCAM_SS250 CONTROL.pkg" can't be opened because it was not downloaded from the Mac App Store. If a message like this appears, follow the instructions in Working with Gatekeeper page 6 and then proceed with the installation.
- Download the latest TASCAM SS250 CONTROL Mac application from the TEAC Global Site (https://teac-global.com/) and save it on the computer to be used with the unit.
- Double-click "TASCAM_SS250 CONTROL_installer_vXXX.dmg" ("XXX" is the version number), which is the saved disk image file for the Mac TASCAM SS250 CONTROL application, and double-click "TASCAM_SS250 CONTROL.pkg" inside the folder that opens.
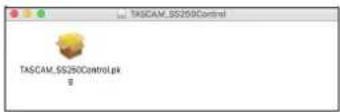
NOTE
Depending on the computer's settings, the downloaded zip file might not have opened automatically. In this case, open the zip file first and then double-click the disk image file.
- When the installer starts, click the "Continue" button.
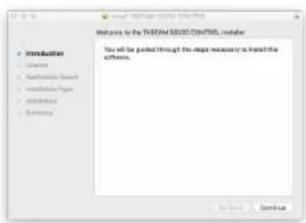
- Next, select the desired language and click the "Continue" button.
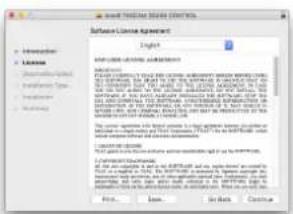
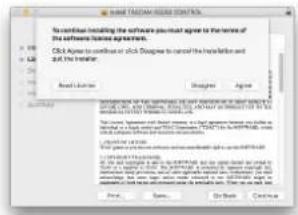
- Click the "Read License" button and check the contents of the Software License Agreement. you agree to the contents, click "Agree".
Then, click the "Next" button.
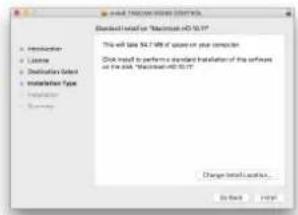
- Next, click the "Install" button to start installation.
- The following screen appears when installation has completed.
Click the "Close" button.
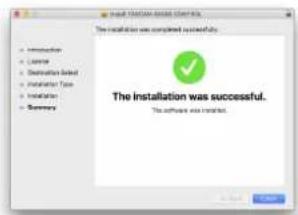
This quits the installer.
TASCAM TASCAM SS250 CONTROL
Working with Gatekeeper
When using Mac OS X, depending on the Gatekeeper security function setting, a warning message might appear during installation.
The solution depends on the warning message shown.
See the following explanations for details.
When the Gatekeeper setting is "Allow applications downloaded from: the Mac App Store"
The following security warning might be shown: "TASCAM_SS250 CONTROL.pkg" can't be opened because it was not downloaded from the Mac App Store."
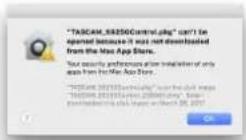
In this case, click the "OK" button to close the message. Then, control-click (or right-click) the file and click "Open".
When the "TASCAM_SS250 CONTROL.pkg' can't be opened because it was not downloaded from the Mac App Store. Are you sure you want to open it?" security warning message appears, click the "Open" button.
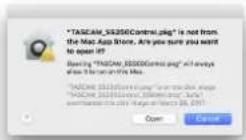
This warning message might also appear when the Gatekeeper setting is something other than "Allow applications downloaded from: Mac App Store."
The following security warning might be shown: "TASCAM_SS250 CONTROL.pkg" can't be opened because it was not downloaded from the Mac App Store.
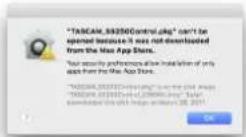
In this case, copy the file from the folder where it is to the desktop or another folder, and then open it. Alternatively, change the Gatekeeper settings to "Allow apps downloaded from: App Store and identified developers" and try opening it again.
Changing the Gatekeeper setting
The Gatekeeper setting can be changed using the "Allow apps downloaded from:" item on the "General" page of the "Security & Privacy" pane of the System Preferences.
To change this, you must click the lock icon ( ) at the bottom left and enter a password to unlock the settings.
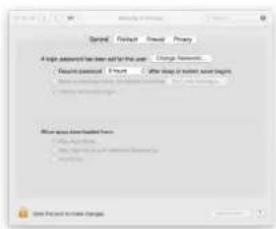
This setting will lock again when you click the button or type command-Q to close the System Preferences or when you click "Show All" to close the open pane.
ATTENTION
Changing the Gatekeeper setting could result in security risks.
If you changed the Gatekeeper setting to decrease security (use one of the lower settings), set it back to the original setting after installing the application.
TASCAM TASCAM SS250 CONTROL
Connecting the SS-CDR250N/SS-R250N and SS250 CONTROL
- Power the SS-CDR250N/SS-R250N unit and connect it to a router with a LAN cable.
- Confirm the IP address and password assigned to the SS-CDR250N/SS-R250N unit on the NETWORK 1 and NETWORK 2 menu pages.
![NETWORK 1:LINKED 13/22 [MAC ADDRESS 00-02-EE-81-90-05] [IP ADDRESS 192.168.100.100] [DNS ADDRESS 0.0.0.0] IP SETUP STATIC DNS SETUP STATIC](/content/2026/05/826045/images/59a384ff6eb0bdf15f05fa0602b24764c260073883318de8402fef1190d1175e.jpg)
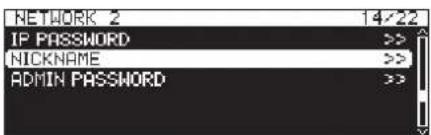
- Connect the device to the network by Wi-Fi or with a wired connection.
ATTENTION
Connect the SS-CDR250N/SS-R250N unit and the other devices to the same router.
If connections are made through multiple hubs and routers, the app might not be able to detect devices on the network using UDP broadcasting.
Even when the SS-CDR250N/SS-R250N unit and the other devices are connected to the same hub or router, detection might not be possible depending on the model being used.
For further information, please contact your network administrator.
- The following login screen will appear when SS250 CONTROL is launched.
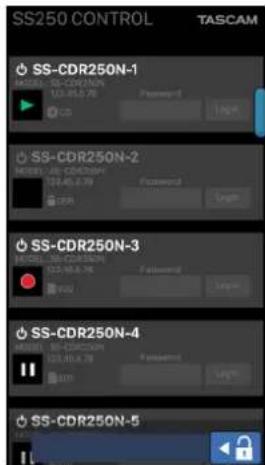
The SS-R250N/SS-CDR250N units on the same subnet (segment) will be shown on the login screen.
NOTE
- Multiple units of SS-CDR250N/SS-R250N cannot be operated simultaneously. Only one unit can be operated at a time.
- If an SS-CDR250N/SS-R250N unit is turned off, and the remote power control function setting is OFF, it will not appear on the login screen.
For details about the remote power control function, see "Setting the remote power control function" in "14 – Other Settings, Information Screens and Keyboard Operations".
- A button will appear below the list of units on the same subnet (segment) shown on the login screen. Tap button to refresh the list of units on the same subnet (segment).
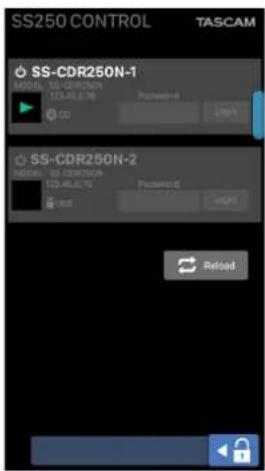
- Select and tap the name of an SS-CDR250N/SS-R250N unit that is connected to SS250 CONTROL from the list shown on the login screen.
The IP password of the selected item in the list can be input.
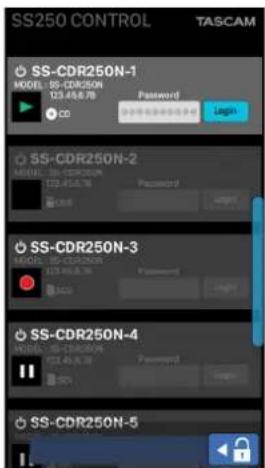
- Input the IP password, and tap the button. The SS250 CONTROL Home Screen will open when the connection between the SS-CDR250N/SS-R250N unit and the device is established.
Tap the button to save the password in the app.
TASCAM TASCAM SS250 CONTROL
Screen overviews
Changing screens
iOS/Android
When using iOS or Android, swipe left or right to cycle through the 5 screens (Home, MENU, BROWSE, PLAYLISTS and TIMER EVENT).
Windows/Mac
When using Windows or Mac, use the tabs at the top of the screen.
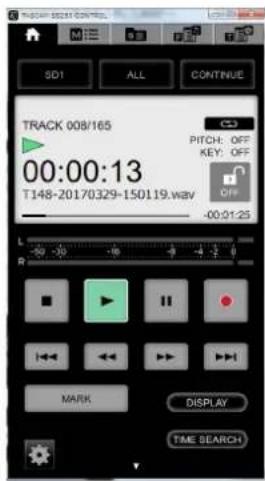
Click a tab to open the corresponding screen.
| Icon Meaning | |
| Open the Home Screen | |
| Open the “MENU” screen | |
| Open the “BROWSE” screen | |
| Open the “PLAYLISTS” screen | |
| Open the “TIMER EVENT” screen | |
Using app and unit controls together
When using the unit and this application at the same time, if the BROWSE, playlist or timer event list screen is open on the unit and being edited, the "BROWSE", "PLAYLISTS" and "TIMER EVENT" screens in the app can be viewed but not edited.
At such times, the icon appears on the app screen.
Using multiple apps at the same time
If a single SS-CDR250N/SS-R250N unit is connected to the control app on multiple devices, when the "BROWSE", "PLAYLISTS" or "TIMER EVENT" screen is open in the app on one device, it cannot be opened in the app on other devices.
Home Screen
During playback
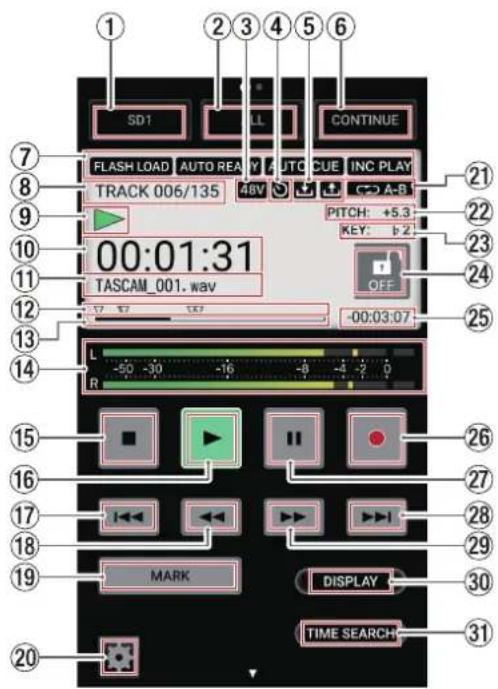
① Current media status/selection button
This shows the media currently selected on the SS-CDR250N/SS-R250N unit.
Tap it to open a drop-down list where you can select the current media.
② Playback area status/selection button
This shows the current playback file area.
Tap it to open a drop-down list where you can select the playback area.
③ Phantom power supply status
When phantom power is on, the 48V on appears.
④ Timer event setting status
The ☒on appears when the timer event function is on.
⑤ Upload/download status
An icon appears when the SS-CDR250N/SS-R250N unit is uploading or downloading files, for example, over the network.
: Uploading
: Downloading
⑥ Playback mode status/selection button
This shows the current playback mode.
Tap it to open a drop-down list where you can select the playback mode.
⑦ Playback function setting status area
Icons appear for the playback functions that are currently on.
| Indicator | Meaning |
| FLASH LOAD | Appears when already flash loaded |
| AUTO READY | Appears when auto ready function is on |
| AUTO CUE | Appears when auto cue function is on |
| INC PLAY | Appears when incremental playback function is on |
TASCAM TASCAM SS250 CONTROL
⑧ Track number/total number of tracks
This shows the current track number and total number of tracks in the current playback area.
⑨ SS-CDR250N/SS-R250N unit status
This icon shows the operation status of the SS-CDR250N/SS-R250N unit.
| Icon Meaning | |
| Stopped | |
| Paused | |
| Playing back | |
⑩ Elapsed time
The elapsed time from the beginning of the file appears as hours: minutes: seconds.
During jog playback, 10msec increments are also shown.
Touch the "DISPLAY" button (30) to switch between showing the elapsed time from the beginning of the track and the elapsed time of the playback area.
⑪ Track name
This shows the title of the current track.
⑫ Marks
An b icon is shown at each mark.
⑬ Playback position bar
The current playback position is shown by a bar.
As playback progresses, the bar extends from the left.
Touch the "DISPLAY" button (30) to switch between showing the elapsed time from the beginning of the track and the elapsed time of the playback area.
If marks have been added, mark icons will appear above the bar.
⑭ Level meters
This area shows the levels of the input and playback signals.
⑮ ■ button
Press to stop playback or recording.
⑯ ▶ button
- Press when stopped or in playback standby to start playback.
- Press when in recording standby to start recording.
- This button lights during playback and recording.
- This button blinks during jog playback.
⑰ ◀◀◀ button
When the home screen is open, the unit is playing back or in playback standby, and a mark has been added, press to move to the previous mark. If there are no marks, press to skip to the previous track.
⑱ button
- Press when playing back or in playback standby to skip by the amount of time set by the time skip function.
- When playing back or in playback standby, press and hold this button to search backward while outputting audio (review).
- When the playback area is set to FOLDER, press when stopped to change the current folder.
- When the playback area is set to PLAYLIST, press when stopped to change the current playlist.
⑲ MARK button
Press to add a mark when the Home Screen is open and the unit is stopped, recording, playing back, or in recording or playback standby.
If the current media is set to CD, the "MARK" button will not appear.
⑳ Settings button
Press when stopped, paused or playing back to open the settings window. (see "Settings Window" on page 10)
②1 Repeat playback setting status
An icon appears when the repeat playback function is on.
: Repeat playback
A-B : A-B repeat playback
② Pitch control function status
This shows whether the pitch control function is on or off and its current setting.
②3 Key control function status
This shows whether the key control function is on or off and its current setting.
⑳ Screen lock button
Double-tap this button to lock operation of the application and change this icon to "ON".
Double-tap this icon when it is "ON" to unlock the screen.
25 Remaining time display
This shows the remaining time (hours: minutes: seconds).
Touch the "DISPLAY" button (30) to switch between showing the elapsed time from the beginning of the track and the elapsed time of the playback area.
②6 ● button
- Press when stopped to start recording standby.
- When recording, press to divide the recording by creating a new file (increment the track number).
- This button lights when recording or in recording standby.
27 II button
- Press when stopped or playing back to enter playback standby.
- Press when recording to start recording standby.
- This button lights when in playback standby or recording standby.
• This button blinks during jog playback. - Press this button when in playback standby to locate to the call point (where playback was last started from playback standby) and stay in playback standby.
28 ▶▶▶I button
When the home screen is open, the unit is playing back or in playback standby, and a mark has been added, press to move to the next mark. If there are no marks, press to skip to the next track.
29 ▶ button
- Press when playing back or in playback standby to skip by the amount of time set by the time skip function.
- When playing back or in playback standby, press and hold this button to search forward while outputting audio (cue).
- When the playback area is set to FOLDER, press when stopped to change the current folder.
- When the playback area setting is PLAYLIST, press when stopped to change the current playlist.
③0 DISPLAY button
Press to change the following display modes.
• ⑩ Elapsed time
• ⑬ Playback position bar
• 25 Remaining time display
③1 TIME SEARCH button
This opens the "TIME SEARCH" window. (see "TIME SEARCH window" on page 11)
TASCAM TASCAM SS250 CONTROL
During recording
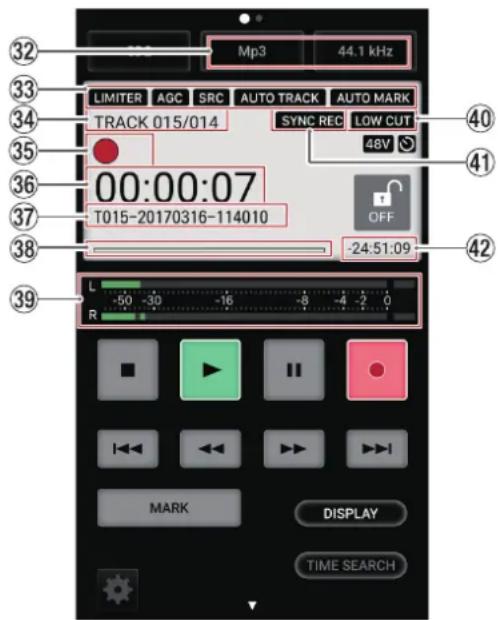
32 Recording format setting status
Set the sampling frequency and file format combination for recording.
③3 Recording function setting status area
Icons appear for the recording functions that are currently on.
| Indicator | Meaning |
| LIMITER | Appears when the LIMITER dynamics function is on |
| CMPSOFT | Appears when the COMP_SOFT dynamics function is on |
| CMPHARD | Appears when the COMP_HARD dynamics function is on |
| AGC | Appears when the automatic gain control function is on |
| SRC | Appears when the sampling rate converter is on |
| AUTO TRACK | Appears when the automatic track incrementation function is on |
| AUTO MARK | Appears when the automatic mark function is on |
③4 Track number/total number of tracks
This shows the total number of tracks and the number of the track currently being recorded.
35 Recorder operation status
This icon shows the operation status of the SS-CDR250N/SS-R250N unit.
| Icon Meaning | |
| Recording standby or recording paused | |
| Recording | |
③6 Elapsed track recording time
This shows the elapsed time of the recorded file (hours: minutes: seconds).
Touch the "DISPLAY" button (27) to switch between showing the elapsed track recording time and the total elapsed time.
37 Track name
This shows the title of the track being recorded.
38 Track recording position bar
The current recording position is shown by a bar. As recording progresses, the bar extends from the left.
⑲ Input levels
The input sound levels are shown.
④0 Low cut filter setting status
The LOW CUT appears when the low-cut filter is set.
④ Sync recording function setting status
The SYNC REC appears when the sync recording function is on.
42 Remaining track recording time
This shows the remaining recording time until the maximum file size (2 GB) is reached (in hours: minutes: seconds).
Settings Window
Press the Settings button on the Home Screen when stopped, playing back or in playback standby to open the Settings Window.
Press the Settings button again or tap outside the Settings Window to close it.
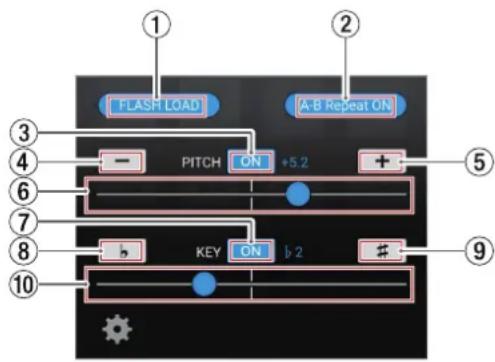
① FLASH LOAD button
Press this button to make the SS-CDR250N/SS-R250N unit flash load.
② A-B Repeat ON button
Use this button to set the A-B repeat function of the SS-CDR250N/SS-R250N unit.
Press this button when "Set A" appears on it and the unit is playing back or in playback standby to set the repeat playback interval start point (A).
This will change the button to "Set B".
Press this button again at the position where you want to set the repeat playback end point (B) and start A-B repeat playback.
This will change the button to "A-B Repeat ON".
Press this button again to clear the set A-B interval and turn A-B repeat playback off.
③ PITCH ON button
Press this button to turn the pitch control function on/off.
④ PITCH – button
Press this button to change the pitch in 0.1% increments.
⑤ PITCH + button
Press this button to change the pitch in 0.1% increments.
⑥ PITCH slider
This changes the pitch in 0.1% increments.
TASCAM TASCAM SS250 CONTROL
⑦ KEY ON button
Press this button to turn the key control function on/off.
⑧ KEY b button
Press this button to change the key.
⑨ KEY # button
Press this button to change the key.
⑩ KEY slider
Use this to change the key.
TIME SEARCH window
Press the "TIME SEARCH" button on the Home Screen to open the "TIME SEARCH" window.
Use this screen to move to set points when stopped, playing back or in playback standby.
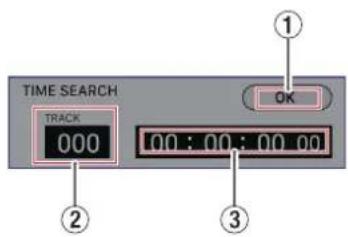
① OK button
Press this button to move to the set point.
② TRACK number
Input the number of the track in which you want to move to a point.
③ Time from track beginning
Enter the time from the track beginning that you want to move to in hours, minutes, seconds and 10msec increments, using two digits for each.
INFORMATION window
Swipe up on the Home Screen to open the "INFORMATION" window.
In the IOS version, tap the button on the Home Screen to open the INFORMATION window.
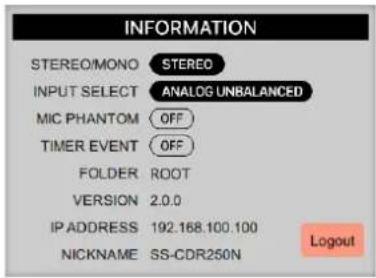
STEREO/MONO
When the SS-CDR250N/SS-R250N unit's REC 3 page STEREO/HONO menu item is set to HONO (HIX), "MONO" appears here.
INPUT SELECT
The setting of the SS-CDR250N/SS-R250N unit's REC 1 page INPUT SELECT menu item appears here.
MIC PHANTOM
The setting of the SS-CDR250N/SS-R250N unit's REC 1 page HIC PHANTON menu item appears here.
TIMER EVENT
The SS-CDR250N/SS-R250N unit's TIMER EVENT item on/off setting appears here.
FOLDER/PLAYLIST
If the current playback mode is PLAYLIST, the name of the playlist appears here.
Otherwise, the current folder appears here.
VERSION
This shows the version of TASCAM SS250 CONTROL.
IP ADDRESS
This shows the current IP address of the SS-CDR250N/SS-R250N unit.
NICKNAME
This shows the identification name of the SS-CDR250N/SS-R250N unit.
Logout button
Tap the button to return to the login screen. (see
"Connecting the SS-CDR250N/SS-R250N and SS250 CONTROL" on page 7)
TASCAM TASCAM SS250 CONTROL
MENU screen
Swipe left on the Home Screen to open the "MENU" screen.
| MENU | |
| PLAY | |
| PLAY AREA | ALL |
| PLAY MODE | CONTINUE |
| REPEAT | ON |
| AUTO CUE | |
| MODE | ON |
| LEVEL | -54dB |
| AUTO READY | ON |
| INCREMENTAL PLAY | ON |
| MONO MIX | OFF |
| DUCKING | |
| MODE | OFF |
| THRESHOLD | -6dBFS |
Various menu items for the SS-CDR250N/SS-R250N unit can be set on the "MENU" screen.
The menu items that can be set are as follows.
For details about each menu item, see "Menu structure" in "2 - Names and Functions of Parts" of the Owner's Manual for the unit.
| Menu item | |
| PLAY | |
| PLAY AREA | |
| PLAY MODE | |
| REPEAT | |
| AUTO CUE | |
| MODE | |
| LEVEL | |
| AUTO READY | |
| INCREMENTAL PLAY | |
| MONO MIX | |
| DUCKING | |
| MODE | |
| THRESHOLD | |
| ATTENUATION | |
| RELEASE TIME | |
| EOM TRACK | |
| EOM MEDIA | |
| RESUME | |
| TIME SKIP | |
| FADER DELAY | |
| OUTPUT RATE | |
| CALL | |
| REC | |
| Menu item | |
| INPUT SELECT | |
| REC SET LINK | |
| BAL. INPUT GAIN | |
| INPUT GAIN Lch | |
| INPUT GAIN Rch | |
| INPUT LEVEL | |
| LEVEL (L) | |
| LEVEL (R) | |
| MIC PHANTOM | |
| PHANTOM(+48V)Lch | |
| PHANTOM(+48V)Rch | |
| MIC AGC | |
| AGC Lch | |
| AGC Rch | |
| DYNAMICS | |
| DYNAMICS Lch | |
| DYNAMICS Rch | |
| LOW CUT | |
| LOW CUT Lch | |
| LOW CUT Rch | |
| REC FORMAT | |
| BACKUP/RELAY MEDIA | |
| SD1 | |
| SD2 | |
| USB | |
| WAV SETTING | |
| FORMAT TYPE | |
| BIT LENGTH | |
| MP3 BITRATE | |
| STEREO/MONO | |
| FILE NAME | |
| DITHER | |
| SRC | |
| PAUSE MODE | |
| DIRECT REC | |
| PRE REC | |
| SYNC REC | |
| MODE | |
| LEVEL | |
| DELAY | |
| STOP TIME | |
| AUTO TRACK | |
| MODE | |
| LEVEL | |
| DELAY | |
| SIZE | |
| TIME | |
| AUTO MARK | |
| OVER | |
TASCAM TASCAM SS250 CONTROL
| Menu item | |
| TIME | |
| UNLOCK | |
| REC | |
| BOF | |
| TIMER EVENT | |
| TIMER EVENT | |
| UTILITY | |
| LINK PLAY | |
| MODE | |
| TERMINAL | |
| POWER ON ACTION | |
| OUTPUT LEVEL | |
| PREFERENCES | |
| REFERENCE LEVEL | |
| BRIGHTNESS | |
| LCD CONTRAST | |
| KEYBOARD | |
| REMOTE | |
| RS-232C | |
| BAUD RATE | |
| PALITY BIT | |
| STOP BIT | |
| DATA LENGTH | |
| RC-3F | |
| MEDIA | |
| MEDIA INFORMATION | |
| CAPACITY | |
| AVAILABLE | |
| FOLDER | |
BROWSE Screen
Audio files on SD cards and USB flash drives loaded in the SS-CDR250N/SS-R250N unit can be managed in a folder structure on the "BROWSE" screen.
NOTE
"BROWSE" screen operations are not possible if the current media is CD.
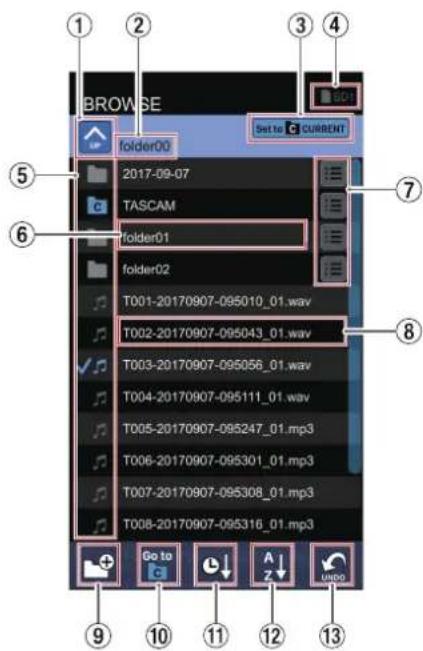
① Folder UP button
Use this to move up one level in the folder structure. If the ROOT folder level is selected, this icon becomes gray, and "ROOT" appears as the folder name.
② Folder name
This is the name of the folder that is being shown. Tap this to scroll long folder names that cannot be shown completely at once.
③ Current folder setting button
Tap this to set the selected folder as the current folder. If the selected folder is the current folder, it will appear like the following.

CURRENT TASCAM
④ Current medium
This shows the medium currently selected in the SS-CDR250N/SS-R250N unit. The current medium can be selected on the Home Screen. (see "During playback" on page 8)
TASCAM TASCAM SS250 CONTROL
⑤ BROWSE icons
The icons that appear on the "BROWSE" Screen are as follows.
Plain folder
The file name appears after the icon.
The icon appears for the current folder.
Audio file
The audio file name appears after the icon.
The icon appears for the current audio file.
⑥ Folder name
Touch this to open the selected folder and view its contents as a list.
Long-tap this to scroll long folder names that cannot be shown completely at once.
⑦ Folder menu button
Tap this to open the folder menu pop-up window.
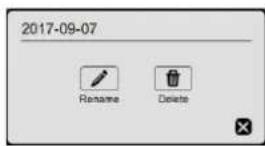
| Icon Meaning | |
| Rename | This opens the "Rename folder" window where you can edit the name of the selected folder. |
| Rename folder 2017-09-07 | |
| OK Cancel | |
| Delete | Delete the selected folder. |
⑧ File name/information display
Tap this to open the file menu and information pop-up window.
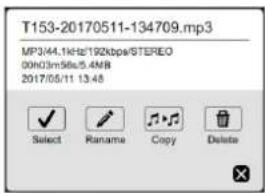
| Icon Meaning | |
| ✓ Select | Set the selected file as the current track. |
| Rename | This opens the "Rename file" window where you can edit the name of the selected file. Rename file T001-20170907-095010_01.w av OK Cancel |
| Delete | Delete the selected file. |
| Copy | Copy the selected file to a different folder. |
Long-tap this to scroll long file names that cannot be shown completely at once.
⑨ CUREATE FOLDER button
Create a new folder.
⑩ GO TO CRRENT FOLDER button
Move to the current folder.
NOTE
- The current folder:
- is the playback area when playback area is set to FOLDER
• is where recorded files are saved - is where files are downloaded by download events when using the timer event function
• After a new folder is created, it becomes the current folder.
⑪ SORT BY TIME button
Reorder the folders and files shown by creation date.
⑫ SORT BY NAME button
Reorder the folders and files shown by name.
⑬ UNDO button
Immediately after deleting a folder or file, you can undo the deletion.
TASCAM TASCAM SS250 CONTROL
PLAYLISTS Screen
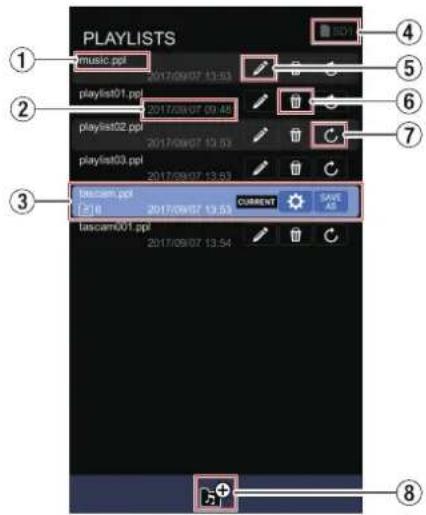
On the "PLAYLISTS" screen, playlists set on the SS-CDR250N/SS-R250N can be viewed and edited.
NOTE
- "PLAYLISTS" screen operations are not possible if the current media is CD.
- "PLAYLISTS" screen operations are not possible if the PLAY AREA is set to ALL or FOLDER. Set it to PLAYLIST.
① Playlist name
This shows the playlist file name.
② Date and time updated
This shows when the playlist file was last edited.
③ Current playlist
This shows the playlist currently selected in the SS-CDR250N/SS-R250N unit. See Current playlist display details page 15 for details.
④ Current medium
This shows the medium currently selected in the SS-CDR250N/SS-R250N unit. The current medium can be selected on the Home Screen. (see "During playback" on page 8)
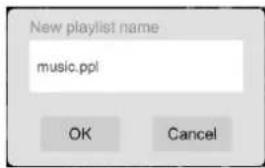
⑤ Playlist rename button
Tap this to open a pop-up window where the name of the selected playlist can be edited.
⑥ Playlist deletion button
Tap this to delete the selected playlist.
⑦ Playlist loading button
Tap this to set the selected playlist as the current playlist.
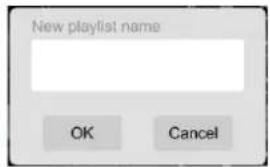
⑧ CREATE PLAYLIST button
Tap this to create a new playlist. This opens a pop-up window where the desired playlist name can the input.
Current playlist display details
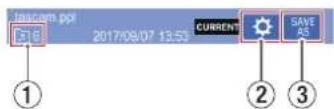
① Number of playlist entries
This shows the number of files that have been assigned to the selected playlist.
② Playlist editing button
Tap this to open the "Entries in playlist" screen where the current playlist can be edited. See Entries in playlist screen details page 16 for details.
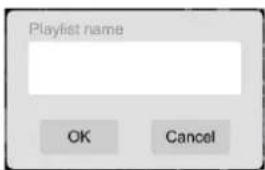
③ SAVE AS button
Tap this to save the current playlist with a different name. This opens a pop-up window where the new playlist name can be edited.
TASCAM TASCAM SS250 CONTROL
Entries in playlist screen details
The contents of the current playlist can be edited on this screen.
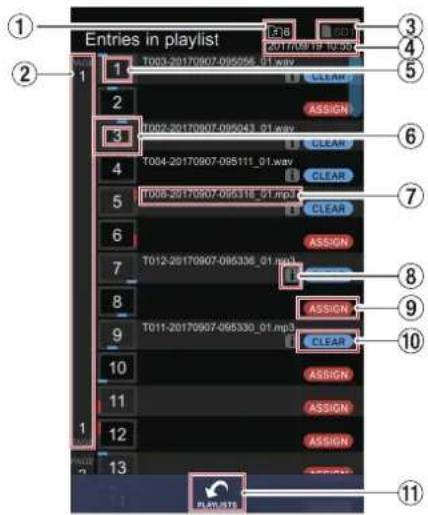
① Number of playlist entries
This shows the number of files that have been assigned to the selected playlist.
② Page number
This shows the PAGE of the playlist screen on the SS-CDR250N/SS-R250N unit or the page number shown on the RC-SS150 Home Screen.
③ Current medium
This shows the medium currently selected in the SS-CDR250N/SS-R250N unit. The current medium can be selected on the Home Screen. (see "During playback" on page 8)
④ Date and time updated
This shows when the playlist file was last edited.
⑤ Entry number
This shows the entry number in the selected playlist.
⑥ Button location
This shows to which button the playlist entry is assigned on the RC-SS150 (1-12).
Of the 1-12 buttons on the RC-SS150, those at the top and bottom (1-4/7-10) are shown in blue while those on the left and right (5-6/11-12) are shown in red.
⑦ File name
This shows the name of the file that has been assigned to the playlist.
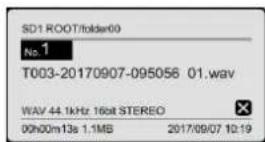
⑧ Entry information button
Press this button to open a pop-up with information about the file assigned to the playlist.
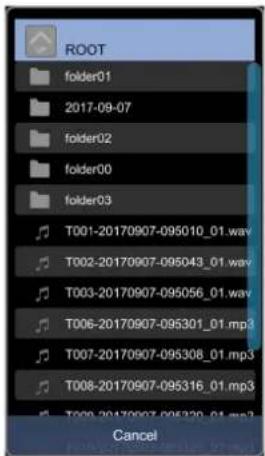
⑨ ASSIGN button
The "ASSIGN" button appears for empty entries that do not have playlist assignments.
Tap this button to open the "BROWSE" screen.
⑩ CLEAR button
Tap this button to clear the playlist entry assignment. After an entry has been cleared, the file name and entry information icon ( ) will disappear, and the "ASSIGN" button will be shown.
⑪ PLAYLISTS button
Tap this button to open the "PLAYLISTS" screen.
TASCAM TASCAM SS250 CONTROL
TIMER EVENT Screen
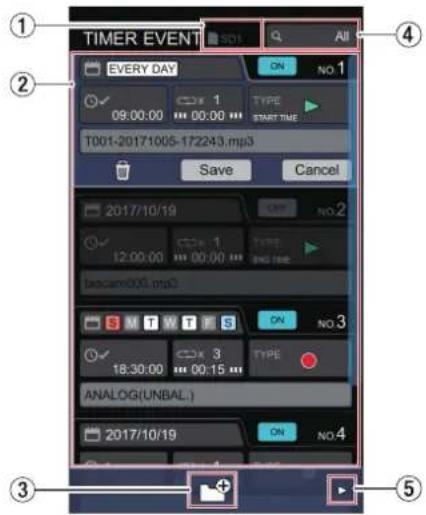
On the "TIMER EVENT" screen, timer events set on the SS-CDR250N/SS-R250N can be viewed and edited.
NOTE
- "TIMER EVENT" screen operations are not possible if the current media is CD.
- "TIMER EVENT" screen operations are not possible if the PLAY AREA is set to FOLDER or PLAYLIST. Set it to ALL.
- "TIMER EVENT screen operations are not possible if the PLAY MODE is set to PROGRAM or RANDOM. Set it to CONTINUE or SINGLE.
TIP
To use the timer event function, set the "TIMER EVENT" item on the "MENU" screen to "ON".
① Current medium
This shows the medium currently selected in the SS-CDR250N/SS-R250N unit. The current medium can be selected on the Home Screen. (see "During playback" on page 8)
② Timer event display area
This shows the timer events set on the SS-CDR250N/SS-R250N unit.
③ CREATE NEW EVENT button
Tap this to create a new event.
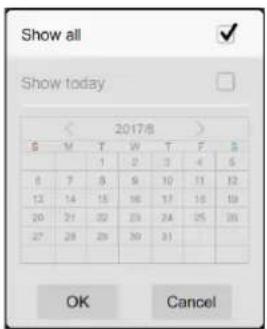
④ Event list display status
This shows the display range setting of the event list shown on the "TIMER EVENT" screen.
| Indicator Meaning | |
| All | This shows all the timer events set on the SS-CDR250N/SS-R250N unit. |
| Today | This shows only the timer events set the same day on the SS-CDR250N/SS-R250N unit. |
| YYYY/MM/DD | This shows only the timer events set the specified day on the SS-CDR250N/SS-R250N unit. |
Tap this to open a pop-up window where the range of events shown on the "TIMER EVENT" screen can be set.
NOTE
The event list shown on the "TIMER EVENT" screen depends on the events list display setting. (see "Explanation of the TIMER EVENT screen event list" on page 20)
⑤ ▶ /DELETE ALL button
Tap the ▶ button or swipe the bottom of the screen to the left to show the "DELETE ALL" icon.

Tap this icon to delete all items.
TASCAM TASCAM SS250 CONTROL
Timer event display details
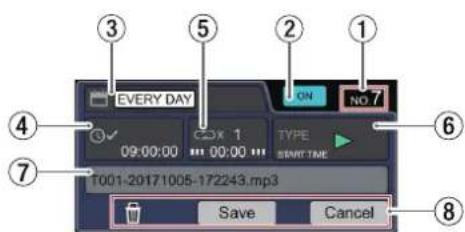
① Timer event number
This shows the timer event number.
② Timer event on/off switch
This shows the "ON" or "OFF" of timer event.
Tap this to turn the timer event on/off.
③ Event execution date/days
This shows the dates or days the event will be executed.
“**”, appears for the month when set to "Every month".
Tap this to open a pop-up window where the date or days that the event is executed can be set.
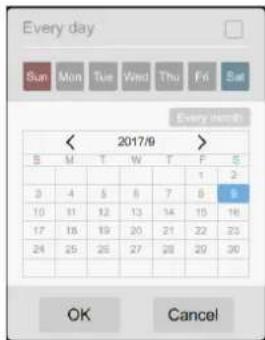
Every day area
Check this checkbox (√) to execute the event daily.
Day icon area
The event will be executed on the selected days.
Calendar area
The event will be executed on the selected date.
To execute an event every month, tap the "Every month" icon to turn it on.
④ Event execution time
This shows the time (hour: minute: second) of timer event execution.
Tap this to open a pop-up window where the time (hour: minute: second) that the event is executed can be set.
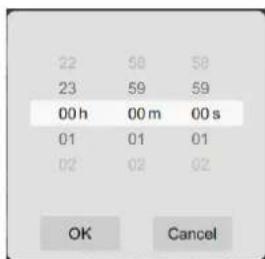
To set the values in the white frame, flick the numbers up and down.
⑤ Timer event repeat status
This shows the number of times the event will be repeated and the execution interval (hours: minutes).
Tap this to open a pop-up window where the number of times the event will be repeated and the execution interval (hours: minutes) can be set.
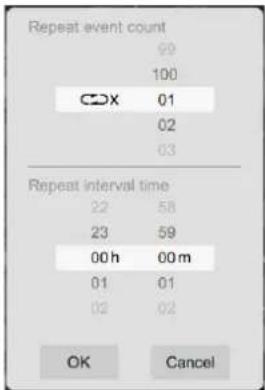
To set the values in the white frame, flick the numbers up and down.
NOTE
Depending on the number of event executions ("Repeat event count" setting), the event list appearance on the "TIMER EVENT" screen will differ. (see "Explanation of the TIMER EVENT screen event list" on page 20)
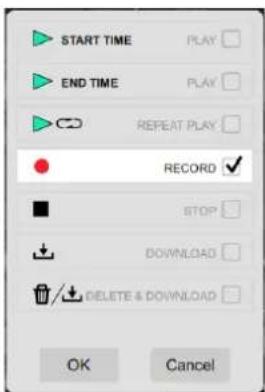
⑥ Event type
An icon is shown for the set timer event type.
| Icon Meaning | |
| START TIME | Set the event to start playback of the playback file at the set time. |
| END TIME | Set the event to end playback of the playback file at the set time. |
| Repeat playback | |
| Record | |
| Stop | |
| Download (from an FTP server) | |
 | Delete before downloading (after all audio files in the current folder are deleted, download files from the FTP server) |
Tap this to open a pop-up window where the event type can be set.
TASCAM TASCAM SS250 CONTROL
⑦ Event type setting details
Depending on the event type setting, the pop-up window that opens will differ when this is tapped.
- "PLAY" or "REPEAT PLAY" event type
This opens a pop-up window where the file to be played can be selected.
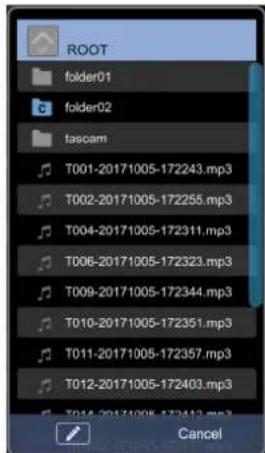
Tap a file to set it as the file to be played.
Tap the icon to select a playback file using character input.
- "RECORD" event type
This opens a pop-up window where the input source can be selected.
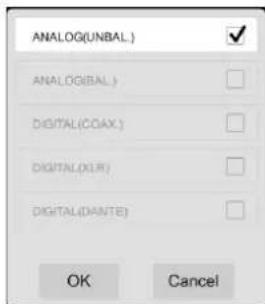
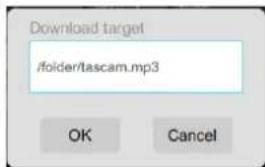
- "DOWNLOAD" or "DELETE & DOWNLOAD" event type
This opens a pop-up window where the download target can be selected. Directly input the name of the download target to set it.
NOTE
Tapping this area will not open a pop-up if the event type is "STOP".
⑧ Event editing confirmation buttons
These execute the following operations for the selected timer event.
They only appear when an event is selected.
| Icon Meaning | |
| Delete the selected timer event from the SS-CDR250N/SS-R250N unit. | |
| Save | Save changes made to the selected timer event on the SS-CDR250N/SS-R250N unit. |
| Cancel | Cancel changes made to the selected timer event without saving them on the SS-CDR250N/SS-R250N unit. |
TASCAM TASCAM SS250 CONTROL
Explanation of the TIMER EVENT screen event list
Depending on the event list display status and number of event executions ("Repeat event count" setting), the event list appearance on the "TIMER EVENT" screen will differ.
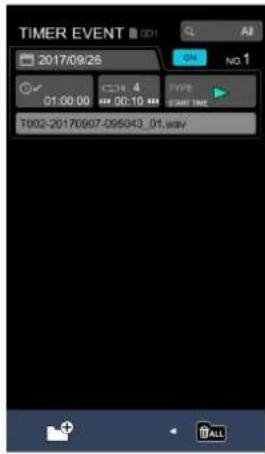
• Event list display set to "All"
One event will be shown regardless of the number of times set to repeat.
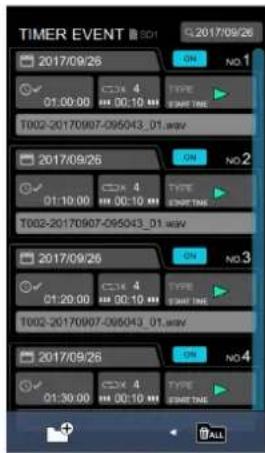
- Event list display set to "Today" or a date
Events will be shown individually for the number of set event repetitions ("Repeat event count").
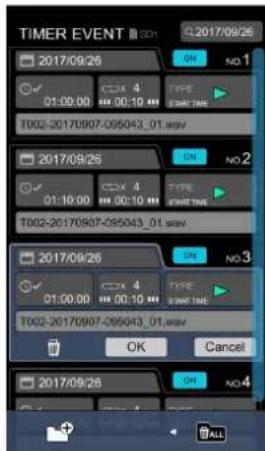
NOTE
When an individual event is selected for editing, its original repeated event will be shown on the editing screen.
Using SS250 CONTROL to manage the power of SS-CDR250N/SS-R250N units
SS250 CONTROL can manage the power of SS-CDR250N/SS-R250N units by restarting them and turning them on and off.
NOTE
Connection between the SS-CDR250N/SS-R250N unit and SS250 CONTROL must be established first (through successful login).
- Check the identifying name (NICKNAME) and administrator password (ADMIN PASSWORD) set for the SS-CDR250N/SS-R250N unit on the NETWORK 2 menu page.
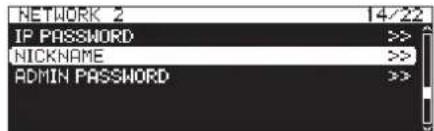
- Connect the device to the network by Wi-Fi or with a wired connection.
ATTENTION
Connect the SS-CDR250N/SS-R250N unit and the other devices to the same router.
If connections are made through multiple hubs and routers, the app might not be able to detect devices on the network using UDP broadcasting.
Even when the SS-CDR250N/SS-R250N unit and the other devices are connected to the same hub or router, detection might not be possible depending on the model being used. For further information, please contact your network administrator.
- The login screen will appear when SS250 CONTROL is launched. The SS-R250N/SS-CDR250N units on the same subnet (segment) will be shown on the login screen.
ATTENTION
If an SS-CDR250N/SS-R250N unit is turned off, and the remote power control function setting is OFF, it will not appear on the login screen
For details about the remote power control function, see "Setting the remote power control function" in "14 – Other Settings, Information Screens and Keyboard Operations".
- Swipe the key icon shown at the bottom of the login screen to the left.

When the key icon moves left, "Admin mode" will appear.

TASCAM TASCAM SS250 CONTROL
- Tap "Admin mode" for the first time to open a pop-up window where the app password can be set. Input it in two places to confirm.
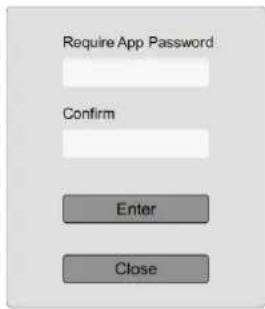
After the first time, tapping this opens a pop-up window to confirm the app password.
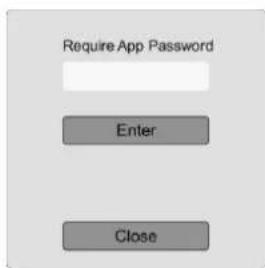
- Input the app password, and tap "Enter".
After the first time, if the input app password matches the app password set previously, the login screen will open in "Admin mode".
In "Admin mode", the login screen background will become blue.
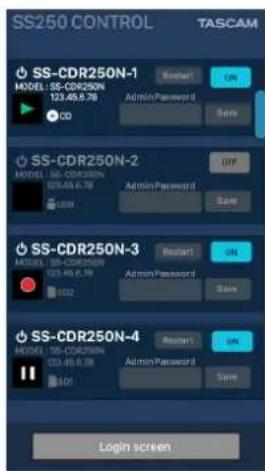
- Select and tap the name of an SS-CDR250N/SS-R250N unit that is connected to SS250 CONTROL from the list shown on the login screen.
The administrator password of the selected item in the list can be input.
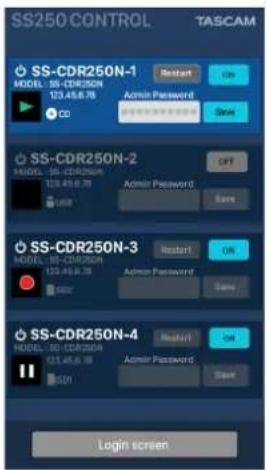
- Input the administrator password, and tap "Save".
This records the administrator password in the app.
- This enables using the following buttons to manage the power of the unit.
Restart
This restarts the SS-CDR250N/SS-R250N unit.
ON/OFF
This turns the SS-CDR250N/SS-R250N unit on/off (standby).
TASCAM
TEAC CORPORATION
10410 Pioneer Blvd. Suite #1 Santa Fe Springs, California 90670, U.S.A.
TEAC UK Ltd.
https://www.tascam.eu/en/
Phone: +44-1923-797205
Luminous House, 300 South Row, Milton Keynes, Buckinghamshire, MK9 2FR, UK
TEAC EUROPE GmbH https://www.tascam.en/de/
Phone: +49-611-71580
Room 817, Xinian Center A, Tairan Nine Road West, Shennan Road, Futian District, Shenzhen, Guangdong Province 518040, China
- MA-2451C
- Overview
- Conventions used in this manual
- TIP
- NOTE
- ATTENTION
- TASCAM TASCAM SS250 CONTROL
- Trademarks and copyrights
- Operating environment
- iOS devices
- Supported operating systems
- Android devices
- Windows
- Computer hardware requirements
- CPU
- Memory
- Open disc space
- Screen resolution/number of colors
- Mac
- Supported models
- Screen resolution
- SS-CDR250N/SS-R250N unit and application versions
- Installing SS250 CONTROL
- iOS/Android devices
- Working with Gatekeeper
- When the Gatekeeper setting is "Allow applications downloaded from: the Mac App Store"
- Changing the Gatekeeper setting
- Connecting the SS-CDR250N/SS-R250N and SS250 CONTROL
- Screen overviews
- Changing screens
- iOS/Android
- Windows/Mac
- Using app and unit controls together
- Using multiple apps at the same time
- Home Screen
- During playback
- ⑧ Track number/total number of tracks
- ⑨ SS-CDR250N/SS-R250N unit status
- ⑩ Elapsed time
- ⑪ Track name
- ⑫ Marks
- ⑬ Playback position bar
- ⑭ Level meters
- ⑮ ■ button
- ⑯ ▶ button
- ⑰ ◀◀◀ button
- ⑱ button
- ⑲ MARK button
- ⑳ Settings button
- ②1 Repeat playback setting status
- ② Pitch control function status
- ②3 Key control function status
- ⑳ Screen lock button
- Remaining time display
- ②6 ● button
- II button
- ▶▶▶I button
- ▶ button
- ③0 DISPLAY button
- ③1 TIME SEARCH button
- During recording
- Recording format setting status
- ③3 Recording function setting status area
- ③4 Track number/total number of tracks
- Recorder operation status
- ③6 Elapsed track recording time
- Track name
- Track recording position bar
- ⑲ Input levels
- ④0 Low cut filter setting status
- ④ Sync recording function setting status
- Remaining track recording time
- Settings Window
- ① FLASH LOAD button
- ② A-B Repeat ON button
- ③ PITCH ON button
- ④ PITCH – button
- ⑤ PITCH + button
- ⑥ PITCH slider
- TIME SEARCH window
- INFORMATION window
- STEREO/MONO
- INPUT SELECT
- MIC PHANTOM
- TIMER EVENT
- FOLDER/PLAYLIST
- VERSION
- IP ADDRESS
- NICKNAME
- Logout button
- MENU screen
- BROWSE Screen
- ① Folder UP button
- ② Folder name
- ③ Current folder setting button
- ④ Current medium
- ⑤ BROWSE icons
- Plain folder
- Audio file
- ⑥ Folder name
- ⑦ Folder menu button
- ⑧ File name/information display
- ⑨ CUREATE FOLDER button
- ⑩ GO TO CRRENT FOLDER button
- ⑪ SORT BY TIME button
- ⑫ SORT BY NAME button
- ⑬ UNDO button
- PLAYLISTS Screen
- ① Playlist name
- ② Date and time updated
- ③ Current playlist
- ⑤ Playlist rename button
- ⑥ Playlist deletion button
- ⑦ Playlist loading button
- ⑧ CREATE PLAYLIST button
- Current playlist display details
- ① Number of playlist entries
- ② Playlist editing button
- ③ SAVE AS button
- Entries in playlist screen details
- ② Page number
- ③ Current medium
- ④ Date and time updated
- ⑤ Entry number
- ⑥ Button location
- ⑦ File name
- ⑧ Entry information button
- ⑨ ASSIGN button
- ⑩ CLEAR button
- ⑪ PLAYLISTS button
- TIMER EVENT Screen
- ① Current medium
- ② Timer event display area
- ③ CREATE NEW EVENT button
- ④ Event list display status
- ⑤ ▶ /DELETE ALL button
- Timer event display details
- ⑦ Event type setting details
- - "PLAY" or "REPEAT PLAY" event type
- - "RECORD" event type
- - "DOWNLOAD" or "DELETE & DOWNLOAD" event type
- ⑧ Event editing confirmation buttons
- Explanation of the TIMER EVENT screen event list
- • Event list display set to "All"
- - Event list display set to "Today" or a date
- Using SS250 CONTROL to manage the power of SS-CDR250N/SS-R250N units
- TASCAM
Brand : TASCAM
Model : SS250 Control
Category : Remote control