PTL600 - Smartphone Pharos - Free user manual and instructions
Find the device manual for free PTL600 Pharos in PDF.


| Product Type | Smartphone / GPS Phone |
| Brand | Pharos |
| Model | PTL600 (GPS Phone 600) |
| Operating System | Windows Mobile 5.0 (AKU 3.0) |
| Processor | Samsung SC32442, 400 MHz |
| Memory | 128 MB Flash ROM, 64 MB SDRAM |
| Display | 2.8" transmissive TFT LCD, QVGA 240 x 320, 16-bit / 65,536 colors, touch panel |
| Network | GSM Quad-band 850/900/1800/1900 MHz, EDGE/GPRS Class 10 |
| Wireless Connectivity | Bluetooth 2.0 Class 2 + EDR, Wi-Fi 802.11b/g |
| GPS | SiRFstarIII 20-channel, WAAS enabled |
| Camera | 2.0 megapixel with flash, up to 1600 x 1200 resolution; video recording |
| FM Radio | Tri-Band FM radio, TMC ready |
| Battery | 1530 mAh Li-Ion Polymer, rechargeable, replaceable; up to 5 h talk time, 160 h standby |
| Dimensions | 113 x 59.5 x 15.5 mm (4.45 x 2.34 x 0.61 in) |
| Weight | 146 g (5.2 oz) including battery |
| Expansion | Micro SD card slot |
| Interfaces | Mini USB (data/charge), 3.5 mm headset jack, microphone, speaker |
| Audio | Built-in speaker, microphone, stereo earphones included |
| Included Accessories | AC charger, USB cable, car charger, car mount/holder, stereo earphones, leather case, micro SD card* (* not in 600e package) |
| Safety & Compliance | FCC, SAR (Head: 0.776 W/kg, Body: 0.987 W/kg) |
| Operating Temperature | -5°C to 45°C (23°F to 113°F) |
| Storage Temperature | -25°C to 50°C (-13°F to 122°F) |
Frequently Asked Questions - PTL600 Pharos
User questions about PTL600 Pharos
0 question about this device. Answer the ones you know or ask your own.
Ask a new question about this device
Download the instructions for your Smartphone in PDF format for free! Find your manual PTL600 - Pharos and take your electronic device back in hand. On this page are published all the documents necessary for the use of your device. PTL600 by Pharos.
USER MANUAL PTL600 Pharos
Pharos GPS Phone 600 Series
Hardware User's Manual
GPRS / EDGE Settings for AT&T / Cingular
Step 1
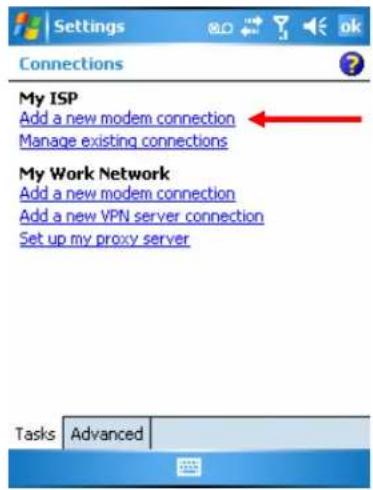
◆ Tap Start, Settings, the Connections tab, Connections, and then the Tasks tab.
♦ Tap Add a new modem connection.
Step 2
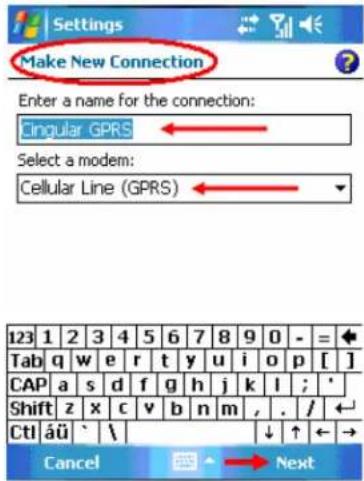
◆ Enter a new connection name (i.e. Cingular GPRS).
♦ Select Cellular Line (GPRS).
♦ Tap Next.
Step 3


◆ Enter Access point name wap.cingular.
♦ Tap Next.
Step 4
![Settings Cingular GPRS User name: Password: Domain:* * If provided by ISP or network administrator. Advanced... 123 1 2 3 4 5 6 7 8 9 0 - = Tab q w e r t y u i o p [ ] CAP a s d f g h j k l ; * Shift z x c v b n m , . / Ctl äü ` \ Back Finish](/content/2026/05/825552/images/60338225a86d97161380a1ffe4f619d335de23189fccec52b2cff50085442b96.jpg)
♦ Tap Finish.
GPRS / EDGE Settings for T-Mobile
Step 1

Tap Start, Settings, the Connections tab, Connections, and then the Tasks tab.
♦ Tap Add a new modem connection.
Step 2
![Settings Make New Connection Enter a name for the connection: T-Mobile GPRS Select a modem: Cellular Line (GPRS) 123 1 2 3 4 5 6 7 8 9 0 - = Tab q w e r t y u i o p [ ] CAP a s d f g h j k l ; * Shift z x c v b n m , . / CtI äü ` \ | ↓ ↑ ← → Cancel Next](/content/2026/05/825552/images/f7dd9bd26c21bf5dbdadb2d64effb81d3a47dc8e96c90cace53b27ef63f61b3e.jpg)
◆ Enter a new connection name (i.e. T-Mobile GPRS).
♦ Select Cellular Line (GPRS).
♦ Tap Next.
Step 3

![123 1 2 3 4 5 6 7 8 9 0 - = Tab q w e r t y u i o p [ ] CAP a s d f g h j k l ; * Shift z x c v b n m , . / ← CtI áü ` \ Back → Next](/content/2026/05/825552/images/7426e1ec852d2be34b3d2bfe4ef5d1f38bf97f3cb8fab3573c6a4e4da8815d42.jpg)
◆ Enter Access point name wap.voicestream.com.
♦ Tap Next.
Step 4

![123 1 2 3 4 5 6 7 8 9 0 - = Tab q w e r t y u i o p [ ] CAP a s d f g h j k l ; ' Shift z x c v b n m , . / CtI äü ` \ ↓ ↑ ← → Back Finish](/content/2026/05/825552/images/ccccbccf45ca4279475b34a8f2c55d9131ff4e4bfd86fdd59f9120128604d25d.jpg)
♦ Tap Finish.
Table of Contents
GPRS / EDGE Settings for AT&T / CINGULAR i
GPRS / EDGE Settings for T-Mobile ii
Table of Contents 1
Please Read Before Proceeding 6
Important Safety Precautions 7
Chapter 1: Voice Command Satellite Navigation 9
1.1 Navigation Device Installation 9
1.2 GPS Navigation Software Installation 10
1.3 Conditions for Using GPS Car Navigation 10
Chapter 2: Getting Started 12
2.1 Package Contents 12
2.2 External Views 13
- Hardware Hot Key Functions 14
- Rear Side 15
2.3 Using the GPS Phone 600 for the First Time 16
- Charging Power and Power Supply 16
• Re-installation or Replacing the Battery 18
2.4 Power On and Off 19
- Sleep Mode 19
- Turn on the Screen 20
- Restarting the GPS Phone 600 21
- Reset 21
- Cold Boot 22
Chapter 3: Using the GPS Phone 600 24
3.1 Start Screen 24
- Today Screen 25
- Programs 27
- System Application Programs 29
3.2 Entering Information on Your GPS Phone 600 31
- Entering Text Using the Input Panel 31
- Typing with the Soft Keyboard 32
• Using Letter Recognizer 32
• Using Block Recognizer 33
• Using Transcriber 33
- Selecting Typed Text 33
- Writing on the Screen 34
- Selecting Writing 34
- Convert Writing to Text 35
- Drawing on the Screen 36
- Creating a Drawing 36
- Selecting a Drawing 37
- Recording a Message 37
- Creating a Recording 38
- Using My Text 39
Chapter 4: Using the Phone 40
4.1 Installing and Removing the SIM Card 41
• Installing the SIM Card and Battery 41
4.2 Using the Phone 42
- Adjusting the Phone Volume 43
4.3 Turning the Phone On / Off and Making Calls 44
- Phone Toolbar 45
- Calling from Contacts 45
- Calling from Speed Dial 46
- Calling from the Call History 46
4.4 Customizing Your Phone 47
4.5 Phone Application Programs 48
• SIM Tool Kit 48
- SMS Sender 48
Chapter 5: Customize Your GPS Phone 600 49
5.1 Adjusting Settings 49
5.2 Notifications 50
5.3 Power Preference Settings 51
5.4 Backlight 52
5.5 Microphone 53
5.6 Adjusting the Volume 54
5.7 Find and Organizing Information 55
5.8 Navigation Bar and Command Bar 56
5.9 Pop-Up Menus 57
5.10 Redefine Hot Keys 58
Chapter 6: Using Microsoft ActiveSync 59
6.1 Installing and Using ActiveSync 60
• ActiveSync Connection Troubleshooting 61
6.2 USB Synchronization 62
- USB Synchronization 62
6.3 Synchronizing Using Bluetooth 65
Chapter 7: Connections 66
7.1 Connecting to the Internet 66
- Setting the GPRS / EDGE Connection 67
- Starting GPRS / EDGE Connection 68
- Disconnecting GPRS / EDGE 69
7.2 Using Bluetooth 70
- Bluetooth Connection Wizard 70
- Bluetooth Connection Setting 72
• Service 73 - Serial Port 74
- Bluetooth Headset 75
- FTP Sharing 75
7.3 CSD Type 76
7.4 Connecting with a Personal Computer 77
7.5 Wireless LAN Transmission 77
Chapter 8: Using Wireless LAN 78
8.1 Connecting to Wireless LAN 78
8.2 Configure Your Wireless Network
(Reference for a Normal Network Setup) 80
8.3 Configure Your Wireless Network
(Reference for Proxy Setup) 82
Chapter 9: Sending and Receiving Messages 84
9.1 E-mails and SMS Messages 84
- Synchronizing E-mail Messages 85
- Connecting Directly to the Mail Server 86
• E-mail Server Setup 87
• Using E-mails and SMS 88 - Direct Push Technology Alert 91
- Direct Push Technology Alert Settings 91
9.2 MSN Messenger 93
- Setting Up 94
- Working with Contacts 95
- Chatting with Contacts 96
Chapter 10: Multimedia 97
10.1 Using Camera 97
- Camera Mode 98
- Camera Mode Using Wizard 99
- Managing Pictures Shot by Continuous Shutter 100
• Digital Video Mode 101
• Digital Video Mode Using Wizard 103
• Speed Shooting Using the Hardware Hot Keys 104
10.2 FM Tuner 105
Chapter 11: Companion Programs 107
11.1 Calendar: Scheduling Appointments and Meetings 108
- Create an Appointment 109
- Use the Summary Screen 110
- Create Meeting Requests 110
- Schedule a Meeting 110
11.2 Contacts: Tracking Friends and Colleagues 111
- Create a Contact 112
• Find a Contact 113 - Use the Summary Screen 113
11.3 Tasks: Keeping a To Do List 114
- Create a Task 115
- Use the Summary Screen 116
11.4 Notes: Capturing Thought and Ideals 117
- Create a Note 117
11.5 Word Mobile 118
11.6 Excel Mobile 120
- Tips for Working in Excel Mobile 122
11.7 PowerPoint Mobile 123
11.8 Windows Media Player 124
11.9 Internet Explorer 125
• Using Internet Explorer 125
- Browse the Internet 126
• View Mobile Favorites 127
• The Mobile Favorites Folder 127
- Favorite Links 128
- Synchronize Mobile Favorites 128
- Create a Mobile Favorite 128
- Save GPS Phone 600 Memory 129
Chapter 12: Maintaining the GPS Phone 600 130
12.1 Adding or Removing Programs 130
- Add Programs Using ActiveSync 130
- Add a Program Directly from the Internet 131
- Add a Program to the Start Menu 131
- Remove Programs 132
12.2 Manage Memory 133
• View Memory Status 133
• Find Available Memory 135
12.3 System Information 138
Chapter 13: Specifications 139
Appendix 140
A.1 Regulation Notices and Safety Declaration 140
• Health and Safety Information 140
A.2 FCC Regulations 142
A.3 RF Exposure Information (SAR) 143
• SAR Information 143
• Holster Information 143
• Where to Find Information 144
A.4 FAQ 145
PLEASE READ BEFORE PROCEEDING
This device is not charged when you take it out of the box. When you use this product the first time, we recommend that you install the battery as illustrated and fully charge it for about 8 hours before use. Do not remove the battery pack when the device is charging.
Before you install the SIM card, make sure to tap the ALL OFF Button in Wireless Manager to turn off your GPS Phone 600's mobile phone, Bluetooth, and wireless LAN functions. Press the "Power Button" of the GPS Phone 600 to turn off the screen. Otherwise, disconnection problems or damage to the SIM card may occur.
When you are on a plane, in a medical facility or at a gas station where wireless communications devices are not allowed and must be turned off, please go to Wireless Manager and select the ALL OFF Button to turn off your GPS Phone 600's mobile phone, Bluetooth, and wireless LAN functions. By pressing the "Power Button" of the GPS Phone 600, you only turn off the display.
In case the GPS Phone 600 is damaged, send it back to the dealer for repair. Do not attempt to disassemble the GPS Phone 600 on your own; otherwise the warranty will be void. Your warranty will be invalidated if you open or tamper with the device's outer casing.
- This document lists the functions, specifications, and illustrations for reference only. Product specifications are subject to change.
Important Safety Precautions
When using this product the safety precautions below must be taken to offset possible legal liabilities and damages.
Electrical Safety
This product is intended for use when supplied with power from the battery. Other usage may be dangerous and will invalidate any approval given to this product.
Safety in Aircraft
Due to the possible interference caused by this product to an aircraft's navigation system and its communications network, using this product on board an airplane is against the law in most countries.
Interference with Medical Equipment Functions
This product may cause medical equipment to malfunction. The use of this device is forbidden in most hospitals and medial clinics.
Nonionizing Radiation
This product should be operated in the suggested normal condition only to ensure the radioactive performance and safety of the interference. As with other mobile radio transmitting equipment, users are advised that for satisfactory operation of the equipment and for the safety of personnel, it is recommended that no part of the human body be allowed to come too close to the antenna during operation of the equipment
Body-worn Operations
This device was tested for typical body-worn operations with the back of the phone kept 1.5 cm from the body. To maintain compliance with FCC RF exposure requirements, use only belt-clips, holsters or similar accessories that maintain a 1.5 cm separation distance between the user's body and the back of the phone, including the antenna. The use of belt-chips, holsters and similar accessories should not contain metallic components in its assembly. The use of accessories that do not satisfy these requirements may not comply with FCC RF exposure requirements, and should be avoided.
Road Safety
Vehicle drivers in motion are not permitted to use telephony services with handheld devices, except in the case of emergency. In some countries, using hands-free devices as an alternative is allowed.
Environment Restrictions
Do not use this product at gas or refueling stations. The use of this product is also prohibited in fuel storehouses, chemical plants, and locations containing explosives.
Safety for Environments
Do not use this product in gas stations, fuel depots, chemical plants or where blasting operations are in progress, or in potentially explosive atmospheres such as fueling areas, below deck on boats, fuel or chemical transfer or storage facilities, and areas where the air contains chemicals or particles, such as grain, dust, or metal powders. Please be aware that sparks in such areas could cause an explosion or fire resulting in badly injury or even death.
Explosive Atmospheres
When in any area with a potentially explosive atmosphere or where flammable materials exist, the product should be turned off and user should obey all signs and instructions. Sparks in such areas could cause an explosion or resulting in bodily injury or even death. Users are advised not to use the equipment at refueling points such as service or gas stations. Users are reminded of the need to observe restrictions on the use of radio equipment in fuel depots, chemical plants or where blasting operations are in progress. Areas with a potentially explosive atmosphere are often, but not always, clearly marked. These include fueling areas, below desk on boats, fuel or chemical transfer or storage facilities, and areas where the air contains chemicals or particles, such as grain, dust, or metal powders.
Chapter 1 Voice Command Satellite Navigation
1.1 Navigation Device Installation

- GPS Phone 600: Slide into the GPS Holder.
- Car Charger: When GPS Phone 600 is low on power, recharge by connecting one end to the car cigarette lighter/12 volt power outlet and the other end to the socket on base of the GPS Holder.
- Car Mount/Holder
Attention:
The GPS signal receiver is built into the GPS Phone 600. If car windscreen has heat reflective metallic film, or the GPS Phone 600 is obstructed by other objects, reception of the GPS signals may be affected.
1.2 GPS Navigation Software Installation
Please refer to the Ostia User Manual for instructions on installing and operating Ostia Navigation software.
1.3 Conditions for Using GPS Car Navigation
By using this system you are agreeing to the following conditions:
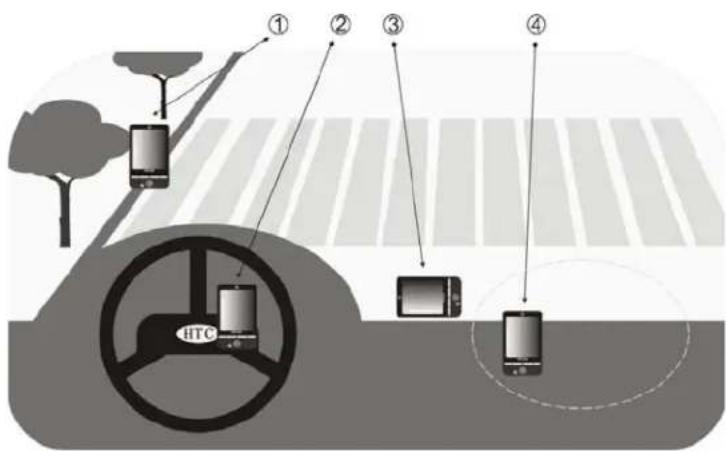
When using this device, please use the included car mounting. Affix device securely to the car mount. Please note that installation in the areas shown below can be dangerous.
flowchart
graph TD
    A["①"] --> B["Motor"]
    C["②"] --> B
    D["③"] --> E["Motor"]
    F["④"] --> E
    B --> G["Wheel"]
    E --> G
    G --> H["Motor"]
    style A fill:#f9f,stroke:#333
    style C fill:#f9f,stroke:#333
    style D fill:#f9f,stroke:#333
    style F fill:#f9f,stroke:#333
- Do not place where it will obstruct driver vision.
- Do not place over air bag.
- Do not place where it can not be securely attached.
- Do not place in path of activated air bag.
◆ Please set navigation destination before driving. Do not operate the controls on this system while driving. The responsibility for safe driving rests with you.
♦ GPS positioning is limited by weather and usage location (tall buildings, tunnels, underpasses, trees, bridges). Most GPS do not work indoors, nor can GPS signals penetrate buildings, car sun shades and heat reflective film with metallic content. Please use your GPS where it has a clear view of the sky.
The GPS system is built and operated by the U.S. Department of Defense which is also responsible for its maintenance and calibration. Any changes made by them may affect the operation and accuracy of the GPS system.
- Wireless devices (mobile phones, speed radar detectors) may interfere with the satellite signal and cause unreliable signal reception.
- The GPS position fix is provided for your reference and should not affect actual driver behavior.
- The electronic map data provided in the navigation system is for reference only and not intended for high precision applications. You should determine your exact location based on actual road conditions.
- When not in use, please do not leave the device inside the car. If exposed directly to sunlight, the battery may overheat and cause damage to this device. This may endanger the vehicle as well.
Chapter 2 Getting Started
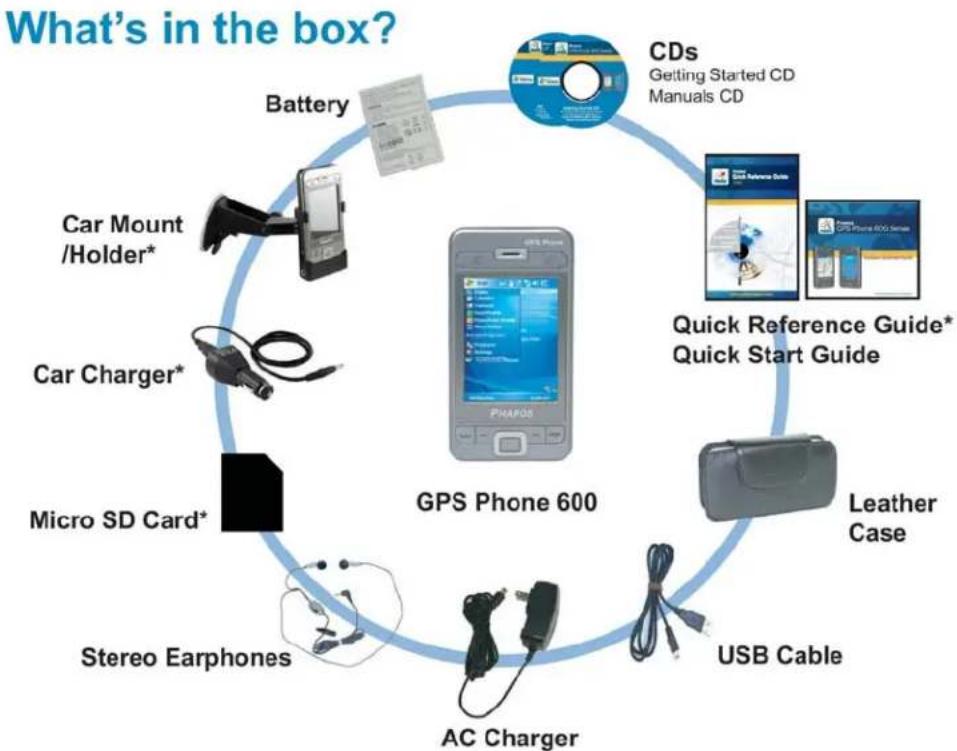
2.1 Package Contents
flowchart
graph TD
    A["GPS Phone 600"] --> B["Battery"]
    A --> C["Car Mount /Holder*"]
    A --> D["Car Charger*"]
    A --> E["Micro SD Card*"]
    A --> F["Stereo Earphones"]
    A --> G["AC Charger"]
    A --> H["USB Cable"]
    A --> I["Leather Case"]
    A --> J["Quick Reference Guide*"]
    A --> K["Quick Start Guide"]
    A --> L["CDs Getting Started CD Manuals CD"]
*These items and Ostia navigation software are not included in the 600e package.
2.2 External Views
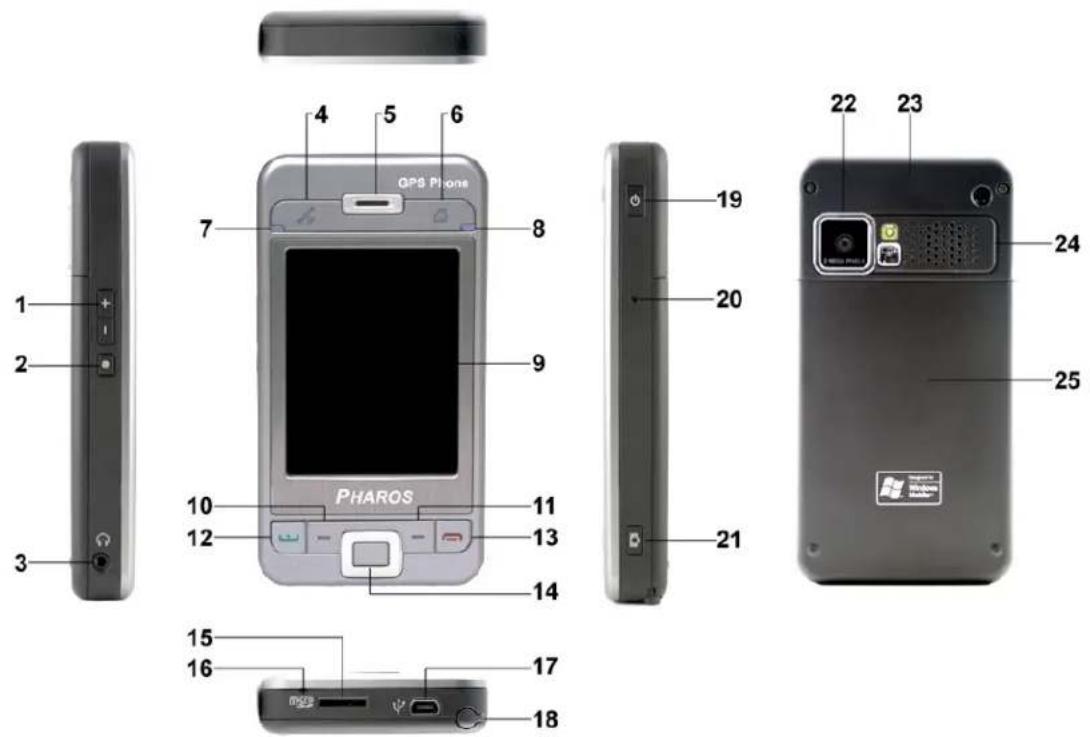
- Volume control keys
- Screen orientation / record hot key
- Earphone and microphone jack
- Hot key for Ostia
- Cell Phone speaker
- Today Screen hot key
- Left LED
♦ WLAN active LED (Orange)
◆ Bluetooth active LED (Blue, blinks once)
♦ GPS active LED (Blue, blinks twice)
- Right LED
◆ Power charging LED (Red)
◆ Cell phone active LED (Green)
-
Touch screen
-
Left Soft-Key
-
Right Soft-Key
-
Send button
- End button
- Navigation button. Press the center of the button to set as launch key.
- Micro SD Slot
- Microphone
- Mini USB port
- Stylus holder. Slide the stylus out of the holder. This is a two-stage push-pull stylus.
- Power button
- Reset button
- Camera shutter
- Built-in camera lens / preview mirror
- Hidden antenna for cell phone
- Speaker
- Back cover. Battery is inside.
Hardware Hot Key Functions

| Hardware Button | Short Press (Press once and release) | Long Press (Press for a few seconds and release) |
| 1 | Adjust volumeZoom in/out during camera mode | N/A |
| 2 | Chancescreen orientation | Voice |
| 3 Hot key for Ostia N/A | ||
| 4 | Connect to Today Screen | N/A |
| 5 Connect to Phone/dial/redial/answer N/A | ||
| 6 Left Soft-Key:Soft-keys on the left.To perform the command / function shown above the button at the bottom of the screen display. | N/A | |
| 7 Right Soft-Key:Soft-keys on the right.To perform the command / function shown above the button at the bottom of the screen display. | N/A | |
| 8 | Hang up during callDisconnect during GPRS connectionSkip to Today's screen while in other programs. | N/A |
| 9 | Power Button = open or close screenPower Button + Reset Button = Cold boot | N/A |
| 10 Reset Button N/A | ||
| 11 D | Camera | N/A |
recc
Rear Side
Installing the SIM Card
- Insert the SIM card into the SIM card slot with its golden contacts facing down. Refer to the picture on the right.

natural_image
Back view of a smartphone showing internal components and a camera (no text or symbols visible)Installing the Battery
- Insert the battery. Refer to the picture on the right.
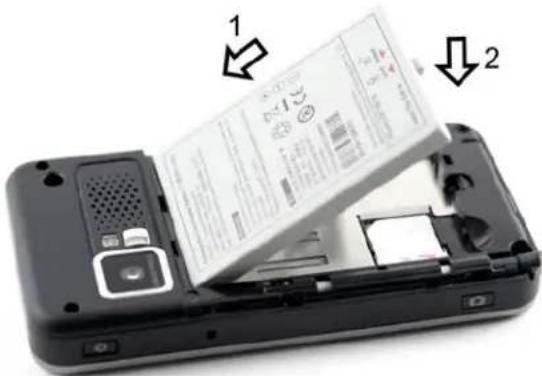
natural_image
Black-and-white photo of a device with open lid and internal battery pack, showing two arrows labeled 1 and 2 pointing to the paper (no text or symbols on main subject)- To keep the battery in place, push the lock switch up. To take out the battery, first pull the lock switch down. Refer to the picture on the right.

2.3 Using the GPS Phone 600 for the First Time
Charging Power and Power Supply

a. Connect the AC adapter plug to any household power outlet.
b. Connect the other plug from the AC adapter to the USB port. The GPS Phone 600 starts to charge automatically.
c. If you need to connect GPS Phone 600 and a desktop computer, connect the USB cable to the USB port on the GPS Phone 600 and connect the other end of the USB cable to the USB port on the desktop computer. Your GPS Phone 600 will also charge at the same time.
-
Remove the back cover. (If you are opening this product for the first time, the main battery and the GPS Phone 600 are packed separately inside the product package.)
-
Install the main battery properly and lock the battery securely (install the SIM card first if you want to use the phone functions).
-
Connect the AC adapter to any household power outlet and connect the cord from the AC adapter to the mini-USB port on the GPS Phone 600.
-
Cold Boot: Press and hold the "Power Button" with one hand, and use the stylus tip to press the "Reset Button" with the other hand. Release the "Power Button" and the "Reset Button" at the same time. Wait for the GPS Phone 600 to restart and follow the instructions on the screen to complete screen alignment.
-
It will take about 8 hours to fully charge the battery the first time. Subsequent charging will only take about 3 hours. After charging, you can disconnect the AC Adapter and carry the GPS Phone 600 with you. To maintain reliable operation charge the power regularly. View the battery icon on the upper right corner to check the power usage condition.
-
The LED indicator on the upper left of the GPS Phone 600 displays the WLAN, Bluetooth and GPS status.
| WLAN Active Bluetooth Active GPS Active | ||
| Orange LED flashes | Blue LED blinks once every 4 seconds | Blue LED blinks twice every 4 seconds |
- The LED indicator on the upper right of the GPS Phone 600 indicates the charging status, cell phone status, and notices.
| Charging Fully charged Insufficient power | ||
| Red LED lights up | Red LED goes offGreen LED lights up | Red LED flashes |
| Phone is on Caution or Warning | ||
| Green LED flashes | Orange LED flashes | |
Re-installation or Replacing the Battery
If the phone, GPRS or wireless LAN connection function is already activated, deactivate it first and then replace the battery.
| 1. Slide and remove the back cover of the GPS Phone 600. | 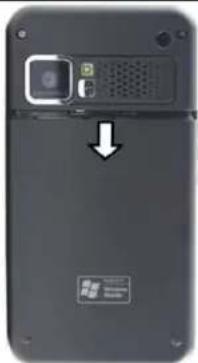 |
| 2. Press down to unlock the main battery lock in order to remove the battery. |  |
| 3. Replace the main battery and lock it properly. When you remove the main battery, your GPS Phone 600 will enter sleep mode. |  |
| 4. Slide the back cover into the groove, and reinstall the back cover. |  |
2.4 Power On and Off

Sleep Mode
- Press the "Power Button" of the GPS Phone 600 to enter the Sleep mode. When you do so, the screen is turned off and all peripheral devices enter the power-saving mode. If the Phone application is activated it will remain in call waiting mode (as indicated by the flashing of the green indicator).
- To turn on the screen later, just press the "Power Button."
- Tap 📋 Start, Settings, the System tab, Power and then the Advanced tab to set the device to turn off automatically after a specified time period.

Turn on the Screen
This product is designed with a power-saving feature. If the screen is turned off, press the "Power Button" of the GPS Phone 600 to turn it on.
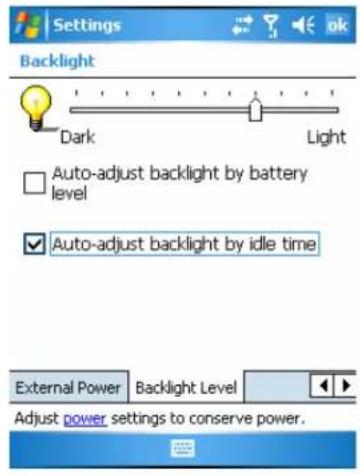
If the screen is too dark and you cannot see clearly, set the proper brightness level for the backlight.
Tap Start, Settings, the System tab, Backlight and then the Backlight Level tab.
Using the Stylus to Touch the Screen
- Your GPS Phone 600 is designed for graphics-based operation. Use the stylus to perform basic actions such as tap, drag, and tap and hold on the touch screen. Other actions such as reset and cold boot will require the use of the stylus tip.
◆ Pull the stylus to full-length to make it easier to tap the screen during operation. When kept completely in the stylus holder, the stylus length shortens.
◆ To avoid damage to the screen, avoid pressing too heavily on the touch screen with the stylus or your fingers.
Restarting the GPS Phone 600
If the GPS Phone 600 is unable to maintain normal operation, has no response, or if the screen is frozen.
Try the following steps in order. If the problem is solved, skip the remaining steps.
| Option | Procedure |
| Reset Press the | “Reset Button” of GPS Phone 600 with the tip of the stylus. |
| Default Settings procedure | If the touch screen is functional, please tap Start, Programs, Utilities, and then Default Settings. |
| Clean Boot Hold | the “Power Button” and press once on the “Reset Button” with the tip of the stylus, and release both buttons simultaneously. Next, continually hold the End Button until the system inquiry screen is displayed, then release the End Button. Answer the question(s). |
Reset

natural_image
Black handheld device with a metallic cable extending from its side, against a white background (no text or symbols visible)◆ Reset method: Press the “Reset Button” of GPS Phone 600 with tip of the stylus.
◆ Appropriate situation: If the GPS Phone 600 is unable to maintain normal operation, has no response, or if the screen is frozen.
Result: In a moment, when GPS Phone 600 automatically completes the system startup process, the last display will be the Today screen. This will retain all of your data, settings, and any programs you may have installed.
Cold Boot
Cold boot method
Hold the "Power Button" of the GPS Phone 600 with one hand while using the stylus tip to push in the "Reset Button." Simultaneously release both the "Power Button" and "Reset Button"

natural_image
Close-up of a black handheld device with a metallic lever extending from its side, showing a small circular button and an arrow pointing to it (no text or symbols visible)Appropriate situation
If a previous reset has already been attempted and the GPS Phone 600 is still unable to maintain normal operations, has no response, or if the screen is frozen.
Before executing the preceding "Cold boot method", please carefully consider the following instructions and then decide on the cold boot method.
-
After a cold boot is performed, if no buttons are pressed, the result is identical to the reset result.
-
If a previous reset has already been attempted but the GPS Phone 600 is still unable to maintain normal operation, consider the following solution: After cold boot, hold the End Button on the bottom right of the GPS Phone 600 until the system inquiry screen is shown, and then release the End Button. Next, please read thoroughly through the instructions on cold booting before continuing.
Perform cold boot and hold the End Button . The system will display a two question inquiry screen. Please carefully refer to following instructions.
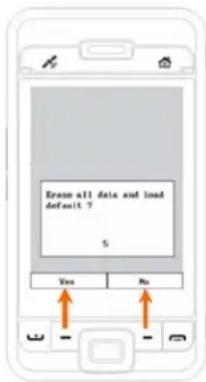
◆ Erase all data and load default? (The default is “No.” If Yes or No was not selected, after a few seconds the system will automatically execute the default No).
If you press the Left Soft-Key for a few seconds to select "Yes" then the system will erase all data and load the default settings. After your GPS Phone 600 restarts, follow the instructions on the screen to complete.

◆ Delete registry only? (The default is "No." If Yes or No was not selected, after a few seconds the system will automatically execute the default No).
- If you press the Left Soft-Key for a few seconds to select "Yes" then the system will delete the registry only.
Caution
- After performing a cold boot, the system will retain Microsoft Windows and pre-installed programs. If you answer "Yes" to the two questions displayed after a cold boot, other items such as your data, any programs you have installed, and any custom settings will be lost.
- There are two ways to retain your data, loaded default and registry:
◆ Perform a Reset.
◆ Performing a Cold Boot, and answer “No” when the above two questions display.
Chapter 3 Using the GPS Phone 600
3.1 Start Screen
Tap Start, Settings, the System tab, and then Screen.
The first time you use or cold boot the GPS Phone 600, the system will ask you to align the screen. Continue to tap the center of each cross (+) that appears and follow the screen instructions to complete the operation. If you feel that the position is not quite accurate while tapping on the screen, you can align the screen again at any time.

1. Orientation:
♦ Portrait (default)
◆ Landscape (right-handed)
◆ Landscape (left-handed)
- Tap the Align Screen button to calibrate the screen. When Align Screen appears, use the stylus to tap the center of the cross (+) until the next cross appears, and then follow the screen instructions to complete the operation. Finally, tap to exit.
3. Text Size tab:
For selecting the desired text size.
If you are unable to use the stylus, use the following steps to open the touch screen calibration mode.
- Simultaneously press the Left Soft-Key on the bottom-left of the GPS Phone 600 and the execution button in the center of the navigation pad.
- Release these two buttons at the same time, and you will enter the calibration screen.
Today Screen
The Today screen displays important information, such as upcoming appointments and status indicators. You can access it by tapping 📋 Start and then Today or by pressing the Today button on the upper-right of your GPS Phone 600.

-
Start. Tap to switch to a program.
-
Tap to enable or disable the GPRS connection feature.
-
_× Antenna icon. Tap to turn the phone on or off.
-
Speaker icon. For adjusting volume.
-
Time. Tap to display the current date, time, and upcoming appointments. Tap and hold the time area to select analog or digital clock display from the list.
-
Today screen. Display important information for the day. Tap on any item to enter its relevant setup screen. For example, tap 🖼️ to sign in to Pocket MSN.
-
The icons mean you can tap to quick link to programs, such as Wireless Manager, etc.
-
Tap to quick link to Contacts.
The following table lists the icons that you may see. Refer to the “Meaning” column for explanation or tap on the icon to access the instant message.
| Icon | Meaning |
| Speaker is on. | |
| Speaker is off. | |
| Main battery is charging. | |
| Main battery power is low. | |
| Main battery power is very low. | |
| Main battery is fully charged. | |
| Notify you that you have one or more MSN instant messages. | |
| Notify you that you have one or more e-mails, text messages or SMS. | |
| Notify you that you have one or more voice mails. | |
| If there is not enough space on the screen to display all notification icons, tap this icon to view all icons. | |
| PowerPoint slide show. | |
| Active connection to computer. | |
| Active Sync is synchronizing. | |
| SIM card unavailable. | |
| Phone is powered off. | |
| Signal strength indicator for phone function. | |
| No data sessions active. | |
| GPRS in use.The G is replaced by an E when the EDGE signal is detected. | |
| GPRS available.The G is replaced by an E when the EDGE signal is detected. | |
| Wireless LAN Active. | |
| Wireless LAN Data Calling. | |
| Wireless LAN in use. |
Programs
You can switch from one program to another by selecting it from the Start menu. (You can customize which programs you see on this menu. For information, see "Adjusting Settings" section.) To access some programs, you'll need to tap Start, Programs, and then the program name.
| Icon Programs Description | ||
 | Games Group Bubble Breaker, Solitaire. | |
 | Multimedia Group | Camera, FM Tuner. |
 | Phone Group SIM Tool Kit, SMS Sender. | |
 | Utilities Group Application Recovery, Bluetooth Manager, Default Settings, WLAN Utility. | |
 | ActiveSync Synchronize information between your GPS Phone 600 and desktop computer. | |
 | Calendar Keep track of your appointments and create meeting requests. | |
 | Contacts Keep track of your friends and colleagues. | |
 | Notes Create handwritten or typed notes, drawings, and recordings. | |
 | Tasks Keep track of your tasks. | |
 | Messaging Send and receive e-mail messages. | |
 | Internet Explorer | Browse Web and WAP sites, and download new programs and files from the Internet. |
 | Pocket MSN MSN related programs. For example, send and receive instant messages with your MSN Messenger contacts. | |
 | Word Mobile Create new documents or view and edit Word documents created on your desktop computer. | |
 | Excel Mobile Create new workbooks or view and edit Excel workbooks created on your desktop computer. | |
 | PowerPoint Mobile | View PowerPoint slide shows created on your desktop computer. |
 | Calculator Performs basic calculations. | |
 | Pictures & Videos | Take, view, and edit pictures. |
 | Windows Media Player | Plays movies or sound files. |
| [WS8G] | File Explorer Manages files or folders. | |
 | Wireless Manager | Manage the mobile phone, Bluetooth, and wireless LAN functions. |
You can also switch to some programs by pressing a program button. Your GPS Phone 600 has one or more programs buttons located on the front or side of the unit. The icons on the buttons help to identify the programs they activate. For more information, refer to "Redefine Hot Keys" section.
System Application Programs
Tap Start, Settings, the Personal tab.
| Programs Description | |
| Buttons Set the hot key for GPS Phone 600 hardware button. | |
| Input Set the details about the input method. | |
| Menus | Set the items displaying on the Start menu |
| MSN Options Set the details about Pocket MSN. | |
| Owner Information | Input owner information. |
| Lock Set the access rights and password of GPS Phone 600. | |
| Phone Set the details about the phone. | |
| Sounds & Notifications | Set the volume and notification method. |
| Today Set the look of Today screen and display information. | |
Tap Start, Settings, the System tab.
| Program Description | |
| About Display the important information about the GPS Phone 600. | |
| Backlight Set the details about the backlight and brightness. | |
| Certificates For network identification to prevent unauthorized access. | |
| Clock & Alarms | Set the time and alarms. |
| Memory View the memory usage, and the list of running programs, etc. | |
| Microphone Set the microphone volume. | |
| Power View the power usage condition, whether or not to power off after a waiting period. | |
| Regional Settings | Set the region and information display formats such as date, time, etc. |
| Remove Programs | Remove programs that are no longer used. |
| Screen Aligning the screen is helpful in improving the touch accuracy. You can select the portrait or landscape orientation. | |
| System information | View the system information. |
Tap Start, Setting, the Connections tab.
| Program Description | |
| Beam Set if | receiving end will accept Bluetooth beam data automatically or not. |
| Connections | Set the network connection. |
| CSD Type Set | GPS Phone 600 to simulate a modem and access the Internet through the built-in GSM device. |
| Network Cards | Set the details about network cards. |
| USB to PC Change the type of USB connection. | |
3.2 Entering Information on Your GPS Phone 600
You have several options for entering new information:
- Use the input panel to enter typed text, either by using the soft keyboard or other input method.
- Write directly on the screen.
- Draw pictures on the screen.
- Speak into your GPS Phone 600 microphone to record a message.
- Use Microsoft® ActiveSync® to synchronize or copy information from your desktop computer to your GPS Phone 600. For more information on ActiveSync, see ActiveSync Help on your desktop computer.
Entering Text Using the Input Panel
Use the input panel to enter information in any program on your GPS Phone 600. You can either type using the soft keyboard or write using Letter Recognizer, Block Recognizer, or Transcriber. In either case, the characters appear as typed text on the screen.
To show or hide the input panel, tap the Input Panel button. Tap the arrow next to the Input Panel button to see your choices.
![MMSSendRecvManager::SendRecvProc Started [0] MMSSendRecvManager::SendRecvProc Started... Before Calling SendMMSMsgBlocked SendMMSMsg Called with fblock = [1] MMSSendRecvManager::SendRecvProc Started... CMMSSR Transport::SendMessage called... Options... Block Recognizer • Keyboard Letter Recognizer Transcriber 123 1 2 Tab q v CAP a Shift z Ctrl äü 1 View Menu 1 2 3](/content/2026/05/825552/images/2124e426d865addcb2b7d085f55df26f71638cac371fb996df95afa823177933.jpg)
- Select an input method.
- Tap to see your choices.
- Input Panel button.
When you use the input panel, your GPS Phone 600 anticipates the word you are typing or writing and displays it above the input panel. When you tap the displayed word, it is inserted into your text at the insertion point. The more you use your GPS Phone 600, the more words it learns to anticipate.

- Tap here if this is the right word.
![B I U Meeting 1 1234567890-= Tab q w e r t y u i o p [ ] CAP a s d f g h i k l ; * Shift z x c v b n m , . / +← Ct: 60 - \ View Menu](/content/2026/05/825552/images/3ae4b437b11e43aca15c1cc9491b6c6b31f77040ab599fe6607cdb7eb210c045.jpg)
To change word suggestion options, such as the number of words suggested at one time, tap Start, Settings, the Personal tab, Input, and then the Word Completion tab.
Typing with the Soft Keyboard
- Tap the arrow next to the Input Panel button and then Keyboard.
- On the soft keyboard that is displayed, tap the keys with your stylus.
Using Letter Recognizer
With Letter Recognizer you can write letters using the stylus just as you would on paper.
- Tap the arrow next to the Input Panel button and then Letter Recognizer.
- Write a letter in the box.
When you write a letter, it is converted to typed text that appears on the screen. For specific instructions on using Letter Recognizer, with Letter Recognizer open, tap the question mark next to the writing area.
Using Block Recognizer
With Block Recognizer you can input character strokes using the stylus that are similar to those used on the other PDA's.
- Tap the arrow next to the Input Panel button and then Block Recognizer.
- Write a letter in the box.
When you write a letter, it is converted to typed text that appears on the screen. For specific instructions on using Block Recognizer, with Block Recognizer open, tap the question mark next to the writing area.
Using Transcriber
With Transcriber you can write anywhere on the screen using the stylus just as you would on paper. Unlike Letter Recognizer and Block Recognizer, you can write a sentence or more of information. Then, pause and let Transcriber change the written characters to typed characters.
- Tap the arrow next to the Input Panel button and then Transcriber.
- Write anywhere on the screen.
For specific instructions on using Transcriber, with Transcriber open, tap the question mark in the lower right hand corner of the screen.
Selecting Typed Text
If you want to edit or format typed text, you must select it first. Drag the stylus across the text you want to select. You can cut, copy, and paste text by tapping and holding the selected words and then tapping an editing command on the pop-up menu, or by tapping the command on the menu.
Writing on the Screen
In any program that accepts writing, such as the Notes program, and in the Notes tab in Calendar, Contacts, and Tasks, you can use your stylus to write directly on the screen. Write the way you do on paper. You can edit and format what you've written and convert the information to text at a later time.
Tap Menu and then check Draw to switch to writing mode. This action displays lines on the screen to help you write.

- Tap Menu and then check Draw. Use your stylus like a pen now.
Some programs that accept writing may not have the Draw function. See the documentation for the program to find out how to switch to writing mode.
Selecting Writing
If you want to edit or format writing, you must select it first.
- Tap and hold the stylus next to the text you want to select.
- Without lifting, drag the stylus across the text you want to select.
If you accidentally write on the screen, tap Menu, then Undo and try again. You can also select text by tapping Menu and then Draw to deselect it and then dragging the stylus across the screen.
You can cut, copy, and paste written text in the same way you work with typed text: tap and hold the selected words and then tap an editing command on the pop-up menu, or tap the command on the Menu menu.
Convert Writing to Text
Tap Menu, Tools, and then Recognize. If you want to convert only certain words, select them before tapping Recognize on the Tools menu (or tap and hold the selected words and then tap Recognize on the pop-up menu). If a word is not recognized, it is left as writing.

-
Select the text you want to convert and tap Recognize on the pop-up menu.
-
The writing is turned into text.
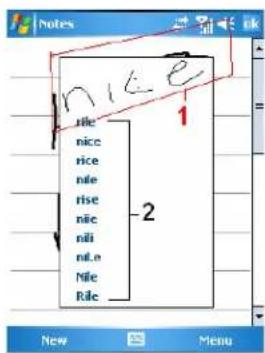
If the conversion is incorrect, you can select different words from a list of alternates or return to the original writing. To do so, tap and hold the incorrect word (tap one word at a time). On the pop-up menu, tap Alternates. A menu with a list of alternate words appears. Tap the word you want to use, or tap the writing at the top of the menu to return to the original writing.
-
Tap to return to your original writing.
-
Or, tap the word you want to use.
Tips for getting good recognition:
- Write neatly.
- Write on the lines and draw the descendants below the line. Write the cross of the "t" and apostrophes below the top line so that they are not confused with the word above. Write periods and commas above the line.
- For better recognition, try increasing the zoom level using the Zoom menu.
- Write the letters of a word closely and leave big gaps between words so that the GPS Phone 600 can easily tell where words begin and end.
- Hyphenated words, foreign words that use special characters such as accents, and some punctuation cannot be converted.
- If you add writing to a word to change it (such as changing a "3" to an "8") after you attempt to recognize the word, the writing you add will not be included if you attempt to recognize the writing again.
Drawing on the Screen
You can draw on the screen in the same way that you write on the screen. The difference between writing and drawing on the screen is how you select items and how they can be edited. For example, selected drawings can be resized, while writing cannot.
Creating a Drawing
Cross three ruled lines on your first stroke. A drawing box appears. Subsequent strokes in or touching the drawing box become part of the drawing. Drawings that do not cross three ruled lines will be treated as writing

- The drawing box indicates the boundaries of the drawing.
- Tap Menu and then check Draw.
You may want to change the zoom level so that you can more easily work on or view your drawing. Tap Menu, Zoom and then a zoom level.
Selecting a Drawing
If you want to edit or format a drawing, you must select it first. Tap and hold the stylus on the drawing until selection handle appears. To select multiple drawings, tapping Menu and then Draw to deselect it and then drag to select the drawings you want.
You can cut, copy, and paste selected drawings by tapping and holding the selected drawing and then tapping an editing command on the pop-up menu, or by tapping the command on the Menu menu. To resize a drawing, make sure the Draw function is not selected, and drag a selection handle.
Recording a Message
In any program where you can write or draw on the screen, you can also quickly capture thoughts, reminders, and phone numbers by recording a message. In Calendar, Tasks, and Contacts, you can include a recording in the Notes tab. Refer to “Voice Recordings Format” section.
In the Notes program, you can either create a stand-alone recording or include a recording in a written note. If you want to include the recording in a note, open the note first. In the Inbox program, you can add a recording to an e-mail message.
Creating a Recording
-
Hold your GPS Phone 600's microphone near your mouth or other source of sound.
-
Press and hold the Record hardware button on your GPS Phone 600 until you hear a beep.
-
While holding down the Record button, make your recording.
-
To stop recording, release the Record button. Two beeps will sound. The new recording appears in the note list or as an embedded icon.
-
You can also make a recording by tapping the Record button on the Recording toolbar.
◆ To play a recording, tap it in the list or tap its icon in the note.

- Indicates an embedded recording.
- Tap to begin recording.
- Recording toolbar.
- Tap Menu and then check View Recording Toolbar.
Using My Text
When using Messaging or MSN Messenger, use My Text to quickly insert preset or frequently used messages into the text entry area. To insert a message, tap My Text and tap a message.

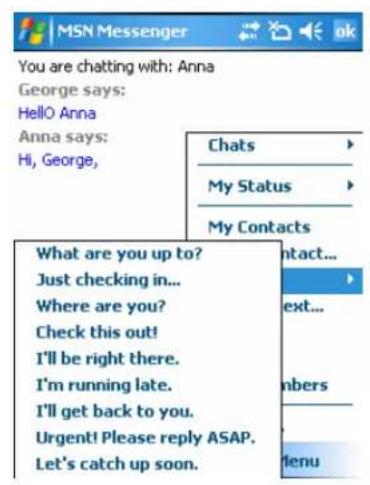
You can add text after inserting a My Text message before sending it. To edit a My Text message, select Edit My Text Messages. Select the message you wish to edit and make desired changes.
Chapter 4 Using the Phone
The Phone feature on the GPS Phone 600 allows you to perform the following tasks:
- Make and receive calls
- Quickly make calls or listen to voice mail without entering phone numbers using Contacts, Speed Dial, or your Call Log.
- Check the Call Log to see who has called, whom you have called, add a new number to Contacts, and access notes taken while you were on a call.
- Receive calls and easily take notes during the call.
- Send SMS messages.
- Customize how your phone rings.
To switch to the Phone function, press the button on the lower part of the GPS Phone 600 or tap start and then Phone.
Caution
To avoid distraction and affecting driving safety, never use your GPS Phone 600 will driving an automobile or any other moving vehicle.
Make sure that the SIM card is properly installed in your GPS Phone 600 and the Phone is already turned on before you use the functions described in this section.
When you are on a plane, in a medical facility or at a gas station where wireless communications devices are not allowed and must be turned off, please go to Wireless Manager and select the ALL OFF button to turn off your GPS Phone 600 mobile phone, Bluetooth, and wireless LAN functions. By pressing the “Power Button” of the GPS Phone 600, you only turn off the display.
- The Phone function relies on the GPS Phone 600 main battery for power. Maintain the main battery power level to assure call quality and the normal operation.
4.1 Installing and Removing the SIM Card
- Tap the ALL OFF button in Wireless Manager to turn off your GPS Phone 600's mobile phone, Bluetooth, and wireless LAN functions
- Press the "Power Button" of the GPS Phone 600 to turn off the screen.
- Remove the back cover, unlock the main battery lock and remove the battery.
- Insert the SIM card into the SIM card slot with the golden contacts facing down. Use according to the picture labeled on the GPS Phone 600, or remove the SIM card horizontally.
- Reinstall the main battery and then lock the main battery lock.
- Slide the back cover into the groove, and reinstall the back cover.
Installing the SIM Card and Battery

- Insert the SIM card into the SIM card slot with its golden contacts facing down. Follow the picture indicated on the GPS Phone 600.
- Main Battery. 5. Main battery lock
-
Back cover.
-
Follow the direction in the picture to install the main battery.
4.2 Using the Phone

-
Microphone
-
Phone Speaker
-
Earphones
-
Phone Microphone (Bottom of GPS Phone 600)
| Combination Method | Operation Answer or End a Call Adjust | Earphones Volume | |
| Hold the GPS Phone manually for calls. | Hold the GPS Phone 600 and position the speaker close to your ear and the microphone close to your lips. | Press Send Button or End Button on the lower part of the GPS Phone 600. | While answering a call, push the volume control key on the side of the GPS Phone 600 to test the earphones volume. |
| Install the external headset. | Place the earphone in your ear and position the microphone to your lips. | Use the line control function. Press the button on the headset answer or end the call. | Use the knob on the headset to adjust the volume of the earphones during a call. |
Adjusting the Phone Volume

Tap on the top and adjust all programs' sound functions under □Adjust the phone sound volume under
When there is no call, you can push the volume control key on the side of the GPS Phone 600 or use the stylus to tap the speaker icon. Tap and then to adjust the ring volume of the incoming call.
Push the volume control key on the side of the GPS Phone 600 or tap and then to adjust the phone volume. You can only do this during a call.
◆ Vibration mode: The speaker icon 🔊 on the top changes to 📄.
◆ Mute mode: The speaker icon 🖼️ on the top changes to 📄.
Adjusting for proper volume:
If earphones are used with the GPS Phone 600 to make calls, set the volume according to your personal needs.
- If you are not using earphones, you can set the volume to the top two levels for hands-free operation.
- For holding the GPS Phone 600 close to the ear directly for calls, set the volume to the lower four levels. It is recommended not to use the top two levels because the volume is high and may affect your hearing.
Turn on / off the speakerphone:
- Enable the speakerphone: While answering a call, tap Speaker on to turn on.
- Disable the speakerphone: Tap Speaker off to turn off.
4.3 Turning the Phone On / Off and Making Calls
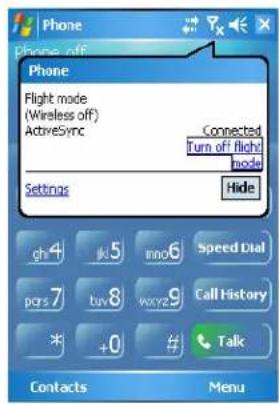
Make certain that the SIM card is properly installed before attempting to make calls.
- Turn on the phone: Tap the icon. When the message window appears, tap "Turn off flight mode," and input the PIN and wait for the phone to turn on. The icon changes to .
- Dial: Press to enter the phone screen. Use the stylus to tap the telephone number and then tap the Enter Button.
- Answer a call: Press √.
- End a call: Press
- Turn off the phone: Tap the icon. When the message window appears, tap "Turn on flight mode."
The following table shows the icons that you may see on the Navigation Bar on the top of the screen.
| Signal Indicator | Description |
| SIM card unavailable. | |
| The phone is turned off. To turn it on, tap this icon. | |
| Network is searching or unavailable. | |
| Phone connection unavailable or network error. To turn it off, tap this icon. | |
| The phone is turned on and signal reception is normal. To turn off, tap this icon. | |
| Active call. To switch back from other programs, tap this icon. | |
| Call forwarding active. | |
| Calls are forwarded. | |
| Missed call. | |
| Roaming mode. |
Phone Toolbar

- Contacts Button: Link to Contacts.
-
Menu Button:
-
Save to Contacts: Save the dialed phone number to Contacts.
- Create Note: While making a call, you can enter Notes to use the panel as the memo pad for writing down notes, pictures or recording.
- Options: Change the phone setup such as ring tone, vibration mode, PIN cod, etc.

- Keypad Button: Tap to return to the keypad.
- Speaker on Button: While answering a call, tap to enable the speakerphone.
Calling from Contacts
Phone numbers entered in Contacts can be used to quickly locate phone numbers and make calls.
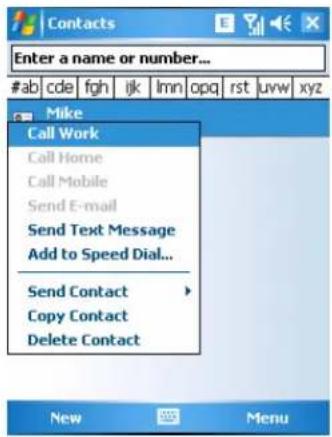
- In the contact list, tap and hold the contact to display a pop-menu.
- Tap Call Mobile or Call Work on the pop-up menu.
- Tap a contact to display the details.
Calling from Speed Dial
On the Phone screen, tap Speed Dial Button to enter the following screen.

- Tap and hold on a contact. The pop-up menu provides the Delete and Edit options for phone setup.
- Tap to redial this number. Remember that this code (for example, "2") you want to dial can also be dialed from the number area in the Phone screen by tapping on "2".
- Tap Menu and the New to show the Contacts name and number will add it to the Speed Dial list. A maximum of 99 numbers are allowed.
Calling from the Call History
Tap Call History Button on the phone screen to enter the following screen.


- Tap Menu and then Filter to list the categories. To search, tap By Caller and follow the screen instructions to complete the operation.
- Tap this icon to redial this number immediately.
- Tap and hold the phone number area and tap the option you need on the pop-up menu. For example, tap Call to redial this number, tap Save to Contacts to add this number to the Phonebook.
- Tap Menu and then Delete All Calls to delete all call records. Or tap Call Timers to view the number of calls, call time and manage call records as shown in the figure on the left.
4.4 Customizing Your Phone
Tap Menu, Options, and then the Phone, Services, Network, or Others tabs to modify the relevant service setup. Note that the setup values you can change here depend on the services provided by your telephone company.
♦ Tap the Others tab.

- GPRS Setting: You can set the option for GPRS connection.
- Broadcast Channels: If your telephone company provides this service, you can activate it.
- Band: You can set the band for different regions.
◆ Tap Menu Options, and then the Phone tab.

- You can set the ring type as ring, vibration or mute.
- If you want to use a customized ring tone file, use the ActiveSync program, on your desktop computer to copy the .wav, .mid, or .mp3 ring tone file to the /Windows/Rings folder on the GPS Phone 600. You can then select this ring tone from the Ring tone list.
- Set the key sound for dialing.
- You can set a PIN (Personal Identity Number) to block unauthorized access to your phone. Your first PIN is provided by your phone service provider.
4.5 Phone Application Programs
Caution
Before you can use the functions described in the Phone Group. Make sure that the SIM card is properly installed in your GPS Phone 600 and the Phone is turned on.
SIM Tool Kit
Tap Start, Programs, Phone, and then SIM Tool Kit.

This screen is for reference only. The actual screen is based on the service items provided by your telecom company.
-
Tap any service item.
-
Select Button: Launch service item. Follow the screen or voice instructions.
SMS Sender
Tap Start, Programs, Phone, and the SMS Sender.
Tap Start, Messaging and then New.
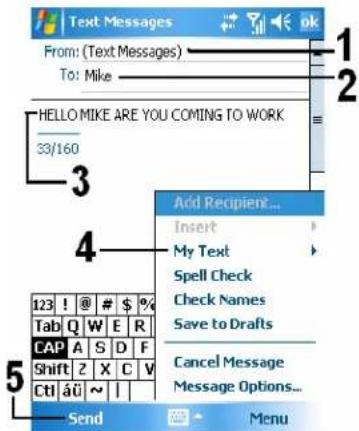
Enter the composing SMS screen in Messaging.
- "Text Messages" means you are editing SMS.
- Input the mobile phone number.
- Input the messages you want to send.
- Tap Menu and then My Text to select canned messages or to edit your Text Messages.
- Tap to send SMS message.
Chapter 5
Customize Your GPS Phone 600
You can adjust the GPS Phone 600 settings according to your personal preferences and install other programs.
5.1 Adjusting Settings
To see available options, tap Start, Settings, then the Personal or System tab located at the bottom of the screen. The following utilities allow you to adjust the settings based on your personal work style.
◆ Clock & Alarms
To change the time or to set alarms.
◆ Menus
To customize what appears on the Start menu, and to enable a pop up menu from the New button.
Owner Information
To enter your contact information.
Lock
To limit access to your GPS Phone 600.
Power
To maximize battery life.
Today
To customize the look and the information that is displayed on the Today screen.
5.2 Notifications
Your GPS Phone 600 reminds you in a variety of ways when you have something to do. For example, if you've set up an appointment in Calendar, a task with a due date in Tasks, or an alarm in Clock & Alarms, you'll be notified in any of the following ways:
◆ A Message box appears on the screen.
◆ A sound, which you can specify, is played.
◆ A light flashes on your GPS Phone 600.
◆ The GPS Phone 600 vibrates.
To choose reminder types and sounds for your GPS Phone 600, tap Start and then Settings. In the Personal tab, tap Sounds & Notifications. The options you choose here apply throughout the GPS Phone 600.
5.3 Power Preference Settings
Tap Start, Settings, the System tab, and then Power.
View the power usage condition or perform the relevant power management settings.

1. Key Lock
With Key Lock checked, when you accidentally press the hardware buttons on the GPS Phone 600, the GPS Phone 600 will not exit the sleep mode. This will prevent unnecessary power consumption if a button is accidentally pressed.
2. Battery Icon
Checking this item displays the power icon on the upper right side of the screen.
3. Advanced tab
Set the GPS Phone 600 to turn off automatically after a period of inactivity.
5.4 Backlight
Tap Start, Settings, the System tab, and then Backlight.

- Battery Power or External Power tab: Set the relevant backlight functions.
- Backlight Level tab: Adjust the backlight level.
5.5 Microphone
| Profile | Microphone |
| Voice Commander voice control volume setting for better recognition of system. | Turn the volume down and find the proper |
| Speech recording Turn the volume up. |
Tap Start, Settings, the System tab, and then Microphone.

- Use the slider to adjust volume of the recording microphone.
- Default Button: Restore to default system settings.
5.6 Adjusting the Volume
Push the volume control key on the side of the GPS Phone 600 or use the stylus to tap the 🔔 icon on the top of the screen to adjust all program sound functions under 📄. Adjust the phone volume under 🔔

-
Adjust volume: When set to Ⓞ On, use the stylus to tap and drag the slider up and down to adjust the volume. You can also push + or -- on the side of the GPS Phone 600.
-
Vibrate: Under Ⓞ Vibrate mode, the sound function of all programs will be replaced by vibration, including incoming call rings. The 📋con on the top changes to 📋
-
Mute: Under ☑ Off mode, the sound function of all programs will be turned off, including incoming call rings. The icon on the top changes to .
5.7 Finding and Organizing Information
The Search feature on your GPS Phone 600 helps you quickly locate information.

- Tap Start, Programs, and then Search. Input the text you want to find and then select the data type. Tap on Search to start the search.
- To find information that occupies a larger space, select Larger than 64 KB for Type.
You can also use the File Explorer to search for files and place these files into folders systematically. Just tap 📋 Start, Programs, and then File Explorer.
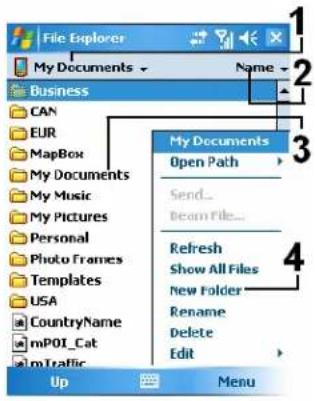
- Tap to change folders.
- Select the sort order for the list.
- Tap the folder name to open folder.
- Tap Menu and then New Folder to create a new folder.
You can move files in File Explorer by tapping and holding the items you want to move, and then tapping Cut, Copy, or Paste on the pop-up menu.
5.8 Navigation Bar and Command Bar
The navigation bar is located at the top of the screen. It displays the active program and current time, and allows you to switch to programs and close screens.
Use the command bar at the bottom of the screen to perform tasks in programs. The command bar includes menu names, buttons, and the Input Panel button. To create a new item in the current program, tap New. To see the name of a button, tap and hold the stylus on the button. Drag the stylus off the button so that the command is not carried out.
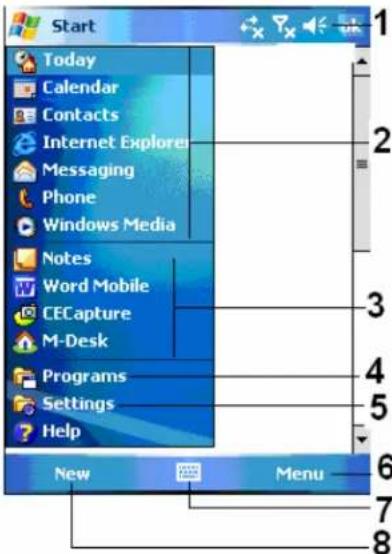
- Tap to change volume or mute the GPS Phone 600.
- Tap to select a program.
- Tap to quickly select a program you have recently used.
- Tap to see additional programs.
- Tap to customize the GPS Phone 600.
- Menu button.
- Input panel button.
- New button
5.9 Pop-up Menus
With pop-up menus, you can quickly choose an action for an item. For example, you can use the pop-up menu in the contact list to quickly delete a contact, make a copy of a contact, or send an e-mail message to a contact. The actions in the pop-up menus vary from program to program. To access a pop-up menu, tap and hold the stylus on the item name that you want to perform the action on. When the menu appears, lift the stylus, and tap the action you want to perform. Or tap anywhere outside the menu to close the menu without performing an action.

- Tap and hold to display the pop-up menu.
- Lift the stylus and tap the action you want.
- Tap outside the menu to close it without performing an action.
5.10 Redefine Hot Keys
Tap Start, Settings, the Personal tab, and then Buttons.


These hot keys can be redefined as launch keys for frequently used programs.
End Button and Send Button are exclusive phone functions so they cannot be redefined.
Chapter 6 Using Microsoft ActiveSync
Using Microsoft® ActiveSync®, you can synchronize the information on your desktop computer with the information on your GPS Phone 600. Synchronization compares the data on your GPS Phone 600 with your desktop computer and updates both computers with the most recent information. For example:
- Keep Pocket Outlook data up-to-date by synchronizing your GPS Phone 600 with Microsoft Outlook data on your desktop computer.
- Synchronize Microsoft Word and Microsoft Excel files between your GPS Phone 600 and desktop computer. Your files are automatically converted to the correct format.
By default, ActiveSync does not automatically synchronize all types of information. Use ActiveSync options to turn synchronization on and off for specific information types.
With ActiveSync, you can also:
◆ Back up and restore your GPS Phone 600.
- Copy (rather synchronize) files between your device and your desktop computer.
- Control when synchronization occurs by selecting a synchronization mode. For example, you can synchronize continually while connected to your desktop computer or only when you choose the synchronize command.
- Select which information types are synchronized and control how much data is synchronized. For example, you can choose how many weeks of past appointments you want synchronized.
6.1 Installing and Using ActiveSync
Important Installation Notice
Before you install ActiveSync, make sure that the USB cable on the GPS Phone 600 is not connected to the personal computer. Connect the USB cable only after ActiveSync is installed.
- Installing ActiveSync: You could use the Getting Started CD to install Microsoft ActiveSync version 4.1 or above on the personal computer. ActiveSync is already installed on your GPS Phone 600.
- Hardware installation: The USB cable is a plug-and-play device. Use the USB cable to connect your GPS Phone 600 to your personal computer.

3. Using ActiveSync
◆ After installation is complete, the ActiveSync Setup Wizard helps you customize your synchronization settings.
Once you use the USB cable to connect the two devices properly, the Set Up a Partnership screen appears on the personal computer. Set it up according to your requirements. The green icon appears on the status bar of your personal computer to indicate that it is connected.
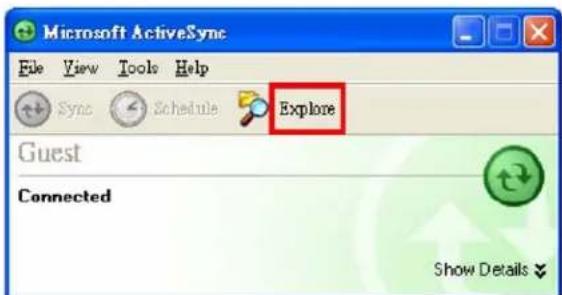
- Click Explore on the Microsoft ActiveSync window on the personal computer to access files in the GPS Phone 600. You can then use Windows Explorer to manage the files on your GPS Phone 600.
◆ Windows 95 and Windows NT do not support USB connections.
ActiveSync Connection Troubleshooting
Tap Start, Settings, the Connections tab, and then USB to PC.
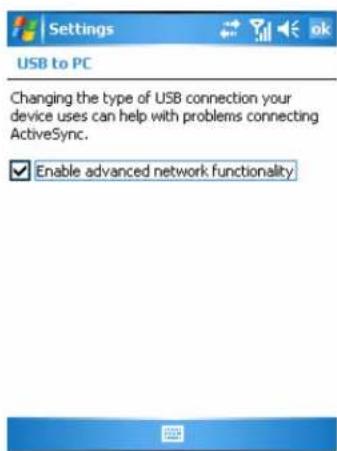
- Factory setting defaults to checking the box.
- If you have followed the above installation and operation procedures and find that the connection between your GPS Phone 600 and desktop PC still cannot be established, uncheck the box shown on the left.
6.2 USB Synchronization
Before you start to synchronize, use the GPS Phone 600 Getting Started CD to install ActiveSync on your personal computer. For more information on how to install ActiveSync, please refer to the ActiveSync CD or online help. ActiveSync is already installed on your GPS Phone 600.
USB Synchronization
- After installation is complete, the Setup Wizard will continue to guide you. Adjust the options according to your actual needs.
- Use the USB cable to connect the two devices properly and the Set Up a Partnership screen appears on the personal computer. Set it up according to your requirements.

- If this message appears, you may want to disconnect your GPS Phone 600 and install Outlook on your PC before continuing. In any event, click OK to close the message box.

- Click Next.

- Check the items you want to synchronize.
- Click Next.


5. Click Finish.
After installation is complete, the ActiveSync Setup Wizard helps you connect your GPS Phone 600 to your desktop computer, set up a partnership so you can synchronize information between your GPS Phone 600 and your desktop computer, and customize your synchronization settings. Your first synchronization process will automatically begin when you finish using the wizard.
The green icon 🔒 appears on the status bar of the personal computer to indicate that it is connected.
After your first synchronization, take a look at Calendar, Contacts, and Tasks on your GPS Phone 600. You'll notice that information you've stored in Microsoft Outlook on your desktop computer has been copied to your device, and you didn't have to type a word. Disconnect your GPS Phone 600 from your computer and you're ready to go!
Once you have set up ActiveSync and completed the first synchronization process, you can initiate synchronization from your GPS Phone 600. To switch to ActiveSync on your GPS Phone 600, tap Start and then tap ActiveSync.
For more information on how to use ActiveSync on your personal computer, run ActiveSync and refer to the ActiveSync online help. To learn more about the GPS Phone 600 ActiveSync, switch to ActiveSync and tap 📋 Start and then Help. Just refer to the Help for more information.
After the synchronization is complete, tap Calendar, Contacts, and Tasks on the GPS Phone 600 to view if the information saved in Microsoft Outlook on the personal computer is already copied to the GPS Phone 600.

On the GPS Phone 600:
Tap Start, Programs and then ActiveSync.
- View synchronization status.
- View connection status.
- Tap to connect and synchronize.
- Tap to synchronize via Bluetooth or change synchronization settings.
6.3 Synchronizing Using Bluetooth
Without using the USB cable to connect the two devices, you can still synchronize using Bluetooth. The greatest advantage is that you don't have to plug in and detach from the USB cable so often. This is especially useful for managing several GPS Phone 600s. For details on Bluetooth devices, refer to “Using Bluetooth” section.
Chapter 7 Connections
7.1 Connecting to the Internet
This section teaches you how to use GPRS wireless network connection. GPRS wireless networking is a convenient function for working at home or while traveling. You can use the GPS Phone 600 to browse websites and read or send E-mails, SMS or MSN messages.
Make sure that your telecom company provides this service and apply for a SIM with GPRS function. If you already have a SIM card, all you need to do is apply for the GPRS function from your service provider. Current SIM cards can support GPRS networking functions.
Generally, you will only need to install the SIM card to your GPS Phone 600 to use the mobile phone function. The system will automatically add the connection items for this SIM card. To verify, Tap Start, Settings, the Connections tab, Connections, and then "Manage existing connections," the list will show the newly added network name.
If the system is unable to successfully add the connection to your SIM card, use the Connection Wizard as shown next.
Setting the GPRS / EDGE Connection
Tap Start, Settings, the Connections tab, Connections, and then the Tasks tab.
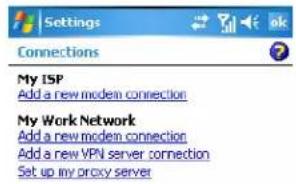
- As shown in the screen on the left tap "Add a new modem connection."

- Enter the "Make New Connection" screen as shown in the screen on the left.
Input a new connection name for convenience in making connections in the future.
♦ Select "Cellular Line (GPRS)".
- Lastly tap Next.

- Input the Access Point Name provided by your telecom company (this may appear as APN in the information provided by your carrier) and tap Next.
- Input your personal information such as account number, and tap Finish.

Starting the GPRS / EDGE Connection

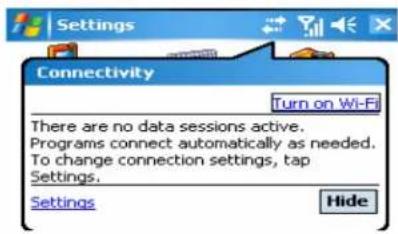

-
Tap the 📋 or 📋 icon at the top of the screen and when a message window appears tap "Turn off flight mode" and input your PIN to turn on the Phone. The 📋 icon will change to 📋 while the 📋 icon changes to 📋
-
Tap G, then tap Settings to link to Connections. You are ready to connect GPRS / EDGE.
-
Select "Message existing connections" in Connections. Tap and hold on the newly created connection name, and then select Connect to finish GPRS / EDGE connection.
-
Input your account information in the Logon Network screen and tap to login to the Network.
-
After the connection is established, the icon will change to

- Now you can use the appropriate program to access the Internet, receive or send E-mails, etc.
Disconnecting GPRS / EDGE

1. Disconnect GPRS / EDGE
♦ Tap G and the message window appear.
♦ Tap Disconnect.
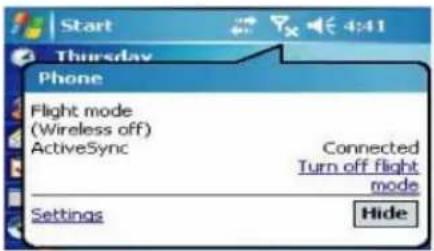
2. Turn off Phone
◆ Tap 📋 and the message window appear.
♦ Tap "Turn on flight mode."
7.2 Using Bluetooth
Bluetooth is a short-distance wireless communication technology with an effective range under 10 meters (30 feet). When you enable Bluetooth function, the blue LED blinks once every 4 seconds.
- Tap Wireless Manager.
- Tap to enable Bluetooth.

flowchart
graph LR
    A["Bluetooth LED indicator (Blue)"] --> B["Mobile Device"]
    B --> C["Wireless Manager"]
    C --> D["GSM"]
    C --> E["Bluetooth"]
    C --> F["Wi-Fi"]
    C --> G["All ON"]
Bluetooth Connection Wizard
Tap Start, Programs, Utilities, and then Bluetooth Manager.

- Tap on any one of the icons on the left side of the Wizard screen, the system will ask you if you would like to activate Bluetooth. After activation, the LED indicator on the upper left will flash blue.
- Tap here and the system will search for all nearby Bluetooth headsets.
- Tap to configure your Bluetooth device.
- Tap to enter the Bluetooth device pairing screen.

Step 1 2 3

flowchart
graph TD
    A["GPS"] --> B["1"]
    C["G - K"] --> D["2"]
    E["BT Headset"] --> F["3"]
    F --> G["4"]
All nearby Bluetooth devices found by the system.
- Tap on any one the shortcut icons and you will be able to follow the on-screen instructions to pair with that particular device. Devices that have already been paired with are shown with a ☑.
- Tap on one of the icons which represent a Bluetooth headset, when a ☑ is shown, it means that you may use that particular Bluetooth headset.
- Refresh Search Button: re-scan for all nearby Bluetooth devices.
- Change viewing method.

Tap Bluetooth Manger Button in the Wizard Mode screen to enter this screen.
- The system will search once again and add to the number of the devices that you may pair with.
- Return to Bluetooth Wizard.
- Tap to configure your Bluetooth device.
Bluetooth Connection Setting
Tap Settings Button in the Bluetooth Wizard screen to display the Bluetooth Settings screen.
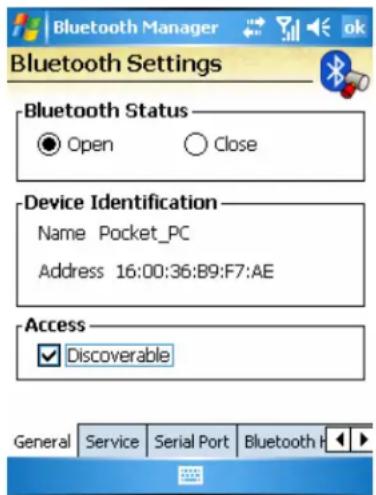
Tap the General tab.
1. Bluetooth Status
♦ Tap Open to enable Bluetooth function.
♦ Tap Close to disable Bluetooth function.
Make sure that you disable Bluetooth function when you need to save power or if you are in locations such as an airplane or hospital that ban the use of wireless devices.
2. Device Identification
Name
Other devices supporting Bluetooth can identify your GPS Phone 600 by this name.
◆ Address
This is the unique address of your GPS Phone 600.
3. Access
◆ Check "Discoverable"
Within an effective range of 10 meters (30 feet), all devices supporting Bluetooth can detect your GPS Phone 600 and data transmission is performed with confirmation from the other party.
◆ Uncheck "Discoverable"
Your GPS Phone 600 can transmit data to other devices but other devices cannot detect your GPS phone 600.
Service

Tap the Service tab.
Provide the settings about services of serial port, file transport and exchange vCard
Serial Port
If you have other Bluetooth software or hardware that uses a serial port, use the product as instructed and refer to the accompanied documentation and this section to register your GPS Phone 600 as a serial port or search for other serial ports.
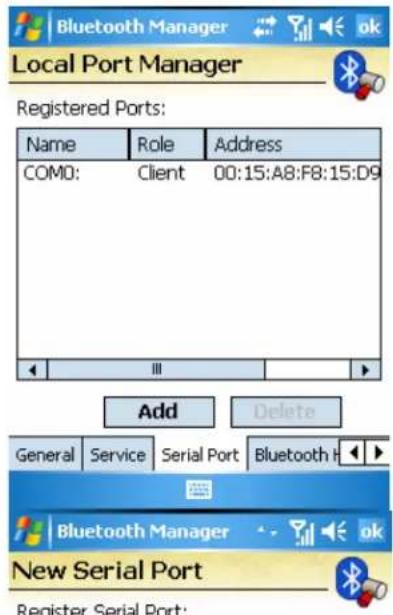
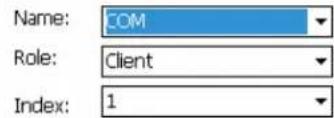
you Register name'
Tap the Serial Port tab.
- Tap Add to enter the Settings screen.
If you no longer need to use a registered serial port, tap this serial port under the "Name" column to highlight and then tap Delete to delete it.
- The figure on the left shows the settings screen for registering a new serial port.
If you select COM for the "Name" field then the valid options for the "Index" field are 0, 2, 4, 6, and 7.
- If you select BTS for the "Name" field, then the valid options for the "Index" field are 0 to 9.

Bluetooth Headset

Tap the Bluetooth Headset tab.
- Select a headset from the period list.
- Check "Use Headset."
FTP Sharing
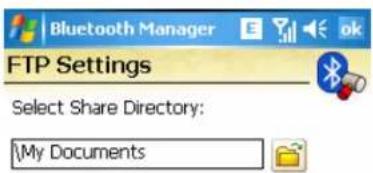
Tap the FTP tab.
Specify one of the folders on your GPS Phone 600 as a shared directory.

7.3 CSD Type
Tap Start, Settings, the Connections tab, and then CSD Type.
You must first apply for Circuit-Switched Data (CSD) service from your telecom company before you can use this function. In short, this function is similar to the modem dial-up in a personal computer. By simulating the GPS Phone 600 as a modem and connecting through the built-in GSM device, you can use the GPS Phone 600 to access the web.

This figure is for reference only.
The parameters shown in the screen will be based on the settings provided by your telecom company. The charge rate is regulated by your telecom company.
7.4 Connecting with a Personal Computer
For more information, refer to "Microsoft ActiveSync" section.
7.5 Wireless LAN Transmission
Tap the Wireless Manger icon 📋 on the lower right corner of the Today screen. For more information, refer to "Using Wireless LAN" section.

Chapter 8 Using Wireless LAN
8.1 Connecting to Wireless LAN
This section teaches you how to use the GPS Phone 600's built-in wireless LAN function to connect to the Internet. It is convenient for you to browse websites and send / receive E-mails through wireless networks at certain locations where wireless networking services are provided.
When you purchase credits for connecting to the Internet through a wireless LAN, you may be given some or all of the following information: an IP address, DNS name server address, Proxy server, port, and network key, etc. You need this information to setup and activate your connection. In some cases, you may need additional information to use a company's wireless connection, please confirm with the network administrator in your company.
If this is your first time using the wireless LAN function, firstly you should refer to the following "Configure Your Wireless Network" section for instructions for the necessary configuration settings. After you have completed the one-time configuration process, you only need to select the icon in the Wireless Manager main menu for subsequent connections.
Select the 📋 icon on the bottom right of the Today screen or Tap 📋 Start, Programs and then Wireless Manager.
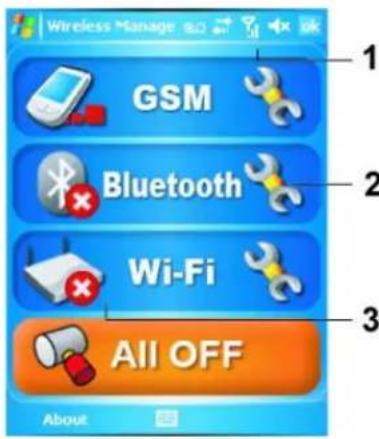
- This icon will show up on your screen whenever your GPS Phone 600 has detected a usable wireless network and has connected to that network, indicating that your GPS Phone 600 has successfully connected to the network hotspot (Access Point). At this point, the indicator on the upper left of your GPS Phone 600 will flash orange.
- Tap to enter the setup screen.
- Tap to connect or disconnect to your wireless network, a ✗ means that this function has been disabled.
![Multiple Networks Detected Select a network to connect to: ●test [Security-enabled] ○NT[Unsecured] ○E9[Unsecured] OK Menu](/content/2026/05/825552/images/b89338f9a507098dc0f1518db195e313e1a5fb89db9e6d27f982ecb7e6994d8b.jpg)
When the screen shown on the left appears, please choose a wireless network that you can use, and then tap OK button. Then, select Work, and tap Connect button.

The first time you use the wireless LAN function, your system will ask you to set the above mentioned settings, after that, your system will continue to use the settings from your most recent successful connection
8.2 Configure Your Wireless Network
(Reference for a normal network setup)
You will need a correct IP address, DNS name server address, Proxy server, and connection port number to setup your connection. If you have purchased a wireless Internet service account, then the service desk at the location where you will be connecting will provide you with this information, or, you should obtain this information from the network administrator of your company.
When your GPS Phone 600 is unable to automatically detect or connect to a usable wireless network, please try to configure the network manually. Please refer to this section's settings instructions.
-
Select the icon in the Wireless Manager main menu, an icon will display on the navigation bar.
-
Then Tap Start, Settings, the Connections tab, Connections, and then the Advanced tab, the screen displays shown on the left.
-
Select the Select Networks Button.
-
As shown on the left, make sure that My Work Network is selected for both items, and finally tap to save and exit.
✿ My Work Network is the WLAN connection method. The next time you need to use the GPRS connection, you will have to refer to the above listed steps, select My ISP for the first item.
![WLAN DRUY Link Status Connected SSID mm Operating Mode Infrastructure BISSID 00 40 F4 AA 58 B7 Channel L WEP Enable Power Saving Enable Signal Strength -81 TxRateMode Unavailable Status Setting About Configure Settings Configure Wireless Networks Add New... mmm Connected Networks to access: All Available Wireless Network Adapters Connect Menu Settings Configure Network Authentication Authentication: Open Data Encryption: WEP The key is automatically provided Network key: Key index: 1 123 1 2 3 4 5 6 7 8 9 0 - = Tabi q w e r t y u i o p [ ] CAP a s d f g n j k l ; * Shift z x c v b n m , . / + Ctrl äu \ Back Next Settings Configure Wireless Networks Add New... mmm Connect WiFi Remove Settings Edit Networks to access: All Available Wireless Network Adapters Connect Menu](/content/2026/05/825552/images/fb06d642c6ab9de1a246d002c8345dd32262b240c6fa20431ebf8c020d7a721b.jpg)
-
Tap Start, Programs, Utilities, and then WLAN Utility or in the Wireless Manager main menu, select to enter the WLAN Utility screen.
-
Then select the Configure Button to enter the WLAN setup screen.
-
Select name of a currently available network to enter the WLAN authorization setup screen.
-
Set according to the rules and information provided by the hotspot location.
a. Authentication: Select Open
b. Data Encryption: Select WEP to enable the entry bar about Network key
c. Network key
d. Network key index
- Tap and hold on the name of the network connection that you can currently use, and then select Connect. When the 🎨️ icon appears on the top of the screen, your wireless network has been successfully connected.
8.3 Configure Your Wireless Network
(Reference for Proxy setup)
To successfully configure your network, you will need the following information: a correct IP address, DNS name server address, Proxy server, and connection port number, etc. Please obtain the above listed information from your company's network administrator. If your company's networking environment doesn't need Proxy server settings, please close the proxy connection.
Tap Start, Settings, the Connections tab, Connections, and then the Tasks tab.
![Settings Connections My Work Network Add a new modern connection Add a new VPN server connection Edit my proxy server Manage existing connections Tasks Advanced Settings My Work Network This network connects to the Internet This network uses a proxy server to connect to the Internet Proxy server: XXX.X006.XX.XX Advanced... General Modern VPN Proxy Settings 123 1 2 3 4 5 6 7 8 9 0 . = Tab q w e r tyt y Uzbek[p[ ] CAP:a s d f g h-j,k,l;' Shift:f x c\v b n m, . .f← Ctrl: a \ \ ↓ ↑ ← →](/content/2026/05/825552/images/4dbbd6a8b859add9646c8a09ad4ff687e51af7de638d34aa5f44199b353dc964.jpg)
If your GPS Phone 600 fails to automatically detect or connect to a usable wireless network, please try using the manual method to configure your network settings. Refer to the settings information in this section.
-
Select "Setup my proxy server" or "Edit my proxy server," as shown on the left.
-
In the Proxy Settings tab screen, make sure that the following items have been checked:
a. This network connects to the Internet
b. This network uses a proxy server to connect to the Internet
The above is applicable to an office environment that requires a Proxy setup. For networks that do not use a proxy server, skip the following procedures.
- Enter the name into the "Proxy server" field.
- Select the Advanced button and enter the advanced settings screen.
![Settings My Work Network Tap a proxy type to change its settings. Type Server HTTP xxx.xxx.xx.xx:80 WAP Secure WAP Socks xxx.xxx.xx.xx:1080 123 1 2 3 4 5 6 7 8 9 0 - = Tab q w e r t y u i o p [ ] CAP a s d f g h j k l ; * Shift z x c v b n m , . / Ctl äü ` \ ↓ ↑ ← → 123 1 2 3 4 5 6 7 8 9 0 - = Tab q w e r t y u i o p [ ] CAP a s d f g h j k l ; * Shift z x c v b n m , . / Ctl äü ` \ ↓ ↑ ← → 123 1 2 3 4 5 6 7 8 9 0 - = TAB q w e r t y u i o p [ ] CAP a s d f g h j k l ; * Shift z x c v b n m , . / Ctl äü ` \ ↓ ↑ ← →](/content/2026/05/825552/images/8bc9d5747ac33ea86c707ff3143979f8af41aa75947f859ca6d443d2e18fa754.jpg)
-
You can modify the settings by tapping the HTTP type.
-
Enter the number into the "Port" field. Finally, tap ok to save and exit.
Chapter 9 Sending and Receiving Messages
9.1 E-mails and SMS Messages
Refer to "Connecting to the Internet" section to learn how to connect the GPS Phone 600 to the Internet and start using Messaging to send and receive E-mails and SMS messages.
This section explains the basics. For additional information, see the online help.
Use Messaging to send and receive E-mails messages in either of these ways:
- Send and receive e-mail messages by connecting directly to an e-mail server through an Internet service provider (ISP) or a network.
- Synchronize e-mail messages with Microsoft Exchange or Microsoft Outlook on your desktop computer.
- Inbox synchronization does not support synchronization with Microsoft Outlook Express.
Reference for using E-mail:
- Refer to "E-mail Server Setup" section.
- Refer to "Using E-mails and SMS".
Reference for using SMS:
- Refer to "Using E-mails and SMS" section.
- To send and receive SMS only, you only need to turn on the Phone (antenna icon on the Navigation Bar is ). It is not necessary to connect GPRS to the network nor is it necessary to establish a new E-mail account and connection in Messaging.
Synchronizing E-mail Messages
If you want to synchronize e-mails with company or home usage, please refer to this section. E-mail messages can be synchronized as part of the general synchronization process. You will need to enable Inbox synchronization in ActiveSync. For information on enabling Inbox synchronization, see ActiveSync Help on the desktop computer.
During synchronization:
- Refer to "Connecting to the Internet" section. Select the partnership you want to establish under "Set up a Partnership" and you can start to synchronize data. If you choose not to synchronize data, you can manually copy or move E-mails between the GPS Phone 600 and a personal computer.
- E-mail messages in the "Outbox" folder on your GPS Phone 600 are transferred to Exchange or Outlook, and then sent from those programs.
- Exchange or Outlook E-mail is supported.
- Messages in the GPS Phone 600 Inbox folder will be transmitted to the personal computer.
- If you delete mail in the GPS Phone 600, this mail will also be deleted from the personal computer the next time the two devices perform synchronization.
- SMS messages are not synchronized.
Connecting Directly to the Mail Server
For single-machine use, not combining office and home E-mails, please refer to “E-mail Server Setup” section.
You will receive messages directly from the mail server without using a PC. You can work online or offline. When working online, you read and respond to messages while connected to the e-mail server. Messages are sent as soon as you tap Send, which saves space on your GPS Phone 600.
When working offline, once you've downloaded new message headers or partial messages, you can disconnect from the e-mail server and then decide which messages to download completely. The next time you connect, Inbox downloads the complete messages you've marked for retrieval and sends the messages you've composed.
Based on your preference, you can program the GPS Phone 600 to receive mail for the last few days, receive subjects only or the entire mail, or just receive mail with file attachments smaller than a specified size. If you want to receive more or less mail, tap Menu, Tools and then Options to adjust the E-mail account settings according to your needs.
E-mail Server Setup
Refer to this section if you are preparing for single-machine use and not combining office and home E-mails. If you already have an E-mail account from your ISP or company network, you can use Messaging to send and receive mails and messages. To establish a new Messaging E-mail server on your GPS Phone 600, refer to the following sections.
- Obtain the following information from your ISP or company's network administrator for convenience in setting up the E-mail service.
◆ E-mail address, account name and password.
◆ POP3 or IMAP4 server name for internal mail.
◆ SMTP server name for sending mail.
For AT&T / Cingular, use cwx.com as the outgoing mail server.
![E-mail Setup Choose Outlook E-mail to set up an e-mail account that synchronizes with Exchange Server or your Outlook Desktop. Your e-mail provider: Select an e-mail provider 123 1 2 3 4 5 6 7 8 9 0 - = ◆ Tab q w e r t y u i o p [ ] CAP a s d f g h j k l ; ' Shift z x c v b n m , . / ← Ctrl äü ` \ Cancel Next](/content/2026/05/825552/images/7fca6ac0ed40b21b6dca9739334dcd22d6365c72d0554088ba1a027064ffbf7e.jpg)
- E-mail Setup
◆ Tap Start, Messaging, Menu, Tools, and then New Account to display the screen on the left.
◆ Follow the screen instructions to set up the E-mail service.
-
Refer to "Connecting to the Internet" section to connect the GPS Phone 600 to the Internet and you can start sending and receiving E-mails and SMS messages.
-
Connecting to the E-mail server
◆ Tap Messaging, Menu, Switch Accounts, and then check POP3.
♦ Tap Menu and then Send / Receive.
✿ Tap Menu, Tools and then Options to change the E-mail setup.
Using E-mails and SMS
Below is a brief description of the Messaging screen functions:
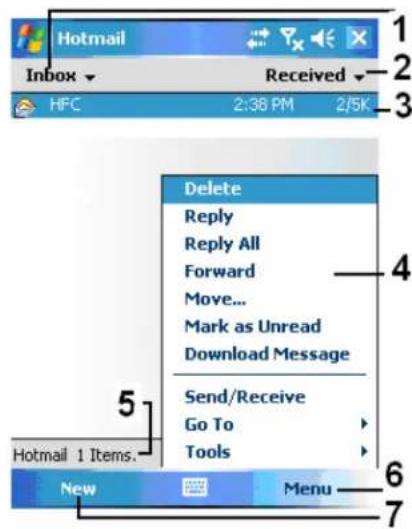
- Select the service and folder you want to display.
- Select the sort order for messages.
- Tap to open a message.
- Tap and hold to display a pop-up menu of actions.
- Status bar.
- Tap to change the account settings.
- Tap to compose a message.
Brief description on writing, sending, reading and replying (to) mail:
1. Send and Receive Mail:
Tap New to compose a message and then tap Send to send it.
![Hotmail Bcc: Cc: From: George To: Mike Subject: 123 1 2 3 4 5 6 7 8 9 0 - = Tab q w e r t y u i o p [ ] CAP a s d f g h j k l ; * Shift z x c v b n m , . / CtI äü \ Send Menu Select Menu Select (POP3/IMAP) ok Select a Contact Enter a name or number... #ab cde fgh ijk lmn opq rst uvw xyz Greg](/content/2026/05/825552/images/50de85ab4bd66b4403125306b64317b8617ecd7a393a1859aa3df6d3bb9855b5.jpg)
- Tap To, Cc or Bcc to open the Contacts screen. As long as you have set up Contacts beforehand, you can just tap to select.
- Tap the data area to input the E-mail address, mobile phone number and subject directly. If there is more than one contact, use a semi-colon (;) to separate the addresses.
- POP3 means to send E-mail, and Text Messages means to send an SMS message. Note that the same message cannot be sent as E-mail and SMS message at the same time.
- Use the scroll bar to view the header.
- Menu Button: Provides frequently-used functions for writing mail such as request return receipt, attach files to E-mail, select canned messages, edit canned messages or cancel mail.
- Send Button: Send your messages.
8. Read and Reply:
Receive new mails by tapping Menu and then Send/Receive. Switch to the "Inbox" folder and tap to open. The following figure shows the open mail screen.
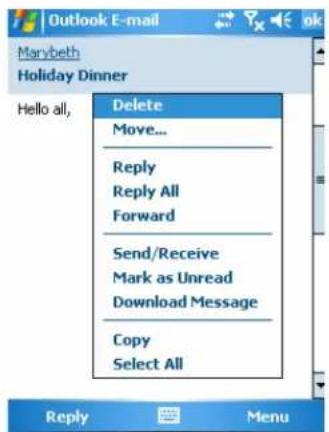
The menu provides additional functions for replying to or forwarding message.
9. Change preference settings.
◆ Set the Inbox Synchronization option under ActiveSync.
- Tap Messaging, Menu, Tools, Options, and then the Accounts, Message ... tabs on the GPS Phone 600 to set the appropriate options.
Direct Push Technology Alert
The Direct Push Technology alert function will enable you as a corporate user to never miss another e-mail. Through the ActiveSync feature, your GPS Phone 600 can instantly and automatically receive important e-mails from Microsoft Exchange Server.
Direct Push Technology Alert Settings
The following description will explain how to setup the ActiveSync program on the GPS Phone 600 end, and to directly synchronize the GPS Phone 600 with Exchange Server. This way, your device under GPRS or wireless network connections will be able to receive in-coming e-mail alerts, and be able to instantly read the messages.
A reminder that if you selected the connection method to be wireless network, for power saving purposes when the GPS Phone 600 enters sleep mode the connection will be broken. During this time you will not be able to receive instant e-mail. However, you will only need to press the “Power Button” to automatically complete the connection to the wireless network.

Tap Start, Programs, ActiveSync, Menu, and then Configure Sever.
- If the Exchange Server synchronization has not been setup before, please select Add Server Source.
1) Tap to connect and synchronize.
2) Tap to modify the synchronization settings.
![ActiveSync Edit Server Settings Server address: server Note: This is the same as your Outlook Web Access server address. ✓ This server requires an encrypted (SSL) connection 123 1 2 3 4 5 6 7 8 9 0 - = Tab q w e r t y u i o p [ ] CAP a s d f g h j k l ; ' Shift z x c v b n m , . / Ctl áü ` \ Cancel Next ActiveSync Schedule Sync during Peak times: As items arrive Off-peak times: As items arrive Use above settings when roaming Send outgoing items immediately Adjust peak times to fit your schedule.](/content/2026/05/825552/images/85d1b9f22a40cfdc6b9d85d2262540b02e6a6abbcdb3d22c79e28245819c75e3.jpg)
-
Obtain the server address, user name, network etc. from the company network administrator to successfully setup the server data
-
Tap Menu and then Schedule. The Peak times and Off-peak times provide an As items arrive option, this is the direct push technology alert function.
9.2 MSN Messenger
On the Today screen, tap 📋 to display the MSN Messenger sign-in screen. Tap 🌐 Start, Programs, Pocket MSN, and then MSN Messenger.
To switch to MSN Messenger, tap 📋 Start, Programs, and then tap Pocket MSN. MSN Messenger on your GPS Phone 600 is an instant messaging program that lets you:
◆ See who is online.
◆ Send and receive instant messages.
◆ Have instant message conversations with groups of contacts.
For more information on using MSN Messenger, tap 📋 Start and then Help.
To use MSN Messenger, you must have a Microsoft Passport ^™ account or a Microsoft Exchange e-mail account. You must have a Passport to use MSN Messenger Service. If you have a Hotmail ^® or MSN account, you already have a Passport. Once you have obtained either a Microsoft Passport or a Microsoft Exchange account, you are ready to set up your account.
❖ Sign up for a Microsoft Passport account at http://www.passport.com. Get a free Microsoft Hotmail e-mail address at http://www.hotmail.com.
Setting Up
Before you can connect, you must enter Passport or Exchange account information.

To sign in, enter your e-mail address and password.
If you already use MSN Messenger on your desktop computer, your contacts will show up on your GPS Phone 600 without being added again.
Working with Contacts
The MSN Messenger window shows all of your messenger contacts at a glance, divided into Online and Not Online categories. From this view, while connected, you can chat, send an e-mail, block the contact from chatting with you, or delete contacts from your list using the pop-up menu.

- Tap a contact to start a chat.
- Tap and hold to display a pop-up menu of actions
To see others online without being seen, tap Menu, My Status, and then select Appear Offline.
If you block a contact, you will appear offline but will remain on the blocked contact's list. To unblock a contact, tap and hold the contact, then tap Unblock on the pop-up menu.
Chatting with Contacts

![2 Hello 3 Send Last message: 12/29/06 at 11:57 AM. 123 1 2 3 4 5 6 7 8 9 0 - = + Tab q w e r t y u i o p [ ] CAP a s d f g h j k l ; * Shift z x c v b n m , . / ← CtI áü ` \ ↓ ↑ ← → Send Menu](/content/2026/05/825552/images/b8d7d1ac9229cd6b2eb841f81eeed040937f508ed45709ac1491df40907cdc10.jpg)
- View full chat.
- Enter message.
- Tap to send message.
- View status of the chat. To know if the contact you are chatting with is responding, look for the message under the text entry area.
Tap a contact name to open a chat window. Enter your message in the text entry area, and tap Send. Or tap Menu and then My Text to select a preset message. To invite another contact to a multi-user chat, tap Menu and then Invite and tap the contact you want to invite.
To switch back to the main window without closing a chat, tap Menu and then My Contacts. To revert back to your chat window, tap Menu and then Chats and select the person whom you were chatting with.
Chapter 10
Multimedia
10.1 Using Camera
Tap Start, Programs, Multimedia, and then Camera.
To take photos of scenery or of other people, turn the GPS Phone 600 so the screen is facing you and when you are satisfied with the composition, press the button on the side of the GPS Phone 600.
◆ To take a picture of yourself, turn the GPS Phone 600 around so that the preview mirror is facing you.
Tap Start and then Messaging to send the picture as an attachment in an E-mail.

natural_image
Scenic waterfall cascading through dense green forest, with camera and UI icons in corner (no readable text or symbols)
- Shutter
- Lens
- Preview Mirror
- Zoom In / Out
Shooting Tips
To take a self-portrait, it is best to face into the light. For best photo results, avoid backlit or dark areas.
Camera Mode
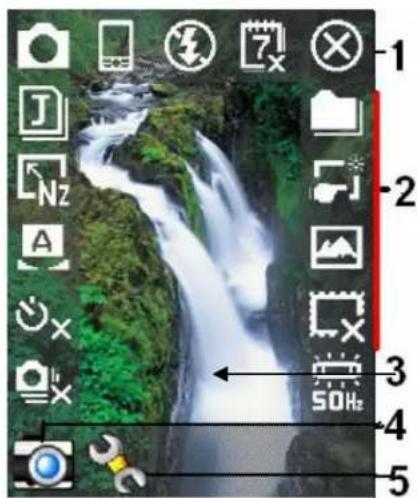
You can use Camera to shoot pictures and videos. This section describes the Camera tools.
- Exit Camera.
- Camera toolbar.
- Viewfinder.
- Switch between Camera and Digital video modes.
- Open or close the toolbar.
| Icon | Meaning |
| Photo mode: Normal, Timer, Continuous shutter, Portrait. | |
| Activate “Timer” to select the fixed time for shooting a picture. | |
| Activate “Continuous shutter” to select the number of pictures to be taken. | |
| Choose landscape or portrait. | |
| Enable or disable the flash function. | |
| Display or hide the date. | |
| File format. | |
| Select resolution. The higher the resolution, the larger the picture files. | |
| Select white balance mode. | |
| Select storage path. | |
| Enable or disable Wizard. | |
| Select special effect. | |
| Select picture frame. | |
| Select Frequency. |
Camera Mode Using Wizard
Tap 📄 or 📋 to select Wizard. After you press the shutter button on the side of the GPS Phone 600, the Wizard will guide you through how to link to other programs conveniently. This section explains the Wizard tools.

natural_image
Scenic waterfall cascading over a lush green forest, with numbered annotations (-1, 2, -3) and icons in the corner (no readable text or symbols on the waterfall itself)- Exit Camera.
- Photo-viewing area retains the last photo just taken.
- Wizard toolbar.
- If "Continuous Shutter" is selected, it will directly open or use the last picture just taken when linking to other programs.
| Icon | Meaning | |
| [ZDST] | Return to Camera to continue taking pictures. | |
| Delete current picture. | ||
 | Connect to Messaging. | |
Managing Pictures Shot by Continuous Shutter
Tap ☐ to select "Continuous shutter" in the wizard mode. After you press the shutter button, you can preview all thumbnails just shot and delete the unnecessary ones.

natural_image
Grid of nine identical waterfalls in a forest setting, each with a camera icon and a numbered scale bar (no text or symbols on the images themselves)- Exit Camera.
- Tap the thumbnail that you want to delete.
- Tap on the toolbar to delete the unnecessary picture.
Digital Video Mode
Recording without entering the Camera screen: Directly press and hold the recorder Button for a few seconds and then release to start recording. To finish recording, press the Recorder Button to stop.
-
Tap Start, Programs, Multimedia, and then Camera, DV Mode (the camera icon in the lower left corner of the screen switches camera modes).
-
Since only horizontal (landscape) mode is supported, please rotate your GPS Phone 600 90 degrees when recording.
- To shoot a video, turn the GPS Phone 600 so the screen is facing you, press the Recorder Button on the side of the GPS Phone 600 to start recording. To finish recording, press the Recorder Button again to stop.
- To shoot the footage of yourself, turn the GPS Phone 600 around so that the preview mirror is facing you.
Note: The 3GP format is a compressed version of MPEG 4 used on GSM camera phones. The 3GP video files can be viewed on a PC using a compatible player such as Apple's QuickTime Player or you can obtain a program for your PC to convert the 3GP files to another format for use with players such as Windows Media Player.

This section explains the Camera's digital video tools.
- Exit Camera
- Digital Video Mode toolbar
- Viewfinder
- Switch between Camera and Digital Video modes
- Open or close the toolbar
| Icon | Meaning |
 | Recording quality. The higher the resolution, the larger the file. |
 | Select file format. |
 | Select resolution. The higher the resolution, the larger the file. |
 | Select scene. |
 | Enable or disable sound recording. |
 | Select storage path. |
 | Enable or disable Wizard. |
 | Select special effect. |
 | Select Frequency. |
Digital Video Mode Using Wizard
Tap 📄 or 📃 to select Wizard. After you finish recording, the Wizard will guide you through how to link to other programs conveniently. This section explains the Wizard tools.
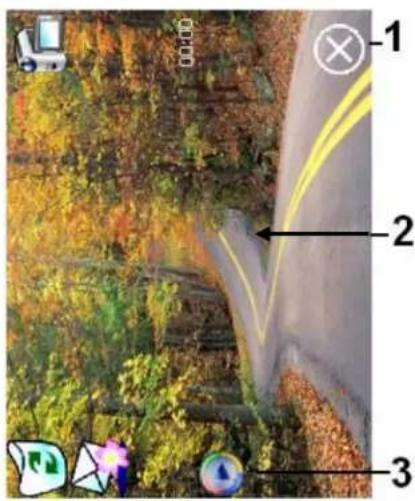
- Exit Camera.
- The photo viewing window stops at the first scene of the video you just recorded.
- Wizard toolbar.
| Icon | Meaning | |
 | Return to Camera and continue shooting video. | |
| Delete current video. | ||
| Connect to Messaging. | ||
 | Connect to Window Media. | |
Speed Shooting Using the Hardware Hot Keys
◆ Capture Mode

- Adjust zoom
- Exit Camera
- Switch between Camera and Video Recording modes
- Open or close the toolbar
- Camera Shutter / Video Recorder
Setting Mode / Wizard Mode

natural_image
Black and white photo of a waterfall on a green forest cliff, surrounded by camera app icons (no text or symbols on the waterfall itself)
natural_image
Front view of a smartphone with control buttons and a red circle highlighting the screen area (no text or symbols)- Use the Navigation Button to navigate up, down, left and right to select from the icons on the screen.
- Press the middle button to execute selection.
10.2 FM Tuner
Tap Start, Programs, Multimedia, and then FM Tuner.
This program is for listening to the radio with the headset. The headset will improve radio quality with its built-in antenna and is necessary to hear the radio.
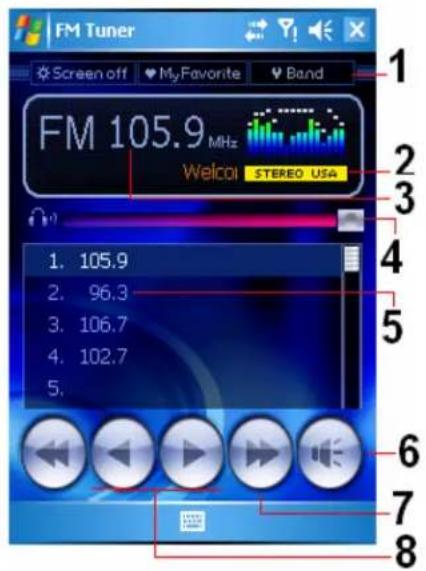
- Tool bar:
Screen off: This function turns off the screen but leaves the program running. Turn on the power to activate the screen. When the GPS Phone 600 enters sleep mode, the system will shut down the program.
◆ My Favorite: Manage My favorite radio station list.
- Band: Change the band frequency. Use the function to change the local band rate when traveling overseas.
-
Show the selected band frequency.
-
Tap and edit the frequency to change the station. The marquee below shows the relevant information from the radio station.
- The volume setting.
- Show the My favorite station list. Tap an item from the list to listen to the station. Hold an item for a few seconds to save the current station.
- Turn the sound on or off.
- Seek to the first radio station. Seek to the next radio station.
- or : Set the last or next frequency.


Set the station frequency:
- Tap and edit the frequency to set a custom station.
Note: The frequency must be in the legal range.
- Cancel.
- OK.
- Delete the previous digit.
Tap the My Favorite Button in the main screen to set My favorite station.
- Close and save the setting.
- The default value is EUROPE. To change the setting, hold the desired tab for a few seconds.
- My favorite station list.
- Choose an empty item and tap the + button in the tool bar to edit the station.
- Tool bar:

Add station

Delete station

Edit station

Set the position in the list

Close without saving
Chapter 11 Companion Programs
Microsoft® Pocket Outlook includes Calendar, Contacts, Tasks, Messaging, and Notes. You can use these programs individually or together. For example, e-mail addresses stored in Contacts can be used to address e-mail messages in Messaging.
Using ActiveSync, you can synchronize information in Microsoft Outlook or Microsoft Exchange on your desktop computer with your GPS Phone 600. You can also synchronize this information directly with a Microsoft Exchange server. Each time you synchronize, ActiveSync compares the changes you made on your GPS Phone 600 and desktop computer or server and updates both computers with the latest information. For information on using ActiveSync, see ActiveSync Help on the desktop computer.
You can switch to any of these programs by tapping them on the Start menu.
11.1 Calendar: Scheduling Appointments and Meetings
Use Calendar to schedule appointments, including meetings and other events. You can check your appointments in one of several views (Agenda, Day, Week, Month, and Year) and easily switch views by using the View menu.

- Tap to go to today.
- Tap to display or edit the appointment details.
- View menu.
- Tap Menu and then New Appointment to create a new appointment
You can customize the Calendar display, such as changing the first day of the week, by tapping Menu and then Options.
Create an Appointment
![Calendar Subject: Location: Starts: 12/18/06 12:00 PM Ends: 12/18/06 1:00 PM All Day: No Occurs: Once Reminder: Remind me 15 minute(s) Categories: No categories... Appointment Notes 123 1 2 3 4 5 6 7 8 9 0 - = Tab q w e r t y u i o p [ ] CAP a s d f g h j k l ; * Shift z x c v b n m , . / CtI áü ` \ Menu](/content/2026/05/825552/images/ce2f54eba9ea59a91ac64cfd6f119710152ffc819ce5bfccdef3e20009d7bfb3.jpg)
- Tap to return to the calendar (the appointment is saved automatically).
- Tap to choose from predefined text.
- Tap to choose from previously entered locations.
- Tap to select a time.
- Tap to select a date.
-
Notes are a good place for maps and directions.
-
If you are in Day or Week view, tap the desired date and time for the appointment.
-
Tap Menu and then New Appointment.
-
Using the input panel, enter a description and a location. Tap first to select the field.
-
If needed, tap the date and time to change them.
-
Enter other desired information. You will need to hide the input panel to see all available fields.
-
To add notes, tap the Notes tab. You can enter text, draw, or create a recording. For more information on creating notes, see "Notes: Capturing Thoughts and Ideas" section.
-
When finished, tap to return to the calendar.
If you select Remind me in an appointment, your GPS Phone 600 will remind you according to the options set in ✿ Start, Settings, the Personal Sounds & Notifications.
Use the Summary Screen
When you tap an appointment in Calendar, a summary screen is displayed. To change the appointment, tap Edit.

- View appointment details.
- View.
- Tap to change appointment.
Create Meeting Requests
You can use Calendar to set up meetings with users of Outlook or Pocket Outlook. The meeting request will be created automatically and sent either when you synchronize Inbox or when you connect to your e-mail server. Indicate how you want meeting requests sent by tapping Menu and then Options. If you send and receive e-mail messages through ActiveSync, select ActiveSync.
Schedule a Meeting
- Create an appointment.
- In the appointment details, hide the input panel, and then tap Attendees.
- From the list of e-mail addresses you've entered in Contacts, select the meeting attendees.
The meeting notice is created automatically and placed in the Outbox folder. For more information on sending and receiving meeting requests, see Calendar Help and Messaging Help on the GPS Phone 600.
11.2 Contacts: Tracking Friends and Colleagues
Contacts maintains a list of your friends and colleagues so that you can easily find the information you're looking for, whether you're at home or on the road.
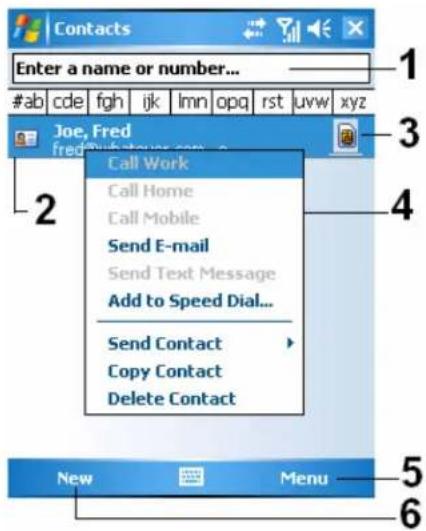
- Tap and enter part of a name to quickly find it in the list.
- Tap to display the contact details.
- This icon indicates that this particular contact entry is stored on your SIM card, so some of the information you will only be able to modify when the mobile phone is turned on.
- Tap and hold to display a pop-up menu of actions.
- Provides the relevant menu. For example, select Options to change the way information is displayed in the list. Or select Save to SIM or Save to Contacts to duplicate to Contacts or SIM phonebook.
- Tap to create a new contact.
Create a Contact
- Tap New.
- Using the input panel, enter a name and other contact information. You will need to scroll down to see all available fields.
- To assign the contact to a category, scroll to and tap Categories and select a category from the list. In the contact list, you can display contacts by category.
- To add notes, tap the Notes tab. You can enter text, draw, or create a recording. For more information on creating notes, see "Notes: Capturing Thoughts and Ideas" section.
- When finished, tap to return to the contact list.
![Contacts Name: Picture: Select a picture... Job title: Department: Company: Work tel: Work fax: Work addr: IM: Details Notes 123 1 2 3 4 5 6 7 8 9 0 - = Tab q w e r t y u>i pivot[ ] CAP a s d f g h j k,l; ' Shift z x c v b n m, . / ← CtI äü \ ↓ ↑ ← → Menu](/content/2026/05/825552/images/c48d223d60755a42cd80dc871fb7af2c6a1a635f8e7d06cc9f61222447b67e96.jpg)
- Tap to return to the contact list (the contact is saved automatically).
- Tap to select a representative picture for this contact, when dialing, this picture will appear on your screen, making it easier to identify the contact which you are dialing to and adding a lot of fun.
- Scroll to see more fields.
- Notes are a good place for maps and directions.
Find a Contact
There are four ways to find a contact:
In the contact list, enter a contact name in the box under the navigation bar. To show all contacts again, clear text from the box or tap the button to the right of the box.
In the contact list, tap Menu, Filter and then select the type of contact that you want displayed. To show all contacts again, select All Contacts. To view a contact not assigned to a category, select No Categories.
To view the names of companies your contacts work for, in the contact list, tap Menu, View By and then Company. The number of contacts that work for that company will be displayed to the right of the company name.
Tap Start, Programs, and then Search, enter the contact name, select Contacts for the type, and then tap Search.
Use the Summary Screen
When you tap a contact in the contact list, a summary screen is displayed.

- View contact details. All of the available contact information is listed, you can tap and use easily.
- Tap Menu and then Edit to change the contact information.
- Tap to view notes.
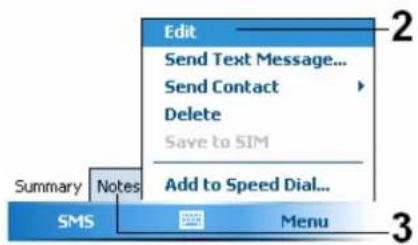
11.3 Tasks: Keeping a To Do List
Use Tasks to keep track of what you have to do.

- Indicates high priority.
- Tap to display or edit the task details.
- Tap and hold to display a pop-up menu of actions.
- Tap to create a new task.
- Provides the relevant menu.
For example, tap Filter to select the category of tasks you want displayed in the list. Tap Sort By to select the sort order of the list. Or tap Options to change the way information is displayed in the list.
Create a Task
- Tap New.
- Using the input panel, enter a description.
- You can enter a start date and due date or enter other information by first tapping the field. If the input panel is open, you will need to hide it to see all available fields.
- To assign the task to a category, tap Categories and select a category from the list. In the task list, you can display tasks by category.
- To add notes, tap the Notes tab. You can enter text, draw, or create a recording. For more information on creating notes, see "Notes: Capturing Thoughts and Ideas" section.
- When finished, tap to return to the task list.
![Tasks Subject: Priority: Normal Status: Not Completed Starts: None Due: None Occurs: Once Reminder: None Categories: No categories... Task Notes 123 1 2 3 4 5 6 7 8 9 0 - = + Tab q w e r t y u i o p [ ] CAP a s d f g h j k l ; * Shift z x c v b n m , . / ← CtI äü ` \ Menu](/content/2026/05/825552/images/9d803190a0c89d20510fef7294612a90a5e38815e8ab80ed2c269596f6e6f321.jpg)
- Tap to return to the task list (the task is saved automatically).
- Tap to choose from predefined subjects.
- Notes is a good place for maps and drawings.
To quickly create a task with only a subject, check Show Tasks entry bar on the Options menu. Then, tap "Tap here to add a new task" and enter your task information.
Use the Summary Screen
When you tap a task in the task list, a summary screen is displayed. To change the task, tap Edit.

- View task details.
- Tap to show and hide additional summary information.
- View notes.
- Tap to change task
11.4 Notes: Capturing Thoughts and Ideas
Quickly capture thoughts, reminders, ideas, drawings, and phone numbers with Notes. You can create a written note or a recording. You can also include a recording in a note. If a note is open when you create the recording, it will be included in the note as an icon. If the note list is displayed, it will be created as a stand-alone recording.

- Tap to change the sort order of the list.
- Tap to open a note or play a recording.
- Tap and hold to display a pop-up menu of actions.
- Tap to record.
- Provides the relevant menu. For example, check View Recording Toolbar to show the Recording toolbar.
- Tap to create a new item.
Create a Note
- Tap New.
- Create your note by writing, drawing, typing, and recording. For more information about using the input panel, writing and drawing on the screen, and creating recordings, see "Enter Information on Your GPS Phone 600."

- Tap to return to the note list (the note is saved automatically)
- Tap to show or hide the input panel.
- Provides the relevant menu. For example, check View Recording Toolbar to add a recording to the note; or check Draw to write on the screen
11.5 Word Mobile
Word Mobile works with Microsoft Word on your desktop computer to give you easy access to copies of your documents. You can create new documents on your GPS Phone 600, or you can copy documents from your desktop computer to your GPS Phone 600. Synchronize documents between your desktop computer and your GPS Phone 600 so that you have the most up-to-date content in both locations.
Use Word Mobile to create documents, such as letters, meeting minutes, and trip reports. To create a new file, tap 📋 Start, Programs, Word Mobile, and then New. A blank document appears. Or, if you've selected a template for new documents in the Options dialog box, that template appears with appropriate text and formatting already provided. You can open only one document at a time; when you open a second document, you'll be asked to save the first. You can save a document you create or edit in a variety of formats, including Word (.doc), Word Mobile (.pwi), Rich Text Format (.rtf), and Plain Text (.txt).
Word Mobile contains a list of the files stored on your GPS Phone 600. Tap a file in the list to open it. To delete, make copies of, and send files; tap and hold a file in the list. Then, select the appropriate action on the pop-up menu.

- Select the type of folder you want displayed in the list.
- Tap to change the sort order of the list.
- Tap to open a document.
- Tap and hold an item to see a pop-up menu of actions.
- Tap to create a new document.
You can change the zoom magnification by tapping View and then Zoom. Then select the percentage you want. Select a higher percentage to enter text and a lower one to see more of your document.
If you're opening a Word document created on a desktop computer, check Wrap to Window on the View menu so that you can see the entire document.
Using the input panel, enter typed text into the document. For more information on entering typed text, see “Entering Information on Your GPS Phone 600.”
To format existing text and to edit text, first select the text. You can select text as you do in a Word document, using your stylus instead of the mouse to drag through the text you want to select. You can search a document to find text by tapping Menu, Edit and then Find / Replace.
![Word Mobile Where is the new location Cut Copy Paste Clear Font... Paragraph... Increase Indent Decrease Indent Spelling 123 1 2 3 4 5 6 Tab q w e r t y u i o p [ ] CAP a s d f g h j k l ; Shift z x c v b n m , . / ← CtI áü ` \ View Menu 4 5](/content/2026/05/825552/images/cb12b3a6194e09acc3339e67e7926b9d644f0af66583ca66eee5ca1fa2924448.jpg)
- Tap to return to the document list (changes are saved automatically).
- Tap and hold to see a pop-up menu of actions.
- Tap to format text.
- Provides the relevant menu. For example, select Format to change formatting options.
- Tap View and then check Toolbar to show the toolbar.
11.6 Excel Mobile
Excel Mobile works with Microsoft Excel on your desktop computer to give you easy access to copies of your workbooks. You can create new workbooks on your GPS Phone 600, or you can copy workbooks from your desktop computer to your GPS Phone 600. Synchronize workbooks between your desktop computer and your GPS Phone 600 so that you have the most up-to-date content in both locations.
Use Excel Mobile to create workbooks, such as expense reports and mileage logs. To create a new file, tap 📋 Start, Programs, Excel Mobile, and then New. A blank workbook appears. Or, if you've selected a template for new workbooks in the Options dialog box, that template appears with appropriate text and formatting already provided. You can open only one workbook at a time; when you open a second workbook, you'll be asked to save the first.
Excel Mobile contains a list of the files stored on your GPS Phone 600. Tap a file in the list to open it. To delete, make copies of, and send files; tap and hold a file in the list. Then select the appropriate action from the pop-up menu.
Excel Mobile provides fundamental spreadsheet tools, such as formulas, functions, sorting, and filtering. To display the toolbar, tap View and then check Toolbar.
![Excel Mobile A1 Bob A B C 1 Bob 234 2 Henry 235 3 Greg 250 4 5 Ready Sheet1 Count=6 Σ $ .00 123 1 2 3 4 5 6 7 8 9 0 - = Tab q w e r t y u i o p [ ] CAP a s d f g h j k l ; * Shift z x c v b n m , . / CtI äü ` \ ↓ ↑ ← → View Menu](/content/2026/05/825552/images/e9310349b410c6bdb15260abdd3222544256075346dd95ee0707e0b1aee026eb.jpg)
- Cell contents appear here as you enter them.
- Select cell contents for the resource of chart.
- Insert Chart button
- AutoSum button
- Zoom button

bar
| Category | Red Bar | Green Bar | Blue Bar | |---|---|---|---| | 1 | 2100 | 200 | 100 | | 2 | 2100 | 6100 | 7100 | | 3 | 2100 | 7100 | 8100 |Tap Insert Chart Button to modify the relevant information, such as titles, scale, type and series.
Tips for Working in Excel Mobile
For more information on using Excel Mobile, tap 📋 Start and then Help. Note the following when working in large worksheets in Excel Mobile:
- View in full-screen mode to see as much of your worksheet as possible. Tap View and then Full Screen. To exit full-screen mode, tap Restore.
◆ Show and hide window elements. Tap View, Show and then tap the elements you want to show or hide. - Freeze panes on a worksheet. First select the cell where you want to freeze panes. Tap View and then Freeze Panes. You might want to freeze the top and leftmost panes in a worksheet to keep row and column labels visible as you scroll through a sheet.
Split panes to view different areas of a large worksheet. Tap View and then Split. Then drag the split bar to where you want it. To remove the split, tap View and then Remove Split.
Show and hide rows and columns. To hide a row or column, select a cell in the row or column you want to hide. Then tap Menu, Format, then Row or Column, and then Hide. To show a hidden row or column, tap Menu, Format, then Row or Column, and then Unhide.
11.7 PowerPoint Mobile
View PowerPoint slides created in PowerPoint 97 and above versions on your desktop computer. The supported formats include .ppt and .pps files. PowerPoint Mobile cannot be used to create or edit PowerPoint slides.
![PowerPoint Mobile My Documents QualcommDataPr... 2:22 p Name 80k 1 2 3 123 1 2 3 4 5 6 7 8 9 0 - = + Tab q w e r t y u i o p [ ] CAP a s d f g h j k l ; * Shift z x c v b n m , . / ← CtI äü ` \ ↓ ↑ ← → Open Menu 4 5](/content/2026/05/825552/images/600f49cf5e59d9af9cf96d71115ebaaefec821732a64f4887d96d3cca0262102.jpg)
- Select the folder you want displayed in the list.
- Tap to change the sort order of the list.
- Tap to open a file, and play the slides.
Depending on the slide layout, your screen may automatically switch to landscape mode to display the slides. - Tap to open the file you played last time.
- Provides the relevant menu.

flowchart
graph TD
    A["Next"] --> B["Previous"]
    B --> C["Go to Slide"]
    C --> D["Custom Show"]
    D --> E["Zoom In"]
    E --> F["Zoom Out"]
    F --> G["Show Options..."]
    G --> H["End Show"]
    I["Data Flow"] --> J["Assembly Process"]
    J --> K["Final Output"]
Tap ▲ on the lower left corner to open the menu. Tap End Show to quit.
11.8 Windows Media Player
Use Microsoft Windows Media Player to play digital audio and video files that are stored on your GPS Phone 600 or on a network. To switch to Windows Media Player, tap 📋 Start and then Windows Media.

- Use full-screen to view video.
- Display website. Find music or video to be played from website.
- Return to the start of the current file or previous file.
- Tap to play or pause.
- Tap to skip to the next song.
- Tap to adjust volume.
- Audio / Mute
- Indicates the progress of the current track.

To enter the screen shown on the left, tap Menu and then Library.
- Select Library.
- Tap and hold the file or folder to be played, then tap Play or Queue Up.
- Menu Button: Tap Open File to play files that do not belong to the current library. Tap Update Library to update the file list.
Use Microsoft Windows Media Player on your desktop computer to copy digital audio and video files to your GPS Phone 600. You can play Windows Media and MP3 files on your GPS Phone 600.
For more information about using Windows Media Player, tap 📋 Start, and then tap Help.
11.9 Internet Explorer
Using Internet Explorer
Use Microsoft ^® Internet Explorer Mobile to view Web or WAP pages in either of these ways:
During synchronization with your desktop computer, download your favorite links and mobile favorites that are stored in the Mobile Favorites subfolder in Internet Explorer on the desktop computer.
- Connect to an Internet service provider (ISP) or network and browse the Web. To do this, you'll need to create the connection first, as described in “Connect to the Internet”.
When connected to an ISP or network, you can also download files and programs from the Internet or intranet.
To switch to Pocket Internet Explorer, tap 📋 Start and then Internet Explorer.
Browse the Internet
Refer to "Connecting to the Internet" section to connect the GPS Phone 600 to the Internet and start browsing websites.
- Tap Start and then Internet Explorer.
- Input the site address into the address bar at the top of the screen and connect to this site.
- Use the scroll bar at the right side or bottom of the screen, or press the up or down button on the GPS Phone 600 to view the contents of the entire website.

- Input address here
- Tap to launch
- Back Button
- Provides the relevant menu, such as Favorites, Add to Favorites, Home, and Refresh.
Aside from keying in the address directly, you can also connect to websites using the following methods.
Tap the Favorites button, and then tap the favorite you want to view.
In the address bar, tap the arrow ▼ to choose from previously entered addresses.
To add a favorite link while using the GPS Phone 600, go to the page you want to add, tap and hold on the page, and tap Add to Favorites.
View Mobile Favorites

- Tap the favorite you want to view.
-
Tap to add or delete a folder or favorite link.
-
Tap the Favorites button to display your list of favorites.
- Tap the page you want to view.
You'll see the page that was downloaded the last time you synchronized with your desktop computer. If the page is not on your GPS Phone 600, the favorite will be dimmed. You will need to synchronize with your desktop computer again to download the page to your GPS Phone 600, or connect to the Internet to view the page.
The Mobile Favorites Folder
Only items stored in the Mobile Favorites subfolder in the Favorites folder in Internet Explorer on your desktop computer will be synchronized with your GPS Phone 600. This folder was created automatically when you installed ActiveSync.
Favorite Links
During synchronization, the list of favorite links in the Mobile Favorites folder on your desktop computer is synchronized with Pocket Internet Explorer on your GPS Phone 600. Both computers are updated with changes made to either list each time you synchronize. Unless you mark the favorite link as a mobile favorite, only the link will be downloaded to your GPS Phone 600, and you will need to connect to your ISP or network to view the content. For more information on synchronization, see ActiveSync Help on the desktop computer.
Synchronize Mobile Favorites
If you are using Microsoft Internet Explorer 5.0 or later on your desktop computer, you can download mobile favorites to your GPS Phone 600. Synchronizing mobile favorites downloads Web content to your GPS Phone 600 so that you can view pages while you are disconnected from your ISP and desktop computer.
Use the Internet Explorer plug-in installed with ActiveSync to create mobile favorites quickly.
Create a Mobile Favorite
- In Internet Explorer on your desktop computer, click Tools and then Create Mobile Favorite.
- To change the link name, enter a new name in the Name box.
- Optionally, in Update, select a desired update schedule.
- Click OK. Internet Explorer downloads the latest version of the page to your desktop computer.
- Synchronize your GPS Phone 600 and desktop computer. Mobile favorites that are stored in the Mobile Favorites folder in Internet Explorer are downloaded to your GPS Phone 600.
If you did not specify an update schedule in step 3, you will need to manually download content to keep the information updated on your desktop computer and GPS Phone 600. Before synchronizing with your GPS Phone 600, in Internet Explorer on your desktop computer, click Tools and then Synchronize. You will see the last time content was downloaded to the desktop computer, and you can manually download content if needed. You can add a button to the Internet Explorer toolbar for creating mobile favorites. In Internet Explorer on your desktop computer, click View, Toolbars, and then Customize.
Save GPS Phone 600 Memory
Mobile favorites take up storage memory on your GPS Phone 600. To minimize the amount of memory used:
In the settings for the Favorites information type in ActiveSync options, turn off pictures and sounds, or stop some mobile favorites from being downloaded to the GPS Phone 600. For more information, see ActiveSync Help.
- Limit the number of downloaded linked pages. In Internet Explorer on the desktop computer, right-click the mobile favorite you want to change and then Properties. In the Download tab, specify 0 or 1 for the number of linked pages you want to download.
Chapter 12 Maintaining the GPS Phone 600
12.1 Adding or Removing Programs
Programs added to your GPS Phone 600 at the factory are stored in ROM (read-only memory). You cannot remove this software, and you'll never accidentally lose ROM contents. All other programs and data files added to your GPS Phone 600 after factory installation are stored in RAM (random access memory).
You can install any program created for your GPS Phone 600, as long as your GPS Phone 600 has enough memory. The most popular place to find software for your GPS Phone 600 is on the Pocket PC Web site (http://www.microsoft.com/windowsmobile/pocketpc/).
Add Programs Using ActiveSync
You'll need to install the appropriate software for your GPS Phone 600 on your desktop computer before installing it on your GPS Phone 600.
- Programs created for Windows Mobile 5 Pocket PCs are compatible with the GPS Phone 600, and that many older Pocket PC programs may also run.
- Read any installation instructions, Read Me files, documentation that comes with the program. Many programs provide special installation instructions.
- Connect your GPS Phone 600 and desktop computer.
- Double-click the *.exe file.
If the file is an installer, the installation wizard will begin. Follow the directions on the screen. Once the software has been installed on your desktop computer, the installer will automatically transfer the software to your GPS Phone 600.
If the file is not an installer, you will see an error message stating that the program is valid but it is designed for a different type of computer. You will need to move this file to your GPS Phone 600. If you cannot find any installation instructions for the program in the Read Me file or documentation, use ActiveSync Explore to copy the program file to the Program Files folder on your GPS Phone 600. For more information on copying files using ActiveSync, see ActiveSync Help.
Once installation is complete, tap 📋 Start, Programs, and then the program icon to switch to it.
Add a Program Directly from the Internet
Programs created for Windows Mobile 5 Pocket PCs are compatible with the GPS Phone 600, and many older Pocket PC programs may also run.
- Download the program to your GPS Phone 600 straight from the Internet using Pocket Internet Explorer. You may see a single *.exe or *.zip file, a Setup.exe file, or several versions of files for different Pocket PC types and processors. Be sure to select the program designed for Windows Mobile 5.
- Read any installation instructions, Read Me files, or documentation that comes with the program. Many programs provide special installation instructions.
- Tap the file, such as a *.zip or *.exe file. The installation wizard will begin. Follow the directions on the screen.
Add a Program to the Start Menu
Tap 📋 Start, Settings, the Personal tab, and then Menus.

Check the box for the program you want to add.
If you do not see the program listed, you can either use File Explorer on the GPS Phone 600 to move the program to the Start Menu folder, or use ActiveSync on the desktop computer to create a shortcut to the program and place the shortcut in the Start Menu folder.
Using File Explorer on the GPS Phone 600: Tap Start, Programs, File Explorer, and locate the program (tap the folder list, labeled My Documents by default, and then My Device to see a list of all folders on the GPS Phone 600). Tap and hold the program and tap Cut on the pop-up menu. Open the Start Menu folder located in the Windows folder, tap and hold a blank area of the window, and tap Paste on the pop-up menu. The program will now appear on the Start menu.
Using ActiveSync on the desktop computer: Use the Explorer in ActiveSync to explore your GPS Phone 600 files and locate the program. Right-click the program, and then click Create Shortcut. Move the shortcut to the Start Menu folder in the Windows folder. The shortcut appears on the Start menu. For more information, see ActiveSync Help.
Remove Programs
Tap Start and then Settings.
On the system tab, tap Remove Programs.

Tap a program name from the list under "Programs in storage memory" to highlight it and then tap Remove.
If the program does not appear in the list of installed programs, use File Explorer on your GPS Phone 600 to locate the program, tap and hold the program, and then tap Delete on the pop-up menu.
12.2 Manage Memory
View Memory Status
Tap Start, Settings, the System tab, and then Memory.
◆ Tab the Main tab.

- The status of Storage and Program memory.
- Find: Quick link to the Search program.

♦ Tap the Storage Card tab.

- Current storage card memory status.
- Tap to select the built-in or external storage card.

♦ Tap the Running Programs tab.

-
Tap a program name in "Running Programs List" and when it is highlighted, tap Activate or Stop.
-
Activate: Start running the program you selected.
Stop: Stop the program you selected.
Stop All: Stop all programs in the "Running Programs List."
Find Available Memory
Under certain circumstances such as insufficient memory, the GPS Phone 600 cannot allocate memory automatically. Try to solve this problem through the following methods:
Tap Start, Programs, and then Search.

- To find files occupying larger amounts of Memory, select "Larger than 64 KB" for type and tap Search.

- Then, use File Explorer.

-
Tap 📋 Start, Programs, and then File Explorer. Use File Explorer to move the files you want to keep to external storage cards. Tap and hold the items to be moved, then tap Cut or Copy on the pop-up menu. Move to the storage card and then tap Paste.
-
Use File Explorer to delete files that you no longer need.
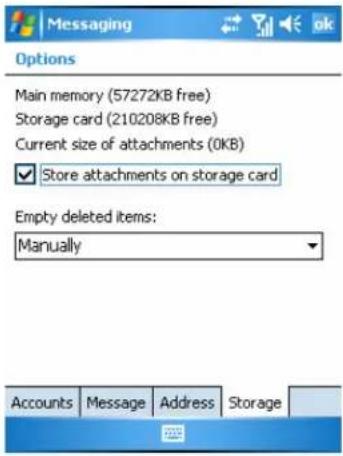
Tap 📁 Start, Messaging, Menu, Tools, Options, and then Storage tab.
Check "Store attachments on storage card" to save attached files from E-mails automatically in the storage card in future.

Tap 📋 Start, Internet Explorer Menu, Tools, Options and then Memory.
Tap Clear History and Delete Files to delete records of websites that you have browsed.
Tap Start, Programs, Notes / Word Mobile / Excel Mobile, Menu, and then Options.

- Enter the Notes file list screen.
- Tap Menu and then Options.
- Tap the "Save to" function button and select SDMMC from the list. This indicates that you are using your external storage card. Hereafter, new files will be automatically saved to this storage card.
❖ Follow the same operation procedure for Notes in Word Mobile and Excel Mobile.
In addition, you can use the Rename / Move or Save As function provided by the program above to move or save files to the storage card.
12.3 System Information
Tap 📄 Start, Settings, the System tab, and then System Information. Tap + or - to display or hide the system information.

Chapter 13 Specifications
| Item Description | |
| Operating system | Windows Mobile 5.0 (AKU 3.0) |
| Processor | Samsung SC3 2442, 400 MHz |
| Memory | 128 MB Flash ROM64 MB SDRAM |
| Display | 2.8" transmissive TFT LCD, touch panelQVGA 240 x 320,16-bit / 65,536 colors |
| Phone | GSM Quad band 850 / 900 / 1800 / 1900 MHzEDGE/GPRS Class 10Bluetooth 2.0 Class 2 + EDRWiFi IEEE 802.11b/gUnlocked with one SIM card slotUp to 5 hours talk time, 160 hours standby |
| GPS | SiRFstarIII 20-channel GPS receiver, WAAS enabled |
| Digital camera / camcorder | 2.0 mega pixels with flashUp to 1600 x 1200 resolution |
| FM | Tri-Band FM radioReady for TMC applications |
| Interface | Audio: Microphone, speaker, stereo headset jackData: Mini USB |
| Expansion | One micro SD card slot |
| Battery | 1530 mAh Li-lon Polymer, rechargeable, replaceable |
| Weight | 146 g / 5.2 oz (including battery) |
| Dimensions | L = 4.45 inch / 113 mmW = 2.34 inch / 59.5 mmH = 0.61 inch / 15.5 mm |
| Accessories | Getting Started CD, Manuals CDAc charger, USB cable, stereo earphones, leather caseCar charger*, car mount/holder*, micro SD card* |
| Environmental | Operation temperature: -5°C ~ 45°C; 23°F ~ 113°FStorage temperature: -25°C ~ 50°C; -13°F ~ 122°FHumidity: 5% - 80% non-condensing |
* These items and Ostia navigation software are not included in the 600e package.
Appendix
A.1: Regulation Notices and Safety Declaration
Health and Safety Information
Electrical and Battery Safety
Use only the AC adapter provided with this product. Do not use similar items from other products. The provided AC adapter is for use with this product only. Do not use it for other electrical products.
- Follow the specifications of the battery manufacturer: Avoid charging the battery when the environmental temperature is higher than 45°C. Do not store or use the battery when the environmental temperature is higher than 50°C. Otherwise, battery expansion or leakage may occur.
Do not attempt to disassemble, pound, pierce or damage the battery to avoid causing injury, danger or risk.
Application Environment Safety
Do not directly expose the GPS Phone 600 to any of the following environments: rapid changes of temperature, high temperature (such as direct exposure to sunlight or stoves), extremely low temperature, high pressure, areas with electrostatic discharge interference or dusty and humid places. Do not soak or wet the GPS Phone 600 with water or any other liquid.
Do not place the GPS Phone 600 near electrical appliances (such as TVs, computers, scanners, disc players, faxes, hair dryers, etc.) that may generate electrostatic discharge interference.
◆ Never drop the GPS Phone 600 nor subject it to strong impact.
Do not use ordinary pen or any object with a sharp tip to tap the GPS Phone 600 cover or screen (LCD panel) to avoid damaging and scratching the surfaces.
Do not use corrosive or volatile liquids to wipe the GPS Phone 600. If necessary, use a soft cloth or tissue to wipe the GPS Phone 600.
Warranty Security
In case the GPS Phone 600 is damaged, return it to your place of purchase. Do not attempt to disassemble this device on your own as this may void the warranty.
If any hazards result from the failure of the user to comply with usage rules, we will not be held responsible for any resulting warranty claims.
Data Security
- This company is not responsible for any data loss or damage to the GPS Phone 600 due to improper use. Record important data in your notebook separately or use the USB accessories that come with this product to save important data to your computer or storage card.
Privacy Restrictions
Some countries require full disclosure of recorded telephone conversations, and stipulate that you must inform the person with whom you are speaking that the conversation is being recorded. Always obey the relevant laws and regulations of your country when using the recording feature of your GPS Phone 600 Phone.
A.2: FCC Regulations
This device complies with part 15 of the FCC Rules. Operation is subject to the following two conditions: (1) This device may not cause harmful interference, and (2) this device must accept any interference received, including interference that may cause undesired operation.
This device has been tested and found to comply with the limits for a Class B digital device, pursuant to Part 15 of the FCC Rules. These limits are designed to provide reasonable protection against harmful interference in a residential installation. This equipment generates, uses and can radiated radio frequency energy and, if not installed and used in accordance with the instructions, may cause harmful interference to radio communications. However, there is no guarantee that interference will not occur in a particular installation If this equipment does cause harmful interference to radio or television reception, which can be determined by turning the equipment off and on, the user is encouraged to try to correct the interference by one or more of the following measures:
- Reorients or relocate the receiving antenna.
○ Increase the separation between the equipment and receiver. - Connect the equipment into an outlet on a circuit different from that to which the receiver is connected.
- Consult the dealer or an experienced radio TV technician for help.
- Changes or modifications not expressly approved by the party responsible for compliance could void the user’s authority to operate the equipment.
A.3: RF Exposure Information (SAR)
This device meets the government's requirements for exposure to radio waves. This device is designed and manufactured not to exceed the emission limits for exposure to radio frequency (RF) energy set by the Federal Communications Commission of the U.S. Government.
The exposure standard for wireless devices employs a unit of measurement known as the Specific Absorption Rate, or SAR. The SAR limit set by the FCC is 1.6W/kg. *Tests for SAR are conducted using standard operating positions accepted by the FCC with the device transmitting at its highest certified power level in all tested frequency bands. Although the SAR is determined at the highest certified power level, the actual SAR level of the device while operating can be well below the maximum value. This is because the device is designed to operate at multiple power levels so as to use only the poser required to reach the network. In general, the closer you are to a wireless base station antenna, the lower the power output.
The FCC has granted an Equipment Authorization for this device with all reported SAR levels evaluated as in compliance with the FCC RF exposure guidelines. SAR information on this device is on file with the FCC and can be found under the Display Grant section of http://www.fcc.gov/oet/fccid after searching on FCC ID: HFS-GPS600.
For body worn operation, this device has been tested and meets the FCC RF exposure guidelines for use with an accessory that contains no metal and the positions the handset a minimum of 1.5 cm from the body. Use of other enhancements may not ensure compliance with FCC RF exposure guidelines. If you do no t use a body-worn accessory and are not holding the device at the ear, position the handset a minimum of 1.5 cm from your body when the device is switched on.
SAR Information
Read this manual carefully before using.
Warning: Reduced electromagnetic waves, please use properly.
Head: 0.776 W/Kg - PCS 1900
FCC WLAN: 0.136 W/Kg
GSM 850 Body with holster: 0.987 W/Kg
Holster Information
Holster model name: PZX28
Dimensions: 6.1 x 11.8 x 2.5 cm +/- 0.1 cm
Where to Find Information
| For information on See this source | |
| Programs on your GPS Phone 600 This User’s Guide and GPS Phone 600 Help. To view Help, tap Start and then H e l p . | |
| Additional programs that can be installed on the GPS Phone 600 | The GPS Phone 600 Getting Started CD. |
| Connecting to and synchronizing with a desktop computer | Check the user’s guide that comes with this product or look for the online help relevant to ActiveSync on the desktop PC or the GPS Phone 600. |
| Up-to-date information on your GPS Phone 600 | http://www.microsoft.com/windowsmobile/ or http://www.pharosgps.com |
A.4: FAQ
- What features does the GPS Phone 600 have?
Answer:
1). Built-in 802.11b/g wireless networking module.
2). The built-in camera module's sensitization and filming quality are better than other brands of Pocket PCs in the same class.
3). The latest Microsoft Windows Mobile 5.0 operating system, with all its settings stored on a Flash ROM. You won't have to worry about losing your data even if the GPS Phone 600 runs completely out of power. The extra-large Flash memory space is capable of storing a large amount of personal data and application programs.
- How do I configure the wireless network? And how do I connect to the Internet?
Answer:
Wireless Manager will assist you in managing your Bluetooth devices, GSM mobile devices, and your wireless networks.
1). When you purchase credit points for connection to the Internet via a wireless connection, you will be given an IP address, DNS name server address, Proxy server, connection port number, and network key information, you will need this information to successfully connect to the Internet. Sometimes corporate networks may need additional information, please contact your company's network administrator for details. If you are using your wireless network for the first time, please refer to the "Configure your Wireless Network" section and set the necessary configurations.
2). In general, you can activate the wireless connection by tapping the icon in Wireless Manager. When your GPS Phone 600 detects and connects to a available wireless network, a 🎨 icon will appear on the top of your screen, this means that your GPS Phone 600 has successfully connected with a network hotspot (Access Point). At this time, the indicator on the upper left of your GPS Phone 600 will flash orange.
- My GPS Phone 600 cannot boot. What should I do about it?
Answer:
1). Make sure the GPS Phone 600 battery you use still has enough power.
2). Plug your GPS Phone 600 into the charger, and make sure the red charging indicator lights up. Press the "Power Button."
3). If you have done the above but your GPS Phone 600 still cannot boot, proceed with the following step: Remove the GPS Phone 600 back cover, and check the battery lock is in place. If not, the system cannot be started.
- My GPS Phone 600 has a screen freeze or the system does not respond.
What should I do about it?
Answer:
1). You may reset your GPS Phone 600. This means to re-start the whole system to release unnecessary resources so that the system can return to normal.
2). If you have reset your GPS Phone 600 but it still cannot operate normally, then you need to carry out a cold boot to solve this problem. How to carry out a cold boot: Press and hold the "Power Button" with one hand, and use the stylus tip to press the "Reset Button" with the other hand. Release the "Power Button" and the "Reset Button" at the same time. If you answer "Yes" to the two questions displayed after a cold boot. (Erase all data and load default? Delete registry only?) The programs installed by yourself, self-made settings, and self-made data (e.g., "Contacts" and "Calendar") will disappear and return to their default settings. As a result, we suggest you copy your data to the storage card. Data stored in the storage card will not vanish because of a cold boot. Or you can synchronize the data on your GPS Phone 600 with your desktop computer.
- Why doesn't my GPS Phone 600 make any sound?
Answer:
1). Tap the speaker icon 📄 on the top right of the screen, then select the volume control options, or adjust the volume of the incoming call sound.
2). Alternatively, you may use the volume control key on the side of your GPS Phone 600 by pushing it up or down to control the volume.
- Why does my GPS Phone 600 screen automatically become dark?
Answer:
Tap Start, Settings, the System tab, Backlight, and then the Battery Power or the External Power tab. You may find that if you use battery power, the backlight automatically shuts down after 30 seconds by default; the external power shuts down after 1 minute by default. If you think these times are too short, you may extend them as needed.
- When I want to open a program or file, a warning message "Not enough memory" pops up. What should I do about it?
Answer:
Because your GPS Phone 600's memory is shared by storage memory and program memory, the following methods are available. You may choose the one that works best for you.
1). Remove the programs you installed or that are not frequently used to release program memory space.
2). Delete data that is not used frequently or unnecessary to release storage memory space.
- The characters on the screen are too small to read. How can I enlarge them?
Answer:
Tap 📋 Start, Settings, the System tab, Screen, and then the Text size tab. You may adjust the text size as you wish. Also, you may select the landscape orientation in the General tab screen. Try and change them so that you can read more smoothly.
- The contact point of my stylus is not quite precise. What should I do about it?
Answer:
Align the screen and the touch screen can respond to the operation of your stylus more precisely. The following two ways will bring you into the touch screen calibration mode.
1). Tap 📋 Start, Settings, the System tab, Screen, and then Align Screen Button.
2). Simultaneously press the Left Soft-Key on the bottom-left of the GPS Phone 600 and the execution button in the center of the navigation pad.
- A hardware button on my GPS Phone 600 doesn't make any response or calls a wrong program. What should I do about it?
Answer:
Tap 📋 Start, Settings, the Personal tab, and then Buttons. Check each button for correct setup.
- My GPS Phone 600's ActiveSync cannot be executed or make a connection.
What should I do about it?
Answer:
1). Make sure you have installed ActiveSync version 4.1 or above. The CD accompanying the product contains the software. If you have lost the CD, you may download it from the Microsoft Website.
2). Make sure the USB cable supplied with your GPS Phone 600 is connected to your PC.
3). Make sure you are not executing another program that uses the same serial port you selected for operation during installation.
4). If your ActiveSync is still not working, remove the ActiveSync software at the PC end and install it once again.
- Pharos GPS Phone 600 Series
- Hardware User's Manual
- GPRS / EDGE Settings for AT&T / Cingular
- GPRS / EDGE Settings for T-Mobile
- Step 1
- Step 2
- Step 3
- Step 4
- Table of Contents
- Chapter 1: Voice Command Satellite Navigation 9
- Chapter 2: Getting Started 12
- Chapter 3: Using the GPS Phone 600 24
- Chapter 4: Using the Phone 40
- Chapter 5: Customize Your GPS Phone 600 49
- Chapter 6: Using Microsoft ActiveSync 59
- Chapter 7: Connections 66
- Using Bluetooth 70
- CSD Type 76
- Connecting with a Personal Computer 77
- Wireless LAN Transmission 77
- Chapter 8: Using Wireless LAN 78
- Chapter 9: Sending and Receiving Messages 84
- Chapter 10: Multimedia 97
- FM Tuner 105
- Chapter 11: Companion Programs 107
- Calendar: Scheduling Appointments and Meetings 108
- Contacts: Tracking Friends and Colleagues 111
- Tasks: Keeping a To Do List 114
- Notes: Capturing Thought and Ideals 117
- Word Mobile 118
- Excel Mobile 120
- PowerPoint Mobile 123
- Windows Media Player 124
- Internet Explorer 125
- Chapter 12: Maintaining the GPS Phone 600 130
- Adding or Removing Programs 130
- Manage Memory 133
- System Information 138
- Chapter 13: Specifications 139
- Appendix 140
- A.1 Regulation Notices and Safety Declaration 140
- PLEASE READ BEFORE PROCEEDING
- Important Safety Precautions
- Electrical Safety
- Safety in Aircraft
- Interference with Medical Equipment Functions
- Nonionizing Radiation
- Body-worn Operations
- Road Safety
- Environment Restrictions
- Safety for Environments
- Explosive Atmospheres
- Chapter 1 Voice Command Satellite Navigation
- Navigation Device Installation
- Attention:
- GPS Navigation Software Installation
- Conditions for Using GPS Car Navigation
- Chapter 2 Getting Started
- Package Contents
- External Views
- Rear Side
- Installing the SIM Card
- Installing the Battery
- Using the GPS Phone 600 for the First Time
- Charging Power and Power Supply
- Re-installation or Replacing the Battery
- Power On and Off
- Sleep Mode
- Turn on the Screen
- Using the Stylus to Touch the Screen
- Restarting the GPS Phone 600
- Cold Boot
- Cold boot method
- Appropriate situation
- Caution
- Chapter 3 Using the GPS Phone 600
- Start Screen
- Orientation:
- Text Size tab:
- Today Screen
- Programs
- System Application Programs
- Entering Information on Your GPS Phone 600
- Entering Text Using the Input Panel
- Typing with the Soft Keyboard
- Using Letter Recognizer
- Using Block Recognizer
- Using Transcriber
- Selecting Typed Text
- Writing on the Screen
- Selecting Writing
- Convert Writing to Text
- Drawing on the Screen
- Creating a Drawing
- Selecting a Drawing
- Recording a Message
- Creating a Recording
- Using My Text
- Chapter 4 Using the Phone
- Installing and Removing the SIM Card
- Using the Phone
- Adjusting the Phone Volume
- Adjusting for proper volume:
- Turning the Phone On / Off and Making Calls
- Phone Toolbar
- Calling from Contacts
- Calling from Speed Dial
- Calling from the Call History
- Customizing Your Phone
- Phone Application Programs
- SIM Tool Kit
- SMS Sender
- Chapter 5
- Customize Your GPS Phone 600
- Adjusting Settings
- Notifications
- Power Preference Settings
- Key Lock
- Battery Icon
- Advanced tab
- Backlight
- Microphone
- Adjusting the Volume
- Finding and Organizing Information
- Navigation Bar and Command Bar
- Pop-up Menus
- Redefine Hot Keys
- Chapter 6 Using Microsoft ActiveSync
- Installing and Using ActiveSync
- Important Installation Notice
- Using ActiveSync
- ActiveSync Connection Troubleshooting
- USB Synchronization
- USB Synchronization
- Click Finish.
- Tap Start, Programs and then ActiveSync.
- Synchronizing Using Bluetooth
- Chapter 7 Connections
- Connecting to the Internet
- Setting the GPRS / EDGE Connection
- Starting the GPRS / EDGE Connection
- Disconnecting GPRS / EDGE
- Disconnect GPRS / EDGE
- Turn off Phone
- Using Bluetooth
- Bluetooth Connection Wizard
- Bluetooth Connection Setting
- Bluetooth Status
- Device Identification
- Access
- Service
- Serial Port
- Tap the Serial Port tab.
- Bluetooth Headset
- FTP Sharing
- CSD Type
- Connecting with a Personal Computer
- Wireless LAN Transmission
- Chapter 8 Using Wireless LAN
- Connecting to Wireless LAN
- Configure Your Wireless Network
- Configure Your Wireless Network
- Chapter 9 Sending and Receiving Messages
- E-mails and SMS Messages
- Synchronizing E-mail Messages
- During synchronization:
- Connecting Directly to the Mail Server
- E-mail Server Setup
- Using E-mails and SMS
- Send and Receive Mail:
- Read and Reply:
- Change preference settings.
- Direct Push Technology Alert
- Direct Push Technology Alert Settings
- MSN Messenger
- Setting Up
- Working with Contacts
- Chatting with Contacts
- Chapter 10
- Multimedia
- Using Camera
- Shooting Tips
- Camera Mode
- Camera Mode Using Wizard
- Managing Pictures Shot by Continuous Shutter
- Digital Video Mode
- Digital Video Mode Using Wizard
- Speed Shooting Using the Hardware Hot Keys
- ◆ Capture Mode
- Setting Mode / Wizard Mode
- FM Tuner
- Chapter 11 Companion Programs
- Calendar: Scheduling Appointments and Meetings
- Create an Appointment
- Use the Summary Screen
- Create Meeting Requests
- Schedule a Meeting
- Contacts: Tracking Friends and Colleagues
- Create a Contact
- Find a Contact
- Tasks: Keeping a To Do List
- Create a Task
- Notes: Capturing Thoughts and Ideas
- Create a Note
- Word Mobile
- Excel Mobile
- Tips for Working in Excel Mobile
- PowerPoint Mobile
- Windows Media Player
- Internet Explorer
- Using Internet Explorer
- Browse the Internet
- View Mobile Favorites
- The Mobile Favorites Folder
- Favorite Links
- Synchronize Mobile Favorites
- Create a Mobile Favorite
- Save GPS Phone 600 Memory
- Chapter 12 Maintaining the GPS Phone 600
- Adding or Removing Programs
- Add Programs Using ActiveSync
- Add a Program Directly from the Internet
- Add a Program to the Start Menu
- Remove Programs
- Manage Memory
- View Memory Status
- Find Available Memory
- System Information
- Chapter 13 Specifications
- Appendix
- A.1: Regulation Notices and Safety Declaration
- Health and Safety Information
- Electrical and Battery Safety
- Application Environment Safety
- Warranty Security
- Data Security
- Privacy Restrictions
- A.2: FCC Regulations
- A.3: RF Exposure Information (SAR)
- SAR Information
- Holster Information
- A.4: FAQ
- Answer:
Brand : Pharos
Model : PTL600
Category : Smartphone