
ELITE 9135 - Uncategorized UNIDEN - Free user manual and instructions
Find the device manual for free ELITE 9135 UNIDEN in PDF.


| Product Name | Uniden ELITE 9135 |
| Product Type | Cordless Telephone with Bluetooth and Answering System |
| Handset Battery | Rechargeable Ni-MH (BT-694 or BT-694s) 650mAh or 500mAh |
| Talk Time | Up to 10 hours (normal use) |
| Standby Time | Up to 7 days |
| AC Adapter (Base) | Input 240V AC, Output 9V DC @ 350mA (AAD-041S(M)) |
| AC Adapter (Charger) | Input 240V AC, Output 9V DC @ 210mA (AAD-600S(M)) |
| Display | LCD with status icons |
| Phonebook Capacity | 200 entries (home) plus up to 1500 entries per paired mobile phone (up to 4 phones) |
| Caller ID | Stores up to 50 calls (landline and mobile) |
| Redial List | Last 5 numbers per handset |
| Call Block List | Up to 20 entries; also blocks private and unknown numbers |
| Bluetooth | Bluetooth V2.0 handsfree profile; pair up to 4 mobile phones |
| Handset Range | Up to 3 m for Bluetooth; typical cordless range up to 50 m indoors |
| Number of Handsets Supported | Up to 10 cordless handsets plus 6 XDECT R002 range extenders |
| Answering System | Digital; records messages; remote access with 2-digit security code |
| Greeting Length | 2–30 seconds personal greeting |
| Record Time | 1 or 4 minutes, or Announce Only |
| Do Not Disturb | Programmable 1–9 hours or Always On |
| Privacy Mode | Prevents other handsets from joining a call |
| Keypad Lock | Press and hold * to lock/unlock |
| Belt Clip | Included |
| Headset Jack | 2.5 mm |
| Warranty | 1-year limited warranty |
Frequently Asked Questions - ELITE 9135 UNIDEN
User questions about ELITE 9135 UNIDEN
0 question about this device. Answer the ones you know or ask your own.
Ask a new question about this device
Download the instructions for your Uncategorized in PDF format for free! Find your manual ELITE 9135 - UNIDEN and take your electronic device back in hand. On this page are published all the documents necessary for the use of your device. ELITE 9135 by UNIDEN.
USER MANUAL ELITE 9135 UNIDEN
For more exciting new products please visit our website:
Australia: www.uniden.com.au
New Zealand: www.uniden.co.nz
OWNER'S MANUAL
Important Notice:
Under power failure conditions this appliance may not operate. ◆ Please ensure that a separate telephone, not dependent on local power, is available for emergency use.
General Notices for New Zealand Model:
The grant of a NZ Telepermit for any item of terminal equipment ◆ indicates only that Telecom has accepted that the item complies with minimum conditions for connection to its network. It indicates no endorsement of the product by Telecom, nor does it provide any sort of warranty. Above all, it provides no assurance that any item will work correctly in all respects with another item of Telepermitted equipment of a different make or model, nor does it imply that any product is compatible with all of Telecom’s network services.
The maximum volume setting of this telephone exceeds the ◆ Telecom specified volume requirement. Telecom takes no responsibility for the high volume available on this telephone, customer’s who believe this telephone is too loud should contact the manufacturer at the website indicated on owner’s manual warranty page.
For telephone networks other than Telecom there may be a charge ◆ incurred for local calls if the Insert 0 feature is on. Turn Insert 0 off. This equipment may not provide for the effective hand-over of a call ◆ to another device connected to the same line.
Elite 9135 Series Owner's Manual
What's in the box?
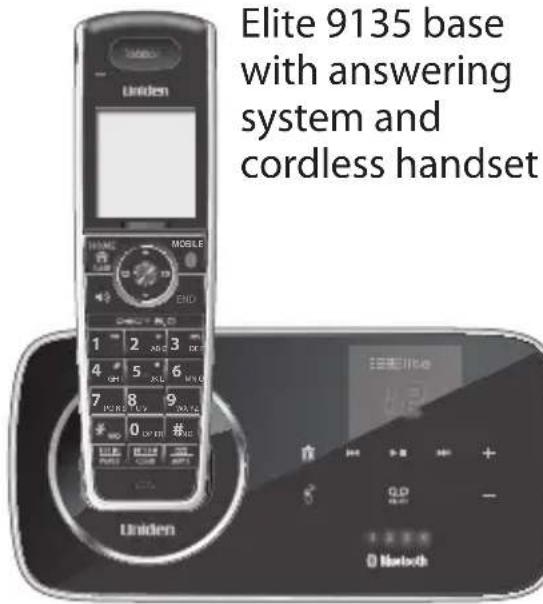
Battery cover
Not pictured:
Rechargeable battery • (BT-694 or BT-694s)
Belt clip •

• AC adapter (AAD-041S(M))
Telephone cord
You will also find:
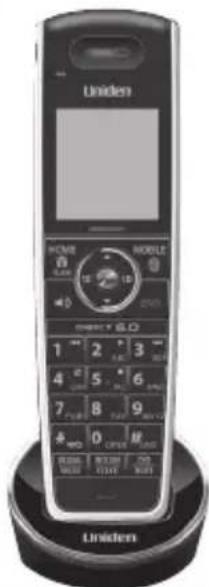
Accessory handset and charger
Not pictured:
- Rechargeable battery (BT-694 or BT-694s) Battery cover Belt clip AC adapter (AAD-600S(M))
| If you purchased model number: | You should have: |
| Elite 9135 None | |
| Elite 9135+1 1 of each | |
| Elite 9135+2 2 of each | |
| Elite 9135+3 3 of each | |
| Elite 9135+4 4 of each | |
| Elite 9135+5 5 of each |
If any items are missing or damaged, contact your place of purchase ◆ immediately. Never use damaged products!
Need help? Get answers at our website: ◆
www.uniden.com.au for Australian model
www.uniden.co.nz for New Zealand model.
What's in the manual?
Getting Started ....3
Installing Your Phone ....3
Setting Up the MobileLink Bluetooth™ Connection ....4
Getting to Know Your Phone ...... 6
Using the Handset Menu 9
Using Your Phone 11
Using Your Bluetooth Connection .....12
Finding a Lost Handset 12
Changing the Volume 12
Using the Caller ID and Redial Lists .....13
Using Call Waiting 14
Using an Optional Headset 14
Using the Phonebooks ....15
Using Special Features ...... 17
Call Block 17
DND (Do Not Disturb) 18
Multihandset Features ....18
Voice Message Notification 20
Using the Answering System .....20
Answering System Options (Ans. Setup) 20
Personalizing the Greeting .....21
Accessing the Answering System ...... 22
Using the System While You're Away from Home 23
Important Information ......24
Solving Problems 24
Resetting Handsets 27
Registering Handsets 27
Adapter and Battery Information ...... 28
One-year Limited Warranty ......29
Important Safety Instructions!
When using your telephone equipment, basic safety precautions should always be followed to reduce the risk of fire, electric shock and injury to persons, including the following:
- This unit is NOT waterproof. DO NOT expose it to rain or moisture.
Do not use this product near water, for example, near a bath tub, wash bowl, • kitchen sink or laundry tub, in a wet basement or near a swimming pool.
Avoid using a telephone (other than a cordless type) during an electrical storm. There may be a remote risk of electric shock from lightning.
Do not use the telephone to report a gas leak in the vicinity of the leak.
Use only the power cord and batteries indicated in this manual. Do not dispose of batteries in a fire. They may explode. Check with local codes for possible special disposal instructions.
- Do not place the handset in any charging cradle without the battery installed and the battery cover securely in place.
SAVE THESE INSTRUCTIONS!
CAUTION! Risk of explosion if battery is replaced by an incorrect type! Dispose of used batteries according to the instructions. Do not open or mutilate the battery. Disconnect the battery before shipping this product.
For more details, see the Important Information section.
GETTING STARTED
Installing Your Phone
Charge the Battery
- Unpack all handsets, battery packs, and battery covers.
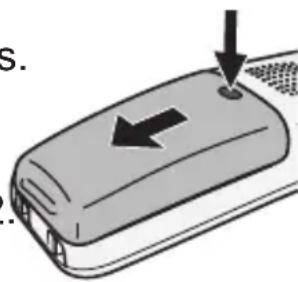
If you need to remove a cover, press in on the notch and slide the cover down and off.
Line up the battery connector with the jack inside the 2.
handset; the connector only fits one way.
Push the connector in until it clicks into place; tug 3.
gently on the wires to make sure the battery is securely connected.
Replace the battery cover and slide it into place.4.
natural_image
Illustration of a device with an arrow pointing to a small object on top, no text or symbols presentUse an AC adapter to connect the power jack on the base to a regular 5.
indoor (240V AC) power outlet. Connect any chargers the same way.
Place a handset in the base with the display facing forward. If the 6.
display doesn't light up, reseat the handset or connect the base to a different outlet. For 2 or more handsets, place each handset in a charger.
Charge all handsets completely (about 15 hours) before using.
Connect the Telephone Cord
Use the telephone cord to connect the TEL LINE jack on the base to a standard telephone wall jack.
Test the Connection
Pick up the handset and press HOME/FLASH. The handset sounds a dial tone, and the display shows Talk.
If you don't hear a dial tone or the display says Check Tel Line, check the connection between the base and the phone jack.
Make a quick test call. (Press END to hang up.)
If there's a lot of noise, check for interference (see page 25). –
Test all handsets the same way. If you can't get a dial tone, move the 3.
handset closer to the base.
Attaching the Belt Clip
Line up the holes on each side of the handset. Insert the belt clip into the holes on each side of the handset. Press down until it clicks.
To remove the belt clip, pull either side of the belt clip to release the tabs from the holes.
Setting Up the MobileLink Bluetooth™ Connection
The Elite 9135 with MobileLink technology can connect with mobile phones that support the Bluetooth V2.0 handsfree profile.
Visit our website on the front cover or contact customer service for a detailed list of tested mobile phones.
If you are not certain of the profiles supported by your Bluetooth ◆ phone or if you have difficulty pairing your phone to the Elite 9135, see the manual that came with your phone.
With the MobileLink feature, you can essentially treat your mobile phone as a second line. You can use the Elite 9135 handset to make and receive calls on your mobile phone number, put mobile phone calls on hold, and transfer calls to other handsets. See page 11 for more information.
Bluetooth wireless devices have a maximum range of about 3 m; the actual range will vary depending on local conditions (obstacles, battery power, interference, etc.).
Pair your Bluetooth phone
Pairing “introduces” four Bluetooth devices and gives them permission to connect to each other. In most cases, once you pair a phone to the Elite 9135, these devices connect automatically whenever they detect each other. (If you have to manually reconnect each time, check the Bluetooth settings on your mobile phone.) You can pair your Bluetooth devices through the Elite 9135 handset.
Press MENU/SELECT to display the handset's main menu.
Select the Bluetooth menu, then select the Add Mobile phone submenu. The base goes into pairing mode when the handset displays Search & select from Mobile Elite 9135 PIN: 0000.
On your Bluetooth phone, start a search for other Bluetooth devices. 3. (This process may take several seconds and it will be different for each mobile phone. See your phone owner's manual for detailed instructions.)
Your phone should discover a device called Elite 9135 or Handsfree device. When your phone asks if you want to pair with this device, answer yes.
If your phone prompts you for a PIN code or password to pair with the 5. Elite 9135, enter 0000 (four zeroes).
When your phone accepts the Bluetooth connection, the Elite 9135 6. sounds a confirmation tone. The Bluetooth device number icon on the base and the handset display light up.
Most mobile phones automatically transfer the audio to a Bluetooth device as soon as it pairs; if yours does not, look in your mobile phone's Bluetooth setup for a “transfer audio” or “send audio to device” option.
To test the connection
Pick up the handset from the cradle.1.
Dial the number you want to call, then press MOBILE on the handset.
You may not hear a dial tone or ringing, but the handset display says Talk.
Make sure the call connects and you can hear clearly. (When you're 3. finished, press END to hang up.)
The Elite 9135 remembers the pairing information for your mobile phone; if it loses connection with your phone for any reason (e.g., the mobile phone travels out of range, runs out of charge, etc.), the Elite 9135 can automatically reconnect the next time your phone becomes available.
Using the Elite 9135 with four Bluetooth phones
The Elite 9135 can save the pairing information for four different ◆
Bluetooth phones, but it can only use one mobile line at any given time. For example, if you pair the Elite 9135 to four Bluetooth phones, when you press MOBILE on the handset, the Elite 9135 asks which phone you want to connect to.
If you are using the Elite 9135 to talk on one Bluetooth phone, the ◆ Elite 9135 will not ring if a call comes in on another phone.
You can set a different ring tone for each paired mobile phone (see page 9).
To pair another Bluetooth phone, just repeat the pairing procedure ♦ with the new phone. (If the paired phones interfere when you're pairing the new one, just turn off Bluetooth on any paired phones until you finish pairing the new one.)
GETTING TO KNOW YOUR PHONE
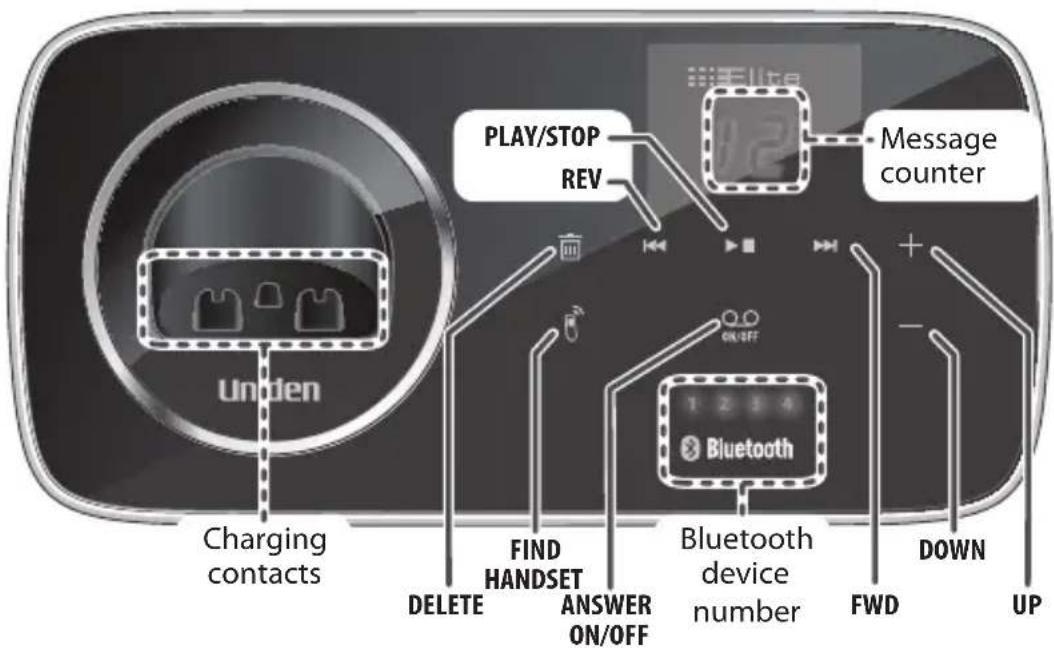
Parts of the Base
flowchart
graph TD
    A["Charging contacts"] --> B["DELETE"]
    B --> C["FIND HANDSET"]
    C --> D["ANSWER ON/OFF"]
    D --> E["Bluetooth device number"]
    E --> F["FWD"]
    F --> G["DOWN UP"]
    H["PLAY/STOP REV"] --> I["Message counter"]
    I --> J["1 2 3 4"]
    J --> K["ON/OFF"]
    K --> L["Bluetooth device number"]
| Key (icon) What it does | |
| DELETE( [IMAGE] ) | When listening to messages: delete the current message. •In standby: delete all messages. •When a call comes in on a paired Bluetooth phone and •while this phone is ringing: block this call. |
| FIND HANDSET( [IMAGE] ) | In standby: page all handsets. • |
| REV ( [IMAGE] ) | In the first 2 seconds of a message: go to the previous •message.Anytime after that: restart the current message. • |
| ANSWER ON/OFF( [IMAGE] ) | In standby: turn the answering system on and off • |
| PLAY/STOP (▶ ■) | In standby: begin message playback. •While screening calls: mute Call Screen. •While playing a message: stop playing messages. •While the phone is ringing: ignore this call (mute the ringer). • |
| FWD (▶▶I) | While playing a message: skip to the next message. |
| DOWN (—) | In standby: decrease the ringer volume.While playing a message: decrease the speaker volume. |
| UP (+) | In standby: increase the ringer volume.While playing a message: increase the speaker volume. |
| Bluetooth device number | The number indicates the Bluetooth device number linked to the Elite 9135. |
Parts of the Handset
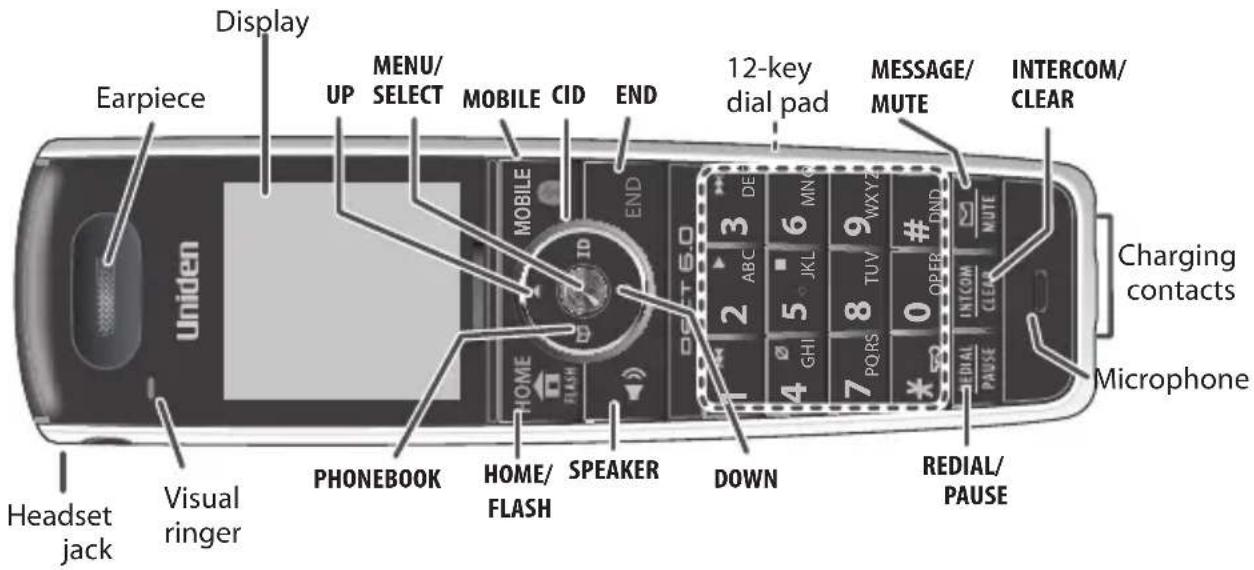
| Key (icon) What it does | |
| UP (▲) | In standby: increase the ringer volume. •During a call: increase the audio volume. •In any menu or list: move the cursor up one line. • |
| MENU/SELECT | In standby: open the menu. •In any menu or list: select the highlighted item. • |
| MOBILE | In standby: start a telephone call using a paired Bluetooth • phone.While a paired phone is ringing: answer the incoming call. •During a call with a paired phone: switch to a waiting call. • |
| CID | In standby or during a call: open the Caller ID list. •When entering text: move the cursor to the right. • |
| END | During a call: hang up. •In any menu or list: exit and go to standby. •While the phone is ringing: ignore this call (mute the ringer). • |
| #/DND | Do Not Disturb. In standby: press and hold to turn off the ringer on the base or any registered handset (see page 18). |
| MESSAGE/MUTE (✉) | In standby: access your answering system.During a call: mute the microphone.While the phone is ringing: ignore this call (mute the ringer). • |
| INTERCOM/CLEAR | In standby: start an intercom call.During a call: put the call on hold and start a call transfer.When entering text or numbers: erase the character at the cursor (press and hold to erase all characters). |
| REDIAL/PAUSE | In standby: open the redial list.When entering a phone number: insert a 2-second pause. |
| * [IMAGE] | Press and hold to lock/unlock the keypad. • |
| DOWN (▼) | In standby: decrease the ringer volume. •During a call: decrease the audio volume. •In any menu or list: move the cursor down one line. • |
| SPEAKER (◀) | Switch a normal call to the speakerphone (and back). • |
| HOME/FLASH | In standby: start a telephone call on your land line (get a dial tone).While the land line is ringing: answer the incoming call. •During a call: switch to a waiting call. • |
| PHONEBOOK (◀) | In standby or during a call: open the phonebook. •In the menu: go back to the previous screen. •When entering text: move the cursor to the left. • |
Reading the Display
The table shows possible status icons and what they mean. Since the icons appear based on what the phone is doing, you won't see all the icons at the same time.
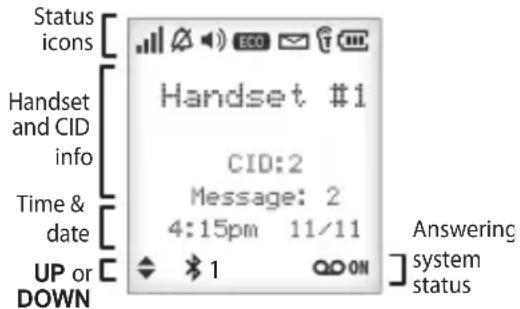
| Icon | What it means |
| The signal from the base is 1) weak through 4) strong. | |
| The ringer is turned off and will not ring for new calls. | |
| The speakerphone is on. | |
| The handset is using ECO (power save) mode. | |
| You have a voice message waiting. | |
| T-coil mode is on (see page 9). | |
| The battery is 1) full, 2) half charged, 3) getting low or 4) empty. | |
| Privacy Mode is on: no other handset can join the call. | |
| The operation using UP and DOWN is available. | |
| Bluetooth device number linked to the Elite 9135. | |
| [Aa] [aA] | Enter 1) capital or 2) lower case letters (see page 10). |
Using the Handset Menu
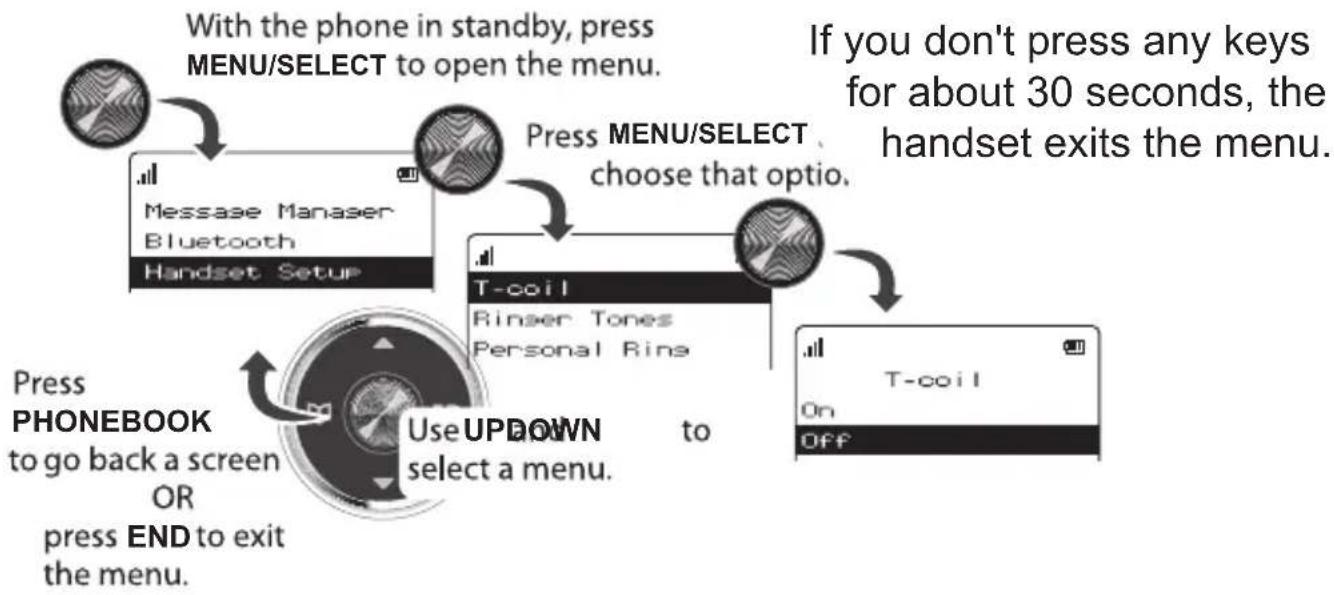
flowchart
graph TD
    A["With the phone in standby, press MENU/SELECT to open the menu."] --> B["Press MENU/SELECT choose that optio."]
    B --> C["T-coil\nRinser Tones\nPersonal Rinse"]
    C --> D["T-coil\nOn\nOff"]
    E["Press PHONEBOOK to go back a screen OR press END to exit the menu."] --> F["Use UP DOWN to select a menu."]
Message Manager Menu
Message Manager displays the caller's information for each message. You can select a caller and play back the message (see page 22).
Bluetooth Menu
Use the Bluetooth menu to pair a mobile phone to the Elite 9135 and select a mobile phone if you pair more than one.
Handset Setup Menu
You can change these settings separately for each handset.
| Menu Option What it does | |
| T-coil | Turn on T-coil mode to reduce noise on hearing aids equipped with a telecoil (T-coil) feature. T-coil mode shortens talk time, so keep your battery fully charged. |
| Ringer Tones | Select a phone, then choose that phone's ring tone. As you highlight each ring tone, you hear a sample. Press MENU/ SELECT to select. |
| Personal Ring | Turn on personal ring so you can assign a special ring tone to people in your phonebook. With Caller ID, this handset uses the assigned tone when the person calls. |
| AutoTalk | Have this handset answer a call when you pick it up from the cradle (without pressing any buttons). |
| Any Key Answer | Have this handset answer a call when you press any key on the 12-key dialpad. |
| Banner | Change the name used on the handset's display. |
| Key Touch Tone | Have the keypad sound a tone when you press a key. |
| LCD Contrast | Change the contrast of the display. |
Ans. Setup Menu
Refer to page 20 for details on setting up your answering system.
Date & Time Menu
Use this menu to set the clock (if you have Caller ID, the phone sets date and time automatically). Enter the date and time; select AM or PM. Use CID to move the cursor past a digit without changing it.
Global Setup Menu
The settings on this menu affect all handsets. Only one handset at a time can change these menu options.
| Menu Option What it does | |
| Insert 0 | This feature adds “0” or “00” at the beginning of the number received from Caller ID. The default setting for New Zealand is On. The default setting for Australia is Off. |
| Set Line Mode | Do not change this setting unless instructed to by customer service. |
| VMWI Reset | Reset the Voice Message Waiting Indicator (see page 20). |
| Edit Voice Mail | Enter, edit, or delete the access number for your voice mail service (see page 20). |
| Edit Int'l No. | Enter, edit, or delete international numbers. The “+” in a phonebook entry will be actually dialed with this number. |
Call Blocking Menu
See page 17 for a detailed description of the Call Blocking feature.
Entering Text on Your Phone
Use the 12-key dial pad anytime you want to enter text into your phone (a name in the phonebook, the handset banner, etc.).
If two letters in a row use the same key, enter the first letter; wait for the cursor to move to the next space and enter the second letter.

| To... Press... | |
| move the cursor left | PHONEBOOK. |
| move the cursor right | CID. |
| erase the character at the cursor | INTERCOM/CLEAR. |
| erase the entire entry and hold | INTERCOM/CLEAR. |
| enter a blank space | #. |
| switch between upper and lower case letters | *. |
| rotate through the punctuation and symbols | 0. |
USING YOUR PHONE
This section explains the most common functions on the phone.
| To... From the land | line From the mobile phone | |
| make a call, dial the number, then | Press HOME/FLASH or SPEAKER. | Press MOBILE. If two or more mobile phone is paired, the phone prompts you to choose one. |
| answer a call Press | HOME/FLASH or SPEAKER. | Press MOBILE. |
| hang up Press | END or put the handset in the cradle. | |
| ignore a call (mute the ringer) | While the phone is ringing, pressMESSAGES/MUTEon the handset. | |
| switch between the speakerphone and earpiece | Press SPEAKER. | |
| switch from one line to the other (automatic hold) | Press MOBILE. If two or more mobile phone is paired, the phone prompts you to choose one. | Press HOME/FLASH. |
| mute the microphone during a call | PressMESSAGES/MUTE.Press again to turn the microphone back on. | |
| put a call on hold | Press INTERCOM/CLEAR. After 5 minutes on hold, the call will be disconnected. | |
| return to a call on hold | Press HOME/FLASH or SPEAKER. | Press MOBILE. |
Using Your Bluetooth Connection
After you have paired your mobile phone with the Elite 9135 (see page 4), you can make and receive calls from your mobile phone through the Elite 9135.
To use the Bluetooth menu options, press MOBILE with the phone in standby, then select a mobile phone. Select one of these options:
| To... Select... | |
| make a mobile phone call | Make Call; enter the number to call. |
| let the specific handsets ring for incoming calls on that mobile phone | Privacy Setup, then select On or Off.All handsets set to Off: All handsets will ring (default).One or more handsets set to On: Only handsets set to On will ring.Other handsets do not ring but they can still receive calls and get CID information. |
| download phonebook | Download PB. The phone displays a confirmation screen when complete. |
| delete Bluetooth pairing | Remove Mobile. The phone displays a confirmation screen when complete. |
| relink a mobile phone | Connect. The phone displays a confirmation screen when complete. |
You can also access the Bluetooth menu options from the main menu (see page 9).
Finding a Lost Handset
With the phone in standby, press FIND HANDSET on the base. All handsets beep for 1 minute; to cancel, press FIND HANDSET again or press any handset key.
Changing the Volume
| To change the... When... Press... | ||
| earpiece volume for each handset | you are listening to that earpiece or speaker (playing messages, etc.) | UP to increase the volume. DOWN to decrease it. |
| speaker volume | ||
| ringer volume (If you turn the ringer all the way down, that particular ringer turns off.) | the phone is in standby |
Using the Caller ID and Redial Lists
Caller ID (CID) is a service available from your telephone provider that shows the phone number (and sometimes the caller's name) of incoming calls. Contact your telephone provider for more information.
| Caller ID list Redial list | |
| The phone saves the information for the last • 50 incoming calls (both land line and mobile phone calls) to the CID list. An asterisk (*) marks any calls received since the last time you checked the record details.All handsets share the same CID list so only • one handset can access the list at a time.In standby, handsets show how many calls • came in since the last time you checked the CID list. | Each handset remembers the last 5 numbers you dialed on it.Only one handset can • access its redial list at a time.The handset does not • record which line was used to call the number. |
| To... Press... | |
| open the CID list | CID, then use the UP and DOWN keys to enter the list.Up to 5 entries display at a time. |
| open the redial list | REDIAL/PAUSE. |
| scroll through the lists | UP to select the previous number.DOWN to select the next number.In CID list:RIGHTo view the next 5 numbers.LEFTto view the previous 5 numbers. |
| select the CID number | SELECT to view the CID data of the highlighted number. |
| dial this number from the land line | (First, make sure the number is SELECTed, see above).HOME/FLASH or SPEAKER. |
| dial this number from the mobile phone | MOBILE. If you have two or more mobile phones paired, select the phone you want and press MENU/SELECT. |
| review current CID record details | MENU/SELECT after scrolling to the desired entry. |
| close the lists | END. |
For individual record options, find a number (and review the detail for a CID record), and then press MENU/SELECT to display the following options:
| Menu Option What it does | |
| Delete | Erase the number from the list. |
| Store Into PH BK | Add the number to the phonebook. The phone displays the Edit Name screen (see page 16). |
| Add Call Block | (CID list only) Add the number to the Call Block list (see page 17). |
Using Call Waiting
Call Waiting, a service available from your telephone provider, lets you receive calls while you are on another call. Caller ID on Call Waiting (CIDCW) service displays Caller ID information for a waiting call.
If you get a Call Waiting call, the phone sounds a tone and displays any CID information received from the waiting call.
For Australian Model: Press HOME/FLASH and then press 2 on a land line call, or press MOBILE on a mobile phone call to accept the waiting call. The first caller is put on hold, and you will hear the new caller after a short pause. To return to the original caller, press HOME/FLASH and then press 2 on a land line call, or press MOBILE on a mobile phone call again.
For New Zealand Model: Press HOME/FLASH on the land line or MOBILE on a mobile phone call to accept the waiting call. The first caller is put on hold, and you will hear the new caller after a short pause. To return to the original caller, press HOME/FLASH or MOBILE again.
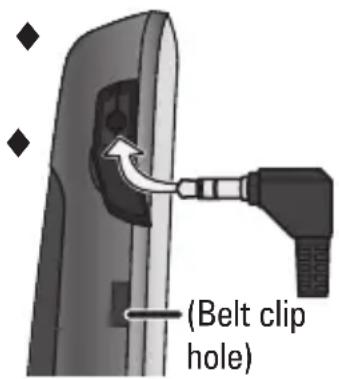
Using an Optional Headset
You can use a standard 2.5 mm telephone headset with your cordless handsets. To purchase headsets, visit our website (see the front cover).
To install a headset, remove the headset jack cover and insert the headset plug into the jack.
Just make and receive calls as usual, and use your headset to talk to the caller after the call connects.
While you connect a headset, the handset ♦ automatically mutes the earpiece.
Using the Phonebooks
You can download the phonebook (up to 1500 entries) from each paired mobile phone (up to four). You can also store up to 200 entries in the Elite 9135's home phonebook, which is separate from any downloaded phonebooks.
Only one cordless handset can access the phonebook at a time. ◆
Downloading mobile phonebooks into your phone
Make sure your mobile phone is paired to the Elite 9135 and is within 1. range of the base.
With the Elite 9135 in standby, open the menu and select Bluetooth.
Select the mobile phone you want to download from, then select 3.
Download PB. When downloading is complete, the cordless handset displays a confirmation screen. To cancel downloading, press END.
Each time you download a phonebook, the Elite 9135 overwrites ◆
any previous copy of that phonebook. The Elite 9135 automatically cancels the download if it receives an incoming call or someone tries to make an outgoing call.
If the download is interrupted or canceled, the Elite 9135 reverts to the original copy of the downloaded phonebook.
If you delete the pairing information for a mobile phone, the downloaded phonebook from that phone will also be deleted.
| To... Press... | |
| open the phonebook | PHONEBOOK, then select the phone name and then View Number. |
| scroll through the entries | DOWN to scroll through the entries from A to Z.UP to scroll from Z to A.RIGHT to view the next 5 listings.LEFT to view the previous 5 listings. |
| jump to entries that start with a certain letter | the number key corresponding to the letter you want. |
| dial this number from the land line | HOME/FLASH or SPEAKER. |
| dial this number from the mobile phone | MOBILE. If you have two or more mobile phones paired, select the phone you want and press MENU/SELECT. |
| review the current entry's details | MENU/SELECT after scrolling to the desired entry. |
| close the phonebook | END. |
For individual entry options, find a number and press MENU/SELECT twice to display the following options:
| To... Press... | |
| save this mobile phonebook entry to the home phonebook | MENU/SELECT twice to open the menu, then select Store Into PH BK. |
| edit the current entry | MENU/SELECT twice to open the menu, then select Edit. |
| delete the current entry | MENU/SELECT twice to open the menu, then select Delete. To confirm, select Yes. |
Adding Phonebook Entries (Home only)
With the phone in standby, open the phonebook. Select Home and then Create New. Enter a name and number and select a personal ring.
Enter the phone number (up to 20 digits) exactly as you would dial it.
If you need the phone to wait before sending the next set of digits, press REDIAL/PAUSE to insert a 2-second pause. You can insert multiple pauses, but each one counts as a digit (you'll see P in the display).
To edit the name, press PHONEBOOK to move the cursor back and insert a letter. Press INTERCOM/CLEAR to delete a letter.
To edit the number, press INTERCOM/CLEAR to back up the cursor and delete numbers. Re-enter the correct numbers.
Deleting All the Phonebook Entries
With the phone in standby, open the phonebook. Select the phone name and then Delete All. To confirm, select Yes.
Chain Dialing
If you often have to enter a series of digits or a code number during a call, you can save that code number to a phonebook entry and use the phonebook to send the code number.
Make your call normally.1.
When you hear the prompt that tells you to enter the number, open 2. the phonebook and find the entry that contains your code number.
Press MENU/SELECT twice to send the code. If you change your mind, just close the phonebook.
USING SPECIAL FEATURES
Call Block
If you subscribe to Caller ID, you can save phone numbers to the call block list. When a call comes in, the phone compares the received phone number to the numbers on the call block list. If the phone number is on the list, the phone replaces the caller's name with Call Blocked and blocks the call.
You can block an incoming call from the mobile phone; press DELETE on the base.
The call block list holds 20 entries, and all handsets share the same list. You can add entries by selecting Add Call Block in the CID menu that displays after you have viewed the CID record or through the Call Blocking menu (see below). (Only one handset can edit the call block list at a time.)
Call Blocking Menu Options
With the phone in standby, open the menu and select Call Blocking. Choose one of these options:
| Menu Option What it does | |
| View Number | See the numbers on your call block list. |
| Create New | Add an entry to your call block list. The phone will prompt you to enter a name and phone number. |
| Private Number | Block all calls from numbers reported by CID as "Private." (This does not count as one of the 20 entries.) |
| Unknown Number | Block all calls from numbers reported by CID as "Unknown." (This does not count as one of the 20 entries.) |
Call Blocking Entry Options
With the phone in standby, open the call block list and find the entry you want. Press MENU/SELECT to open the individual entry menu. Choose one of these options:
| Menu Option What it does | |
| Edit | Edit this entry. The phone will prompt you to edit the name and phone number. |
| Delete | Erase this entry from the list and allow calls from this number. |
DND (Do Not Disturb)
You can silence the ringers on the base and all handsets for a specific period of time; the answering system answers any incoming calls without playing anything through the speaker.
With the phone in standby, press and hold #.on any handset. The phone prompts you to select the number of hours (1 - 9 or Always On) that you want it to stay in DND mode.
To confirm, press MENU/SELECT or just wait about 5 seconds. The phone turns on the answering system and displays Do Not Disturb on each handset.
After the selected number of hours, the phone automatically exits 3. DND mode. To exit DND mode manually, press and hold # again.
If the phone is in DND mode and you turn off the answering system, the phone exits DND mode.
Multihandset Features
To use the features in this section, you need at least 2 handsets.
Your base supports a total of 10 cordless handsets: the one that came ♦ with the base and up to 9 accessory handsets.
Your base also supports a total of 6 XDECT R002 range extenders ◆ Visit the Elite 9135 page on the website for compatible repeaters.
You must register accessory handsets to the base before using them. ◆ (Handsets that came packaged with the base are already registered.)
◆ Handsets that aren’t registered display a Not Registered message. For registration instructions, see page 27 or see the accessory handset manual.
If a handset was ever registered to a base, you must reset it before it can register to a new base; see page 27, or see the accessory handset manual.
Conference Calling
When an outside call comes in on the land line, four handsets can join in a conference call with the outside caller.
◆ To join a call that's already in progress, just press HOME/FLASH or SPEAKER.
To leave the conference call, hang up normally; the other handset ◆ remains connected to the call.
Privacy Mode
To activate privacy mode on a land line call in progress, press MENU/SELECT twice. As long as privacy mode is on, you'll see a Pin the display, and no other handsets can join your call. Privacy mode turns off automatically when you hang up; you can also turn it off by pressing MENU/SELECT twice.
To use privacy mode during a conference call, wait until all handsets have joined the call before turning on privacy mode. If a handset disconnects, that handset cannot rejoin the call as long as privacy mode remains on.
Call Transfer
| To... On the land line | Using mobile phone | |
| transfer a call | Press INTERCOM/CLEAR, then select the handset you want to transfer the call to (select ALL to page all the handsets). When the other handset accepts the call, you'll be disconnected. | |
| cancel a transfer and leave the call on hold | Press END. | |
| return to the call Press | HOME/FLASH. Press | MOBILE. |
| answer a call transfer page | Press INTERCOM/CLEAR. You can speak to the transferring handset.To speak to the outside caller,2. | |
| Press HOME/FLASH. Press | MOBILE. | |
Intercom
Whenever the phone is in standby, you can make an intercom call ♦ between handsets without using the phone line.
You can make an intercom call from any handset, but only two handsets can be in an intercom call at any time.
If an outside call comes in during an intercom page, the phone ◆ cancels the page so you can answer the incoming call.
If an outside call comes in during an intercom call, press HOME/FLASH or MOBILE, depending on which line is ringing, to hang up the intercom call and answer the outside call.
| To... Press... | |
| make an intercom page | INTERCOM/CLEAR. Select the handset you want to talk with, or ALL to page all handsets at the same time. |
| cancel a page | END. |
| answer a page | INTERCOM/CLEAR or HOME/FLASH. |
| end an intercom call | END. Both handsets return to standby. |
Voice Message Notification
If you subscribe to a voice mail service, your phone can notify you when you have a new message. This feature supports Frequency-Shift Keying (FSK) notification. Contact your voice mail provider for information.
When you have new messages, the display shows a message icon. To access your voice mail, press MESSAGE/MUTE and select Voice Mail.
When you select Voice Mail, you will be prompted to enter a Voice Mail Access number if you have not yet set one up (see page 10). If you have already set one up, your phone will dial it.
After you listen to your messages, the message icon turns off. If it doesn't, you can reset it: With the phone in standby, open the menu and select Global Setup; select VMWI Reset, then select Yes.
USING THE ANSWERING SYSTEM
The answering system works with land line calls only.
Answering System Options (Ans. Setup)
You can set or change the answering system options from any handset. Just open the menu and select Ans. Setup.
| Menu Option What it does | |
| Security Code | Enter a 2-digit PIN so you can access your answering system from any touch-tone phone (see page 23). |
| Ring Time | Set the number of rings (6, 9, or 12) before the system answers. Toll Saver makes the system answer after 2 rings if you have new messages or after 4 rings if you don't. |
| Record Time | Set the amount of time (1 or 4 minutes) callers have to leave a message. Choose Announce Only if you don't want the system to let callers to leave a message. |
| Message Alert | Have the system beep every 15 seconds when you have a new message. The alert stops after you listen to all your new messages or if you press any key on the base. |
| Call Screen | Turn on the call screen feature (see page 23). |
| Ans. On/Off | Turn your answering system on or off.You can also press ANSWER ON/OFF on the base. |
| Record Greeting | Record your greeting (see below). |
| Greeting Options | Switch greetings or delete your greeting (see below). |
Personalizing the Greeting
Your personal outgoing message or greeting can be from 2 to 30 seconds long. If you don't record a greeting, the system uses a pre-recorded greeting: Hello, no one is available to take your call. Please leave a message after the tone.
| To... Follow these steps: | |
| record a personal greeting | Open the menu with the phone in standby. Select Ans. Setup, then Record Greeting.Press MENU/SELECT to start recording. Wait until the system says "Record greeting" before speaking.Press MENU/SELECT to stop recording. The system plays back your new greeting.To keep the greeting, press END. To delete it and try again, press INTERCOM/CLEAR. |
| switch between greetings | Open the menu with the phone in standby. Select Ans. Setup, then Greeting Options.The system plays back the current greeting. Press MENU/ SELECT to switch greetings. |
| delete your greeting | Switch to your personal greeting, then press INTERCOM/CLEAR while the greeting is playing. |
Accessing the Answering System
When the phone's in standby, you can access the system from any handset using two different methods: Message Manager and Play Messages. Regardless of which method you use to get your messages, the following conditions apply:
Only 1 handset can access the system at ♦ a time.
If you do nothing for 30 seconds, the phone returns to standby.
During remote access, the phone beeps ◆ so you know it's waiting for the next command.
During message playback, press MENU/SELECT to open the menu for playback control.
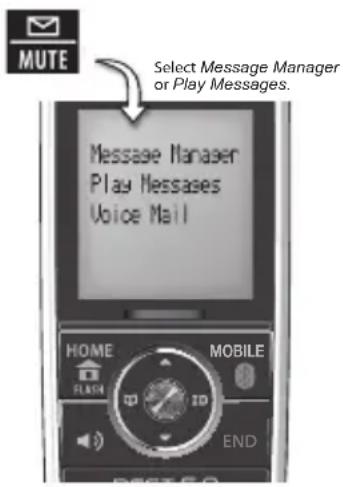
Message Manager
Message Manager lets you view the caller's information. With the phone in standby,
press MESSAGES/MUTE and then select Message
Manager; press UP or DOWN to find the message you want to listen to.
Press MENU/SELECT to listen to that message or you can scroll to the next one.
Play All Messages
Play All Messages replays all the messages received, starting with the newest, unheard messages and then replaying the older messages.
With the phone in standby, press MESSAGES/MUTE to access the Play Messages selection. You can play messages with this mode from the base or from the handset.
| To... From the base From a handset | ||
| play new messages | Press PLAY/STOP. | PressMESSAGE/MUTEandselectPlay Messages. |
| The system announces the number of new and old messages, then plays each new message (followed by the day and time) in the order it was received. After the new messages play, the system plays the old messages. | ||
| restart this message | Wait at least 5 seconds after the message starts playing, pressREV. | press1(number key). |
| replay an earlier message | Within 2 seconds after a message starts playing, press REV. | select 1 (number key). |
| skip a message | Press FWD. Select | 3 (number key). |
| delete a message | While a message is playing, press DELETE. select | 4 (number key). |
| delete all messages | With the phone in standby, press DELETE; press DELETE again to confirm. | Not available. |
| play old messages | After the system plays all new messages, press PLAY/STOP again. select | 2 (number key). |
| stop playback Press | PLAY/STOP. Select | 5 (number key). |
Screening Your Calls
You can use the answering system for call screening. While the system takes a message, you can listen on the base speaker (if you turn on Call Screen) or from a handset. Only one handset can screen calls at a time. If another handset tries to screen calls, it beeps and returns to standby.
| To... From the base | From a handset | |
| hear the caller leaving a message | Listen to the caller over the speaker. | PressMESSAGE/MUTE. |
| answer the call NA | Press | HOME/FLASH. |
| mute the call screen without answering | PressPLAY/STOP. | PressENDor return the handset to the cradle. |
| If you mute the call screen, the system continues taking the message: it just stops playing through the speaker. | ||
Using the System While You're Away from Home
You can dial in to your answering system from any touch-tone phone. Before you can use this feature, you must program a security code.
Programming a Security Code
With the phone in standby, open the menu; select Ans. Setup, then select Security Code. Use the number keypad to enter a two-digit security code (00 to 99). Press MENU/SELECT when you're finished.
Remember to make a note of your new security code!
Dialing In to Your System
Call your phone number and wait until the system answers. (If the 1. system is turned off, it answers after 15 rings and sounds a series of beeps.)
During the greeting or beeps, press Ⓛ. and immediately enter your security code. If you enter it incorrectly 3 times, the system hangs up and returns to standby.
The system announces the time, the number of messages in memory, 3. and a help prompt. It beeps to let you know it's waiting for a command.
When you hear 4. beeping, enter a 2-digit command from the chart.
| #1 | Repeat message | #5 | Stop playback |
| #2 | Play message | #6 | Turn the system on |
| #3 | Skip message | #9 | Turn the system off |
| #4 | Delete message | #0 | Hear help prompts |
If you don't press
any keys for 15 seconds, the system hangs up and return to standby.
IMPORTANT INFORMATION
Solving Problems
If you have any trouble with your phone, check this section first. If you need help, visit the customer support page of our website listed on the front cover.
| General problems Possible solutions | |
| No handsets can make or receive calls. | Check the telephone cord connection.• Disconnect the base AC adapter for a few • minutes; then reconnect it. |
| A handset can’t make or receive calls. | Move the handset closer to the base.• |
| A handset can make calls, but it won’t ring. | Make sure the ringer is turned on.• Make sure DND mode is turned off (see page 18). |
| A handset is not working. | Charge the battery for 15-20 hours. Check the battery connection. |
| The phone keeps ringing when I answer on an extension. | You may have to change the line mode. Contact Customer Service for instructions. |
| Audio issues Possible solutions | |
| Callers sound weak or soft. | Move the handset closer to the base. •Keep the handset's battery fully charged. •Increase the earpiece volume. • |
| There's a lot of noise or static on the line | Check for interference from appliances (microwave • ovens, TVs, etc.) or wireless devices (baby monitors, WiFi equipment, etc.). Move the handset or base away from the interference source.• If you use a telecoil hearing aid, turn on T-coil mode (see page 9).If you have any service that uses the phone line, add a • DSL or telephone line filter (see page 26). |
| Caller ID problems Possible solutions | |
| No handsets display Caller ID information. | Let calls ring twice before answering. •Make sure your Caller ID service is active. • |
| Caller ID displays briefly and then clears. | You may have to change the line mode. •Contact Customer Service for instructions. |
| Multi-handset problems Possible solutions | |
| I can't transfer calls. Reset the | handset (see page 27). • |
| Two handsets can't talk to a caller. | See if any handset is in Privacy Mode. • |
| A handset says Unavailable. | Move the handset closer to the base. •See if any handset is in Privacy Mode. • |
| I can't register a new handset. | Reset the handset (see page 27). •See if you have 12 registered handsets. • |
| Answering system problems | Possible solutions |
| The answering system does not work. | Make sure the answering system is on.Make sure the base is plugged in. |
| The system won't record messages. | See if Record Time is set to Announce Only.Delete messages (memory may be full). |
| A handset can't access the answering system. | See if another handset is using the system.Make sure the phone is in standby. |
| My outgoing message is gone. | If there was a power failure, re-record your personal outgoing message. |
| I can't hear the base speaker. | Make sure call screening is turned on.Change the base speaker volume. |
| Messages are incomplete. | Increase the Record Time.Delete messages (memory may be full). |
| Answering system problems Possible solutions | |
| The system keeps recording when I answer on an extension. | You may have to change the line • mode. Contact Customer Service for instructions. |
| Bluetooth problems Possible solutions | |
| The Elite 9135 won’t pair with my phone. | Making sure your phone is in pairing mode. Check your phone’s manual for instructions on Bluetooth device pairing.Making sure your phone supports the Bluetooth • hands-free profile.Making sure your phone is in range of the base.• If Elite 9135 appears in your mobile phone’s paired device list, remove it and try pairing again.Turn your phone off, then turn it on again. Repeat • pairing steps.Disconnecting the base AC adapter. Wait a few • minutes, then reconnect it. Repeat pairing steps. Checking the link order for that phone. In rare • cases, some mobile phones may not be linked as the third or fourth mobile phone. |
| The Elite 9135 doesn’t ring when my mobile phone does. | Making sure your phone has Bluetooth turned on.• Checking if the Elite 9135 is on the paired device • list on your mobile phone and is in connected status. If not, try pairing again.Making sure your phone doesn’t connect with • other Bluetooth devices.Making sure your phone is in range of the base.• Making sure the handset’s ringer is not turned off.• (The base doesn’t ring on mobile phone calls.) |
| The Elite 9135 paired with my phone, but I can’t hear anything through the handset. | Adjusting the handset volume.• Setting your mobile phone to transfer the audio to a Bluetooth device. Check your phone’s manual for instructions on Bluetooth setup and options.Erase the Bluetooth pairing and repair the mobile phone to the base again. To delete the Bluetooth pairing, see page 12. |
Installing a Line Filter or DSL Filter
A telephone line filter or DSL filter prevents services that use the phone line from causing interference on your phone. To get a line filter, contact your service provider or look in an electronics store.
Plug the filter into the telephone wall jack and plug the base into the filter. Make a test call to make sure the noise is gone.
Liquid Damage
CAUTION: If the base is covered in liquid, disconnect the adapter and phone cord from the wall before touching it.
If the liquid is only on the exterior housing of the base or handset, wipe it off and use as normal. If you can hear liquid inside the housing:
Remove all compartment covers, and disconnect all cables and 1. cords.
If liquid is leaking from any vent or hole, turn the phone so that vent 2. faces down. If not, place the largest vent face down.
Let dry for at least 3 days. Check for liquid inside the phone before 3. replacing compartment covers and reconnecting cords.
Resetting Handsets
The base can register up to 10 handsets. If you have trouble with a handset or if you want to replace one, clear the registration information from the base and the handset:
Press and hold END and # at the same time until you see the System Reset menu.
If you still have the base the handset is registered to, select Deregister HS, then select the handset you want to reset. If you don't have that base anymore, select Base Unavailable.
To confirm, select Yes. The handset displays Handset not registered.
Registering Handsets
If you see a “not registered” message on a handset, you must register it to a base before using it.
Place the handset in the base; the display should say Handset Registering.
Wait until the display says Registration Complete (about 30 seconds), then pick up the handset; press HOME/FLASH.
If you don't hear a dial tone or the display says Registration Failed, charge the battery completely, then try again.
Adapter and Battery Information
| AC adapter Base Charger | ||
| Part number AAD-041S(M) | AAD-600S(M) | |
| Input voltage 240V AC, | 50Hz 240V AC, 50Hz | |
| Output voltage 9V DC @ | 350mA 9V DC @ 210mA |
Use only the supplied AC adapters. ◆
Use the proper adapter for the base and any chargers.
Do not place the unit in direct sunlight or subject it to high temperatures.
| Battery pack (with normal use) | |
| Part number BT-694 or BT-694s | |
| Capacity 650mAh (BT-694) or 500mAh (BT-694s) | |
| Talk time about 10 hours | |
| Standby time | about 7 days |
| Battery life | about 1 year |
Replace the battery when the talk or standby time becomes noticeably reduced. For replacements, visit the online shop on our website (see the front cover).
When the battery gets low, the handset beeps and shows a low battery alert; put the handset in the cradle for recharging.
Rechargeable Battery Warning
◆ This equipment contains a rechargeable Nickel-Metal-Hydride (Ni-MH) battery.
◆ Do not short-circuit the battery.
◆ The batteries in this equipment may explode if disposed of in a fire.
Do not charge the batteries in any charger other than the one specified in the owner's manual. Using another charger may damage the battery or cause it to explode.
Rechargeable batteries must be recycled or disposed of properly.
Uniden works to reduce lead content in our products and accessories.
ONE-YEAR LIMITED WARRANTY
IMPORTANT Satisfactory evidence of the original purchase is required for warranty service
Please refer to our Uniden website for any details or warranty durations offered in addition to those contained below.
Warrantor
The warrantor is either Uniden Australia Pty Limited ABN 58 001 865 498 (“Uniden Aust”) or Uniden New Zealand Limited (“Uniden NZ”) as the case may be.
Terms of Warranty
Uniden Aust/NZ warrants to the original retail purchaser only that the Elite9135 (“the Product”), will be free from defects in materials and craftsmanship for the duration of the warranty period, subject to the limitations and exclusions set out below.
Warranty Period
This warranty to the original retail purchaser is only valid in the original country of purchase for a Product first purchased either in Australia or New Zealand and will expire one (1) year from the date of the original retail sale.
If a warranty claim is made, this warranty will not apply if the Product is found by Uniden to be:
(A) Damaged or not maintained in a reasonable manner or as recommended in the relevant Uniden Owner's Manual;
(B) Modified, altered or used as part of any conversion kits, subassemblies or any configurations not sold by Uniden Aust or Uniden NZ;
(C) Improperly installed contrary to instructions contained in the relevant Owner's Manual
(D) Repaired by someone other than an authorized Uniden Repair Agent in relation to a defect or malfunction covered by this warranty; or
(E) Used in conjunction with any equipment, parts or a system not manufactured by Uniden.
Parts Covered
This warranty covers the Product and included accessories.
User-generated Data
This warranty does not cover any claimed loss of or damage to user-generated data (including but without limitation phone numbers, addresses and images) that may be stored on your Product.
Statement of Remedy
If the Product is found not to conform to this warranty as stated above, the Warrantor, at its discretion, will either repair the defect or replace the Product without any charge for parts or service. This warranty does not include any reimbursement or payment of any consequential damages claimed to arise from a Product's failure to comply with the warranty.
Our goods come with guarantees that cannot be excluded under the Australian Consumer Law.
You are entitled to a replacement or refund for a major failure and for compensation for any other reasonably foreseeable loss or damage. You are also entitled to have the goods repaired or replaced if the goods fail to be of acceptable quality and the failure does not amount to a major failure.
This warranty is in addition to and sits alongside your rights under either the COMPETITION AND CONSUMER ACT 2010 (Australia) or the CONSUMER GUARANTEES ACT (New Zealand) as the case may be, none of which can be excluded.
Procedure for Obtaining Warranty Service
Depending on the country in which the Product was first purchased, if you believe that your Product does not conform with this warranty, you should deliver the Product, together with satisfactory evidence of your original purchase (such as a legible copy of the sales docket) to Uniden at the addresses shown below. You should contact Uniden regarding any compensation that may be payable for your expenses incurred in making a warranty claim. Prior to delivery, we recommend that you make a backup copy of any phone numbers, images or other data stored on your Product, in case it is lost or damaged during warranty service.
UNIDEN AUSTRALIA PTY LTD
Service Division
345 Princes Highway,
Rockdale, NSW 2216
Phone number: 1300 366 895
Email address: custservice@uniden.com.au
UNIDEN NEW ZEALAND LTD
Service Division
150 Harris Road, East Tamaki
Auckland 2013
Phone number: (09) 273 8377
Email address: service@uniden.co.nz
- OWNER'S MANUAL
- Important Notice:
- General Notices for New Zealand Model:
- Elite 9135 Series Owner's Manual
- What's in the box?
- You will also find:
- What's in the manual?
- Getting Started ....3
- Getting to Know Your Phone ...... 6
- Using Your Phone 11
- Using Special Features ...... 17
- Using the Answering System .....20
- Important Information ......24
- One-year Limited Warranty ......29
- Important Safety Instructions!
- SAVE THESE INSTRUCTIONS!
- GETTING STARTED
- Installing Your Phone
- Charge the Battery
- Connect the Telephone Cord
- Test the Connection
- Attaching the Belt Clip
- Setting Up the MobileLink Bluetooth™ Connection
- Pair your Bluetooth phone
- To test the connection
- Using the Elite 9135 with four Bluetooth phones
- GETTING TO KNOW YOUR PHONE
- Reading the Display
- Using the Handset Menu
- Message Manager Menu
- Bluetooth Menu
- Handset Setup Menu
- Ans. Setup Menu
- Date & Time Menu
- Global Setup Menu
- Call Blocking Menu
- Entering Text on Your Phone
- USING YOUR PHONE
- Using Your Bluetooth Connection
- Finding a Lost Handset
- Changing the Volume
- Using the Caller ID and Redial Lists
- Using Call Waiting
- Using an Optional Headset
- Using the Phonebooks
- Downloading mobile phonebooks into your phone
- Adding Phonebook Entries (Home only)
- Deleting All the Phonebook Entries
- Chain Dialing
- USING SPECIAL FEATURES
- Call Block
- Call Blocking Menu Options
- Call Blocking Entry Options
- DND (Do Not Disturb)
- Multihandset Features
- Conference Calling
- Privacy Mode
- Intercom
- Voice Message Notification
- USING THE ANSWERING SYSTEM
- Answering System Options (Ans. Setup)
- Personalizing the Greeting
- Accessing the Answering System
- Message Manager
- Play All Messages
- Screening Your Calls
- Using the System While You're Away from Home
- Programming a Security Code
- Remember to make a note of your new security code!
- Dialing In to Your System
- IMPORTANT INFORMATION
- Solving Problems
- Installing a Line Filter or DSL Filter
- Liquid Damage
- Resetting Handsets
- Registering Handsets
- Adapter and Battery Information
- Rechargeable Battery Warning
- ONE-YEAR LIMITED WARRANTY
- IMPORTANT Satisfactory evidence of the original purchase is required for warranty service
- Warrantor
- Terms of Warranty
- Warranty Period
- Parts Covered
- User-generated Data
- Statement of Remedy
- Procedure for Obtaining Warranty Service
- UNIDEN AUSTRALIA PTY LTD
- UNIDEN NEW ZEALAND LTD
Brand : UNIDEN
Model : ELITE 9135
Category : Uncategorized