
Modro 15 - Uncategorized UNIDEN - Free user manual and instructions
Find the device manual for free Modro 15 UNIDEN in PDF.


| Product Type | Corded Telephone |
| Brand | Uniden |
| Model | Modro 15 |
| Power Supply | AC Adaptor (240V) or 3x AA Alkaline Batteries (optional) |
| Display | LCD with contrast adjustment (8 levels) |
| Caller ID Memory | Up to 66 calls |
| Dialed Number Memory | Up to 20 numbers |
| Ring Tones | 16 selectable |
| Ring Volume | dB0 (Do Not Disturb) to dB3 (loudest) |
| Speakerphone | Yes, with volume control (4 levels) |
| Secret Code (DND Override) | 4-digit PIN |
| Flash Time Options | 100, 300, 600, 1000 ms (default 600 ms) |
| Battery Life (with alkaline) | 2-3 months (based on 12 hours use per day) |
| Warranty | 1 Year Limited |
| Safety | Not waterproof; avoid moisture and rain; use only specified power cord and batteries |
| Included Accessories | Base with corded handset, AC Adaptor, Telephone Cord, Owner's Manual |
| Color | Black |
| Additional Features | Redial, Pause, Delete, Out, Set, Flash, Ring, Up/Down navigation, Date/Time setting, Local/Long Distance Code |
Frequently Asked Questions - Modro 15 UNIDEN
User questions about Modro 15 UNIDEN
0 question about this device. Answer the ones you know or ask your own.
Ask a new question about this device
Download the instructions for your Uncategorized in PDF format for free! Find your manual Modro 15 - UNIDEN and take your electronic device back in hand. On this page are published all the documents necessary for the use of your device. Modro 15 by UNIDEN.
USER MANUAL Modro 15 UNIDEN
For more exciting new products please visit our website: Australia: www.uniden.com.au
OWNER'S MANUAL
IMPORTANT SAFETY INSTRUCTIONS
When using your telephone equipment, basic safety precautions should always be followed to reduce the risk of fire, electric shock and injury to persons, including the following:
- This unit is NOT waterproof. DO NOT expose this unit to moisture.
• DO NOT expose this unit to rain. - Do not use this product near water, for example, near a bath tub, wash bowl, kitchen sink or laundry tub, in a wet basement or near a swimming pool.
- Avoid using a telephone (other than a cordless type) during an electrical storm. There may be a remote risk of electric shock from lightning.
- Do not use the telephone to report a gas leak in the vicinity of the leak.
- Use only the power cord and batteries indicated in this manual. Do not dispose of batteries in a fire. They may explode. Check with local codes for possible special disposal instructions.
SAVE THESE INSTRUCTIONS!
WHAT'S IN THE BOX?
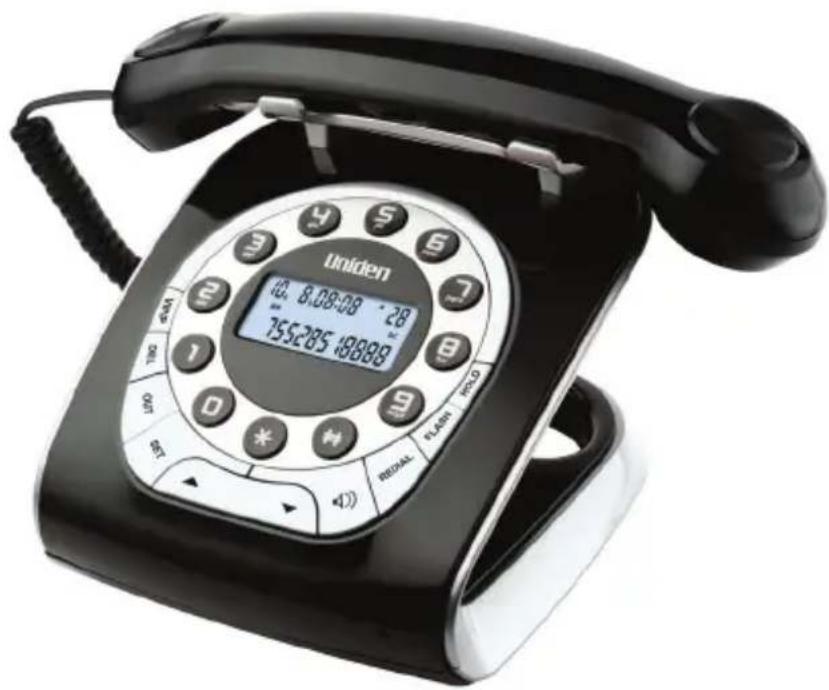
natural_image
Black UNiden rotary telephone with digital keypad and rotary dial (no visible text or symbols beyond branding)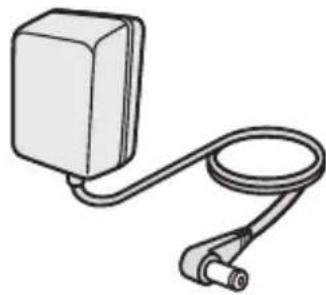
natural_image
Simple line drawing of a rectangular device connected to a cable with a terminal connector (no text or symbols)AC Adaptor

natural_image
Coiled cable with two connectors at ends (no text or symbols)Telephone Cord
Modro 15 Base with Corded Handset
Not Pictured:
- Owner's Manual
- If any item is missing or damaged, contact your place of purchase immediately. Never use damaged products!
- Need help? Get answers at our website: www.uniden.com.au for Australian model
CONTENTS
INSTALLING YOUR PHONE .... 5
Getting Started 5
Optional Backup Battery Installation 5
GETTING TO KNOW YOUR PHONE ......6
OPERATIONS 8
Receiving a Call 8
Making a Call 8
CID list 9
Dialled Number List 9
Menu Setting 10
Ring Tone 11
Speakerphone Volume 12
Secret Code Setting 12
IMPORTANT INFORMATION ....13
Solving Problems 13
ONE-YEAR LIMITED WARRANTY 14
INSTALLING YOUR PHONE
Getting Started
Connect the Corded Handset
Use the coiled cord to connect the corded handset to the connector on the bottom of the base.
Connect the Power and Telephone Cords
- Connect the base AC adaptor to the power jack and the telephone cord to the LINE jack on the bottom of the base.
- Plug the AC adaptor into a standard 240V AC power outlet, and connect the telephone cord to a standard telephone wall jack.
Test the Connection
Pick up the corded handset from the base. You should hear a dial tone. When you get a dial tone, make a quick test call.
Optional Backup Battery Installation
Batteries may be used instead of the supplied AC Adaptor.
- Remove the battery compartment cover.
- Fit 3 x 1.5V AA alkaline batteries.
- Replace the cover.
Based on 12 hour use per day, good alkaline batteries should last 2-3 months.
If using the AC Adaptor, batteries are not required for normal operation.
Always ensure telephone cord and AC adaptor is disconnected before opening the battery compartment door and installing batteries.
Caution: there is a risk of explosion if the battery is replaced by an incorrect type. Dispose the used batteries according to the instructions.
GETTING TO KNOW YOUR PHONE
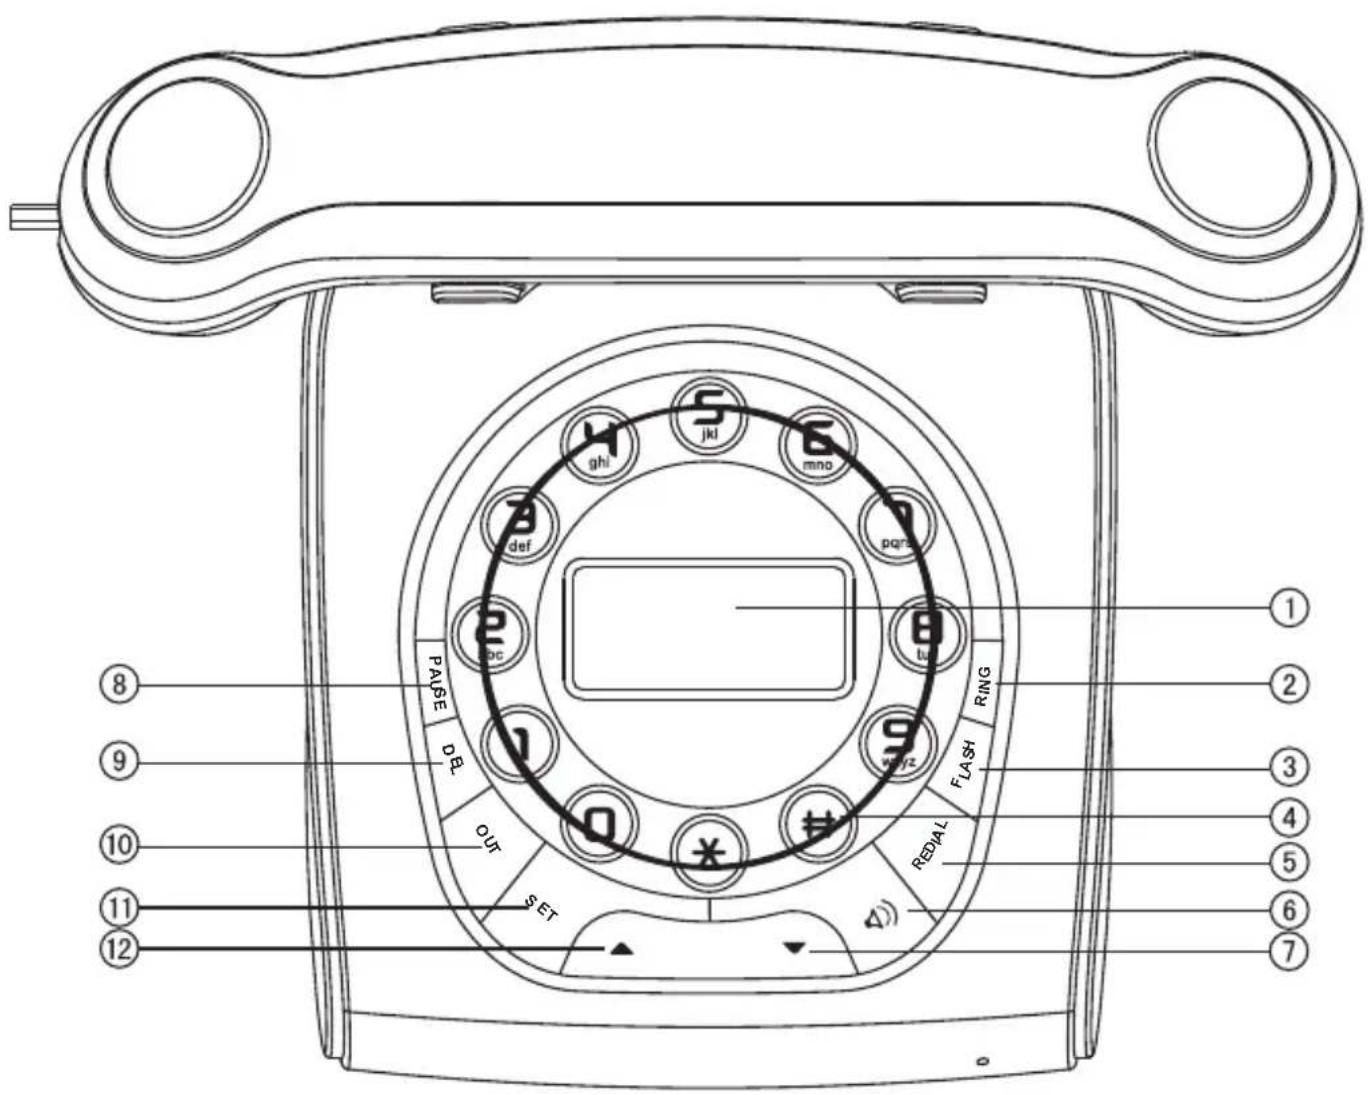
| Keys/Icon What | it does | |
| 1 LCD Display | ||
| 2 RING | In standby, press to scroll through the ring tones. Once the ring tone has been selected, press theorkeys to increase or decrease the volume.Press and hold to set the secret code (Refer to page 12 for details). | |
| 3 FLASH | During a call: Press to switch to a waiting callIn Standby: Press to increase or decrease the LCD contrast | |
| 4 Key Pad | ||
| 5 REDIAL In off-hook | or speakerphone mode press to dial the last dialled number. | |
| 6 SPEAKER ▶) | Press to switch to the speakerphone mode. | |
| 7 DOWN ▼ | In the menu list, move one line downIn the speakerphone mode, press to decrease the speaker volume.In the on-hook state, press to view the CID list. | |
| 8 PAUSE During a phone number entry: insert a short pause. | ||
| 9 DEL | In the on-hook state, when dialling in the number, press to delete the last digit entered.In the on-hook state, press OUT to view the dialled number list, then press DEL to delete the numbers.In the on-hook state, press▲ or▼to view the CID list, then press DEL to delete the numbers. | |
| 10 OUT In standby, press to view the dialled number list. | ||
| 11 SET | In standby: open the menuIn the menu setting, press to confirm the setting | |
| 12 UP ▲ | In the menu list, move one line upIn the speakerphone mode, press to increase the speaker volume.In the on-hook state, press to view the CID list. | |
OPERATIONS
Receiving a Call
From Handset
When a call comes in, the telephone rings, pick up the handset and speak to the other party.
When finished, return the handset to the base.
Switching to Speakerphone
When using the handset, press and return the handset to the base.
When finished, press 🏠 again.
From Speakerphone
When a call comes in, the telephone rings, press 🔔 and talk. Try to limit the distance from the base to under 25cms, in order to hear the other party clearly.
When finished, press ◀ again.
Making a Call
From Handset
Pick up the handset, and when you hear the dial tone, key in the desired number.
The unit will start to time the conversation.
After finishing, return the handset to the base.
From Speakerphone
Press and when you hear the dial tone, key in the desired number.
The unit will start to time the conversation.
When finished, press 🏠 again.
Pre-dialing
In the on-hook state, key in the desired number.
Press ◀ or pick up the handset to dial out the number.
Redial
Press or pick up the handset and press REDIAL to dial out the last dialled number.
CID list
Review
The unit saves the information for the last 66 received calls to the CID list. In the on-hook state, press or key to scroll and review the numbers.
Delete
In the on-hook state, while reviewing the CID list and when the desired number is displayed, press DEL, the number will be deleted.
While reviewing, if you press and hold DEL, the entire CID list will be deleted.
Call
In the on-hook state, press ▲ or ▼key to review the CID list and select a desired number. Then press ▶or pick up the handset, and the number will be dialled out.
Dialled Number List
Review
The unit saves the information for the last 20 dialed numbers in the list. In the on-hook state, press OUT to view the dialled number list. You can either press OUT or use the ▲ or keys to scroll through the list.
Delete
In the on-hook state, press OUT to view the dialled number list. Scroll through the list to get to the desired number. Press DEL and the number will be deleted. Or press and hold DEL for 3 seconds, all the numbers will be deleted.
Call
In the on-hook state, press OUT to view the dialled number list. Then press or pick up the handset, and the number shown on the LCD will be dialled out.
Menu Setting
In the on-hook state, press SET to view the menu options. Use ▲ or ▼ key to scroll through the submenu list and press SET to select the desired option. After selecting the desired option, press ▲ or ▼ to change the setting and press SET to confirm.
Date & Time
- In the on-hook state, press SET, LCD displays SET 1 DATE. Press SET again, the year flashes.
- Press ▲ or ▼ key to edit.
- Press SET to confirm.
Next, the value for the month will flash.
- Press ▲ or ▼ key to edit.
- Press SET to confirm.
After that the value for the day will flash.
-
Press ▲ or ▼ key to edit.
-
Press SET to confirm.
The value of the time will flash.
- Press ▲ or ▼ key to edit.
- Press SET to confirm.
Local Area Code
- In the on-hook state, press SET and then press ▲ key, the LCD displays SET 2 CODE.
- Press SET again, LCD displays CODE ---- and first “-” flashes.
- Press ▲ or ▼ key to edit the flashing code.
- Press SET to confirm and move to the next digit and finally exit.
- Press DEL to quit the setting.
Long Distance Code
- In the on-hook state, press SET and press ▲ key twice, the LCD displays SET 3 LCODE.
-
Press SET again, the LCD displays ----0 or preset codes, press DEL to delete it.
-
Key in the long distance codes using numerical keys, maximum 16 digits.
- Press SET to confirm and exit.
LCD Contrast
- In the on-hook state, press SET and press ▲ key three times, the LCD displays SET 4 LCD.
- Press SET again, LCD displays the default LCD contrast value.
- Press ▲ or ▼ key to adjust the LCD contrast. A total of 8 levels can be selected.
- Press SET to confirm and exit.
In the on-hook state, press FLASH to enter the LCD Contrast setting. Then either press FLASH or ▲ or ▼ to adjust the LCD contrast.
FLASH Time
- In the on-hook state, press SET and press ▲ key four times, the LCD displays SET 5 FLASH.
- Press SET again, the LCD displays FL ASH 100.
- Press ▲ or ▼ key to edit the flash time from the available options (100, 300, 600 and 1000ms - Default time is 600MS for Australia) Press SET to confirm and exit.
Ring Tone
You can choose from 16 different kinds of ring tones.
- In the on-hook state, press RING, the LCD displays the default ring tone.
- Press RING to scroll through the various tones.
- Press ▲ or ▼ key to adjust ringing volume.
- Press SET to confirm and exit.
The volume ranges from dB0-dB3, with dB3 being the loudest, and dB0 is the 'Do Not Disturb' mode. If the ring tone is set to the DND mode, the phone will not ring when a call comes in.
Speakerphone Volume
In speakerphone mode, press ▲ or ▼ key to adjust the volume. The LCD displays the default volume level. The volume can be adjusted to up to 4 levels.
Secret Code Setting
The secret code, when entered by the caller, enables the phone to ring even though it is in the DND mode.
- In the on-hook state, press and hold RING key for 3 seconds, LCD displays Pin ----.
- Input a 4-digit PIN using the numerical keys (0-9), and press SET to confirm. If you want to delete the code, press DEL.
- Set the telephone in DND state. (Please refer to 'Ring Tone' on page 11)
How does it work?
When the phone is set to the DND mode, it will not ring when a call comes through. However, the caller will hear the usual ring tone (when the line gets through) a couple of times and then a short 'di' sound. At this point, the caller should key in the secret code. Once the caller keys in the correct code, the unit will ring.
Press 🔵 or pick up the handset to have the conversation with the caller.
If the caller keys in the wrong code, he/she will have to call again and key in the correct secret code.
This function is useful only when the unit is in the DND mode (ringer is set to OFF). The caller must know the secret code in order to dial through the line.
IMPORTANT INFORMATION
Solving Problems
If you have any trouble with your phone, check this section first. If you need help, visit the customer support page of our website listed on the front cover.
| General Problems Possible Solutions | |
| Blank or faint screenCaller ID will not work properlyPhone will not ring | Check the line cord. Connect Telephone Cord.Call your telephone company to verify that your Caller ID services are active.You may have too many communication devices hooked to a single line. A communication device can be a phone, modem, or facsimile (FAX) machine.Contact your telephone company for help in calculating the limit for your residence or business line. |
| No Dial Tone | Verify that the Telephone Cord is plugged in correctly.Verify that the LINE connection is correct and tightly secured. |
| LCD too dim | Check if the LCD contrast is properly set.Replace the batteries (if using). |
| LCD does not light up | This could happen during a power failure. Unplug the AC adaptor from the rear DC jack and use only the recommended batteries. |
| There is a background noise for a few seconds after the call has been answered. | Use either the provided AC adaptor or the recommended batteries to power the phone. DO NOT use both together. Unplug out the AC adaptor from the base if you are using the batteries. |
ONE-YEAR LIMITED WARRANTY
MODRO 15
IMPORTANT Satisfactory evidence of the original purchase is required for warranty service
Please refer to our Uniden website for any details or warranty durations offered in addition to those contained below.
Warrantor
The warrantor is Uniden Australia Pty Limited ABN 58 001 865 498 (“Uniden Aust”).
Terms of Warranty
Uniden Aust warrants to the original retail purchaser only that the MODRO 15 (“the Product”), will be free from defects in materials and craftsmanship for the duration of the warranty period, subject to the limitations and exclusions set out below.
Warranty Period
This warranty to the original retail purchaser is only valid in the original country of purchase for a Product first purchased either in Australia or New Zealand and will expire one (1) year from the date of the original retail sale.
If a warranty claim is made, this warranty will not apply if the Product is found by Uniden to be:
(A) Damaged or not maintained in a reasonable manner or as recommended in the relevant Uniden Owner's Manual;
(B) Modified, altered or used as part of any conversion kits, subassemblies or any configurations not sold by Uniden Aust;
(C) Improperly installed contrary to instructions contained in the relevant Owner's Manual
(D) Repaired by someone other than an authorized Uniden Repair Agent in relation to a defect or malfunction covered by this warranty; or
(E) Used in conjunction with any equipment, parts or a system not manufactured by Uniden.
Parts Covered
This warranty covers the Product and included accessories.
User-generated Data
This warranty does not cover any claimed loss of or damage to user-generated data (including but without limitation phone numbers, addresses and images) that may be stored on your Product.
Statement of Remedy
If the Product is found not to conform to this warranty as stated above, the Warrantor, at its discretion, will either repair the defect or replace the Product without any charge for parts or service. This warranty does not include any reimbursement or payment of any consequential damages claimed to arise from a Product's failure to comply with the warranty.
Our goods come with guarantees that cannot be excluded under the Australian Consumer Law. You are entitled to a replacement or refund for a major failure and for compensation for any other reasonably foreseeable loss or damage. You are also entitled to have the goods repaired or replaced if the goods fail to be of acceptable quality and the failure does not amount to a major failure.
This warranty is in addition to and sits alongside your rights under either the COMPETITION AND CONSUMER ACT 2010 (Australia) or the CONSUMER GUARANTEES ACT (New Zealand) as the case may be, none of which can be excluded.
Procedure for Obtaining Warranty Service
Depending on the country in which the Product was first purchased, if you believe that your Product does not conform with this warranty, you should deliver the Product, together with satisfactory evidence of your original purchase (such as a legible copy of the sales docket) to Uniden at the addresses shown below. You should contact Uniden regarding any compensation that may be payable for your expenses incurred in making a warranty claim. Prior to delivery, we recommend that you make a backup copy of any phone numbers, images or other data stored on your Product, in case it is lost or damaged during warranty service.
UNIDEN AUSTRALIA PTY LTD
Service Division 345 Princes Highway, Rockdale, NSW 2216 Phone number: 1300 366 895 Email: custservice@uniden.com.au
Uniden®

- OWNER'S MANUAL
- IMPORTANT SAFETY INSTRUCTIONS
- SAVE THESE INSTRUCTIONS!
- WHAT'S IN THE BOX?
- CONTENTS
- INSTALLING YOUR PHONE .... 5
- GETTING TO KNOW YOUR PHONE ......6
- OPERATIONS 8
- IMPORTANT INFORMATION ....13
- ONE-YEAR LIMITED WARRANTY 14
- INSTALLING YOUR PHONE
- Getting Started
- Connect the Corded Handset
- Connect the Power and Telephone Cords
- Test the Connection
- Optional Backup Battery Installation
- GETTING TO KNOW YOUR PHONE
- OPERATIONS
- Receiving a Call
- From Handset
- Switching to Speakerphone
- From Speakerphone
- Making a Call
- Pre-dialing
- Redial
- CID list
- Review
- Delete
- Call
- Dialled Number List
- Menu Setting
- Date & Time
- Local Area Code
- Long Distance Code
- LCD Contrast
- FLASH Time
- Ring Tone
- Speakerphone Volume
- Secret Code Setting
- IMPORTANT INFORMATION
- Solving Problems
- ONE-YEAR LIMITED WARRANTY
- MODRO 15
- IMPORTANT Satisfactory evidence of the original purchase is required for warranty service
- Warrantor
- Terms of Warranty
- Warranty Period
- Parts Covered
- User-generated Data
- Statement of Remedy
- Procedure for Obtaining Warranty Service
- UNIDEN AUSTRALIA PTY LTD
- Uniden®
Brand : UNIDEN
Model : Modro 15
Category : Uncategorized