
MX50 - Tablet Getac - Free user manual and instructions
Find the device manual for free MX50 Getac in PDF.


| Product Type | Rugged Tablet |
| Brand | Getac |
| Model | MX50 |
| Display Size | 5.5 inches |
| Resolution | 1280 x 720 pixels |
| Processor | Intel Atom x7-Z8700 |
| RAM | 4 GB |
| Storage | 64 GB (expandable via microSD) |
| Operating System | Windows 10 Pro |
| Battery Life | Up to 8 hours |
| Dimensions | 173 x 89 x 18 mm |
| Weight | 520 g |
| Ingress Protection | IP65 |
| Drop Specification | MIL-STD-810G |
| Camera (Rear) | 8 MP with autofocus |
| Camera (Front) | 2 MP |
| Connectivity | Wi-Fi 802.11ac, Bluetooth 4.2, GPS, 4G LTE |
| Ports | USB 3.0, HDMI, microSD, audio jack, docking connector |
| Power Supply | AC adapter 12V DC, 2A |
| Maintenance | Clean with a soft, dry cloth. Do not use solvents. |
| Safety | Do not expose to extreme temperatures or liquids. Use only approved accessories. |
| Spare Parts | Battery, AC adapter, stylus, screen protector available from Getac. |
| Warranty | 3 years standard (extendable) |
Frequently Asked Questions - MX50 Getac
User questions about MX50 Getac
0 question about this device. Answer the ones you know or ask your own.
Ask a new question about this device
Download the instructions for your Tablet in PDF format for free! Find your manual MX50 - Getac and take your electronic device back in hand. On this page are published all the documents necessary for the use of your device. MX50 by Getac.
USER MANUAL MX50 Getac
Google and Android are trademarks of Google Inc.
The Bluetooth word mark and logos are owned by the Bluetooth SIG, Inc.
All other brand and product names are trademarks or registered trademarks of their respective companies.
Disclaimer
Specifications and manuals are subject to change without notice. Getac assumes no liability for damage incurred directly or indirectly from errors, omissions, or discrepancies between the device and the manuals.
Notes
Depending on the specific model purchased, the color and look of your device and accessories may not exactly match the graphics shown in this document.
The screenshots and other presentations shown in this document are for reference only. They may differ from the actual screens and presentations generated by the actual product.
Your device is based on Google's Android 7.1 operating system, with additions by Getac.
For the latest version of the manual, please visit the Getac website at www.getac.com..
Table of Contents
Chapter 1 Getting Started....1
Identifying Hardware Components.... 1
Front Components.... 1
Back Components 2
Top Components....3
Right-Side Components....4
Getting Your Device Ready for Use 5
Connecting to AC Power and Charging the Battery...... 5
Performing the Initial Startup 7
Using the Tactical Vest Mount (Optional) 8
Chapter 2 Basic Skills....10
Sleeping and Shutting Down 10
Navigating on the Screen.... 10
Touch Mode 11
Home Screen 12
Extensions to the Home Screen 12
Customizing Your Home Screen.... 12
Using Applications 13
Navigation Bar 13
Status Bar and Notifications Panel 14
Quick Settings 14
Entering Information.... 15
Chapter 3 Getting Connected....16
Wireless Connections.... 16
Using Wi-Fi Networks 16
Using the Bluetooth Function.... 17
External Connections....18
Using a MicroSD Card....18
Connecting an Audio Device 19
Connecting to a Computer via USB 20
Chapter 4 Android Preinstalled Applications....21
Google Applications Overview....21
Camera 23
Taking Pictures....23
Shooting Videos....24
Camera Settings 25
Chapter 5 Getac Applications....27
File Manager 27
Button Descriptions....27
Opening a File....28
GPS-ECompass 29
Satellite Position 29
Electronic Compass....30
Location Information 31
Settings.... 31
GPS Logging 32
Chapter 6 Managing Your Device ....33
Managing Power.... 33
Low Battery Signals and Actions 33
Power-Saving Tips....34
Settings 34
Wireless and Networks Settings 35
Device Settings.... 35
Personal Settings 37
System Settings 37
Chapter 7 Care and Maintenance....39
Restarting Your Device 39
Caring for Your Device 39
Chapter 8 Regulatory Information......41
Regulations Statements....41
USA Class B Regulations 41
European Union CE Marking and Compliance Notices.....42
Safety Precautions....44
About Charging 44
About the AC Adapter 44
About the Battery....45
Heat Related Concerns 46
California Proposition 65....47
User Notification of Take-back Service....48
Chapter 1
Getting Started
This chapter introduces you to the external components of your device and guides you through the process of setting up your device for use.
Identifying Hardware Components
Front Components
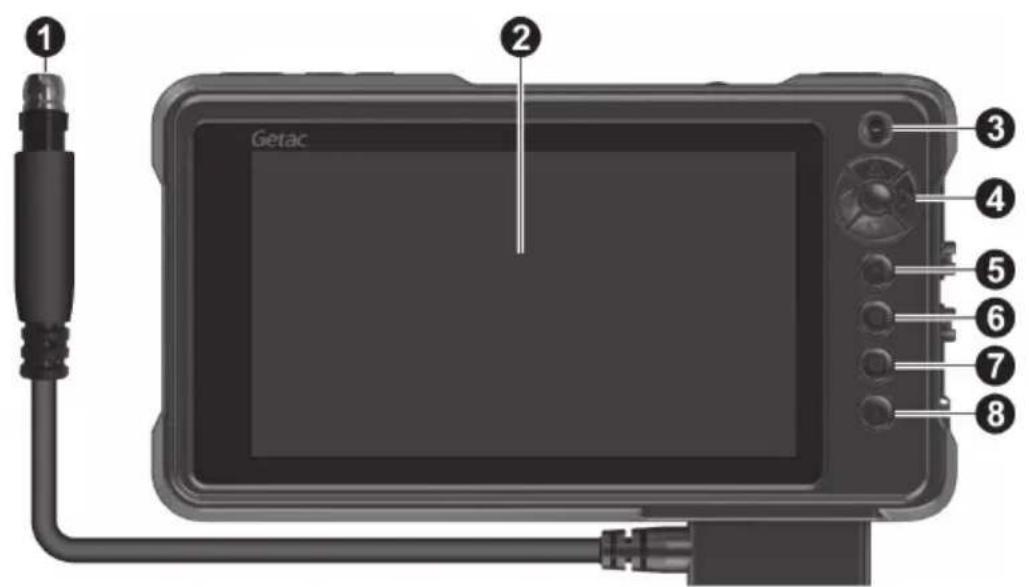
| Ref | Component | Description |
| 1 | Power connector | Connects to an external power source.CAUTION: Never carry the device simply by grasping the cable. The pulling can damage the wires inside the cable. |
| 2 | Touch screen | Displays the output of your device and responds to your touching. |
| 3 | Camera lens | Takes still pictures or records video clips. |
| 4 | OK button | Confirms your selection or input. |
| Arrow buttons | Moves up, down, left and right within the screen or menu. | |
| 5 | Back button | Goes back to the previous screen. |
| 6 | Home button | Opens the Home screen. |
| 7 | Recent button | Opens a screen containing thumbnails of applications you’ve used recently. Touch a thumbnail to open that application. |
| 8 | Fn quick button | Opens the Camera application (default setting). |
| Can be assigned to a different function through Settings. |
Back Components
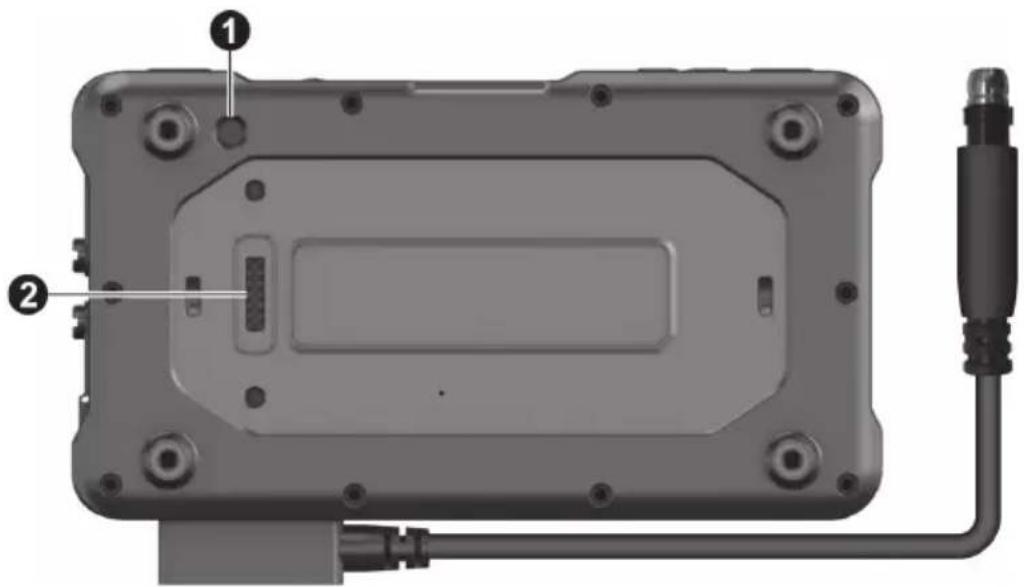
| Ref | Component Description | |
| 1 | Camera lens | Takes still pictures or records video clips. |
| 2 | Expansion connector (Pogo pin) | Connects to a proprietary snapback module. |
Top Components

| Ref | Component Description | |
| 1 | P1 quick button | Disables/enables the touch screen (default setting).When disabled, you will see a frame around the screen and a message at the bottom of the screen. |
| Can be assigned to a different function through Settings. | ||
| 2 | Minus button | Decreases the brightness level (default setting). |
| Can be assigned to a different function through Settings. | ||
| 3 | Plus button | Increases the brightness level (default setting). |
| Can be assigned to a different function through Settings. | ||
| 4 | Power button | Starts up the device. |
| Turns off or restores the screen. | ||
| When pressed longer:Opens a menu with Power off option. | ||
| 5 | Reset switch | Restarts your device when pressed for more than 5 seconds. |
| 6 | P2 quick button | Captures the current screen and saves it as an image file (default setting). |
| Can be assigned to a different function through Settings. | ||
Right-Side Components
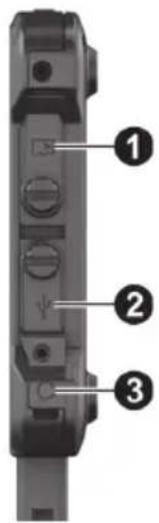
| Ref | Component Description | |
| 1 | MicroSD card slot (inside the cover) | Accepts a microSD card for removable storage. |
| 2 | Micro USB host connector (inside the cover) | Connects to a computer via USB cable for data transfer. |
| Accepts 5 Volts from a USB power source for power charging. | ||
| 3 | Combo Audio Connector (inside the cover) | Connects a set of headphones. |
| Supports a headset microphone with 4-pole TRRS 3.5mm jack. | ||
CAUTION: To ensure sealing capability, always have the cover closed and screw (if existing) tightened unless you need to open the cover for accessing the connector inside.
Getting Your Device Ready for Use
Connecting to AC Power and Charging the Battery
NOTE: This device is shipped to you in a battery power saving mode that protects the battery from charging/discharging. The battery will get out of the mode to be ready for use once you connect external power source for the very first time. (If you have the charging dock, you can also use it as the external power source.)
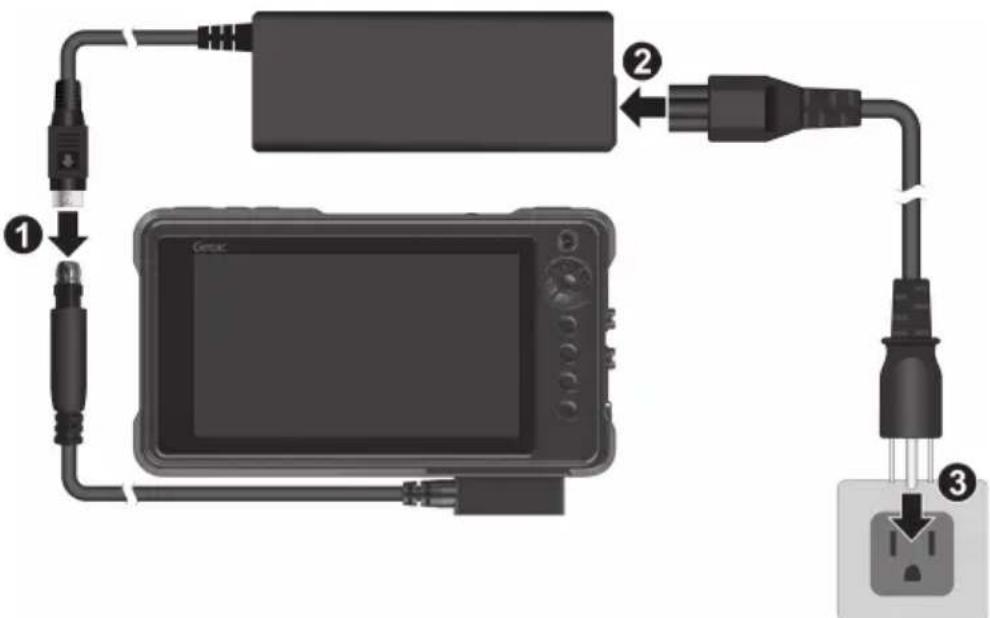
1. If you have the AC adapter:
Connect the AC adapter to the power connector of MX50 (①). Connect one end of the power cord to the AC adapter (②) and the other end to an electrical outlet (③).
flowchart
graph TD
    A["Device"] -->|①| B["Cable"]
    B -->|②| C["Plug"]
    C -->|③| D["Plug"]
    style A fill:#f9f,stroke:#333
    style B fill:#ccf,stroke:#333
    style C fill:#cfc,stroke:#333
    style D fill:#fcc,stroke:#333
NOTE: AC adapter and power plug types vary with countries.
If you have the USB power adapter charger:
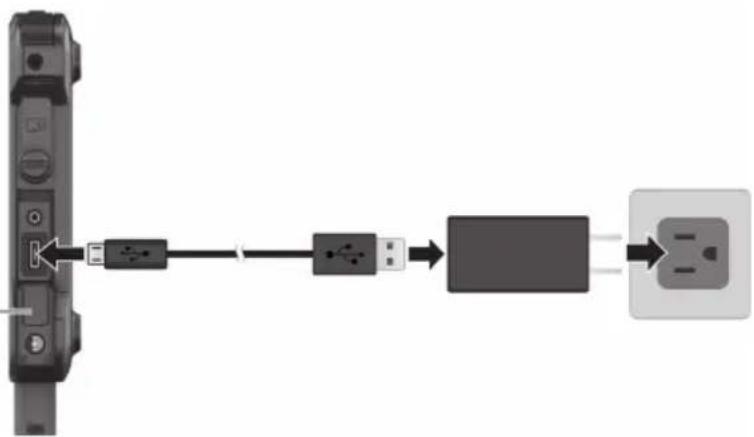
Connect the micro USB end of the cable to MX50 and the USB end to the adapter. Connect the adapter to an electrical outlet.
Open the cover to 180 degrees so as not to interfere with the cable connection.
flowchart
graph LR
    A["Device with switch"] --> B["USB port"]
    B --> C["USB port"]
    C --> D["Output socket"]
- Power is being supplied from the external power source to MX50.
When external power is connected, it also charges the internal battery. For information on using battery power, see "Managing Power" in Chapter 6.
CAUTION: For optimal performance of the lithium battery, take note of the following:
• Use the included AC adapter only.
- There is no need to fully discharge the battery before charging. You can charge the battery before it is discharged.
- Do not charge the battery where the temperature is high (e.g. in direct sunlight).
- As a battery protection, store the device where the temperature is appropriate. Avoid high temperatures.
- The battery can be charged when its temperature is between 0°C (32°F) and 40°C (104°F).
- If you will not use the product for a long period of time, be sure to fully charge the battery at least once every two weeks. Over discharge of the battery can affect the charging performance.
Performing the Initial Startup
NOTE: You must use external power source when starting up the device for the very first time.
When turning on your device for the very first time, you will be guided through a setup process.
- Make sure that your device is either connected to AC power or the battery has power.
- Press the power button.
The device powers up and displays the initial screen.
- Follow the on-screen instructions to complete the initial setup process.
After the setup is completed, the Home screen appears. You can now use your device.
Using the Tactical Vest Mount (Optional)
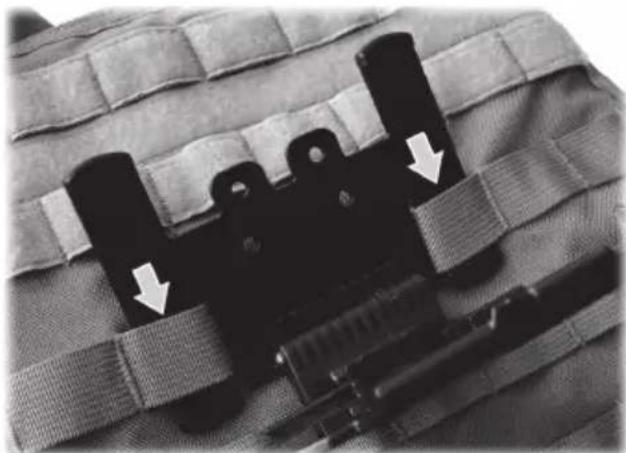
- Feed the two lower tabs of the mount through lower webbing.
natural_image
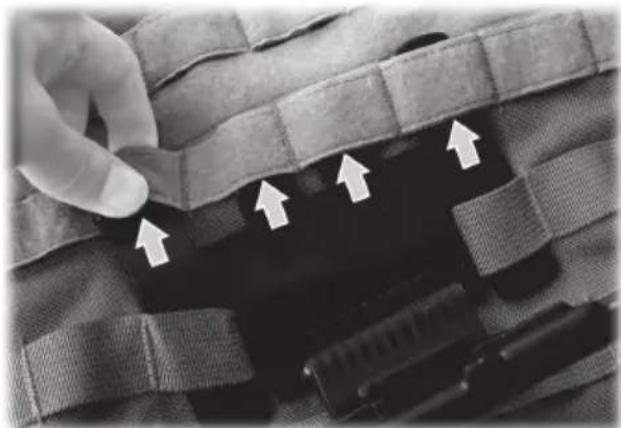
Close-up of a tactical gear assembly with multiple clips and tape, no visible text or symbols- Feed all four top tabs through upper webbing.
natural_image
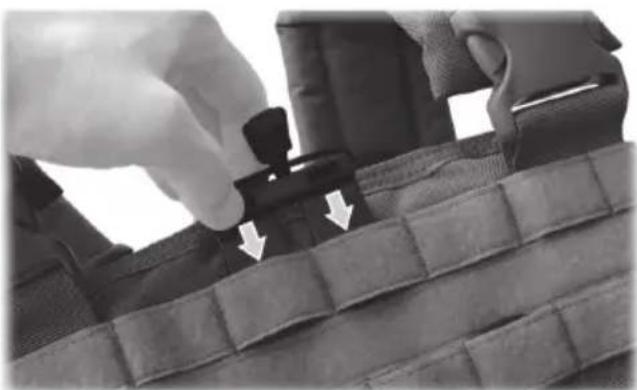
Close-up of a hand adjusting a black tactical device with white arrows pointing to it, placed on a patterned fabric (no text or symbols visible)- Insert the retention-cord piece to the webbing above the center of the mount.
natural_image
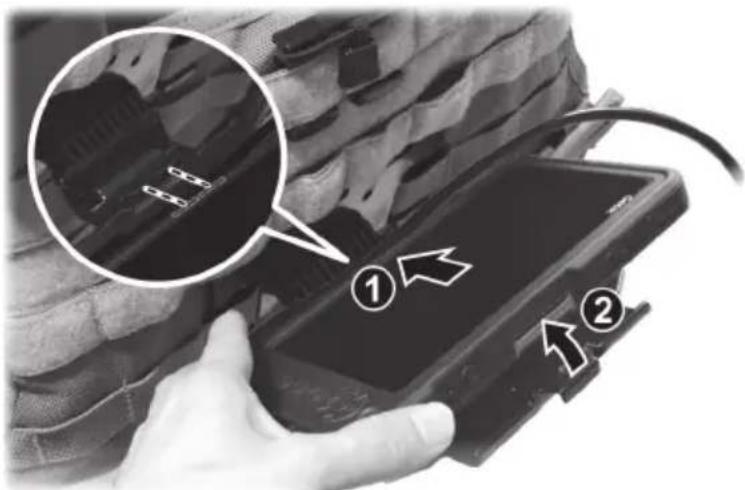
Close-up of hands adjusting a tactical belt component with directional arrows (no text or symbols visible)- Align the bottom grooves of MX50 with the counterparts on the mount and insert MX50 at an angle (①). Then press the holder and MX50 together until the clamp clicks into place (②).
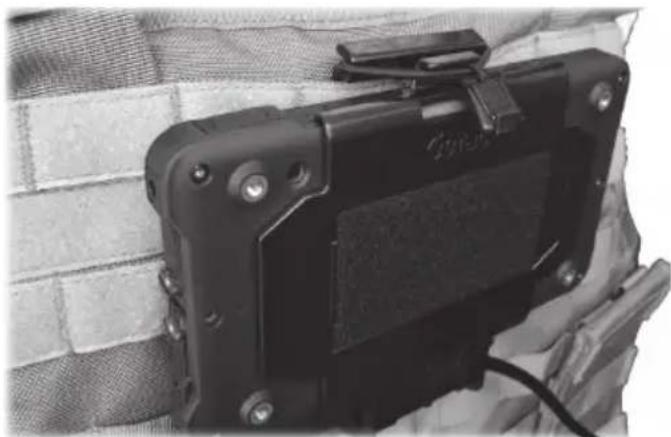
- When you flip up the mount, pull the cord over the clamp.
natural_image
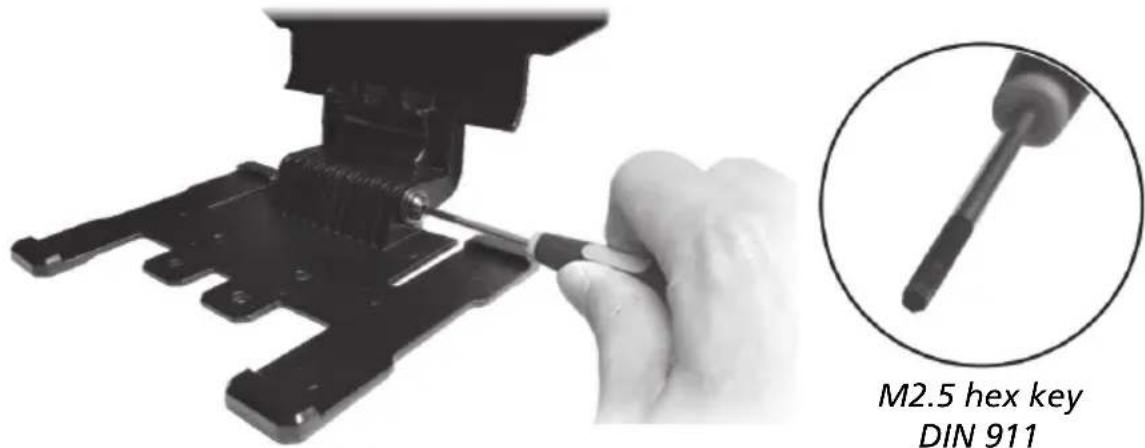
Close-up of a black tactical device with attached clip, resting on a textured white background (no visible text or symbols)NOTE: The hinge of the mount might get loose after long time usage. Tighten the hex nut if this happens.
Chapter 2
Basic Skills
This chapter familiarizes you with the basic operations of your device.
CAUTION: The device can get uncomfortably warm when you use it in high temperatures. In such a circumstance, please take safety measures (such as wearing gloves) to protect yourself. Prolonged body contact can cause discomfort and potentially a burn.
Sleeping and Shutting Down
You can manually put your device to sleep by briefly pressing the power button. To wake up, press the power button.
To shut down, press and hold the power button until a menu pops up. Touch Power off.
Navigating on the Screen
CAUTION: Do not use sharp objects on the touch screen. Doing so may damage the display surface.
Use your finger to navigate and select objects on the screen.
Here are some common terms that you should know when using the touch screen:
- Touch
Touch the screen once with your finger to open an item or select an object.
- Touch and hold
Touch and hold your finger on an item to see a list of actions available for that item.
- Drag
Hold your finger on an item and, without lifting the finger, move across the screen until you reach the target position.
- Swipe or slide
Move your finger across the screen, without pausing when you first touch it (so you don't "drag" instead). For example, you slide the screen up or down to scroll a list.
- Pinch
In some applications (such as Maps and Photos), you can zoom in and out by placing two fingers on the screen at once and pinching them together (to zoom out) or spreading them apart (to zoom in).
NOTE: When the touch screen does not seem to respond, put the device to sleep and then wake it. The screen should function again.
Touch Mode
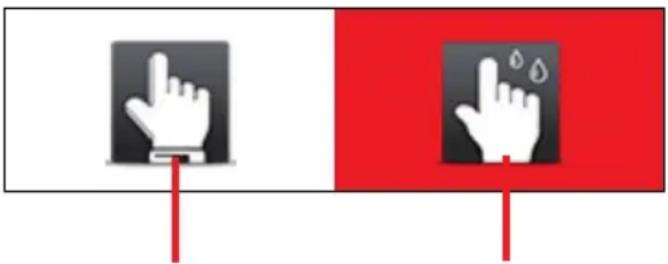
You can change the touch mode to suit your scenario. To quickly switch the mode, touch one of the widgets on the Home screen.
natural_image
Two hand icons, one pointing at a computer screen and the other with water droplets, set against white and red background (no text or symbols)Select this if you are wearing thick gloves (referring to warm gloves or work gloves, not referring to touch screen capable gloves).
This mode works best with fingertip. In this mode, the touch screen will not pick up the light touches of liquids, such as raindrops, as input.
Home Screen
The Home screen is your starting point to access all the features on your device. You can have it display application icons, widgets, shortcuts, and other features that you want. The default Home screen already contains some application icons and widgets. At the right side of every Home screen is the Favorites tray.
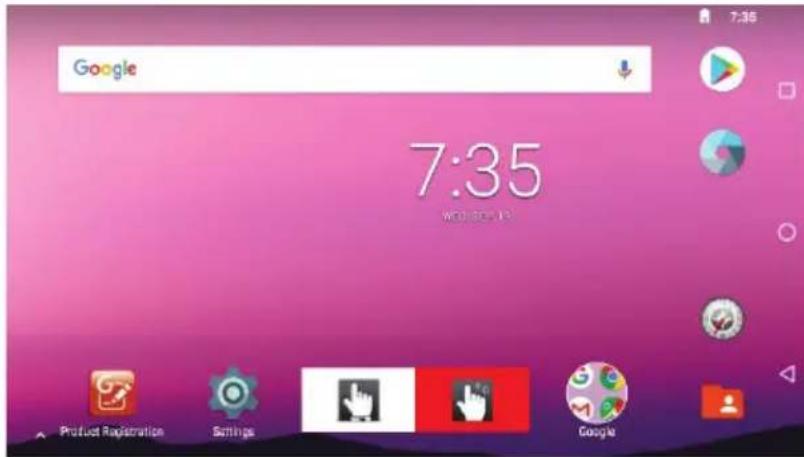
To return to the Home screen at any time, touch Ⓞ at the right side of the screen or the Home button on the device.
Extensions to the Home Screen
You can slide left or right across the Home screen to see other parts of the Home screen. Extensions to the Home screen provide more space for widgets, shortcuts, and other items.
Customizing Your Home Screen
You can add application icons, shortcuts, widgets, and other items to any part of the Home screen where there's free space.
Using Applications
Swipe up from the bottom of the Home screen to open the All Apps screen. The screen holds icons for all of the applications on your device. Touch an icon to open the application.
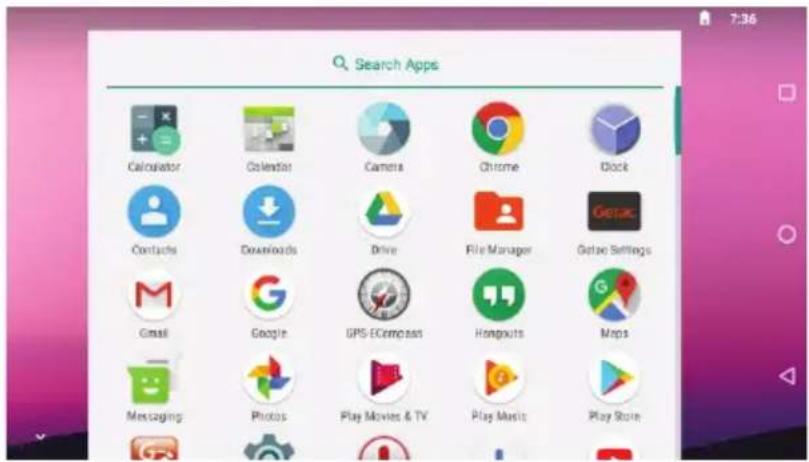
Most applications include a Menu icon near the top or lower right corner of the screen. The menu contains tools that apply to the activities of the current screen or application.
Navigation Bar
The navigation bar at the right side of the screen provides buttons for navigation purposes and frequently-used tasks.
| Button | Name Description | |
 | Recent | Opens a screen containing thumbnails of applications you’ve used recently. Touch a thumbnail to open that application. |
 | Home Opens the Home screen. | |
 | Back | Goes back to the previous screen. |
Status Bar and Notifications Panel
The Status bar appears at the top of almost every screen. It displays icons indicating that you've received notifications (on the left) and icons indicating the current status (on the right), along with the current time.

You can open the Notifications panel by swiping down from the top.
Quick Settings
Use Quick Settings to quickly change common settings such as screen brightness, Wi-Fi, Bluetooth, Airplane mode, and others.
You can open Quick Settings from anywhere on your device. Swipe down from the top to open the Notifications panel and swipe down again to open the Quick Settings panel.
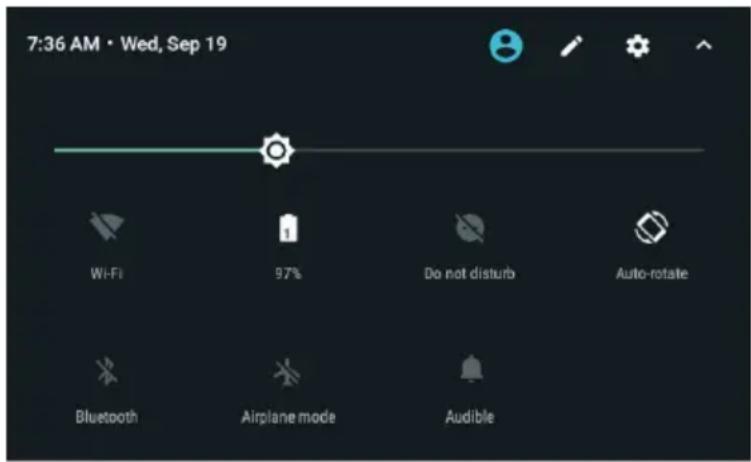
Entering Information
You enter text, numbers, and symbols using the onscreen keyboard. Some applications open the keyboard automatically. In others, you touch an input field where you want to enter text to open the keyboard.
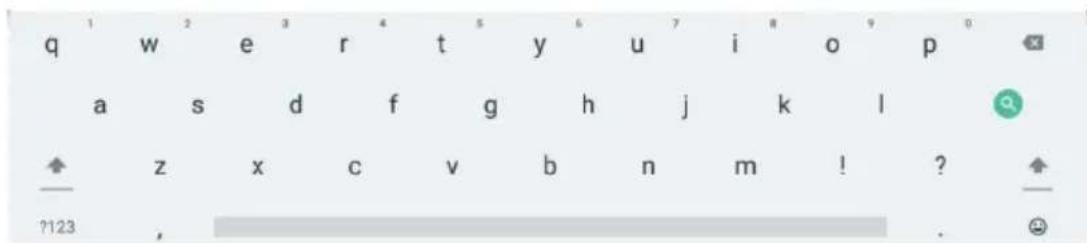
To enter text, touch the keys on the keyboard to type. To enter numbers or symbols, touch the Symbols key ?123 to switch to the numbers and symbols keyboard.
Chapter 3
Getting Connected
This chapter tells you how you can get your device connected through a variety of ways.
Wireless Connections
Using Wi-Fi Networks
Turning On/Off the Wi-Fi Radio
Go to Quick Settings and touch the Wi-Fi icon.
- Or -
Go to Settings. Find the Wi-Fi item under WIRELESS & NETWORKS. Slide the Wi-Fi switch on or off.
When the Wi-Fi radio is turned on, the icon ▼ appears in the status bar. If your device finds a network that you connected to previously, it connects to it.
Connecting to a Wi-Fi Network
- Make sure the Wi-Fi radio is on (as described in the previous section).
- Go to Quick Settings and touch the down arrow of the Wi-Fi item.
- Or -
Go to Settings. Touch Wi-Fi.
- Your device scans for available Wi-Fi networks and displays the names in the screen.
- On the list of discovered networks, touch the one you want to connect to.
- If the network is secured, you're prompted to enter a password or other credentials.
If the network is open, you are prompted to confirm that you want to connect to that network by touching Connect
Using the Bluetooth Function
NOTE: Getac does not guarantee the product's compatibilities with the Bluetooth headsets/devices from all manufacturers.
Turning On/Off the Bluetooth Radio
Go to Quick Settings and touch the Bluetooth icon.
- Or -
Go to Settings. Find the Bluetooth item under WIRELESS & NETWORKS. Slide the Bluetooth switch on or off.
When the Bluetooth radio is turned on, the icon ✪ appears in the status bar.
Pairing with a Bluetooth Device
The first time you use a new Bluetooth device with your device, you must "pair" them, so that they know how to connect securely to each other. After that, you can simply connect to a paired device.
- Make sure that the other Bluetooth device is set as "discoverable" and within range.
- Make sure the Bluetooth radio is on (as described in the previous section).
- Go to Quick Settings and touch the down arrow of the Bluetooth item.
- Or -
Go to Settings. Touch Bluetooth. - Your device scans for and displays the IDs of all available Bluetooth devices in range.
- On the list of discovered devices, touch the ID of the device you want to pair with.
- The devices pair with each other. If you're prompted to enter a passcode, try entering 0000 or 1234 (the most common passcodes), or consult the documentation that came with the device to learn its passcode.
If the pairing is successful, your device connects to the device.
External Connections
Using a MicroSD Card
Inserting a MicroSD Card
-
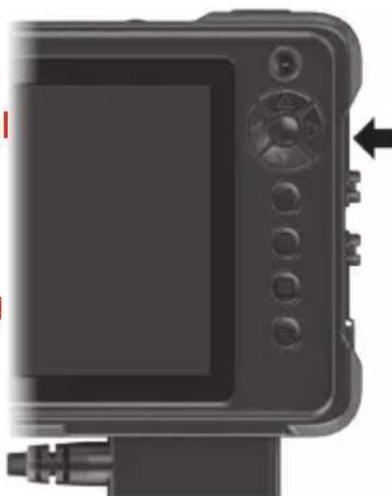
Open the microSD card slot cover by loosening the slotted screw.
-
Insert the card into the slot, with the golden contacts pointing to the slot and facing front.
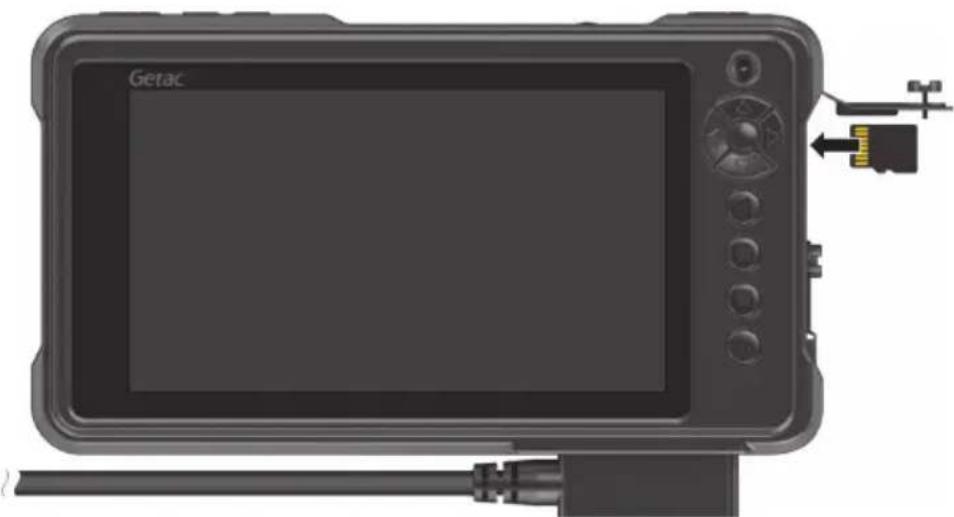
- Close the cover and tighten the screw.
CAUTION:
- When closing the cover, you must firmly press all over the cover to ensure its sealing capability. And keep the screw tightened to protect against external impacts.
- To ensure IP67 protection performance, always have the cover closed with the screw tightened unless you need to open it for inserting or removing a microSD card.
- To maintain IP67 protection efficiency, it is suggested to replace the O-ring of the cover once every year.
natural_image
Close-up of a black electronic device with control panel and connector (no visible text or symbols)Removing MicroSD card
You can safely remove the microSD card from your device any time the device is shut down. If you need to remove the card while the device is on, unmount the card first to prevent corrupting or damaging the card.
To unmount:
-
Go to Settings.
-
Touch Storage and touch Unmount SD card under EXTERNAL SD CARD.
-
Open the microSD card slot cover. Press the edge of the card to release it and then pull the card out of the slot.
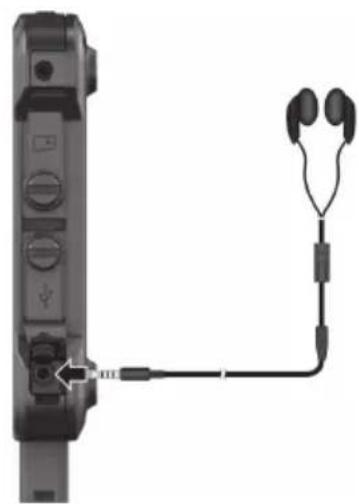
Connecting an Audio Device
The audio combo connector is the "4-pole TRRS 3.5mm" type so you can connect a compatible headset microphone.
natural_image
Close-up of a black electronic device with earphones connected to a cable, showing ports and connectors (no text or symbols visible)SAFETY WARNING:

To prevent possible hearing damage, do not listen at high volume levels for long periods.
Connecting to a Computer via USB
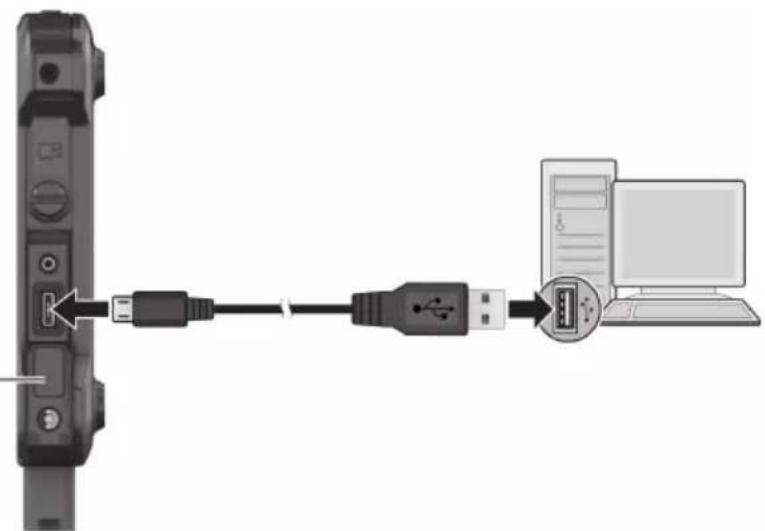
You can connect your device to a computer with the USB cable, to transfer files between your device and the computer.
- Loosen the slotted screw of the cover and open the cover to 180 degrees.
- Use the USB cable (available to you as an option) to connect the device to a USB port on your computer.
Open the cover to 180 degrees so as not to interfere with the cable connection.
natural_image
Diagram showing a USB cable connecting a device to a laptop via an external port (no text or symbols present)CAUTION:
- When closing the cover, you must firmly press all over the cover to ensure its sealing capability. And keep the screw tightened to protect against external impacts.
- To ensure IP67 protection performance, always have the cover closed with the screw tightened unless you need to open it for cable connection.
- To maintain IP67 protection efficiency, it is suggested to replace the O-ring of the cover once every year.
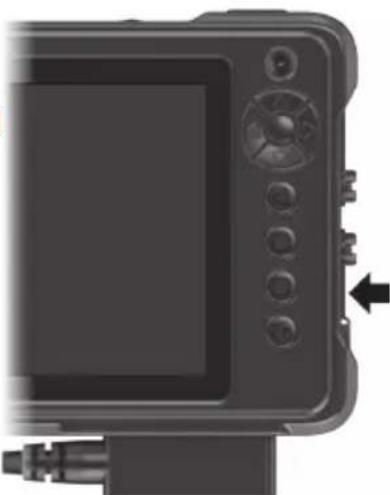
natural_image
Close-up of a black electronic device with control panel and connector (no visible text or symbols)Chapter 4
Android Preinstalled Applications
This chapter briefly introduces the Android preinstalled applications from Google.
Google Applications Overview
For instructions on using the Google applications, check Google official website for online help.
NOTE: The table below does not include Getac applications. See the next chapter for information on Getac applications.
| Apps Descriptions | |
| Calculator | Use Calculator to solve arithmetic problems. You can then paste the results into another application. |
| Calendar | The Calendar app works with the web-based Google Calendar calendaring service. It also works with the Microsoft Exchange ActiveSync calendaring service. |
| Camera | Use Camera to take pictures and shoot videos. (See “Camera” later in this chapter for more information.) |
| Chrome | This is the web browser from Google. Sign in to sync your Chrome browser experience from your computer |
| Clock | Use Clock to display the date and time in large characters on your screen. |
| Contacts | The Contacts app gives you quick and easy access to the people you want to reach. |
| Downloads | The Downloads app lets you to manage most downloads. |
| Drive | Use Drive to store your files securely in the cloud and also to access them. |
| Gmail | Gmail works with Google's web-based email service. |
| Use Google to easily and quickly find what you need on the web and on your device. | |
| Hangouts | Use Hangouts to send messages, make voice and video calls, and share photos. |
| Maps | This is the Google Maps app for Android. |
| Photos Use Photos to manage photos and videos on your device. | |
| Play Movies & TV Shows | You can play digital content through the service of Google. However, the availability of the service depends on your geographical location. The app icons will disappear from the screen if you are in a region where the service is currently unavailable. |
| Play Music | Use Play Music to organize and listen to music and audio files. |
| Play Store | Use Play Store to get all your applications and entertainment in one place. |
| Settings | The Settings app contains most of the tools for customizing and configuring your device. (See "Settings" in Chapter 6 for more information.) |
| Sound Recorder | This is a tool for recording sound. |
| Voice Search | Use Voice Search to quickly search your device, the web, and nearby locations by speaking, instead of typing. |
| YouTube This is | the official YouTube app for Android. |
Camera
Use the Camera application to take pictures and shoot videos. In addition, you can have GPS information embedded into the picture/video file.
Taking Pictures
- Open the Camera application.
If you are in Video mode, drag toward the right and select .

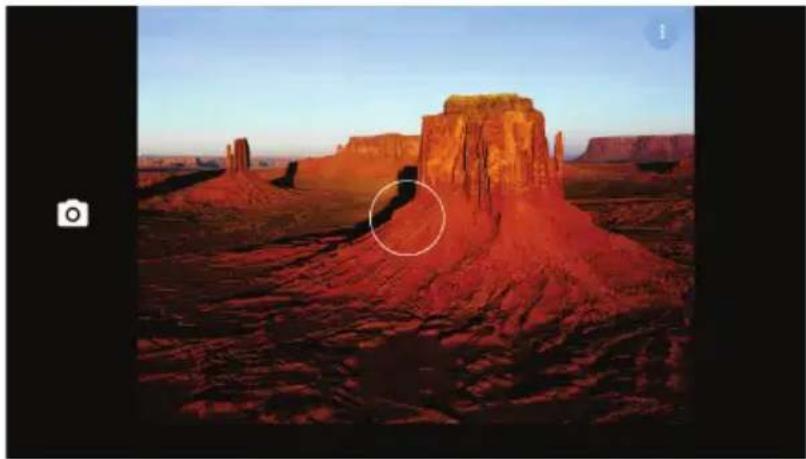
natural_image
Desert landscape with red rock formations and a highlighted peak, no visible text or symbols- A white circle will appear briefly in the center, indicating the focus area. To focus on a specific area, touch the area in the preview window.
- To zoom in or out, use the pinch gesture.
- You can open the options menu by touching ⋮, located at the top right corner of the preview window. Touch an icon in the menu to cycle through the available settings.
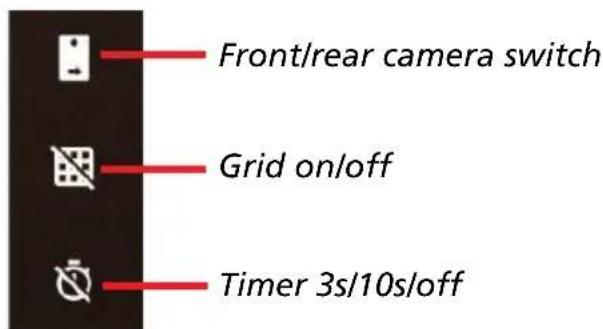
Swiping up from the menu closes the menu.
The 3x3 grid is a feature that helps you achieve better balance in the composition of a photo. What you do is place your points of interest in the intersections or along the grid lines.
NOTE: For overall settings such as resolution and geolocation, see "Camera Settings" later.
-
To take the picture, touch 🔓.
-
The picture you just took is displayed as a thumbnail at the corner. You can touch the thumbnail to view the picture.
The file is saved to the internal storage of your device.
Shooting Videos
- Open the Camera application.
If you are in Camera mode, drag toward the right and select .
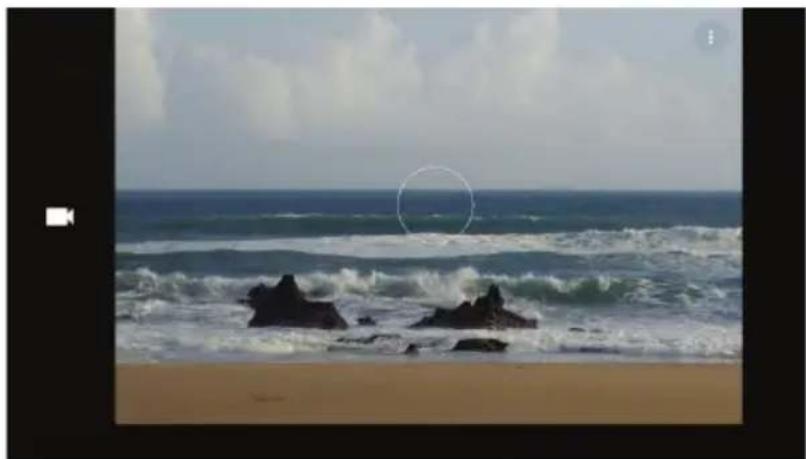
natural_image
Beach scene with waves crashing against the sea under cloudy sky, no visible text or symbols-
A white circle will appear briefly in the center, indicating the focus area. To focus on a specific area, simply touch the area in the preview window.
-
To zoom in or out, use the pinch gesture.
-
You can open the options menu by touching ⋮, located at the top right corner of the preview window. Touch an icon in the menu to cycle through the settings.
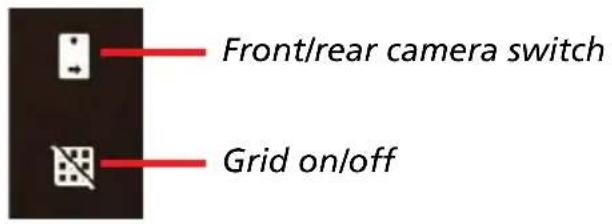
Swiping up from the menu closes the menu.
NOTE: For overall settings such as resolution and geolocation, see "Camera Settings" later.
- To start shooting the video, touch 📄.
The elapsed time shows at the corner.
-
To stop, touch □.
-
An image from your most recent video is displayed as a thumbnail at the corner. You can touch the thumbnail to view the video.
The file is saved to the internal storage of your device.
Camera Settings
Drag / toward the right and touch to open Settings.
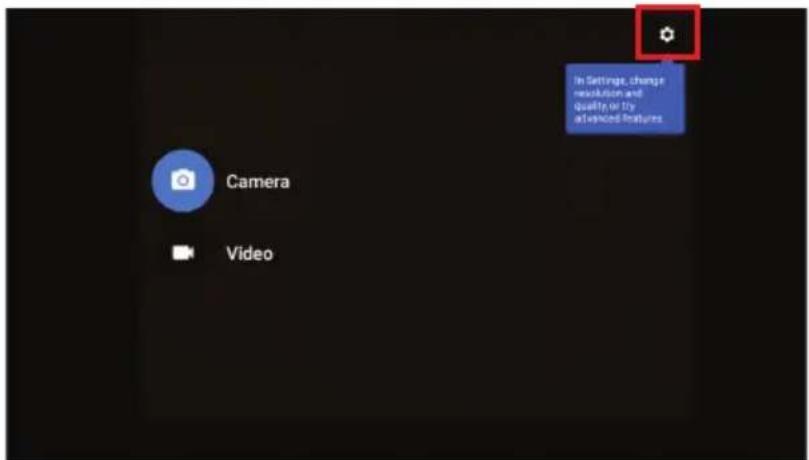
| Items Descriptions | |
| Resolution & quality | To set the front/back camera photo resolution. |
| To set the front/back video quality. | |
| Save location | Slide the switch to enable/disable the geolocation function.When enabled, the location details (GPS coordinates) will be saved with the photo/video. |
| Advanced Slide | the switch to enable/disable manual exposure.When enabled, one more icon +will display in the options menu. To use exposure compensation, touch this icon and choose compensation on a scale from -2 to +2. |
Chapter 5
Getac Applications
This chapter describes the applications added by Getac for special features of your device.
File Manager
File Manager allows you to organize your data in the internal SD card and any connected external storage (such as a microSD card).
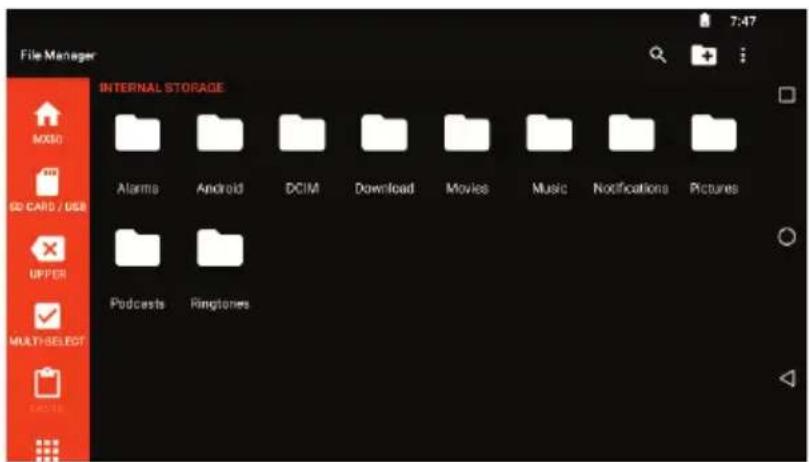
To exit, touch Exit.
Button Descriptions
Left side buttons:
| Buttons Descriptions | |
| MX50(Home) | Goes to the internal storage of your device. |
| SD Card/USB | Goes to the external storage. |
| Upper Goes one level up to the parent directory. | |
| Multi-Select | Enables or disables multiple selections.When enabled, you can touch multiple files or folders for one batch operation. A set of buttons appear on the left side of the screen for you to use. |
| Paste | Pastes what you have cut or copied to the current directory. |
| View | Switches between icon and list view. |
| Refresh Refreshes the current directory. | |
Upper-right buttons:
| Buttons Descriptions | ||
| Search | Opens the Search box. | |
| Add Folder | Adds a folder in the current directory. | |
| Menu | Settings | |
| Show all files/directories | ||
| Show image thumbnail(s) | ||
| Display type | ||
| Sort by Specifies | ||
| Home directory setting | ||
Opening a File
When you touch a filename, File Manager tries to open or execute the file depending on the file type.
NOTE: Not all files can be opened in this way.
GPS-ECompass
GPS-ECompass can:
- Function as a compass.
- Receive GPS satellite signals to calculate the location of your device.
- Record GPS logs.
When opening the application, you will be asked to turn on GPS if it is off. The icon 🔒 in the status bar indicates GPS service is in use.
The application has three pages as described later. Touch one of the three buttons (Satellite Position, Electronic Compass, and Location Information) at the left side of the screen to see the page.
Satellite Position
The Satellite Position page shows the positions of the overhead satellites and their signal strength. It also indicates the on/off status of the SBAS and logging functions.
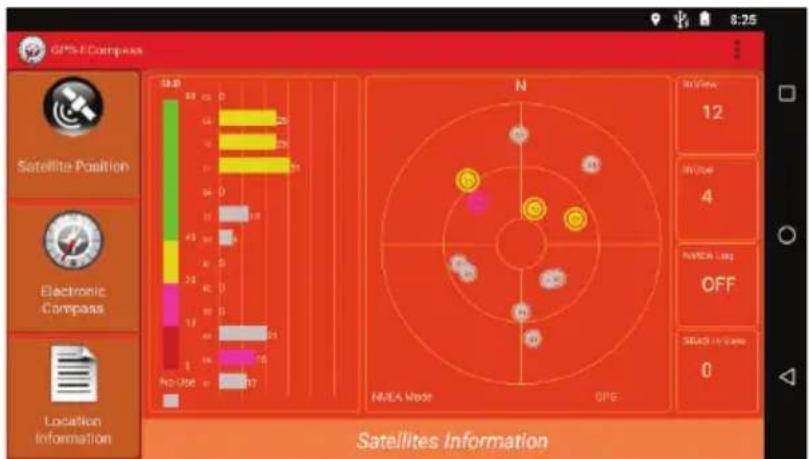
SBAS (satellite-based augmentation system) provides additional accuracy and reliability for the GPS devices. Ground stations are necessary to achieve the purpose. The SBAS feature works where such stations exist. You can enable the SBAS feature. (See “Getac Settings” in Chapter 6.)
Electronic Compass
The Electronic Compass page shows directions of movement including orientation, pitch angle, roll angle, and azimuth angle.
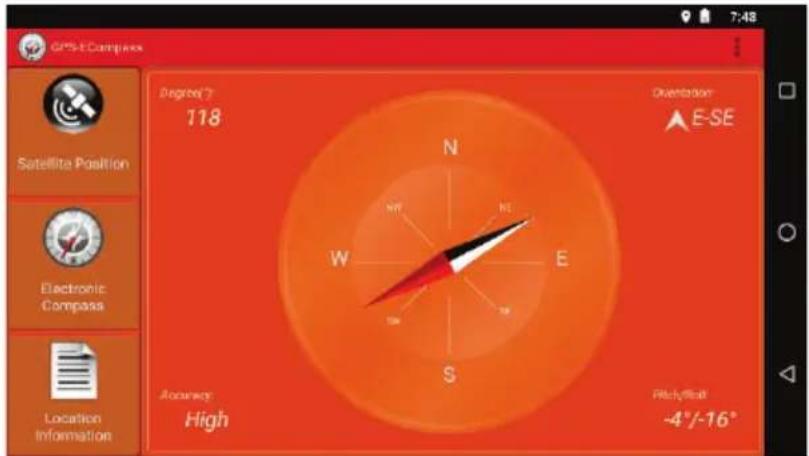
The Accuracy reading is for your reference. When the application determines that calibration is needed, it will pop up the “Calibration” graphics asking you to calibrate the compass. Hold the device and swing it in the way as shown on the screen. Do this several times until the popup graphics disappear.
NOTE: Follow these guidelines when using the compass.
- Keep the device away from objects that generate magnetic fields, such as cars, large belt buckles, computers, cell phones, etc.
- If you must use the compass inside a car, the device should be at least 20 cm (7.87 inches) away from metal objects such as car doors, dashboard, air vents, etc.
Location Information
The Location Information page shows the geographic information of the current location once GPS positioning is completed.
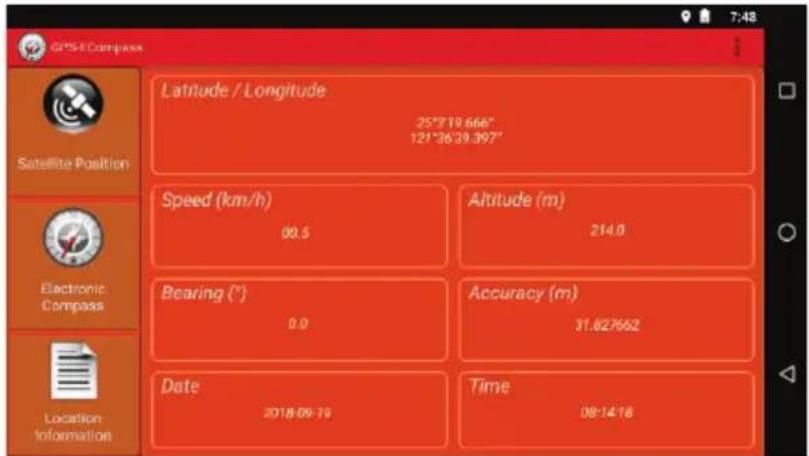
Settings
Touch and touch Setting.
| Items Descriptions | |
| Location Service | Check GPS satellites to turn on GPS receiver. |
| Satellites Log | See the next subsection for information. |
| Rotation Type | Set to Needle Compass for a pivoting needle on a fixed dial or Wheel Compass for a fixed needle on a rotating dial. |
| Display | Check Calibration to display the Accuracy reading on the Electronic Compass screen.Check Balance to display the Pitch/Roll reading on the Electronic Compass screen. |
Touch OK for the changes to take effect.
GPS Logging
You can record a GPS log file for the use of other applications. The output format is NMEA.
- Touch and touch Setting.
- Touch Start to write Log in /storage/sdcard0/GpsLog.
- In the selection menu that pops up, touch .. to accept the default folder for storing the file.
If you want to specify a different folder, select it in the menu.
- Touch OK. The recording will continue until you stop it.
- To stop, touch and touch Setting. Touch Stop to write Log in ....
- Touch OK.
Chapter 6
Managing Your Device
This chapter tells you how to manage power and configure your device.
Managing Power
The operating time of a fully charged battery depends on how you are using the device. Some functions, such as using multimedia or operating an SD card, may consume the battery power considerably.
Low Battery Signals and Actions
CAUTION: When you recharge the battery upon a warning of low power, you should charge for at least 30 minutes. If you unplug the AC adapter soon, you may not have sufficient battery power for your operation.
The battery status (charging or discharging) and level (as a percentage of fully charged) are displayed at the top of the screen. To check the battery information, go to Settings → Battery.
You should save your data and recharge the battery immediately upon a warning of low power; otherwise your device will turn off automatically. You need to connect the device to external AC power for charging before you can use it again.
Power-Saving Tips
You can extend your battery's life between charges by turning off features that you don't need. You can also monitor how applications and system resources consume battery power.
- Turn off radios that you aren't using.
- Lower the screen brightness and set a shorter screen timeout.
- Lower the volume.
- If you don't need it, turn off automatic syncing for all applications.
- Avoid power-consuming applications. To check which applications consume the most battery power, go to the Home screen, go to Settings → Battery.
Settings
NOTE:
- Incorrect settings may cause your system to malfunction. Make sure that you fully understand the function of a certain item before any adjustment.
- Some setting items are available only for specific models or applications you have in your device.
The Settings application contains most of the tools for customizing and configuring your device.
To open Settings, use any of the below methods:
- Touch-Settings in the Home screen.
- Open Quick Settings and touch the Settings icon
- Open the All Apps screen and touch Settings.
Wireless and Networks Settings
| Item Description | |
| Wi-Fi | |
| Bluetooth To configure and use Bluetooth. | |
| Data usage | |
| More... | |
| Airplane mode | |
| Tethering & portable hotspot | |
| VPN | |
| Ethernet To configure Ethernet settings. | |
| Network settings reset | |
Device Settings
| Item Description | |
| Display | To set brightness, wallpaper, sleep timeout, and font size. |
| Notifications | To configure notification settings for certain apps or for the whole device. |
| Sound | To configure sound-related settings such as volume, phone ringtone, vibration with ringing, notification sound, etc. |
| Apps | To view details about the applications installed on your device and to manage them. |
| Storage | To view the used and available space on your device's storage. |
| Battery To view battery usage data. | |
| Memory | To view the average memory use. |
| Users | To add, change, or delete users. |
| Getac settings See | below. |
Getac Settings
| Item Description | |
| Physical buttons | To assign a function or application to a hardware button on your device. |
| Night vision | To toggle night vision on/off. |
| Global Navigation Satellite System | To toggle the below functions on/off.GPSGLONASSSBAS |
| Touchscreen To switch between the below two modes:WaterGlove and Stylus | |
| Assistant on home button | To allow long press of the Home button in the navigation bar to launch Google Assistant. |
| Battery indicator | To enable the display of battery indicators in the four corners of the screen during startup. This setting is useful when the device is seated in the Multi-Bay Dock. |
| Hardware status To view sensors data. | |
| Firmware | To update BIOS firmware with an image file. |
| To update MCU firmware with an image file. | |
| OTG Advanced Option | To enable USB host reverse DC-in mode. |
| PCIE ethernet | To enable the built-in PCIE ethernet device. |
Personal Settings
| Item Description | |
| Location | To configure how you want your device to determine your location and how you want to share your location with Google and others. |
| Security | To configure screen lock, power-on password, device administration, and credential storage. |
| Accounts To add accounts. | |
| Google To manage settings for Google apps and services. | |
| Language & input | To set up display language, personal dictionary, keyboard language, input method, voice search, and text-to-speech output. |
| Backup & reset | To back up data and settings and to reset to factory default state. |
System Settings
| Item Description | |
| Date & time | To use automatic data and time or to enter manually |
| To choose data and time format. | |
| Accessibility | To modify your device's accessibility settings |
| Printing | To add printing services to your device and to manage service settings. |
| About tablet | To upgrade the entire system using Getac OTA (Over-The-Air) manager. |
| To view legal, hardware, and software information of your device. | |
Chapter 7
Care and Maintenance
This chapter provides guidelines on taking care of your device.
Restarting Your Device
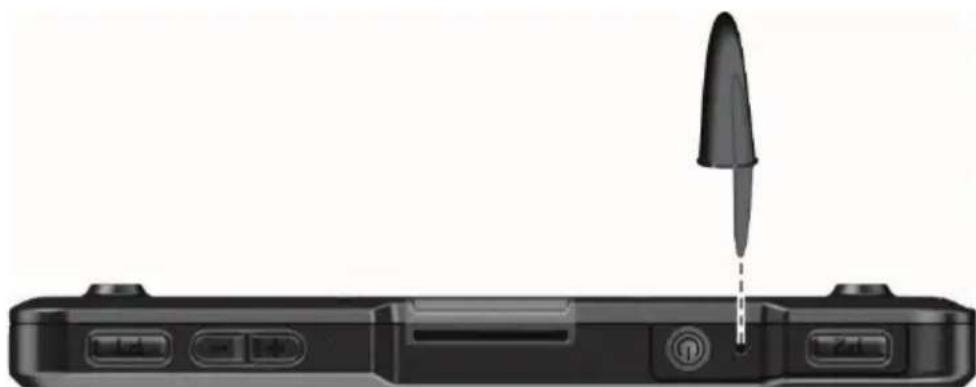
To restart the device, press and hold the Reset Switch (shown below) for more than 5 seconds.
natural_image
Diagram of a device with a black pen tip inserted into a black rectangular device (no text or symbols visible)Alternatively, you can force the device to power off by pressing and holding the power button for more than 10 seconds. Then turn it on again.
Caring for Your Device
Taking good care of your device will ensure trouble-free operation and reduce the risk of damage to your device.
- Keep your device away from excessive moisture and extreme temperatures.
-
Avoid exposing your device to direct sunlight or strong ultraviolet light for extended periods of time.
-
Do not place anything on top of your device or drop objects on your device.
- Do not drop your device or subject it to severe shock.
- Do not subject your device to sudden and severe temperature changes. This could cause moisture condensation inside the unit, which could damage your device. In the event of moisture condensation, allow your device to dry out completely before use.
- To avoid damaging the screen, do not touch it with any sharp object. Non-adhesive generic screen protectors designed specifically for use on portable devices with LCD panels may be used to help protect the screen from minor scratches.
- Never clean your device with it powered on. Use a soft, lint-free cloth to wipe the screen and the exterior of your device.
- Do not use paper towels to clean the screen.
- Never attempt to disassemble, repair or make any modifications to your device. Disassembly, modification or any attempt at repair could cause damage to your device and even bodily injury or property damage and will void the warranty.
- Do not store or carry flammable liquids, gases or explosive materials in the same compartment as your device, its parts or accessories.
Chapter 8
Regulatory Information
NOTE: Marking labels located on the exterior of your device indicate the regulations that your model complies with. Please check the marking labels on your device and refer to the corresponding statements in this chapter. Some notices apply to specific models only.
Regulations Statements
USA Class B Regulations
Federal Communications Commission Radio Frequency Interference Statement
NOTE:
This equipment has been tested and found to comply with the limits for a Class B digital device pursuant to Part 15 of the FCC Rules. These limits are designed to provide reasonable protection against harmful interference in a residential installation. This equipment generates, uses, and can radiate radio frequency energy and, if not installed and used in accordance with the instructions, may cause harmful interference to radio communications. However, there is no guarantee that interference will not occur in a particular installation. If this equipment does cause harmful interference to radio or television reception, which can be determined by turning the equipment off and on, the user is encouraged to try to correct the interference by one or more of the following measures:
- Reorient or relocate the receiving antenna.
-
Increase the separation between the equipment and receiver.
-
Connect the equipment into an outlet on a circuit different from that to which the receiver is connected.
- Consult the dealer or an experienced radio/TV technician for help.
Any changes or modifications not expressly approved by the manufacturer could void the user's authority to operate the equipment.
Please note:
The use of a non-shielded interface cable with this equipment is prohibited.
Company name: Getac USA
Address: 15495 Sand Canyon Rd., Suite 350 Irvine, CA 92618 USA
Phone: 949-681-2900
European Union CE Marking and Compliance Notices
Statements of Compliance
English
This product follows the provisions of the European Directive 2014/53/EU.
Danish
The device is restricted to indoor use only when operating in the 5150 to 5350 MHz frequency range.

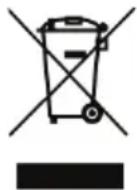
Waste Electrical and Electronic Equipment (WEEE)
This symbol means that according to local laws and regulations your product and/or its battery shall be disposed of separately from household waste. When this product reaches its end of life, take it to a collection point designated by local authorities. Proper recycling of your product will protect human health and the environment.
Safety Precautions
- Prolonged listening of music in maximum volume can damage the ears.
- The use of headphones other than those recommended/supplied can cause hearing impairment due to excessive sound pressure.
About Charging
- Use only the AC adapter supplied with your device. Use of another type of AC adapter will result in malfunction and/or danger.
- Use only the car charger supplied by the manufacturer. Use of another type of car charger will result in malfunction and/or danger.
- This product is intended to be supplied by a LISTED Power Unit marked with "LPS," "Limited Power Source," and output rated + 12 V dc / 2.0 A or + 5 V dc / 2.0 A.
- Use a specified cradle approved by the manufacturer.
- Use a specified battery in the equipment.
About the AC Adapter
- If a ground/earth pin attachment plug on the AC power cord is provided, always plug the cord into a grounded/earthed outlet. Do not disable ground/earth pin of the plug/cord.
- Do not use the AC adapter in a high moisture environment. Never touch the AC adapter when your hands or feet are wet.
- Allow adequate ventilation around the AC adapter when using it to operate the device or charge the battery. Do not cover the AC adapter with paper or other objects that will reduce cooling. Do not use the AC adapter while it is inside a carrying case.
- Connect the AC adapter to a proper power source. The voltage and grounding requirements are found on the product case and/or packaging.
- Do not use the AC adapter if the cord becomes damaged.
- Do not attempt to service the unit. There are no serviceable parts inside. Replace the unit if it is damaged or exposed to excess moisture.
- Specific models do not have the AC adapter and power cord as standard items. To purchase the AC adapter kit for your model, contact a Getac authorized distributor. (Check https://www.getac.com/en/contact/ for contact information.)
About the Battery
Caution for service personnel: Risk of explosion if battery is replaced by an incorrect type. Dispose of used batteries according to the instructions.
If the battery is mishandled, it may cause fire, smoke or an explosion and the battery's functionality will be seriously damaged. The safety instructions listed below must be followed.
Danger
- Do not charge/discharge or place the battery in high-temperature (more than 80 °C / 176 °F) locations, such as near a fire, heater, in a car in direct sunlight, etc.
- Do not use unauthorized chargers.
- Do not force a reverse-charge or a reverse-connection.
- Keep the system and battery away from an extremely low air pressure environment as it may result in an explosion or the leakage of flammable liquid or gas.
Warning
- Keep the battery away from infants.
- Stop using the battery if there are noticeable abnormalities such as abnormal smell, heat, deformities, or discoloration.
- Stop charging if the charging process cannot be finished.
- In case of a leaking battery, keep the battery away from flames and do not touch it.
Caution
- Do not use the battery where static electricity (more than 100V) exists that might damage the protection circuit of the battery.
- When children are using the system, parents or adults must ensure that they are using the system and battery correctly.
- Keep the battery away from flammable materials during charging and discharging.
Heat Related Concerns
Your device may become very warm during normal use. It complies with the user-accessible surface temperature limits defined by the International Standards for Safety. Still, sustained contact with warm surfaces for long periods of time may cause discomfort or injury. To reduce potential heat-related concerns, follow these guidelines:
- Keep your device and its AC adapter in a well-ventilated area when in use or charging. Allow for adequate air circulation under and around the device.
- Use common sense to avoid situations where your skin is in contact with your device or its AC adapter when it's operating or connected to a power source. For example, don't sleep with your device or its AC adapter, or place it under a blanket or pillow, and avoid contact between your body and your device when the AC adapter is connected to a power source. Take special care if you have a physical condition that affects your ability to detect heat against the body.
- If your device is used for long periods, its surface can become very warm. While the temperature may not feel hot to the touch, if you maintain physical contact with the device for a long time, for example if you rest the device on your lap, your skin might suffer a low-heat injury.
- If your device is on your lap and gets uncomfortably warm, remove it from your lap and place it on a stable work surface.
- Never place your device or AC adapter on furniture or any other surface that might be marred by exposure to heat since the base of your device and the surface of the AC adaptor may increase in temperature during normal use.
California Proposition 65
For California USA:
Proposition 65, a California law, requires warnings to be provided to California consumers when they might be exposed to chemical(s) identified by Proposition 65 as causing cancer and birth defects or other reproductive harm.
Almost all electronic products contain 1 or more of the chemicals listed under Proposition 65. This does not mean the products pose a significant risk of exposure. As the consumers have the right to know about the products they purchase, we are giving this warning on our packaging and user manual to keep our consumers well informed.

WARNING
This product can expose you to chemicals including lead, TBBPA or formaldehyde, which are known to the State of California to cause cancer and birth defects or other reproductive harm. For more information go to www.P65Warnings.ca.gov
User Notification of Take-back Service
To Institutional (B2B) Users in United States:
Getac believes in providing our institutional customers with easy-to-use solutions to recycle your Getac-brand products for free. Getac understands the institutional customers will likely be recycling multiple items at once and as such. Getac wants to make the recycling process for these larger shipments as streamlined as possible. Getac works with recycling vendors with the highest standards for protecting our environment, ensuring worker safety, and complying with global environmental laws. Our commitment to recycling our old equipment grows out of our work to protect the environment in many ways.
Please see the product type below for information on Getac product, battery and packaging recycling in USA.
- For Product Recycling:
Your portable Getac products contain hazardous materials. While they pose no risk to you during normal use, they should never be disposed with other wastes. Getac provides a free take-back service for recycling your Getac products. Our electronics recycler will provide competitive bids for recycling non-Getac products as well.
- For Battery Recycling:
The batteries used to power your portable Getac products contain hazardous materials. While they pose no risk to you during normal use, they should never be disposed with other wastes. Getac provides a free take-back service for recycling your batteries from Getac products.
- For Packaging Recycling:
Getac has chosen the packaging materials used to transport our products carefully, to balance the requirements of shipping the product to you safely while minimizing the amount of material used. The materials used in our packaging are designed to be recycled locally.
If you have the above for recycling, please visit our website https://us.getac.com/aboutgetac/environment.html
- Disclaimer
- Notes
- Table of Contents
- Chapter 1 Getting Started....1
- Chapter 2 Basic Skills....10
- Chapter 3 Getting Connected....16
- Chapter 4 Android Preinstalled Applications....21
- Chapter 5 Getac Applications....27
- Chapter 6 Managing Your Device ....33
- Chapter 7 Care and Maintenance....39
- Chapter 8 Regulatory Information......41
- Chapter 1
- Getting Started
- Identifying Hardware Components
- Top Components
- Right-Side Components
- Getting Your Device Ready for Use
- Connecting to AC Power and Charging the Battery
- If you have the AC adapter:
- Performing the Initial Startup
- Using the Tactical Vest Mount (Optional)
- Chapter 2
- Basic Skills
- Sleeping and Shutting Down
- Navigating on the Screen
- - Drag
- - Swipe or slide
- - Pinch
- Touch Mode
- Home Screen
- Extensions to the Home Screen
- Customizing Your Home Screen
- Using Applications
- Navigation Bar
- Status Bar and Notifications Panel
- Quick Settings
- Entering Information
- Chapter 3
- Getting Connected
- Wireless Connections
- Using Wi-Fi Networks
- Turning On/Off the Wi-Fi Radio
- Connecting to a Wi-Fi Network
- Using the Bluetooth Function
- Turning On/Off the Bluetooth Radio
- Pairing with a Bluetooth Device
- External Connections
- Using a MicroSD Card
- Inserting a MicroSD Card
- CAUTION:
- Removing MicroSD card
- Connecting an Audio Device
- SAFETY WARNING:
- Connecting to a Computer via USB
- Chapter 4
- Android Preinstalled Applications
- Google Applications Overview
- Camera
- Taking Pictures
- Shooting Videos
- Camera Settings
- Chapter 5
- Getac Applications
- File Manager
- Button Descriptions
- Opening a File
- GPS-ECompass
- Satellite Position
- Electronic Compass
- Location Information
- Settings
- GPS Logging
- Chapter 6
- Managing Your Device
- Managing Power
- Low Battery Signals and Actions
- Power-Saving Tips
- NOTE:
- Wireless and Networks Settings
- Device Settings
- Chapter 7
- Care and Maintenance
- Restarting Your Device
- Caring for Your Device
- Chapter 8
- Regulatory Information
- Regulations Statements
- USA Class B Regulations
- Please note:
- European Union CE Marking and Compliance Notices
- Statements of Compliance
- English
- Danish
- Waste Electrical and Electronic Equipment (WEEE)
- Safety Precautions
- About Charging
- About the AC Adapter
- About the Battery
- Danger
- Warning
- Caution
- Heat Related Concerns
- California Proposition 65
- User Notification of Take-back Service
- - For Product Recycling:
- - For Battery Recycling:
- - For Packaging Recycling:
Brand : Getac
Model : MX50
Category : Tablet