
HE200073-S - Security Camera Aldi - Free user manual and instructions
Find the device manual for free HE200073-S Aldi in PDF.


| Product Type | Smart Wireless Camera with Solar Panel |
| Brand | Aldi (Cocoon) |
| Model | HE200073-S |
| Resolution | 1080P |
| Water Resistance | IP65 |
| Lens | Wide angle |
| Night Vision | Infrared |
| Two-Way Audio | Yes, with noise suppression |
| Wi-Fi | 2.4GHz only |
| Storage | MicroSD up to 64GB (not included) |
| Cloud Storage | Available with fees |
| Power Input | DC 5V, 1A via Micro USB |
| Battery | 2 x 18650 Li-Ion 2600mAh |
| Solar Panel | Included, maintains battery charge |
| App Compatibility | Cocoon Connect (iOS 10+/Android 4.4+) |
| Motion Detection | Adjustable sensitivity (Off/Low/Medium/High) |
| Field of View | Wide angle (exact angle not specified) |
| Warranty | 12 months |
| What's Included | Camera, base bracket, 2 batteries, USB cable, solar panel, silicone cover, mounting screws, guides |
| Maintenance | Wipe with dry soft cloth; store in clean dry environment |
| Safety Certification | AS/NZS CISPR 32, AS/NZS 4268, AS/NZS 62368.1 |
Frequently Asked Questions - HE200073-S Aldi
User questions about HE200073-S Aldi
0 question about this device. Answer the ones you know or ask your own.
Ask a new question about this device
Download the instructions for your Security Camera in PDF format for free! Find your manual HE200073-S - Aldi and take your electronic device back in hand. On this page are published all the documents necessary for the use of your device. HE200073-S by Aldi.
USER MANUAL HE200073-S Aldi
SMART WIRELESS CAMERA WITH SOLAR PANEL
User Guide
cocoon ^TM
Model: HE200073-S
Version 1.0

natural_image
Close-up of a white electronic device with two black buttons (no visible text or symbols)
natural_image
Black rectangular electronic device with two white diagonal lines on a dark surface, mounted on a stand (no text or symbols visible)
Warranty Note
Wireless Camera with Solar Panel
Getting the most out of your Smart Wireless Camera:


Read the entire manual
It will help you set up with ease
Visit www.cocoonproducts.com.au
We have additional support videos and guides
Call After Sales Support - 1300 663 907
Or email help@cocoonproducts.com.au - we're always happy to help
If you experience any issues with this product or its performance is not what you had expected, please contact our friendly customer service team
It is likely that we can resolve problems for you via phone or email
We can be reached on:
Phone: 1300 663 907 (Mon - Fri; 8:30am - 6:00pm AEST)
Email: help@cocoonproducts.com.au
Web: www.cocoonproducts.com.au

COCOON™
SMART WIRELESS CAMERA & SOLAR PANEL
Warranty Details
REGISTER YOUR PURCHASE AT www.aldi.com.au/en/about-aldi/product-registration/TO KEEP UP-TO-DATE WITH IMPORTANT PRODUCT INFORMATION
The product is guaranteed to be free from defects in workmanship and parts for a period of 12 months from the date of purchase. Defects that occur within this warranty period, under normal use and care, will be repaired, replaced or refunded at our discretion. The benefits conferred by this warranty are in addition to all rights and remedies in respect of the product that the consumer has under the Competition and Consumer Act 2010 and similar state and territory laws.
Our goods come with guarantees that cannot be excluded under the Australian Consumer Law. You are entitled to a replacement or refund for a major failure and for compensation for any other reasonably foreseeable loss or damage. You are also entitled to have the goods repaired or replaced if the goods fail to be of acceptable quality and the failure does not amount to a major failure.
Safety Instructions
Wireless Camera with Solar Panel
- Carefully read all safety instructions and the user manual before operation
- If power is reset then please allow 1-2 minutes for a Wi-Fi connection to be re-established
- Handle with care. Don't drop the Wireless Camera, especially on a hard surface. Do not crush, squeeze, puncture, bend, deform, shred or submerge the Wireless Camera in liquid
- Never use the Wireless Camera if any part of it is damaged
- Do not attempt to open or disassemble the Wireless Camera.
- Modifying any parts may void your warranty
- While the Wireless Camera is rated IP65, do not expose it to strong water jets or submerge it. Avoid installing this product in a location with high humidity or in a location where liquid may consistently spill onto it. Liquid may cause a short circuit which can result in electric shock or fire. Never attempt to dry the Wireless Camera with an appliance such as a hair dryer or in a microwave oven
- Do not wash the Wireless Camera with corrosive or liquid aerosol cleaners. Always use a damp, soft cloth for cleaning
- Children should be supervised to ensure they do not play with this appliance. Close supervision is necessary when any appliance is used by or near children
- Do not install the Wireless Camera near any heat sources such as radiators, stoves or other appliances that can generate heat
- At the end of its working life, observe local regulations when disposing of this product
- Dispose of batteries in an environmentally friendly matter
• The manufacturer is not responsible for loss or stolen goods - Do not mix old and new batteries
- This unit comes supplied with Lithium Ion Batteries. Do not mix Alkaline, standard (Car-Zinc), or rechargeable (Nickel-Cadmium) batteries with this product. If the battery compartment does not close securely, stop using the product and keep it away from children
- Batteries should not be exposed to excessive heat such as sunshine, fire or the like
- The battery should be charged at least every three months to avoid shortening the battery life
- Dispose of used batteries according to the instructions
• CAUTION: Risk of explosion - If the battery is replaced by an incorrect type.
- If the battery is subjected to high or low extreme temperatures that a battery can be subjected to during use, storage or transportation.
- If the battery is subjected to low air pressure at high altitude.
- Replacement of a battery with an incorrect type that can defeat a safeguard (for example, in the case of some lithium battery types).
- Disposal of a battery into fire or a hot oven, or mechanically crushing or cutting of a battery, that can result in an explosion.
- Leaving a battery in an extremely high temperature surrounding environment that can result in an explosion or the leakage of flammable liquid or gas.
- A battery subjected to extremely low air pressure that may result in an explosion or the leakage of flammable liquid or gas.
This product has been tested to AS/NZS CISPR 32, AS/NZS 4268 and AS/NZS 62368.1.
After Sales Support

1300 663 907
help@cocoonproducts.com.au
www.cocoonproducts.com.au
Model number: HE200073-S
10/2021
Contents
Wireless Camera with Solar Panel
Warranty Note 3
Safety Instructions 5
Contents 6
Parts List 7
Technical Specifications 7
Installing the Cocoon Connect App 8
Before you start 8
Setting up the Cocoon Connect application for the first time 8
Create a Home 9
Setup 10
Inserting batteries 10
Charging the batteries 10
Setting up the Wireless Camera in the Cocoon Connect app 10
Operation 12
Main controls 12
Settings menu 13
Additional Functionality 14
Adding other Cocoon Connect accounts to your Home 14
MicroSD card usage 14
Solar Panel Installation
Mounting the solar panel 15
Connect the solar panel to your Smart Wireless Camera 15
Troubleshooting
Firmware updates 16
FAQs
Maintenance, Storage & Disposal 18
After Sales Support
6
1300 663 907
help@cocoonproducts.com.au
www.cocoonproducts.com.au
Model number: HE200073-S
10/2021
Parts List
- 1x Smart Wireless Camera
- 1× Base bracket*
- 2 x Rechargeable batteries*
- 1 x Screw for bracket*
- 1 x USB charging cable*
- 1x Adhesive tab*
- 1× Solar panel
- 1 x Silicone camera cover*
- 1x Long charging cable*
- 1 x Getting started guide*
- 1 x User guide*
- 1 x Screws for solar panel
- 1x Warranty certificate*
* Not shown
Wireless Camera with Solar Panel

natural_image
Two electronic devices: a white remote control unit and a black solar panel mounted on a stand (no visible text or symbols)Technical Specifications
• 1080P Resolution
• Water resistant IP65
- Wide angle lens
- Micro SD Slot (up to 64GB, card not included)
• Rechargeable batteries via USB
- WI-FI 2.4Ghz
• Infrared night vision
• 2 way audio with noise suppression
• DC Power Input: 5V d.c. 1A
• Battery rating: 3.7V d.c. 2600mAh X 2
NOTE:
- Your phone does not have to be connected to your local Wi-Fi to use this device, however mobile charges may apply
- The Cocoon Connect App is subject to change over time. The manual is written as per Cocoon Connect app version 1.1.6. Please see our website for any updates on the app
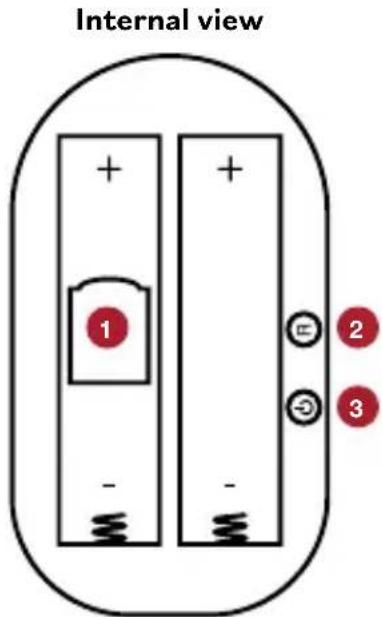
- MicroSD card slot
- Reset button
- Power button
Installing the Cocoon Connect App
Wireless Camera with Solar Panel
Before you start
- Know your Wi-Fi network & password
- The Smart Wireless Camera requires a Wi-Fi connection to communicate to the Cocoon Connect application
- Make sure your mobile device is running iOS 10 or higher or Android 4.4 or higher

natural_image
Icon of a power button with an upward arrow, no text or symbols presentSetting up the Cocoon Connect application for the first time
- Download the Cocoon Connect application by scanning the QR code provided or downloading it from the iOS App Store or Google Play Store
- Launch the application and select Register to register a Cocoon Connect account
- Select Agree to Terms and Conditions and then you will be required to enter an email address and press Obtain verification code. A verification code will then be sent to the email address you entered
- Enter the verification code into the password field
- Set the password for your Cocoon Connect account
OPTIONAL: Click on eye icon to unhide the password

After Sales Support
8
1300 663 907
help@cocoonproducts.com.au
www.cocoonproducts.com.au
Model number: HE200073-S
10/2021
Installing the Cocoon Connect App Wireless Camera with Solar Panel
Create a Home
The first time you set up the Cocoon Connect application, you will be prompted to create a Home.
Creating a home allows you to invite other Cocoon Connect account holders to control the same device. Creating a home is a good way of giving other household members control of Connected Home devices
- Select Create home
- Enter a name for the Home, for example use your surname, address or workplace etc.
- Set the location for the Home. If location is turned on, the Cocoon Connect application can use your smartphone's GPS function to pinpoint your location.
NOTE: You do not have to enter a location or use this feature
-
Select (or un-select) rooms which will have Cocoon Connect devices (e.g. living room, bedroom, front door). Add new rooms if required
-
Select Done on the top right-hand side to create the Home. You will get the confirmation Home Created Successfully


Setup
Wireless Camera with Solar Panel
Inserting batteries
To operate the Wireless Camera, 2 x rechargeable 18650 Li-Ion batteries need to be inserted. It is also recommended you charge the batteries prior to use.
NOTE: For first time charging, use a constant USB power source (not included) and not the included solar panel
- Move switch on the top of camera to open position to unlock the casing
- Open case to see battery compartment
- Ensure power switch is set to Off
- Insert batteries methodically, taking care with polarity
- Switch power On, close case and set top switch to lock position
- The Wireless Camera will power up and say "The Camera is now ready to begin pairing" and the left LED will flash blue / purple
Charging the batteries
- Make sure the included batteries are secure in the camera in the correct polarity positions
- Plug the Micro USB end of the USB cable into the bottom of the smart wireless camera
NOTE: For first time charging, use a constant USB power source (not included) and not the included solar panel - Plug the other end of the USB cable into a DC 5V USB power supply (Not included)
Setting up the Wireless Camera in the Cocoon Connect app
- Open the Cocoon Connect app on your phone which is connected to your Wi-Fi network and log into your account
- Select the ↑ Home tab on the bottom left hand side
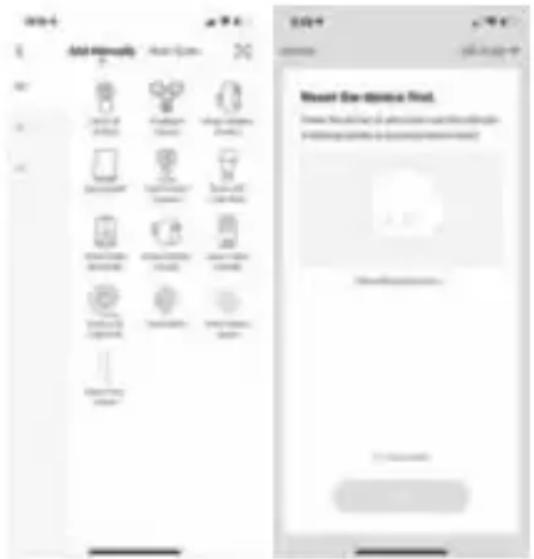
- Select the + icon on the top right-hand side or select Add Device to add a product
- Select Add Manually, select AU in the menu on the left hand side, then select the Wireless Camera icon on the right
- Confirm the blue/purple LED on the Wireless Camera is flashing by selecting Next Step. If not, reset the camera as per "FAQs" on page 17
After Sales Support
10
1300 663 907
help@cocoonproducts.com.au
www.cocoonproducts.com.au
Model number: HE200073-S
10/2021
Setup
Wireless Camera with Solar Panel
- Verify that your smartphone is connected to the Wi-Fi network you wish to connect the Wireless Camera to.
a. With initial connection, it is recommended to have the Wireless Camera near your Wi-Fi router to ensure a clear network connection
b. If there is more than one Wi-Fi network, you can change the Wi-Fi network your phone is connected to by selecting the Wi-Fi network name. You will be taken to your settings where you can change your network settings. Once changed, return to previous screen to enter your Wi-Fi password
c. Enter your local Wi-Fi password and select Confirm. You can click on the eye icon to see your password on your screen
- With the local Wi-Fi network confirmed, you will need to scan a unique QR Code that will appear on your phone
a. Tap Continue and a QR Code will be displayed on the phone screen
b. Place the phone approximately 15-20cm in front of the Wireless Camera (LED blinking rapidly) with the QR code facing the camera
c. The Wireless Camera will read the unique QR code and an audible sound will be heard. In addition, the LED will turn blue and begin flashing
d. Once you hear the sound, select Heard the Beep on the application
e. If you do not hear a beep, select Heard nothing at all on the app and follow instructions on screen (see “Troubleshooting” on page 16)

- Having selected Heard the Beep the application will begin registering the device with your account. This can take a few minutes
- Once the Wireless Camera is paired with the app, you will be asked to name it and to select a room
a. The name of the Wireless Camera should be simple and descriptive
b. Select the room icon to select the Wireless Camera's location
c. Then select Complete. The app will then start retrieving the camera's video stream
- You can also view the video stream from the Product Control Screen
a. Your phone does not have to be connected to your local Wi-Fi to view the Wireless Camera (however mobile data charges may apply if it's not)
Operation
Main controls
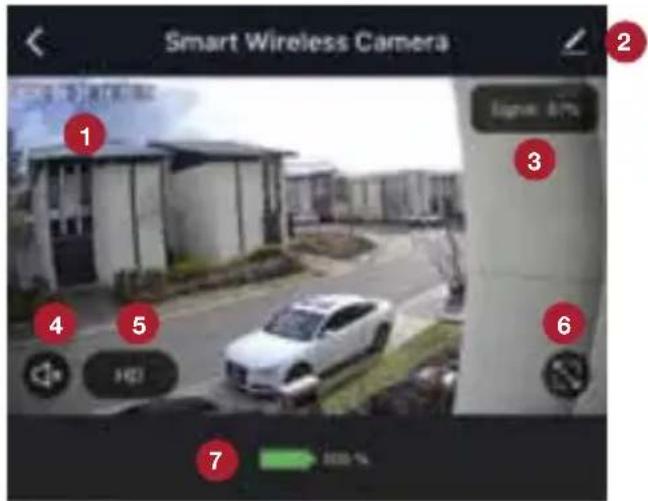
Once added to the Cocoon Connect app, you can tap on the Wireless Camera from the home screen to access the video feed and controls. Each of the items on the screen allow the following functions:
- Date & Time Watermark: Displays the device's date and time on video stream (must be turned on in settings)
- Settings: Allows you to adjust further settings for the camera (see below)
- Signal: Wi-Fi signal strength in percentage
- Speaker: Select to hear audio from the camera
- HD / SD: High Definition or Standard Definition selection
- Full Screen Icon: Plays the video in full screen
- Battery: Shows the cameras current battery percentage
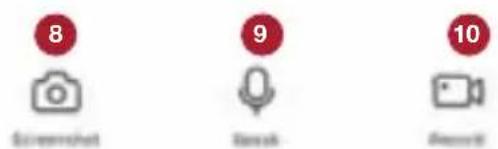
- Screenshot: Takes a screenshot of the current video stream onto your smartphone
- Speak: Hold this button to allow two-way communication. Unmutes camera
- Record: Activates the recording of real time video onto your Smartphone
- Playback: Allows the playback of video stored on the SD Card (sold separately) in the Smart Wireless Camera.
- Cloud Storage: Set up cloud storage for records that cannot be destroyed or stolen
NOTE: Additional fees apply - Photo album: Review images or videos recorded to your smartphone photo gallery
Wireless Camera with Solar Panel


Operation
Wireless Camera with Solar Panel
Settings menu
a. Device Name: Allows user to edit the name and Room location of the Smart Wireless Camera
b. Share Device: Allows user to share device to another user.
It is recommended to share device via home management option (see “Adding other Cocoon Connect accounts to your Home” on page 14) so a Home member can control the device
c. Device Information: Provides the device owner account name, device's IP address, the unique device ID, device time zone & the Wi-Fi strength of the network
d. Use Echo: Provides step by step instructions on adding the Smart Wireless Camera to an Amazon Echo device (Sold separately)
e. Power Management Settings:
f. Basic Function Settings:
- Flip Screen: Rotates the video stream 180^
g. Motion Detection: Adjust motion sensitivity between Off, Low, Medium or High
h. Value Added Service (VAS) Purchase: Link to cloud storage for video stream of Smart Wireless Camera
i. Storage Settings:
• Storage Capacity: Shows total, used and remaining capacity of SD Card (SD Card not included)

j. FAQ & Feedback: The user can access our FAQs and also provide feedback via the app to resolve networking, application and device issues
k. Firmware information: Provides current firmware version of the application, the last time it was updated and allows the user to check for firmware upgrades
I. Remove Device: Allows you to remove the Smart Wireless Camera from your account and home
Additional Functionality
Wireless Camera with Solar Panel
Now that you have set up this device you may want to connect it with other Cocoon Connect devices. For example, you may want a Smart Bulb to activate if a motion is detected. Instructions for applying such functions can be found on our website https://cocoonproducts.com.au/
Voice control, via third party support, is also another great way to control Cocoon Connect products. Voice control instruction can be found in our manual online. In addition, you will find a list of associated commands.
Adding other Cocoon Connect accounts to your Home
Follow these steps to add allow other Cocoon Connect accounts access to a Home:
- Select your current Home in the top left corner of the main page and select Home Management
- Select the Home you want to allow another account to access
- Select Add Member – the home member must set up an account prior to adding them
- Fill out the details for the new Home member
- Select if you want to give that account administrator rights – allowing them to make changes to the settings of devices in that home (including removing the whole home). This will also allow them to create automations of these devices
- Select completed and Cocoon Connect will send an invitation for the account to join the home to access the connect devices
MicroSD card usage
The Smart Wireless Camera can be used with a MicroSD card (not included) to record and store footage to review later. The MicroSD card slot can be found inside the battery compartment.
To install:
- Open the casing to see the battery compartment
- The MicroSD card slot is located behind the battery furthest away from the power button
- To unlock the MicroSD slot, slide the silver cover down (it will click down into place) and gently pull down
- Place a MicroSD card with the contacts facing down, as per the small diagram above the slot
- Gently replace the silver cover, and slide back up so it clicks into place on top of the MicroSD card
After Sales Support
14
1300 663 907
help@cocoonproducts.com.au
www.cocoonproducts.com.au
Model number: HE200073-S
10/2021
Solar Panel Installation
Wireless Camera with Solar Panel
The solar panel requires full, direct sunlight to charge your camera. Grey skies, rainy days, and other inclement weather conditions may hinder the ability of the solar panel to generate power.
- For best results, the solar panel should be tilted towards the sun. The optimum angle varies throughout the year, depending on the seasons and your location.
- Preferably, mount the solar panel somewhere that receives plenty of sunlight, between 10am and 3pm, to fully sustain your camera's power needs all year round. Avoid placing in a shady area. Shading from trees and buildings will substantially reduce the output of the solar panel.
- The solar panel is designed to maintain the camera's battery charge level based upon the amount of sunlight received daily. It is not intended to power a flat camera or to fully charge a camera from a low battery state. We recommend fully charging your camera via your regular USB charger before attaching to the solar panel.
- Keep the solar panel surface clear of leaves and debris for optimum performance.
Mounting the solar panel
- Attach the mounting bracket to a solid surface with the supplied screws. Make sure to allow enough charging cable to reach your camera from the mounting location of the solar panel.
NOTE: If mounting to a wooden surface, screw the mounting bracket directly to the surface. If mounting to a masonry surface (bricks, concrete, or stucco), drill three holes using a 8mm(1/8") drill bit and insert the supplied wall plugs into holes. Then secure the mounting bracket to the surface with supplied screws - Attach the solar panel to the mounting bracket. Align the solar panel with the threaded screw on the swivel head mount, and then screw in the solar panel until it is secured tightly.
- The solar panel produces power only when it is exposed to sunlight. To generate the most power and achieve best charging performance, tilt the solar panel towards the sun, away from cover and shade.
Connect the solar panel to your Smart Wireless Camera
- Insert the micro usb cable into the silicone waterproof cover.
- Put the Smart Wireless Camera into the silicone waterproof cover and connect the micro usb cable into the charging port on the base of the camera.
NOTE:
- If the solar panel is used, the included silicone cover must be used on the camera at all times
- The camera can be used without the included solar panel, however charging must be done via USB
Troubleshooting
Wireless Camera with Solar Panel
My connection process does not work
If your connection process fails, then you may see the screen to the right
Failed to add device
There are several potential problems, including but not limited to an incorrect Wi-Fi password, router firewall settings, network firewall settings, poor wireless communication and security settings on router. With the initial connection, it is recommended to have the device near your Wi-Fi router to ensure a clear network connection. For further troubleshooting, press the View Details tab

Why is there no prompt from the camera?
If the device is not providing a prompt when the QR code is help up to the camera lens try the below:
- Ensure that the lens is not blocked. If the camera has a protective film, remove it before you scan the QR code
- Place the app QR code in front of the camera at a distance of 15cm to 20cm. Adjust the angle and distance until you hear a prompt
- Reset your camera and try step 2 again
Firmware updates
Visit https://support.cocoonproducts.com.au for the latest firmware updates for the Smart Wireless Camera
Warning: Before installing any firmware updates the camera must have at least 80% battery charge. It is recommended that you recharge your Wireless Camera completely before any firmware update. If there is not enough battery power there is a risk the firmware will not load correctly, rendering the camera unusable. Do not power off the camera during a firmware update.
| Question Solution | |
| I can’t get the blue / purple LED to blink rapidly for set up of my Wireless Camera | Ensure that the camera is powered up and hold the Reset button down for 6 seconds. The Wireless Camera should now say “The Camera is now ready for pairing” and the Blue/Red LED will start blinking rapidly |
| My Wireless Camera does not load on my App | Check that your internet router is on and reset if needed. Please see the troubleshooting section for when the connection process does not work. |
| What if my Router is not 2.4GHz? Wi-Fi routers operate in two bands, 2.4GHz and 5GHz. Some routers operate on both bands simultaneously. The Cocoon Connect Wireless Camera can only operate on the 2.4GHz frequency. | |
| Why are the speaker and microphone not working? | Check the app settings to make sure they are not disabled |
| How do I turn On/Off Push Notifications? | Push notifications for the camera can be accessed in the settings function under motion detection. Push notifications for your whole account can be accessed via the settings in the ‘Me’ menu |
| Where can I get additional Cocoon Connect products? | Additional Cocoon Connect smart home products are available at your local ALDI store and at https://cocoonproducts.com.au |
For more information, setup guides and videos, please visit https://cocoonproducts.com.au
Maintenance, Storage & Disposal
Wireless Camera with Solar Panel
The Smart Wireless Camera does not require scheduled maintenance or cleaning. Should cleaning be necessary, simply wipe the outside surface with a dry soft cloth. Be sure to unplug this device before cleaning.
Always store your device in a clean dry environment and avoid storage in extreme heat or cold.
At the end of its working life, do not throw this product out with your household rubbish. Electrical and electronic products contain substances that can have a detrimental effect on the environment and human health if disposed of inappropriately. Observe any local regulations regarding the disposal of electrical consumer goods and dispose of it appropriately for recycling. Contact your local authorities for advice on recycling facilities in your area.
Observe and local regulations regarding the disposal of waste products. Contact your local authorities for advise on recycling facilities in your area.
Please keep the original packaging carton and materials in a safe place. It will help to prevent any damage if the product needs to be transported in the future. In the event it is to be disposed of, please recycle all packaging material where possible.
If you require another copy of this instruction manual, please contact help@cocoonproducts.com.au to obtain an electronic copy.

ALDI
COCOON
SMART WIRELESS CAMERA & SOLAR PANEL Repair and Refurbished Goods or Parts Notice
Unfortunately, from time to time, faulty products are manufactured which need to be returned to the Supplier for repair.
Please be aware that if your product is capable of retaining user-generated data (such as files stored on a computer hard drive, telephone numbers stored on a mobile telephone, songs stored on a portable media player, games saved on a games console or files stored on a USB memory stick) during the process of repair, some or all of your stored data may be lost.
We recommend you save this data elsewhere prior to sending the product for repair.
You should also be aware that rather than repairing goods, we may replace them with refurbished goods of the same type or use refurbished parts in the repair process.
Please be assured though, refurbished parts or replacements are only used where they meet ALDI's stringent quality specifications.
If at any time you feel your repair is being handled unsatisfactorily, you may escalate your complaint. Please telephone us on 1300 663 907 or write to us at:
Balco Brands Pty Ltd
PO Box 537 Bayswater Business Centre, Victoria, Australia
1300 663 907 - Hours: Mon-Fri 8:30am - 6:00pm AEST
help@cocoonproducts.com.au
AFTER SALES SUPPORT


1300 663 907

help@cocoonproducts.com.au
MODEL: HE200073-S PRODUCT CODE: 707109 10/2021

cocoon ^v
After Sales Support
Ph. 1300 663 907
help@cocoonproducts.com.au


- SMART WIRELESS CAMERA WITH SOLAR PANEL
- Warranty Note
- Wireless Camera with Solar Panel
- Read the entire manual
- Visit www.cocoonproducts.com.au
- Call After Sales Support - 1300 663 907
- COCOON™
- SMART WIRELESS CAMERA & SOLAR PANEL
- Warranty Details
- Safety Instructions
- Contents
- Parts List
- Technical Specifications
- NOTE:
- Installing the Cocoon Connect App
- Before you start
- Setting up the Cocoon Connect application for the first time
- Installing the Cocoon Connect App Wireless Camera with Solar Panel
- Create a Home
- Setup
- Inserting batteries
- Charging the batteries
- Setting up the Wireless Camera in the Cocoon Connect app
- Operation
- Main controls
- Settings menu
- Additional Functionality
- Adding other Cocoon Connect accounts to your Home
- MicroSD card usage
- To install:
- Solar Panel Installation
- Mounting the solar panel
- Connect the solar panel to your Smart Wireless Camera
- Troubleshooting
- My connection process does not work
- Failed to add device
- Why is there no prompt from the camera?
- Firmware updates
- Maintenance, Storage & Disposal
- COCOON
- SMART WIRELESS CAMERA & SOLAR PANEL Repair and Refurbished Goods or Parts Notice
Brand : Aldi
Model : HE200073-S
Category : Security Camera