
CS62KM - Computer Cable ATEN - Free user manual and instructions
Find the device manual for free CS62KM ATEN in PDF.


| Product Type | 2-Port USB Boundless Cable KM Switch |
| Dimensions (L x W x H) | 8.45 x 3.4 x 2.21 cm (3.33 x 1.34 x 0.87 in) |
| Weight | 0.12 kg (0.26 lb) |
| Power Supply | Bus-powered via USB; no external adapter required (requires connection to two computers for sufficient power) |
| Power Consumption | DC 5V: 0.74W / 8 BTU |
| Computer Connections | 2 |
| Port Selection Methods | Hotkey (Scroll Lock or Ctrl), Mouse Wheel (double-click), Mouse Cursor (Boundless Switching), Remote Port Selector |
| Console Connectors | 2 x USB Type A Female (keyboard and mouse) |
| Remote Port Selector Connector | 1 x 2.5mm Audio Jack Female |
| LED Indicators | 2 (Green) – one per port |
| Cable Length (Console) | 0.15 m |
| Keyboard/Mouse Emulation | USB (HID) |
| Operating Temperature | 0°C – 40°C (32°F – 104°F) |
| Storage Temperature | -20°C – 60°C (-4°F – 140°F) |
| Humidity | 0 – 80% RH, Non-condensing |
| Housing Material | Plastic |
| Compliance | FCC Class B, RoHS |
| Supported Operating Systems | Windows, macOS, iOS, Linux, Android (Note: Boundless Switching not supported on macOS/iOS/Linux/Android) |
| Main Features | Boundless Switching, Bus-powered, Firmware upgradeable, USB hot plugging, No software required, Remote port selector included |
| Maintenance & Cleaning | Unplug device; clean with a damp cloth; do not use liquid or aerosol cleaners |
| Safety | For indoor use only; avoid water, heat sources, and unstable surfaces; do not block ventilation openings |
| Spare Parts & Repairability | No user-serviceable parts; refer servicing to qualified personnel |
| Package Contents | 1x CS62KM unit, 1x remote port selector, 1x user instructions |
Frequently Asked Questions - CS62KM ATEN
User questions about CS62KM ATEN
0 question about this device. Answer the ones you know or ask your own.
Ask a new question about this device
Download the instructions for your Computer Cable in PDF format for free! Find your manual CS62KM - ATEN and take your electronic device back in hand. On this page are published all the documents necessary for the use of your device. CS62KM by ATEN.
USER MANUAL CS62KM ATEN
2-Port USB Boundless
Cable KM Switch
User Manual
Compliance Statements
FEDERAL COMMUNICATIONS COMMISSION INTERFERENCE STATEMENT
This equipment has been tested and found to comply with the limits for a Class B digital service, pursuant to Part 15 of the FCC rules. These limits are designed to provide reasonable protection against harmful interference in a residential installation. Any changes or modifications made to this equipment may void the user's authority to operate this equipment. This equipment generates, uses, and can radiate radio frequency energy. If not installed and used in accordance with the instructions, may cause harmful interference to radio communications. However, there is no guarantee that interference will not occur in a particular installation. If this equipment does cause harmful interference to radio or television reception, which can be determined by turning the equipment off and on, the user is encouraged to try to correct the interference by one or more of the following measures:
◆ Reorient or relocate the receiving antenna.
- Increase the separation between the equipment and receiver.
- Connect the equipment into an outlet on a circuit different from that to which the receiver is connected.
- Consult the dealer or an experienced radio/TV technician for help.
The device complies with Part 15 of the FCC Rules. Operation is subject to the following two conditions: (1) this device may not cause harmful interference, and (2) this device must accept any interference received, including interference that may cause undesired operation.
FCC Caution: Any changes or modifications not expressly approved by the party responsible for compliance could void the user's authority to operate this equipment.

KCC Statement
This product is RoHS compliant.
KVM+ 多電腦切換器類產品
| 設備名稱Equipment Name | 2埠USB鍵盤/滑鼠無邊快切帶線式KM多電腦切換器 | 型號(型式)Type designation (Type) | CS62KM | |||
| 單元Unit | 限用物質及其化學符號Restricted substances and its chemical symbols | |||||
| 鉛Lead(Pb) | 汞Mercury(Hg) | 鎘Cadmium(Cd) | 六價鉻Hexavalent chromium( Cr^+6 ) | 多溴聯苯Polybrominated biphenyls(PBB) | 多溴二苯醚Polybrominated diphenyl ethers(PBDE) | |
| 電纜線 Cable | - | ○ | ○ | ○ | ○ | ○ |
| 印刷電路部件PCBA | - | ○ | ○ | ○ | ○ | ○ |
| 塑膠/其他部件Plastic / Other parts | ○ | ○ | ○ | ○ | ○ | ○ |
| 金屬部件Metal parts | - | ○ | ○ | ○ | ○ | ○ |
備考1. “超出0.1wt%”及“超出0.01wt%”係指限用物質之百分比含量超出百分比含量基準值。
Note 1: “Exceeding 0.1 wt %” and “exceeding 0.01 wt %” indicate that the percentage content of the restricted substance exceeds the reference percentage value of presence condition.
備考2. “○”係指該項限用物質之百分比含量未超出百分比含量基準值。
Note 2: “○” indicates that the percentage content of the restricted substance does not exceed the percentage of reference value of presence.
備考3. “-”係指該項限用物質為排除項目。
Note 3: “-” indicates that the restricted substance corresponds to the exemption.
製造商:宏正自動科技股份有限公司
This user manual is provided to help you get the most from your CS62KM unit. It covers all aspects of installation, configuration and operation. An overview of the information found in the manual is provided below.
Chapter 1, Introduction, introduces you to the CS62KM. Its purpose, features and benefits are presented, and its front and back panel components are described.
Chapter 2, Hardware Setup, describes how to set up your installation. The necessary steps are provided.
Chapter 3, Basic Operation, explains the fundamental concepts involved in operating the CS62KM.
Chapter 4, Hotkey Operation, details all of the concepts and procedures involved in the Hotkey operation of your CS62KM installation.
Chapter 5, Keyboard Emulation, provides tables that list the PC to Mac keyboard emulations mappings.
Chapter 6, The Firmware Upgrade Utility, explains how to upgrade the CS62KM's firmware with the latest version available.
Appendix, provides specifications and other technical information regarding the CS62KM.
Conventions
This manual uses the following conventions:
Monospaced Indicates text that you should key in.
[ ] Indicates keys you should press. For example, [Enter] means to press the Enter key. If keys need to be chorded, they appear together in the same bracket with a plus sign between them: [Ctrl+Alt].
- Numbered lists represent procedures with sequential steps.
◆ Bullet lists provide information, but do not involve sequential steps.
Indicates selecting the option (on a menu or dialog box, for example), that comes next. For example, Start > Run means to open the Start menu, and then select Run.

Indicates critical information.
Package Contents
The CS62KM package consists of:
◆ 1 CS62KM 2-Port USB Boundless Cable KM Switch
◆ 1 remote port selector
◆ 1 user instructions*
Check to make sure that all the components are present and that nothing was damaged in shipping. If you encounter a problem, contact your dealer.
Read this manual thoroughly and follow the installation and operation procedures carefully to prevent any damage to the unit, and/or any of the devices connected to it.
Note:*Features may have been added to the CS62KM since this manual was printed. Please visit our website to download the most up-to-date version of the manual.
Product Information
For information about all ATEN products and how they can help you connect without limits, visit ATEN on the Web or contact an ATEN Authorized Reseller. Visit ATEN on the Web for a list of locations and telephone numbers:
| International http://www.aten.com |
| North America http://www.aten-usa.com |
User Information
Online Registration
Be sure to register your product at our online support center:
International http://eservice.aten.com
Telephone Support
For telephone support, call this number:
| International 886-2-86 | 92-6959 |
| China 86-400-810-0-8 | 10 |
| Japan 81-3-5615-581 | 1 |
| Korea 82-2-467-6789 | |
| North America 1-888- | 999-ATEN ext 4988 |
| 1-949-428-1111 |
User Notice
All information, documentation, and specifications contained in this manual are subject to change without prior notification by the manufacturer. The manufacturer makes no representations or warranties, either expressed or implied, with respect to the contents hereof and specifically disclaims any warranties as to merchantability or fitness for any particular purpose. Any of the manufacturer's software described in this manual is sold or licensed as is. Should the programs prove defective following their purchase, the buyer (and not the manufacturer, its distributor, or its dealer), assumes the entire cost of all necessary servicing, repair and any incidental or consequential damages resulting from any defect in the software.
The manufacturer of this system is not responsible for any radio and/or TV interference caused by unauthorized modifications to this device. It is the responsibility of the user to correct such interference.
The manufacturer is not responsible for any damage incurred in the operation of this system if the correct operational voltage setting was not selected prior to operation. PLEASE VERIFY THAT THE VOLTAGE SETTING IS CORRECT BEFORE USE.
Contents
Compliance Statements ...... ii
About this Manual .....iv
Conventions iv
Package Contents v
Product Information ...... vi
User Information . . . . . . . . . . . . . . . . . . . . . . . . . . . . . . . . . . . . . . . . . . . . . . . . . . . . . . . . . . . . . . . . . . . . . . . . . vi
Online Registration....vi
Telephone Support....vi
User Notice vii
Contents ......viii
1. Introduction
Overview....1
Features 2
Requirements 3
Console 3
Computers....3
Operating Systems 3
Components 4
CS62KM Hardware View 4
2. Hardware Setup
Hardware Installation 7
Installation Diagram 7
3. Basic Operation
Port Selection 9
Manual Switching 9
Mouse Switching....9
Hotkey Switching....9
Boundless Switching....9
Port ID Numbering 10
Hot Plugging 10
Powering Off and Restarting....10
4. Hotkey Operation
Port Switching....11
Cycling Through the Ports. 11
Going Directly to a Port 12
Hotkey Setting Mode 13
Invoking HSM 13
Alternate HSM Invocation Keys 14
Alternate Port Switching Keys. 14
Keyboard Operating Platform 15
List Switch Settings 15
USB Reset....15
Keyboard Language 16
Port Switching Keys 16
Firmware Upgrade Mode....16
Power on Detection .....17
Mouse Emulation....17
Mouse Port Switching .....17
Screen Size....18
Boundless Switching....23
Cycle Port Switching 24
Monitor Layout 25
HSM Summary Table 27
5. Keyboard Emulation
Mac Keyboard....29
6. The Firmware Upgrade Utility
Before you Begin. 31
Starting the Upgrade 33
Upgrade Successful 35
Upgrade Failed 35
Appendix
Safety Instructions....37
Technical Support 39
International....39
North America 39
Specifications 40
Troubleshooting 41
Hotkey Default Settings 42
Limited Warranty 43
This Page Intentionally Left Blank
Chapter 1
Introduction
Overview
The CS62KM is a 2-port USB Cable KM Switch that enables users to control up to 2 computers with a single keyboard and mouse. It features various innovative port selection methods. Users can switch between the connected computers via remote port selector, keyboard hotkey, mouse cursor, and mouse wheels. The mouse cursor method adopts ATEN's exclusive Boundless Switching technology, which provides an intuitive way to switch control to another computer by simply moving your mouse cursor across a screen border and onto the target computer display. Move the mouse cursor in any direction to switch the control focus without limitations.
The CS62KM's Boundless Switching function supports up to 2 monitors, expediting the process of switching between computers for a smooth and hassle-free user experience. In addition to making multitasking across two displays more efficient, this function is especially useful in emergencies that necessitate the immediate monitoring and management of computers.
Further advanced features of the CS62KM include bus-power mode which means no external power adapter is required. With a rich feature set, the CS62KM is designed to simplify administrative tasks, save space, and increase work productivity, and is especially suitable for complex multitasking applications in control rooms in any industry.
Features
◆ Single USB keyboard and mouse controls up to 2 computers
- Boundless Switching – simply move the mouse cursor across the display border and onto the corresponding display of the target computer to switch the keyboard/mouse operations from one computer to the next
- Port selection via remote port selector, keyboard hotkey, mouse cursor, and mouse wheel ^1
◆ Supports Windows operating systems
- No software required
- Firmware upgradeable
◆ Supports USB hot plugging
- Bus-powered – no external power adapter required ^2
◆ Works with iOS, Android, macOS, and Linux operating systems ^3
Note: 1. The mouse port switching is only supported under mouse emulation mode with a USB 3-button mouse wheel.
- The USB bus-powered design allows the switch to get power from the connected computers. It requires connection to two computers to get sufficient power supply.
- The boundless switching is not supported on iOS, Android, macOS, and Linux operating systems.
Requirements
Console
A USB mouse
◆ A USB keyboard
Computers
The following equipment must be available on each computer:
- Video Display
USB Type A port
Operating Systems
- Windows
- macOS
iOS
Linux
Android
Note: The boundless switching is not supported on iOS, Android, macOS, and Linux operating systems.
Components
CS62KM Hardware View
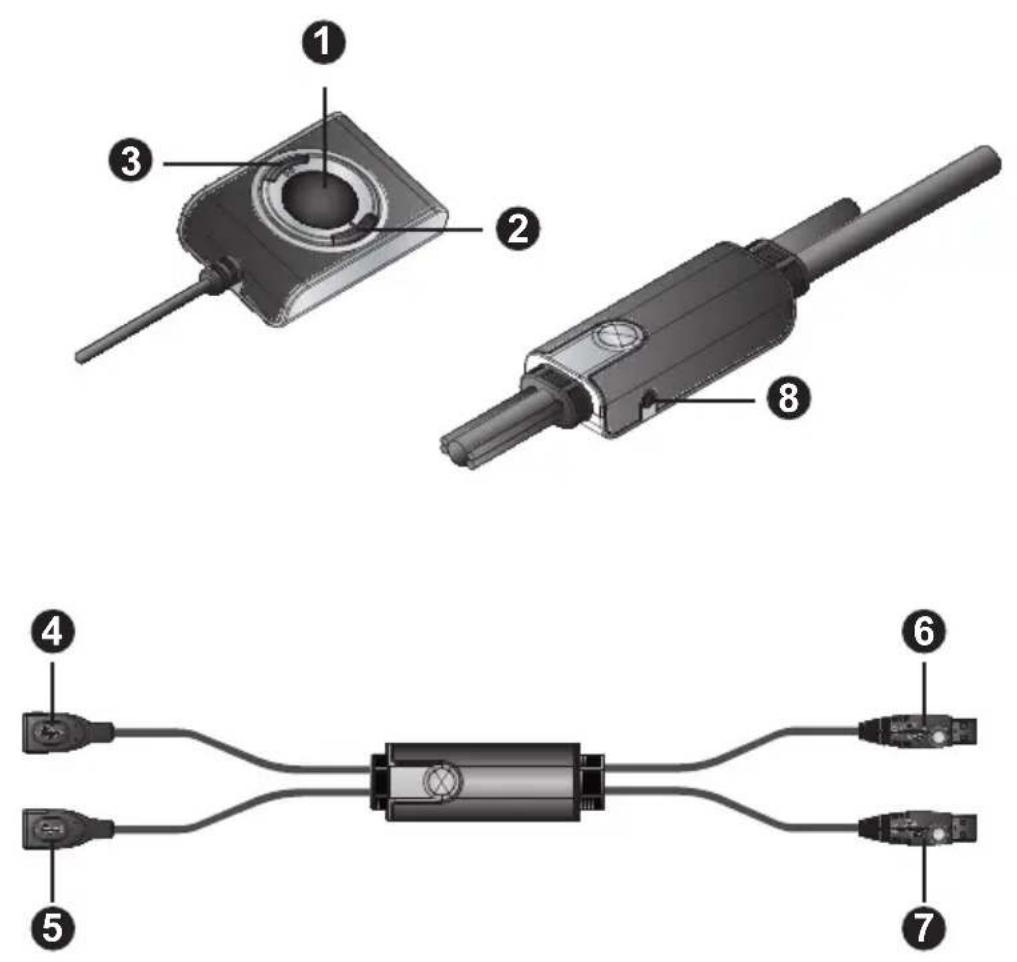
| No. | Component Description | |
| 1 port selection button | Press the port selection button to toggle the KM and focus between the two computers. | |
| 2 port 1 LED Lights when the corresponding computer port has the KM focus. | ||
| 3 port 2 LED Lights when the corresponding computer port has the KM focus. | ||
| 4 keyboard cable | Connects the keyboard here. | |
| 5 mouse cable Connects the mouse here. | ||
| 6 PC 1 USB cable | Connects the first computer here. | |
| No. | Component Description | |
| 7 PC | 2 USB cable | Connects the second computer here. |
| 8 remote port selector jack | Plugs the remote port selector cable here if you choose to use the remote port selector. | |
This Page Intentionally Left Blank
Chapter 2
Hardware Setup

-
Important safety information regarding the placement of this device is provided on page 37. Please review it before proceeding.
-
To prevent damage to your installation from power surges or static electricity. It is important that all connected devices are properly grounded.
-
Make sure that power to all the devices you will be installing has been turned off. You must unplug the power cords of any computers that have the Keyboard Power On function.
-
Please operate the device with caution when under high environmental temperatures, as the surface of the device may become overheated under such conditions. For instance, the surface temperature of the device may reach 70 °C ( 158 °F ) or higher when the environmental temperature reaches close 50 °C ( 122 °F ).
Hardware Installation
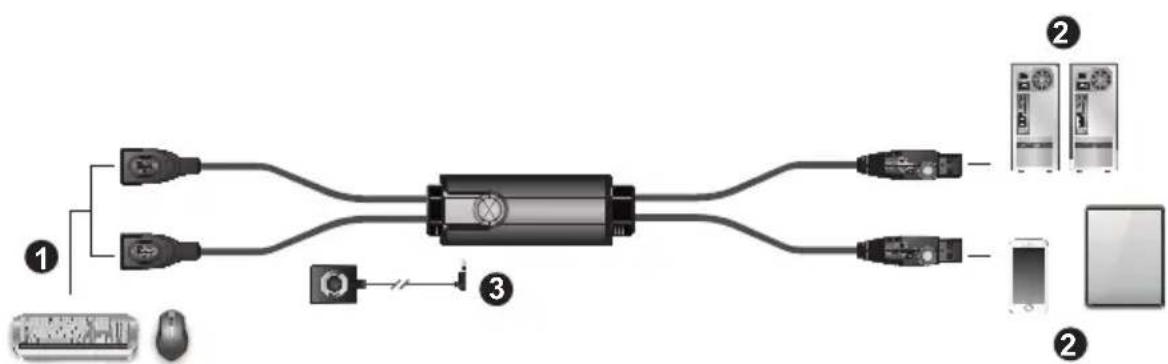
To set up your installation, refer to the installation diagram below (the numbers in the diagram correspond to the steps below), and do the following:
Installation Diagram
flowchart
graph LR
    A["Device 1"] --> B["Switch"]
    C["Device 2"] --> D["Switch"]
    E["Device 3"] --> F["Central Device"]
    G["Computer Interface"] --> H["Switch"]
    I["Mobile Device"] --> J["Switch"]
    style A fill:#f9f,stroke:#333
    style C fill:#f9f,stroke:#333
    style E fill:#ccf,stroke:#333
    style G fill:#ccf,stroke:#333
    style I fill:#dfd,stroke:#333
-
Plug your keyboard into the connector at the end of the keyboard cable, and plug your mouse into the connector at the end of the mouse cable.
-
Plug the PC 1 USB cable into the USB port on your first computer and/or Andorid / iOS mobile device, and plug the PC 2 USB cable into the USB port on your second computer and/or Andorid / iOS mobile device.
Note: 1. A power adapter is not provided with the package as the USB bus-power allows the switch to get power from the computers. It requires connection to two computers to get a sufficient power supply.
2. Please use appropriate USB adapters when connecting your Android / iOS mobile device (e.g., USB Type-A to USB Type-C adapter for iPad Pro).
- (Optional) If you choose to use the remote port selector, plug its cable into the remote port selector jack, located on the side of the unit.
Note: The switch can be operated with hotkeys alone, so connecting the remote port selector is optional.
- Power on the computers.
Note: Make sure the computers and devices that the CS62KM connects to are also properly grounded.
Port Selection
There are four convenient methods to switch between the computers: Manual – by pressing the port selection button; Mouse – by double-clicking the scroll wheel; Hotkey – by entering key combinations on the keyboard; and Boundless Switching– by moving the mouse cursor across display borders.
Manual Switching
For manual port selection:
- Press port selection button from the remote port selector to bring the KM focus to the computer attached to its corresponding port.
Mouse Switching
For mouse port selection: Double-click the scroll wheel of your USB mouse to cycle through the ports.
Note: 1. Mouse switching is only supported by USB 3-key scroll wheel mice.
2. Mouse switching is disabled by default. See Mouse Port Switching, page 17, to enable mouse switching.
3. Mouse switching is only supported when Mouse Emulation is enabled. See Mouse Emulation, page 17.
Hotkey Switching
For Hotkey port selection: All port switches from the keyboard begin by pressing the Scroll Lock key twice. For more information on the Hotkey parameters, (see Port Switching, page 11).
Boundless Switching
Boundless Switching is for port selection by moving the cursor across the display borders – when the cursor appears on the next screen, the KM focus switches. Before using Boundless Switching, you must turn off mouse acceleration in the operating system and configure:
- The screen size of all connected displays via hotkey, for more information, see Screen Size, page 18.
- The monitor layout via hotkey, for more information see Monitor Layout, page 25.
Port ID Numbering
The PC 1 USB Cable is assigned a port number 1, and the PC 2 USB Cable is assigned a port number 2. The Port ID is used to specify which computer gets the KM focus with the Hotkey port selection method (See Going Directly to a Port, page 12 for details).
Hot Plugging
The CS62KM supports USB hot plugging – components can be removed and added back into the installation by unplugging their cables from the USB hub ports without the need to shut the unit down.
Powering Off and Restarting
If it becomes necessary to power off the CS62KM unit, before powering it back on, you must do the following:
- Shut down all the computers that are attached to the switch.
- Power on the computers.
Chapter 4
Hotkey Operation
The switch provides an extensive, easy-to-use, hotkey function that makes it convenient to control and configure your KM installation from the keyboard.
Port Switching
All port switches begin with tapping the [Scroll Lock] key twice. The tables below describe the actions that each key combination performs.
Note: If using the [Scroll Lock] key conflicts with other programs running on the computer, the [Ctrl] key can be used, instead. See Alternate Port Switching Keys, page 14, for details.
Cycling Through the Ports
| Hotkey Action | |
| [Scroll Lock] [Scroll Lock][Enter] | Brings the KM focus from the port that currently has it to the next port on the installation (1 to 2; 2 to 1). The KM focus all go to this port even if they were on different ports to begin with. |
Example
To bring the KM focus from port 1 to port 2, do the following:
- Press [Scroll Lock] twice.
- Press [Enter].
Going Directly to a Port
| Hotkey Action | |
| [Scroll Lock] [Scroll Lock][n] [Enter] | Brings the KM focus to the computer attached to the port corresponding to the specified Port ID. The KM focus all go to this port even if they were on different ports to begin with. |
Note: The [n] stands for the computer's Port ID number (1, or 2). See Port ID Numbering, page 10. Replace the [n] with the appropriate Port ID when entering hotkey combinations.
Example
To bring the KM focus from a port to a specified port number (e.g., port 2), do the following:
- Press [Scroll Lock] twice.
- Press [2].
- Press [Enter].
Hotkey Setting Mode
Hotkey Setting Mode is used to configure the CS62KM. All operations begin with invoking Hotkey Setting Mode (HSM).
Invoking HSM
To invoke HSM, do the following:
- Press and hold down the [Num Lock] key.
- Press and release the [-] key.
- Release the [Num Lock] key.
Note: 1. There is an alternate key combination to invoke HSM. See below for details.
2. The [-] must be released within one half-second, otherwise Hotkey invocation is canceled.
When HSM is active, the Caps Lock and Scroll Lock LEDs flash in succession. They stop flashing and revert to normal status when you exit HSM.
Ordinary keyboard and mouse functions are suspended – only Hotkey-compliant keystrokes and mouse clicks, described in the sections that follow, can be input.
At the conclusion of some hotkey operations, you automatically exit Hotkey mode. With some operations, you must exit manually.
To exit HSM manually, press the [Esc] key, or the [Spacebar].
Alternate HSM Invocation Keys
An alternate set of HSM invocation keys is provided in case the default set conflicts with programs running on the computers.
To switch to the alternate HSM invocation set, do the following:
- Invoke HSM (see page 13).
- Press and release [H].
The HSM invocation keys become the [Ctrl] key (instead of the [Num Lock] key) and [F12] key (instead of the [-] key).
Note: This procedure is a toggle between the tow methods. To revert back to the original HSM invocation keys, invoke HSM, then press and release the [H] key again.
Alternate Port Switching Keys
The port switching activation keys can be changed from tapping the [Scroll Lock] key twice to tapping the [Ctrl] key twice.
To change the port switching activation keys, do the following:
- Invoke HSM (see page 13).
- Press and release the [T].
Note: This procedure is a toggle between the two methods. To revert back to the original [Scroll Lock] [Scroll Lock] method, invoke HSM, then press and release the [T] key again.
Keyboard Operating Platform
The CS62KM's default port configuration is for a PC compatible keyboard operating platform. To set the keyboard operating platform to work under special operating system as a standard (104 key) keyboard, or automatically detect and set the keyboard operating platform, follow the steps below:
- Bring the KM focus to the port you want to set.
- Invoke HSM (see page 13).
- Press and release the Function key (see table below). After completing this procedure, you automatically exit HSM.
| Function Key Operation | |
| [F1] Sets the SPC mode | so that it can work under special operating systems as a standard (104 key) keyboard. |
| [F2] Enables Mac keyboard | emulation, see page 29, for details. |
| [F10] Enables Windows | keyboard emulation. |
List Switch Settings
To see a listing of the current switch settings, do the following:
- Open a text editor or word processor and place the cursor in the page window.
- Invoke HSM (see page 13).
- Press and release [F4] to display the settings.
USB Reset
If the USB loses focus and needs to be reset, do the following:
- Invoke HSM (see page 13).
- Press and release [F5].
Keyboard Language
To change the keyboard language, do the following:
-
Invoke HSM (see page 13).
-
Press [F6] [nn] [Enter].
Note: nn is a two-digit number that represents the keyboard language code (US English: 33; French: 08; Japanese: 15; German: 09).
Port Switching Keys
To enable or disable the port switching activation keys, do the following:
-
Invoke HSM (see page 13).
-
Press [X] [Enter].
Note: This procedure is a toggle. To enable / disable the Port Switching keys, repeat step 1 and 2.
To reset the switch to its default hotkey settings, do the following:
-
Invoke HSM (see page 13).
-
Press [R] [Enter].
All hotkey settings return to the factory default settings (See Hotkey Default Settings, page 42).
Firmware Upgrade Mode
To set the switch to Firmware Upgrade Mode, do the following:
-
Invoke HSM (see page 13).
-
Key in: [U] [P] [G] [R] [A] [D] [E].
-
Press [Enter]. The front panel LEDs flash to indicate the Firmware Upgrade Mode is in effect.
Note: To exit Firmware Upgrade Mode, you must power off the switch.
Power on Detection
With Power on Detection, if the focus computer is powered off, the switch will automatically switch to the next powered-on computer. Power on Detection can be enabled or disabled. The default setting is enabled. To disable Power on Detection, do the following:
- Invoke HSM (see page 13).
- Press and release [E].
Note: This procedure is a toggle. To enable / disable the Power on Detection, repeat step 1 and 2.
Mouse Emulation
To enable or disable to toggle between mouse emulation, do the following:
- Invoke HSM (see page 13).
- Press [M].
Note: This procedure is a toggle. To enable / disable the Mouse Emulation, repeat step 1 and 2.
Mouse Port Switching
Mouse Port Switching allows you to use the mouse wheel button (clicked twice) to switch ports. For Mouse Port Switching to work, Mouse Emulation (above) must be enabled. To enable or disable mouse port switching, do the following:
- Invoke HSM (see page 13).
- Press [W].
Note: 1. This feature is only supported by USB 3-key scroll wheel mice. The default setting is disabled. This feature is only supported when mouse emulation is also enabled. See Power on Detection, above.
- This procedure is a toggle. To enable / disable the Mouse Port Switching, repeat step 1 and 2.
Screen Size
Sets the screen size of each monitor so that the CS62KM knows to switch computers when the mouse cursor moves from one computer's screen to the next. To set the screen size, do the following:
Setting the Screen Size with Firmware v1.0.062
- Bring the KM focus to the port you want to set up.
- Invoke HSM (see page 13).
- Press [L].
- In the upper left corner of the display, click the left mouse button and hold it down while you move the cursor to the bottom right corner of the display, and then release.
- Repeat this procedure for each monitor connected to your installation.
Note: If the display's resolution changes, you must reset the screen size to the correct resolution or Boundless Switching may not work correctly.
Setting the Screen Size with Firmware v1.1.101 or Later
Setting the Screen Size
- Bring the KM focus to the port you want to set up.
- Invoke HSM (see page 13).
- Press [L] [1].
- In the upper left corner of the display, click the left mouse button and hold it down while you move the cursor to the bottom right corner of the display, and then release.
- Repeat this procedure for each monitor connected to your installation.
Setting the Screen Resolution
- Bring the KM focus to the port you want to set up.
- Invoke HSM (see page 13).
- Press [L] [2] [Resolution (e.g., 3840x2160)] [Enter]. For a list of available resolutions supported by the CS62KM, see Supported Resolutions, page 19.
- Repeat this procedure for each monitor connected to your installation.
Supported Resolutions
| Horizontal Vertical | |
| 640 350 | |
| 640 400 | |
| 640 480 | |
| 720 288 | |
| 720 400 | |
| 720 480 | |
| 720 756 | |
| 768 480 | |
| 800 600 | |
| 840 480 | |
| 854 480 | |
| 960 540 | |
| 960 640 | |
| 1024 576 | |
| 1024 600 | |
| 1920 1080 | |
| 1024 768 | |
| 1152 864 | |
| 1176 774 | |
| 1280 600 | |
| 1280 720 | |
| 1280 768 | |
| 1280 800 | |
| 1280 960 | |
| 1280 1024 | |
| 1360 768 | |
| 1366 768 | |
| 1400 1050 | |
| 1440 756 | |
| 1440 900 | |
| 1600 1024 | |
| 1600 1200 | |
| 1680 720 | |
| 1680 1050 | |
| 1768 992 | |
| 1776 1000 | |
| 1792 1344 | |
| 1856 1392 | |
| 1920 1200 | |
| 1920 1440 | |
| 1920 2160 | |
| 2048 1152 | |
| 2048 1536 | |
| 2560 1080 | |
| 2560 1440 | |
| 2560 1600 | |
| 2560 2048 | |
| 3200 2048 | |
| 3200 1800 | |
| 3200 2400 | |
| 3440 1440 | |
| 3840 2160 | |
| 3840 2400 | |
| 4090 2160 | |
| 4096 2160 | |
| 4096 3072 | |
| 350 640 | |
| 400 640 | |
| 480 640 | |
| 288 720 | |
| 400 720 | |
| 480 720 | |
| 756 720 | |
| 480 768 | |
| 600 800 | |
| 480 840 | |
| 480 854 | |
| 540 960 | |
| 640 960 | |
| 576 1024 | |
| 600 1024 | |
| 1080 1920 | |
| 768 1024 | |
| 864 1152 | |
| 774 1176 | |
| 600 1280 | |
| 720 1280 | |
| 768 1280 | |
| 800 1280 | |
| 960 1280 | |
| 1024 1280 | |
| 768 1360 | |
| 768 1366 | |
| 1050 1400 | |
| 756 1440 | |
| 900 1440 | |
| 1024 1600 | |
| 1200 1600 | |
| 720 1680 | |
| 1050 1680 | |
| 992 1768 | |
| 1000 1776 | |
| 1344 1792 | |
| 1392 1856 | |
| 1200 1920 | |
| 1440 1920 | |
| 2160 1920 | |
| 1152 2048 | |
| 1536 2048 | |
| 1080 2560 | |
| 1440 2560 | |
| 1600 2560 | |
| 2048 2560 | |
| 2048 3200 | |
| 1800 3200 | |
| 2400 3200 | |
| 1440 3440 | |
| 2160 3840 | |
| 2400 3840 | |
| 2160 4090 | |
| 3072 4096 | |
| 1720 1440 | |
| 1440 1720 | |
| 3440 1440 |
Boundless Switching
To enable or disable to toggle between the boundless switching, do the following:
-
Invoke HSM (see page 13).
-
Press [Y] [Enter].
Note: 1. This procedure is a toggle. To enable / disable the boundless switching, repeat step 1 and 2.
2. This hotkey is only supported by CS62KM using firmware version v1.1.101 or later.
3. The mouse emulation must be enabled for the boundless switching to work, see Mouse Emulation, page 17.
Cycle Port Switching
The cycle port switching allows the boundless switching to switch port to the next available port before the mouse cursor reach to the edge of the display. To enable or disable to toggle between the cycle port switching, do the following:
- Invoke HSM (see page 13).
- Press [C] [Enter].
Note: 1. This procedure is a toggle. To enable / disable the cycle port switching, repeat step 1 and 2.
- This hotkey is only supported by CS62KM using firmware version v1.1.101 or later.
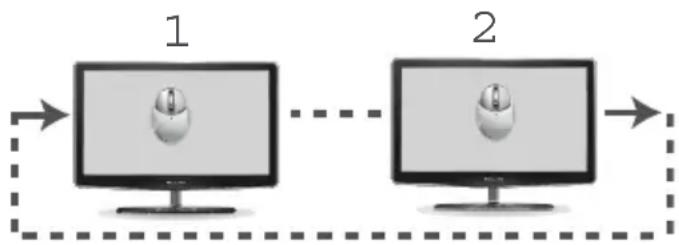
Example
Moving the mouse cursor to the far right of monitor 2 to switch port to monitor 1.
Monitor #
flowchart
graph LR
    A["1"] --> B["Computer monitor"]
    C["2"] --> D["Computer monitor"]
Monitor Layout
Sets the physical layout of the monitors allowing the CS62KM to switch to the correct computer when the mouse cursor moves off a screen to the right, left, up, or down. Before using Boundless Switching you must first configure the screen size of each display via hotkey (Screen Size, page 18).
You must disable mouse acceleration in the Windows Control Panel for Boundless Switching to work.
To set the layout, do the following:
-
Invoke HSM (see page 13).
-
Type in the layout using the parameters below:
| Parameter Row Monitor | ||
| P | A | 1 |
| B | 1 | |
Parameter refers to the letter “P” which all commands must begin with (PA12). Row refers to a group of displays aligned together, each letter represents a row: A, B. Monitor refers to a display in each row: 1, 2. Enter the number in order as it appears in the layout, left-to-right, beginning with Row A. The number represents the computer connected to a port # on the CS62KM.
Note: Monitor 1 refers to the monitor connected to Port 1; Monitor 2 refers to the monitor connected to Port 2 respectively.
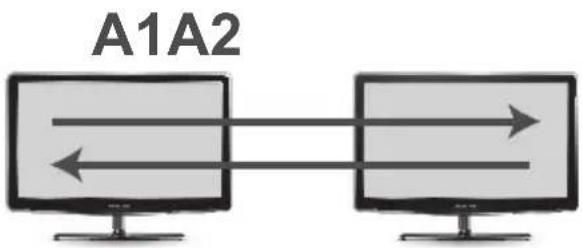
Examples are provided below with different layouts and arrows showing where the mouse cursor can cross display borders to switch computers.
Example 1
To key in a layout, enter "P" followed by "A" and a number for each display. If you have two displays in one row, type: PA12 [Enter]. The monitor 1 and 2 are fixed on the left and right in a row monitor layout.
1 x 2 Monitor Layout
flowchart
graph LR
    A["Computer monitor"] -->|Data left| B["Computer monitor"]
    B -->|Data right| A
Example 2
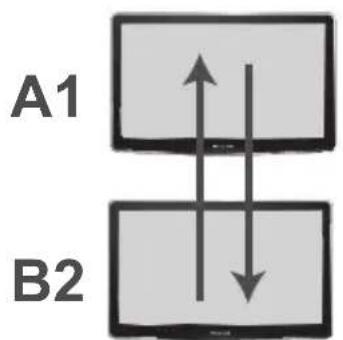
To key in a layout, enter "P" followed by "A" and a number for each display. If you have one display in each row, type: PA1B2 [Enter]. The monitor 1 and 2 are fixed on the top and bottom in a tier monitor layout.
2 x 1 Monitor Layout
HSM Summary Table
After invoking HSM (see page 13), key in one of the following keys to perform the corresponding function:
| Key Function | |
| [C] [Enter] Enables / | disables the Cycle Port Switching. |
| [E] Enables / disables the Power on Detection feature. | |
| [H] Toggles between the default and alternate HSM invocation keys. | |
| [L] Starts screen size configuration mode. | |
| [L] [n] n = 1, sets the screen size of your monitor. Note: This hotkey is only supported by CS62KM using firmware version v1.1.101 or later. | |
| [L] [n] [Enter] n = 2, sets the resolution of your monitor. Note: This hotkey is only supported by CS62KM using firmware version v1.1.101 or later. | |
| [M] Enables / disables Mouse Emulation. | |
| [P] [m] [n] [Enter] Configures the physical monitor layout for Boundless Switching. m: A, B, refers to the row number. n: 1, 2, refers to the monitor's column number. | |
| [R] [Enter] Resets the hotkey settings to their default setting. | |
| [T] Toggles between the default ([Scroll Lock] [Scroll Lock]) and alternate ([Ctrl] [Ctrl]) Port Switching keys. | |
| [U][P][G][R][A][D][E] [Enter] Invokes Firmware Upgrade Mode. | |
| [W] Enables / disables mouse port switching. | |
| [X] [Enter] Enables / disables the Port Switching keys. | |
| [Y] [Enter] Enables / disables the Boundless Switching. | |
| [F1] Allows the keyboard and mouse to work under special operating system as a standard (104 key) keyboard/ mouse. | |
| [F2] Enables Mac keyboard emulation. | |
| [F4] Prints the switch's current settings via a text editor or word processor. | |
| [F5] Performs a reset on all USB devices. | |
| [F6] [nn] [Enter] | Sets the keyboard language. nn represents one of the following keyboard language codes: US English: 33; French: 08; Japanese: 15; German: 09. |
| [F10] Automatically detects keyboard operating platform. | |
Chapter 5
Keyboard Emulation
Mac Keyboard
The PC compatible (101/104 key) keyboard can emulate the functions of the Mac keyboard. The emulation mappings are listed in the table below.
| PC Keyboard Mac Keyboard | |
| [Shift] Shift | |
| [Ctrl] Ctrl | |
 |  |
| [Ctrl] [1] |  |
| [Ctrl] [2] |  |
| [Ctrl] [3] |  |
| [Ctrl] [4] |  |
| [Alt] Alt | |
| [Print Screen] F13 | |
| [Scroll Lock] F14 | |
 | = |
[E  | |
 | |
 | |
 | F15 |
Note: When using key combinations, press and release the first key (Ctrl), then press and release the activation key.
This Page Intentionally Left Blank
Chapter 6
The Firmware Upgrade Utility
The Windows-based Firmware Upgrade Utility (FWUpgrade.exe) provides a smooth, automated process for upgrading the switch's firmware. The Utility comes as part of a Firmware Upgrade Package that is specific for each device. Check the web site regularly to find the latest packages and information relating to them: http://www.aten.com/download/download_fw.php
Before you Begin
- From a computer that is not part of your KM installation, go to our Support & Download → Downloads site and choose the model name that relates to your device (CS62KM) to get a list of available Firmware Upgrade Packages.
- Choose the Firmware Upgrade Package you want to install (usually the most recent), and download it to your computer.
- Disconnect the CS62KM from your KM installation and remove all cable connections.
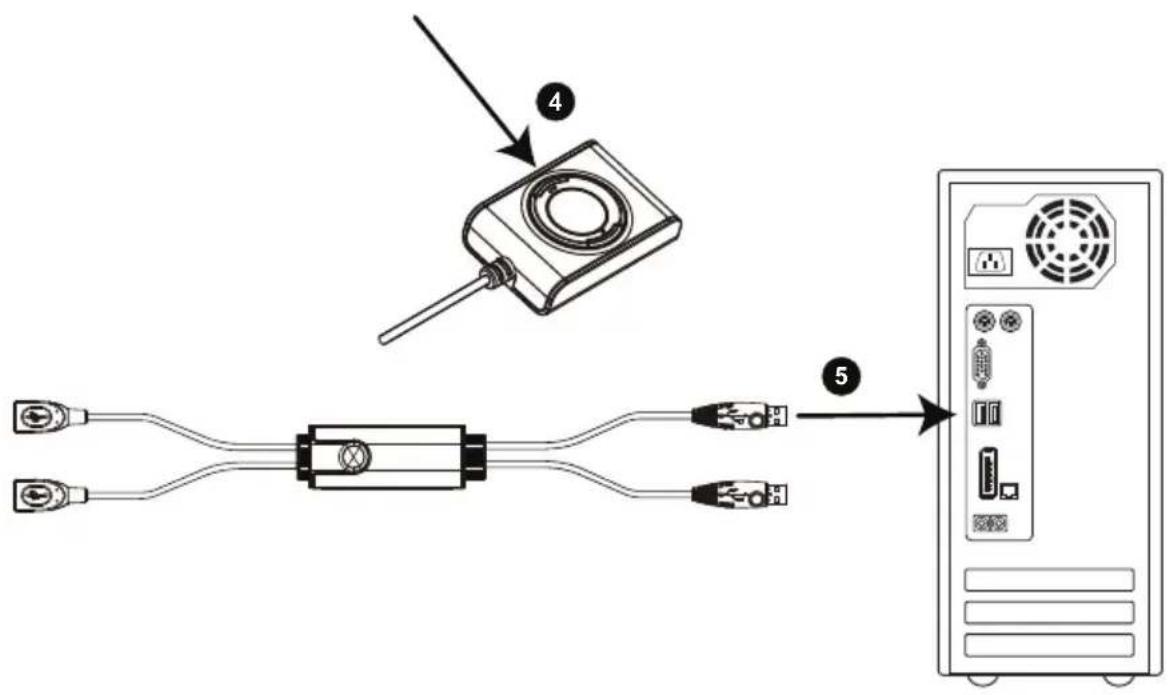
-
Press and hold port selection pushbutton.
-
While you are still holding the pushbutton, connect the PC 1 USB connector to a USB port on the computer you have downloaded the Firmware Upgrade Packages to.
-
The CS62KM now enters Firmware Upgrade Mode. The two ports LEDs flash together to indicate Firmware Upgrade Mode is in effect.
Note: While the CS62KM is in Firmware Upgrade Mode, normal keyboard and mouse functions are suspended. You must complete the firmware upgrade or exit Firmware Upgrade Mode to regain normal control of the console.
Starting the Upgrade
- Run the downloaded Firmware Upgrade Package file – either by double clicking the file icon, or using a command line to enter the full path.
The Firmware Upgrade Utility Welcome screen appears:
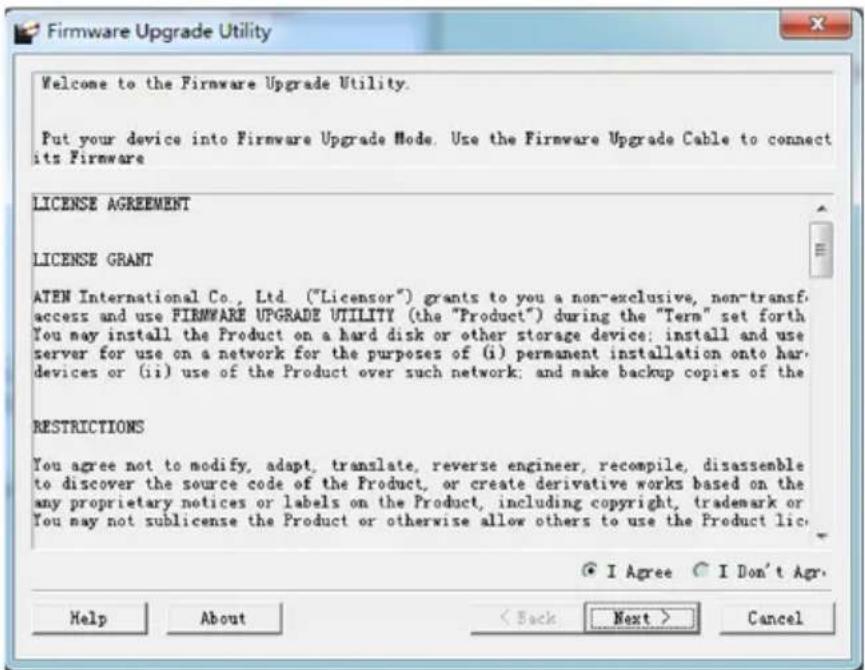
- Read the License Agreement (click the I Agree radio button).
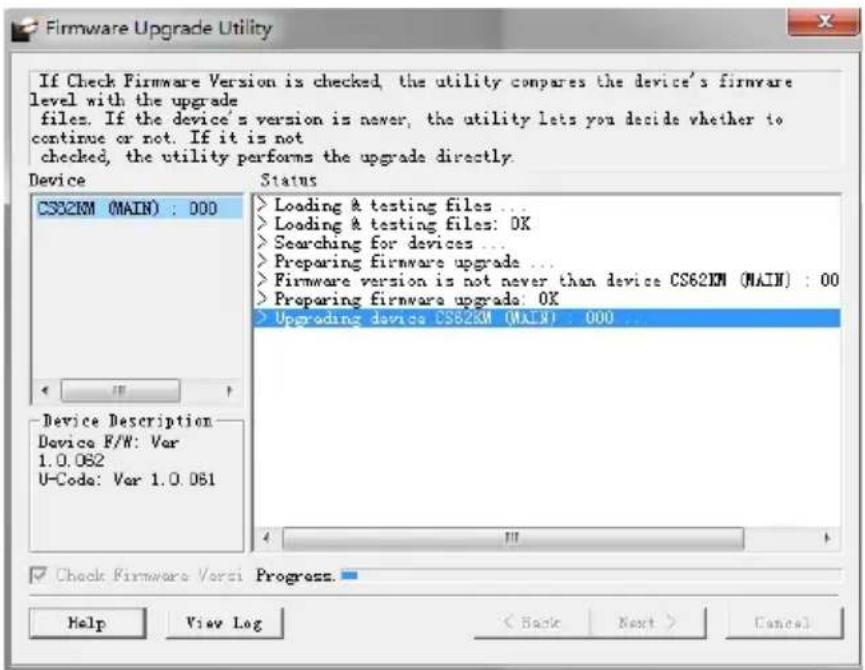
- Click Next. The Firmware Upgrade Utility main screen appears. The Utility inspects your installation. All the devices capable of being upgraded by the package are listed in the Device List panel.
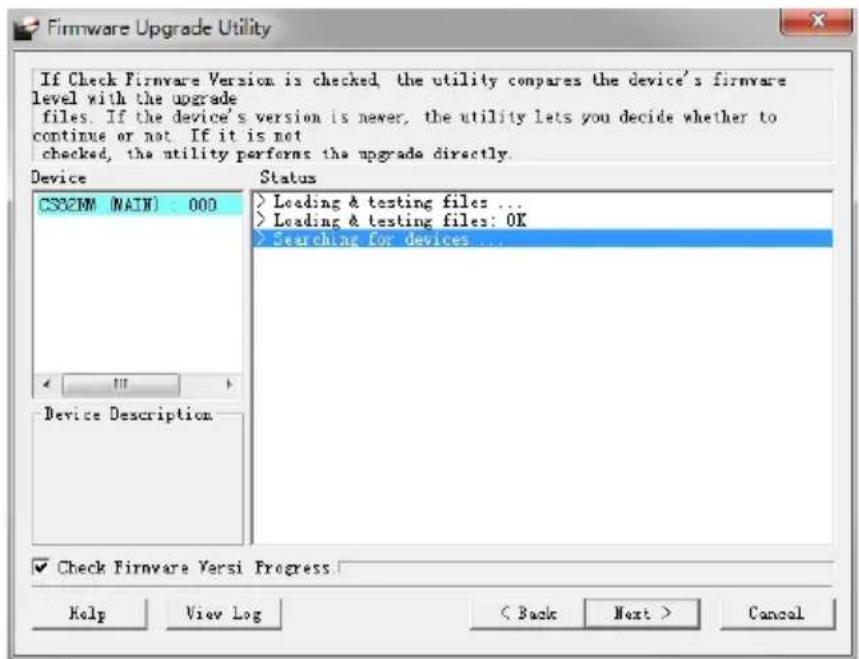
- As you select a device in the list, its description appears in the Device Description panel. After you have made your device selection(s), click Next to perform the upgrade.
If you enabled Check Firmware Version, the Utility compares the device's firmware level with that of the upgrade files. If the device's version is higher than the upgrade version, a dialog box gives you the option to Continue or Cancel.
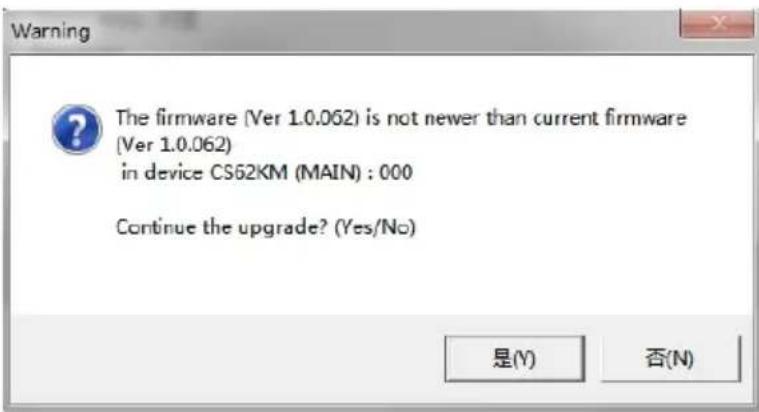
If you did not enable Check Firmware Version, the Utility installs the upgrade files without checking whether they are a higher level, or not.
As the Upgrade proceeds, status messages appear in the Status Messages panel, and the progress toward completion is shown on the Progress bar.
Upgrade Successful
After the upgrade has completed, a screen appears to inform you that the procedure was successful:
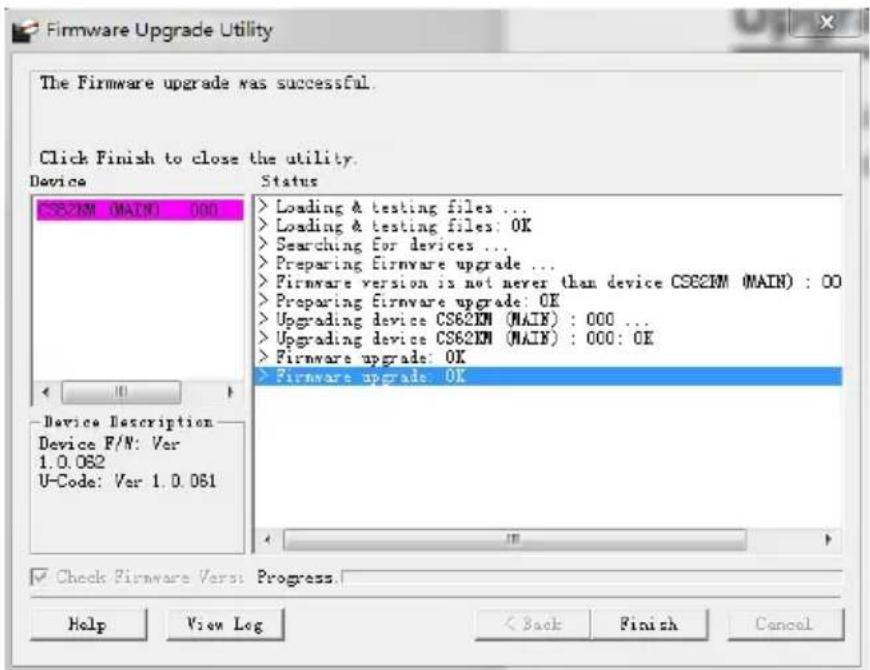
Click Finish to close the Firmware Upgrade Utility.
After a successful completion, the CS62KM exits Firmware Upgrade Mode, and resets itself.
Upgrade Failed
If the Upgrade Successful screen does not appear, it means that the upgrade failed to complete successfully, and you should repeat the upgrade procedure from the beginning.
This Page Intentionally Left Blank
Safety Instructions
- Read all of these instructions. Save them for future reference.
- This device is for indoor use only.
◆ Follow all warnings and instructions marked on the device. - Do not place the device on any unstable surface (cart, stand, table, etc.). If the device falls, serious damage will result.
♦ Do not use the device near water. - Do not place the device near, or over, radiators or heat registers.
- The device cabinet is provided with slots and openings to allow for adequate ventilation. To ensure reliable operation, and to protect against overheating, these openings must never be blocked or covered.
- The device should never be placed on a soft surface (bed, sofa, rug, etc.) as this will block its ventilation openings. Likewise, the device should not be placed in a built-in enclosure unless adequate ventilation has been provided.
- Never spill liquid of any kind on the device.
- Unplug the device from the wall outlet before cleaning. Do not use liquid or aerosol cleaners. Use a damp cloth for cleaning.
- The device should be operated from the type of power source indicated on the marking label. If you are not sure of the type of power available, consult your dealer or local power company.
- Avoid circuit overloads. Before connecting equipment to a circuit, know the power supply’s limit and never exceed it. Always review the electrical specifications of a circuit to ensure that you are not creating a dangerous condition or that one doesn’t already exist. Circuit overloads can cause a fire and destroy equipment.
- To prevent damage to your installation, it is important that all devices are properly grounded.
- Do not allow anything to rest on the power cord or cables. Route the power cord and cables so that they cannot be stepped on or tripped over.
-
Position system cables and power cables carefully; Be sure that nothing rests on any cables.
-
Never push objects of any kind into or through cabinet slots. They may touch dangerous voltage points or short out parts resulting in a risk of fire or electrical shock.
- Do not attempt to service the device yourself. Refer all servicing to qualified service personnel.
-
If the following conditions occur, unplug the device from the wall outlet and bring it to qualified service personnel for repair.
-
The power cord or plug has become damaged or frayed.
- Liquid has been spilled into the device.
- The device has been exposed to rain or water.
- The device has been dropped, or the cabinet has been damaged.
- The device exhibits a distinct change in performance, indicating a need for service.
- The device does not operate normally when the operating instructions are followed.
- Only adjust those controls that are covered in the operating instructions. Improper adjustment of other controls may result in damage that will require extensive work by a qualified technician to repair.
Technical Support
International
- For online technical support – including troubleshooting, documentation, and software updates: http://eservice.aten.com
- For telephone support, see Telephone Support on page vi.
North America
| Email Support support@aten-usa.com | ||
| Online Technical Support | Troubleshooting Documentation Software Updates | http://eservice.aten.com |
| Telephone Support 1-888-999-ATEN | ext 49881-949-428-1111 | |
When you contact us, please have the following information ready beforehand:
Product model number, serial number, and date of purchase.
- Your computer configuration, including operating system, revision level, expansion cards, and software.
◆ Any error messages displayed at the time the error occurred.
- The sequence of operations that led up to the error.
◆ Any other information you feel may be of help.
Specifications
| Function CS62KM | ||
| Computer Connections 2 | ||
| Port Selection Hotkey, Mouse Wheel*, Mouse Cursor, Remote Port Selector | ||
| Connectors Console Ports 2 x USB Type A Female | ||
| Remote Port Selector 1 x 2.5mm Audio Jack Female | ||
| LEDs Selected 2 (Green) | ||
| Cable Length Console 0.15 m | ||
| Emulation | Keyboard / Mouse | USB |
| Power Consumption | DC 5V:0.74W:8BTU | |
| Environment | Operating Temp. | 0-40°C |
| Storage Temp. | -20-60°C | |
| Humidity | 0-80% RH, Non-condensing | |
| Physical Properties | Housing | Plastic |
| Weight | 0.12 kg (0.26 lb) | |
| Dimensions (L x W x H) | 8.45 x 3.4 x 2.21 cm (3.33 x 1.34 x 0.87 in) | |
Note: Port switching only works with 3-key USB mouse wheel in emulation mode.
Troubleshooting
Operation problems can be due to a variety of causes. The first step in solving them is to make sure that all cables are securely attached and seated completely in their sockets.
In addition, updating the product's firmware may solve problems that have been discovered and resolved since the prior version was released. If your product is not running the latest firmware version, we strongly recommend that you upgrade. See The Firmware Upgrade Utility, page 31, for upgrade details.
| Symptom Possible Cause Action | ||
| Erratic behavior. Keyboard | Board and/or mouse need to be reset. | Unplug the cable(s) from the console port(s), then plug it/them back in. |
| No connection to the computer. | Check the cable from the switch to the computer to make sure it is properly connected. | |
| KM switch needs to be reset. | Power off all devices on the installation; power off the KM switch; wait five seconds; then power up. | |
| USB devices not responding. | USB ports need to be reset. | Unplug the device's USB cable from the USB port on the switch's rear panel, then plug it back in. |
| Use the USB Reset hotkey combination (see page 15), to reset the USB ports. | ||
Hotkey Default Settings
The hotkey factory default settings are as follows:
| Setting Default | |
| Port Switching [Scroll Lock] [Scroll Lock] | |
| Invoking HSM [Num Lock] [-] | |
| Mouse Emulation Enabled | |
| Keyboard Language English | |
| Keyboard Mapping Auto Detect | |
| Mouse Wheel Switching Disabled |
Limited Warranty
ATEN warrants its hardware in the country of purchase against flaws in materials and workmanship for a Warranty Period of two [2] years (warranty period may vary in certain regions/countries) commencing on the date of original purchase. This warranty period includes the LCD panel of ATEN LCD KVM switches. Select products are warranted for an additional year (see A+ Warranty for further details). Cables and accessories are not covered by the Standard Warranty.
What is covered by the Limited Hardware Warranty
ATEN will provide a repair service, without charge, during the Warranty Period. If a product is detective, ATEN will, at its discretion, have the option to (1) repair said product with new or repaired components, or (2) replace the entire product with an identical product or with a similar product which fulfills the same function as the defective product. Replaced products assume the warranty of the original product for the remaining period or a period of 90 days, whichever is longer. When the products or components are replaced, the replacing articles shall become customer property and the replaced articles shall become the property of ATEN.
To learn more about our warranty policies, please visit our website: http://www.aten.com/global/en/legal/policies/warranty-policy/
MEMO
MEMO
Released: 2021-08-04
© Copyright 2021 ATEN® International Co., Ltd.
ATEN and the ATEN logo are registered trademarks of ATEN International Co., Ltd. All rights reserved.
All other brand names and trademarks are the registered property of their respective owners.
ATEN International Co., Ltd., 3F, No. 125, Sec. 2, Datung Rd., Sijhih District, New Taipei City 221, Taiwan
Phone: 886-2-8692-6789 Fax: 886-2-8692-6767 TECHNICAL SUPPORT CENTER: 886-2-8692-6959
- Compliance Statements
- FEDERAL COMMUNICATIONS COMMISSION INTERFERENCE STATEMENT
- KCC Statement
- Conventions
- Package Contents
- Product Information
- User Information
- Online Registration
- Telephone Support
- User Notice
- Contents
- Introduction
- Hardware Setup
- Basic Operation
- Hotkey Operation
- Keyboard Emulation
- The Firmware Upgrade Utility
- Appendix
- Chapter 1
- Introduction
- Overview
- Features
- Requirements
- Console
- Computers
- Operating Systems
- Components
- Chapter 2
- Hardware Setup
- Hardware Installation
- Installation Diagram
- Port Selection
- Manual Switching
- Mouse Switching
- Hotkey Switching
- Boundless Switching
- Port ID Numbering
- Hot Plugging
- Powering Off and Restarting
- Chapter 4
- Hotkey Operation
- Port Switching
- Cycling Through the Ports
- Example
- Going Directly to a Port
- Hotkey Setting Mode
- Invoking HSM
- Alternate HSM Invocation Keys
- Alternate Port Switching Keys
- Keyboard Operating Platform
- List Switch Settings
- USB Reset
- Keyboard Language
- Port Switching Keys
- Firmware Upgrade Mode
- Power on Detection
- Mouse Emulation
- Mouse Port Switching
- Screen Size
- Setting the Screen Size with Firmware v1.0.062
- Setting the Screen Size with Firmware v1.1.101 or Later
- Setting the Screen Size
- Setting the Screen Resolution
- Cycle Port Switching
- Monitor Layout
- Example 1
- Example 2
- HSM Summary Table
- Chapter 5
- Keyboard Emulation
- Mac Keyboard
- Chapter 6
- The Firmware Upgrade Utility
- Before you Begin
- Starting the Upgrade
- Upgrade Successful
- Upgrade Failed
- Safety Instructions
- Technical Support
- International
- Troubleshooting
- Hotkey Default Settings
- Limited Warranty
- What is covered by the Limited Hardware Warranty
- MEMO
Brand : ATEN
Model : CS62KM
Category : Computer Cable