E-SC02PRO - Electric scooter ElectriQ - Free user manual and instructions
Find the device manual for free E-SC02PRO ElectriQ in PDF.


| Product Type | Electric Scooter |
| Brand | ElectriQ |
| Model | E-SC02PRO |
| Dimensions (Unfolded) | Approx. 110 x 45 x 120 cm |
| Dimensions (Folded) | Approx. 110 x 45 x 50 cm |
| Net Weight | Approx. 12.5 kg |
| Maximum Load | 100 kg |
| Motor Power | 350 W (peak) |
| Battery Type | Lithium-ion |
| Battery Capacity | 36 V / 7.5 Ah |
| Charging Time | Approx. 4-6 hours |
| Maximum Speed | 25 km/h (15.5 mph) |
| Range per Charge | Up to 25 km (15.5 miles) |
| Brake System | Rear disc brake + electronic anti-lock brake |
| Tire Size | 8.5 inches front and rear (air-filled) |
| Lighting | LED front headlight and rear reflector |
| Display | LCD display showing speed, battery, and mode |
| Frame Material | Aluminum alloy |
| Foldable | Yes, with locking mechanism |
| IP Rating | IPX4 (splash resistant) |
| Warranty | 1 year limited warranty |
| Maintenance | Regularly check tire pressure, brake pads, and tighten bolts |
| Cleaning | Wipe with a damp cloth; do not use high-pressure water |
| Safety Features | Electronic brake, bell, and reflective stickers |
| Spare Parts Availability | Contact ElectriQ support or authorized dealers |
Frequently Asked Questions - E-SC02PRO ElectriQ
User questions about E-SC02PRO ElectriQ
0 question about this device. Answer the ones you know or ask your own.
Ask a new question about this device
Download the instructions for your Electric scooter in PDF format for free! Find your manual E-SC02PRO - ElectriQ and take your electronic device back in hand. On this page are published all the documents necessary for the use of your device. E-SC02PRO by ElectriQ.
USER MANUAL E-SC02PRO ElectriQ
natural_image
Two black electric scooters with red buttons and wheels, shown from different angles (no text or symbols visible)E-SC02PRO
ELECTRIC SCOOTER
Thank you for choosing electriQ
Please read the manual before using this scooter and keep it safe for future reference.
Visit our page www.electriQ.co.uk for our entire product range
CONTENTS
SAFETY WARNINGS 3
SCOOTER DIAGRAM 4
ASSEMBLY 5
FIRST USE 5
UNFOLDING THE SCOOTER 6
FOLDING THE SCOOTER 6
TURNING ON AND OFF 7
HOW TO RIDE 7
TIGHTENING THE HANDLEBAR STEM 7
DISPLAY 8
MAINTENANCE 9
STORAGE 9
TECHNICAL SPECIFICATIONS 9
SUPPORT 10
SAFETY WARNINGS
- Carefully read the user manual before use to avoid the risk of injury. Keep the user manual safe for future reference.
- The scooter can only be used by people aged 12 years old and over. Persons with reduced physical, sensory or mental capabilities or who lack experience and knowledge can also use this scooter if they are supervised, or have been given the correct instructions concerning the use of the scooter and understand the hazards involved.
- Do not leave children unattended with the scooter.
- Cleaning and user maintenance must not be performed by a child under the age of 12 unless supervised by an adult.
- The user is responsible for all consequences from improper use of the scooter.
- The scooter is for personal use only, and must be operated in accordance with current local legislation.
- Only one person can use the scooter at a time.
- Inspect the scooter before use. Do not attempt operation if any damage is found or suspected.
- Keep fingers clear of the folding mechanism when folding or unfolding the electric scooter.
- Do not allow children to fold or unfold the scooter.
- This scooter is to be ridden responsibly. If you lose control you could cause serious injury.
- Wear suitable clothing and footwear, including, but not limited to, flat shoes, helmet, knee protectors and elbow protectors.
- Do not ride after consuming alcohol, or under the influence of drugs.
- Verify that use of the scooter is allowed in the area you wish to ride.
- Do not use the scooter at night, or when visibility is low.
- Always check the battery level using the LED display. If the battery is low, the scooter might stop suddenly and cause injury.
- Always ensure that the battery is locked in position and the key removed before attempting to ride the scooter.
- The scooter is designed to be used on smooth flat ground.
- Do not use the scooter in wet conditions, including snow, mud and ice.
- Maintain a slow speed if travelling downhill. Use both brakes together to stop from high speeds.
- Do not carry children while using the scooter.
• This scooter is not a toy.
NOTE: Pictures and information in this manual may vary from the product, due to continuous product improvement.
BATTERY SAFETY
- The scooter comes supplied with a lithium battery. Care must be taken with the battery and charging to maintain its lifespan.
- Do not expose the scooter or battery to naked flames or extreme heat.
- Do not expose the scooter or battery to extreme cold.
- Do not allow moisture to enter the battery compartment or charging port.
- Only use the provided charger.
- Do not overcharge the battery or leave unattended whilst charging.
- The battery must be removed if disposing of the product.
• The battery is to be disposed of safely. - Lithium batteries are considered dangerous goods. Check your countries laws on transportation and use.
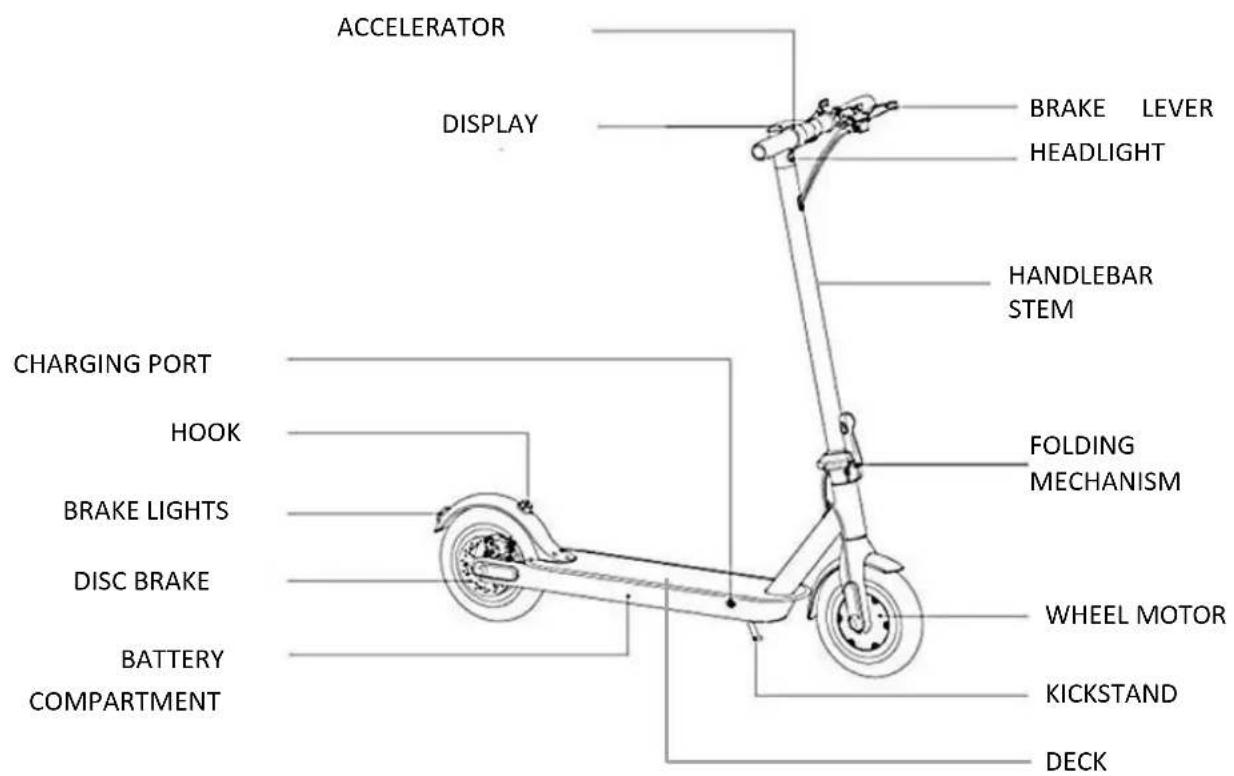
SCOOTER DIAGRAM
ASSEMBLY
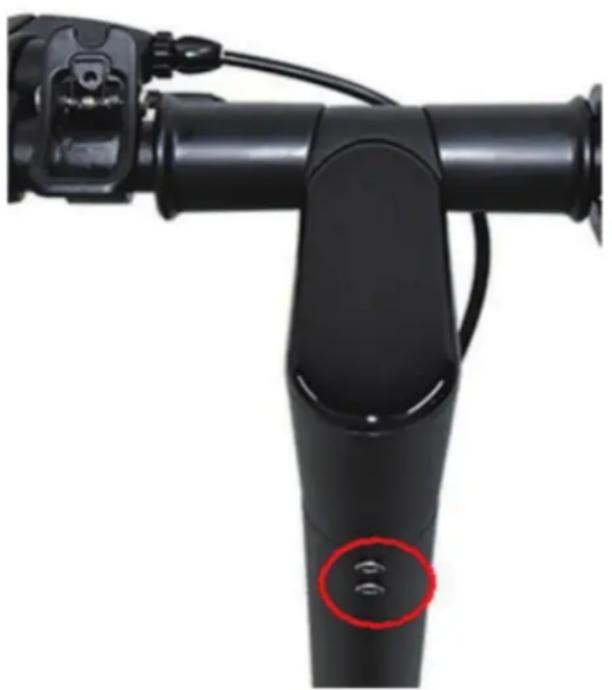
To assemble the handlebar, it must first be fitted into the top of the handlebar stem. Slide the silver base of the handlebars into the stem and align the 4 holes (2 on either side). Then insert the 4 bolts provided loosely into the holes. Once all 4 are in position tighten them to fix the handlebar into place, taking care not to damage any of the interior wiring.
natural_image
Close-up of a black robotic arm joint with a red circular button highlighting a specific component (no text or symbols visible)FIRST USE
IMPORTANT: Before using the scooter for the first time, fully charge the battery. After turning on the scooter, check the battery power on the display and verify that all lights are working.
- Remove the protective cover from the charging port on the scooter.
- Ensure that the charging port is dry and not damaged before inserting the charger into the port. (Refer to the scooter diagram for location).
- When the indicator on the charger is red, the scooter is charging.
- The indicator light on the charger will turn green when the battery is fully charged. This usually takes 5-6 hours.
- Do not over charge as long-term battery life may be affected. Do not leave unattended while charging.
- When charging has completed, remove the charger and ensure that the protective cover is placed securely over the charging port.
UNFOLDING THE SCOOTER
natural_image
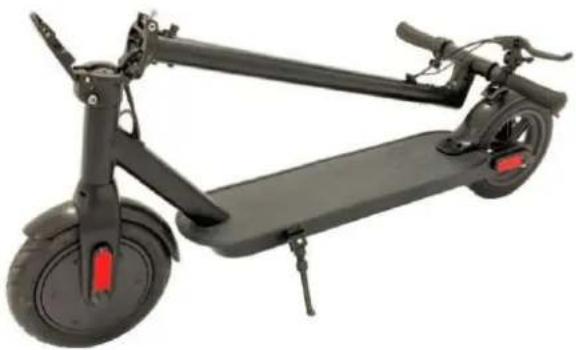
Black electric scooter with extended body and visible wheels (no text or symbols)From the folded position, unclip the handlebar from the hook on the rear mudguard.

natural_image
Close-up of a black mechanical component with mounting bracket and adjustment knob (no visible text or symbols)When the handlebar is in the vertical position, lock it into place using the clamp on the front of the handlebars. Ensure that the clamp is fully secure before using.
FOLDING THE SCOOTER

natural_image
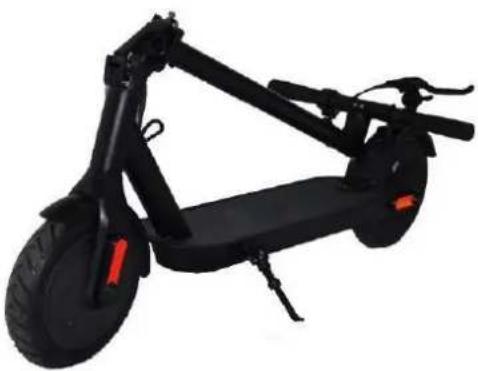
Close-up of a black mechanical device with articulated joints and a cylindrical component (no visible text or symbols)Unfasten the handlebar clamp and fold the handlebars from the clamp towards the back wheel.
natural_image
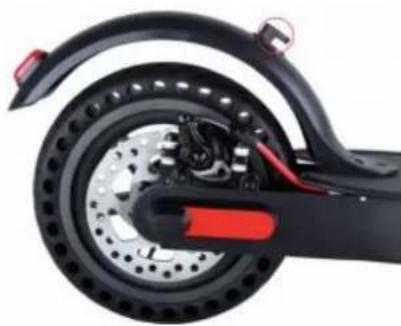
Close-up of a black electric scooter wheel with visible battery, brake, and sensor components (no text or symbols)Fix the handlebar to the hook on the mudguard, ensuring it is securely locked in position.
natural_image
Black electric scooter with red buttons and a black body, isolated on white background (no text or symbols visible)TURNING ON/OFF
IMPORTANT: Make sure the scooter is upright and placed on a flat surface before starting.
natural_image
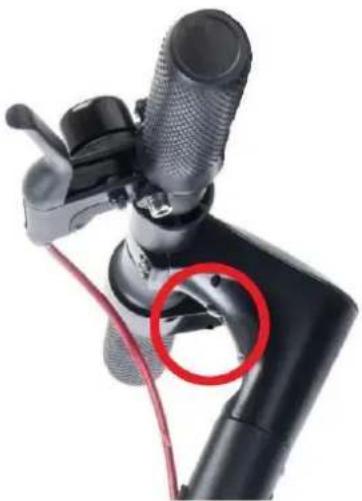
Close-up of a black handheld device with a red circular highlight on its side (no text or symbols visible)Press and hold the power button below the handlebar, for around 2 seconds to turn on the scooter.
Press and hold the power button again to turn off the scooter.
HOW TO RIDE
- Place one foot firmly on the deck, keeping your other foot on the ground for balance.
- Press the accelerator on the right handle and put your other foot on the scooter when it begins to move. This should all be done at very low speed.
- Press the accelerator gradually to increase speed. Release the accelerator to gently slow down, or pull the brake lever for more immediate braking.
- When the scooter has stopped, remove your feet one by one.
TIGHTENING THE HANDLEBAR STEM
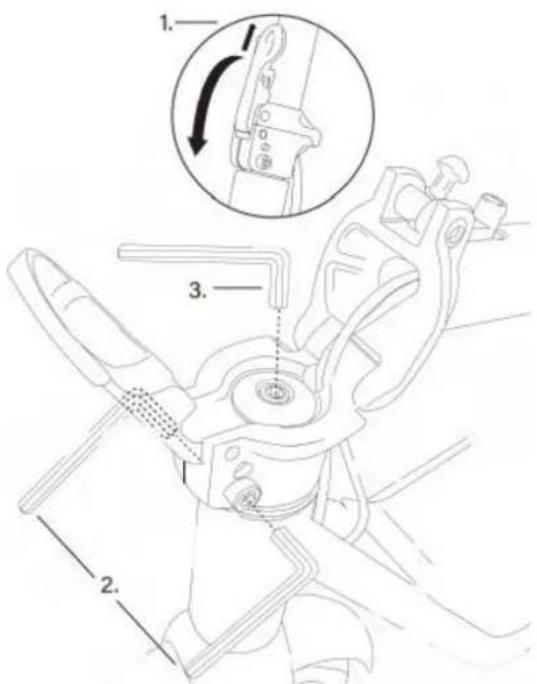
If your scooters steering feels loose and unstable, or the front wheel is out of alignment, the handlebar stem should be adjusted following the procedure below:
- Lock the scooter in its folded position.
- Use the provided allen key to loosen the bolt on the clamp as shown.
- Once the wheel is aligned, use the allen key to tighten the bolt until it is tight. Do not overtighten.
- Once tightened the handlebars can be unfolded.
DISPLAY
• The LED display on the handlebar will turn on after powering up the scooter.
- The scooters battery level is displayed at the bottom of the display. During use, the number of bars on the battery level indicator will decrease.
- When the battery level reduces, the bars will disappear until the battery is empty. The battery warning indicator will illuminate when the battery is at critical level.
- When the battery warning light is blinking, you must slow down and find a power source immediately, as continued use may risk damaging the battery.
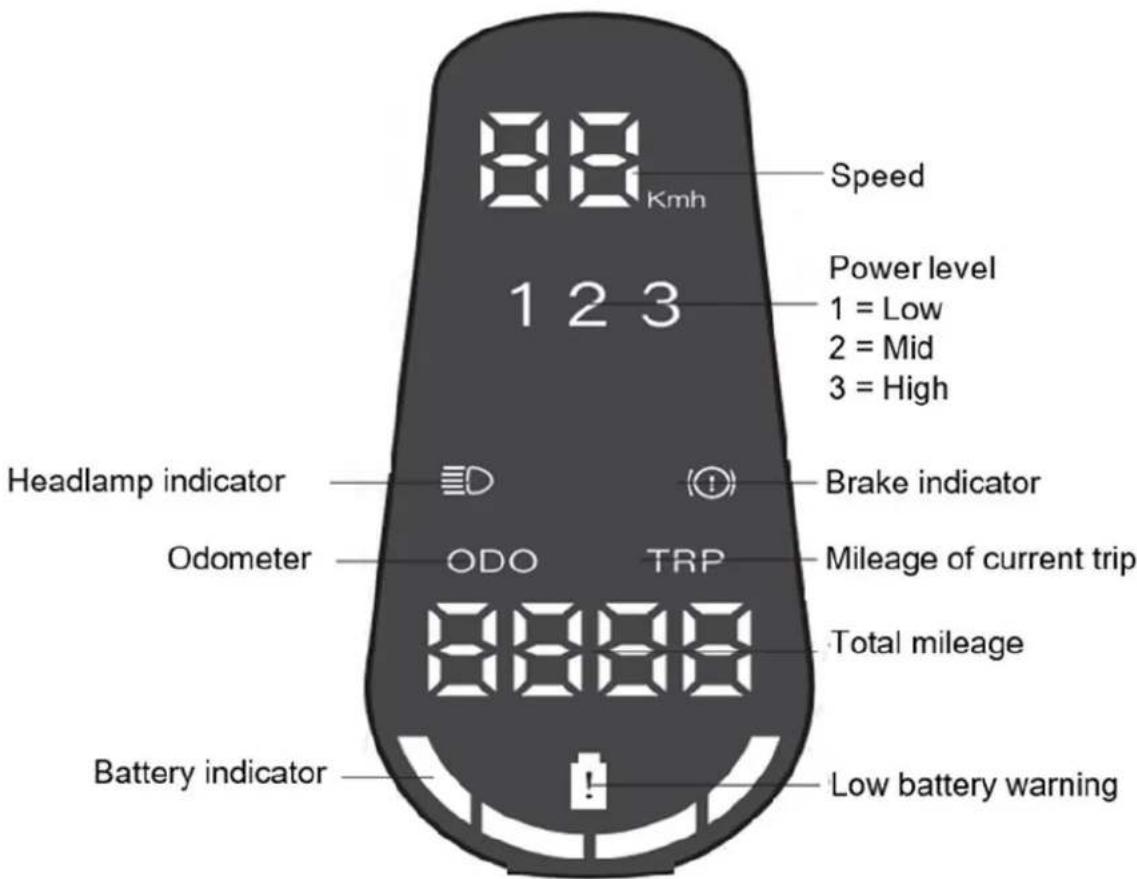
When the scooter is turned on it will be set at speed level 1, this is the lowest speed and highly recommended for beginners and inexperienced users.
To change between the three power levels, press the power button. After speed 3 has been reached, if the power button is pressed again it will cycle back to speed 1.
Quickly press the power button twice to turn the front/rear lights on or off.
MAINTENANCE
The scooter requires routine cleaning and maintenance.
- Before any work is carried out on the scooter, ensure that the charging cable is not connected and that the scooter is powered off.
• To clean the scooter, wipe the exterior with a soft damp cloth, then dry immediately.
• The exterior of the scooter is dustproof and splash proof with a water ingress rating of IPX4. - Do not allow water to get inside of the scooter. There is a high risk of the internal electronics becoming permanently damaged.
- The tyres on the scooter must be regularly checked for deflation and damage. If the tyres are deflated, pump them up to the recommended tyre pressure 2.0 bar.
STORAGE
- Ensure that your scooter is only charged to 40 – 50 percent power before storage. If you plan on storing the scooter for a long time. Make sure to half charge the scooter every 2 months to avoid battery issues.
• Do not store the scooter at less than 7^ C or above 25^ C - Keep the scooter inside its own packaging, or cover it to prevent dust build up.
- Keep the scooter indoors at all times when not in use.
TECHNICAL SPECIFICATIONS
| Model name | E-SC02PRO |
| Maximum loading | 120 kg |
| Maximum speed | 25 Km/h |
| Maximum Range | 45 km |
| Motor power | 350W |
| Climbing gradient | 11^ |
| Power supply | AC 110-240V, 50/60Hz |
| Battery | 15000 mAh Lithium battery |
| Battery power | 540 Wh |
| Battery voltage | 36V |
| Battery capacity | 15 Ah |
| Charging temperature | 0^ - 40^ |
| Charging time | 7-8 hours |
| Storage humidity | 5% - 95% |
| Body dimensions | 110 x 42 x 115 cm |
| Folded body dimensions | 110 x 42 x 52 cm |
| Net weight | 17.85kgs |
| Tyre Size | 10 inches |
electriQ UK SUPPORT.
03303903061
Office hours: 9AM - 5PM Monday to Friday
www.electriQ.co.uk
Unit J6, Lowfields Business Park
Lowfields Way, Elland
West Yorkshire, HX5 9DA
PRODUCT DISPOSAL
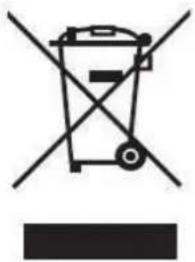
Do not dispose this product as unsorted municipal waste. Collection of such waste must be handled separately as special treatment is necessary.
Recycling facilities are now available for all customers at which you can deposit your old electrical products. Customers will be able to take any old electrical equipment to participating civic amenity sites run by their local councils. Please remember that this equipment will be further handled during the recycling process, so please be considerate when depositing your equipment. Please contact the local council for details of your local household waste recycling centres.
natural_image
Symbol of a trash bin crossed with no text or numbers, representing waste sorting or disposal (no text present)Brand : ElectriQ
Model : E-SC02PRO
Category : Electric scooter