Micro HD+ SL505 - Camera SEALIFE - Free user manual and instructions
Find the device manual for free Micro HD+ SL505 SEALIFE in PDF.


| Product Type | Underwater Digital Camera |
| Model | Micro HD+ SL505 |
| Internal Memory | 16GB (SL500) or 32GB (SL501/WiFi) |
| Display | 2.4" TFT Color LCD |
| Image Resolution | Up to 13 MP (4128 x 3096) |
| Video Resolution | Up to 1080p at 30 fps, 720p at 60 fps, 240p at 240 fps |
| Field of View | 140° wide angle (fisheye) |
| Battery Type | Internal rechargeable lithium-ion |
| Charging Method | USB via wall charger or computer (wall charger recommended for faster charging) |
| WiFi | Built-in (Micro HD+ only, for smartphone/tablet connection via ACTION CAM HD app) |
| Waterproof Depth | Up to 130ft (40m) (based on typical SeaLife cameras; manual does not specify exact depth but dive mode for >25ft) |
| White Balance Modes | Auto, Underwater Shallow, Underwater Deep, Daylight, Cloudy |
| Scene Modes | Land, Dive, Snorkel, Ext Light, Dual Ext Lights |
| Capture Modes | Single, Continuous (10fps), Time Lapse (2s-30m interval), AEB |
| Dimensions | Not specified; approximate: 3.5 x 2.5 x 2 inches (based on typical compact underwater cameras) |
| Weight | Not specified; approximate: 200g (7 oz) with battery |
| Care Instructions | Rinse in fresh water after use, dry before storing, avoid prolonged sunlight |
| Spare Parts / Service | Contact dealer or visit sealife-cameras.com for parts and repair; battery only replaceable by authorized service center |
| Operating Temperature Storage | -20°F to 140°F (-29°C to 60°C) |
| Warranty | SeaLife warranty (statement included in package) |
Frequently Asked Questions - Micro HD+ SL505 SEALIFE
User questions about Micro HD+ SL505 SEALIFE
0 question about this device. Answer the ones you know or ask your own.
Ask a new question about this device
Download the instructions for your Camera in PDF format for free! Find your manual Micro HD+ SL505 - SEALIFE and take your electronic device back in hand. On this page are published all the documents necessary for the use of your device. Micro HD+ SL505 by SEALIFE.
USER MANUAL Micro HD+ SL505 SEALIFE
Instruction Manual for:
Micro HD
Underwater Camera
Item SL500
Micro HD+
Underwater Camera
Item SL501
natural_image
Underwater scene with a large yellow fish swimming near blue water, no visible text or symbols
natural_image
Underwater scene with a diver in gear and a large fish head, no visible text or symbols
natural_image
Orange snail swimming near a sea of fish (no text or symbols visible)Table of Contents
I. Package Contents ...... 2
II. Getting to Know Your Camera....3-8
a. Front view .... 3
b. Rear view....4
c. LCD Display: Capture Mode 5
d. LCD Display: Playback Mode 7
III. Basic Camera Operation....9-18
a. Power On....9
b. Take a Picture 10
c. Take a Video .... 10
d. Easy Setup....11
e. Playback Pictures and Videos 12
f. Charge Battery 13-15
g. Upload Pictures to PC....16-18
IV. WiFi Connection to Smartphone/Tablet (Micro HD+ only)....19-22
a. Download ACTION CAM HD App....19-20
b. Changing ACTION CAM HD Username and Password....21-22
V. Using the Action Cam HD App (Micro HD+ only) 23-25
a. Home Screen 23
b. Playback Screen....24
c. Share / Delete Screen....25
VI. Menu Navigation....26-37
a. Easy Setup....26
b. Picture Settings....27-32
c. Video Settings....33-34
d. System Settings....35-37
VII. Great Underwater Pictures Made Easy 38-41
VIII. Optional Accessories 42-44
IX. Care and Maintenance ....45
X. Spare Parts and Service 46
XI. FCC Statement....47-49
Visit sealife-cameras.com/manuals for Español, Deutsch, Français, Italiano and Nederlands
I. Package Contents
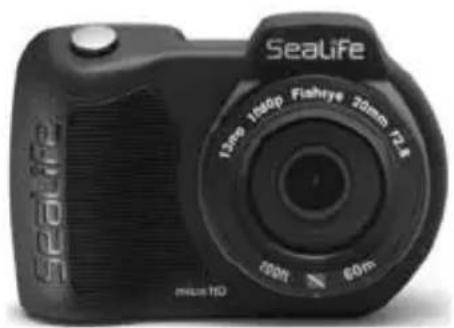
natural_image
Black Sealife digital camera with control knobs and display screen (no visible text or symbols on body)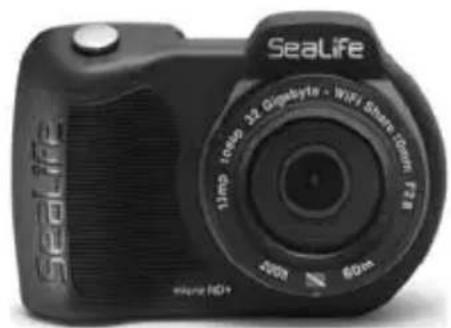
natural_image
Black SeaLife digital camera with visible lens and control buttons (no text or symbols on body)Micro HD Underwater Camera (16GB SL500 or 32GB WiFi SL501)
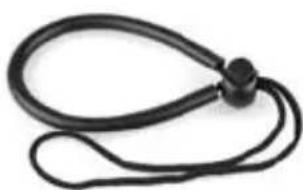
natural_image
Black stethoscope with a black head and coiled cord (no text or symbols visible)Wrist strap (SL50102)
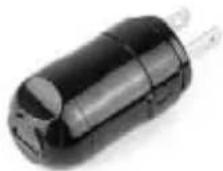
Wall charger with US plug (SL50105)
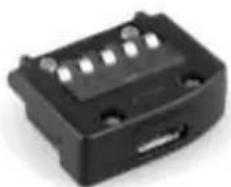
natural_image
Close-up of a black plastic electronic component with multiple pins and a central port (no visible text or symbols)USB adapter (SL50103)
natural_image
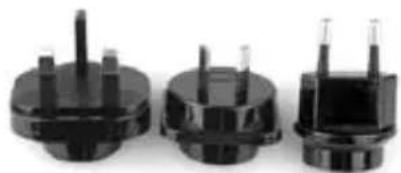
Three black plastic electrical connectors with three leads, shown from different angles (no text or symbols visible)Int'l plug adapters for UK, EU, AU (SL50106)
natural_image
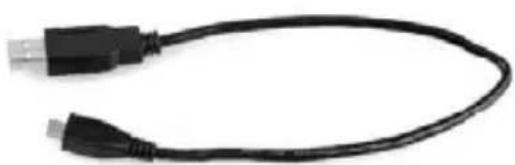
Close-up of a black USB cable with two connectors (no text or symbols visible)USB cable (SL50104)
natural_image
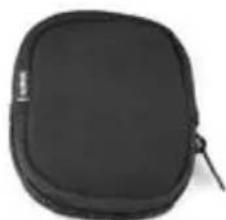
Black rounded square pouch with a zipper, no visible text or symbolsCamera pouch (SL50107)
Not shown:
Instruction manual – English (SL50108)
SeaLife Warranty statement
II. Getting to Know Your Camera
Front view
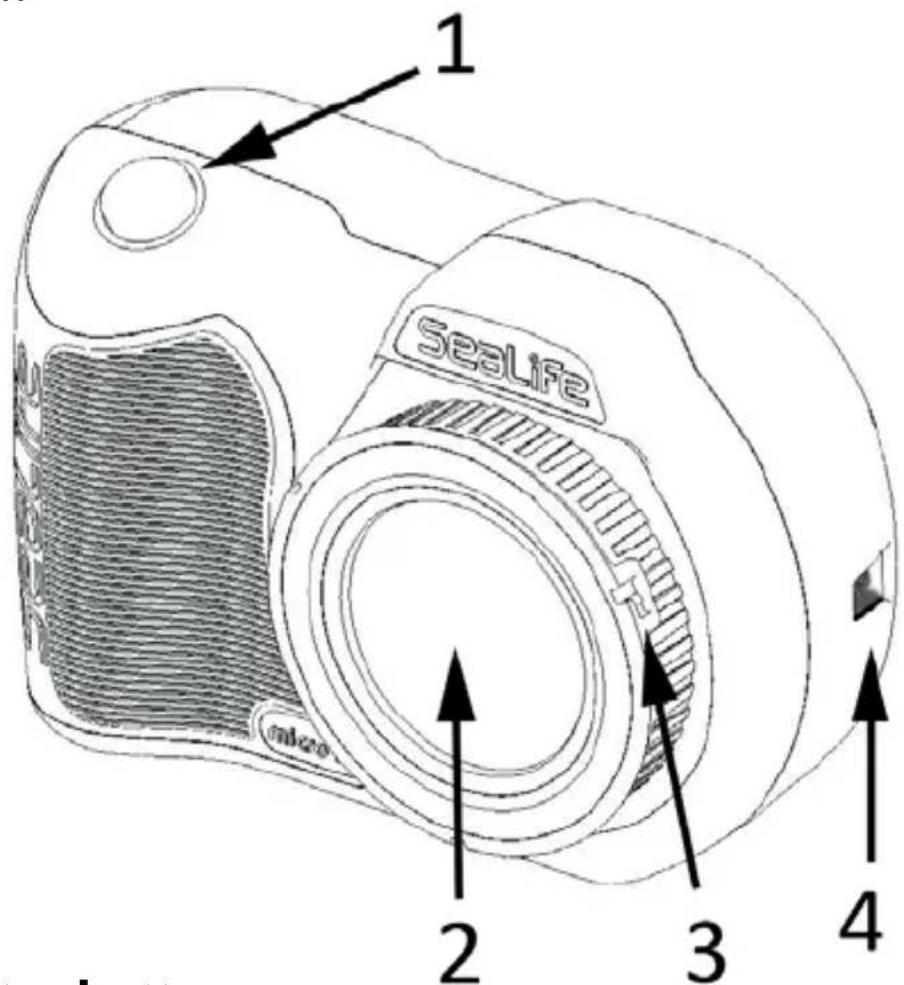
- Shutter button
- Optical glass lens port
- Lens adapter ring (For attaching close-up lens accessory – sold separately)
- Wrist strap connection
II. Getting to Know Your Camera (cont'd)
Rear view
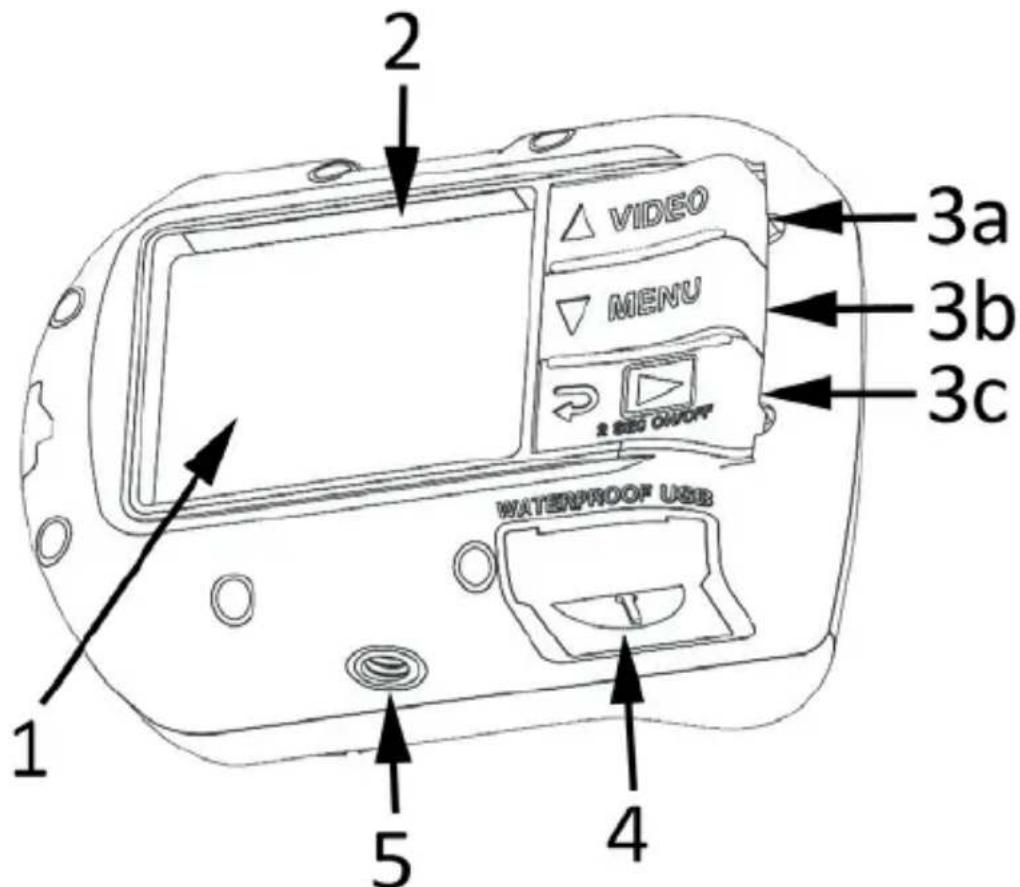
- 2.4" TFT color display
- Serial #
- "Piano Key" controls:
a. Video (up)
b. Menu (down)
c. Playback / Power (back 1 step)
-
Waterproof USB contacts (shown w/ USB cover)
-
1/4-20 tripod accessory mount
II. Getting to Know Your Camera (cont'd)
LCD Display:
Capture Mode
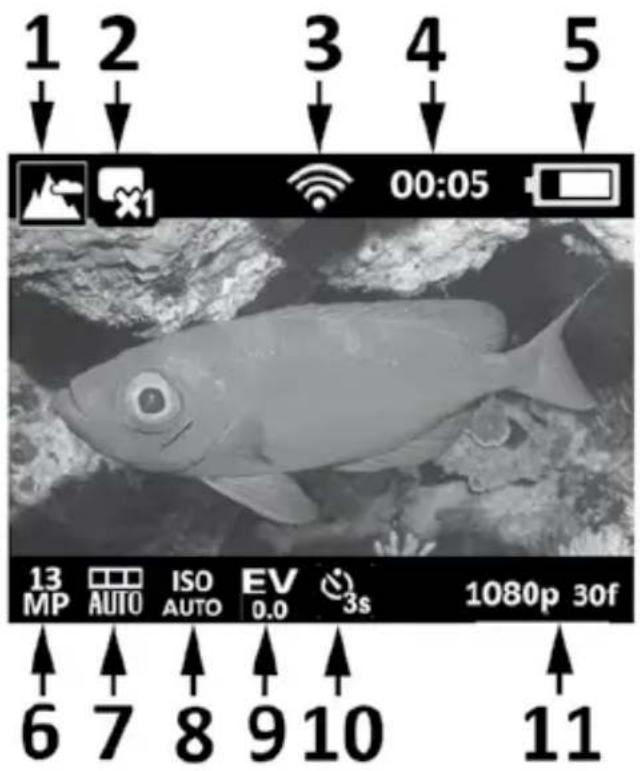
1. Scene modes

Land

Dive

Snorkel
d. light
e. 2 Ext Lights
2. Capture mode

Single

Continuous

Lapse

AEB
3. WiFi On
4. Timers
a. • 0:00:01 Video record time (H:MM:SS)
b. OD:05 Lapse countdown time (MM:SS)
5. Battery condition
a. Full power
b. High power
c. Medium power
d. □/power
e. empty
II. Getting to Know Your Camera (cont'd)
LCD Display: Capture Mode
6. Image size resolution
a. 13 MP / 4128 x MP 3096 / 4:3 / 140°
b. 10MP/4128 x MP 2322/16:9/130°
c. MP / 3464 x
2598 / 4:3 / 90°
d. 7 MP / 3072 x
MP 2304 / 4:3 / 140°
e. 4 P / 2440 x
MP 1832 / 4:3 / 140°
f. 2 / 1920 x
MP 1080 / 16:9 / 130°
g. 2 MP / 1504 x
MP 1128 / 4:3 / 140°
7. White Balance
a. Auto
b. WB DEEP
c. WB Shallow
d. Daylight
e. Cloudy
8. ISO value
a. ISO AUTO Auto
b. ISO 100 100
c. ISO 200 200
ISO 400 ISO 800
400
800
- Exposure Value (From -2.0 to +2.0 in 0.3 increments)
10. Self-timer or Time Lapse time interval
a. Cull timer (3s or 10s)
b. Time Lapse interval (2s, 5s, 10s, 30s, 1m, 5m or 30m)
11. Video resolution size (with frames per second)
a. 1080p 30p at 30 fps (frames per second)
b. 720p at 60fps
c. 720p 30p at 30fps
d. 240p 1240p at 120fps
e. 240p 240p at 240fps
II. Getting to Know Your Camera (cont'd)
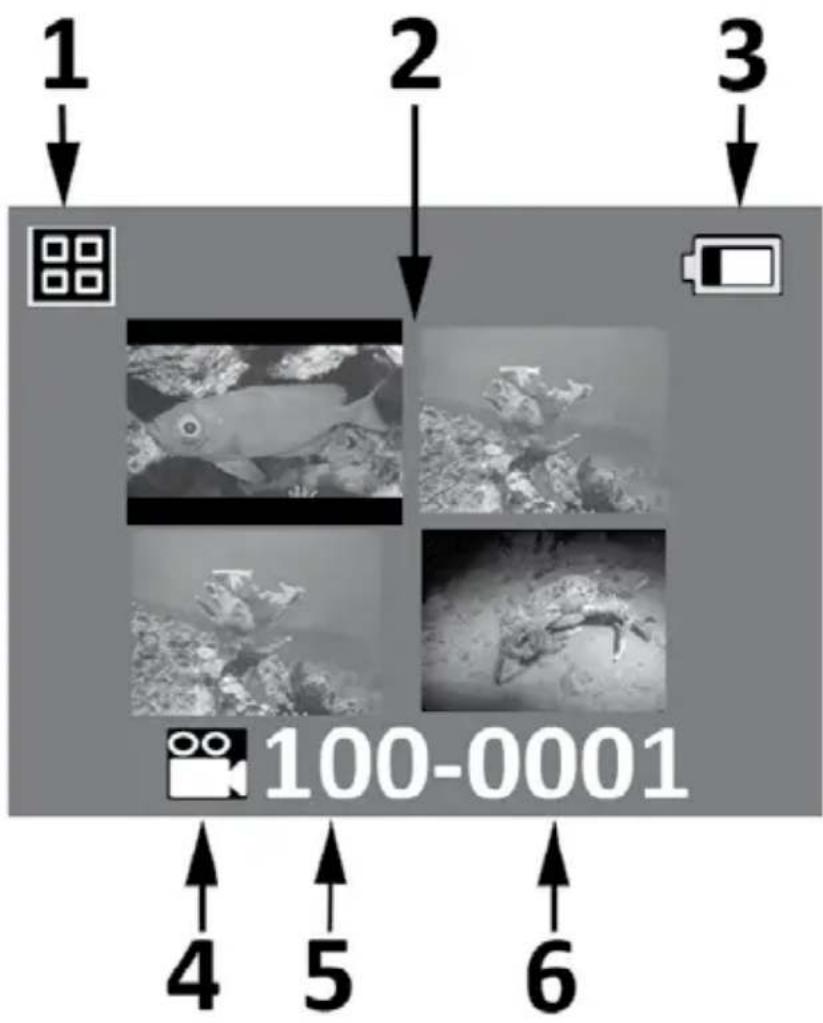
LCD Display: Playback Mode (Thumbnail view)
flowchart
graph TD
    A["1"] --> B["2"]
    B --> C["3"]
    D["4"] --> E["5"]
    E --> F["6"]
    G["100-0001"] --> H["Output"]
    style A fill:#f9f,stroke:#333
    style B fill:#ccf,stroke:#333
    style C fill:#cfc,stroke:#333
    style D fill:#fcc,stroke:#333
    style E fill:#cff,stroke:#333
    style F fill:#ffc,stroke:#333
- Playback icon - Thabnail view
- Thumbnail images (Maximum 4 per page)
- Battery condition
- File type: a. Still image b. Video clip
- Folder # (100 to 999)
- File # (0001 to 0999)
II. Getting to Know Your Camera (cont'd)
LCD Display:
Playback Mode
(Single view)
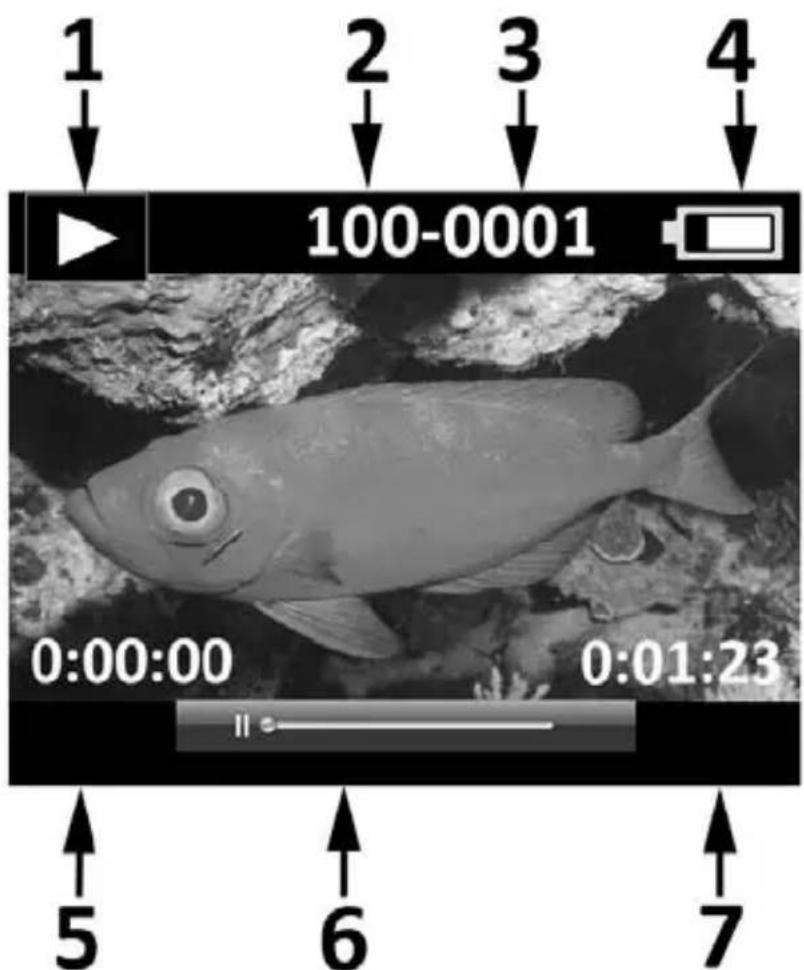
- Playback icon - Single image view
- Folder # (100 to 999)
- File # (0001 to 0999)
- Battery condition
- Elapse time H:MM:SS (video files only)
- Video status bar (video files only)
- Total recorded time H:MM:SS (video files only)
III. Basic Camera Operation
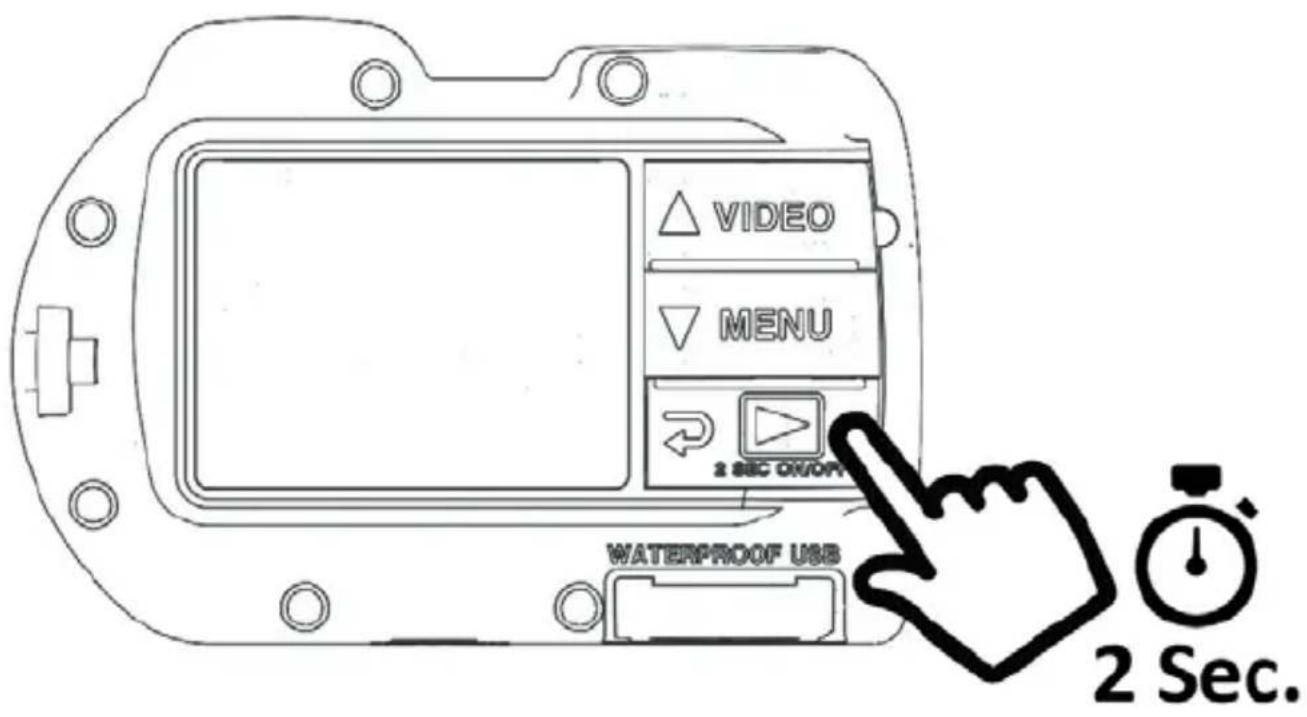
Power On:
Push and hold bottom button for 2 seconds to power camera ON or OFF.
III. Basic Camera Operation (cont'd)
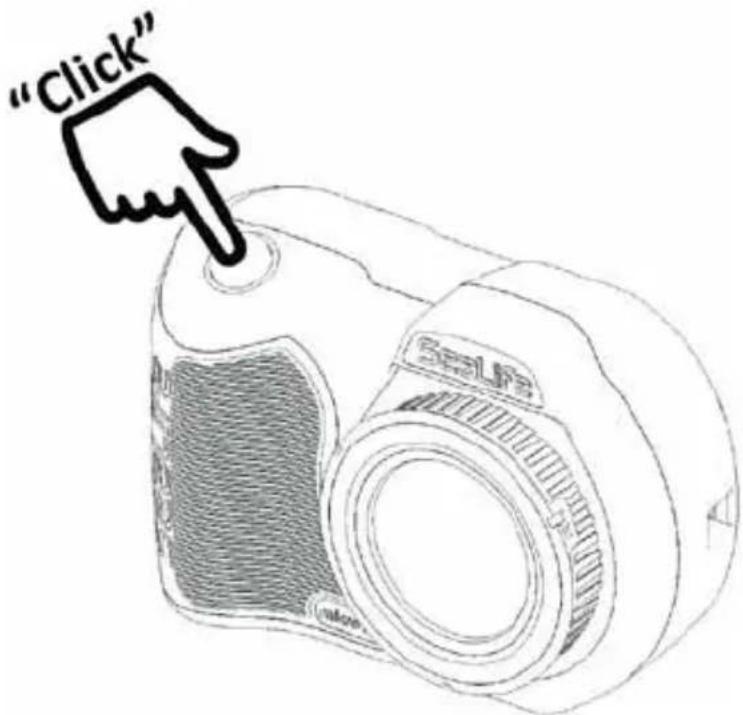
Take a Picture:
Aim, hold camera steady and push shutter button.
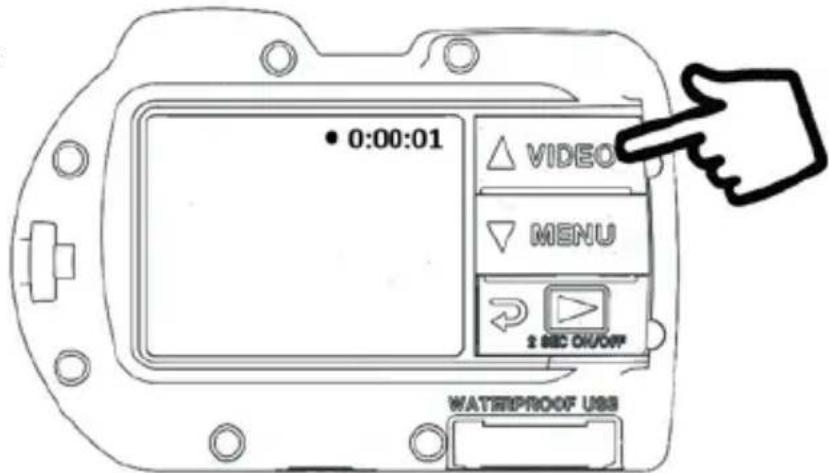
Take a Video:
Aim, hold camera steady and push video button to start or stop video recording.
Note:
- When video recording is in progress, you will see a red dot with elapse record timer on the top right of the LCD display.
- You can also take a 2MP picture while recording video by pushing the shutter button.
III. Basic Camera Operation (cont'd)
Easy Setup:
This on-screen guide will help you set the camera correctly.
1. Push MENU button
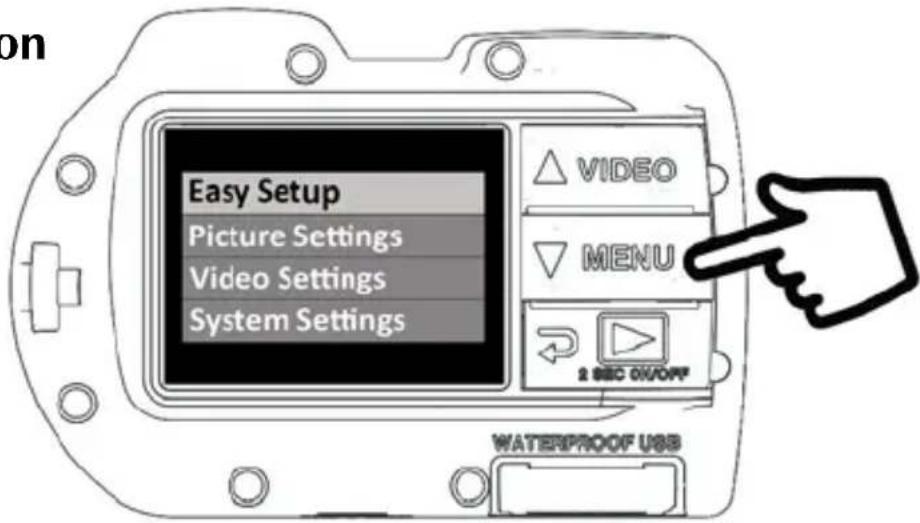
2. Push shutter button to select "Easy Setup."
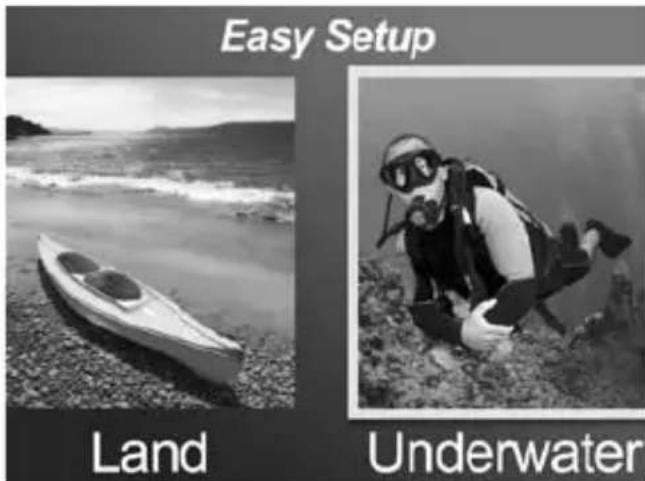
3. Follow the on-screen guide using the Up (△ VIDEO ) or Down (▽ MENU) buttons to select desired option and Shutter button to confirm setting.
III. Basic Camera Operation (cont'd)
Playback Pictures and Videos:
- Push Playback button to display thumbnail images.
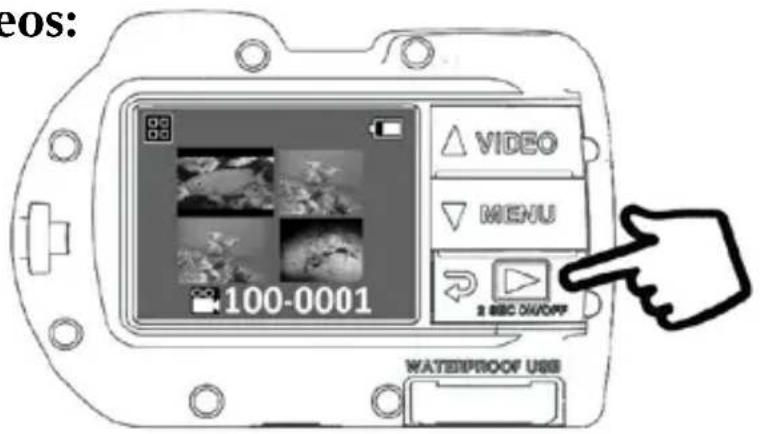
-
Use the Up (△VIDEO) or Down (▽MENU) buttons to scroll through thumbnails.
-
Push Shutter button to select and display single images/videos.
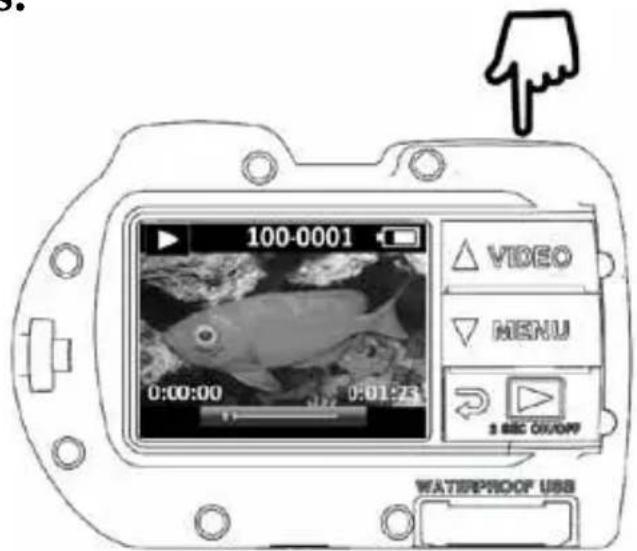
Note:
- Push Shutter button to start or pause playback of video files.
- Use Up (△VIDEO) button to increase playback speed or Down (▽MENU) button to decrease playback speed.
- You can delete an image file by pushing and holding shutter button while in thumbnail view.
III. Basic Camera Operation (cont'd)
Charge Battery:
- Remove USB cover.
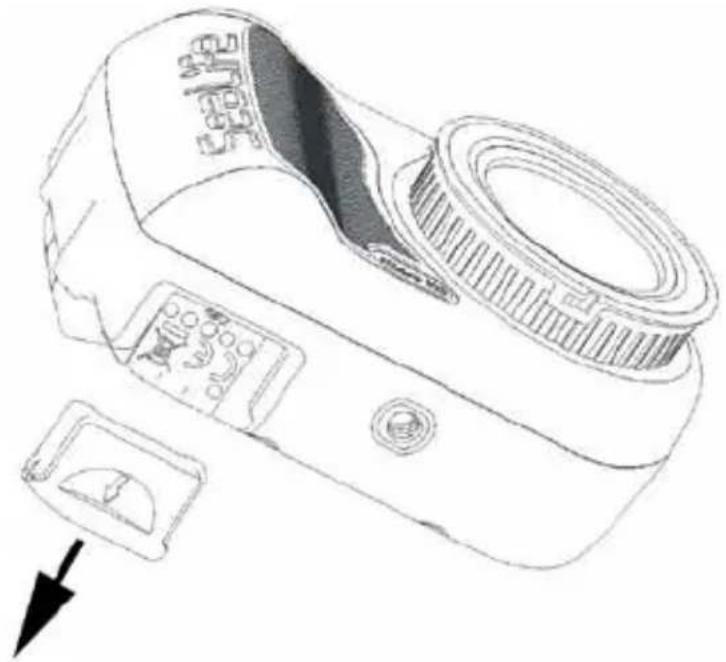
natural_image
Line drawing of a DSLR camera with visible lens and adjustment knobs (no text or symbols)- Make sure camera is dry. Insert USB cable into USB adapter, and insert into waterproof USB port

Warning: Dry camera before inserting USB adapter. USB adapter is not waterproof.
III. Basic Camera Operation (cont'd)
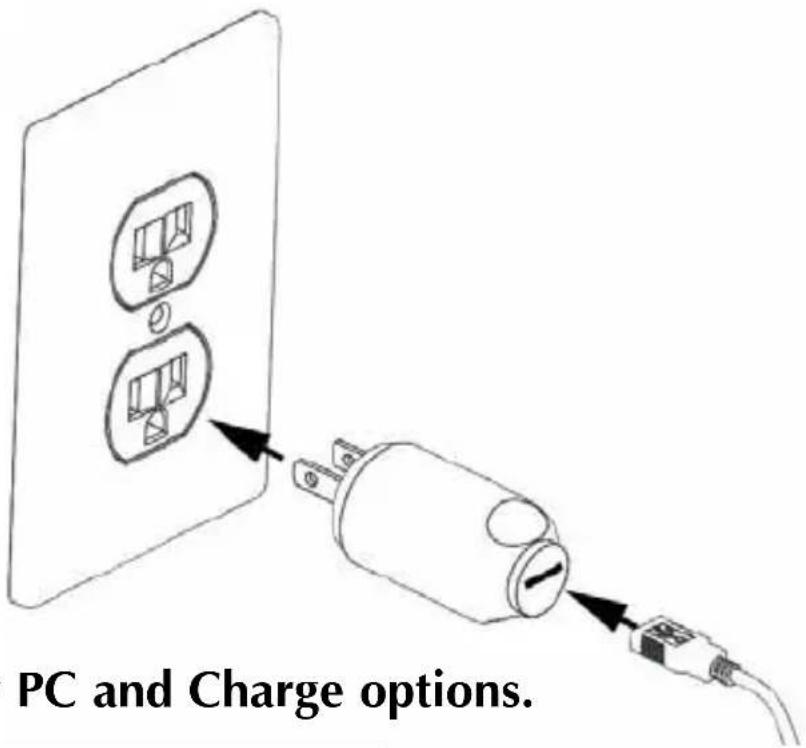
- Connect other end of the USB cable into the wall charger, and insert wall charger into outlet.
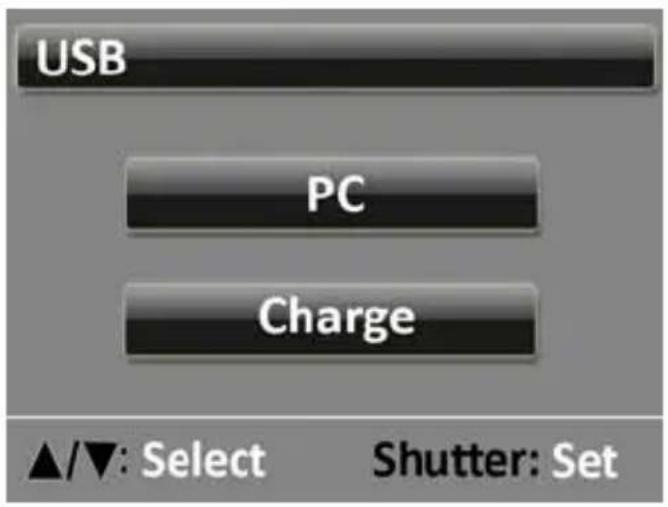
- The camera will display PC and Charge options.
-
Use the Up (△VIDEO) or Down (▽MENU) buttons to select Charge and push Shutter button to confirm selection.
-
When the camera is charging, the large battery icon in center of display will blink from one to three bars repeatedly. The icon will show three solid bars when the battery is fully charged.
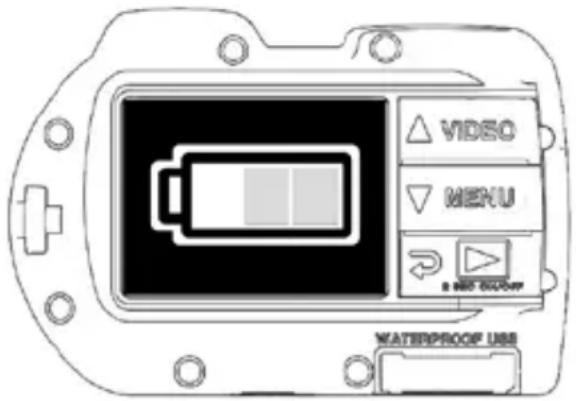
- After 1 minute of charging, the display will go to sleep in order to save power and charge faster. Push any button to turn on display and see battery charging status.
Note:
- After 1 minute, the camera will go into power save mode and display will turn off while camera continues charging.
- Push any button to show battery charging status. Flashing icon means battery is still charging. Solid icon means battery is finished charging.
- The camera may also be charged when connected to a computer USB port; however, charging takes twice as long as charging with wall charger.
- The wall charger may be fitted with one of the 3 international plug types.
- Don't push any buttons while connecting to PC or the camera will not connect.
III. Basic Camera Operation (cont'd)
Upload pictures to PC:
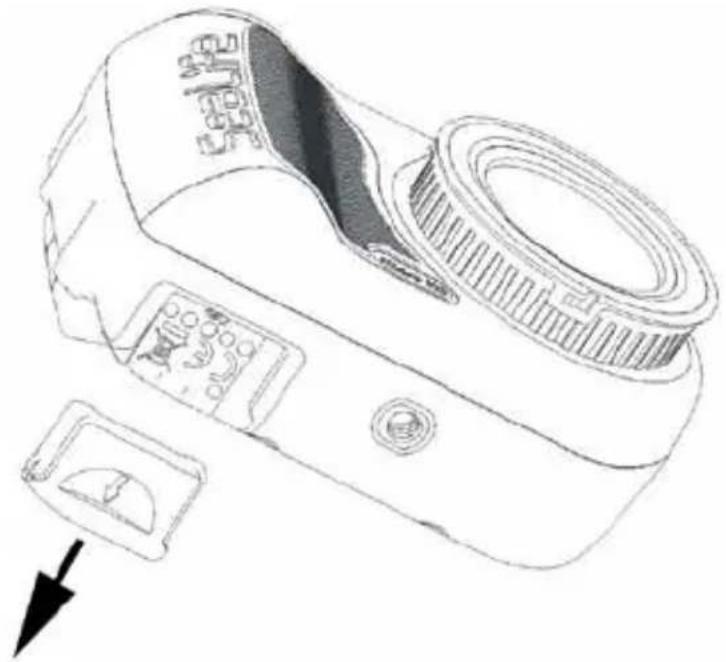
- Remove USB cover.
natural_image
Line drawing of a DSLR camera with visible lens and adjustment knobs (no text or symbols)- Make sure camera is dry. Insert USB cable into USB adapter, and into waterproof USB port.
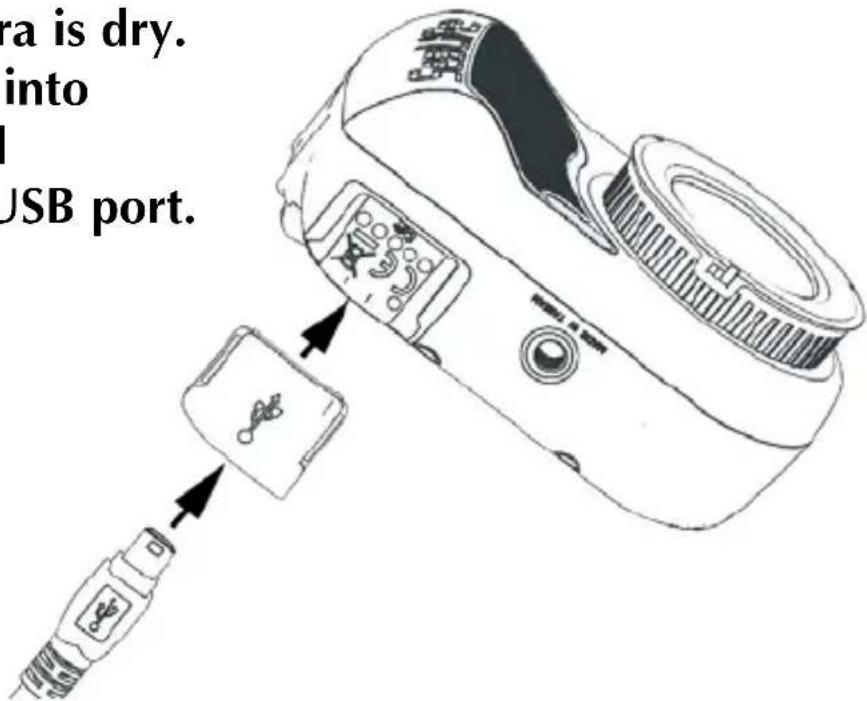
Warning: Dry camera before inserting USB adapter. USB adapter is not waterproof.
III. Basic Camera Operation (cont'd)
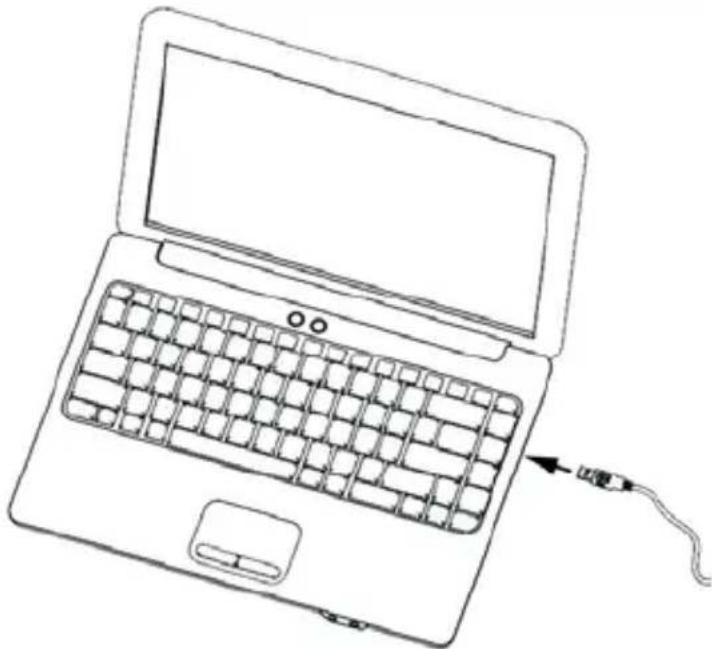
- Connect other end of the USB cable into computer.
natural_image
Line drawing of a laptop with a cable inserted, showing the keyboard and screen (no text or symbols)- The camera will display PC and Charge options.
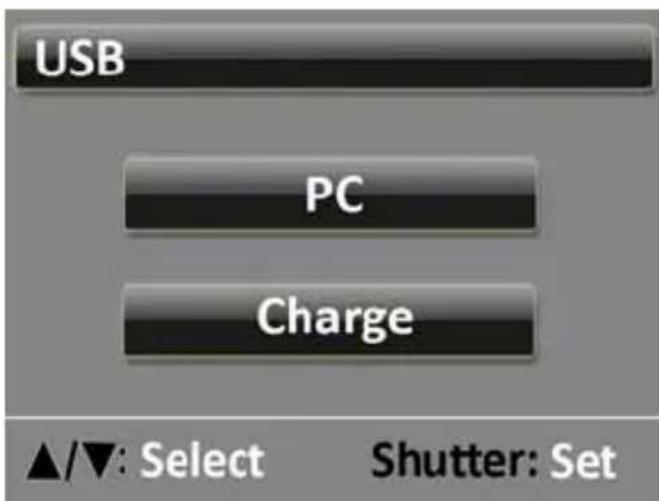
- Use the Up (△VIDEO) or Down (▽MENU) buttons to select Charge. Push Shutter button to confirm selection.
III. Basic Camera Operation (cont'd)
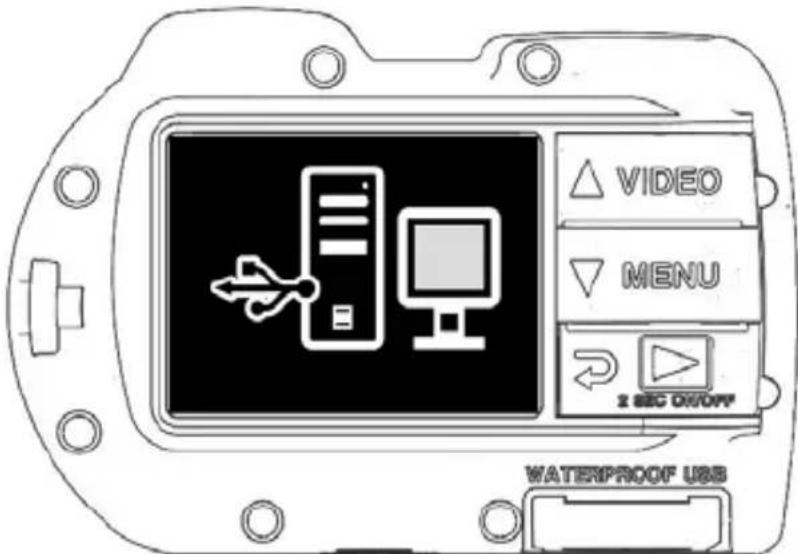
6. Display will show PC connection icon for about 1 minute.
For Windows
Click on Windows Start icon and select "My Computer."
Double click on "Removable Disk" icon.
The DCIM folder contains all pictures and videos.
Eject USB device to disconnect camera from computer.
For MAC
Double click on "untitled" or "unlabeled" disk drive icon or your desktop.
The DCIM folder contains all pictures and videos.
Eject USB device to disconnect camera from computer.
Note:
- After 1 minute, the camera will go into power save mode and display will turn off while camera is still connected to PC.
- Push any button to show PC connection icon.
- The battery will keep its charge (not charge or discharge) when connected to a computer USB port.
IV. WiFi Connection to Smartphone/Tablet (Micro HD+ only)
- Download and install the free "ACTION CAM HD" app* to your Android or iOS device.
natural_image
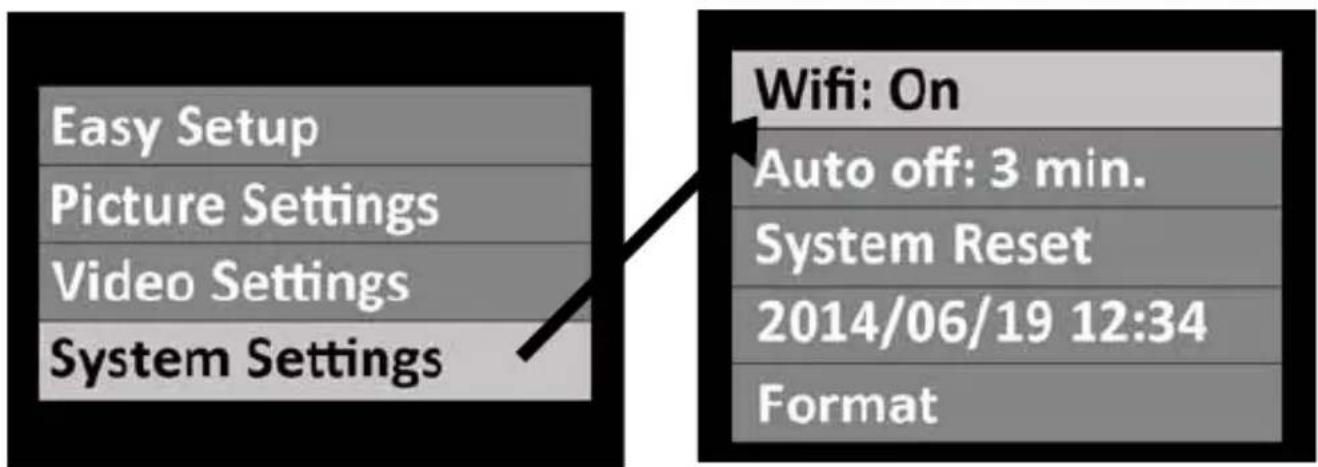
Close-up of a camera aperture with visible blades and central hub (no text or symbols)- In the camera's "System Settings" menu, turn WiFi setting to "WiFi: On."
Note:
• After turning WiFi ON, please allow 15 to 20 seconds for the WiFi to start up.
IV. WiFi Connection to Smartphone/Tablet (Micro HD+ only) (cont'd)
- On your smartphone (or tablet), select "Settings" icon then select "WiFi."
- On the list of available WiFi hotspots, click "SeaLife micro HD+" and enter password 1234567890
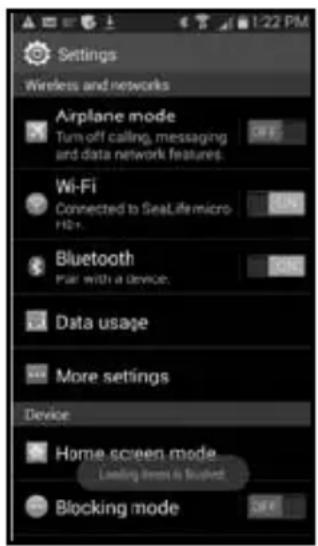
Android
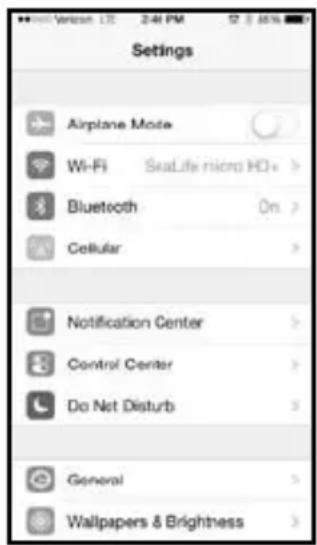
Apple
- Open "ACTION CAM HD" app. Camera will automatically connect to your smartphone.
- When the camera is connected, the smartphone will show a live preview of what the camera sees.
- To disconnect WiFi, turn off camera power or select "WiFi: Off" from camera's Systems Menu.
Note:
- To change the username and password please refer to page 21.
IV. WiFi Connection to Smartphone/Tablet (Micro HD+ only) (cont'd)
Changing ACTION CAM HD username and password (OPTIONAL):
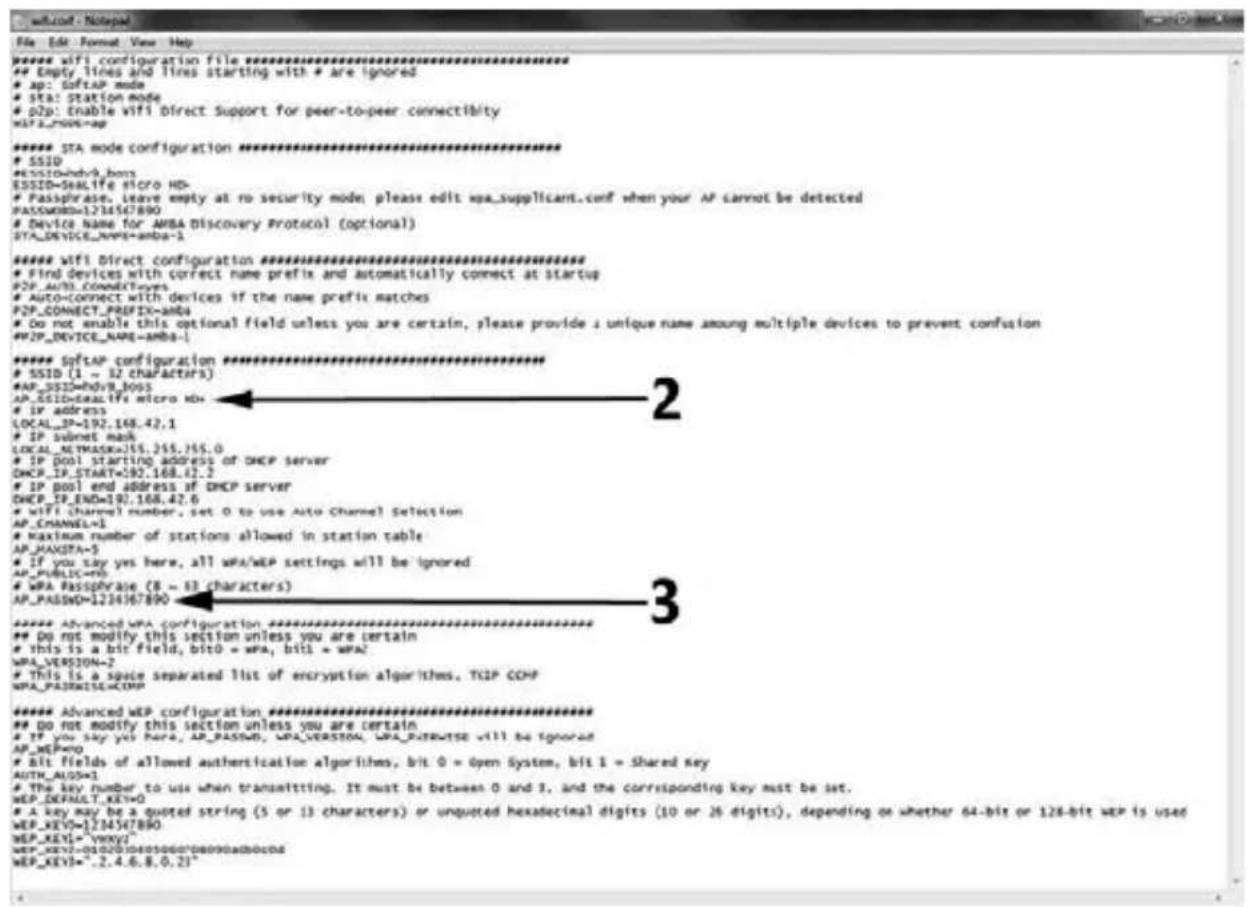
Follow these instructions to change the default username (sealife micro HD+) and password (1234567890):
- Connect camera to PC using USB cable. See page 16 for instructions on connecting camera to PC.
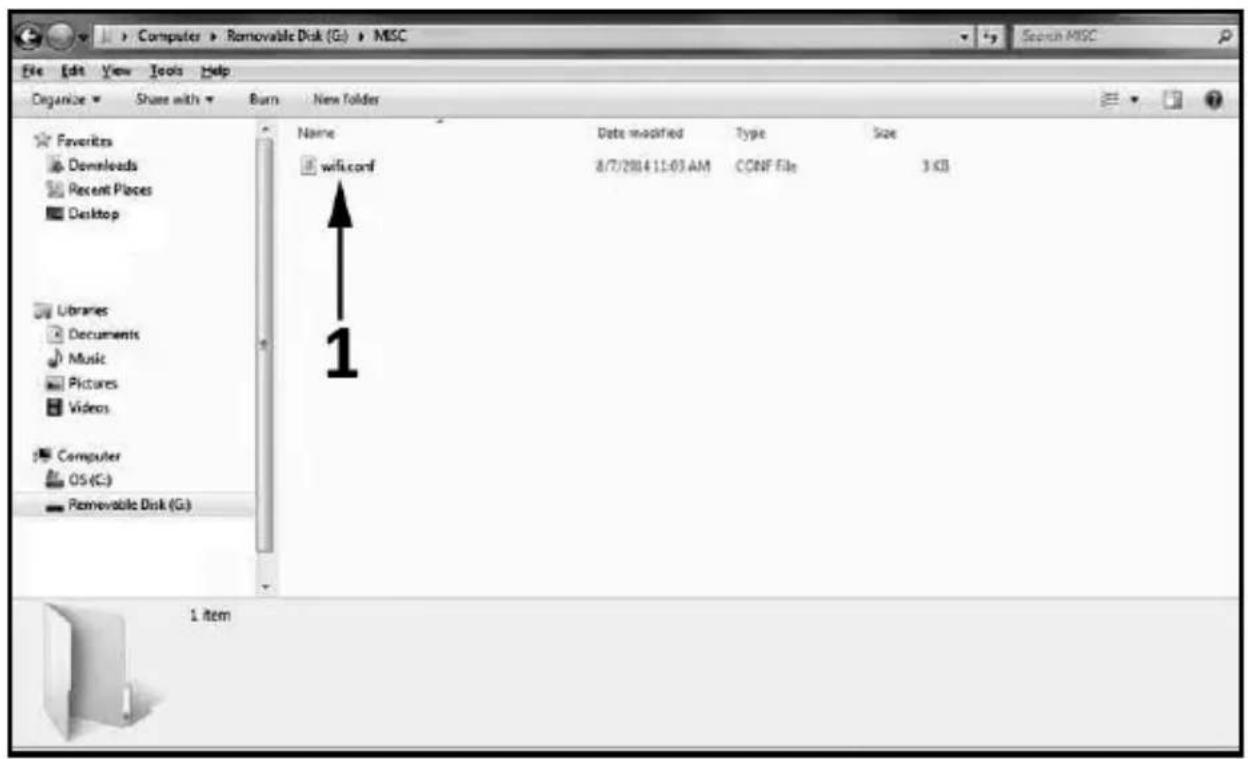
- Select the "Removable Disk (_:)" drive, double-click the "MISC" folder, and open the "wifi.conf" file (1) with Microsoft Notepad or Mac TextEdit.
IV. WiFi Connection to Smartphone/Tablet (Micro HD+ only) (cont'd)
- Under the section "SoftAP configuration," change the default username "SeaLife Micro HD+" (2) and password "1234567890" (3) to a new username and password of your choice. Username and password must be a minimum of 8 characters and a maximum of 32 characters in length, and may be made up of letters and numbers. Save file after making changes.
V. Using the ACTION CAM HD App (Micro HD+ only)
Home Screen:
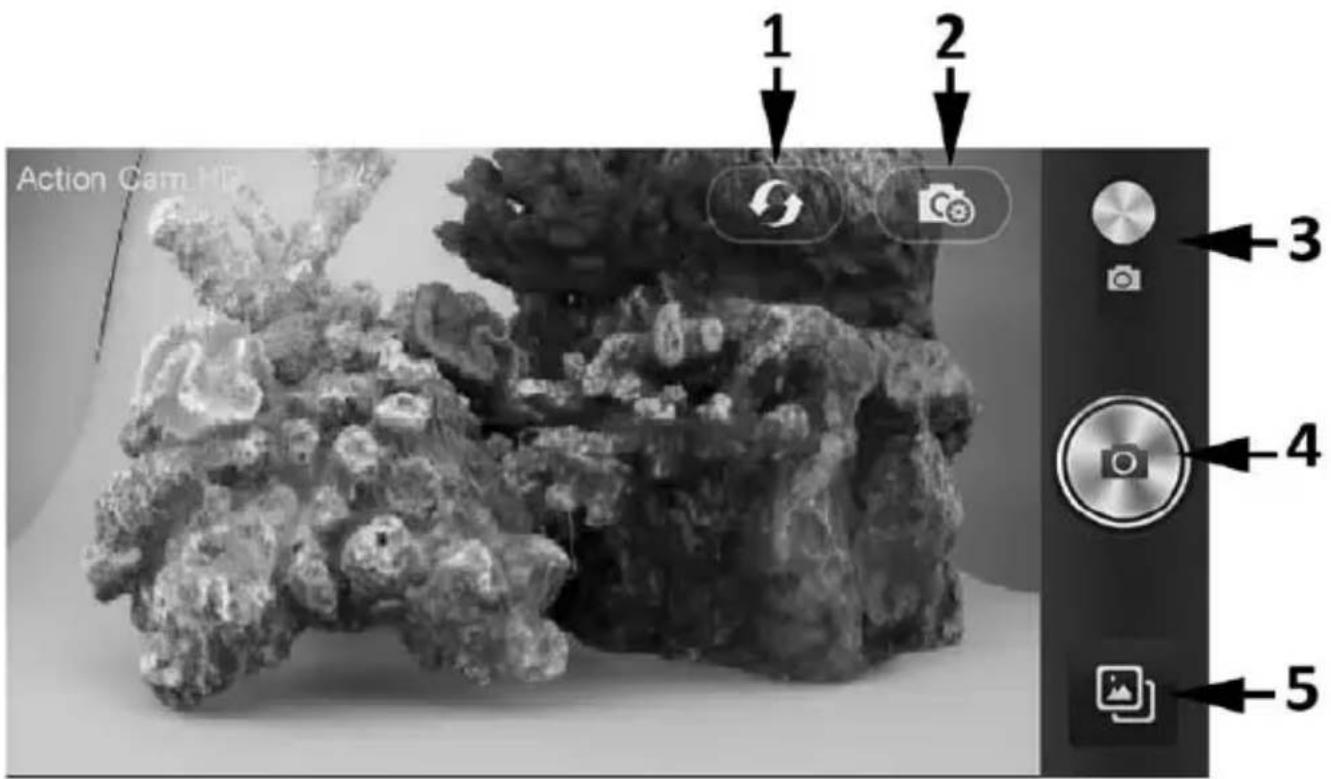
- Refresh WiFi connection
- Camera settings menu
- Picture / Video mode
- Take picture or start/stop video
- Playback
V. Using the ACTION CAM HD App (Micro HD+ only) (cont'd)
Playback Screen:
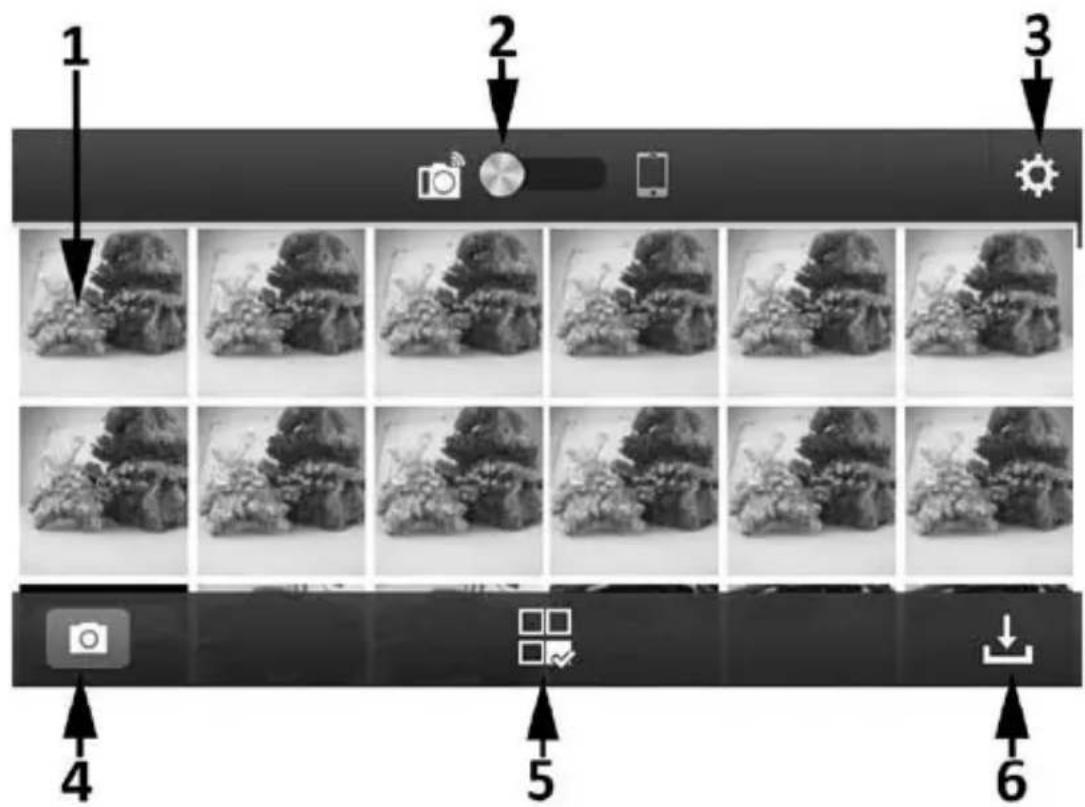
- Thumbnail images (touch to enlarge image)
- Image saved on camera (left) or downloaded to smartphone (right)
- Playback settings
- Home screen
- Share and delete images
- Download images to smartphone
V. Using the ACTION CAM HD App (Micro HD+ only) (cont'd)
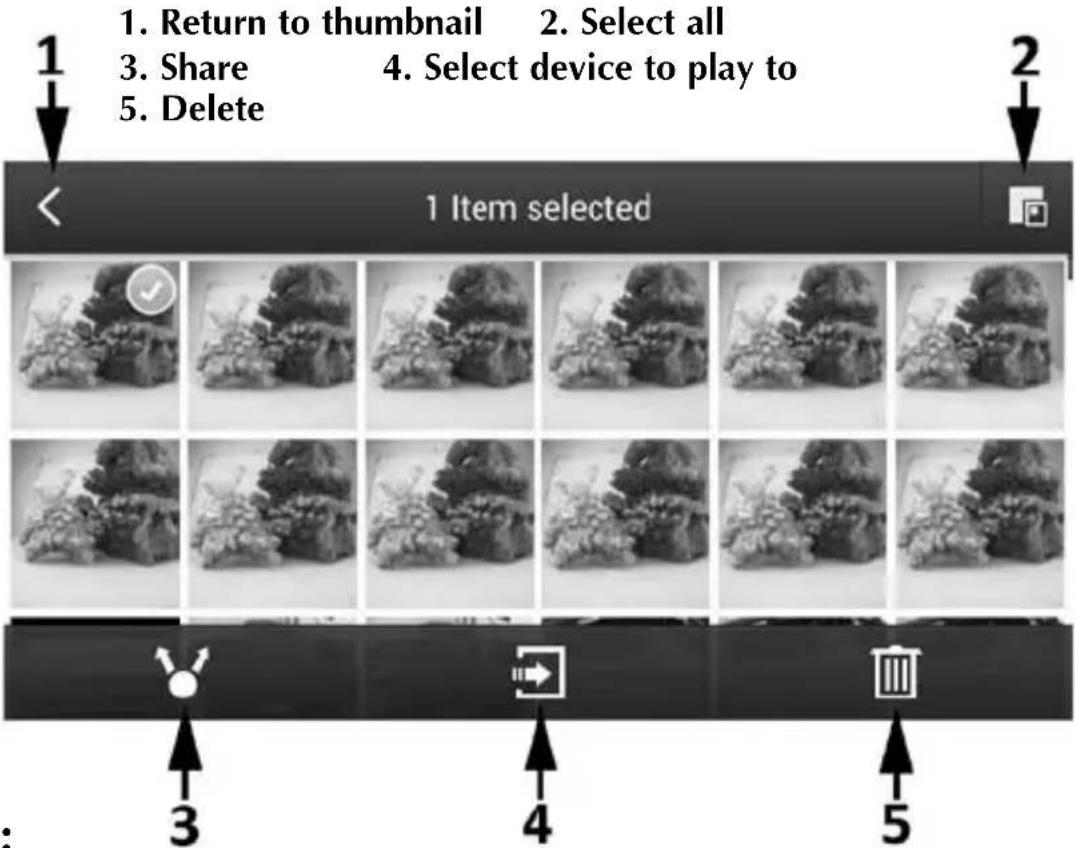
Share / Delete Screen:
flowchart
graph TD
    A["1 Return to thumbnail"] --> B["2 Select all"]
    B --> C["3 Share"]
    C --> D["4 Select device to play to"]
    D --> E["5 Delete"]
    E --> F["1 Item selected"]
Note:
The "Share" option only lists the apps installed on your smartphone or tablet. For example, if you want to share a picture or video on Facebook, you will first need to install the Facebook app on your smartphone or tablet.
Pictures and videos downloaded to your smartphone or tablet will be saved in the following locations:
Apple iOS (iPhone/iPad) – Use the Action Cam HD to view and share pictures and videos. You may also connect your iPhone and iPad to a computer and find the pictures saved here: Action Cam HD\documents\MultiMedia\
Google Android - Use the Action Cam HD to view and share pictures and videos. You may also connect your Android device to a computer and find the pictures saved here: sdcard\Media+\SalixActionCam\Content\
VI. Menu Navigation
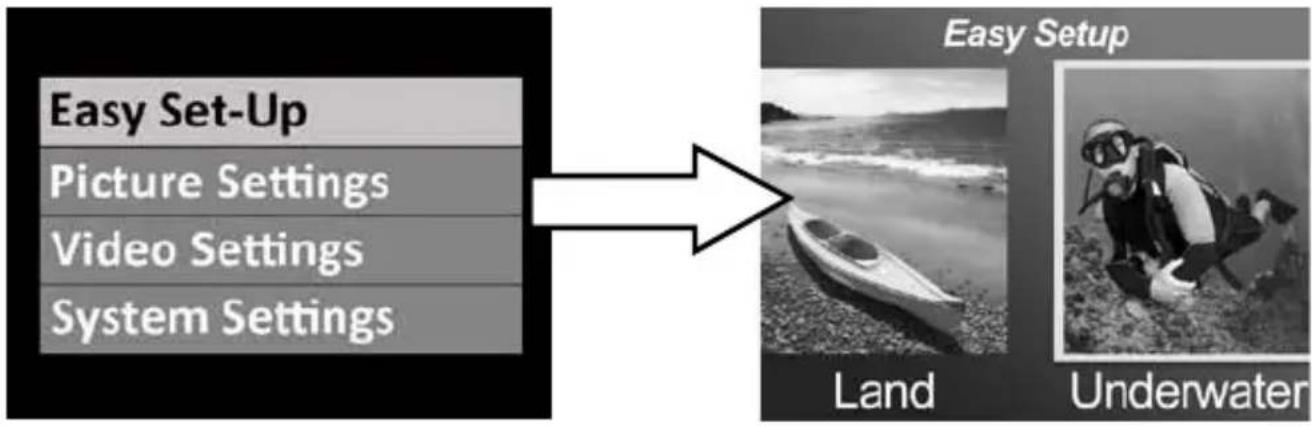
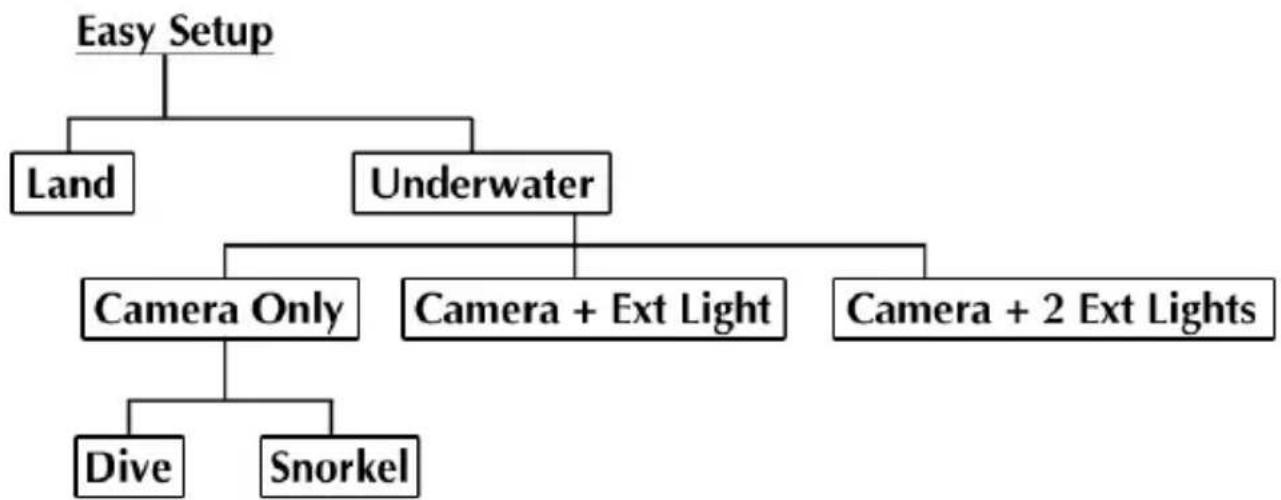
Easy Setup:
A step-by-step guide that helps you set the camera correctly. Simply follow the on-screen guide and enter if you are using the camera on land or underwater, and if you are using one or two lights.
flowchart
graph LR
    A["Easy Set-Up"] --> B["Picture Settings"]
    A --> C["Video Settings"]
    A --> D["System Settings"]
    B --> E["Easy Setup"]
    C --> E
    D --> E
    E --> F["Land"]
    E --> G["Underwater"]
flowchart
graph TD
    A["Easy Setup"] --> B["Land"]
    A --> C["Underwater"]
    C --> D["Camera Only"]
    C --> E["Camera + Ext Light"]
    C --> F["Camera + 2 Ext Lights"]
    D --> G["Dive"]
    D --> H["Snorkel"]
VI. Menu Navigation (cont'd)
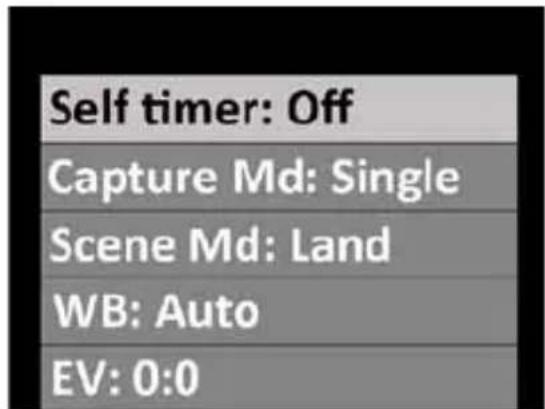
Picture Settings:
Self Timer
Useful for capturing self portraits or videos. Delays image capture or video record start time by 3 sec. or 10 sec. after pushing shutter button.
Capture Mode
There are 4 different methods for capturing still images:
Single: Captures one image at a time.
Continuous: Keeps shooting images while shutter button is pushed at a rate of 10 frames per second.
Time Lapse: Records still images at pre-set time intervals of 2 sec, 5, sec, 10 sec, 30 sec, 1 min, 5 min and 30 min. Useful for shooting a sequence of pictures without holding the camera or disturbing the subject. Later you can select the best image or combine all the images into a time lapse video using video editing software.
AEB: Auto Exposure Bracketing. Captures 3 images at different exposures: Standard exposure, slightly over-exposed and slightly under-exposed. Later you can select the best exposure.
VI. Menu Navigation (cont'd)
Scene Mode
Select between 5 different pre-programmed camera settings to automatically give you the best possible image and video under specific shooting conditions.
Land: For above water. Camera sets to 13MP resolution, auto white balance and auto exposure.
Dive: For underwater at depths greater than 25ft/8m. Camera sets to 13MP resolution, Underwater Deep white balance and auto exposure program that favors faster shutter speeds to minimize motion blur effect.
Snorkel: For underwater at depths less than 25ft/8m. Camera sets to 13MP resolution, Underwater Shallow white balance and auto exposure program that favors faster shutter speeds to minimize motion blur effect.
Ext Light: For underwater at any depth with one external light accessory. Camera sets to 9MP resolution (uses a more narrow, 90-degree field of view to match wide beam angle of external light and minimize hot spot effect), Daylight white balance and auto exposure program that favors faster shutter speeds to minimize motion blur effect.
Dual Ext Lights: For underwater at any depth with two external light accessories. Camera sets to 13MP resolution (uses a wider 140-degree field of view to match wider beam angle of two external lights – spread lights out), Daylight white balance and auto exposure program that favors faster shutter speeds to minimize motion blur effect.
VI. Menu Navigation (cont'd)
White Balance (WB)
Select between 5 different white balance settings to give you the best possible image and video under specific ambient lighting conditions.
Auto: Automatically selects best white balance for land (not for underwater).
Underwater Ideal for shooting underwater images and Shallow: videos at depths less than 25ft/8m.
Underwater Ideal for shooting underwater images and Deep: videos at depths greater than 25ft/8m.
Daylight: Ideal for shooting in sunny conditions.
Cloudy: Ideal for shooting in cloudy conditions.
Exposure Value (EV)
This setting adjusts the camera's auto exposure program and is useful to force the camera to capture slightly over-exposed or under-exposed images. Increasing the value results in a brighter image exposure. Decreasing the value results in a darker image exposure.
VI. Menu Navigation (cont'd)
Quality
This adjusts how much the still image or video is compressed. Select between 3 options:
Super Fine: Lowest degree of compression, resulting in best quality and largest file size.
Fine: Moderate degree of compression, resulting in good quality and smaller file size.
Standard: Highest degree of compression, resulting in fair quality and lowest file size.
Size
Select among 7 different resolutions and image formats depending on how you want to use the image.
4:3 is the most common format used for viewing pictures on a computer monitor or for printing. 16:9 is a wide-screen format commonly used to view pictures on an HD TV, smartphone or other wide screen devices.
13MP (Wide 4:3): 4128 x 3097. Highest 4:3 format resolution. 140-degree field of view.
10MP (Wide 16:9): 4128 x 2322. Highest 16:9 format resolution. 130-degree field of view.
VI. Menu Navigation (cont'd)
9MP (Normal 4:3): 3464 x 2598. Center of 13MP image is cropped by 33% resulting in 9MP image with narrower 90-degree field of view. Ideal for shooting with one external light accessory to minimize hot spot effect.
7MP (Wide 4:3): 3072 x 2304. Medium resolution with wide 140-degree field of view.
4MP (Wide 4:3): 2440 x 1832. Medium resolution with wide 140-degree field of view.
2MP (Wide 16:9): 1920 x 1080. Resolution and frame size equivalent to full 1080p frame size. Ideal for time lapse photography that is later produced into HD quality video.
2MP (Wide 4:3): 1504 x 1128. Lowest resolution with wide 140-degree field of view.
ISO
ISO adjusts how sensitive the image sensor is to light. The higher the ISO value, the more sensitive the camera will be to light and is ideal for low light shooting conditions. A higher ISO value also results in a grainier, less sharp picture. The lower the ISO value, the less sensitive the camera will be to light and is ideal for brighter light shooting conditions. A lower ISO value also results in sharper, less grainy image quality. Selecting AUTO ISO automatically selects the optimal setting.
VI. Menu Navigation (cont'd)
Sharpness
Choose among 3 sharpness levels – hard, standard and soft. A “harder” picture has sharper edges and lines, showing more detail but may appear more pixelated. Softer images have smoother lines.
Metering
This sets the area that the camera uses to calculate exposure. Spot metering uses the center of the image frame to determine exposure. Average metering uses the entire image field to calculate exposure.
Time Lapse
Select the time interval used for the Time Lapse capture mode. See above.
VI. Menu Navigation (cont'd)
Video Settings:
Size
5 different video recording resolutions and frame speeds depending on what you are recording and what you intend to do with the video clip.
1080 - 30fps
720p - 60fps
720p - 30fps
240p - 120fps
240p - 240fps
White Balance (WB)
See description on page 29
Metering
See description on page 32
Quality
See description on page 30
VI. Menu Navigation (cont'd)
Microphone
The camera includes a microphone located inside the waterproof enclosure, which may be turned ON or OFF. When the microphone is turned ON, the volume has been preset to the highest possible setting; however, the video recording audio is minimal because of the waterproof design. Suggest using YouTube or video editing software to add music or narrations to your video.
Sharpness
See description on page 32
Dual Stream
When Dual Stream setting is ON, the camera saves two video files for each recording. One is a smaller version of the original, useful for viewing on smartphone or emailing. The smaller “thumbnail” file shares the same file name as the original larger file, but includes a “_thm.mp4” extension.
Note:
- Each video recording also includes a .THM file which is a thumbnail needed to playback the video on the camera. It's okay to delete the .THM file after transferring videos to your computer, smartphone or tablet.
System Settings:
WiFi
Turn WiFi ON to enable the wireless transmitter needed to connect the camera to your iOS or Android smartphone or tablet. Please allow about 15 seconds for the device to boot-up. A green WiFi indicator will appear on the top of the display when WiFi is turned on. See page 19 for information on connecting camera to smartphones or tablets.
Note:
- Keep WiFi turned off when not in use, as this will deplete battery power. WiFi will also turn off automatically if camera is powered off.
Auto Off
Camera will automatically turn off after 3 minutes of not pushing any buttons. The Auto Off function can be disabled by selecting “Auto off: Off” or extended to 5 minutes by selecting “Auto off: 5 min.”
System Reset
System Reset will restore all camera settings to original factory default. Camera will reboot after System Reset.
VI. Menu Navigation (cont'd)
Date / Time
Set camera date and time.
Format
This will delete all files in the internal memory. It is useful to format memory if internal memory is corrupted by other files saved on the camera. It is recommended to format the memory occasionally to refresh the memory's folder structure.
Firmware Version
Displays what firmware (software) version is installed on the camera. SeaLife may occasionally release firmware updates if any operation and performance enhancements are discovered. Please check SeaLife website for updates: www.sealife-cameras.com/firmware
Sound
The camera includes a speaker located inside the waterproof enclosure, which may be turned ON or OFF. The speaker volume has been preset to the loudest possible level, but may be difficult to hear because of the waterproof design.
VI. Menu Navigation (cont'd)
Quickview
This sets whether or not to show the captured image on the LCD display after it has been captured. You can select OFF, 2 seconds or 5 seconds.
Language
Select among English, German, French, Spanish, Italian and Dutch.
Date Stamp
Turning Date Stamp ON will imprint the data and time on the bottom right corner of each picture. Not available for videos.
Light Frequency
To avoid flicker effect when taking pictures indoors under fluorescent lighting, select 60Hz for USA and other countries using 110-120V electrical system. Select 50Hz for countries using 220-240V electrical system.
Memory Available
Shows how much internal memory is available for storage. The camera uses some internal memory for operating system files, so 28.9GB and 14.4GB of memory is available for HD+32GB and HD 16GB models, respectively.
VII. Great Underwater Pictures Made Easy
Taking underwater images is much different than taking land photos or video. Here are the most important tips to taking great pictures underwater:
Crystal clear water
Crystal clear water is essential for good underwater pictures. Tiny particles floating in the water cause low visibility and poor picture quality. Avoid stirring up the sandy bottom with your fins. These floating particles cause small spots to appear in your picture, known as "backscatter." Try to limit your shooting distance to 1/10 of the water visibility. For example, if the visibility is 60 feet (18m), you should keep your shooting distance to within 6 feet (1.8m).
Get close to your subject
The ideal shooting distance is 1ft to 4ft (0.3 to 1.2 meters). This distance will result in greater detail. Remember the camera's minimum focus range is 12" (30cm). For shooting closer shooting distances of 6" to 24"(15cm to 60cm), consider purchasing the optional 10X close-up lens (item # SL570).
Move calmly and control your buoyancy before taking a picture
It's hard to take good pictures when you are moving. Position yourself at the best shooting angle and neutralize your buoyancy. Be calm and patient: Sometimes you have to wait so the fish that were frightened away come back. Don't chase the fish, let the fish come to you. Always be in control of your buoyancy before taking pictures and observe all safe diving rules.
VII. Great Underwater Pictures Made Easy (cont'd)
Shoot many pictures of the same subject - if you don't like it, delete it later
One of the great advantages of digital cameras is that you can review and delete pictures later, so shoot several pictures of the same subject. One of the best ways to learn underwater photography is by comparing your good pictures and bad pictures.
Use a Sea Dragon Underwater Photo/Video/Dive Light to enhance color and brightness
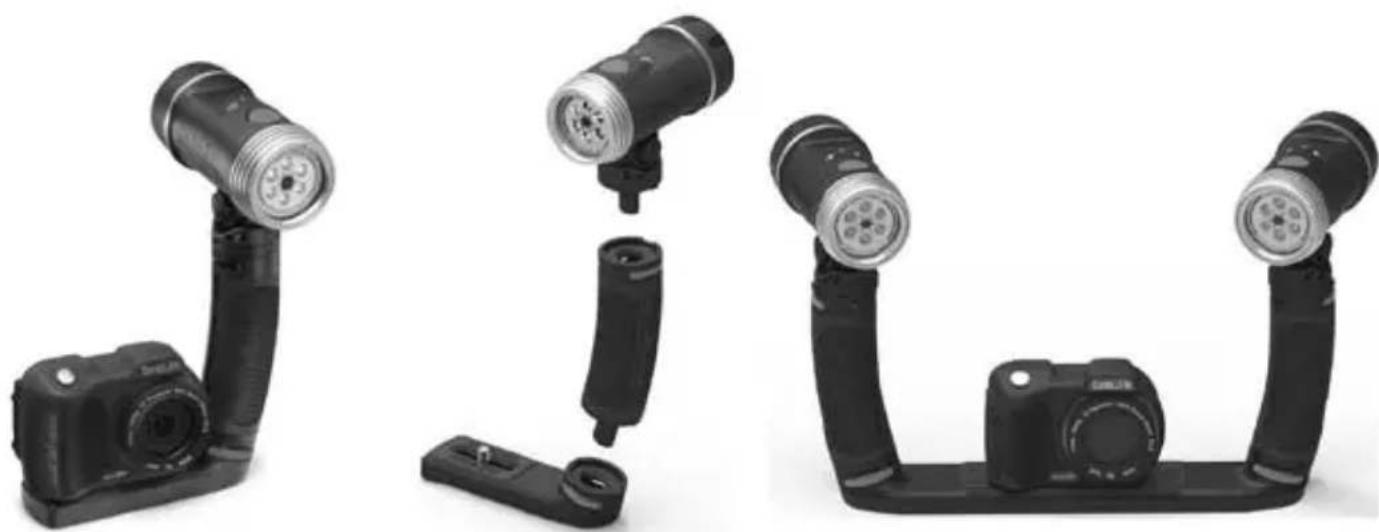
Water filters out light and red/yellow colors resulting in darker, blue images. The Dive and Snorkel modes will correct for lost colors, but are only effective to a depth of about 60ft/18m, depending on available sunlight and water visibility. The most effective way to compensate for lost colors is by using a Sea Dragon Photo/Video/Dive light. The light easily mounts to the bottom of the camera. The Flex-Connect system of trays, grips, flexible arms and adapters can click together and apart in seconds without tools, for compact travel. Two lights can be mounted to the camera for wide angle illumination.
Pan very slowly or not at all
When recording video, keep the camera aimed steady at the subject. Avoid making any sudden or jerky movements. If you pan the camera, move it very, very slowly or you will get seasick watching it later. A better way is to slowly move the camera off of the subject, stop recording, change the angle or distance, then start the recording again.
VII. Great Underwater Pictures Made Easy (cont'd)
Limit video clips to 60 seconds or less
It's better to record many 1 minute clips than a few long videos. Shorter clips are much easier to share and edit. Remember, a 30 second clip is about 35MB – 10 times more than one 13 megapixel still image.
Correcting fisheye lens barrel distortion
The built-in fisheye lens allows you to get close to the subject and still fit everything into the picture. Some pictures taken of straight objects, like a tree or horizon, may appear bent.
There are many photo editing programs available that can correct this barrel distortion effect. Here is a BEFORE and AFTER example corrected with software called ShiftN, which is a free download.

natural_image
Two people relaxing on a beach with umbrellas overhead (no text or symbols visible)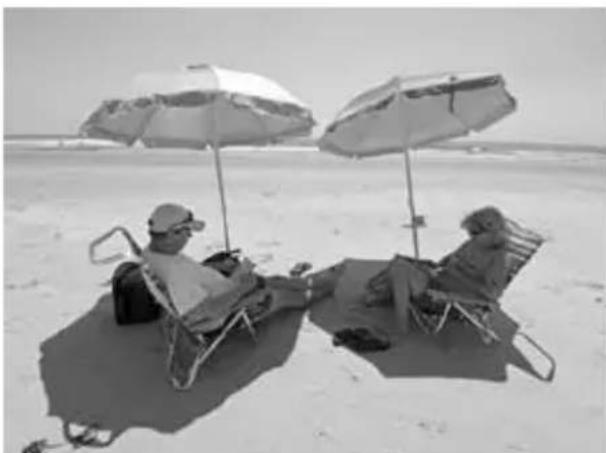
natural_image
Two people relaxing on a beach with umbrellas, no visible text or symbolsVII. Great Underwater Pictures Made Easy (cont'd)
Visit the SeaLife website for updated tips and advice
Any updates to the manual or additional tips and advice can be found on the SeaLife website at www.sealife-cameras.com.
Ask your local SeaLife dive dealer about underwater camera courses
Most SeaLife dive dealers offer underwater camera courses which include hands-on training as well as many helpful tips and techniques to underwater videos and photography.
VIII. Optional Accessories
Sea Dragon Underwater Photo/Video/Dive Lights
The bright, powerful line of Sea Dragon underwater lights not only produces sharp, colorful pictures and videos, but also makes for a great dive light. Reefs and coral come alive with true colors you've never seen before. The compact and powerful line of Sea Dragon lights are easy to connect to your Micro HD/HD+ camera using the Flex-Connect system of trays, grips and arms. Check out sealife-cameras.com for the latest line of Sea Dragon underwater lights.
natural_image
Three black industrial robotic arms with camera modules, shown from different angles (no text or symbols visible)Left: Micro HD+ attached to Sea Dragon 2000 UW light w/ Flex Connect Grip and Micro Tray. Center: Sea Dragon lights quickly and easily click together with a push of a button. Right: Micro HD+ attached to two Sea Dragon 2000 UW lights w/ Flex Connect Grips and Dual Tray.
VIII. Optional Accessories (cont'd)
AquaPod (SL913)
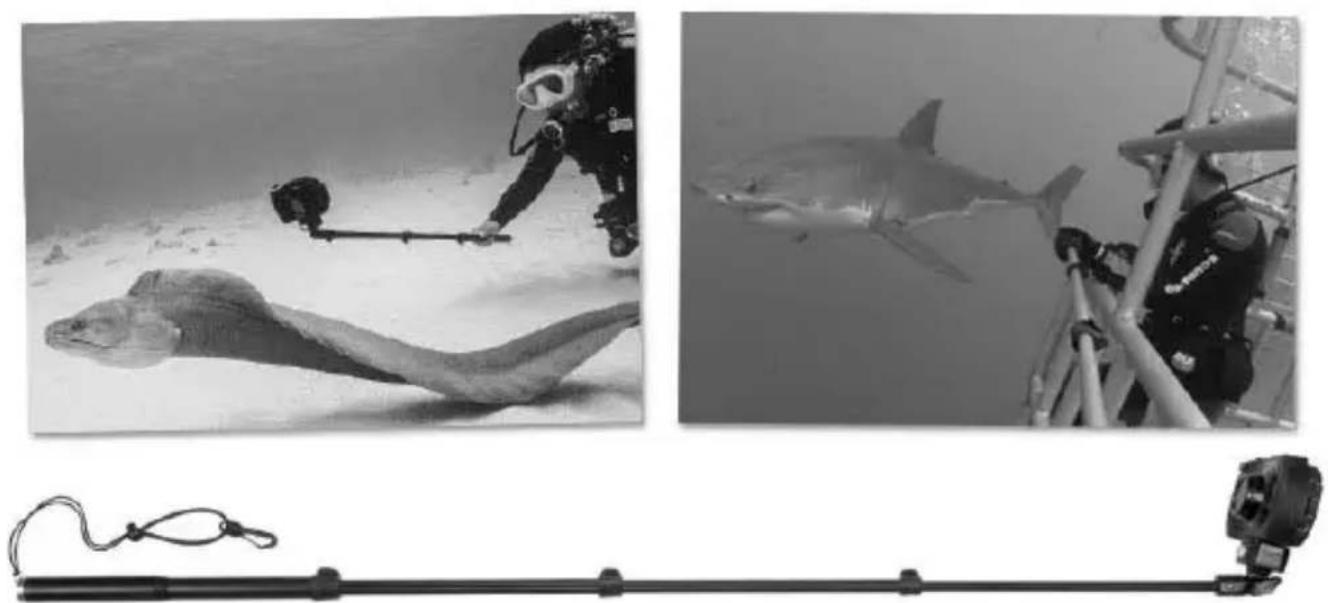
The SeaLife AquaPod allows for close up underwater photos and videos while maintaining a comfortable distance between you and your subject. It's ideal for exciting shark images and video, as well as easily frightened ocean species.
Rotate the Micro HD/HD+ on the AquaPod for self-portrait images. Easy to use and hold steady, both above and below the water, the AquaPod extends from 18 inches (46cm) to 53 inches (135cm).
natural_image
Black-and-white photo collage showing underwater diving, a diver in flight, and a shark under observation (no text or symbols visible)To shoot still images, simply set the camera to “Time Lapse” mode, allowing it to automatically shoot at set time intervals. For videos, just push the video button on the camera and start shooting. For best results, make smooth and gentle movements so the lens stays focused on your subject.
VIII. Optional Accessories (cont'd)
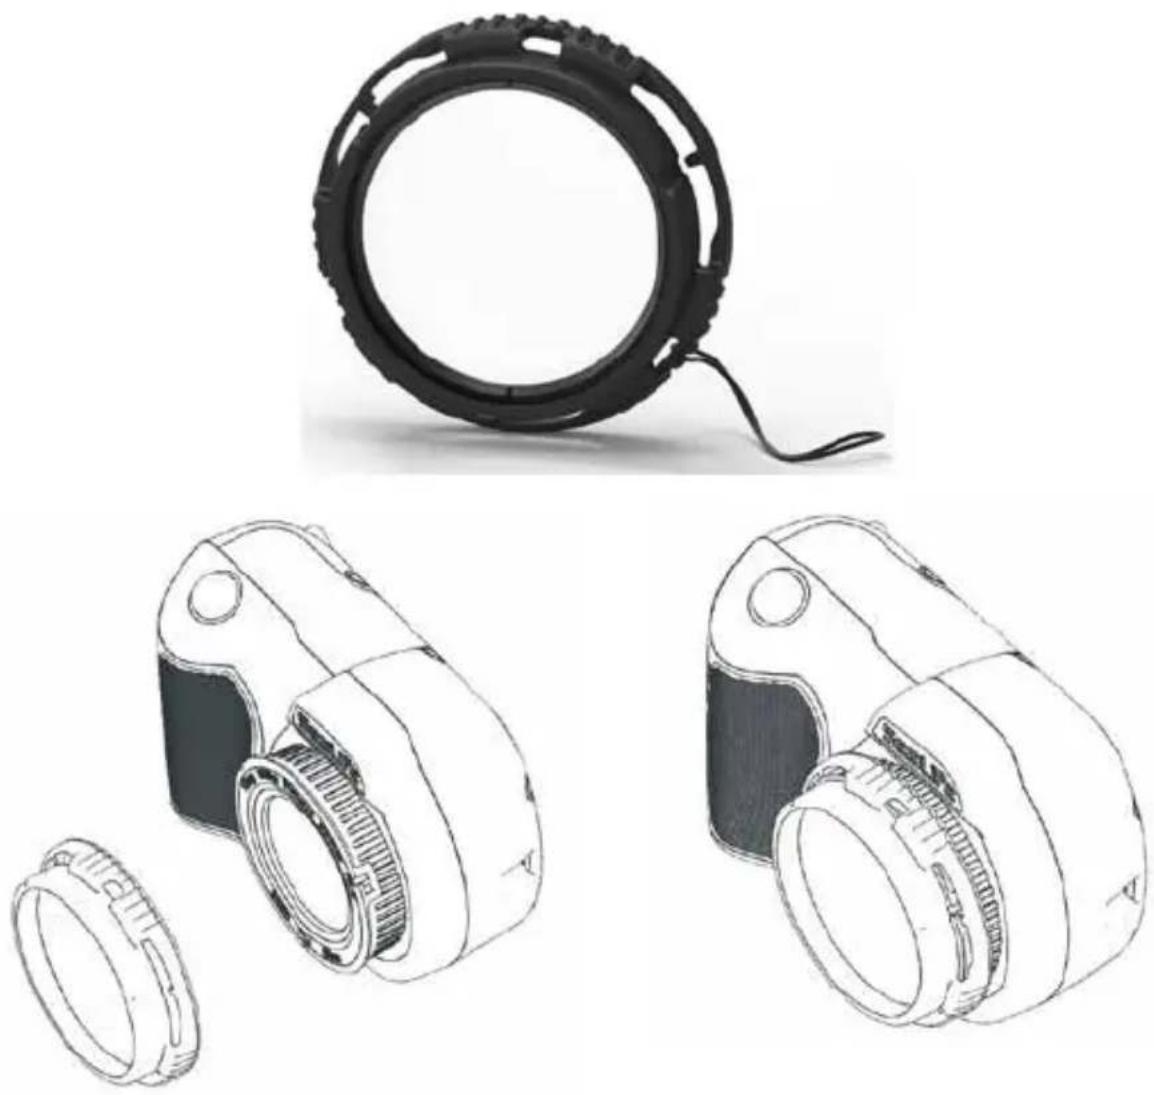
10X Close-up Lens (SL570)
For shooting sharp close-ups from 6" to 24" (15cm to 60cm) the optical glass lens easily attaches to the lens port and locks in place with a right twist. It's removable underwater and includes a safety lanyard that connects to the camera.
natural_image
Technical line drawings of mechanical components including a tire and two views of a device (no text or symbols present)IX. Care and Maintenance
- Immediately after using camera underwater, soak camera in a fresh water tub for about 10 minutes.
- While holding camera underwater, push each button a few times to rinse out trapped saltwater.
- Dry housing with clean soft towel after removing from fresh water tub. Never let water dry on the lens or LCD window, which can cause water drop stains.
- Do not let camera sit in direct sunlight for prolonged periods of time. Keep camera in a shaded area or under a dry towel.
- Make sure camera is perfectly dry before storage. Store camera in a clean dry area.
- Do not disassemble this product; there are no user-serviceable parts inside and will void warranty.
- Keep camera away from extreme temperatures or prolonged exposure to direct sunlight. Storage temperature range is -20°F to 140°F (-29°C to 60°C).
- For long-term storage, charge battery to about 50%. Storing camera with 0% charge may shorten battery lifespan or permanently damage battery.
- Opening and tampering with the camera will void your warranty.
- Battery may only be replaced by Authorized SeaLife Service Center. Risk of explosion if battery is replaced by incorrect type. Dispose of used batteries according to your local laws.
X. Spare Parts and Service
We stand behind our product with a pledge to provide superior service to our customers. If your camera needs service or if you need a replacement part, we promise fast, friendly and professional service so you can have your equipment in good working order before your next dive trip.
Parts
To order spare parts, please contact your local SeaLife dealer. Visit the Dealer Locator at www.sealife-cameras.com to find a dealer near you. US residents can also order spare parts online at www.SealifePartsDirect.com
Service
If your SeaLife product is damaged and requires repair service, please follow these important instructions:
- Visit the Product Updates page located in the Technical Support menu of the sealife-cameras.com website.
- Check that you have the most recent firmware loaded on your camera. Firmware updates are also available in the Technical Support menu of the sealife-cameras.com website.
- Contact the dealer from whom you purchased the product. The Dealer Locator page contains a complete list of local dealers that may be able to assist you with trouble shooting your problem.
If none of these options help, please follow the return instructions available on the seaLife-cameras.com website.
Applies to SeaLife Micro HD+ (SL501) only:
15.105(b)
This equipment has been tested and found to comply with the limits for a Class B digital device, pursuant to part 15 of the FCC rules. These limits are designed to provide reasonable protection against harmful interference in a residential installation. This equipment generates, uses and can radiate radio frequency energy and, if not installed and used in accordance with the instructions, may cause harmful interference to radio communications. However, there is no guarantee that interference will not occur in a particular installation. If this equipment does cause harmful interference to radio or television reception, which can be determined by turning the equipment off and on, the user is encouraged to try to correct the interference by one or more of the following measures:
-Reorient or relocate the receiving antenna.
-Increase the separation between the equipment and receiver.
- Connect the equipment into an outlet on a circuit different from that to which the receiver is connected.
-Consult the dealer or an experienced radio/TV technician for help.
This device complies with Part 15 of the FCC Rules. Operation is subject to the following two conditions:
1) This device may not cause harmful interference and
2) This device must accept any interference received, including interference that may cause undesired operation of the device.
15.21
You are cautioned that changes or modifications not expressly approved by the part responsible for compliance could void the user's authority to operate the equipment.
FCC RF Radiation Exposure Statement:
This equipment complies with FCC radiation exposure limits set forth for an uncontrolled environment. End users must follow the specific operating instructions for satisfying RF exposure compliance. This transmitter must not be co-located or operating in conjunction with any other antenna or transmitter.
Canada, Industry Canada (IC) Notices
This Class B digital apparatus complies with Canadian ICES-003 and RSS-210.
Operation is subject to the following two conditions: (1) this device may not cause interference, and (2) this device must accept any interference, including interference that may cause undesired operation of the device.
Radio Frequency (RF) Exposure Information
The radiated output power of the Dell Wireless Device is below the Industry Canada (IC) radio frequency exposure limits. The Dell Wireless Device should be used in such a manner such that the potential for human contact during normal operation is minimized.
This device has been evaluated for and shown compliant with the IC Specific Absorption Rate ("SAR") limits when installed in specific host products operated in portable exposure conditions (antennas are less than 20 centimeters of a person's body).
This device has been certified for use in Canada. Status of the listing in the Industry Canada's REL (Radio Equipment List) can be found at the following web address: http://www.ic.gc.ca/app/sitt/reltel/srch/nwRdSrch.do?lang=eng
Additional Canadian information on RF exposure also can be found at the following web address: http://www.ic.gc.ca/eic/site/smt-gst.nsf/eng/sf08792.html
Canada, avis d'Industry Canada (IC)
http://www.ic.gc.ca/app/sitt/reltel/srch/nwRdSrch.do?lang=eng
natural_image
Underwater view of a whale swimming near the ocean surface, with a person in wetsuit assisting (no text or symbols on the main subject)Item SL50108 | September 2014
Share your photos and videos with us on the web!
sealife-cameras.com





Visit sealife-cameras.com/manuals for Español, Deutsch, Français, Italiano and Nederlands
- Micro HD
- Micro HD+
- Table of Contents
- Package Contents ...... 2
- Getting to Know Your Camera....3-8
- Basic Camera Operation....9-18
- WiFi Connection to Smartphone/Tablet (Micro HD+ only)....19-22
- Using the Action Cam HD App (Micro HD+ only) 23-25
- Menu Navigation....26-37
- Great Underwater Pictures Made Easy 38-41
- Optional Accessories 42-44
- Care and Maintenance ....45
- Spare Parts and Service 46
- FCC Statement....47-49
- Package Contents
- Getting to Know Your Camera
- Getting to Know Your Camera (cont'd)
- LCD Display:
- Capture Mode
- Scene modes
- Capture mode
- WiFi On
- Timers
- Battery condition
- LCD Display: Capture Mode
- Image size resolution
- White Balance
- ISO value
- Self-timer or Time Lapse time interval
- Video resolution size (with frames per second)
- Basic Camera Operation
- Power On:
- Basic Camera Operation (cont'd)
- Take a Picture:
- Take a Video:
- Note:
- Easy Setup:
- Push MENU button
- Push shutter button to select "Easy Setup."
- Follow the on-screen guide using the Up (△ VIDEO ) or Down (▽ MENU) buttons to select desired option and Shutter button to confirm setting.
- Playback Pictures and Videos:
- Charge Battery:
- Display will show PC connection icon for about 1 minute.
- For Windows
- For MAC
- WiFi Connection to Smartphone/Tablet (Micro HD+ only)
- WiFi Connection to Smartphone/Tablet (Micro HD+ only) (cont'd)
- Empty lines and lines starting with # are ignored
- ap: SoftAP mode
- STA: Station mode
- p2p: Enable wifi Direct Support for peer-to-peer connectivity
- SSID
- Passphrase, leave empty at no security mode; please edit wpa_supplicant.conf when your AP cannot be detected
- Device Name for AMBA Discovery Protocol (optional)
- Find devices with correct name prefix and automatically connect at startup
- Auto=connect with devices if the name prefix matches
- Do not enable this optional field unless you are certain, please provide a unique name among multiple devices to prevent confusion
- SSID (1 - 32 characters)
- IP address
- IP subnet mask
- IP pool starting address of DHCP server
- IP pool end address if DHCP server
- WiFi channel number, set 0 to use Auto Channel Selection
- Maximum number of stations allowed in station table
- If you say yes here, all wpa/WEP settings will be ignored
- WPA Passphrase (8 - 63 characters)
- Do not modify this section unless you are certain
- this is a bit field, bit0 = wpa, bit1 = wpa!
- This is a space separated list of encryption algorithms, TC2P CCHP
- IF you say yes here, AP_PASSMD, WPA_VERSION, WPA_PATRWTSE will be ignored
- bit fields of allowed authentication algorithms, bit 0 = Open System, bit 1 = Shared Key
- The key number to use when transmitting, it must be between 0 and 3, and the corresponding key must be set.
- A key may be a quoted string (5 or 13 characters) or unquoted hexadecimal digits (10 or 26 digits), depending on whether 64-bit or 128-bit WEP is used
- Using the ACTION CAM HD App (Micro HD+ only)
- Using the ACTION CAM HD App (Micro HD+ only) (cont'd)
- Share / Delete Screen:
- Menu Navigation
- Menu Navigation (cont'd)
- Picture Settings:
- Self Timer
- Scene Mode
- White Balance (WB)
- Exposure Value (EV)
- Quality
- Size
- ISO
- Sharpness
- Metering
- Time Lapse
- Video Settings:
- Microphone
- Dual Stream
- System Settings:
- WiFi
- Auto Off
- System Reset
- Date / Time
- Format
- Firmware Version
- Sound
- Quickview
- Language
- Date Stamp
- Light Frequency
- Memory Available
- Great Underwater Pictures Made Easy
- Crystal clear water
- Get close to your subject
- Move calmly and control your buoyancy before taking a picture
- Great Underwater Pictures Made Easy (cont'd)
- Pan very slowly or not at all
- Limit video clips to 60 seconds or less
- Correcting fisheye lens barrel distortion
- Visit the SeaLife website for updated tips and advice
- Ask your local SeaLife dive dealer about underwater camera courses
- Optional Accessories
- Sea Dragon Underwater Photo/Video/Dive Lights
- Optional Accessories (cont'd)
- AquaPod (SL913)
- 10X Close-up Lens (SL570)
- Care and Maintenance
- Spare Parts and Service
- Parts
- Service
- Applies to SeaLife Micro HD+ (SL501) only:
- 15.105(b)
- 15.21
- FCC RF Radiation Exposure Statement:
- Canada, Industry Canada (IC) Notices
- Radio Frequency (RF) Exposure Information
- Canada, avis d'Industry Canada (IC)
Brand : SEALIFE
Model : Micro HD+ SL505
Category : Camera