
HANNSbook SN12E23BUP212 - Laptop HANNSPREE - Free user manual and instructions
Find the device manual for free HANNSbook SN12E23BUP212 HANNSPREE in PDF.


| Product Type | Laptop |
| Brand | Hannspree |
| Model | HANNSbook SN12E23BUP212 |
| Screen Size | 12.5 inches |
| Screen Resolution | 1920 x 1080 pixels |
| Processor | Intel Celeron or equivalent |
| RAM | 4 GB DDR3 |
| Storage | 64 GB eMMC |
| Operating System | Windows 10 Home |
| Battery Type | Lithium-ion, 2-cell, 36 Wh |
| Battery Life | Up to 8 hours |
| Dimensions (W x D x H) | 292 x 200 x 18 mm |
| Weight | 1.2 kg |
| Connectivity | Wi-Fi 802.11ac, Bluetooth 4.2, USB 3.0, HDMI, headphone/mic combo |
| Camera | Front-facing 0.3 MP |
| Audio | Built-in stereo speakers, digital microphone |
| Power Adapter | Input: 100-240V AC, Output: 12V DC, 2A |
| Maintenance | Clean with soft dry cloth; do not use liquids |
| Safety | Do not expose to water, heat, or magnetic fields; avoid dropping |
| Spare Parts & Repairability | Battery, keyboard, and touchpad are replaceable; contact support |
Frequently Asked Questions - HANNSbook SN12E23BUP212 HANNSPREE
User questions about HANNSbook SN12E23BUP212 HANNSPREE
0 question about this device. Answer the ones you know or ask your own.
Ask a new question about this device
Download the instructions for your Laptop in PDF format for free! Find your manual HANNSbook SN12E23BUP212 - HANNSPREE and take your electronic device back in hand. On this page are published all the documents necessary for the use of your device. HANNSbook SN12E23BUP212 by HANNSPREE.
USER MANUAL HANNSbook SN12E23BUP212 HANNSPREE
natural_image
Line drawing of a laptop computer with visible keyboard and mouse (no text or symbols)Trademark:
All trademarks are the property of their respective owners.
Version:
User's Manual V1.0 for Notebook.
Symbol Description:

Caution: Refers to important information that can help you to use Notebook better, and tells you how to avoid problems.

The use of this symbol indicates that this product may not be treated as household waste. By ensuring this product is disposed of correctly, you will help prevent potential negative consequences for the environment and human health, which could otherwise be caused by inappropriate waste handling of this product. For more detailed information about recycling of this product, please contact your local city office, your household waste disposal service or the shop where you purchased this product.
Safety Precautions
The following safety precautions will increase the life of the Notebook. Please follow all precautions and instructions. Except as described in the manual, refer all servicing to qualified personal.

■ Do not place on uneven or unstable work surfaces. Seek servicing if the casing has been damaged.
■ Do not expose to dirty or dusty environment. And Do not operate during a gas leak.
■ Do not leave the Notebook on your lap or any part of the body to prevent discomfort or injury from heat exposure.
■ Do not press or touch the display screen. Do not place together with small items that may scratch or enter the Notebook.
■ The Notebook should only be used in environment with ambient temperature between 0^(32^) and 40^(104^) .
■ Do not place or drop objects on top.
■ Do not expose to or use near liquids, rains, moisture or strong magnetic or electrical fields.
■ Do not carry or cover a Notebook that is powered on with any materials that will reduce air circulation such as a carrying bag.
■ Do not throw the Notebook in municipal waste. Check local regulations for disposal of electronic products.
■ Wipe the Notebook using a clean cellulose sponge or chamois cloth dampened with a solution of nonabrasive detergent and a few drops of warm water and remove any extra moisture with a dry cloth.
- Risk of explosion if battery is replaced by an incorrect type. Dispose of used batteries according to the instructions.
■ Use only the power cord and batteries indicated in this manual. Do not dispose of batteries in a fire. They may explode. Check with local codes for possible special disposal instructions.
Table of Contents
Chapter 1 Introduction to Your Notebook
Accessories 2
External Appearance....3
Setting Up Your Computer....7
Touchpad Usage 10
Special Function Keys 12
Chapter 2 Install Windows 7 in Notebook
Setting BIOS and Install a new Windows 7 system.... 14
Install Drivers in Windows 7 17
Chapter 3 Recovery of Windows 7 System....19
Chapter 4 Introduction to the Linux System
Overview 23
Recovery of Linux system 24
Appendix
Product Specification....29
Notebook FAQ 31
natural_image
Line drawing of a laptop computer with blank screen and keyboard (no text or symbols)Notebook
Introduction to Your Notebook
■ Accessories
■ External Appearance
■ Setting Up Your Computer
■ Touchpad Usage
■ Special Function Keys
1-1 Accessories
Check your product package for the following items:
- Notebook
- Battery Pack
- Adapter
- AC Power Cable
- Driver DVD
- Recovery DVD
- Quick Installation Guide
- Warranty Card
- Carry Bag
- Wiping Cloth

Before your purchase, if any of the above items is damaged or missing, please contact your retailer.
1-2 External Appearance
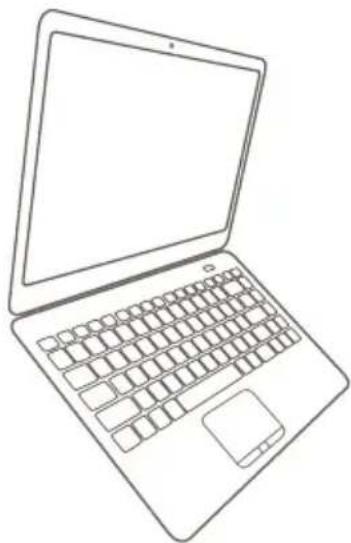
Refer to the diagram below to identify the components on every side of the Notebook.
1. Top View
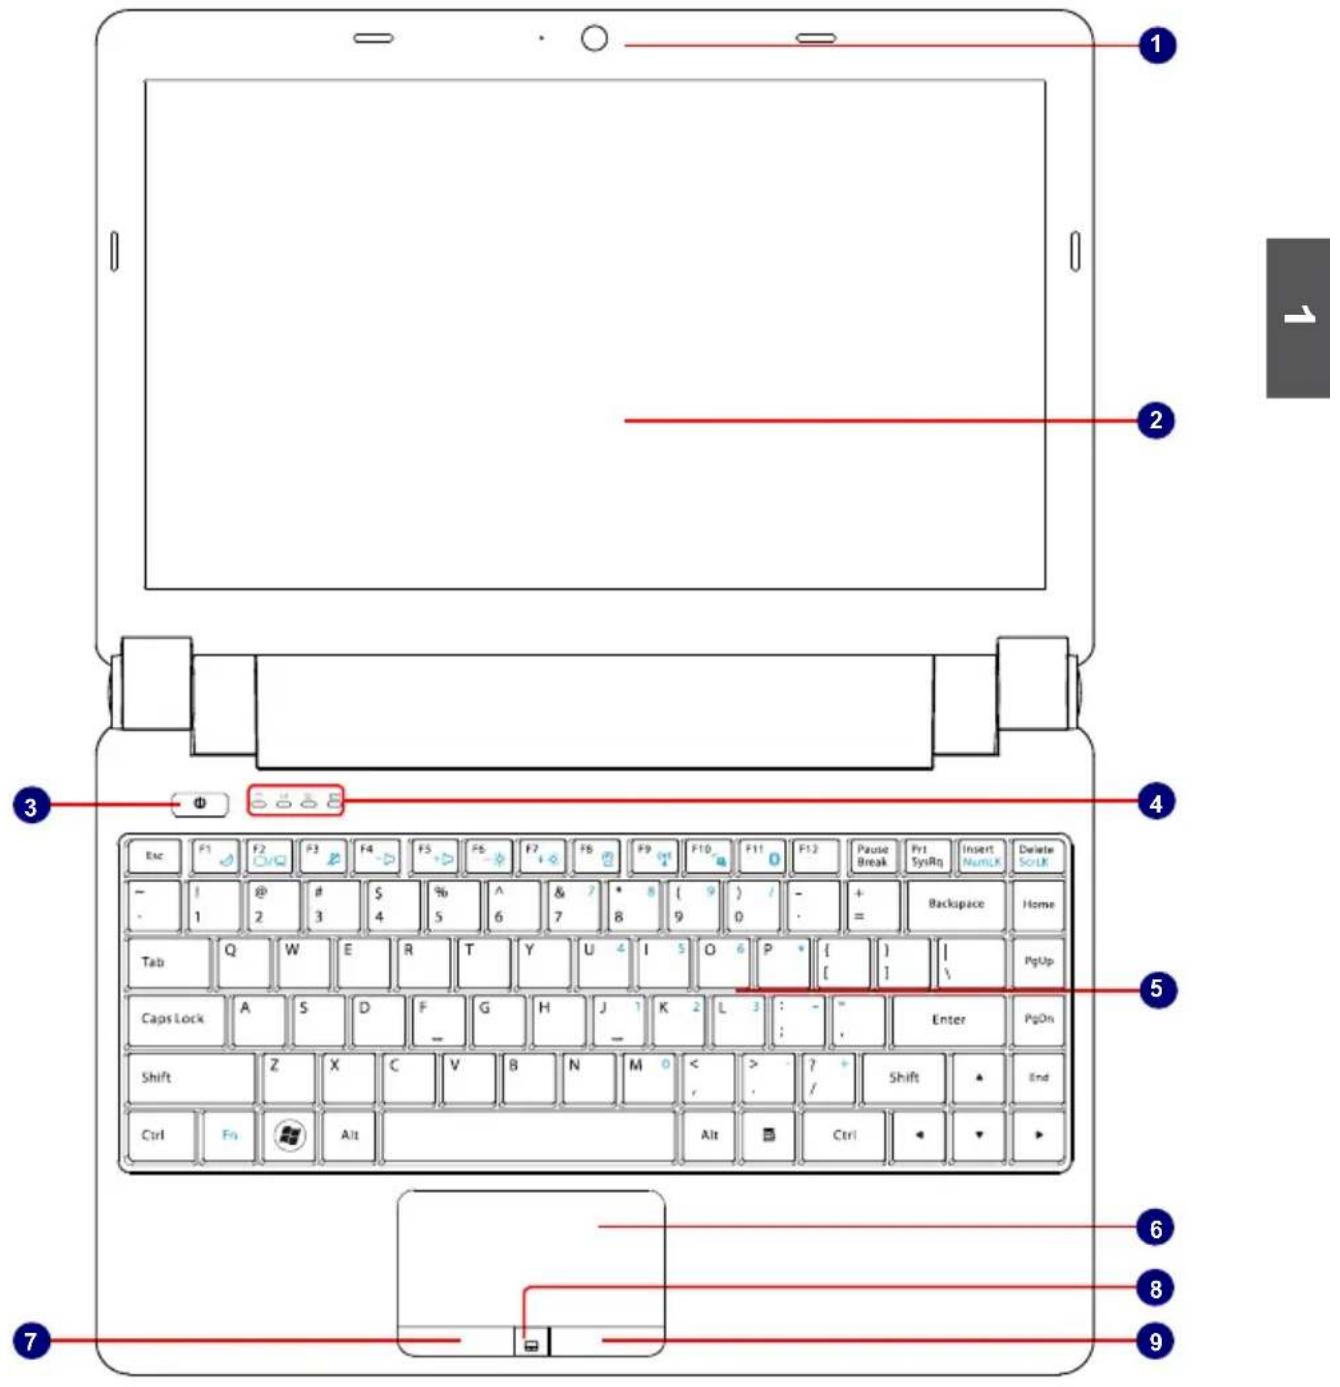

Your Notebook keyboard may vary depending on the country/region of purchase.

| No. | Item Description | |
| 1 Web | Camera Records videos or take photos | |
| 2 LCD | LED backlight panel | |
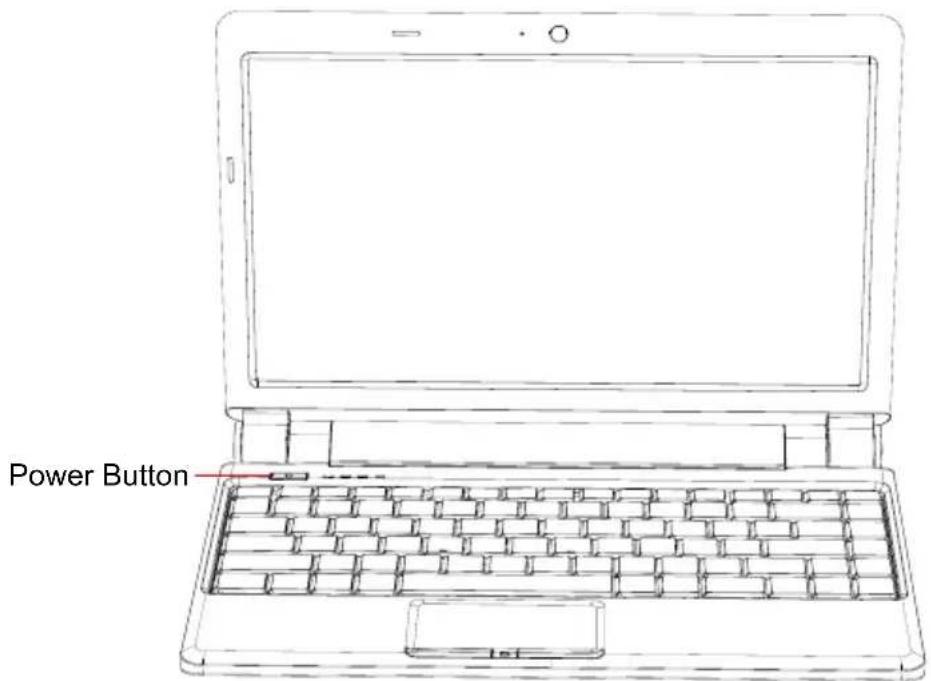
| 3 Power | Button Button for turning the computer's power on/off | |
| 4 Status Indicators | From left to right:a. HDDBlinking blue when data is written to or read from the hard disk drive.b. Wireless LANThe indicator glows blue when wireless LAN function is enabled.The indicator is off when wireless LAN function is disabled.c. Caps LockGlowing blue when the keyboard is in Caps-lock mode.d. BatteryGlowing blue when the battery is being charged.Blinking blue when the battery is in low battery status.The indicator goes out when the battery is fully charged. | |
| 5 Keyboard | Input device used for controlling the Notebook's various functions | |
| 6 Touchpad | Works the same way as a mouse and is used for controlling the computer cursor | |
| 7 Left Touchpad Button Works the same way as the left mouse button | ||
| 8 Touchpad Lock Button Press the button to lock or unlock the touchpad | ||
| 9 Right Touchpad Button Works the same way as the right mouse button | ||
2. Rear View
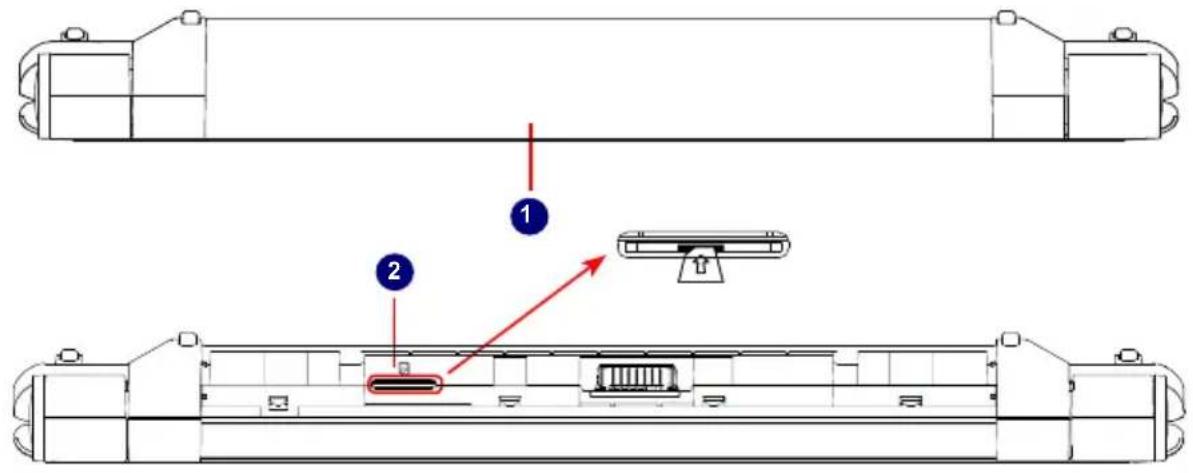
| No. Item Description | ||
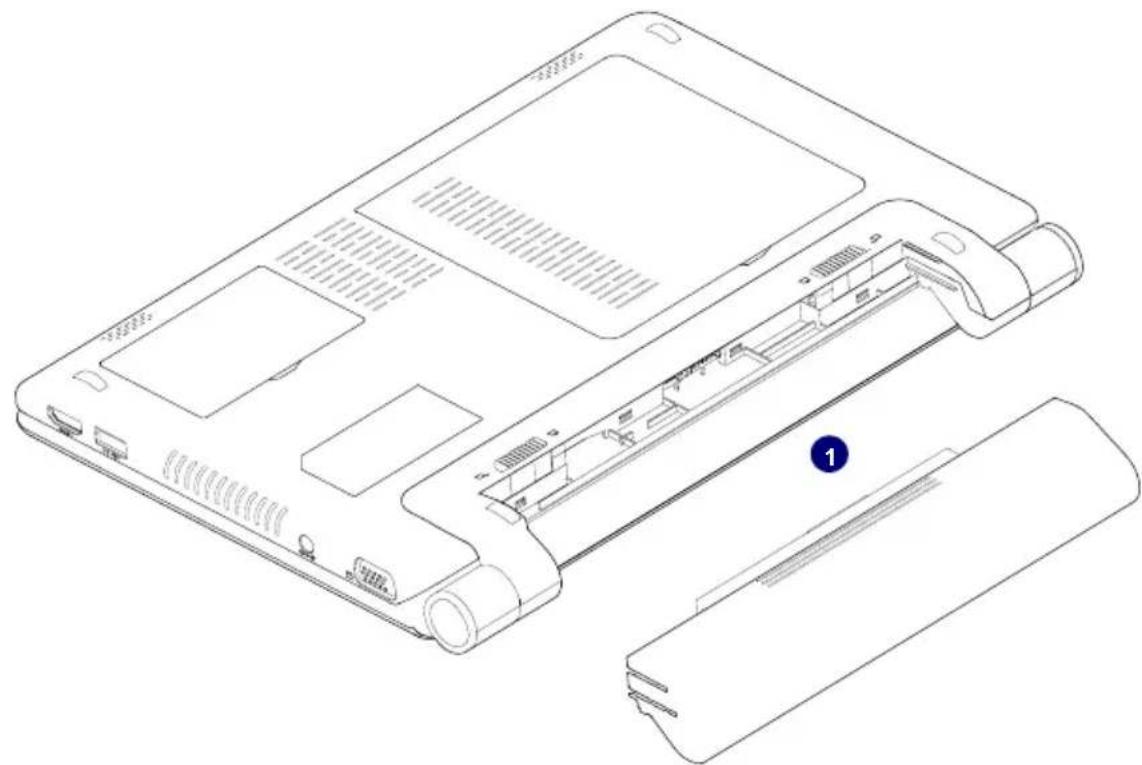
| 1 Battery Pack Replaceable battery pack that serves as Notebook's power supply | ||
| 2 SIM | Card Slot(Optional) | To insert the SIM card into the slot and make sure that the gold pins of SIM card are downward.Warning: Please do not insert or pull out the SIM card when power-on, otherwise the data may lose or the card would be damaged. |

3. Bottom View

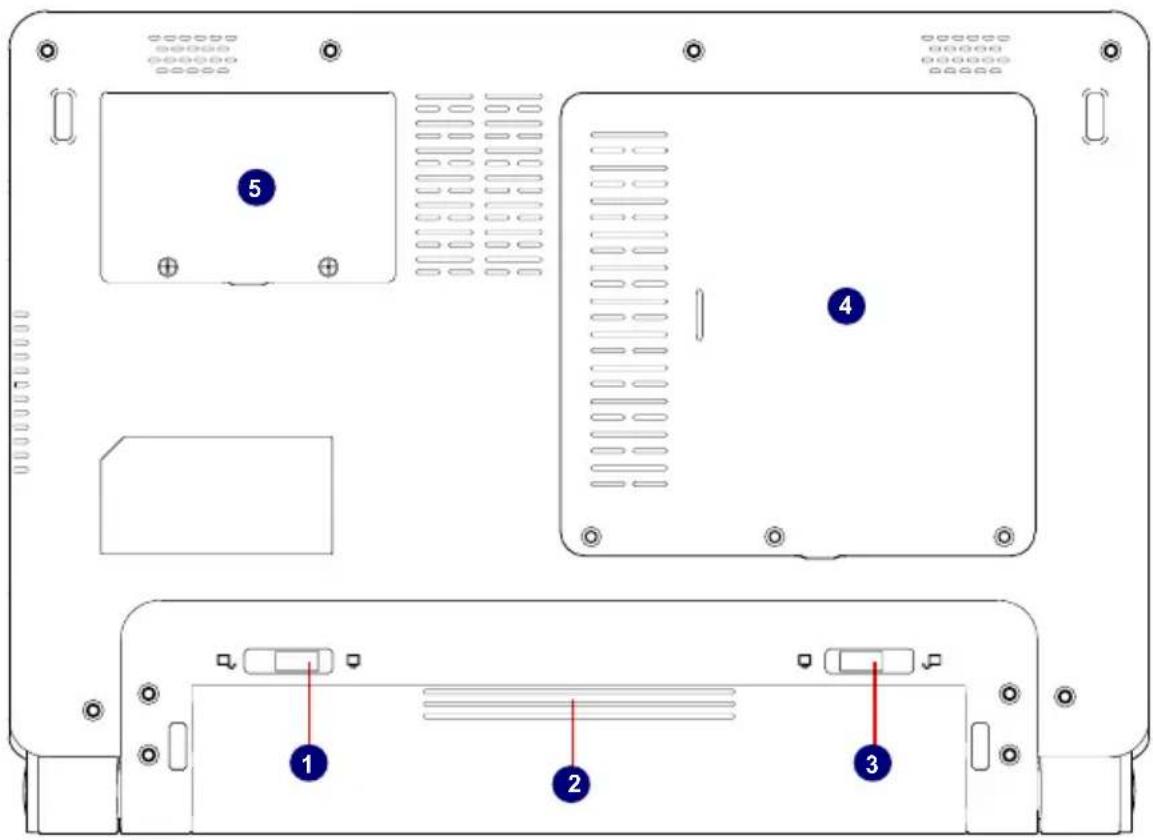
| No. | Item Description | |
| 1 | Battery Lock Slide inwards to lock the battery in place. Slide outwards to unlock battery. | |
| 2 | Battery Pack Replaceable battery pack. Serves as the Notebook's power supply | |
| 3 | Battery Latch Push outwards to release battery for removal | |
| 4 | Hard Disk Cover The Hard Disk Cover protects the internal hardware. Open to exchange device | |
| 5 | Memory Cover The cover is to protect the memory from damage. Open to exchange device | |

When the computer is running or charging, heat is produced inside the Notebook and transferred to the back of the chassis by the heat dissipation system for cooling. The transformer may also produce a lot of heat during normal use as well. The Notebook and its transformer should therefore not be placed in the lap or on any other body part for prolonged periods during use. Also avoid placing the Notebook on a soft surface (e.g. sofa) as it might block the heat vents and interfere with cooling.
4. Left View
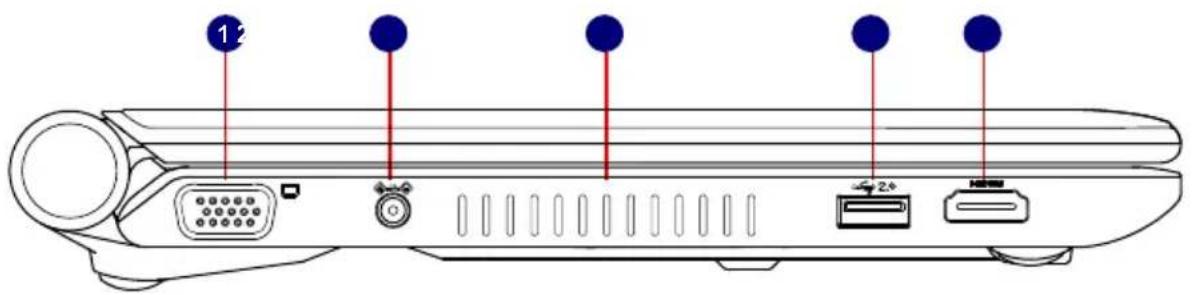
| No. | tem Description | |
| 1 VGA | Port Connects to an external display | |
| 2 Power | Port Connects to the external power supply | |
| 3 Vent | Notebook's cooling vent | |
| 4 USB | Port Connects to USB 2.0 device | |
| 5 HDMI | Port The HDMI(High-Definition Multimedia Interface)provides an all-digital audio/video interface to transmit the uncompressed audio/video signals and is HDCP compliant. Connect the HDMI audio/video device to the port. |

5. Right View
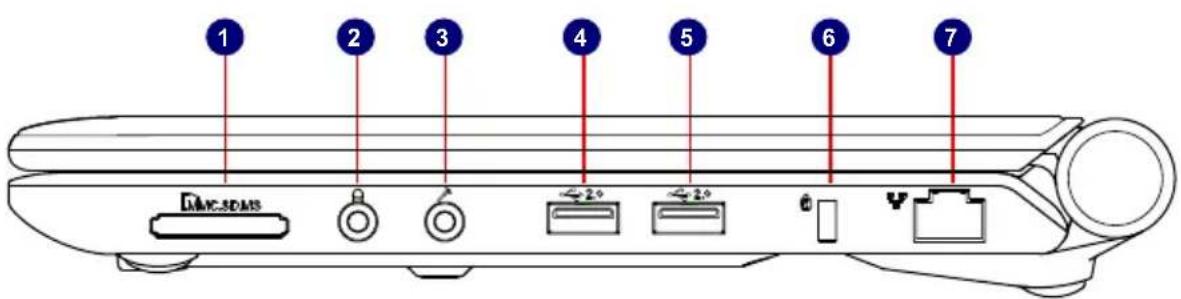
| No. | Item Description | |
| 1 | Memory Card Slot Supports MMC/SD/MS memory cards | |
| 2 | Headphone Connects to external headphone | |
| 3 | Microphone Connects to external microphone | |
| 4 | USB Port Connects to USB 2.0 device | |
| 5 | USB Port Connects to USB 2.0 device | |
| 6 | Anti-Theft Lock Slot Attach a Kensington security system or a compatible lock to secure your Notebook | |
| 7 | Network Port Standard RJ-45 network port |
1-3 Setting Up Your Computer
1. Installing/Removing the Battery
Please install the battery before using the Notebook and connect the external power supply transformer. The Notebook can be powered by the battery or the external transformer. If you are in an office environment, we recommend using the external transformer as much as possible. If you are away from the office and no power socket is available, use the battery instead.
Installing the Battery

-
Turn the Notebook over and have the back of the battery facing upwards as well. Now push the end of the battery with the metal contacts into the Notebook's battery slot evenly and slowly along the battery rails.
-
Push the end of the Notebook battery with the metal contacts completely into the battery slot. When there is a "click", this means the battery latch has engaged and the battery is now secured to the Notebook.
-
Push the Battery Lock inwards lightly to lock the battery in place.
natural_image
Line drawing of a laptop chassis showing internal components and exterior casing (no text or symbols)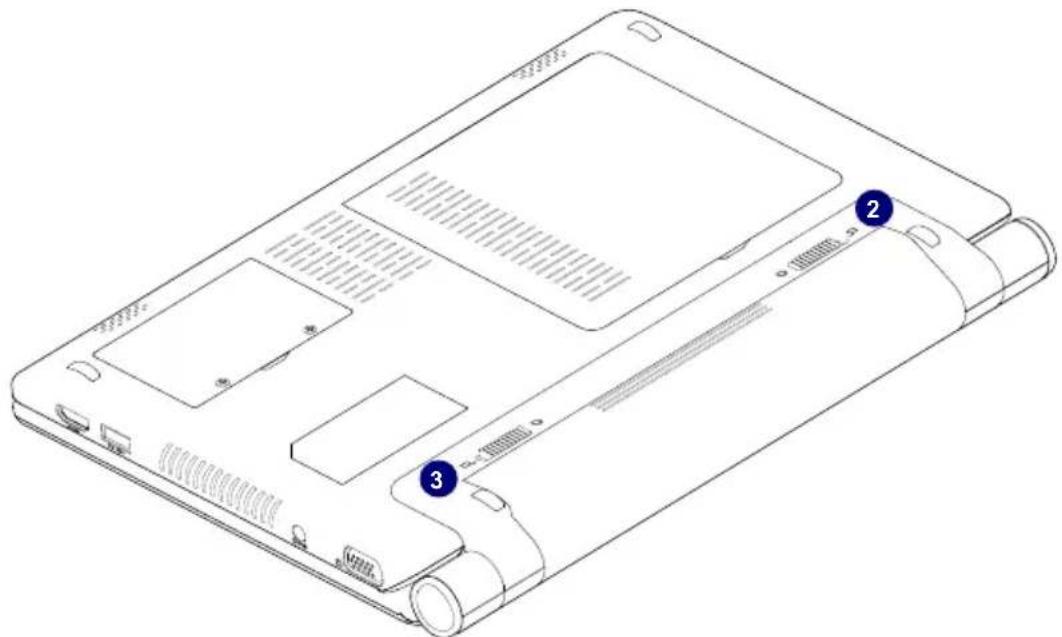
Removing the Battery
- Shut down the Notebook. Disconnect all cables and devices.
- Turn the Notebook over and unlock the battery by pushing the Battery Lock outwards.
- Push the Battery Latch outwards and hold it in place with your finger. Now use the other hand to pull the battery out.
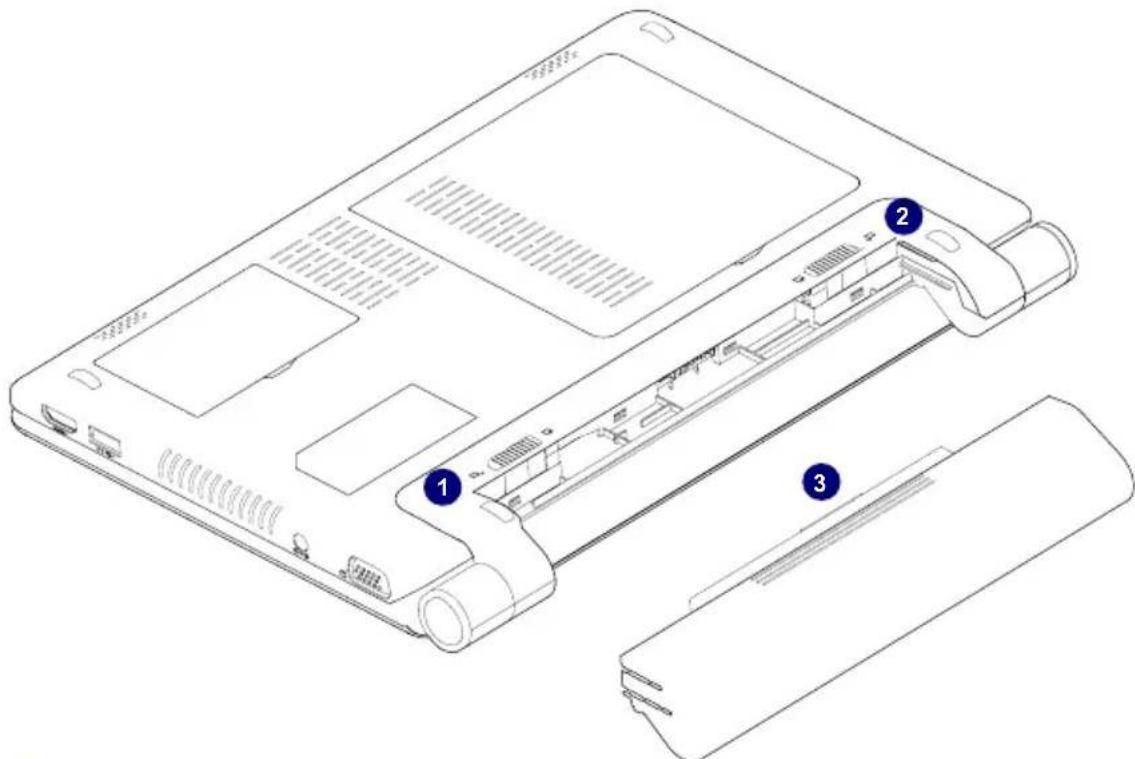

Do not remove the battery while the Notebook is still running. This may damage the data on the hard disk.

2. Connecting the Power Supply
The AC transformer provides external power source to your notebook and charges the battery pack at the same time. The AC transformer also has an auto-switching design that can connect to any 100V AC - 240V AC power outlets.
- Plug the power cord into the power socket of the AC transformer.
- Plug the connector of the AC transformer to the DC port of Notebook.
- Plug the other end of the power cord to a live power outlet.
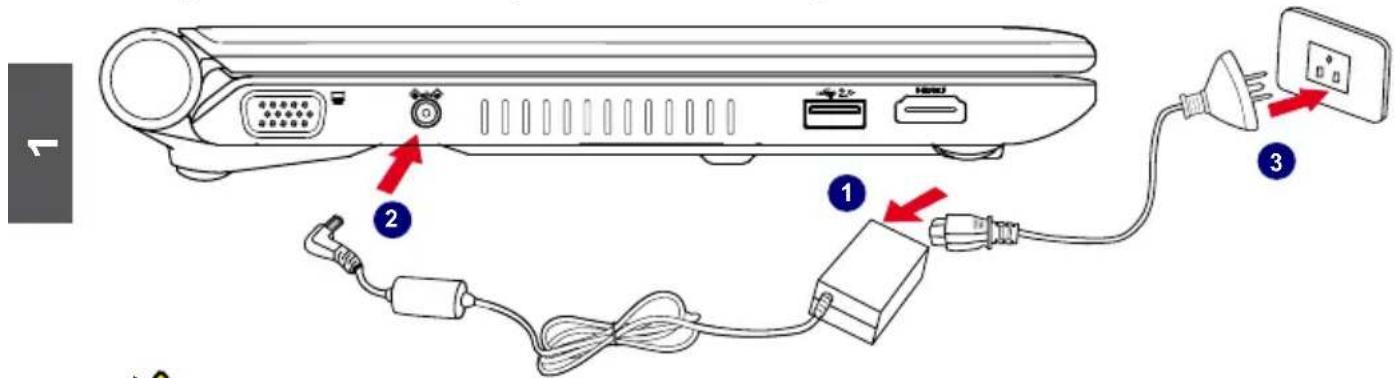

The connector of the power cord for the power outlet may vary depending on the local national standards. The appropriate connector will be bundled with your Notebook. Please always use the connector to connect the power outlet. The connector shown here may not match the type included in the box and is provided for reference only.
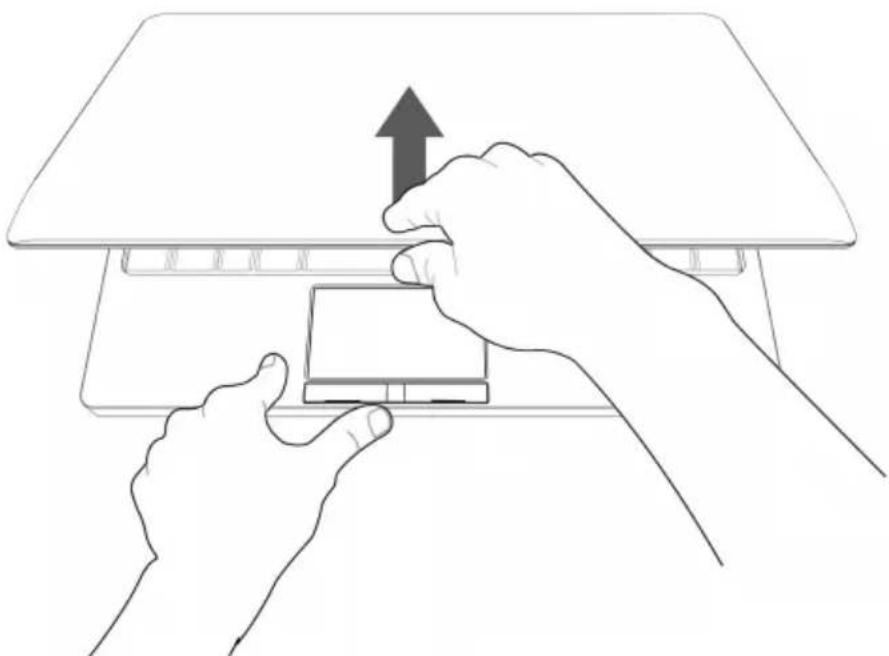
3. Startup
- Open the screen of your Notebook.
natural_image
Line drawing of two hands inserting a device into a device with an upward arrow (no text or symbols)- Turn on the machine by pressing the Power Button.

4. Emergency Shutdown
When the Notebook cannot be shut down through normal means, please press and hold the Power Button until the Notebook powers off.
1-4 Touchpad Usage
1. Introduction to the Touchpad
The touchpad is like a computer mouse. It senses the pressure from the user's finger and generates a voltage that is used to control the cursor's movements and issue commands.
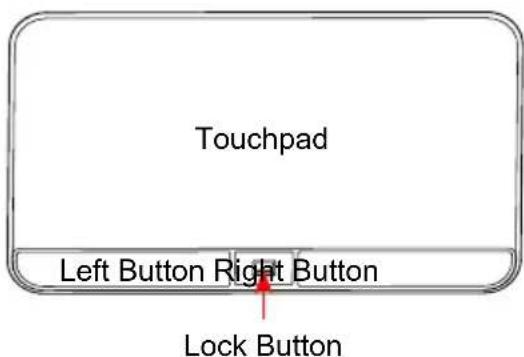
The touchpad senses finger movements. Simply move one finger across the touchpad to control the movement of the cursor on screen. Below the touchpad is three buttons. The left button is like the left mouse button and is used for selecting options or launching programs on screen. The right button works the same way as the right mouse button. The lock button is to lock or unlock the touchpad.
2. Single Tap/ Single Click
To select a window function or press a button icon, move your finger across the touchpad to move the cursor to the window or button to select. Now tap the touchpad with your finger to perform the action. This action is equivalent to pressing the left mouse button. You can also press the left touchpad button for the same effect.
3. Double Tap/ Double Click
To open a file or document, move your finger across the touchpad to move the cursor to the file you wish to open. Now quickly tap the touchpad twice with your finger to perform the action. This action is equivalent to pressing the left mouse button twice. You can also press the left touchpad button twice for the same effect.
4. Drag
Move your finger across the touchpad to move the cursor to the object you wish to drag. Now hold down the left touchpad button with one hand and move the cursor to the desired location. Release the button and complete the drag operation. You can also double tap the object you wish to drag and keep the finger on the touchpad after the second tap to perform the drag operation with one hand.
5. Multi-finger Gesture Input
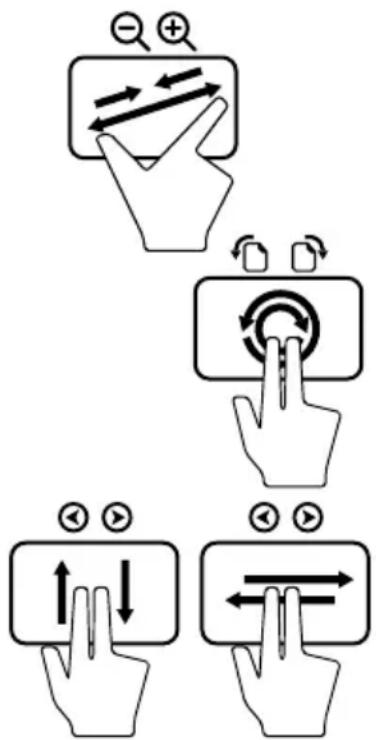
| Finger gesture | Applications |
| Two-finger zooming in/out Adobe Reader | Windows Photo Viewer |
| Two-finger rotating Adobe Reader, Windows Photo Viewer | Photo Viewer |
| Two-finger scrolling up/down or left/right Adobe Reader, MS Word, MS Excel | |
- Two-finger zooming in/out:
Moving two fingertips apart or together on the touchpad to zoom in or zoom out. This is convenient when viewing photos or reading documents.
- Two-finger rotating:
Making two fingertips open slightly to draw a concentric circle on the touchpad to rotate the photo or the document you are viewing. You can make a clockwise or counterclockwise rotation based on your needs.
- Two-finger scrolling up/down or left/right:
Making two fingertips open slightly to slide up/down or left/right on the touchpad to scroll a window up/down or left/right.
flowchart
graph TD
    A["Hand with left-hand icon"] --> B["Arrow to right-hand icon"]
    B --> C["Arrow to left-hand icon"]
    C --> D["Arrow to right-hand icon"]
    D --> E["Arrow to left-hand icon"]
    E --> F["Arrow to right-hand icon"]
    F --> G["Arrow to left-hand icon"]
    G --> H["Arrow to right-hand icon"]
1-5 Special Function Keys
The following defines some special function keys on the Notebook.
| Function Keys Description | |
| Fn + F1 Enter sleeping | mode |
| Fn + F2 Switches to the external display | |
| Fn + F3 Audio on or off | |
| Fn + F4 Decrease audio volume | |
| Fn + F5 Increase audio volume | |
| Fn + F6 Decrease the display brightness | |
| Fn + F7 Increase the display brightness | |
| Fn + F8 Web Camera on or off | |
| Fn + F9 Wireless LAN on or off | |
| Fn + F10 3G on or off | |
| Fn + F11 Bluetooth on or off | |
| Fn + Insert "Number Lock" on or off | |
| Fn + Delete "Scroll Lock" on or off | |

natural_image
Line drawing of a laptop computer with blank screen and keyboard (no text or symbols)Notebook
Install Windows 7 in Notebook
■ Setting BIOS and Install a new Windows 7 system
■ Install Drivers in Windows 7
Install Windows 7 in Notebook
Make sure you have these ready:
An USB DVD drive, a Notebook driver CD, Windows 7 Install CD
Before you continue :
■ Shut down your computer
■ Connect the USB DVD drive to an USB port of Notebook and connect the power cord to AC power
2-1 Setting BIOS and Install a new Windows 7 system
- Power on your Notebook, then press
to enter BIOS setup during POST, set "1st Boot Device" to "USB : SONY DVD-ROM D"(DVD drive name) in "Boot" -> "Boot Device Priority" menu, the figure is shown as below. And then save changes and exit BIOS.
| BIOS SETUP UTILITY | |
| Boot | |
| Boot Device Priority Specifies the boot sequence from the 1st Boot Device [USB : SONY DVD-ROM D] available devices. 2nd Boot Device [HDD : PO-WDC WD2500B] A device enclosed in parenthesis has been corresponding type menu. ↑↓←→: Move +/-: Change Option Enter:Select Esc :Exit F2/3 :Change color F9 : Optimal defaults F10 : Save and exit | available devices . disabled in the F1 :General help |
| v02.67 (C)Copyright 1985-2009, American Megatrends, Inc. | |
- Put the Windows 7 Install CD into the USB DVD drive.
- The computer will reboot, and it will start loading files for installing Windows 7 system.
- After that, it will start Windows and come out a "Install Windows" dialog box to set the "Language to install", "Time and current format" and "Keyboard or input method". Click "Next" to continue and click "Install now" button to start the setup.
- When the license terms appear, select to accept and click "Next" to continue.
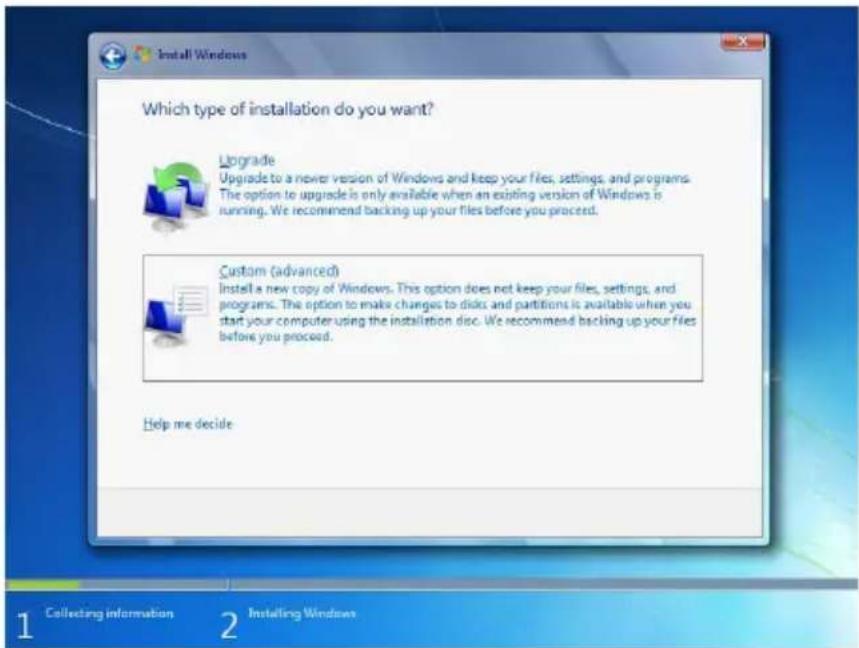
- It then asks you to select the installation type. Click "Custom (advanced)" to install a new copy of Windows.

- The setup will display the hard disk partitions (160GB, in this example) of your system. If there were other systems (such as Linux) installed previously, you need select them and click "Drive options (advanced)" -> "Delete" to delete them. When all partitions are clean, setup will display the biggest size of your hard drive.
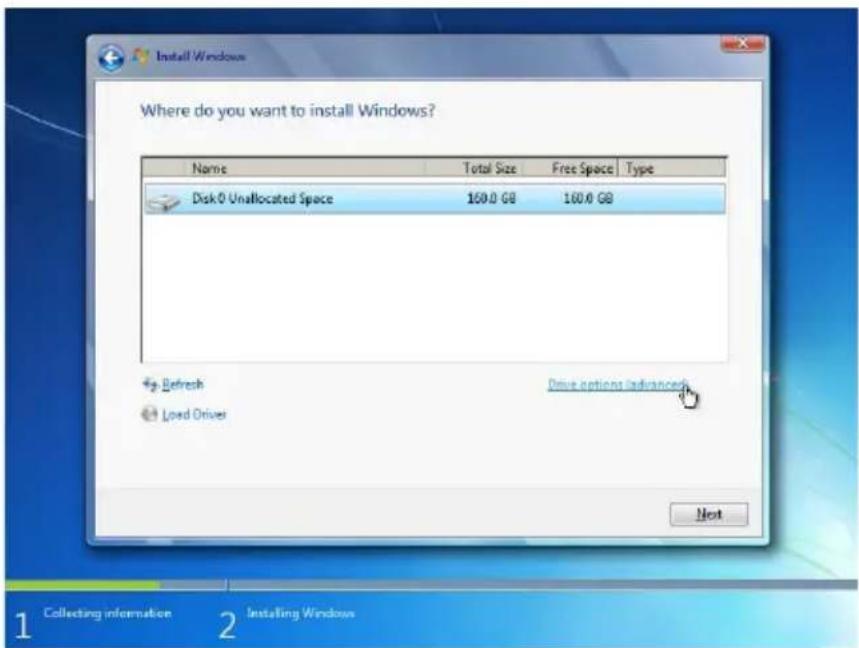
- In this biggest hard disk size screen, you can click "Drive options (advanced)" -> "New" to create partitions as you need. In this example, we are creating a 70GB partition to install Windows, and click "Apply" to continue.
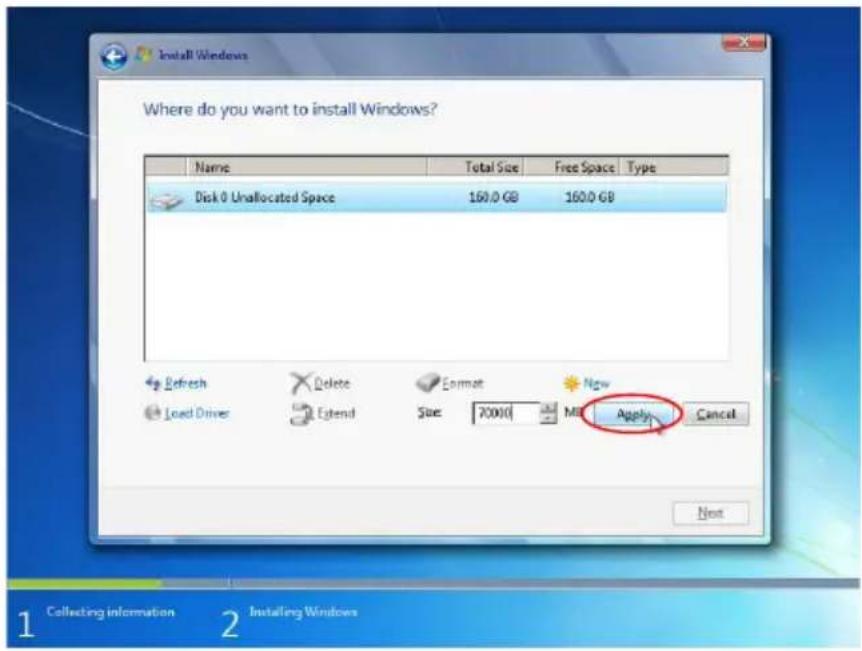
To ensure that all Windows features work correctly, Windows might create additional partitions for system files. So you will see a 100MB partition reserved by system after you create a partition. Select the 70GB partition and click "Next" to continue.

- From this step we start to install windows 7 into your hard disk. During the process, your computer will restart several times.
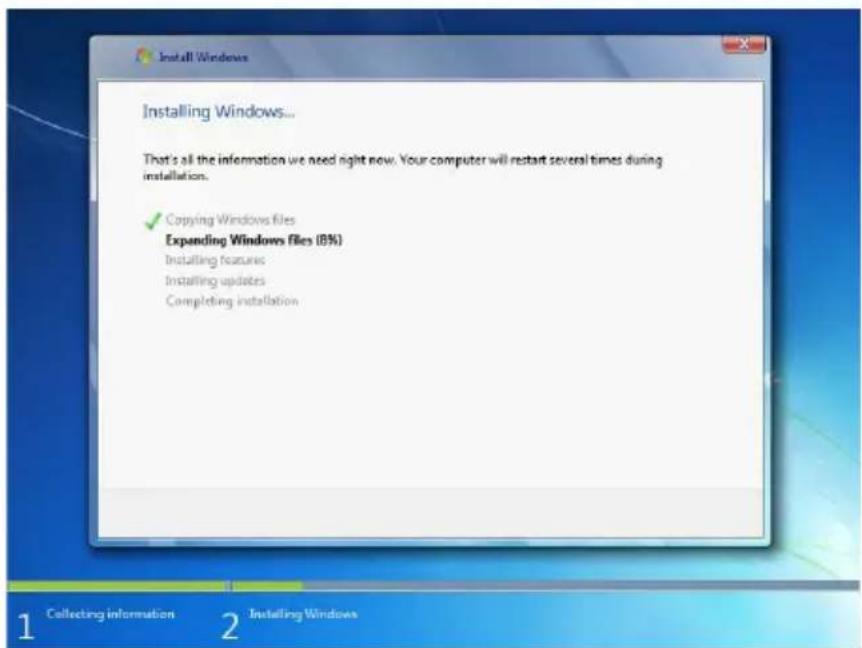

- When the installation is complete, setup will prepare your computer for the first use. Then you can follow steps to select system settings, create an account, set a password...etc, until the whole process is complete and enter Windows 7 system.
2-2 Install Drivers in Windows 7
- When the Windows 7 is completely installed, you have to install the necessary drivers before using the Notebook. Take out the Windows 7 Install CD from the USB DVD drive, and put the driver CD inside. Waiting for a few seconds, the main menu will be displayed on the screen.
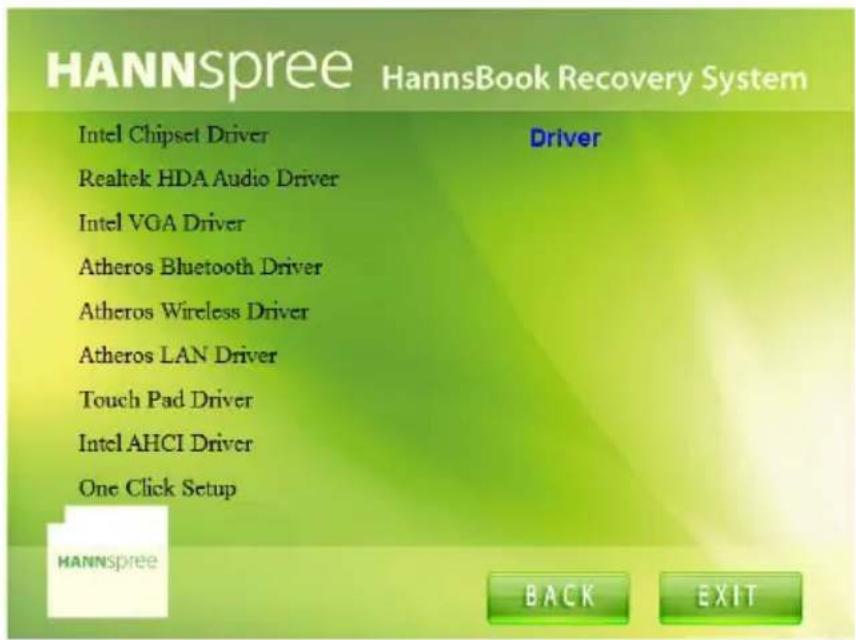
- Use these options to install all the drivers for your system. You must click "Intel Chipset Driver" to install it first. After that, you can click "One Click Setup" to install all the other drivers, or you can click on each individual driver to install it manually.
- After all the drivers are installed, you need to restart your Notebook, then you can start using it.
natural_image
Line drawing of a laptop computer with blank screen and keyboard (no text or symbols)Notebook
Recovery of Windows 7 System
Recovery of Windows 7 System
- Power on the computer, when the message "Press F3 to Rescue and Recovery" appears on the top of the screen, press "F3" to enter the recovery interface.
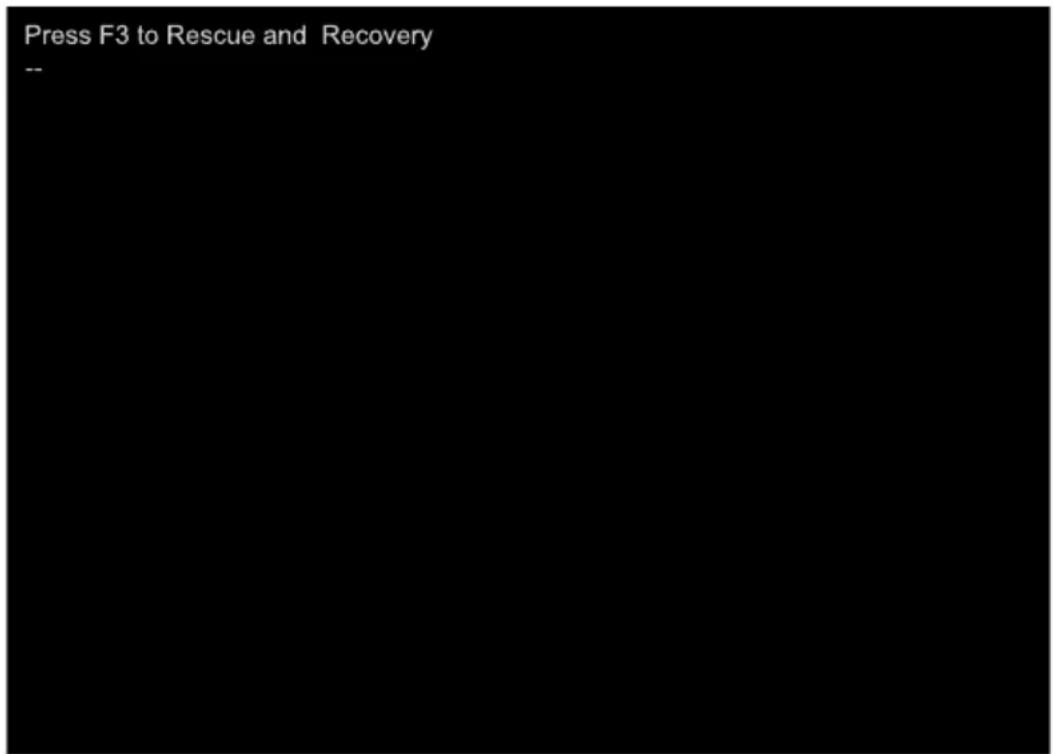
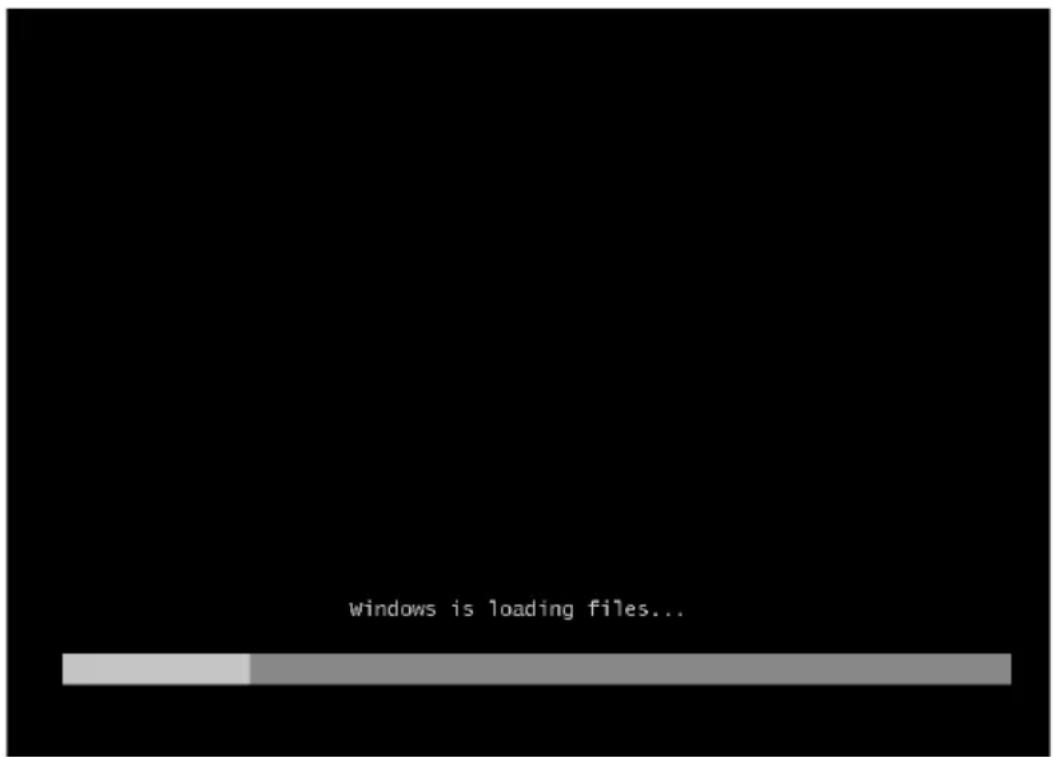
- System prepares for the recovery after pressing "F3" key.
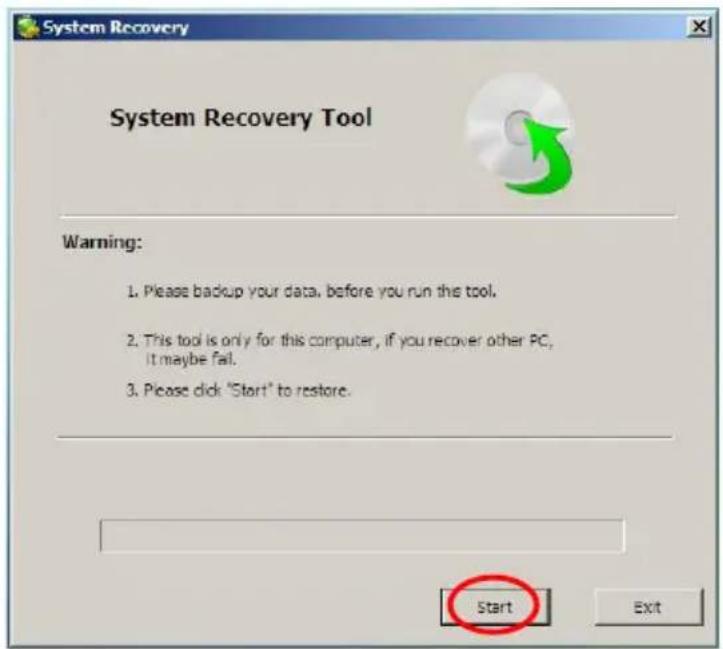
- Recovery begins after clicking "Start" in the following image.
- When the following image appears, click "OK" to continue.
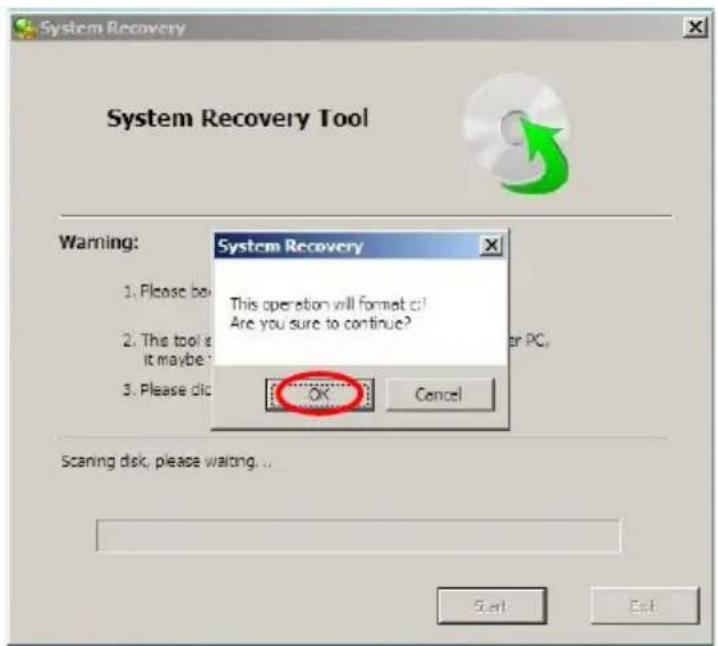
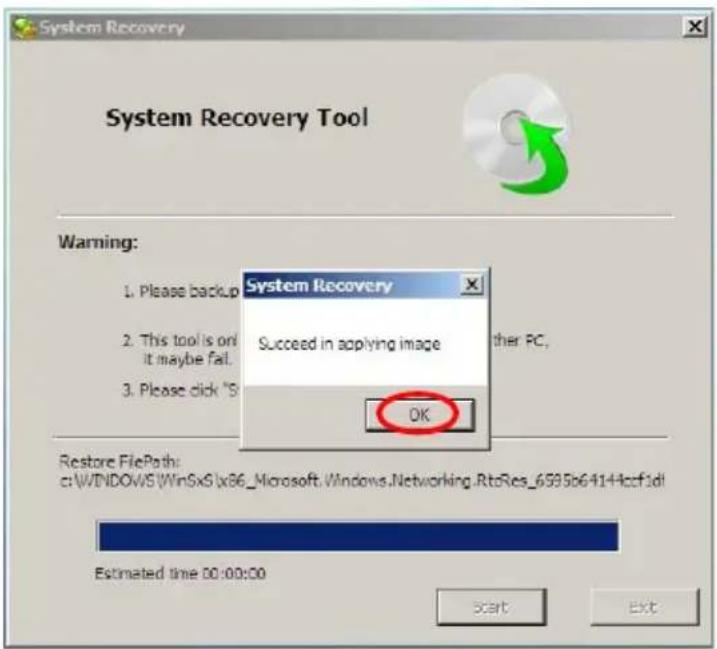
- Recovery is accomplished when the following image appears, click "OK" to finish it.
- Now, click "Restart" to reboot the system.
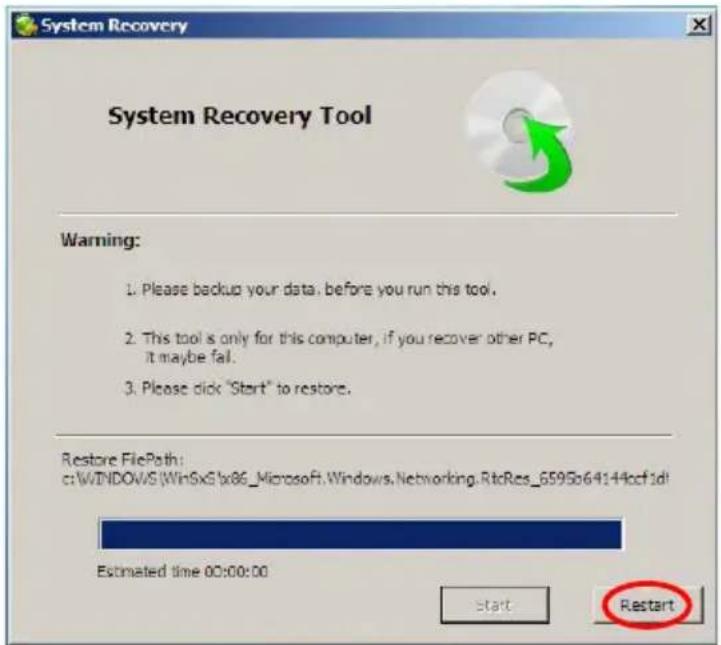
natural_image
Line drawing of a laptop computer with blank screen and keyboard (no text or symbols)Notebook
Introduction to the Linux System
■ Overview
■ Recovery of Linux system
4-1 Overview
After turning on the Notebook, when you log in Linux system, the following screen will appear:
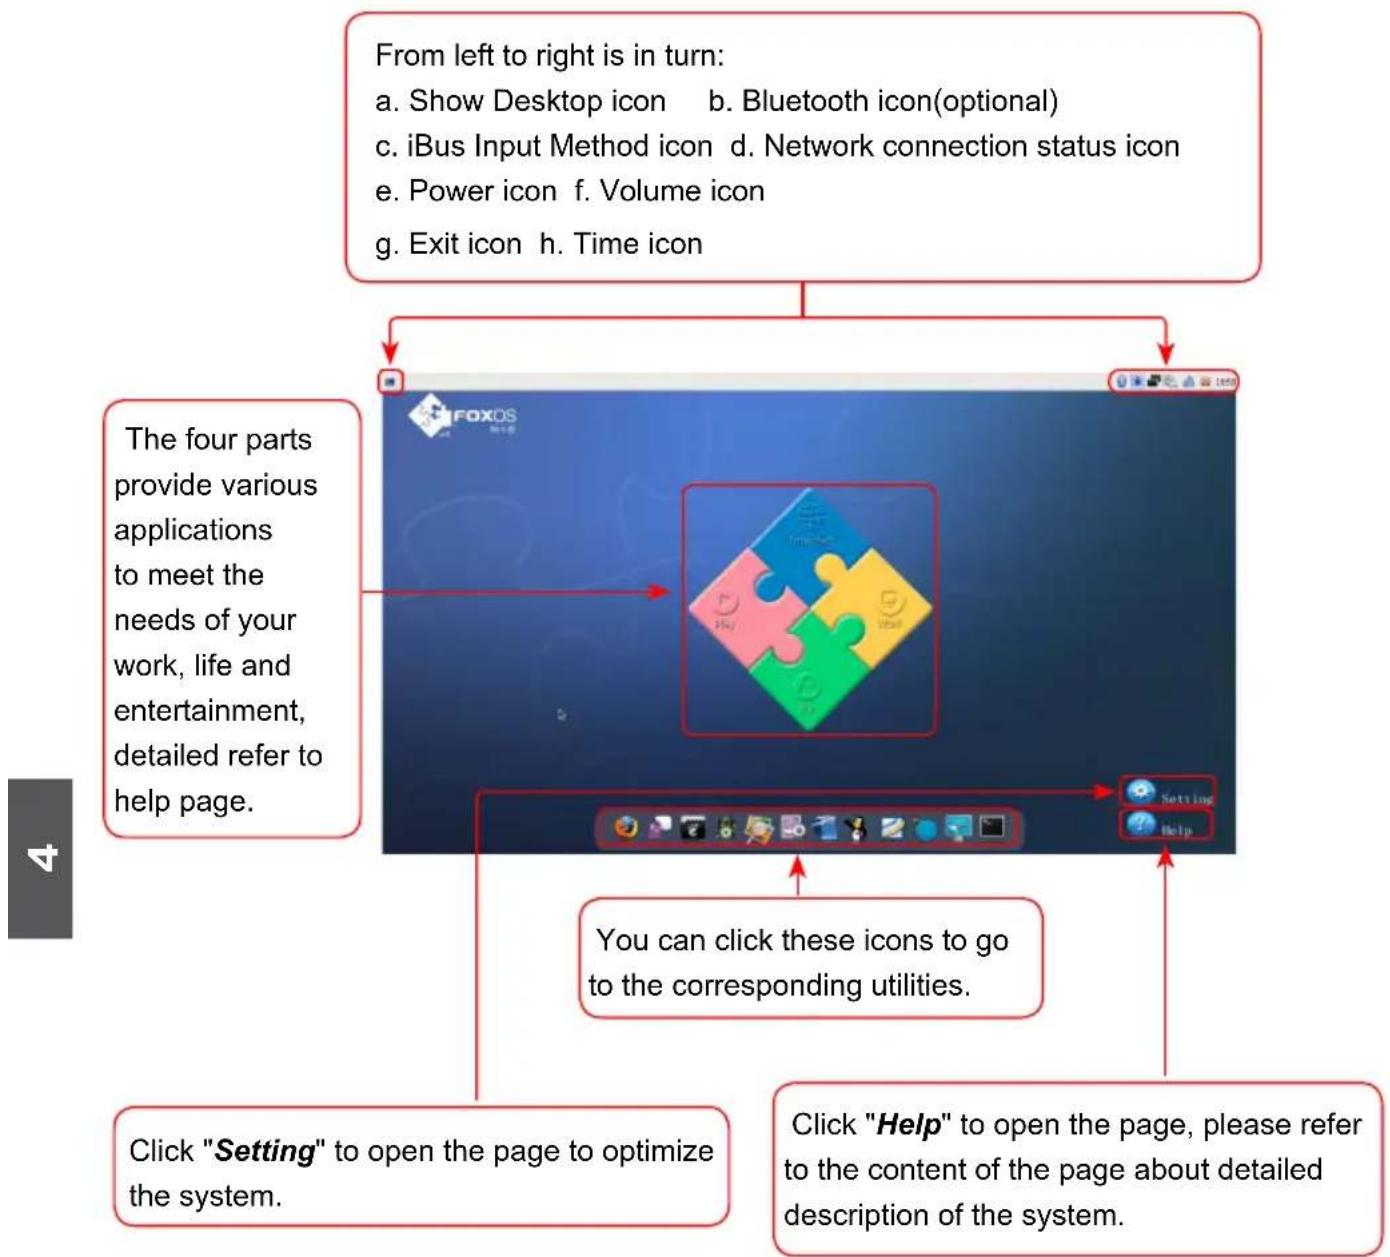
flowchart
graph TD
    A["From left to right is in turn: a. Show Desktop icon b. Bluetooth icon(optional) c. iBus Input Method icon d. Network connection status icon e. Power icon f. Volume icon g. Exit icon h. Time icon"] --> B["FOXOS"]
    B --> C["Setting Help"]
    C --> D["You can click these icons to go to the corresponding utilities."]
    D --> E["Click "Setting" to open the page to optimize the system."]
    E --> F["Click "Help" to open the page, please refer to the content of the page about detailed description of the system."]
4-2 Recovery of Linux system
● From DVD to recover system
1 Boot from DVD
Power on the computer, insert the system Installation DVD into the DVD drive, press "F11" to select booting system from the DVD drive.
2 Select the way of Installation
When the figure as below shows, select "Install and make recovery partition", the system will be installed and a recovery partition will be made. Or select "Install system only", the system will be installed without recovery partition, so recover system from hard disk is impossible.

3 Click "Next", the warning box is shown as below:
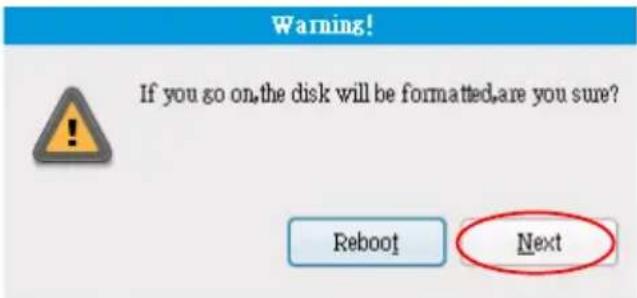
4 Installing system
Click "Next" to format hard disk and install system. The figure is shown as below:
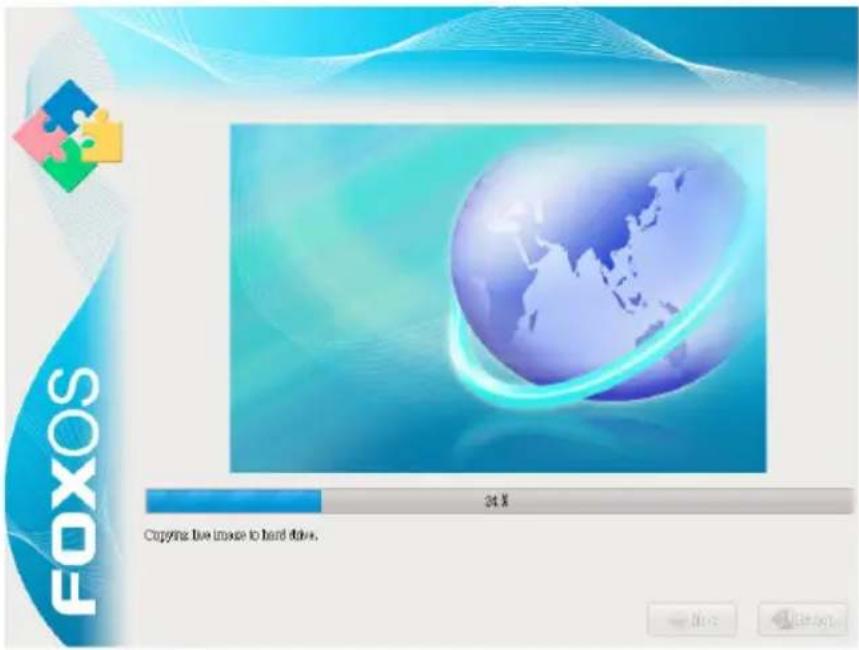
5 After installing, click "Reboot" to restart the system.
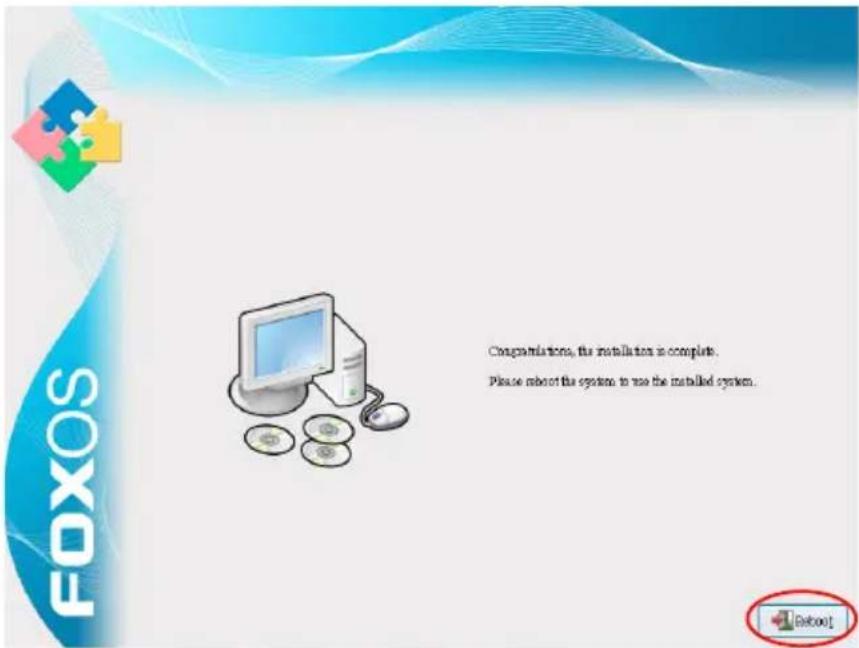
- From hard disk to recover system
1 When you log in, according to the screen suggestion, press any key to enter Grub interface, the figure is shown as below:
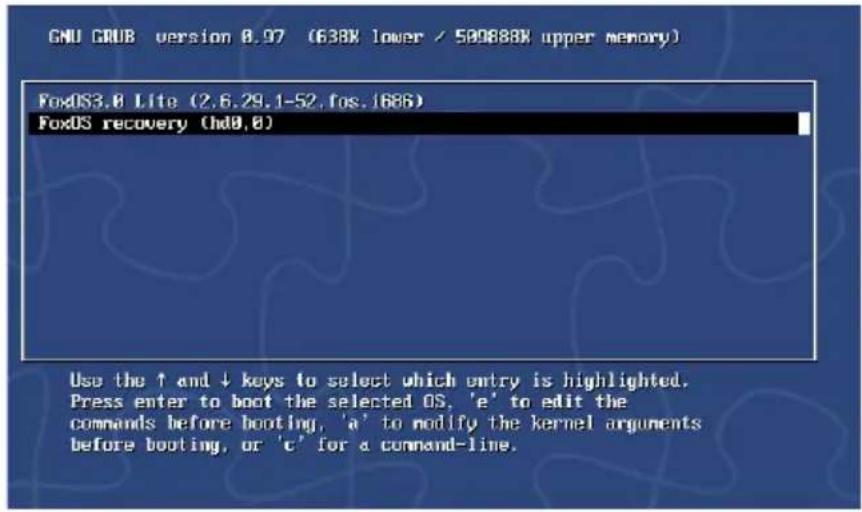
2 Select "FoxOS recovery" item and then press "Enter", the warning box is shown below:
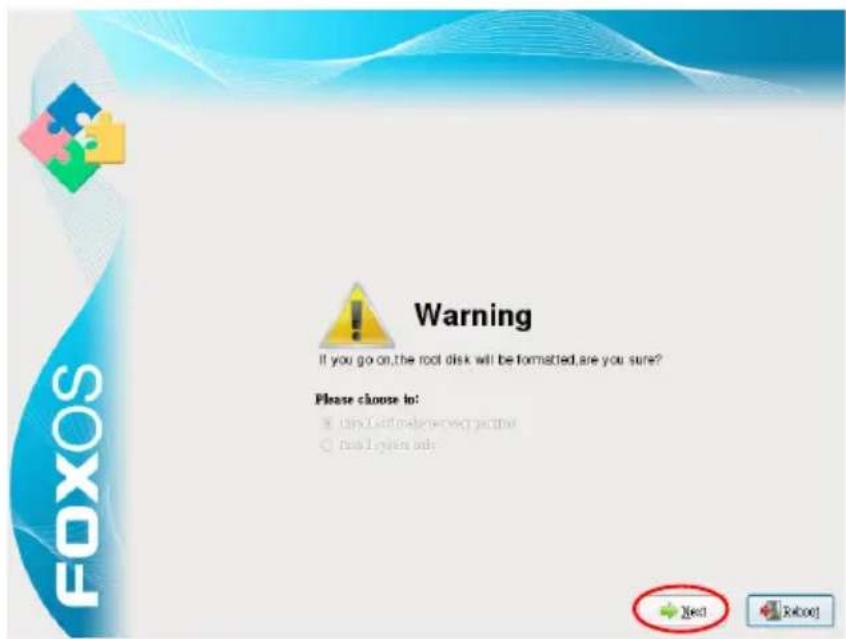

3 Select "Next", system warns the root partition(hd0, 0) will be formatted. The figure is shown as below:
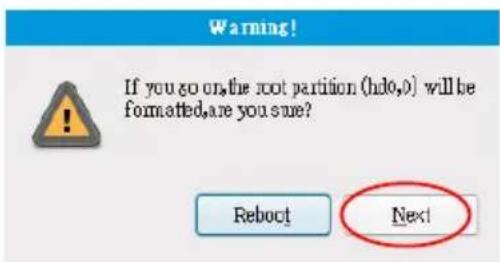
4 Click "Next" to format partition(hd0,0) and recover system from hard disk. The figure is shown as below:
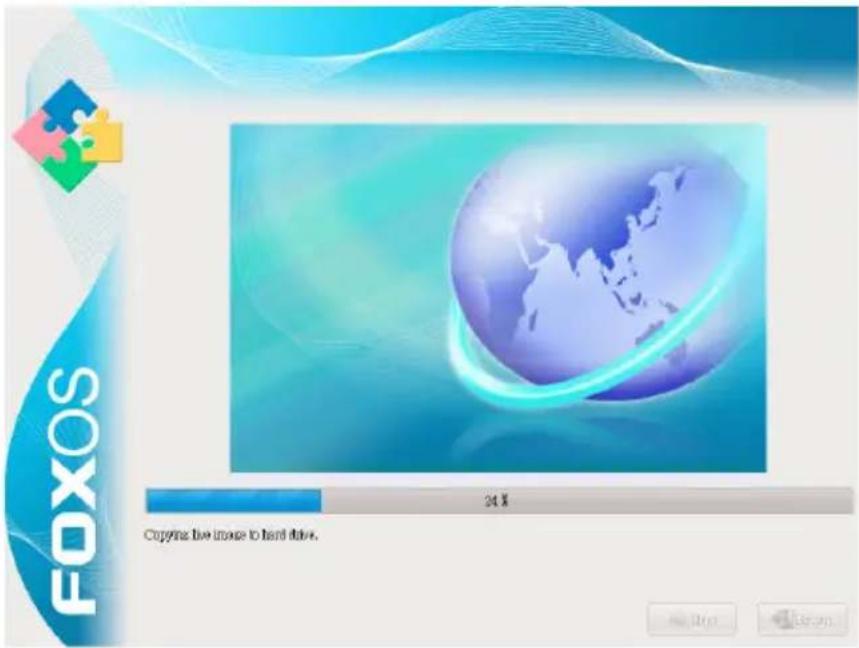
5 When the process is completed, please reboot the system. The figure is shown as below:

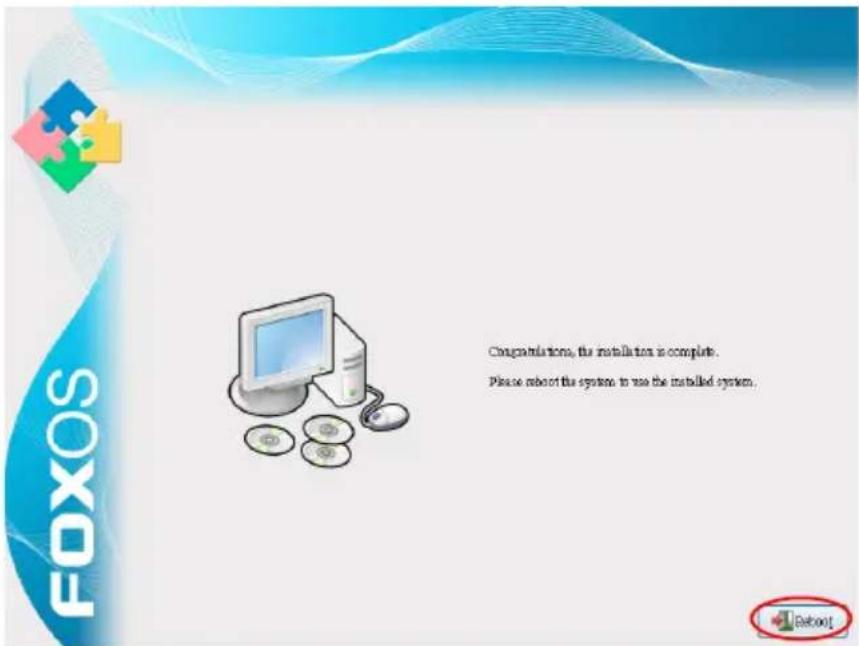
natural_image
Line drawing of a laptop computer with blank screen and keyboard (no text or symbols)Notebook
Appendix
■ Product Specification
■ Notebook FAQ
Product Specification
| CPU ● Intel CULV | CPU FSB 800MHz*: The CPU type depends on model you purchase, please refer to the physical product. |
| Chipset ● Intel GS | 45 + ICH9M |
| Memory ● 1 x DDR3 | SDRAM socketSODIMM,DDR3 1,066 1GBSODIMM,DDR3 1,066 2GB(Optional) |
| LCD ● LED backlight panel, 12" WXGA, resolution 1366 x 768 | |
| Storage ● SATA 2 | 5" HDD 5400rpm 160GSATA 2.5" HDD 5400rpm 250GB(Optional) |
| Battery ● Li-ion rechargeable battery3-cell, 2600mAh6-cell, 5200mAh (Optional) | |
| Audio ● Support amplifier and Mic.2.1 channel support2 high quality stereo speakers | |
| Card Reader ● 3-in-1 MS/SD/MMC | |
| LAN ● 10/100/1000 Mb/s with low power consumption | |
| Bluetooth(Optional) | Bluetooth 2.1+ EDR |
| WiFi ● IEEE 802.1 | 1 b/g/n, mini-PCI-e interface |
| 3G Module(WWAN)(Optional) | Mini-PCI-e interface, WCDMA or EV-DOSIM card slot is accessible in battery compartment |
| Webcam ● 1.3M pixel + digital mic | |
| Keyboard ● 86-key full-size keycap | |
| Touchpad ● Hidden Type touchpad with 2 buttonsSupport Multi-fingerWith lock button | |
| Speaker ● 2 x internal stereo speakers | |
| Microphone ● Internal microphone, Integrated with camera module | |
| AC Adapter ● 19V, 65W | |
| EC | ITE IT8502E |
| I/O Ports • 3 x US | B 2.0 portHDMI1 x VGA port1 x RJ-45 LAN port1 x Headphone port1 x Microphone In port1 x MS/SD/MMC card reader slot1 x DC-in port1 x Kensington lock port |
| LED Indicator • Power LED (Power button)Caps LockWireless LANBattery powerHDD | |
| BIOS • AMI | • Support PnP, ACPI 3.0 |
| O/S • Support Windows 7, Linux FoxOS | |
| Dimension • 298x215x25.3mm | |
| Weight • 1.38Kg with 3-cell battery | |
| SRS Premium Sound Brief | • SRS Premium Sound® offers the richest and most immersive audio experience in any listening environment using technologies from SRS Labs. SRS TruSurround HD® can offer a rich immersive experience and virtual surround sound for your music, movies, and games over only 2 speakers.SRS CS Headphone® uses SRS Circle Surround® decoding to deliver accurate virtual surround sound for movie and game content when users listen on headphones. |
Notebook FAQ
- A: Does the HDD shock-proof designed?
B: Yes, it does.
- A: Can I expand the RAM stick?
B: It depends on your products specification, if you get one with 1GB, you can expand it up to 4GB.
- A: Could the VGA share memory be adjusted in BIOS?
B: No, it could't.
- A: Could Windows Vista be installed properly?
B: Not Vista ready.
- A: How long the battery could be used after complete charge?
B: About 2-3 hours normally, according to Notebook loading.
- A: How about "Fn + Function keys"?
B: Please pay more attention to hot keys below, if some function fail, please examine them first:
Fn + F1: Enter sleep mode (Suspend to RAM)
Fn + F2: Switch to the external display
Fn + F3: Audio on/off
Fn + F9: Wireless LAN on/off
Please refer to the instruction of Special Function Keys in page 13 for details.
- A: What's the function of LED indicator on the top left corner?
B: From left to right is in turn:
The first indicator blinks when data is written to or read from the disk drive.
The second indicator means Wireless LAN on or off.
The third indicator means the keyboard is in Caps-lock mode.
The fourth indicator shows the status of the battery's power.
- A: Why does the touchpad fail to work?
B: You need to confirm whether the touchpad lock button is in lock mode.
- A: Why does the wireless LAN fail to work?
B: You need to confirm whether the wireless LAN function key is enabled or not.
Please refer to the instruction of Special Function Keys in page 13 for details.
- A: SD card reader is unable to work normally.
B: Please confirm whether the specification of SD card is 3-in-1 MS/SD/MMC and then the gold pins of SD card are placed down, or to insert it again.
- A: What is FoxOS?
B: FoxOS is the Linux operating system.
- A: How to recovery FoxOS without CD-ROM?
B: Recover system from hard disk.
- A: What to do when I forget the BIOS or Linux password?
B: Please contact with local sevice center to resolve the problem.
- A: How to get Windows 7 driver?
B: From DVD with your Notebook.
- A: How to view system configuration in Windows 7?
B: Please click "Computer" in desktop or use "CPU-Z" and other system tool softwares.
- A: The problem is that wireless LAN card does not distribute IP address.
B: Maybe it is relative to the configuration of Windows 7 optimize edition. Please use Windows 7 complete edition, and pay attention to the items of optimized configuration. No Windows 7 complete edition may cause abnormal operation of the system.
- A: After choosing the option of "safely removing the hardware" and taking out the using SD card in Windows 7, but why the SD card can not be detected while inserting it again?
B: It is normal. The card reader is designed for hot plug, you needn't to choose the option of "safely removing the hardware". The card reader can work normally only after rebooting the computer.

- Trademark:
- Version:
- Symbol Description:
- Safety Precautions
- Table of Contents
- Chapter 1 Introduction to Your Notebook
- Chapter 2 Install Windows 7 in Notebook
- Chapter 3 Recovery of Windows 7 System....19
- Chapter 4 Introduction to the Linux System
- Appendix
- Notebook
- Introduction to Your Notebook
- 1-1 Accessories
- 1-2 External Appearance
- Top View
- Rear View
- Bottom View
- Left View
- Right View
- 1-3 Setting Up Your Computer
- Installing/Removing the Battery
- Installing the Battery
- Removing the Battery
- Connecting the Power Supply
- Startup
- Emergency Shutdown
- 1-4 Touchpad Usage
- Introduction to the Touchpad
- Single Tap/ Single Click
- Double Tap/ Double Click
- Drag
- Multi-finger Gesture Input
- 1-5 Special Function Keys
- Install Windows 7 in Notebook
- Make sure you have these ready:
- Before you continue :
- 2-1 Setting BIOS and Install a new Windows 7 system
- 2-2 Install Drivers in Windows 7
- Recovery of Windows 7 System
- Introduction to the Linux System
- 4-1 Overview
- 4-2 Recovery of Linux system
- ● From DVD to recover system
- Boot from DVD
- Select the way of Installation
- Installing system
- - From hard disk to recover system
- Notebook FAQ
Brand : HANNSPREE
Model : HANNSbook SN12E23BUP212
Category : Laptop