
Express XL CPE300 - Multicooker Crock-Pot - Free user manual and instructions
Find the device manual for free Express XL CPE300 Crock-Pot in PDF.


| Product Type | Multicooker (Express Crock Multi-Cooker) |
| Model Number | CPE300 |
| Brand | Crock-Pot |
| Capacity | 7.6 L (8 quarts) |
| Cooking Functions | Manual Pressure, Meat/Stew, Beans/Chili, Poultry, Soup, Rice/Grains, Dessert, Steam, Slow Cook, Brown/Sear, Sauté, Boil, Simmer, Yogurt, Keep Warm, Delay Timer |
| Pressure Settings | High (6.5-10 PSI) and Low (3.3-6.5 PSI) |
| Temperature Settings | Adjustable Low/High for Slow Cook, Yogurt, Boil, Simmer, Sauté, Brown/Sear |
| Control Panel | Digital display with touch buttons: START/STOP, TIME (+/-), TEMP/PRESSURE, DELAY TIMER, function selection |
| Display | Shows cooking time, preheat status ("HEAt"), and notification codes (E1-E6, CLOSE LID) |
| Inner Pot | Non-stick coated aluminum, with MAX, 1/3, 1/2, 2/3 markings |
| Lid | Standard pressure lid with locking mechanism, silicone sealing gasket, and steam release valve; includes optional glass lid for non-pressure functions |
| Safety Features | Lid lock pin prevents opening under pressure; bobber valve indicates pressure; steam release valve with extended finger tab; pressure release valve; automatic safety sensors; RCD recommended |
| Accessories Included | Steaming rack, plastic spoon, condensation collector, glass lid |
| Power Supply | 220-240V ~ 50/60 Hz, 1200W (estimated) |
| Cord | Removable power cord for flexibility and storage |
| Cleaning and Care | Inner pot dishwasher safe; hand wash lid, gasket, and condensation collector; wipe heating base with damp cloth; do not immerse base |
| Gasket Maintenance | Silicone sealing gasket; remove for cleaning; replace every 1-2 years depending on use |
| Warranty | 12 months replacement or repair (Australia/NZ) |
| Material | Heating base: plastic/metal; inner pot: aluminum with non-stick coating |
| Usage | Household only; not for commercial use |
Frequently Asked Questions - Express XL CPE300 Crock-Pot
User questions about Express XL CPE300 Crock-Pot
0 question about this device. Answer the ones you know or ask your own.
Ask a new question about this device
Download the instructions for your Multicooker in PDF format for free! Find your manual Express XL CPE300 - Crock-Pot and take your electronic device back in hand. On this page are published all the documents necessary for the use of your device. Express XL CPE300 by Crock-Pot.
USER MANUAL Express XL CPE300 Crock-Pot
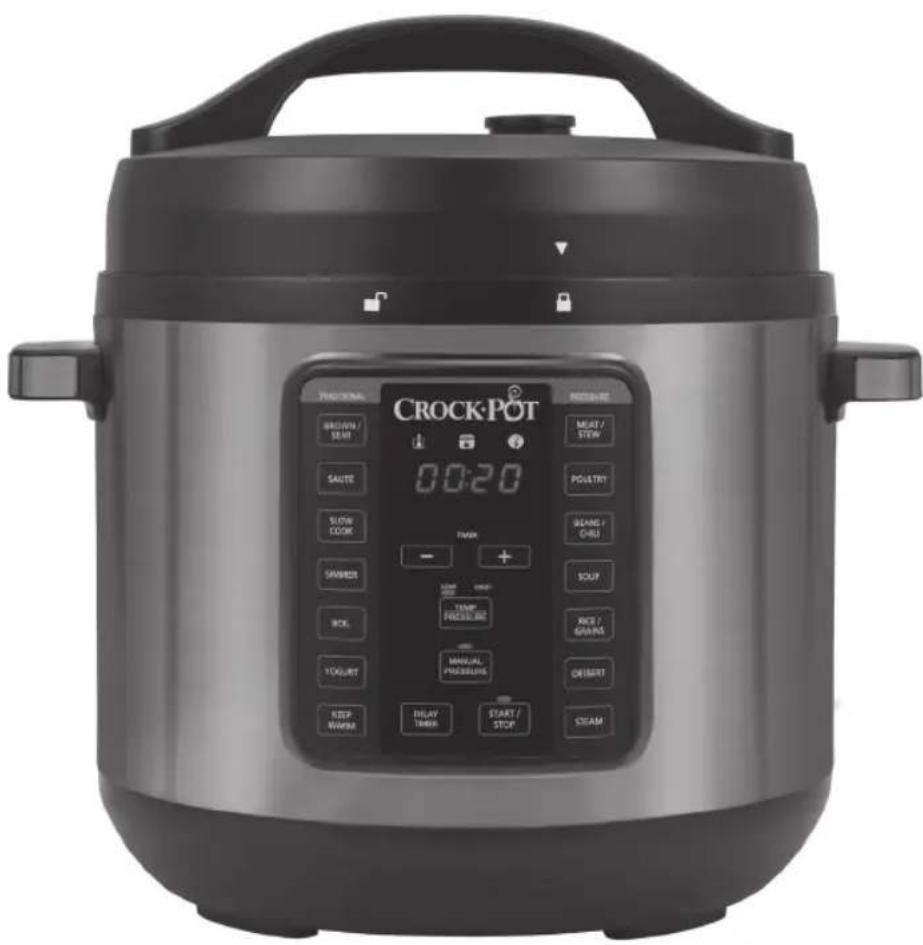
Express Crock XL Multi-Cooker
User Guide
CPE300


Contents
Crock-Pot's Safety Precautions 1 - 2
Features of your Express Crock 3 - 4
Things to know about your Express Crock 5 - 6
Using your Express Crock 7
Time Delay Function 8
Pressure Cooking 9 - 12
Slow Cooking 13
Cooking Guide 14
Steaming 15 - 16
Brown/Sear & Sauté 17
Rice/Grains 17 - 18
Boiling & Simmering 19
Care & Cleaning 20 - 22
Troubleshooting & Notification Codes 23-24
Hints & Tips 25
Important Instructions - retain for future use
Crock-Pot's Safety Precautions
SAFETY PRECAUTIONS FOR YOUR MULTI COOKER.
- Do not plug in or switch on the unit without having the cooking pan inside the unit.
- Do not operate the unit on an inclined surface
- Use your unit well away from walls and curtains, and don't use in confined spaces.
- Check the pressure and steam release valve before use, and if clogged clean as necessary.
- Do not operate the unit without food or liquid in the cooking pan. Never exceed the maximum markings on the inside of the cooking pan, or maximum and minimum quantities stated in the recipes provided. Some foods expand during cooking, and it may result in developing excess pressure.
- Place the unit so that the pressure and steam release valve is positioned away from the body.
- Ensure the lid is locked before use. Brown/Sear and Sauté functions do not require the lid to be used.
- Never use any lid except the lid provided with your Express Crock.
- Never place any part of the body including face, hands and arm over the Steam Release Valve. Steam can result in serious burns.
- Do not move or cover the unit whilst in operation
- Do not touch any metal surfaces of the unit while it is in use as they will be hot.
- After pressure cooking, do not open the lid until the internal pressure has been released. If the lid will not turn to unlock, this is because there is pressure inside the unit. Do not force the lid open.
-
This appliance is not intended for use by persons (including children) with reduced physical, sensory or mental capabilities, or lack of experience and knowledge, unless they have been given supervision or instruction concerning use of the appliance by a person responsible for their safety.
-
Children should be supervised to ensure that they do not play with the appliance.
- The temperature of accessible surfaces may be high when the appliance is operating.
- Do not immerse the base of the unit in water or any other liquid.
- To prevent damage to the unit do not use alkaline cleaning agents when cleaning, use a soft cloth and a mild detergent.
- Avoid spillage on the connector.
- The heating element surface is subject to residual heating after use.
- Misuse may potentially cause injury or physical damage to the user.
- This appliance can be used by children aged from 8 years and above if they have been given supervision or instruction concerning use of the appliance in a safe way and if they understand the hazards involved. Cleaning and user maintenance shall not be made by children unless they are older than 8 and supervised. Keep the appliance and its cord out of reach of children aged less than 8 years.
- Do not immerse the appliance in water or any other liquid unless recommended.
- Appliances are not intended to be operated by means of an external timer or separate remote control system.
- This appliance is intended to be used in household and similar applications such as: staff kitchen areas in shops, offices and other working environments; farm houses; by clients in hotels, motels and other residential type environments; bed and breakfast type environments.
Crock-Pot's Safety Precautions
Crock-Pot is very safety conscious when designing and manufacturing consumer products, but it is essential that the product user also exercise care when using an electrical appliance. Listed below are precautions which are essential for the safe use of an electrical appliance:
- Read carefully and save all the instructions provided with an appliance.
- Always turn the power off at the power outlet before you insert or remove a plug. Remove by grasping the plug - do not pull on the cord.
- Turn the power off and remove the plug when the appliance is not in use and before cleaning.
- Do not use your appliance with an extension cord unless this cord has been checked and tested by a qualified technician or service person.
- Always use your appliance from a power outlet of the voltage (A.C. only) marked on the appliance.
- Never leave an appliance unattended while in use.
- Do not use an appliance for any purpose other than its intended use.
- Do not place an appliance on or near a hot gas flame, electric element or on a heated oven.
- Do not place on top of any other appliance.
- Do not let the power cord of an appliance hang over the edge of a table or bench top or touch any hot surface.
-
Do not operate any electrical appliance with a damaged cord or after the appliance has been damaged in any manner. If damage is suspected, return the appliance to the nearest Sunbeam Appointed Service Centre for examination, repair or adjustment.
-
The appliance should be supplied through a residual current device (RCD) having a rated residual operating current not exceeding 30 mA.
- The supply cord should be regularly examined for signs of damage and the appliance is not to be used if the cord is damaged.
- Do not cook more than 4 cups of dried beans/legumes with 8 cups of water. Cooking with more beans or water may result in the build up of excess pressure. Leave for ten minutes after cooking before releasing the pressure valve.
- Be careful when lifting and removing lid after cooking. Always tilt the lid away from you as steam is hot and can result in serious burns. Never place face over the unit.
- The pressure cooker operates under pressure. Incorrect use may result in injury.
- Use handles and oven mitts to move the unit, the cooking pan and the lid when hot.
- Unplug the unit when not in use and before cleaning. Allow the unit to cool before putting on or taking off parts to clean.
- Certain foods are not suited for pressure cooking as they can foam, froth, splatter and clog the pressure and steam release valve. Noodles, macaroni, spaghetti, cranberry, apple sauce, rhubarb, split peas, pearl barley, oatmeal and other cereals should not be cooked with pressure cook mode.
- Do not use the cooking pan for food storage or place in the freezer.
- Do not operate the unit when placed directly onto a bench top. Place a heat proof mat or chopping board underneath to protect the surface.
If you have any concerns regarding the performance and use of your appliance, please visit www.crockpot.com or contact the Consumer Service Line.
Ensure the above safety precautions are understood.
Features of your Express Crock
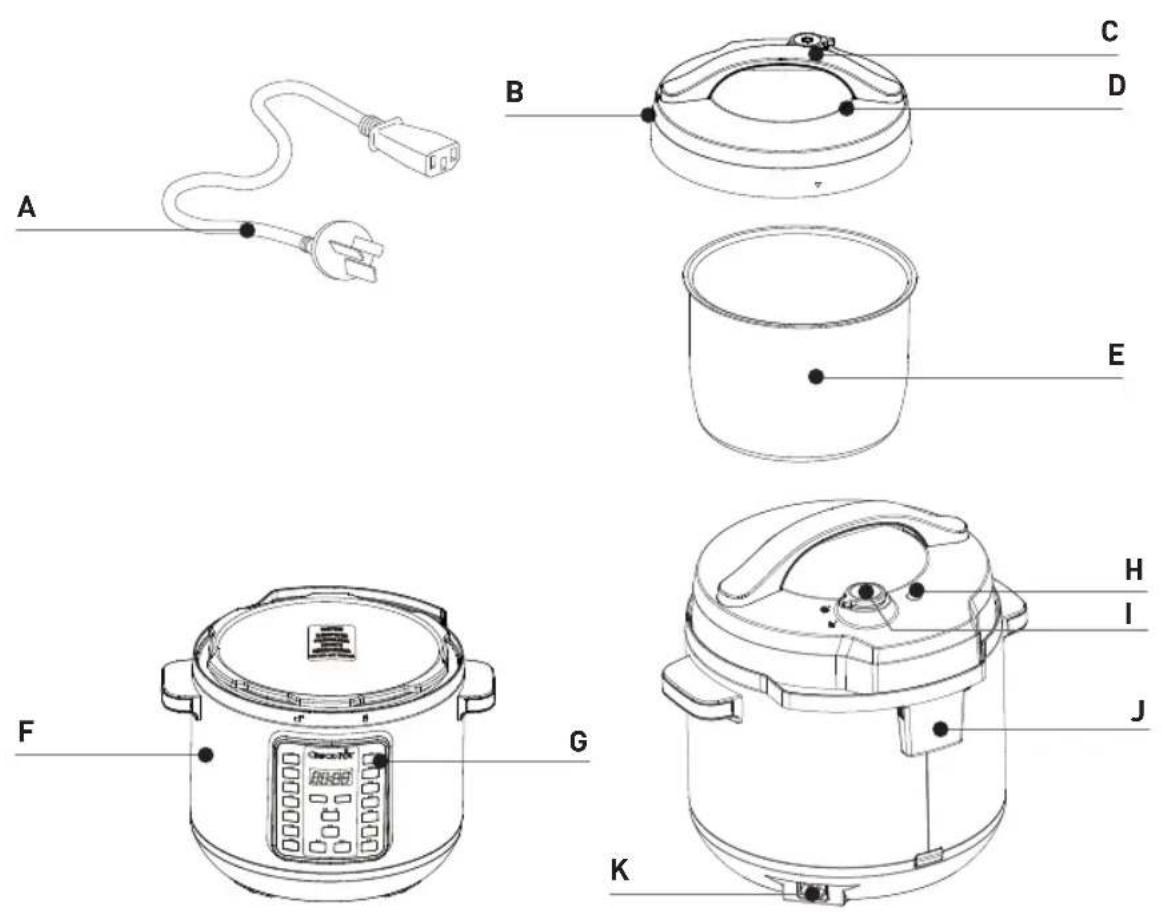
Control Panel Underside of Lid
3
Features of your Express Crock
A. Power Cord
Removable power cord for added flexibility and ease of storage.
B. Lid Lock Pin
Acts as safety feature to ensure lid is secured properly before pressure starts to build during cooking.
C. Lid Handle
Comfortable and easy to grip handle allows removal of the lid and convenient way to carry the Express Crock.
D. Lid
Locks securely to the Heating Base during cooking. Cannot be unlocked until all pressure inside the unit has been released. Not required when using Brown/Sear or Sauté modes.
E. Cooking Pot
7.6L capacity easy clean non-stick coated cooking pot with volume markings on the inside as a handy capacity indicator.
F. Heating Base
The Cooking Pot is placed into the Heating Base during cooking. Helps maintain an even temperature throughout cooking process.
G. Control Panel
Use these buttons to select a cooking mode or a 1-touch meal then adjust the time, pressure and temperature options to suit.
H. Bobber Valve
The Express Crock will naturally release pressure through this valve at the end of the cooking cycle.
I. Steam Release Valve
Use this valve to quickly release pressure at the end of the cooking cycle. The extended finger tab on the cover is designed to keep the hand away from the top of the valve. Always use a kitchen utensil to turn this valve.
J. Condensation Collector
Collects excess condensation during the cooking and cooling process. Easy to remove and empty.
K. Power Cord Port
Connect the Power Cord here to use your Express Crock.
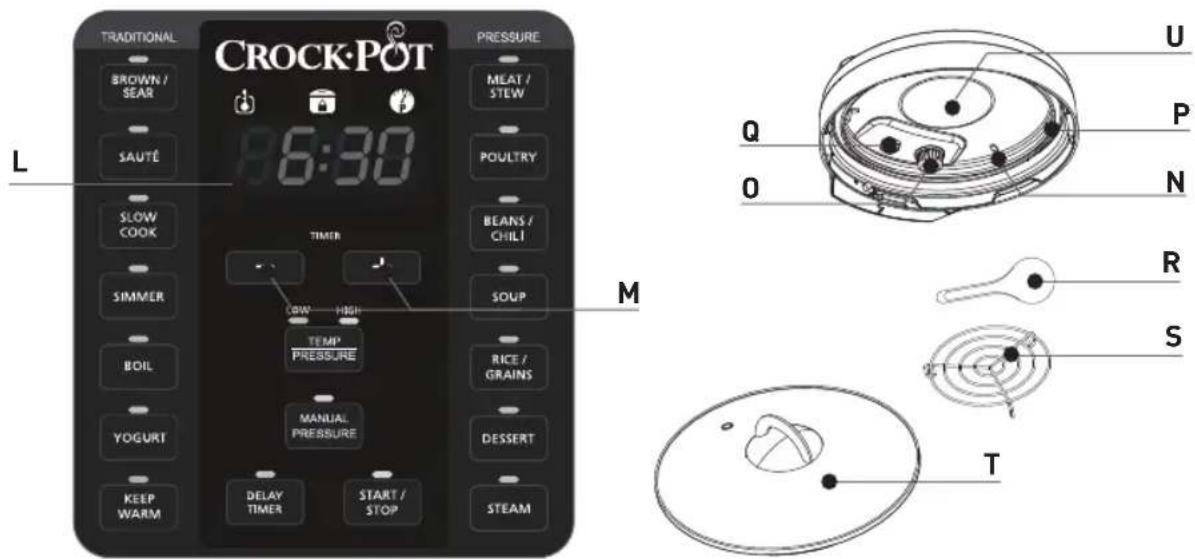
L. Display Screen
Shows the remaining cooking time.
M. Time Selection Buttons
Adjust the total cooking time or time delay using these buttons. Total time will be displayed on the Display Screen.
N. Gasket Fixing Ring
Holds the Sealing Gasket tightly in place during cooking.
0. Steam Release Valve Cover
Located on the underside of the lid to keep food in the Cooking Pot during quick pressure release through the Steam Release Valve. Ensure free from debris before cooking.
P. Sealing Gasket
Helps to create a tight seal between the Cooking Pot and Lid when building pressure. Always examine before each use for debris and deterioration.
Q. Bobber Valve
The Express Crock will naturally release pressure through this valve at the end of the cooking cycle.
R. Plastic Spoon
Use to serve cooked food from the Express Crock without damaging the Cooking Pot.
S. Steaming Rack
Use to elevate food off the bottom of the Cooking Pot during cooking. Used primarily for Dessert and Steam functions.
T. Glass Lid
Use as an alternative to standard lid (D) with non-pressure functions only.
U. Pressure Release Valve
It is a safety device. It will actuate when pressure reach preset limit.
Before First Use of the Express Crock
Step 1. Remove Packaging
Ensure all packaging has been removed.
Step 2. Position Machine
Place the Heating Base facing you on a dry, level surface.
Step 3. Wash Parts
Wash the Cooking Pot, Lids and Condensation Collector in warm water using a mild detergent. Dry each part thoroughly before use.
Step 4. Assembly
Insert the Power Cord into the Power Cord Port and insert the Cooking Pot into the Heating Base.
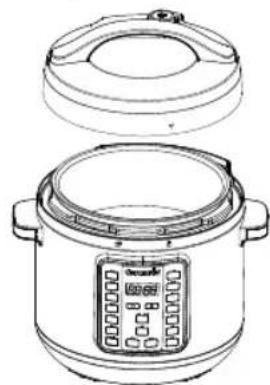
Step 5. Standard Lid Assembly
Place Lid upon Multi-Cooker and align ▼ with ■To lock, twist counterclockwise, aligning ▼with .■to unlock, twist Lid clockwise and align ▼with .■
Step 6: Sealing Gasket
Remove the Lid by turning clockwise to unlock, aligning with . Remove the Sealing Gasket from the Lid and wash the gasket and the Lid in warm soapy water. Dry the Sealing Gasket and Lid thoroughly before reattaching the Sealing Gasket to the Lid. Ensure the Sealing Gasket is smoothly and securely in place in the gasket holder. If the Sealing Gasket is not in the correct position the Lid will not be able to form a seal and will not be able to gain pressure.
Locked Lid
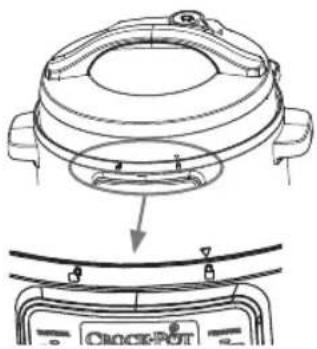
Unlocked Lid
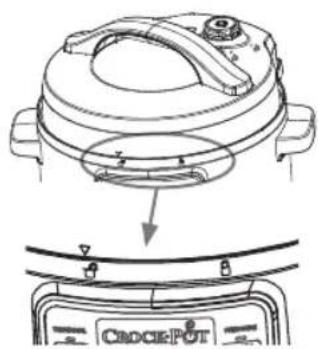
Open Lid
natural_image
Line drawing of a rice cooker with lid and side panel (no text or symbols)Things to know about your Express Crock
The Express Crock Multi-Cooker has been designed with safety in mind and has various safety measures.
- Pressure will not build if the Lid is not shut correctly and has not sealed.
- Ensure Lid is in the completely locked position and the ▼is aligned with 🔒
- Pressure will not build if the Steam Release Valve has not been switched to the Seal position.
• Over filling may cause a risk of clogging the vent pipe and developing excess pressure.
- The gasket and the valves can be removed for cleaning. (See page 21).
- Once the pressure increases, the Lid cannot be opened. Safety sensors ensure the pressure remains within the set range.
- The Steam Release Valve has an extended finger tab, designed to keep the hand away from the top of the valve. Always use a kitchen utensil when operating this tab. See RELEASING PRESSURE Instructions on page 11.
- The pressure cooking functions require liquid to work. If the inside of the Cooking Pot does not have enough liquid, an notification will appear in the Display Screen. See NOTIFICATION CODES chart on page 24.
- At the end of cooking, the Lid cannot be unlocked until all the pressure is released. This can be done using the Natural Pressure Release Method or Quick Pressure Release Method, explained on page 11.
- The Time Selection Buttons (+ and -) are used to set the cooking time. To advance slowly, simply press the + or - button and release. To advance quickly, press and hold the + or - button. If you have passed the desired time, simply press the opposite arrow button to return to the desired time.
Note: The timer can be selected for all programs and can be changed at any time during cooking by pressing START/STOP and selecting a new function.
- The TEMP/PRESSURE button is used to select desired cooking pressure (HIGH or LOW). Each pre-set cooking setting automatically selects the optimum pressure for that selection, but it can be manually selected with this button (see the Cooking Guide on page 14 for available adjustments).
- The TEMP/PRESSURE button is used to select desired temperature (HIGH or LOW). The temperature may only be adjusted on the SLOW COOK, YOGURT, BOIL, SIMMER, SAUTÉ and BROWN/SEAR functions (see the Cooking Guide on page 14 for available adjustments).
Note: Glass Lid can be used as an alternative to standard Lid for these non-pressure functions only.
- The START/STOP button starts and stops a cooking function. It must be pressed to change from one cooking function to another after cooking has begun.
- The Display Screen shows how much longer the food needs to cook from the selected time in hours and minutes once the Multi-Cooker is preheated. While the Multi-Cooker is preheating, the display screen will show, "HEAt".
Using your Express Crock
Note: The Multi-Cooker beeps as each button is pressed.
- Add desired ingredients to Cooking Pot. Place Lid on top of Multi-Cooker and align ▼ with ■ To lock, twist counterclockwise, aligning ▼ with .
- Plug provided Power Cord into the Power Cord Port of the Multi-Cooker.
- Plug other end of the Power Cord into a wall power outlet.
- Select the cooking function you would like to use.
- The START/STOP button and the time on the screen will flash.
- Select the desired cook time by using the + and - buttons. Select the desired temperature using the TEMP/PRESSURE button (if applicable).Select the desired pressure using the TEMP/PRESSURE button, if applicable. (Please refer to the Cooking Guide chart on page 14 for time and temperature recommendations.)
- Press the START/STOP button. For pressure cooking functions, the word "HEAt" will appear on the Display Screen during preheating time. Once the Multi-Cooker is preheated, the selected cooking time will appear on Display Screen.
Note: For Pressure Cooking functions, 13-15 minutes is the approx. average preheat time. If food content is larger or very cold, the time may be slightly longer.
- This Multi-Cooker allows you to delay the start of your cooking so that cooking finishes when you need it. See page 8 for instructions on the DELAY TIMER function.
- After the set cooking time has elapsed, the Multi-Cooker will beep again and will automatically switch to the KEEP WARM setting. The Display Screen will then change from the cook time to a new timer that will count up to 4:00 (4 hours) or until you press the START/STOP button. After 4 hours in the KEEP WARM setting, the Multi-Cooker will turn off.
- To end a cooking function at any time, press the START/STOP button.
- When finished, unplug the Multi-Cooker and wait for it to cool completely before attempting to clean.
CAUTION: The Cooking Pot and Heating Base will get very hot while using this Multi-Cooker. Do not touch hot surfaces. Always use pot holders or oven-mitts when using this Multi-Cooker. Always lift the Lid by tilting away from you to avoid the steam.
Time Delay Function
This Multi-Cooker allows you to delay the start of your cooking so that cooking finishes when you need it.
Note: The DELAY TIMER function is not available on the BROWN/SEAR, SAUTÉ, KEEP WARM, BOIL, SIMMER or YOGURT settings.
Note: Do not use the DELAY TIMER function when the recipe has perishable ingredients such as meat, fish, eggs, or dairy, as these may spoil.
- Adjust the Multi-Cooker settings using the instructions on pages 9-19.
- After setting the cooking time, press the DELAY TIMER button. The DELAY TIMER and START/STOP buttons will flash, and "0:30" will flash on the Display Screen, to indicate the Multi-Cooker is being programmed on the delay setting.
- Press the + and - buttons until you reach the number of hours and minutes you want the cooking process to be delayed (i.e., set the amount of time you wish to delay the cooking cycle). The maximum delay is 4 hours.
- Press START/STOP button to begin the delay feature. The timer and DELAY TIMER button will stop flashing, while the START/STOP button will continue flashing. This will indicate that the Multi-Cooker has been set on the DELAY TIMER setting. The Display Screen will countdown the delay time until 0:00 is reached. When 0:00 is reached, the DELAY TIMER light will turn off and the START/STOP light will stop flashing to show that time delay has finished. The word "HEAt" will appear on the display screen until the Multi-Cooker is fully pressurised. When the selected pressure has been reached, the timer will start counting down.
Example:
It's 4pm and you want to have a soup cooked and ready in 2 hours' time for dinner at 6pm. You want to set the machine now so you are free to do other things.
The pre-set function (if unchanged) will cook for 30 minutes at HIGH pressure. Time to gain pressure varies according to humidity and water temperature, but let's assume it takes 15 minutes to gain pressure. Therefore total time is 45 minutes. To have the soup ready by 6pm, you will need to delay the start of your cooking by approximately 1 hour and 15 minutes.
- Press SOUP
- The Display Screen will flash "0:30"
- Press the DELAY TIMER button and set for "1:15"
- Press START/STOP
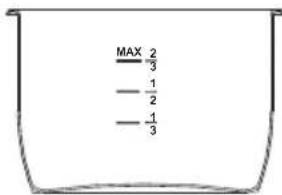
Cooking Pot Markings
Inside the removable Cooking Pot are markings to guide the fill level of the Cooking Pot. The word MAX indicates the maximum fill line.
The 1/3, 1/2, and 2/3 markings are handy guides to use in your recipes.
CAUTION: Never load the Cooking Pot above the maximum ingredient level line marked MAX on the inside of the Cooking Pot.
Foods that expand during cooking (e.g. rice) should never go above the 1/2 mark.
Note: The Multi-Cooker cannot pressure cook without liquid. Ensure a minimum of 250ml of liquid is used inside the removable Cooking Pot.
Pressure Cooking
Pressure cooking is an ideal way to create quick, flavourful meals. Pressure cooking is a method of cooking food in liquid (water, stock, wine, etc.) in a sealed Cooking Pot. The sealed Multi-Cooker retains steam and builds pressure, raising the temperature of the liquid inside the pot above boiling point. The increased temperature of the liquid and the steam results in reduced cooking times.
HIGH Pressure Setting is 6.5 - 10 PSI (45 - 70 kPa). It is suitable for a wide range of foods. LOW Pressure Setting is 3.3 - 6.5 PSI (23 - 45 kPa). It is more suited to delicate foods like chicken fillet, fish and some vegetables.
KEEP WARM Setting: When cooking time is completed, the Multi-Cooker automatically switches to the KEEP WARM setting to prevent overcooking and to keep your cooked food warm until serving - perfect for busy families, those on the run and those who need flexible meal times. This setting is not hot enough to cook and should only be used to keep warm, cooked food for serving.
Ideal Meals to Pressure Cook: Soups, stocks, casseroles, sauces (e.g. pasta sauces), meat, rice, firm vegetables (beetroot, potatoes) and desserts (e.g., pudding).
Capacity: Never fill the Cooking Pot above the MAX line. Foods that expand during cooking should never go above the 1/2 mark. The Multi-Cooker cannot pressure cook without liquid. Ensure a minimum of 250ml of liquid is used inside the removable Cooking Pot.
Note: There are 8 functions which use pressure to cook. These are Meat/Stew, Beans/Chili, Poultry, Soup, Rice/Grains, Dessert, Steam and Manual Pressure.
IMPORTANT: Do not cook more than 4 cups of dried beans/legumes with 8 cups of water. Cooking with more beans or water than this may result in the build up of excess pressure. Wait at least 10 minutes after cooking before releasing the pressure valve.
Using Pressure Cooking functions
Place the Multi-Cooker on a flat, level surface. Place Cooking Pot inside Heating Base. Plug the Multi-Cooker into a wall outlet. The Multi-Cooker will beep, and the Display Screen will illuminate with four dashes (- - - -).
- Place your food and liquid inside the removable Cooking Pot.
- Place the Lid onto the Multi-Cooker and align with .■to lock, rotate counterclockwise to the LOCKED position.
- Using the finger tab, rotate the Steam Release Valve to the "Seal" position.
- Select the desired cooking function
- Adjust the cooking time and pressure if necessary.
Note: See the Cooking Guide on page 14 to find the possible time and pressure adjustments.
- Once you have made the desired adjustments, if any, press START/STOP.
- The Multi-Cooker needs to gain pressure before pressure cooking can begin. When the Multi-Cooker is gaining pressure, "HEAt" will appear on the Display Screen and the time will not count down. The amount of time the Multi-Cooker takes to gain pressure varies according to humidity and water temperature, but average pressurisation time is 13-15 minutes. When pressure has been reached, "HEAt" will disappear on the Display Screen, and the time will begin to count down.
- After the set cooking time has elapsed, the Multi-Cooker will beep and will automatically switch to the KEEP WARM setting. The Display Screen will therefore change from the cook time to a new timer that will count up to 4:00 (4 hours) or until you press the START/STOP button. After 4 hours in the KEEP WARM setting, the Multi-Cooker will go into stand-by mode, and the Display Screen will illuminate with four dashes (----).
TIP:
- The pressure cooking settings are in the Cooking Guide table on page 14.
- If the lid is not shut correctly or if the Steam Release Valve is not in the "Seal" position, the Multi-Cooker cannot gain pressure and an Notification message will appear in the Display Screen. Ensure that the Sealing Gasket is placed evenly in the lid. See the Notification Codes chart on page 24.
- It is common for some steam to release through the Bobber Valve during the cooking cycle. This is part of normal operation of the unit.
Note: The Multi-Cooker cannot pressure cook without liquid. Ensure a minimum of 250ml of liquid is used inside the removable Cooking Pot.
Caution: During cooking, steam will build up in the Multi-Cooker, so when lifting the lid use an oven glove to protect your hands.
Note: Foam may naturally form when pressure cooking beans or legumes. Add a small amount of oil to the water before cooking to reduce this.
Releasing Pressure at the End of Cooking
Natural Pressure Release Method:
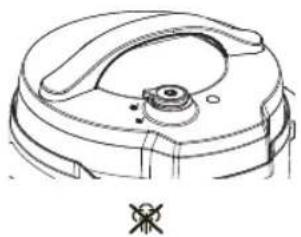
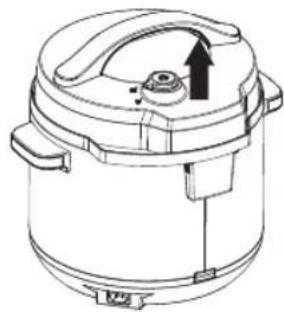
After cooking cycle is complete, let Multi-Cooker naturally release pressure through the Bobber Valve. Unit will gradually cool down on its own. Wait at least 10 minutes after cooking has completed. If using a higher volume of food and liquid, this can take up to 20 minutes. And then, using a kitchen utensil, gradually flick the tab on the Steam Release Valve to the "Release" position (see Figure 4). Do not place any part of your hand or body over the steam outlet on top of the valve, as steam is very hot and can scald skin. The pressure has been released when steam is no longer escaping from the valve and the Lid opens freely with minimal force. Only then is it safe to remove the Lid and serve food.
CAUTION: Never use the quick release method when cooking foods high in liquid content such as casseroles, beans, stews, stocks and soups.
Quick Pressure release method should be used with caution:
Using a kitchen utensil, gradually flick the tab on the Steam Release Valve to the "Release" setting (see Figure 4). Steam will release rapidly from the Steam Release Valve. Do not place any part of your hand or body over the steam outlet on the top of the valve, as steam is very hot and can scald skin. Do not use this method when cooking liquid ingredients such as casseroles, soups, stocks, beans and pulses. Never use this method when cooking rice, as rice tends to be very delicate. The pressure has been released when steam is no longer escaping from the valve and the Lid opens freely with minimal force. Only then is it safe to remove the Lid and serve food.
CAUTION: Do not force the Lid to open. If it does not open easily this means that the Multi-Cooker is still under pressure.
CAUTION: During cooking, steam will build up in the Multi-Cooker, so when lifting the Lid use a kitchen glove or mitt to protect your hand.
Pressure Release Valve Valve CLOSED ("Seal")
natural_image
Technical line drawing of a mechanical component with no visible text or symbolsValve OPEN ("Release")
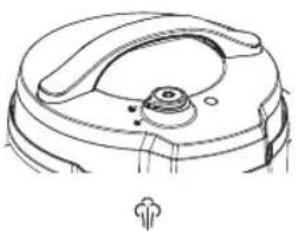
natural_image
Technical line drawing of a mechanical component with no visible text or symbolsFigure 4
Valve REMOVE
natural_image
Line drawing of a cooking pot with handle and outlet (no text or symbols)Bobber Valve
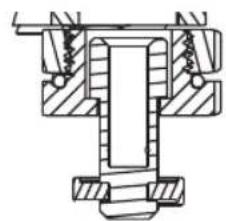
When Bobber Valve is in the "UP" position, DO NOT attempt to open the Lid, as the Multi-Cooker is still under pressure. When the Bobber Valve is in the "DOWN" position, the pressure has released. (See figure 5)
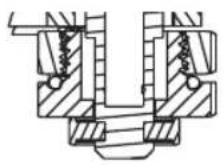
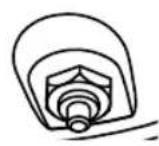
"UP" Position Pressurized
natural_image
Technical mechanical assembly diagram showing a bearing housing and mounting bracket (no text or labels)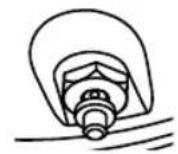
"DOWN" Position Not Pressurized
Figure 5
Using the Lid and Steam Release Valve
| FUNCTION PRESSURE COOK LID REQUIRED | STEAM RELEASE VALVE POSITION | ||
| MANUAL PRESSURE | Yes Yes Seal | ||
| MEAT/STEW | Yes Yes Seal | ||
| BEANS/CHILI | Yes Yes Seal | ||
| RICE/GRAINS | Yes Yes Seal | ||
| YOGURT | No Standard or Glass Release | ||
| POULTRY | Yes Yes Seal | ||
| DESSERT | Yes Yes Seal | ||
| SOUP | Yes Yes Seal | ||
| SLOW COOK | No Yes Release | ||
| STEAM | Yes Yes Seal | ||
| BROWN/SEAR | No Glass Lid optional Do not use Standard Lid | ||
| SAUTÉ | No Glass Lid optional Do not use Standard Lid | ||
| BOIL | No Glass Lid optional Do not use Standard Lid | ||
| SIMMER | No Glass Lid optional Do not use Standard Lid | ||
USING THE GLASS LID
The optional Glass Lid accessory can be used instead of the standard Express Crock Lid on all non-pressure cooking functions such as SLOW COOK, BROWN/SEAR, SAUTÉ, BOIL, SIMMER, YOGURT, and KEEP WARM.
Slow Cooking
LOW Setting: This is suitable for simmering and slow cooking. Recommended cooking times in LOW are from 6 to 8 hours.
HIGH Setting: This is for faster cooking. Recommended cooking times in HIGH are from 2 to 4 hours.
KEEP WARM Setting: When cooking time is completed, the Multi-Cooker automatically switches to the KEEP WARM setting to prevent overcooking and to keep your cooked
food warm until serving - perfect for busy families, those on the run and those who need flexible meal times. This setting is not hot enough to cook and should only be used to keep hot, cooked food warm for serving.
Note: When slow cooking, the ideal fill level for your ingredients is between the 1/2 and 2/3 marks. Never fill the Cooking Pot above the MAX line.
Using the SLOW COOK Function
The SLOW COOK function does not use pressure in the cooking process, but some pressure can build inside the unit during cooking. When using this function, ensure the Steam Release Valve is in the "Release" position. This function will cook similarly to standard slow cookers, using lower temperatures and longer cooking times to achieve tender, flavorful meals.
Place the Multi-Cooker on a flat, level surface.
Place Cooking Pot inside Heating Base. Plug the Multi-Cooker into a wall outlet. The Multi-Cooker will beep, and the Display Screen will illuminate with four dashes (- - - -).
- Place your food and liquid inside the removable Cooking Pot.
- Place the Lid onto the Multi-Cooker and align with .■o lock, rotate counterclockwise to the LOCKED position.
- Using the finger tab, rotate the Steam Release Valve to the "Release" position.
Note: Although this setting will not use pressure in the cooking process, some pressure can build inside the unit during cooking. This is why it's important to keep the Steam Release Valve in the "Release" position.
- Press the SLOW COOK button and adjust the time and temperature as needed.
Note: See the Cooking Guide on page 14 to find the possible time and temperature adjustments.
- Press START/STOP. The time will begin to count down.
- After the set cooking time has elapsed, the Multi-Cooker will beep and will automatically switch to the KEEP WARM setting. The Display Screen will therefore change from the cook time to a new timer that will count up to 4:00 (4 hours) or until you press the START/STOP button. After 4 hours in the KEEP WARM setting, the Multi-Cooker will turn off.
TIP: The SLOW COOK settings are in the Cooking Guide on page 13.
Caution: During slow cooking, steam may build up in the Multi-Cooker, so when lifting the Lid use a kitchen glove or mitt to protect your hand.
Cooking Guide
| Cooking Function | Default Setting | Pressure Adjustments | Temperature Adjustments | Cook Time Range |
| MANUAL PRESSURE | High Pressure / 30 minutes | Low-High N/A | A 1 minute - 4 hours | |
| SLOW COOK | High temp / 4 hours N/A | Low-High 30 minutes - 20 hours | ||
| STEAM | High pressure / 10 minutes | Low-High N/A | A 1 minute - 1 hour | |
| SAUTÉ | High temp / 30 minutes | N/A Low-High | 5 minutes - 30 minutes | |
| BROWN/SEAR | High temp / 30 minutes | N/A Low-High | 5 minutes - 30 minutes | |
| KEEP WARM | Warm temp / 4 hours N/A | Warm 30 minutes - 4 hours | ||
| MEAT/STEW | High pressure / 35 minutes | Low-High N/A | 15 minutes - 2 hours | |
| BEANS/CHILI | High pressure / 20 minutes | Low-High N/A | 1 minute - 4 hours | |
| RICE/GRAINS | Low pressure / 12 minutes | Low-High N/A | 3 minutes - 30 minutes | |
| YOGURT | Low temp / 8 hours N/A | Low-High | Low: 6 hours - 12 hoursHigh: N/A | |
| POULTRY | High pressure / 15 minutes | Low-High N/A | 15 minutes - 2 hours | |
| DESSERT | Low pressure / 10 minutes | Low-High N/A | 5 minutes - 2 hours | |
| SOUP | High pressure / 30 minutes | Low-High N/A | 5 minutes - 2 hours | |
| BOIL | Low temp / 15 minutes | N/A Low-High 5 minutes - 4 hours | ||
| SIMMER | Low temp / 15 minutes | N/A Low-High 5 minutes - 4 hours |
Steaming
The STEAM function is perfect for gently steaming fish and vegetables. It is pre-programmed to use the HIGH pressure cooking setting. When steaming, use the Steaming Rack.
Capacity:
When the Multi-Cooker is used with the STEAM function, the maximum capacity of liquid should be just under the rack wires, so that the liquid is not touching the food.
Note: The unit cannot pressure cook without liquid. Ensure a minimum of 250ml of liquid is used inside the removable Cooking Pot.
Using the STEAM Function
- Place the Multi-Cooker on a flat, level surface.
- Place Cooking Pot inside Heating Base. Plug the Multi-Cooker into a wall outlet. The Multi-Cooker will beep, and the Display Screen will illuminate with four dashes (- - - -).
- Add 250ml of water to the bottom of the removable Cooking Pot and insert the cooking rack. Ensure water is just under the wires of the rack so that food is not touching water.
- Place your food on the cooking rack.
- Place the Lid on and lock by rotating counterclockwise to the LOCKED 🔒 position.
- Using the finger tab, flick the Steam Release Valve to the "Seal" position.
- Press the STEAM button and adjust the time and pressure as needed.
Note: See the Cooking Guide on page 14 to find the possible time and pressure adjustments. -
Once you have made the desired adjustments, if any, press START/STOP.
-
The Multi-Cooker needs to gain pressure before pressure cooking can begin. When the Multi-Cooker is gaining pressure, "HEAt" will appear on the Display Screen and the time will not count down. When pressure has been reached, "HEAt" will disappear on the Display Screen, and the time will begin to count down.
- After the set cooking time has elapsed, the Multi-Cooker will beep and will automatically switch to the KEEP WARM setting. The Display Screen will therefore change from the cook time to a new timer that will count up to 4:00 (4 hours) or until you press the START/STOP button. After 4 hours in the KEEP WARM setting, the Multi-Cooker will turn off.
TIP: See the Steaming Chart on page 16.
CAUTION: During cooking, steam will build up in the Multi-Cooker, so when lifting the Lid use a kitchen glove or mitt to protect your hand.
Steaming Chart
| Food Amount | Amount of | water | Pre-prep Cooking | Time, minutes |
| Asparagus 250g 400ml | trim woody ends | 2 | ||
| Broccoli 300g 400ml | trim stalks 2 | |||
| Brussel Sprouts 400g | 400ml peel outer | eaves, leave | whole 4 | |
| Butternut Squash 1 w | hole,900g-1kg | 400ml cut | in half, remove seeds, slice into 6 | 7 |
| Carrots 500g 400ml s | liced into 1 cm rounds 5 | |||
| Carrots and Swede 600g | 400ml peel and | cut into similar | sized pieces | 6 |
| Cauliflower | 500g 400ml | cut into 5cm | florets 3 | |
| Corn on the Cob | 2 | 400ml | remove any outer leaves | 3 |
| Frozen Chunky Vegetables | 500g 400ml | cook from frozen | 3 | |
| Green cabbage | 1 whole | 400ml | cut into quarters | 4 |
| Leeks 500g 400ml trim | ends and cut into | 2 cm | rounds | 4 |
| New Potatoes | 750g 400ml | leave whole | 8 | |
| Sweet Potatoes 900g | 1kg 400ml | peel and cut | into large chunks 5 | |
| White potatoes, ideal for mash | 900g - 1kg | 400ml peel and cut into large chunks | 9 | |
| Basmati Rice | 400g (2 cups) | 600ml | rinse rice before use | 6 |
| Brown Rice | 400g (2 cups) | 400ml rinse rice before use 22 | ||
| Eggs | 6 | 400ml whole in shell | 7 | |
| Chicken fillet | 2-4 fillets | 400ml | season before cooking | 8 |
| Salmon | 2-4 fillets | 400ml | season before cooking | 3 |
Using the BROWN/SEAR and SAUTÉ Functions
The settings BROWN/SEAR and SAUTÉ do not cook under pressure. They works similarly to standard cooking, requiring dry heat, and therefore do not need the Lid.
Important: Do not use the Standard Lid with these functions.
Place the Multi-Cooker on a flat, level surface.
Place Cooking Pot inside Heating Base. Plug the Multi-Cooker into a wall outlet. The Multi-Cooker will beep, and the Display Screen will illuminate with four dashes (- - - -).
- Select the BROWN/SEAR or SAUTÉ function and adjust the time and temperature if necessary, using the + and - buttons.
- PressSTART/STOP.
- When the Multi-Cooker is pre-heating, "HEAt" will appear on the Display Screen. When the temperature has been reached, the timer will start counting down. Using plastic tongs, carefully add your food to the hot pot.
BROWN/SEAR
Designed to brown (sear) meat for casseroles and soups. Browning meat prior to pressure cooking and slow cooking not only gives your food great colour, but also seals in the juices and flavours and keeps the meat tender.
SAUTE
Sauté onions or mirepoix (mix of chopped onion, carrot and celery), amongst many other foods, often in pressure cooking and slow cooking recipes. Sautéing foods allows caramalisation which contributes to flavour and colour in the end dish.
Capacity:
When the Multi-Cooker is used to brown or sauté it may be best to cook in batches to ensure the food is evenly cooked.
Rice Cooking
When cooking rice, use the RICE/GRAINS function. This is suitable for all types of rice, including white and/or brown rice.
The RICE/GRAINS function cooks under pressure for faster cooking.
Capacity:
Since rice expands during cooking, do not fill Cooking Pot above the 1/2 mark when using the RICE/GRAINS function.
Using the RICE/GRAINS Function
Place the Multi-Cooker on a flat, level surface.
Place Cooking Pot inside Heating Base. Plug the Multi-Cooker into a wall outlet. The Multi-Cooker will beep, and the Display Screen will illuminate with four dashes (- - - -).
• Measure the desired quantity of rice.
Note: 1 cup uncooked white rice = 2 cups of cooked white rice (approximately). 1 cup uncooked brown rice = 2 cups cooked brown rice (approximately).
- Place the measured rice in a strainer and wash rice thoroughly under cold water. Wash until the water runs clear. This removes excess starch which helps to achieve fluffier rice, and prevents rice grains sticking to the Cooking Pot. Rinsing the rice reduces the build-up of starchy water and bubbles that sometimes form around the Valve Cover and Lid, which can cause spitting from the Steam Release Valve.
- Ensure the Cooking Pot is clean and dry before placing it inside the Heating Base.
- Place the washed rice in the Cooking Pot. Add the quantity of water needed for your recipe (Standard ratio -- 1 cup of uncooked rice : 1.5 cups of water). Ensure that a minimum of 250ml of liquid is placed inside the removable Cooking Pot.
- Place the Lid on and lock by rotating counterclockwise to the LOCKED 🔒 position.
- Using the finger tab, flick the Steam Release Valve to the "Seal" position.
- Press the RICE/GRAINS button and adjust the time and pressure as needed.
Note: See the Cooking Guide on page 14 to find the possible time and pressure adjustments.
- Once you have made the desired adjustments, if any, press START/STOP.
- The Multi-Cooker needs to gain pressure before pressure cooking can begin. When the Multi-Cooker is gaining pressure, "HEAt" will appear on the Display Screen and the time will not count down. When pressure has been reached, "HEAt" will disappear on the Display Screen, and the time will begin to count down.
- After the set cooking time has elapsed, the Multi-Cooker will beep and will automatically switch to the KEEP WARM setting. The Display Screen will therefore change from the cook time to a new timer that will count up to 4:00 (4 hours) or until you press the START/STOP button. After 4 hours in the KEEP WARM setting, the Multi-Cooker will turn off.
Note: Do not keep rice in the pot for extended periods of time on the KEEP WARM setting, as the rice will become dry and the quality will deteriorate. Use the supplied plastic spoon to stir and serve the rice. Do not use metal utensils, as these will scratch the non-stick coating.
Note: As rice grains can be delicate, at the end of cooking wait until the pressure releases naturally. Do not use the Quick Pressure Release Method (see page 11 for instructions on the Natural Pressure Release Method).
Note: Standard ratio for cooking rice -- 1 cup of uncooked rice : 1.5 cups of water.
Caution: During cooking, steam will build up in the Multi-Cooker, so when lifting the Lid use a kitchen glove or mitt to protect your hand.
Using the BOIL and SIMMER Functions
The BOIL and SIMMER settings do not cook under pressure. they work similarly to standard cooking, requiring dry heat, and therefore do not require a lid.
Important: Do not use the Standard Lid with these functions.
Place the Multi-Cooker on a flat, level surface.
Place Cooking Pot inside Heating Base. Plug the Multi-Cooker into the wall outlet. The Multi-Cooker will beep, and the Display Screen will illuminate with four dashes (----).
- Place liquid inside the Cooking Pot prior to cooking.
- Select the BOIL or SIMMER function and adjust the time and temperature if necessary, using the + and - buttons.
- Press START/STOP.
- When the Multi-Cooker is pre-heating, "HEAt" will appear on the Display Screen. When the temperature has been reached, the timer will start counting down.
Important: Never boil or simmer thick sauces. The BOIL and SIMMER functions are intended for liquids only.
BOIL
Use to prepare meals like pasta and poached eggs.
LOW setting - Suitable for boiling low volumes of food up to the 1/3 Cooking Pot mark.
HIGH setting - Suitable for boiling higher volumes of food between the 1/3 and 1/2 mark. Do not fill above the 1/2 mark in this mode.
SIMMER
Use to thicken sauces and make gravies at the end of cooking.
LOW setting - Suitable for boiling low volumes of food up to the 1/3 Cooking Pot mark.
HIGH setting - Suitable for boiling higher volumes of food between the 1/3 and 1/2 mark. Do not fill above the 1/2 mark in this mode.
To thicken a dish at the end of cooking, stir a small amount of cornflour with water then add to the sauce.
To Change a Setting
It's easy to switch functions during cooking. Press the START/STOP button and then select the new desired cooking function. A new timer will flash on the Display Screen, and the selected function will also flash. Select the desired time, pressure, and/or temperature. Press the START/STOP button and the new function will begin preheating.
To Change the Cooking Time
You can change the cooking time before cooking begins by pressing the + and - buttons before pressing START/STOP. Press and release to change slowly. Press and hold to change time quickly. If you pass the desired temperature or time, press the opposite button.
To Change the Temperature or Pressure
You can change the temperature or pressure on certain pre-set functions before cooking begins by pressing the TEMP/PRESSURE button before pressing START/STOP. The display screen will illuminate TEMP or PRESSURE depending on which setting is being adjusted. The temperature may only be adjusted on the SLOW COOK, YOGURT, BOIL, SIMMER, SAUTÉ and BROWN/SEAR functions. See Cooking Guide on page 14 for adjustments.
Care & Cleaning
Cleaning should only be carried out when the Express Multi-Cooker is cool and unplugged. Allow the Multi-Cooker to completely cool before cleaning. Do not use the removable Cooking Pot on the stovetop, inside a microwave oven or inside an oven. Use the pot only inside the Express Multi-Cooker Heating Base. Wash the Sealing Gasket and Lids by hand in warm, soapy water. Dry all parts thoroughly.
Cooking Pot
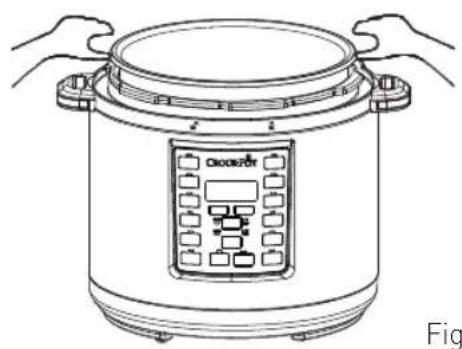
When removing the Cooking Pot from the Heating Base, always use two hands and lift directly upward. Failure to do so may result in scratching the outside of the Cooking Pot (see figure 6).
natural_image
Line drawing of a rice cooker with hands holding the lid (no text or symbols)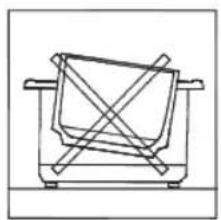
natural_image
Simple line drawing of a cooking pot with crossed panes (no text or symbols)Figure 6
Care & Cleaning
If food sticks or burns to the surface of the Cooking Pot, then fill it with hot soapy water and let it soak before cleaning. Use a rubber or nylon spatula to remove stubborn residue. If scouring is necessary, use a non-abrasive cleaner and a nylon scouring pad or brush. Hand wash the Cooking Pot with mild detergent in warm water to protect the inner coating.
Note: Cooking Pot is dishwasher safe however the outer aluminium finish may discolour over time. This will not affect cooking performance.
If white spots form on surface of Cooking Pot, then soak it in a solution of vinegar or lemon juice and warm water for 30 minutes. Rinse and dry.
Note: Never use metal utensils or cleaning devices on the Cooking Pot, as this may result in scratching and damaging the non-stick coating.
Exterior
Wipe the exterior of the Heating Base with a damp cloth and polish dry. DO NOT use harsh abrasives, scourers or chemicals, as these will damage the surfaces. To prevent damage to the Multi-Cooker do not use alkaline cleaning agents when cleaning. Only use a soft cloth and mild detergent. Never immerse the heating base in water or any other liquid.
Condensation Collector
Empty any collected water from the Condensation Collector after each use. Wash in warm, soapy water.
Lid and Sealing Gasket
Always examine the gasket before each use. The silicon Sealing Gasket on the inside of your Multi-Cooker Lid may deteriorate over time. Remove Sealing Gasket for cleaning as needed. Hand clean using warm, soapy water, dry thoroughly, and replace Sealing Gasket in Lid before use. Leave the Lid upturned for storage, as this will also extend the life of the gasket. Sealing Gasket may need to be replaced every 1 – 2 years depending on regular use. Contact Crock-Pot® customer service to order replacement parts.
Steam Release Valve
Ensure the Steam Release Valve is clear from debris before you begin using the Multi-Cooker. Remove the valve and gently clean. Ensure it is completely dry before replacing.
Steam Release Valve Cover
The Steam Release Valve Cover is on the underside of the Lid. Ensure it is clear from debris before you begin using the Multi-Cooker. To clean, carefully pull the cover off and clean using warm, soapy water. Press the cover back into its place after cleaning is complete.
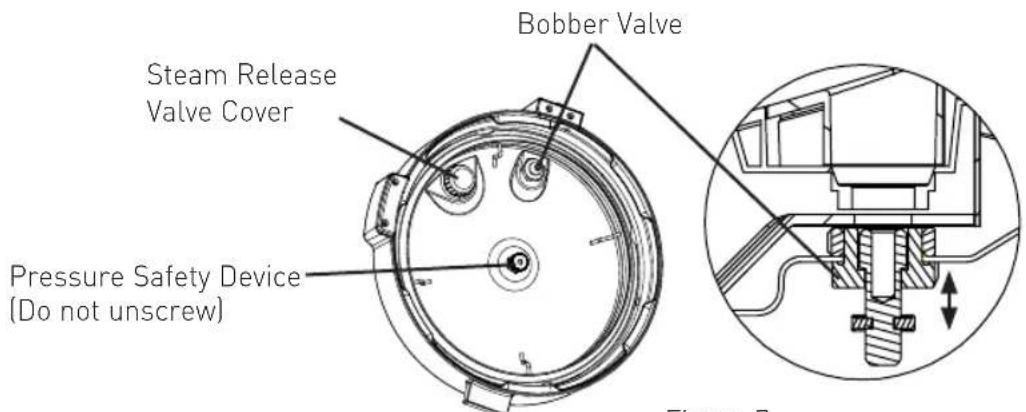
Figure 7 Underside of Lid
Care & Cleaning
Bobber Valve
Gently press the valve up and down 2-3 times and ensure it is clear from debris before you begin using the Multi-Cooker.
Lid Lock Pin
Gently press the pin and ensure it is clear from debris before you begin using the Multi-Cooker.
Note: Condensation may collect inside the Heating Base under the removable Cooking Pot. This is normal. Allow to cool, and then dry using kitchen cloth.
Note: Always make sure that each component (pot, valves, gasket, etc.) is completely dry before you put back into the Multi-Cooker.
Troubleshooting
| Subject Question Solution | ||
| Power My Mult | -Cooker will not turn on | Make sure outlet is functioning properly |
| Check that the Multi-Cooker is plugged in | ||
| Call Customer Service on 1300 881 861 (Aus), 0800 786 232 (NZ) | ||
| Doneness of food | My food was undercooked | Make sure you selected the proper cooking setting |
| Make sure the Lid is properly placed and locked, and that Steam Release Valve in "Seal" (closed) position. | ||
| Check the recipe to see that the proper pressure, temperature, and time selection were made | ||
| Be sure the power was not interrupted | ||
| Make sure the Cooking Pot has enough liquid to create desired steam and build pressure. Minimum of 250ml of liquid should be used when pressure cooking. Never fill over the "MAX" line. | ||
| My food was overcooked | Make sure the Cooking Pot was at least 1⁄2 full | |
| Check that the proper pressure, temperature, and time were selected | ||
| Programming | Can I set a time for the Brown/Sear and Sauté program? | Because sautéing and searing are functions which generally require your full attention this may not be necessary. However, if desired a time can be selected. |
| Can I change the cooking function, time or temperature once the food is cooking? | Yes, to change the cooking function, press START/STOP and select a new cooking function. Change the time and temperature as required for the food. Press START/STOP again. The time and temperature can be changed at any time. | |
| Cooking Can the Cooking Pot and Lid be used on top of the stove or in the oven? | The Cooking Pot and Lid are not oven safe. Neither can be used on the stove or in the oven. | |
| I stopped the cooking process and changed pressure settings, and now the Multi-Cooker is preheating again. | ||
| Steam Steam is leaking out of the Multi-Cooker | It is normal for a small amount of steam to come out of the Bobber Valve before the Multi-Cooker is pressurised.If steam is coming out from the perimeter of the Lid, the Lid has not been closed and locked completely or too much water has been added to the cooking pot. | |
| Lid I am having trouble removing the Lid. | There is a safety feature to keep Lid from being removed while the Multi-Cooker is under pressure. Please make sure to de-pressurise the unit by rotating the Steam Release Valve into the "Release" (open) position. Refer to Releasing Pressure section for further instructions. | |
Notification Codes
| Error Solution | |
| "CLOSE LID" blinking light | Ensure that the Lid is closed completely and in the LOCKED position, aligning with . |
| Display "E1" The Multi-Cooker will stop the cooking cycle. Unplug Multi-Cooker and contact service center. | |
| Display "E2" The Multi-Cooker will stop the cooking cycle. Unplug Multi-Cooker and contact service center. | |
| Display "E3" The lid did not seal or close properly.The Multi-Cooker will stop the cooking cycle. Unplug Multi-Cooker, and allow to cool down completely. Once Multi-Cooker has cooled down, check all parts of the Lid (See page 21). Turn Lid to LOCKED position. Ensure Steam Release Valve is in "Seal" (closed) position. If this notification code occurs again, unplug Multi-Cooker and contact service center. | |
| Display "E4" The Multi-Cooker will stop the cooking cycle. Unplug Multi-Cooker, and allow to cool down completely. Once Multi-Cooker has cooled down, check Cooking Pot to ensure there is enough liquid inside. Add more liquid if necessary (Minimum 250ml). Ensure no steam is coming out of Cooking Pot before placing Lid back on Multi-Cooker. Turn Lid to LOCKED position. Ensure Steam Release Valve is in "Seal" (closed) position. Select a pressure cooking function, and then press START/STOP. | |
| Display "E5" The lid or steam release valve is being used incorrectly for a non-pressure cooking setting.The Multi-Cooker will stop the cooking cycle. Unplug Multi-Cooker and allow to cool. Once it is cooled down, remove the Lid and check the Cooking Pot. Do not use the Lid when using the BROWN/SEAR or SAUTÉ function.When using the SLOW COOK function, make sure that the Steam Release Valve is in the "Release" (open) position before starting the cooking cycle. | |
| Display "E6" The Express Crock was unable to generate enough steam to pressurise completely.The Multi-Cooker will stop the cooking cycle. Unplug Multi-Cooker and allow to cool. Once it is cooled down, remove the Lid and check the Cooking Pot. Add liquid as necessary. Ensure a minimum of 250ml of liquid is used inside the removable Cooking Pot. If using a pressure cooking function, ensure that the Steam Release Valve is in the "Seal" (closed) position. | |
Hints & Tips
With your Express Crock you can create a large variety of delicious meals, snacks and desserts. Various foods take different times to cook perfectly, so sometimes it may take some trial and error to get the cooking times right for you.
- Please refer to your Express Crock user guide when using your Multi-Cooker.
- Never fill the Cooking Pot past the MAX line.
- Do not leave Multi-Cooker plugged in when not in use.
-
Make sure Multi-Cooker is kept away from cabinets and walls when in use.
-
The Cooking Pot is designed to be used only in this Multi-Cooker. Do not use on stovetop, in microwave, or in oven.
- The provided Steaming Rack is designed to be used in this Multi-Cooker. It should not damage the surface of the Cooking Pot.
- When removing the Lid, use a pot holder to grasp the Lid Handle and lift away from your body to allow steam to escape.
- Always place a trivet or pot holder under the Cooking Pot if it is removed from the Heating Base.
Hints & Tips For Slow Cooking
- If you are slow cooking, you can use the BROWN/SEAR or SAUTÉ functions first, which allows you to sear meats and vegetables at the beginning but also allows you to thicken sauces and make gravies at the end. Browning meat prior to slow cooking not only gives your food great colour, but it also seals in the juices and flavours and keeps the meat tender.
- To thicken a casserole at the end of cooking, use the SIMMER function and stir a small amount of corn flour with water. Allow to simmer, stirring until thickened.
-
It is not uncommon for meat to cook faster than root vegetables. It is for this reason that we recommend chopping all vegetables to a similar small size. Meat can be cut into larger chunks because if it is cut too small, it will break up once cooked and tenderized.
-
When using the SLOW COOK function, the Multi-Cooker does not recover lost heat quickly, so using the glass lid is a great way to monitor the cooking progress without having to remove the lid. Different cuts and thickness of meats and vegetables can vary cooking times.
- Slow Cooking reduces evaporation, resulting in the flavours and juices being maintained. Keep this in mind when creating your own recipes, as you may not require as much liquid as you would when using other cooking methods.
| Temperature | Temperature Suggestions Recipes Ideas | |
| High Use this setting for recipes that require shorter cooking times, generally 4-6 hours. | Ideal for sauces, chili, potato dishes, cheese dishes, chicken wings and meatballs in sauce | |
| Low Use this setting for recipes that require longer cook times. This setting is used for recipes that usually require cooking for more than 8 hours. Perfect for less tender cuts of meats. | Ideal for less tender cuts of meat, braised meals, dried beans, soups and stews | |
Notes


Notes
This product is covered by a 12 month replacement or repair warranty, which is in addition to your rights under the Australian Consumer Law (if your product was purchased in Australia) or New Zealand Consumer Guarantees Act (if your product was purchased in New Zealand).
Should you experience any difficulties with your product during the warranty period, please contact our customer service line for advice on 1300 881 861 in Australia, or 0800 786 232 in New Zealand.
Australia
www.crockpot.com.au
1300 881 861
Units 5 & 6,
13 Lord Street,
Botany NSW 2019
Australia
New Zealand
www.crockpot.co.nz
0800 786 232
Level 6, Building 5,
Central Park,
660-670 Great South Road,
Greenlane, Auckland
New Zealand
Upon receipt of your claim, Sunbeam will seek to resolve your difficulties or, if the product is defective, advise you on how to obtain a replacement or refund.
To assist us in managing warranty claims, we recommend you register your product as soon as practicable after purchase by creating a MySunbeam account on our website and uploading a copy of your original receipt.
In order to make a claim under our warranty, you must have the original proof of purchase documentation for the product and present it when requested (if not already uploaded to our website).
Should your product develop any defect within 12 months of purchase because of faulty materials or workmanship, we will replace or repair it, at our discretion, free of charge. A product presented for repair may be replaced by a refurbished product of the same type rather than being repaired. Refurbished parts may be used to repair the product.
Our replacement or repair warranty only applies where a defect arises as a result of faulty material or workmanship during the warranty period. Your warranty does not cover misuse or negligent handling (including damage caused by failing to use the product in accordance with this instruction booklet), accidental damage, or normal wear and tear.
Your warranty does not:
• cover freight or any other costs incurred in making a claim, consumable items, accessories that by their nature and limited lifespan require periodic renewal (such as filters and seals) or any consequential loss or damage; or
• cover damage caused by:
- power surges, power dips, voltage supply problems, or use of the product on incorrect voltage;
- servicing or modification of the product other than by Sunbeam or an authorised Sunbeam service centre;
- use of the product with other accessories, attachments, product supplies, parts or devices that do not conform to Sunbeam specifications; or
- exposure of the product to abnormally corrosive conditions; or
- extend beyond 3 months if the product is used in commercial, industrial, educational or rental applications.
The benefits given to you by our warranty are in addition to other rights and remedies under law in relation to the product.
In Australia our goods come with guarantees that cannot be excluded under the Australian Consumer Law. You are entitled to a replacement or refund for a major failure and for compensation for any other foreseeable loss or damage. You are also entitled to have the goods repaired or replaced if the goods fail to be of acceptable quality and the failure does not amount to a major failure.
Our goods also come with guarantees that cannot be excluded under the New Zealand Consumer Guarantees Act.
If your warranty claim is not accepted, we will inform you and if requested to do so by you, repair the product provided you pay the usual charges for such repair. You will also be responsible for all freight and other costs.
Should your product require repair or service after the warranty period, contact your nearest Sunbeam service centre. For a complete list of Sunbeam's service centres, visit our website or call our customer service line for advice on 1300 881 861 in Australia, or 0800 786 232 in New Zealand.

CROCK·POT.
Need help with your appliance?
Contact our Customer Care Team or visit our website for information and tips on getting the most from your appliance.
AUSTRALIA
Visit: www.crockpot.com.au
Phone: 1300 881 861
Mail: Units 5 & 6, 13 Lord Street, Botany NSW 2019
NEW ZEALAND
Visit: www.crockpot.co.nz
Phone: 0800 786 232
Mail: Level 6, Building 5, Central Park, 660–670 Great South Road, Greenlane, Auckland



Sunbeam Corporation PTY LTD | ACN 000 006 771 Crock-Pot and Sunbeam are registered trade marks.
Due to continued product improvements, product illustrations and photographs in this User Guide may differ slightly from the actual product.
CPE300_19EM1 GCDS-CRP010319-JC
3756A-1B

- Express Crock XL Multi-Cooker
- Contents
- Important Instructions - retain for future use
- Crock-Pot's Safety Precautions
- SAFETY PRECAUTIONS FOR YOUR MULTI COOKER.
- Features of your Express Crock
- Power Cord
- Lid Lock Pin
- Lid Handle
- Lid
- Cooking Pot
- Heating Base
- Control Panel
- Bobber Valve
- Steam Release Valve
- Condensation Collector
- Power Cord Port
- Display Screen
- Time Selection Buttons
- Gasket Fixing Ring
- Steam Release Valve Cover
- Sealing Gasket
- Bobber Valve
- Plastic Spoon
- Steaming Rack
- Glass Lid
- Pressure Release Valve
- Before First Use of the Express Crock
- Step 1. Remove Packaging
- Step 2. Position Machine
- Step 3. Wash Parts
- Step 4. Assembly
- Step 5. Standard Lid Assembly
- Step 6: Sealing Gasket
- Things to know about your Express Crock
- Using your Express Crock
- Time Delay Function
- Cooking Pot Markings
- Pressure Cooking
- Using Pressure Cooking functions
- TIP:
- Releasing Pressure at the End of Cooking
- Natural Pressure Release Method:
- Quick Pressure release method should be used with caution:
- Bobber Valve
- USING THE GLASS LID
- Slow Cooking
- Using the SLOW COOK Function
- Steaming
- Capacity:
- Using the STEAM Function
- Using the BROWN/SEAR and SAUTÉ Functions
- BROWN/SEAR
- SAUTE
- Rice Cooking
- Using the RICE/GRAINS Function
- Using the BOIL and SIMMER Functions
- BOIL
- SIMMER
- To Change a Setting
- To Change the Cooking Time
- To Change the Temperature or Pressure
- Care & Cleaning
- Cooking Pot
- Exterior
- Condensation Collector
- Lid and Sealing Gasket
- Steam Release Valve
- Steam Release Valve Cover
- Lid Lock Pin
- Hints & Tips
- Hints & Tips For Slow Cooking
- Notes
- Australia
- New Zealand
- CROCK·POT.
- Need help with your appliance?
Brand : Crock-Pot
Model : Express XL CPE300
Category : Multicooker