Flex100 City - Trampoline JumpFlex - Free user manual and instructions
Find the device manual for free Flex100 City JumpFlex in PDF.


| Product Type | Trampoline with Safety Enclosure |
| Model | Flex100 City |
| Brand | JumpFlex |
| Available Sizes | 8 ft, 10 ft, 12 ft, 14 ft, 15 ft diameter |
| Recommended Age | 6 years and older |
| Maximum User Weight | Not specified (assume 120 kg/265 lbs typical) |
| Frame Material | Galvanized steel |
| Jump Mat Material | Polypropylene (PP) mat |
| Safety Net Material | Polyethylene (PE) netting |
| Safety Padding Material | UV-resistant, water-resistant foam |
| Springs | Galvanized steel; quantity varies by size (48 to 100) |
| Frame Warranty | 10 years |
| Jump Mat & Springs Warranty | 5 years |
| Safety Pad & Net Warranty | 3 years |
| Accessories Warranty | 1 year |
| Assembly Required | Yes, by adults (2 people recommended) |
| Use Location | Outdoor, level ground, away from obstacles |
| Minimum Overhead Clearance | 8 m (26 ft) |
| Side Clearance | Minimum 1 m (3.3 ft) from walls/fences |
| Maintenance | Monthly cleaning with warm soapy water; inspect before use |
| Contact | jumpflex.com (various country websites) |
Frequently Asked Questions - Flex100 City JumpFlex
User questions about Flex100 City JumpFlex
0 question about this device. Answer the ones you know or ask your own.
Ask a new question about this device
Download the instructions for your Trampoline in PDF format for free! Find your manual Flex100 City - JumpFlex and take your electronic device back in hand. On this page are published all the documents necessary for the use of your device. Flex100 City by JumpFlex.
USER MANUAL Flex100 City JumpFlex

Australia
1800 586 735

New Zealand
0800 586 735

USA
1866 305 7238

Canada
1866 305 7238

UK
0330 010 4301
jumpflex.com.au
jumpflex.co.nz
jumpflex.com
jumpflex.ca
jumpflex.co.uk

Warning: Read all assembly, installation, care, maintenance and use instructions in the manual prior to assembling and using this Jumpflex product.
These products are for personal use only by 1 person aged 6 years and older, for outdoor use.
Warning: For domestic use only. Adult assembly required.
Risk Warning: The use of this product involves a significant risk of participants suffering personal injury including the possibility of serious injuries, permanent disability or death. All participants who engage in activities with the product do so at their own risk.
Contents
1 Notice to User 2 Safety Information 3 Maintenance and Care Instructions 4 Warranty information 5 Trampoline Location 6 Trampoline Parts List 7 Trampoline Assembly Instructions 21 Trampoline Ladder Assembly instructions
Notice | Instructions
Notice to User
Please read this agreement carefully before purchase or assembly. By opening this package, you acknowledge that you have read this agreement, understand it and agree to be bound by its terms. If you are making a purchase on behalf of another person, you agree that you are making the purchase as their agent.
Please Read
Jumpflex Australia Pty Ltd ABN: 25 611 941 934 | Jumpflex Ltd 3733426 ("Jumpflex") as a supplier of trampolines and Accessories, ("Equipment"), sells all Equipment subject to the following conditions:
- To the maximum extent permitted by law, Jumpflex, its employees, directors and agents will not be liable to the customer, their dependents or legal representatives for damage to property, personal injury or death suffered by the customer because the Equipment was not manufactured or supplied with due care and skill, the Equipment is not reasonably fit for its purpose or because of negligence, breach of contract, breach of statute or breach of statutory duty by Jumpflex.
- Jumpflex, its employees, directors and agents are not liable to the customer, their dependents or legal representatives for personal injury or death suffered by the customer because the Equipment was not:
a. Installed in accordance with the Jumpflex Assembly Manual. It is the customer's responsibility to check all boxes to confirm that all components are included and in the correct condition before assembly. b. Installed with due care and skill, by the customer or a third party assembly service, and in the same condition as when the Equipment was supplied, due to wear and tear including, but not limited to, weather damage, deterioration of the net, spring stretch, UV deterioration or rust.
The customer acknowledges that using this Equipment can be dangerous, with inherent risks and hazards. As a consequence, personal injury or death may occur. The customer assumes and accepts all such risks to the full extent permitted by law and waives any right of action against, and fully releases Jumpflex for all loss, damages, personal injury or death in any way caused by, or relating to, the customer's use of the Equipment. This includes, without limitation, liability for any negligent or tortious acts or omissions, breach of duty, breach of contract or breach of statutory duty on the part of Jumpflex, its officers, directors, employees or agents.
Risk Warning
The use of this Equipment involves a significant risk of participants suffering personal injury including the possibility of serious injury, permanent disability or death. All participants who use the Equipment do so at their own risk.
Safety
Instructions
Specific Use Limitations
- Do not use trampoline without mature and knowledgeable supervision.
- Do not attempt or allow somersaults.
- Do not allow more than one person on the trampoline at any time.
- Do not use the trampoline if it's raining or wet.
- Do not jump onto or off of the trampoline.
- Do not use a trampoline while under the influence of drugs or alcohol.
- Do not allow any activity underneath the trampoline.
- Learn fundamental bounces and body positions thoroughly before attempting more advanced skills.
- Properly secure the trampoline when not in use to protect against unauthorized use. If a trampoline ladder is used, the supervisor should remove it from the trampoline when leaving the area.
- The trampoline must not be used in gusty or severe winds and only when wind or air movement is calm and gentle.
Safety Instructions
- Read all instructions before using the trampoline.
- Allow only one person on the trampoline at any time. Use by more than one person at the same time can result in serious injury.
- Use the trampoline only with mature adult supervision at all times.
- Inspect the trampoline before each use. Make sure the frame padding is correctly and securely positioned. Replace any worn, defective, or missing parts.
- Keep objects away that could interfere with the user. Maintain a clear area around, above, and under the trampoline.
- Misuse and abuse of the trampoline is dangerous and can cause serious injuries.
- Focus your eyes on the edge of the trampoline. This will help control your bounce.
- Avoid bouncing for too long. Do not bounce when tired.
- Stop your bounce by flexing your knees as your feet come in contact with the trampoline bed. Learn this skill before you attempt any others.
- Climb on and off the trampoline - do not jump. Jumping from the trampoline to the ground is dangerous. Similarly, do not run and leap onto the trampoline.
- Never use springs or extension elements as 'hand grips'.
- Avoid bouncing too high. Stay low until you can control your bounce and repeatedly land in the centre of the trampoline.
- Do not use the trampoline as a springboard to other objects. Use the trampoline only for trampoline style bouncing.
- It is advisable not to bounce immediately after a meal.
- Do not attempt knee drops. This can cause injury if you attempt this skill without some experience or personal instruction.
- Your clothing should allow plenty of freedom of movement, but loose clothing is discouraged.
- No buckles or jewellery should be worn, as these could damage the trampoline mat and cause injury to the jumpers.
- Do not wear shoes while bouncing on the trampoline unless they are designed specifically for use on a trampoline.
- Remove ladder when it is not in use to prevent young children falling and injuring themselves.
- Avoid bringing any miscellaneous items onto the trampoline.
- Trampoline safety net must always be fitted to trampoline to promote safer use of the trampoline.
- Refrain from eating or drinking on the trampoline to avoid spillages and potential injury as a result.
- Remember to wear suitably sun-protective clothing, sunscreen and a hat (soft, not hard) to avoid becoming sunburned.
- For further information or additional instructional materials, contact Jumpflex or your nearest trampoline club.
- Jumpflex does not condone pets to be on the trampoline at any time, as sharp claws may also cause damage to the safety netting, jumping mat, or safety padding of the trampoline.
Maintenance
Instructions
Your trampoline is a substantial investment for the enjoyment of your family, and it must be noted that improper use or lack of care can lead to early deterioration. Please follow all of the points below to ensure your product lasts as long as possible.
General Care
- We strongly recommend cleaning your Jumpflex Trampoline and accessories every month with warm soapy water. When dirt and other particles are left to build up on the trampoline, this can cause wear and tear to accelerate.
- When your trampoline is not going to be used for a long period of time, it is best to store it out of the weather.
- Protect and secure your trampoline in extreme weather such as strong winds, hail, and lightning. An effective way to prevent damage under these extreme circumstances is to cover the trampoline with an appropriate protective cover and to secure the trampoline to the ground to avoid it being moved by strong winds.
- Inspect the trampoline before each use and replace any worn, defective, or missing parts.
Safety Padding
- Dirt and dust build up on the Safety Pad if left will accelerate the deterioration of the Padding. Your Safety Padding should be cleaned once a month with warm soapy water.
- Trampoline safety padding is made from highly water-resistant and UV-resistant material to withstand sun exposure. The safety padding is designed to be able to be drained in the event water becomes trapped inside, as this can accelerate the deterioration of the padding. If water becomes trapped, lift the pads from the inside edge to drain the water out.
- Safety padding must be kept loose above the springs. Under no circumstances should the safety padding be leaned on, sat on, or stood on. This weight applies direct contact to the springs and can cause ripping in the safety pads and/or injury.
- In areas that experience extreme cold, remove and store the safety pads indoors in winter. This will prevent any possible cracking due to sub-zero temperatures.
- Under no circumstances should any object hotter than 120 degrees Fahrenheit or 48 degrees Celsius come into contact with any part of the safety padding. High temperatures may result in melting or burning of the padding material and extreme temperatures may cause the padding to catch fire.
- Rainwater, if not wiped off, may result in spots forming from residue left from the water as it dries. Any water applied to clean the surface must be wiped dry with a clean cloth or chamois and not left to dry in the sun.
Safety Net
- Inspect the trampoline enclosure before each use.
- Prolonged exposure of the safety net to UV rays from the sun can lead to a shortened lifespan of the material. During the winter months or when the trampoline will not be in use for a long time, e.g., winter or storm seasons, remove the safety net and store indoors in a cool dry place out of sunlight.
- The user of the trampoline must not have any solid or sharp objects on their person while using the trampoline. These foreign objects may cause damage to the safety netting, jumping mat, or safety padding.
- Always check for any defects in the safety netting poles before using your trampoline.
- Regularly check that the safety netting pole bolt assembly remains in a working state, is completely fastened, and is tight.
- The safety net must be in use at all times.
Warranty | Information
Jumpflex Ltd, Jumpflex Pty Ltd Limited Trampoline Warranty
Warranty Coverage
Jumpflex Ltd and its authorized service partners warrant its products to be free of defects in material and workmanship under normal domestic recreational use and service conditions. The various component parts of the trampoline are warranted against failure and defects in the workmanship as follows:
FRAME: 10 YEARS
JUMP MAT & SPRINGS: 5 YEARS SAFETY PAD & SAFETY NET: 3 YEARS JUMPFLEX ACCESSORY RANGE: 1 YEAR
The warranty in respect of the mat and the enclosure net does not cover normal wear and tear (e.g., stitching wear due to use), burns, cuts, or snags. The warranty on the frame does not cover surface rust. Warranty claims resulting from manufacturing QC defects (e.g., cuts in mats, broken D-rings, tears in net, missing components, etc.) must be reported within 45 days of the product being purchased. Warranty claims reported outside the initial 45-day purchase period may be rejected by Jumpflex Ltd. Shipping costs associated with approved warranty claims during this 45-day period will be borne by Jumpflex Ltd. Beyond this 45-day period, all shipping costs must be borne by the purchaser.
JUMPFLEX LTD, JUMPFLEX PTY LTD IS NOT RESPONSIBLE OR LIABLE FOR INDIRECT, SPECIAL, OR CONSEQUENTIAL DAMAGES ARISING OUT OF OR IN CONNECTION WITH THE USE OR THE PERFORMANCE OF THE PRODUCT OR ANY OTHER DAMAGES WITH RESPECT TO ANY ECONOMIC LOSS, LOSS OF PROPERTY, LOSS OF REVENUE OR PROFITS, LOSS OF ENJOYMENT OR USE, COST OF REMOVAL, INSTALLATION/DISASSEMBLY, OR OTHER CONSEQUENTIAL DAMAGES. SOME STATES/TERRITORIES DO NOT ALLOW THE EXCLUSION OR LIMITATION OF INCIDENTAL OR CONSEQUENTIAL DAMAGES. ACCORDINGLY, THE ABOVE LIMITATIONS MAY NOT APPLY TO YOU.
THE WARRANTY EXTENDED HEREUNDER IS IN LIEU OF ALL OTHER WARRANTIES, AND ANY IMPLIED WARRANTY OF MERCHANTABILITY OR FITNESS FOR A PARTICULAR PURPOSE IS LIMITED IN ITS SCOPE AND DURATION TO THE TERMS SET FORTH HEREIN. SOME STATES/TERRITORIES DO NOT ALLOW LIMITATIONS ON HOW LONG AN IMPLIED WARRANTY LASTS. ACCORDINGLY, THE ABOVE LIMITATIONS MAY NOT APPLY TO YOU. THIS WARRANTY IS NOT TRANSFERABLE.
Trampoline | Location
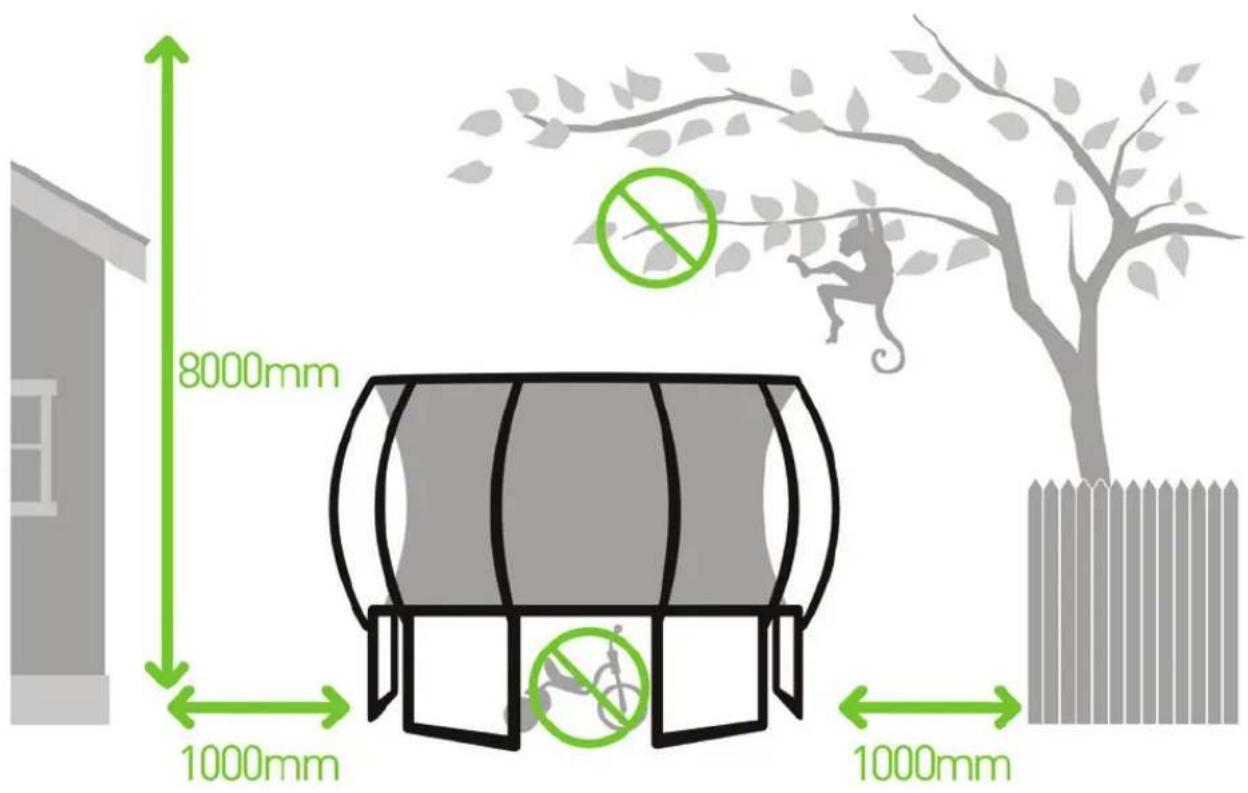
- Minimum overhead clearance of 8m / 26 ft from ground level. Possible hazards may include wires and tree limbs.
- Recommended clearance of 1000mm from obstacles such as walls, structures, fences and other play areas.
- Keep the trampoline on a level surface • The trampoline must not be used in gusty or severe winds.
Trampoline | Assembly Instructions
Trampoline | Parts List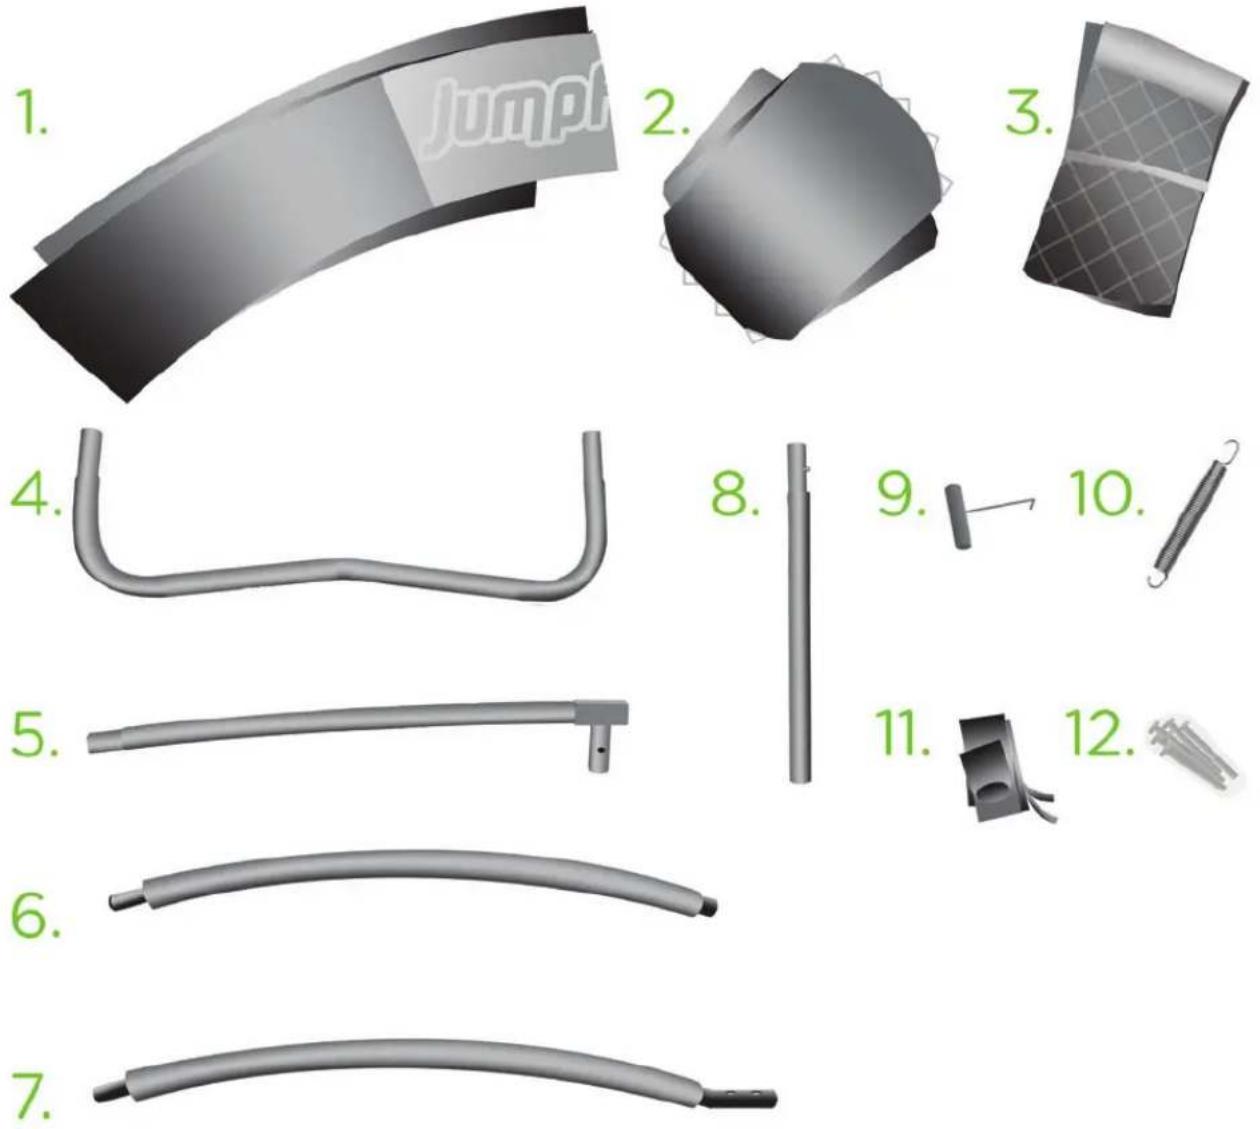
| Part Type 8 FT 10 FT 12 FT 14FT 15FT | ||||||
| 1 | Spring Pad 11111 | |||||
| 2 | Jump Mat 11111 | |||||
| 3 | Safety Net 11111 | |||||
| 4 | Foot 3 4 4 5 5 | |||||
| 5 | Top Rail | 6 8 8 | 10 | 10 | ||
| 6 | Upper Safety Net pole | 6 8 8 | 10 | 10 | ||
| 7 | Lower Safety Net pole | 6 | 8 | 8 | 10 | 10 |
| 8 | Leg | 6 | 8 | 8 | 10 | 10 |
| 9 | Spring Tool | 11111 | ||||
| 10 | Springs | 48 | 64 | 72 | 90 | 100 |
| 11 | PVC Sleeves | 6 | 8 | 8 | 10 | 10 |
| 12 | Nuts & Bolts | 12 | 16 | 16 | 20 | 20 |
Trampoline | Assembly Instructions
01
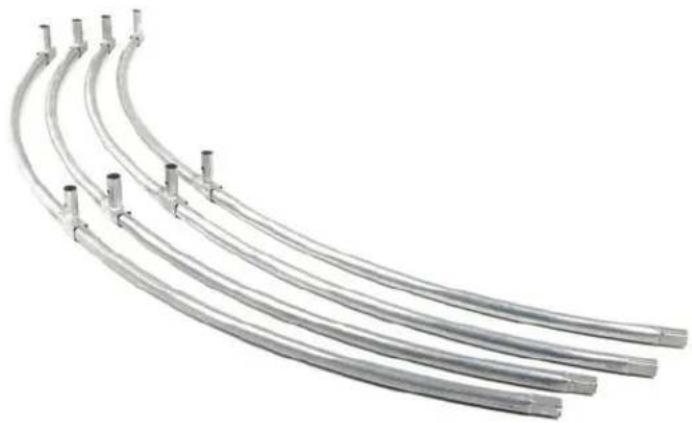
Take out all of the curved top rail poles and join them together in lots of 2, like shown.
Note: 8 ft size = 3 pairs (6 top rails)
10ft size = 4 pairs (8 top rails)
12ft size = 4 pairs (8 top rails)
14ft size = 5 pairs (10 top rails)
15ft size = 5 pairs (10 top rails)
02
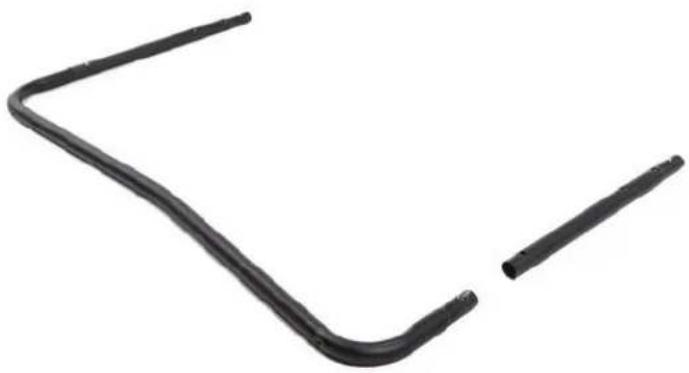
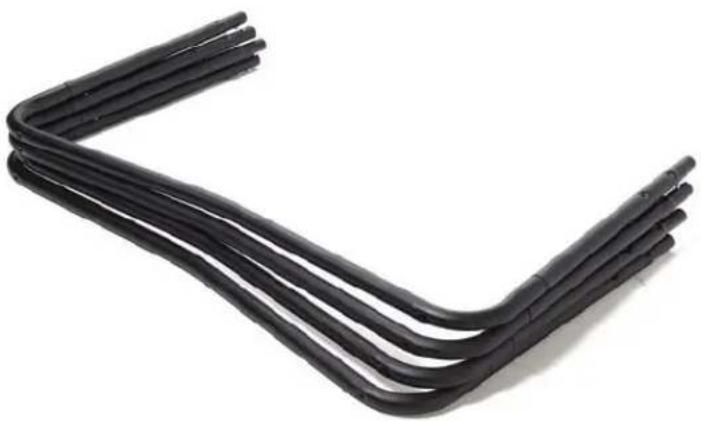
Take out all of the black w-shaped Feet and connect on each end the short straight black Leg poles.
Make sure the silver spring button clip is aligned and clicks into place, securing the poles together.
Assemble all of the w-shaped Feet and Legs as shown; these will be the legs and feet of the trampoline.
Note: 8ft size = 3 feet rails
10ft size = 4 feet rails
12ft size = 4 feet rails
14ft size = 5 feet rails
15ft size = 5 feet rails
03
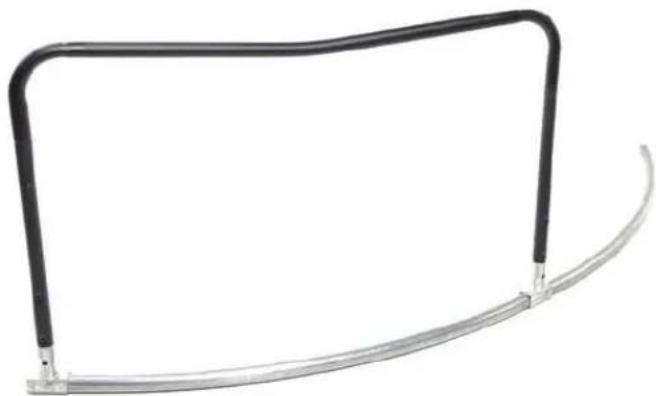
Take the assembled w-shaped component (trampoline legs and feet) and connect each end into the paired top rails.
Repeat this for all components.
Tip: Insert the two legs evenly and at the same time, otherwise this step might be difficult.
Trampoline
Assembly Instructions
04
Safety net pole assembly
Take out the curved poles with the black foam surround.
Connect them together in pairs, with one black pole and one silver pole making a pair.
Note: 8ft size = 6 assembled poles
10ft size = 8 assembled poles
12ft size = 8 assembled poles
14ft size = 10 assembled poles
15ft size = 10 assembled poles
05
Once you have assembled all the safety net poles, take out the black PVC sleeves and slide the open end over the top of the curved safety net pole and slide this down over the pole (top = plastic cap).
Tip: Make sure the foam does not slide down the pole by squeezing the foam against the pole with one hand, while pulling down the black sleeve with the other.
Once the sleeve is on make sure the foams are flush with the top of the pole, and are touching in the centre.
06
Attaching the Safety Net poles to the top rail and feet component
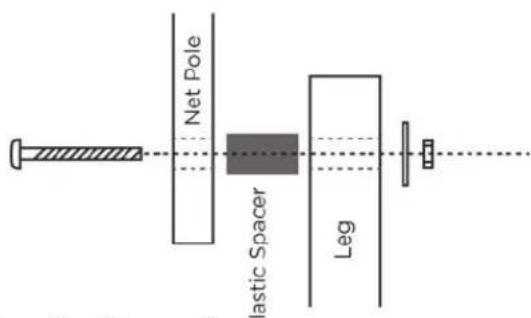
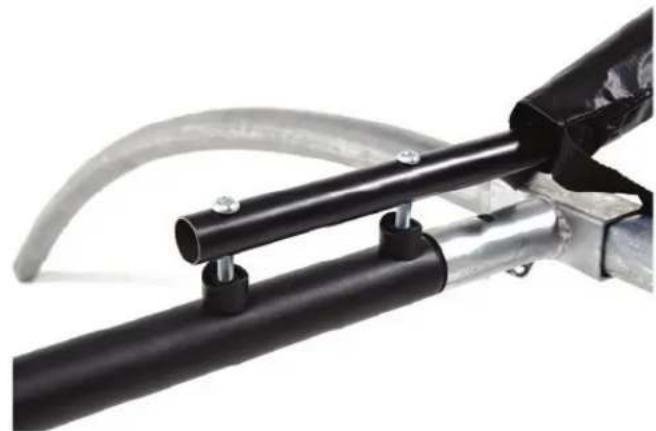
Using the provided bolts, attach the safety net poles to the straight leg poles.
Note: Make sure to attach the bolts in this order;
Jumpflex™ Trampolines
Trampoline
Assembly Instructions
07

Important Note
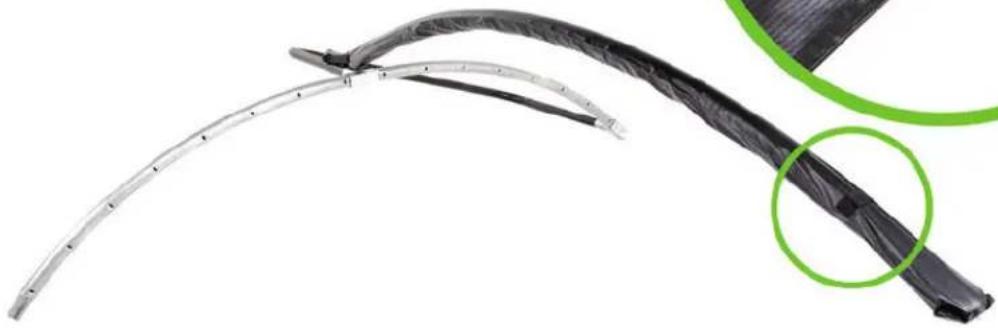
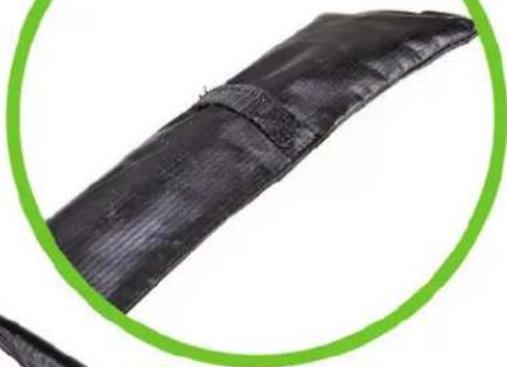
When attaching the Safety Net pole to the top rail and feet component, make sure the small webbing strip is facing away from the curve as shown (facing towards the outside of the trampoline).
08
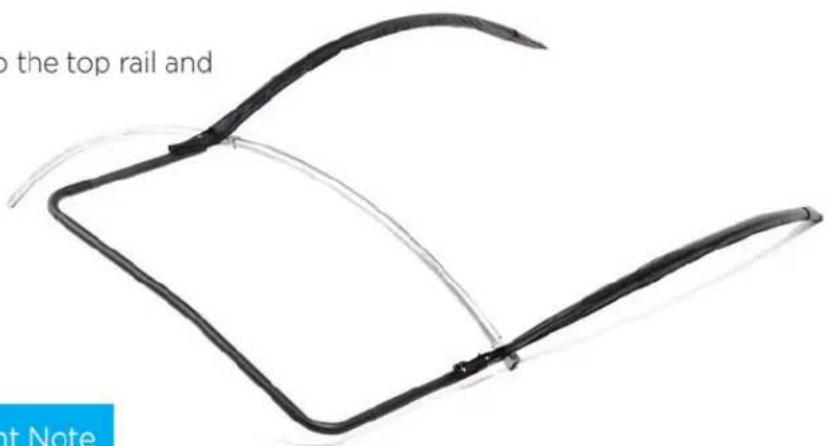
Attach all the safety net poles to the top rail and feet components as shown.
09

Important Note
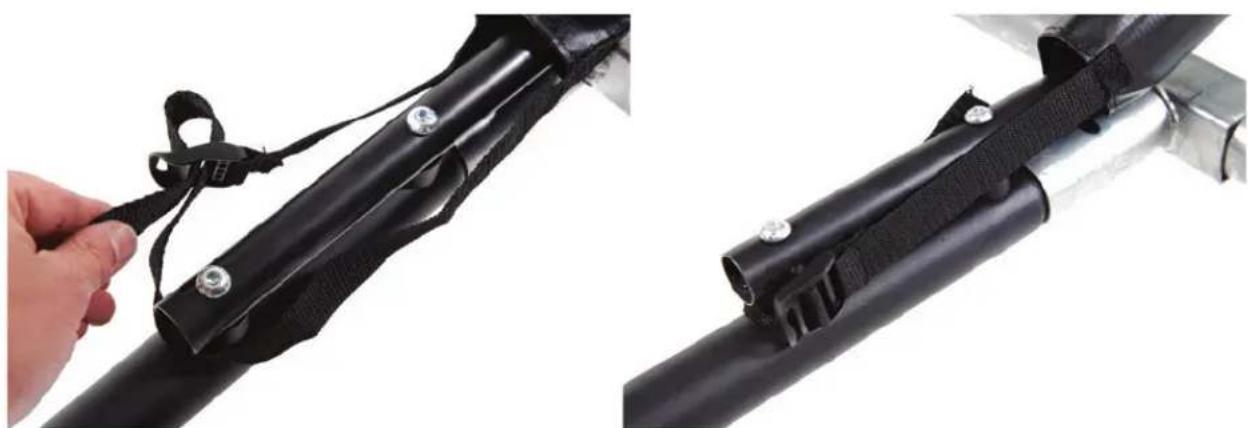
Secure the bottom of the black sleeve by feeding the webbing length under and around the bottom of the safety net pole. Lock the webbing in place by securing the plastic buckle.
Trampoline | Assembly Instructions

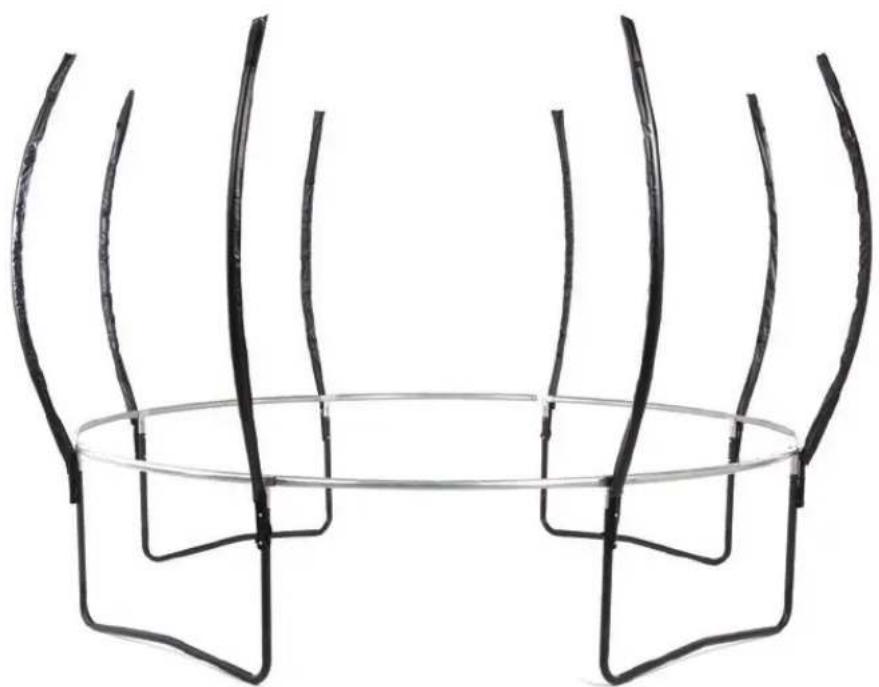
Connect the top rail and leg components together to create the complete frame of your trampoline.
Tip: Asking the help of an assistant with this step will make it a lot easier.
Have your assistant stabilise each section while you carefully slot the components together.
Please take caution to make sure the components don't tip or fall over.
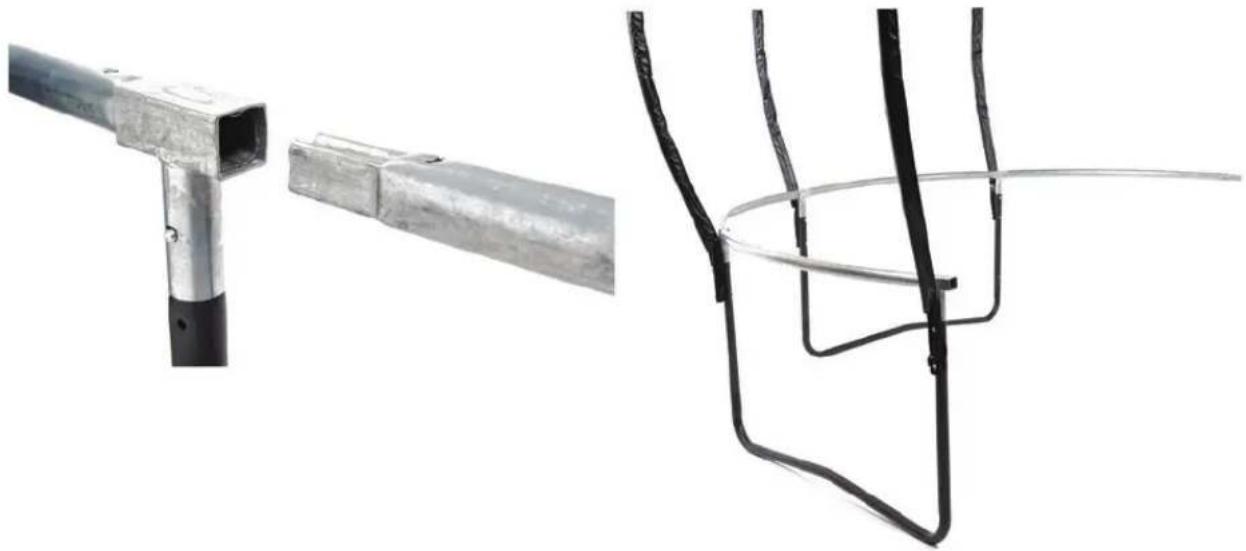

You should now have the complete trampoline frame connected as shown below.
Trampoline
Assembly Instructions
12
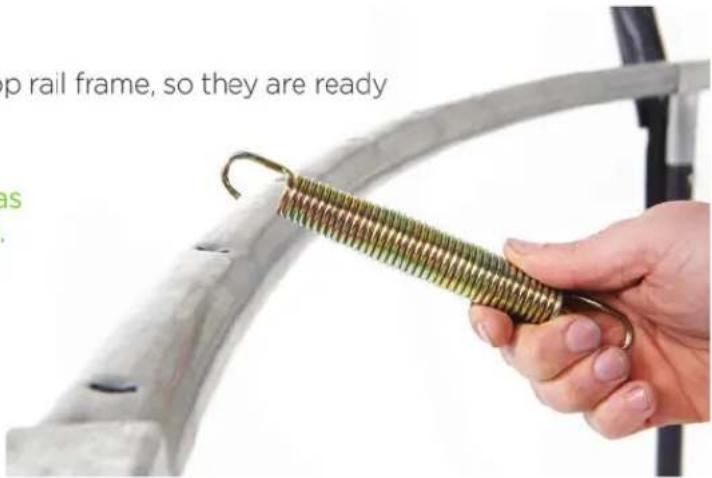
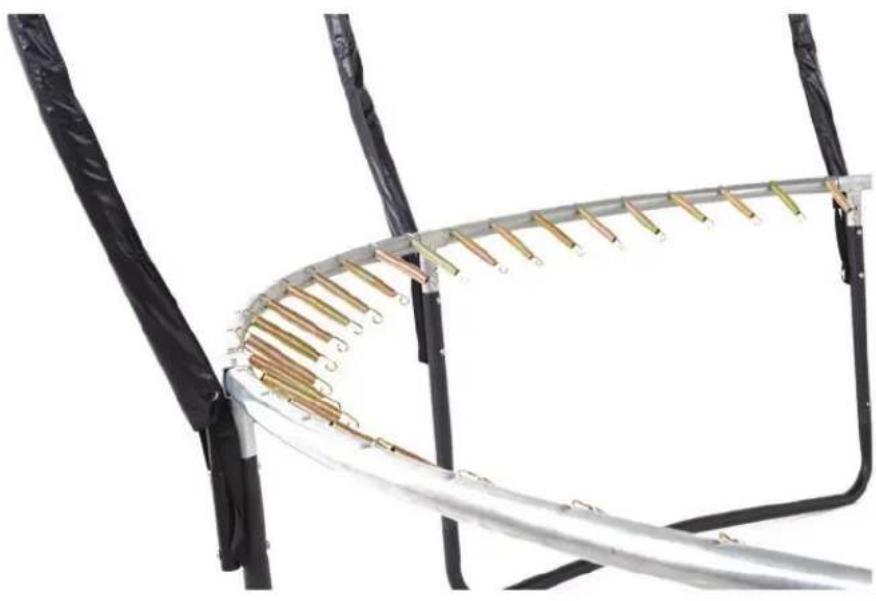
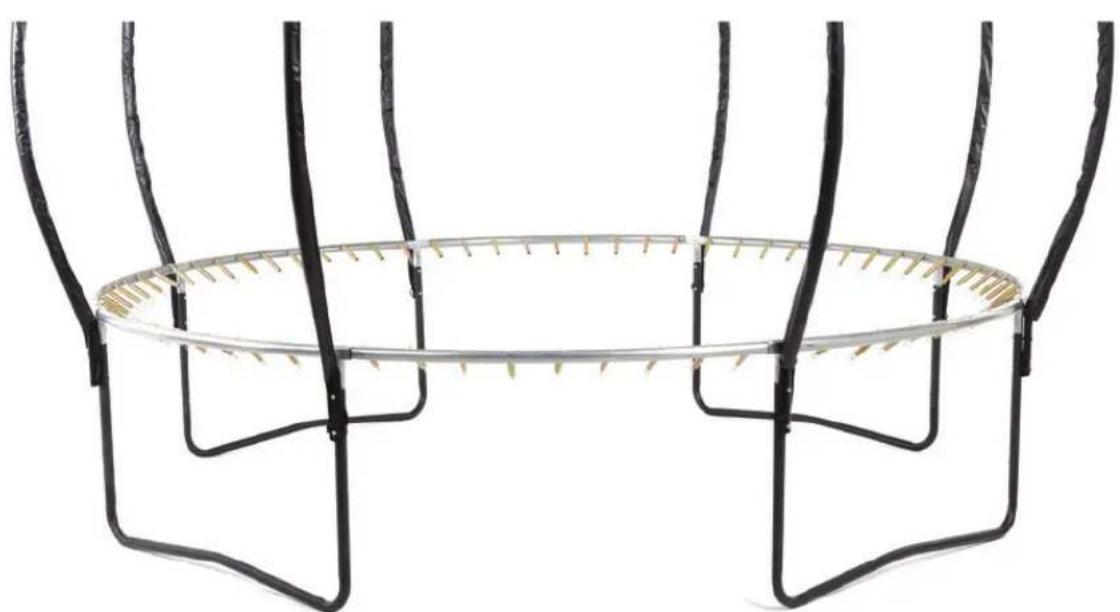
Now pre-hang all of the springs to the top rail frame, so they are ready to be attached to the Jump Mat.
Note: Hook the end of the spring that has the larger open hook to the frame. Make sure the springs are on the inside of the trampoline ring.
Trampoline
Assembly Instructions
13
Attaching the Jump Mat
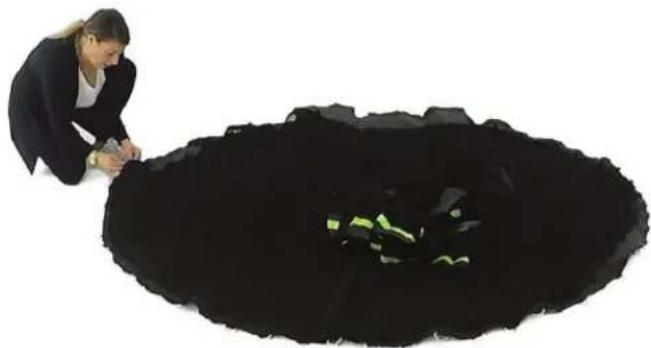
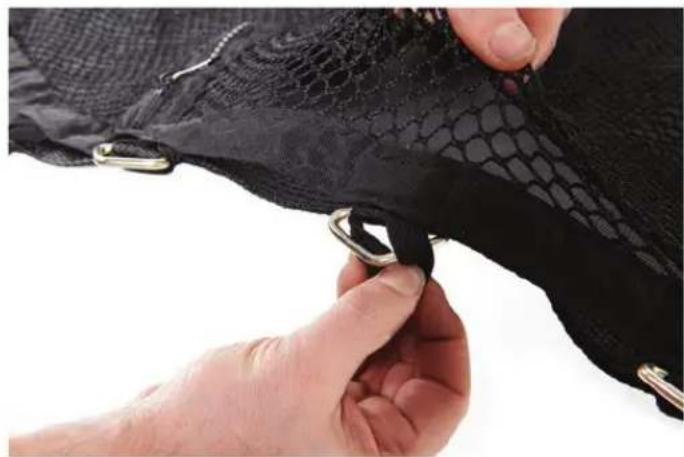
Lay the Jumping Mat out on the ground and position the Jumpflex logo above where the zip entrance will be located. Spread the Safety Net over top of the Jumping mat. Starting at the zip, attach the elastic loops on the Net to the D-Rings on the Jumping Mat. Continue around the Safety Net attaching each elastic loop to each D-Ring.
Continue this process around the Jump Mat until the Safety Net is attached.
14
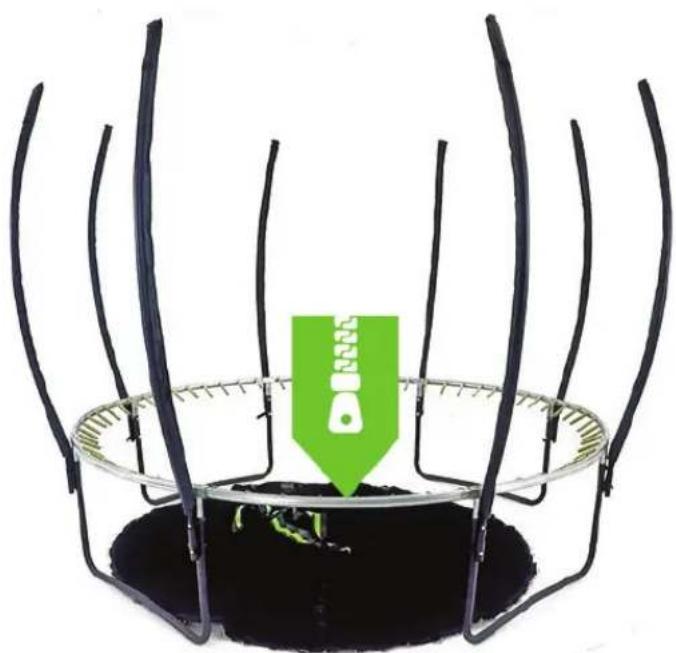
Slide the assembled Jumping Mat and Safety Net into the inside of the Trampoline, and position the zip entrance in the middle between two of the leg assemblies.
Trampoline | Assembly Instructions
15
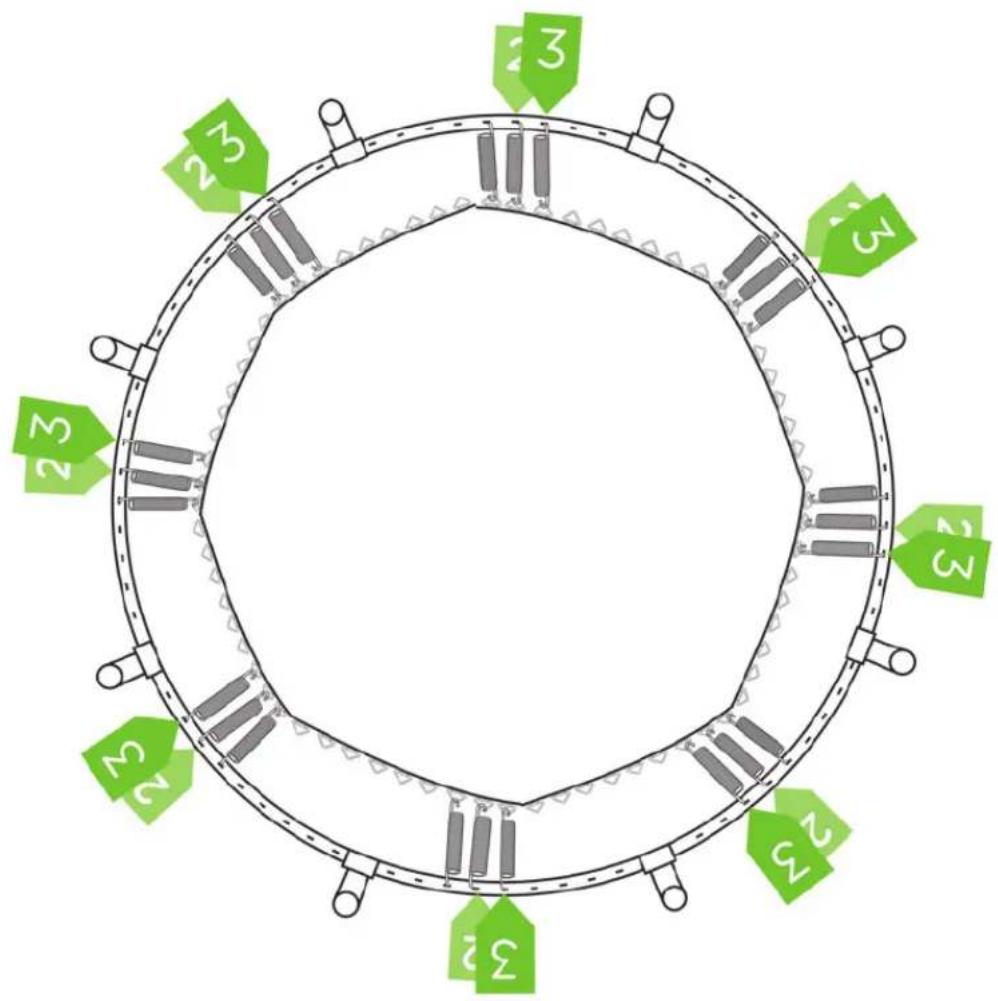
The below drawings illustrate looking down on the frame of the Trampoline, to position the Zip entrance of the Safety Net.
Following the below illustration, attach the Spring to the Jumping Mat so the Zip is positioned in the middle between the safety net poles.
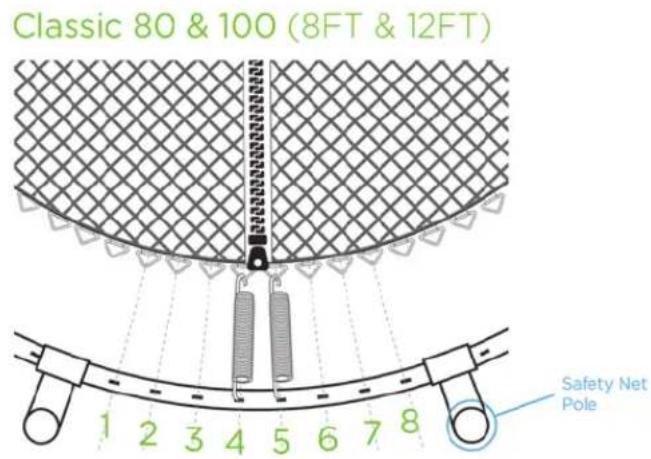
Note: 8FT & 10FT model: The Zip on the Net should be located between No. 4 and No. 5 D-Ring/Top Rail attachment.
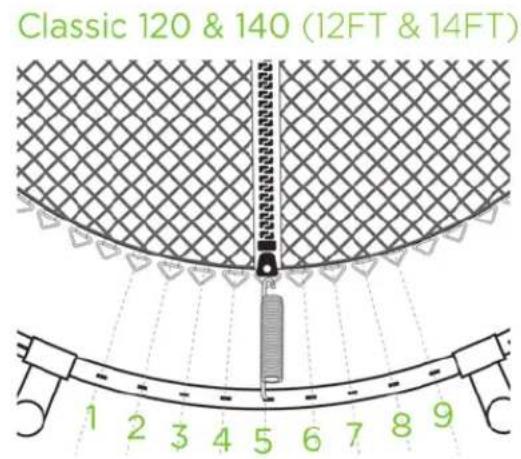
Note: 12FT & 14FT model: The Zip on the Net should be located at the No. 5 D-Ring/Top Rail attachment.
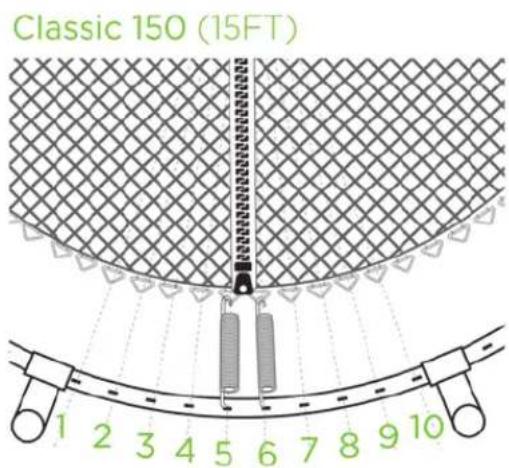
Note: 15FT model: The Zip on the Net should be located between No. 5 & No. 6 D-Ring/Top Rail attachment.
Note: The number of Springs between the Safety Net poles changes depending on the size of your Jumpflex trampoline.
These drawings illustrate the position of the Zip and Spring count based on the trampoline size.
Trampoline
Assembly Instructions
17
Note: In this example we are assembling a Classic 120 (12Ft), which will be the same as the Classic 140 (14FT).
Once you have attached the Spring(s) to the Jumping Mat as per the previous page, count out;
Classic 80 & 100 (8FT & 10FT) = 8 Springs on the Frame and 8 Jumping Mat gold D-Rings Classic 120 & 140 (12FT & 14FT) = 9 Springs on the Frame and 9 Jumping Mat gold D-Rings Classic 150 (15FT) = 10 Springs on the Frame and 10 Jumping Mat gold D-Rings
and attached this spring to the Jumping Mat gold D-Ring and Frame. Continue to count out either 8, 9 or 10 (depending on your Trampoline size) springs and attaching this Spring, until you have gone all the way around.

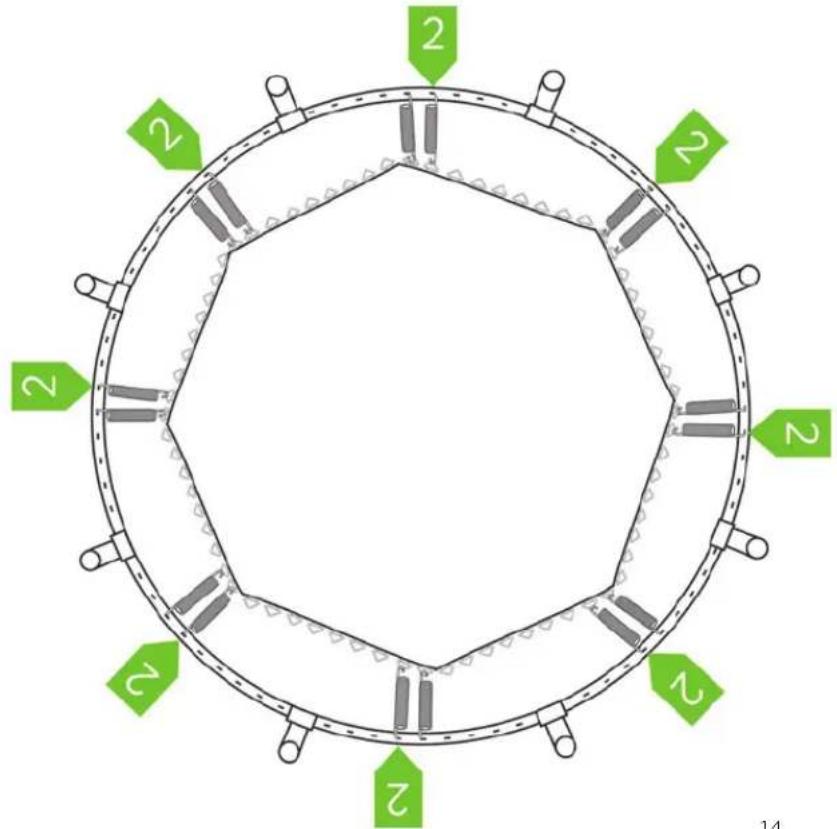
18
Attaching the rest of the Springs to the Jump Mat
Attach another Spring to the Jump Mat beside each Spring that is in place. Remember to firstly attach it to the Jump Mat then use the Spring tool to pull it towards you and hook it back onto the frame.
Follow the sequence as illustrated.
Tip: It is important to attach the springs equally around the entire frame to ensure even distribution of Spring tension when attaching.
Trampoline
Assembly Instructions

To make sure we attach the springs evenly, attach the next Spring beside the Spring we just attached.
You will now have groups of 3 Springs attached to the Frame and to the Jump Mat.
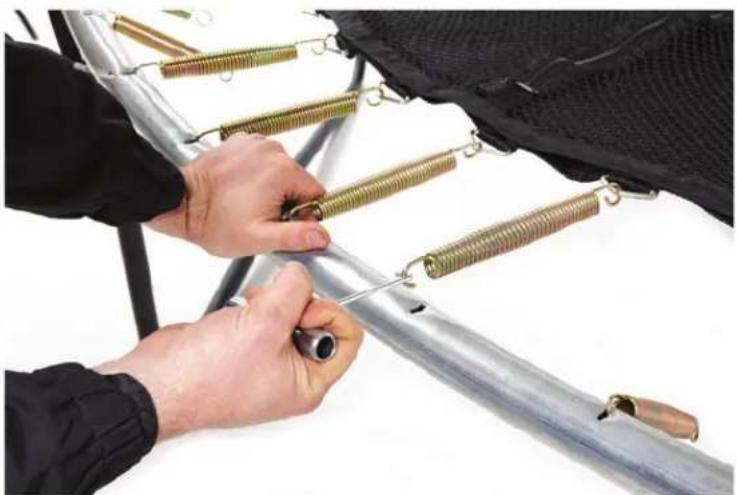
Tip: The easiest method of attaching a Spring is to have the Spring first hooked to the mat, and then placing your other hand on the frame for support, use the Spring tool to pull the spring out away from the mat by using your entire body weight.
Then hook the end you pull onto the frame.
Trampoline | Assembly Instructions
20
Continue this pattern of attaching the springs in groups around the trampoline. Make sure to alternate in the attaching of the springs on opposite sides, slowly building up the attached Springs so they are evenly spread around the Trampoline.
21
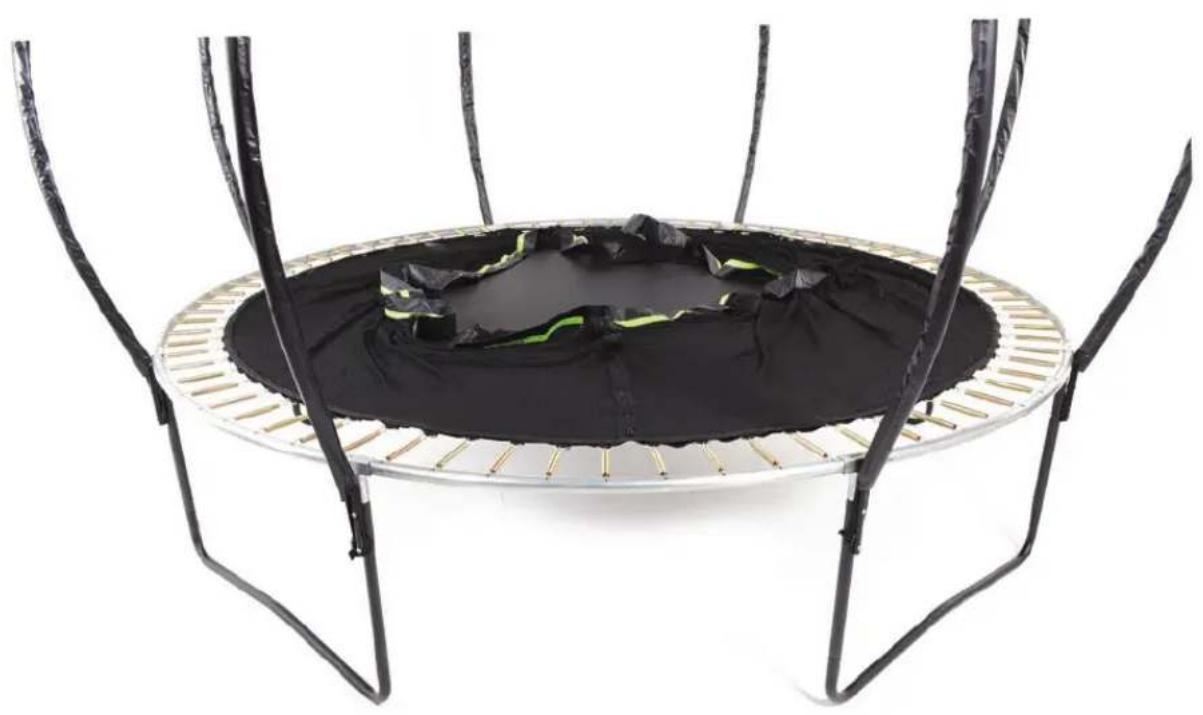
Continue until all of the Springs are attached to the Jump Mat and Frame.
Trampoline | Assembly Instructions
22
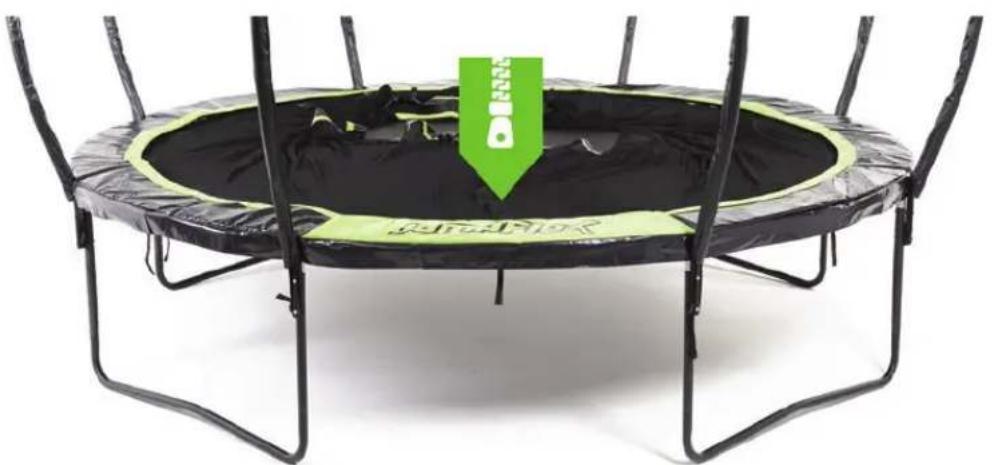
Take out the Spring Padding and lay it around the Trampoline so that it sits on top of the Springs. Make sure you align the green panel in front of the Zip and in between the Safety Net poles.
23
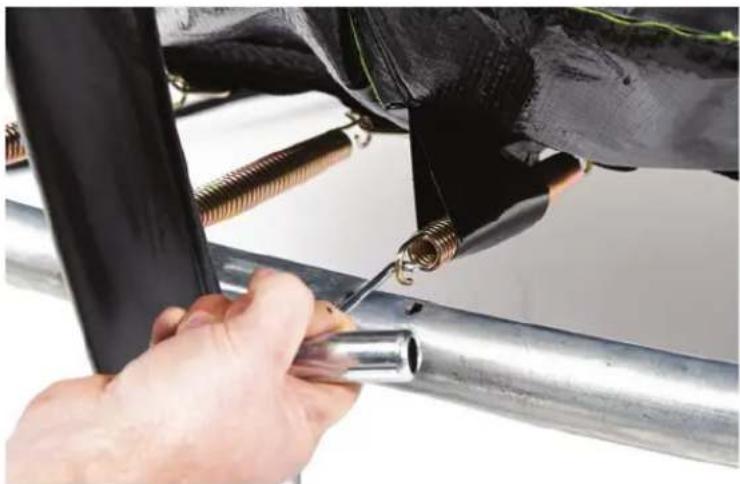
On the underside of the Spring Pad there are stitched loops. Find the Springs that are beneath these loops, remove them and push the Spring through. Reattach the Spring to the Mat then to the Frame using the Spring tool. Do this for each loop.
24
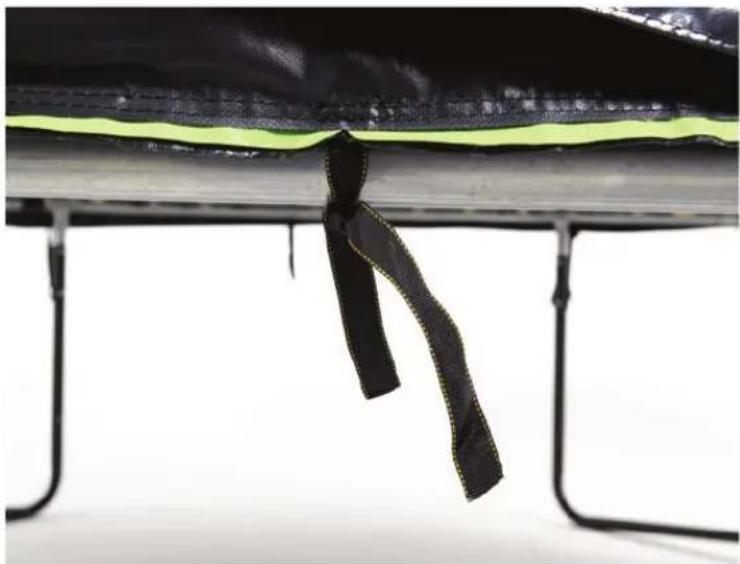
There are webbing straps located on the underside of the Spring Pad, tie these to the Trampoline frame. Continue until each one is tied and the Pad is secured to the Frame.
Trampoline
Assembly Instructions
25
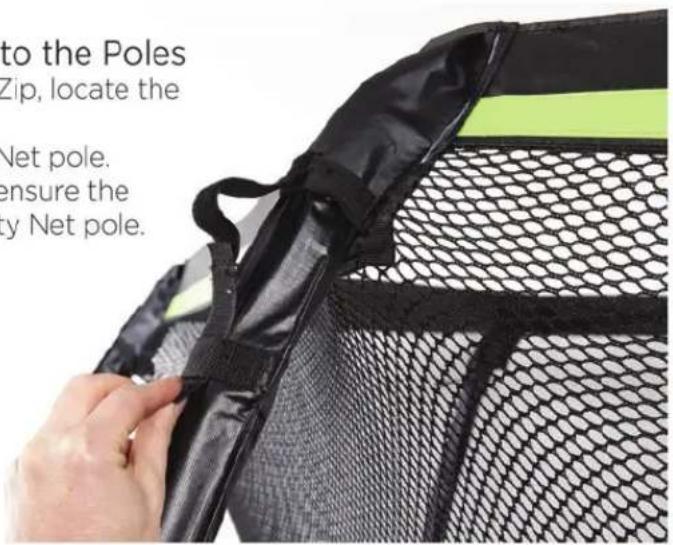
Attaching the top of the Safety Net to the Poles. Using a step ladder and starting at the Net Zip, locate the Net Pocket to either side of the Zip. Slide the pocket over the top of the Safety Net pole. While pushing the pole up into the pocket, ensure the foam remains flush with the top of the Safety Net pole.
Note: The Zip should be running perfectly straight up and down (vertically).
26
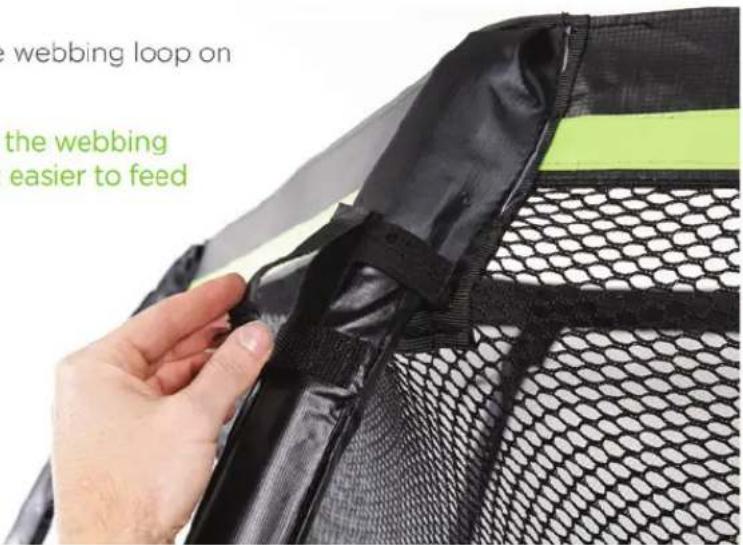
Feed the Velcro tag down through the webbing loop on the Safety Net pole as illustrated.
Note: If you push your finger through the webbing loop to open it up, this makes it easier to feed the Velcro through.
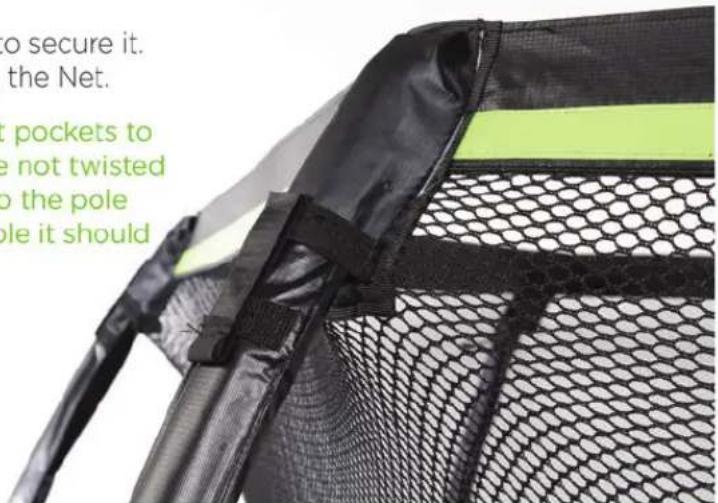
27
Fold the Velcro back up and onto itself to secure it. Do this on every pole to finish attaching the Net.
Note: Make sure when attaching the net pockets to the Safety Net pole, that you have not twisted the net by attaching the pocket to the pole either to the left or right of the pole it should be on.
Trampoline | Assembly Instructions
28
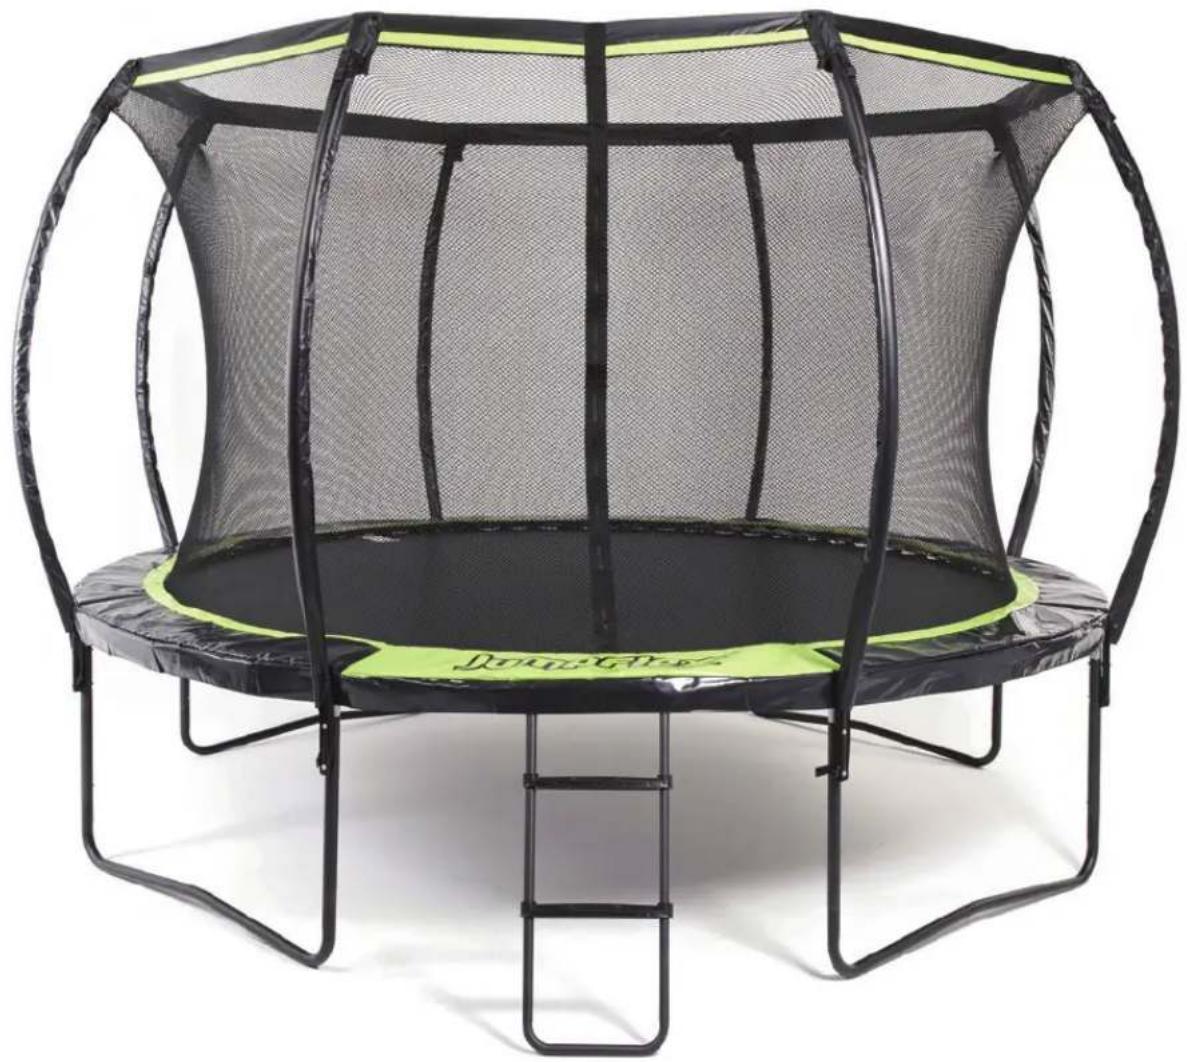
Congratulations!
You have finished the assembly of your Jumpflex Trampoline.
Play for Life
"Stay active and have fun at the same time thanks to Jumpflex"
Playing on your new Jumpflex Trampoline has so many great health benefits. It's great for your heart, it's an efficient and easy way of exercising, it's easy on your joints, it helps you build strong bones, tones and strengthens muscles,
it improves energy levels.... the list goes on!
Ladder | Assembly Instructions
Step|1
![graph LR A["Left U-shaped component"] --> B["Top part with arrow"] B --> C["Bottom part with arrow"] C --> D["Right end with arrow"]](/content/2026/05/820235/images/534698282d9ae7d69ba1247b8b838ee945429ae14e48453798697ec02cf4502a.jpg)
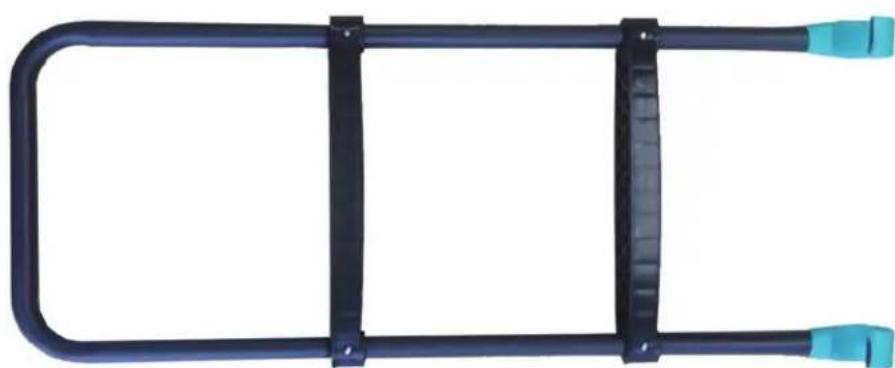
Slide the black plastic step onto the ladder poles in the direction shown
Step 2

Note: The lower piece of the ladder will need to be splayed open slightly.
Step 3
JumpFlex
play for life

facebook.com/jumpflex

Share your fun on instagram #Jumpflex


Australia

New Zealand

USA

Canada

UK

1800 586 735

0800 586 735

1866 305 7238

1866 305 7238

0330 010 4301
jumpflex.com.au
jumpflex.co.nz
jumpflex.com
jumpflex.ca
jumpflex.co.uk

Warning: Read all assembly, installation, care, maintenance and use instructions in the manual prior to assembling and using this Jumpflex product.
These products are for personal use only by 1 person aged 6 years and older, for outdoor use.
Warning: For domestic use only. Adult assembly required.
Risk Warning: The use of this product involves a significant risk of participants suffering personal injury including the possibility of serious injuries, permanent disability or death. All participants who engage in activities with the product do so at their own risk.
Play for Life


- CONTENTS
- NOTICE | INSTRUCTIONS
- NOTICE TO USER
- PLEASE READ
- RISK WARNING
- SAFETY
- INSTRUCTIONS
- SPECIFIC USE LIMITATIONS
- SAFETY INSTRUCTIONS
- MAINTENANCE
- GENERAL CARE
- SAFETY PADDING
- SAFETY NET
- WARRANTY | INFORMATION
- TRAMPOLINE | LOCATION
- TRAMPOLINE | ASSEMBLY INSTRUCTIONS
- TRAMPOLINE
- ASSEMBLY INSTRUCTIONS
- SAFETY NET POLE ASSEMBLY
- ATTACHING THE SAFETY NET POLES TO THE TOP RAIL AND FEET COMPONENT
- IMPORTANT NOTE
- ATTACHING THE JUMP MAT
- ATTACHING THE REST OF THE SPRINGS TO THE JUMP MAT
- CONGRATULATIONS
- PLAY FOR LIFE
- LADDER | ASSEMBLY INSTRUCTIONS
- STEP
- JUMPFLEX
Brand : JumpFlex
Model : Flex100 City
Category : Trampoline