
TBC50-ACC - Beer dispenser EDGESTAR - Free user manual and instructions
Find the device manual for free TBC50-ACC EDGESTAR in PDF.


| Product Type | Mini Kegerator / Beer Dispenser |
| Brand | EdgeStar |
| Model | TBC50-ACC |
| Compatible Kegs | 5 Liter mini kegs (Heineken DraughtKeg included; others with optional kit) |
| Power Supply | 115V AC / 60Hz (110-120V) or 12V DC (cigarette lighter adapter) |
| Cooling | Cold plate; chills to mid-to-high 30s °F |
| Included Accessories | AC & DC power cords, Heineken-style tap, dispenser handle, drip tray, squeeze bottle cleaning kit |
| Optional Accessories | Regulator, CO2 cartridges (16g), non-pressurized keg tap, CO2 releaser, pressurized cleaning kit, rubber rings |
| Cleaning | Manual line cleaning via squeeze bottle with detergent/vinegar/baking soda; optional pressurized kit |
| Safety Features | Grounded power cord, child safety precautions, do not immerse, keep away from heat sources |
| Warranty | 1 year parts, 90 days labor (residential use in USA) |
| Intended Use | Household only, not commercial |
| Environment | Room temperature (mid 70s °F), away from sun/heat, 2-3" ventilation space |
| Carbonation (Non-pressurized kegs) | Adjustable pressure via CO2 cartridge; recommended 0.4-1.0 bars depending on beer type |
| Beer Capacity per Keg | ~169 oz (approx. 10-14 servings) |
Frequently Asked Questions - TBC50-ACC EDGESTAR
User questions about TBC50-ACC EDGESTAR
0 question about this device. Answer the ones you know or ask your own.
Ask a new question about this device
Download the instructions for your Beer dispenser in PDF format for free! Find your manual TBC50-ACC - EDGESTAR and take your electronic device back in hand. On this page are published all the documents necessary for the use of your device. TBC50-ACC by EDGESTAR.
USER MANUAL TBC50-ACC EDGESTAR
Important safeguards 10
Limited warranty 10
Thank you
Thank you for purchasing this EdgeStar mini kegerator. Once you get this unit set up, it will provide you and your family with years of great service.
This mini kegerator is designed to refrigerate and serve most 5 Liter mini kegs- under optimal conditions, it can refrigerate to the mid to high 30°s Fahrenheit. It ships with a tap for Heineken brand DraughtKeg 5 Liter mini kegs. An optional accessory kit is available that fits most other brands of 5 Liter mini keg. A 5 Liter mini keg has about 169 ounces of beer in it, so it should provide about 10 12 pints of beer or the equivalent of about 14 12 oz cans.
If you are reading this owner's manual, you've probably already unpacked the unit. Note that you should save the packaging in case you need to safely transport this unit in the future.
Accessories
Included accessories:
- Main unit
- AC power cord
- DC power cord
- "Squeeze bottle" cleaning kit
• Heineken-style mini keg tap - Dispenser handle
- Emblem for dispenser handle
- Drip tray assembly
Optional accessories:
- Regulator
• 16g CQcartridges (3) - 16g COadapter
- 16g C _2 holder
• Non-pressurized mini keg tap - CO_2 releaser
- Pressurized cleaning kit
- Rubber ring (2)
If you would like to order the optional accessory kit, or if you need any help with this unit, please feel free to call EdgeStar at 866.319.5473.
Installation
In order to assemble this appliance, carefully unpack all parts.
Place the unit on a flat and level surface. It will work best in a room temperature environment, away from the sun and other heat sources, and with 2"-3" of ventilation room all around it.
natural_image
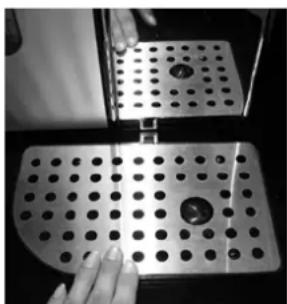
Close-up of a hand pressing down on a metal perforated plate with holes (no text or symbols visible)Install the drip tray by sliding it partially underneath the main unit (align the "tab" sticking out of the drip tray assembly with the notch in the underside of the main unit).
natural_image
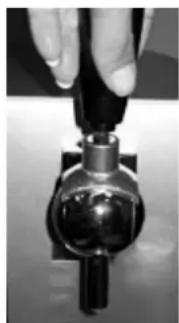
Close-up of a hand holding a metallic valve component (no visible text or symbols)Install the dispenser handle by screwing it onto the dispenser head. There is also a circular emblem that magnetically attaches directly to the top of the dispenser handle. Place this on the dispenser handle.
Now select the appropriate power cord (three prong grounded 115V or the 12V DC plug [cigarette lighter adapter]). Plug the power cord into the back of the unit, and then plug the other end into your power source. Check to make sure the unit is on by looking at the LED in front of the unit. If the LED is lit, your unit is powered up.
We suggest you clean the lines prior to tapping your first mini keg, and cleaning them again after every mini keg.

12V DC
Note that this mini kegerator ships with the connections to tap and enjoy Heineken brand DraughtKeg 5 Liter mini kegs. This is the most popular and widely-available 5 Liter mini keg. Heineken brand DraughtKeg 5 Liter mini kegs are already pressurized and need no 115V AC
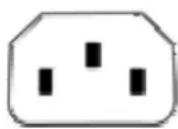
additional CO_2 to tap them. With the optional upgrade kit, you can tap and enjoy all commercially available 5 Liter mini kegs.
- Fill the "Squeeze bottle" cleaning kit half full of water. Add a small amount of detergent, baking soda, white vinegar, or beer line cleaner. Mix the mixture thoroughly.
- Attach the nozzle of the squeeze bottle to the beer line. Place a cup or bowl underneath the beer dispenser.
- Squeeze the bottle while opening the dispenser all the way, forcing the cleaning mixture through the beer line and into the cup/bowl beneath the nozzle.
- Once all the mixture has run through the line, rinse out the squeeze bottle.
- Refill the squeeze bottle with water and repeat the above process with water until the lines are clear of cleaning solution.
General instructions
Regardless of the brand of 5 Liter mini keg, here are the basic steps for tapping it:
- Chill your keg- although this mini kegerator has a cooling plate that will cool your keg, best results will come from a keg that is already cooled to drinking temperature- this way, the cooling plate only has to keep your keg cool.
- Follow the instructions on the mini keg to eliminate excess gas or pressure.
- Connect the beer line to the correct dispenser head and tap the keg (use the included head for Heineken brand DraughtKeg 5 Liter mini kegs; use the optional head for all other brands)
-
Connect the gas lines (if using the optional head for non-pressurized 5 Liter mini kegs)
-
Do a test-pour to ensure that the beer is flowing freely. If the test pour is good, start the party!
Note that you may experience a lot of foam shortly after tapping the mini keg. If you wait 15-20 minutes after tapping, the foam should lessen. Additionally, pours with the spout fully open should deliver less foam than pours with the spout only partially open.
-
Open the mini kegerator door by depressing the button located on the upper right-hand side of the door.
-
Gently put the mini keg on the cold plate. You may find it helpful to hook the line(s) up to the mini keg while it is slightly outside the unit.
Heineken brand DraughtKeg tapping instructions
Heineken brand DraughtKeg mini kegs have an internal CO_2 tank. This is the only type of mini keg that you can tap without the optional accessories.
-
Chill the mini keg
-
Open the door of the mini kegerator.
-
Place the mini keq near the open door.
-
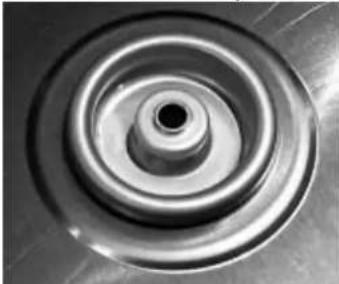
Make sure the top of the mini keq looks like this:
natural_image
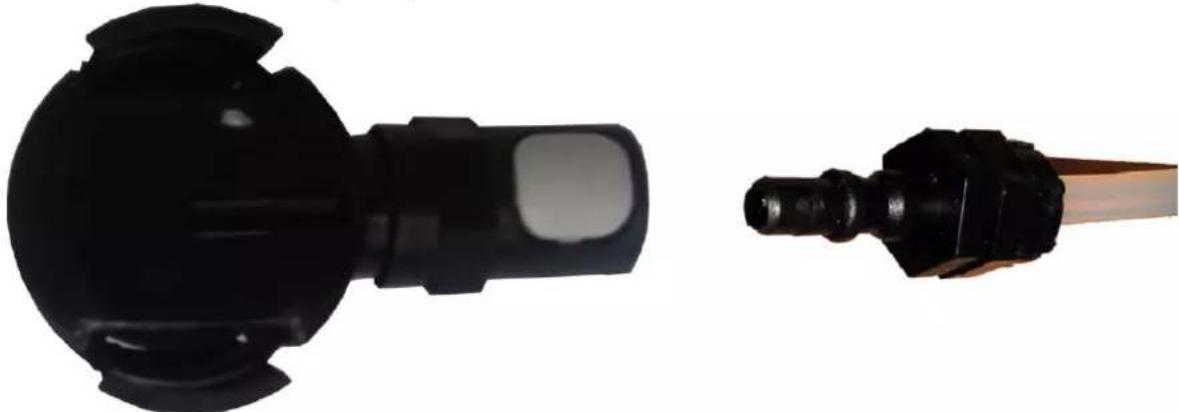
Close-up of a metallic mechanical component with concentric circular grooves (no text or symbols visible)- Attach the Heineken-style tap to the beer line:
natural_image
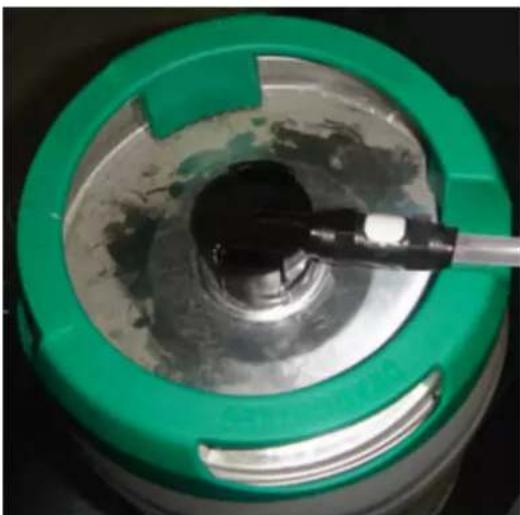
Two black plastic pipe fittings with different end caps, shown from different angles (no text or symbols visible)- Attach the Heineken-style tap and beer line assembly to the mini keg:
natural_image
Close-up of a mechanical component with a green circular base and a black tool inserted, no visible text or symbols.- Place the mini keg inside the mini kegerator and shut the door.
- Pour your first glass of beer!
- When the keg is floated, remove the Heineken-style tap from the keg by squeezing the two tabs on top of it and pulling it off.
- Detach the tap from the beer line by pressing the white/gray button and pulling the line off.
- Rinse the tap under running water. You should also clean it with a mild detergent solution and rinse it thoroughly.
- Clean the beer lines as noted above.
Note: Heineken says that a tapped Heineken brand DraughtKeg will remain fresh for up to 30 days after tapping (provided it remains refrigerated).
Non-pressurized mini keg tapping instructions
Note that the following instructions refer to optional accessories. Call 866.319.5473 for more information or to order them.
All 5 Liter mini kegs except the above-mentioned Heineken DraughtKeg are “non-pressurized”- though the kegs are shipped with minimal pressure inside to ensure the freshness of the beer, once they are opened, all the pressure escapes and they must be served with gravity (poured), or by re-pressurizing them (in this case, with CO₂).
All non-pressurized mini kegs must use the optional non-pressurized mini keg tap, shown following:
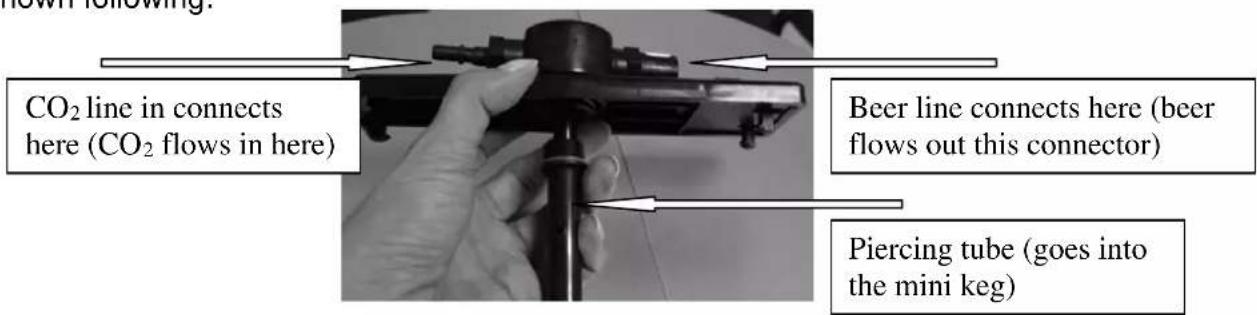
A few notes on usage of the above tap:
- Before piercing the plug on the top of the keg, you must always follow the instructions marked on the keg to eliminate the excess gas and ensure that
the keg has remained still long enough to avoid foaming from the ventilation opening.
- It's a good idea to wet the "piercing tube" with a little water prior to tapping a mini keq. This will lubricate the tube.
- Drive the piercing tube soundly into the mini keg when tapping it, and then secure the tap assembly onto the top of the mini keg with the spring-loaded catch.
Tapping the different types of kegs:
There are several different types of non-pressurized 5 Liter kegs available. The mini kegs mainly differ in the type of "bung" (plug) sealing the top of the mini keg. It is into this bung that the mini kegs are tapped.
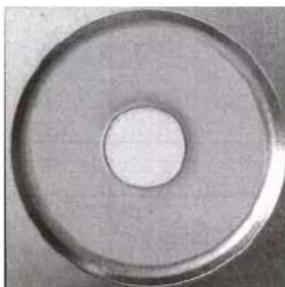
a) Mini keg with rubber plug:
This type of plug allows you to tap the keg with the piercing tube by screwing the piercing tube into the rubber bung- simply drive the tube down the center of the bung- the center piece will fall harmlessly into the beer.
natural_image
Circular metallic ring with a central hole, no text or symbols visibleb) Mini keg with combined plug:
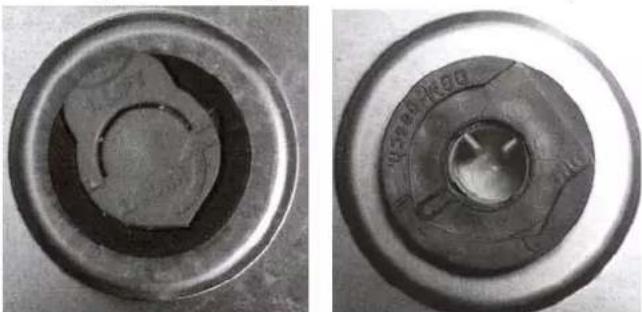
This type of plug requires the pressurized air to be expelled from the keg before tapping it. Read and comply with the instructions on the mini keg. Then pull vigorously on the below-pictured part, revealing the second part of the plug. Next drive the piercing tube down the center of the bung- the center piece will fall harmlessly into the beer.
natural_image
Close-up of two circular mechanical components with internal features, no visible text or symbolsc) Mini keg with vent plug:
It is difficult to tell the difference between this type of bung and the above type (combined plug).
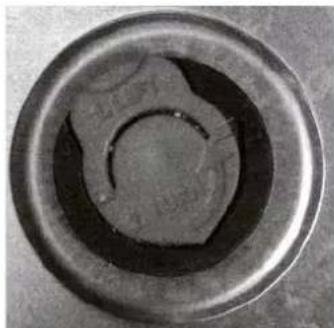
This type of plug requires the pressurized air to be expelled from the keg before tapping it. Read and comply with the instructions on the mini keg. Then pull vigorously on the below-pictured part, revealing the second part of the plug. Now use a tool (not included) the cut/remove the remaining part of the bung. If part of the bung falls into the beer, this will not cause any health risks or affect the flavor of the beer. Now fit the yellow-orange all-purpose plug (received with the optional spare parts) into the hole in the mini keg. Finally, drive the piercing tube down the center of this plug. (Note: make sure to retrieve, wash, and save this plug for future use when you are done with this mini keg.)
natural_image
Close-up of a metallic circular mechanical component with concentric rings and central hole (no text or symbols visible)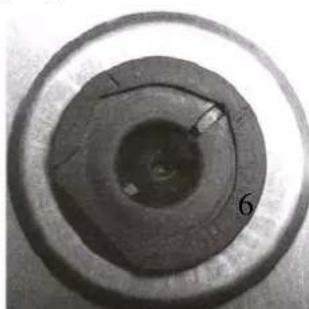
natural_image
Close-up of a circular mechanical component with concentric rings and a central hole, labeled '6' (no text or symbols beyond the number)d) Other types of mini kegs:
For most other types of mini kegs, you can remove the bung and replace it with the yellow-orange all-purpose plug (received with the optional spare parts). Then drive the piercing tube down the center of this plug. (Note: make sure to retrieve, wash, and save this plug for future use when you are done with this mini keg.)
Installing the beer line and running the CO_2 to the mini keg
Now that you have tapped your non-pressurized mini keg, you need to run the beer line and CO_2 supply.
Running the beer line is simple- insert the "male" end of the beer line in the mini kegerator to the "female" receptacle on the tap.
Running the CO_2 is a bit more complicated:
- Open the compartment located on the right-hand side of the mini kegerator.
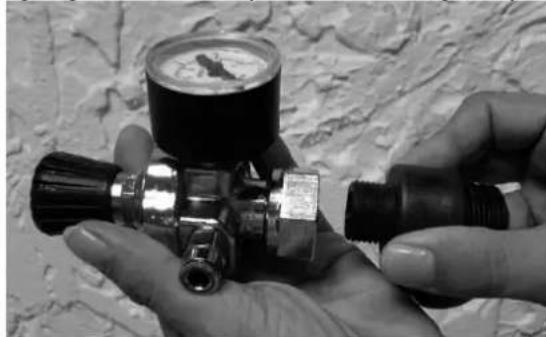
- Make sure that the pressure gauge valve is closed (to close the valve, turn it counterclockwise).
- Attach the pressure gauge on the end piece of the 16g adapter.
natural_image
Close-up of hands holding a pressure regulator valve and connector (no visible text or symbols)- Insert the 16g CO _2 cartridge in the long part of the adapter.
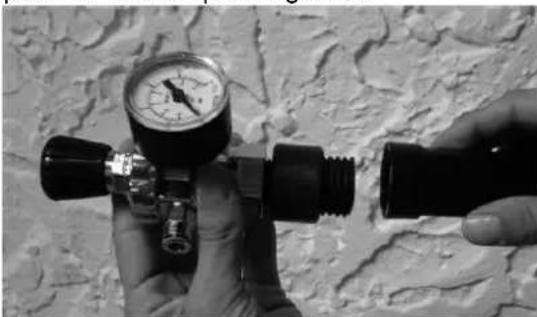
- Screw the two parts of the adapter together.
natural_image
Close-up of hands holding a pressure regulator and connector against a textured wall (no visible text or symbols)Note : once you screw this assembly together with a 16g CO₂ cartridge, do not unscrew it until the cartridge is empty- or all remaining CO₂ will rush out
- Screw the gas cartridge fully home on the pressure gauge.
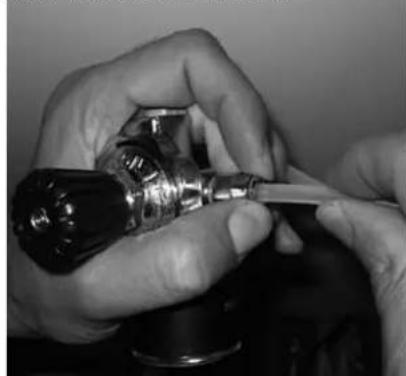
- Connect the hose by driving it home into the regulator (To check that the hose is correctly connected, try to remove it by gently tugging on it. Resistance indicates that
the hose is correctly connected. If you really want to disconnect the hose, push down the metallic end-piece while pulling the hose).
natural_image
Close-up of hands assembling a mechanical component with a tool (no visible text or symbols)- Place the assembly on its support and place the entire assembly into the compartment located on the right-hand side of the mini kegerator.
- Connect the CO_2 line to the tapped mini keg (the "female" end of the line coming from the mini kegerator connects to the "male" connector on the mini keg tap)
- Turn the dial on the regulator clockwise to begin the flow of CO_2 . Check the chart under “Operation” for pressure suggestions.
Notes:
You can use a larger CO_2 tank if you wish. Please seek informed assistance if you wish to pursue this option.
Do not use BB gun/paintball CO2 cartridges- these often have some oil mixed in with the CO2 .
Make sure to close the regulator if you want to remove the tap from the mini-keg.
To replace the CO_2 cartridge, close the regulator, unscrew the current cartridge, and reinstall a new cartridge as detailed above.
Removing the CO_2 line and mini keg
Once your mini keg is floated, you need to shut off the CO_2 and remove the keg.
- Open the compartment located on the right-hand side of the mini kegerator.
- Shut off the regulator (turn the knob counter-clockwise).
- Put a container under the dispenser and pour off any remaining beer (this will also relieve some of the pressure in the mini keg).
- Open the mini kegerator main door and disconnect the CO _2 line and beer line.
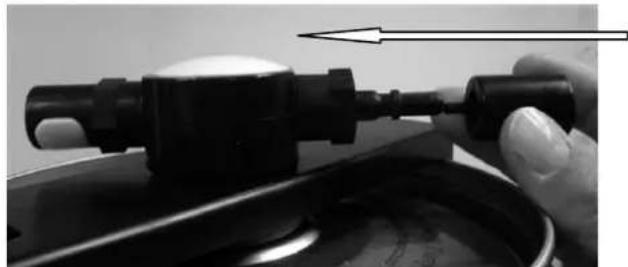
- Empty the remaining CO2 from the mini keg with the CO2 releaser as shown following:
natural_image
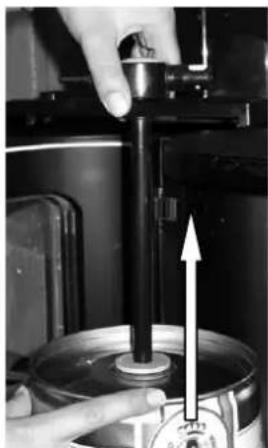
Close-up of a hand holding a mechanical component with a tool, no visible text or symbols- Undo the tap from the mini keg by releasing the catch (on the top of the tap) and pulling it up and out of the mini keg):
natural_image
Close-up of a hand operating a kitchen air conditioner with a vertical rod and upward arrow indicating motion (no text or symbols visible)- Rinse the tap out under running water. You should also clean it with a mild detergent solution and rinse it thoroughly.
- Clean the lines as directed above under "Tapping your first mini keg"
Note that the optional accessories include a cleaning kit that uses CO_2 pressure to force the cleaning solution through the lines. To use this system, fill the cleaning kit half full with your choice of cleaning solution (water mixed with a bit of beer line cleaner, baking soda, or white vinegar), connect it to the unit as if it were a non-pressurized mini keg, and pour out all of the solution. Make sure to rinse the lines again!
Operation
-
For best results, use clean glasses. Rinsing the glasses with cold water prior to pouring can deliver better results (less foam).
-
Hold the glass at an angle under the dispenser. Do not touch the nozzle of the dispenser to the glass.
-
Pull the dispenser handle towards you to start the flow of beer. Open the dispenser up all the way to get the maximum flow rate (this will decrease foam).
-
Slowly tip the glass upright as it fills.
-
Gently ease the dispenser handle back to the "closed" position as the foam nears the lip of the glass.
-
Enjoy your beer!
Note: If you are enjoying a non-pressurized mini keg, you may adjust the pressure for maximum enjoyment. Here are our suggestions:
| Beer type CO2 content in % | Pressure (@ approx. 41°F) | |
| German beers +/- 0.5 | +/- 0.4 - 0.5 bars | |
| French beers +/- 0.6 - | 0.8 +/- 0.8 bars | |
| Very fermented brown ales +/- 0.6 - 0.8 +/- 0.8 - 1 bars | ||
Cleaning
You should clean the lines after every keg. The instructions for this are under the heading "Tapping your first mini keg".
For cleaning the other parts of the unit, a damp cloth with a mild detergent solution is best.
Important Safeguards
- Do not use the appliance if the power supply cord is damaged. If the power supply cord is damaged, it must be replaced by a qualified technician.
- This unit is designed to function on 115 Volts/ 60 Hz (110/115/120 Volts acceptable) electrical circuits.
- This appliance is not designed for children. Never allow unattended children to use this appliance.
- Unplug the appliance if it will not be used for an extended period of time.
- Unplug the appliance prior to cleaning.
- Set the appliance on a flat surface away from direct sunlight and other heat sources.
- This appliance is designed to function optimally in room temperature environments (mid 70°s Fahrenheit).
- Do not move the unit while it is full.
- The power supply cord must be grounded.
- Never pull the cord directly to disconnect the appliance. Always pull the plug out of the socket.
- Never lift the appliance by the power supply cord or the dispensing tap.
- Keep the power supply cord away from heating surfaces.
- Do not try to repair, adjust this appliance or replace its components by yourself. Should it not operate correctly, contact customer support.
- This appliance is designed for household use only and not for commercial use.
Do not use the appliance for other uses than that for which it is designed. - Do not immerse the appliance or its power supply cord in water or any other liquid.
- Do not cover the appliance or place anything on it.
- Do not insert any objects into the ventilation holes.
- Only use approved CO _2 cartridges
- Cartridges contain pressurised CO _2 . Keep them away from heat, in a dry and cool place.
- Do not dispose of empty CO _2 cartridges in a fire.
- Clean this appliance prior to use, and after every keg
Limited Warranty
This EdgeStar product is warranted to be free from defective workmanship and materials for the first year following the date of original purchase. Replacement parts will be supplied free of charge for the first year following the date of original purchase. Labor will be performed free of charge for the first 90 days following the date of original purchase.
WHAT IS COVERED:
This warranty applies to the original purchaser only, and only covers defects in workmanship experienced during operation of the product under normal service, maintenance, and usage conditions. This warranty applies to the purchase and use of this product in residential settings within the United States of America.
WHAT IS NOT COVERED:
The following limitations apply to the coverage of this warranty:
Optional accessories, attachments, and appearance items are excluded from warranty coverage, as is shipping damage, and any damage caused by improper voltage or any other misuse, including abnormal service, handling, or usage.
This warranty does not cover normal wear and tear on parts or replacement of parts designed to be replaced, e.g. filters, etc.
This warranty does not cover service trips to deliver, pick-up, repair, or install the product, or to instruct in proper usage of the product.
Damages or operating problems resulting from abuse, operation outside environmental specifications, uses contrary to instructions provided in the owner's manual, accidents, vermin, fire, flood, improper installation, unauthorized service, acts of God, unauthorized installation or modification, or commercial use are excluded from warranty coverage.
This warranty does not cover labor incurred 91 days or more after the date of original purchase.
This warranty does not cover use of EdgeStar products in commercial settings.
DESCRIPTION OF WARRANTY SERVICE:
All defective product components covered by this warranty will be repaired or replaced, at EdgeStar's option, free of charge on a mail-in basis to EdgeStar's authorized repair facility during the first 90 days from the date of original purchase.
All defective product components covered by this warranty will be repaired or replaced, at EdgeStar's option, on a mail-in basis to EdgeStar's authorized repair facility during the time period beginning on the 91^st day from the date of original purchase and ending one year from the date of original purchase. During this time period, parts will be supplied free of charge, but labor charges will apply.
All replacement parts and units will be new, remanufactured, or refurbished.
All products and components replaced by EdgeStar under warranty service become the property of EdgeStar.
OBTAINING WARRANTY SERVICE:
Contact EdgeStar for troubleshooting assistance and warranty service authorization at 1-866-319-5473. Please have your order receipt available to confirm the date of purchase.
Once an EdgeStar authorized representative has confirmed that your product is eligible for warranty service, the product must be returned to an EdgeStar authorized repair facility.
The purchaser is solely responsible for prepaying all shipping related costs to and from the repair facility.
EdgeStar is not responsible for damage resulting from shipper mishandling or improper packaging.
Do not return defective product to the place of purchase.
THIS WARRANTY IS IN LIEU OF ANY OTHER WARRANTY, EXPRESS OR IMPLIED, INCLUDING WITHOUT LIMITATION, ANY WARRANTY OF MERCHANTABILITY OR FITNESS FOR A PARTICULAR PURPOSE. TO THE EXTENT ANY IMPLIED WARRANTY IS REQUIRED BY LAW, IT IS LIMITED IN DURATION TO THE EXPRESS WARRANTY PERIOD ABOVE. NEITHER THE MANUFACTURER NOR ITS DISTRIBUTORS SHALL BE LIABLE FOR ANY INCIDENTAL, CONSEQUENTIAL, INDIRECT, SPECIAL, OR PUNITIVE DAMAGES
OF ANY NATURE, INCLUDING WITHOUT LIMITATION, LOST REVENUES OR PROFITS, OR ANY OTHER DAMAGE WHETHER BASED IN CONTRACT, TORT, OR OTHERWISE. SOME STATES DO NOT ALLOW THE EXCLUSION OF INCIDENTAL OR CONSEQUENTIAL DAMAGES, SO THE ABOVE EXCLUSION MAY NOT APPLY TO YOU. THIS WARRANTY GIVES YOU SPECIFIC LEGAL RIGHTS. YOU MAY HAVE OTHER RIGHTS THAT VARY FROM STATE TO STATE.
- Thank you
- Accessories
- Installation
- General instructions
- Heineken brand DraughtKeg tapping instructions
- a) Mini keg with rubber plug:
- b) Mini keg with combined plug:
- c) Mini keg with vent plug:
- d) Other types of mini kegs:
- Notes:
- Removing the CO_2 line and mini keg
- Operation
- Cleaning
- Important Safeguards
- Limited Warranty
- WHAT IS COVERED:
- WHAT IS NOT COVERED:
- DESCRIPTION OF WARRANTY SERVICE:
- OBTAINING WARRANTY SERVICE:
Brand : EDGESTAR
Model : TBC50-ACC
Category : Beer dispenser