
Revolution 200 - Regulator MONSTER - Free user manual and instructions
Find the device manual for free Revolution 200 MONSTER in PDF.


| Type | Universal Remote Control |
| Brand | Monster |
| Model | Revolution 200 |
| Dimensions (approximate) | 8 x 2 x 1 inches |
| Weight (with batteries) | 0.5 lb |
| Power Source | 4 AAA batteries |
| Connectivity | USB 2.0 (for programming) |
| Display | LCD screen |
| Main Functions | Programmable activities (Hello, Good Night, Watch Movie, Watch Satellite/Cable), favorite channels up to 20, learning from original remotes, firmware updates via PC |
| Compatible Systems | Windows XP SP3, Vista, 7 (32/64-bit); Internet Explorer 7+ |
| Setup Method | Setup Wizard on CD-ROM, database of device codes, manual learning |
| Maintenance | Clean with a soft, dry cloth |
| Safety Precautions | Do not expose to moisture; use only specified batteries; dispose of batteries properly |
| Spare Parts | Not applicable |
| Reparability | Not user-serviceable; contact Monster support for issues |
| General Information | Designed for home theater and lighting control; supports up to 10 devices; includes CD-ROM, USB cable, quick start guide |
Frequently Asked Questions - Revolution 200 MONSTER
User questions about Revolution 200 MONSTER
0 question about this device. Answer the ones you know or ask your own.
Ask a new question about this device
Download the instructions for your Regulator in PDF format for free! Find your manual Revolution 200 - MONSTER and take your electronic device back in hand. On this page are published all the documents necessary for the use of your device. Revolution 200 by MONSTER.
USER MANUAL Revolution 200 MONSTER
SIMPLE ADVANCED
HOME THEATER AND LIGHTING CONTROL
AUDIO/VIDEO
INSTRUCTION MANUAL
REVOLUTION 200 SETUP GUIDE
Overview 2
What's in the Box....2
Installing Batteries 3
GETTING STARTED WITH THE REVOLUTION 200....3
Installing the REVOLUTION Remote Control Setup Wizard 3
Overview 3
Minimum Technical Requirements 3
Installing the REVOLUTION Remote Control Setup Wizard 4
If Your CD Does Not Start the Install Process Automatically....4
Launching the REVOLUTION Remote Control Setup Wizard 4
Logging In....4
Connecting Your Remote 5
HOW TO SET UP ACTIVITIES....13
Overview of Activities 13
Getting Started with Activities.... 13
Why You Should Set Up a Hello Activity 13
Adding a Hello Activity (All ON)....14
Configuring the Hello Activity for Your Components.... 16
Testing the Hello Activity 18
Finishing the Hello Activity....20
Setting Up the Good Night Activity 22
Adding the Good Night Activity 22
To Add the Good Night Activity....22
Configuring the Good Night activity for Your Devices....24
Testing the Good Night Activity....26
Finishing the Good Night Activity 28
Setting Up the Watch Movie Activity 29
Recording Which Devices You Use to Watch Movies....29
Recording How You Access These Inputs With Your Original Remotes 30
Adding a New Activity Using the REVOLUTION Remote Control Setup Wizard....30
Building the Watch Movie Activity 32
Setting Up the Watch Satellite or Cable Activity 39
Recording Which Devices You Use to Watch Satellite or Cable....39
Recording How You Access These Inputs With Your Original Remotes 39
Adding a New Activity in the REVOLUTION Remote Control Setup Wizard 40
Building the Watch Cable or Watch Satellite Activity 41
Using Your Activities 47
HOW TO SET UP FAVORITES 49
Overview of Favorites....49
Setting Up a List of Favorite Channels....49
Choosing Your Favorite Channels 53
Assigning Remote Button Groups to Control Different Devices 57
TROUBLESHOOTING....58
REVOLUTION 200 SETUP GUIDE
Everything you need to start using your new remote:
What's in the Box•
Installing the REVOLUTION Remote Control Setup Wizard
How to Assign Devices•
How to Set Up Activities•
How to Set Up Favorites•
How to Set Up Lighting•
OVERVIEW
Goal of this section: to become familiar with your remote.
What's in the Box•
Installing Batteries•
Understanding the Display Window•
Setting Up the REVOLUTION•
WHAT'S IN THE BOx
First, check that all of the following items are in your package.

Remote
CD-ROM
4 AAA Batteries
Quick Start
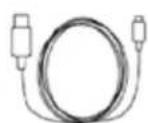
USB Adapter
Installing Batteries
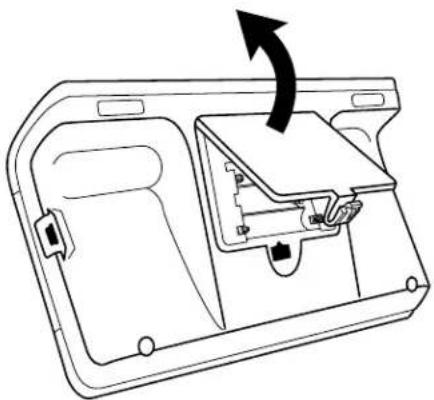
The REVOLUTION uses 4 AAA batteries. To put batteries in your remote, follow these instructions.
natural_image
Technical line drawing of a mechanical component with an arrow indicating rotation (no text or symbols present)Remove the battery cover from the back of the remote by pressing on the latch.1.
Install 4 AAA batteries in the battery bay, following the diagram inside.2.
GETTING STARTED WITH THE REVOLUTION
INSTALLING THE REVOLUTION REMOTE CONTROL SETUP WIZARD
Goal of this section: set up the advanced features on your remote using the Setup Wizard.
Overview
Minimum Technical Requirements•
Installing the REVOLUTION Remote Control Setup Wizard
Launching the REVOLUTION Remote Control Setup Wizard
Logging In•
Connecting Your Remote•
Minimum Technical Requirements
Make sure your PC meets the REVOLUTION's minimum technical requirements.
Minimum hardware requirements:
USB 2.0 port•
CD-ROM drive•
Internet connection•
Minimum software requirements:
Operating system: Windows XP (Service Pack 3 and later), Windows Vista, Windows 7 • (Windows 2000 not supported)
Web browser: Internet Explorer 7.0 or later•
Installing the REVOLUTION Remote Control Setup wizard
To begin setting up your remote, install the software and follow these instructions.
If your CD does not start the install process automatically...
Open the CD as a folder on your desktop.1.
Double-click the icon shown above.2.
* If you are using Windows XP, make sure you have installed Service Pack 3 before you install this software.
Launching the REVOLUTION Remote Control Setup wizard
Double-click the Setup Wizard icon on your desktop.
Logging In
The first time you run the Setup Wizard, you need to register so you can save your remote's settings. Click "Create New Account." After creating your account, use your username and password to log in.
Need help setting up this remote? Call Monster Support toll-free at 1-877-800-8989.
Connecting Your Remote
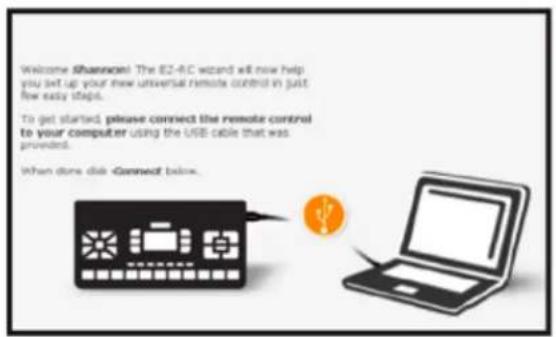
If you see a progress bar in the corner of the screen...
It means your remote's firmware is being updated. Don't disconnect the remote! The REVOLUTION
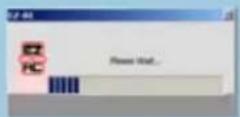
is constantly being updated and improved, to get the latest codes and provide the most advanced functionality available.
Connect the remote to your computer, using the USB cable that came with it.
Check that your remote is connected.
See the green arrow icon in the status bar of your PC.

What to do if this error message appears...
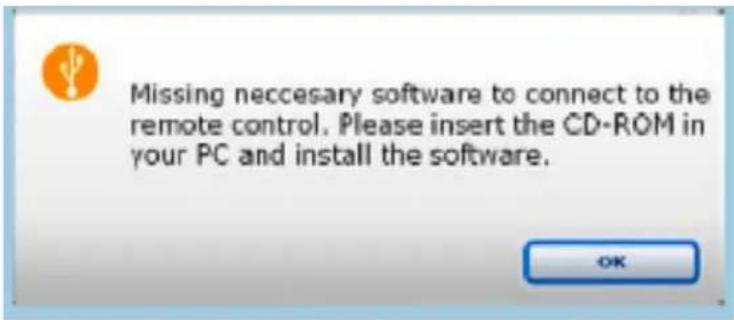
Change the ActiveX settings in your browser to enable the Setup Wizard to work:
Click "OK" in the dialog box pictured above.1.
Find the pale yellow bar across the top of the page, as shown below.2.

To begin changing the ActiveX setting, click on the text that reads "click here" as circled above.3.
Click the "Connect" button again at the bottom of the screen.4.
Once your remote is connected...
Check the option "Start a new setup" and click the Start button.
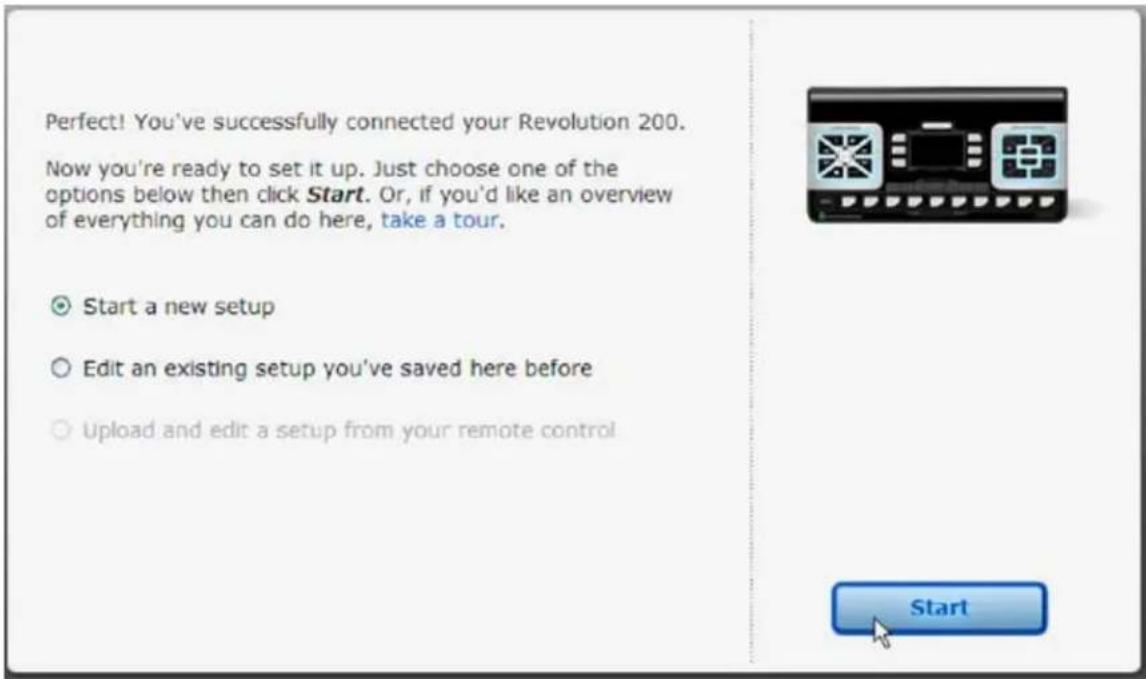
Next, the "Set up Devices" screen appears. It gives you an overview of the steps to entering your home entertainment system's components. Once you finish the steps for each component, signal the Wizard to transfer this information to your remote.
Click the "Next" button to begin the process.

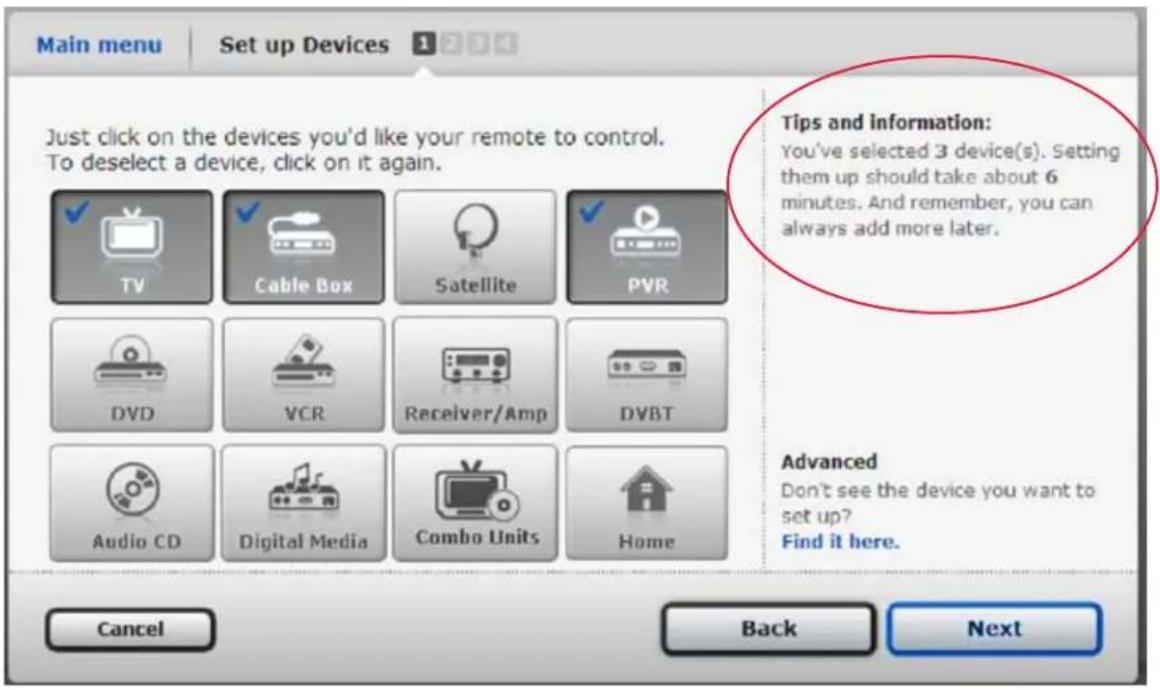
In Step #1 of "Set up Devices," roll your cursor over any icon, and a list of the relevant devices appears on the right.
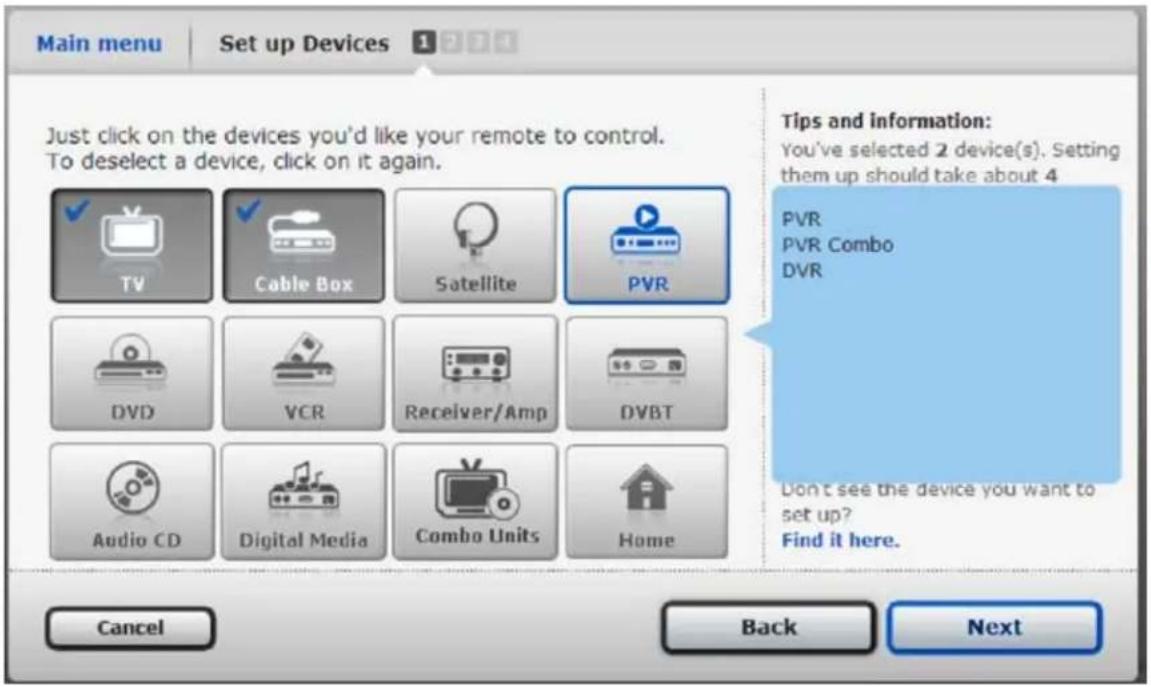
As you choose the types of components, the Wizard estimates how much time you need to complete setup (see "Tips and Information" as circled in red below). Make all your selections, and click the "Next" button.
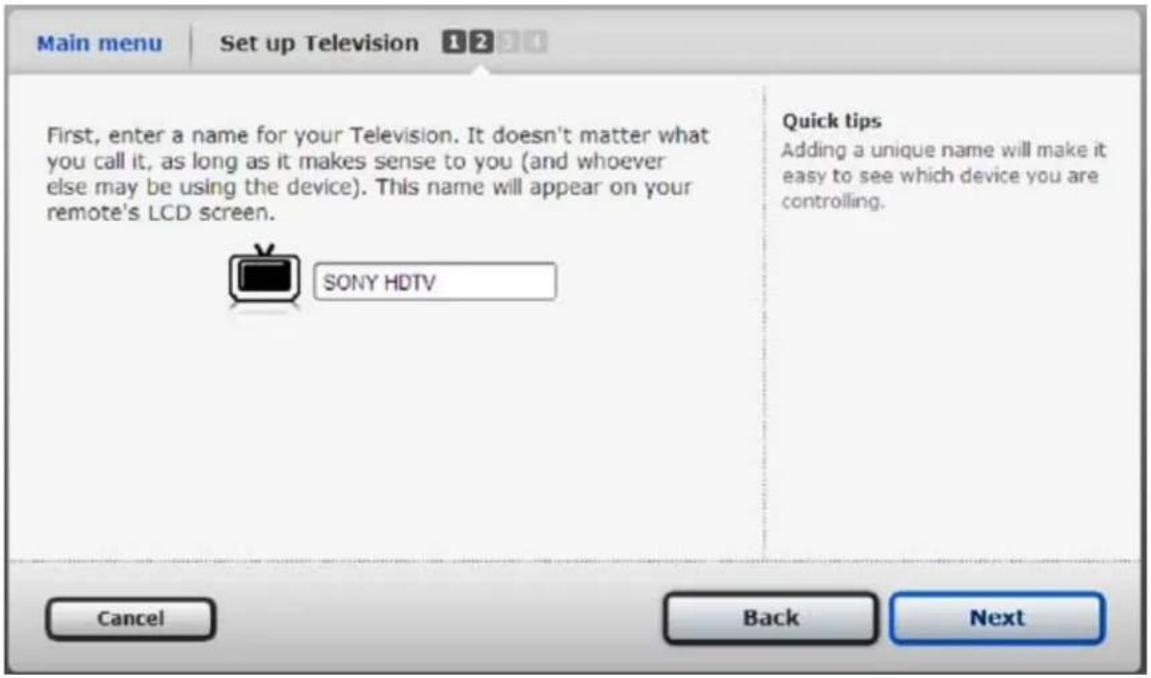
In Step #2, you set up your TV. Enter a name that's descriptive and easy for you to remember. Click "Next" to continue.
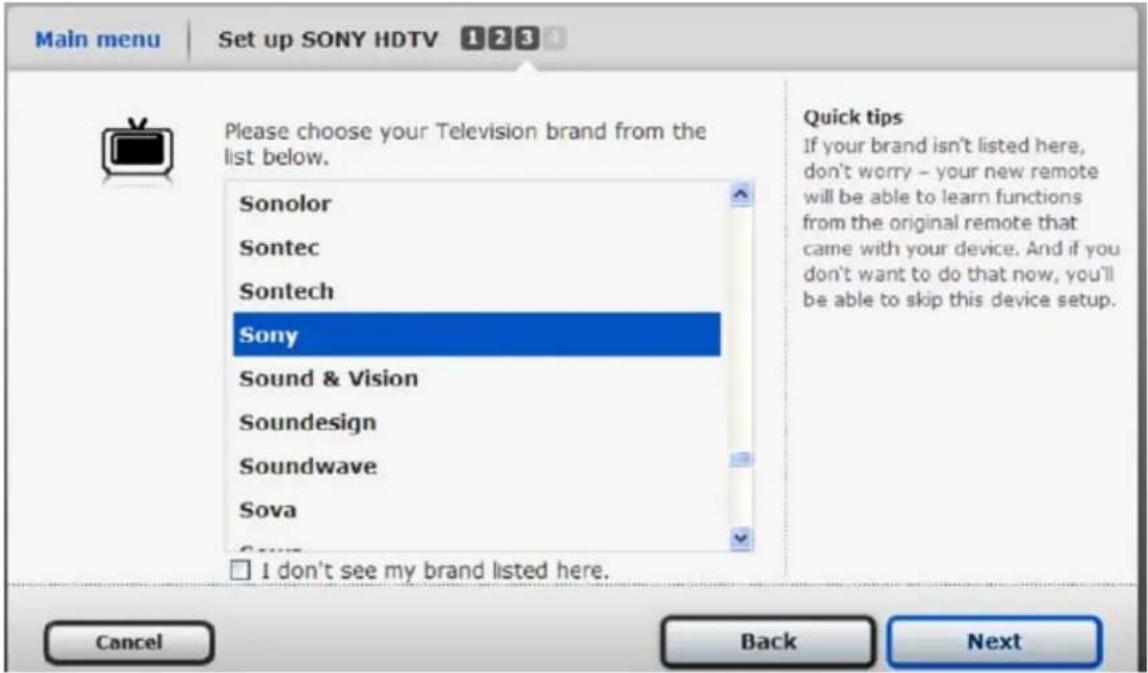
In Step #3, scroll to find the manufacturer of your component and select it. Click "Next" to continue.
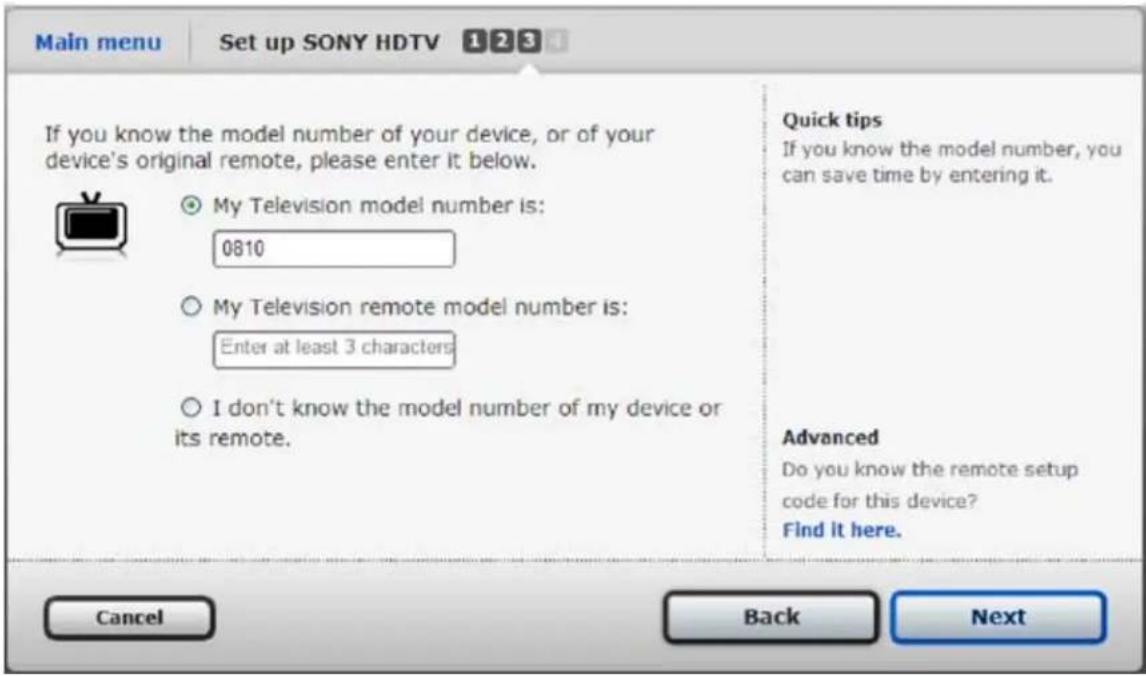
Enter its model number (and only its model number). Notice you can still continue without model numbers. Click "Next" to continue.
The Setup Wizard lists all models numbers similar to what you entered. Scroll through the list to find yours and highlight it. Click "Next" to continue.
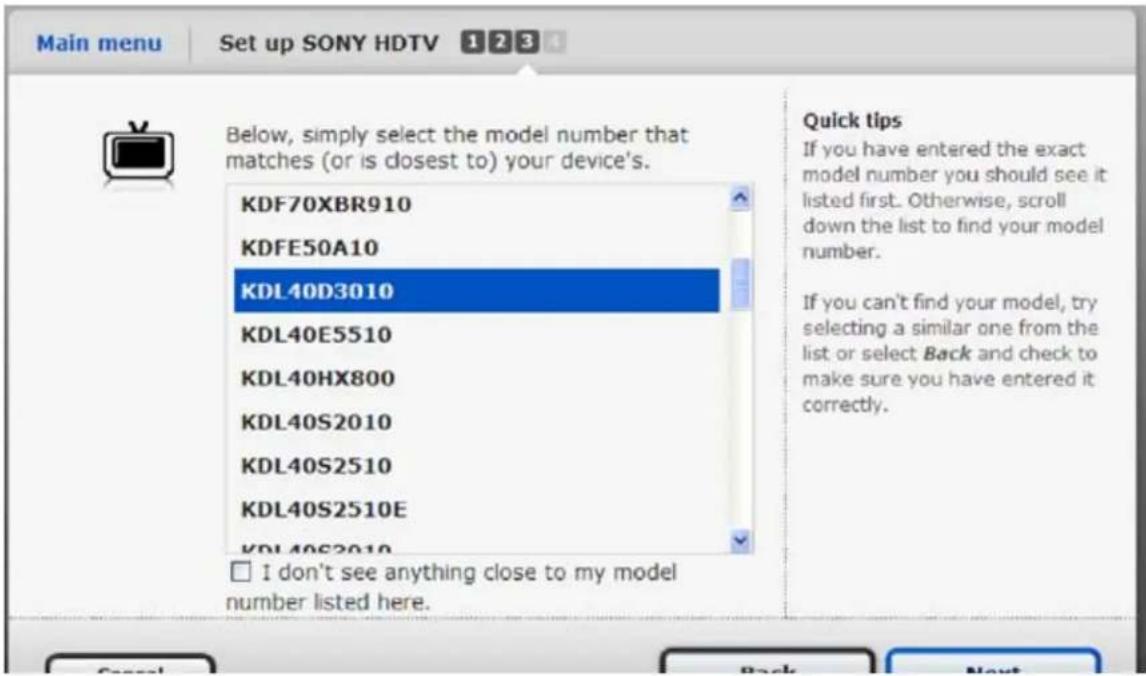
When you select a code the Wizard recognizes, you can test that code in the following steps, as you can see below.
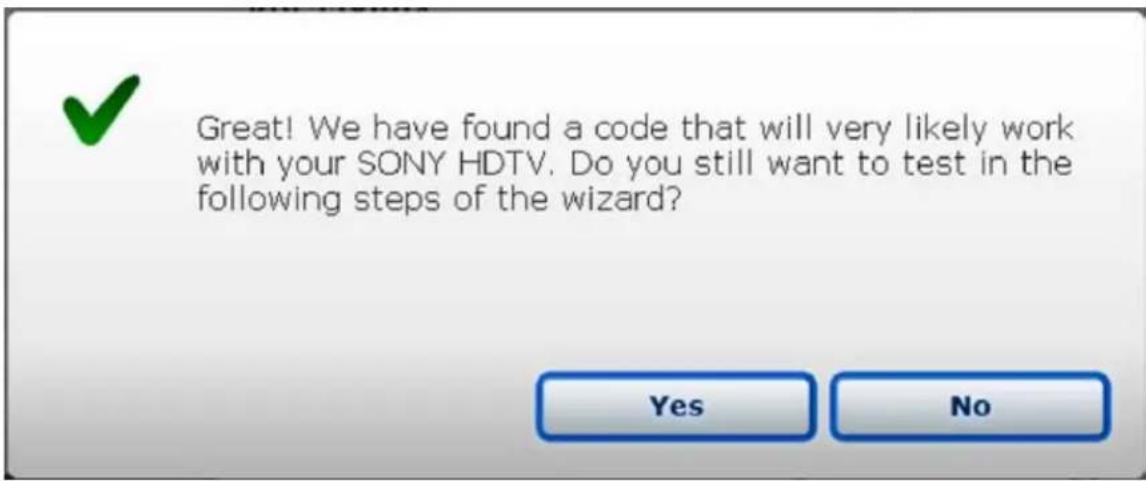
For now, click "No" and start setting up the other devices you indicated in Step #1.
The Wizard congratulates you on setting up your TV. It also displays the other devices you will set up. To set up the next device, click "Next" and continue.
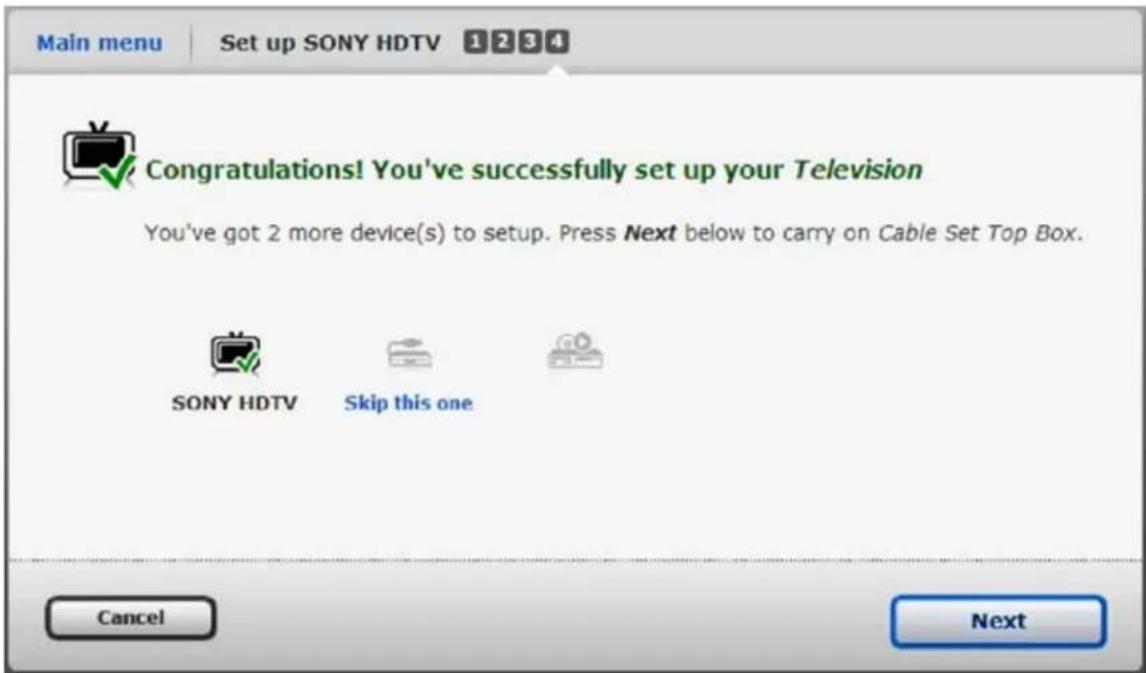
NOTE: Since the process for setting up the other devices is the same, skip ahead to what your complete setup looks like.
Complete all four steps for each device to see the screen below. Click "No" and return to the Main Menu to download your configuration to your remote.
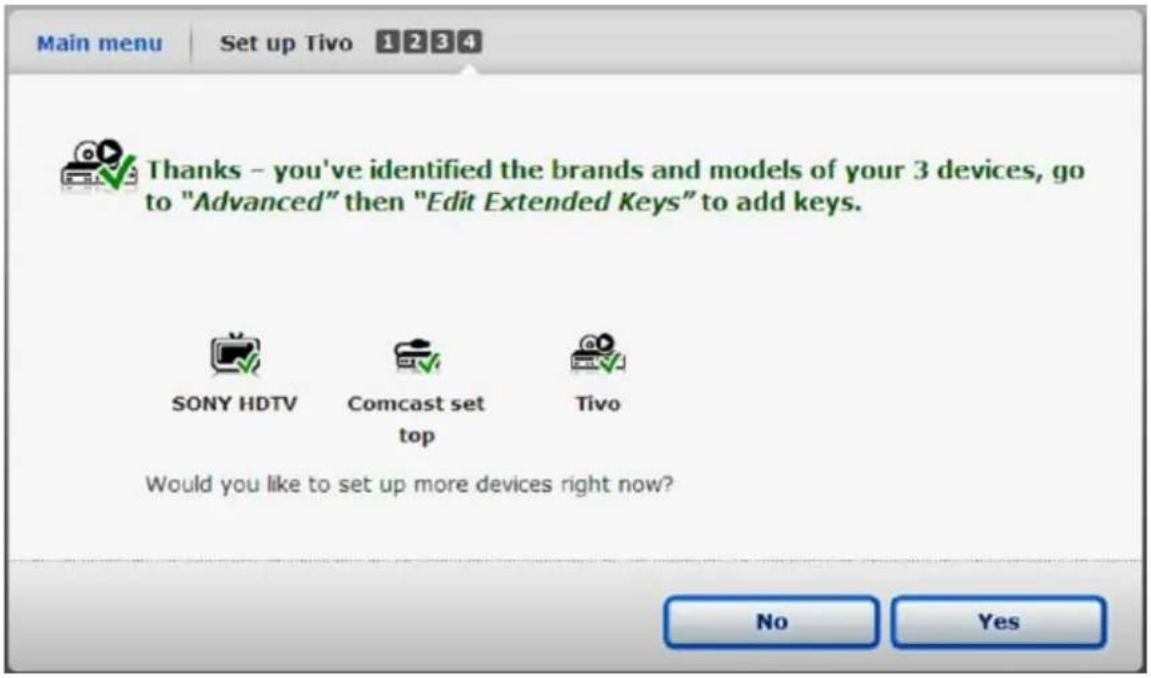
To download your configuration, click the "Download to Remote" button.
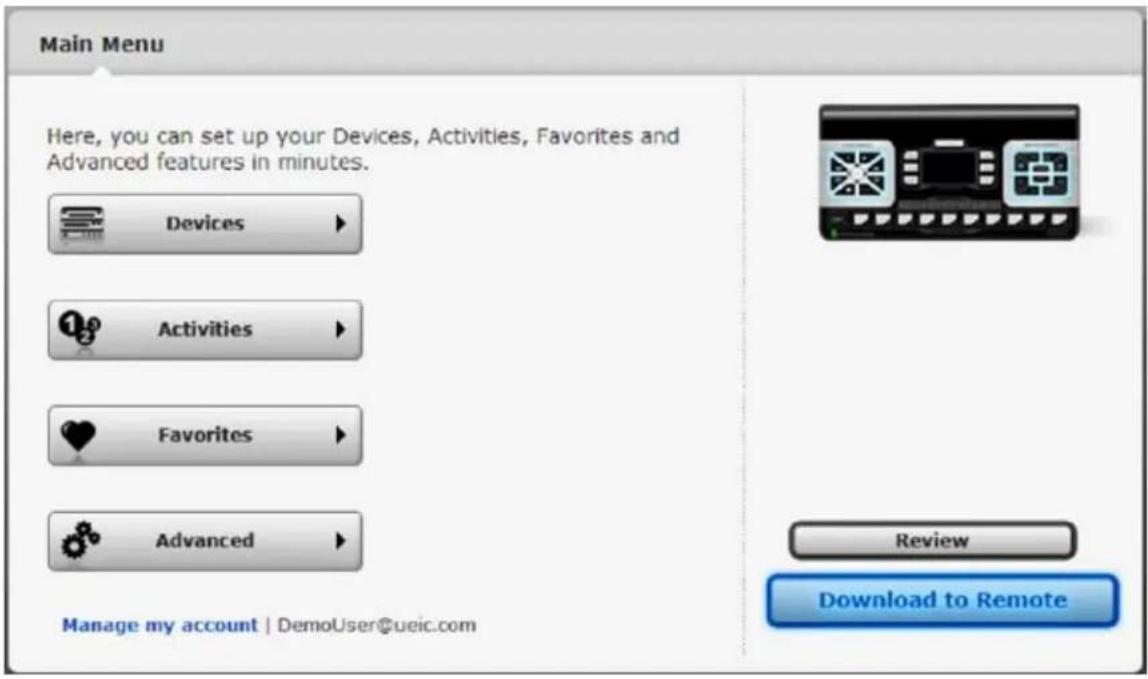
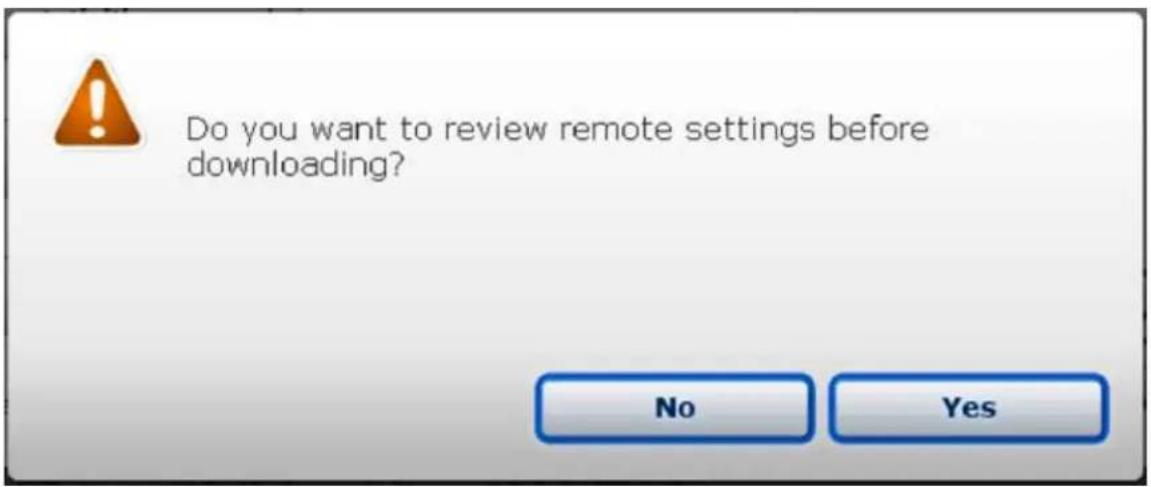
The Wizard prompts you to review your settings, which is a good idea before sending the configuration to your remote. Click "Yes."
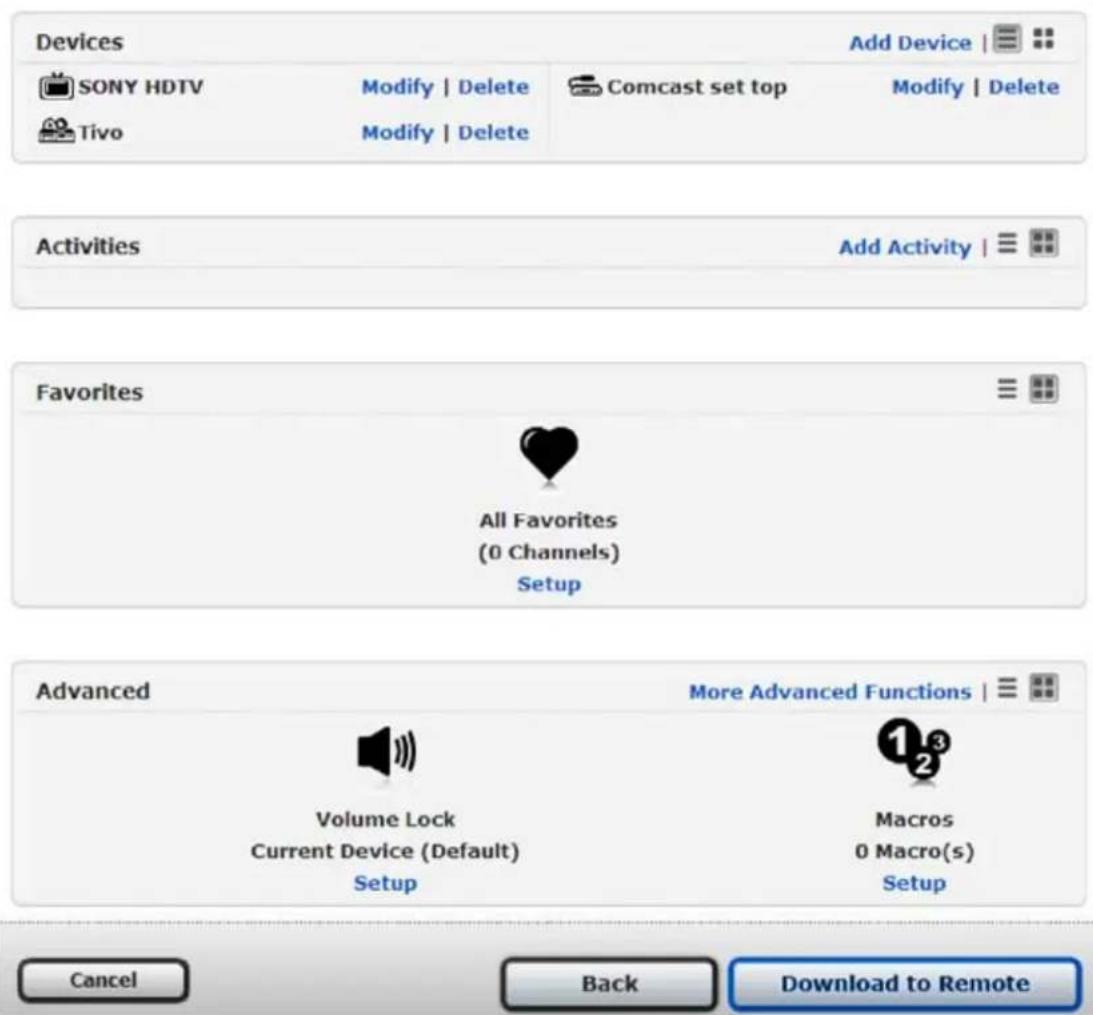
The next screen contains a list of your devices with links to add another device, modify the settings of a device you already added, or to delete one of them. If all appears correct, click the "Download to Remote" button.
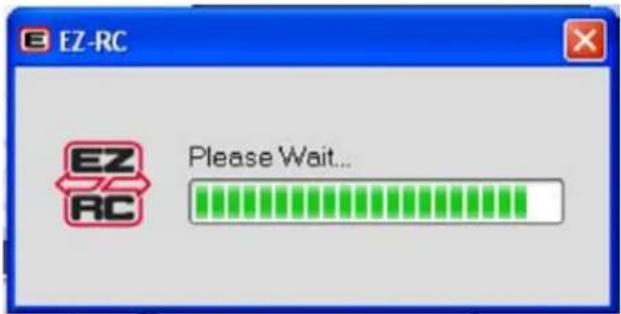
While the configuration downloads to your remote, you see this progress indicator.
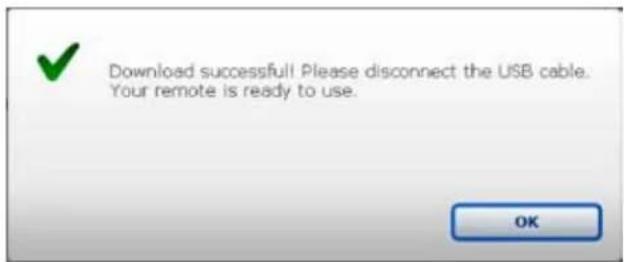
After a successful download, see the dialog box below. Click "OK." You've successfully configured your remote to control your home system.
HOW TO SET UP ACTIVITIES
This section teaches you how to control your entire home entertainment system at the touch of a button.
OVERVIEW OF ACTIVITIES
Set up the Hello activity•
Set up the Good Night activity•
Set up a Watch Movie activity•
Set up a Watch Satellite or Cable activity•
GETTING STARTED WITH ACTIVITIES
Activities give you one-touch control over your complete home system to watch movies and listen to music.
Why You Should Set Up a Hello Activity
Different components need different amounts of time to warm up before they are ready for use. This can interfere with activities like "Watch Movie" that require multiple steps. The Hello activity makes certain your components are ready before a multi-step activity like "Watch Movie."
Adding a Hello Activity (All ON)
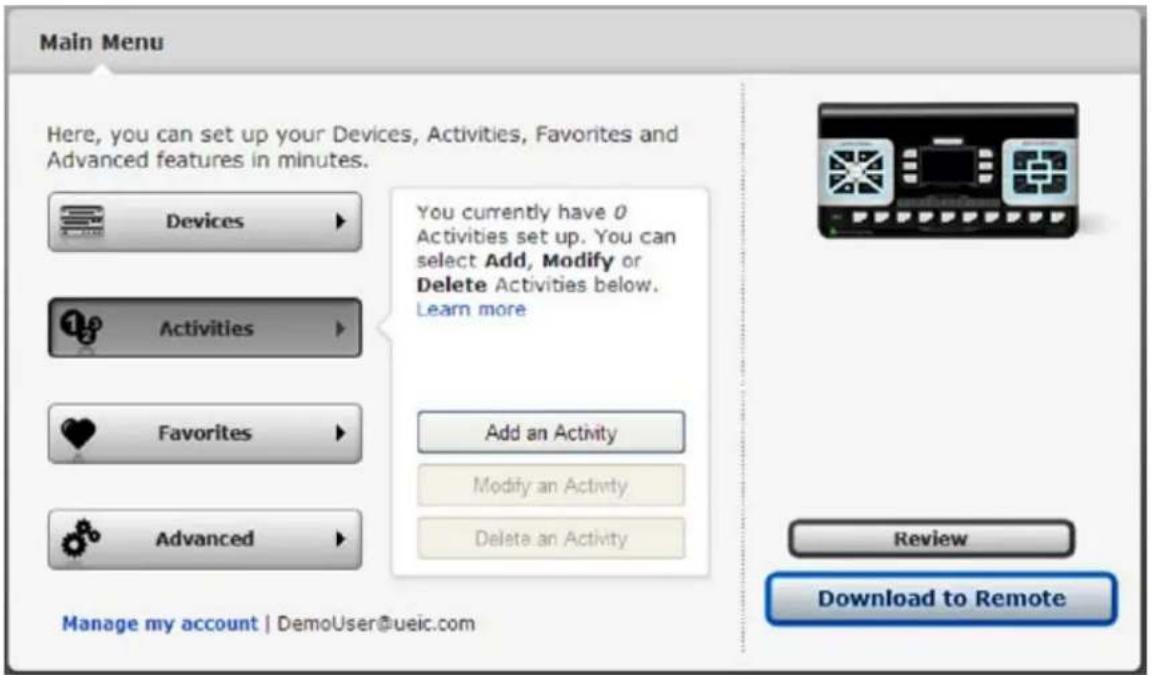
From the Main Menu, click "Activities." From the submenu, click "Add an Activity."
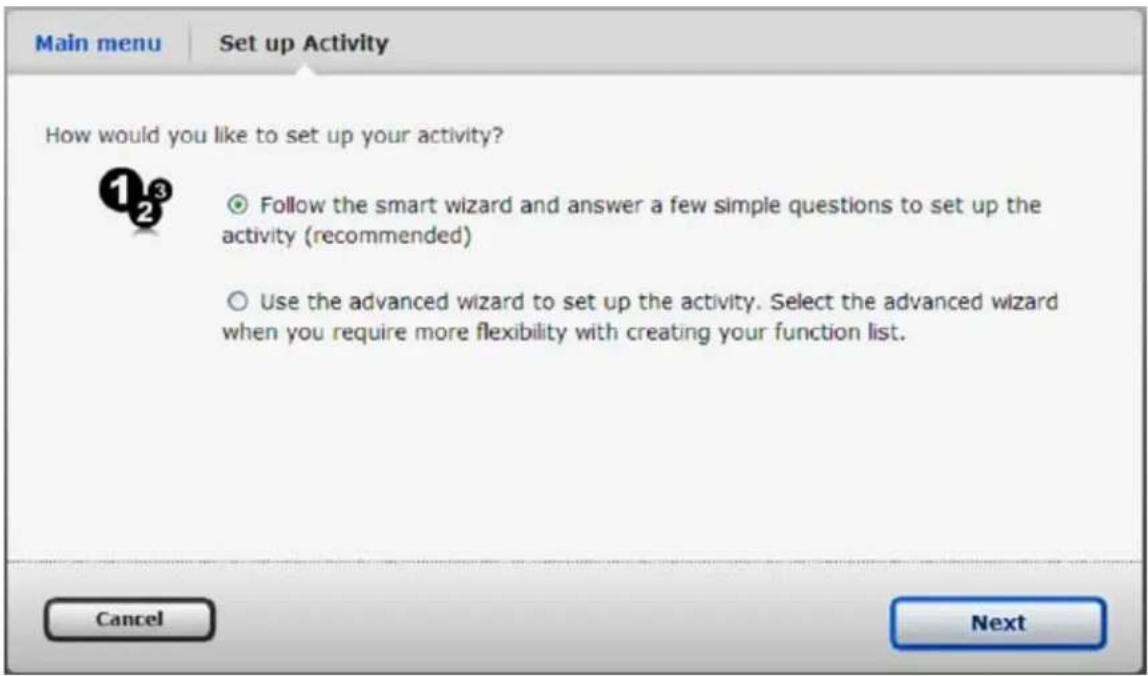
Select "Smart Wizard" and click "Next" to continue.
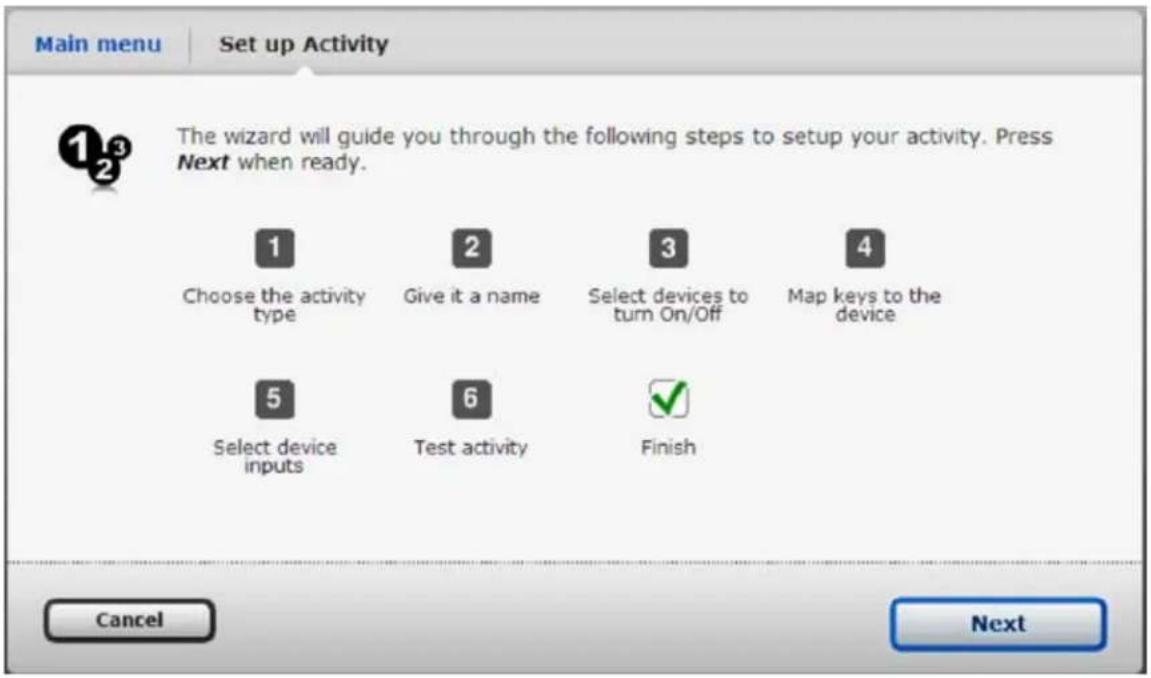
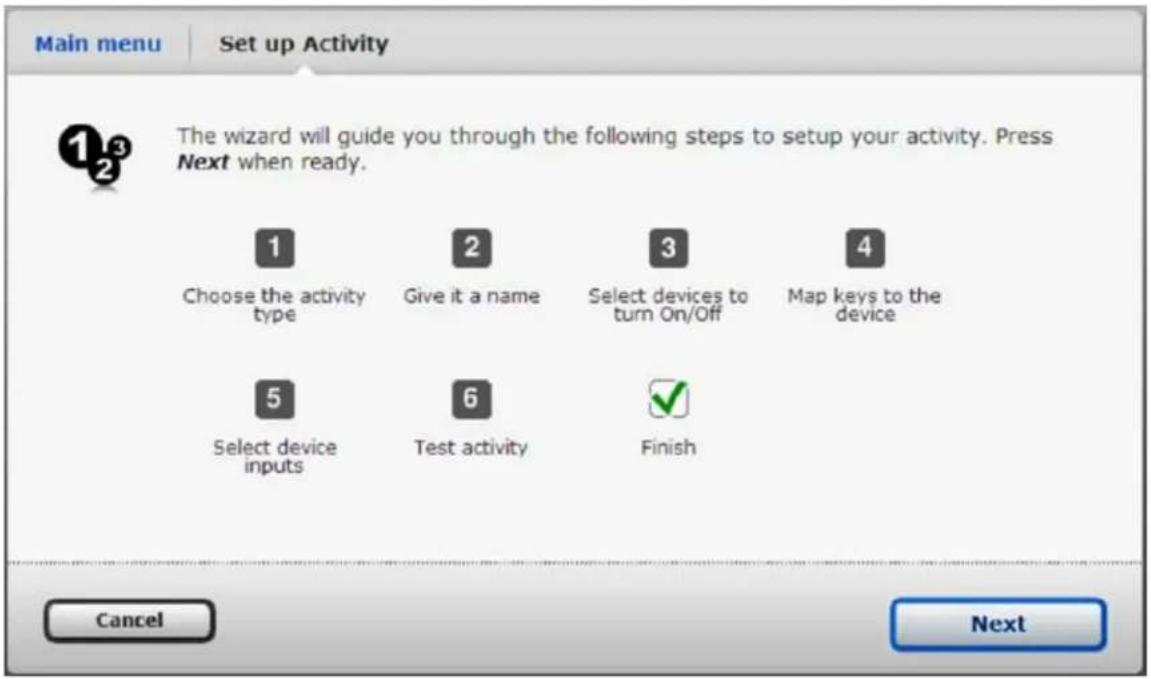
The following screen lists the steps needed to set up the activity. Click "Next" to continue.
Select "Hello" from the list of activities. Click "Next" to continue.
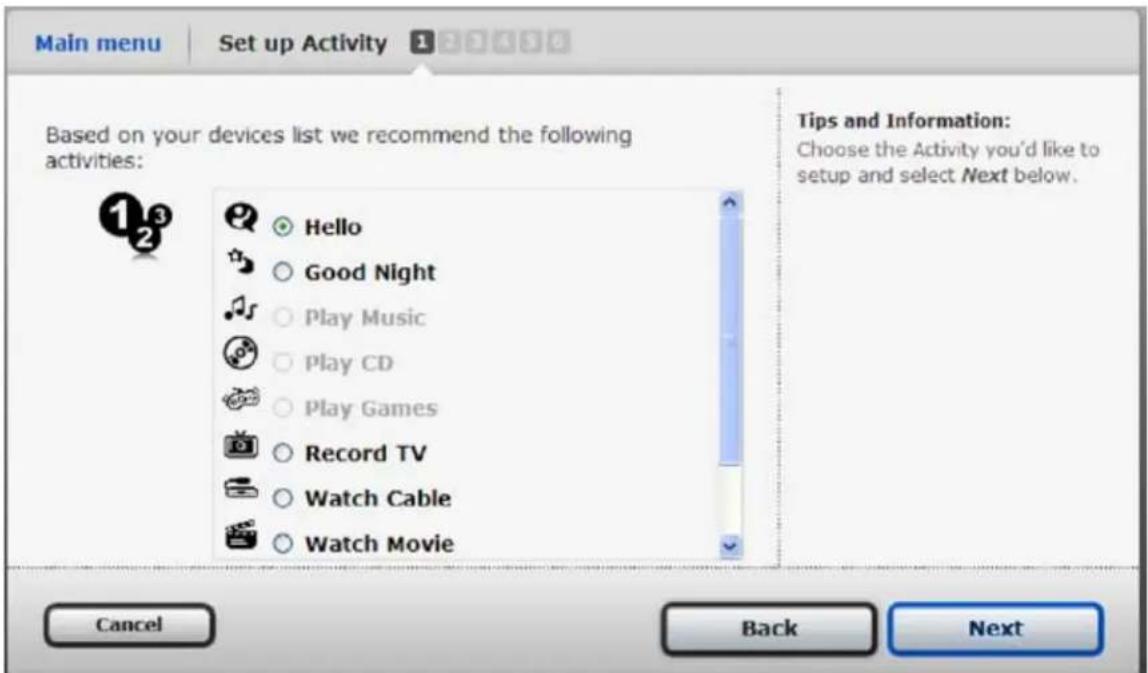
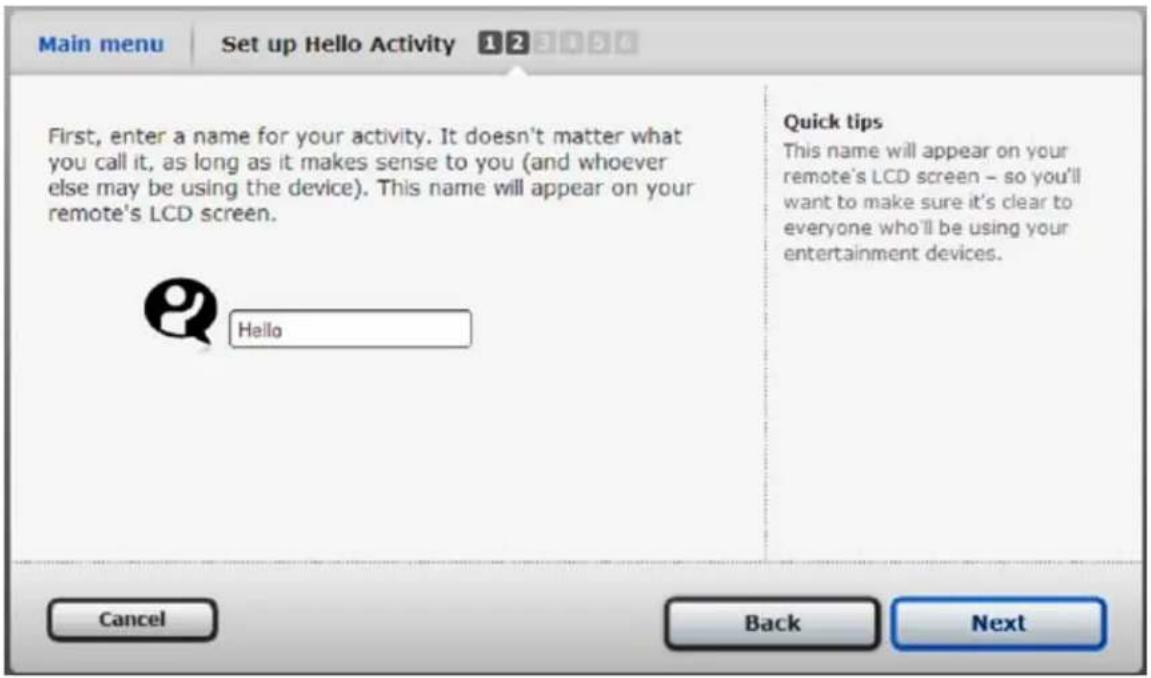
Enter a new name for this activity, or leave it as "Hello." Click "Next" to continue.
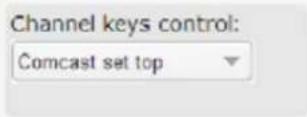
Configuring the Hello Activity for Your Components
In this screen you can tell each device how to turn on.
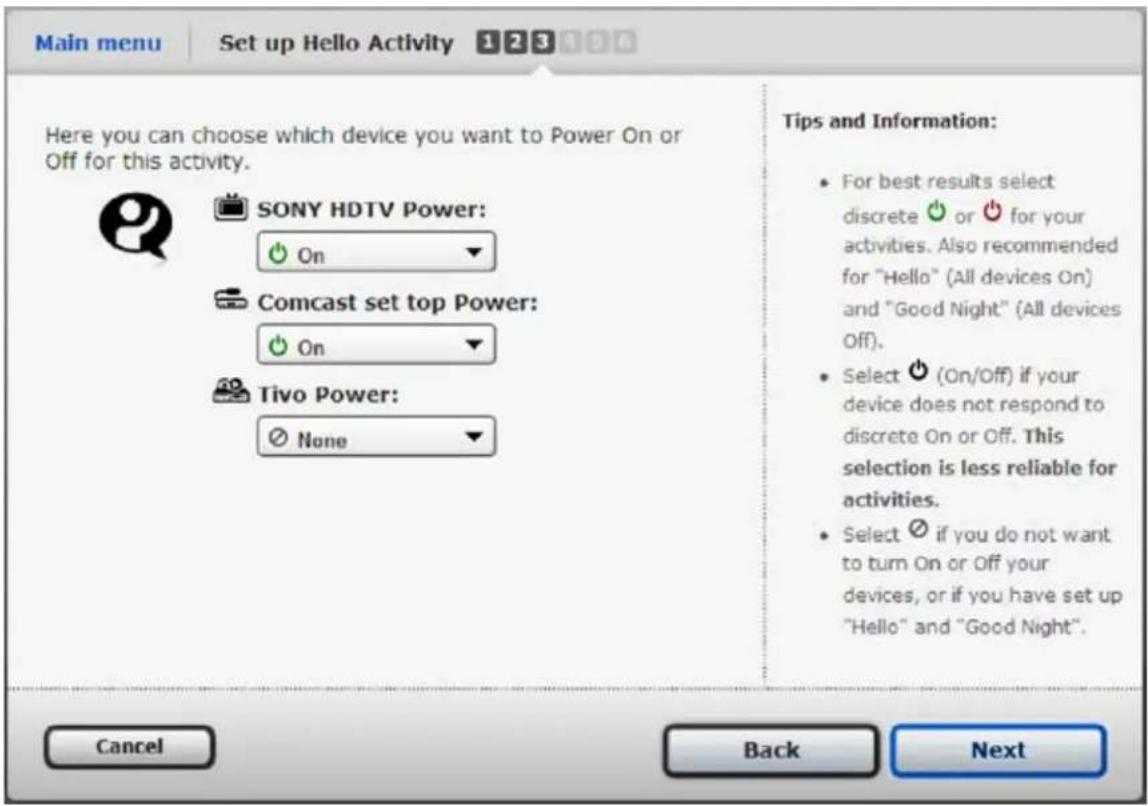
Use the drop-down menu for each device and choose from:
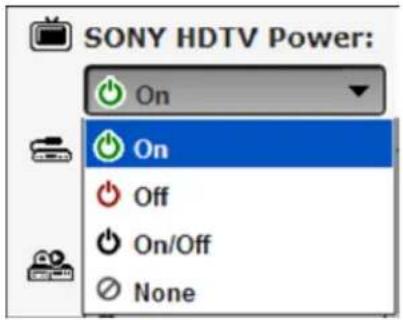
None Use this option to exclude a device from an activity.
On Use this option if the device's original remote has separate "Power ON" and "OFF" buttons.
Off You won't need this option for the Hello activity.
Toggle Use this option if the device's original remote has a single "Power ON/OFF" button.
Once you set the Power ON command for each device, click "Next" to continue.
Setting Volume/Channel/Playback Controls
For the Hello activity, you can assign volume control, channel-changing, and playback to the appropriate devices.
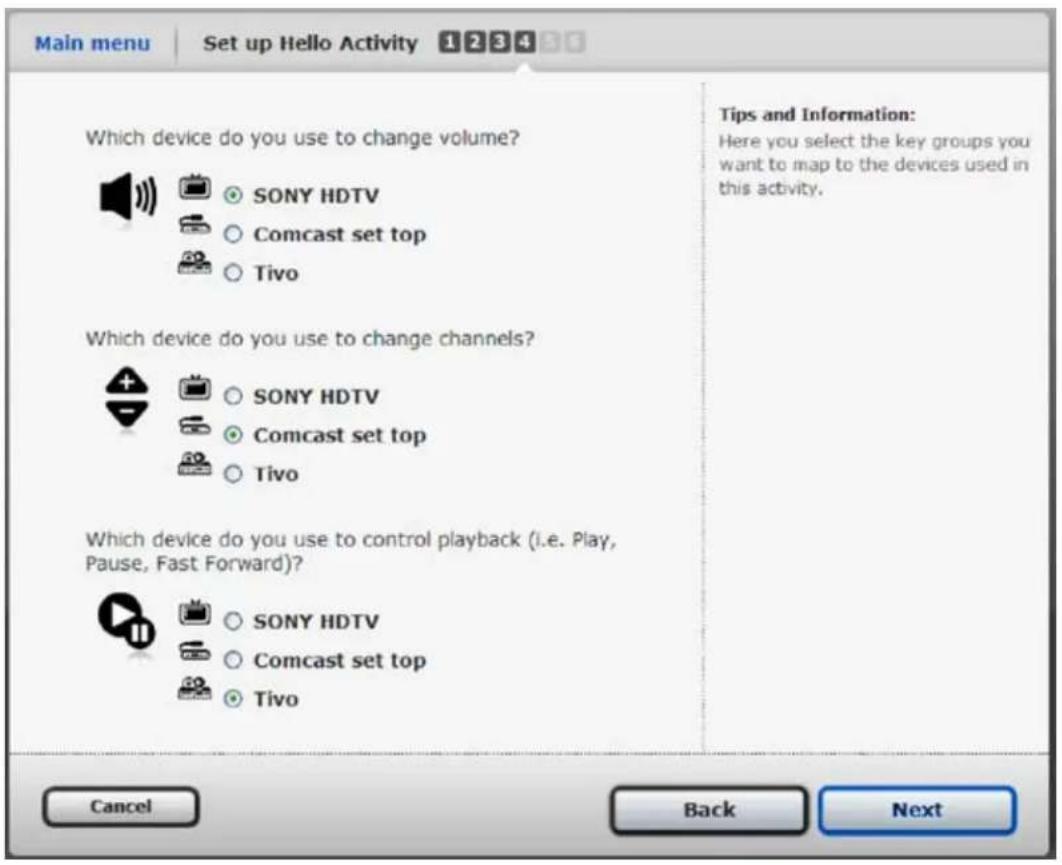
After you make your settings, click "Next" to continue.
Now the Setup Wizard prepares your remote.
Testing the Hello Activity
When the remote is ready, you see the screen shown below.
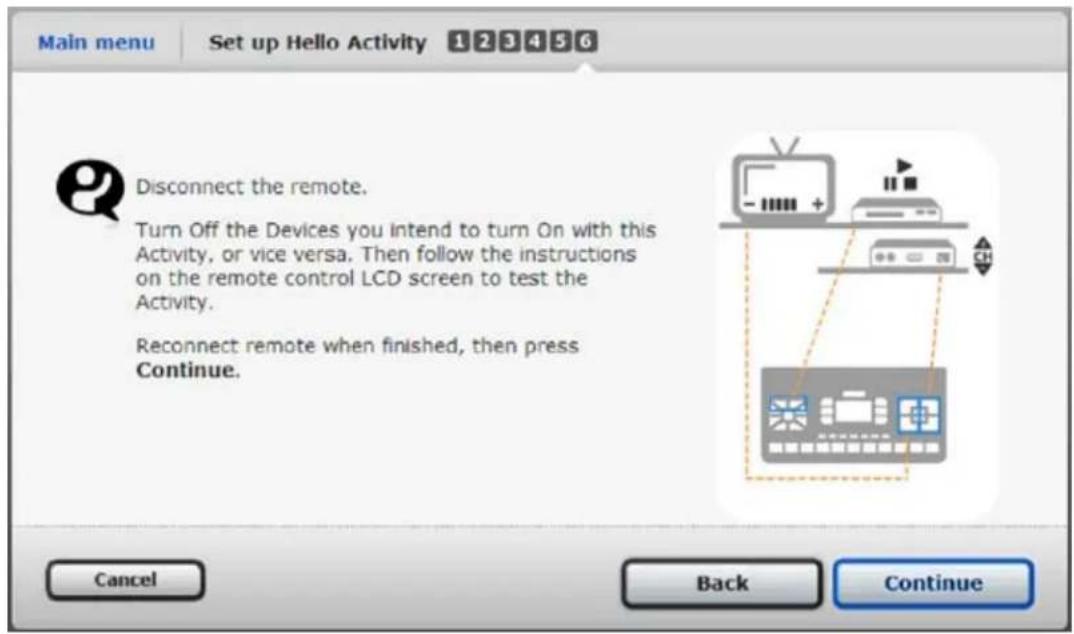
Testing the Hello activity has three phases. In the first phase, you can test Power ON commands for each device individually. In the second phase, you send a Power ON command to all of these devices at once.
To get started, carefully disconnect the remote from your PC.
ImpORTANT: Turn off all devices in your Hello activity before you test the remote.
Phase 1: Testing Power Commands for Individual Devices
The remote begins this with this screen display:
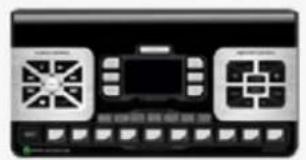
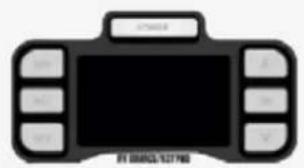
DEVICE POWER TEST PRESS POWER KEY FOR DEVICE IR
Next, you see a list of the devices your Hello activity will power on.
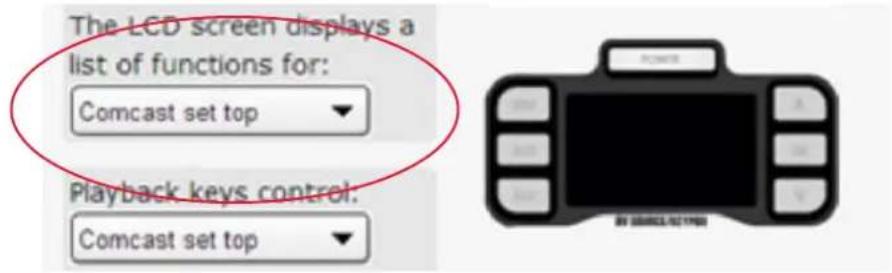
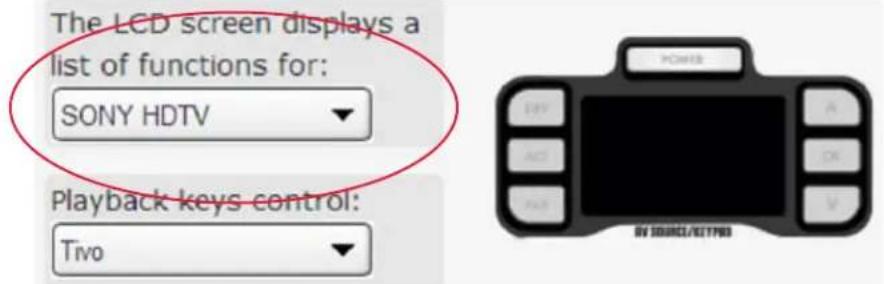
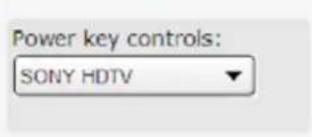
SONY HDTV Comcast set top
Up to three devices can appear on this page. If your activity involves four or more devices, use the △ or ▼ buttons to scroll among them.
Use the △ or ▼ buttons to highlight a device for individual testing. Press the "Power" button to test the device.
See if it turns on that device. (If it does, make sure to turn it back off!)
ImpORTANT: If a device does not respond to the power command, make a note—you need to use the Smart Wizard to assign a different power command to that device.
After you test each device individually, press and hold the OK button for 3 seconds to start Phase 2.
Phase 2: Testing the Entire Hello Activity
Before you start, make sure all your devices are off. Also, be sure to point your remote directly at your home theater.
The Hello activity appears pre-selected, as shown below.
ACTIVITY TEST Hello
Now press the "OK" button to begin testing.
If it does work, skip to Phase 3.
If it doesn't work, make sure your remote points directly at your components with nothing blocking the path. Also, try several times, holding the remote in different positions.
ImpORTANT: Turn OFF all devices in your Hello activity before doing any further testing.
If it still doesn't work, return to Phase 1 and test the power on commands of each device individually before trying Phase 2 again. To return to Phase 1, press the "Shift/TV" button.
Phase 3: Informing the Smart Wizard of the Outcome
To inform the Smart Wizard of the status of your Hello activity, reconnect the remote to your PC. Once reconnected, click "Continue."
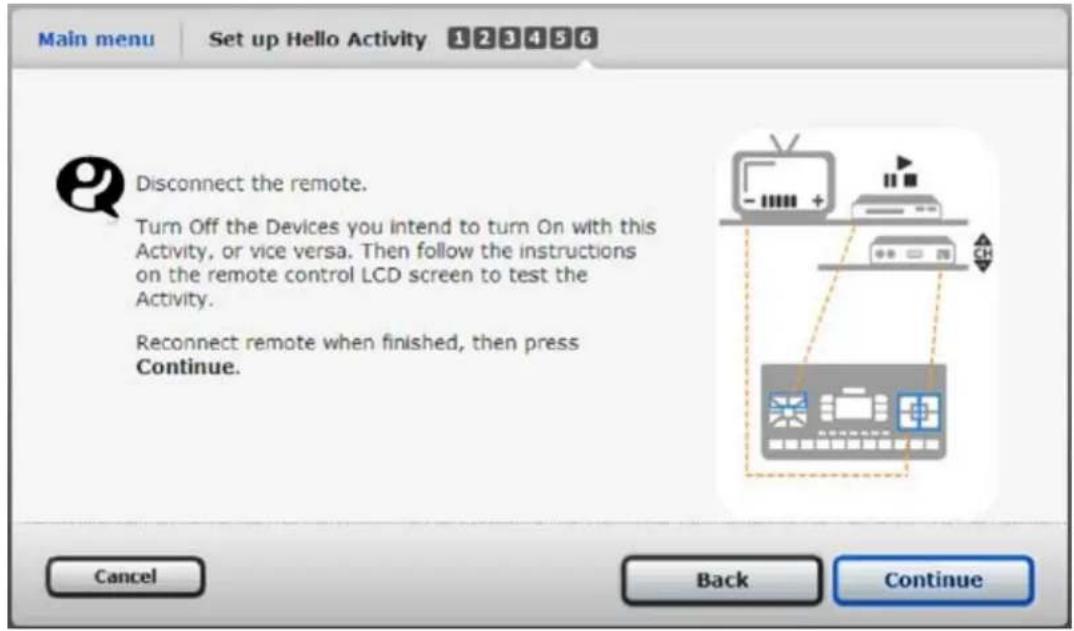
The green arrow icon in the status bar of your PC shows the remote is reconnected.

finishing the Hello Activity
If the remote performs the activity successfully, you're just one step from being done. If the activity does not work as expected, use the activity as explained below.
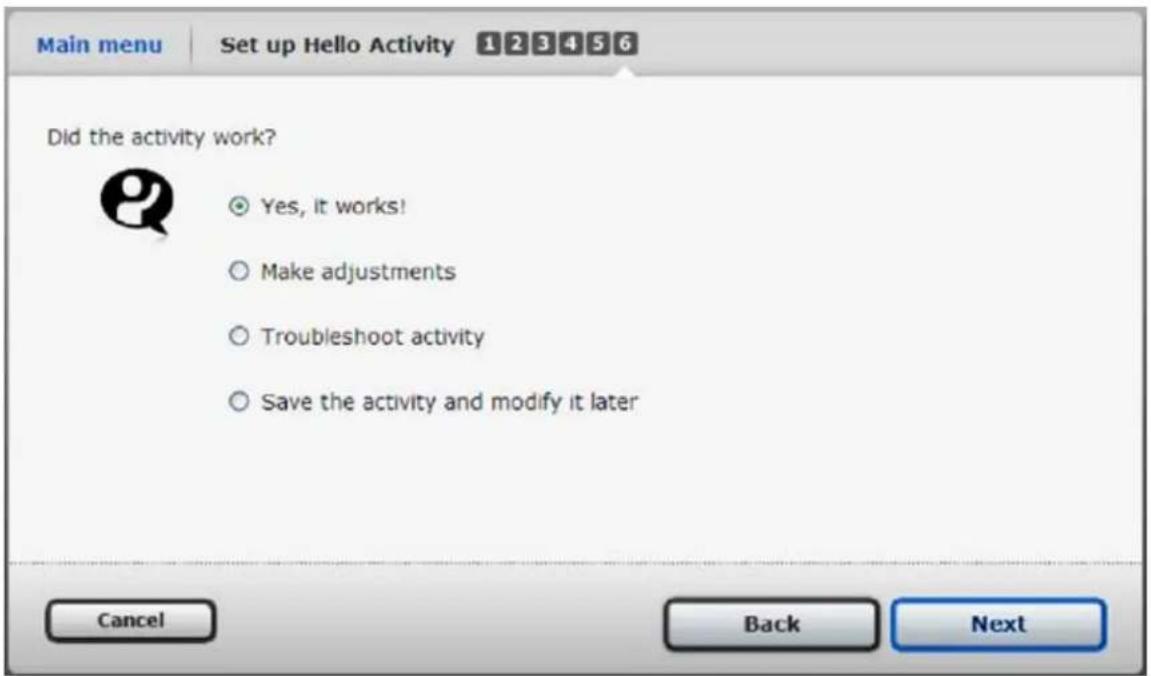
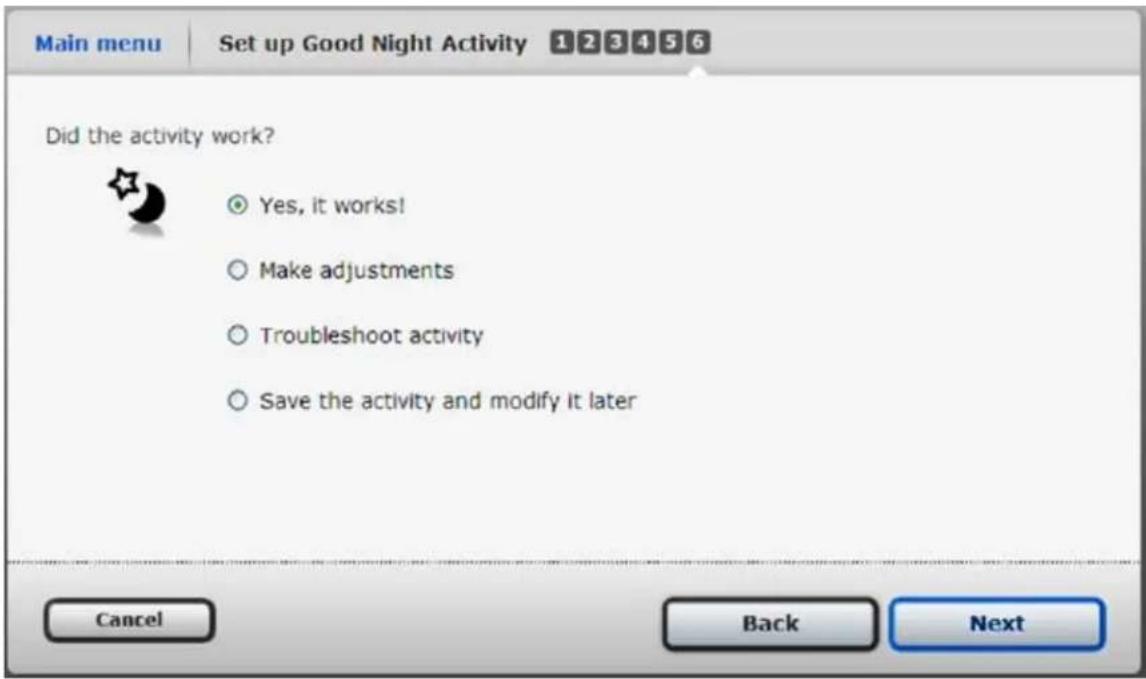
Select "Yes," if the activity worked.
Select "Make adjustments," if you know what needs to change (e.g., a device didn't turn on).
Select "Troubleshoot," if you're not sure what needs to be changed.
Select "Save the activity and modify later," if the activity didn't work and you want to come back to it.
Click "Next" when you make your selection.
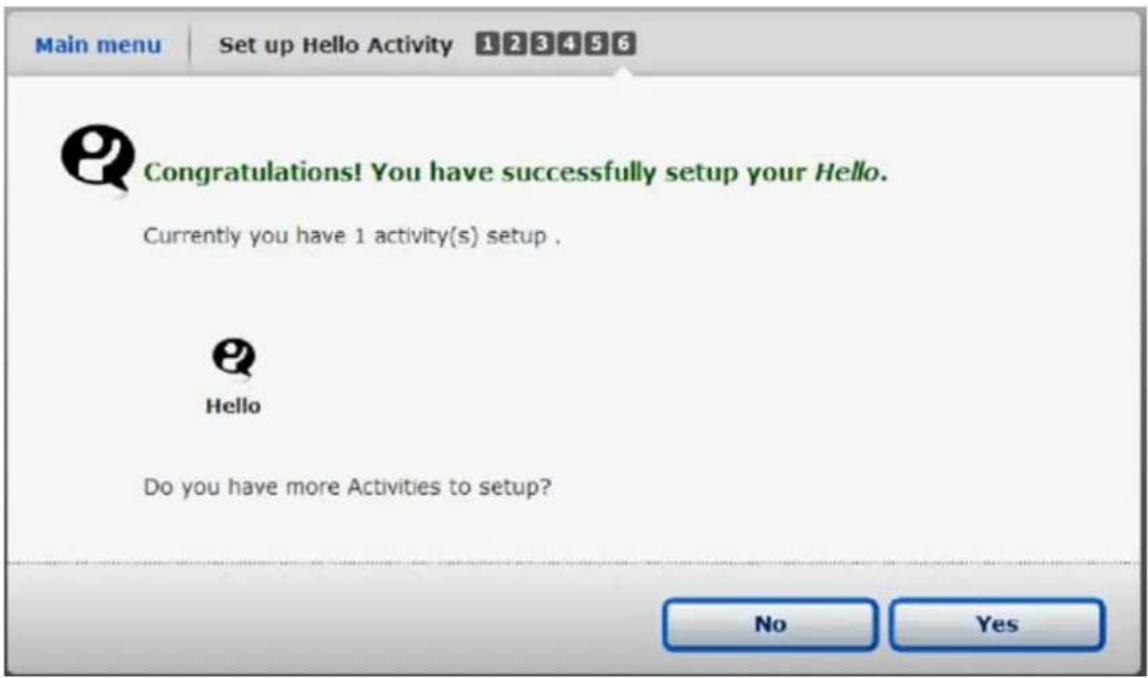
The final screen confirms successful setup of the Hello activity.
Click "Yes" to set up the next activity.
When you add new devices to your system...
Return to your Hello activity and add commands to power them on as well.
Need help setting up your remote? Call Monster Support toll-free at 1-877-800-8989.
SETTING UP THE GOOD NIGHT ACTIVITY
Adding the Good Night Activity
To add the Good Night Activity, return to the Main Menu. Click "Activities." From the submenu, click "Add an Activity."
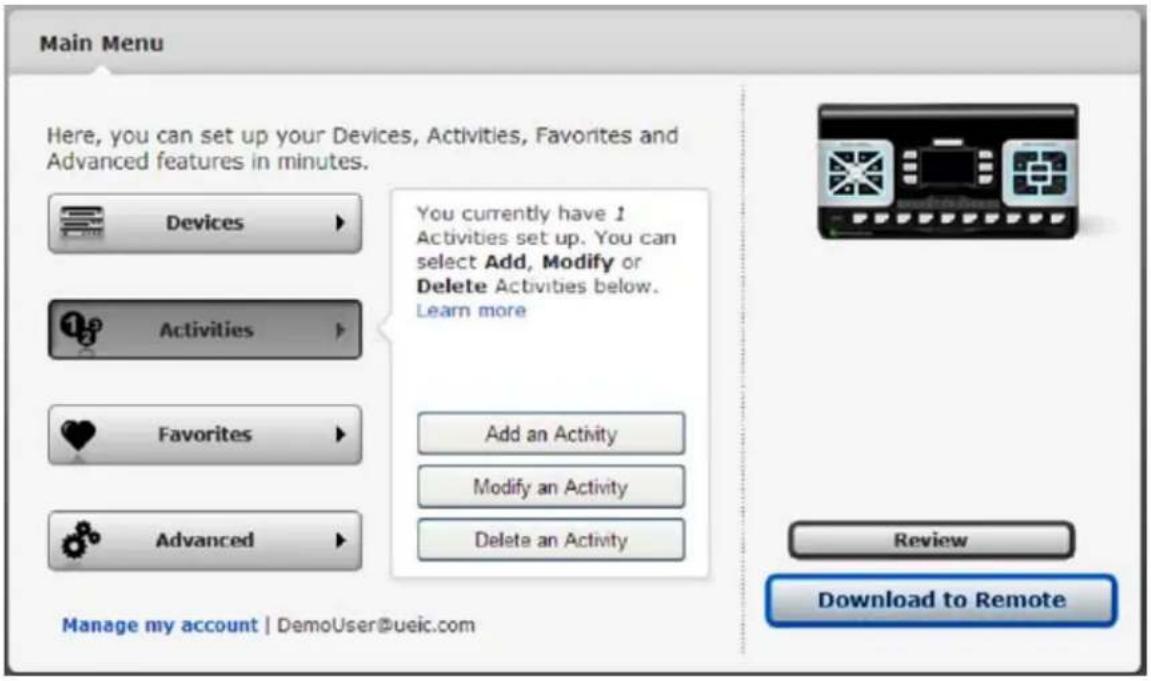
Follow the prompts on this screen and the next one.
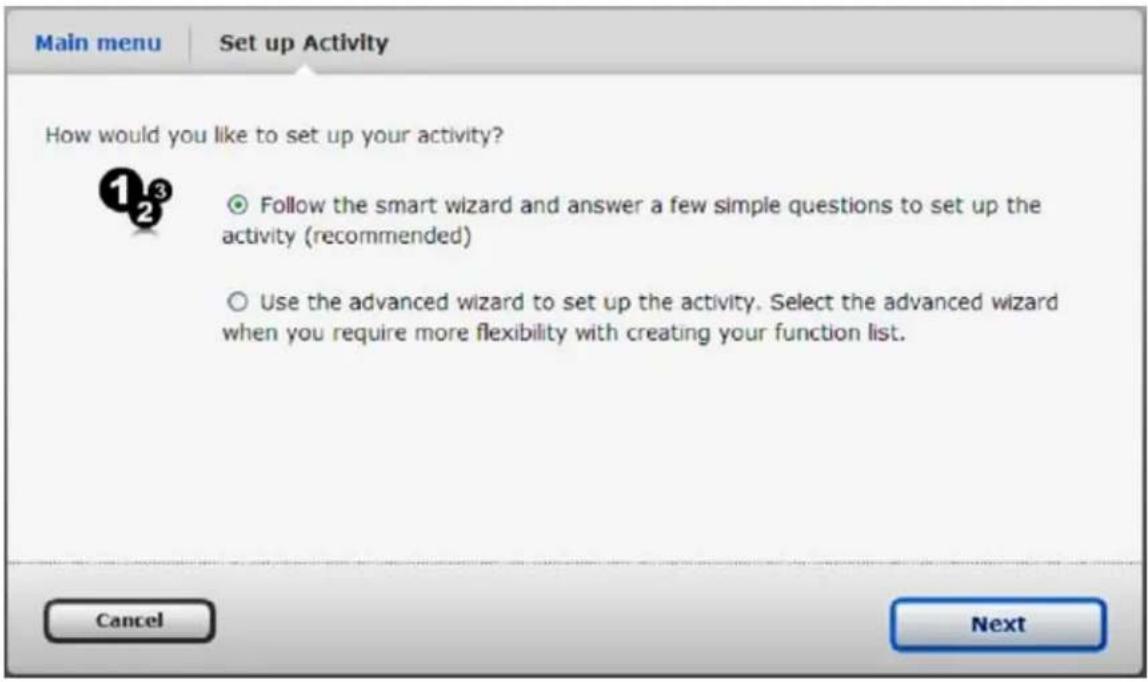
When to use the Advanced Wizard...
You can set up activities with both the Smart Wizard and the Advanced Wizard. The Smart Wizard is easier for simple activities, like turning everything on or off. The Advanced Wizard is better for more complex tasks.
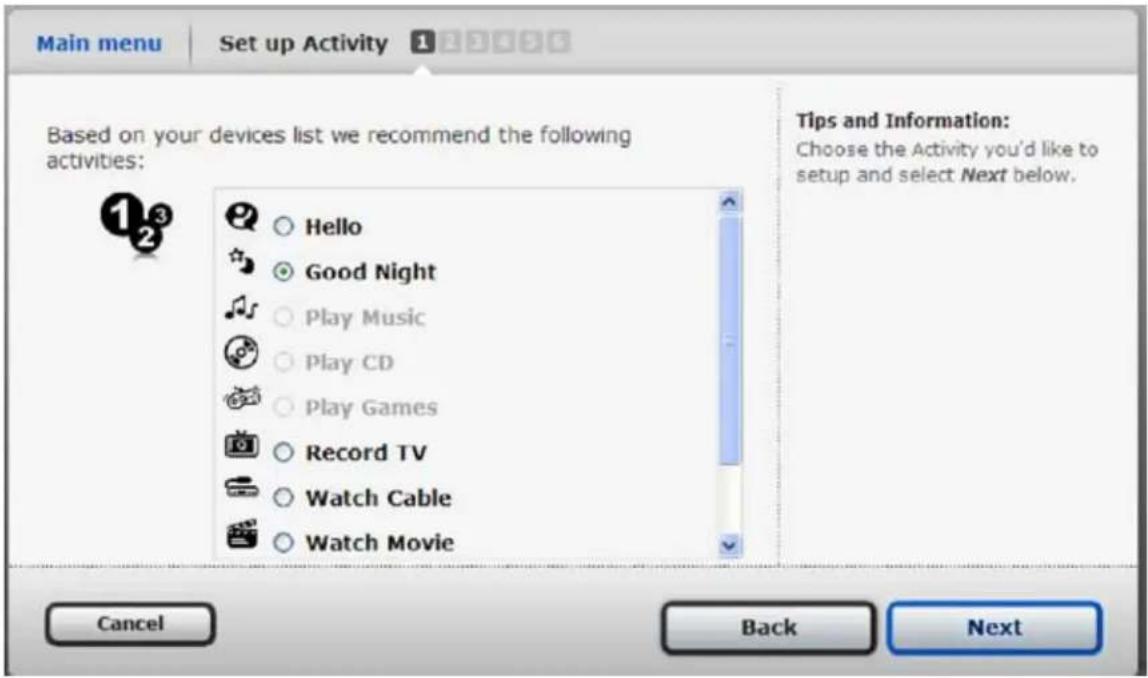
Choose the Good Night activity
The next screen lists the activities you can set up. Choose "Good Night" and click "Next" to continue.
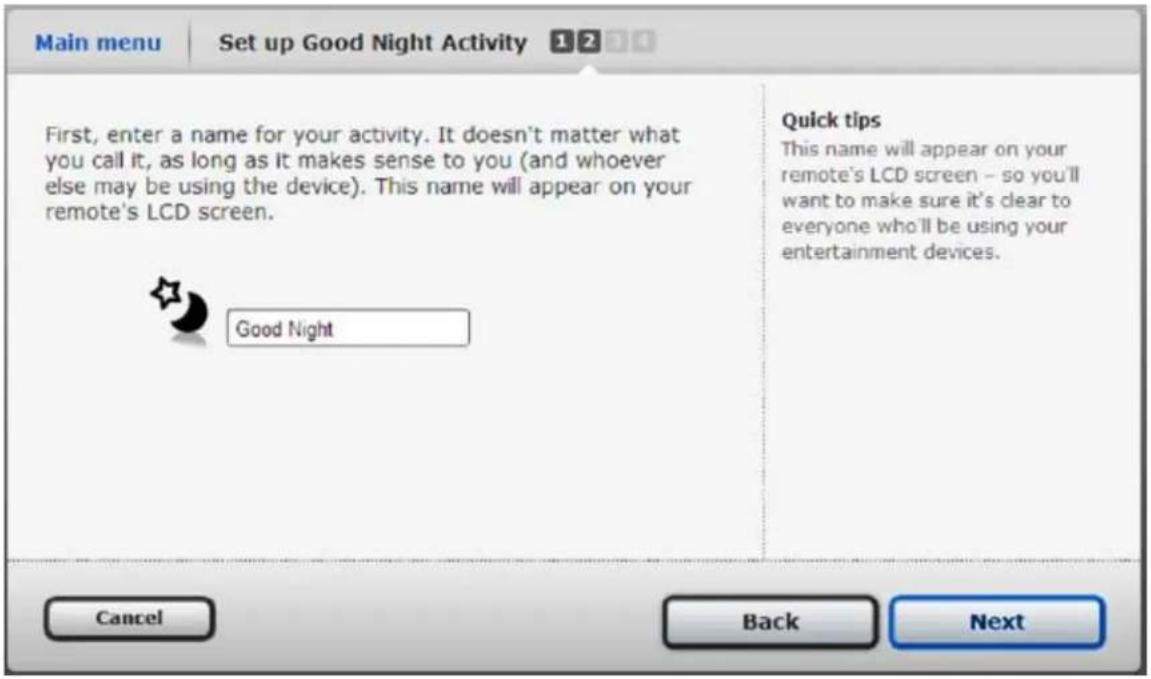
Name the activity
Type in a name for this activity or leave it as "Good Night." Click Next.
Configuring the Good Night Activity for Your Devices
Set the Power Off commands
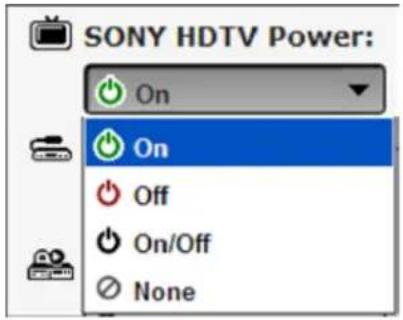
Use the next Wizard screen to set how each device should power off.

Use the drop-down menu for each device to set its Power Off command. The options are:
None Use this option to exclude a device from the Good Night activity.
On We won't be using this option in the Good Night activity.
Off Use this option if the device's original remote has separate Power ON and OFF buttons.
Toggle Use this option if the device's original remote has a single Power ON/OFF button.
Set the Power Off command for each device and click "Next" to continue.
After you click "Next," the Setup Wizard prepares your remote to test the activity with your home theater system.
Testing the Good Night Activity
When the remote is ready to test, you see the screen shown below.
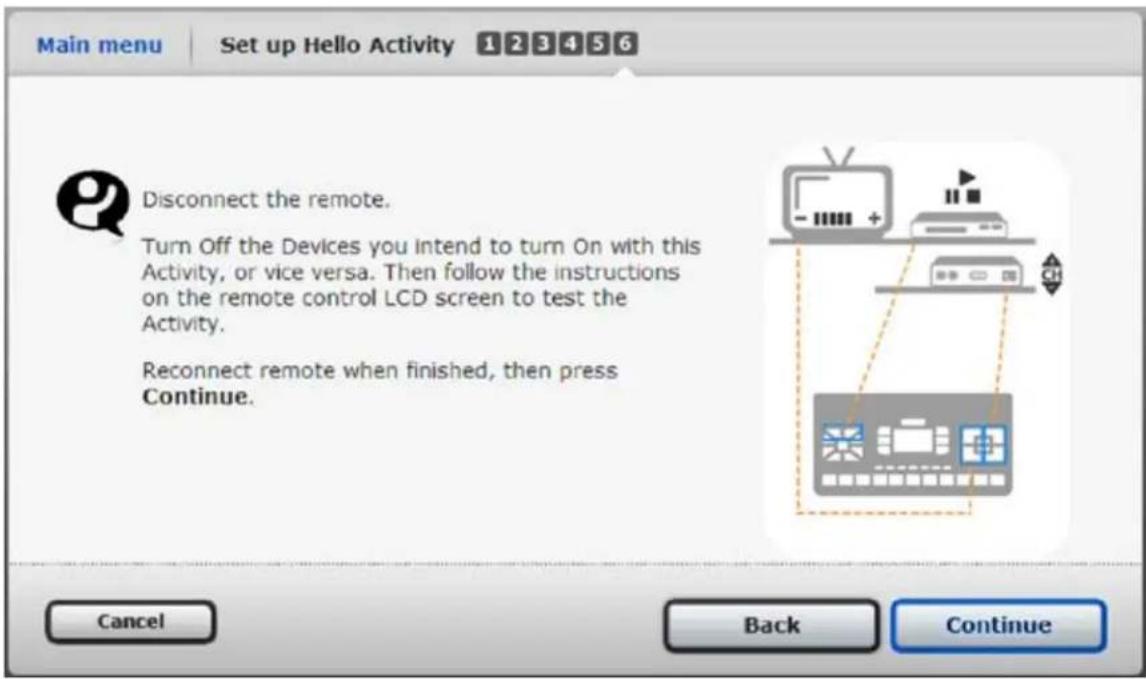
The Good Night activity has three phases. In the first phase, you can test the power off commands for each device individually. In the second phase, you can send a Power Off command to all of these devices at once.
To start, carefully disconnect the remote from your PC.
ImpORTANT: Turn ON all devices in your Good Night activity before you test the remote.
Phase 1: Testing Power Commands for Individual Devices
The remote begins with this screen display:
DEVICE POWER TEST PRESS POWER KEY FOR DEVICE IR
Next, you see a list of the devices your Good Night activity will power off.
SONY HDTV
Comcast set top Tivo
Up to three devices can appear on this page. If your activity involves four or more devices, use the ^ or ^ buttons to scroll among them.
Use the ^ or ^ buttons to highlight a device for individual testing. Press the "Power" button to test the device.
See if it turns off that device. (If it does, make sure to turn it back on!)
ImpORTANT: If a device does not respond to the Power Off command, make a note. You need to use the Smart Wizard to assign a different Power Off command to that device.
After you test each device individually, press and hold the OK button for 3 seconds to start Phase 2.
Phase 2: Testing the Entire Good Night Activity
Before you start, make sure all your devices are on. Also, be sure to point your remote directly at your home theater.
The Good Night activity appears pre-selected, as shown below.
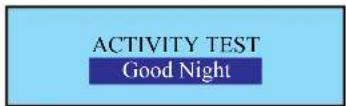
Now press the OK button to begin testing your Good Night activity.
If it works, skip to Phase 3.
If it doesn't work, make sure your remote points directly at your components, with nothing blocking the path. Also, try several times, holding the remote in different positions.
ImpORTANT: Turn on all devices in your Good Night activity before doing any further testing.
If it still doesn't work, return to Phase 1 and test the Power Off commands of each device individually before trying Phase 2 again. To return to Phase 1, press the "Shift/TV" button.
Phase 3: Informing the Smart Wizard of the Outcome
To inform the Smart Wizard of your activity status, reconnect the remote to your PC. Once reconnected, click "Continue."
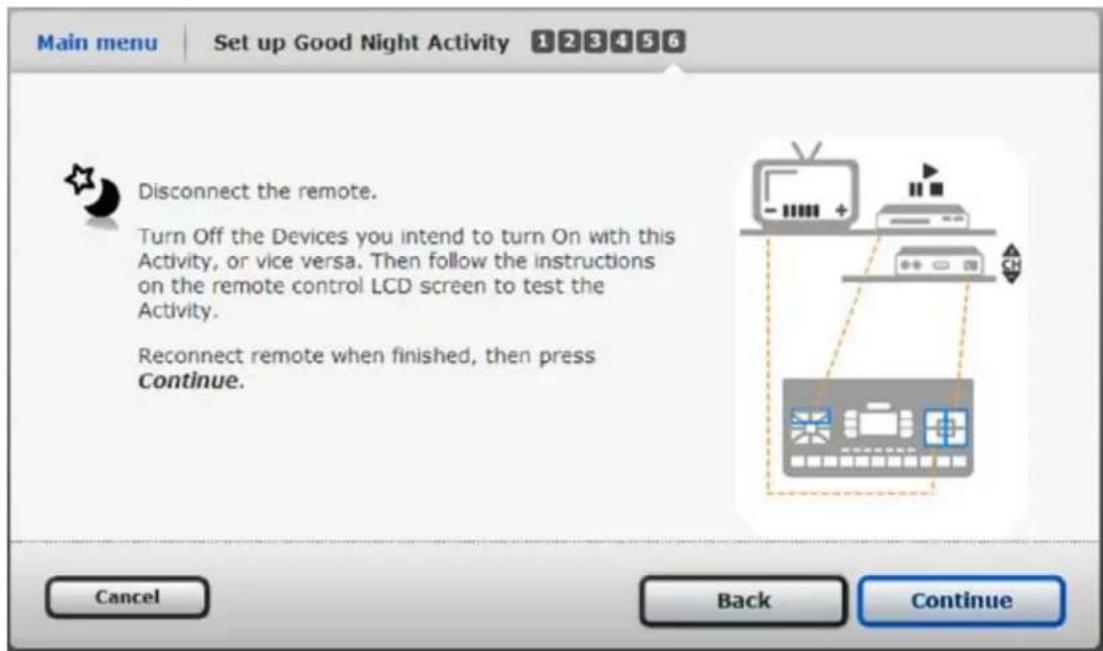
The green arrow icon in the status bar of your PC shows the remote is reconnected.

finishing the Good Night Activity
If the remote performs the activity successfully, you're just one step from being done. If the activity doesn't work as you expect, use the Setup Wizard as explained below.
Select "Yes," if the activity worked.
Select "Make adjustments," if you know what needs to change (e.g., a device didn't turn off).
Select "Troubleshoot," if you're not sure what needs to change.
Select "Save activity and modify later," if the activity didn't work and you want to return to it later to make changes.
Click "Next" when you make your selection.
The final screen confirms successful set up of the activity.
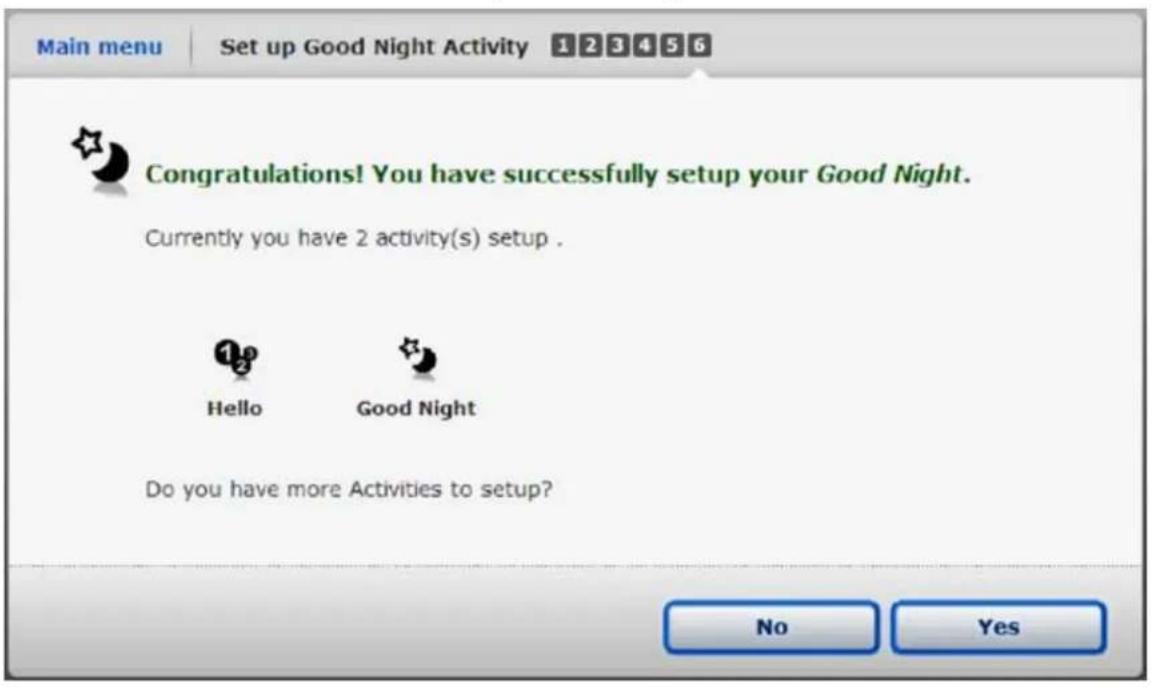
Click "Yes" to set up the next activity (e.g., "Watch Movie").
When you add new devices to your system...
Return to your Good Night activity and add commands to power them OFF as well!
Need help setting up your remote? Call Monster Support toll-free at 1-877-800-8989.
SETTING UP THE WATCH MOVIE ACTIVITY
The next activity, "Watch Movie," is different from the Hello and Good Night activities. For this activity, you can use the Advanced Wizard. The Advanced Wizard gives you more options to customize "Watch Movie" so it more closely reflects your home system setup. As such, it's a good idea to gather some information about your devices before using the Advanced Wizard.
Recording Which Devices You Use to Watch Movies
Look at the following example for "Watch Movie." Fill in the information for this activity as appropriate for your home system.
| Example setup | What device do you use to... | ||
| Control volume? | Watch video? | Control playback? | |
| Watch Movie | A/V receiver | TV | DVD player |
| YOUR setup | What device do you use to... | ||
| Control volume? | Watch video? | Control playback? | |
| Watch Movie | |||
Recording How You Access these Inputs with Your Original Remote
Look at the following example for a Watch Movie activity. Fill in the information for the activity as per your home theater.
| Example setup | Key presses to watch/listen to a movie |
| A/V receiver | HDMI1 key |
| TV | INPUT, down arrow, ENTER |
| YOUR setup | Key presses to watch/listen to a movie |
IMPORTANT: If you always use the same input on any of your devices, you don't need to include this device, as it should already be on the correct input.
Adding a New Activity Using the REVOLUTION Remote Control Setup Wizard
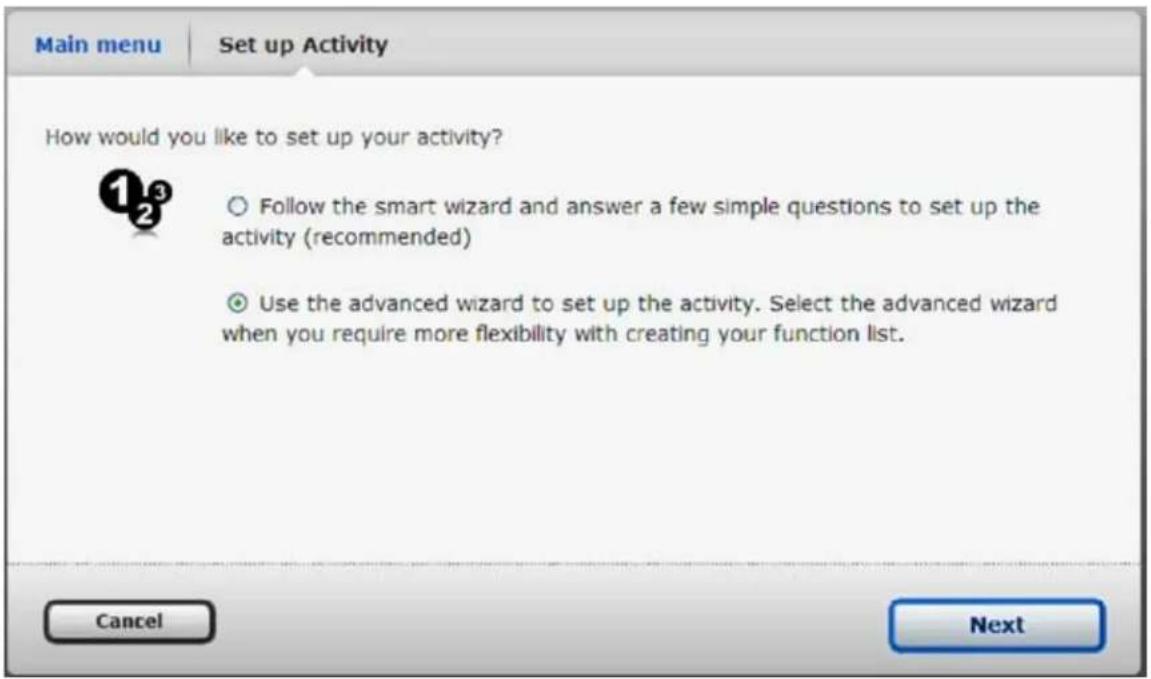
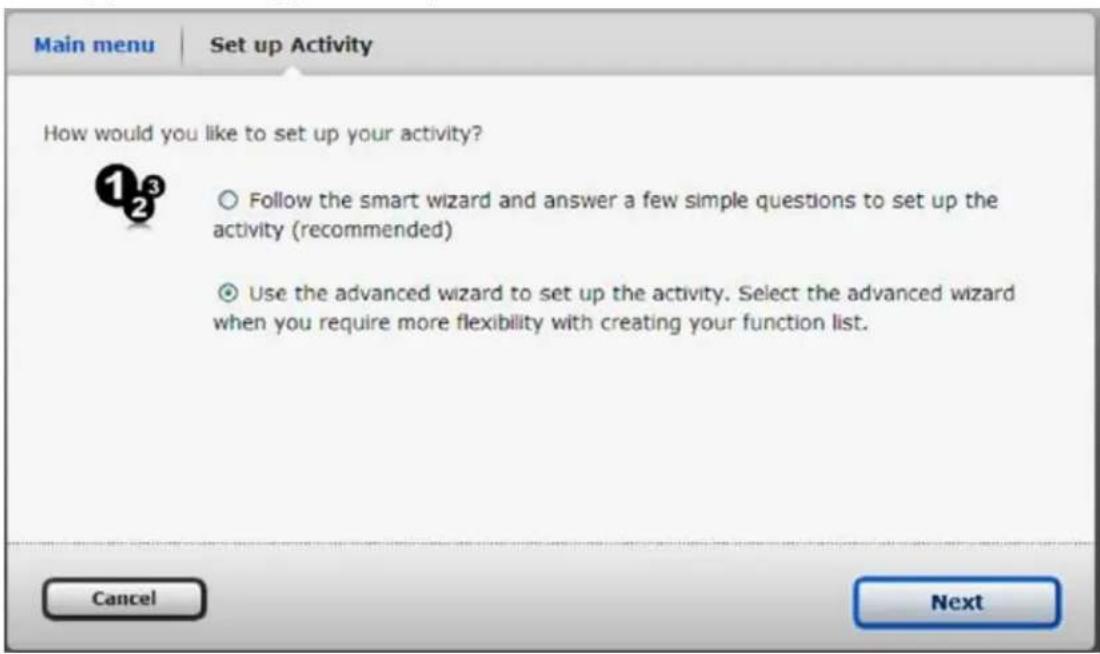
Choose "Advanced Wizard."
For the Watch Movie activity, choose the "Advanced Wizard." Click "Next" to continue.
The next screen shows you through the steps of the Advanced Wizard. Click "Next" to continue.
Why Use the Advanced Wizard?
The Advanced Wizard is better for Watch and Listen activities because it flexibly accommodates the wide variety of setups possible with today's systems.
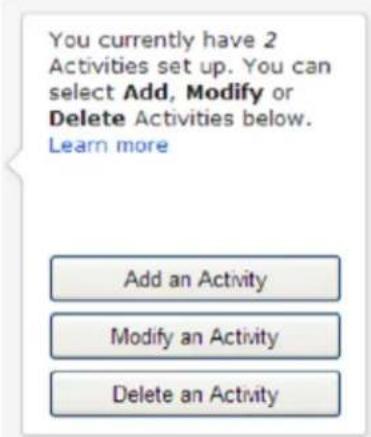
If you return to Advanced Setup Wizard, go to the Main Menu and click "Activities." Select "Add an Activity" from the submenu.
Continue with the following steps to set up the Watch Movie activity.
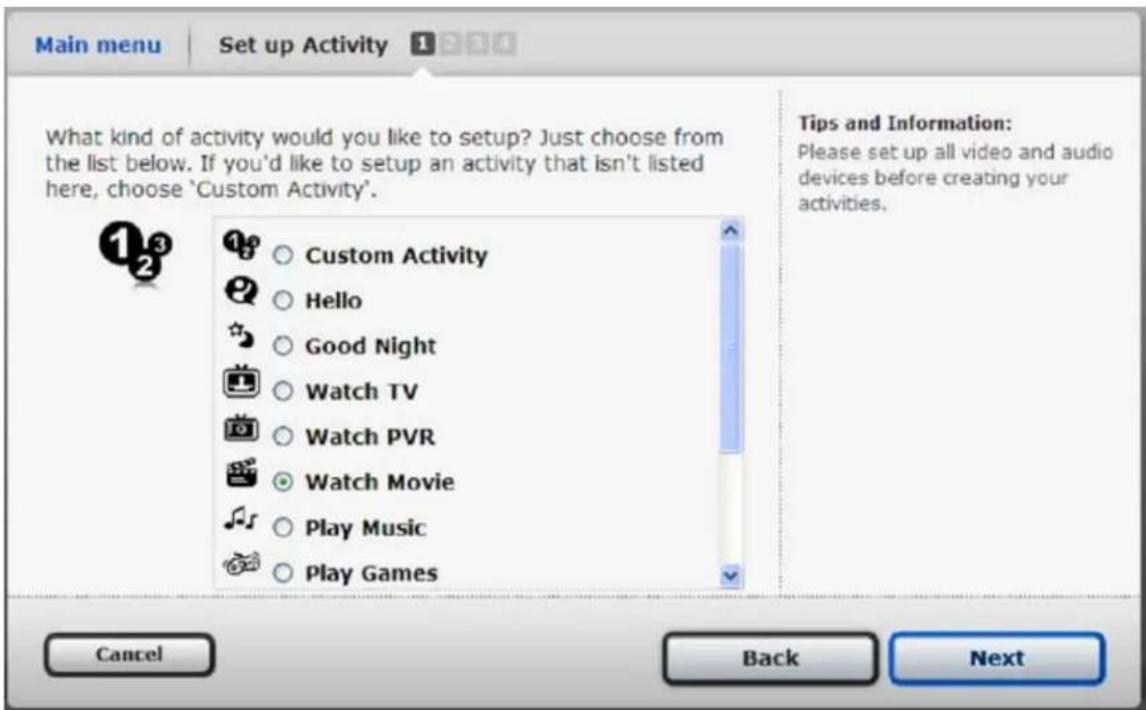
Choose the Watch Movie Activity
Select Watch Movie from the list. Press "Next" to continue.
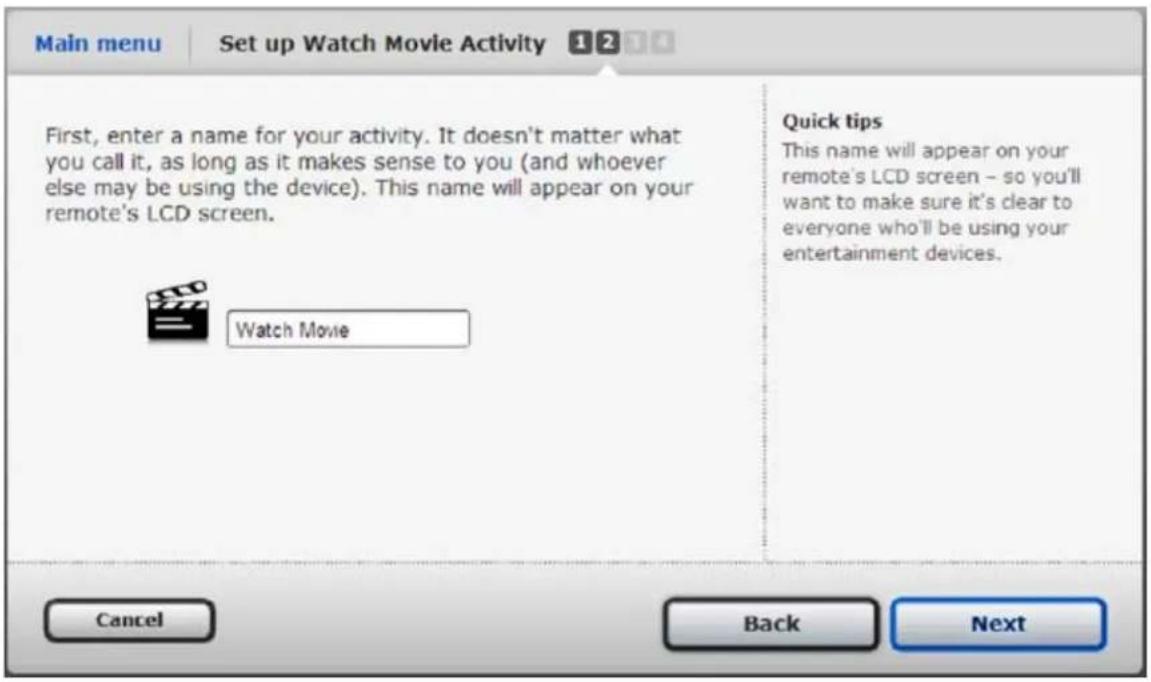
Name the activity
Type in a name for this activity, or leave it as "Watch Movie." Click "Next."
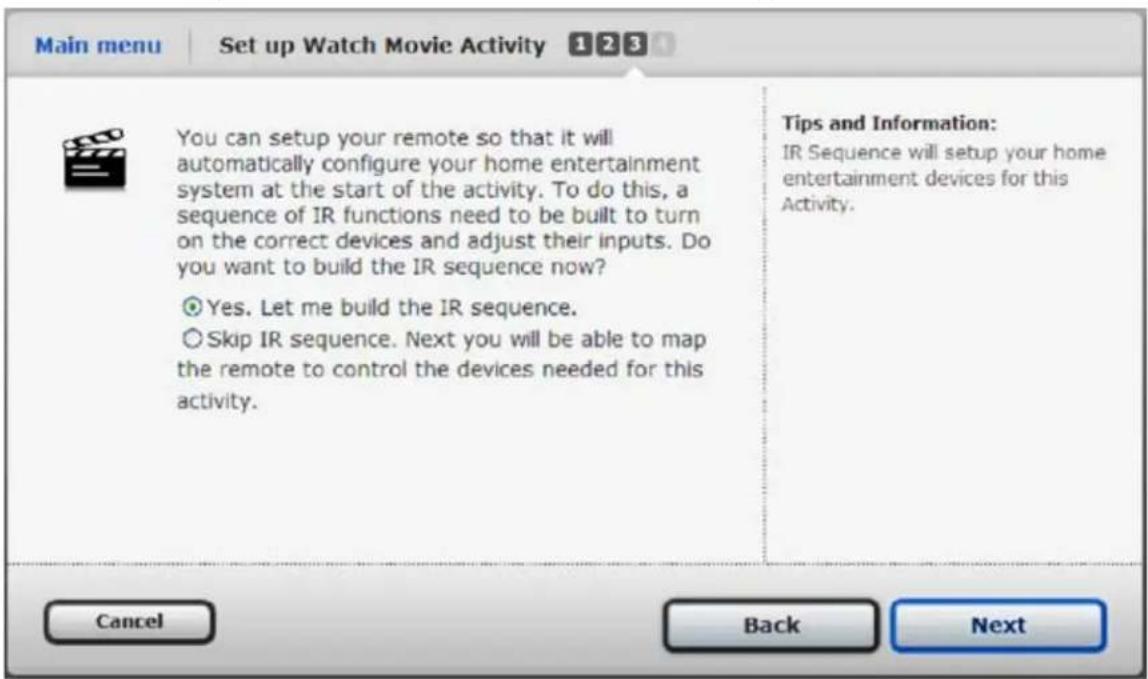
Building the watch movie Activity
With the next Wizard screen, you can build the sequence of commands to configure your home entertainment components. Select "Yes. Let me build the IR sequence," and click "Next."
Now, enter the key presses you use to watch a movie on your home system.
Refer to the chart you created on pg. 29, recording how you access these inputs with your original remotes.
For "Watch Movie" you don't need to turn anything on. The Hello activity does that for you. Simply find the right input on your devices.
To enter each command into the sequence:
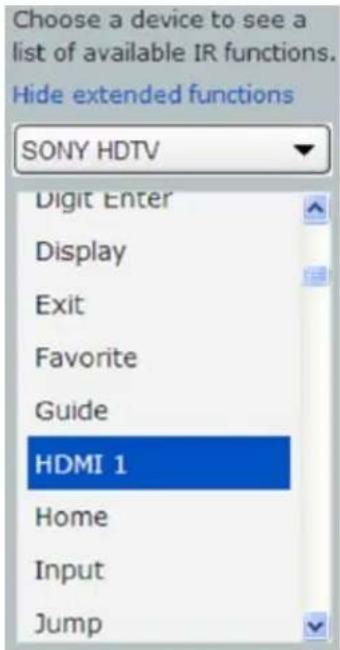
- Use the drop-down menu on the right side of the screen. Select the component you want to command.
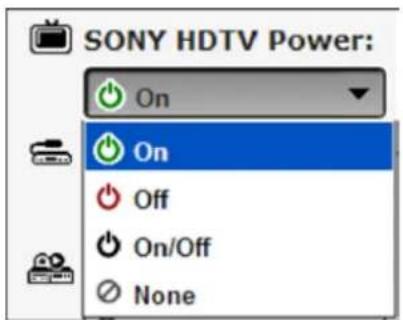
- Scroll through the available commands for this device. (The list includes extended functions your remote can create if needed.) Find the key(s) you wish to enter for this device.
Highlight the command you want. Click the arrow left of the list, which includes your choice 3. for Watch Movie.
If the key command you want is not listed...
First, check that you selected the correct device from the drop-down menu. Then, refer to your original remote, and make sure you write down the key name accurately. If you still don't see the key command you want, your remote can learn this key from your original remote.
To learn a new key:
Click "Cancel" in the Advanced Setup Wizard screen. Save the activity as is.1.
Click "Download to Remote" in the Main Menu. Once the download is finished, disconnect 2. the remote from your PC.
- Follow the instructions for your remote to learn the key from the original remote (See the Owner's Manual on the CD-ROM that came with your remote).
Once your remote learns the specific input key, reconnect the remote to your PC now, and 4. launch the Advanced Setup Wizard.
In the main menu, click "Activities." Select "Modify Activity" from the submenu.5.
Choose the Watch Movie activity, then "Key Command Sequence." Follow the rest of the 6. instructions from the beginning of this section, (See Building the Watch Movie activity).
Repeat for each key command to be included in this activity. 4.
To re-order commands in the sequence, click the command in the list. Click the ^ or ^ arrow that appears until the command appears.
To delete commands from the sequence: click the X icon on the right side of the command's entry in the list. Answer "Yes" to the dialog box that confirms you want to delete it.
To change the timing between commands (useful when a device must respond to one command before it can handle another): click the pale blue clock icon on the second line of the command. Use the arrows to adjust the number of seconds you wait between commands.
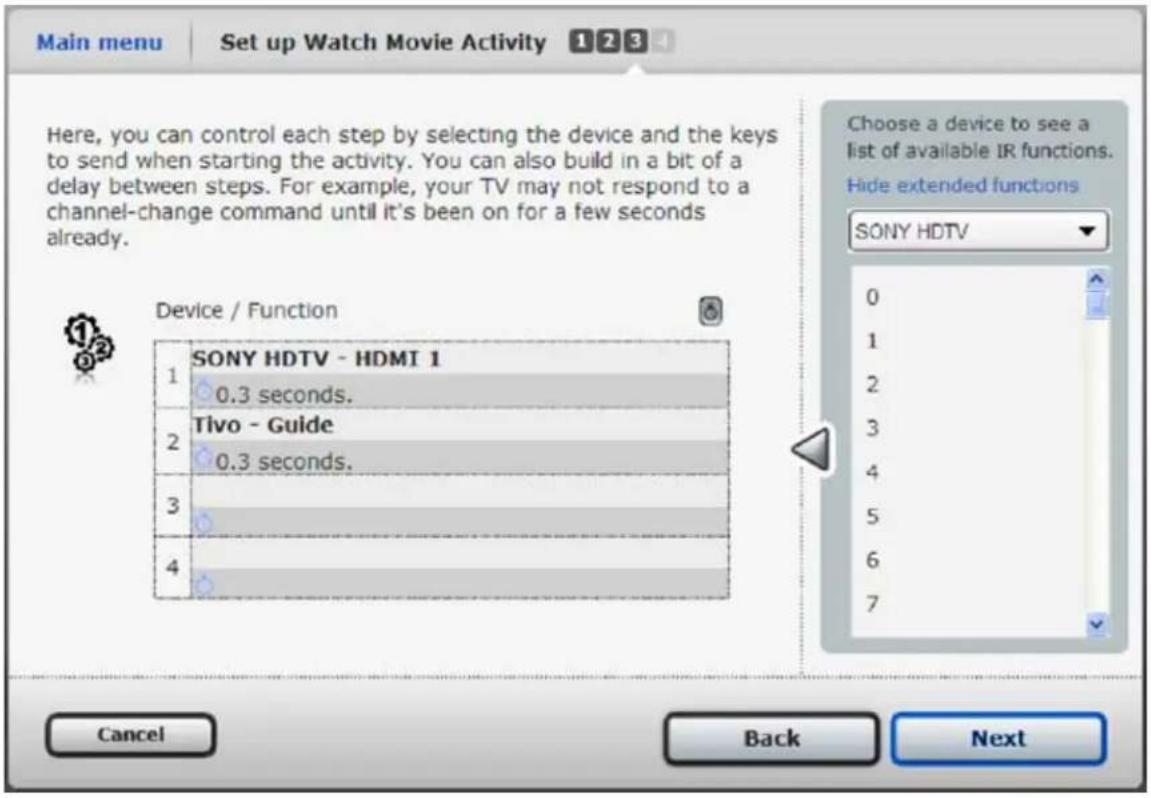
- Once you build the activity as you wish, click "Next."
Set the Volume/Channel/Transport Controls
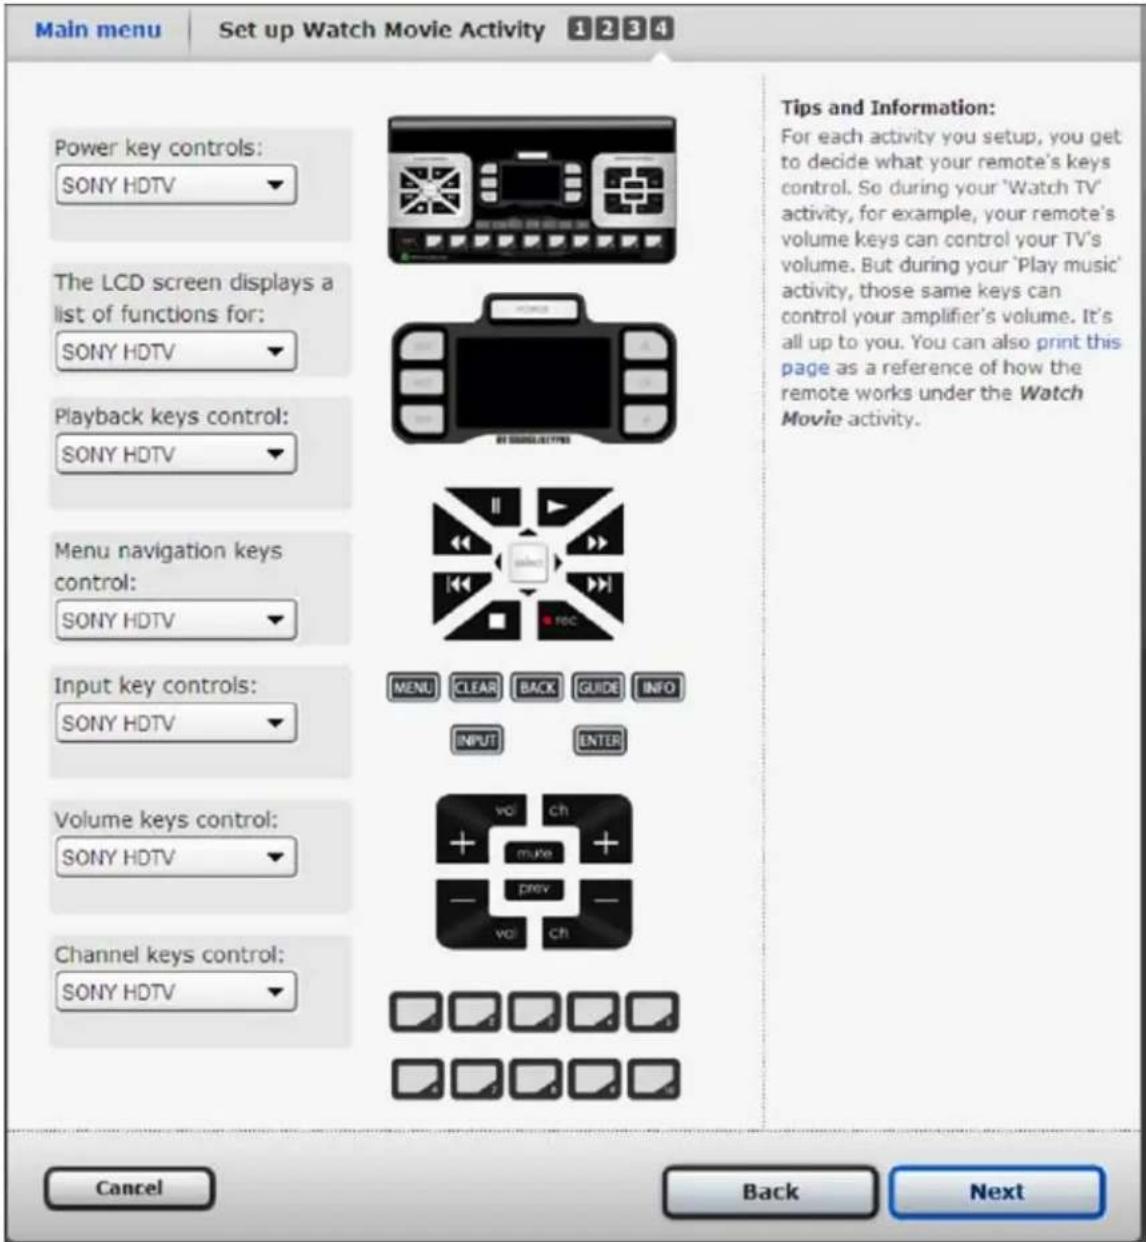
On the final screen you can set which devices you use to control the volume, channels, and playback when watching a movie.
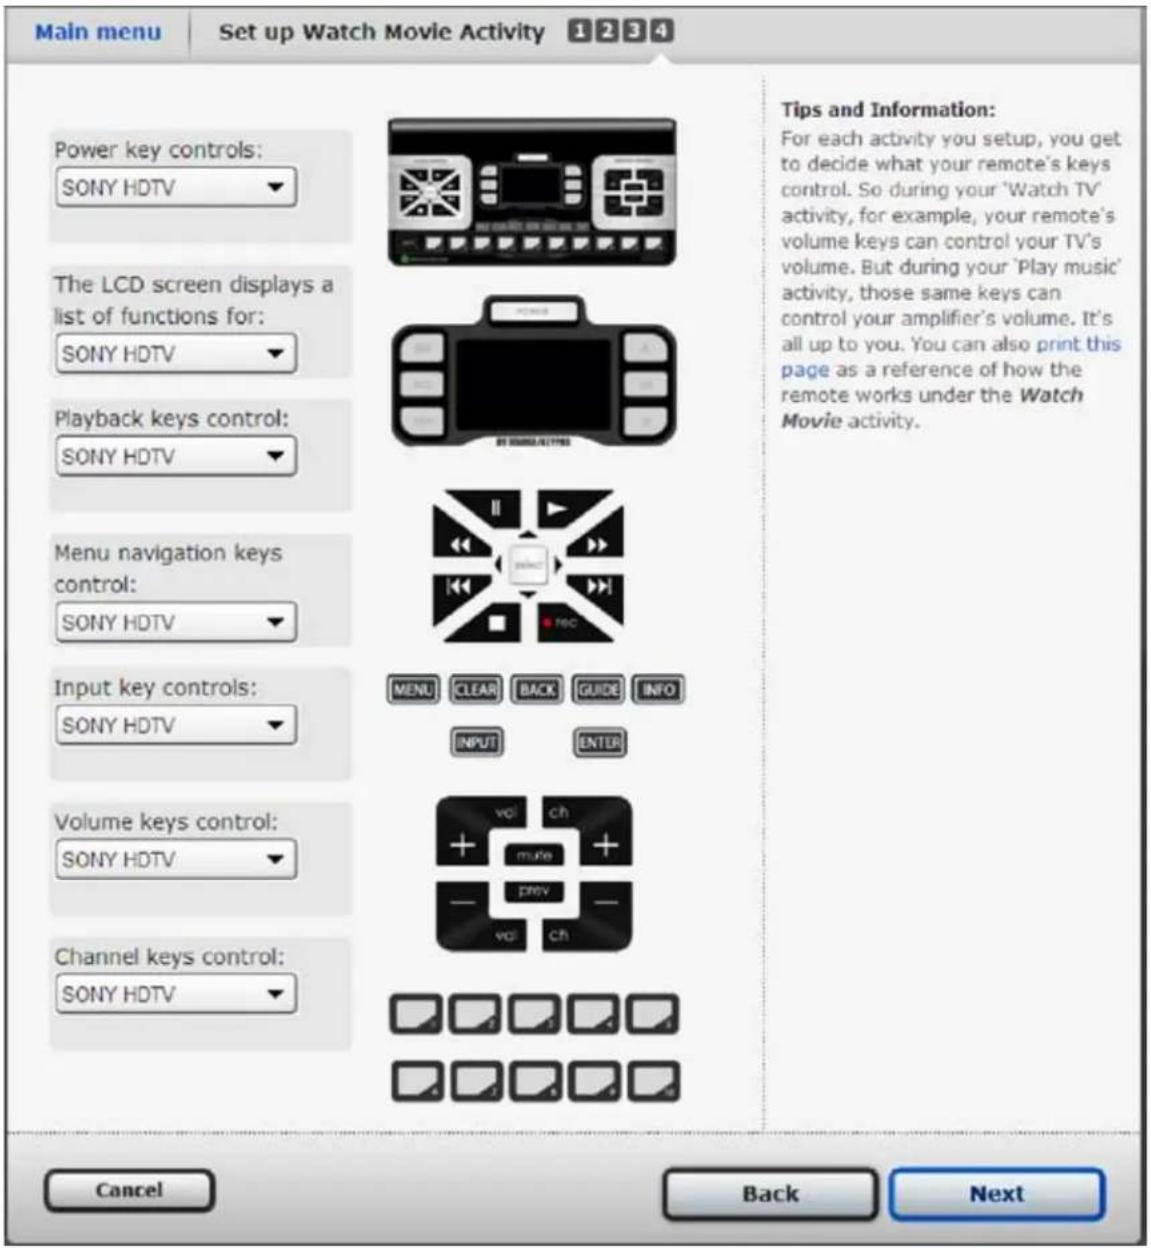
To change the device controlled by a group of keys, click the device listed for the drop-down menu. Select the device you want.
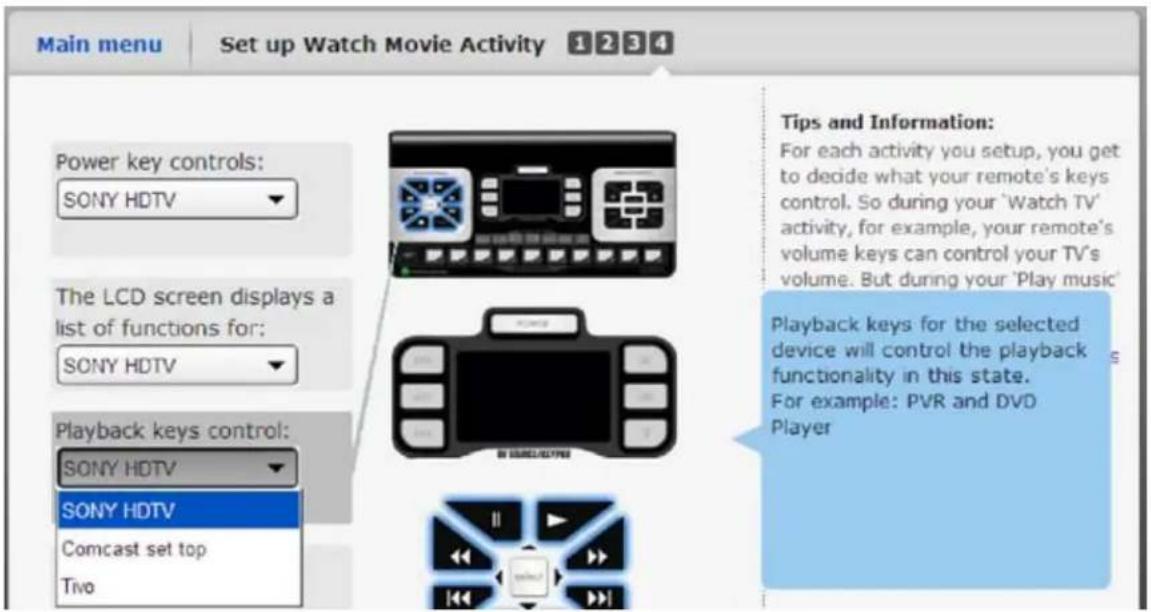
Once you set the devices you want to control and their volume, channels, and playback, click "Next."
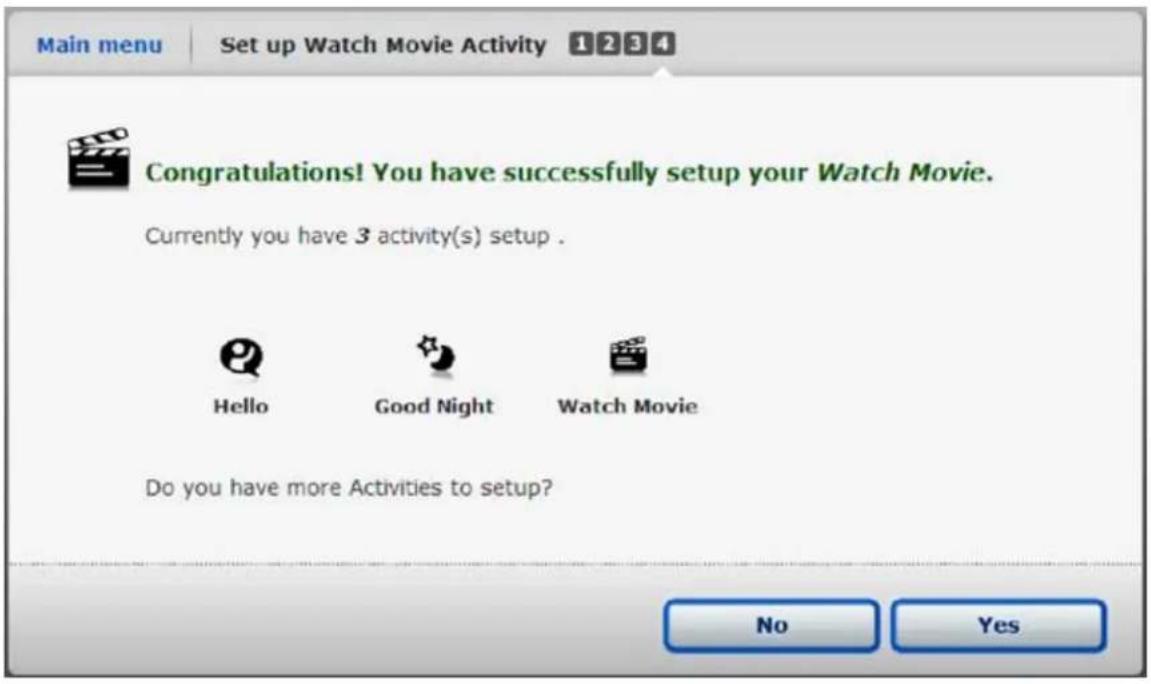
The final screen confirms that you set up this activity.
SETTING UP THE WATCH SATELLITE OR CABLE ACTIVITY
Recording Which Devices You Use to Watch Satellite or Cable
Refer to the following example to fill in the information for your system.
| Example setup | What device do you use to... | ||
| Control volume? | Watch video? | Change channels? | |
| Watch Satellite | A/V receiver | TV | Satellite rcvr |
| YOUR setup | What device do you use to... | ||
| Control volume? | Watch video? | Change channels? | |
| Watch Satellite | |||
Recording How You Access These Inputs With Your Original Remotes
Refer to the following example to fill in the information for your home system.
| Example setup | Keypresses to watch/listen to satellite/cable |
| A/V receiver | HDMI2 key |
| TV | INPUT, down arrow, ENTER |
| YOUR setup | Keypresses to watch/listen to satellite/cable |
IMPORTANT: If you always use the same input on any of your devices, you don't need to include this device in the Watch Satellite or Watch Cable Activity. It should already be on the correct input.
Adding a New Activity in the REVOLUTION Remote Control Setup Wizard
Choose the Advanced Wizard
For the Watch Satellite or Watch Cable activity, choose the Advanced Wizard. Click "Next" to continue.
A screen appears showing you the steps of the Advanced Wizard. Click "Next" to continue.
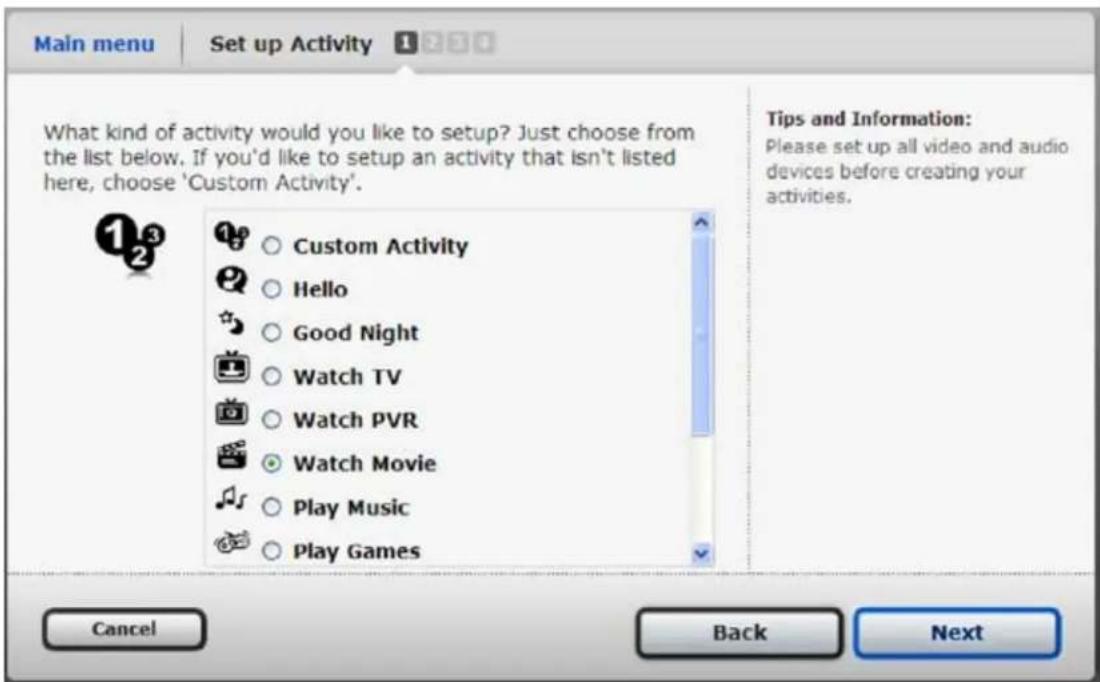
Select the activity to set up (Watch Satellite or Watch Cable)
Choose "Watch Satellite" or "Watch Cable" from the list. Press "Next" to continue.
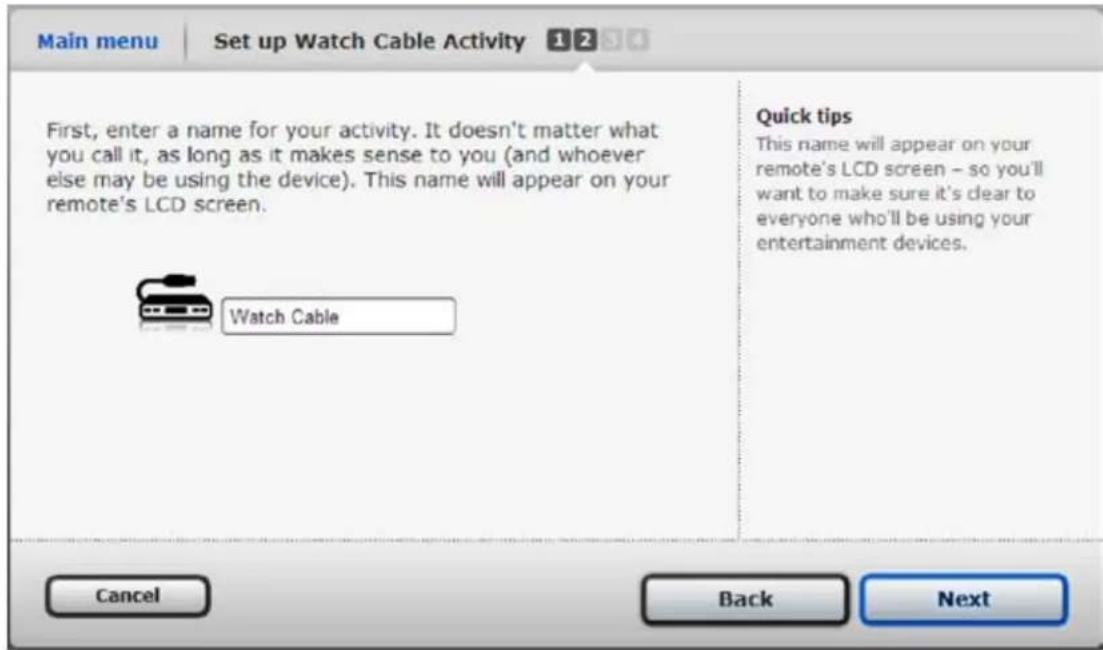
Name the activity
Next, type in a new name for this activity, or leave it as "Watch Satellite" or "Watch Cable." Click "Next."
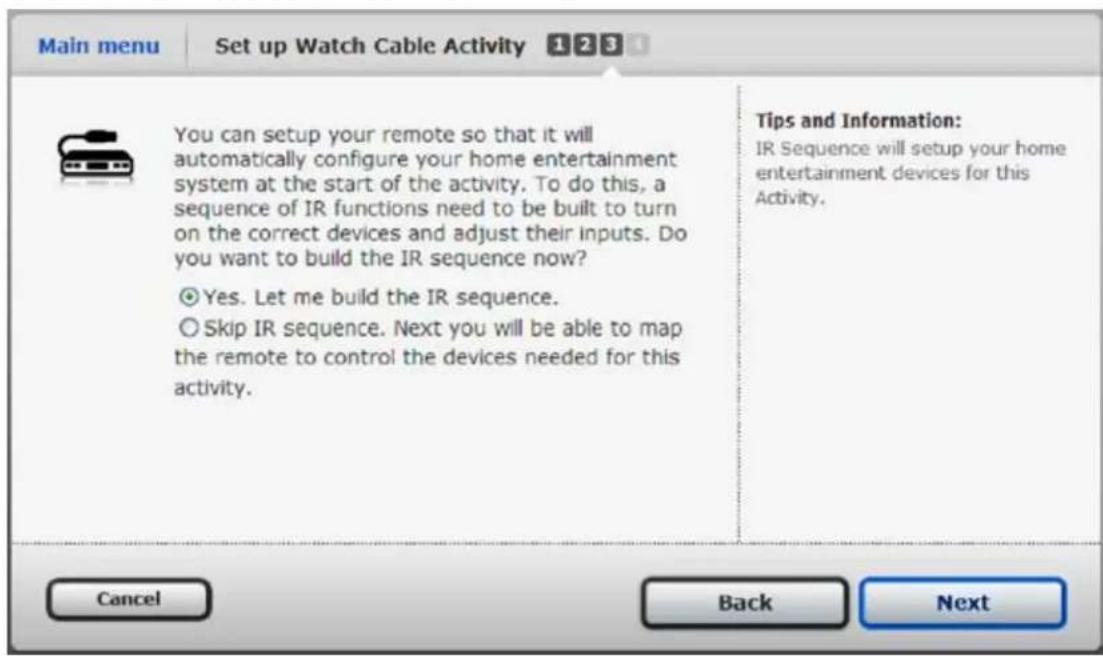
Building the watch Cable or watch Satellite Activity
Next, you can build the sequence of commands to configure your home theater system to perform this activity. Select "Yes" and click "Next."
Now, enter the key presses you use to watch a movie on your system.
Refer to the chart you created on pg. 29, recording how you access these inputs with your original remotes.
For the Watch Cable or Watch Satellite activities, you don't need to turn anything on. The Hello activity does that for you. Simply find the right input on your devices.
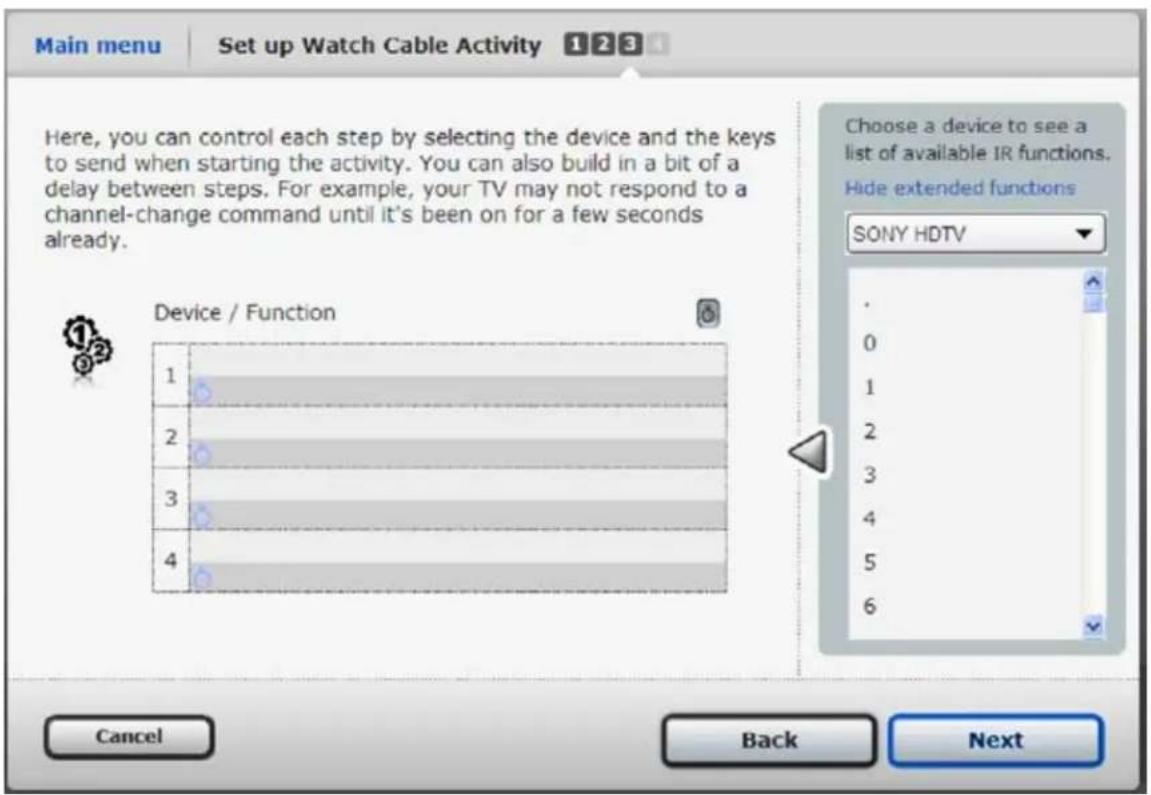
To enter each command into the sequence:
- Use the drop-down menu on the right side of the screen. Select the component you want to command.
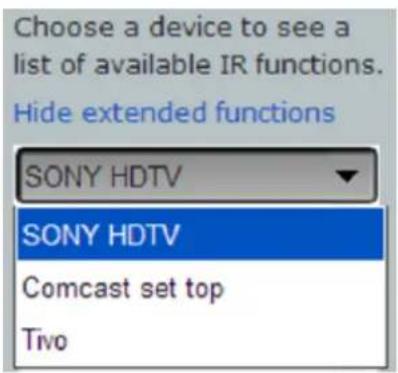
Scroll through the available commands for this component. (The list also includes extended 2. functions your remote will create if needed.) Find the key(s) you want to enter for this component.
When you see a key command you want, highlight it and press the on-screen arrow button. 3. This includes it in the list of commands for this activity.
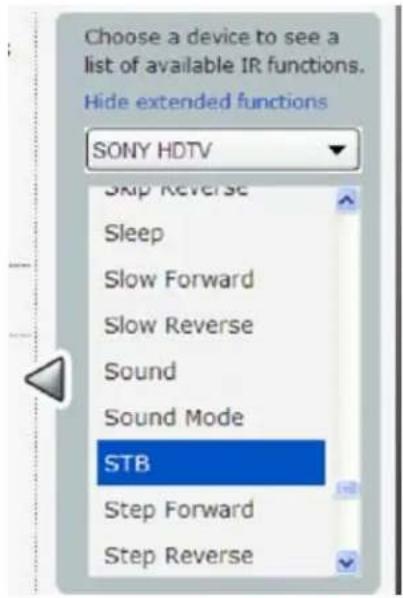
Don't see the key command you want?
See the "If the key command you want is not listed...box" on pg. 25 for troubleshooting options.
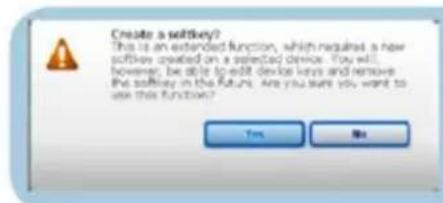
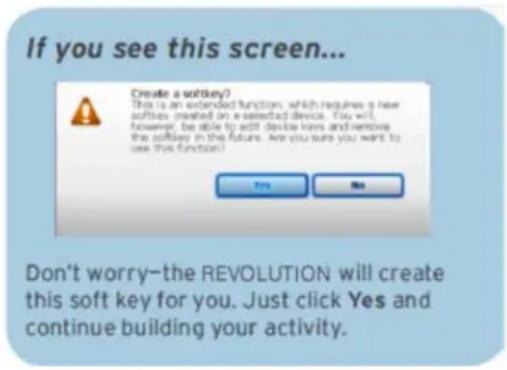
If you see this screen...
Don't worry-the REVOLUTION will create this soft key for you. Just click Yes and continue building your activity.
Repeat for each key command to be included in this activity.4.
To re-order commands, click the command in the list. Click the up or down arrow that appears until you see the command you want.
To delete commands from the sequence: click the X icon on the right side of the command's entry in the list. Answer "Yes" to the dialog box that you want deleted.
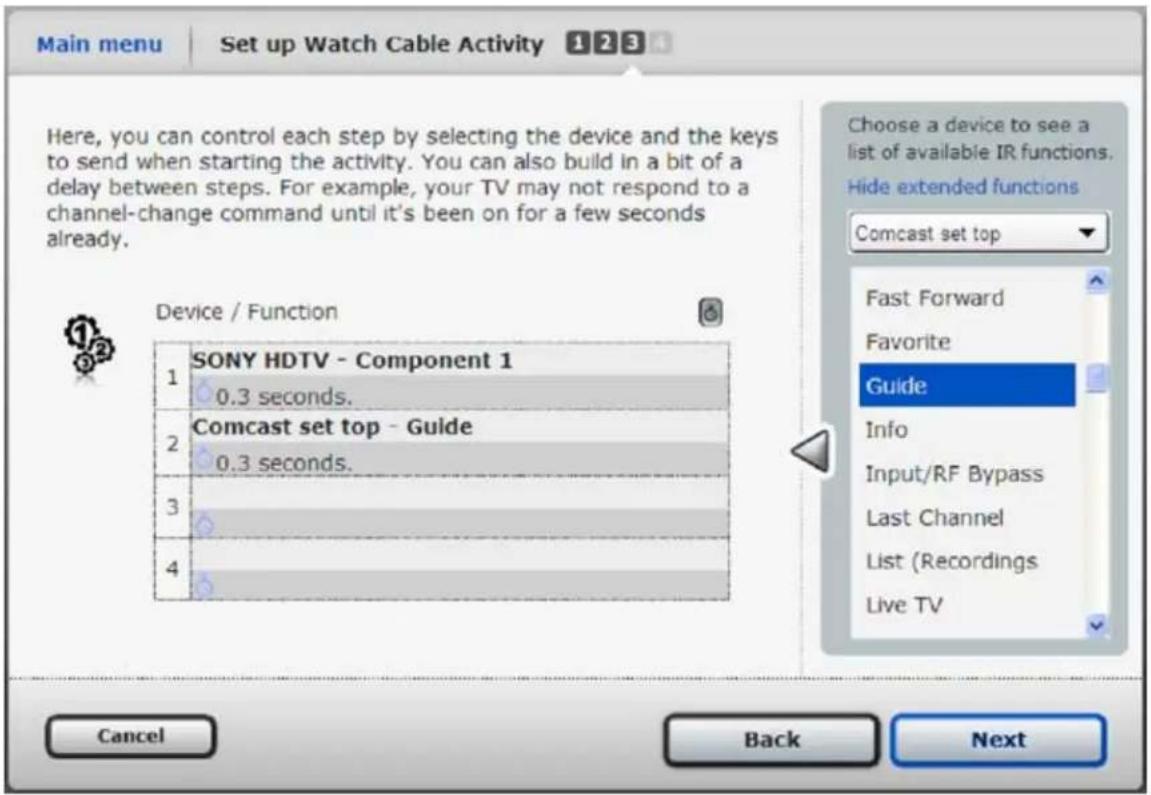
To change the timing between commands (useful when a device must respond to one command before it can handle another): click the clock icon on the second line of the command. Use the arrows to adjust the number of seconds to wait between commands.
Once you build the activity as you wish, click "Next."5.
Setting the volume/channel/transport controls
On the final screen, you can set which devices you use to control the volume, channels, and playback when watching a show on satellite or cable.
To change the device controlled by a group of keys, click the device listed to display the drop-down menu. Select the device you want.
Once you set the devices you want to control and their volume, channels, and playback, click "Next."
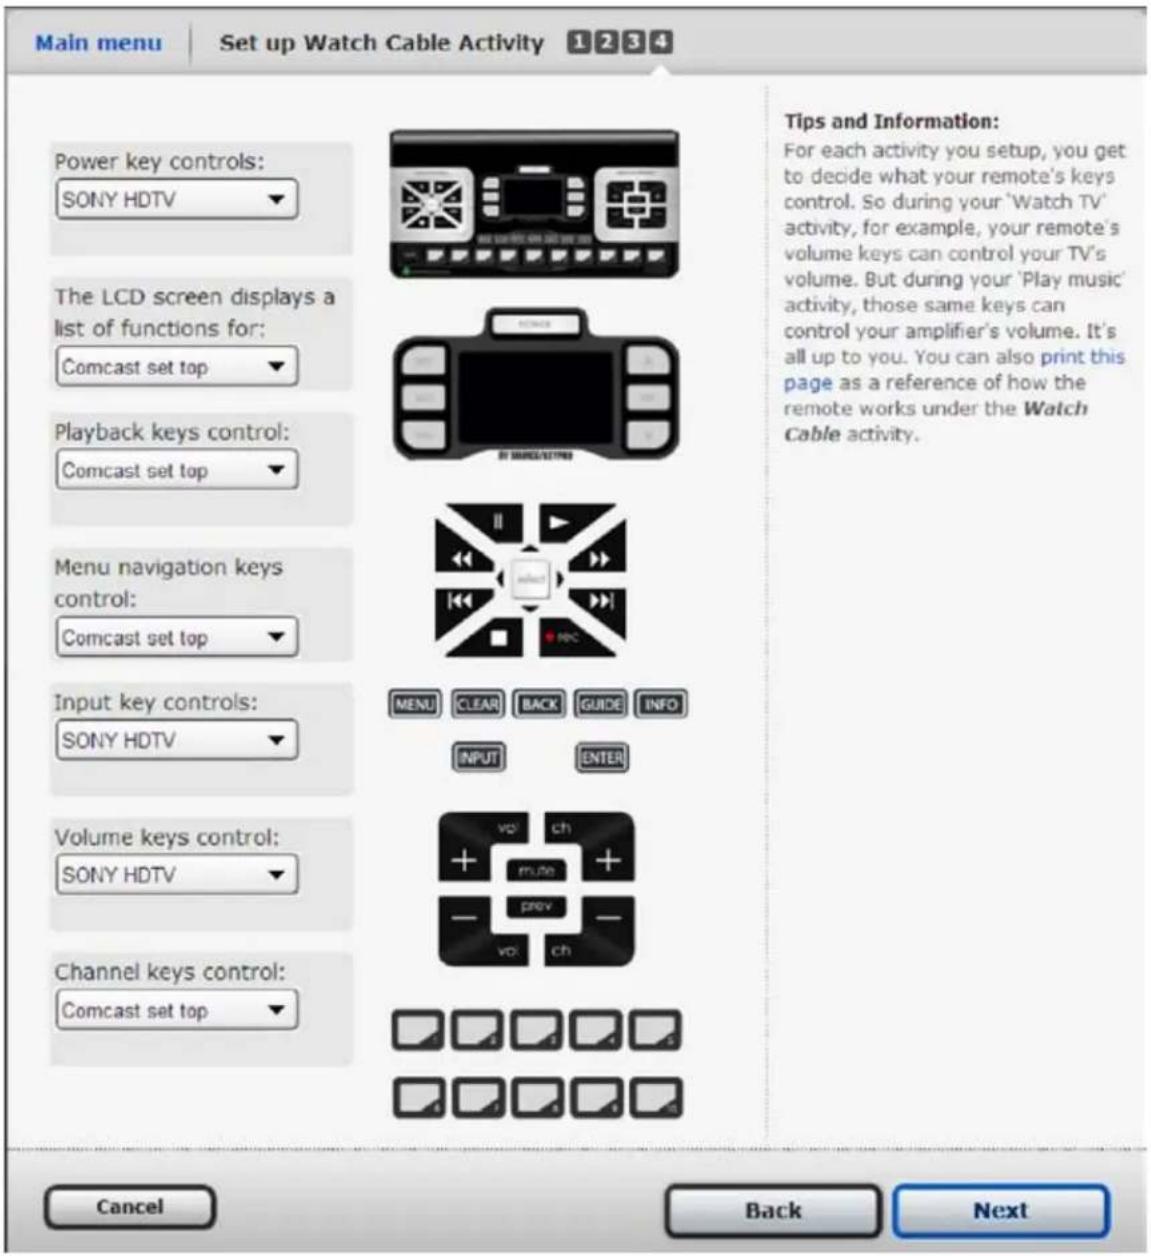
ImpORTANT: Remember to download this activity to your remote. When finished customizing your remote using the Advanced Wizard, go to the Main Menu. Click "Download to Remote," to physically save your settings onto the remote. The next screen lets you review your settings.
Choose "Yes" if you want to see your complete list of activities, favorites, devices, and other settings using the Setup Wizard.
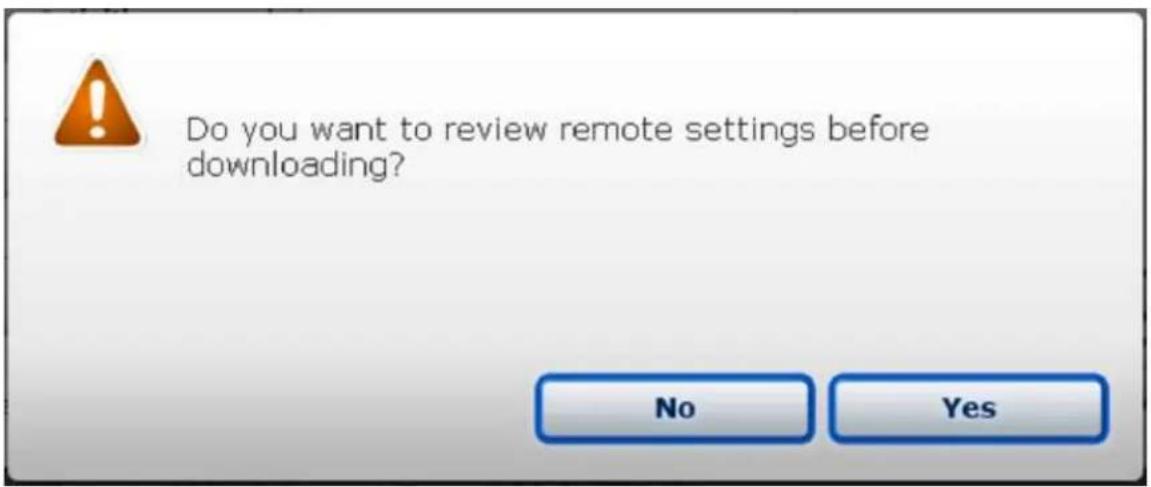
Choose "No" if you want to download without reviewing the settings. Once all the information downloads to your remote, you see a confirmation screen.
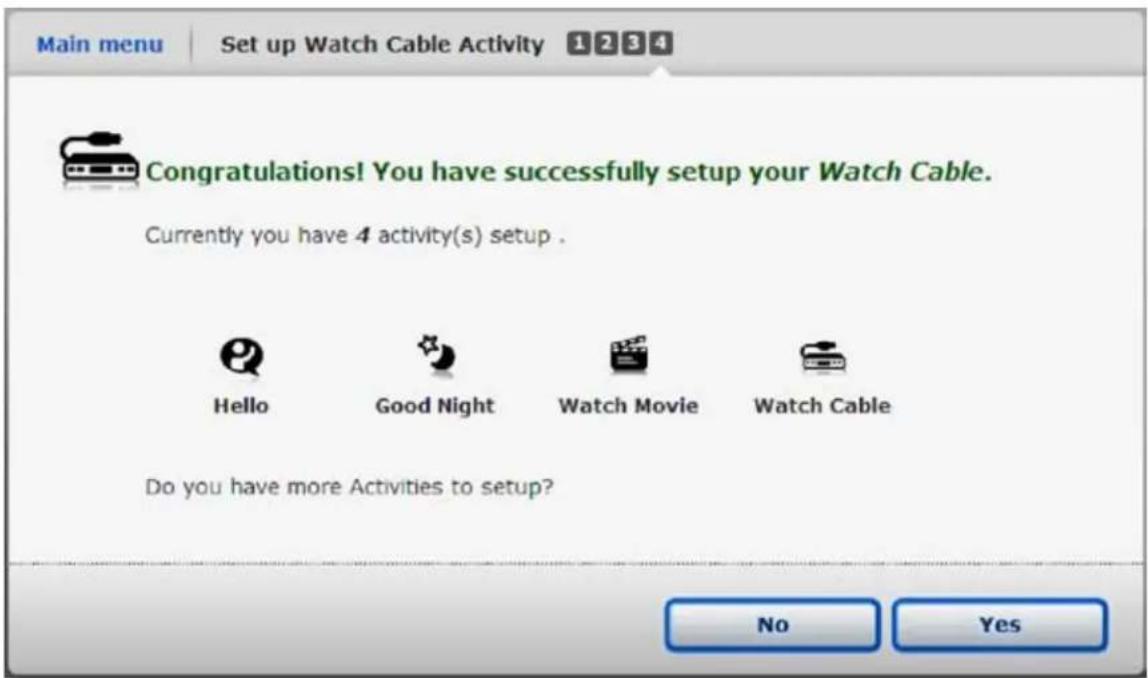
Now, you can disconnect the remote from your PC and use it.
USING YOUR ACTIVITIES
Activities enable one-touch control over your complete home entertainment system to watch movies, watch TV, and listen to music.
Using the Hello Activity
Before you turn anything on, highlight the "Hello," if it has not been selected.2.
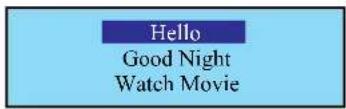
Press the "OK" button.3.
How to tell when an activity is done
Once the remote completes the activity, you can see menu selections based on your setup.
To perform another activity, press the "Activities" key.
Using the Watch Movie activity
Use the 2.∧ or √ buttons to highlight the Watch Movie activity, if it has not been selected.
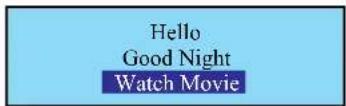
- Press the OK button.
How to tell when an activity is done
Once the remote completes the activity, you see menu selections based on your setup choices.
To perform another activity, press the "Activities" key.
Using the Good Night Activity
Press the "Activities" button.4.
Use the 5. ^w or v buttons to highlight the Good Night activity, if it is not already highlighted.
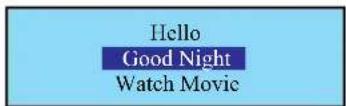
6. Press the "OK" button.
How to tell when an activity is done
Once the remote completes the activity, you see menu selections based on your setup choices.
Need help setting up your remote? Call Monster Support toll-free at 1-877-800-8989.
HOW TO SET UP FAVORITES
Goal of this section: to control the REVOLUTION your way, at the touch of a button.
OVERVIEW OF FAVORITES
With your remote, you can save up to 20 Favorite Channels.
Setting Up a List of Favorite Channels
In the main menu, click "Favorites," and select "Set up Favorites" from the submenu. Press "Next" to continue.
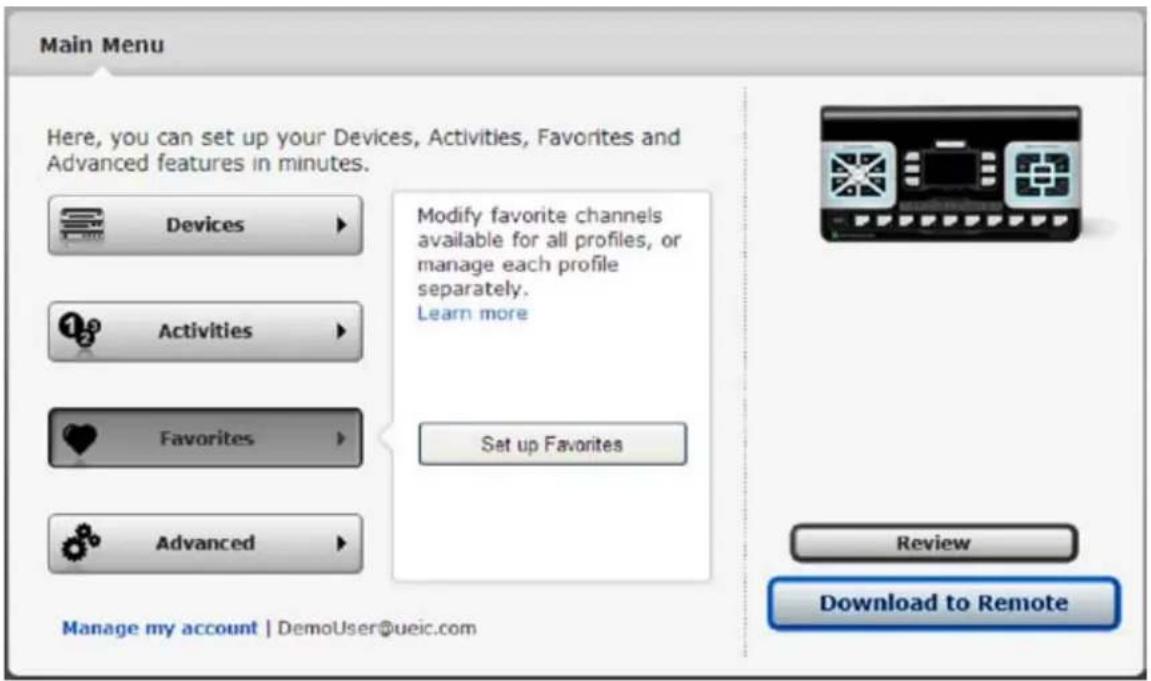
Here are the steps involved in the Wizard.
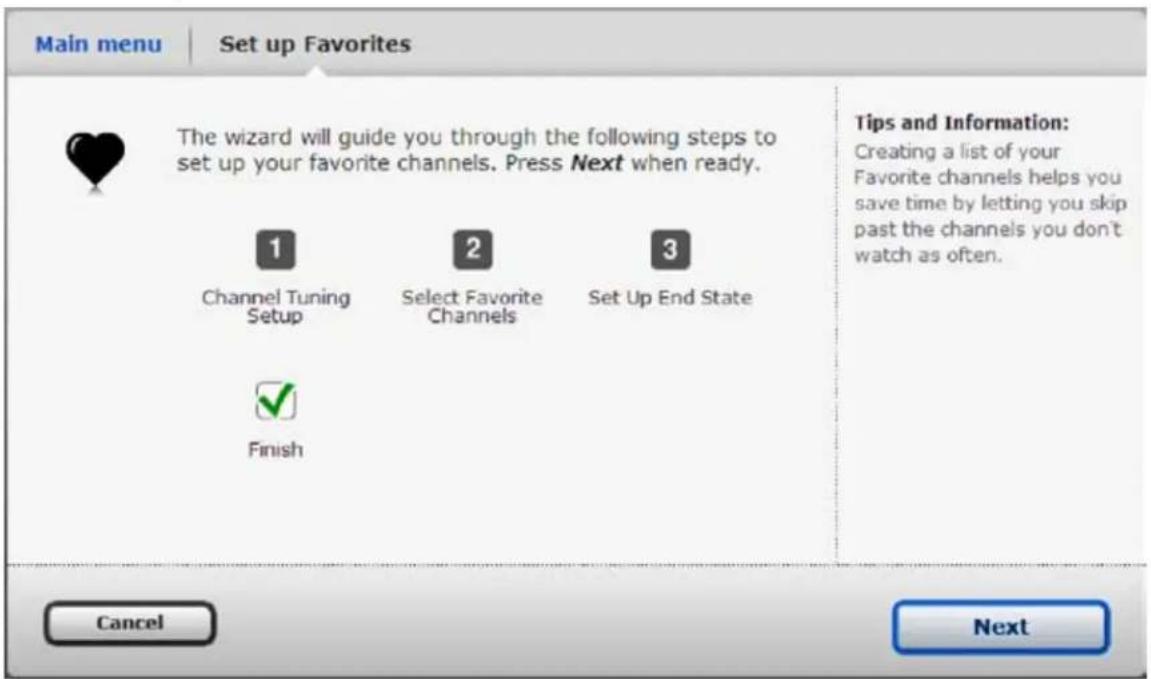
Select the device you change channels with
For example, if you subscribe to a cable provider, you likely use your cable box to change channels, not your TV. Choose what works for your home theater, and click "Next."
Note: Favorites work with a single source only (e.g., your cable or satellite box). They do not work with a second source (e.g., a cable receiver box and over-the-air programming on your TV).
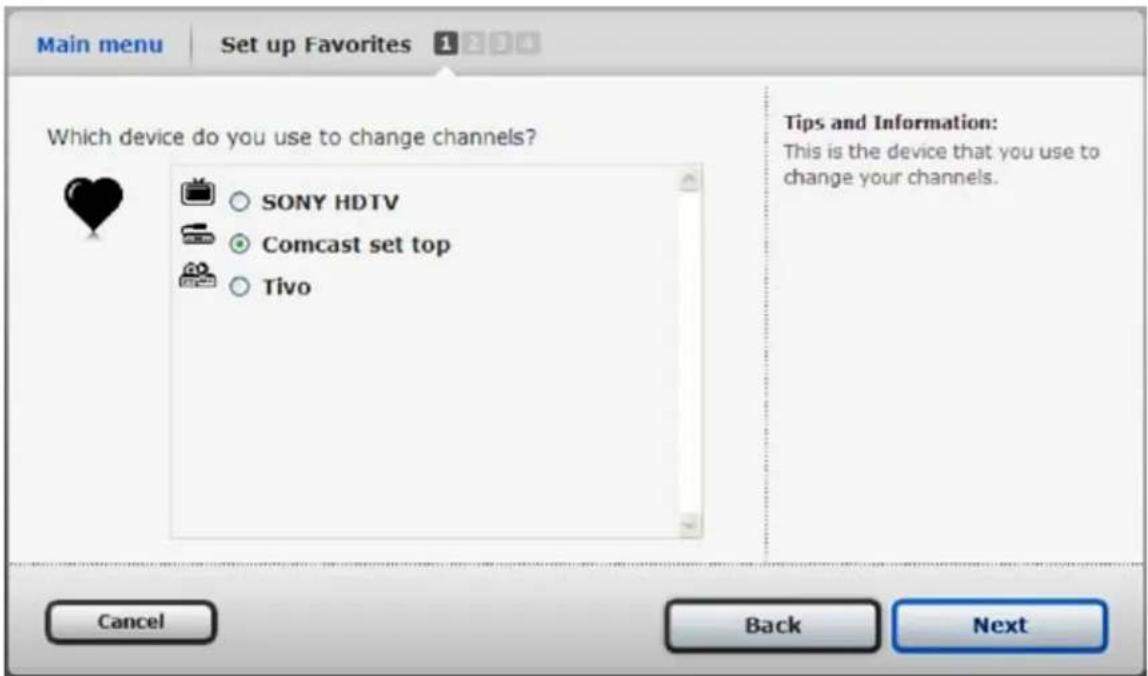
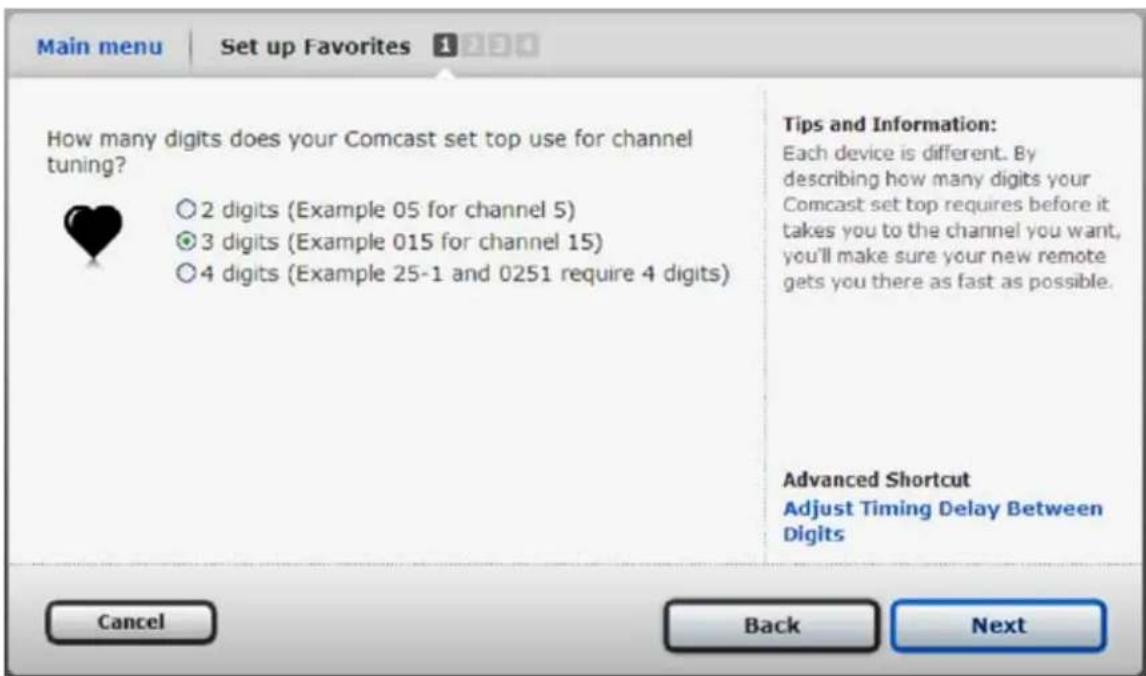
Set the number of digits your channels use
If your channels go up to 999, then select 3 digits. If they go to up to 99, select 2 digits. Choose what works for your home theater and click Next.
Note: To include digital subchannels in your Favorites list (e.g., 51.1), choose 4 digits. Confirm your choice on the next screen by clicking "Enter" or "Select/OK."
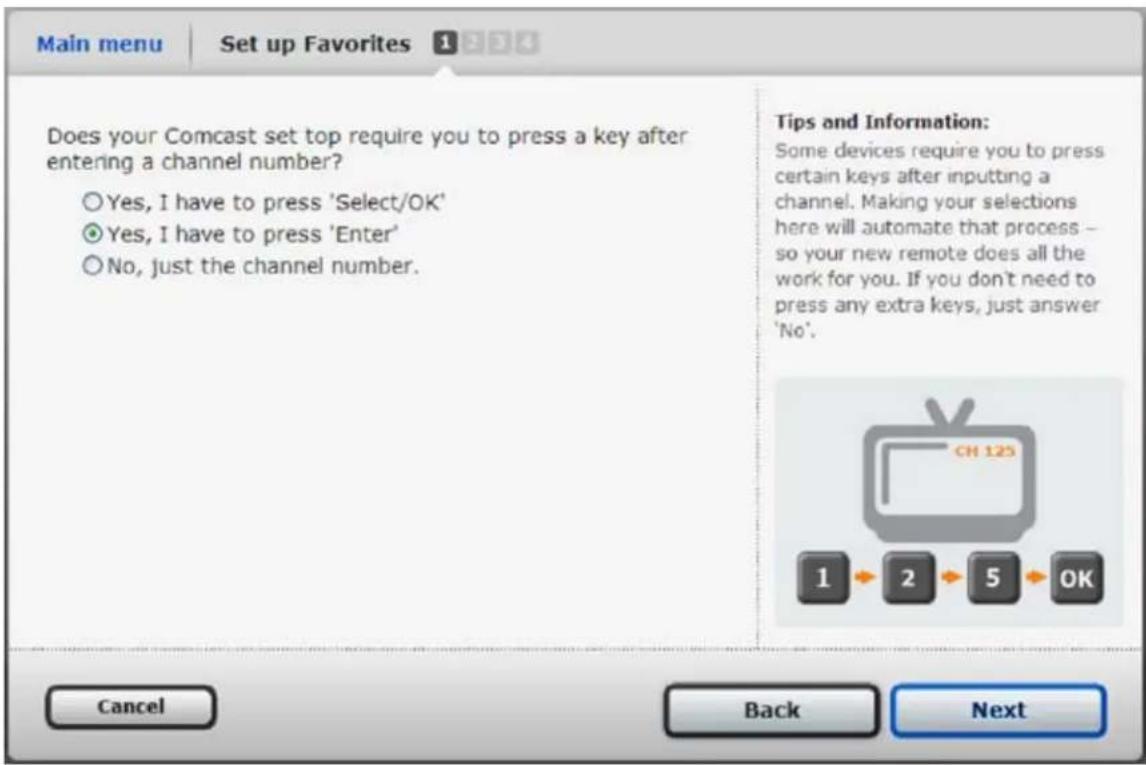
Set how you finish entering channel numbers
Next, tell the Setup Wizard whether you press "Enter" or "OK" on your remote to enter a channel. Choose what works for your home theater and click "Next."
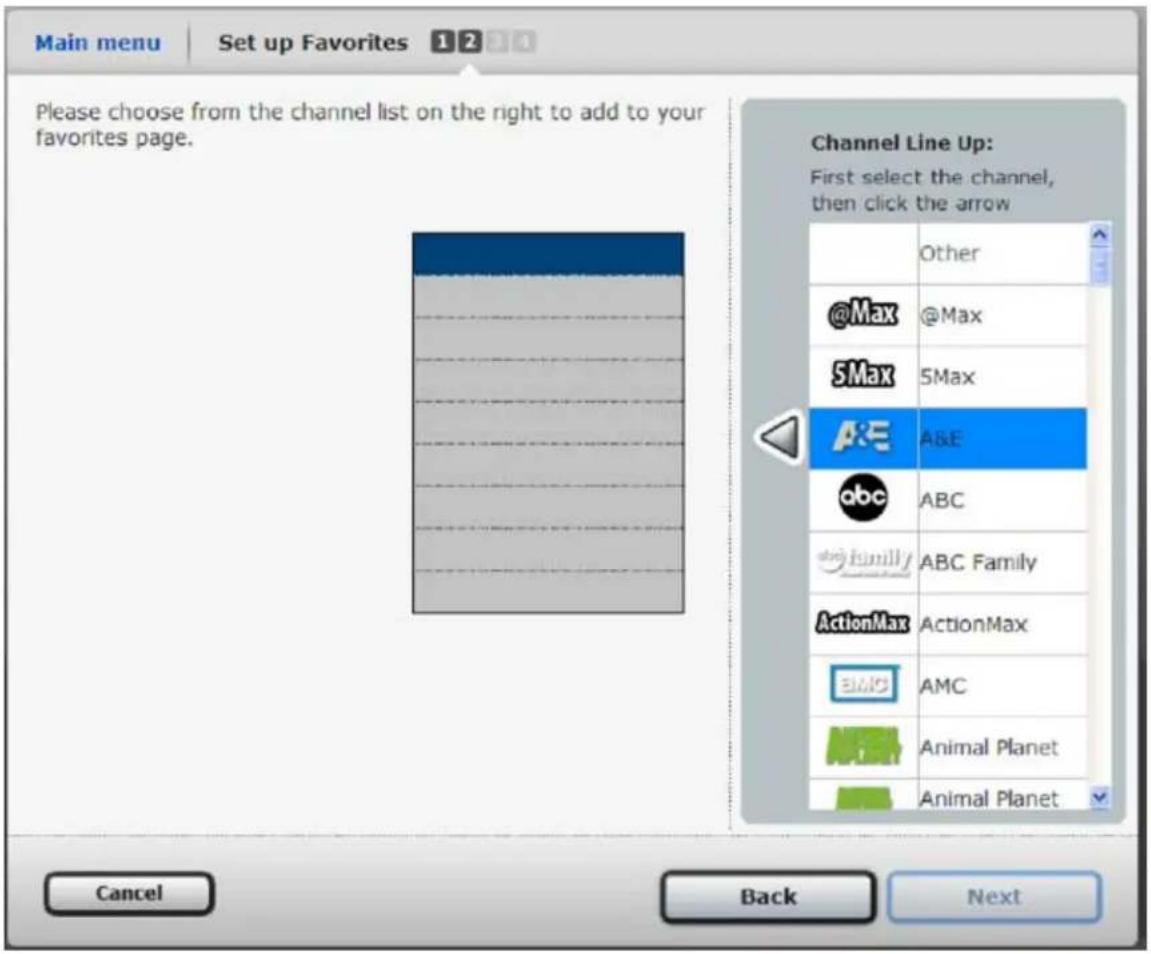
Now the Setup Wizard begins loading the channel icons. How long this takes depends on the speed of your Internet connection.
Choosing Your favorite Channels
Select a channel
To find a channel to add to your Favorites, click the scroll bar. The channels appear in alphabetical order. Highlight a channel you want to add. Click the arrow that points to the left when you highlight the channel.
Next, you see a prompt to enter the channel number for your choice.
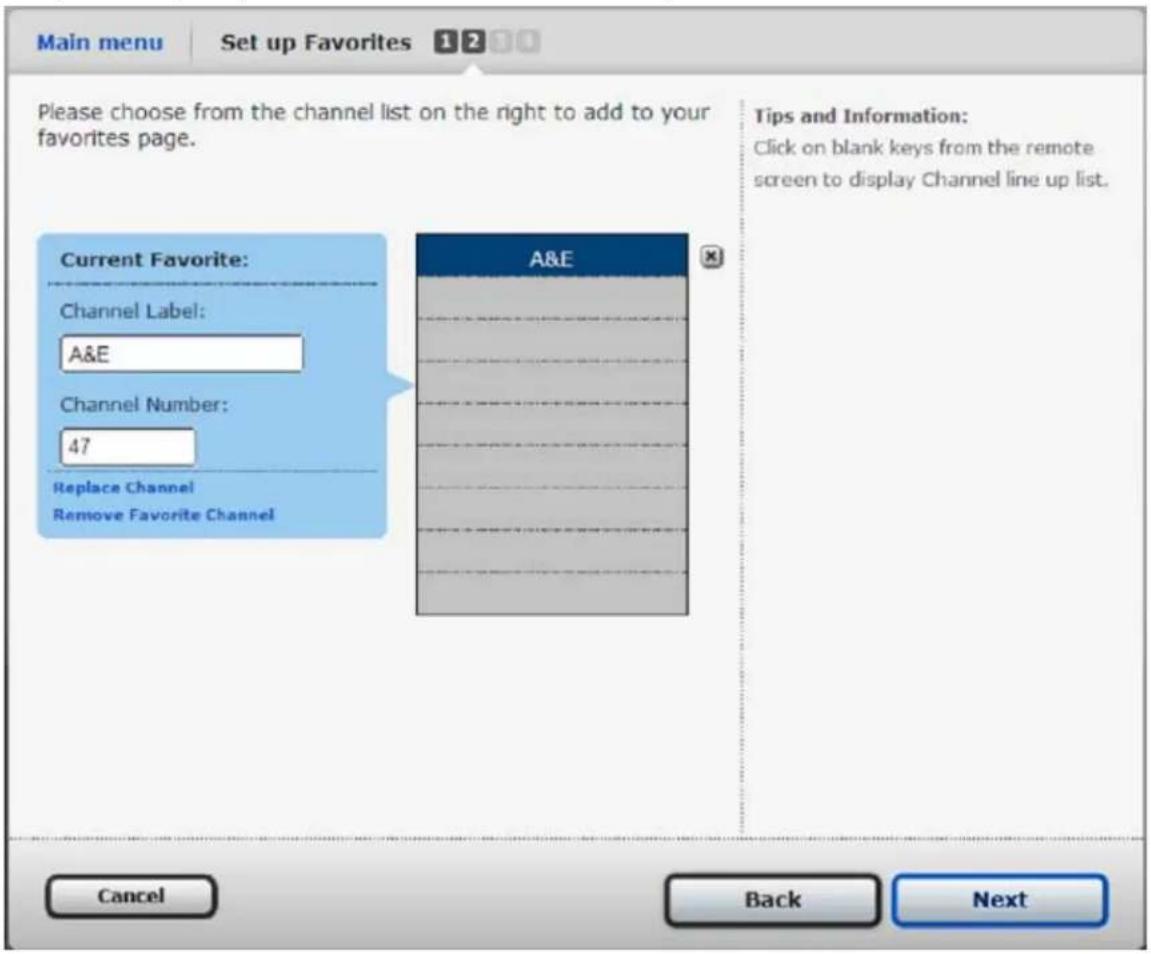
Adding more favorite channels
To add more, click on a blank row to return to the Channel Line Up list. Add your next channel the same way you added the previous one.
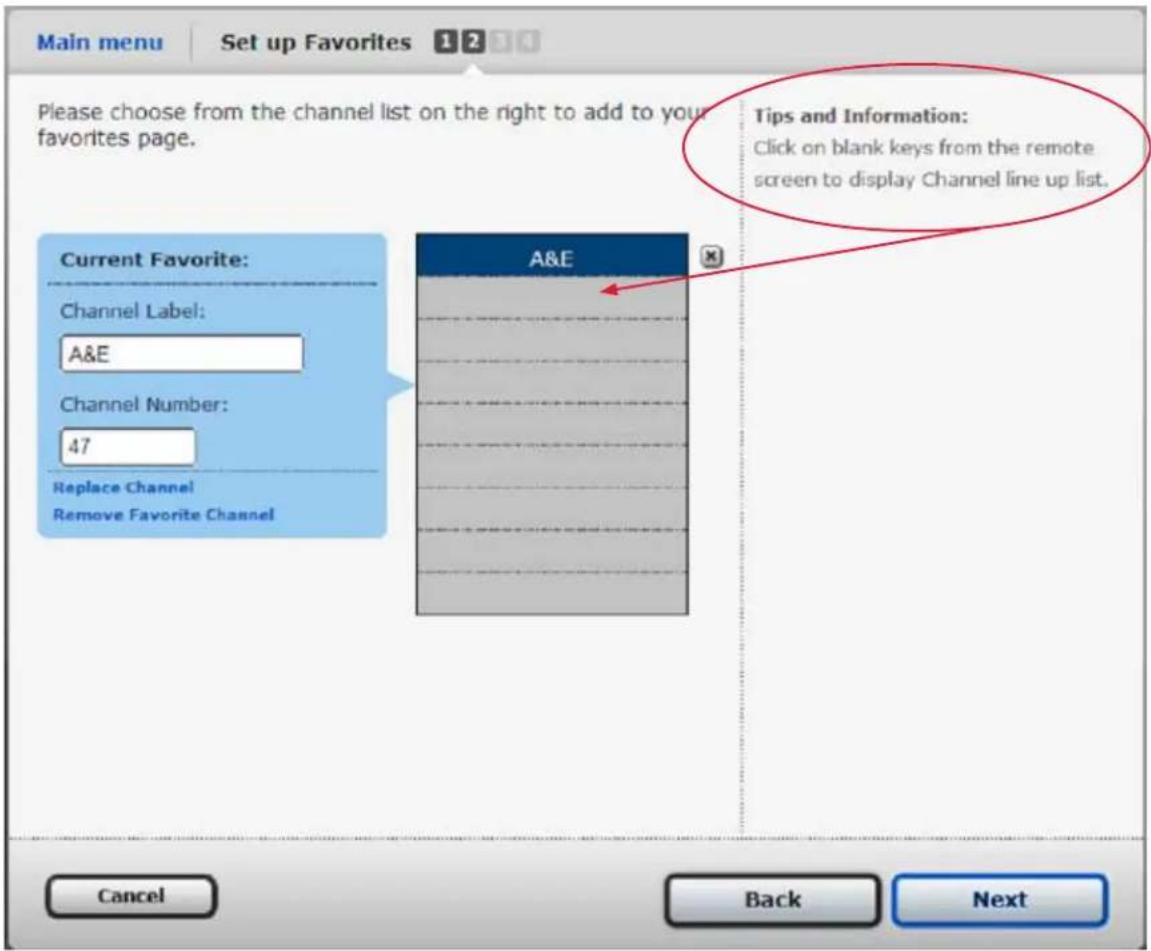
If you don't see your channel listed...
To add it manually, choose "Other" at the top of the list.
You can then find this channel with a text label or search the Setup Wizard library for a channel icon.
To use a text label, type in the text you want to use and follow the prompts to enter the channel number.
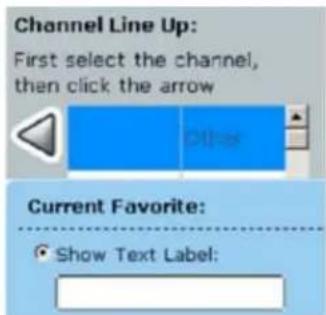
Check your channels
Once you add all your Favorite Channels, check them by clicking each row and review the Channel Label and Channel Number fields. An alert icon appears next to any Favorite missing a channel number.
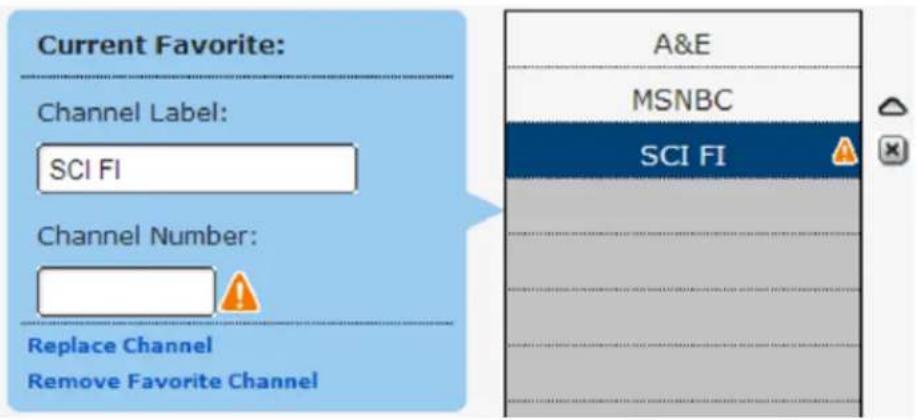
To change where a channel appears on the page, select its row and click on a directional arrow to move it into a new position.
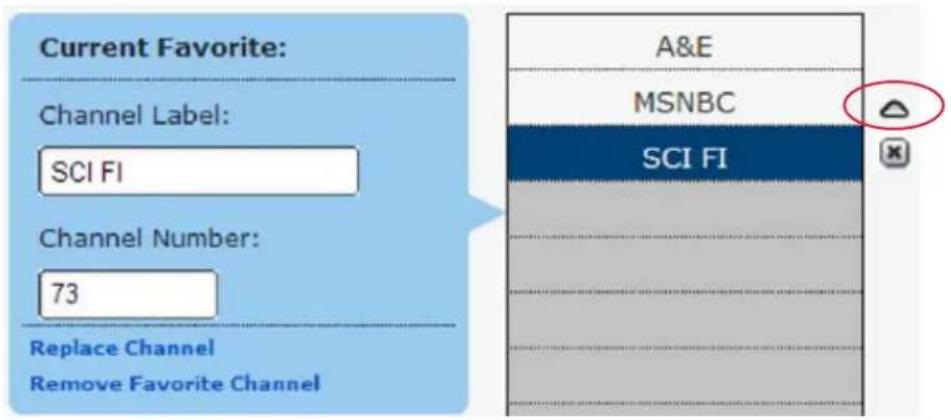
Completing the list
When you are done, click the "Next" button. This takes you to the last step of creating a Favorites list.
Assigning Remote Button Groups to Control different devices
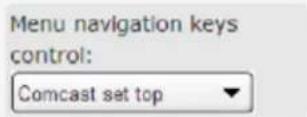
You can decide what your remote's buttons control during this activity by choosing the device from the drop-down lists.
natural_image
Front view of a black electronic device with two white fan-shaped indicators and control buttons (no visible text or symbols)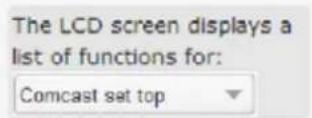
natural_image
Black and white stylized icon of a film camera with no text or symbols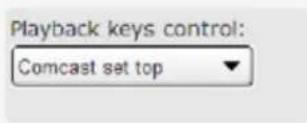
flowchart
graph TD
    A["<<"] --> B["<<"]
    C["<<"] --> D["<<"]
    E["<<"] --> F["<<"]
    G["<<"] --> H["<<"]
    I["<<"] --> J["<<"]
    K["<<"] --> L["<<"]
    M["<<"] --> N["<<"]
    O["<<"] --> P["<<"]
    Q["<<"] --> R["<<"]
    S["<<"] --> T["<<"]
    U["<<"] --> V["<<"]
    W["<<"] --> X["<<"]
    Y["<<"] --> Z["<<"]
    AA["<<"] --> AB["<<"]
    AC["<<"] --> AD["<<"]
    AE["<<"] --> AF["<<"]
    AG["<<"] --> AH["<<"]
    AI["<<"] --> AJ["<<"]
    AK["<<"] --> AL["<<"]
    AM["<<"] --> AN["<<"]
    AO["<<"] --> AP["<<"]
    AQ["<<"] --> AR["<<"]
    AS["<<"] --> AT["<<"]
    AU["<<"] --> AV["<<"]
    AW["<<"] --> AX["<<"]
flowchart
graph TD
    A["va"] --> B["male"]
    C["ch"] --> B["male"]
    D["+"] --> B["male"]
    E["-"] --> F["prev"]
    G["va"] --> H["ch"]
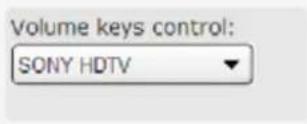
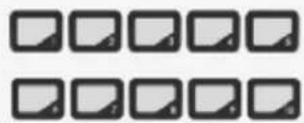
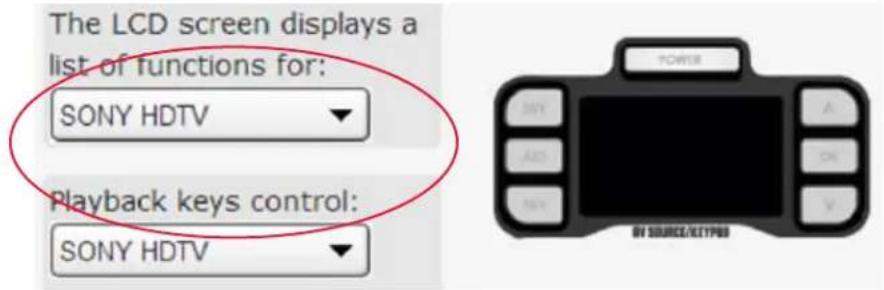
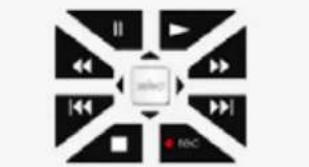
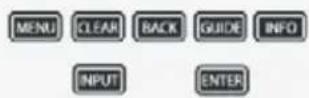
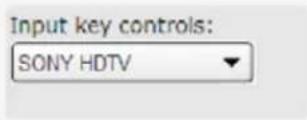
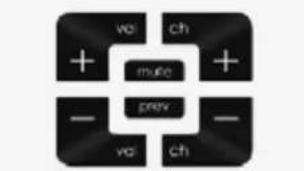
In this last step, you assign default devices for each group of buttons to control.
The image to the left shows what button groups you can assign.
You can set this screen in the same way you set your remote when watching your Favorite Channels.
To change an option, highlight the option you want to change. From the drop-down menu, choose the device you want this group to control.
When you're done, click "Next" to continue.
All done! Your Favorites are ready to use.
TROUBLESHOOTING
Most problems with the REVOLUTION can be resolved by following the solutions described in this section. If you still have questions, you can call Monster Support toll-free at 1-877-800-8989.
INITIAL SETUP
I can't find a code for my device or one that does everything I expected.
Point the remote directly at the device you want to control.
Some devices take a few seconds to respond, particularly ON / OFF commands.
Some brands use separate Power On and Power Off keys. If you have the device's original remote, check if it has separate power keys. If so, use other keys (volume, channel, or number keys) to test codes in this step.
If the approaches above don't work completely, use the Setup Wizard. The Wizard lets you enter the model number of your device to find its exact code. If you find a code which does most of what you want, your remote can learn additional keys from the Settings menu (see the original remote's user manual for instructions).
How do I take a step or two back when I make a mistake?
To go back one or more screens in the setup process, press the "Shift" or "DEV" key.
THE REVOLUTION REMOTE CONTROL SETUP WIZARD
The REVOLUTION program doesn't run on my PC.
Your PC must run on Windows 7, Windows Vista, or Windows XP. You must use Internet Explorer 7.0 or later, as the REVOLUTION software doesn't support other browsers.
Windows XP users must install Service Pack 3 and .Net 3.5
to see which service pack you have:
Right-click on "My Computer."1.
Choose "Properties" from the drop-down menu.2.
In the General tab, you see the service pack's number listed under System.3.
To update to Service Pack 3:
Insert the REVOLUTION CD. If your Internet connection works, the CD goes automatically 1. to the Microsoft update site.
On the web site, click "Express." Microsoft begins the update process by checking your 2. computer (this can take 5-10 minutes).
You should see prompts for the updates you need to install. Follow the Microsoft Installation 3. Wizard to download and install them. If you have SP1, it takes about 1 hour to update to SP2; plus 30 minutes for SP3 (depending on connection speed). If you have SP2, it will take about 30 minutes (depending on connection speed).
Close all Internet browser windows, and continue with the installation.4.
What if my install CD won't start up automatically?
Find the CD in Windows Explorer. Double-click on the REVO icon. If you have Windows XP and need Service Pack 3, see the "Important Note" for Windows XP users on the previous page (Windows 7 and Vista users don't need this update).
The REVOLUTION program runs slowly.
Proxy servers, as found in many business networks, can affect the speed of the Setup Wizard. For best results, run the Setup Wizard with a direct Internet connection (e.g., most home connections).
How can I tell my remote is connected to my PC?
If a green arrow icon appears in your Windows status bar, it's connected.
When I connect the remote to my PC, a progress bar appears in the corner of my screen. What does this mean?
Your remote is updating its firmware. Do NOT disconnect the remote! Your remote updates and improves itself automatically with the latest codes and functionality.
What should I do if I get an error message after connecting my remote?
For the Setup Wizard to work, it may be necessary to tweak the ActiveX settings in your Internet Explorer browser:
Click OK in the "Missing necessary software..." dialog box.1.
Locate the light yellow warning bar at the top of the page.2.
To change ActiveX settings, click the warning bar's "click here" indicator.3.
Click the "Connect" button at the bottom of the screen.4.
SETTING UP ACTIVITIES
How do I add a key command to my Watch Movie/Satellite/Cable activity that's not on the list of commands?
Make sure the:
Correct device is selected from the drop-down menu.1.
Key name is correct as per the original remote.2.
If you still need to enter model number information for this device in the Setup Wizard:
Go to the Main Menu.1.
Select "Devices" and "Modify Device."2.
Enter the model number to get all available functionality.3.
If you don't see the key command you want, your remote learn this key from the original remote.
See pg. 34 for more information.
Activities are set up on my PC, but I can't access them on my remote.
If you use the Setup Wizard to change your settings, don't forget to transfer them to the remote:
Go to the Main Menu.1.
Click "Download to Remote" to save your settings.2.
See pg. 5 for more information.
USING ACTIVITIES
My device goes to the wrong input or doesn't change inputs at all in the Assist screens.
Does the input on the "No Sound/No Picture" screen match the device input you want to access? If not, use the Setup Wizard to change it.
Connect the remote to your PC.1.
Launch the Setup Wizard.2.
In the Main Menu, choose "Activities," "Modify an Activity," the activity you want to modify, 3. and "Key Command Sequence."
Check that each device's input command is correct.4.
USING FAVORITES AND PROFILES
How do I add the channel I want to add to my Favorites?
Add it manually by choosing "Other" at the top of the list. Select this channel with a text label, or search the Setup Wizard library for a channel icon. To use an icon from the library (or one of your own), select "Show Channel Icon," then click the ... button.
Scroll through the icons in the library. Highlight the logo you want. If you don't see the one you want, add your own. Simply, click the "Browse" button and find the image file on your PC. When you find the icon you want, press "OK." The channel icon appears in the mini remote screen. Follow the remaining prompts to add the channel number.
I can't access one or more of my favorite channels.
Are all your favorite channels from a single source (e.g., cable box or satellite receiver)? Favorites only work from a single source. If you have digital subchannels in your Favorites list (e.g., 51.1), choose 4 digits in the Favorites setup. See pg. 51 for more information.
Check if your Favorites settings match how you tune to channels in your system. See pg. 51 for more information.
Are the channel numbers entered as Favorites accurate?
If you need help setting up this remote... Call Monster Support toll-free at 1-877-800-8989
Use of the software provided with this product may require the most recent Windows® updates in order to function properly. Any such updates are third party software which shall be governed by such third party's license agreement. Monster Cable is not responsible for any third party's software and shall have no liability for your use of third party software. ©2010 Monster Cable. REVOLUTION, REVOLUTION 200, and REVOLUTION Remote Control Setup Wizard are trademarks or registered trademarks of Monster Cable. Windows® is a registered trademark Of Microsoft Corporation. All trademarks are the properties of their respective owners.

MONSTER®
www.MonsterCentral.com
©2010 Monster, LLC
7251 West Lake Mead Blvd.
Las Vegas, NV 89126
Monster, the Monster logo, Monster Central, and the Monster Central logo are trademarks
or registered trademarks of Monster Cable Products, Inc. or its subsidiaries in the
United States or other countries. All other company and product names
may be trademarks of their respective companies.
- REVOLUTION 200 SETUP GUIDE
- GETTING STARTED WITH THE REVOLUTION 200....3
- HOW TO SET UP ACTIVITIES....13
- HOW TO SET UP FAVORITES 49
- TROUBLESHOOTING....58
- OVERVIEW
- WHAT'S IN THE BOx
- Installing Batteries
- GETTING STARTED WITH THE REVOLUTION
- INSTALLING THE REVOLUTION REMOTE CONTROL SETUP WIZARD
- Minimum Technical Requirements
- If your CD does not start the install process automatically...
- Launching the REVOLUTION Remote Control Setup wizard
- Logging In
- Connecting Your Remote
- If you see a progress bar in the corner of the screen...
- Check that your remote is connected.
- What to do if this error message appears...
- HOW TO SET UP ACTIVITIES
- OVERVIEW OF ACTIVITIES
- GETTING STARTED WITH ACTIVITIES
- Why You Should Set Up a Hello Activity
- Adding a Hello Activity (All ON)
- Configuring the Hello Activity for Your Components
- Setting Volume/Channel/Playback Controls
- Testing the Hello Activity
- Phase 1: Testing Power Commands for Individual Devices
- DEVICE POWER TEST PRESS POWER KEY FOR DEVICE IR
- SONY HDTV Comcast set top
- Phase 2: Testing the Entire Hello Activity
- ACTIVITY TEST Hello
- Phase 3: Informing the Smart Wizard of the Outcome
- finishing the Hello Activity
- SETTING UP THE GOOD NIGHT ACTIVITY
- Adding the Good Night Activity
- When to use the Advanced Wizard...
- Choose the Good Night activity
- Name the activity
- Configuring the Good Night Activity for Your Devices
- Set the Power Off commands
- Testing the Good Night Activity
- SONY HDTV
- Phase 2: Testing the Entire Good Night Activity
- finishing the Good Night Activity
- When you add new devices to your system...
- SETTING UP THE WATCH MOVIE ACTIVITY
- Recording Which Devices You Use to Watch Movies
- Recording How You Access these Inputs with Your Original Remote
- Adding a New Activity Using the REVOLUTION Remote Control Setup Wizard
- Why Use the Advanced Wizard?
- Choose the Watch Movie Activity
- Building the watch movie Activity
- If the key command you want is not listed...
- Set the Volume/Channel/Transport Controls
- SETTING UP THE WATCH SATELLITE OR CABLE ACTIVITY
- Recording Which Devices You Use to Watch Satellite or Cable
- Recording How You Access These Inputs With Your Original Remotes
- Adding a New Activity in the REVOLUTION Remote Control Setup Wizard
- Choose the Advanced Wizard
- Select the activity to set up (Watch Satellite or Watch Cable)
- Building the watch Cable or watch Satellite Activity
- Don't see the key command you want?
- If you see this screen...
- Setting the volume/channel/transport controls
- USING YOUR ACTIVITIES
- Using the Hello Activity
- How to tell when an activity is done
- Using the Watch Movie activity
- Using the Good Night Activity
- Press the "OK" button.
- HOW TO SET UP FAVORITES
- OVERVIEW OF FAVORITES
- Setting Up a List of Favorite Channels
- Select the device you change channels with
- Set the number of digits your channels use
- Set how you finish entering channel numbers
- Choosing Your favorite Channels
- Select a channel
- Adding more favorite channels
- If you don't see your channel listed...
- Check your channels
- Completing the list
- Assigning Remote Button Groups to Control different devices
- TROUBLESHOOTING
- INITIAL SETUP
- THE REVOLUTION REMOTE CONTROL SETUP WIZARD
- What if my install CD won't start up automatically?
- The REVOLUTION program runs slowly.
- How can I tell my remote is connected to my PC?
- When I connect the remote to my PC, a progress bar appears in the corner of my screen. What does this mean?
- What should I do if I get an error message after connecting my remote?
- SETTING UP ACTIVITIES
- Make sure the:
- Activities are set up on my PC, but I can't access them on my remote.
- USING ACTIVITIES
- USING FAVORITES AND PROFILES
- How do I add the channel I want to add to my Favorites?
- I can't access one or more of my favorite channels.
- MONSTER®
Brand : MONSTER
Model : Revolution 200
Category : Regulator