
ZKB7429DX - Oven ZANKER - Free user manual and instructions
Find the device manual for free ZKB7429DX ZANKER in PDF.


| Type of product | Built-in electric oven with steam function |
| Brand | Zanker |
| Model | ZKB7429DX |
| Oven cavity dimensions (HxWxD) | 325 x 440 x 390 mm |
| Oven capacity | 53 L |
| Recess dimensions (HxWxD) | Under top: 595 x 560 x 550 mm; Column: 580 x 560 x 550 mm |
| Voltage / Frequency | 230 V – 50 Hz |
| Total power rating | 2.8 kW |
| Heating element ratings | Top + bottom: 1800 W; Grill: 1750 W; Fan oven: 2000 W; Steam generator: 735 W |
| Oven light | 15 W, E14, 300°C resistant |
| Functions | Conventional, fan, grill, steam, defrost (fan without heat) |
| Temperature range (conventional/fan) | 50 °C – 250 °C |
| Steam temperature range | 140 °C – 220 °C |
| Water tank capacity | Approximately 1 L (enough for ~1 hour of steam cooking) |
| Control type | Electronic programmer with push-push knobs |
| Timer functions | Cooking duration, end of cooking, minute minder, time of day |
| Safety features | Safety thermostat, cooling fan for controls, child lock (optional door protection device) |
| Cleaning | Grease filter (dishwasher safe), removable oven door, hinged grill element, manual steam generator cleaning |
| Accessories included | Diet cooking double dish, steam injectors, exhaust pipe, dripping pan, shelf |
| Installation type | Built-in (under top or column) |
| Electrical connection | Single-phase 230 V via terminal block; cable not supplied (requires H07RN-F, etc.) |
| Spare parts availability | Original spare parts through Service Centre (Distriparts) |
Frequently Asked Questions - ZKB7429DX ZANKER
User questions about ZKB7429DX ZANKER
0 question about this device. Answer the ones you know or ask your own.
Ask a new question about this device
Download the instructions for your Oven in PDF format for free! Find your manual ZKB7429DX - ZANKER and take your electronic device back in hand. On this page are published all the documents necessary for the use of your device. ZKB7429DX by ZANKER.
USER MANUAL ZKB7429DX ZANKER
⚠️ Important Safety Information
These warnings are provided in the interest of safety. You must read them carefully before installing or using the appliance.
Installation
- It is mandatory that all operations required for the installation are carried out by a qualified or competent person, in accordance with existing rules and regulations.
- It is dangerous to alter the specification in any way.
- Once you removed all packaging from the appliance, ensure that it is not damaged and the electric cable is in perfect conditions. Otherwise, contact your dealer before proceeding with the installation.
Child Safety
- This appliance has been designed to be operated by adults and children under supervision. Young children MUST NOT be allowed to tamper with the controls or play near or with the oven.
- Accessible parts of this appliance may become hot when it is in use. Children should be KEPT AWAY until it has cooled.
During use
- This appliance has been designed for cooking edible foodstuff only and must not be used for any other purposes.
- Ensure that all control knobs are in the OFF position when not in use.
- Should you connect any electrical tool to a plug near this cooking appliance, ensure that electric cables are not in contact with it and keep them far enough from the heated parts of this appliance.
- If the appliance is out of order, disconnect it from the electric supply.
- Do not leave utensils containing foodstuffs, e. g. fat or oil in or on the appliance. This could cause damage in case the appliance is inadvertently switched on.
- Always place the dripping pan in position to collect fat when using the grill or when cooking meat. Pour a little water into the dripping pan to avoid smoke and unpleasant smells.
- Always use oven gloves to remove pans from the oven.
- For hygiene and safety reasons, this appliance should be kept clean at all times. A build-up of fats or other foodstuff could result in a fire.
- Disconnect the appliance from the electrical supply, before carrying out any cleaning or maintenance work.
- Some parts of the appliance are covered by a shock-proof plastic film. Remove this film before using the oven.
- This appliance is meant to operate with a single-phased connection to 230V electrical supply. An
eventual 400V poliphasic connection without earth wire will destroy the oven and the hob, if fitted.
- The manufacturer disclaims any responsibility should all the safety measures not be carried out.
Service
- Under no circumstances should you attempt to repair the appliance yourself. Repairs carried out by unexperienced persons may cause injury or serious malfunctioning. Refer to your local Service Centre. Always insist on genuine spare parts.
Environmental Information
• After installation, please dispose of the packaging with due regard to safety and the environment.
- When disposing of an old appliance, make it unusable, by cutting off the cable.
It is most important that this instruction book is be retained with the appliance for future reference. Should the appliance be sold or transferred, always ensure that the book is left with the appliance in order that the new owner can get to know the functions of the appliance and the relevant warnings.
Guide to Use the instructions
The following symbols will be found in the text to guide you throughout the Instructions:
Safety Instructions
Step by step instructions for an operation
i Hints and Tips
Environmental information
CE This appliance complies with the following E.E.C. Directives:
- 73/23 - 90/683 (Low Voltage Directive);
- 89/336 (Electromagnetical Compatibility Directive);
- 93/68 (General Directives) and subsequent modifications.
MANUFACTURER: ELECTROLUX ZANUSSI S.p.A.
Viale Bologna, 298
47100 FORLÌ (Italy)
Contents
For the User For the Installer
Important Safety Information 59
Description of the appliance 60
Safety when cooking 62
When the oven is first installed 62
Electronic programmer 63
Water tank pilot lamps 66
How to set the oven ready for a steam
cooking 66
Cooking with steam 67
Accessories for steam cooking 68
Steam cooking chart 69
Traditional, fan and grill cookings 70
Cooking charts 71
Cleaning and maintenance 72
What happens if something goes wrong 74
Technical Assistance and Spare Parts 75
Technical Data 76
Installation 76
OVEN DOOR PROTECTION DEVICE (stainless steel models) All our appliances comply with the European Safety Standards. Nevertheless, in order to ensure the highest safety level, and avoid little children to be exposed to the heat when the appliance is operated, it is possible to fit a special protection device to the oven door. This device can be purchased in our Service Force Centres, specifying the relevant code (35791) and the Product No. shown on the rating plate. Fitting instructions are provided with the kit package.
Description of the appliance


natural_image
Line drawing of a portable stove with a lid and two handles, placed on a flat surface (no text or symbols)- Control panel
- cooking function control knob
- Steam generator pilot lamps
- Electronic programmer
- Thermostat control knob
- Thermostat control light
- Water tank feeding drawer
- Grillelement
- Oven lamp
- Fan
- Steam injector
- Water tank exhaust-valVe
- water tank exhaust-pipe
- Rating plate
Oven Control Knobs
Your new steam oven allows you to cook your favourite dishes without losing any nutrition property and keeping their original taste.
You can choose both the traditional cooking systems or the steam cooking system. To obtain the best cooking results, it is necessary to get familiar with the oven controls.
Push-Push control knobs
Some models are provided with push-push control knobs (Fig. 1). These knobs can be completely sunken inside the control panel when the oven is not working.
Oven Function Control Knob (Fig. 2)
Here you can find the symbols appearing on the Oven Function Control Knob and their meaning.
0 OFF position

Oven Light - The oven light will be on without any cooking function

Conventional cooking - The heat comes from both the top and bottom element, ensuring even heating inside the oven.

Grill - The grill element will be on.

Fan cooking - This allows you to roast or roast and bake simultaneously using any shelf, without flavour transference.

Steam cooking - The steam cooking function will be on (see the following pages for the correct use of this cooking function).
You can choose the function you need by turning the knob on the relevant symbol.
Thermostat Control Knob (Fig. 3)
By turning the oven control knob clockwise, you can select cooking temperatures, from 50°C up to 250°C (MAX).
Thermostat Control Light
Once the oven temperature has been selected, the temperature light will come on and remain on until the oven has reached the correct setting; after that, it will go on and off with the thermostat, showing how the temperature is being maintained.
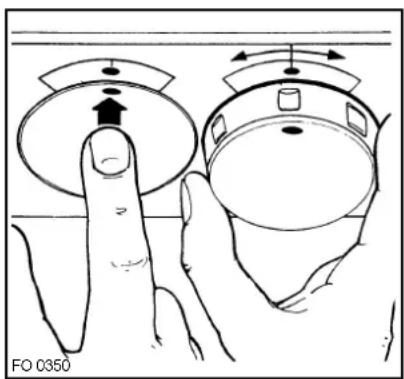
Fig. 1
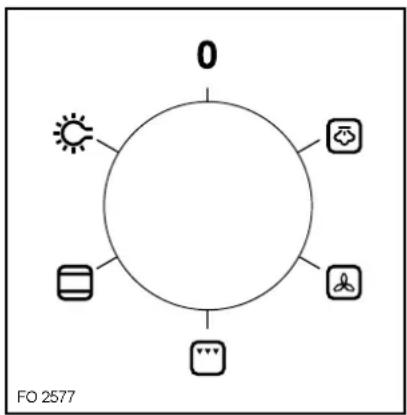
Fig. 2

radar
| Angle | Value | |-------|-------| | 0 | 50 | | 40 | 100 | | 80 | 150 | | 120 | 200 |Fig. 3
The Safety Thermostat
This oven is provided with a safety thermostat. In case of malfunctioning of the main thermostat, and consequent over-heating, the safety device will stop the power supply to the appliance. If this happens, call your local Service Centre. Under no circumstances should you attempt to repair the appliance yourself.
The Cooling Fan for the Controls
This oven is provided with a cooling fan, meant to keep the front panel, the knobs and the oven door handle cool. This fan may run on after the oven or grill is switched off, until a normal temperature is reached.
When the oven is first installed

Before cooking for the first time, carefully wash the oven accessories.
The oven will work only if the time of day has been set (please read the relevant instructions).
Once the oven has been installed:
a) set the thermostat knob to MAX (250);
b) switch the oven function control knob to conventional cooking (☐)
c) allow the oven to run empty for approximately 45 minutes;
d) open a window for ventilation.
During this time, an unpleasant odour may be emitted. This is absolutely normal, and is caused by residues of manufacturing.
Repeat this operation for the grill and fan cooking function. Once this operation is carried out, let the oven cool down, then clean the oven cavity with a soft cloth soaked in warm soapy water.

natural_image
Line drawing of a hand holding a tool, no text or symbols presentFig. 4

To open the oven door, always catch the handle in its central part (Fig. 4).
Safety when cooking

Always cook with the oven door closed.
- Always use oven gloves to remove and replace food in the oven.
- The temperatures inside the oven can reach 250^ . Always ensure that you are using oven proof baking trays, oven dishes, etc.
- Do not place pans, biscuit pans or aluminium foil directly on the base of the oven. This could cause a heat build-up which could affect the performance of the oven and damage the oven enamel.
- Carefully supervise cookings with fats or oil, since these types of foodstuff can result in a fire, if overheated.
For the same reason, be careful when placing or removing food in the oven, not to let any fat or oil fall on the oven base. If this happens, carefully clean the oven to avoid unpleasant smells or smoke.
Grease Filter
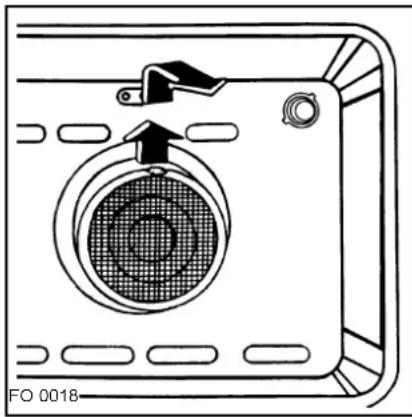
To prevent a build-up of fats on the fan impellor, the grease filter must be fitted by clipping it over the vents in the back panel. When the oven has cooled down, remove the filter by pushing the protruding tongue on the filter upward, and wash carefully.
The grease filter should be cleaned after every use. The filter may be washed in a dishwasher on a 65°C wash.
natural_image
Technical diagram of a device casing with a circular vent and mounting bracket (no text or symbols)Fig. 5
Electronic programmer


The oven will work only if the time of day has been set. Moreover, the oven can also be operated without any programme.
Setting the time of day ⏻
When the power supply is switched on, or after a power failure, the "Time of day" pilot lamp ⏻ will flash on the display.
To set the correct time of day:
- press button " + or " -
- After the setting is carried out, wait for 5 seconds: the "Time of day" pilot lamp will go out and the display will show the set time. The appliance is ready for use.
To reset the correct time of day:
- press button ② repeatedly to select the "Time of day" function. The relevant pilot lamp will start flashing. Then proceed as described above.
The time of day may be reset only if no automatic function (cook duration |→|end of cooking) →| has been set.
"Cooking Duration" function |→|
Thanks to this function, the oven will automatically switch off at the end of a programmed cooking duration time. Place food in the oven, select a cooking function and adjust the cooking temperature. Press button ② repeatedly to select the "Cooking Duration" function. The relevant pilot lamp will start flashing. Then, proceed as follows:
To set the duration time:
- press button "or"—
- After the setting is carried out, wait for 5 seconds: the "Cooking Duration" pilot lamp will come on and the display will revert to the time of day.
-
When cooking time is over, the oven will be switched off automatically and an acoustic alarm will be heard, while the pilot lamp will start flashing. Turn the oven function and the thermostat control knob to zero. To switch off the acoustic alarm, press any button. NOTE: when doing this operation, the oven will be operated again, therefore, remember to turn the oven function and the thermostat control knob to zero at the end of the cooking time.
-
Push button for selecting a function
- Decreasing control button " _
- Increasing control button “+
- Display
- "Cooking Duration" pilot lamp |→|
- "End of cooking" pilot lamp →
- "Minute minder" pilot lamp
- "Time of day" pilot lamp ⏻
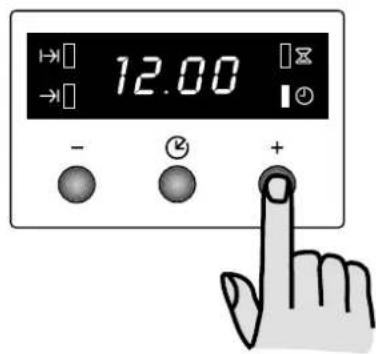


To cancel the duration time:
- Press button ② repeatedly to select the "Cooking Duration" function. The relevant pilot lamp will flash and the display will show the remaining cooking time.
- Press button " _ until the display shows "0:00". After 5 seconds the pilot lamp will go out and the display will revert to the time of day.
"End of cooking" function →
Thanks to this function, you can set the oven to switch off automatically when a programmed end of cooking time is over. Place food in the oven, select a cooking function and adjust the cooking temperature. Press button repeatedly to select the "End of cooking" function. The relevant pilot lamp will start flashing. Then, proceed as follows:
To set the End of cooking time:
- press button " + or " -
- After the setting is carried out, wait for 5 seconds: the "End of cooking" pilot lamp will come on and the display will revert to the time of day.
- When cooking time is over, the oven will be switched off automatically and an acoustic alarm will be heard, while the pilot lamp will start flashing. Turn the oven function and the thermostat control knob to zero. To switch off the acoustic alarm, press any button. NOTE: when doing this operation, the oven will be operated again, therefore, remember to turn the oven function and the thermostat control knob to zero when cooking is over.
To cancel the End of cooking time:
- Press button ② repeatedly to select the "End of cooking" function. The relevant pilot lamp →will flash and the display will show the programmed End of cooking time.
- Press button " _ until the display shows the current time of day. The programmer will beep and the pilot lamp will go out.
“Cooking duration” → and “End of cooking time” → combined
The functions “Cooking duration” e “End of cooking time” can be used simultaneously to set the oven to switch on and off automatically at a later time.
- With the "Cooking duration" function (Carry out the cooking duration setting as described in the relevant chapter) set the duration time. Then, press button the display will show the programmed setting.
- With the "End of cooking time" function (darry out the End of cooking setting as described in the relevant chapter) set the end of cooking time. The relevant pilot lamps will come on and the display will show the time of day. The oven will switch on and off according to the set programmes.
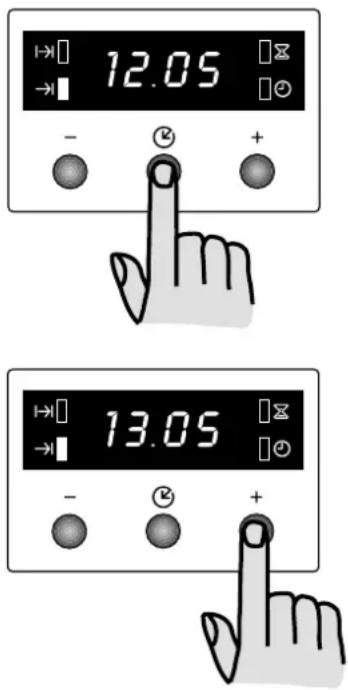
"Minute minder" function ☒
The minute minder alarm will sound at the end of a timed period, but THE OVEN WILL REMAIN ON, if it is in use.
To set the minute minder:
- Press button 📋 repeatedly to select the "Minute minder" function. The relevant pilot lamp☒ will start flashing.
- Then, press button "+" or "-" (maximum: 2 hours, 30 minutes).
- After the setting is carried out, wait for 5 seconds: the "Minute minder" pilot lamp will come on.
- At the end of the timed period, the pilot lamp will start flashing and acoustic alarm will be heard. To switch off the acoustic alarm, press any button.
To cancel the minute minder:
-
Press button 📋 repeatedly to select the "Minute minder" function. The relevant pilot lamp☒ will flash and the display will show the remaining time.
-
Press button " _ until the display shows "0:00". After 5 seconds the pilot lamp will go out and the display will revert to the time of day.


How to switch off the display
- Press two or three programmer push buttons simultaneously and keep them pressed for about 5 seconds. The display will switch off.
- To switch on the display, press any button.
The display can be switched off only if no other functions have been set.

Water tank pilot lamps
Pilot lamp "water tank full"
It indicates that the oven is ready to be used for a steam cooking.
Pilot lamp "tank out of water"
It indicates that the oven cannot be used for a steam cooking and water should be poured into the water tank.
Cleaning cycle pilot lampS
It indicates that the water tank cleaning procedure should be carried out or that the steam injector is obstructed.
Fig. 7

How to set the oven ready for a steam cooking
Before using the oven for a steam cooking, the water tank must be filled.
To fill the water tank, open the oven door, pull out the water tank drawer, unscrew the drawer cap and pour in water using a graduated vessel, until the pilot light "FULL WATER TANK" comes on. Consider that not more than one liter of water can be poured into the water tank. Then refit the drawer cap and push in the water tank drawer. Your oven is now ready for a steam cooking.

If too much water happens to be poured into the water tank, the exceed water will flow into the oven cavity through a safety opening. Immediately wipe the oven cavity dry with a sponge or a soft cloth (Fig. 9).

Fig. 8

natural_image
Line drawing of a hand cleaning a kitchen appliance with a circular pattern on the wall (no text or symbols)Fig. 9
Cooking with steam
1 - Before any steam cooking, fill the water tank as described in the previous chapter. One liter of water allows about 1 hour of steam cooking.
2 - Place the food in suitable ovenproof pans or pots and place them on the oven shelf (Fig. 10). Set the shelf level according to the cooking table. The second shelf level from the bottom usually gives the best cooking results.
3 - Turn the oven function control knob on the "STEAM COOKING" function (symbol)
4 - Turn the thermostat control knob on the required temperature between 140° and 220°C. Consider that a temperature above 220°C will not give good cooking results.

natural_image
Line drawing of a chicken inside a rectangular oven with a rack, no text or symbols presentFig. 10
Hints and tips about steam cooking

- Don't cover the pans or pots. This would not allow steam to come in contact with the food.
- You can also place food directly on the oven shelf, as shown in Fig. 11. In that case, always place the dripping pan at the lowest level, with some water in it, to avoid smoke and unpleasant smells.
- If you need to open the oven door and check the food, always remember to switch off the steam cooking function by turning the function control knob on symbol. After having checked it, turn back the function control knob on symbol to make the steam function operate again.
Fig. 11

natural_image
Line drawing of a bed inside an incubator with a circular vent and bed, no text or symbols presentSteam can condense and produce water droplets on the oven door glass. This is quite normal and is not caused by fault of the oven. We recommend you to wipe away condensation after all cookings.
Accessories for steam cooking
Depending on models, a special accessory kit is supplied with the appliance. This kit is meant to allow a wider range of steam cookings, especially for fish, vegetables, etc.
The accessory kit includes:
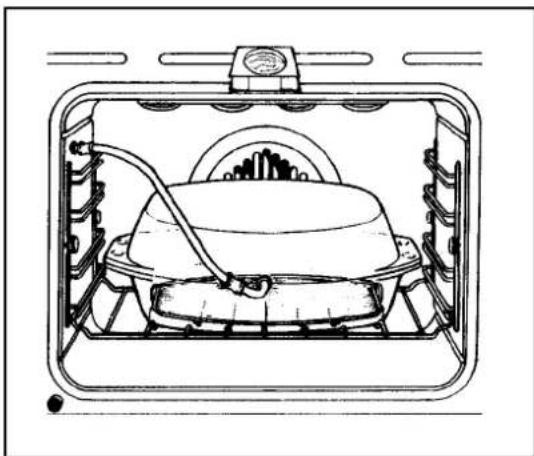
- a diet cooking double dish, provided with a special mould to allow a steam injector to be fitted to the dish (Fig.12);
- a small shelf meant to be inserted inside the double dish to prevent food to lay on the dish surface;
- two different steam injectors, to be used as shown in figures 12 and 13 after being fitted to the exhaust pipe which is supplied with the appliance.
The diet cooking double dish (Fig. 12) is particularly recommended to cook vegetables, as it allows you to keep their original taste and nutrition properties.
The direct steam cooking system (Fig. 13) will give the best results with poultry. The long steam injector provided with holes on its surface must be inserted inside the joint and makes steam cook the internal part, while the outside is gently browned by the traditional heating elements. The injector holes must not be covered: for this reason the injector must be inserted into the empty cavity inside the joint, as shown in Figure 13.
natural_image
Technical line drawing of a mechanical device inside a container (no text or symbols)Fig. 12

natural_image
Illustration of a roasted chicken being cut with a fork, surrounded by meat and a circular background (no text or symbols)Fig. 13
Steam cooking chart
| Weightingr. | Food | Steam cooking [TXXB] | Cookingduration[04X2]minutes | Notes | |
| Level | temp. °C | ||||
| CakesWhipped up kneadingLeavened kneadingCreme caramel 2 150 40 ~60Butter-milk cheese cake 2 150 40 ~60Apple cake 2 175 30 ~45Strudel 2 150 45 ~60Jam-tart 2 175 30 ~45800 Mixed cooked fruit 2 150 30 ~40 Sliced1000 Cooker apples - pears 2 175 45 ~60 WholeSmall cakesBread and Pizza500 White bread500 Bread rollsPizzaFlansPasta flanQuiche 2 175 35 ~45LasagneVegetable flanMeat1200 Beef1000 Pork1000 Veal1000 Mutton1000 Guinea-fowl1200 Lamb1200 Chicken1000 Pigeons800 Quails1000 Boar4000 Turkey1500 Duck3000 Goose1200 RabbittFish1000 Stockfish800 Sea-bream1000 Hake1000 Gilthead 2 175 30 ~40 Whole1500 Salmon1000 Sole1200 Tunny1500 Trout1000 Squill1000 Prawn1200 LobsterVegetables1000 Tomatoes1000 Potatoes1000 Roasted potatoes1200 Aubergines1500 Stuffed peppers1000 Courgettes1000 Fennels800 Cauliflower800 Stuffed mushrooms800 Onions 2 150 35 ~45600 Celery | 2 150 30 ~452 160 30 ~60150 40 ~602 175 15 ~2 200 45 ~65 22 200 25 ~35 62 175 15 ~2 175 30 ~2222222222222222222222222222222222222222222222222222222222222222222222222222222222222222222222222222 | 454540175175175175175175175175175175175175175175175175175175175175175175175175175175175175175175175175175175 | Sliced45 ~6045 ~6030 ~40Sliced35 ~4525 ~35Chopped | SlicedHalf cutHalf cut9 mushrooms | |
Traditional, fan and grill cookings
Conventional cooking
Turn the oven function control knob to the relevant symbol (☐) and set the thermostat knob on the required temperature.
If your dish need more heat from the top or from the bottom adjust the shelf level as required (see Fig. 14).
The Fan Oven
Turn the oven function control knob to the relevant symbol
(2) and set the thermostat knob on the required temperature.
The fan situated behind the back panel circulates heated air into the oven.
If you need to cook more than one dish in the fan oven at the same time, place the shelves on the first and third position from the bottom (See Fig. 14).
If you are cooking only one dish in the fan oven, use the lower positions, as this will give you better results.
Defrosting
Turn the oven function control knob to the relevant symbol
( ) and set the thermostat knob on the OFF position (symbol : ●).
The oven fan operates without heat and circulates the air, at room temperature, inside the oven. This increases the rate at which defrosting takes place.
Grilling
Turn the oven function control knob to the relevant symbol
( ) and set the thermostat knob on the required temperature.
Place the oven shelf as shown in Fig. 15.

i Hints and Tips on Cooking Fish and Meat
You can place meat in oven proof dishes, or directly on the oven shelf. In this case, remember to place the dripping pan in the first position from the bottom with some water in it. The dripping pan will avoid the falling of melted fat on the oven base.
White meat, poultry and fish in general, need a medium temperature cooking (between 150 and 175 °C). If you need to cook red meat (slightly browned on the outside and more gently cooked in the inside), a higher temperature (between 200 and 250 °C) for a short time is recommended.
Hints and Tips on baking
Cakes usually need a medium temperature cooking, between 150 and 200 °C.
A short oven pre-heating (about 10 minutes) is recommended when cooking cakes or baking. Once the cooking has been started, keep the oven door closed during all the cooking time, and check the cooking results through the oven door glass.
Hints and Tips on grilling
If you need to grill meat or fish, place them directly on the shelf after spreading a little oil on them.
In the grill function, heat comes only from the top element. Therefore, you need to adjust the cooking level depending on meat or fish's thickness.
Always remember to place the dripping pan in the lower position with some water in it.

natural_image
Technical line drawing of a mechanical component with internal structural detail (no text or symbols)Fig.15
Cooking charts (traditional and fan oven, grill)
TRADITIONAL COOKING AND FAN DUCTED COOKING
| WEIGHT (GR.) | TYPE OF DISH | Traditional Cooking | Fan Oven | Cooking time minutes | NOTES | ||
| Level | temp. °C | Level | temp. °C | ||||
| Cakes Whipped up kneading | 2 180 2 (1 and 3)* 160 | 45 ~ 60 | |||||
| Leavened kneading | 2 180 2 (1 and 3)* 160 | 20 ~ 35 | |||||
| Shortbread dough | 2 180 2 (1 and 3)* 160 | 20 ~ 30 | |||||
| Butter-milk cheese cake 1 | 175 2 150 60 ~ 80 | ||||||
| Apple cake 1 180 2 (1 and 3)* 160 40 ~ 60 | |||||||
| Strudel 2 175 2 (1 and 3)* | 150 60 ~ 80 | ||||||
| Jam-tart 2 180 2 (1 and 3)* | 160 45 ~ 60 | ||||||
| Small cakes 2 180 2 (1 and 3)* | 160 15 ~ 25 | ||||||
| Biscuits 2 180 2 (1 and 3)* | 160 10 ~ 20 | ||||||
| Meringues | 2 100 2 (1 and 3)* 100 | 90 ~ 120 | |||||
| Bread and Pizza | |||||||
| 1000 | White bread | 1 | 200 | 2 | 175 | 45 ~ 60 | 1 piece |
| 500 | Rye bread | 2 | 200 | 2 | 175 | 30 ~ 45 | In bread pan |
| 500 | Bread rolls | 2 | 200 | 2 (1 and 3)* | 175 | 20 ~ 35 | 8 rolls |
| 250 | Pizza | 1 | 220 | 2 (1 and 3)* | 200 | 20 ~ 35 | In baking pan |
| Flans | |||||||
| Pasta flan | 2 200 2 (1 and 3)* 175 | 40 ~ 50 | |||||
| Vegetable flan | 2 | 200 | 2 (1 and 3)* | 175 | 45 ~ 60 | ||
| Quiches | 2 200 2 (1 and 3)* 175 | 35 ~ 45 | |||||
| Lasagne | 2 | 200 | 2 | 175 | 45 ~ 60 | ||
| Meat | |||||||
| 1000 | Beef | 2 | 200 | 2 | 175 | 50 ~ 70 | On grid |
| 1200 | Pork | 2 | 200 | 2 | 175 | 100 ~ 130 | On grid |
| 1000 | Veal | 2 | 200 | 2 | 175 | 90 ~ 120 | On grid |
| 1500 | English roast beef | 2 220 | 2 200 | 50 ~ 70 | On grid | ||
| 1200 | Lamb | 2 | 200 | 2 | 175 | 110 ~ 130 | Leg |
| 1000 | Chicken 2 200 2 175 60 ~ 80 | Whole | |||||
| 4000 | Turkey | 2 | 200 | 2 | 175 | 210 ~ 240 | Whole |
| 1500 | Duck | 2 | 175 | 2 | 160 | 120 ~ 150 | Whole |
| 3000 | Goose | 2 | 175 | 2 | 160 | 150 ~ 200 | Whole |
| 1200 | Hare | 2 | 200 | 2 | 175 | 60 ~ 80 | Cut in pieces |
| Fish | |||||||
| 1000 | Whole | 2 | 200 | 2 (1 and 3)* | 175 | 40 ~ 60 | 2 fishes |
| 800 | Fillets | 2 | 200 | 2 (1 and 3)* | 175 | 30 ~ 40 | 4 fillets |
NOTE:
Cooking times do not include pre-heating time. We recommend a short oven pre-heating (about 10 minutes) before baking or cooking pizza.
(*) If you need to cook more than one dish at the same time, we recommend you to place them on the levels quoted between brackets.
GRILLING
| TYPE OF DISH | Quantity | Grilling [IMAGE] | Cooking time (minutes)  | ||||
| PIECES | WEIGHT | Level |  | temp. °C | Upper side | Lower side | |
| Steaks | 4 | 800 | 4 | max | 10 | 8 | |
| Chops | 4 | 600 | 4 | max | 12 | 8 | |
| Sausages | 8 | 500 | 4 | max | 10 | 6 | |
| Chicken (cut in pieces) | 6 | 800 | 3 | max | 30 | 20 | |
| Kebabs | 4 | 700 | 4 | max | 12 | 10 | |
| Chicken (breast) | 4 | 400 | 4 | max | 13 | 10 | |
| Tomatoes | 8 | 500 | 4 | max | 12 | — | |
| Fish (fillets) | 4 | 400 | 4 | max | 8 | 6 | |
| Sandwiches | 4 | — | 4 | max | 8 | — | |
| Toast | 4 | — | 4 | max | 2~3 | 1 | |
Cleaning and maintenance
General Cleaning

Before carrying out any cleaning or maintenance work, always disconnect the appliance from the electrical supply, and allow it to cool down.
- When using spray cleaning products, be careful not to spread them on the heating elements or on the thermostat sensor.
- Never use harsh abrasives, steel wool or cleaners with bleach, as they could damage the enamel and the oven door glass.
The Oven Cavity
The enamelled oven cavity is best cleaned whilst the oven is still warm. It is advisable to wipe the oven over with a soft cloth soaked in warm soapy water after each use. However, from time to time, it will be necessary to do a more complete cleaning, using a proper oven cleaner. In case of particularly tough stains, you can use stainless steel cleaning products or some warm vinegar.

If cooking fruits, some over-heated natural acids can squeeze and settle on the oven enamel, causing stains quite difficult to remove. This could affect the enamel brightness, but it will have no consequence on the oven performances. To avoid these stains to be burnt out during the next cooking, carefully clean the oven cavity after all fruits cookings.
The Oven Door and its gasket
Before cleaning the oven door, we recommend you to remove it from the oven.
Proceed as follows:
a) open the oven door completely;
b) find the hinges linking the door to the oven (fig. 16);
c) unlock and turn the small levers located on the two hinges (fig. 16);
d) handle the door by its left- and right-hand sides, then slowly turn it towards the oven until it is half-closed;
e) gently pull the oven door off its site (fig. 16);
f) place it on a steady plan.
Clean the oven door glass with warm water and a soft cloth only.
Once the cleaning is carried out, refit the oven door, following the procedure in reverse.
The correct operation of the oven is ensured by a gasket placed round the edge of the oven cavity.
- Periodically check the condition of this gasket. If necessary, clean it without using abrasive cleaning products.
- If the gasket shows to be damaged, call you local Service Centre. Do not use the oven until it has been repaired.
Replacing the Oven Light
Ensure the electricity supply is switched off before carrying out this operation.
The oven bulb has to comply to these features:
a) resistant to temperatures of 300 °C;
b) electric rate: 230 V - 50 Hz;
c) electric power rate: 15 W;
d) connection type: E 14.
To replace the bulb, proceed as follows (Fig. 17):
a) push in and turn the glass lid anticlockwise;
b) remove tha faulty bulb;
c) replace it with a new one;
d) refit the glass lid;
e) switch on the electricity supply.

Fig. 16

natural_image
Diagram of a device interior with three circular components and directional arrows indicating rotation or movement (no text or symbols)Fig. 17
Cleaning the steam generator
Cleaning the water tank
Just like in any appliance fed with water (e.g. the iron), is it absolutely normal that limestone residues form in the water tank.
After having used the oven for steam cooking several times, the limestone residues that settle inside the water tank can cause a reduction of the steam.
If the red pilot light that indicates the need of a cleaning cycle comes on, this means that a certain quantity of limestone has settled in the water tank and that a thorough cleaning of the steam generator is necessary.

In that case proceed as follows:
- Set the water tank exhaust-pipe ready for use. Fit the connector with hexagonal nut (Figure 18, letter "A") to one of the edges of the pipe.
- Open the oven door (Fig. 19) and fit the connector (A) into the exhaust-valve (C) located in the lower left hand corner of the oven cavity frame.
- Place the free edge of the pipe into a vessel, then turn the pipe connector "A" anticlockwise to open the exhaust-valve. Water will flow out the water tank.
- When water stops flowing out the water tank, turn the pipe connector clockwise to close the exhaust-valve.

Warning! - The connector "A" has not a block fitting. Take care this connector doesn't slip off the pipe during the water tank exhaust procedure.
- After the water tank has been drained, melt two spoonful of citric acid (about 50-60 grams) into 800 cc. of water.
Citric acid is a natural substance, which looks like white small grains of sugar. It is normally used in food industry and can be purchased in drugstores, wine shops or chemist's shops.
- Pour the citic acid and water solution into the water tank drawer, as previously explained.
- Fit the connector "B" to one of the edges of the exhaust-pipe, then insert the connector "B" into the steam injector (Figure 20, letter "D"). Place the free pipe edge in a vessel, to collect the limestone residues.
- Let the citric acid and water solution stay into the water tank for about 60 minutes, with the oven cooled down.
- After 60 minutes, switch on the oven by turning the function control knob on the "STEAM COOKING" function (symbol: ☐ and set the thermostat knob on 140°C.
- After about 20-25 minutes, turn the knobs off.
- Allow the oven to cool down, then drain the water tank following the procedure previously explained.
- When the procedure is carried out, rinse the water tank by pouring water into the tank drawer and letting the water flow out through the exhaust pipe, until you
Fig. 18

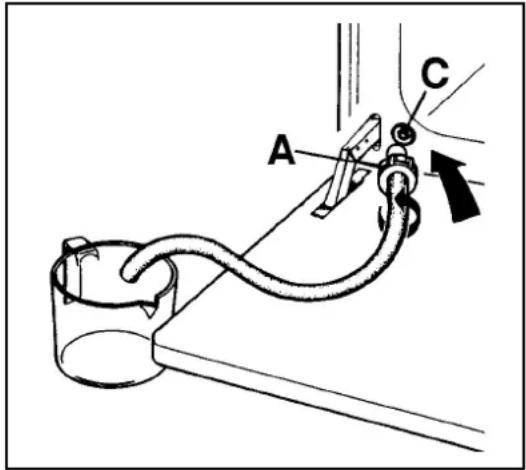
Fig. 19
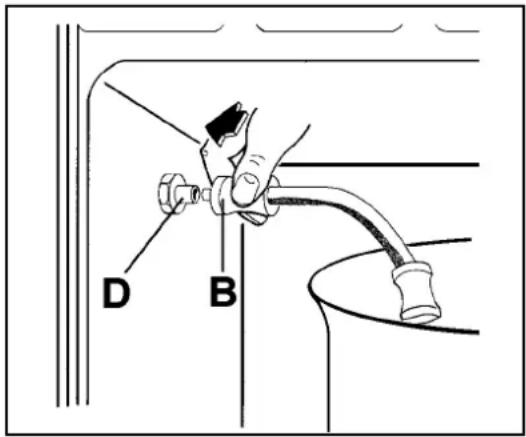
Fig. 20
see clear water without limestone residues coming out.
While carrying out this procedure, a lemon flavour will be smelt in the room.
If you foresee not to use the steam oven for 2-3 weeks, we recommend to drain the water tank.
Cleaning the exhaust pipe
When a cleaning procedure has been carried out, carefully wash the exhaust pipe in warm soapy water. Don't use acids, spray cleaners or abrasives to clean the exhaust pipe and connectors, this could damage them.
Using different water types
If you use bottled mineral water or water with low limestone content, the need of cleaning the water tank will be reduced (e.g., every 150-200 cookings). If a water conditioner or a water softener has been installed in your house, then the main water supply of your house can be normally used.
i Using hard waters (that is, waters with high limestone content) will make the necessity of cleaning procedures more frequent, but this will not affect in any way the oven operation.
What happens if something goes wrong
If the appliance is not working correctly, please carry out the following checks, before contacting your local Service Centre.
| SYMPTOM | SOLUTION |
| ■THE OVEN DOES NOT WORK | ◆Check the control knobs are correctly set for a cooking function and follow the instructions given in this bookor◆Check the appliance is wired in properly, and the socket switch or the switch from the mains supply to the oven are ON. |
| ■THE "TANK OUT OF WATER" LIGHT COMES ON | ◆Fill the water tank |
| ■THE "CLEANING CYCLE" LIGHT COMES ON | ◆Carry out a complete cleaning cycle as described in the relevant chapteror◆If you already carried out a cleaning cycle but the pilot light does not go off, repeat the procedure and allow the citric acid and water solution to stay in the tank several hours.or◆The steam injector can be obstructed. Remove the limestone residues from the steam injector. |
| ■THE "FULL TANK" GREEN LIGHT GOES OFF | ◆Fill. the water tank. If the green light does not come on after having poured more than 1 liter of water, call the nearest Service Centre. |
| ■THE "STEAM COOKING FUNCTION" DOES NOT WORK | ◆Check the oven function control knob is set on the "Steam Cooking" function.or◆Carefully close the oven dooror◆Fill the water tank |
| ■THE OVEN LAMP DOES NOT COME ON | ◆Buy a new oven light bulb, asking for it to your local Service Centre and replace it by following the instruction provided in this booklet. |
| ■THERE IS WATER IN THE OVEN CAVITY | ◆Too much water has been poured into the oven tank. Turn the control knobs on the "OFF" position, then wipe the oven cavity dry with a sponge or a soft cloth. |
| ■IT TAKES TOO MUCH TIME TO FINISH THE DISHES, OR THEY ARE COOKED TOO FAST. | ◆Refer to the contents of this booklet, especially to the chapter "Using the Oven". |
| ■CONDENSATION SETTLES ON THE FOOD AND THE OVEN CAVITY. | ◆Leave dishes inside the oven no longer than 15-20 minutes after the cooking is completed. |
The Hinged Grill
This model is fitted with a hinged grill element, to enable you to clean the roof of the oven easily.

Before proceeding ensure the oven is cool and is isolated from the electricity supply.
- Undo the screws which hold the grill in place (see Fig. 21). When doing this operation for the first time, we recommend using a screwdriver.
- Then gently pull the grill downward to allow access to the oven roof.
- Clean the oven roof with a suitable cleaner and wipe dry before replacing the hinged grill element.
●Gently push up the grill element into place and firmly screw into place the holding nuts.

Ensure the grill holding nuts are firmly in place to avoid the grill falling down when in use.
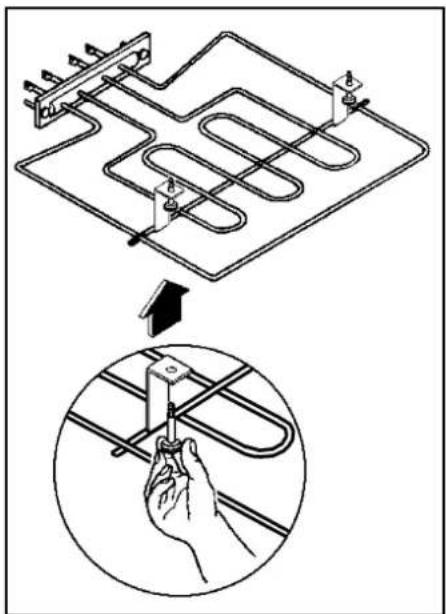
Fig. 21
Technical Assistance and Spare Parts
If after the checks listed in the chapter "What happens if something goes wrong", the appliance still does not work correctly, contact your local Service Centre, specifying the type of malfunctioning, the appliance model (Mod.), the product number (Prod. No.) and the serial number (Ser. No.) marked on the identification plate.
This plate is placed on the oven cavity frame
Original spareparts, certified by the product manufacturer and carrying this symbol

Electrolux
DISTRIPARTS
are only available at our Service Centre and authorized spareparts shops.

Technical Data
Recess dimensions
height undertop: 595 mm in coloum: 580 mm
width 560 mm
depth 550 mm
Oven cavity dimensions
height 325 mm width 440 mm depth 390 mm oven capacity 53 l.
Heating elements ratings
| Oven ratings | |
| Top + Bottom heating elements | 1800 W |
| Grill element | 1750 W |
| Fan oven element | 2000 W |
| Steam generator | 735 W |
| Oven light | 15 W |
| Cooling fan | 20 W |
| Convection fan | 30 W |
| Total rating | 2,8 kW |
| Voltage tension (50Hz) | 230 V |
Installation
Building In
It is important that the dimensions and materials of the surround or cabinet into which the oven will be built are correct and will withstand a temperature increase.
A correct installation will have to ensure a proper protection against contact with electric parts or merely functionally isolated parts.
All the units meant to ensure protection have to be fitted not to be taken away without using any tool.
We recommend not to install the appliance near refrigerators or freezer, since the heat could affect the performance of these appliances.

Fig. 22 - Coloumn Built-in Recess Dimensions

Fig. 23 - Oven Dimensions

Fig. 24 - Undertop Built-in Recess Dimensions
Securing the Oven to the Cabinet
Fit the appliance into the cabinet recess.
Open teh oven door and secure the oven to the kitchen cabinet with four wood screws, which fit the holes provided in the oven frame (Fig. 25).
When installing an electric plate hob over the oven, the hob's electrical connection and the oven's one have to be carried out separately, for security reasons and to let the oven be taken off the unit easier, if necessary.
Electric Connection
Before the appliance is connected:
1) check that the main fuse and the domestic installation can support the load;
2) check that the power supply is properly earthed in compliance with the current rules;
3) check the socket or the double pole switch used for the electrical connection can be easily reached with the appliance built in the forniture unit.
This appliance is supplied without connection cable. A suitable one must be fitted, in compliance with the electric supply rate. Only the following cable types must be used: H07 RN-F, H05 RN-F, H05 RR-F, H05 VV-F, H05 V2V2-F (T90), H05 BB-F (section 3x 1,5 mm ^4 ). A suitable plug, able to carry the load specified on the rating plate, must be fitted to the cable. The plug has to be fitted in a proper socket.
If connecting the appliance directly to the electric system, a double pole switch must be installed between the appliance and the electricity supply, with a minimum gap of 3 mm. between the switch contacts and of a type suitable for the required load in compliance with the current rules. The earth wire must not be interrupted by the double switch pole.
The connection cable has to be placed in order that, in each part, it cannot reach a temperature 50 °C higher than the room temperature.
After the connection is carried out, test the heating elements for about 3 minutes.
Terminal block
The oven has an easily accessible terminal block, which is meant to work with an electric single-phase rate of 230 V (Fig. 26).
The manufacturer disclaims any responsibility should all the safety measures not be carried out.
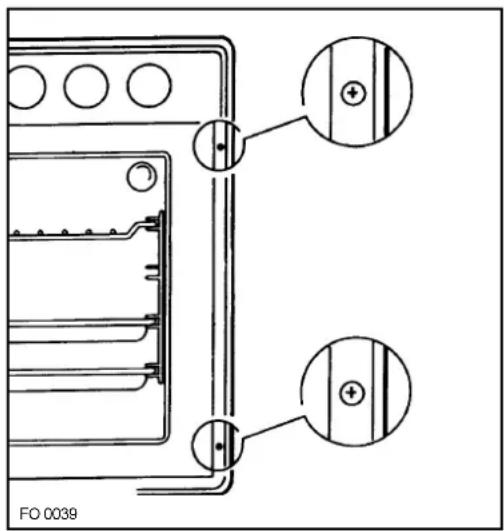
Fig. 25

Fig. 26
Our appliances are produced with the greatest of care. However, a defect may still occur. Our consumer services department will repair this upon request, either during or after the guarantee period. The service life of the appliance will not, however, be reduced as a result. This declaration of guarantee terms is based on European Union Directive 99/44/EC and the provisions of the Civil Code. The statutory rights that the consumer has under this legislation are not affected by this declaration of guarantee terms.
This declaration does not affect the vendor's statutory warranty to the end user. The appliance is guaranteed within the context of and in adherence with the following terms:
- In accordance with provisions laid down in paragraphs 2 to 15, we will remedy free of charge any defect that occurs within 24 months from the date the appliance is delivered to the first end user. These guarantee terms do not apply in the event of use for professional or equivalent purposes.
- Performing the guarantee means that the appliance is returned to the condition it was in before the defect occurred. Defective parts are replaced or repaired. Parts replaced free of charge become our property.
- So as to avoid more severe damage, the defect must be brought to our attention immediately.
- Applying the guarantee is subject to the consumer providing proof of purchase showing the purchase and/or delivery date.
- The guarantee will not apply if damage caused to delicate parts, such as glass (vitreous ceramic), synthetic materials and rubber, is the result of inappropriate use.
- The guarantee cannot be called on for minor faults that do not affect the value or the overall reliability of the appliance.
- The statutory warranty does not apply when defects are caused by:
- a chemical or electrochemical reaction caused by water,
•abnormal environmental conditions in general,
•unsuitable operating conditions,
- contact with harsh substances.
- The guarantee does not apply to defects due to transport which have occurred outside of our responsibility. Nor will the guarantee cover those caused by inadequate installation or assembly, lack of maintenance or failure to respect the assembly instructions or directions for use.
-
Defects that result from repairs or measures carried out by people who are not qualified or expert or defects that result from the addition of non-original accessories or spare parts are not covered by the guarantee.
-
Appliances that are easy to transport may be delivered or sent to the consumer services department. Home repairs are only anticipated for bulky appliances or built-in appliances.
- If the appliances are built-in, built-under, fixed or suspended in such a way that removing and replacing them in the place where they are fitted takes more than half an hour, the costs that result therefrom will be charged for. Connected damage caused by these removal and replacement operations will be the responsibility of the user.
- If, during the guarantee period, repairing the same defect repeatedly is not conclusive, or if the repair costs are considered disproportionate, in agreement with the consumer, the defective appliance may be replaced with another appliance of the same value.
In this event, we reserve the right to ask for a financial contribution calculated according to the length of time it has been used.
-
A repair under guarantee does not mean that the normal guarantee period will be extended nor that a new guarantee period begins.
-
We give a twelve month guarantee for repairs, limited to the same defect.
-
Except in the event where liability is legally imposed, this declaration of guarantee terms excludes any compensation for damage outside the appliance for which the consumer wishes to assert his rights. In the event of legally admitted liability, compensation will not exceed the purchase price paid for the appliance.
These guarantee terms are only valid for appliances purchased and used in Belgium. For exported appliances, the user must first make sure that they satisfy the technical conditions (e.g.: voltage, frequency, installation instructions, type of gas, etc.) for the country concerned and that they can withstand the local climatic and environmental conditions. For appliances purchased abroad, the user must first ensure that they meet the qualifications required in Belgium. Non-essential or requested adjustments are not covered by the guarantee and are not possible in all cases.
Our consumer services department is always at your disposal, even after the guarantee period has expired.
Address for our consumer services department: ELECTROLUX HOME PRODUCTS BELGIUM Bergensesteenweg, 719 – 1502 LEMBEEK Tel. 02.3630444


- ⚠️ Important Safety Information
- Installation
- Child Safety
- During use
- Service
- Environmental Information
- Guide to Use the instructions
- Safety Instructions
- i Hints and Tips
- CE This appliance complies with the following E.E.C. Directives:
- Contents
- For the User For the Installer
- Description of the appliance
- Oven Control Knobs
- Push-Push control knobs
- Oven Function Control Knob (Fig. 2)
- Thermostat Control Knob (Fig. 3)
- Thermostat Control Light
- The Safety Thermostat
- The Cooling Fan for the Controls
- When the oven is first installed
- Safety when cooking
- Grease Filter
- Electronic programmer
- Setting the time of day ⏻
- To set the correct time of day:
- To reset the correct time of day:
- "Cooking Duration" function |→|
- To set the duration time:
- To cancel the duration time:
- "End of cooking" function →
- To set the End of cooking time:
- To cancel the End of cooking time:
- “Cooking duration” → and “End of cooking time” → combined
- "Minute minder" function ☒
- To set the minute minder:
- To cancel the minute minder:
- How to switch off the display
- Water tank pilot lamps
- Pilot lamp "water tank full"
- Pilot lamp "tank out of water"
- Cleaning cycle pilot lampS
- How to set the oven ready for a steam cooking
- Cooking with steam
- Hints and tips about steam cooking
- Accessories for steam cooking
- Steam cooking chart
- Traditional, fan and grill cookings
- Conventional cooking
- The Fan Oven
- Defrosting
- Grilling
- i Hints and Tips on Cooking Fish and Meat
- Hints and Tips on baking
- Hints and Tips on grilling
- Cooking charts (traditional and fan oven, grill)
- NOTE:
- Cleaning and maintenance
- General Cleaning
- The Oven Cavity
- The Oven Door and its gasket
- Replacing the Oven Light
- Cleaning the steam generator
- Cleaning the water tank
- Cleaning the exhaust pipe
- Using different water types
- What happens if something goes wrong
- The Hinged Grill
- Technical Assistance and Spare Parts
- Technical Data
- Recess dimensions
- Oven cavity dimensions
- Heating elements ratings
- Building In
- Securing the Oven to the Cabinet
- Electric Connection
- Terminal block
Brand : ZANKER
Model : ZKB7429DX
Category : Oven