
ZKS5619AL - Dishwasher ZANKER - Free user manual and instructions
Find the device manual for free ZKS5619AL ZANKER in PDF.


| Product Type | Dishwasher |
| Brand | Zanker |
| Model | ZKS5619AL |
| Width | 59.6 cm |
| Height | 81.8 - 87.8 cm (adjustable) |
| Max Depth | 57.5 cm |
| Max Depth with Open Door | 111.4 cm |
| Weight (approx.) | 45 kg |
| Electrical Connection | 230 V - 50 Hz |
| Total Power | 2300 W |
| Heating Element Power | 2100 W |
| Motor Rating (wash) | 200 W |
| Water Supply Pressure | 50 - 800 kPa (0.5 - 8 bar) |
| Capacity | 12 place settings |
| Washing Programs | Intensive 70°C, Normal 65°C (with/without prewash), Bio 50°C (with/without prewash), Quick Wash 50°C, Rinse and Hold |
| Water Softener | Adjustable (levels 0-5) |
| Rinse Aid Dispenser | 110 ml capacity, adjustable dosage (6 positions) |
| Salt Container | 1 liter water first fill, salt indicator light |
| Flood Protection | Water inlet hose safety device, bottom leak device |
| Noise Protection | Adhesive noise insulation strip |
| Maintenance | Clean central filter after each wash, large filter monthly, external with damp cloth |
| Safety Features | Door safety switch, child lock (door ajar prevention), steam protection |
| Reparability | Authorized service, genuine spare parts only |
Frequently Asked Questions - ZKS5619AL ZANKER
User questions about ZKS5619AL ZANKER
0 question about this device. Answer the ones you know or ask your own.
Ask a new question about this device
Download the instructions for your Dishwasher in PDF format for free! Find your manual ZKS5619AL - ZANKER and take your electronic device back in hand. On this page are published all the documents necessary for the use of your device. ZKS5619AL by ZANKER.
USER MANUAL ZKS5619AL ZANKER
Important safety information 27
Description of the appliance 28
The control panel 29
Before use 30
Setting the water softener 30
Rinse aid 32
Using your appliance 33
Loading your appliance 33
Adjusting the height of the upper basket 34
Use of detergent 35
Hints and tips 36
Washing programmes 37
Operating sequence 38
Maintenance and cleaning 39
Internal cleaning 39
Cleaning the central filter 39
Cleaning the large filter 39
External cleaning 40
Prolonged periods of non-operation 40
Frost precautions 40
Moving the machine 40
Something not working 41
Protection against flooding 42
Service and spare parts 42
Hints for test centres 43
Technical specifications 43
For the installer
Installation instructions 44
Water supply connections 44
Water outlet hose connection 45
Electrical connection 45
Building-in 46
Guide to use the instruction book
The following symbols will be found in the text to guide you throughout the instructions:

Safety instructions
1.2.3.
Step by step

Hints and tips

Environmental information

Important safety information
It is most important that this instruction book should be retained with the appliance for future reference. Should the appliance be sold or transferred to another owner, or should you move house and leave the appliance, always ensure that the book is left with the appliance in order that the new owner can get to know the functioning of the appliance and the relevant safety information.
This information has been provided in the interest of your safety. You MUST read it carefully before installing or using the appliance.
Installation
- This appliance is heavy. Care should be taken when moving it.
- It is dangerous to alter the specifications or attempt to modify this product in any way.
- Care must be taken to ensure that the appliance does not stand on the electrical supply cable.
- Any electrical work required to install this appliance should be carried out by a qualified electrician or competent person.
- Any plumbing work required to install this appliance should be carried out by a qualified plumber or competent person.
Child Safety
- This appliance is designed to be operated by adults. Children should not be allowed to tamper with the controls or play with the product.
- Keep all packaging well away from children.
- Keep all detergents in a safe place out of children's reach.
During Use
- Items that are contaminated by petrol, paint, steel or iron debris, corrosive, acidic or alkaline chemicals must not be washed in this dishwasher.
- Under no circumstances should you open the door whilst the appliance is in operation. Always turn off the appliance before opening the door.
- Only use detergent specifically designed for use in dishwashers.
- Long bladed knives stored in an upright position are a potential hazard.
- Long and/or sharp items of cutlery such as carving knives must be positioned horizontally in the upper basket.
-
When finishing loading or unloading close the door, as an open door can be a hazard.
-
Do not sit or stand on the open door.
- Isolate the appliance from the power supply and turn off the water supply after use.
- Care should be taken when cleaning the bottom door seal and hinge area as any exposed metal edges may cut if care is not taken.
- This product should be serviced by an authorised Service engineer, and only genuine spare parts should be used.
- Under no circumstances should you attempt to repair the machine yourself. Repairs carried out by inexperienced persons may cause injury or serious malfunctioning. Contact your local Service Force Centre. Always insist on genuine spare parts.
Conservation
In the interest of the environment:
- Materials marked with the symbol are recyclable.
- Check with your local Council or Environmental Health Office to see if there are facilities in your area for re-cycling this appliance.
- When the appliance is to be scrapped, cut off the power supply cable and make the door closing device unusable to prevent young children from being trapped inside.
- Help to keep your country tidy - use authorised disposal sites for your old appliance.
Description of the appliance

- Water hardness adjustment
- Levelling spacers
- Upper basket stop
- Salt container
- Lower spray arm
- Detergent dispenser
- Control panel
- Rating plate
- Rinse aid dispenser
- Large filter
- Central filter
- Upper spray arm
- Upper basket
The control panel




- On/Off indicator light
- On/Off push button
- Main wash temperature push buttons
- Door handle
- Salt refilling indicator light
- Programme marker
-
Programme selector dial
-
Programme sequence indicator
As the programme progresses, the programme selector dial turns, to show the phase in the wash programme the appliance has reached.
Prewash / Rinse and Hold
Wash
Cold rinse
Hot rinse
Drying
- Programme guide
Before use
Before using your dishwasher for the first time:
- Ensure that the electrical and water connections comply with the installation instructions
- Remove all packaging from inside the appliance
- Set the water softener
- Pour 1 litre of water inside the salt container and then fill with salt
- Fill the rinse aid dispenser.
Setting the water softener
The dishwasher is equipped with a water softener designed to remove minerals and salts from the water supply, which would have a detrimental or adverse effect on the operation of the appliance.
The higher the content of these salts, the harder your water is.
Water hardness is measured in equivalent scales, German, French degrees and PPM (parts per Million).
The softener should be adjusted according to the hardness of the water in your area. Your local Water Authority can advise you on the hardness of the water in your area.
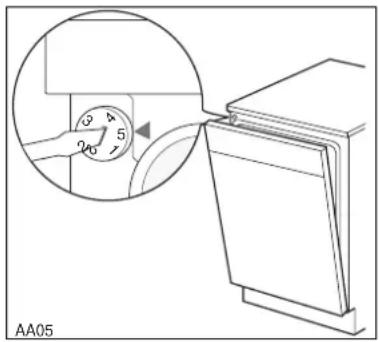
The dishwasher is factory set at level 2.
If this level is not suitable for your area the softener should be adjusted.
To adjust the water softener
With a screwdriver turn the selector on the upper front corner of the machine until the level required corresponds with the marker.
| Water hardness | Level | Use of salt | ||
| German degrees (°dH) | French degrees (°TH) | PPM (Parts per Million) | ||
| 0 - 4 | 0 - 8 | 0 - 80 | 0 | NO |
| 5 - 11 | 9 - 20 | 81 - 200 | 1 | YES |
| 12 - 22 | 21 - 40 | 201 - 400 | 2 | YES |
| 23 - 34 | 41 - 60 | 401 - 600 | 3 | YES |
| 35 - 45 | 61 - 80 | 601 - 800 | 4 | YES |
| 46 - 50 | 81 - 90 | 801 - 900 | 5 | YES |

If your water is level 0 it is already soft and therefore there is no need to use salt. In this case adjust the water softener on level 1 without using salt.
The salt indicator light on the control panel will always remain illuminated when the machine is switched on.
natural_image
Diagram showing a device with a dial and a magnified view of the interior (no text or symbols)Filling with salt

Only use salt specifically designed for use in dishwashers.
All other types of salt not specifically designed for use in a dishwasher, especially table salt, will damage the water softener.

Only fill with salt just before starting one of the complete washing programmes (not the Rinse and Hold programme). This will prevent any grains of salt or salty water, which may have been spilled, remaining on the bottom of the machine for any period of time, which may cause corrosion.
To fill:
- To fill with salt, unscrew the cap of the salt container.
- Pour 1 litre of water inside the container (this is necessary only before filling with salt for the first time).
- Using the funnel provided, pour in the salt until the container is full.
Do not worry if water over flows from the unit when filling with salt, this is quite normal. - Replace the cap making sure that there is no trace of salt on the screw thread or on the gasket.
- Screw on the cap tightly.
The salt container will require topping up periodically.
You are reminded of this by the salt indicator light on the control panel which comes on when the salt has finished.

The salt indicator light on the control panel can remain illuminated for 2-6 hours after the salt has been replenished, assuming the dishwasher remains switched on. If you are using salts that take longer to dissolve then this can take longer. The function of the machine is not affected.

Rinse aid
Rinse aid is automatically added during the last rinse, ensuring thorough rinsing, and spot and streak free drying. The dispenser, which is positioned inside the door, holds about 110 ml of rinse aid, which is sufficient for 16 - 40 dishwashing programmes, depending upon the dosage setting.
Filling with rinse aid
- Open the container by turning the lid (A) anticlockwise.
- Add the rinse aid until the container is completely full. The indicator (B) will be completely dark.
- Top up the rinse aid when the indicator (B) becomes clear.
Ensure that the lid is closed after every refill.
Do not put liquid detergent in the rinse aid compartment. Clean up any rinse aid spilt during filling with an absorbent cloth to avoid excess foaming during the next wash.
Adjusting the dose
According to the finish and drying results obtained, adjust the dose of rinse aid by means of the 6 position selector (C) (position 1 minimum dosage, position 6 maximum dosage).
Start from position 3.
Gradually increase the dose if there are drops of water or lime spots on the dishes after washing. Reduce it if there are sticky whitish streaks on the dishes.


Using your appliance
Loading your appliance
Before placing dishes in the machine, remove any scraps of food, to avoid clogging the filters and consequently reducing the performance.

Do not load very small items which can fall through the baskets.
The lower basket
The lower basket is designed to take saucepans, lids, plates, salad bowls, cutlery etc.
Serving dishes and large lids should be arranged around the edge of the basket, ensuring that the upper spray arm can turn freely.
The cutlery basket

Long bladed knives stored in an upright position are a potential hazard. Long and/or sharp items of cutlery such as carving knives must be positioned horizontally in the upper basket. Take care when loading or unloading sharp items such as knives.
Cutlery should be placed in the removable cutlery basket with the handles facing downwards.
If the handles protrude from the bottom of the basket, obstructing the lower spray arm, load the cutlery with the handles facing upwards.
Mix spoons with other cutlery to prevent them from sticking together.
Arrange spoons, dessert spoons, knives and other small items of cutlery in the racks on both sides of the cutlery basket.

natural_image
Technical line drawing of a multi-tiered mechanical component with internal compartments and mounting holes (no text or symbols)
natural_image
Line drawing of a kitchen appliance with cutlery and a basket (no text or symbols)
natural_image
Line drawing of a basket filled with round fruits and leaves, labeled UI03 (no text or symbols on the main diagram)The upper basket
The upper basket is designed for plates (dessert plates, saucers, dinner plates of up to 24 cm in diameter), salad bowls, cups and glasses.
Arrange items on and underneath the fold-down cup racks so that water can reach all surfaces.
Light items (plastic bowls etc.) should be loaded in the upper basket and arranged so they do not move.

Before closing the door, ensure that the spray arms can rotate freely.

natural_image
Line drawing of a basket filled with various plastic bottles and containers, no text or symbols presentAdjusting the height of the upper basket
If washing very large plates (over 27 cm and up to 31 cm in diameter) you can load them in the lower basket after moving the upper basket to the higher position.
To move to the higher position proceed as follows:
- Move the front runner stops (A) of the upper basket outward and slide the basket out.
- Refit the basket in the higher position and replace the stops (A) in their original position.

When the top basket is in the higher position it will only take plates up to 20 cm in diameter and you will not be able to use the raised cup racks.

flowchart
graph TD
    A["RC01"] --> B["Move Cart"]
    B --> C["Conveyor Belt"]
    C --> D["Rotating Component"]
    D --> E["Final Transport"]

After loading your machine always close the door, as an open door can be a hazard.
Use of detergent

Only use detergents specifically designed for use in dishwashers.
If using powder detergents proceed as follows:
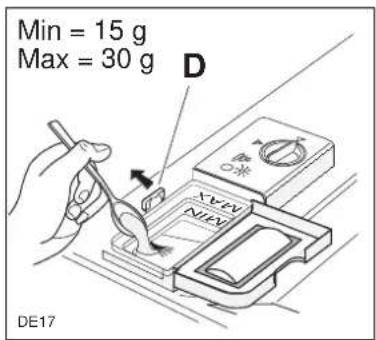
- Open the dispenser lid by pulling the catch (D).
- Add the detergent. As all detergents are not the same, you should consult the instructions on the packet.
- Always close the lid.
- If the programme has a prewash add the required detergent over the lid of the dispenser.
If using detergent in tablets proceed as follows:
- For all programmes; place 1 tablet inside the detergent dispenser.
- Always close the lid.
- For all programmes with prewash; place a portion of a further tablet on the lid of the detergent dispenser.

Insufficient quantities of detergent will produce poor washing results, whereas an excessive amount of detergent will not improve washing results and is also wasteful.
Using no more than the correct amount also contributes to reducing pollution.

natural_image
Line drawing of a hand using a tool to press or install an electronic device (no text or symbols visible)Compact detergents with enzymes
In these compact powders the environmentally unfriendly components have been replaced by natural enzymes and other more biodegradable substances.
The enzymes deploy their full dirt dissolving power at a temperature as low as 50°C.
By choosing the "Bio" programmes you can therefore achieve the same cleaning results that would otherwise be achievable only with 65°C programmes and conventional detergents.
These new compact powders are generally phosphate-free.
As phosphates have water softening properties, we suggest you add salt to the salt container even if the hardness of your water is as low as 8^ TH.
This will avoid lime deposits on crockery and the inner tub.
Hints and tips
To save energy
Place dishes in the machine immediately after every meal and wait until the dishwasher is full before washing.
If necessary run the Rinse and Hold programme (see "Washing Programmes" chart) so that any food scraps do not become caked on the dishes while you are waiting to run the complete wash programme.
Do not prewash dishes under running water.
For best washing and drying results
Before loading, remove all scraps of food and soak very heavily soiled pots and pans.
Arrange saucepans, cups and glasses etc. upside-down.
Tilt items with convex or concave surfaces so that the water drains off easily.
Avoid contact between the dishes as far as possible.
Items not suitable for dishwashers
The following items should not be washed in the dishwasher (unless they are sold as dishwasher proof):
- Cutlery with wooden or horn handles or glued parts
- bronze cutlery
- saucepans with wooden handles
- aluminium ware
- crystal ware
- leaded glass
- plastic items
- antique or fine decorated china
Certain types of decoration can discolour when washed in a dishwasher.
Crystal-ware and plastic objects, if not guaranteed dishwasher proof should be washed by hand.
Certain types of glass can also become opaque after being washed several times in a dishwasher.
A chemical reaction can occur between silver cutlery and stainless steel cutlery. As a precaution, do not wash together.
Iron and cast iron objects can rust and stain other items.
Aluminium tends to go black, copper, pewter and brass tend to stain.

If in doubt check with manufacturer of the item.
When buying new dishes, ensure that they are dishwasher proof.
Washing programmes
| Programme | Degree of soil and type of load | Starting position of the programmer | Required pushbuttons | Cycle description |
Intensive 70°C | Heavy soil.Crockery, cutlery,pots and pans | A | I+On/Off | Hot prewashMain wash up to 70°C2 cold rinses1 hot rinseDrying |
Normal 65°C with prewash | Normal soil.Crockery and cutlery | A | On/Off | Cold prewashMain wash up to 65°C1 cold rinse1 hot rinseDrying |
Normal 65°C no prewash | Light soil.Crockery and cutlery | B | On/Off | Main wash up to 65°C1 cold rinse1 hot rinseDrying |
Bio 50°C with prewash | Normal soil.Crockery and cutlery | A | BIO+On/Off | Cold prewashMain wash up to 50°C1 cold rinse1 hot rinseDrying |
Bio 50°C no prewash | Light soil.Crockery and cutlery | B | BIO+On/Off | Main wash up to 50°C1 cold rinse1 hot rinseDrying |
* Quick wash 50°C | Light soil.Crockery and party crockery | C | BIO+On/Off | Main wash up to 50°C1 cold rinse1 hot rinse |
| Rinse and hold | Any. Partial load (to be completed later in the day). | D | On/Off | 1 cold rinse (to avoid food scraps from sticking together). |
* This is a special programme for quick washing a full load of lightly soiled dishes, glasses and crockery (except pots) so that you may re-use them promptly.
Operating sequence
1. Check the filters
Ensure they are clean and properly positioned (see "Maintenance and cleaning").
2. Check that there is rinse aid and salt
3. Load the dishes
Remove any scraps of food.
Pull the lower basket out and arrange the saucepans, plates and cutlery in it.
Pull the upper basket out and arrange the plates, saucers, glasses and cups etc. in it.
Slide the baskets back into the machine.
4. Ensure that the spray arms can rotate freely.
5. Measure out detergent
Add the required amount of detergent into the dispenser according to the dosage instructions from the manufacturer of your brand.
Close the detergent dispenser lid.
6. Close the dishwasher door
7. Set the programme
Turn the programme selector dial clockwise until the letter of the programme you wish to select corresponds with the programme marker on the control panel.
If necessary select the temperature of the main wash according to the instructions in the
"Washing programmes" chart (see "Required push buttons").
8. Start the programme
Depress the On/Off push button.
The On/Off indicator light will come on and the machine will start.
If you wish to interrupt the washing programme at any time press this button again.
9. At the end of the washing programme
At the end of the programme the dishwasher will automatically stop.
The On/Off indicator light remains on until the On/Off push button is depressed.
10. Switch off the dishwasher
Switch off the dishwasher by pressing the On/Off push button and open the door.
Wait a few minutes before removing the dishes; in this way they will be cooler and the drying will be improved.
Empty the lower basket first and then the upper one; this will avoid water dripping from the upper basket onto the dishes in the lower one.

When the washing programme has finished, it is recommended that the dishwasher is unplugged and the water tap turned off.
In general it is not advisable to open the door while the machine is working; if the door is opened however, a safety device ensures that the machine stops.

Important!
Care must be taken if the door is opened during the hot phase or immediately after a programme has finished, as steam may escape.
Maintenance and cleaning
Internal cleaning
Ensure that the seals around the door, the detergent and rinse aid dispensers are cleaned regularly with a damp cloth.
We recommend every 3 months to run a 65°C wash programme without dishes using detergent.
Cleaning the central filter
(After each wash)
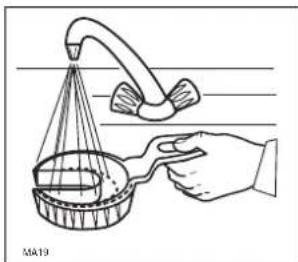
Scraps of food may accumulate in the drain filter (A) and should be removed by rinsing the filter under running water.
To remove the drain filter
- simply pull it out by the handle.
Once cleaned, refit the filter by pushing it back to its original position until it engages.

natural_image
Illustration of a hand using a tool to clean or wash a surface with a funnel and bucket (no text or symbols)Cleaning the large filter
(Every month)
If necessary clean the large filter (B) on both sides under running water, using a brush.
To remove the large filter
- Remove the spray arm by pulling it upwards on one side.
- Turn the column (C) anticlockwise by 90° and then slide out the filter.
- Once cleaned refit it following the above instructions in reverse order.
- Ensure the filter is in its original position, the handle of the drain filter should be pointing towards the front of the appliance.


natural_image
Line drawing of a hand washing a showerhead on a drain, with no text or symbols present.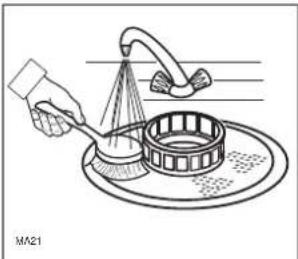
natural_image
Illustration of a hand using a spray gun to clean a surface with a filter and sink (no text or symbols)
natural_image
Diagram of a hand pouring liquid into a mechanical component (no text or symbols visible)
The dishwasher must not be used without filters.
Incorrect repositioning and fitting of the filters will produce poor washing results. Cleaning the filters is vital to ensure correct operation of the machine.
External cleaning
Clean the external surfaces of the machine and control panel with a damp soft cloth. If necessary use only neutral detergents. Never use abrasive products, scouring pads or solvent (acetone, trichloroethylene etc....).
Prolonged periods of non-operation
If you are not using the machine for any period of time you are advised to:
- Unplug the appliance and then turn off the water.
- Fill the rinse aid dispenser.
- Leave the door ajar to prevent the formation of any unpleasant smells.
- Leave the inside of the machine clean.
Frost precautions
Avoid placing the machine in a location where the temperature is below 0^ C. If this is unavoidable, empty the machine, close the appliance door, disconnect the water inlet pipe and empty it.
Moving the machine
If you have to move the machine (moving house etc.....):
- Unplug it.
- Turn the water tap off.
- Remove the water inlet and discharge hoses.
- Pull the machine out together with the hoses.
Avoid over tilting the machine during transportation.
Something not working
Certain problems are due to lack of simple maintenance or oversights, which can be solved easily without calling out an engineer.
Before contacting your local Service Force Centre, please carry out the checks listed below.
| Symptom Solution | |
| The machine will not start | The door has not been properly closed.The plug is not properly inserted in the power socket.There is a power failure. |
| The machine does not fill • Ensure the water tap is open.with water • Ensure the mains water supply has not been cut off. | The inlet hose may be squashed or bent. Reposition the hose.The inlet hose may be blocked. Switch off the water supply and clean the filter. |
| The filters are blocked | Clean the filters (refer to "Maintenance and cleaning"). |
| The spray arms are not rotating | Ensure the crockery is loaded correctly. |
| The dishwasher will not drain | The drain hose may be squashed or bent.Reposition the hose.The sink may be blocked. Clear any blockages.The drain hose extension is not correct. Follow the instructions for connecting to the waste.There is no vent in the end of the drain hose. |
| The machine is noisy | Dishes are rattling against each other, refer to "Loading your machine".The spray arms are knocking against the dishes. Refer to "Loading your machine". |
| The door is difficult to close | The dishwasher is not level, or not properly built-in. |
| Visible lime deposits or white film on the dishes | Check that there is salt and that the salt cap is tight.Check that the right level of the water softener is setted. |
| The dishes are not quite dry | The rinse aid has run out or too little is being used. |
| The dishes are not clean (poor wash) | The baskets are too full.The dishes have not been arranged properly.The spray arms do not rotateThe spray arms are clogged.The filters are clogged.The filters are not in the correct position.Not enough detergent has been used or it is unsuitable.The detergent is old or has gone hard.The salt container cap is not properly closed.The washing programme selected is too gentle. |
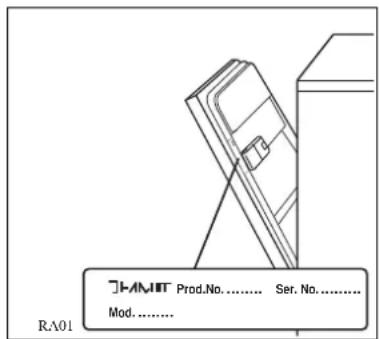
If after all these checks, the problem persists, contact your local Service Force Centre, quoting the model and serial number. This information can be found on the rating plate located on the right hand side of the dishwasher door (see picture).
Protection against flooding
In order to prevent water floods, the machine has been provided with two additional devices, having the following characteristics:
-
In the water inlet hose (see "Water supply connections"). The device comes into operation as a result of any damage to the water inlet hose and stops the water inflow. It functions even with the machine off.
-
In the bottom of the machine: the device comes into operation as a result of any water leaks in the machine and it functions only with the machine on.
To repair the machine call the Service Centre.
Service and spare parts

This product should be serviced by an authorised Service engineer, and only genuine spare parts should be used. Under no circumstances should you attempt to repair the machine yourself. Repairs carried out by inexperienced persons may cause injury or serious malfunctioning. Contact your local Service Force Centre. Always insist on genuine spare parts.
Hints for test centres
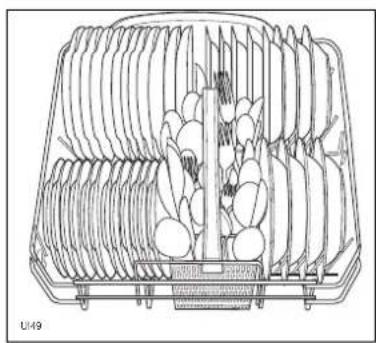
Before starting any test it is necessary to fill completely with salt the salt container and with rinse aid the rinse aid dispenser.
| Test standard EN 50242 | |
| Reference programme: Bio 50°C with prewash | |
| Load: 12 standard place settings | |
| Rinse aid selector: position 5 | |
| Detergent dosage : 25 g in the dispenser5 g on the dispenser lid | |

natural_image
Line drawing of a shopping basket with various items (no text or symbols)Arrangement upper basket
natural_image
Technical line drawing of a mechanical component with internal layered structure (no text or symbols)Arrangement lower basket

natural_image
Diagram of a mechanical device with internal components and labeled parts (no text or symbols)Arrangement cutlery basket
Technical specifications
| Dimensions Width 59.6 cm | Height 81.8 - 87.8 cmMax depth 57.5 cmMax depth with open door 111.4 cm | |
| Electrical connection VoltageMotor rating during washPower of heating elementOverall power | 230 V - 50 Hz | 200 W2100 W2300 W |
| Water supply pressure | MinimumMaximum | 50 kPa (0.5 bar)800 kPa (8 bar) |
| Capacity | 12 place settings |
Installation instructions
Remove all packaging before positioning the machine.
If possible, position the machine next to a water tap and a drain.
Water supply connections
This dishwasher may be fed with either hot (max. 60°) or cold water.
Nevertheless we advise you a cold water supply.
A hot water supply is not always efficient with very soiled crockery as it shortens the washing programmes a lot.
The water pressure must be within the limits given in the technical specifications.
Your local Water Authority will advise you on the average mains pressure in your area.
The dishwasher features fill and drain hoses which can be turned either to the left or the right to suit the installation.
The locknut must be correctly fitted to avoid water leaks.
Avoid bends or kinks in the hose which could prevent or slow down the water supply.
If the machine is connected to new pipes or pipes which have not been used for a long time, you should run the water for a few minutes before connecting the inlet hose. This will prevent deposits of sand or rust clogging the inlet hose filter.
For making the connection itself, the coupling nut fitted to the machine's supply hose is designed to screw onto either a 3/4 inch gas thread spout, or to a purpose made quick-coupling tap such as the Press-block.
The water supply hose is fitted with a safety device, which prevents water from entering the machine should the inner hose split, due to wear.
The problem is signalled by a red indicator which appears in the window (B - ① ②).
If this happens, close the water tap and have the hose replaced.
The retaining ring (A - ① ②) must be properly fitted so as to avoid water leaks.
Note:
Only for water supply hoses with Lock-fast safety device to prevent inadvertent loosening.
To detach the hose press yellow lever (C - ②) and turn the retaining ring anticlockwise ②.
Any electrical work required to install this appliance should be carried out by a qualified electrician or competent person.
Any plumbing work required to install this appliance should be carried out by a qualified plumber or competent person.

Water outlet hose connection
The end of the drain hose can be connected in the following ways:
-
To the sink outlet siphon, securing it if necessary with a clip.
-
To a stand pipe provided with vent-hole, minimum internal diameter 4 cm.
The waste connection must be at a height of between 30 cm (minimum) and 100 cm (maximum) from the bottom of the dishwasher.
The drain hose can face either to the right or left of the dishwasher
Ensure the hose is not bent or squashed as this could prevent or slow down the discharge of water.
If you use a drain hose extension it must be no longer than 2 metres and its internal diameter must be no smaller than the diameter of the hose provided.
Likewise the internal diameter of the couplings used for connections to the waste outlet must be no smaller than the diameter of the hose provided.
The sink plug must not be in place when the machine is draining as this could cause the water to siphon back into the machine.


Electrical connection
Before plugging the appliance into the wall socket, make sure that:
-
The mains voltage corresponds to the voltage given in the "Technical specifications".
-
The meter, fuses, mains power supply and wall socket can all take the maximum load required. Make sure that the socket and plug are compatible without having to use any type of adaptor. If necessary, have the domestic wiring system socket replaced.

Safety standards require the appliance to be earthed.
The manufacture accepts no liability for failure to observe the above safety precautions.

This appliance complies with the following E.E.C. Directives:
- 73/23 of 19.2.73 (Low Voltage Directive) and subsequent modifications;
- 89/336 of 3.5.89 (Electromagnetic Compatibility Directive) and subsequent modifications.
Building-in
This dishwasher is designed to be fitted under a kitchen counter or worksurface.
It is essential that the recess dimensions indicated in the diagram are followed.
No further openings for venting of the dishwasher are required, but only to let the water fill and drain hose and power supply cable pass through.
The recess height may be anywhere between 820 and 880 mm from the floor as the dishwasher incorporates adjustable feet (max 60 mm).
A distance of 2 mm should be allowed between the top of the dishwasher and the counter top.
Adjusting the height of the appliance
To adjust the height proceed as follows:
- Loosen or tighten the two front feet.
- The rear foot is adjusted by turning the screw in the middle of the front kick plate to the left or right.
Pads are supplied for the feet to make sliding the appliance in and out of the recess easier.
To fit the pads, press them onto the feet.
If required, the dimensions of these pads can be reduced by breaking them where marked.
Good levelling is essential for correct closure and sealing of the door. When the appliance is correctly levelled, the door will not catch on the levelling spacers, either side of the cabinet.
If the door does not close correctly, loosen or tighten the adjustable feet until the machine is perfectly level.


natural_image
Diagram of concentric circular layers with directional arrows, no text or symbols presentThe furniture door
The door on this appliance is designed for the overlay of a panel having the following dimensions:
Width 596 mm
Height 604 mm max
Thickness 20 mm max
Weight 2 - 7.5 kg max
The height of the panel depends on the height of adjacent kitchen units (see kitchen plinth adjustment).

The panel height should be no more than indicated, otherwise complete opening of the door will not be possible as the furniture door panel will hit against the dishwasher plinth.
Furtermore, it is possible to line up the control panel to correspond with the height of the drawers of adjacent pieces of furniture, thus perfectly co-ordinating with style of the rest of the unit furniture in your kitchen.
Add one or more of the fillets provided until you reach the desired height.
Secure the fillets as shown in the picture, by means of two screws 4 x 40 provided therewith.
Prepare the panel as follows:
-
Measure the distance (B) between the part below the control panel (or fillets) and the reference notch (X) on the door.
-
Drill the panel with a ∅ 2 x 14 bit according to the dimensions given in the picture.
-
Screw the two fastening pivots into the holes indicated in the picture.
-
Mount the decor panel by inserting the two fastening pivots into the slotted holes of the door. Lift the decor panel until perfect alignment with the fascia panel is obtained.
-
Once the correct position has been found, open the door and fasten the decor panel by means of the four 4 x 40 screws provided, using the holes through the inner door.


natural_image
Technical line drawing of a cabinet or storage unit with internal components and directional arrows (no text or symbols)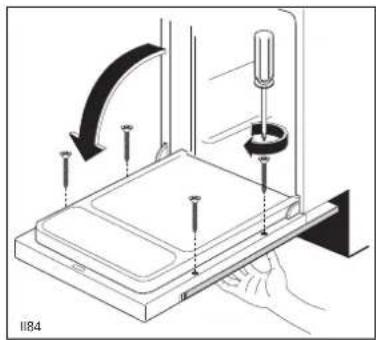
Fitting the vapour protection
Screw the vapour protecting strip onto the front part of the worktop using four 3,5 x 16 screws.
Fitting the sealing strips to the sides of the appliance
To ensure closer contact with adjacent kitchen units, fit the plastic sealing strips down both sides of the front of the machine before inserting it into the recess.


Fixing to the adjacent units
The appliance must be secured to the underside of the worktop using the brackets provided. Failure to do this could cause damage or injury.
Insert the two fixing brackets into the slots provided in the top front part of the dishwasher as shown in the figure.
Secure the brackets to the adjacent units with the 3.5 x 16 screws using the upper or the side holes.

Attention!
The sides of the dishwasher must never be drilled to prevent damage to hydraulic components.

natural_image
Technical line drawing of a mechanical assembly with two inset views showing internal components (no text or symbols)Noise protection
Adhesive noise protection ensures excellent noise insulation. This should be fitted when the dishwasher has been mounted in the recess and the height adjusted.
Apply the protection as shown in the drawing, making sure that the non-adhesive section reaches right down to the floor.
Kitchen plinth adjustment
To allow correct opening of the door it is sometimes necessary to cut the kitchen plinth. Refer to the cutting table.
According to dimensions (a) and (b) as shown on the figure, you will find on the following table the depth (x) of the cut to be made on the plinth.
The dimensions (a) and (b) of the table are those most frequently used in the kitchen furnitures.

natural_image
Pure architectural line drawing of two rectangular structures with arrows indicating support points (no text or symbols)
natural_image
Line drawing of a wooden cabinet with a side panel and wooden support frame, no text or symbols present

heatmap
Height (a)* | Depth (b)* | 170 | 160 | 150 | 140 | 130 | 120 | 110 | 100 | 90 | |---|---|---|---|---|---|---|---|---|---| | 40 | 136 | 131 | 125 | 118 | 110 | 100 | 93 | 85 | 75 | | 50 | 135 | 131 | 125 | 118 | 110 | 102 | 92 | 85 | 75 | | 60 | 137 | 132 | 125 | 118 | 110 | 102 | 94 | 85 | 75 | | 70 | 138 | 134 | 128 | 120 | 110 | 104 | 95 | 85 | 75 | | 80 | / | 139 | 130 | 124 | 115 | 105 | 98 | 88 | 78 | | 90 | / | / | 138 | 129 | 120 | 110 | 100 | 90 | 80 | | 100 | // | | | 135 | 125 | 115 | 105 | 95 | 85 | X
- For the installer
- Guide to use the instruction book
- Important safety information
- Installation
- Child Safety
- During Use
- Conservation
- In the interest of the environment:
- Description of the appliance
- The control panel
- Before use
- Setting the water softener
- To adjust the water softener
- Filling with salt
- To fill:
- Rinse aid
- Filling with rinse aid
- Ensure that the lid is closed after every refill.
- Adjusting the dose
- Using your appliance
- Loading your appliance
- The lower basket
- The cutlery basket
- The upper basket
- Adjusting the height of the upper basket
- To move to the higher position proceed as follows:
- Use of detergent
- If using powder detergents proceed as follows:
- If using detergent in tablets proceed as follows:
- Compact detergents with enzymes
- Hints and tips
- To save energy
- For best washing and drying results
- Items not suitable for dishwashers
- The following items should not be washed in the dishwasher (unless they are sold as dishwasher proof):
- Operating sequence
- Check the filters
- Check that there is rinse aid and salt
- Load the dishes
- Ensure that the spray arms can rotate freely.
- Measure out detergent
- Close the dishwasher door
- Set the programme
- Start the programme
- At the end of the washing programme
- Switch off the dishwasher
- Maintenance and cleaning
- Internal cleaning
- Cleaning the central filter
- (After each wash)
- To remove the drain filter
- Cleaning the large filter
- (Every month)
- To remove the large filter
- External cleaning
- Prolonged periods of non-operation
- Frost precautions
- Moving the machine
- Something not working
- Protection against flooding
- Service and spare parts
- Hints for test centres
- Installation instructions
- Remove all packaging before positioning the machine.
- Water supply connections
- Note:
- Water outlet hose connection
- Electrical connection
- Building-in
- Adjusting the height of the appliance
- The furniture door
- Prepare the panel as follows:
- Fitting the vapour protection
- Fitting the sealing strips to the sides of the appliance
- Fixing to the adjacent units
- Attention!
- Noise protection
- Kitchen plinth adjustment
Brand : ZANKER
Model : ZKS5619AL
Category : Dishwasher