
GoXtreme Nano - Camcorder EASYPIX - Free user manual and instructions
Find the device manual for free GoXtreme Nano EASYPIX in PDF.


| Product Type | Digital camcorder |
| Dimensions | 48.5 x 23.5 x 33 mm |
| Power Supply | Built-in 3.7V rechargeable lithium battery |
| Main Functions | Video recording (HD 1280x720, VGA 640x480), photo capture (1.3M, 3.1M), black and white display, mass storage, TV output |
| Maintenance | Keep away from dust, clean lens gently with optical cloth, avoid organic solvents, keep away from strong magnetic fields, temperature extremes, liquids |
| Safety | Do not disassemble battery, format memory card before first use, use minimum class 4 TF card, power off before inserting/removing card |
| Spare Parts | TF memory card (4GB-32GB class 4+), USB cable included; no other specified spare parts |
| General Information | 1.3MP CMOS sensor, file formats JPEG/AVI, USB 2.0, TV output PAL, auto white balance, auto power-off after 3 minutes, focal length 5.8mm, aperture F2.8, operating system Microsoft Windows 7/2000/XP/VISTA |
Frequently Asked Questions - GoXtreme Nano EASYPIX
User questions about GoXtreme Nano EASYPIX
0 question about this device. Answer the ones you know or ask your own.
Ask a new question about this device
Download the instructions for your Camcorder in PDF format for free! Find your manual GoXtreme Nano - EASYPIX and take your electronic device back in hand. On this page are published all the documents necessary for the use of your device. GoXtreme Nano by EASYPIX.
USER MANUAL GoXtreme Nano EASYPIX
MANUAL Foreword
Thank you for purchasing this digital camera. Please carefully read through this product manual before using, and keep this manual properly for future reference.
Contents of the product manual are based on the updated information when compiled. The screen display and figures used in the manual are for detailed and visual operation of the camera. Due to technical development and different production lots, they may differ from the digital camera you actually use.
Operation Notice
This camera uses the TF card (Multimedia memory card) Instructions for using the memory card
● For the first time of using a new memory card, or when there is unrecognized data for the camera or images shot with other cameras in the memory card, please make sure to firstly format the memory card;
- Please power the camera off before plugging in or taking out the memory card;
● After using for many times, performance of the memory card will get lower. In case of lower performance of the memory card, please buy a new one;
● The memory card is a precision electronic device. Please do not bend the card and prevent from falling down or heavy load on it;
- Keep the memory card away from the environment with strong electromagnetic field or magnetic field like places close to speaker or TV receiver:
- Keep the memory card away from the environment with over high or low temperature;
- Keep the memory card clean and prevent it from contacting liquid. In case of liquid contacted, clean and dry it with a piece of soft cloth;
● In case of idle use, please keep the memory card in a guard staple;
- Please note that the memory card will get hot after long-term use, and this is normal;
- Do use the memory card having been used on other digital video recorder or digital cameras. In case of using the memory card, please firstly format it;
- Using the memory card formatted with other digital video recorders or digital cameras are prohibited;
- In case of one of the followings for the memory card, the recoded data may be damaged:
- Improper use of the memory card;
- Power-off of taking out the memory card during recording, deleting (formatting) or reading;
- It is recommended to make backup for the important data on other media like soft disk, harddisk or CD;
- To ensure image quality, minimum class 4 high-speed card is needed for TF card.
Camera maintenance
● Use proper protective cover to avoid lens and display scratched;
- It is to blow off dust and sand on surface of the lens before cleaning, and then gently clean the lens with cloth or paper suitable for cleaning optical devices. If needed, please use lens cleanser. It is strictly prohibited to clean the camera with organic solution;
● It is strictly prohibited to touch surface of the lens with finger.
System Requirements
When operating and using this digital camera, please pay attention to minimum system requirements from the camera. You are strongly recommended to use better computer to control the camera for better effect. The requirements for minimum system are as below:
| System Requirements | |
| Operating system | Microsoft Windows 7, 2000, XP, VISTA |
| CPU | Intel PIII667above or CPU with equivalent performance |
| International memory | 512 MB or above |
| Sound card, graphics card | Sound card and graphics card support DirectX8 or above |
| CD-ROM | 4x speed or above |
| Harddisk | Minimum 1 GB free space |
| Others | One standard USB 1.1 or USB 2.0 interface(s) |
Function Characteristics
This camera is equipped with various characteristics and functions:
● Digital video recorder;
● Digital camera (1.3 Mega pixel);
● Black and white digital display;
● Mass Storage (portable disc)
Appearance
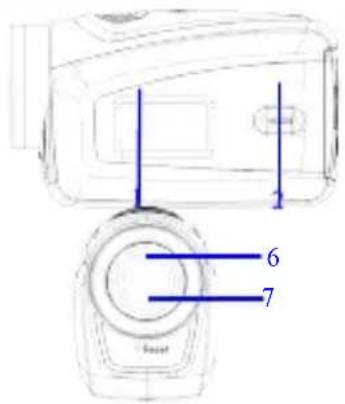
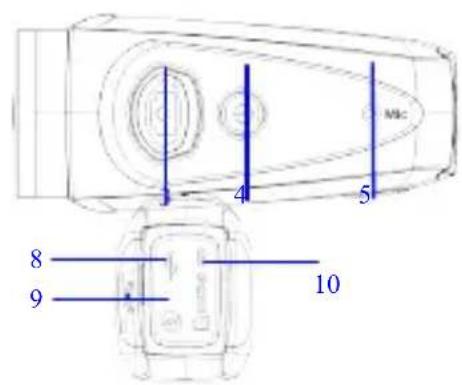
Black and white digital screen(2)MODE key(3)Shutter (4)Power(5)Microphone(6)Lens(7)Reset(8)USB port(9)TV port(10)TF card slot
Key Functions and Indictors
| Key/Indicator | Function |
| Power | Power On/Off |
| Shutter | Video recording mode, Recording/StopCapture mode, taking picturesReplay mode; after connecting to TV, short press to play the recorded video; long press to enter shortcut for deletion; short press to confirm file deletion. |
| MODE key | Switchover of video recording and capture mode in circle and change image size;In capture mode, long press MODE key to format FT card;Replay mode: after connecting to TV, it is used for next or previous photo, or exit from deletion mode. |
Start Operation
Battery
This camera uses the original packaged built-in rechargeable 3.7V lithium battery. Battery disassembly is prohibited.
Memory card installation
Following instructions by the card slot, it is plug the FT memory card into the card slot with metal pins inwards.
To take the memory card out, please press the FT card downward and take it out.
Attention: ●Please disconnect power supply of the camera before replacing the memory card;
- Keep a correct direction to plug the card in. Gently plug the card to void card or camera parts damaged. In case of fail to plug in, check it is in a correct direction to plug in;
- Please format the memory card before the first time of use, using a card having been used on other cameras.

Power-on
Press and hold power key for 2 seconds and release it for power-on of the camera.
Mode switchover
After power-on, the camera enters the default mode of video recording at a default size of Lo. In video recording mode at Lo size, click MODE key to switch the size to HI; in video recording mode at HI size, click MODE key to enter capture mode at Lo size, and in capture mode at Lo size, click MODE key to return to video recording mode at Lo size.
Attention: ●Video recording mode: Lo indicates VGA (640x480) 60 frames, Hi indicates HD (1280x720) 30 frames
●Capture mode: Lo indicates 1.3M (1280x960), Hi indicates 3.1M (2048x1536)

Video recording
In video recording mode, click Shutter key to start video recording and click it again to stop recording.
Capture
In capture mode, press Shutter key to take pictures.
TV output
When output of image and audio from the camera to TV is needed, please plug common end of TV cable into TV port of the camera. The yellow port is for video input, and the red/white port is for audio.
Replay
After connecting to TV, the camera enters the replay mode. In replay mode, press MODE key to select photo or recorded video.
After selecting recorded video file, press Shutter key to play the file. During playing the recorded video, press Shutter key to stop playing.
In replay mode, long press Shutter key to enter shortcut deletion prompt, press Shutter key to confirm deletion, and press MODE key to exit from deletion.
Power-off
In power-on mode, long press Power key to power the camera off.
Connection to computer
Firstly power the camera on, and then connect the camera with attached USB cable to USB port of the computer. After connecting to the computer, the camera automatically enters portable disc mode.
Advanced Operation
Video recording, capture mode
After power-on, the camera automatically enters video recording mode. In video recording mode at Lo size, click MODE key to switch the size to HI; in video recording mode at HI size, click MODE key to enter capture mode at Lo size, and in capture mode at Lo size, click MODE key to return to video recording mode at Lo size.
In video recording mode, press Shutter key to start recording and press it again to stop recording, press MODE key to switch to Lo size. In capture mode, press Shutter key to start shooting, and press MODE key to switch to Lo size.
In video recording mode, information are displayed on the screen as below:
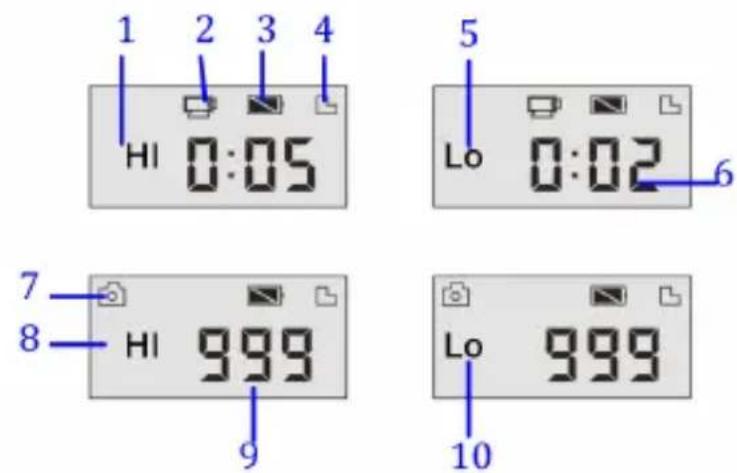
| No. | Icon | Description |
| 1 | Video recording HI | Indicates high resolution in current video recording mode |
| 2 | Video recording icon | Indicates currently in video recording mode (Flashing icon means in the process of video recording) |
| 3 | Battery level | Indicates level of battery |
| 4 | TF card | Indicates a memory card available |
| 5 | Recording Lo | Indicates low resolution in current video recording mode |
| 6 | Time left for recording | Indicates time left in FT card for video recording |
| 7 | Capture mode | Indicates currently in capture mode |
| 8 | Capture HI | Indicates high resolution in current capture mode |
| 9 | Photo to be captured | Indicates quantity of photos to be captured in current internal memory |
| 10 | Capture Lo | Indicates low resolution in current capture mode |

Attention: ●Due to limited characters displayed on the screen, video recording time can be displayed in minimum unit minute;
E.g. 0: 02 indicates 2 minutes. During recording, 0: 01 indicates video recorded for 1 minute.
Replay Mode
After power-on and connecting to TV, the camera enters the replay mode. In replay mode, press MODE key to select photo and recorded video. After selecting video file, press Shutter key to play it. During playing, press Shutter key to Stop playing.
In replay mode, long press Shutter key to enter file deletion mode. In file deletion mode, press Shutter key to confirm deletion, and press MODE key to exit from deletion.
In replay mode, information are displayed on the screen as below:
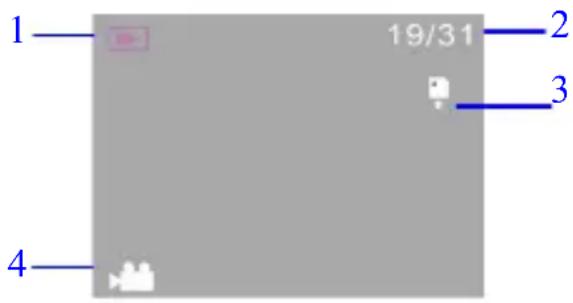
| No. | Icon | Description |
| 1 | Replay mode | Indicates reply mode |
| 2 | File quantity | Indicates there are total 31 files, and the 19th file is being browsed currently. |
| 3 | TF card | Indicates a memory card available |
| 4 | Icon for video recording | Indicates the current file is a video recording file. |
File Deletion
After connecting to TV, the camera enters the replay mode. In replay mode, long press Shutter key to enter file deletion mode, press Shutter key to confirm deletion, and press MODE key to exit from deletion.
Delete This file?
Enter
Back
Connect to computer to download photo/video
After connecting to computer, the camera enters portable disc mode. In window of "My computer", there will be a portable disc added. The photos or video is stored under catalogue of "DCIM\100MEDIA" in the portable disc. You may enter this catalogue to copy files onto harddisk of your computer.

Attention: During file downloading, do not disconnect USB. Plug-in or plug-out of USB connection is prohibited to avoid loss of data.
Specification
| Image sensor | 1.30Mega pixel CMOS image sensor |
| Image resolution | Lo 1M(1280x1024), HI 3M(2048 x 1536) |
| Memory | External TF card (4GB to 32GB class 4or above) |
| File format | JPEG, AVI |
| Video resolution | Hi HD 1280X720, Lo VGA 640×480 |
| White balance | Automatic |
| Exposure compensation control | Automatic |
| USB port | USB2.0 |
| TV Output | PAL |
| Display | Black and white digital screen |
| Power supply | Built-in 3.7V rechargeable lithium battery |
| Menu language | English |
| Focal length | f=5.8mm |
| Iris aperture | F2.8 |
| Automatic power-off | 3 minutes |
| Requirements for operating system | Microsoft Windows 7, 2000, XP, VISTA |
| Dimensions | 48.5 x 23.5 x 33 mm |
Attention: Design specification of the product is based on updated information when the product manual is compiled. Specification is subject to change without further notice.
FAQ
| Failure of camera startup after placing battery in | Battery low. Recharging battery is required. |
| Fail to take picture or record video by pressing Shutter key | Full memory. Please store filed achieved on other memories. |
| Blur photo | Trembling hand when taking the photo. Hold the camera stead with two hands, or fix the camera stable with assistance of tripod to keep the camera from of moving during taking photo. |
| Dull photo or video | Insufficient light. Please take photo with sufficient light or use lamp to increase brightness. |
| Automatic power-off of the camera | Battery low. Recharge the battery. |
| To save power, the camera will automatically power off if no any operation performed for over 3 minutes. |
For technical help please visit our support area on www.easypix.eu.
- MANUAL Foreword
- Operation Notice
- Camera maintenance
- System Requirements
- Function Characteristics
- Appearance
- Start Operation
- Battery
- Memory card installation
- Power-on
- Mode switchover
- Video recording
- Capture
- TV output
- Replay
- Power-off
- Connection to computer
- Advanced Operation
- Replay Mode
- File Deletion
- Delete This file?
Brand : EASYPIX
Model : GoXtreme Nano
Category : Camcorder