
CaptureView CVB 1005 - Binoculars MEADE - Free user manual and instructions
Find the device manual for free CaptureView CVB 1005 MEADE in PDF.


| Product Type | Binoculars with integrated digital camera |
| Brand | Meade |
| Model | CaptureView CVB 1005 |
| Magnification | 8x |
| Objective Lens Diameter | 42 mm |
| Optical Design | Folding roof prism, fully-coated |
| Close Focus | 16 ft (4.9 m) |
| Field of View | 376 ft at 1000 yds |
| Camera Sensor | 2.0 megapixel CMOS |
| Image Resolution | 2048×1536, 1600×1200, 1280×960, 640×480 (24-bit color) |
| Memory (Built-in) | 16 MB SDRAM, 16 MB flash |
| Memory (External) | SD/MMC card up to 256 MB |
| Movie Recording Length | Up to 90 seconds |
| Battery | 2 × AA 1.5V (user-supplied) |
| Dimensions (W×H×D) | 4.9 in × 3.25 in × 5.75 in |
| Weight | 26 oz (746 g) |
| Interface | USB 1.1 |
| Display | Color LCD |
| Included Accessories | USB cable, neck strap, cleaning cloth, carry case, CD-ROM, instruction manual |
| Warranty | 1 year limited (U.S.A. and Canada) |
| Care Instructions | Wipe with damp cloth; avoid liquids; store in dry, cool place |
Frequently Asked Questions - CaptureView CVB 1005 MEADE
User questions about CaptureView CVB 1005 MEADE
0 question about this device. Answer the ones you know or ask your own.
Ask a new question about this device
Download the instructions for your Binoculars in PDF format for free! Find your manual CaptureView CVB 1005 - MEADE and take your electronic device back in hand. On this page are published all the documents necessary for the use of your device. CaptureView CVB 1005 by MEADE.
USER MANUAL CaptureView CVB 1005 MEADE
Operating Instructions
Meade® 8 x 42 2.0D CaptureView™ Integrated Binocular and Digital Camera

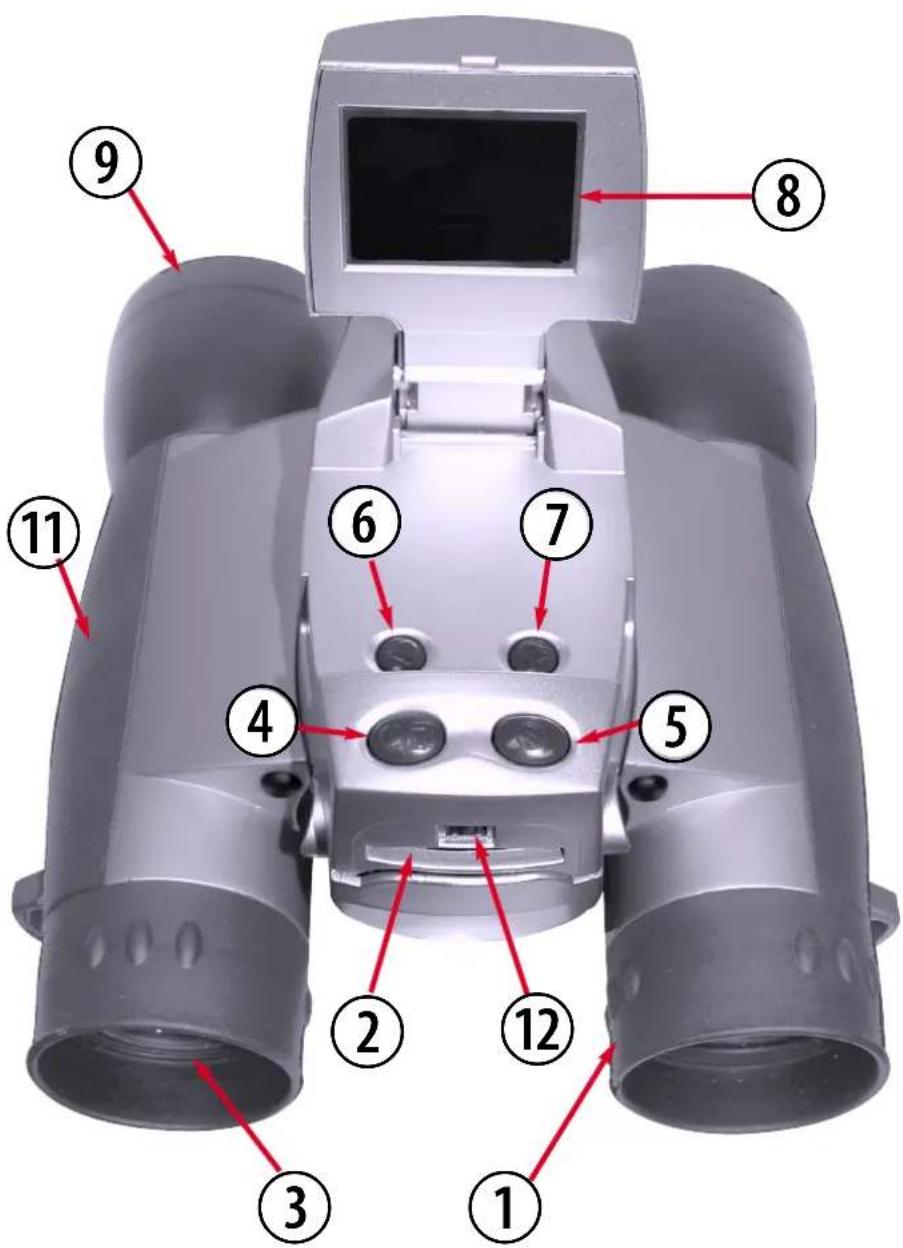
Fig. 1: Top View
- Diopter Scale (on underside of right eyepiece)
- SD Card Port
- Eyepiece
- Menu Button
- Shutter Button
- Left Button
- Right Button
- LCD Screen
- Objective Lens
- Camera Lens (not visible, see Fig. 2)
- Barrel
- USB Port
- Battery Compartment Lid (see Fig. 2)
- Focus knob (not visible, see Fig. 2)
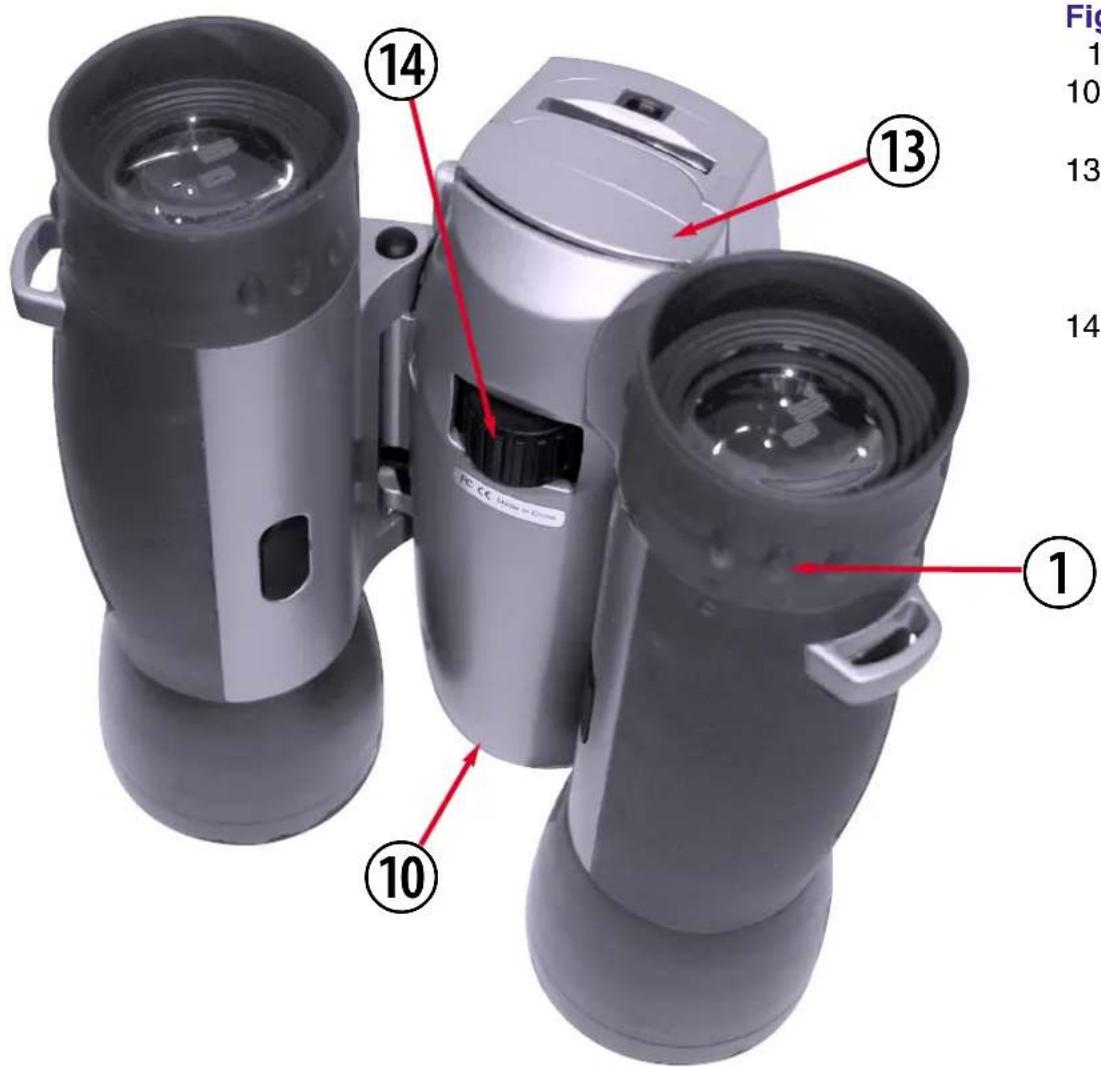
Fig. 2: Bottom View
- Diopter Scale
- Camera Lens (not visible)
- Battery Compartment Lid (squeeze and pull back to remove)
- Focus knob

WARNING! Never use a Meade® binocular to look at the Sun! Looking at or near the Sun will cause instant and irreversible damage to your eye. Eye damage is often painless, so there is no warning to the observer that damage has occurred until it is too late. Do not point the binocular at or near the Sun. Children should always have adult supervision while observing.
I. Introduction
Meade CaptureView is an 8 x 42mm full-featured binocular integrated with a digital camera that requires no film to take pictures or movies. For best results, please follow these operating instructions to capture and download pictures.
• Fully functional binoculars.
• Take pictures and movies, and view them on your PC.
- Transfer pictures and movies to your PC for easy printing, editing, enhancing, and manipulating.
• E-mail pictures to your friends and family.
- You can view pictures and movies you just took on the LCD panel. Also the LCD panel indicates status for ease in selecting and performing desired operations.
II. How to Use Your Binocular
To enhance your viewing enjoyment, please take a moment to familiarize yourself with your new binocular:
Adjustment of Eye Relief for Eyeglass Wearers
For best results when viewing an object while wearing eyeglasses, fold down the rubber eyecups and place them against your glasses.
Adjusting the Eyepieces
The distance between your eyes is usually different than the distance between another person's eyes. This distance is known as the interpupillary distance, or IPD. Adjustment to your IPD is important to the proper use of you CaptureView:
- Hold CaptureView up to your face in the normal viewing position, using both hands to hold each barrel firmly.
- Pull the barrels apart or push the barrels together until you see a single circular field with both of your eyes.
Focusing the Binocular
- Set the Diopter Scale on underside of CaptureView (1, Fig. 1) at its center point between + and -.
- Choose an object that is at least 16 feet (4.9m.) away.
- Looking with just your left eye, rotate the Center Focus Knob (14, Fig. 1) until the object you are viewing is in best focus.
- Looking with just your right eye, rotate the Diopter Scale (1, Fig. 1) until the object you are viewing is in best focus.
- Now, looking with both eyes, both far and near objects can easily be brought into focus with a turn of the Center Focus Knob.
III. How To Use Your Camera
CaptureView performs best under good lighting conditions. It takes some practice to get used to high-magnification photography. Take some time to practice capturing still pictures and movies. Depending on the available light and your distance from the object, captured images may not appear as bright or as centered as when viewed through the binoculars. Note also that CaptureView has a fixed focus (you cannot focus manually) and takes focused pictures even if the image in the binoculars is out-of-focus.
Inserting Batteries
- Lift the battery compartment lid (13, Fig. 2) by squeezing the outer edges and then pulling forward.
- Insert 2 AA 1.5v (user-supplied) batteries into the compartment, noting the correct polarity as illustrated inside the compartment.
Power Saving Features
If you do not press any of the buttons, the camera will automatically shut off after 2 minutes to save energy.
You can also turn off the LCD manually to further save battery power. While in Preview mode only (this feature does not operate in Menu mode), hold down the Left and Right buttons at the same time. The LCD screen will turn off.
However, you will be able to continue taking pictures or movies using the Shutter button. Press both buttons at the same time again to turn the LCD screen back on again.
III. How To Use Your Camera
Camera Modes
CaptureView provides the following modes: Menu, Preview (Still, Movie and Flashback), and Playback.
Press the Menu button to enter the Menu mode, which displays the menu and menu options. Use the Menu mode to select and activate CaptureView's many features. See MENUS, pages 11-14, for more information.
When you first turn on the camera or when you exit the Menu mode, the Preview mode is operational and the LCD screen displays a live image. The Preview mode has three modes to choose from: Still, Movie and Flashback. Use this mode to take pictures or movies. See STILL MODE, MOVIE MODE and FLASHBACK, pages 11-12, for more information.
Select the Playback mode from the CaptureView menus. Use this mode to review the pictures or movies you have taken. See PLAYBACK, page 13, for more information.
III. How To Use Your Camera
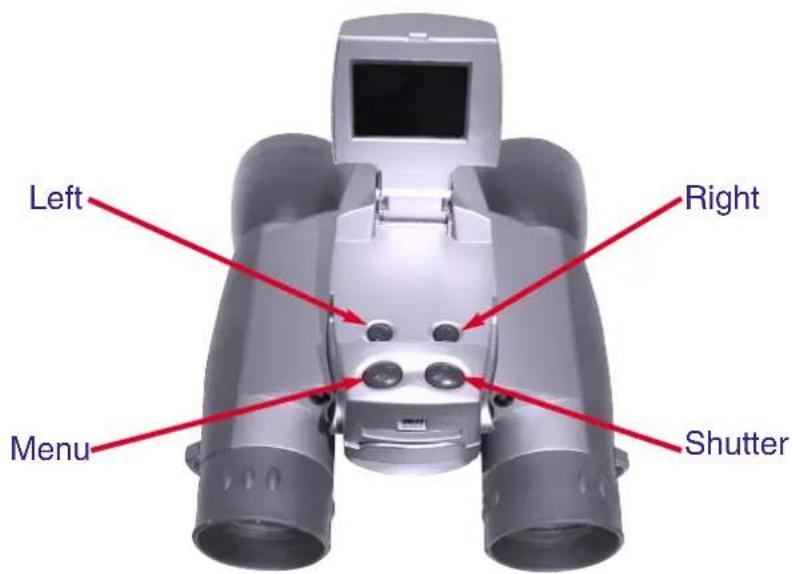
Using the Buttons and Moving through the menus
- Press and hold the Menu button for 3 to 5 seconds to turn on the camera.
- Press the Menu button to display the menus.
- Use the Right and Left buttons to move the red selection box right or left over menus or menu options.
- When the box is over a menu or menu option you wish to select, press the Menu button. Select "Back" from a menu and press the Menu button to go back to the last displayed menu.
- Press the Shutter button to exit the menus or the Playback mode. Also use the Shutter button to take pictures or movies when in the Preview mode.
The following example demonstrates how to use these buttons. See MENUS, pages 11-14, for a description of the menus and their on-screen icons.
III. How To Use Your Camera
Taking Pictures

- Lift up the LCD (8, Fig. 1) to an upright position. Press and hold the Menu button (4, Fig. 1) for 3 to 5 seconds to turn on the camera. Point the binoculars and you will see images appear on the LCD.
- Press the Menu button again and the first menu screen displays on the LCD. Use the Right or Left buttons (6 or 7, Fig. 1) to move the red selection box over the Resolution menu (the "2M" icon) and press the Menu button to display the Resolution menu. Use the Right or Left buttons to move the red selection box to the desired Resolution option. Press the Menu button to select the option and the main menu displays again. See Size (RESOLUTION) OPTIONS, page 13, for the resolution choices that are available.
- Use the Right or Left buttons to move the selection box over the Camera menu (the Camera icon) and press the Menu button to display the menu. Use the Right or Left buttons to move the red selection box to the Digital Still Camera (DSC) option. Press the Menu button to select the option and the main menu displays again.
You may also choose either the Movie or Flashback menu selections to record images. See MOVIE MODE and FLASHBACK, pages 11-12, for more information.

- Use the Right or Left buttons to move the selection box over Exit and press the Menu button to exit the menu mode. You may also press the Shutter button to exit from the menus.
- You are now in the Preview mode. When you are in the Preview mode, you can record pictures or movies. Sight on a target by looking through the binocular eyepieces or by looking at the LCD.
- Hold CaptureView steady and press the Shutter button (5, Fig. 1). A beep sounds and "Saving..." displays, to confirm that a picture was taken. The counter in the upper right corner of the LCD increases by one.
Note: Be careful to hold the camera steady while taking a picture in the higher resolution modes (see SIZE (RESOLUTION) OPTIONS, page 13). The camera is more sensitive to motion in this mode.
III. How To Use Your Camera
To playback your captured images:

- To see the image(s) that you have captured, move the selection box to the Playback menu (the right pointing triangle icon) and press the menu button. The last image you captured displays on the LCD screen. Use the right and left buttons to scroll through your captured images or movies (each movie counts as one item). A counter appears at the upper left. If the counter reads, 3/5, for example, it means the third of five items.

- Select the Exit menu and press the Menu button to leave this mode.
IV. Menus
Main Menu

Still Mode. Select to take still images. Remember to check your resolution setting before taking a still image.

Movie Mode. Select the Movie icon from the Main menu to take movies. This puts you into the Preview mode. Then just press the Shutter Button to record and press again to stop recording. You can watch the movie using the Playback button. Each movie you record counts as one "item" in the Playback mode.
IV. Menus
Main Menu {continued}

The FlashBack feature records a movie for a user-selected period of time (5, 10, 15 or 20 seconds). You will select the Flashback menu icon and press the Menu button to activate recording. You can record for as long as you like, but you will only save a recording for the period of time you have selected. For example, if you chose 10 seconds, only the last ten seconds of the recording will remain in memory and be saved—the rest of the recording is discarded.
To select a period of time, go to the Flashback Period submenu (located under the Settings menu; see FLASHBACK PERIOD, page 15). The camera remembers the last setting you choose in this menu.
This feature is very useful when you wish to capture a short activity, but are not sure when it will begin.
For example, if you wish to record a baseball pitcher throwing a pitch:
- Select the Settings menu and press the Menu button.
- Select the Flashback Period submenu and press the Menu button. Select 10 seconds and press the Menu button.
- Select Back and press the Menu button.
- Select Flashback and press the Menu button. You are now in Preview mode.
- Press the Shutter button to begin recording while the pitcher prepares. After the pitcher throws the ball, click on the shutter button again to turn off recording. "Saving" displays on the LCD screen." You'll have saved only the last ten seconds of the pitcher's activity.
- Select Playback mode to review your movie. If you wish to perform another flashback recording, just press the Shutter button to begin recording again. Choose another setting from the menu to exit this mode.
IV. Menus
Main Menu {continued}

Playback Mode. Press once to review still images or movies captured in the Preview mode. Press the Right or Left Arrow buttons to scroll through the items (still pictures or movies) you have captured.
While in Playback mode, press the Menu button once to displays Playback setting submenus: Delete Last Image, Delete All Images, and Format. Select "Back" to exit to Preview mode.

Erasing/Deleting Pictures
Delete last image. Select the "Delete Last Image" menu to erase the last image or movie displayed in Playback mode.

Delete All Images. Select "Delete All Images" menu to erase all the images and movies.

Format Storage. Choose "Yes" to erase and format the SD card.

Size (Resolution) Options
CaptureView provides four resolution settings (displayed as 3M, 2M, 1M or VGA in the menus or as stars in the viewing mode). You can take more pictures in the VGA mode than in the 1, 2 or 3 megapixel modes.
★★★
(4 Stars) 3 megapixels mode (2048 x 1536). This mode interpolates images to 3 megapixel resolution.
(3 Stars) 2 megapixels mode (1600 x 1200). Default.
(2 Stars) I megapixel mode (1280 x 960).
(1 Star) VGA Resolution mode (640 x 480).
[Non-Text]
★
★
IV. Menus
Main Menu {continued}
Exposure

Auto. Select this setting to allow CaptureView to automatically select dark-light exposure of the image. Normally, you will use this setting.

Backlight. Select this setting to manually set the exposure using the Right and Left buttons. Use this feature only in the most extreme lighting situations.
IV. Menus
Settings

Settings. Select this icon to display the Settings submenus: Time and Date, Beep, Info Display, Date Stamp, Flicker, Flashback Period and Default.
Settings Menu

Time and Date. Select this menu to set the current time and date. Use the right and left arrow keys to scroll through the settings on each line of the clock menu. Press the Menu button once the desired setting is displayed. This will select the setting and move you to the next line. When you press the Menu button in the Minute line, you will exit the menu. The year, month, day, hour, and minute settings are displayed in this menu.

Beep. Select On or off to adjust the beep.

Info Display. Select On to display the icons of the menus options you have chosen on the LCD when in viewing mode. Select Off to turn off menu icons on the LCD (giving you a more unobstructed view on the LCD).

Date Stamp. Select On to record the date stamp (the current time and date) while taking still pictures. The date appears in the lower right corner of all pictures. Select Off when you do not wish to record the date stamp.

Flicker. Select the flicker rate (50Hz or 60Hz) for your country. The flicker rate for the United States is 60Hz.

Flashback Period. Select the length of time you wish the Flashback feature to record: 5, 10, 15 or 20 seconds. See FLASHBACK, page 12 for more information.

Default. Select this icon to change all the menu option settings back to the factory defaults.
IV. Menus
Other LCD Icons

Mass storage. Appears on LCD while you are downloading pictures or movies to a PC.

Card Present. Displays when the SD card is in the camera. To load or eject memory card: Press the card in and release when you hear a click. The card may be read by any flash card reader. By using a flash card reader, you can also download your images to a Macintosh or Unix system. When using a flash card reader, the flash card looks like a hard drive to your computer.
Note: You cannot load to a Mac or Unix system using the camera's USB port—this port only can download to a Windows OS.
Note: If you wish to copy files to or from your flash card, make sure you change the Read-Write setting on the flash card to "Write."
Note: You may have to change the drive letter using your PC's Disk Management function if the flash card tries to use a drive letter that is already in use (e.g., E:).

Battery Life. Displays the amount of power left in your batteries.
V. System Requirements
- Windows 98/Win M/Win 2000/Win XP
- 200MHz (or equivalent) processor or faster.
- 64MB of RAM free over System requirements
- Video (VGA) card with 2MB of RAM for minimum 16-bit (High Color) display.
- 4x CD-ROM drive.
- USB port (1.1).
- 600MB of free hard drive space.
If you have questions regarding your PC system specifications, please contact your PC manufacturer.
VI. Downloading and Software Installation
No driver is necessary for downloading your pictures or movies unless you are using Windows 98. Just attach one end of the USB cable to the camera's USB port (2, Fig. 2) and the other end to your PC's USB port. Refer to Fig. 3. Your PC considers the camera as a mass storage device and displays it like a hard drive. You can then copy your still pictures or movies to your computer or even copy files to the flash card on your camera.
Note: You may have to change the drive letter using your PC's Disk Management function if the flash card tries to use a drive letter that is already in use (e.g., E:).
For Win98 Users
Note for Win98 Users: DirectX 8.1 or higher must be installed on your PC before you can download images. If you do not have DirectX 8.1 or higher on your PC, DirectX 8.1 is included on the CD ROM. To install, click the "Install DirectX" button on the CD ROM.
- Install the software first. Do not plug your camera in until step #5.
- Insert the provided CD ROM into your CD ROM drive.
- The CaptureView Manager menu displays. Click on the "CaptureView 2.0D Manager (Windows 98 only)."
Note: Only click on the "CaptureView 2.0D Manager (Windows 98 only)" button; do not click on any of the other CaptureView Manager buttons. - The driver setup begins. Follow the on-screen directions. Note that if a window displays that gives you a choice of buttons to "Continue Anyway" or "Stop Installation," click on "Continue Anyway."
- After the setup is complete, follow any on-screen instruction (e.g., "Restart Computer"). Using the provided USB cable, plug the one end of the cable into the camera's USB port and the other end into your PC's USB port. Refer to Fig. 3.
- Wait for about 10 seconds, follow any on-screen instructions. You may now download images to your PC using the CaptureView Manager.
- Click on the "CaptureView Manager Manual" button to display the on-screen instruction manual for the CaptureView Manager software.
VI. Downloading and Software Installation
For WinXp/2000/ME Users
- Using the provided USB cable, plug the one end of the cable into the camera's USB port and the other end into your PC's USB port. Refer to Fig. 3.
- CaptureView automatically installs drivers on your PC (there is no need for external drivers).
- After setup is complete, using Windows Explorer, you can browse the camera's memory as if it were a hard drive.
- If CaptureView does not appear in Windows Explorer, it might be using a drive letter that has already been assigned by your PC (e.g., C:, D:, E:, etc.). Use Windows' Disk Manager program to change the drive letter to an unassigned letter (e.g., K:).
5 You may now copy images or files from the camera's memory to your PC just as you would with any external hard drive or flash memory.

Fig. 3: Connecting CaptureView to a PC
VI. Downloading and Software Installation
For Macintosh and Unix Users
- Use a flash card reader to download your images to a Macintosh or Unix system (Note: You cannot load to a Mac or Unix system using the camera's USB port—you must use a flash card reader). When using a flash card reader, the flash card looks like a hard drive to your computer.
Other Software
The CD ROM also includes other software programs by Ulead that will assist you in editing your images, allow you to transfer images to email, and provide you with other useful functions. Ulead Photo Express ® , Photo Explorer, and Cool 360 ™ and CaptureView Manager are proprietary programs, and may not be sold, licensed or distributed without the express written consent of Ulead. For more information about Ulead Photo Express, visit the Ulead website at www.ulead.com/pe. Click on the "Product Documents" link in the Download section of their homepage to find a link for the Photo Express manual.
Troubleshooting
It is very important to use the following connection and disconnection procedures to download pictures.
- Only connect CaptureView to your PC when the PC is on and Windows has completed loading.
- Your CaptureView camera and PC must be connected before running the CaptureView Manager program.
- Avoid physically connecting, disconnecting and reconnecting the camera during a download session. Instead, disconnect the camera using Windows software: Right-click the USB on-screen icon and select disconnect (or connect to reconnect).
- Always disconnect CaptureView before shutting down the PC.
If CaptureView is unexpectedly not recognized by the software program, close the program, disconnect the camera and reboot your PC. Only connect and disconnect your CaptureView using the procedure outlined in this section.
VII. Maintenance
Operating Environment: 41° to 104° F (5° to 40° C).
20%-85% relative humidity, non-condensing.
Care of your CaptureView
- Never immerse CaptureView into any fluid or liquid. Remove dust or stains with a soft cloth dampened with water or neutral detergent. Keep in a dry and cool dust-free environment or a container when it is NOT used.
Do not spray liquid cleaners directly onto LCD. Using only gentle pressure, wipe the LCD with a slightly dampened cleaning cloth. - Take the batteries out when CaptureView is NOT to be used over a long period.
- Avoid dropping the CaptureView. Do not disassemble CaptureView.
- Download pictures to your PC before removing the batteries.
VIII. Specifications
Binocular power 8x
Binocular objective lens diameter 42mm
Binocular optical design Folding roof prism, fully-coated
Binocular close focus 16 ft.
Angle of view (diagonal) 8.0°
Binocular field of view 376 ft. at 1000 yds.
Image capture resolution 2048 x 1536, 1600 x 1200,
1280 x 960, 640 x 480, 24-bit color
2.0 megapixel CMOS sensor
Number of images at each resolution 3 megapixels (interpolated): Up to 20
(Built-in Memory, average 2 megapixels: Up to 40
subject matter) 1 megapixel: Up to 60
VGA: Up to 120
Max length of movie 90 seconds
Camera aperture f/4.0; fixed lens
Camera optimum range 66 ft. (20m) to infinity
35mm lens equivalent 400mm
Memory (Built-in) 16MB SDRAM, 16MB flash
Memory (External)
Supported formats: Secure Digital (SD),
Multi-Media Cards (MMC) up to 256MB
Windows 98/2000/Me/XP
Operating system requirements
Interface type
Preview display
Weight
Product dimensions
Battery (user supplied)
Accessories
USB
Color LCD
26 oz. (746g)
4.9" W x 3.25" H x 5.75" D
Two x AA 1.5v
USB cable, instructions, neck strap
cleaning cloth, carry case, CD ROM
MEADE BINOCULAR/DIGITAL CAMERA LIMITED WARRANTY
Every Meade binocular/digital camera is warranted by Meade Instruments Corporation (“Meade”) to be free of defects in materials and workmanship for a period of ONE YEAR from the date of original purchase in the U.S.A. and Canada. At its option, Meade will repair or replace the product, or part thereof, found upon inspection by Meade to be defective, provided the defective part or product is returned to Meade, freight prepaid, with proof of purchase. This warranty applies to the original purchaser only and is
non-transferable. Meade products purchased outside North America are not included in this warranty, but are covered under separate warranties issued by Meade International Distributors.
RGA Number Required: Prior to the return of any product or part, a Return Goods Authorization (RGA) number must be obtained from Meade by writing, or by calling Meade Customer Service at (800) 62-MEADE. Each returned part or product must include a written statement detailing the nature of the claimed defect, as well as the owner's name, address, and phone number.
This warranty is not valid in cases where the product has been abused or mishandled, where unauthorized repairs have been attempted or performed, or where depreciation of the product is due to normal wear-and tear. Meade specifically disclaims special, indirect, or consequential damages or lost profit, which may result from a breach of this warranty. Any implied warranties which cannot be disclaimed are hereby limited to a term of one year from the date of original retail purchase.
This warranty gives you specific rights. You may have other rights which vary from state to state. Meade reserves the right to change product specifications or to discontinue productions without prior notice. This warranty supersedes all previous Meade binocular warranties.
ANY RETURN MADE IN THE U.S.A. UNDER THIS LIMITED WARRANTY MUST FOLLOW THIS PROCEDURE:
- Carefully package your binocular/digital camera to avoid shipping damage; use a thick-walled carton box for mailing.
- Enclose a written statement detailing the exact nature of the service needed. Be sure to include the RGA number, your name, address, plus daytime and evening telephone numbers.
- Enclose \$10.00 to cover handling and return-shipping, by check or money order payable to "Meade Instruments." Non-warranty repairs may entail additional charges which will be confirmed with you before any binocular/digital camera repairs are initiated.
- Insure the package and send your binocular/digital camera, freight prepaid, to:
Meade Instruments Corporation, Attn: Binocular/Digital Camera Repair 6001 Oak Canyon, Irvine, California 92618
® The name “Meade,” and the Meade logo, are trademarks registered with the U.S. Patent Office and in principal countries throughout the world. All rights reserved.
© 2003 Meade Instruments Corporation.

ADVANCED PRODUCTS DIVISION
Meade Instruments Corporation
World's Leading Manufacturer of Telescopes for the Serious Amateur
6001 Oak Canyon, Irvine, California 92618 ■(949) 451-1450
FAX: (949) 451-1460 ■www.meade.com

- OPERATING INSTRUCTIONS
- INTRODUCTION
- HOW TO USE YOUR BINOCULAR
- ADJUSTMENT OF EYE RELIEF FOR EYEGLASS WEARERS
- ADJUSTING THE EYEPIECES
- FOCUSING THE BINOCULAR
- HOW TO USE YOUR CAMERA
- INSERTING BATTERIES
- POWER SAVING FEATURES
- CAMERA MODES
- USING THE BUTTONS AND MOVING THROUGH THE MENUS
- TAKING PICTURES
- TO PLAYBACK YOUR CAPTURED IMAGES
- MENUS
- MAIN MENU
- MAIN MENU {CONTINUED}
- ERASING/DELETING PICTURES
- SIZE (RESOLUTION) OPTIONS
- EXPOSURE
- SETTINGS
- SETTINGS MENU
- OTHER LCD ICONS
- SYSTEM REQUIREMENTS
- DOWNLOADING AND SOFTWARE INSTALLATION
- FOR WIN98 USERS
- FOR WINXP/2000/ME USERS
- FOR MACINTOSH AND UNIX USERS
- OTHER SOFTWARE
- TROUBLESHOOTING
- MAINTENANCE
- CARE OF YOUR CAPTUREVIEW
- SPECIFICATIONS
- MEADE BINOCULAR/DIGITAL CAMERA LIMITED WARRANTY
- MEADE INSTRUMENTS CORPORATION
Brand : MEADE
Model : CaptureView CVB 1005
Category : Binoculars