
P80805ML1 - Digital Personal Assistant PALM - Free user manual and instructions
Find the device manual for free P80805ML1 PALM in PDF.


| Product type | Digital Personal Assistant (PDA) |
| Model | P80805ML1 (Palm m500 series) |
| Brand | Palm, Inc. |
| Dimensions | Approximately 4.6 x 3.1 x 0.5 inches (117 x 79 x 13 mm) |
| Weight | Approximately 5.6 oz (160 g) |
| Display | Monochrome LCD with backlight and contrast adjustment |
| Input methods | Stylus, onscreen keyboard, Graffiti handwriting recognition, external keyboard (optional) |
| Internal memory | 8 MB RAM |
| Expansion slot | Secure Digital (SD) / MultiMediaCard (MMC) slot |
| Connectivity | USB HotSync cradle (serial adapter available), IR port |
| Power source | Rechargeable Lithium-ion battery; charges via HotSync cradle with AC adapter |
| Battery life | Several days with typical use; charges fully in 2 hours |
| Operating system | Palm OS |
| Built-in applications | Date Book, Address Book, To Do List, Note Pad, Memo Pad, Mail, Clock, Expense |
| Synchronization | HotSync with Palm Desktop software for Windows or Macintosh |
| Data beaming | Infrared (IR) port to exchange data with other Palm OS devices |
| Backlight | Yes, activated by holding power button for 2 seconds |
| Contrast adjustment | Yes (on select models via contrast icon or scroll buttons) |
| Reset methods | Soft reset (reset button) and hard reset (power button + reset) |
| Certifications | See product CD-ROM for agency compliance information |
| Supported languages | Multiple (selectable during setup; hard reset if changed) |
| Included accessories | HotSync cradle, AC adapter, stylus with reset tip, Palm Desktop CD-ROM |
Frequently Asked Questions - P80805ML1 PALM
User questions about P80805ML1 PALM
0 question about this device. Answer the ones you know or ask your own.
Ask a new question about this device
Download the instructions for your Digital Personal Assistant in PDF format for free! Find your manual P80805ML1 - PALM and take your electronic device back in hand. On this page are published all the documents necessary for the use of your device. P80805ML1 by PALM.
USER MANUAL P80805ML1 PALM
with Palm™ m500 Series Handhelds
Copyright
Copyright © 2000 Palm, Inc. or its subsidiaries. All rights reserved. Graffiti, HotSync, PalmConnect, and Palm OS are registered trademarks, and the HotSync logo, Palm, and the Palm logo are trademarks of Palm, Inc. or its subsidiaries. Other product and brand names may be trademarks or registered trademarks of their respective owners.
Disclaimer and Limitation of Liability
Palm, Inc. and its subsidiaries assume no responsibility for any damage or loss resulting from the use of this guide.
Palm, Inc. and its subsidiaries assume no responsibility for any loss or claims by third parties which may arise through the use of this software. Palm, Inc. and it subsidiaries assume no responsibility for any damage or loss caused by deletion of data as a result of malfunction, dead battery, or repairs. Be sure to make backup copies of all important data on other media to protect against data loss.
Important: Please read the End User Software License Agreement with this product before using the accompanying software program(s). Using any part of the software indicates that you accept the terms of the End User Software License Agreement.
HotSync® Cradle Adapters and Software Download Available
The HotSync ® cradle supplied with your handheld fits a USB connector. If you do not have a USB port available on your computer, you can order a 9-pin serial cradle and the following types of adapters: 25-pin serial adapter (for use with Windows computers), or a Macintosh serial adapter. To order a HotSync cradle or adapters, go to the web site: http://www.palm.com.
Palm ™ Desktop software is supplied on a CD-ROM disc. If you do not have access to a CD-ROM drive for your computer, you can download the Palm Desktop software from http://www.palm.com.
Agency Compliance Information
Product regulatory and compliance information can be found in the Handbook file located on the product CD-ROM.
P/N: 406-2698-A-US
A/N: 423-2698-A-US
Contents
Chapter 1: Get Started ....1
Your Palm m500 series handheld ....2
Upgrading from another Palm OS handheld....2
Preparing to use your handheld 3
Connecting the HotSync cradle.... 3
Charging your handheld....3
Setting up your handheld 4
Installing Palm Desktop software....4
Installing Palm Desktop software on a Windows computer..... 5
Installing Palm Desktop software on a Macintosh...... 6
Synchronizing data: Performing the first HotSync operation .....7
Using Expansion Features......8
Inserting an expansion card 8
Removing an expansion card 9
Using Peripheral Hardware 9
Congratulations!......10
Chapter 2: Enter Data....11
Entering data with the onscreen keyboards......11
Entering data with Graffiti writing....12
Graffiti tips 13
Entering data with Note Pad....13
Entering data with Palm Desktop software ....14
Entering data using an external keyboard....14
Importing data....14
Chapter 3: Get to Work....15
Adjusting the screen ....15
Using the backlight 15
Adjusting the contrast 15
Using Address Book 16
Creating an Address Book entry.... 16
Viewing and changing an Address Book entry.... 17
Deleting an Address Book entry.... 17
Using Date Book....18
Creating an event 18
Creating an untimed event.... 19
Creating a repeating or continuous event 20
Rescheduling an event 20
Changing the Date Book view.... 21
Deleting an event.... 22
Using To Do List 23
Creating a To Do List item 23
Changing a To Do List item 24
Marking a To Do List item complete 25
Deleting a To Do List item.... 25
Using Note Pad 26
Creating a note 26
Deleting a note 26
Transcribing a note.... 26
Using Memo Pad....27
Reviewing and changing a memo.... 28
Deleting a memo.... 28
Using Clock.... 29
Viewing the time and date 29
Setting an alarm 30
Using Mail....31
Viewing e-mail items 31
Opening an e-mail item 32
Creating e-mail items 32
Replying to an e-mail item 34
Deleting e-mail.... 34
Purging deleted e-mail.... 35
Using Preferences and other settings.... 36
Changing the Applications Launcher display...... 36
Changing fonts.... 36
Setting Date and Time preferences 37
Setting General preferences 38
Changing Formats preferences.... 39
Beaming information....39
Beaming data.... 40
Beaming applications.... 40
Receiving beamed information.... 41
Beaming your business card 41
Beaming Tips...... 41
Installing add-on applications 42
Installing applications using a Windows computer...... 42
Installing applications using a Macintosh 44
Resetting your handheld 45
Performing a soft reset.... 45
Performing a hard reset.... 46
Chapter 4: Frequently Asked Questions......47
I don't see anything on my handheld screen.... 47
I can't complete a HotSync operation 48
Troubleshooting communication problems...... 48
Troubleshooting data synchronization problems ...... 49
Chapter 1
Get Started
Palm ™ m500 series handhelds will help you stay organized and on time, and keep up with daily tasks while you are away from your desk. Use your new handheld to do the following:
■ Enter your schedule in Date Book, and set an alarm to remind you of important meetings
- Keep all your contact names, addresses, and phone numbers in Address Book
■ Prioritize and assign your tasks a due date in To Do List
■Jot quick notes directly on the screen in Note Pad
■ View, edit, and compose email on the run
■ Track expenses for your expense report
■ Synchronize your data with Palm™ Desktop software on your Windows or Macintosh computer so you always have a copy
■ Insert Secure Digital (SD) or MultiMedia Card (MMC) expansion cards to add additional software or memory, or to back up your data
■ Attach and use peripheral hardware devices, such as a modem or portable keyboard
- Beam information to another Palm OS handheld that is close by and has an IR (infrared) port
This guide, Getting Started with Palm ™ m500 Series Handhelds, provides information about performing basic tasks on your handheld and with Palm Desktop software.
After you install Palm Desktop software on your computer, please read the online Handbook for Palm™ m500 Series Handhelds for information about performing more advanced tasks. If you are using a Windows computer, open the handbook by clicking the Handbook.pdf file in the Palm folder on your computer. If you are using a Macintosh computer, copy the Handbook.pdf file from the Documentation folder on the Palm Desktop CD-ROM to your Palm folder, and then click the file.
Your Palm m500 series handheld

Upgrading from another Palm OS handheld
If you already own a Palm OS handheld, you must install the version of Palm Desktop software that comes with your new handheld. Also, perform a HotSync® operation using your old handheld and cradle before you complete the installation tasks. This ensures all data on your handheld is on your desktop computer.
Preparing to use your handheld
Before you begin using your handheld and Palm Desktop software, you must complete a few easy installation tasks.
Connecting the HotSync cradle
Important: The HotSync cradle supplied with your handheld fits a USB connector. If your computer does not have a USB port, or if you are using Windows 95, Windows NT, or an older Macintosh, you can order a serial cradle and either a 25-pin or Macintosh serial adapter, if necessary, from http://www.palm.com. Follow the documentation that accompanies the serial cradle before attempting to complete the installation tasks.
- Shut down and turn off your computer.
- Plug the USB connector into a USB port on your computer.
- Connect the power cord that attaches to the back of the cradle's USB port connector to the AC adapter cord.
- Plug the AC adapter into any AC current outlet.
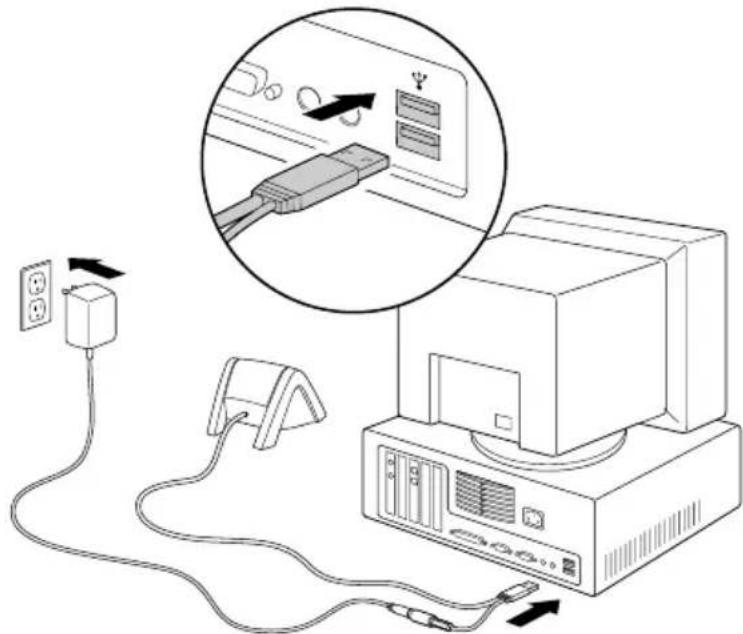
natural_image
Diagram showing a computer setup with an attached power outlet, cable, and a close-up of a connected device (no text or symbols present)Charging your handheld
Just place your handheld in the cradle for two hours for an initial charge before you use it. Then place it in the cradle for a few minutes each day to recharge the battery to full capacity. If your handheld shuts down because the battery has fully discharged, you still have about a week to recharge the battery before you lose the data on your
handheld.
Setting up your handheld
-
Press the power button to turn on your handheld.
-
Follow the instructions on the screen to set up your handheld.
Note: If your handheld does not turn on, see Chapter 4 in this guide for suggestions.
Important: For users outside the United States, choose the same language for your handheld and Palm Desktop software. Choosing a language that does not match the Palm Desktop software is not recommended or supported, and may result in data loss. If you need to reselect a language on your handheld, you must perform a hard reset. See “Resetting your handheld” in Chapter 3 for details.
- After you complete the set up steps, tap Next to complete the Basic Skills tutorial.
Tip: To access the Basic Skills tutorial later, tap the Welcome icon in the Applications Launcher.
Installing Palm Desktop software
Palm Desktop software includes the same applications as your handheld: Date Book, Address Book, To Do List, Note Pad, Memo Pad, and Expense. You can use the HotSync Manager to backup and exchange data between your handheld and your computer.
If you are upgrading, you may want to create a copy of your old Palm Desktop software folder and its contents before installing your new Palm Desktop software. This is optional. If you do this, rename the copied folder (for example, Palm Old), and store it outside the Palm Desktop software folder.
Note: If you are using Microsoft Outlook or other organizer software instead of Palm Desktop software, you still need to complete this process to install HotSync Manager, conduit software, and other features of Palm Desktop software.
Installing Palm Desktop software on a Windows computer
- Turn on your computer.
- Exit any open programs, including those that run automatically at startup (such as Microsoft Office) and virus-scanning software.
- Insert the Palm Desktop CD-ROM into the CD-ROM drive.
Note: If installation does not begin, click the Windows Start button, choose Run, enter D:\autorun.exe, and then click OK. If necessary, replace D: with the drive letter assigned to your CD-ROM drive.
- Follow the onscreen instructions to complete the installation. During installation, you may be asked to connect your handheld to the HotSync cradle.
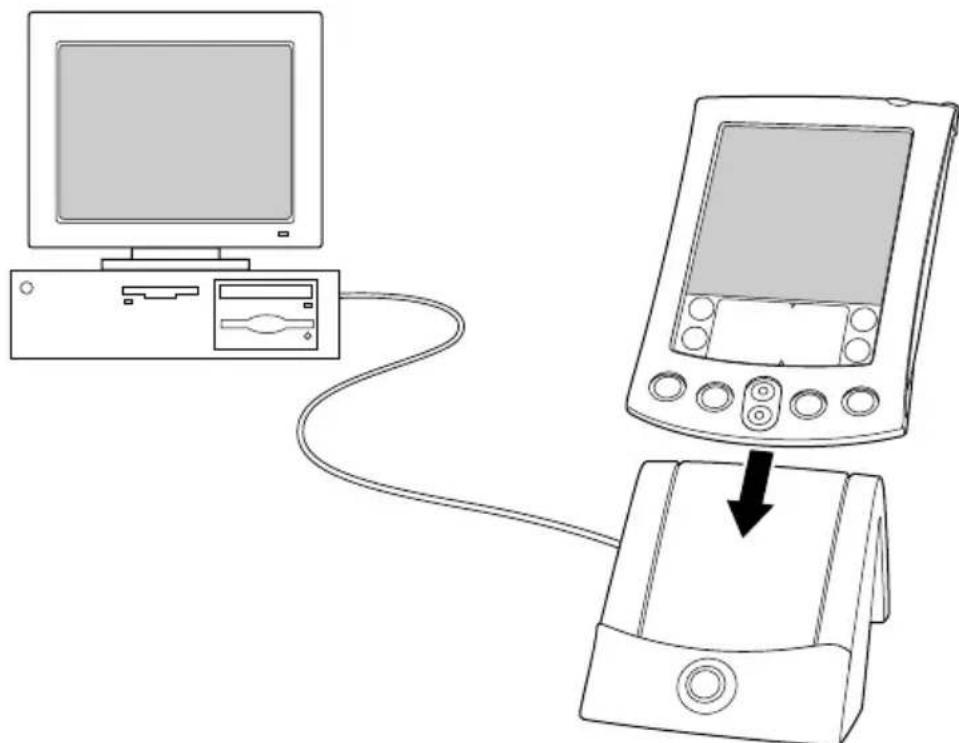
natural_image
Line drawing showing a computer connected to a digital device via cable (no text or symbols)Installing Palm Desktop software on a Macintosh
- Turn on your Macintosh.
Note: If you are upgrading and your old Palm Desktop software is version 1.0, uninstall your old Palm Desktop software.
- Insert the Palm Desktop CD-ROM into the CD-ROM drive.
- Double-click the Palm Desktop CD icon.
- Double-click the Palm Desktop Installer icon.
- Follow the onscreen instructions to complete the installation.

natural_image
Line drawing showing a desktop computer connected to a device via cable (no text or symbols)Synchronizing data: Performing the first HotSync operation
The HotSync process automatically synchronizes — that is, exchanges and updates — data between your handheld and Palm Desktop software. Changes you make on your handheld or Palm Desktop software appear in both places after a HotSync operation.
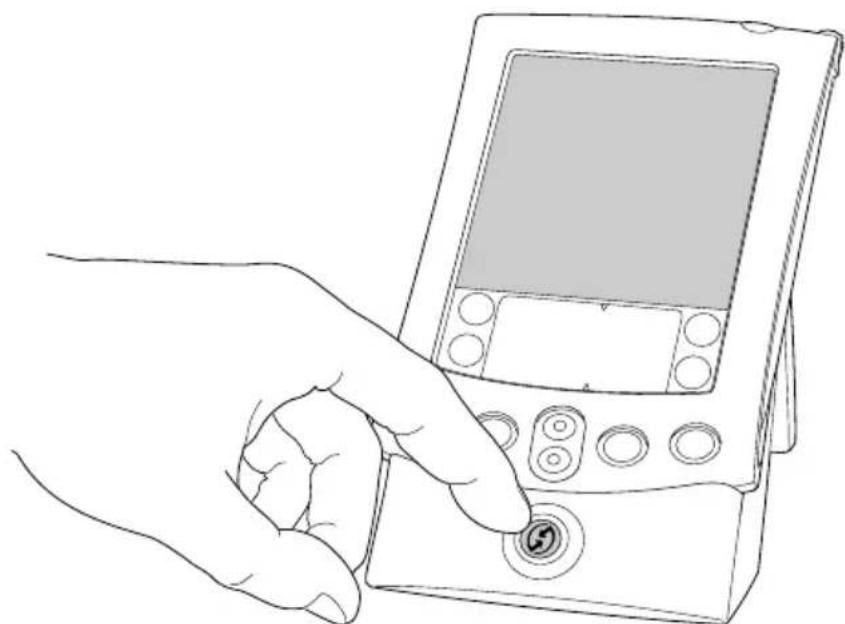
natural_image
Line drawing of a hand inserting a device into a control panel (no text or symbols)-
Place your handheld on the HotSync cradle.
-
Press the HotSync button 📋 on the cradle.
-
When the Users dialog box appears, select the user name you entered when you installed Palm Desktop software.
-
Wait for a message on your handheld indicating that the process is complete.
Note: Your user name serves as the connection between your handheld and your computer. If you're sharing Palm Desktop software with another handheld user, you can change users by selecting a name from the User list on the right side of the Palm Desktop window. Be sure you select the correct user name before entering data in Palm Desktop software.
Tip: To remove your handheld from the cradle, rock it gently forward, then lift.
Each handheld must have a unique name
To prevent unexpected results during HotSync operations, possible data loss, and other complications, each handheld must have a unique name. If you have upgraded, your new handheld and your old handheld have the same user name after completing the upgrade process. We strongly recommend that you perform a hard reset on your old handheld to erase all data from the old handheld and assign it a new user name during the next HotSync operation with the old handheld. See “Performing a hard reset” in Chapter 3 for details.
Using Expansion Features
Your handheld provides an expansion card slot that accepts Secure Digital (SD) or MultiMedia Card (MMC) expansion cards. These enable you to add additional software applications or memory. You can also use an expansion card to back up your data when it is inconvenient to perform a HotSync operation.
Inserting an expansion card
- Hold your handheld securely.
- Insert the card into the expansion card slot, following the direction indicated by the expansion card icon on the back panel of your handheld.

natural_image
Line drawing of hands holding a smartphone with a scroll wheel, showing the cable being inserted (no text or symbols)- Use your thumb to push the card into the expansion slot. When you feel the card lock and hear the system sound, the card is properly seated within the slot.
Removing an expansion card
- Hold your handheld securely.
- Use your thumb to lightly push against the top of the card, following the direction indicated by the expansion card icon on the back panel of your handheld. The expansion card slot releases the card, and your handheld plays the system sound.
- Lift the card from the expansion card slot.
Note: Your handheld comes with a dummy card seated within the expansion card slot. To prevent debris from entering and damaging the slot, we suggest that you leave the dummy card seated when you are not using an expansion card.
Using Peripheral Hardware
So that you can easily attach and use peripheral hardware devices, such as a modem, portable keyboard, or a Global Positioning System (GPS) receiver, your handheld is equipped with a universal connector. For information about the installation and operation of hardware devices, please refer to the documentation that accompanies each device.
Congratulations!
You've charged the battery in your handheld, connected your handheld to your computer, installed the Palm Desktop software, and performed your first HotSync operation.
For more information about using your handheld, see the following:
■ This guide, Getting Started with Palm™ m500 Series Handhelds, provides instructions on performing basic tasks on your handheld.
■ The Basic Skills tutorial on your handheld. To access this tutorial, go to the Applications Launcher and then tap the Welcome icon.
- The online handbook, Handbook for Palm™ m500 Series Handhelds, provides comprehensive instructions on using your handheld and the Palm applications that come with it.
Windows. Open the Palm folder on your computer, and then double-click the Handbook.pdf file.
Macintosh. Open the Documentation folder on the CD-ROM and copy the Handbook.pdf file to the Palm folder on your Macintosh, and then double-click the file.
Note: If the handbook file does not open, then you need to install Adobe Acrobat from the Palm Desktop CD-ROM. Windows. Open the Acroread folder and then double-click the ar405eng.exe file. Macintosh. Open the Palm Extras folder, open the Adobe Acrobat Reader folder, and then double-click the Reader 4.05 Installer icon.
For more information about using Palm Desktop Software, see the following:
- The Windows tutorial for Palm Desktop software, Quick Tour. To access this tutorial, go to the Help menu in Palm Desktop software and choose Quick Tour.
- The online user guide, Palm Desktop Software for the Macintosh User's Guide. To access this guide, open the Documentation folder on the Palm Desktop CD-ROM, copy the Palm Desktop.pdf file to the Palm folder on your Macintosh, and then double-click the file.
■ The online help for Palm Desktop software. To access the online help, go to the Help menu in Palm Desktop software.
■ The Help Notes support information for Windows users. To access this information, open the Palm folder on your computer, open the Helpnote folder, and then double-click the individual note files.
Chapter 2
Enter Data
There are several ways to enter data into your handheld: the onscreen keyboards, Graffiti® writing, Note Pad, Palm™ Desktop software, an external keyboard accessory, and importing data. You can also accept beamed data from another Palm OS handheld that is close by and has an infrared port. See “Beaming information” in Chapter 3 for details.
Entering data with the onscreen keyboards
- Open any application (such as Address Book).
- Tap any record, or tap New.
- Tap "abc" or tap "123" to open an onscreen keyboard.

Note: Graffiti writing area shown with contrast adjustment. Some models do not use contrast adjustment.
- Tap the characters to enter text and numbers.
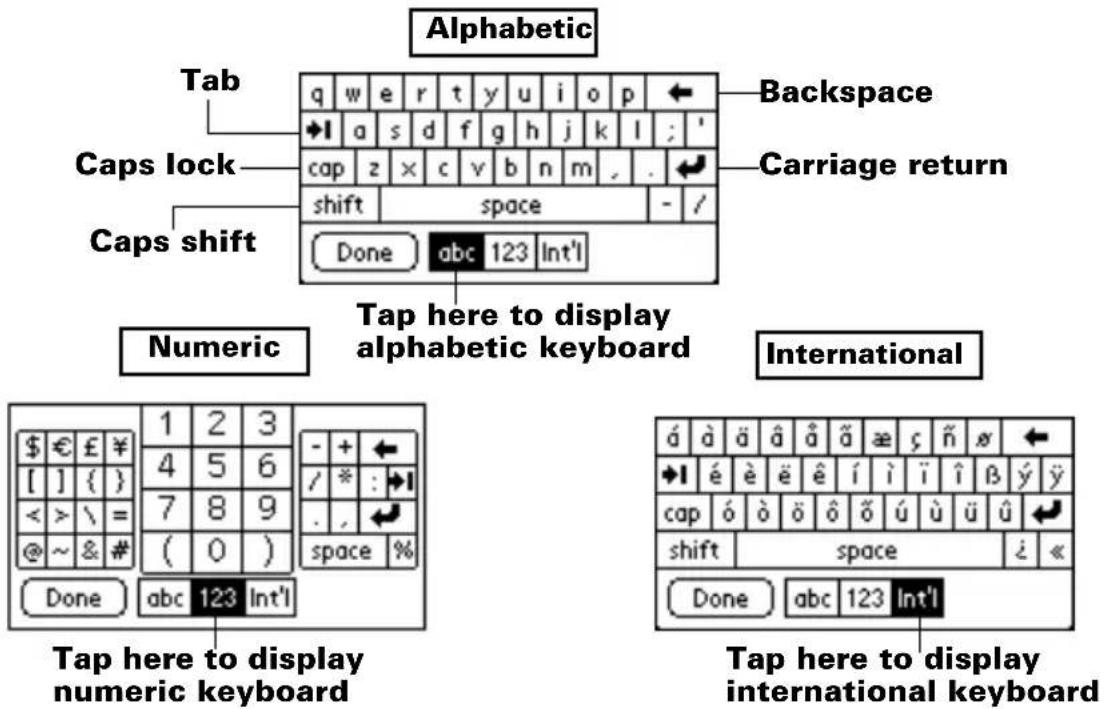
- Tap Done to close the onscreen keyboard.
Entering data with Graffiti writing
Graffiti characters are similar to uppercase letters that are formed with a single-stroke. Your writing turns into text wherever the blinking cursor appears on the handheld screen. Graffiti writing is easy, fun, accurate, and fast (up to 30 words per minute). It's worth taking a few minutes to learn.
- Open any application (except Note Pad).
- Tap any record, or tap New.
-
Tap the line where you want the text to appear.
-
Write Graffiti characters in the Graffiti writing area.

Graffiti tips
■ To display Graffiti Help (shown above), tap the Menu icon, tap Edit, and then tap Graffiti Help.
■ Write big and press firmly. Draw strokes that nearly fill the Graffiti writing area to improve accuracy.
■ To delete characters, set the insertion point to the right of the character you want to delete and make the backspace stroke (a line from right to left) in the Graffiti writing area.
■ Write at natural speed. Writing too slowly can generate errors.
■ Do not write on a slant. Vertical strokes should be parallel to the sides of the Graffiti writing area.
■ Install the Graffiti writing game, Giraffe, to practice writing.
Entering data with Note Pad
The Note Pad application provides a place where you can write a quick note in your own handwriting directly on your handheld screen. Think of Note Pad as a virtual “sticky pad” for short notes. Later, you can transfer your “sticky” notes to a more permanent place by entering the information in another application, or you can “throw them away” by deleting them. See “Using Note Pad” in Chapter 3 for more information and instructions.
Entering data with Palm Desktop software
Palm Desktop software enables you to use your computer keyboard to enter or import information.
- Open Palm Desktop software:
Windows. Launch the Palm Desktop icon on your desktop.
Macintosh. Double-click the Palm Desktop icon in the Palm folder.
- Enter the information in Palm Desktop software.
- Perform a HotSync operation. See "Synchronizing data: Performing the first HotSync operation" in Chapter 1 for details.
Entering data using an external keyboard
You can connect an optional keyboard accessory to the universal connector on your handheld and type data directly into your handheld. This accessory is very helpful if you need to enter large amounts of data quickly while you are away from your computer. See the documentation that comes with the optional keyboard accessory for details.
Importing data
If you have data in computer applications such as spreadsheets and databases, or you want to import data from another handheld, you can transfer the data to your handheld without entering it manually. See the online Handbook for Palm™ m500 Series Handhelds and the online Help in Palm Desktop software for details.
Chapter 3
Get to Work
Adjusting the screen
If lighting conditions make it difficult to see the information on your handheld, you can use the backlight to adjust your screen. On Palm ™ m500 series handhelds that use contrast adjustment, you can also use the contrast control to adjust your screen.
Using the backlight
- Press the power button for about two seconds. Release the button when the backlight turns on.
- Press the power button for about two seconds to turn off the backlight.
Note: The backlight also turns off automatically after a period of inactivity defined by the Auto-off setting. See “Setting General preferences” later in this chapter for details.
Adjusting the contrast
- If your m500 series handheld uses contrast adjustment, tap the
Contrast icon ① in the upper-right corner of the Graffiti ® writing area.
- Adjust the contrast setting.
Tap to left or right of slider to make small adjustments

Tip: You can also use the up and down scroll buttons on the front of your handheld to adjust the contrast setting.
- Tap Done.
Using Address Book

Address Book enables you to store names, addresses, phone numbers, and other information about your personal and business contacts.
Creating an Address Book entry
-
Press the Address Book application button on your handheld.
-
Tap New.

- Enter the information you want to add.
Note: Your handheld automatically capitalizes the first letter of most fields. As you enter letters, matching entries in your Address Book appear. For example, if you have San Jose and Saratoga in your Address Book and you enter "S," Saratoga appears, then as you enter "a" and "n" San Jose replaces Saratoga. To accept the word, tap the next field.
- After you finish entering information, tap Done.
Tip: You can also import a database into Palm™ Desktop software and transfer it to your handheld during the next HotSync® operation. See the online Handbook and Palm Desktop online Help for more information.
Viewing and changing an Address Book entry
- Tap the entry you want to view or change.
- Tap Edit.
- Tap Details.

- Select any of these settings:
Show in List Select which information appears in the Address list screen: Work, Home, Fax, Other, E-mail, Main, Pager, and Mobile.
Category Assign the entry to a category.
Private Hide or mask this entry when Security is turned on.
- Tap OK.
Deleting an Address Book entry
- Select the entry you want to delete.
- Tap the Menu icon .
- Tap Record, and then tap Delete Address.
Note: If you want to save a copy of the deleted item to an archive file in Palm Desktop software, select the check box in the confirmation dialog box.
- Tap OK.
Tip: You can also delete an entry by opening the Address Entry Details dialog box, tapping Delete, and then tapping OK.
Using Date Book

Date Book lets you quickly and easily schedule appointments or any kind of "event" associated with a time and date.
Creating an event
- Press the Date Book application button on your handheld.
- Select the date you want for the event.
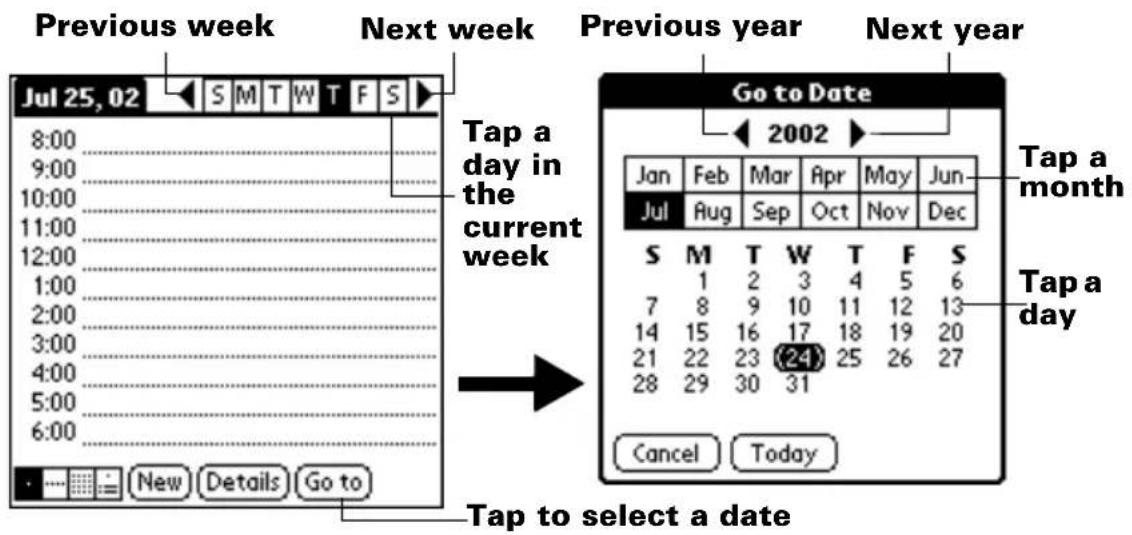
- Tap the line for the time the event begins and enter a description.
- If the event is longer or shorter than an hour, tap the time of the event to set the duration, and then tap OK.
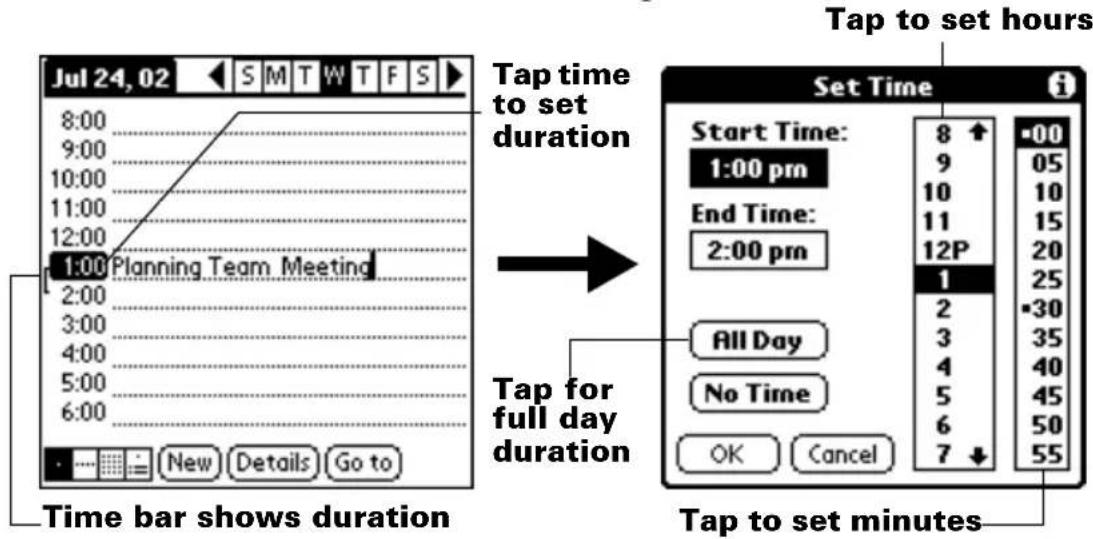
Tip: You can define the default duration for All Day events in Date Book preferences.
- Tap a blank area of the screen to deselect the event. A time bar appears next to the time, indicating the duration of the event.
Creating an untimed event
You can also schedule events in your Date Book that occur on a particular date but have no specific start or end times, such as birthdays, holidays, and anniversaries. These are referred to as “untimed events.” Untimed events appear at the top of the list of times, marked with a diamond. You can have more than one untimed event on a particular date.
- Select the date that you want for the event.
- Tap New.
- Tap No Time, so that no start or end times are defined for the event.
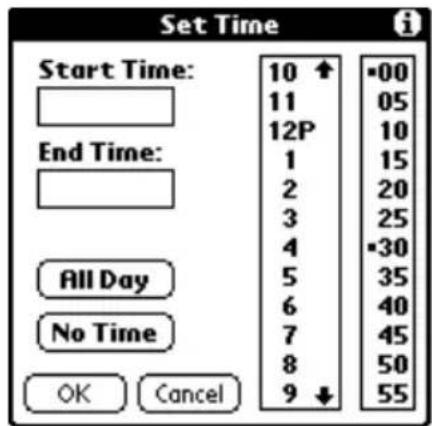
Tip: You can also create a new untimed event by verifying no event is selected and writing in the Graffiti writing area.
- Enter a description of the event.

- Tap a blank area on the screen to deselect the untimed event.
Tip: If you create an event and decide there is no start or end time, you can change it to an untimed event. Tap the time of the event in the Date Book screen, tap No Time, and then tap OK.
Creating a repeating or continuous event
The Repeat function lets you schedule events that recur at regular intervals or extend over a period of consecutive days.
A birthday is a good example of an event that repeats annually.
Another example is a weekly guitar lesson that falls on the same day of the week and the same time of day. A business trip or a vacation is an example of a continuous event.
- Tap the event.
- Tap Details.
- Tap the Repeat box.
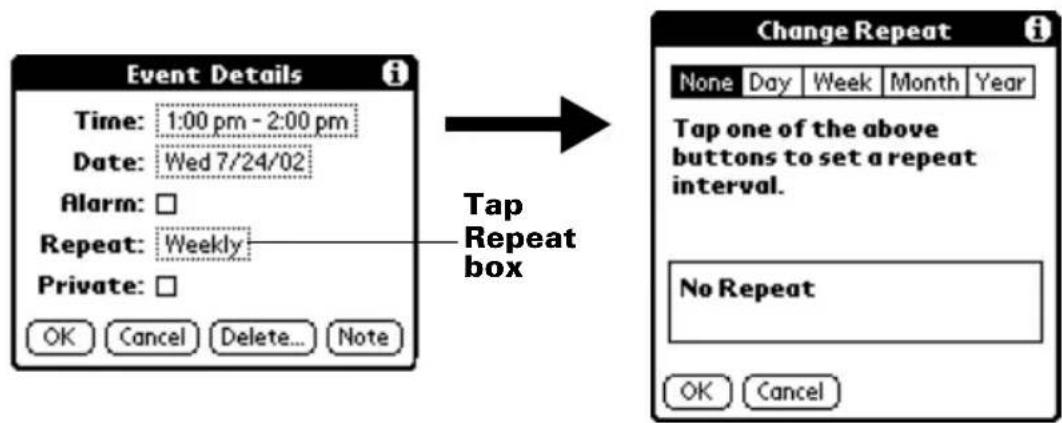
- Tap Day, Week, Month, or Year to set how often the event repeats.
Tip: For a continuous event, tap Day.
- Enter a number on the Every line to indicate the frequency.
For example, if you select Month and enter the number 2, the event repeats every other month.
-
To specify an end date, tap the End on pick list and tap Choose Date. Use the date picker to select an end date.
-
Tap OK. A repeat icon appears to the far right of the event.
Rescheduling an event
- Tap the event you want to reschedule.
- Tap Details.
- To change the time, tap the Time box and select a new time.
- To change the date, tap the Date box and select a new date.
- Tap OK.
Changing the Date Book view
In addition to displaying the time list for a specific day, you can also display a whole week, a month, or an agenda.
■ Tap a view icon to display another view.
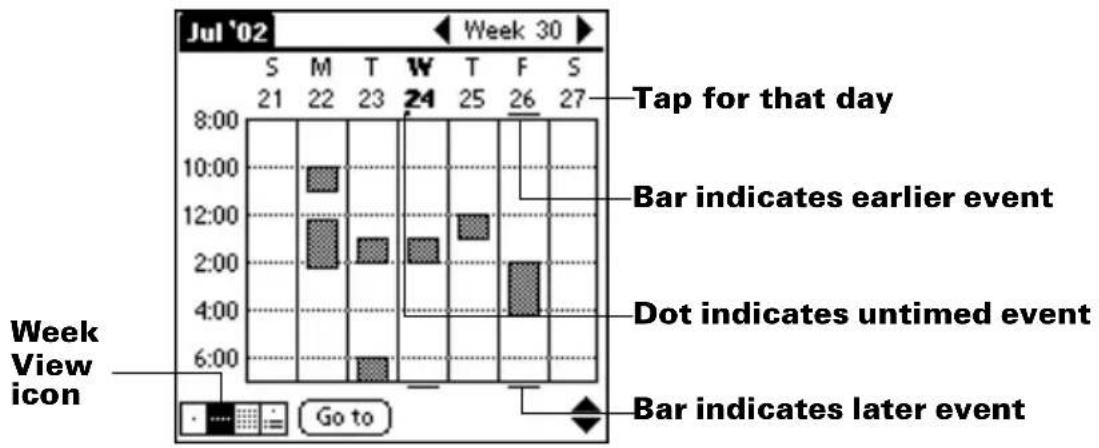
bar
| Time | Event Type | Bar Value | | :--- | :--- | :--- | | 21 | Tap for that day | 9.0 | | 22 | Bar indicates earlier event | 12.0 | | 23 | Bar indicates earlier event | 10.0 | | 24 | Bar indicates untimed event | 11.0 | | 25 | Bar indicates untimed event | 12.0 | | 26 | Bar indicates later event | 4.0 | | 27 | Bar indicates later event | 2.0 | Week View icon Go to

Tip: You can also press the Date Book application button repeatedly to display the next view.
Deleting an event
- Select the event you want to delete.
- Tap the Menu icon .
- Tap Record, and then tap Delete Event.
- If you're deleting a repeating event, tap one of the following:

Current Deletes only the current event item.
Future Deletes the current and all future event items and resets the end date of the repeating event to the last shown date.
All Deletes all occurrences of the repeating event.
Note: If you want to save a copy of the deleted item to an archive file in Palm Desktop software, select the check box in the confirmation dialog box.
- Tap OK.
Tip: You can also delete an event by deleting the text, or by opening the Event Details dialog box, tapping Delete, and then tapping OK.
Using To Do List

To Do List is a convenient place to create reminders and prioritize the things that you have to do. A record in To Do List is called an “item.”
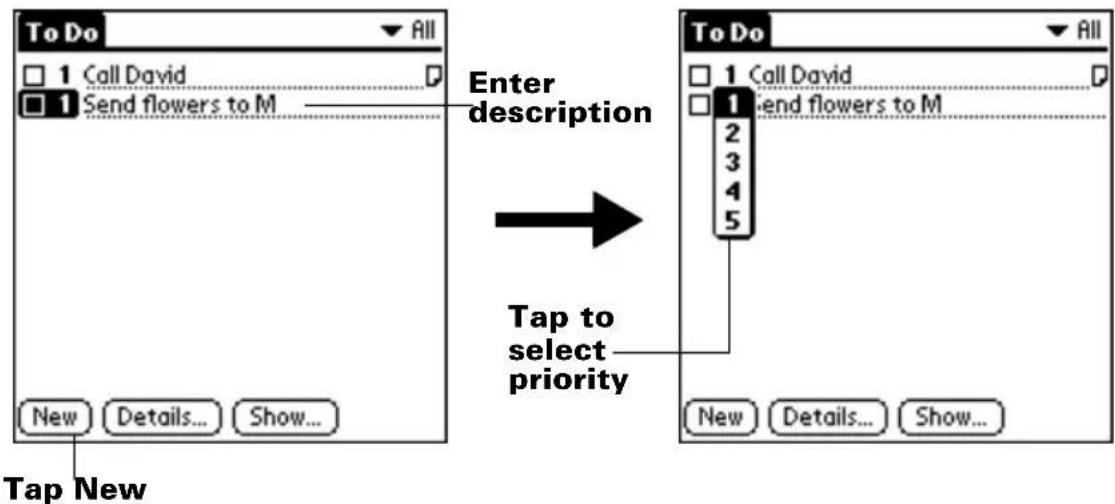
Creating a To Do List item
-
Press the To Do List application button on your handheld.
-
Tap New.
-
Enter a description. The text can be longer than one line.
-
(Optional) Tap the Priority number on the left side of the item and set the Priority number (1 is most important).
Note: When you create a new To Do List item, its priority is automatically set to level 1. If you select another item first, however, the item you create appears beneath the selected item with the same priority as the selected item.
- Tap anywhere on the screen to deselect the To Do List item.
Tip: You can also create a new item by writing in the Graffiti writing area while no other To Do List item is selected.
Changing a To Do List item
-
Tap the text of the item you want to change.
-
Tap Details.

- Tap the Due Date pick list and select a date for the item:
| Today | Assigns the current date. |
| Tomorrow | Assigns tomorrow's date. |
| One week later | Assigns the date exactly one week from today. |
| No Date | Removes the due date from the item. |
| Choose date | Opens the date selector, where you can choose any date that you want for the item. |
- Tap OK.
Tip: If you turn on the Show Due Dates option in the To Do Show Options dialog box, you can tap directly on the due date in the To Do List to open the Due Dates pick list.
Marking a To Do List item complete
■ Tap the check box on the left side of the item.

Tip: You can set the To Do List Show Options to record the date you complete an item, and you can choose to show or hide completed items.
Deleting a To Do List item
-
Select the item you want to delete.
-
Tap the Menu icon .
-
Tap Record, and then tap Delete Item.
Note: If you want to save a copy of the deleted item to an archive file in Palm Desktop software, select the check box in the confirmation dialog box.
- Tap OK.
Tip: You can also delete an item by opening the To Do Item Details dialog box, tapping Delete, and then tapping OK.
Using Note Pad

Note Pad provides a place to take notes directly on the screen in your own handwriting. You can assign each “note” a title and store up to 999 notes on your handheld.
Creating a note
- Press the Note Pad application button on your handheld.
Note: If Note Pad is already running, tap New.

- Write the information directly on the handheld screen.
Tip: Tap the pen selector to choose a different pen width, or choose the eraser to remove unwanted strokes.
-
(Optional) Tap the time at the top of the screen and enter a title using Graffiti characters.
-
Tap Done.
Deleting a note
- Select the note you want to delete.
- Tap Delete.
- Tap OK.
Tip: You can also delete a note by opening it, selecting Delete Note from the Record menu, and then tapping OK.
Transcribing a note
You can use Palm Desktop software to view your notes and enter them in other applications.
-
Perform a HotSync operation. See "Synchronizing data: Performing the first HotSync operation" in Chapter 1 for details.
-
Open Palm Desktop software:
Windows. Launch the Palm Desktop icon on your desktop.
Macintosh. Double-click the Palm Desktop icon in the Palm folder.
- Open the Note Pad window:
Windows. Click the Note Pad icon in the Palm Desktop window.
Macintosh. Double-click the Note Pad icon in the Palm folder.
-
Enter the information in the appropriate application in Palm Desktop software.
-
Perform another HotSync operation to transfer the information to your handheld.
Using Memo Pad

Memo Pad provides a place to store information that is not associated with Date Book, Address Book, or To Do List. A record in Memo Pad is called a “memo.” Each memo can contain up to 4,000 Graffiti characters. The number of memos you can store is dependent only on the memory available on your handheld.
- Tap the Applications icon .
- Tap the Memo Pad icon to display the Memo list.
- Tap New.

- Use Graffiti characters to enter the text you want to appear in the memo. Use the carriage return stroke to move down to new lines in the memo.
Note: The first letter is automatically capitalized.
- Tap Done.
Tip: You can also create a new memo by writing in the Graffiti writing area from the Memo list screen.
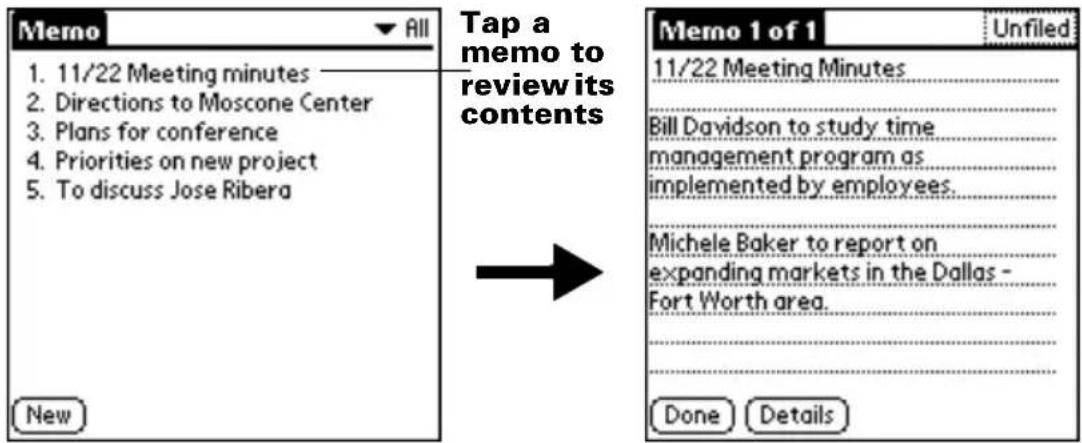
Reviewing and changing a memo
- In the Memo list, tap the text of the memo.
-
Review or edit the text in the memo.
-
Tap Done.
Deleting a memo
-
Select the memo you want to delete.
-
Tap the Menu icon .
-
Tap Record, and then tap Delete Memo.
Note: If you want to save a copy of the deleted memo to an archive file in Palm Desktop software, select the check box in the confirmation dialog box.
- Tap OK.
Tip: You can also delete a memo by opening the Memo Details dialog box, tapping Delete, and then tapping OK.
Using Clock

Clock enables you to quickly view the time and date, and to set an alarm to sound during the next 24-hour period.
Viewing the time and date
Do one of the following:
- Tap the Clock icon in the upper-left corner of the Graffiti writing area.
■ Tap the Applications icon, and then tap the Clock icon.

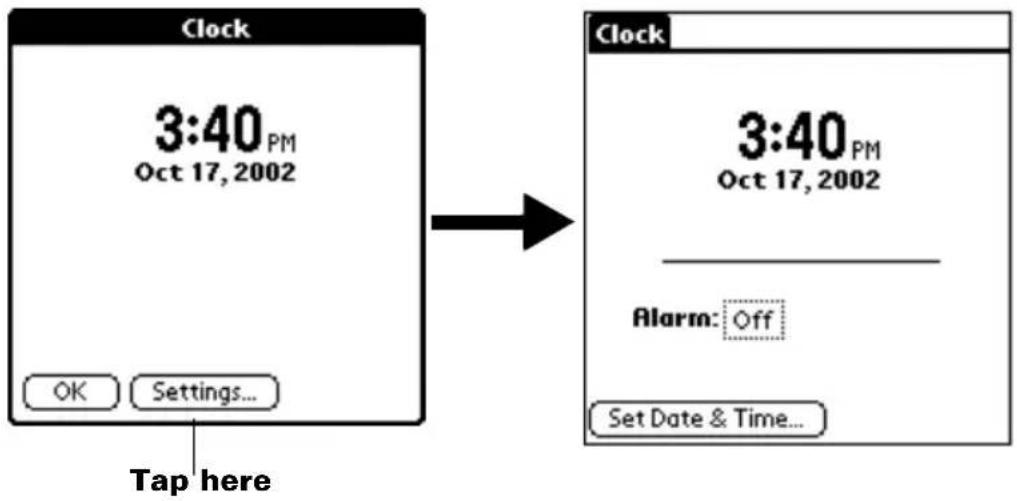
Note: You can also set your handheld to display the time in different formats. See “Changing Formats preferences” later in this chapter for details.
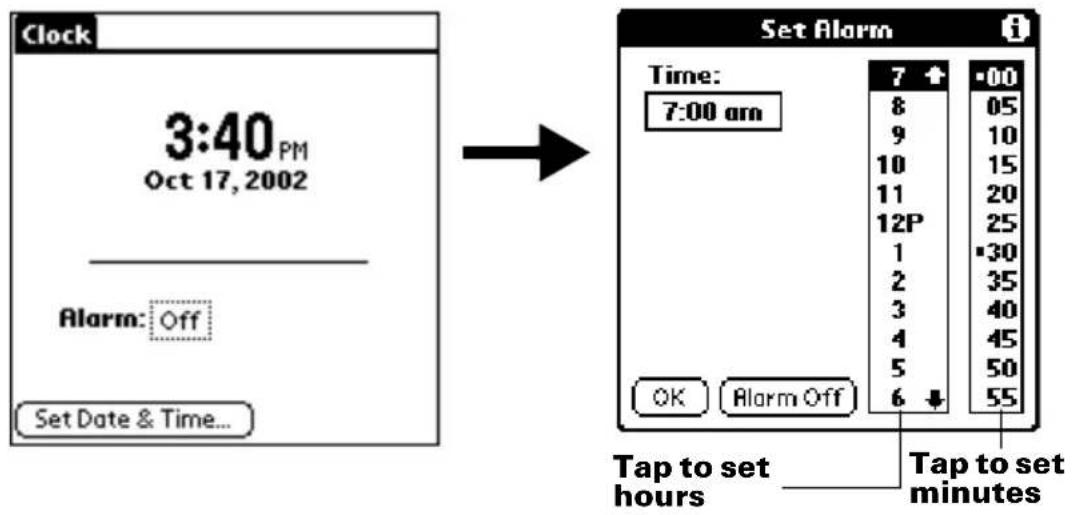
Setting an alarm
- Tap the Alarm box to open the Set Alarm dialog box.
Note: If you do not see the Alarm box, tap the Settings button.
- When the Alarm reminder message appears, tap OK, Snooze, or Go To.
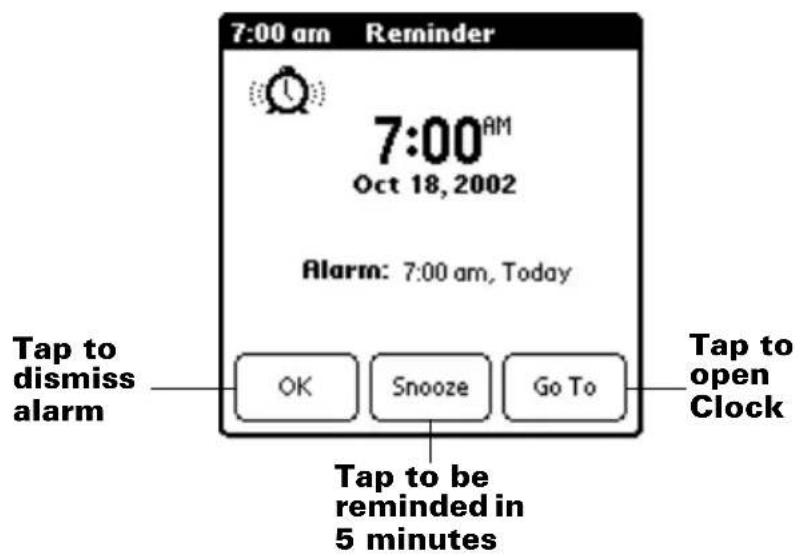
Note: If you tap Snooze, an asterisk blinks in the upper-left corner of the screen until you dismiss the alarm.
Tip: To choose a different alarm sound, tap the Menu icon, tap Alarm Preferences, and then tap the Sound pick list.
Using Mail

Mail lets you manage the e-mail that you send and receive through the E-Mail application on your desktop computer. You can read, reply to, compose, and delete e-mail on your handheld; but to send or receive e-mail, you must perform a HotSync® operation.
Note: Before using Mail, you must set up Palm™ Desktop software for use with your Windows desktop E-Mail application. See the online Handbook for Palm™ m500 Series Handhelds for details.
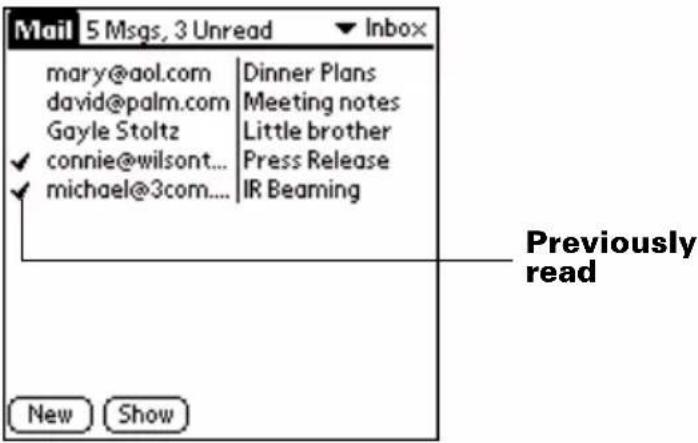
Viewing e-mail items
The Message list displays a list of your incoming e-mail items, who sent them, and the date they were received. E-mail items you've read have a check next to them. High-priority e-mail items appear in bold.
-
Tap the Applications icon .
-
Tap the Mail icon .
Opening an e-mail item
■ Tap an e-mail item to open it.
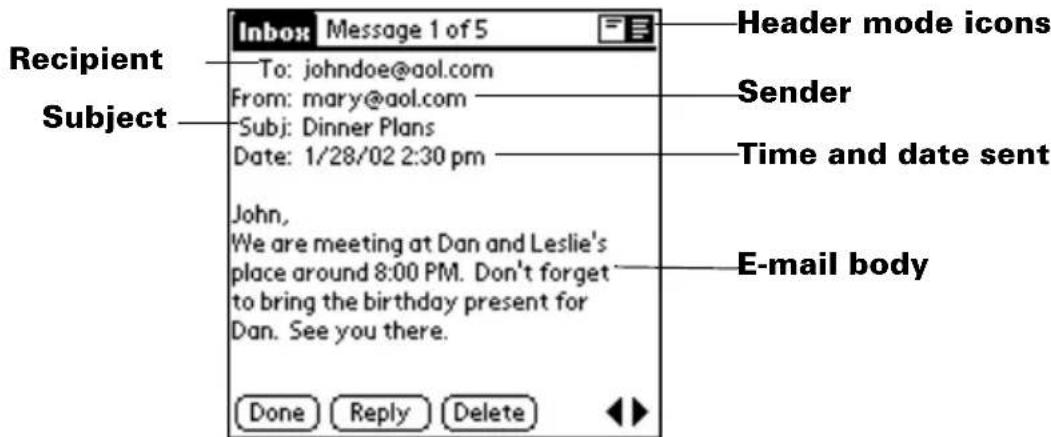
■ Tap Done to close the e-mail item.
Creating e-mail items
You create e-mail items with your handheld the same way you create e-mail with your desktop E-mail application: you identify the recipient(s) of the e-mail item, define a subject, and create the body of the e-mail item.
- Tap New.

Tip: You can also create an e-mail item by tapping New from the Message menu.
- Enter the e-mail address of the recipient.

Note: Enter the address as if you were entering it from your desktop E-Mail application. For example, network users sending an e-mail item to a user on the same network do not need to add Internet information, such as @mycorp.com.
- To send a copy of this e-mail item to additional recipients, tap the CC: field, and then enter the e-mail addresses of the additional recipients, separating the addresses with a comma followed by a space.
- Tap the Subj: field and enter a subject for your e-mail item.
- Tap the Body: field and enter the text of your e-mail item.
Tip: If the address, CC, subject, or body exceeds the capacity of the screen display, tap the name of the field (for example, tap "To:") to expand that field. Tap the Done button to return to the New Message screen.
Tap the name of the field to open

Replying to an e-mail item
-
Tap an e-mail item in the Message list to display it onscreen.
-
Tap Reply.
-
Select whom you want to receive the reply: Sender only, All recipients, or someone who didn't see the original e-mail item (Forward).

-
Select whether you want to include original text or comment original text.
-
Tap OK.
-
Enter the text of your reply.
-
Tap Send to place your reply in the Outbox.
Deleting e-mail
Your handheld stores deleted e-mail in the Deleted folder until you
perform the next HotSync operation. If you delete an e-mail item from the handheld, it is also deleted from your desktop E-Mail application when you perform the next HotSync operation.
-
Open the e-mail item you want to delete.
-
Tap Delete.
Purging deleted e-mail
Because your handheld stores deleted e-mail in the Deleted folder until you perform a HotSync operation, deleted e-mail can monopolize storage space. To avoid or correct this problem, purge the contents of your Deleted folder. E-mail that you purge is still deleted from your desktop E-Mail application when you perform the next HotSync operation.
- Tap the Menu icon .
- Tap Message, and then tap Purge Deleted.
- Tap Yes.
Note: You cannot restore e-mail items after you purge them.
Using Preferences and other settings
Changing the Applications Launcher display
By default, the Applications Launcher displays each application as an icon. You can change the settings to show a list of applications.
- Tap the Applications icon .
- Tap the Menu icon .
- Tap Options, and then tap Preferences.
- Tap the View By pick list and select List.
Tip: You can return to the same category of applications each time you open the Applications Launcher by selecting the Remember Last Category check box.
- Tap OK.
Changing fonts
In most applications you can change the font style to make text easier to read. You can choose a different font style for each application.
- Open an application.
- Tap the Menu icon .
- Tap Options, and then tap Font.

- Tap OK.

Setting Date and Time preferences
Use the Date and Time Preferences screen to set the date, time, time zone, and Daylight Saving option on your handheld.
- Tap the Applications icon .
- Tap the Preferences icon .
- Tap the pick list in the upper-right corner and select Date and Time.
To set the date:
- Tap the Set Date box.
- Tap the arrows to select the current year.
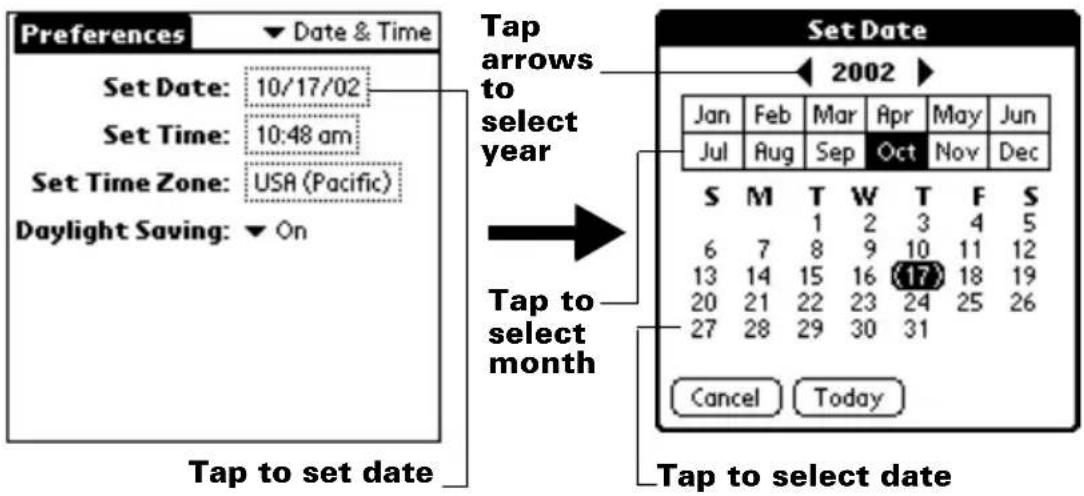
- Tap a month.
- Tap the current date.
To set the time:
- Tap the Set Time box.

- Tap the up or down arrows to change the hour.
- Tap each number of the minute, and then tap the arrows to change them.
Note:Your handheld can also display time based on a 24-hour clock.
See "Changing Formats preferences" later in this section.
- Tap OK.
To set the time zone:
- Tap the Set Time Zone box.

- Tap a time zone.
Tip: When you travel, changing the current time zone setting to a new time zone setting automatically resets the date and time on your handheld.
- Tap OK.
To set the daylight saving switch:
■ Tap the Daylight Saving pick list, and then tap Off or On.
Setting General preferences
You can set your handheld's auto shutoff interval, charging option, alarm options, and sounds. You can also prohibit anyone from beaming information to your handheld.
-
Tap the Applications icon .
-
Tap the Preferences icon .
-
Tap the pick list in the upper-right corner and select General.
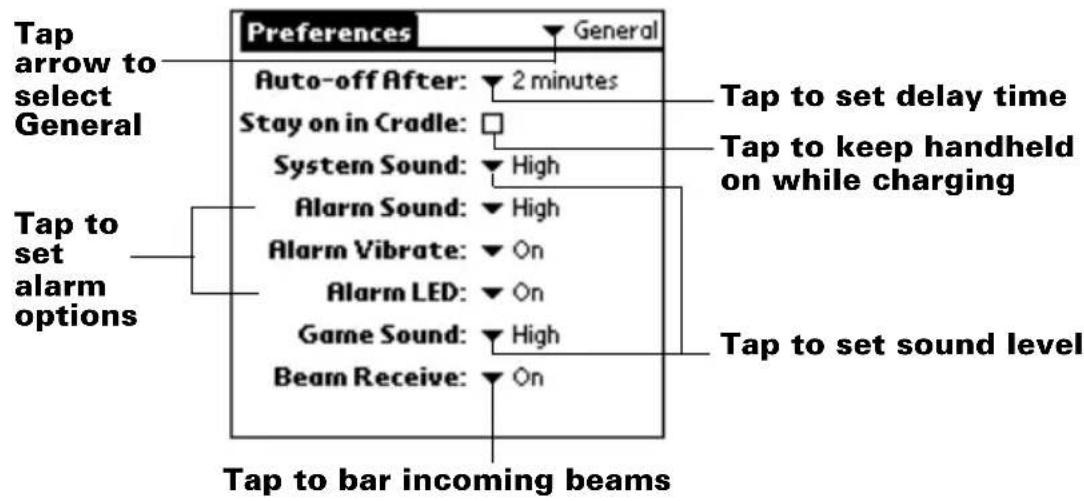
Note: You can set alarms to notify you of entries in your Clock, Date Book and Note Pad applications. See the online Handbook for Palm™ m500 Series Handhelds for details.
Changing Formats preferences
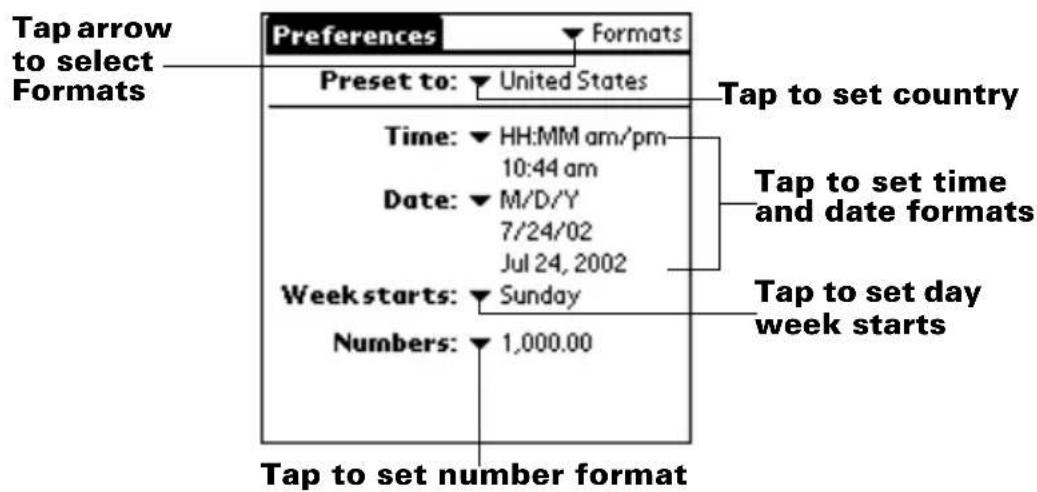
Use the Formats Preferences screen to set the country default and the display format of the dates, times, and numbers on your handheld.
- Tap the Applications icon .
- Tap the Preferences icon .
- Tap the pick list in the upper-right corner and select Formats.
Beaming information
You can use the IR (infrared) port on your handheld to beam the following information to another Palm OS® handheld that's close by
and also has an IR port:
■ The record currently displayed in Date Book, Address Book, To Do List, Note Pad (if installed on the other handheld), or Memo Pad
■ All records of the category currently displayed in Address Book, To Do List, Note Pad (if installed on the other handheld), or Memo Pad
■ A special Address Book record you designate as your business card that contains information to exchange with business contacts
■ An application installed in RAM memory or on an expansion card
Note: You can also perform HotSync operations using the IR port.
Beaming data
- Locate the record or category you want to beam.
- Tap the Menu icon .
- Tap Record, and then tap the appropriate Beam command.
- When the Beam Status dialog box appears, point the IR port on the top of your handheld at the IR port of the receiving handheld.

natural_image
Illustration of two hands holding rectangular blocks with wave patterns, no text or symbols present- Wait for the Beam Status dialog box to indicate the transfer is done.
Beaming applications
- Tap the Applications icon .
- Tap the Menu icon .
- Tap App, and then tap Beam.
- Tap the Beam from pick list, and then select Handheld or Card. To beam an application from a card, you must have a card inserted into the expansion card slot.
- Tap the application you want to transfer.
- Tap Beam.
- When the Beam Status dialog box appears, point the IR port on the top of your handheld at the IR port of the receiving handheld.
- Wait for the Beam Status dialog box to indicate the transfer is done.
Receiving beamed information
- Turn on your handheld.
- Point the IR port on the top of your handheld at the IR port of the transmitting handheld.
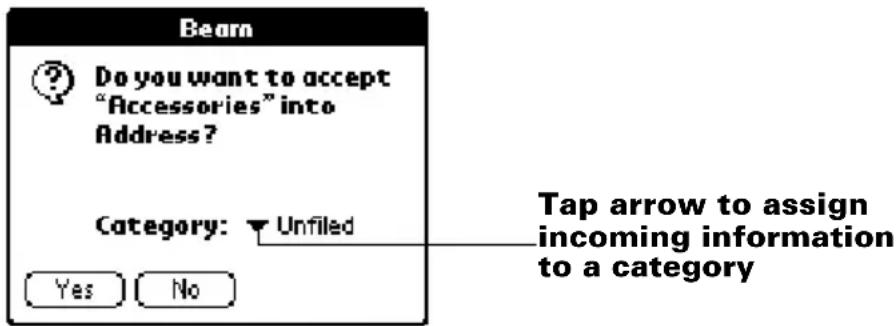
- Tap Yes.
Beaming your business card
- Create an Address Book entry with your business card information.
- Tap the Menu icon .
- Tap Record, and then tap Select Business Card.
- Tap Yes.
- Press the Address Book application button for about two seconds to beam your business card.
Note: Once you complete steps 1 through 4, you do not need to repeat this process. Simply press the Address Book application button for about two seconds.
Beaming Tips
■ For best results, Palm handhelds should be between 10 centimeters (approximately 4 inches) and 1 meter (approximately 39 inches) apart, and the path between the two handhelds must be clear of obstacles. Beaming distance to other Palm OS handhelds may be different.
■ Some applications are copy-protected and cannot be beamed. These are listed with a lock icon next to them.
- You can set the full-screen pen stroke to beam the current entry. See the online Handbook for details.
■ You can draw the Graffiti Command stroke to activate the Command toolbar, and then tap the Beam icon.
■ You can use the Graffiti Command stroke /B to beam the current entry.
Installing add-on applications
You can install a variety of third-party applications on your handheld or on an expansion card that is seated in the expansion card slot during a HotSync operation. To find the bonus add-on applications that come with your handheld, go to the Add-on folder on the Palm Desktop software CD-ROM. To learn about thousands of other add-on applications, go to the web site: http://www.palm.com.
Note: Any game or application that you install on your handheld resides in RAM memory; you can delete them at any time.
Installing applications using a Windows computer
-
Copy or download the application you want to install into the Add-on folder in your Palm Desktop directory on your computer. (If the application is compressed, expand it into this folder.)
-
Double-click the Palm Desktop icon on your desktop.
-
Click Install.
Tip: You can also access the Install Tool dialog by selecting Install Tool from the Palm Desktop program group or by double-clicking any file with a PRC, PDB, or PNC file extension.


- When the Open dialog box appears, select the application(s) you want to install on your handheld or an expansion card and then click Open.

- If you need to change the destination of the application you are installing, click Change Destination on the Install Tool window, and then use the arrows to move applications between your handheld and an expansion card.
- Click OK to close the Change Destination window.
- Click Done to close the Install Tool window.
- Perform a HotSync operation to install the selected application(s).
Installing applications using a Macintosh
- Copy or download the application you want to install into the Add-on folder in your Palm folder on your Macintosh.
Note: If the software is compressed, expand it into this folder.
- Double-click the Hotsync Manager icon in the Palm folder.
- From the HotSync menu, choose Install Handheld Files.
User pop-up menu

- From the User pop-up menu, select your user name.
- Click Add to List.
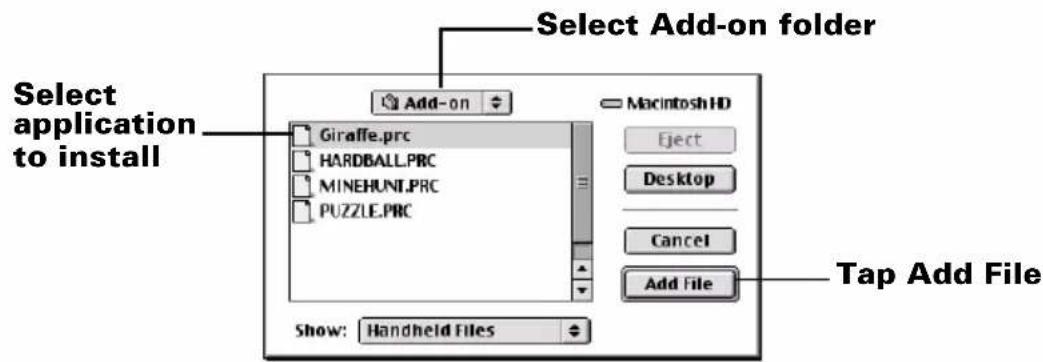
- Select the Add-on folder from the pop-up menu.
- Select the application you want to install.
-
Click Add File to add the selected application to the Install Handheld Files list.
-
If you need to change the destination of the application you are installing, click Change Destination on the Install Handheld Files window, and then use the arrows to move applications between your handheld and an expansion card.

-
Click OK to close the Change Destination window.
-
Close the Install Handheld Files window.
-
Perform a HotSync operation to install the selected application(s) on your handheld.
Resetting your handheld
If your handheld does not respond to buttons or tapping the screen, you need to perform a reset to get your handheld running again.
Performing a soft reset
A soft reset tells your handheld to stop what it's doing and start over again while retaining all records and entries stored in your handheld.
■ Use the reset tip tool, or the tip of an unfolded paper clip (or similar object without a sharp tip) to gently press the reset button inside the hole on the back panel of your handheld.

Tip: The stylus that comes with your handheld has a reset tip inside. To use it, unscrew the metal barrel from the stylus quill.
Performing a hard reset
Important: With a hard reset, all records and entries stored in your handheld are erased. Never perform a hard reset unless a soft reset does not solve your problem. You can restore any data previously synchronized with your computer during the next HotSync operation.
- Hold down the power button on the front panel of your handheld.
- While holding down the power button, use the reset tip tool, or the tip of an unfolded paper clip (or similar object without a sharp tip) to gently press and release the reset button.
- Wait for the Palm™ logo to appear and release the power button.
- When a message appears warning that you are about to erase all the data stored on your handheld, do one of the following:
Press the upper scroll button on the front panel of the handheld to complete the hard reset and display the Digitizer screen.
Press any other button to perform a soft reset.
Chapter 4
Frequently Asked Questions
If you encounter a problem with your handheld, try the suggestions in this section, and the suggestions in the “Frequently Asked Questions” chapter in the online Handbook before contacting Technical Support. If you are still having problems, contact Technical Support. For US and International telephone numbers, see the Worldwide Customer Support card that comes with your handheld or go to http://www.palm.com.
Note: There are thousands of third-party applications available for Palm OS® handhelds. For questions and support, please contact the software developer directly.
I don't see anything on my handheld screen
- Press an application button to ensure your handheld is turned on.
- If your handheld enables contrast adjustment, tap the Contrast icon Ⓞ the upper-right corner of the Graffiti ® writing area. If the Contrast dialog box appears, adjust the contrast by holding down the up scroll button for a few seconds. If this doesn't work, hold the down scroll button for a few seconds.
- Make sure the battery is properly charged.
- Perform a soft reset. Use the reset tip tool, or the tip of an unfolded paper clip (or similar object without a sharp tip) to gently press the reset button on the back of your handheld.
- If your handheld still doesn't turn on, perform a hard reset by holding down the power button while doing a soft reset. Wait for the Palm™ logo to appear, then release the power button. If you want to continue and erase all your data, press the up scroll button.
Important: With a hard reset, all records and entries stored in your handheld are erased. Never perform a hard reset unless a soft reset does not solve your problem. You can restore any data previously synchronized with your computer during the next HotSync® operation. See the online Handbook for instructions on restoring your data.
I can't complete a HotSync operation
The first step in diagnosing HotSync problems is to determine if your handheld and computer are able to communicate with each other.
- Connect your handheld to the HotSync cradle.
- Confirm that HotSync Manager is running and enabled.
Windows. On the Windows desktop, double-click the Palm
Desktop icon, click the HotSync icon on the taskbar and make sure Local USB (or Local Serial if you are using a serial cradle) is checked on the menu. If not, click it to insert a check mark.
Macintosh. Double-click the HotSync Manager icon in the Palm folder. Click the HotSync Controls tab and make sure the Enabled option is selected.
- Press the HotSync button Ⓗ on the cradle.
- Watch your monitor to see if the HotSync Progress dialog box appears (you may also hear the HotSync tones on your handheld).
If the HotSync Progress dialog box does not appear, your handheld and computer are not communicating. See “Troubleshooting communication problems” later in this chapter.
If the HotSync Progress dialog box appears, your handheld and computer are communicating. See “Troubleshooting data synchronization problems” later in this chapter.
Troubleshooting communication problems
Check your connections:
- Check the contact points on your handheld and on the HotSync cradle and make sure they are clean and free from obstruction.
- Make sure that your handheld is seated firmly on the HotSync cradle. Gently rock it back and forth to ensure it is making contact.
- Check the HotSync cradle connection on the back of your computer to make sure it is properly attached.
- Perform a HotSync operation. Continue if you're still having problems.
Check your handheld settings:
- Turn on your handheld and tap the Applications icon .
- Tap the HotSync icon . Ⓗ
- Tap Local above the HotSync icon and select Cradle Connection from the pick list below the HotSync icon.
- Tap the HotSync icon to perform a HotSync operation. Continue if you're still having problems.
Check your Windows computer settings:
- Right-click the My Computer icon on your Desktop and select Properties.
- Click the Hardware tab, and then click Device Manager.
- Click Ports.
- If the port you are using for the HotSync cradle shows an exclamation point, you have a hardware conflict. To resolve this, consult the documentation that came with your computer.
Check your Macintosh settings:
- Double-click the HotSync Manager in the Palm folder.
- Click the Port Settings tab.
- Make sure Local is selected and that the port selection matches the port where your HotSync cradle is attached.
Troubleshooting data synchronization problems
If your data does not appear on your handheld and in the Palm Desktop software after a HotSync operation, try the steps in this section.
Note: If you are attempting to synchronize with applications other than the Palm™ Desktop software (e.g., Microsoft Outlook, Lotus Notes, etc.) using a third-party conduit, please consult the documentation that was provided with that conduit.
Check your desktop configuration:
- Make sure you selected the user name that matches your handheld.
- Make sure the date on your computer matches the date on your handheld.
Check the HotSync log:
- Open the HotSync log.
Windows. Click the HotSync icon on the taskbar and select View Log from the menu.
Macintosh. Double-click the HotSync Manager in the Palm folder and choose View Log from the HotSync menu.
- Ensure that all applications are marked OK. If not, continue to the next section to check your conduit settings.
Check your conduit settings on a Windows computer:
- Click the HotSync icon on the taskbar and select Custom.
- Select the user name that matches the handheld you are attempting to synchronize.
- Ensure that the application conduits (other than Backup and Install) are set to Synchronize the Files.
Check your conduit settings on a Macintosh:
- Double-click the HotSync icon in the Palm folder.
- From the HotSync Manager menu, choose Conduit Settings.
- Select the user name that matches the handheld you are attempting to synchronize.
- Ensure that the application conduits (other than Backup and Install) are set to Synchronize the Files.

- with Palm™ m500 Series Handhelds
- Copyright
- Disclaimer and Limitation of Liability
- HotSync® Cradle Adapters and Software Download Available
- Agency Compliance Information
- Contents
- Chapter 1: Get Started ....1
- Chapter 2: Enter Data....11
- Chapter 3: Get to Work....15
- Chapter 4: Frequently Asked Questions......47
- Chapter 1
- Get Started
- Your Palm m500 series handheld
- Upgrading from another Palm OS handheld
- Preparing to use your handheld
- Connecting the HotSync cradle
- Charging your handheld
- Setting up your handheld
- Installing Palm Desktop software
- Installing Palm Desktop software on a Windows computer
- Installing Palm Desktop software on a Macintosh
- Synchronizing data: Performing the first HotSync operation
- Each handheld must have a unique name
- Using Expansion Features
- Inserting an expansion card
- Removing an expansion card
- Using Peripheral Hardware
- Congratulations!
- For more information about using your handheld, see the following:
- For more information about using Palm Desktop Software, see the following:
- Chapter 2
- Enter Data
- Entering data with the onscreen keyboards
- Entering data with Graffiti writing
- Graffiti tips
- Entering data with Note Pad
- Entering data with Palm Desktop software
- Entering data using an external keyboard
- Importing data
- Chapter 3
- Get to Work
- Adjusting the screen
- Using the backlight
- Adjusting the contrast
- Using Address Book
- Creating an Address Book entry
- Viewing and changing an Address Book entry
- Deleting an Address Book entry
- Using Date Book
- Creating an event
- Creating an untimed event
- Creating a repeating or continuous event
- Rescheduling an event
- Changing the Date Book view
- Deleting an event
- Using To Do List
- Creating a To Do List item
- Changing a To Do List item
- Marking a To Do List item complete
- Deleting a To Do List item
- Using Note Pad
- Creating a note
- Deleting a note
- Transcribing a note
- Using Memo Pad
- Reviewing and changing a memo
- Deleting a memo
- Using Clock
- Viewing the time and date
- Setting an alarm
- Using Mail
- Viewing e-mail items
- Opening an e-mail item
- Creating e-mail items
- Replying to an e-mail item
- Deleting e-mail
- Purging deleted e-mail
- Using Preferences and other settings
- Changing the Applications Launcher display
- Changing fonts
- Setting Date and Time preferences
- To set the date:
- To set the time:
- To set the time zone:
- To set the daylight saving switch:
- Setting General preferences
- Changing Formats preferences
- Beaming information
- Beaming data
- Beaming applications
- Receiving beamed information
- Beaming your business card
- Beaming Tips
- Installing add-on applications
- Installing applications using a Windows computer
- Installing applications using a Macintosh
- Resetting your handheld
- Performing a soft reset
- Performing a hard reset
- Chapter 4
- Frequently Asked Questions
- I don't see anything on my handheld screen
- I can't complete a HotSync operation
- Troubleshooting communication problems
- Check your connections:
- Check your handheld settings:
- Check your Windows computer settings:
- Check your Macintosh settings:
- Troubleshooting data synchronization problems
- Check your desktop configuration:
- Check the HotSync log:
- Check your conduit settings on a Windows computer:
- Check your conduit settings on a Macintosh:
Brand : PALM
Model : P80805ML1
Category : Digital Personal Assistant