
iPAQ rx4240 - PDA HP - Free user manual and instructions
Find the device manual for free iPAQ rx4240 HP in PDF.


| Type of product | PDA (Personal Digital Assistant) |
| Model | HP iPAQ rx4240 |
| Operating system | Microsoft Windows Mobile 5.0 for Pocket PC |
| Processor | Samsung S3C2442 (estimated ~300-400 MHz) |
| Display | 3.5-inch TFT color (QVGA 240x320) |
| Memory | 64 MB ROM, 64 MB SDRAM (estimated) |
| Battery | Removable 1200 mAh Li-Ion rechargeable |
| Charging time | Approximately 2-4 hours for first full charge |
| Battery life | Typical usage up to 8 hours (subject to usage) |
| Wireless connectivity | IEEE 802.11b/g WLAN and Bluetooth 2.0 |
| Expansion slot | Secure Digital (SD slot) for storage and SDIO cards |
| Input methods | Stylus (touchscreen), on-screen keyboard, Block Recognizer, Letter Recognizer, Transcriber |
| Ports | Mini-USB for sync/charging, headset jack |
| Dimensions (approx.) | 4.4 x 2.8 x 0.6 inches (112 x 71 x 16 mm) |
| Weight (est.) | ~5.0 oz (142 g) with battery |
| Included accessories | AC adapter, mini-USB cable, stylus, wired stereo headset, removable clip cover, Getting Started CD, documentation |
| Camera | Not included |
| Keyboard | No hardware keyboard (on-screen only) |
| Protection | Password lock, screen care guidelines |
| Warranty | Refer to HP warranty documentation |
Frequently Asked Questions - iPAQ rx4240 HP
User questions about iPAQ rx4240 HP
0 question about this device. Answer the ones you know or ask your own.
Ask a new question about this device
Download the instructions for your PDA in PDF format for free! Find your manual iPAQ rx4240 - HP and take your electronic device back in hand. On this page are published all the documents necessary for the use of your device. iPAQ rx4240 by HP.
USER MANUAL iPAQ rx4240 HP
© 2006 Hewlett-Packard Development Company, L.P.
Microsoft, Windows, the Windows logo, Outlook, and ActiveSync are trademarks of Microsoft Corporation in the U.S. and other countries.
HP iPAQ products are powered by Microsoft® Windows Mobile® 5.0 software for Pocket PC.

SD Logo is a trademark of its proprietor.
Bluetooth® is a trademark owned by its proprietor and used by Hewlett-Packard Development Company, L.P. under license.
All other product names mentioned herein may be trademarks of their respective companies.
Hewlett-Packard Company shall not be liable for technical or editorial errors or omissions contained herein. The information is provided “as is” without warranty of any kind and is subject to change without notice. The warranties for Hewlett-Packard products are set forth in the express limited warranty statements accompanying such products. Nothing herein should be construed as an additional warranty.
This document contains proprietary information that is protected by copyright. No part of this document may be photocopied, reproduced, or translated to another language without the prior written consent of Hewlett-Packard Development Company, L.P.
HP iPAQ Product Information Guide
First Edition (September 2006)
Table of contents
HP iPAQ Product Information Guide
Frequently Asked Questions 1
Box Contents 2
Getting Started CD Contents 3
Finding More Information 4
Components 5
Top Components 5
Back Panel Components 6
Left and Right Side Components 7
Setting Up Your HP iPAQ 8
Step 1: Install the battery 8
Step 2: Charge the battery 9
Step 3: Insert the Getting Started CD into the CD drive of your personal computer ....9
Step 4: Follow the on-screen instructions on your personal computer ..... 10
Microsoft ActiveSync 10
Step 5: Complete the Setup Wizard on your HP iPAQ 11
Step 6: Synchronize your HP iPAQ with your personal computer .... 11
Synchronization 11
Changing the ActiveSync Connection Mode 13
Troubleshooting Help for Synchronization Issues 13
Protecting Your HP iPAQ with a Password 16
Finding the Serial Number and Model Number 16
Resetting Your HP iPAQ 17
Performing a Soft Reset 17
Performing a Factory Reset 17
HP Quick Launch 18
Today Screen 18
Status Icons 19
iPAQ Wireless 20
Checking the Battery Charge Level 21
Battery Saving Tips 21
Entering Text 22
Entering Text Using Block Recognizer 23
Entering Text Using the On-screen Keyboard 24
Entering Text Using Letter Recognizer 25
Writing with Transcriber 25
Entertainment 26
Windows Media Player 10 Mobile 26
Listening to Music and Watching Videos 27
Clearing the Now Playing List 28
Updating a Library 28
HP Photosmart Mobile 28
Attaching a Voice Note to a Picture 29
E-mailing Pictures 29
Viewing a Slideshow 30
Mobile Office 30
Calendar 31
Accessing Calendar 31
Viewing Today's Agenda 31
Viewing Appointments 32
Scheduling an Appointment 32
Sending a Meeting Request 33
Contacts 33
Accessing Contacts 33
Creating a Contact 34
Finding a Contact 35
Tasks 35
Creating a Task 35
Locating a Task 36
Messaging 36
Different Ways to Access E-mail Messages 36
Setting up an E-mail Account on an Exchange Server 37
Setting up a POP3, HTTP, or IMAP4 E-mail Account 38
Composing and Sending Outlook E-mail Messages 39
Replying to or Forwarding an Outlook E-mail Message 40
Sorting the Message List 40
Internet Explorer Mobile 40
Word Mobile 41
Excel Mobile 41
PowerPoint Mobile 42
WLAN 42
Turning WLAN On or Off 43
Searching for WLAN Networks to Access 43
Configuring Network Security Settings 44
Bluetooth 44
Turning Bluetooth On or Off 45
Connecting to a Bluetooth Headset 45
Protecting the HP iPAQ Screen from Cracking or Damage 46
Obtaining Services for a Cracked or Damaged Screen 47
Additional Guidelines for Using Your HP iPAQ 47
Index 48
HP iPAQ Product Information Guide
Frequently Asked Questions
| How Do I... Find information here... | |
| Install Microsoft ActiveSync and create an ActiveSync partnership? | Synchronization on page 11 |
| Troubleshoot ActiveSync? Troubleshooting Help for Synchronization Issues on page 13 | |
| Locate the serial and model number for my HP iPAQ? | Finding the Serial Number and Model Number on page 16 |
| Set up an e-mail account? Messaging on page 36 | |
| Perform a soft or factory reset? | Resetting Your HP iPAQ on page 17 |
| Use wireless connections? WLAN on page 42 | |
| Use built-in Bluetooth technology? Bluetooth on page 44 | |
| Conserve battery power? | Battery Saving Tips on page 21 |
| Protect my HP iPAQ from screen damage and cracking? | Protecting the HP iPAQ Screen from Cracking or Damage on page 46 |
| Use the entertainment features of my HP iPAQ? | Entertainment on page 26 |
Box Contents
This illustration depicts the items that come in the box with your HP iPAQ. Use this illustration to become more familiar with your new device.

NOTE Box contents vary by model.

Box Contents
(1) Removable clip cover
(2) HP iPAQ
(3) Stylus
(4) Getting Started CD with special software
Box Contents
(5) 1,200 mAh Li-Ion removable/rechargeable battery
(6) HP iPAQ documentation
(7) Wired stereo headset 1.2
(8) Mini-USB synchronization cable
(9) AC adapter with interchangeable plug 3
^1 Wired stereo headset is not included with all models.
^2 Listening to personal stereo equipment at full volume for long periods can damage hearing. In order to reduce the risk of hearing loss, decrease the amount of time listening to personal stereo equipment at full volume. HP recommends use of the headset manufactured by Plantronics, part number 430219, that is included with your HP iPAQ.
^3 Depending on your location, the AC adapter may be provided with more than one interchangeable plug, which may not be attached. Attach the correct plug for your region.
Getting Started CD Contents
The Getting Started CD includes:
• Microsoft ActiveSync 4.1 or later
• Microsoft Outlook 2002
• Additional Product Information
• Important Safety Information
• Additional software for your HP iPAQ and personal computer

NOTE The contents of the Getting Started CD may vary. Select models may not have all applications.
All software and documents are designed to be installed on your personal computer to enable you to use your HP iPAQ to its full potential.

NOTE All current Microsoft operating systems are supported by ActiveSync 4.1, except Windows 98SE and Windows ME.
Finding More Information
| For information on... See this source... | |
| Using your HP iPAQ | Additional Product Information on the Getting Started CD. |
| Connecting to and synchronizing with a computer | ActiveSync Help on your computer. To view Help, start ActiveSync, then click Help > Microsoft ActiveSync Help. |
| Troubleshooting on ActiveSync connections | ActiveSync Troubleshooting on your computer. From ActiveSync, click Help > Microsoft ActiveSync Help > Troubleshooting. |
| Programs that are on your HP iPAQ | Getting Started CD and Help located on the HP iPAQ. From the Start menu, tap Help. |
| Safety precautions | Important Safety Information on the Getting Started CD. |
| Web sites optimized for your HP iPAQ www.hp.com/go/ipaqmobile | |
| Accessory products www.hp.com/accessories/ipaq | |
| Warranty information www.hp.com/go/handheldwarranty | |
Components

NOTE Not all models or features are available in all regions.
Top Components
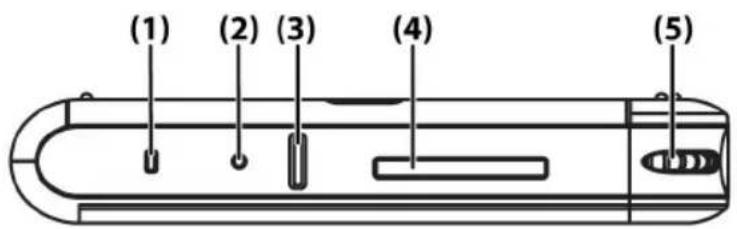
| Component Function | ||
| (1) Wireless LED Indicator | Flashing blue LED—WLAN or Bluetooth is on.LED off—WLAN and Bluetooth are off. | |
| (2) Reset Button | Press with the stylus to perform a soft reset of your HP iPAQ. | |
| (3) Record Button Press to record voice or sound. | ||
| (4) SD Slot | Insert a Secure Digital (SD) storage card for data storage or a Secure Digital Input/Output card (SDIO) card to extend the functionality of your HP iPAQ. | |
| (5) Scroll Wheel Roll the scroll wheel to move through documents and Web pages. Press the scroll wheel to make a selection. | ||
Back Panel Components

Component Function
(1) Speaker Use the speaker to listen to audio.
(2) Battery Cover Remove to install or remove the battery.
(3) Stylus Use to input information:
- Slide out to remove the stylus.
- Slide in to replace the stylus.
Left and Right Side Components


Component Function
| (1) Internal WLAN Antenna | Transmits and receives WLAN signals. |
| (2) Charging/Communications Port | Connects to mini-USB synchronization cable. |
| (3) Headset Connector | Plug the headset into this connector to listen to music. |
| (4) Stylus Use to input information: | |
| Slide out to remove the stylus.Slide in to replace the stylus. | |
| Component Function | ||
| (5) | Scroll Wheel | Roll the scroll wheel to move through documents and Web pages. Press the scroll wheel to make a selection. |
| (6) | Microphone | Speak into the microphone to record voice notes. |
| (7) | OK Button | Press to close the current window or application. Press and hold to launch Calendar. |
| (8) | Messaging Button | Press to launch Messaging. Press and hold to launch Contacts. |
| (9) | Windows Media Player Button | Press to launch Windows Media Player. Press and hold to launch Internet Explorer Mobile. |
| (10) | Rotate Screen Button | Press to rotate the screen to portrait or landscape orientation. Press and hold to launch iPAQ Wireless. |
| (11) | Internal Bluetooth Antenna | Transmits and receives Bluetooth signals. |
| (12) | Power Button Press to turn the unit on and off. | |
Setting Up Your HP iPAQ
Use the following steps to quickly set up your HP iPAQ and connect it to your personal computer. The illustrations in the previous sections display the specific location of the HP iPAQ components.
Step 1: Install the battery
- Remove the battery cover by pressing the open button and sliding the battery cover away from the HP iPAQ.
- Align the battery connectors on the battery with the housing pins in the battery compartment and insert the battery.
- Slide the battery cover on until it clicks into place.
Step 2: Charge the battery

CAUTION To avoid damaging your HP iPAQ or the AC adapter, be sure all connectors are properly aligned before connecting.
The battery provides power for your HP iPAQ to operate. Your HP iPAQ comes with a mini-USB synchronization cable, which must be used to charge the device.
It takes approximately 2 to 4 hours to fully charge the battery the first time. Subsequent charges may take longer.
- Insert the USB end of the mini-USB cable into the port on the AC adapter.
- Install the appropriate head onto the AC adapter.
- Connect the AC adapter to an electrical outlet.
- Connect the mini-USB cable to the charging/communications port on your HP iPAQ. The cable connector only fits one way, so do not force it. If the connector does not insert easily, turn it over.
Step 3: Insert the Getting Started CD into the CD drive of your personal computer
Use the Getting Started CD to complete the setup of your HP iPAQ and to synchronize the HP iPAQ with your personal computer.
The HP Install Wizard automatically opens, and the application starts to run.

NOTE Do you have administrative rights on your personal computer? If not, you may have problems installing the applications from the Getting Started CD. The administrator needs to install the applications.
Step 4: Follow the on-screen instructions on your personal computer
The HP Install Wizard installs:
• Microsoft ActiveSync
• Other optional software applications
Microsoft ActiveSync
Connect your HP iPAQ when instructed.
- Connect the USB end of the synchronization cable to a USB port on your personal computer.
- Connect the mini-USB end of the synchronization cable to the charging/communications port on your HP iPAQ. The connector only fits one way so do not force it. If the connector does not insert easily, turn it over.
When instructed, check the items to synchronize between your HP iPAQ and your personal computer. Do one or both of the following:
- Select the check box for any items you want to synchronize. If you cannot select a check box, you may have to clear the check box for the same information type elsewhere in the list.
- Clear the check box for any items you want to stop synchronizing.
To change available synchronization settings, select the type of information and tap Settings.

NOTE Does your company use a Microsoft Exchange server? If not, during setup, uncheck the box marked Synchronize directly with a server running Microsoft Exchange Server. To sync to your personal computer now, you need to have the server address and your logon credentials.
After completing the ActiveSync installation, return to the HP Install Wizard for more software programs and additional product and setup information.
Step 5: Complete the Setup Wizard on your HP iPAQ
When turning on your HP iPAQ for the first time, follow the instructions on the screen. Use the stylus to enter information. (See the product component illustrations for the location of the stylus.)
Step 6: Synchronize your HP iPAQ with your personal computer
Synchronization
Microsoft ActiveSync software, located on the Getting Started CD, allows your HP iPAQ and your personal computer to communicate with each other.
For synchronization to work properly, install Microsoft ActiveSync on your personal computer before connecting your HP iPAQ to your computer.
Use Microsoft ActiveSync to:
- Synchronize information between your HP iPAQ and up to two computers or one server so that the latest information is in all locations.
- Change synchronization settings and the synchronization schedule.
- Copy files between your HP iPAQ and computer.
• Install applications on your HP iPAQ. - Synchronize links.
- Send and receive e-mail.
- Request meetings.
Synchronizing your HP iPAQ with a personal computer keeps the same information (such as calendar, contacts, and e-mails) on both units, making it available when you work on your personal computer or when you take your HP iPAQ on the go. Synchronize your HP iPAQ with a personal computer using one of the following methods:
• Mini-USB synchronization cable
- Bluetooth
To synchronize your HP iPAQ and a personal computer using the mini-USB synchronization cable:
- Be sure ActiveSync 4.1 or later is installed on your personal computer.
- Plug the USB end of the synchronization cable into your personal computer.
- Connect the mini-USB end on the synchronization cable to the charging/communications port on your HP iPAQ.

CAUTION To avoid damaging your HP iPAQ or the AC adapter, check to be sure all connectors are properly aligned before connecting them.
Synchronization begins automatically.
- Click Next on the Synchronization Setup Wizard screen.
-
Perform one of the following:
-
By default, the check box is selected to synchronize directly with a Microsoft Exchange Server. Clear this check box if you do not want to synchronize directly with a Microsoft Exchange server, and then click Next.
-
Click Next to synchronize directly with a Microsoft Exchange server.
-
When the Synchronization Options screen displays, select the items to synchronize between your HP iPAQ and your computer, and then click Next.
- After the items have been synchronized, click Finish. The Synchronization Setup Wizard starts synchronizing the items you checked.
If ActiveSync does not begin synchronizing, start it manually:
On your personal computer, open ActiveSync by selecting the Start menu > Programs > Microsoft ActiveSync.
Changing the ActiveSync Connection Mode
You can change the type of ActiveSync connection being used between your HP iPAQ and your PC (personal computer) to meet your specific needs.
You should use USB Serial Sync Mode if you:
- Are having general problems with the ActiveSync connection between your HP iPAQ and your personal computer.
- Need to connect your HP iPAQ to your PC while you are using a virtual private network (VPN) tunnel from your personal computer.
- Are running personal or company-enforced firewall software on your personal computer.
You should use RNDIS Sync Mode if you are transferring large files and do not experience any firewall connection issues between your HP iPAQ and your personal computer.
To change the ActiveSync mode on your HP iPAQ:
- Tap Start > Settings > Connections tab > ActiveSync Mode.
- Select RNDIS Sync Mode or USB Serial Sync Mode.
- Tap OK to change the ActiveSync mode.
Troubleshooting Help for Synchronization Issues
Following is a list of symptoms that may indicate synchronization issues are occurring:
- No ActiveSync chimes sound (or a gray icon displays), and there is no activity in the ActiveSync window on your personal computer.
- ActiveSync chimes sound, and the ActiveSync icon on your personal computer changes to a swirling green icon. The “retrieving settings” message appears on your personal computer, but the ActiveSync connection drops prior to establishing the partnership.
-
ActiveSync is searching for a connection but none occurs. (The green icon on your personal computer continues to spin.)
-
Synchronization has been established between your HP iPAQ and personal computer but connection is dropped. (The green icon on your personal computer stops spinning and grays out.)
- Firewall or other network protection software message box is displayed for ActiveSync to access the network or Internet.
If you experience difficulty while synchronizing your HP iPAQ and personal computer, try the following solutions to troubleshoot any synchronization issues:
- Confirm that you are running ActiveSync on your personal computer with a supported operating system (OS).
- To get more information about the supported OS versions, visit: www.microsoft.com/windowsmobile.
- The latest version of ActiveSync is at: www.microsoft.com/windowsmobile/downloads.
- If you are running ActiveSync 4.1 or later and personal firewall software on your personal computer, please add ActiveSync to the firewall program's exception list.
(Firewall software, such as Sygate Personal Firewall, TrendMicro PC-cillin Internet Security, Norton Personal Firewall, McAfee Personal Firewall, or Zone Alarm Security Suite may block synchronization.) Refer to the documentation that came with your firewall program to determine how to add ActiveSync 4.1 or later to the program's exception list. To further troubleshoot a firewall application and enable ActiveSync 4.1 or later, visit: www.microsoft.com/windowsmobile/help/activesync.
- During the ActiveSync installation, if you inadvertently left the Microsoft Exchange Server option box checked and are not planning to connect to an Exchange server, follow these steps:
- Connect your HP iPAQ to your personal computer. Be sure an ActiveSync connection is established.
- On your personal computer, click Start > All Programs > Microsoft ActiveSync.
- Click Tools > Options > Sync Options tab.
- Uncheck the boxes for the sync items listed under the Server group.
- Place a checkmark in the boxes under the Desktop group for those items to synchronize.
- Disconnect your HP iPAQ from your personal computer and wait for the ActiveSync message confirming that your device is no longer connected. Reconnect your HP iPAQ to your personal computer. Wait for about two minutes to see if your HP iPAQ connects to your personal computer.
- On your personal computer, in ActiveSync, select File > Connection Settings. Confirm that USB is selected as a connection method.
- Connect your HP iPAQ to a different USB port on your personal computer.
- Check your mini-USB synchronization cable. Consider using another mini-USB synchronization cable if one is available.
• Try synchronizing via a Bluetooth connection.
- Restart your personal computer and perform a soft reset on your HP iPAQ. (A soft reset does not erase any settings, programs or data.) Use the stylus to lightly press the Reset button. Your HP iPAQ restarts and displays the HP QuickStart Tour. Once your personal computer and HP iPAQ restart, reconnect your HP iPAQ to your personal computer.
- Uninstall ActiveSync from your personal computer and then reinstall it. To uninstall ActiveSync from your personal computer, click Start > Control Panel > Add or Remove Programs > Microsoft ActiveSync. Then click the Remove button and click Yes.
- After trying the above solutions without any success in solving the connection problem, perform a factory reset on your HP iPAQ. (A factory reset clears all user-installed settings, programs, and data and restores your HP iPAQ to factory settings.)
Reinstall applications on your HP iPAQ once the factory reset is complete by using ActiveSync on your personal computer. Once your HP iPAQ is
synchronized properly, go to ActiveSync on your personal computer and select Tools > Add/Remove Programs and select any programs to reinstall.
Protecting Your HP iPAQ with a Password
Keep your data more secure by requiring a password every time you turn on your HP iPAQ.
- Tap Start >Settings > Personal tab > Lock > Password tab.
- Select the Prompt if device unused for check box, and select the amount of time from the list box that your HP iPAQ must be unused before the password is required.
- In the Password type field, select the type of password you would like to use. Enter the password and confirm the password.
- On the Hint tab, enter a phrase to help you remember your password. Be sure that your hint doesn't allow others to guess your password. The hint is displayed after the wrong password is entered five times.
- When prompted, tap OK. The next time your HP iPAQ is unused for the specified amount of time, you are prompted to enter your password.

TIP Use the same steps as above to change or reset your password.
Finding the Serial Number and Model Number
Locate the serial and model numbers before contacting HP Customer Support, particularly if you are calling for in-warranty support.
View the serial number and model ID by tapping Start > Programs > HP Help And Support > Serial and Model Number.
You can also find this information next to the battery of your HP iPAQ. To locate the serial number:
- Remove the battery cover.
- Locate the label containing the serial number next to the battery.
Resetting Your HP iPAQ
Perform a reset if your HP iPAQ stops responding. The two types of resets are soft and factory.
Performing a Soft Reset
A soft reset stops all running applications, but does not erase any programs or saved data.

NOTE Be sure to close all running applications before performing a soft reset.
To perform a soft reset:
- Locate the recessed Reset button on your HP iPAQ.
- Use the stylus to lightly press the Reset button.
The HP iPAQ restarts and displays the HP QuickStart Tour.
Performing a Factory Reset
A factory reset erases all user-installed settings, programs, and data, and restores your HP iPAQ to factory settings.

CAUTION All user-installed settings, programs, and data are erased from memory with a factory reset.
To perform a factory reset and return your HP iPAQ to factory settings:
- Press and hold the OK and Rotate Screen buttons.
- While holding these buttons, use the stylus to lightly press the Reset button on the HP iPAQ until the device restarts.
- When the HP iPAQ restarts, release all of the buttons, and then remove the stylus from the Reset button.
The HP iPAQ restarts and powers on.
HP Quick Launch
HP Quick Launch is a simple way to open the most frequently used programs on your HP iPAQ.
- Tap the Today icon to access the Today screen.
- Tap the Entertainment icon to access entertainment applications like Windows Media Player 10 Mobile for music and videos, Photosmart Mobile, and games.
- Tap the Organizer icon to access Word Mobile, Calendar, Contacts, and Calculator.
- Tap the Internet icon to access Internet Explorer Mobile.
HP Quick Launch is configured by default to be the home screen of your HP iPAQ. Switch to use the Today screen as the home screen by tapping the Menu button and changing the default setting.
- Select Launch on Reset to automatically start Quick Launch every time the HP iPAQ is soft reset.
- Select Launch on Wakeup to automatically start Quick Launch every time the HP iPAQ is turned on.
You can also start the Today screen from the Start menu.
Today Screen
The Today screen shows appointments, active tasks, and information about e-mail messages. Along the top of the Today screen are the connectivity indicators, Volume icon, and the clock.
Tap a section of the Today screen to open the program that is associated with that section.
Access the Today screen by tapping Start > Today.
To customize the Today screen:
- Tap Start > Settings > Today.
- On the Appearance tab, select the desired theme for the background of the Today screen.
- On the Items tab, select the items to appear on the Today screen.

TIP To change the order of items displayed on the Today screen, tap the item, and tap Move Up or Move Down.

NOTE There are two default softkeys on the bottom of the Today screen: Contacts and Calendar. On the Today screen, the Calendar softkey is also the Notification softkey. Any type of alert, such as a meeting reminder, is displayed on the Today screen as a notification.
Status Icons
The following status icons are displayed on the Navigation or Command bar. Tap the icon on the HP iPAQ screen to view more information related to the item.
Icon Status

One or more networks are present. Tap the icon to access an available network.

Connection to a wireless network.

ActiveSync connection to a computer.

Inactive connection to computer or wireless network.
| Icon Status | |
| Microsoft ActiveSync is synchronizing. | |
| Speaker is on. | |
| Speaker is off (or in mute position). | |
| Battery power is low. | |
| Battery power is very low. | |
| E-mail has been received. | |
| Instant messages received. | |
iPAQ Wireless
Tap Start > Today > iPAQ Wireless or tap the iPAQ Wireless icon on the Today screen to launch iPAQ Wireless, which provides a control center to turn all wireless activities (WLAN and Bluetooth) on and off, and to configure their settings.
| Icon Status | |
| WLAN is on. | |
| WLAN is off. | |
Icon Status

Bluetooth is on.

Bluetooth is off.
The iPAQ Wireless screen has two power buttons to turn wireless features on and off. The WLAN and Bluetooth tabs allow you to access each wireless activity individually. Configure wireless connections by tapping View WLAN Networks on the WLAN tab or Bluetooth Settings on the Bluetooth tab.
Checking the Battery Charge Level
To monitor the battery power, tap either the Battery icon on the TodayPanel Lite or tap Start > Settings > System tab > Power.
If the battery charge level is low, connect to AC power.
Battery Saving Tips
The HP iPAQ is as individual as you are. Adjust the settings on your HP iPAQ to fit your individual needs and to help the battery last as long as possible between charges. Here are some recommendations for how to conserve battery life.
- Dim the Backlight – Keep the display only as bright as required to view the screen easily. On the Today screen, use the stylus to adjust the Backlight Brightness Level slider, near the Light bulb icon.
- Auto Turn Off the Backlight – On the Today screen, tap the Light bulb icon and make sure the first box is checked. Specify a short amount of time to wait before turning off the backlight.
- Keep Wireless Features Off – Always turn off the WLAN and Bluetooth power when they are not in use. Tap Start > Today > iPAQ Wireless, and then tap the WLAN or Bluetooth button to turn the features off.
- Sounds & Notifications – Every time you are notified of an event, battery power is consumed. Go to Start > Settings > Sounds & Notifications > Notifications tab and turn off any notification types that are unnecessary.
- Auto Turn Off Device – On the Today screen, tap the Battery icon, and then tap the Advanced tab. Make sure the first box is checked, so the device automatically powers off when not in use. Specify a short amount of time to wait before automatically powering off your HP iPAQ.
HP also offers a variety of accessories to keep your HP iPAQ charged when you are out of the office for extended time periods. These include a vehicle adapter and a battery charger.
Entering Text

NOTE Some text entry methods are not supported in all languages. In addition, some languages may support alternate text entry methods.
Depending on your preference, use the on-screen keyboard or a handwriting recognition feature such as Block Recognizer, Letter Recognizer, or Transcriber to enter text in programs.
- Tap Start > Settings > Personal tab > Input.
- On the Input Method tab, select a text input method and change options as appropriate.
- Tap OK.
You can now go to a program (such as Notes) and start entering text.
Text Input Method Definition
| Block Recognizer | Use a single stroke to write letters, numbers, symbols, and punctuation that are then converted into typed text. Perform gestures to enter Return and Backspace. |
| Keyboard | Tap keys displayed on the on-screen keyboard to enter text. |
| Letter Recognizer Write individual letters, numbers, and punctuation that are converted into typed text. | |
| Transcriber Write in cursive, print, or mixed handwriting (consisting of both cursive and print) and convert writing into typed text. | |

TIP Change the text input method from within any program by tapping the Input Selector arrow and tapping an input method.
Entering Text Using Block Recognizer

NOTE Some text entry methods are not supported in all languages. In addition, some languages may support alternate text entry methods.
- From any program, tap the Input Selector arrow, and then Block Recognizer.
-
Write characters, numbers, and symbols in the designated writing area.
-
Enter letters by writing in the abc (left) area of the box.
- Enter numbers by writing in the 123 (right) area of the box.
- Enter symbols and punctuation by tapping in either area of the box and then writing the desired character.

NOTE Block Recognizer is available when text entry is possible.

TIP For help with writing characters with Block Recognizer, tap the question mark near the writing area.
Entering Text Using the On-screen Keyboard

NOTE Some text entry methods are not supported in all languages. In addition, some languages may support alternate text entry methods.
- From any program, tap the Input Selector arrow, and then Keyboard.
- Tap on the appropriate characters, numbers, and symbols on the on-screen keyboard.
Increase the size of the on-screen keyboard keys to make them easier to tap.
- Tap Start > Settings > Personal tab > Input.
- On the Input Method tab, select Keyboard as the input method, and tap Large keys.
- Tap OK.

NOTE Enlarge the keys even more by selecting the Use gestures for the following keys check box. Fewer keys appear on the keyboard, but you can do gestures for Space, Backspace, Enter, and Shift+key.
Entering Text Using Letter Recognizer

NOTE Some text entry methods are not supported in all languages. In addition, some languages may support alternate text entry methods.
- From any program, tap the Input Selector arrow, and then Letter Recognizer.
- Write characters, numbers, and symbols in the designated writing area.
- Enter capital letters by writing in the ABC (left) area of the box.
- Enter lowercase letters by writing in the abc (middle) area of the box.
- Enter numbers by writing in the 123 (right) area of the box.
- Enter punctuation and symbols by tapping in either area of the box and then writing the desired character.

NOTE Letter Recognizer is available when text entry is possible.

TIP For help with writing characters with Letter Recognizer, tap the question mark near the writing area.
Writing with Transcriber

NOTE Some text entry methods are not supported in all languages. In addition, some languages may support alternate text entry methods.
Transcriber works transparently in the background of programs, recognizing words with its integrated dictionary. When Transcriber is turned on, it interprets stylus movement anywhere on the screen as handwriting input.
To write with Transcriber:
- From any program, position the cursor where you want the text to appear.
- Use the stylus to write anywhere on the screen.
The handwriting is converted to text shortly after you lift the stylus from the screen.
Entertainment
Your HP iPAQ lets you have fun with several entertainment features:
- Play music and watch videos
Play music and watch videos on your HP iPAQ with Windows Media Player 10 Mobile. Synchronize media files between a Windows-based computer and your HP iPAQ. Update playlists, copy music libraries, and use with online music services that support Windows Media DRM protection.
• View and manage digital photos
Use HP Photosmart Mobile to create a digital photo album that's always with you. View and share photos in high-quality color. Use the Slide Show to view photos of friends and family.
- Play games
Let your HP iPAQ help to fill your spare time with games like Solitaire or Bubble Breaker. Purchase other Windows Mobile game titles and useful applications by visiting http://mobile.handango.com/hp or find more information on the Getting Started CD.
Windows Media Player 10 Mobile
Microsoft Windows Media Player 10 Mobile with enhanced features allows you to enjoy digital media in new ways both at home and on the go. The personal computer (PC) version of Windows Media Player 10 or later can be downloaded for free from www.microsoft.com.
With this new version:
- Synchronize music, playlists, videos, and recorded TV to your HP iPAQ for enjoyment on the go.
- Automatically convert video and recorded TV during synchronization to an optimized- and size-reduced format for better viewing on your HP iPAQ.
- Manually select digital media to synchronize to your HP iPAQ, or automatically synchronize to your HP iPAQ each time you connect, based on your preferences.
- New music subscription services that support Windows Media Digital Rights Management (DRM) enable you to pay a monthly fee and download large music libraries to your personal computer. With Windows Media Player 10, you can create playlists with these songs and synchronize them with your HP iPAQ.
For a complete list of features and more, visit www.microsoft.com/windows/windowsmedia/player/windowsmobile.

NOTE Protected files are digital media files that are secured with a license to prevent unauthorized use or playback. Licenses are created and managed by using DRM technology.
Listening to Music and Watching Videos
Use Windows Medial Player 10 Mobile to play songs, videos, and playlists that are stored on your HP iPAQ or removable storage card.
- If you are not on the Library screen, tap Menu > Library.
- If necessary, on the Library screen, tap the Library arrow (near the top of the screen), and then tap the library that you want to use (for example, Storage Card).
- Tap a category (for example, My Music or My Playlists), tap and hold the item that you want to play (such as a song, album, or artist name), and then tap Play or Queue Up.

NOTE To play a file stored on your HP iPAQ but that is not in a library, on the Library screen, tap Menu > Open File. Tap and hold the item that you want to play (such as a file or a folder) and then tap Play or Queue Up.
Clearing the Now Playing List
Under Windows Media Player, the Now Playing playlist displays the currently playing file and any files that are queued up to play next. Quickly remove all items from the playlist by clearing it.
-
If you are on the Library screen, select the Now Playing category to display the Now Playing screen.
If you are on the Playback screen, select Now Playing to display the Now Playing screen. -
On the Now Playing screen, tap Menu > Clear Now Playing.
Updating a Library
In most cases, Windows Media Player 10 Mobile automatically updates your libraries as necessary. However, you can manually update a library to ensure that it has links to any new files that you might have recently copied to your HP iPAQ or a removable storage card.
- If you are not already on the Library screen, tap Menu > Library.
- On the Library screen, tap Menu > Update Library.
- Wait for the files to be added, and then tap Done.
HP Photosmart Mobile
Use HP Photosmart Mobile to:
• View pictures stored on the HP iPAQ or a storage card.
- Add voice or text notes to pictures.
- Print pictures.
• View a slideshow.
- Send pictures by e-mail attachments.
• Associate a picture with a Contact.
- Assign a picture to the Today screen background.
Attaching a Voice Note to a Picture
To attach a sound file to a picture:
- Tap Start > Programs > Photosmart Mobile.
- Tap the thumbnail picture in which you want to add a voice note.
- Tap the Cassette icon.
- Tap the Record button on the Recording toolbar.
- Speak into the microphone to record the sound file and tap the Stop button when finished.
- Tap the Cassette icon again to close the Recording toolbar.
E-mailing Pictures
-
Tap Start > Programs > Photosmart Mobile.
-
Tap the thumbnail picture to be e-mailed.

NOTE If you cannot view or hear the media file to be e-mailed, the file may be protected by Digital Rights Management (DRM). DRM is software that enables secure distribution and prevents illegal distribution of pictures, videos, music, movies, and ring tones over the Internet. For more information on DRM, refer to the on-screen Help by tapping Start > Help and search on DRM.
-
Tap Menu > Send.
-
Tap E-mail Attachment.
-
Tap the Reduce sent photo size to check box and select the reduction percentage desired.
- Tap Next.
- Enter the appropriate e-mail address or use Contacts by tapping Menu > Add Recipient.
- Enter other appropriate information, such as an e-mail title and message.
- Tap Send.
Viewing a Slideshow
To view a slideshow:
- Tap Start > Programs > Photosmart Mobile.
- Tap the slideshow icon at the bottom of the screen.
- Tap the screen to view the Pause, Forward, Backward, and Stop buttons.
Mobile Office
Your HP iPAQ includes the following programs:
- Calendar
- Contacts
- Tasks
- Messaging
• Internet Explorer Mobile - Word Mobile
- Excel Mobile
- PowerPoint Mobile
With these applications:
- Manage contacts and calendar.
- Send and receive e-mail.
- Browse the Internet.
- Open and view slide show presentations.
• Create and edit documents and templates.
• Create and edit Excel workbooks and more.
To access these productivity tools and learn more about the features, tap Start > Programs.
Calendar
Accessing Calendar
Use Calendar to schedule appointments, meetings, and other events.
You can display appointments on the Today screen. If you use Outlook on your personal computer, you can synchronize appointments between your HP iPAQ and computer. You can also set Calendar to remind you of appointments with a sound or flashing LED.
You can look at your appointments in various views (Day, Week, Month, and Agenda). To see detailed appointment information in any view, tap the appointment. You can also change the Calendar view.
For easy access to your calendar, tap Calendar on the bottom of the Today screen. You can also access your calendar by tapping Start > Calendar.
For more information, refer to Additional Product Information located on the Getting Started CD.
Viewing Today's Agenda
- Tap Start > Calendar.
- Tap Menu > View > Agenda.

TIP To quickly view today's agenda, on the Today screen, tap one of your upcoming appointments.
Viewing Appointments
To view an appointment on your calendar:
- Tap Start > Calendar.
- Tap the appointment to view.
To view appointments for the week:
- Tap Start > Calendar.
- Tap Menu > View > Week.

NOTE You can also view appointments for the month or year by tapping the appropriate selection.
Scheduling an Appointment
- Tap Start > Calendar.
- Tap Menu > New Appointment.
- Enter a name for the appointment and information such as start and end times.
To schedule an all-day event, in the All Day box, tap Yes.
- When finished, tap OK to return to the calendar.

NOTE All-day events do not occupy blocks of time in Calendar; instead, they appear in banners at the top of the calendar.
To cancel an appointment, tap the appointment and tap Menu > Delete.

TIP To have the time entered automatically in Day view, tap the time slot for the new appointment, and tap Menu > New Appointment.
Sending a Meeting Request
Use Calendar to schedule meetings via e-mail with contacts who use Outlook or Outlook Mobile.
To send a meeting request:
- Tap Start > Calendar.
- Schedule a new appointment, or open an existing one and tap Edit.
- Tap Attendees.
- Tap the name of the contact to invite.
- To invite additional attendees, tap Add and the tap the name.
- Tap OK. The meeting request is sent to the attendees the next time you synchronize your HP iPAQ.
When attendees accept a meeting request, the meeting is automatically added to their calendars. When their response is sent back to you, your calendar is also updated.
Contacts
Accessing Contacts
Use Contacts to:
- Store phone numbers, e-mail addresses, home addresses, and any other information that relates to a contact, such as a birthday or an anniversary date.
- Add a picture to a contact.
• Quickly communicate with people.
For easy access to contacts, tap the Contacts softkey on the bottom of the Today screen or tap Start > Contacts.
Tap a contact in the list for a summary of contact information.
If you use Outlook on your computer, synchronize contacts between your HP iPAQ and your personal computer.
Creating a Contact
- Tap Start > Contacts.
- Tap New and enter the contact information.
- When finished, tap OK.

NOTE If your contact list has been filtered by a category when you create a contact, that category is automatically assigned to the new contact.
To include a nickname, title, and more, while creating a contact, tap the Name arrow.
If most of the contacts you create have phone numbers that begin with the same area code, in Contacts, tap Menu > Options and enter that area code in the Area code box.
For more information about creating contacts, tap Start > Help on your HP iPAQ.
Finding a Contact
To find a contact on a long list:
- Tap Start > Contacts.
- If you are not in Name view, tap Menu > View By > Name.
-
Do one of the following:
-
Begin entering a name or phone number in the provided text box until the contact is displayed. To show all contacts again, tap the text box and clear the text, or tap the arrow to the right of the text box.
- Use the alphabetical index displayed at the top of the contact list. Tap the tab that corresponds to the first letter of the contact's name.
- Filter the list by categories. In the contact list, tap Menu > Filter. Then tap a category you've assigned to a contact. To show all contacts, select All Contacts.

NOTE To search for a contact by entering a name or phone number, or by using the alphabetical index, you must be in Name view.
Tasks
Creating a Task
Easily create to-do tasks in the Task list.
- Tap Start > Programs > Tasks.
- Tap Menu > New Task, enter a subject for the task, and fill in information such as start and due dates.
- When finished, tap OK.
For more information, refer to Additional Product Information located on the Getting Started CD.
Locating a Task
When the task list is long, display a subset of the tasks or sort the list to quickly find a specific task.
- Tap Start > Programs > Tasks.
-
In the task list, do one of the following:
-
Sort the list. Tap Menu > Sort By, and tap a sort option.
- Filter the list by category. Tap Menu > Filter, and tap the category to display.
Messaging
Different Ways to Access E-mail Messages
When using Messaging, you can send and receive e-mail messages several ways:
- Synchronize Outlook e-mail with your personal computer
Tap Start > Messaging to use your Outlook e-mail address.
• Microsoft Exchange 2003
Exchange enables you to wirelessly synchronize your Inbox, Calendar, and Contacts to remotely check appointments and other information. For more information about Exchange, contact your IT administrator.
- Messaging & Security Feature Pack (MSFP) with Microsoft Exchange 2003 Service Pack 2
Push technology keeps Outlook Mobile up-to-date by delivering Inbox, Calendar, Contacts, and Tasks list quickly and directly to your HP iPAQ. For more information about Connect to Mobile Business E-mail using Exchange Server 2003, contact your IT administrator.
- Internet e-mail messages
Use the e-mail address you received from your Internet Service Provider (ISP) or your employer.

NOTE Some of the messaging applications may vary and are available only on select HP iPAQ models.
Setting up an E-mail Account on an Exchange Server
Synchronize directly with an Exchange Server using a connection to a wireless network or a personal computer.
To set up e-mail on an Exchange server:
- Tap Start > Programs > ActiveSync.

NOTE If a screen displays several messages, click on the link that reads If your company supports synchronizing directly with its Exchange Server you can set up your HP iPAQ to synchronize with it, then follow the series of steps to synchronize your e-mail account with the Exchange Server. Otherwise, continue with the steps below.
- Tap Menu > Configure Server.
If you have not set up a synchronization server link, the following message is displayed: Add Server Source.
-
In the Server address box, enter the name of the server running Exchange 2003.
-
Select the This server requires an encrypted (SSL) connection check box if required by your IT department.
Most companies require this option, and if this box is not checked, you cannot sync with your company Exchange Server.
-
Tap Next.
-
Enter your name, password, and domain, and then tap Next.
-
Select the Save password text box if you want to enable automatic sync.
-
To change the rules for resolving synchronization conflicts, tap Advanced.
-
Select the check boxes for the types of information items that you want to synchronize with Exchange Server.
-
To change available synchronization settings, select the type of information and tap Settings.
-
Tap Finish.
You can set up your HP iPAQ to synchronize with Exchange Server over a wireless network or through a cable or Bluetooth connection to a personal computer. You must have the following information to sync wirelessly: server name, user name, password, and domain name.

NOTE Synchronizing directly with Exchange Server is supported only on Windows Mobile-powered Pocket PC 2002 or later.
By clicking Tools > Options, you can determine whether an information type is synchronized with a personal computer or with Exchange Server.
Setting up a POP3, HTTP, or IMAP4 E-mail Account
To send and receive mail, you need to set up an e-mail account with an Internet Service Provider (ISP) or have an account that you access using a virtual private network (VPN) server connection (typically a work account).
Be sure you have the proper plan with your wireless service provider and the connections have been set up correctly.
To set up an e-mail account on your HP iPAQ:
- Tap Start > Messaging.
- Tap Menu > Tools > New Account.
- Enter your e-mail address, and tap Next.
Auto configuration attempts to download necessary e-mail server settings so that you do not need to enter them manually.
- Once Auto configuration has finished, tap Next.
- Enter your name (the name you want displayed when you send e-mail) and your password.
If Auto configuration is successful, your user name is already entered. Tap Next, then Finish to complete setting up your account, or tap Options to access additional settings. For example:
- Change the time intervals for downloading new messages
- Download attachments
- Limit the number of messages that are downloaded
If Auto configuration is unsuccessful, tap Start > Help and search on email.

NOTE You can set up several e-mail accounts in addition to your Outlook E-mail account.
You cannot add a new account while connected. Tap Menu > Stop Send/Receive to disconnect.
Composing and Sending Outlook E-mail Messages
To compose and send a message:
- Tap Start > Messaging. Outlook E-mail is displayed.
- Tap New. An Outlook E-mail text box is displayed.
- Enter the e-mail address or phone number of one or more recipients, separating them with a semicolon. To access addresses and phone numbers from Contacts, tap To.
-
Enter your message. To quickly add a canned message, tap Menu > My Text and tap a desired message.
-
To check spelling, tap Menu > Spell Check.
- Tap Send. If you are working offline, your message is moved to the Outbox folder and is sent the next time you connect.

NOTE Tap the Inbox drop-down arrow to access other Outlook folders such as Drafts, Outbox, and Sent Items.
Replying to or Forwarding an Outlook E-mail Message
To reply to or forward a message:
- Tap on the message to open it, and then tap Menu > Reply, Reply All, or Forward.
- Enter your response. To quickly add common messages, tap Menu > My Text and tap a desired message.
-
To check spelling, tap Menu > Spell Check.
-
Tap Send.

NOTE To keep the original text with the outgoing message, tap Menu > Tools > Options then tap the Message tab. You must check the When replying to e-mail, include body option.
Sorting the Message List
To sort the message list:
- In the message list, tap the sort list (labeled Received by default) and select an option.
- Select the option again to reverse the sort order (ascending and descending).
Internet Explorer Mobile
Use Internet Explorer Mobile to view and download web pages as well as browse web sites through synchronization, or when connected to the Internet.
Before connecting to the Internet, setting up a wireless connection or network card, obtain the following:
- Internet Service Provider (ISP) or wireless service provider
• ISP server phone number or access point - User name and password
To access Internet Explorer Mobile, tap Start > Internet Explorer.
Word Mobile
You can create and edit documents and templates in Word Mobile. You can also save the documents and templates as .doc, .rtf, .txt, and .dot files.
With Word Mobile:
- Edit Word documents and templates created on your computer.
- Open and edit Pocket Word (*.psw) documents.

NOTE If you edit a file, save it in .doc, .rtf, .txt, or .dot format.
To access Word Mobile, tap Start > Programs > Word Mobile.
Excel Mobile
Create and edit workbooks and templates on your HP iPAQ with Excel Mobile.
With Excel Mobile:
- View, edit, and create charts and graphics, which can be embedded as objects in a worksheet or placed on a separate worksheet.
- Enter formulas and functions, and then filter data to see the subset of information you want.
- Split panes to view different parts of a worksheet at the same time.
- Freeze the top and left-most panes in a worksheet to keep row and column labels or other data visible as you scroll through a sheet.
To access Excel Mobile, tap Start > Programs > Excel Mobile.
PowerPoint Mobile
Use PowerPoint Mobile to open and view slide show presentations created on your computer.
With PowerPoint Mobile:
- Open a presentation from an e-mail message.
- Download a presentation from a file share or the Internet.
- Copy a presentation to your HP iPAQ via a storage card.
- Obtain a presentation by synchronizing with your computer.

NOTE Slide shows created in *.ppt or *.pps format with PowerPoint '97 and later can be viewed on your device.
PowerPoint features that are not supported on your HP iPAQ include:
Notes: Notes written for slides are not visible.
- Rearranging or editing slides: PowerPoint Mobile is a viewer only.
To access PowerPoint Mobile, tap Start > Programs > PowerPoint Mobile.
WLAN
With wireless access, cables are not needed to connect your HP iPAQ to the Internet. Instead, access points transmit data to and from your wireless device. Your HP iPAQ can connect to an 802.11b/g WLAN or connect directly to other WLAN-enabled devices. With WLAN, you can:
- Access the Internet
- Send and receive e-mail
- Access corporate network information
• Use virtual private networks (VPNs) for secure remote access
- Use hotspots for wireless connectivity
Turning WLAN On or Off
To turn WLAN on or off:
- Tap Start > Today > iPAQ Wireless.
- Tap the WLAN icon on the iPAQ Wireless screen.
When WLAN is on:
- The WLAN icon on the iPAQ Wireless screen turns amber or green.
- The wireless light-emitting diode (LED) on your HP iPAQ flashes blue.

NOTE Even though the indicator is blue to indicate WLAN is turned on, it does not necessarily mean a connection has been established with another device or access point.
Turn WLAN off when you are not using it by tapping the WLAN icon again.
When WLAN is off, the WLAN icon turns gray, and the blue LED turns off.
Searching for WLAN Networks to Access
Networks that have been already configured are preferred networks. Choose whether to connect only to preferred networks or to have your HP iPAQ search for and connect to any available network (preferred or not).
- Tap Start > Today > iPAQ Wireless.
- Tap the WLAN icon to turn on WLAN.
-
Tap View WLAN Networks.
-
In the Networks to access box, tap the type of network to connect to (All Available, Only access points, or Only computer-to-computer).
-
Tap the wireless network to which you want to connect.
Configuring Network Security Settings
A wireless network can be added when the network is automatically detected. Or, manually enter the settings information to add the network. To determine if authentication information is needed, check with your Network Administrator or Hotspot Service Provider.
- Tap Start > Today > iPAQ Wireless.
- Turn on WLAN by tapping the WLAN icon.
- Tap View WLAN Networks to choose an available network.
- In Configure Wireless Networks, select the network to configure.
- To use authentication, tap the Network Key tab and select the authentication method from the Authentication list.
- To use data encryption, select an encryption method from the Data Encryption list.
- To automatically use a network key, tap The key is automatically provided. Otherwise, enter the network key manually.
Bluetooth
Your HP iPAQ comes with built-in Bluetooth which is a short-range wireless communications technology. Devices with Bluetooth capabilities can exchange information over a distance of about 30 feet (10 meters) without requiring a physical connection.
Use Bluetooth to:
- Transfer information, such as files, appointments, tasks, and contact cards, between devices that have Bluetooth capabilities.
• Print data to a Bluetooth-designated printer. - Use a Bluetooth service. Once you connect to another device or computer using Bluetooth, you can locate and use any of the services available on that device.

TIP Your HP iPAQ may include additional Bluetooth features.
For more information, refer to Additional Product Information located on the Getting Started CD.
Turning Bluetooth On or Off
To turn on Bluetooth:
- Tap Start > Today > iPAQ Wireless.
- On the iPAQ Wireless screen, tap the Bluetooth icon.
When Bluetooth is turned on, the wireless LED on your HP iPAQ flashes blue.
To turn off Bluetooth, tap the Bluetooth icon again. When Bluetooth is turned off, the Bluetooth LED turns off and no incoming or outgoing Bluetooth connections are possible.

TIP To save battery power, turn Bluetooth off when you are not using it.
Connecting to a Bluetooth Headset
You can use a Bluetooth headset (or other Bluetooth hands-free device) with your HP iPAQ when you create a partnership between them.
- Make sure that the two devices are turned on, discoverable, and within close range.
- Tap Start > Today > iPAQ Wireless > Bluetooth tab.
- Tap Bluetooth Connections > New.
- Select Hands-free/Headset setup and follow the on-screen instructions.
Protecting the HP iPAQ Screen from Cracking or Damage

CAUTION The screen of your HP iPAQ is made of glass and can be damaged or broken by drops, impacts, or pressure.
To reduce the risk of damage to the internal components, do not spray liquid directly on the screen, or allow excess liquid to drip inside your HP iPAQ. Using soap or other cleaning products on the screen might discolor the finish and damage it.
- Observe the following practices to protect the screen of your HP iPAQ from damage:
• Do not sit on your HP iPAQ.
- When transporting your HP iPAQ in a purse, pocket, briefcase, etc., ensure the device does not get compressed, bent, dropped, or hit.
- When not in use, use the protective screen cover (if one is available) on your HP iPAQ and store it in a case. Select from a wide variety of case options at www.hp.com/accessories/ipaq or www.casesonline.com.
- Do not place anything on top of your HP iPAQ.
- Do not bang your HP iPAQ against hard objects.
- Never use any device other than the stylus that comes with the HP iPAQ or an approved replacement to tap or write on the screen. If you lose or break your stylus, order extras at www.hp.com/accessories/ipaq.
- Clean your HP iPAQ by wiping the screen and the exterior with a soft, damp cloth lightly moistened only with water.
Obtaining Services for a Cracked or Damaged Screen

NOTE HP is not responsible for damage that occurs as a result of failure to follow the instructions that came with the HP branded product. Refer to the warranty document included with your HP iPAQ for more information.
If you have a nonwarranty event occur such as a damaged or cracked screen and want your device repaired, contact HP Customer Support at www.hp.com/support for service. However, contacting HP customer service on a nonwarranty event results in a charge for the repair.
Additional Guidelines for Using Your HP iPAQ
- Disconnect all external devices.
• Take the AC adapter and charger adapter with you. - Keep your HP iPAQ in a protective case and keep it in your carry-on luggage.
- For air travel, be sure to turn off Bluetooth and WLAN. To turn off all wireless features, tap Start > Today > iPAQ Wireless.
- When traveling internationally, be sure you have the plug adapter appropriate for the country you are visiting.
Index
A
AC adapter 3
ActiveSync 3, 10, 11, 13
Antennae
Bluetooth 8
WLAN 7
Appointments 32
B
Back components 6
Battery
charging 9
checking charge level 21
cover 6
installation 8
light bulb icon 21
replacing cover 8
saving tips 21
Block Recognizer 23
Bluetooth
antenna 8
headset 45
LED 5, 45
partnerships 45
technology 44
turning on/off 45
Box contents 2
Buttons
Messaging 8
OK 8
power 8
record 5
reset 5
rotate screen 8
Windows Media Player 8
C
Calendar
appointments 32
Today screen 31
today's agenda 31
view 32
CD, Getting Started 2
Charging/communications port 7
Command bar, icons 19
Component illustrations 5, 6, 7
Components
back 6
side 7
top 5
Connections
Bluetooth 44
WLAN 42
Contacts
adding picture 34
creating 34
finding 35
sorting 35
synchronizing 33
Cracked screen protection 46
E
creating 38
forwarding 40
message list 40
Outlook 36
replying 40
sending 39
sorting 40
Entertainment
features 26
HP Photosmart Mobile 28
listening to music 27
playing games 26
playing music and videos 26
viewing pictures 28
watching videos 27
Windows Media Player 10 Mobile 26
Excel Mobile 41
Exchange Server 36, 37
F
Factory reset 17
Finding information
accessing Help 4
Getting Started CD 4
Internet sites 4
sources 4
Frequently asked questions 1
G
Getting Started CD
accessing documents 3
HP iPAQ enhancements 3
installing software 3
H
Handwriting recognition 25
Headset connector 7
HP Install Wizard 10
HP Photosmart Mobile 28
|
Icons
Command bar 19
iPAQ Wireless 20
Navigation bar 19
Quick Launch 18
Illustrations, product 5, 6, 7
Imaging
attaching sounds to pictures 29
e-mailing pictures 29
HP Photosmart Mobile 28
printing pictures 28
sending pictures 29
viewing a slideshow 30
viewing pictures 28
Internet Explorer Mobile 40
iPAQ Wireless
Bluetooth 45
icons 20
WLAN 42, 43, 44
K
Keyboard, on-screen 24
L
LED indicator 5
Left components 7
Letter Recognizer 25
M
Messaging & Security Feature Pack (MSFP) with
Microsoft Exchange 2003 Servic Pack 2 36
Messaging button 8
Microphone 8
Microsoft ActiveSync 10, 11
Microsoft Exchange Server 36, 37
Microsoft programs
Excel Mobile 41
Internet Explorer Mobile 40
PowerPoint Mobile 42
Word Mobile 41
Mini-USB synchronization cable 3, 11
Mobile Office
Calendar 31
Contacts 33
Messaging 36
Tasks 35
Model number, location 16
N
Navigation bar, icons 19
0
OK button 8
Outlook e-mail 36
P
Password
change or reset 16
hint 16
Photos
viewing 28
Power button 8
PowerPoint Mobile 42
Product component illustrations 5, 6, 7
Protecting the HP iPAQ screen reducing damage risks 46
routine care 46
Q
Quick Launch
Entertainment icon 18
Internet icon 18
Organizer icon 18
Today icon 18
R
Record button 5
Removable clip cover 2
Removable/rechargeable battery 3
Reset button 5
Resets
factory 17
soft 17
Right components 7
Rotate screen button 8
S
Screen
cracking 46
damage 46
protecting 46
Scroll wheel 5, 8
SD slot 5
Serial number, location 16
Services
for cracked or damaged screen 47
HP Customer Support, contacting 47
Setup instructions 8
Side components 7
Soft reset 17
Speaker 6
Stylus 2, 6, 7
subscription music service 26
Sync mode 13
Synchronization Setup Wizard 12
Synchronizing
ActiveSync 10, 11
Bluetooth 11
calendar 11
contacts 11
e-mail messages 11
mini-USB synchronization cable 10, 11
personal computer 11
troubleshooting 13
T
Tasks
creating 35
locating 36
Text
Block Recognizer 23
entering 22
Letter Recognizer 25
on-screen keyboard 24
Transcriber 25
Today screen
active tasks 18
appointments 18
clock 18
connectivity indicators 18
Contacts 18
default softkeys 18
messaging 18
volume 18
Top components 5
Transcriber 25
W
Windows Media Player 10 Mobile
listening to music 27
Now Playing list 28
updating library 28
watching videos 27
Windows Media Player button 8
Wired stereo headset 3
WLAN
antenna 7
authentication 44
iPAQ Wireless 43, 44
LED 5, 43
network key 44
network security settings 44
searching for networks 43
turning on/off 43
Word Mobile 41


- Table of contents
- HP iPAQ Product Information Guide
- Frequently Asked Questions
- Box Contents
- Getting Started CD Contents
- Components
- Top Components
- Back Panel Components
- Component Function
- Left and Right Side Components
- Setting Up Your HP iPAQ
- Step 1: Install the battery
- Step 2: Charge the battery
- Step 3: Insert the Getting Started CD into the CD drive of your personal computer
- Step 4: Follow the on-screen instructions on your personal computer
- Microsoft ActiveSync
- Step 5: Complete the Setup Wizard on your HP iPAQ
- Step 6: Synchronize your HP iPAQ with your personal computer
- Synchronization
- Changing the ActiveSync Connection Mode
- Troubleshooting Help for Synchronization Issues
- Protecting Your HP iPAQ with a Password
- Finding the Serial Number and Model Number
- Resetting Your HP iPAQ
- Performing a Soft Reset
- Performing a Factory Reset
- HP Quick Launch
- Today Screen
- Status Icons
- Icon Status
- iPAQ Wireless
- Checking the Battery Charge Level
- Battery Saving Tips
- Entering Text
- Entering Text Using Block Recognizer
- Entering Text Using the On-screen Keyboard
- Entering Text Using Letter Recognizer
- Writing with Transcriber
- Entertainment
- Windows Media Player 10 Mobile
- Listening to Music and Watching Videos
- Clearing the Now Playing List
- Updating a Library
- HP Photosmart Mobile
- Attaching a Voice Note to a Picture
- E-mailing Pictures
- Viewing a Slideshow
- Mobile Office
- Calendar
- Accessing Calendar
- Viewing Today's Agenda
- Viewing Appointments
- Scheduling an Appointment
- Sending a Meeting Request
- Contacts
- Accessing Contacts
- Creating a Contact
- Finding a Contact
- Tasks
- Creating a Task
- Locating a Task
- Messaging
- Different Ways to Access E-mail Messages
- Setting up an E-mail Account on an Exchange Server
- Setting up a POP3, HTTP, or IMAP4 E-mail Account
- Composing and Sending Outlook E-mail Messages
- Replying to or Forwarding an Outlook E-mail Message
- Sorting the Message List
- Internet Explorer Mobile
- Word Mobile
- Excel Mobile
- PowerPoint Mobile
- WLAN
- Turning WLAN On or Off
- Searching for WLAN Networks to Access
- Configuring Network Security Settings
- Bluetooth
- Turning Bluetooth On or Off
- Connecting to a Bluetooth Headset
- Protecting the HP iPAQ Screen from Cracking or Damage
- Obtaining Services for a Cracked or Damaged Screen
- Additional Guidelines for Using Your HP iPAQ
- Index
- A
- B
- C
- E
- F
- G
- H
- |
- K
- L
- M
- N
- 0
- P
- Q
- R
- S
- T
- W
Brand : HP
Model : iPAQ rx4240
Category : PDA