
Synchrony One B - Loudspeaker PSB - Free user manual and instructions
Find the device manual for free Synchrony One B PSB in PDF.


| Product Type | Bookshelf Loudspeaker |
| Frequency Range | 45-23,000 Hz (±3 dB on axis) |
| LF Cutoff (-10 dB) | 38 Hz |
| Sensitivity (Anechoic) | 86 dB |
| Impedance (Nominal) | 6 Ohms |
| Recommended Amplifier Power | 15-150 Watts |
| Program Power | 150 Watts |
| Tweeter | 1" (25 mm) Titanium Dome with Ferrofluid |
| Woofer | 6.5" (165 mm) Fine Weave Fiberglass/Natural Fiber Cone, Rubber Surround |
| Crossover Frequency | 2,200 Hz, 4th-order Linkwitz-Riley |
| Enclosure Type | Bass Reflex (0.75 cu ft / 21 liter) |
| Dimensions (W x H x D) | 8.75" x 14.375" x 12.875" (220 x 364 x 326 mm) |
| Weight (each) | 22 lb (10 kg) |
| Shipping Weight (pair) | 49 lb (22 kg) |
| Finish | Black Ash or Dark Cherry Wood Veneer |
| Connectors | Heavy-duty gold-plated 5-way binding posts (bi-wirable) |
| Grille | Perforated Hex, acoustically transparent metal with cloth cover |
| Special Features | Port Cover accessory for bass tuning; Tri-mode wiring (for surround models); Aluminum/wood cabinet construction |
| Cabinet Care | Wipe with soft cloth, use glass cleaner for heavy soil; avoid abrasives |
| Warranty Registration | Online at www.psbspeakers.com |
Frequently Asked Questions - Synchrony One B PSB
User questions about Synchrony One B PSB
0 question about this device. Answer the ones you know or ask your own.
Ask a new question about this device
Download the instructions for your Loudspeaker in PDF format for free! Find your manual Synchrony One B - PSB and take your electronic device back in hand. On this page are published all the documents necessary for the use of your device. Synchrony One B by PSB.
USER MANUAL Synchrony One B PSB
Warranty Registration/Unpacking 5
Adjusting Rubber Levelers, Spikes and Feet 6
Wall Mounting Synchrony S Surrounds 7
Speaker Placement - Maximizing Your Enjoyment 8 The Speakers in Relation to Room Boundaries You in Relation to the Speakers You in Relation to Room Boundaries Positioning Surround Speakers
Connections 13 Selecting Speaker Wire Conventional Wiring Bi-Wiring or B9Amping Options
Speaker Connection Options (For Synchrony S Surrounds) 15
Synchrony Port Cover 20
Recommended Power 21
Cabinet Care 21
In Case of Problems 22
Specifications 23
Congratulations on purchasing your new PSB Synchrony loudspeaker. We hope that you enjoy our product for many years to come. This owner's manual will give you many useful tips about connecting, placing and using your new Synchrony loudspeaker. We recommend you read it thoroughly and it should answer all of your product related questions. If not, feel free to contact us through our website: www.psbspeakers.com
Synchrony design background
A little technical background might give you an appreciation of the technology that went into the design of your Synchrony product.
Our intention in designing the PSB Synchrony range of products was to bring to bear all that we have learned in over 35 years of crafting fine loudspeakers to create a line of high performance systems of truly elegant design.
The Synchrony models use advances in three core technologies, the cabinet, the drivers, and crossover design.
THE CABINET
Cabinets for a high performance loudspeaker must be heavy, rigid and vibration free. Sound must come from the drivers only, never from the cabinet itself.
Cabinets for Synchrony models are unlike any other. They are a blend of two very different materials: aluminum and wood. Front and back surfaces are from very solid double wall aluminum extrusions. The strength and stiffness of aluminum allows a very rigid structure that can be precisely machined to accept drivers and other components. Special contours can be achieved in aluminum that preserve the sonic characteristics of the drivers.
The curved side panels are made from multiple layers of wood. Wood is stiff relative to its weight and has inherently high damping properties to absorb sonic energy that might otherwise color the sound. The sides of the Synchrony models are made from seven layers of 3mm MDF individually laminated/formed onto a curved surface which improves the panel's stiffness. Additionally, the sides are clad in finely finished veneers to enhance the beauty of the systems.
DRIVERS
Drivers (woofers and tweeters) are a key component to the performance of the new Synchrony models. A number of enhancements elevate them over previous components.
Distortion Reduced Motor
The field generated by a signal driving the voice coil reacts with the field in the magnetic structure's air gap. A long four layer voice coil normally results in high self induction and impedance that varies with excursion.
These two factors causing distortion in bass drivers are practically eliminated by the combination of an aluminum shorting ring within the magnet structure, the aluminum phase plug on the pole piece, and a shorted copper turn on top of the pole piece. The aluminum phase plug smoothes response and also contributes as a heat sink for the voice coil, reducing power compression. Long voice coils for all woofers (in a narrow gap) ensure high and uniform BL vs. excursion, to maintain dynamic linearity. The result is unbelievable clean bass/midrange reproduction.
Laminated Sandwich Cone
The cones are constructed from a fine weave fiberglass cone material along with a laminate of compressed, felted fiber laminate. This creates a stiff but still dampened cone that will remain stable even under very large sound pressures. In addition, a central dustcap gives a second connection between the cone and voice coil. This triangulation provides an incredibly rigid assembly for clean response to high level inputs.
CROSSOVER DESIGN
Great components and construction alone will not guarantee a good sounding system. More than anything, the crossover is what defines the sound of a speaker. The crossover determines the band of operation of each driver and determines how seamlessly the units transition from one range to the next. It sets the octave-to-octave balance that defines the personality of the system. At PSB, years of design experience, highly tuned sets of ears, and the unsurpassed facilities of the National Research Council in Ottawa, lead to superior crossover design.
With the Synchrony One and Two Towers a unique driver/crossover arrangement minimizes the unwanted effects of floor bounce induced early reflections. These reflections interfere with the direct sound and contribute peaks and dips to the response.
For the entire Synchrony series the crossover slopes are acoustical fourth order Linkwitz-Riley type with attention paid to the direction of the “in phase lobe”. The lobe, an inevitable effect of transitioning from driver to driver, is optimally aimed. Whether seated or standing, the frequency response of the system does not vary.
Crossover components are chosen to be the best quality possible. Heavy multi-lamination iron cores are used for large value inductors. High gauge wire air cored inductors are used medium and small value inductors. All capacitors are especially low loss. Tight component tolerances and exhaustive testing in manufacturing ensure that each system is a match to the engineering references, giving you the sound quality that PSB designed in.
Additional features of the Synchrony models:
- 1" Titanium Dome Tweeter/Neodymium Motor/Aluminum Heat Sink. Low mass for required stiffness needed for wide bandwidth response. High efficiency and high power handling.
- Three chamber individually ported cabinet design (tower models) gives greater control over the system tuning, resulting in deeper bass. Doesn't suffer from the standing wave problems found in a typical tower.
• Perforated Hex Acoustically transparent Metal Grill covered in cloth.
• Heavy duty gold plated five way binding posts (bi-wireable).
• Rigid Cast Aluminum Baskets with high flow design. - Woofer suspensions (spiders) are ventilated to allow air to flow freely, creating a cooling effect for the voice coil
- Woofers utilize a progressive (gradually tightening) suspension to achieve soft clipping and low distortion even under extreme excursion.
- Woofer surrounds are made from SBR rubber for wide operating temperature range, low creep and long term reliability.
- Woofer magnets are 20mm thick, 5mm higher than the normal 15mm magnets. This prevents bottoming of the coil to the pole piece for widest dynamic range.
Warranty Registration
We recommend you take a few moments now to register your warranty on-line at www.psbspeakers.com so that we will be able to serve you better in the future.
Unpacking
The packing materials of your PSB Synchrony speakers are designed to protect them from damage during shipping. Retain the packaging in case the need arises to transport the speakers in the future.
Notes on environmental protection

natural_image
Symbol of a trash bin crossed with no text or numbers, representing waste sorting or restriction (no text present)At the end of its useful life, this product must not be disposed of with regular household waste but must be returned to a collection point for the recycling of electrical and electronic equipment. The symbol on the product, user's manual and packaging, point this out.
The materials can be reused in accordance with their markings. Through re-use, recycling of raw materials, or other forms of recycling of old products, you are making an important contribution to the protection of our environment.
Your local administrative office can advise you of the responsible waste disposal point.
Adjusting Rubber Levelers and Spikes
(Tower Speakers)
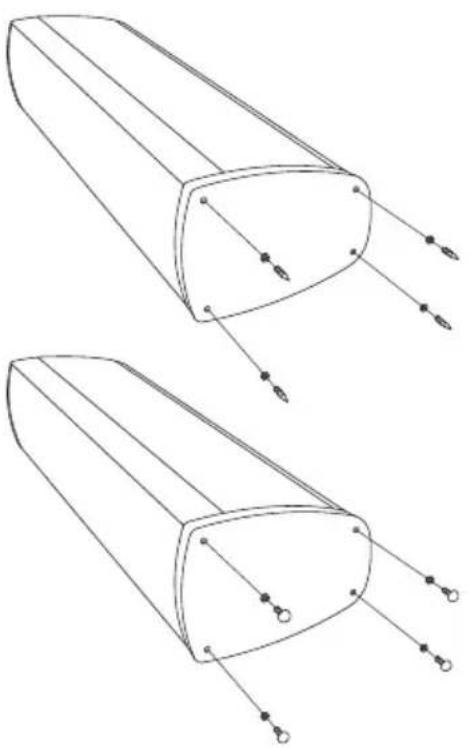
Attach the supplied spikes or rubber levelers to the bottom of the speaker as shown in the diagram at right. On carpets, position the speakers and adjust spikes to the desired height (higher for thicker carpet) and hand tighten the locknuts against the bottom of the cabinet.
Adjusting Rubber Foot (For Centre Channel Models)
The Synchrony One C and Two C centre channel speakers come supplied with a multi-position foot that allows them to be placed at a variety of angles.
Notice that the support has four different angled sides. All of these sides may be attached to the system depending on the angle of tilt required. An adhesive strip is provided to permanently attach the foot to the cabinet.
When placed below your viewing screen you can tilt the system upwards by placing the foot under the front edge of the system. To aim the system straight outward, place the foot under the rear edge with the longer side in contact with the system. It will be raised by the shorter dimension. If the system is well above your viewing screen and a downward tilt is required, then attach the shorter dimension to the back of the cabinet. This will give the maximum rise for the greatest downward tilt.
Apply the provided felt discs to the corners of the opposite edge (front or back) to prevent marring your system or equipment cabinet.
natural_image
Technical line drawing of two cylindrical electronic components with internal wires and terminal dots (no text or symbols)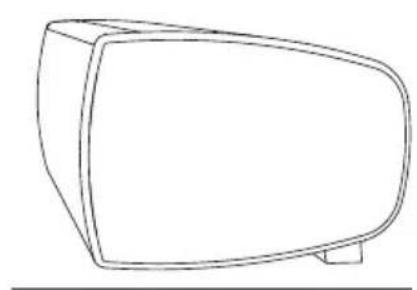
natural_image
Line drawing of a vintage television set (no text or symbols)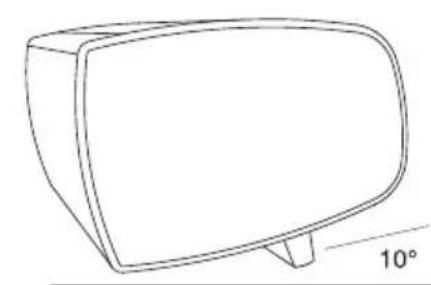
natural_image
Line drawing of a 3D rectangular object with a 10° angle label (no other text or symbols)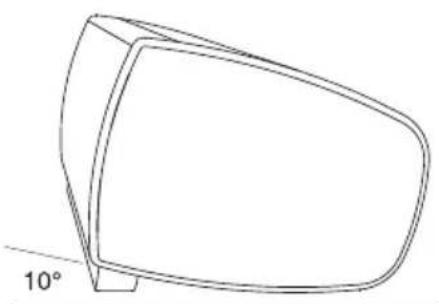
natural_image
Line drawing of a 3D object with a 10° angle标注 (no other text or symbols)Wall Mounting Synchrony S Surrounds
Select and install wall-mounting brackets and hardware sufficient to hold the weight of the speakers on the walls safely.
- Use the "3 finger" style flush mount bracket (provided in Owner's Manual Kit).
- The speaker should be mounted at a minimum height of five feet measured from the bottom of the speaker to the ground. The speaker can be mounted on the wall beside or behind the listener. Screws with sufficient length and located to solidly enter wood are preferred. Metal anchors, which partially collapse inside the wall, provide greater holding power than individual screws. Screws into plastic (or metal) shield anchors in wallboard, tile, masonry, or concrete can provide great holding power. Do not use the simple expanding type anchors in wallboard. These are intended for use in masonry only. If a fastener does not tighten securely, install another, larger fastener.
- One of the brackets has already been installed on the cabinet. Install the other matching bracket, with the interlocking finger facing up, on the wall. Ensure the bracket is level and aligned to the desired position and secure in place. Use the appropriate screws/fasteners for the type and construction of the surface, taking into consideration the weight of the speaker.
- Wire the speaker before mounting on the wall. Maintain electrical polarity throughout the system. Use the following polarity indicators as applicable: red connects to: rib/+/print/copper wire and black to smooth/-/blank/silver wire.
- Place the speaker against the mounting surface and slide down, interlocking the fingers of the brackets.
- Carefully load test the installed speaker to ensure that it is secure and safe.
- THE INSTALLER IS RESPONSIBLE FOR A SAFE AND SECURE INSTALLATION.
Speaker Placement — Maximizing Your Enjoyment
Proper loudspeaker placement is an essential ingredient to getting the best sound from your high performance stereo, multi-channel audio or home theatre system. The goal is to reproduce faithfully the audio soundtrack the movie director or music producer created without calling any attention to the speakers themselves.
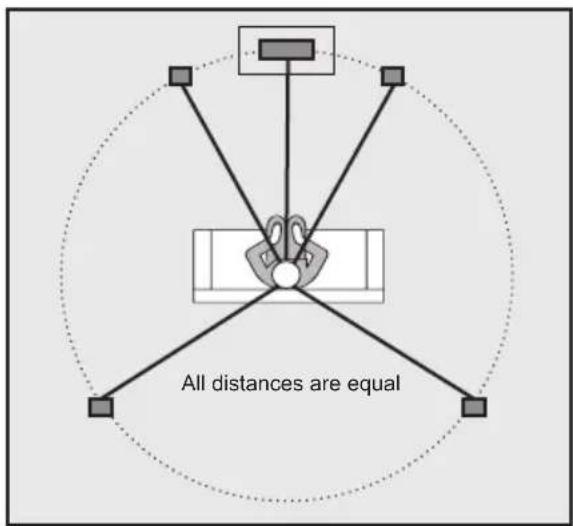
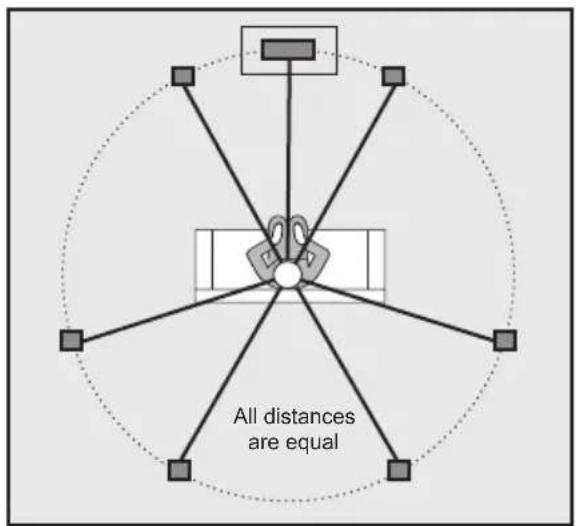
5.1 surround speaker placement 6.1/7.1 surround speaker placement
Fortunately, it is a straightforward process that just takes some care and patience. Should you have a large room and the possibility to arrange the room as you wish or if you are designing a room for home entertainment refer to the diagrams shown here for ideal speaker placement. In this arrangement all speakers (except the subwoofer) are placed the same distance from the listener. In most cases, you'll need to adapt your speaker placement to a given room that's less than ideal. Here are a few speaker placement basics to keep in mind as you get started:
A. I imaging and other spatial qualities will generally be best if your front left/right speakers and your usual seating position form an almost equilateral triangle, with the speakers not quite as far apart from each other as they are from the listening position. If you must sit closer to one speaker than the other, use the Balance control on your electronics (or the individual level controls on home theater channels) to give the more distant speaker a balancing boost in volume.
B. Our tower speakers are designed for optimal listening from the seated to standing position. For our monitors, we offer accessory speaker stands to achieve the right height if you are not using existing shelves or furniture.
C. The best high-frequency dispersion—producing the widest "sweet spot" in which you and others can sit and enjoy optimum high-frequency definition—will result when the main speaker enclosures
are positioned vertically rather than horizontally. If you are placing your monitors horizontally, the speakers will still perform very well, but the seating area where you will enjoy optimum sound will become narrower. We suggest you position the tweeters to the outside away from the centre line. You may prefer to tilt the speakers towards ear level.
D. If you sit equally distant from both speakers, angling the speakers inward ("toeing them in") about 5 to 10 degrees usually produces the best convergence of high frequencies where you listen. Different listening positions may require different toe-in.
E. Surround speaker placement is covered in Section 4. To go beyond these basics, experiment with positioning for optimum performance. Please read the placement guidelines that follow. They are about the speakers, the room, and your listening position.
The Speakers in Relation to Room Boundaries
The position of your speakers with respect to the walls, floor, and ceiling of your listening room will often affect their sound in major ways.
A. The closer you place speakers to the boundary surfaces of your room, the greater the proportion of bass in their overall sound. This is due to the enclosing, “focusing” effects of nearby surfaces on longer-wavelength (lower) frequencies. Positioning the speakers near the intersection of two surfaces (wall and wall, wall and floor, or wall and ceiling) will produce more apparent bass than placement near a single surface. The greatest proportion of bass is delivered by placement near three intersecting surfaces—in a room corner near the floor or ceiling, where the convergence of the two walls and the floor/ceiling produces an amplifying effect that is a bit like that of a megaphone. And the least bass comes from placing a speaker away from all boundaries. Your own tastes should decide what proportion of bass response seems right in your room.
B. The combination of the three dimensions of your room generally will produce at least three points in the room where the frequency response you experience related to a given position (of either the speaker or you) will either greatly increase or almost disappear. The most obvious effects are on low frequencies, but mid-frequency effects, while usually subtler, are also often present. Keep in mind, then, that very small changes in positioning (of the speakers or you) may produce major or subtle changes.
C. Distances of speakers from the walls can make great differences in the number, strength, and particular frequencies of secondary reflections—changing frequency-balance, sonic spaciousness, and definition. Most listeners prefer their speakers at least a few
inches from all walls, but the choice is yours to determine by listening.
You in Relation to the Speakers
Where you sit in relation to your speakers obviously makes a difference too. The proportions of the particular triangle formed by your speakers and you matter. (You may need to send more power to the more distant speaker to compensate if you get much further from one speaker than the other.) The overall distances involved also matter. As you get further from the speakers, more sound reflected from your room's surfaces (in contrast to the sound coming directly from the speakers) reaches your ears, and the original spatial relationships in a recording are changed as your room "takes over." Sometimes the result is a mellower, more "integrated" sound. Other times, it's a more strident or annoyingly "echoey"—or other—quality. Once again, the particular dimensions of your room play a part. And depending on what seems more realistic and/or enjoyable to your ears, you may choose to sit at a great distance or have close-up, "near-field" sound. Keep in mind that the right "toe-in," the right speaker height, and a reasonably symmetrical distance from the speakers all tend to work together to deliver the best high-frequency definition and imaging.
You in Relation to Room Boundaries
Changing your own position with respect to a room's boundaries may also bring a big effect, sometimes for a small change. Getting further from the wall behind you may make sound more precise and localized. Getting closer may make sound more “mellow” and integrated.
Coming too close—to back wall, side wall, or (especially) a corner—you may experience a major peak or cancellation of a certain band of frequencies. It depends on factors we can't cover fully here but do get into on our web site.
Remember too, with respect to your own positioning, that it may—or may not—be easier to change your own seating location than to move your speakers. As with so much else in life, the one certain rule is that you shouldn't fix, or worry about, what isn't broken (audibly in this case), especially if it means moving heavy furniture.
As you consider the three relationships we have outlined, the idea is to manipulate whatever variable is easiest and most productive for improving your listening experience. Be sure to base your judgements on listening to a good variety of recordings of vocals, and acoustic instruments, soloists, different movies and musical instruments to most easily recognize tonal balance shifts.
Positioning Surround Speakers
We are often asked about what kind of surround speakers are best: dipole, bipole, or monopole (direct-radiator). Placement, room acoustics, and other factors affect the sonic realism of movies and

natural_image
Simple diagram showing a speaker with sound waves, no text or symbols presentBipole 5.1 System
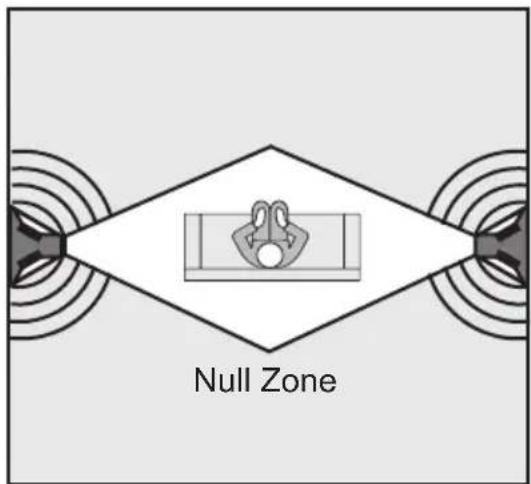
Dipole 5.1 System
Multi-channel audio at least as much as the radiating characteristics of a speaker. Therefore, we do not make specific recommendations but rather suggest you discuss the best solution for your particular needs with your authorized PSB audio/video specialty retailer or visit our Web site.
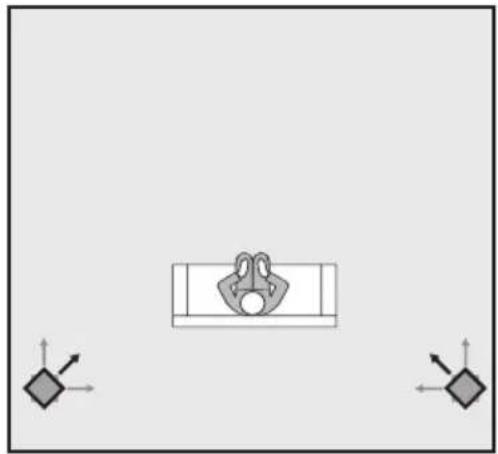
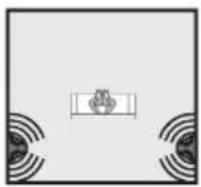
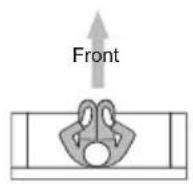
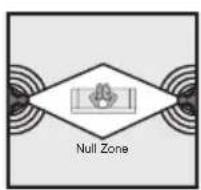
Bipole (speakers in-phase) or direct radiating surrounds placed slightly BEHIND the listening position can offer an exceptionally convincing diffuse soundfield without calling any attention to the surround speakers themselves. It should be noted that in the alternative dipole surround configuration the two baffles of each surround speaker are out-of-phase with each other creating a “null” or dead zone of sound in the area along the 90-degree axis of the speaker. DIPOLE SURROUNDS MUST BE PLACED ON THE SIDE WALLS DIRECTLY BESIDE THE LISTENING POSITION. The effect is lost as soon as you move outside the “null”. All PSB Synchrony Series speakers are timbre matched (have similar tonal characteristics) for easy mix and match home theater system flexibility and ultimate performance. Most surround sound is meant more to create greater depth and overall ambience than to localize effects as coming from a particular spot. How much you prefer these localized effects vs. overall sonic depth and diffusion is up to your listening preferences. If you are listening to multi-channel music from BD-Audio, DVD-Audio or SACD, you may want the maximum localization of instruments. However, for most home theater applications a diffuse soundfield might be preferred. You can locate and aim your surround speakers to produce the effects you prefer, whether precisely pinpointed or pleasantly diffused. For example, you may choose to position monitors behind your listening position on
stands at ear height as shown in the diagram at right and, experiment with speaker positioning in relation to the listener to obtain the level of direct versus diffuse sound that you prefer.
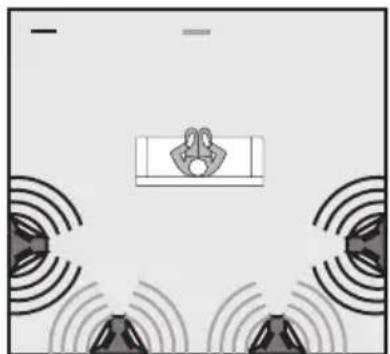
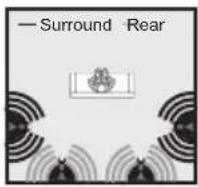
Most people find it best to mount dedicated surround speakers like our Synchrony S Surrounds on the side walls slightly behind the prime listening position and two feet above ear height when seated (this typically places the bottom of the speaker about 5 feet (1.5 m) above the floor.) The surround speakers can also be mounted at ceiling level or on floor stands if this is preferred but remember to follow the wiring requirements outlined in Surround Speaker Connections below. Also, for those adding a rear centre channel for 6.1 and 7.1 systems, the Synchrony S offers several rear centre surround solutions. The Synchrony S Surround with both dual crossovers and speaker inputs, provides exceptional wiring and placement possibilities for achieving a diffuse soundstage. For example, the Synchrony S's Tri-mode Surround Speaker Placement™ (TSSP) design allows for easy bipole or dipole wiring. In addition, it offers the possibility of using one pair of Synchrony S for 6.1/7.1 systems by wiring the forward firing baffles for the side surround channels and the rear firing baffles for the rear center surrounds. The illustrations below show several 6.1/7.1 speaker placement options utilizing two, three or four Synchrony S surrounds. Your PSB audio/video specialist will be able to recommend the best placement options for your particular needs and budget.
natural_image
Simple diagram showing a vehicle with two directional arrows pointing toward it, no text or symbols present.Note that when you move from Figure 1 through to Figure 3 power handling improves, therefore the ability to produce wider dynamic range increases. Also positioning additional Synchrony S Surrounds allows for a more convincing, enveloping surround soundfield.
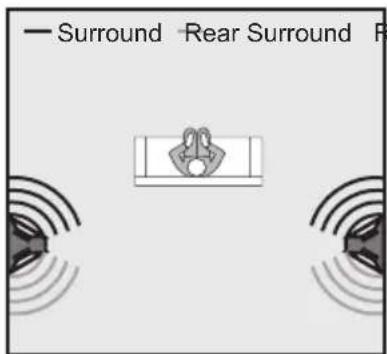
Figure 1 6.1/7.1 System using two Synchrony S Surrounds
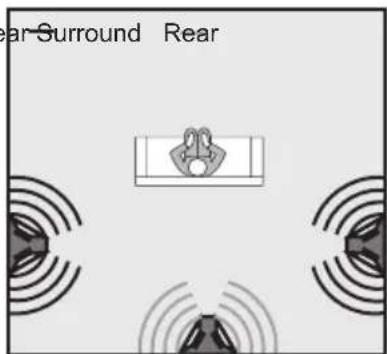
Figure 2 6.1/7.1 System using three Synchrony S Surrounds
natural_image
Diagram of sound wave propagation with speaker and sound waves (no text or symbols)Figure 3 6.1/7.1 System using four Synchrony S Surrounds
Connections
Important: Always turn off your electronic equipment before connecting speakers.
Selecting Speaker Wire
We recommend the following gauge of standard two-conductor speaker wire for the wiring distances specified; if you prefer, you can use thicker (lower-gauge) wire.
Under 25 ft (<7.5 m): 18-gauge or 1.0 mm dia (lamp cord) 25-50 ft (7.5 - 15 m): 16-gauge or 1.3 mm dia (heater cord) 50-100 ft (15-30m): 14-gauge or 1.6 mm dia Over 50 ft (>15 m): 12-gauge or 2.0 mm dia
You may wish to audition and compare the performance of some of the specialty audio interconnects and speaker cables available from your dealer.
Conventional Wiring
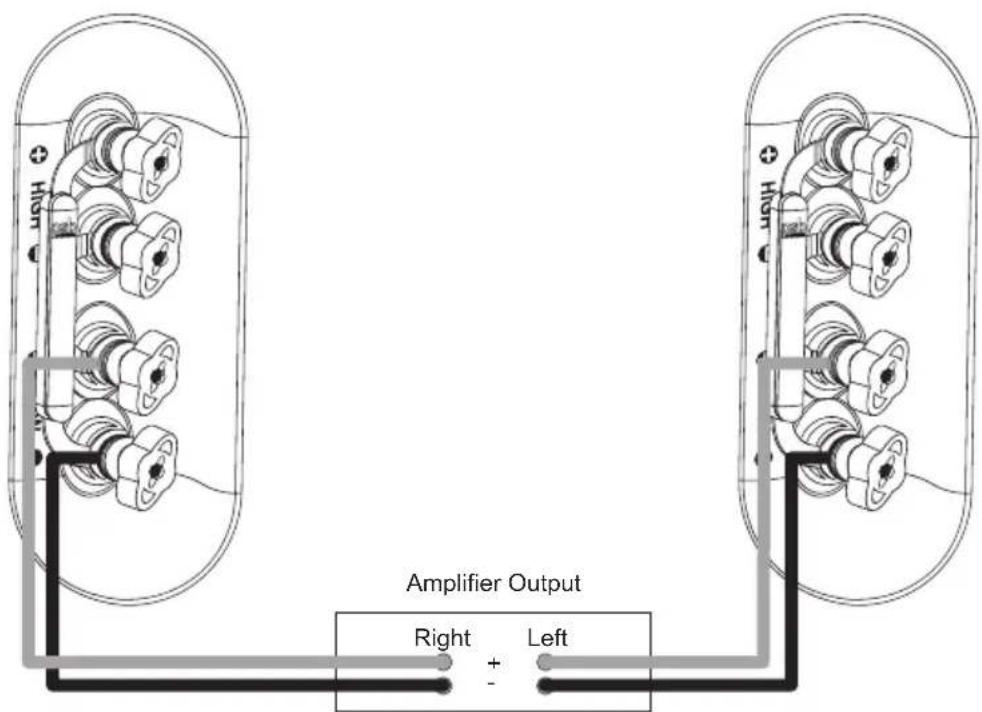
Connect speakers identically to your amplifier or receiver on each panel channel Red amp/receiver terminal to Red speaker terminal, Black to Black. This will ensure that the diaphragms of the speakers on both channels move forward and backward together ("in-phase"), rather than in opposition ("out-of-phase"). In-phase connection provides maximum clarity and bass, while out-of-phase connection results in frequency cancellations and produces thinner and less distinct sound—with less bass, vague vocal quality and no solid center image. To help ensure the proper connection, the two separate conducting wires in a standard two-conductor speaker cable are coded in one way or another to be
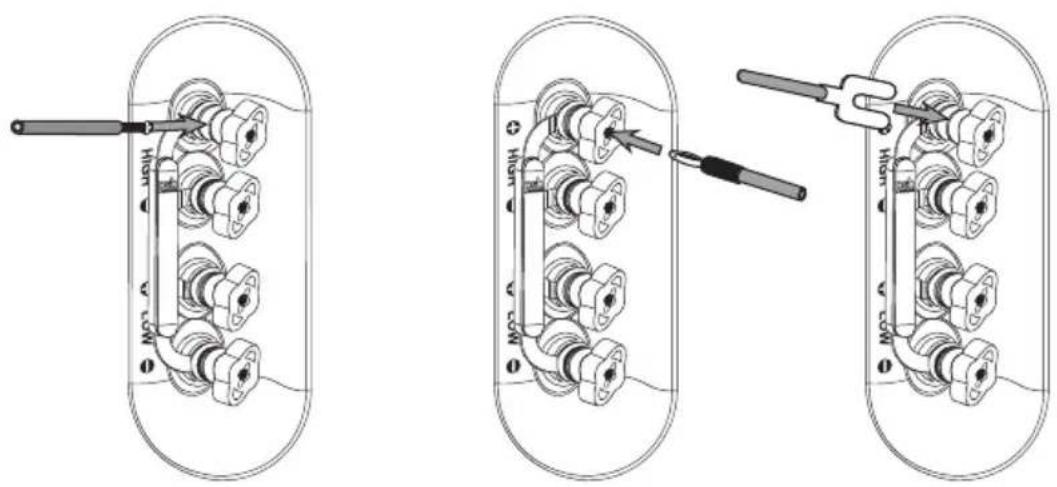
Bare Wire Connection Banana Plug Connection Spade Plug Connection
Loosen 1/2" (13mm) wingnut. Insert wire through hole and tighten nut. Takes wire sizes up to 8 gauge.
Insert banana plug into the top of the wingnut. Ensure the wingnuts are tightened.
Loosen wingnut to expose the top of the jumper strap. A 1/4"(6mm) or 5/16"(8mm) spade will fit on the narrower section of the post. Tighten the wingnut.
distinguishable from each other. (The jacket of one wire may be ribbed or marked with ‘+’ plus signs, or one wire under the insulation may be different from the other.) Use this wire coding, together with amp/receiver and speaker colour-coding, to be sure you are connecting the same wire of a given pair to a like-coded terminal at both ends of your connection. Assure all wiring terminals are tightened firmly but be careful not to over tighten and damage the connectors.
Bi-Wiring or Bi-Amping Options
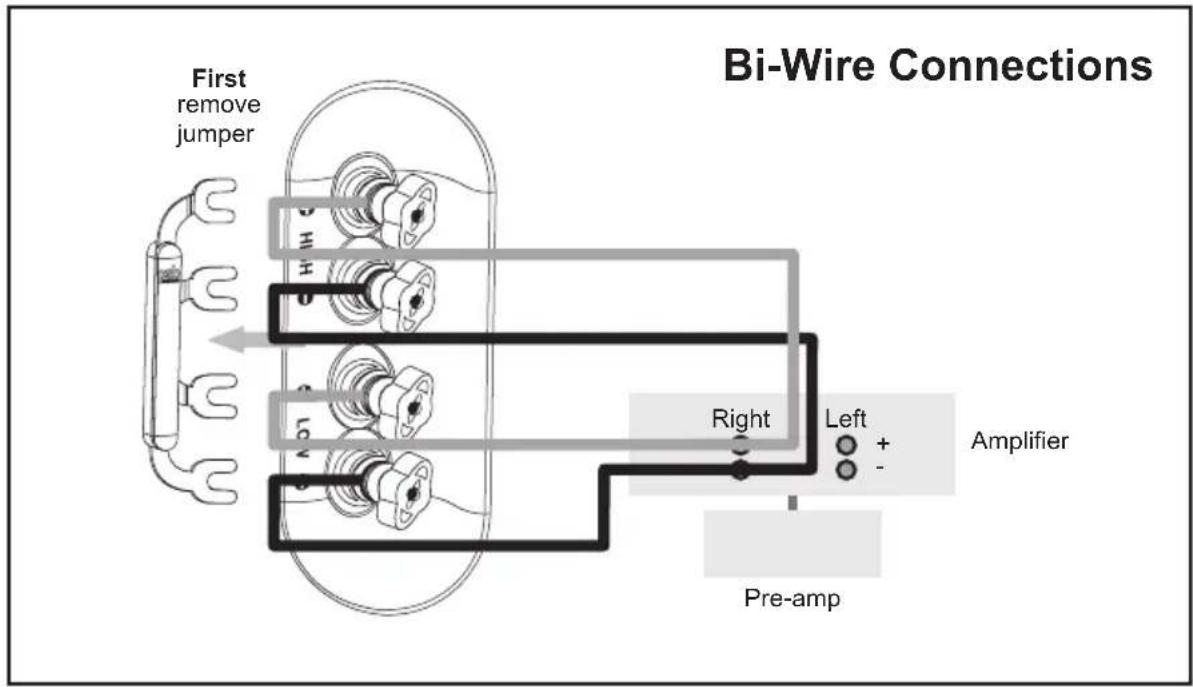
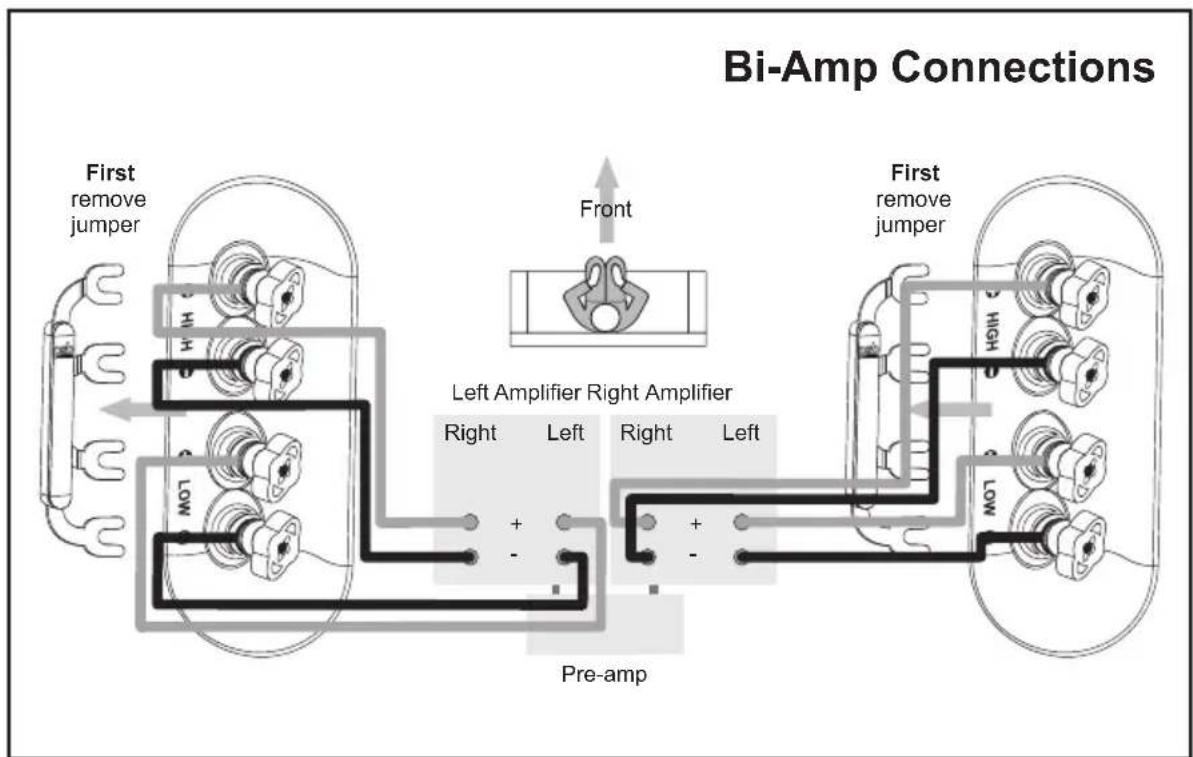
PSB Synchrony speakers can be bi-wired (separate cables to the separated woofers and midrange/tweeters from the same amplifier (except on the Synchrony S Surround)) or bi-amped (separate amplifiers). With single cable inputs, the jumper straps must be in place and both sets of terminals tightened firmly. Before bi-wiring or bi-amping, ALWAYS remove the metal jumper straps that connect the two sets of binding posts on the speaker. Loosen 12 " (13mm) wingnuts to remove the jumper strap. With bi-amp hookup you must use either identical amplifiers or amplifiers adjusted to have the same voltage gain. Consult your PSB dealer or our Web site for further information.
flowchart
graph TD
    A["Pre-amp"] --> B["Amplifier"]
    B --> C["Right"]
    B --> D["Left"]
    C --> E["Jumper"]
    D --> F["Jumper"]
    style A fill:#f9f,stroke:#333
    style B fill:#ccf,stroke:#333
    style C fill:#cfc,stroke:#333
    style D fill:#fcc,stroke:#333
    style E fill:#ffc,stroke:#333
    style F fill:#fcc,stroke:#333
flowchart
graph TD
    A["Pre-amp"] --> B["Left Amplifier Right Amplifier"]
    B --> C["Front"]
    C --> D["Left Jumper"]
    D --> E["First remove jumper"]
    style A fill:#f9f,stroke:#333
    style B fill:#ccf,stroke:#333
    style C fill:#cfc,stroke:#333
    style D fill:#fcc,stroke:#333
    style E fill:#ffc,stroke:#333
Speaker Connection Options (For Synchrony S Surrounds)
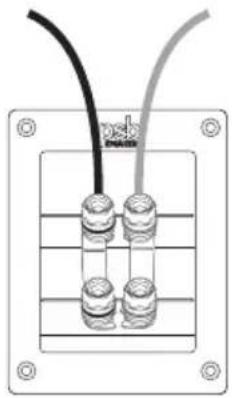
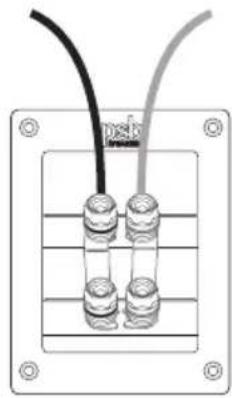
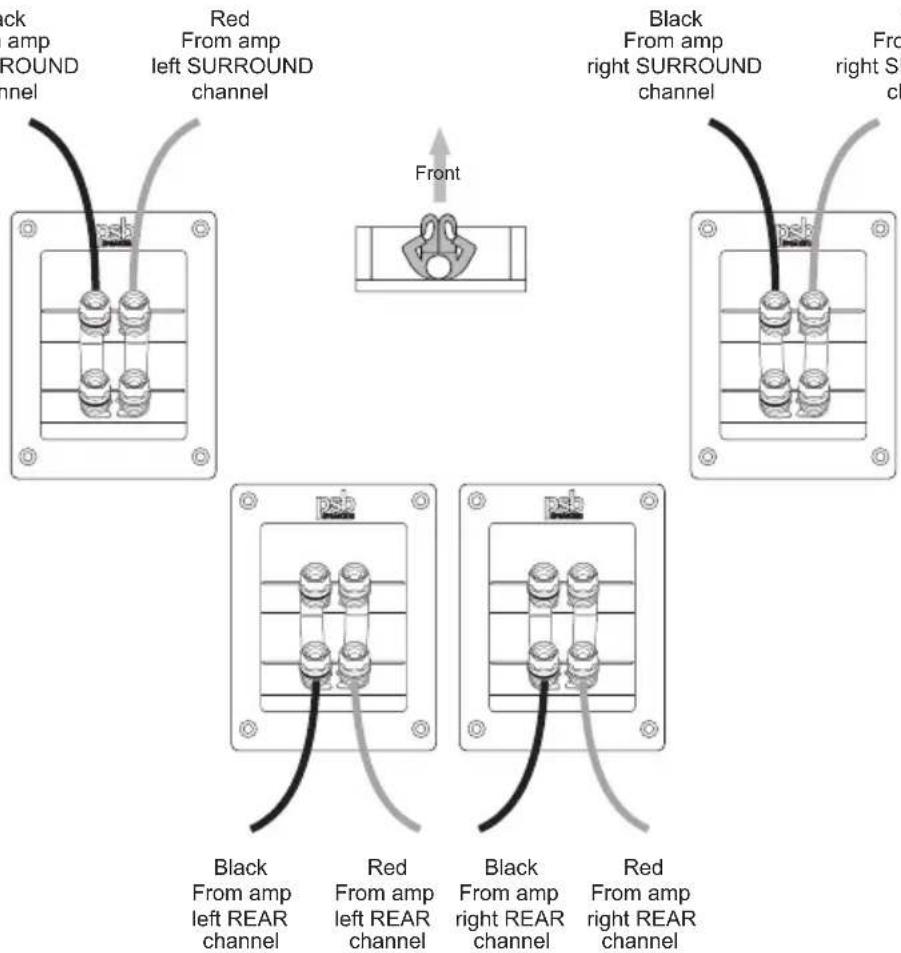
The captioned illustrations below show the following multi-channeled configurations:
- Bipole or direct radiating surround mode
- Dipole surround mode
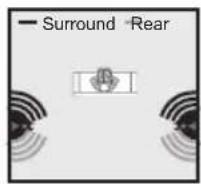
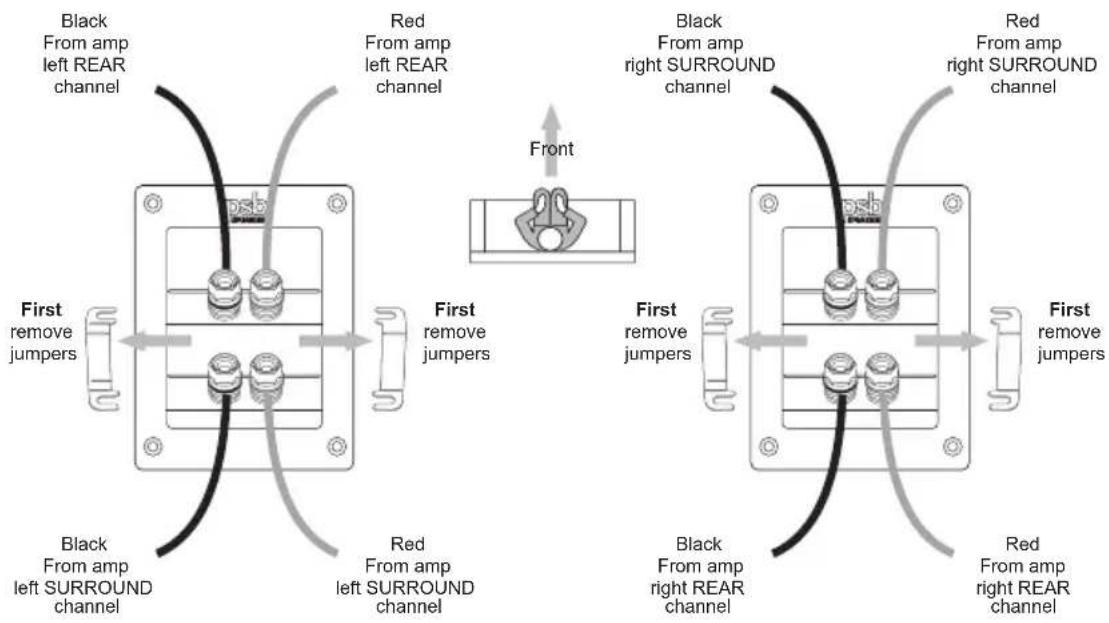
- 6.1/7.1 system utilizing two (2) Synchrony S surrounds
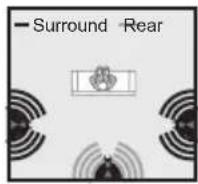
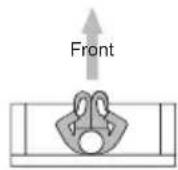
- 6.1/7.1 system utilizing three (3) Synchrony S surrounds
- 6.1/7.1 system utilizing four (4) Synchrony S surrounds
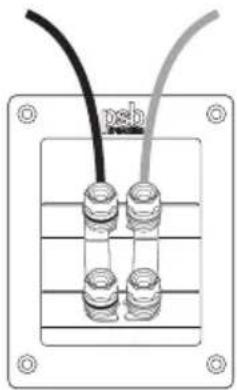
Bipole or direct radiating surround mode
Black
From amp
left SURROUND
channel
Red
From amp
left SURROUND
channel
Black
From amp
right SURROUND
channel
Red
From amp
right SURROUND
channel
natural_image
Pure electrical connector diagram without any text, numbers, or symbols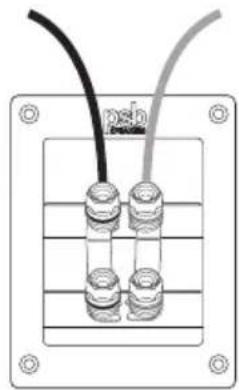
natural_image
Diagram of a three-pin electrical connector with black and gray wires, no text or symbols presentDipole surround mode
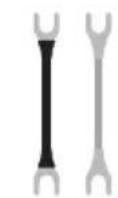
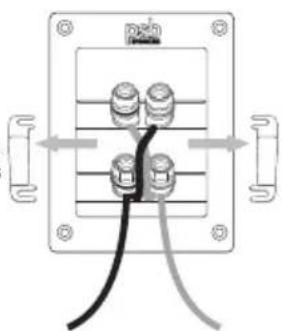
Wire Jumpers
First
remove
jumpers
natural_image
Pure electrical connector diagram without any text, numbers, or symbolsBlack
From amp
left SURROUND
channel
First
remove
jumpers
Red
From amp
left SURROUND
channel
Black
From amp
right SURROUND
channel
Red
From amp
right SURROUND
channel
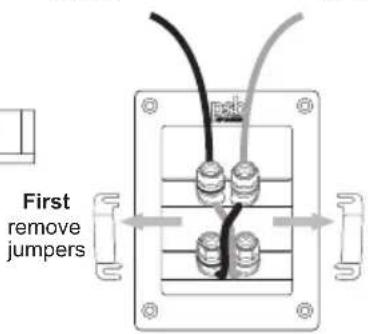
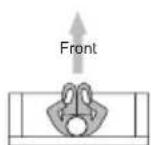
First remove jumpers
Replace gold-plated jumpers with supplied wire jumpers and connect crisscrossed as shown.
6.1/7.1 System Utilizing Two (2) Synchrony S Surrounds
flowchart
graph TD
    A["Black From amp left REAR channel"] --> B["psb"]
    C["Red From amp left REAR channel"] --> D["psb"]
    E["Black From amp left SURROUND channel"] --> F["psb"]
    G["Red From amp left SURROUND channel"] --> H["psb"]
    I["First remove jumpers"] --> J["First remove jumpers"]
    K["First remove jumpers"] --> L["First remove jumpers"]
    M["Front"] --> N["Black From amp right SURROUND channel"]
    O["First from amp right SURROUND channel"] --> P["Red From amp right SURROUND channel"]
6.1/7.1 System Utilizing Three (3) Synchrony S Surrounds
Black
From amp
left SURROUND
channel
Red
From amp
left SURROUND
channel
Black
From amp
right SURROUND
channel
Red
From amp
right SURROUND
channel
natural_image
Pure electrical connector diagram without any text, numbers, or symbolsBlack From amp right SURROUND channel
Red
From amp
right SURROUND
channel
natural_image
Diagram of a device with two black and gray wires connected to a central component (no text or symbols visible)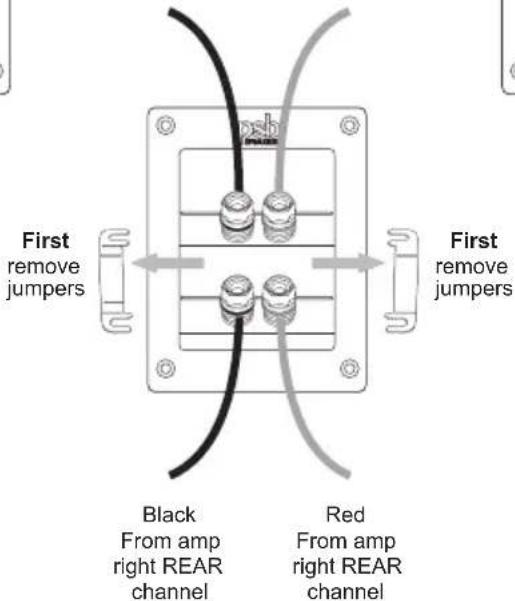
6.1/7.1 System Utilizing Four (4) Synchrony S Surrounds
Black
From amp
left SURROUND
channel
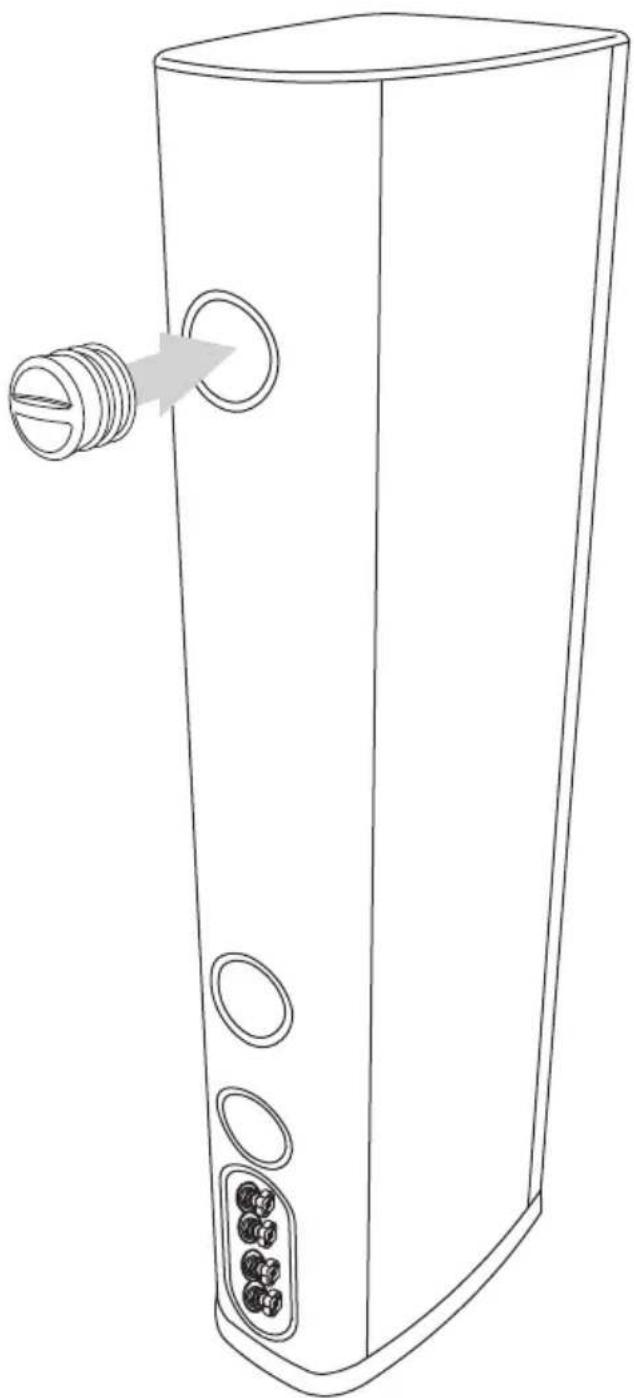
Synchrony Port Cover
A Port Cover accessory is supplied with each tower (Synchrony One and Two) and centre channel speaker (Synchrony One C and Two C). The port covers can be used to adjust the bass tuning of the Synchrony models where room problems at low frequencies (in the 100Hz region) occur. It is well known that the room can dominate the performance of the low frequencies below 200Hz and the added flexibility of a port cover can tweak/improve the performance in problem room setups. For example, by covering the top port on the Synchrony Two the output in the 75Hz to 125Hz region will be reduced by 2dB.
The use of the port cover is not limited to only closing one of the ports in the case of the towers (Synchrony One and Two). We invite the listener to try plugging any one or multiple ports to better integrate the system in their room because any adjustment of the bass balance could be a welcome improvement in a given system setup. Please experiment; it will be worth the effort in many cases. It's impossible to predict what type of room or what the system setup will be, therefore we think the flexibility of multiple chambers and ports allows the speaker to be integrated better in a wider variety of situations. Sometimes tweaking like this can be used to really help “dial in” the best possible sound in your room.
Additional Port Covers can be acquired for a nominal fee in cases where multiple ports need to be covered to achieve the proper bass balance in a given setup. One can also experiment with the Port Cover on the bookshelf models (Synchrony One B and Two B) to tame the bass in some setups.
natural_image
Line drawing of a vertical cylindrical device with multiple circular ports and a threaded port, no text or symbols present.Recommended Power
We recommend amplifiers and receivers rated from a range of 50-300 watts. For playing at consistently room-filling volume, a minimum of 100 watts is usually a good idea. Be wary of driving low-powered amplifiers to their limits as under-powering can cause permanent speaker damage.
Protecting Your Investment
A. For full, year-after-year enjoyment from your speakers, you should respect their limits. Excessive volume levels can damage even the most “bullet-proof” speakers, especially over extended time periods.
B. When listening to music or movies at very loud volume, you shouldn't turn up bass or treble all the way or close thereto. This sends tremendously increased, disproportionate power into the speakers, and may well damage them. Some loudness compensation ("Loudness") controls, which boost both bass and treble, can also be troublesome at high volume. They are intended only for low-volume listening.
C. Finally, you should be aware that when amplifiers and receivers are pushed to their limits to produce excessive volume levels, they are driven into “clipping” and can do severe damage—especially to tweeters. Often, the damage is done by underpowered amplifiers, which may reach their limits very soon. When such units begin to “clip” the audio waveform, they may generate high-frequency “spikes” of tremendous power. More tweeters have probably been destroyed by this phenomenon than any other. If using your speakers at loud levels, listen carefully for any sign of harsh, garbled midrange and diminishing intelligibility—and turn the volume down right away if you detect it.
Cabinets have varying materials and finishes, including wood veneers and painted cast anodized aluminum parts. They should be treated as you would any fine furniture with similar finishes. Dust lightly with a soft cloth; avoiding abrasives. If necessary, wipe carefully with a cloth slightly dampened with glass cleaner to remove heavy soil.
Grilles and Ports
A lint brush does a good job of cleaning grilles. Grilles can be taken off and vacuumed if you prefer. If need be, you can use a lint brush to clean ports. Avoid touching speaker diaphragms. Particularly, pushing in the aluminum dome of the tweeter will cause permanent damage.
In Case of Problems
A. Lower volume if a speaker begins to sound distorted or seems to be missing certain frequencies, to check first to see whether playing at somewhat lower volume seems to clear up the problem. As we noted under “Recommended Power,” it can be especially important to turn down the volume right away if you have pushed a low-powered amplifier or receiver past its comfortable limits.
B. Isolate the problem to the electronics or the speakers and, if the speakers, to specific speakers. Interchange the speaker wire connections on your amplifier or receiver between channels, so that the left speaker is connected to the right channel, or vice versa. If the problem shifts to the other speaker, the problem is not in the speaker but in the electronics.
C. Another component—or, very often, a cable or connection problem between components—may be at fault. If the problem stays in the same speaker, irrespective of the channel to which it's connected—and after changing the connecting wire—the speaker itself probably needs service.
D. See your dealer if you require service. PSB dealers are equipped to handle almost all problems. If you have moved since your purchase, the nearest authorized PSB dealer should be able to help you. You may locate your nearest PSB authorized dealer online at www.psbspeakers.com. If the problem is not resolved, please contact us, providing the Model name, Serial Number, date of purchase, dealer name, and a full description of the problem.
We appreciate your purchase, and hope this owner's guide helps you enjoy the exceptional satisfaction that PSB speaker systems have to offer. We wish you many years of enjoyable listening!
Specifications
| Synchrony OneTowerLoudspeaker | Synchrony TwoTowerLoudspeaker | Synchrony One BBookshelfLoudspeaker | |
| FREQUENCY RANGEResponse | |||
| On Axis @ 0°±3dB | 30-23,000Hz | 34-23,000Hz | 45-23,000Hz |
| On Axis @ 0°±1 1/2dB | 33-20,000Hz | 36-20,000Hz | 47-20,000Hz |
| Off Axis @ 30°±1 1/2dB | 33-10,000Hz | 36-10,000Hz | 47-10,000Hz |
| LF Cutoff -10dB | 24Hz | 29Hz | 38Hz |
| SENSITIVITY | |||
| Anechoic Chamber | 88dB | 88dB | 86dB |
| Typical Listening Room | 90dB | 90dB | 88dB |
| IMPEDANCE | |||
| Nominal | 4 Ohms | 4 Ohms | 6 Ohms |
| Minimum | 4 Ohms | 4 Ohms | 4 Ohms |
| INPUT POWER | |||
| Recommended | 20-300 Watts | 20-300Watts | 15-150 Watts |
| Program | 300 Watts | 300 Watts | 150 Watts |
| ACOUSTIC DESIGN | |||
| Tweeter (Nominal) | 1" (25mm)Titanium Dome with Ferrofuild | 1" (25mm)Titanium Dome with Ferrofuild | 1" (25mm)Titanium Dome with Ferrofuild |
| Midrange (Nominal) | 4" (102mm)Fine Weave Fibreglass/Natural Fibre ConeRubber Surround | ||
| Woofer (Nominal) | 3 x 6 1/2" (165mm)Fine Weave Fibreglass/Natural Fibre ConeRubber Surround | 3 x 5 1/4" (135mm)Fine Weave Fibreglass/Natural Fibre ConeRubber Surround | 6 1/2" (165mm)Fine Weave Fibreglass/Natural Fibre ConeRubber Surround |
| Crossover | 2,200HZ, LR4, 500Hz | 2,200HZ, LR4 | 2,200HZ, LR4 |
| Internal Volume Design Type | 2.4 cu ft (67 liter)Bass Reflex | 1.8 cu ft (51 liter)Bass Reflex | 0.75 cu ft (21 liter)Bass Reflex |
| SIZE (W x H x D) | |||
| Net | 9" x 43" x 13" | 7 5/8" x 39 1/4" x 11" | 8 3/4" x 14 3/8" x 12 7/8" |
| Gross | 228 x 1092 x 328mm | 192 x 994 x 279mm | 220 x 364 x 326mm |
| WEIGHT | |||
| Net | 61 lb (28 kg) each | 46 lb (21 kg) each | 22 lb (10 kg) each |
| Shipping | 77 lb (35kg) each | 56 lb (25 kg) each | 49 lb (22 kg)/pair |
FINISH Black Ash or Dark Cherry Black Ash or Dark Cherry Black Ash or Dark Cherry
| SynchronyTwo BBookshelfLoudspeaker | SynchronyOne CCentre ChannelLoudspeaker | SynchronyTwo CCentre ChannelLoudspeaker | SynchronySTri-mode SurroundLoudspeaker |
| 50-23,000Hz53-20,000Hz53-10,000Hz40Hz | 48-23,000Hz50-20,000Hz50-10,000Hz40Hz | 45-23,000Hz47-20,000Hz47-10,000Hz42Hz | 62-23,000Hz65-20,000Hz65-10,000Hz55Hz |
| 86dB88dB | 88dB90dB | 87dB89dB | 86dB88dB |
| 6 Ohms4 Ohms | 6 Ohms4 Ohms | 6 Ohms4 Ohms | 6 Ohms4 Ohms(2 x 8 Ohms - 2 Channel Mode) |
| 15-150 Watts150 Watts | 15-200 Watts200 Watts | 15-200 Watts200 Watts | 15-150 Watts150 Watts |
| 1" (25mm)Titanium Dome with Ferrofuild | 1" (25mm)Titanium Dome with Ferrofuild | 1" (25mm)Titanium Dome with Ferrofuild | 2 x 1" (25mm)Titanium Dome with Ferrofuild |
| 4" (102mm)Fine Weave Fibreglass/Natural Fibre ConeRubber Surround | |||
| 5 1/4" (135mm)Fine Weave Fibreglass/Natural Fibre ConeRubber Surround | 2 x 6 1/2" (165mm)Fine Weave Fibreglass/Natural Fibre ConeRubber Surround | 2 x 5 1/4" (135mm)Fine Weave Fibreglass/Natural Fibre ConeRubber Surround | 2 x 5 1/4" (135mm)Fine Weave Fibreglass/Natural Fibre ConeRubber Surround |
| 2,200HZ, LR4 | 2,200HZ, LR4, 500Hz | 2,200HZ, LR4 | 2,200HZ, LR4 |
| 0.6 cu ft (17 liter)Bass Reflex | 1.25 cu ft (35 liter)Bass Reflex | 0.9 cu ft (26 liter)Bass Reflex | 0.8 cu ft (23 liter)Sealed |
| 7 1/4" x 13 3/8" x 10 7/8"184 x 338 x 275mm | 24 1/4" x 8 3/4" x 12 7/8"614 x 220 x 326mm | 18 1/8" x 7 1/4" x 10 7/8"458 x 184 x 275mm | 11 1/8" x 13 1/4" x 7 3/4"280 x 334 x 196mm |
| 16 lb (7 kg) each36 lb (16kg)/pair | 37 lb (17 kg) each43 lb (20 kg) each | 22 lb (10 kg) each29 lb (13kg) each | 20 lb (9 kg) each46 lb (21kg)/pair |
| Black Ash or Dark Cherry | Black Ash or Dark Cherry | Black Ash or Dark Cherry | Black Ash or Dark Cherry |
PSB Speakers
633 Granite Court
Pickering, Ontario L1W 3K1
CANADA
www.psbspeakers.com
888-772-0000 (North America)
905-831-6555 (International)
Fax: 905-837-6357

- Synchrony design background
- THE CABINET
- DRIVERS
- Distortion Reduced Motor
- Laminated Sandwich Cone
- CROSSOVER DESIGN
- Warranty Registration
- Unpacking
- Notes on environmental protection
- Adjusting Rubber Levelers and Spikes
- (Tower Speakers)
- Adjusting Rubber Foot (For Centre Channel Models)
- Wall Mounting Synchrony S Surrounds
- Speaker Placement — Maximizing Your Enjoyment
- surround speaker placement 6.1/7.1 surround speaker placement
- The Speakers in Relation to Room Boundaries
- You in Relation to the Speakers
- You in Relation to Room Boundaries
- Positioning Surround Speakers
- Connections
- Selecting Speaker Wire
- Conventional Wiring
- Bare Wire Connection Banana Plug Connection Spade Plug Connection
- Bi-Wiring or Bi-Amping Options
- Speaker Connection Options (For Synchrony S Surrounds)
- Synchrony Port Cover
- Recommended Power
- Protecting Your Investment
- Grilles and Ports
- In Case of Problems
Brand : PSB
Model : Synchrony One B
Category : Loudspeaker