
MS100SS - Oven MATRIX - Free user manual and instructions
Find the device manual for free MS100SS MATRIX in PDF.


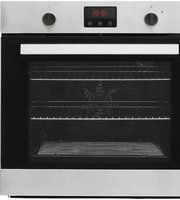
| Type | Built-in Electric Oven |
| Brand | Matrix |
| Model | MS100SS |
| Energy Source | Electricity |
| Volume | 62 L |
| Weight | 35.6 kg |
| Dimensions (H x W x D) | 595 x 595 x 560 mm (approx.) |
| Power Rating | 2800 W |
| Voltage / Frequency | 230-240 V, 50 Hz |
| Fuse Rating | 13 A |
| Oven Functions | Defrost, Eco Fan, Fan Oven, Full Grill, Half Grill, Illuminated Hot |
| Temperature Range | 50 °C – 250 °C |
| Energy Consumption (fan-forced) | 0.77 kWh/cycle |
| Oven Bulb | 230-240 V, 50 Hz, 25 W, G9, high temperature (300 °C) |
| Cooling Fan | Automatic, runs after use |
| Cleaning Instructions | Use mild detergent and non-abrasive cleaners; no steam cleaners |
| Safety | Always use oven gloves; keep children away; do not cover oven floor with foil |
| Installation Type | Type X, built-in, 600 mm cabinet width |
| Guarantee | Invalidated by incorrect installation or misuse (details in manual) |
Frequently Asked Questions - MS100SS MATRIX
User questions about MS100SS MATRIX
0 question about this device. Answer the ones you know or ask your own.
Ask a new question about this device
Download the instructions for your Oven in PDF format for free! Find your manual MS100SS - MATRIX and take your electronic device back in hand. On this page are published all the documents necessary for the use of your device. MS100SS by MATRIX.
USER MANUAL MS100SS MATRIX
Manual for installation, use and maintenance
MS100
Single Oven
Contents:
3 Important information
4 Important notes
5 Recommendations and steps before first use
7 Control panel and using your appliance
9 Cleaning and maintenance
10 Removing the appliance door
11 Replacing the appliance door
12 Removing the inner door glass
14 Changing the oven lamp
15 Installation
16 Mains electrical connection
18 Troubleshooting
19 Energy efficiency information
Important
The CDA Group Ltd cannot be held responsible for injuries or losses caused by incorrect use or installation of this product. Please note that CDA reserve the right to invalidate the guarantee supplied with this product following incorrect installation or misuse of the appliance or use in a commercial environment.
This appliance is not designed to be used by people (including children) with reduced physical, sensorial or mental capacity, or who lack experience or knowledge about it, unless they have had supervision or instructions on how to use the appliance by someone who is responsible for their safety.
Under no circumstances should any external covers be removed for servicing or maintenance except by suitably qualified personnel.
Appliance information:
Please enter the details on the appliance rating plate below for reference, to assist CDA Customer Care in the event of a fault with your appliance and to register your appliance for guarantee purposes.
| Appliance Model | |
| Serial Number |
EU Declarations of Conformity
This appliance has been manufactured to the strictest standards and complies with all applicable legislation, including Electrical safety (LVD) 2014/35/EU and Electromagnetic interference (EMC) 2014/30/EU.
Parts intended to come into contact with food conform to 1935/2004/EC.
IMPORTANT INFORMATION FOR CORRECT DISPOSAL OF THE PRODUCT IN ACCORDANCE WITH EU DIRECTIVE 2012/19/EU.
At the end of its working life, the product must be taken to a special local authority waste collection centre or to a dealer providing appliance recycling services.
Disposing of a household appliance separately avoids possible negative consequences for the environment and health. It also enables the constituent materials to be recovered, saving both energy and resources. As a reminder of the need to dispose of household appliances separately, the product is marked with a crossed-out wheeled dustbin.
Important
- Read the user instructions carefully before using the oven for the first time.
- Follow the instructions for first use of the oven.
- Clean the oven regularly.
- Remove spills as soon as they occur.
- Always use oven gloves when removing shelves and trays from the oven.
- Do not allow children near the oven when in use.
- Do not allow fat or oils to build up on the oven shelves, grill pan or oven base.
-
Do not place any cooking utensils or plates directly on the oven base.
• Always grill with the oven door closed. -
Do not grill food containing fat without using the grill pan grid.
- Do not cover the grill pan grid or the oven walls with aluminium foil.
- Do not use the oven tray for roasting.
- Do not perform maintenance or cleaning of the oven without first switching off the electricity supply. If the oven has recently been used, allow to cool.
- Do not place hot enamel parts in water. Leave them to cool first.
- Do not allow vinegar, coffee, milk, saltwater, lemon or tomato juice to remain in contact with enamel parts.
- Do not use abrasive cleaners or powders that will scratch the surface of the enamel or stainless steel.
- Do not attempt to repair the internal workings of your oven.
- Do not cover the oven floor with aluminium foil.
Before First Use
- The decorative metal finish of this appliance has been coated with a preservative to protect it during transport and storage. This should be removed during installation by using a non-abrasive stainless steel cleaner, and dried thoroughly afterwards. Always follow the instructions given with the cleaner being used.
- Before using the oven for the first time we recommend that you clean the oven with soapy water, rinse carefully and then heat on each of the programs on page 6 at maximum temperature for the specified time. An unpleasant smell may be produced, caused by grease remaining on the oven elements from the production process.

15 minutes of full grill

nutes of fan oven
Please note:
- This oven has been fitted with a cooling fan to achieve maximum efficiency and to maintain low surface temperatures. The cooling fan will switch on automatically when the oven switches on. It is normal for the cooling fan to run for an hour or more after use, depending on the duration, temperature and type of cooking program used.
Control Panel

Control panel:
A. Temperature control knob
B. Function control knob
Oven Controls and Use
Temperature knob
- To set the temperature, turn the temperature knob clockwise to the required temperature.
- Once the oven has reached the required temperature, the temperature indicator lamp on the control panel will switch off.
- The temperature indicator lamp will light up when the oven elements are in operation.
Cooking function knob
To set the function, turn the function control knob to the required function. Each of the oven functions uses different elements within the oven to offer you the best choice of cooking every time. These are explained on pages 7 and 8.

Defrost
he fan only this oven function circulates the air
around the oven cavity, speeding up the natural defrost process.

n oven
This function provides the most ecomonical method for
cooking food. It is similar in operation to the fan oven function below. However, cooking times may be longer.

en
Using the circular element and the fan with a
temperature between 50°C and 250°C, this cooking function blows the air into and around the oven cavity. Heating in this manner helps to ensure uniform heat circulation. Both cooking temperatures and cooking times can be reduced for a more energy efficient cooking process.

action radiates the heat from the grill element and the top element.
This fully temperature variable grill is ideal for grilling a full family meal. It can be set between 50°C and 250°C maximum.
action radiates the heat from the grill element.
This fully temperature variable grill can be set between 50°C and 250°C maximum.

_amp
Illum notes the lamp within the oven.
For each grill function please note:
• Always grill with the oven door closed.
• Put the grill pan as close to the grill as possible.
• Do not grill for more than 30 minutes at a time.
• Preheat the grill for up to five minutes with the oven door closed.
Internal shelf positions
The shelves and grill pan can be inserted into any one of five different positions.
To refer to these they are numbered from "1" to "5", with "5" nearest the grill elements at the top of the oven. Printing on the inside of the oven door frame is designed to remind you of this numbering.
Cleaning and maintenance
Keeping your oven clean and well maintained helps to prolong the fault-free lifespan of it. It is important that, before any cleaning or maintenance is performed, you switch off the oven at the mains supply. Do not start any cleaning or maintenance until the oven has been allowed to cool completely.
Cleaning the oven exterior
As the oven has a stainless steel or enamel surface, you should use a nonabrasive cleaner. Any abrasive cleaner (including Cif) will scratch the surface and could erase the control panel markings. Stainless steel can be effectively cleaned by simply using a dilute solution of water and mild detergent and drying to a shine with a clean cloth.
Proprietary stainless steel cleaners are available. We recommend a microfibre cloth for stainless steel surfaces. If necessary, wipe any
area that has been cleaned using a damp soft cloth or tissue to remove any residual cleaning fluid and then wipe dry with a clean, dry cloth or tissue (such as kitchen towel).
Cleaning the oven interior
The oven should always be cleaned after use when it has been allowed to cool down.
The cavity should be cleaned using a mild detergent solution and warm water and then wiped dry with a suitable, clean cloth.
Suitable proprietary chemical cleaners may be used after first consulting with the manufacturers' recommendations and testing a sample on a small area of the oven cavity. Abrasive cleaning agents or scouring pads/cloths should not be used on the cavity surface.
IMPORTANT:
- Steam cleaners must not be used when cleaning this appliance.
- Once care and maintenance is complete, ensure that all parts are correctly replaced before using the oven.
Removing the appliance door
In order to allow for easier access into the oven cavity for cleaning, it is possible to remove the door. Before removing the door, ensure that you have an area prepared in which you can place the removed door. This area should ideally be protected by something like a folded, dirt-free, towel to help prevent damage to surfaces and the door.
- Open the door fully
- Lift and tilt the safety catch part of the hinge so that is fully
extended and points towards the door (fig. 2).
- Close the door most of the way, lift it slightly and then pull it, safely but firmly, towards you.
Replacing the appliance door
- Hold the door to the appliance in the closed position and manoeuvre the hinges so that the part of the hinge, highlighted by the star in fig. 3, inserts into the hinge slot in the cavity frame.
- Next, ensure the notch on the underside of the hinge sits on the lip of the hinge slot. Open the door fully. Each hinge should be seated in the same way as the hinge in fig. 4. If it is not, follow the steps for removing the door and try replacing it again.
- Finally, lift the safety catch part of the hinges back into place so that they are lying flat against the hinges.


Please note: If the hinge safety
catches are not in the correct place then the door and/or appliance may receive damage when attempting to close the door,
Removing the inner door glass
With the door removed, the inner glass can also be taken out for cleaning purposes.
- Use a flathead screwdriver or to unhook the door slat, as shown in fig. 5
- Remove the door slat, as per fig. 6, and place it somewhere safe where it will neither receive nor cause damage.
- Remove the inner glass from the blocks it is seated within (near to the hinges) and place this somewhere safe also. Pay attention to the way that the glass is facing as it will need to be replaced in the same direction. The smooth surface of the glass should be facing upwards (inwards if the door was back in place) with the patterned side facing the oven door handle.
- Clean the door glass with warm, soapy water and wipe dry with a clean microfibre cloth.
- The middle pane of glass can also be removed but it is important that this pane is reinserted facing the same way that it was when


- removed. There are a number of rubber guides attached to the inner pane and these must be returned to their original positions when reassembling the door. Fig. 7 shows these guides and their position on and around the inner glass.
- Simply reverse these steps in order to reassemble the door. Take care when reattaching the upper door slat. Place the left side on first until you hear a ‘click’ as it connects and then attach the right side. This will help to avoid damaging the door and/or glass.

Important: Do not disassemble the door without it having been removed from the oven. Weight differences could cause the door to snap shut, causing damage to the oven and/or the user.
Changing the oven lamp
Important:
Before any maintenance is started involving electrical parts, the appliance must be disconnected from the power supply.
If the oven has been in use, let the oven cavity and the heating elements cool down before attempting any maintenance.
Never use screwdrivers or other utensils to remove the light cover. This could damage the enamel of the oven or the lamp holder. Remove only by hand.
Never replace the bulb with bare hands as contamination from your fingers can cause premature failure. Always use a clean cloth or gloves.
Changing the bulb (fig. 8)
- Unscrew the protective cover.
- Carefully extract and replace the bulb with the new one suitable for high temperatures (300°C) having the following specifications: 230-240V, 50Hz, 25W G9 fitting.
- Refit the protective cover.
Please note:
The bulb replacement is not covered by your guarantee.

Installation
The installation of this appliance must be carried out by a suitably qualified person.
If the oven is being installed into a built under oven housing unit ensure that the front rail at the top of the unit is not installed as it could restrict ventilation.
Ensure that air can flow freely around the housing area. If the oven is being installed into a fully enclosed built-under oven housing unit it may be necessary to cut a small slot in the top of the plinth fitted under the unit. Cut a section 400mm wide and a minimum of 15mm high to allow air to pass under the unit. Alternatively cut a section 400 x 450mm in the base of the carcass as indicated.
Failure to allow adequate ventilation to the appliance may result in overheating or damage to adjacent units and could invalidate the warranty.
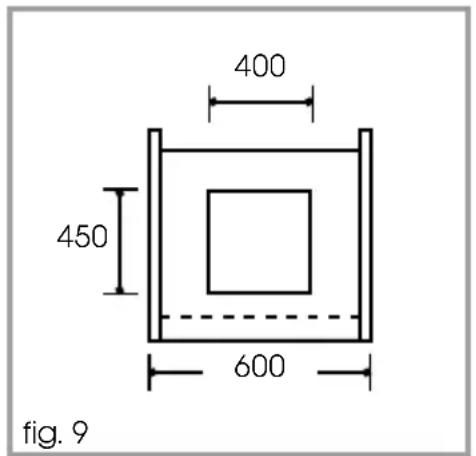
- This appliance is type X installation.
- The walls of the kitchen units must be able to withstand temperatures of 100°C+ .
- When correctly installed ensure that there is a gap of 4mm minimum between the sides of the oven and adjacent furniture doors.
How to install your oven
You will need the housing area in fig. 10 to fit your oven correctly.
The oven is designed to fit into a cabinet of 600mm width. The oven can be built in or built under the kitchen units, but you must ensure that it is properly ventilated. In the diagram below the built-in oven is ventilated by means of a space at the top of the kitchen cabinet. There are many other methods of ventilating your oven - consult a qualified engineer for advice.
Lift the oven carefully into position on the shelf, taking care NOT to lift it by the door handle. If you lower the oven door, you will see 4 screw holes, 2 on each side of the oven (image B fig. 10). The oven should then be secured to the housing by securing screws into these holes. Remember the housing should not be free standing but be secured to the wall and/or adjacent fittings.

Mains electrical connection
Warning! This appliance must be earthed.
This appliance is intended to be connected to fixed wiring by a double pole switch, having a contact separation of at least
3mm in all poles and protected by a 13a fuse. The switch must be positioned no further than 2m from the appliance.
We recommend that the appliance is connected by a qualified electrician, who is a member of the N.I.C.E.I.C. and who will comply with the I.E.T. and local regulations. The wires in the mains lead are coloured in accordance with the following code:
GREEN AND YELLOW = EARTH
BLUE = NEUTRAL
BROWN = LIVE.
As the colours of the wires in the mains lead for the appliance may not correspond with the coloured markings identifying the terminals in your spur box, proceed as follows:
- The wire which is coloured green and yellow must be connected to the terminal marked E (Earth) or coloured Green.
- The wire which is coloured blue must be connected to the terminal marked N (Neutral), or coloured Black.
- The wire which is coloured brown must be connected to the terminal marked L (Live), or coloured Red.
Please note:
- The mains cable must only be replaced by a qualified electrician or service engineer and must be of equivalent or better rating (i.e. 3 x 1.5mm 2 , HO5VV-F).
- This appliance is intended to be connected to the mains supply with a cable of cross sectional area 1.5 mm 2 .
- The current rating of the fuse or circuit breaker protecting this appliance should be marked on the socket outlet.
• Assembly and electrical connection should be carried out by
specialised personnel.
- When installing this product we recommend you seek the help of another individual.
- Should the mains cable be damaged or need to be replaced, it should only be done so by a qualified electrician or engineer. The terminal block on the appliance is clearly marked with regards to the positions of live, neutral and earth.
Appliance electrical rating: 2800W
Troubleshooting
| Problem Cause | Potential remedy | |
| 1. The appliance does not work | No power | Check the fuse, replace if blown |
| 2. Oven lighting does not work. | Loose or damaged bulb | Replace the blown bulb (see Cleaning and Maintenance section) |
| 3. Fan does not work | Risk of overheating! Immediately unplug the appliance or switch off the main circuit breaker. Refer the repair to the service centre. | |
If any of the above steps do not resolve your issue, please contact CDA Customer Care to arrange a repair. Contact details are on the rear cover of this manual. Please have to hand all the details from your appliance's rating plate which can be found on the back of the oven and/or on the back of the instruction manual/warranty card.
Important: All repairs must be carried out by qualified service technicians.
| Energy Efficiency Information | |||
| stinUe | |||
| Model noitacifitnedl | MS100/1 | ||
| Mass of the appliance | M | 35.6 | kg |
| Number of cavities | 1 | ||
| Heat source per cavity (electricity or gas) | Electricity | ||
| Volume per cavity | V | 62 | L |
| Energy consumption (electricity) required to heat a standardised load in a cavity of an electric heated oven during a cycle in conventional mode per cavity (electric final energy) | ECElectric\ cavity | NA | kWh/cycle |
| Energy consumption (electricity) required to heat a standardised load in a cavity of an electric heated oven during a cycle in fan-forced mode per cavity (electric final energy) | ECElectric\ cavity | 0.77 | kWh/cycle |
| Energy consumption required to heat a standardised load in a gas-fired cavity of an oven during a cycle in conventional mode per cavity (gas final energy) | ECGas\ cavity | NA | MJ/cycle : kWh/cycle |
| Energy consumption required to heat a standardised load in a gas-fired cavity of an oven during a cycle in fan-forced mode per cavity (gas final energy) | ECGas\ cavity | NA | MJ/cycle : kWh/cycle |
Vlobi
MATRIX
Serviced by
C|D|A
Built for your life
For our Customer Care Department, or for Service,
please contact us on:


- MANUAL FOR INSTALLATION, USE AND MAINTENANCE
- MS100
- SINGLE OVEN
- CONTENTS
- IMPORTANT
- APPLIANCE INFORMATION
- EU DECLARATIONS OF CONFORMITY
- IMPORTANT INFORMATION FOR CORRECT DISPOSAL OF THE PRODUCT IN ACCORDANCE WITH EU DIRECTIVE 2012/19/EU
- BEFORE FIRST USE
- PLEASE NOTE
- CONTROL PANEL
- OVEN CONTROLS AND USE
- TEMPERATURE KNOB
- COOKING FUNCTION KNOB
- DEFROST
- N OVEN
- EN
- AMP
- FOR EACH GRILL FUNCTION PLEASE NOTE
- INTERNAL SHELF POSITIONS
- CLEANING AND MAINTENANCE
- CLEANING THE OVEN EXTERIOR
- CLEANING THE OVEN INTERIOR
- REMOVING THE APPLIANCE DOOR
- REPLACING THE APPLIANCE DOOR
- PLEASE NOTE: IF THE HINGE SAFETY
- REMOVING THE INNER DOOR GLASS
- CHANGING THE OVEN LAMP
- CHANGING THE BULB (FIG. 8)
- INSTALLATION
- THE INSTALLATION OF THIS APPLIANCE MUST BE CARRIED OUT BY A SUITABLY QUALIFIED PERSON
- HOW TO INSTALL YOUR OVEN
- MAINS ELECTRICAL CONNECTION
- 3MM IN ALL POLES AND PROTECTED BY A 13A FUSE. THE SWITCH MUST BE POSITIONED NO FURTHER THAN 2M FROM THE APPLIANCE
- GREEN AND YELLOW = EARTH
- TROUBLESHOOTING
- MATRIX
Brand : MATRIX
Model : MS100SS
Category : Oven