
VK1100 - Regulator ATEN - Free user manual and instructions
Find the device manual for free VK1100 ATEN in PDF.


| Product Type | Compact Control Box (Regulator) |
| Brand | ATEN |
| Model | VK1100 |
| Dimensions (L x W x H) | 21.50 x 16.23 x 4.18 cm |
| Weight | 1.19 kg |
| Power Input | 100-240 VAC, 50-60 Hz |
| Power Consumption | 20 Watts |
| Serial Ports | 2 x Programmable Bi-directional RS-232/422/485 (DB9 Male) |
| IR/Serial Ports | 2 x Programmable IR / Uni-directional RS-232 (Terminal Block) |
| Relay Channels | 4 x Normally Open, Isolated Relays, Max 24 VDC, 2A |
| Ethernet Port | 1 x RJ-45, 10/100Base-T |
| USB Port | 1 x USB for profile upload |
| 12VDC Output | 1 x 12 VDC, 1A Max |
| IR Learning | Yes (via front IR receiver) |
| Controller ID Switch | 1 x 16-segment switch |
| Material | Metal housing |
| Operating Temperature | 0°C to 50°C |
| Storage Temperature | -20°C to 60°C |
| Humidity | 0% to 80% RH, non-condensing |
| Package Contents | 1 x VK1100, 4 x Terminal Blocks, 1 x Power Cord, 1 x User Instructions |
| Warranty | 2 years limited hardware warranty |
| Maintenance & Cleaning | Unplug before cleaning; use a damp cloth; do not use liquid or aerosol cleaners |
| Safety | Indoor use only; ensure proper grounding; avoid liquid spills; use surge protector |
Frequently Asked Questions - VK1100 ATEN
User questions about VK1100 ATEN
0 question about this device. Answer the ones you know or ask your own.
Ask a new question about this device
Download the instructions for your Regulator in PDF format for free! Find your manual VK1100 - ATEN and take your electronic device back in hand. On this page are published all the documents necessary for the use of your device. VK1100 by ATEN.
USER MANUAL VK1100 ATEN
natural_image
Product display of Apple's internal electronic devices including a desktop, tablet, and remote control unit (no visible text or labels)EMC Information
FEDERAL COMMUNICATIONS COMMISSION INTERFERENCE STATEMENT
This equipment has been tested and found to comply with the limits for a Class A digital device, pursuant to Part 15 of the FCC Rules. These limits are designed to provide reasonable protection against harmful interference when the equipment is operated in a commercial environment. This equipment generates, uses, and can radiate radio frequency energy and, if not installed and used in accordance with the instruction manual, may cause harmful interference to radio communications. Operation of this equipment in a residential area is likely to cause harmful interference in which case the user will be required to correct the interference at his own expense.
FCC Caution: Any changes or modifications not expressly approved by the party responsible for compliance could void the user's authority to operate this equipment.
Warning: Operation of this equipment in a residential environment could cause radio interference.
KCC Statement
This product is RoHS compliant.
Safety
This product has been classified as Information Technology Equipment.

User Information
Online Registration
Be sure to register your product at our online support center:
| International http://eservice.aten.com |
Telephone Support
For telephone support, call this number:
| International 886-2-86 | 92-6959 |
| China 86-400-810-0-8 | 10 |
| Japan 81-3-5615-5811 | |
| Korea 82-2-467-6789 | |
| North America 1-888-999-ATEN ext 4988 | |
| United Kingdom 44-8-4481-58923 | |
User Notice
All information, documentation, and specifications contained in this manual are subject to change without prior notification by the manufacturer. The manufacturer makes no representations or warranties, either expressed or implied, with respect to the contents hereof and specifically disclaims any warranties as to merchantability or fitness for any particular purpose. Any of the manufacturer's software described in this manual is sold or licensed as is. Should the programs prove defective following their purchase, the buyer (and not the manufacturer, its distributor, or its dealer), assumes the entire cost of all necessary servicing, repair and any incidental or consequential damages resulting from any defect in the software.
The manufacturer of this system is not responsible for any radio and/or TV interference caused by unauthorized modifications to this device. It is the responsibility of the user to correct such interference.
The manufacturer is not responsible for any damage incurred in the operation of this system if the correct operational voltage setting was not selected prior to operation. PLEASE VERIFY THAT THE VOLTAGE SETTING IS CORRECT BEFORE USE.
Package Contents
VK2100
The VK2100 package consists of:
◆ 1 VK2100 ATEN Control Box
◆ 1 Rack Mount Kit
◆ 9 Terminal Blocks
♦ 1 Power Cord
◆ 1 User Instructions*
VK1100
The VK1100 package consists of:
◆ 1 VK1100 ATEN Compact Control Box
◆ 4 Terminal Blocks
♦ 1 Power Cord
◆ 1 User Instructions*
Check to make sure that all the components are present and that nothing got damaged in shipping. If you encounter a problem, contact your dealer.
Read this manual thoroughly and follow the installation and operation procedures carefully to prevent any damage to the unit, and/or any of the devices connected to it.
Contents
EMC Information ii
Safety ii
User Information ....iii
Online Registration .....iii
Telephone Support ....iii
User Notice ....iii
Package Contents iv
VK2100 iv
VK1100 iv
Contents ...... v
About this Manual ix
Conventions ..... x
Product Information. . . . . . . . . . . . . . . . . . . . . . . . . . . . . . . . . . . . . . . . . . . . . . . . . . . . . . . . . x
1. Introduction
Overview. 1
Intelligent Control 2
Optimized Performance....2
Simplified Setup 2
Effortless Expandability 2
User Centered Convenience....2
On-the-Go Control. 3
Features 4
VK2100 (Control Box) 4
VK1100 (Compact Control Box) 4
VK6000 (Configurator Software) 4
ATEN Control System App ....5
Requirements 6
Hardware Devices....6
Cables 6
Computer & Software 6
Minimum PC Requirements (VK6000) 6
Optional Equipment 7
......7
Components 8
VK2100 Front View 8
VK2100 Rear View 10
VK1100 Front View 11
VK1100 Rear View ....13
2. Hardware Setup
Rack Mounting 15
VK2100....15
VK1100....16
Connections 18
VK2100 Installation Diagram 19
VK1100 Installation Diagram 20
12VDC Power Output 21
Relay 25
IR / Serial 26
One IR Transmitter 27
Two IR Transmitters 27
Digital I/O 28
RS-232 30
RS-232 / 422 / 485 .... 31
Ethernet 32
Expansion Box 33
ATEN Expansion Boxes 33
VK108US 34
Keypad Installation 34
Power Supply Information 35
Hardware....36
Keypad Layout Examples 37
3. Browser Operation
Overview....39
Logging In. 39
Dashboard 40
Settings 41
Licenses 42
Capacity 43
Access Key 44
Monitor 45
Network 46
4. Software Installation
Overview....47
Configurator Software....47
Installation....47
5. ATEN Configurator (VK6000)
Overview....51
Preface 51
Main Page 52
Menu Bar 53
Project 58
Device 59
Device Configuration 60
Left Sidebar 61
Library 62
Device Library 63
Properties 64
Design 70
Select Viewer 71
Left Sidebar....72
Right Sidebar....72
Keypad 73
Page Overview 74
Edit 75
Windows OS Button Limitation 76
Properties 82
Button / Slider Bar Action. 84
Layering Images 101
Graphic Library 102
Background Color 102
Button 102
Icon 103
Device Interface....103
Advanced Library .....104
Flag 105
Monitor 107
Condition & Action Overview 107
Macro 120
Upload 122
6. ATEN Database Generator
Overview....125
My Library 126
Managing My Library 128
Edit / Add New Device....129
Text Command Tools 130
ATEN Library 141
7. ATEN Control System App
Overview. 143
Installing the App....143
Button Sounds 143
ATEN Control System App ....144
Demo 145
WinViewer1 / iPad / Android1 ..... 145
Demo....146
Welcome 148
Edit Viewer Profile 149
Manage LAN Device 150
Controller 151
Set Password 153
Log Report 154
Information 156
Download Viewer Profile 157
Downloading Profiles 158
Appendix
Safety Instructions 159
General 159
Rack Mounting 161
Technical Support 162
International 162
North America 162
Specifications 163
VK2100 163
VK1100 165
Limited Hardware Warranty 166
What is covered by the Limited Hardware Warranty....166
About this Manual
This User Manual is provided to help you get the most from your ATEN Control System. It covers all aspects of installation, configuration and operation. An overview of the information found in the manual is provided below.
Chapter 1, Introduction, introduces you to the ATEN Control System. Its purpose, features and benefits are presented, and the VK1100 and VK2100's front and back panel components are described.
Chapter 2, Hardware Setup, provides the necessary steps to setup the ATEN Control System installation, including how to wire the different types of hardware connections.
Chapter 3, Browser Operation, provides a complete description of the Browser Graphical User Interface (GUI) and how to use it to remotely configure parts of the ATEN Control System installation.
Chapter 4, Software Installation, explains the steps required to download and install the VK6000 software.
Chapter 5, ATEN Configurator (VK6000), provides a complete description of the VK6000 software and how to use it to configure and operate the ATEN Control System.
Chapter 6, ATEN Database Generator, provides a complete description of the Database Generator software and how to use it to configure new devices to add to the VK6000 device library.
Chapter 7, ATEN Control System App, provides a complete description of the ATEN mobile app and how to use it to operate devices connected to the ATEN Control System.
An Appendix, provides specifications and other technical information regarding the ATEN Control System.
Conventions
This manual uses the following conventions:
MonospacedIndicates text that you should key in.
[ ] Indicates keys you should press. For example, [Enter] means to press the Enter key. If keys need to be chorded, they appear together in the same bracket with a plus sign between them: [Ctrl+Alt].
- Numbered lists represent procedures with sequential steps.
◆ Bullet lists provide information, but do not involve sequential steps.
→ Indicates selecting the option (on a menu or dialog box, for example), that comes next. For example, Start → Run means to open the Start menu, and then select Run.

Indicates critical information.
Product Information
For information about all ATEN products and how they can help you connect without limits, visit ATEN on the Web or contact an ATEN Authorized Reseller. Visit ATEN on the Web for a list of locations and telephone numbers:
| International http://www.aten.com |
| North America http://www.aten-usa.com |
Overview
The ATEN Control System, incorporating the ATEN Control Box (VK2100 / VK1100), the ATEN Configurator (VK6000) and the ATEN Control System App is a standard Ethernet-based management system that connects all hardware devices in a room or large facility to provide centralized control of devices directly and effortlessly via a mobile device. The VK2100 / VK1100 Control Box works as the main controller that provides great connectivity to all sorts of hardware devices commonly seen in a room. After connecting the hardware, the VK6000 Configurator software provides simple setup of the devices with easy step by step configuration. The ATEN Control System App then connects you to the VK2100 / VK1100 Control Box from any iOS, Android or Windows mobile device / tablet computer which empowers you with mobility to control all the hardware devices, in different rooms, whenever and however you like.
The VK2100 / VK1100 Control Box easily deploys into an existing installation and integrates seamlessly with ATEN VanCryst pro-A/V products and nearly any other hardware devices found in a room, including A/V equipment, lighting, conference systems, air conditioning, motion sensors, power switches and many more. The VK2100 / VK1100 Control Box serves as the central platform where hardware devices are connected – to be monitored, managed and controlled directly via a tailor-made GUI from any iOS, Android or Windows mobile device.
The VK6000 Configurator software facilitates quick setup and control of the devices in a few easy steps via an intuitive GUI. The VK6000 walks you through configuring the hardware, designing the interface and uploading Viewer Profiles to the VK2100 / VK1100. To provide control of the hardware devices, Viewer Profiles are imported via the ATEN Control System App from any iOS, Android or Windows mobile device. Through an Ethernet connection, the ATEN Control System App enables you to import and update Viewer Profiles from the VK2100 / VK1100 Control Box via a point-n-tap user interface. Each Viewer Profile provides a customized control GUI that grants you quick access to target and control hardware devices. Use of any profile is protected with password authentication to ensure secure access.
The ATEN Control System is perfectly applicable in meeting rooms, conference centers, boardrooms, classrooms or any room that requires central and mobile control of a variety of hardware devices through a streamlined management system with optimum efficiency and performance.
Intelligent Control
The ATEN Control System makes the interactions between your hardware devices smarter. Pre-programmed actions and triggers can provide a fully automated series of advanced operations that allow your devices to respond to each other intelligently, making your whole solution run smarter and smoother.
Optimized Performance
The ATEN Control System has optimized the communication protocols that not only maintain a near-zero response time but also feature data encryption for extra protection.
Simplified Setup
No matter how large the room or how complicated the hardware, the ATEN Control System can be deployed in 3 easy steps: connect the hardware, configure the system and upload profiles via a smart mobile app. Through an intuitive GUI, the process for setting up the controls for every room is simple and customizable, via straightforward predefined commands and macros, that do not require you to have complicated programming skills.
Effortless Expandability
With a range of expansion boxes available, the ATEN Control System installation can grow to accommodate additional Serial, Relay and IR devices. Furthermore, the ATEN Library has 10,000+ device drivers and grows as you add new devices to the existing database via the Database Generator, making it expandable and easily manageable, whatever the size or scope of the installation.
User Centered Convenience
An advanced, single-software solution creates an intuitive interface for any mobile device, while specific needs are customizable by selecting from an extensive library of actions and design elements to customize the control panel. In addition, the ATEN Control System provides various support services that include driver downloads, database generation and upgrade tools – to help system integrators build easy-to-control environments effortlessly.
On-the-Go Control
Intuitive system control can start with one room and scale up to multiple rooms in the same area or across regions. Toggling between profiles on an iOS, Android or Windows mobile device facilitates control of different rooms with simple point-n-tap operations. In addition, multiple mobile devices can be authorized with access to control the same room or multiple rooms, providing you with flexible, enhanced mobility, and tight security.
Features
VK2100 (Control Box)
◆ Supports various interface connections:
◆ 6 x Serial ports
◆ 4 x IR/Serial ports
◆ 4 x Relay channels
◆ 4 x I/O channels
◆ 1 x Ethernet port
◆ 4 x DC output for power supply connections
◆ 1 x USB port for easy profile upload
- IR Learning function for adding IR device drivers
◆ Easily configure system settings via web GUI
◆ LED indication for hardware status and active messages
- SSH tool to monitor the input and output signals of the Control Box
Rack-mountable
VK1100 (Compact Control Box)
◆ Supports various interface connections:
◆ 2 x Serial ports
◆ 2 x IR/Serial ports
◆ 4 x Relay channels
◆ 1 x Ethernet port
◆ 1 x USB port for easy profile upload
◆ IR Learning function for adding IR device drivers
◆ Easily configure system settings via web GUI
◆ LED indication for hardware status and active messages
- SSH tool to monitor the input and output signals of the Control Box
VK6000 (Configurator Software)
- Simple profile setup with easy configuration steps via intuitive GUI
- Custom design the GUI and controls to use on mobile devices and tablet computers
◆ Built-in Database Generator for device driver setup and overall device management
Built-in ATEN Library comprising 10,000+ device drivers and complete ATEN VanCryst product drivers
◆ Supports Telnet, TCP, ONVIF, and PJLink protocols for controlling IP-based devices over a network
- Two-way communication enables user-defined event monitoring to automatically trigger the next actions
- Test tool to verify commands in action before uploading the profile to the Control Box
◆ Simulator to simulate and review the customized GUI before uploading
ATEN Control System App
- Allows administrators central control of multiple rooms via profiles on a mobile device or tablet computer
- Restrict user access to profiles via password authentication
- Synchronization of system controls amongst multiple mobile devices and tablet computers
- Any iOS, Android, or Windows mobile device can be used to control the system – no need to purchase costly exclusive user panels
Requirements
The following equipment is required for a installation:
Hardware Devices
A device for each type of hardware connection that will be wired to the VK2100 / VK1100, which can include:
◆ Bi-directional RS-232/422/485 serial devices
◆ One-way IR or serial transmitter hardware devices
♦ Relay hardware devices
◆ Digital input hardware devices (VK2100)
◆ Digital output hardware devices (VK2100)
◆ Ethernet controlled PJLink, Telnet, ONVIF and TCP devices
Cables
- Cat 5e/6 Ethernet cable used to connect the VK1100 and VK2100 to the local area network
- For serial devices with DB9 connectors use standard straight through cables.
Computer & Software
◆ PC installed with the ATEN Configurator software (VK6000)
◆ Mobile Device installed with the ATEN Control System App
Minimum PC Requirements (VK6000)
Supported operating systems for the ATEN Configurator software (VK6000) are shown in the table, below:
| OS Version | |
| Windows Win 7, 8, 8.1, 10 and higher |
Optional Equipment
The optional accessories are listed below. Contact your ATEN dealer to purchase any of these additional accessories.
| Model | Description Dimensions Weight | ||
| VK224 4-Port Serial Expansion Box 13.00 x 7.58 x 4.20 cm 0.45 kg | |||
| VK236 6-Port IR/Serial Expansion Box 13.00 x 7.58 x 4.20 cm 0.45 kg | |||
| VK248 8-Channel Relay Expansion Box 20.00 x 7.58 x 4.20 cm 0.65 kg | |||
| VK108US 8-button Keypad (US, 1 Gang) Faceplate: 11.92 x 7.42 x 3.74 cmBack box: 6.80 x 4.77 x 2.82 cm | 0.13 kg | ||
| 2X-031G Single Rack Mount Kit for VK1100 15.30 x 5.00 x 4.15 cm 0.13 kg | |||
Components
VK2100 Front View
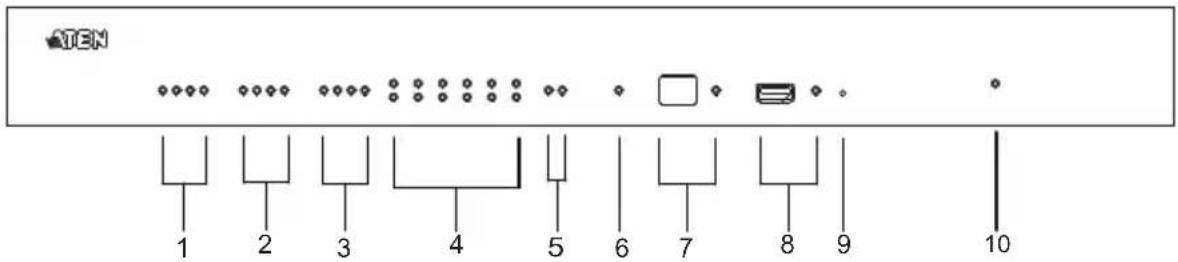
| No. | Component Description | |
| 1 | Relay LED The LED lights | green to indicate an active device connection (closed loop). |
| 2 | IR/Serial LED The LED lights | lights green to indicate an active device connection and IR/Serial signals are being transmitted. |
| 3 | I/O LED The LED lights green to indicate an active device connection and I/O signals are being transmitted. | |
| 4 | Serial LED The LED (1~6) | lights green to indicate serial signals are being transmitted. |
| 5 | Ethernet LED The LEDs provide information about the network connection:◆ Link: The LED blinks green to indicate Ethernet signals are being transmitted.◆ ACT: The LED lights green to indicate 100Mbps transmissions. | |
| 6 | DC Overload LED The LED lights orange to indicate DC output exceeds maximum output.Note: When the LED lights orange, please unplug any of the connected devices to keep its total output under 24W. | |
| 7 | IR Receiver / LED This IR receiver passes the functions of a remote control to the VK2100 in learning mode. The distance between the IR remote and the receiver window should be kept under 10cm with a direct line of sight.◆ The LED blinks green to indicate the unit is ready to receive signals from an IR remote control. | |
| 8 USB Port / LED This is where a USB device plugs in to upload Viewer files to the VK2100.◆ The LED blinks green to indicate Viewer files are being uploaded, and lights green to indicate a successful upload of Viewer files.◆ The LED lights orange to indicate Viewer files failed to upload. | ||
| 9 Reset This semi-recessed pushbutton can be pressed to reset the VK2100's network settings. | ||
| 10 Power LED Lights green when the unit is turned on. | ||
VK2100 Rear View
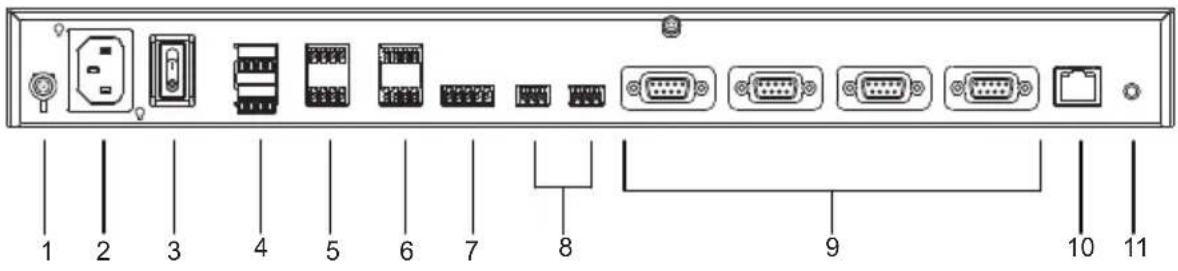
| No. | Component Description | |
| 1 | Grounding Terminal The grounding wire attaches here. | |
| 2 | Power Socket This is a standard 3-pin AC power socket. The power cord from an AC source plugs in here. | |
| 3 | Power Switch This is a standard rocker switch that powers the unit on and off. | |
| 4 | DC Output Ports Four outputs provide a total power output of 24W /2A max. | |
| 5 | Relay Channels Four channels; normally open, isolated relays with a contact rating of 24VDC, 2A max. | |
| 6 | IR / Serial Ports Four IR ports that can also be configured as RS-232 TX ports. pin1: Signal / pin2: Ground. | |
| 7 | I/O Channels Four channels that can be configured as digital input or digital output ports.◆ Digital Input: 0-24VDC programmable input range or contact closure with +12VDC pull-up◆ Digital Output: 250mA sink from 12VDC Pin1~4: Signal / Pin5: Ground | |
| 8 | RS-232 Ports Two RS-232 ports with TX/RX functions supported. | |
| 9 | RS-232/422/485 Ports Four ports with supported RS-232/422/485 conversion by pin assignment and RTS/CTS flow control. The RS232, RS422, or RS485 connection is defined by pin. For pin assignments, see page 31. | |
| 10 | Ethernet Port | This RJ-45 port is used for the network connection. If no IP address is assigned within 30 seconds, the default IP settings will be used:IP: 192.168.0.60 / mask: 255.255.255.0 |
| 11 | Controller ID Switch | This 16-segment switch is used for controller ID selection. |
VK1100 Front View
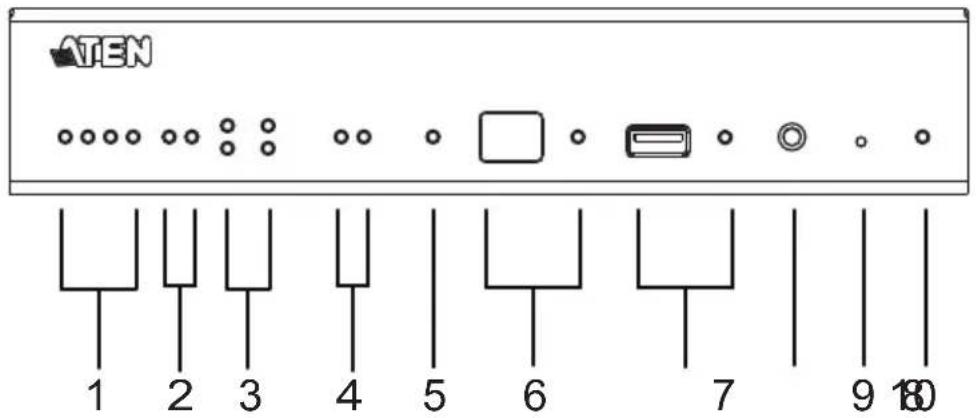
| No. | Component Description | |
| 1 | Relay LED The LED lights | green to indicate an active device connection (closed loop). |
| 2 | IR/Serial LED The LED lights | lights green to indicate an active device connection and IR/Serial signals are being transmitted. |
| 3 | Serial LED The LED (1~2) | lights green to indicate serial signals are being transmitted. |
| 4 | Ethernet Link / ACT LED | The LEDs provide information about the network connection:◆ Link: The LED blinks green to indicate Ethernet signals are being transmitted.◆ ACT: The LED lights green to indicate 100Mbps transmissions. |
| 5 | DC Output Overload LED | The LED lights orange to indicate DC output exceeds maximum output.Note: When the LED lights orange, please unplug any of the connected devices to keep its total output under 12W. |
| 6 | IR Receiver / LED This IR | receiver passes the functions of a remote control to the VK1100 in learning mode. The distance between the IR remote and the receiver window should be kept under 10cm with a direct line of sight.◆ The LED blinks green to indicate the unit is ready to receive signals from an IR remote control. |
| 7 | USB Port / LED This is where a USB device plugs in to upload Viewer files to the VK1100.◆ The LED blinks green to indicate Viewer files are being uploaded, and lights green to indicate a successful upload of Viewer files.◆ The LED lights orange to indicate Viewer files failed to upload. | |
| 8 | Controller ID Switch This 1 | 6-segment switch is used for controller ID selection. |
| 9 | Reset This semi-recessed | pushbutton can be pressed to reset the VK1100's network settings. |
| 10 | Power LED Lights green w | when the unit is turned on. |
VK1100 Rear View
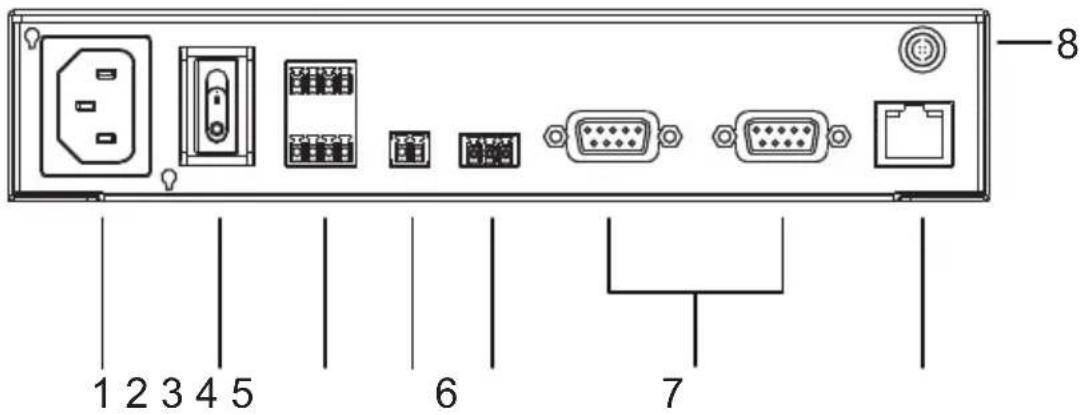
| No. | Component Description | |
| 1 | Power Socket This is a standard 3-pin AC power socket. The power cord from an AC source plugs in here. | |
| 2 | Power Switch This is a standard rocker switch that powers the unit on and off. | |
| 3 | Relay Channels Four channels; normally open, isolated relays with a contact rating of 24VDC, 2A max. | |
| 4 | DC Output Ports One output provides a total power output of 12W max. | |
| 5 | IR / Serial Ports Two IR ports that can also be configured as RS-232 TX ports. pin1: Signal / pin2: Ground. | |
| 6 | RS-232/422/485 Ports Two ports with supported RS-232/422/485 conversion by pin assignment and RTS/CTS flow control. The RS232, RS422, or RS485 connection is defined by pin. For pin assignments, see page 31. | |
| 7 | Ethernet Port This RJ-45 port is used for the network connection. If no IP address is assigned within 30 seconds, the default IP settings will be used:IP: 192.168.0.60 / mask: 255.255.255.0 | |
| 8 | Grounding Terminal The grounding wire attaches here. |
This Page Intentionally Left Blank
Chapter 2
Hardware Setup

-
Important safety information regarding the placement of this device is provided on page 159. Please review it before proceeding.
-
Make sure that the power to all devices connected to the installation are turned off. You must unplug the power cords of any computers that have the Keyboard Power On function.
Rack Mounting
VK2100
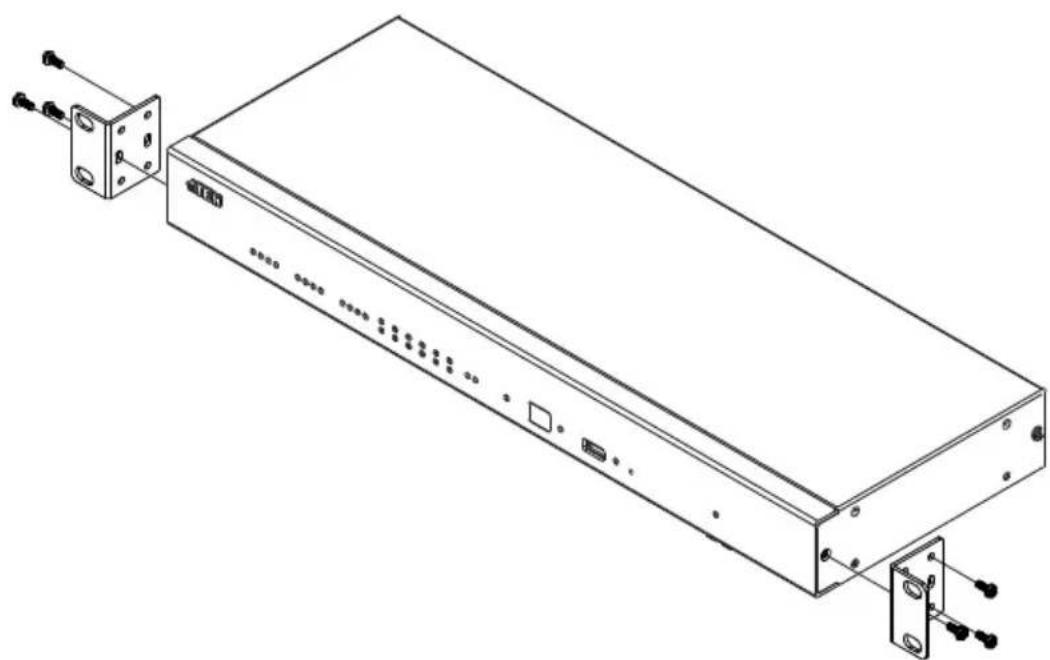
The VK2100 can be mounted in a 19" (1U) system rack. To install the device in a rack, do the following:
- Use the M3 x 8 Phillips head hex screws supplied with the Rack Mount Kit to screw the rack mounting brackets onto the front of the unit.
natural_image
Technical line drawing of a server rack with ports and connectors (no text or symbols)-
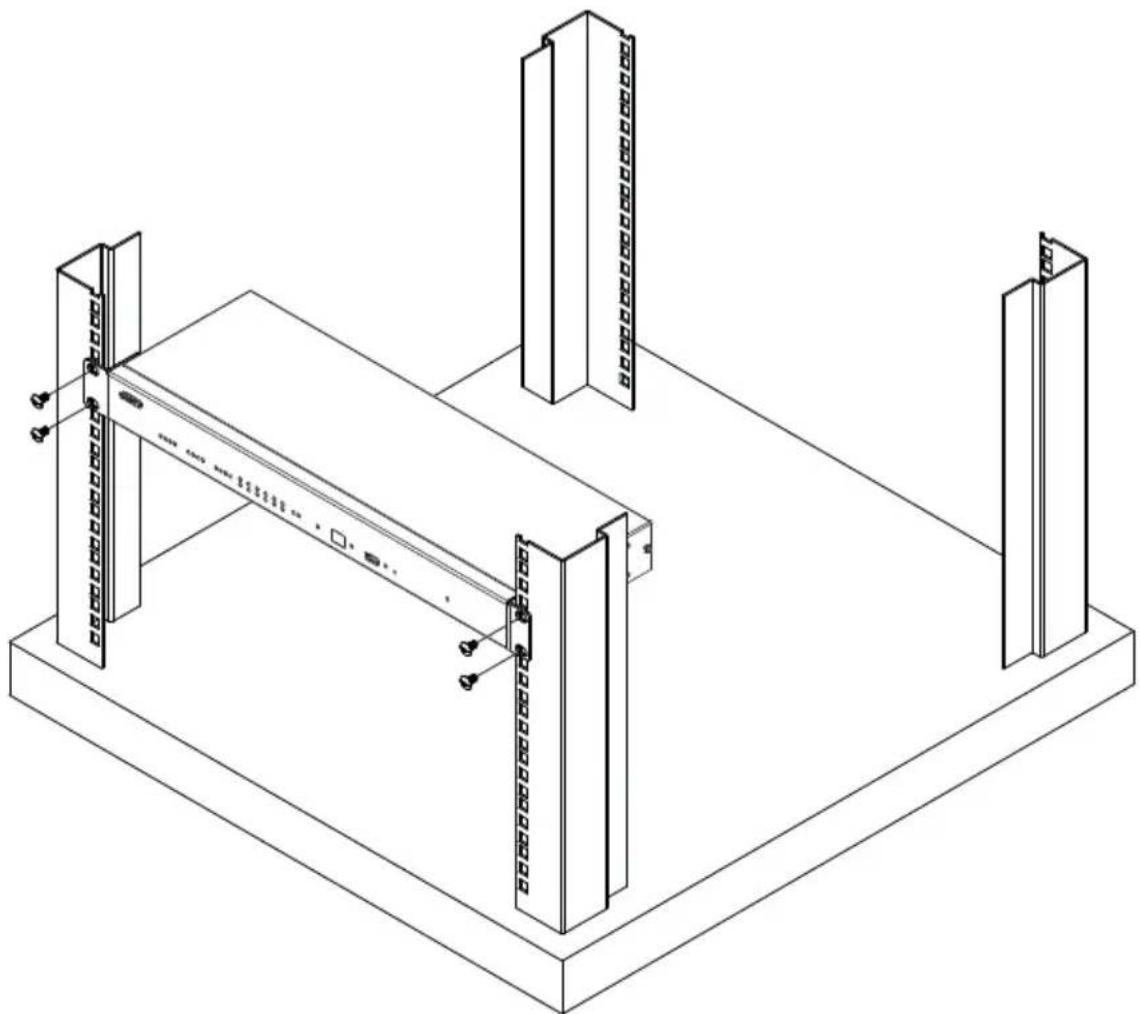
Position the unit in the front of the rack and align the holes in the mounting brackets with the holes in the rack.
-
Screw the mounting brackets to the rack.
natural_image
Isometric line drawing of a structural support frame with vertical supports and mounting brackets (no text or symbols)VK1100
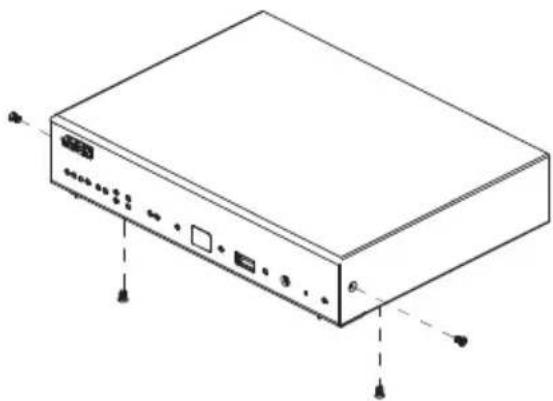
The VK1100 can be mounted in a 19" (1U) system rack. To install the device in a rack, do the following:
- Remove the side and bottom screws from the front of the VK1000.
natural_image
Isometric line drawing of a rectangular electronic device with ports and connectors (no text or symbols)- Use the two bottom screws removed in step 1 to secure the bottom of the brackets, and two M3X6 hexagon screws (included with the rack mount kit) to secure the side of the bracket to the VK1100.
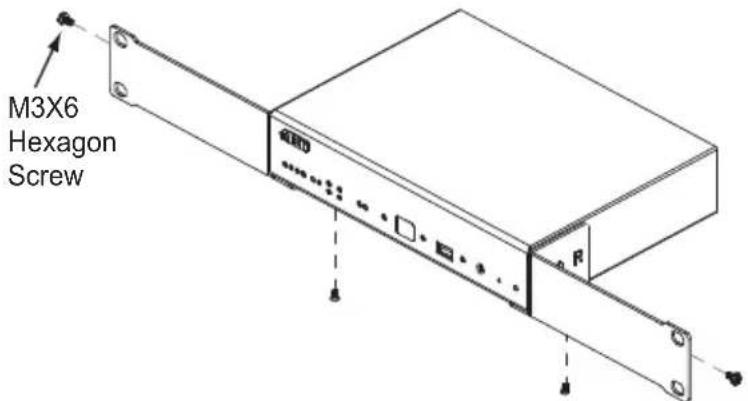
- Screw the mounting brackets to the rack.
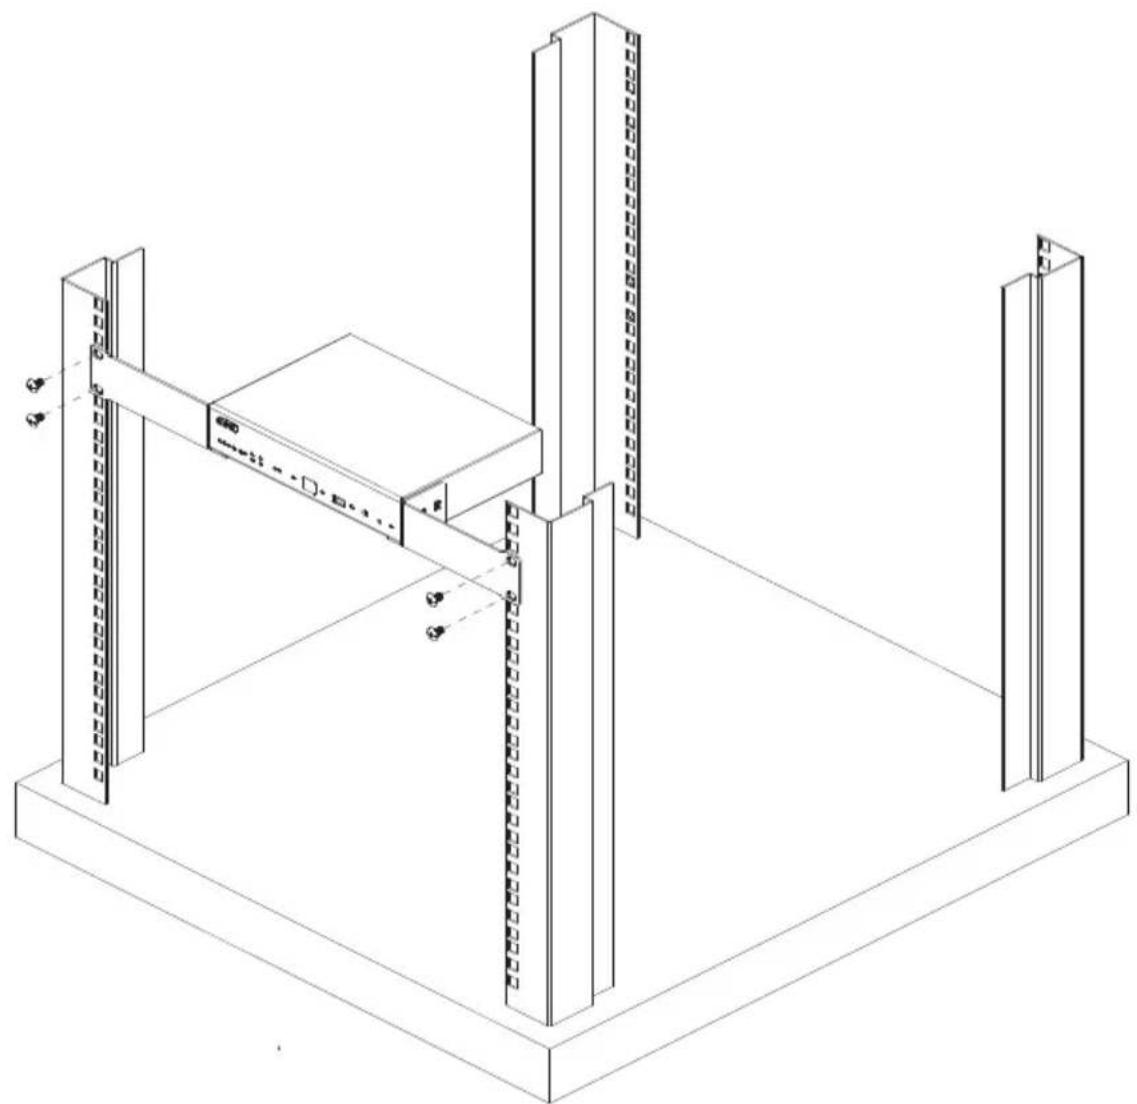
natural_image
Isometric line drawing of a structural frame assembly with vertical supports and mounting points (no text or symbols)Connections
Installation of the Control Box is a matter of connecting the appropriate wires. Refer to the installation diagrams on the pages that follow to setup each device and use the instructions below as a guide (each step provides a corresponding page with diagram for the VK2100 and VK1100), and do the following:
Connect the hardware devices to the Control Box using these instructions:
- Use a grounding wire to ground the unit by connecting one end of the wire to the grounding terminal, and the other end of the wire to a suitable grounded object.
Note: Do not omit this step. Proper grounding helps to prevent damage to the unit from surges or static electricity.
- Use an Cat 5e/6 cable to connect the Control Box's Ethernet port to the network.
- Set the Controller ID to the appropriate setting for this unit.
- Use the DC Output terminals to wire 12VDC power connections using the instructions on page 23.
- Use the Relay terminals to wire relay device connections using the instructions on page 25.
- Use the IR/Serial (TX) terminals to wire IR or serial device connections using the instructions on page 26.
- Use the Digital I/O terminals to wire digital Input/Output device connections using the instructions on page 28.
- Use the RS-232 terminals to wire RS-232 serial device connections using the instructions on page 30.
- Use the DB-9 ports to wire RS-232/422/485 serial device connections using the instructions on page 31.
- Connect TCP LAN based devices to the same network as the Control Box and use the instructions on page 32.
- Plug the power cord supplied with the package into the Control Box's 3-prong AC socket and then into an AC power source.
VK2100 Installation Diagram
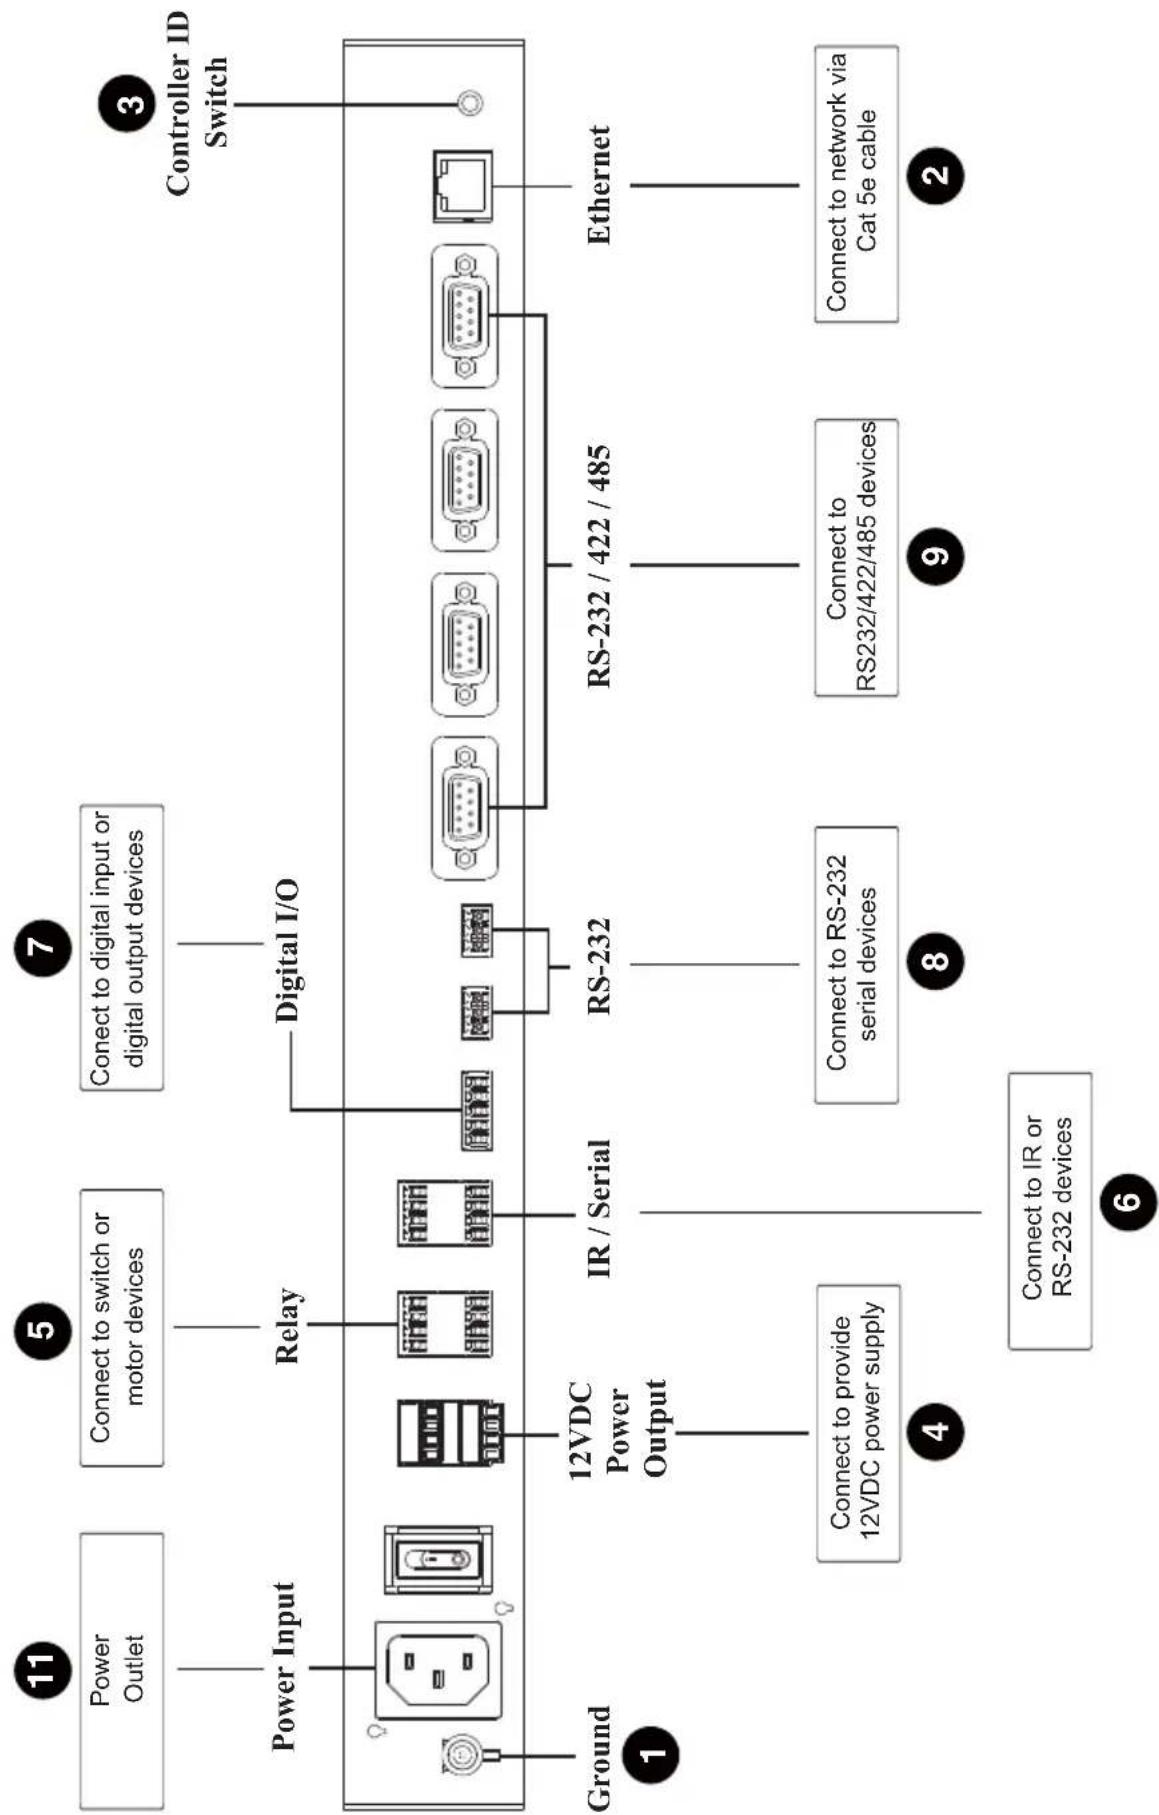
flowchart
graph TD
    A["Power Outlet"] --> B["Power Input"]
    B --> C["12VDC Power Output"]
    C --> D["Connect to provide 12VDC power supply"]
    D --> E["IR / Serial"]
    E --> F["Relay"]
    F --> G["Connect to switch or motor devices"]
    G --> H["Digital I/O"]
    H --> I["RS-232"]
    I --> J["Connect to RS-232 serial devices"]
    J --> K["RS-232 / 422 / 485"]
    K --> L["Connect to RS232/422/485 devices"]
    L --> M["Ethernet"]
    M --> N["Connect to network via Cat 5e cable"]
    N --> O["Controller ID Switch"]
    style A fill:#f9f,stroke:#333
    style O fill:#f9f,stroke:#333
VK1100 Installation Diagram
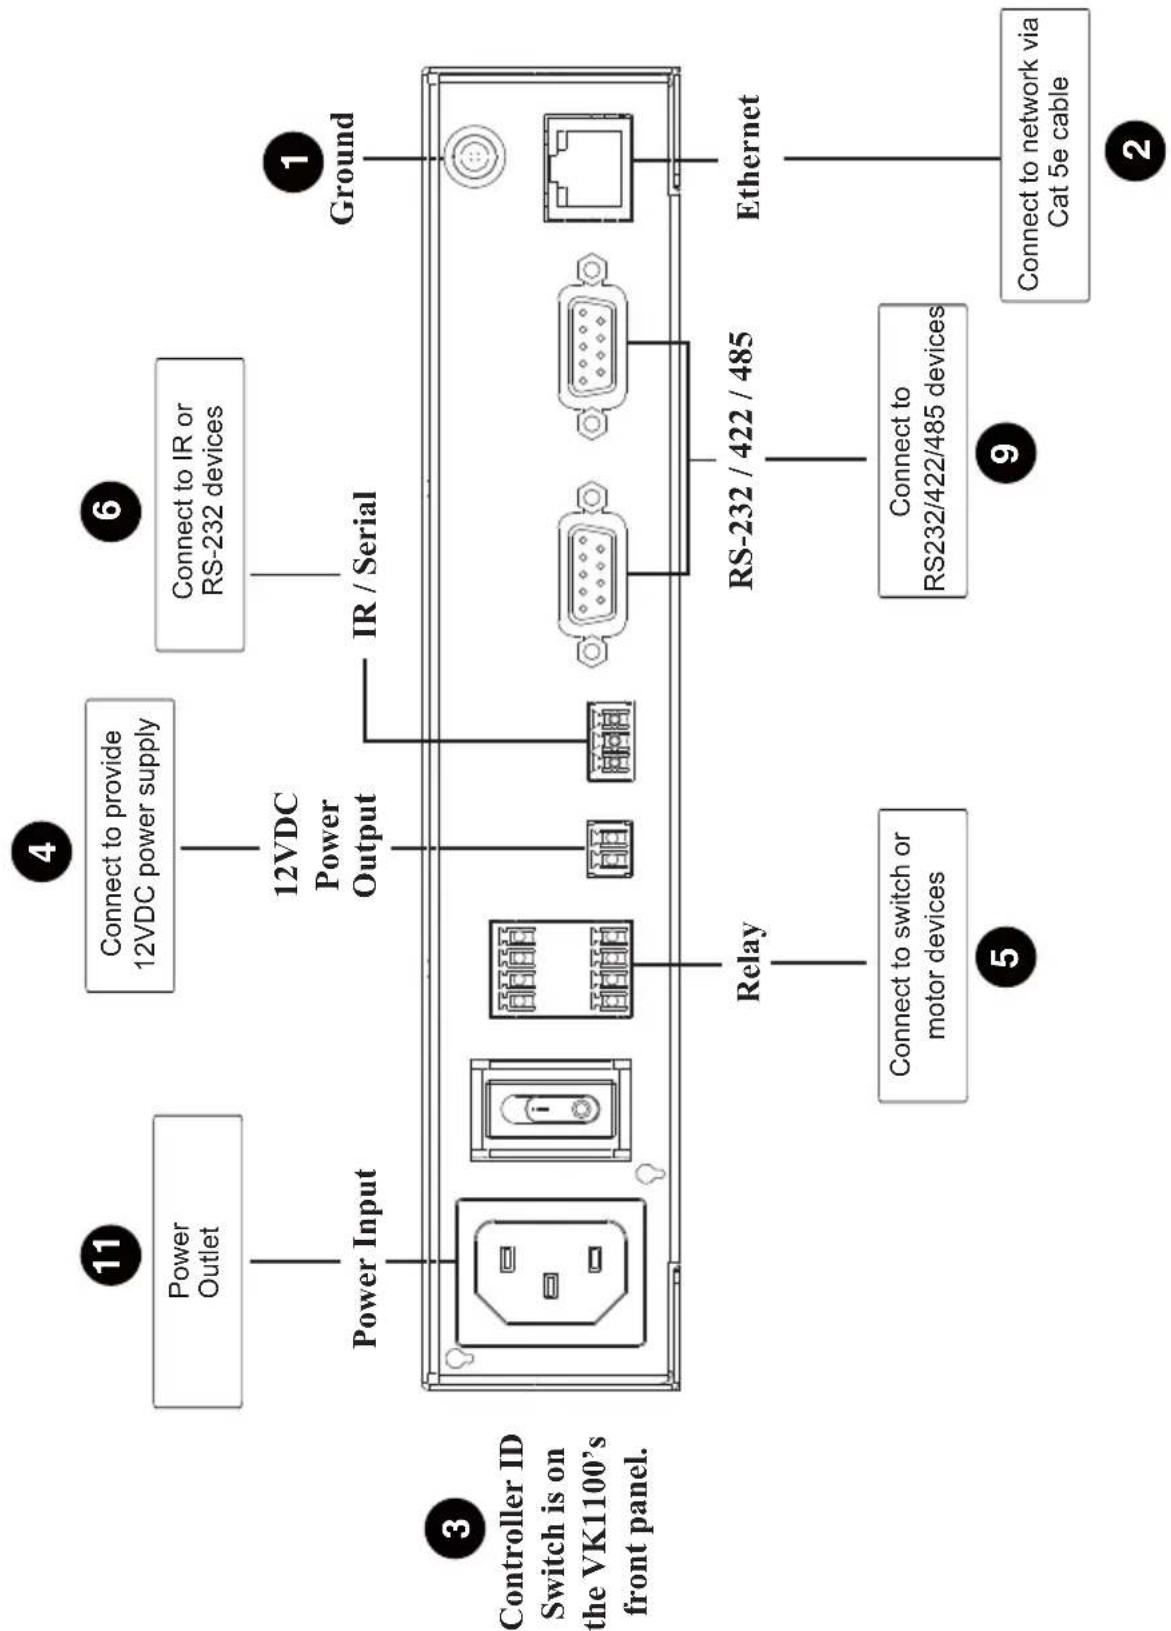
flowchart
graph TD
    A["Controller ID Switch is on the VK1100's front panel."] --> B["Power Outlet"]
    B --> C["Power Input"]
    C --> D["Relay"]
    D --> E["Connect to switch or motor devices"]
    D --> F["RS-232 / 422 / 485"]
    D --> G["Ethernet"]
    D --> H["Ground"]
    D --> I["IR / Serial"]
    D --> J["Connect to network via Cat 5e cable"]
    A --> K["11"]
    A --> L["4"]
    A --> M["6"]
    A --> N["1"]
    A --> O["2"]
12VDC Power Output
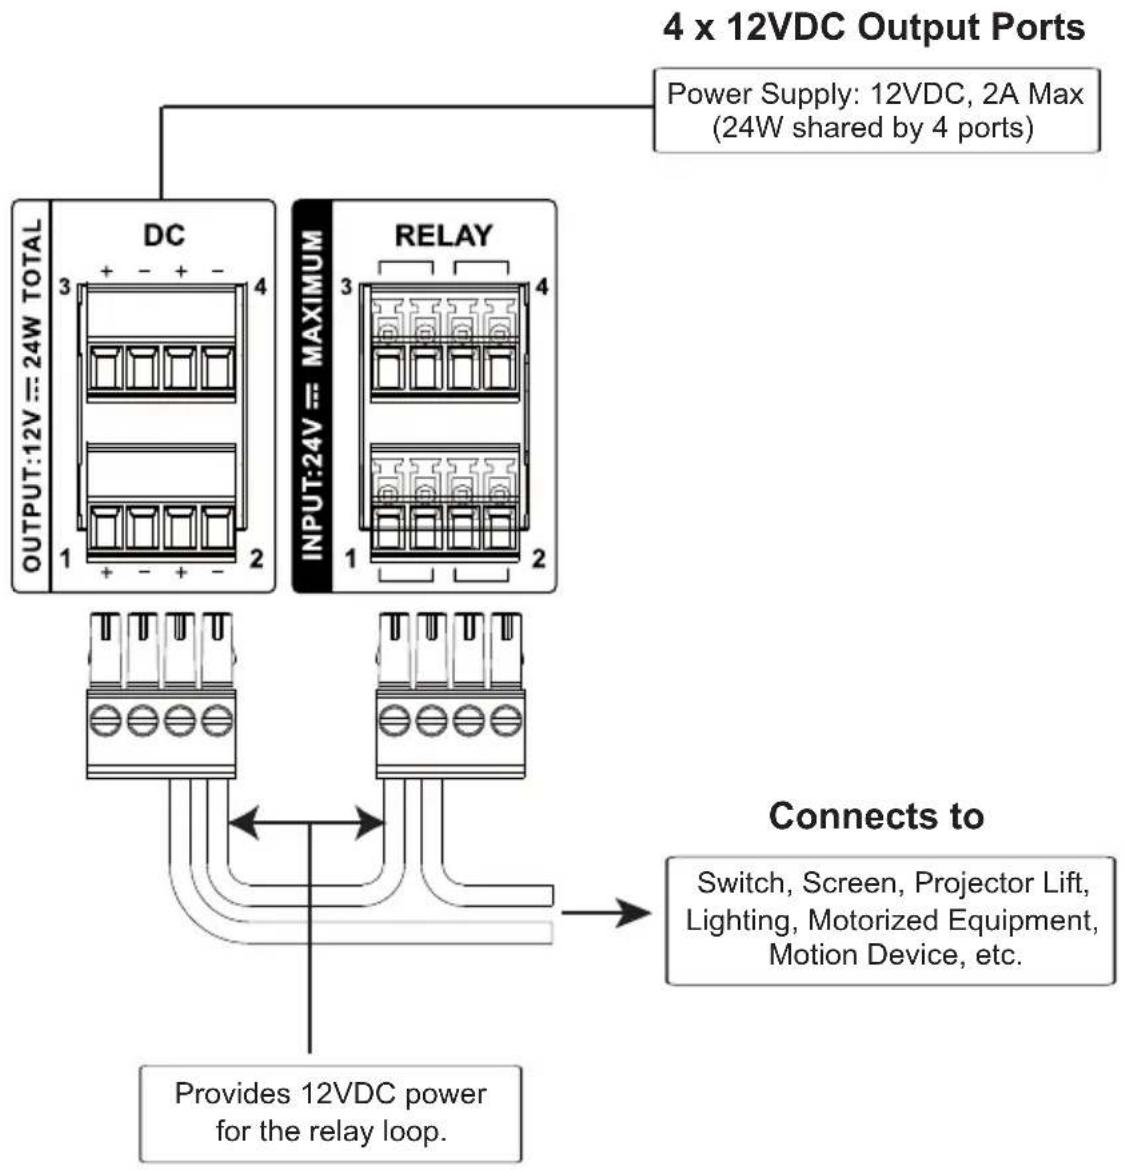
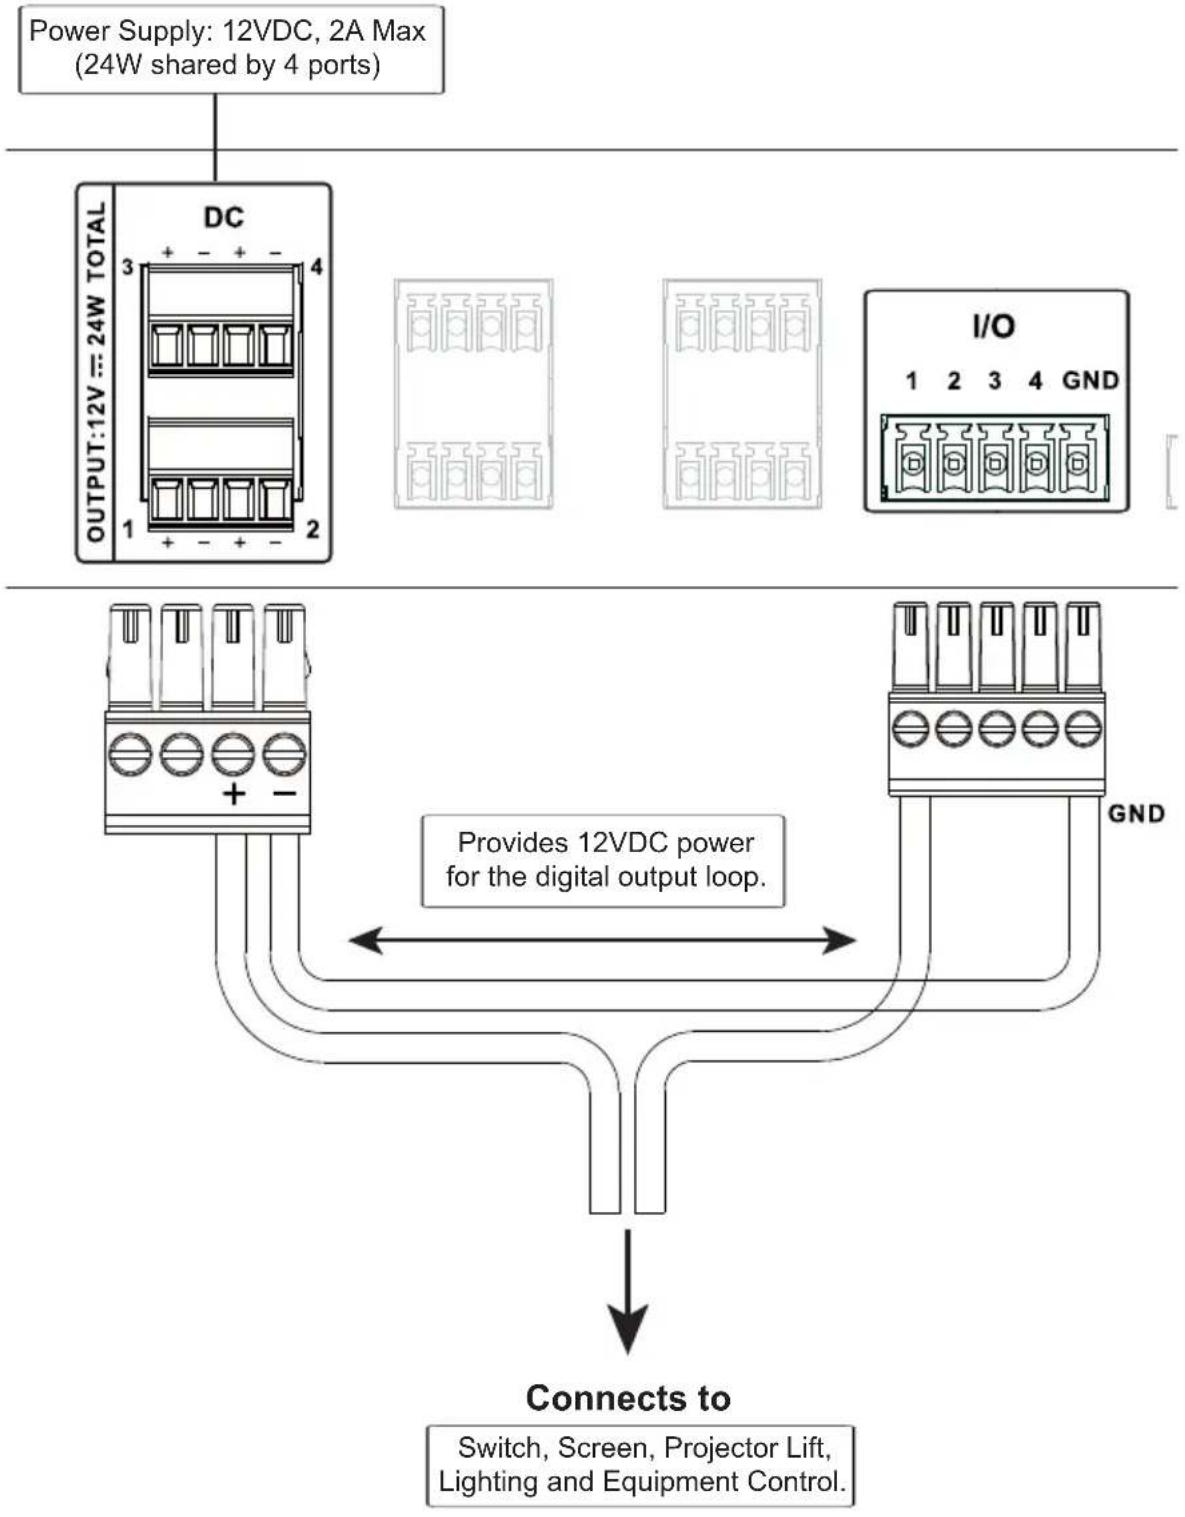
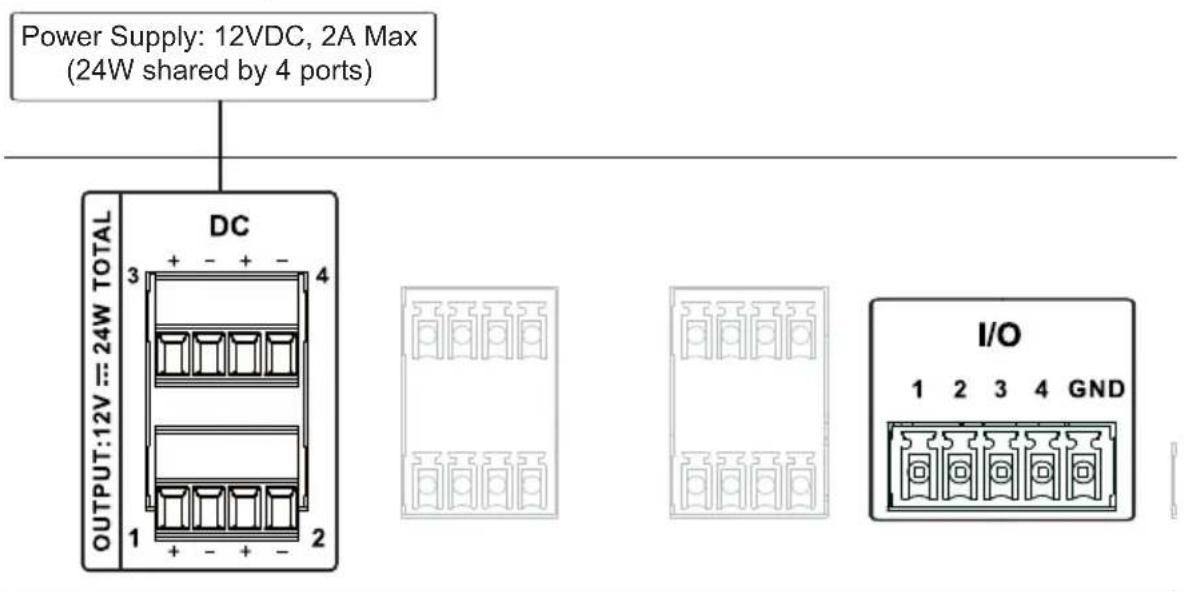
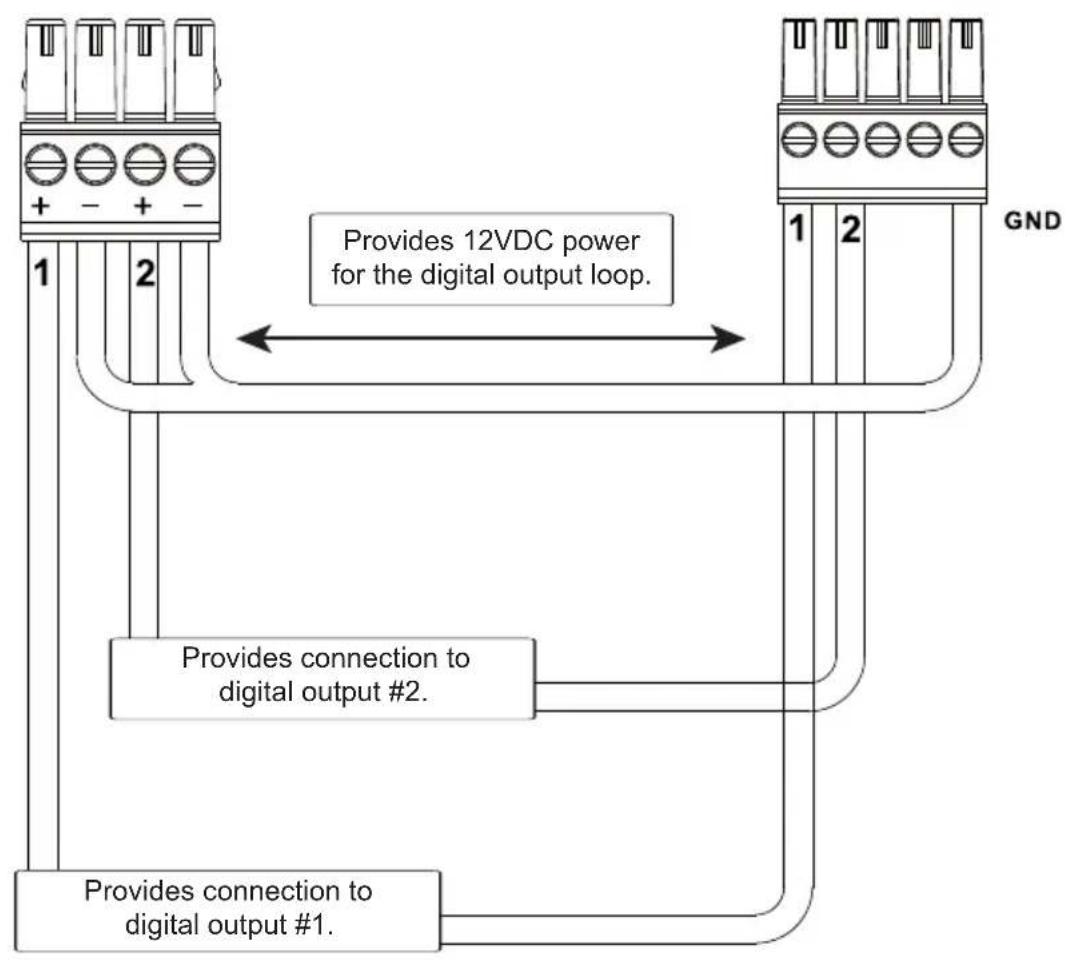
One or four (VK1100 / VK2100) ports provide 12VDC of power with a total of 12 or 24 watts. The output can power one or four (VK1100 / VK2100) independent hardware devices, one or four (VK1100 / VK2100) loops for connected relay devices, or one or four (VK1100 / VK2100) digital output devices. If the combined current of the ports exceeds 1A (VK1100) or 2A (VK2100), the DC Power Overload LED lights orange, an alarm beeps three times and the ports are turned off. To return power to the ports, power off the Control Box, unplug all hardware connected to the 12VDC Power Output ports, power on the Control Box, and then plug in the hardware devices, one at a time, ensuring the current does not exceed 1A or 2A.
The diagrams on the next three pages show ports on the VK2100. The VK1100 is the same except that it has fewer 12VDC terminal blocks and no I/O ports.
Independent Power Supply
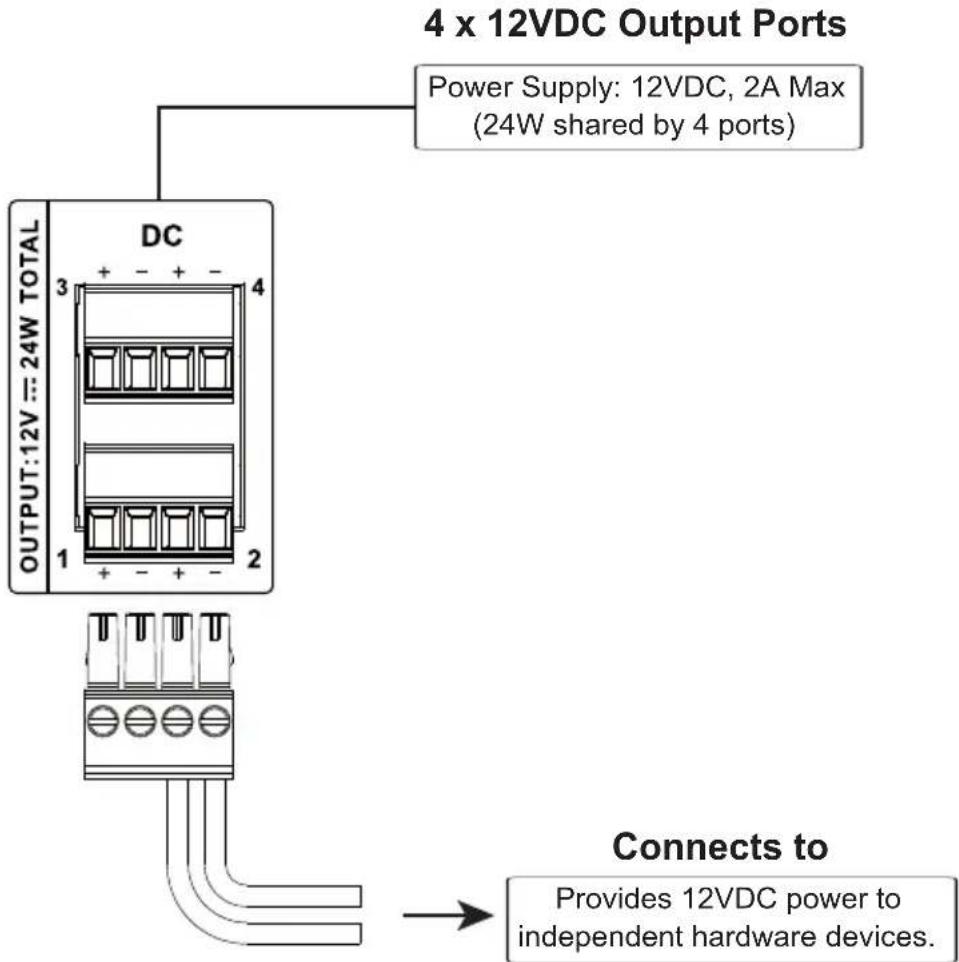
Relay Power Supply
flowchart
graph TD
    A["4 x 12VDC Output Ports"] --> B["DC"]
    A --> C["RELAY"]
    B --> D["Output: 12V = 24W TOTAL"]
    C --> E["INPUT: 24V = MAXIMUM"]
    D --> F["Provides 12VDC power for the relay loop."]
    E --> G["Connects to"]
    G --> H["Switch, Screen, Projector Lift, Lighting, Motorized Equipment, Motion Device, etc."]
    I["Power Supply: 12VDC, 2A Max (24W shared by 4 ports)"] --> A
Digital Output Power Supply (VK2100 only)
4 x 12VDC Output Ports
flowchart
graph TD
    A["Power Supply: 12VDC, 2A Max (24W shared by 4 ports)"] --> B["DC"]
    B --> C["Output: 12VDC = 24W TOTAL"]
    B --> D["I/O: 1 2 3 4 GND"]
    B --> E["Connects to: Switch, Screen, Projector Lift, Lighting and Equipment Control."]
    F["Provides 12VDC power for the digital output loop."] --> B
Digital Output Dual Power Supply (VK2100 only)
4 x 12VDC Output Ports
flowchart
graph TD
    A["1"] --> B["2"]
    B --> C["12VDC power for the digital output loop."]
    C --> D["Provides connection to digital output #1."]
    D --> E["Provides connection to digital output #2."]
    E --> F["12VDC power for the digital output loop."]
    F --> G["GND"]
Relay
These four Relay channels provide connections to control hardware devices such as electric screens, projector lifts and other motorized equipment. Each relay is normally open by default.
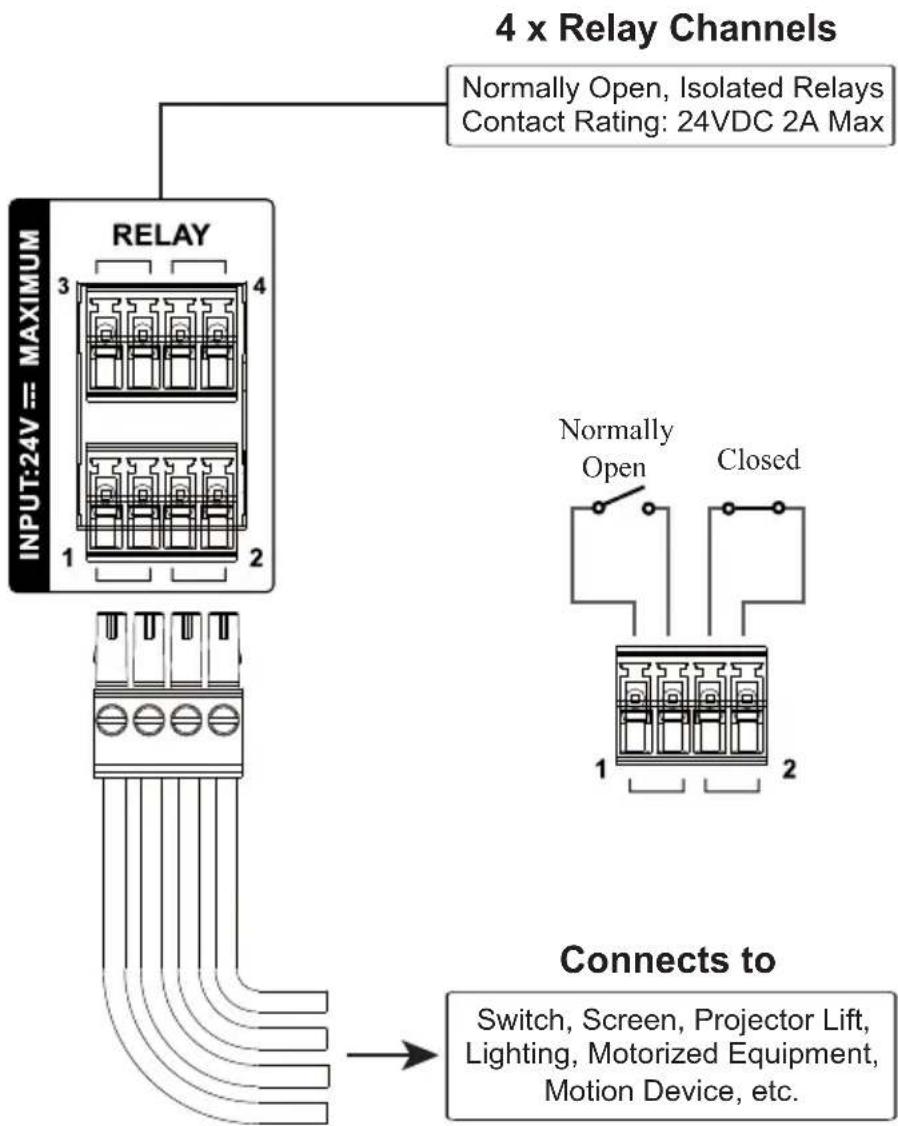
IR / Serial
These two or four (VK1100 / VK2100) ports can be configured to connect IR and RS-232 devices. By default the ports are set to transmit IR signals. Use the ATEN Configurator software to configure the ports for RS-232 signals. The diagram below shows ports on the VK2100. The VK1100 is the same except that it has fewer terminals blocks and the Uni-directional setting is (0 to 5 V).

flowchart
graph TD
    A["VK2100"] --> B["IR/SERIAL"]
    B --> C["1 S G S G 2"]
    B --> D["3 S G S G 4"]
    B --> E["TTL Level (0 to 5 V)<br>Carrier Frequency: 10kHz~455kHz"]
    F["4 x IR Ports"] --> G["4 x RS-232 Ports"]
    G --> H["Uni-directional (+ -5 V)<br>Baud Rate: 300 to 115200<br>(default: 9600)<br>Data Bit: 8 (default) or 7<br>Stop Bit: 1 (default) or 2<br>Parity: None (default), Even or Odd"]
    I["Connects to"] --> J["IR: Blu-ray / DVD Player, TV,<br>Audio Receiver, Projector, etc."]
    K["4 x RS-232 Ports"] --> L["RS-232: Camera, Projector,<br>Switch, Audio Mixer, Multimedia Device, etc."]
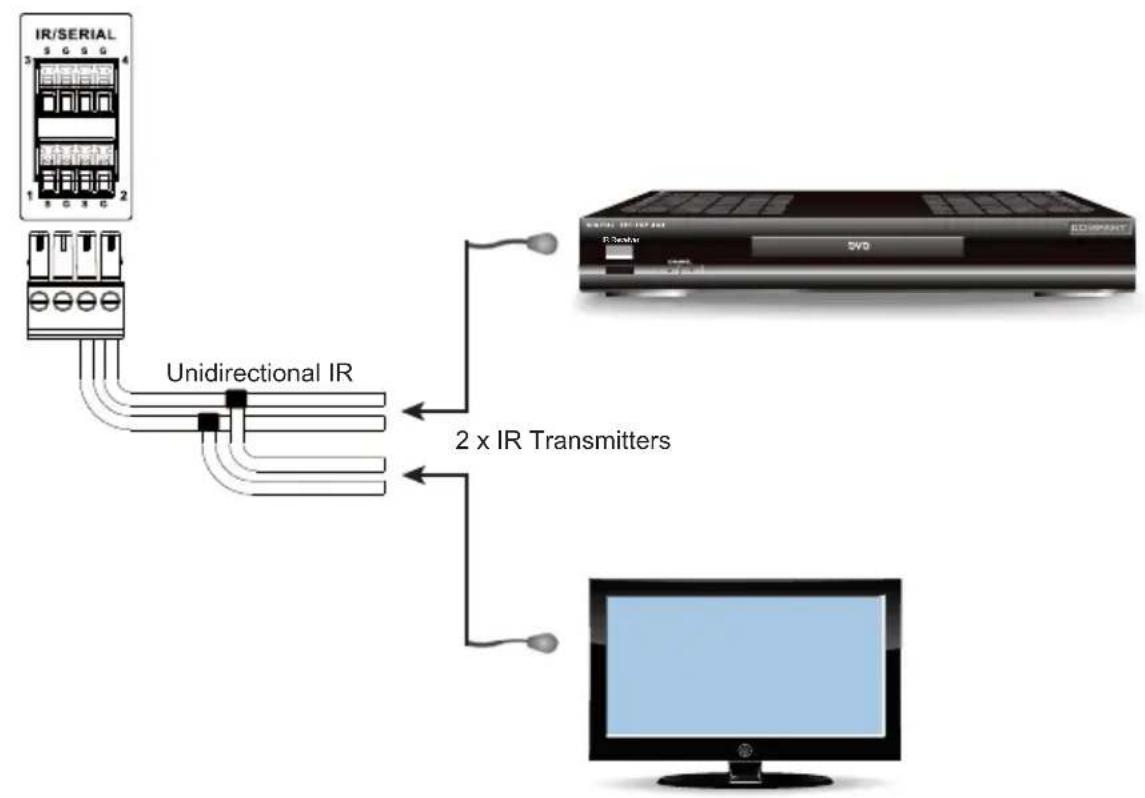
IR Connection: Connect a transmitter cable to the IR and Ground ports on the Control Box and install the IR transmitter on or near the device's IR receiving port, as shown on page 27.
Serial Connection: Connect the device's receiver (RX) and ground ports to the Serial (TX) and Ground ports on the Control Box. Next configure the same serial port setting on the Control Box and serial device so that they can communicate.
One IR Transmitter
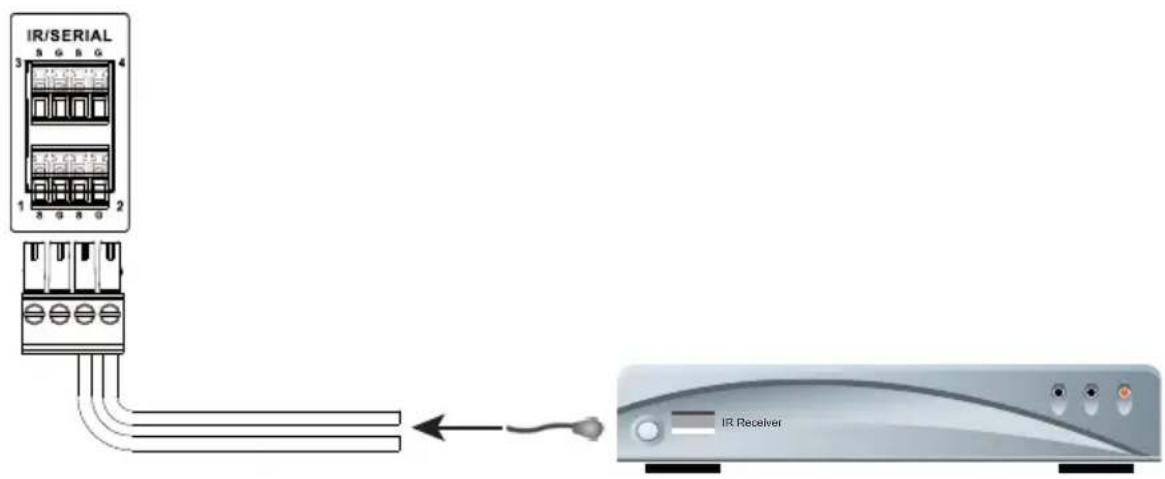
Two IR Transmitters
flowchart
graph TD
    A["IR/SERIAL"] -->|1 2 3 4| B["Unidirectional IR"]
    B --> C["2 x IR Transmitters"]
    C --> D["TV"]
Digital I/O
The four channels on the VK2100 can be used to connect Digital Input or Digital Output hardware devices such as switches, sensors, LEDs and relays. Each channel can be configured as either an Input (VDC), Input (Dry Contact) or Output channel.
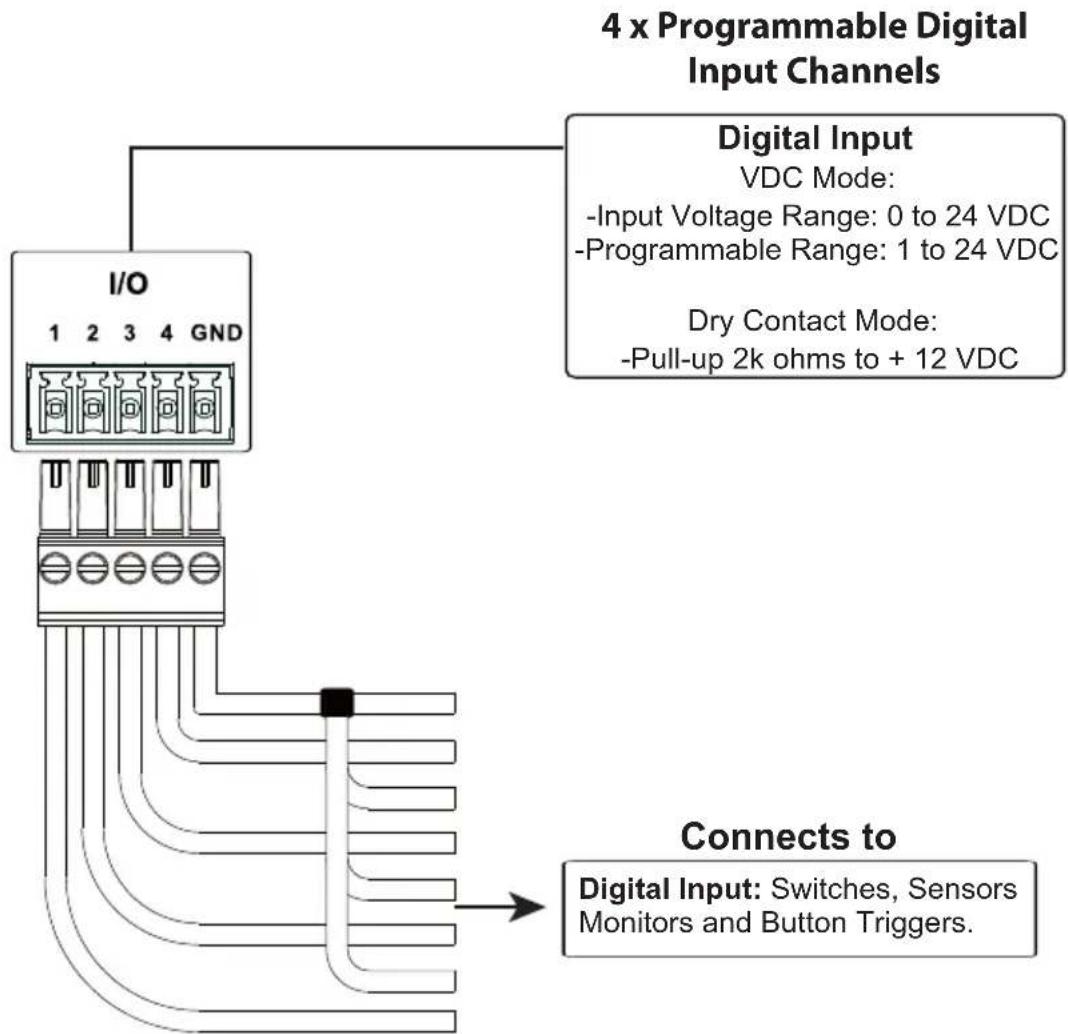
flowchart
graph TD
    A["4 x Programmable Digital Input Channels"] --> B["I/O"]
    B --> C["1 2 3 4 GND"]
    B --> D["Connects to: Digital Input: Switches, Sensors Monitors and Button Triggers."]
    B --> E["Digital Input: VDC Mode: -Input Voltage Range: 0 to 24 VDC, -Programmable Range: 1 to 24 VDC, Dry Contact Mode: -Pull-up 2k ohms to +12 VDC"]
Digital Input (Dry Contact):
Digital inputs are hardware devices (switches, sensors, monitors) with two circuit signals – open and closed. These two signals provide indicators from sensors or switches of an event. An event can be the on/off power, dry contact, sensor or switch status from a device. This information is used to trigger events and functions through the VK2100.
Digital Input (VDC):
Digital input 12VDC hardware devices (temperature, current and monitor sensors) provide voltage signals between 1 and 24. A digital input port detects if a voltage is above/below a specific threshold (1 to 24). If the voltage coming from a hardware device is higher than the set value, the VK2100 will detect the digital input as high. If the voltage coming from a hardware device
is lower than the set value, the VK2100 will detect the digital input as low. This information is used to trigger events and functions through the VK2100.
Digital Output:
Digital output channels provide non-powered dry contact (open and closed) circuit control of hardware devices such as electric screens, projector lifts and other motorized equipment. Devices connected to the Digital Output port must be connected through a Relay Module, as shown below.
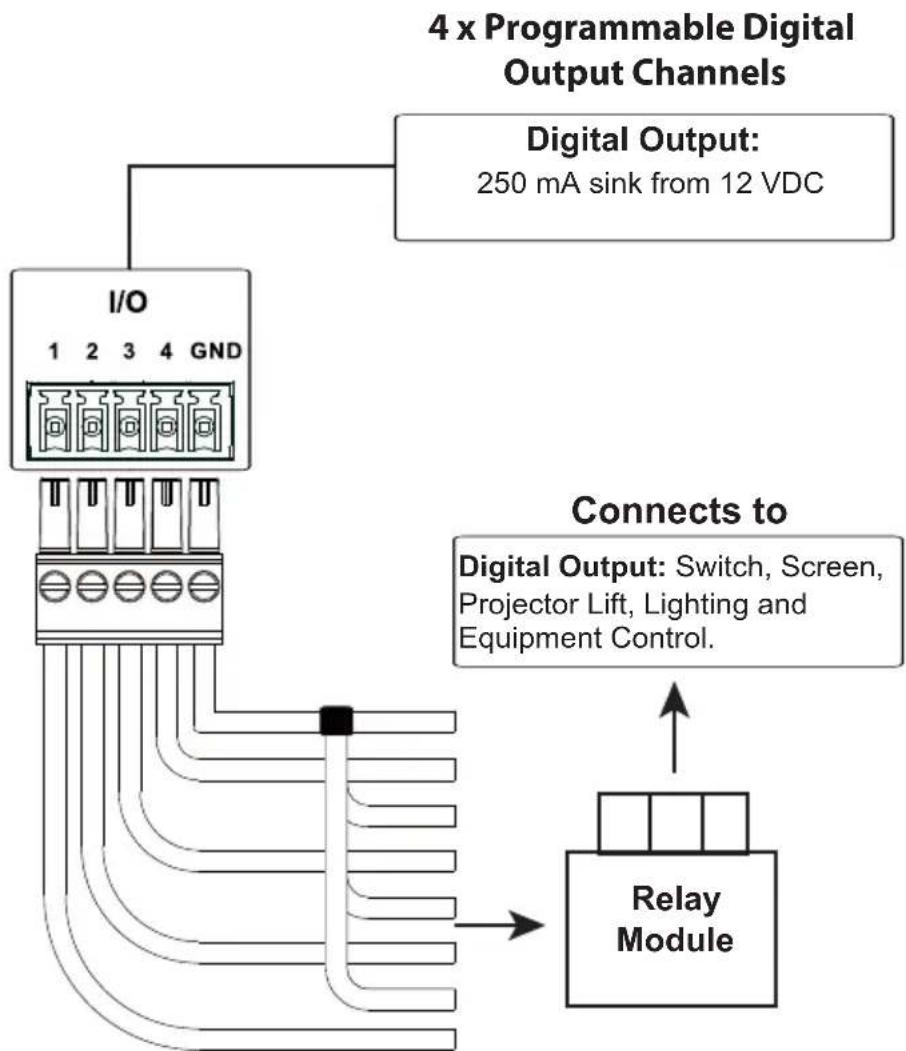
flowchart
graph TD
    A["4 x Programmable Digital Output Channels"] --> B["Digital Output: 250 mA sink from 12 VDC"]
    B --> C["I/O"]
    C --> D["Connects to: Digital Output: Switch, Screen, Projector Lift, Lighting and Equipment Control."]
    C --> E["Relay Module"]
RS-232
The two bi-directional RS-232 ports on the VK2100 provide serial control of hardware devices (projectors, matrix switches, etc.) and receive status messages from the connected devices. For bi-directional RS-232 control, the transmit, receive and ground pins must be wired on both the VK2100 and hardware device. Each hardware device requires different wiring. Please consult each hardware device's manual for details.
2 x Bi-directional RS-232 Ports
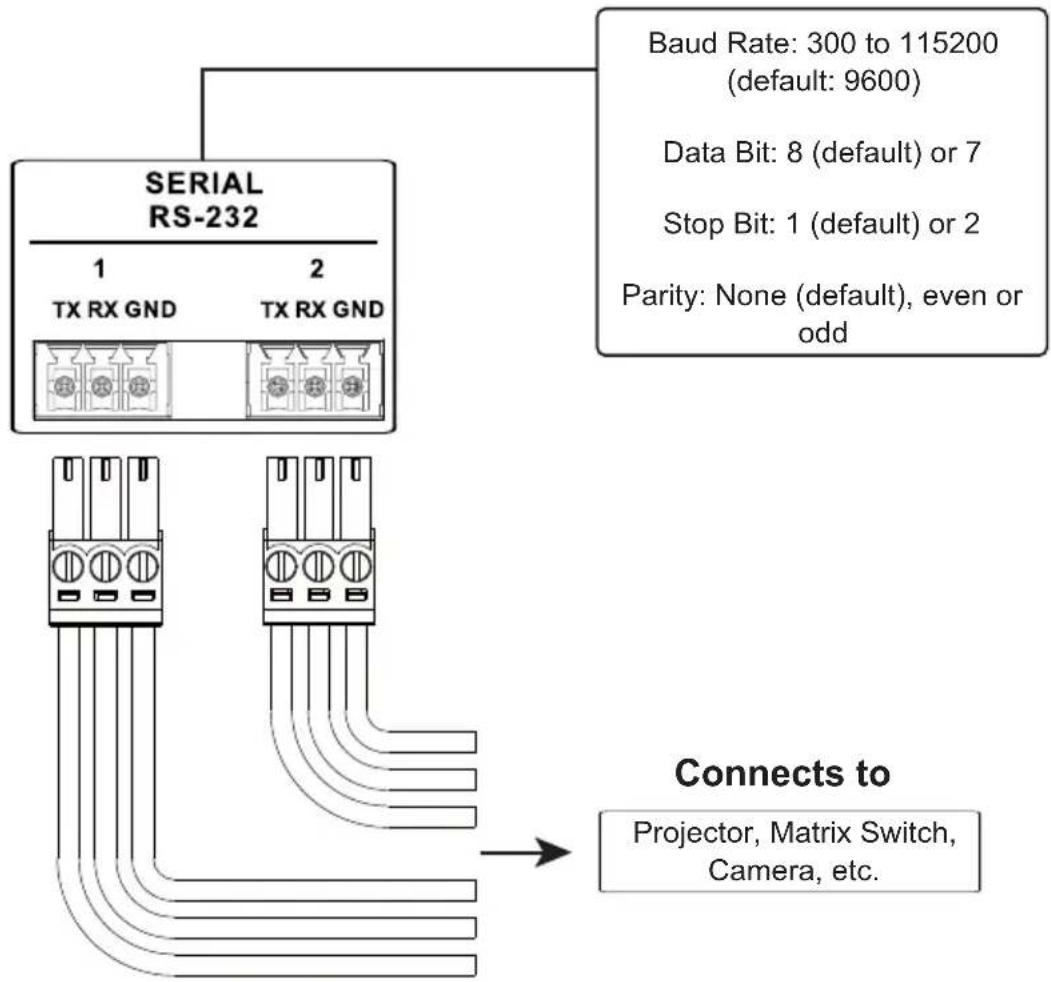
flowchart
graph TD
    A["SERIAL RS-232"] --> B["1 TX RX GND"]
    A --> C["2 TX RX GND"]
    D["Baud Rate: 300 to 115200 (default: 9600)"]
    E["Data Bit: 8 (default) or 7"]
    F["Stop Bit: 1 (default) or 2"]
    G["Parity: None (default), even or odd"]
    H["Connects to: Projector, Matrix Switch, Camera, etc."]
RS-232 / 422 / 485
These two or four (VK1100 / VK2100) bi-directional ports provide serial control of hardware devices (projectors, switches, etc.) with programmable pin assignments and receive status messages from the connected devices. The diagram below shows ports on the VK2100. The VK1100 is the same except that it has fewer ports.
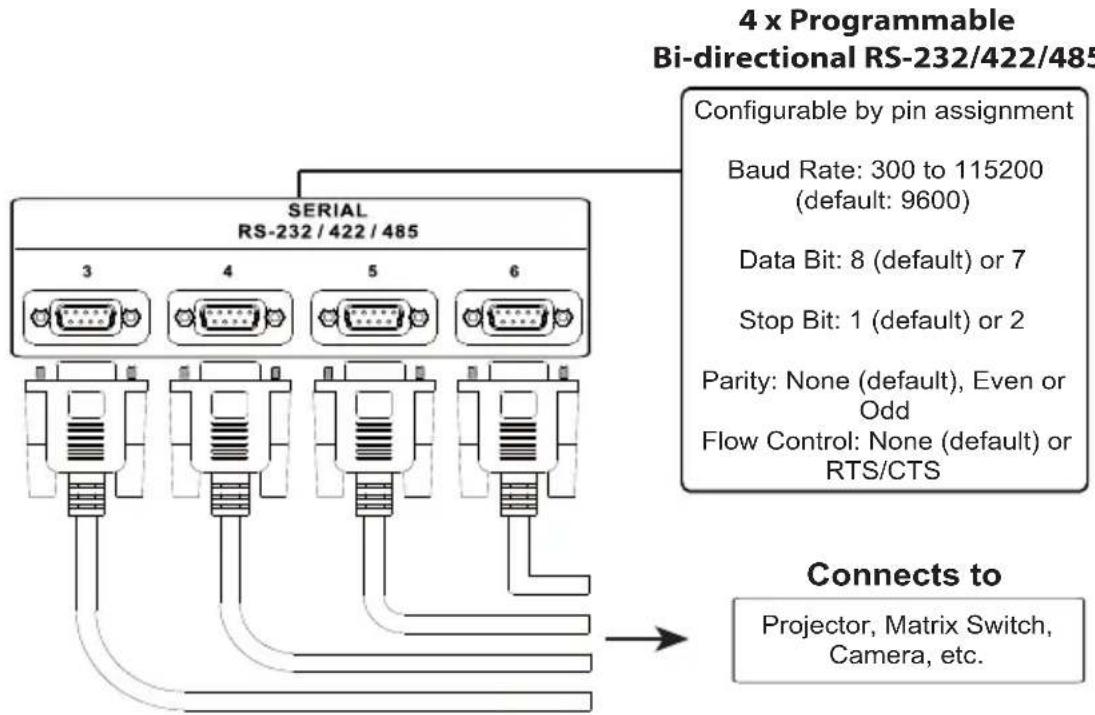
flowchart
graph TD
    A["SERIAL RS-232/422/485"] --> B["3"]
    A --> C["4"]
    A --> D["5"]
    A --> E["6"]
    B --> F["Port 1"]
    C --> G["Port 2"]
    D --> H["Port 3"]
    E --> I["Port 4"]
    F --> J["Connects to: Projector, Matrix Switch, Camera, etc."]
    G --> J
    H --> J
    I --> J
    J --> K["Configurable by pin assignment"]
    K --> L["Baud Rate: 300 to 115200 (default: 9600)"]
    K --> M["Data Bit: 8 (default) or 7"]
    K --> N["Stop Bit: 1 (default) or 2"]
    K --> O["Parity: None (default), Even or Odd"]
    K --> P["Flow Control: None (default) or RTS/CTS"]
Pin Assignments
| RS-232 RS-422 RS-485 | |
| Pin2: RX Pin1: RX- Pin3: D+ | |
| Pin3: TX Pin2: RX+ Pin4: D- | |
| Pin5: GND Pin3: TX+ | |
| Pin7: RTS Pin4: TX- | |
| Pin8: CTS Pin5: GND |
Ethernet
The RJ-45 port provides an Ethernet connection for GUI access (page 39) and the ability to add up to 25 LAN devices (page 60) per Control Box, as shown below.
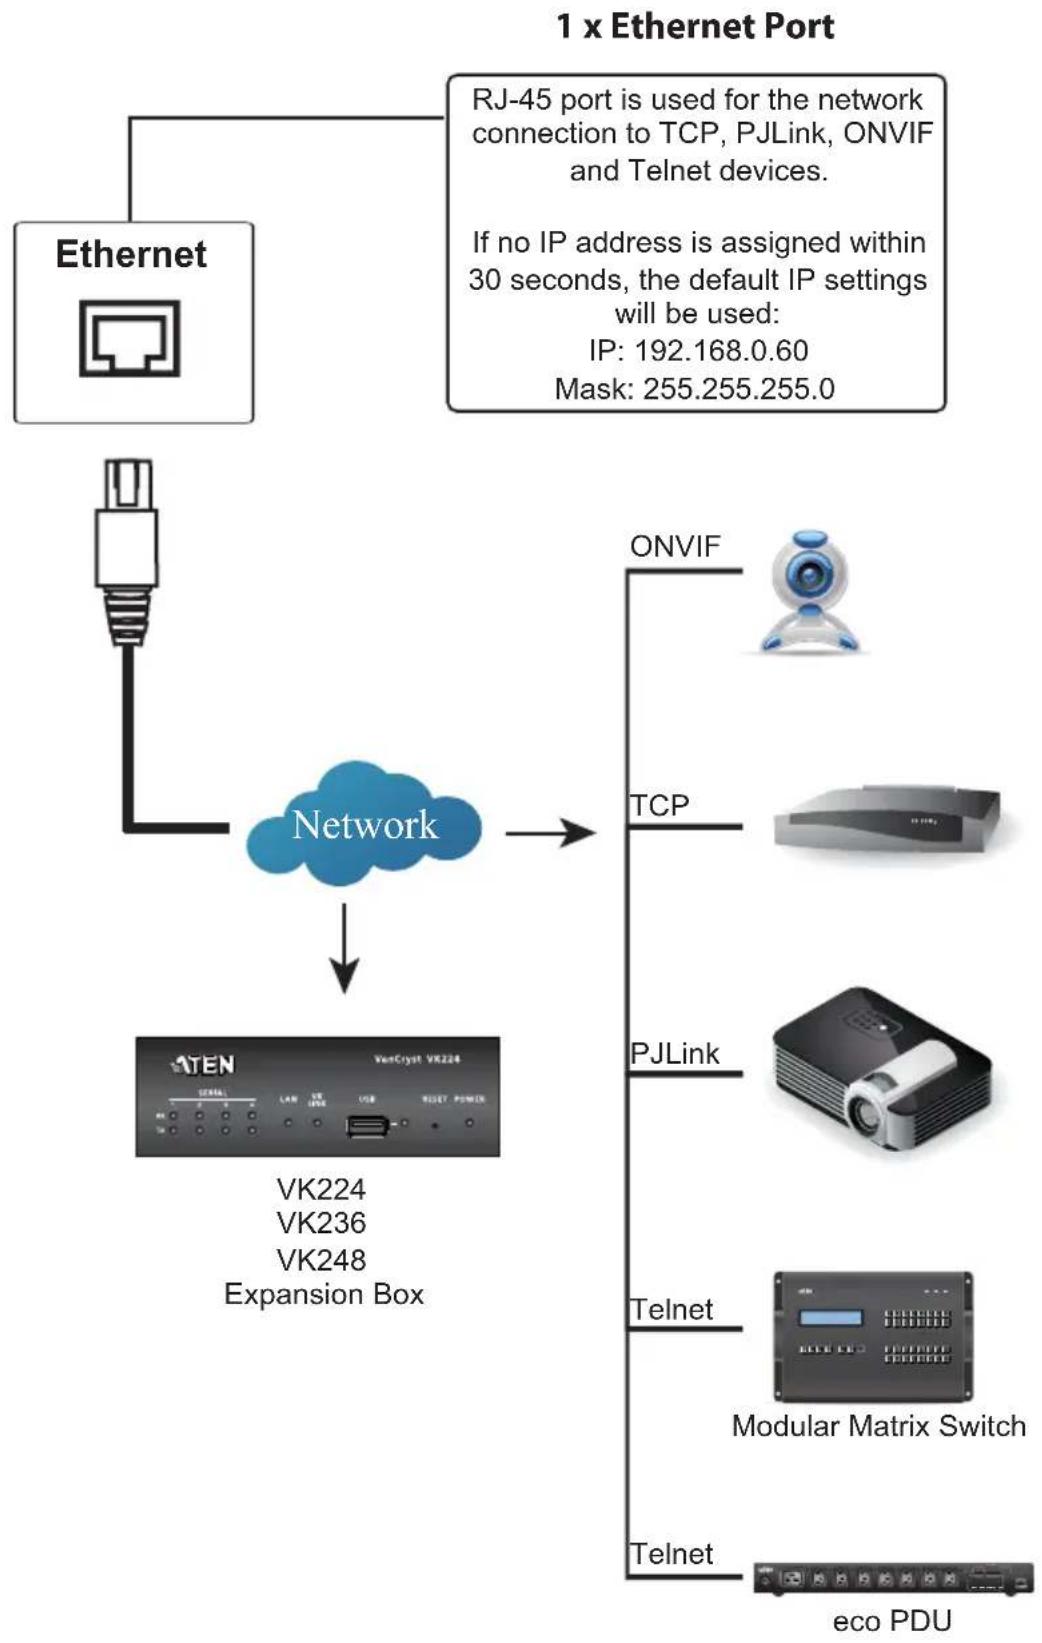
flowchart
graph TD
    A["Ethernet"] --> B["Network"]
    B --> C["ONVIF"]
    B --> D["TCP"]
    B --> E["PJLink"]
    B --> F["Telnet"]
    B --> G["Modular Matrix Switch"]
    B --> H["Telnet"]
    C --> I["ECO PDU"]
    D --> J["ECO PDU"]
    E --> K["ECO PDU"]
    F --> L["ECO PDU"]
    G --> M["ECO PDU"]
    N["RJ-45 port is used for the network connection to TCP, PJLink, ONVIF and Telnet devices. If no IP address is assigned within 30 seconds, the default IP settings will be used: IP: 192.168.0.60, Mask: 255.255.255.0"] --> B
    O["VK224 VK236 VK248 Expansion Box"] --> B
Expansion Box
ATEN Expansion Boxes (sold separately) provide additional ports for a flexible expansion of the ATEN Control System. This allows you to add and control additional devices in an environment where more devices are required. With the advantage of an Ethernet-based connection, the expansion boxes are easily connected to the Control Box via a LAN connection from a variety of locations across a network. The diagram below provides an example of the VK224 4-Port Serial Expansion Box setup.
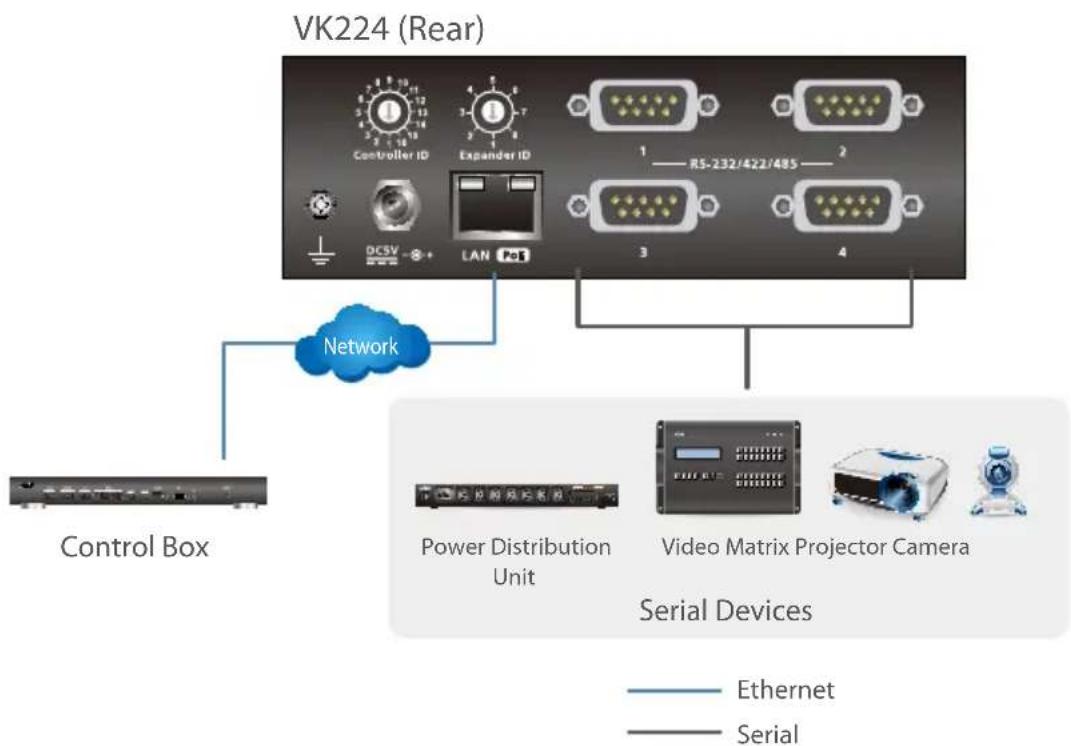
flowchart
graph TD
    A["Control Box"] --> B["Network"]
    B --> C["Controller ID"]
    B --> D["Expander ID"]
    B --> E["RS-232/422/485"]
    B --> F["LAN"]
    B --> G["3"]
    B --> H["4"]
    I["Power Distribution Unit"] --> J["Video Matrix Projector Camera"]
    K["Serial Devices"] --> L["Ethernet"]
    K --> M["Serial"]
To add and configure ATEN Expansion Boxes: see Device Configuration, page 60 and Expander, page 61.
ATEN Expansion Boxes
| Model Description |
| VK224 4-Port Serial Expansion Box |
| VK236 6-Port IR/Serial Expansion Box |
| VK248 8-Channel Relay Expansion Box |
VK108US
The VK108US 8-Button Keypad mounts to a wall to provide control of hardware through a Control Box. The setup of the VK108US to the Control System can be illustrated as follows:
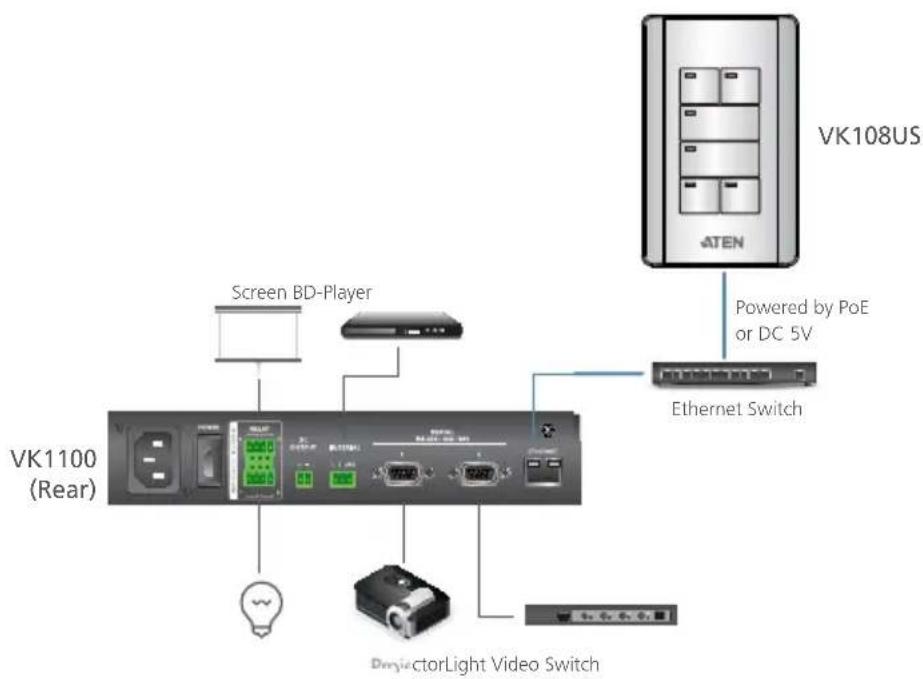
Keypad Installation
To install the keypad, use the diagram and instructions, and do the following:
- Assign ID numbers by adjusting the ID switches on the VK108US. The blue ID switch is to set the keypad's own ID number. The black ID switch is to set which Control Box it will pair with. Up to 8 VK108US Keypads can pair with a VK series Control Box.
- Connect the DC power on the VK108US (see Power Supply Information, page 35) to a power outlet with the power adapter, or use PoE to power the unit.
- Use an Ethernet cable to connect the VK108US to the LAN.
- Screw the keypad to the wall opening.
-
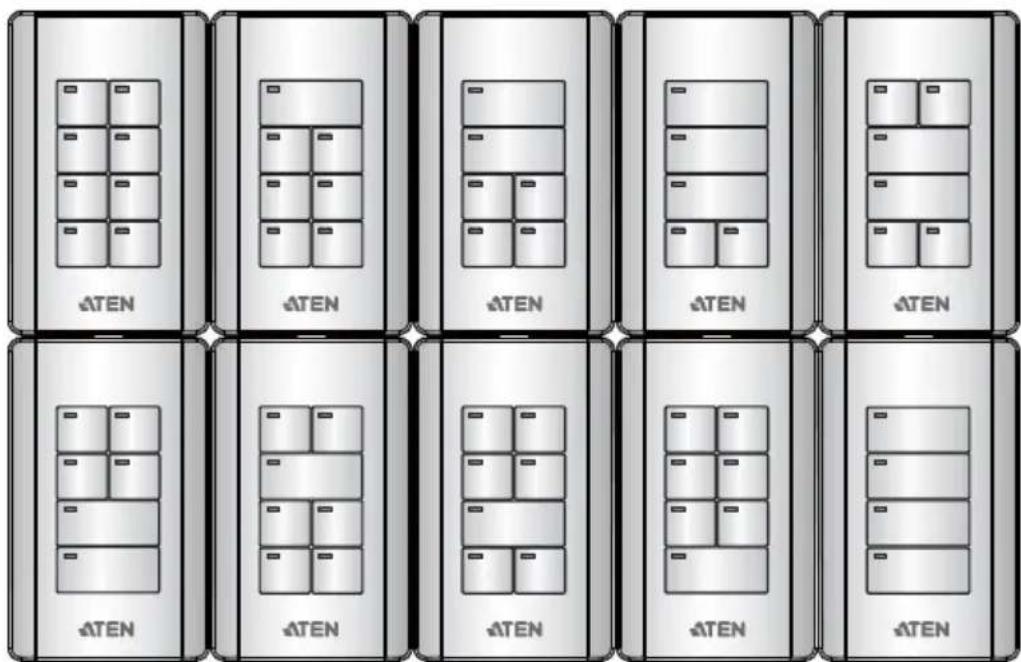
Arrange the button caps to the desired keypad layout. Configure the layout in the ATEN Configurator to match the physical layout of the keypad.
-
Use ATEN Configurator to configure the keypad. When the configuration is complete and the profile is uploaded to the Control Box, check the LAN and Link LED to ensure they light green to indicate a successful connection.
-
Attach the faceplate to the keypad housing and the keypad housing to a wall mount, as shown below.
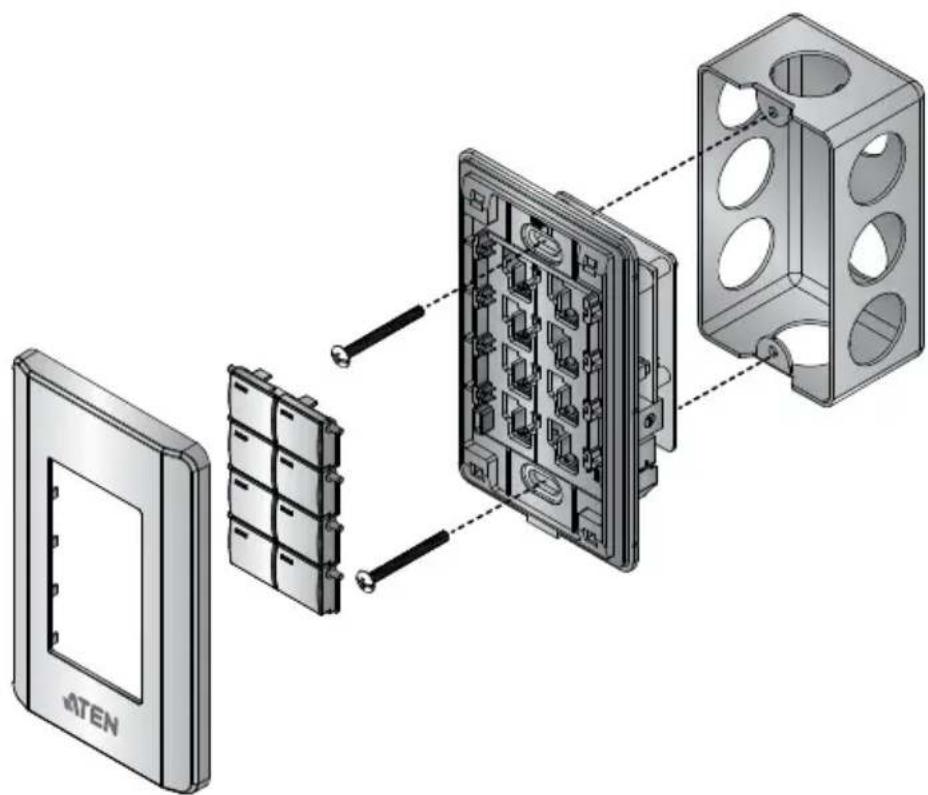
Power Supply Information
Use the instruction below to wire the power adapter to the DC terminal block on the VK108US.
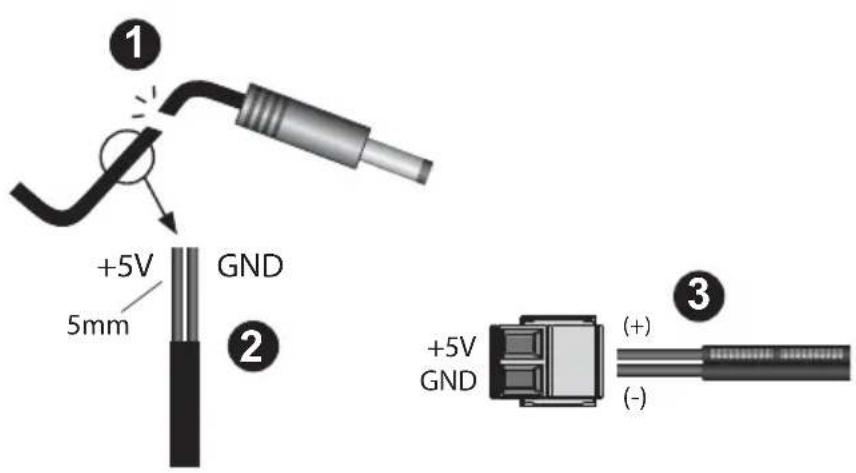
- Cut off the connector end of the power adapter.
- Strip 5 mm of insulation off the power adapter cable to expose the two wires: +5V and grounding.
- Insert the +5V (+) and GND (-) wires into the 2-pin terminal block connector on the VK108US.
- Plug the other end of the power adapter into an AC outlet.
Hardware
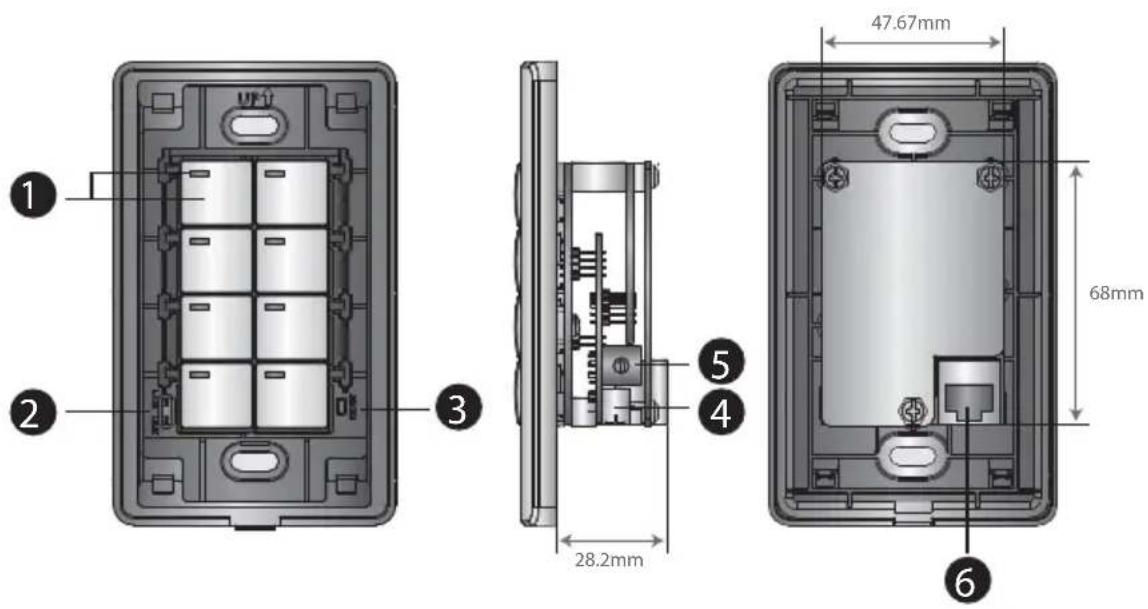
| No. | Component Description | |
| 1 | Buttons and LED Customizable button placement on the keypad can be setup in 14 different configurations with a combination of 4 to 8 buttons. Examples on the next page provide sample layouts. Use the caps to create the desired keypad layout. The LED on each button:◆ Lights orange to indicate the power is on.◆ Lights white to indicate the keypad is in operation.◆ Blinks orange and white to indicate F/W upgrade. | |
| 2 | LAN and Link LED These two system LEDs indicate the keypad status:◆ LAN: lights green to indicate a LAN connection.◆ Link: lights green to indicate a Control Box connection. | |
| 3 | Reset This semi-recessed pushbutton can be pressed to reset the network settings. | |
| 4 DC | Power Plug the power | adapter (included with the package)into this DC power input. |
| 5 ID | Switches There are two | ID switches to configure the keypad:Blue: Sets the ID of the keypad (1~8).Black: Sets the ID of the Control Box (1~16). |
| 6 Ethernet Port This RJ-45 port is used for the network connection. If no IP address is assigned within 30 seconds, the default IP settings will be used:IP: 192.168.0.60 / mask: 255.255.255.0The VK108US keypad supports Power over Ethernet to supply power to the unit. | ||
Keypad Layout Examples
This Page Intentionally Left Blank
Overview
The Control Box can be configured over a standard TCP/IP connection via its built-in Graphical User Interface (GUI). Because it can be accessed from anywhere over a network or the Internet, operators can easily log in via a web browser. The web interface can be used to upload licenses, set the access key, enable monitors and update the firmware.
Logging In
To access the GUI, type the IP address of the Control Box into the address bar of any browser. If a Security Alert dialog box appears, accept the certificate – it can be trusted. The Welcome screen appears:
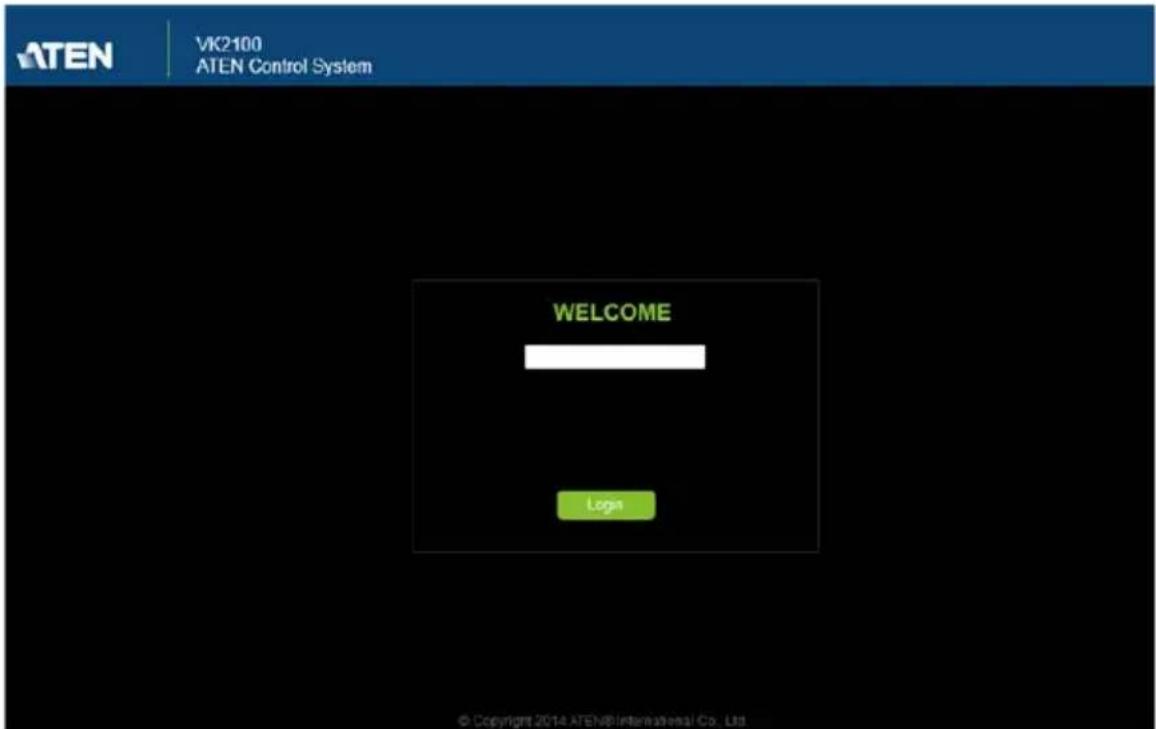
◆ The default IP address is http://192.168.0.60
◆ The default password is: password
♦ Enter the password, then click Login.
- Only one user can log in at a time.
◆ Supports Internet Explorer browsers IE9 and higher
Dashboard
The Dashboard appears when you successfully log in to the Control Box. The Dashboard gives a quick view of each setting and provides a link to each page. Click Manage to configure the settings.
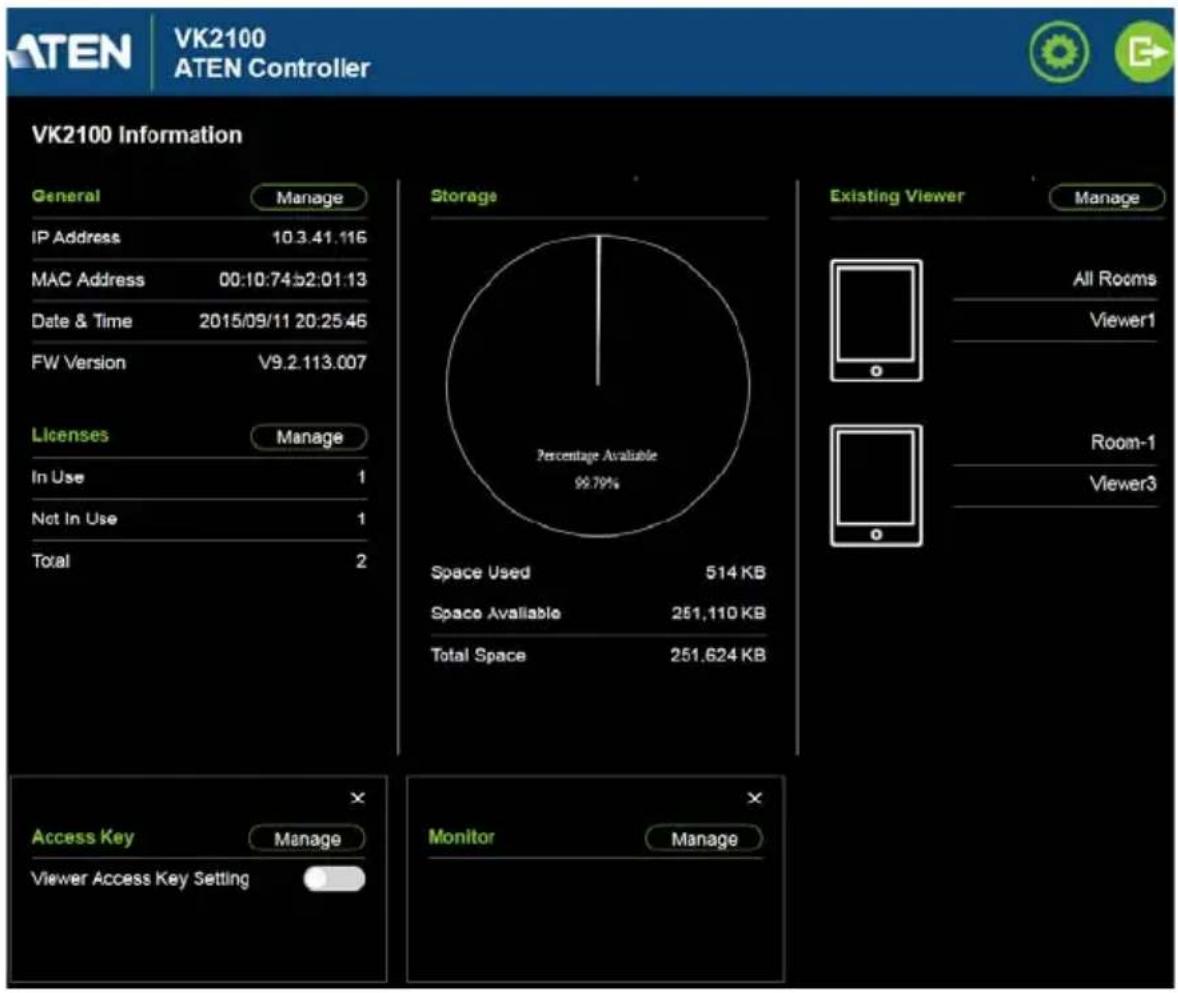
pie
VK2100 Information | Category | Percentage Available (%) | | :--- | :--- | | Storage | 99.79 | | Space Used | 514 KB | | Space Available | 261,110 KB | | Total Space | 251,624 KB | | Access Key | Manage | | Viewer Access Key Setting | Monitor Manage | | Existing Viewer | Manage | | All Rooms Viewer1 Room-1 Viewer3The top bar provides two options:

Click to enter the Settings page.

Click to Logout of the web session.
Settings
The Settings page provides six tabs. Each tab provides options to configure the Control Box. The page is divided into two parts, the Interactive Display Panel which is used to configure the options and the Top Bar which provides icons to exit the settings page and log out of the web session.
The Settings page opens on the General tab, as shown below:
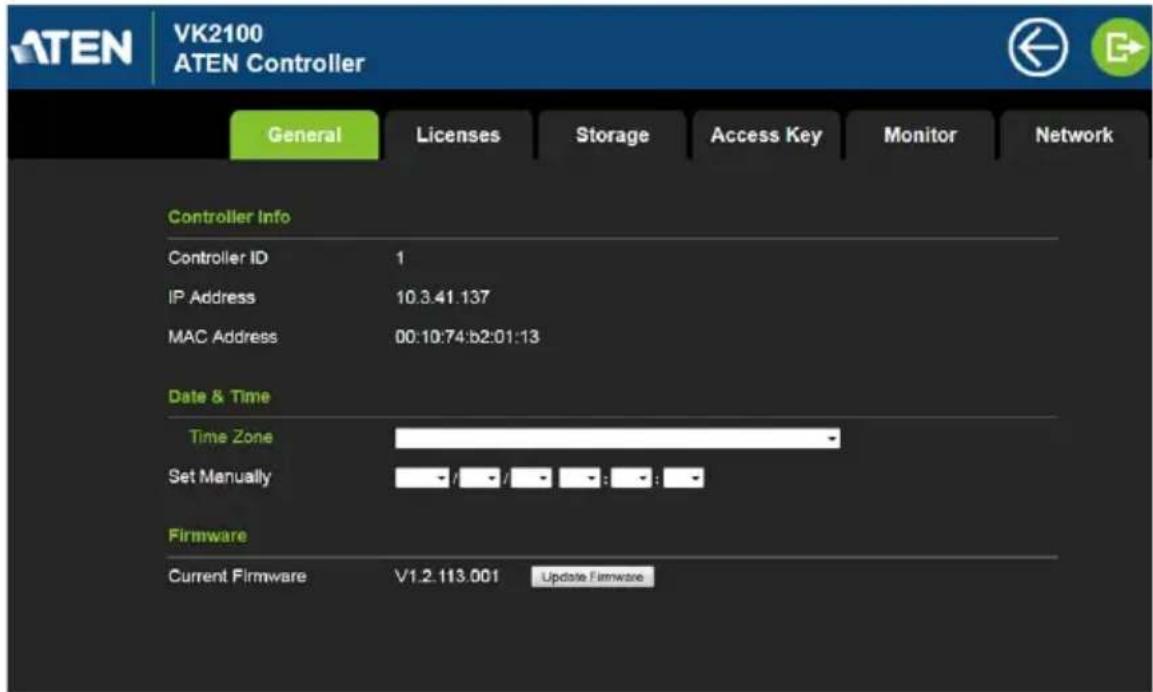
The General tab provides settings and information about the Control Box, as described in the table below.
| Controller Info Provides network and identification information pertaining to the Control Box.◆ Controller ID: Displays the Control Box ID # set on the rear of the unit.◆ IP Address: Provides the IP address of the Control Box.◆ MAC Address: Provides the hardware MAC address of the Control Box. |
| Date & Time Provides two options to set the date and time:◆ Time Zone: To establish the time zone for the Control Box, use the drop-down menu and choose the city that most closely corresponds to where it is located.◆ Set Manually: Use the drop-down menus to manually set the Date (Year/Month/Day) and Time (Hour:Minute:Second). |
| Firmware Displays | the Current Firmware version and option to upgrade.ClickUpdate Firmwareto open theFirmware Upgradewindow.ClickBrowseto select the firmware upgrade file.WhenCheck FW Versionis selected, the system will check the current firmware version against the one being used to upgrade the Control Box. If the device version is higher than the upgrade version a dialog box informs you and gives you the option to continue or cancel.After the file has been selected, clickUpdateto start the firmware upgrade. |
Licenses
The Licenses tab allows you to upload and view license information.
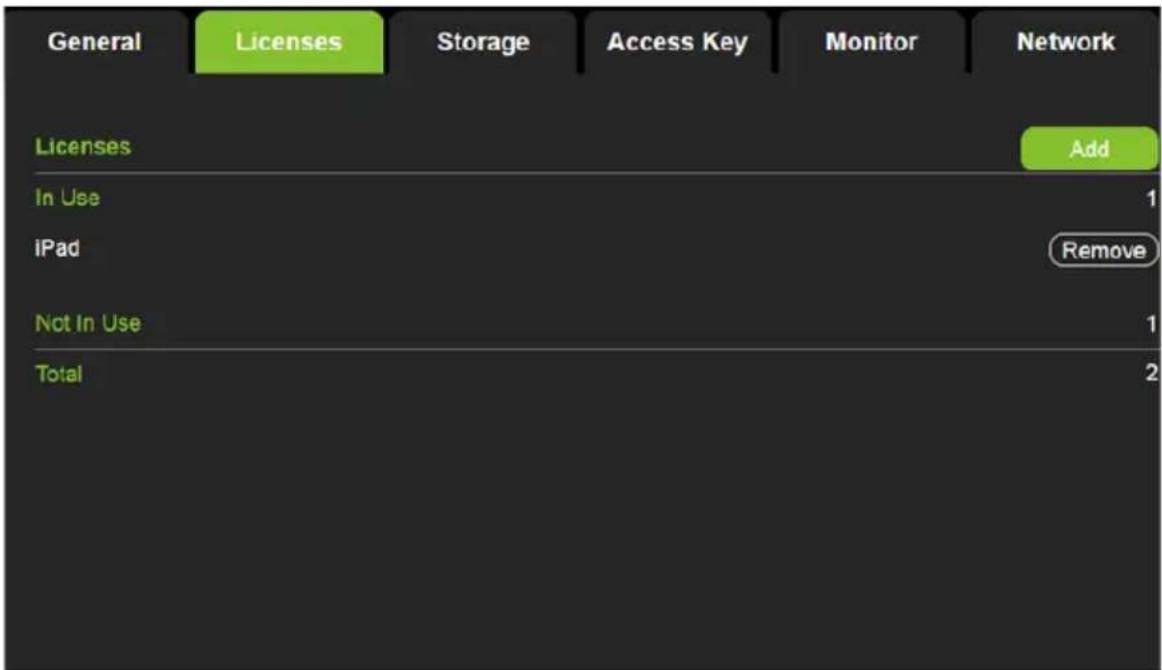
| Licenses This section shows information about the licenses that are available on the Control Box. A license is used each time a mobile device connects to the Control Box to control devices. In Use displays the number of licenses being used by mobile devices. Not in Use displays the number of licenses available for use.Total shows the number of licenses purchased for use on the Control Box. | |
| Add | Clicking Add opens the Add License window to upload new licenses to the Control Box. Click Browse to locate the license file and Add to upload the license(s). |
| Remove When a device is accessing the Control Box you can click the Remove button to disconnect the session. | |
Capacity
The Capacity tab displays information about the space available for storing viewer profiles on the Control Box.
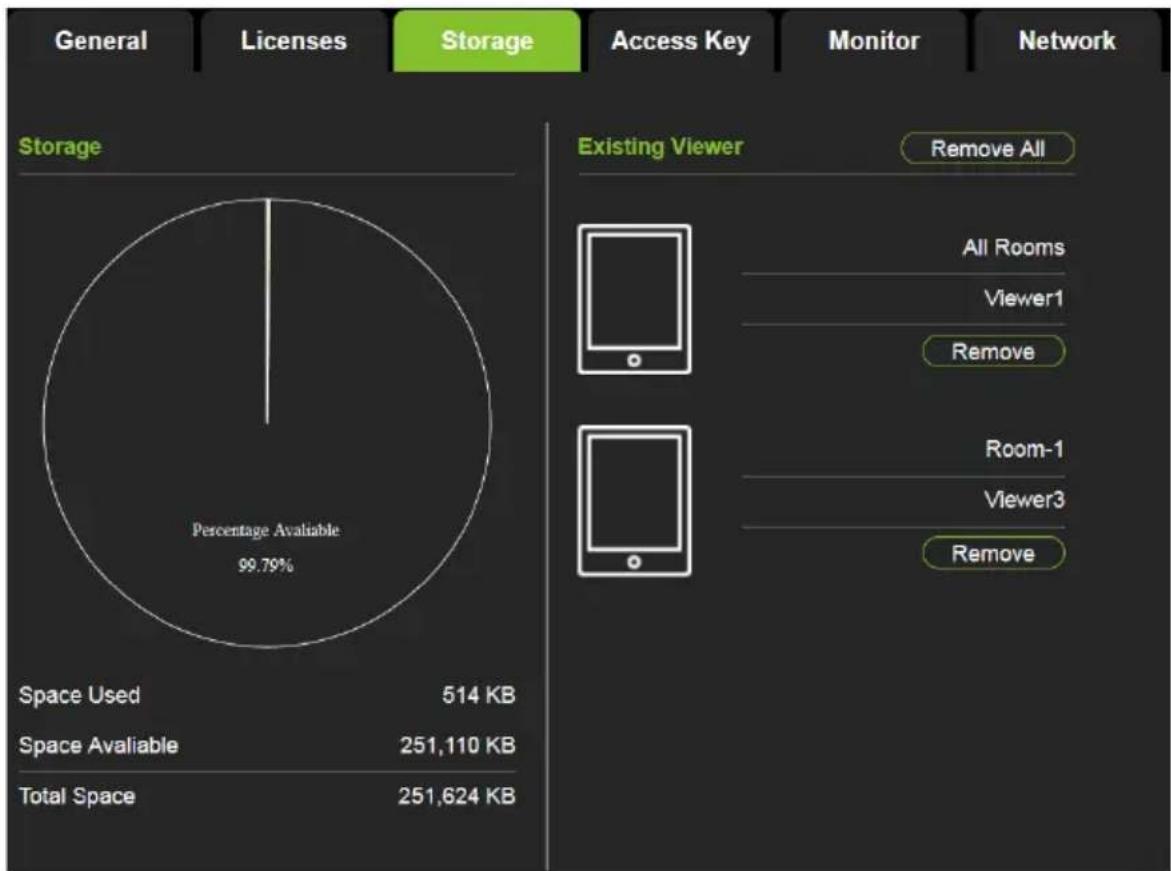
pie
| Category | Percentage Available (%) | | :--- | :--- | | Storage | 99.79 | | Space Used | 514 KB | | Space Available | 251,110 KB | | Total Space | 251,624 KB | | Existing Viewer | Remove All | | All Rooms | | Viewer1 | | Remove | | Room-1 | | Viewer3 | | Remove || Storage This section shows a graph displaying the percentage of space available on the Control Box to upload viewer profiles, as well as:♦ Space Used: The amount of space currently being used to store viewer profiles uploaded to the Control Box.♦ Space Available: The amount of space currently available to store viewer profiles on the Control Box.♦ Total Space: The total amount of space available to store viewer profiles on the Control Box. |
| Existing Viewer This section lists all the viewer profiles that are currently stored on the Control Box with their name and assigned room. Click Remove to delete a single viewer profile or Remove All to delete all viewer profiles from the Control Box. |
Access Key
The Access Key tab allows you to manage the password that is used to upload/download viewer files to the Control Box and from a mobile device.
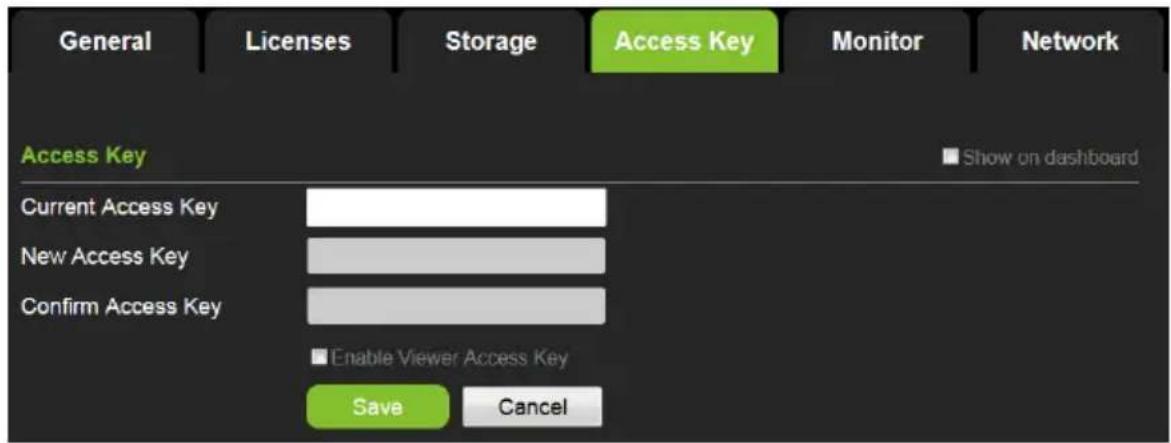
| Show on dashboard | Check this box to show the Access Key settings on the Dashboard. |
| Current Access Key | Enter the password required to upload/download viewer profiles so that you can create a new access key. |
| New Access Key | Enter the current password in the Current Access key box and then use the New Access Key box to enter a new password, finally use the Confirm Access Key box to re-enter the new password. |
| Enable Viewer Access Key | Check this box to require a password when uploading/downloading viewer profiles to the Control Box and from a mobile device. |
| Save Click to save | changes to the access key settings. |
Monitor
The Monitor tab allows you to view and enable the monitors that have been configured for Flags and digital input devices in the VK6000 software. Check the Show on dashboard box to show the Monitor settings on the Dashboard. Click the slide bar next to the monitor you want to enable or use the drop-down menu to select All On or All Off.
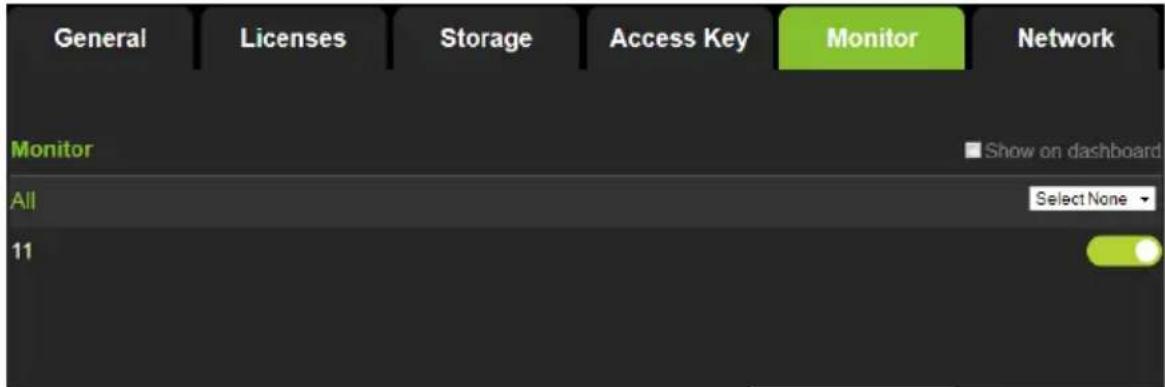
For more information about creating monitors, see Advanced Library, page 104.
Network
The Network tab allows you to view and configure the Control Box's network settings. Select Manually to set a static IP Address, Subnet Mask and Default Gateway, or Use DHCP to have the server assign an IP address to the Control Box.
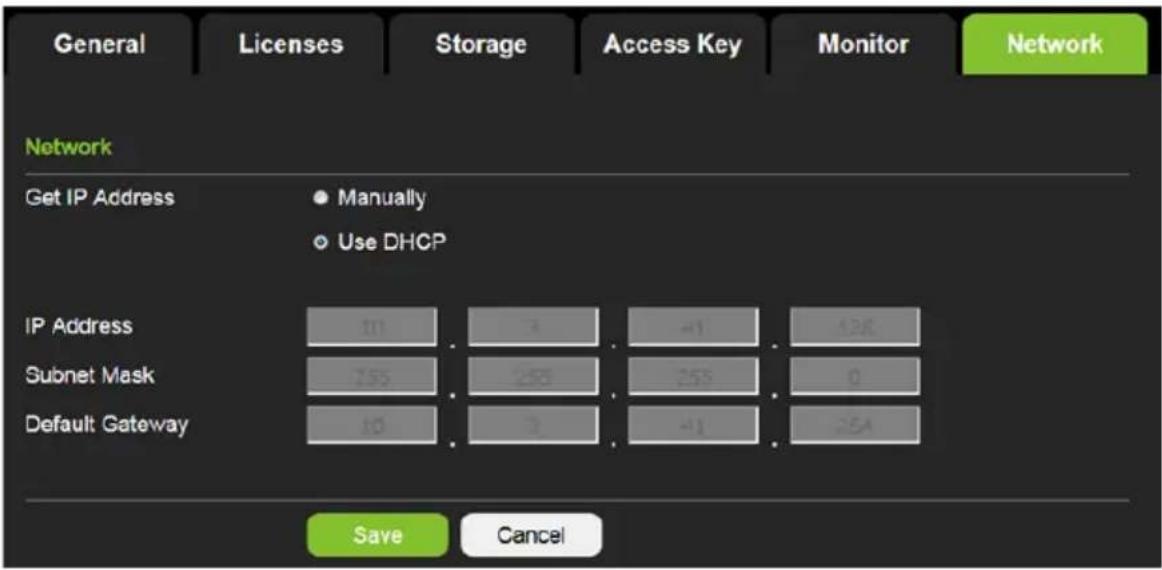
Overview
The ATEN Configurator software (VK6000) is a GUI-based management tool that helps you setup and configure the hardware and controls for the ATEN Control System App. To install the ATEN Configurator software, use the CD that was provided with your package and follow the instructions below.
Configurator Software
Installation
To install the ATEN Configurator software, do the following:
- Place the CD that came with your package into the CD-ROM drive on your computer.
- Double-click the ATEN Configurator.x.xxx.exe file to run the setup.
- When the Welcome screen appears, click Next.
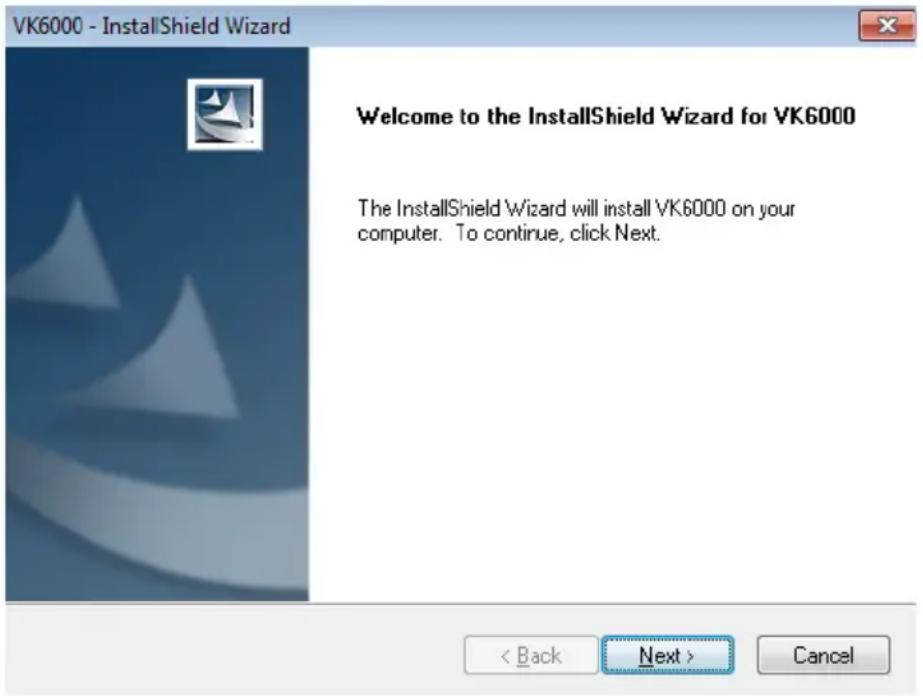
4. The License Agreement appears:
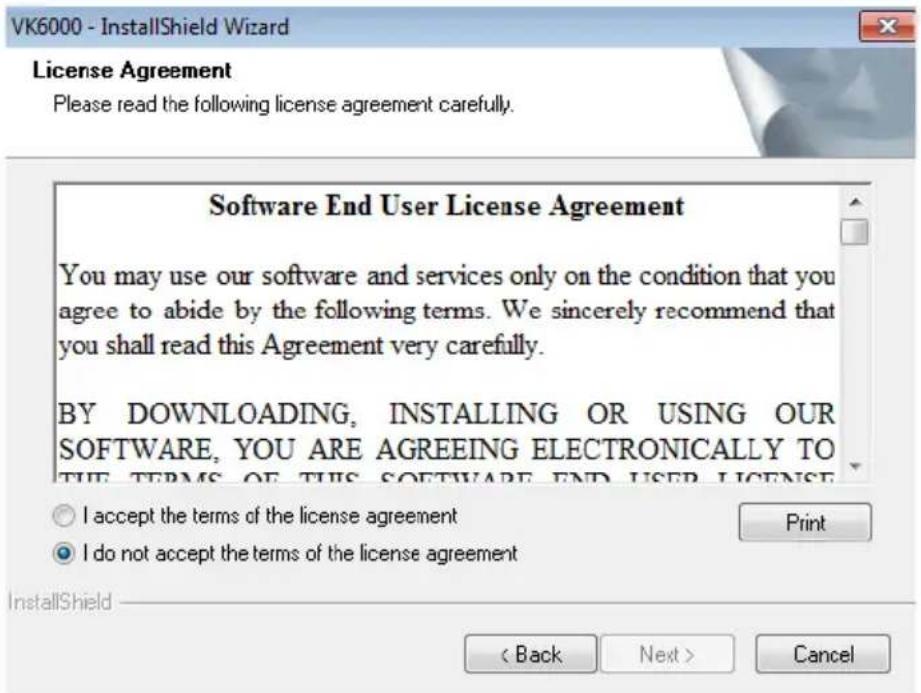
If you agree with the License Agreement, select I accept the terms of the license agreement, and click Next.
Click Print to print the Software End User License Agreement.
5. The Choose Destination Location screen appears:
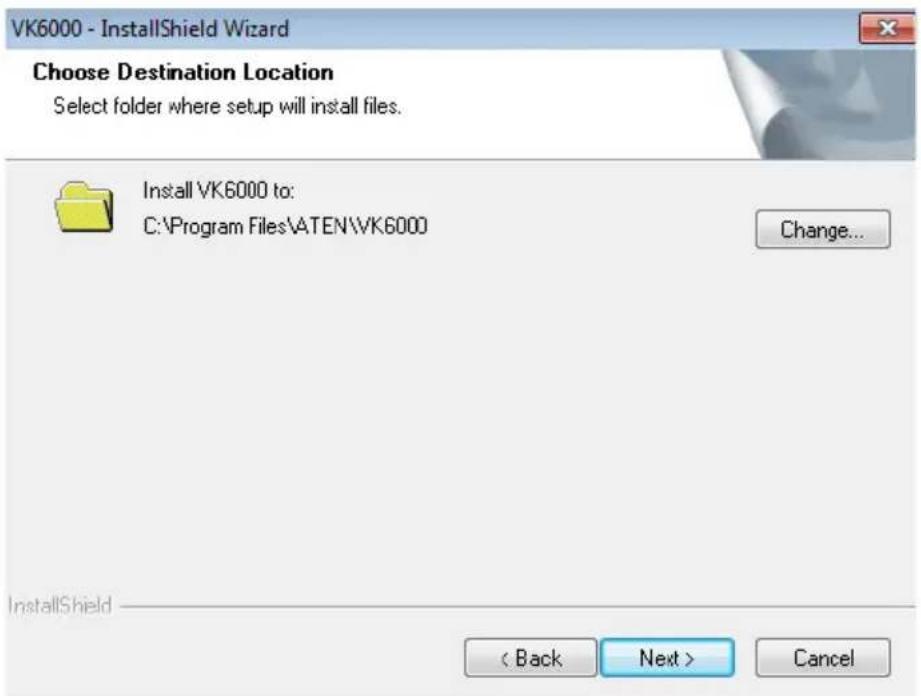
Click Change to choose a location where you would like to install the program, or use the default location and click Next.
- The Ready to Install the Program screen appears:
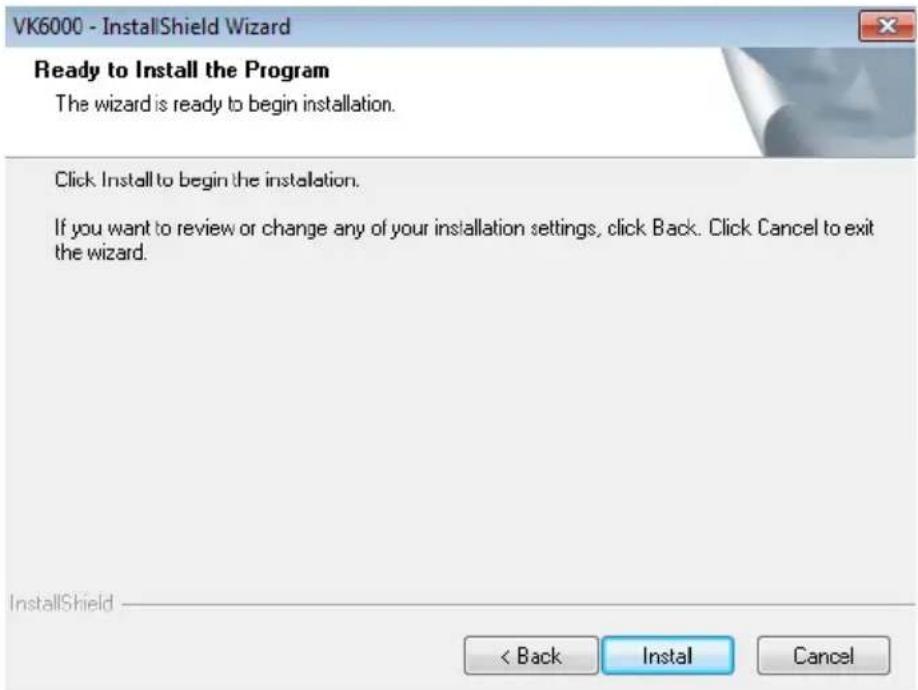
Click Install to begin the installation.
- The Setup Status screen appears with the progress bar:
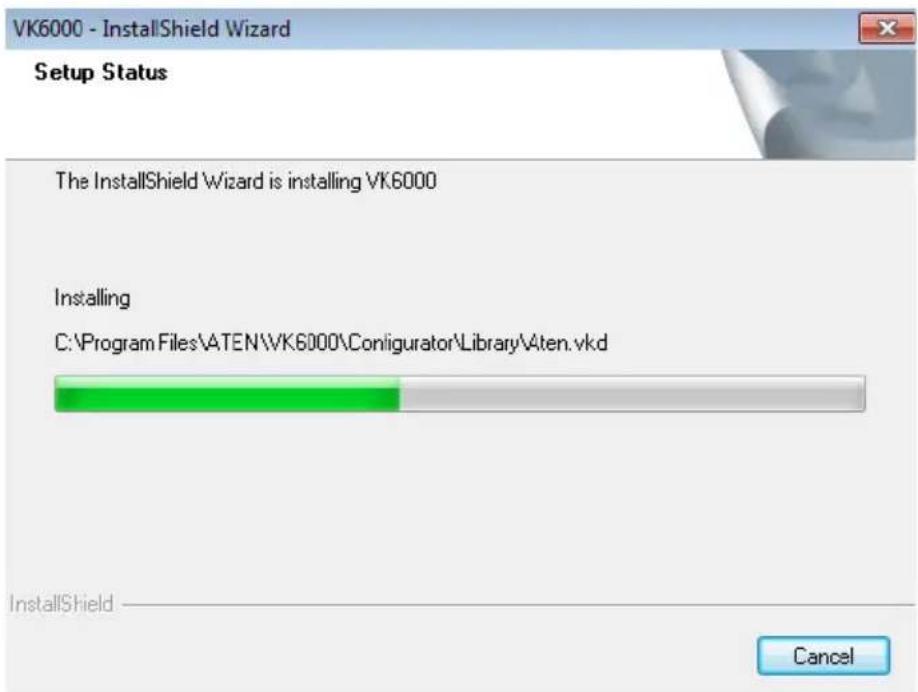
- When the process is done, the InstallShield Wizard Complete screen appears:
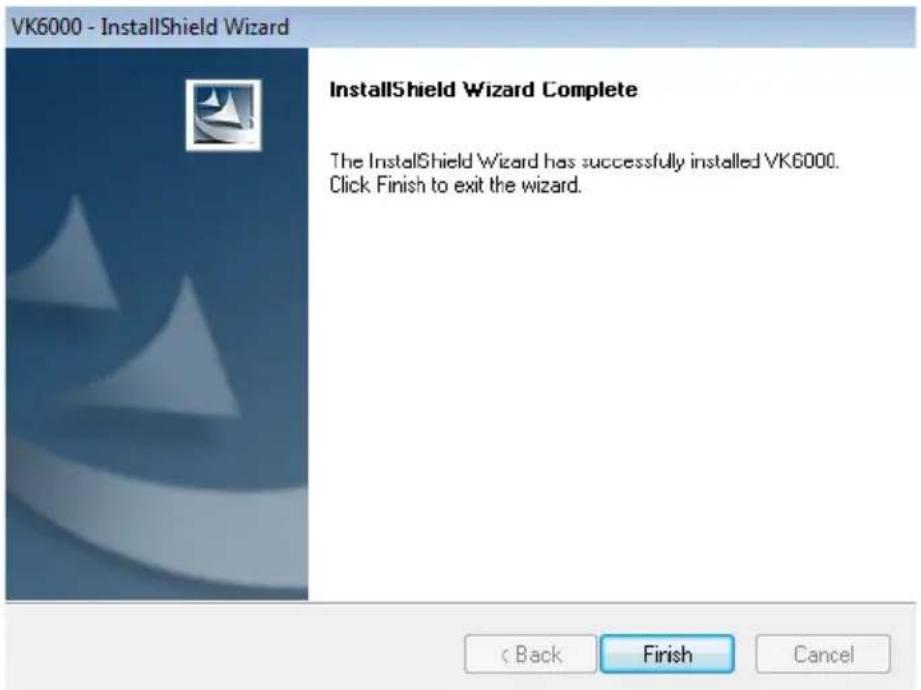
Click Finish.
Overview
The ATEN Configurator software provides four easy steps to setup the hardware and create an interface with controls for each device. After you connect hardware to the Control Box, use the software to start a project to configure each of the Control Box ports, then design a user interface for a mobile device and finally upload the information to the Control Box.
Preface
The ATEN Configurator software guides you through setup in four easy steps. Use Project to enter details about the project; Device to configure Control Boxports according to the connected hardware; Design to design a user interface and configure the buttons that control each device; and Upload to upload the project to the Control Box.
The Project Bar in the ATEN Configurator software provides a link to each of the four steps that are discussed in this chapter.

◆ Project – page 58
♦ Device – page 59
♦ Design – page 70
◆ Upload – page 122
Note: To install the ATEN Configurator, See Software Installation, page 47.
Main Page
Double-click the Configurator.exe shortcut to open the ATEN Configurator software. The Project page appears:
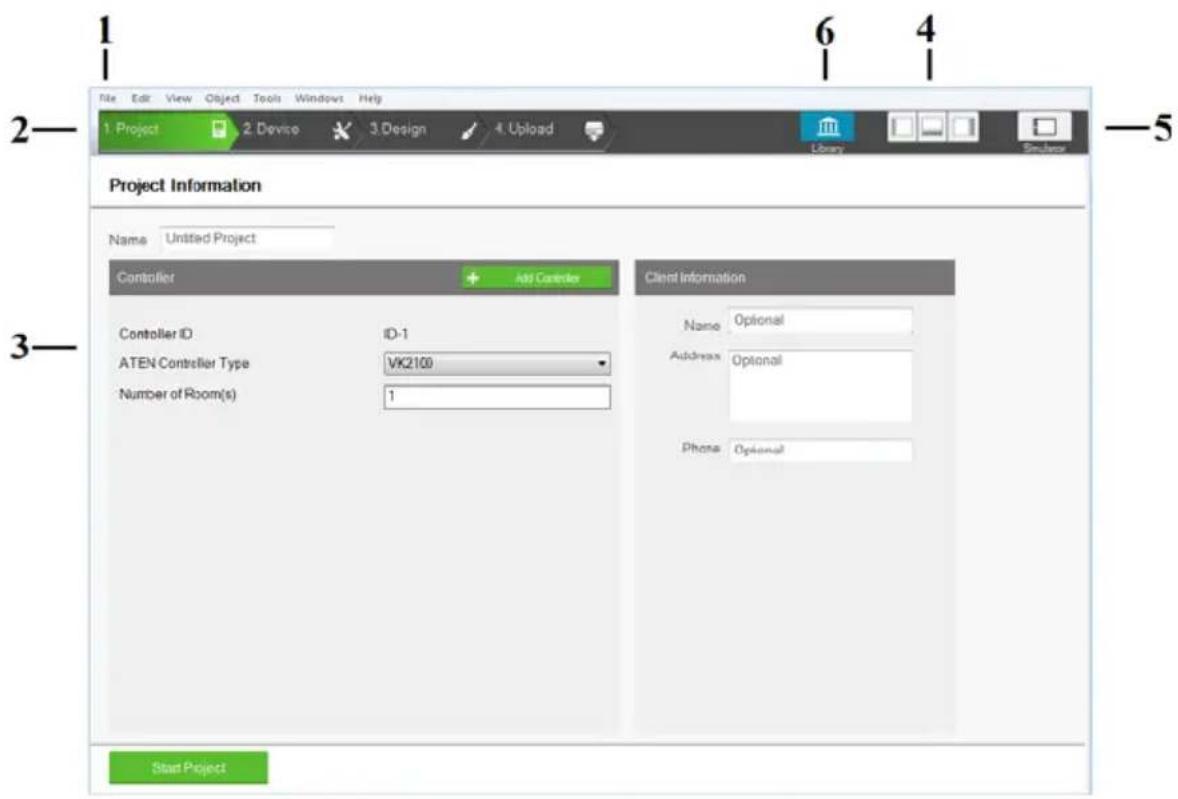
| 1 | Menu bar | The Menu Bar contains categories with options that pertain to different sections of the software. Menu bar items are listed on page 53. |
| 2 | Project Bar | The Project Bar contains four tab and the Library icon. Each tab relates to a step required to setup the project profile. Each step and the Library can be selected by clicking on the bar. Each step is discussed, starting on page 58, and the Library on page 63. |
| 3 Interactive Display Panel This | is the main work area. The page that appears here reflects the project tab that is selected. | |
| 4 Toggle Bar These three icons | are used as a toggle to show or hide the right, left and bottom control panel. | |
| 5 Simulator The Simulator button | n is used to test a viewer's interface after it has been created in Design. The simulator allows you to tryout the interface as it would work on a mobile device but without actually controlling devices. Use the mouse to click through the page links. | |
| 6 Library The Library contains the devices, object, macro, flag and monitor databases. Each section allows you to add custom items or choose from ready made selections. | ||
Menu Bar
Use the Menu Bar to select options in each project tab. The table below provides a description of each menu item.
| Menu Sub-Menu Description | |||
| File New | Project Select to create a new project. | ||
| Open Project Select to browse and | open a previously saved project. | ||
| Close Closes the current project and | returns to the Project tab. | ||
| Save Select to save changes to the current project. | |||
| Save as Use this option to save the project as a different name. | |||
| Export Viewer to USB Exports the viewer(s) and access key to a USB drive. After exporting the data onto the USB drive, plug it into the Control Box's USB port to upload the viewer files and access key. These files can only be read by the Control Box and are not project files that can be opened by the ATEN Configurator software. | |||
| Project Report Click to save a PDF file that contains detailed information about each part of the current project. | |||
| Recent Projects Select to view a list of recent projects that can be clicked on to open. | |||
| Exit Select to close the project and exit. | |||
| Edit Undo | Select to undo a change when editing a viewer page in Create & Design Viewer. | ||
| Redo Select to redo a change when editing a viewer page in Create & Design Viewer. | |||
| Cut/Copy/Paste Select to cut, copy or paste text and objects when editing a viewer page in Create & Design Viewer. When used to copy and paste a button, both the General and Action properties are copied (see page 82). | |||
| Paste Graphic Only Select to paste a button's image but not its Action properties in Create & Design Viewer. | |||
| Delete Select to delete highlighted text and images when editing a page in Create & Design Viewer. | |||
| Delete Action Only Select to delete the Action properties of a button in Create & Design Viewer. | |||
| Select All / Deselect All Use either option to select or deselect all objects when editing a viewer page in Create & Design Viewer. | |||
| Preferences Display | Language | Use to select the language for the interface. | |
| SSH Destination | Click to choose the location of the executable for the SSH Client software. To execute the program, go to the menu bar and select Tools → SSH Client. | ||
| Interface Check | Check a box to enable the feature described below:Show Welcome Page: displays the Welcome screen when the ATEN Configurator software opens.Show Upload Tip Screen: displays a screen reminding you to set the Control Box ID before uploading profiles in Search & Upload.Auto Page Creation: automatically creates a viewer page in Create Viewer & Design, for every hardware device that is configured in Select Device & Configuration.Show Password: displays the characters entered for the password in Edit Access Key from Search & Upload. | ||
| Menu Sub-Menu Description | ||
| View | These options are available from Create Viewer & Design → Edit Viewer. | |
| Zoom Zooms the viewer page to 25%, 50%,75%, 100%, 200% or Fit in Window.Note: A mouse wheel can be used to zoom the viewer page in or out. | ||
| Project Information Select to go to | Project Information. | |
| Device Configuration Select to go to Select Device &Configuration. | ||
| Viewer Design Select to go to Create Viewer & Design. | ||
| Project Upload Select to go to Search & Upload. | ||
| Properties Select to show/hide the Propertieswindow when editing a viewer page. | ||
| Align to Grid Select to automatically align objects withthe grid. This places objects in perfectalignment with the grid dots when theyare moved. Use Show Grid to displaythe grid dots. When Align to Grid is notselected, objects can be placedanywhere on the page. | ||
| Show Grid Select to display the grid dots on thepage. Use with the Align to Grid optionto set objects in perfect alignment on thepage. | ||
| Menu | Sub-Menu | Description | |
| Object The | these options are available from Create Viewer & Design → Edit Viewer. | ||
| Button Select to add a button to the viewer page. | |||
| Text Select to add a text box to the viewer page. | |||
| Image Select to add an image to the viewer page. | |||
| Scroll View Select to add a scroll box to the viewer page, then double-click it to add buttons. Use the box as a scroll window to easily access a list of buttons on the page. | |||
| Video Adds a video box which allows you to view video. The video box can be resized using the Properties sidebar or by dragging a small box on the boarder to resize it to the desired shape. | |||
| Slider Bar Select to add a slider bar to the viewer page. Slider bars are used to adjust the value of a device setting, such as the volume level of an audio device. | |||
| Group Group Select | multiple objects and use Group to lock them together. Objects in the group will move together as one. | ||
| Radio Group | Select multiple buttons and use Radio Group to associate them as follows: selecting a button that belongs to the radio group deselects the previously selected radio button within the same group. | ||
| Ungroup Select | Select grouped objects and use Ungroup to unlock the group. | ||
| Order Bring to | Front | Moves an object to the top position when objects are layered. | |
| Send to Back | Moves an object to the bottom position when objects are layered. | ||
| Bring Forward | Moves an object up one position when objects are layered. | ||
| Send Backward | Moves an object down one position when objects are layered. | ||
| Align Left | Aligns two or more selected objects to the Left side of the object that is selected last. | ||
| Center | Aligns two or more selected objects to the horizontal position of the object that is selected last. | ||
| Make Same Size Width | Resizes two or more selected objects to the same width of the object that is selected last. | ||
| Height Resizes two or more selected objects to the same height of the object that is selected last. | |||
| Both Resizes two or more selected objects to the same width and height of the object that is selected last. | |||
| Space Evenly Across | Page Width | Spaces two or more selected objects evenly across the width of the page. | |
| Across Page Height | Spaces two or more selected objects evenly across the height of the page. | ||
| Between Objects Horizontally | Adjusts the horizontal space between three or more selected objects to the average distance between each of the selected objects. | ||
| Between Objects Vertically | Adjusts the vertical space between three or more selected objects to the average distance between each of the selected objects. | ||
| Tools Database Generator Opens the ATEN | Database Generator which is used to manually add and configure hardware devices. This is where you can create custom devices to add to My Device Library. See ATEN Database Generator, page 125, for details. | ||
| Simulator The Simulator is used to test a viewer's interface after it has been created in Design. The simulator allows you to tryout the interface as it would work on a mobile device but without actually controlling devices. Use the mouse to click through the page links. | |||
| SSH Client This runs the SSH Client software selected under Edit → Preferences → SSH Destination. The SSH Client is used to communicate with the Control Box. | |||
| Windows | New Page Click to create a new view | user page or select a page to open in Create Viewer & Design. | |
| Help About | Provides the firmware version and support information for the Configurator software. | ||
Project
The Project tab allows you to enter details about the installation to start the project. Enter the information using the table below as a guide.
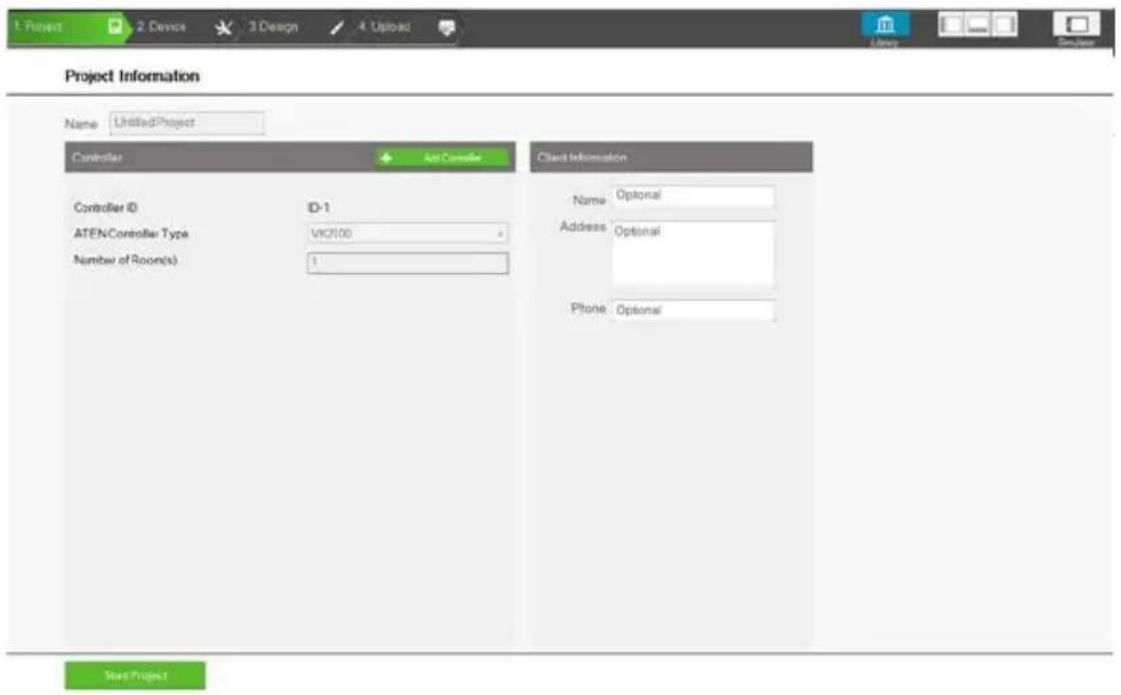
| Name Enter the project name you are setting up. You can create multiple projects but for most installations only one project is required. | |
| Add Controller Click to add Control Boxes to the project. The number added should equal the number of Control Box units being installed. A project can have up to 16 Control Boxes. A Controller is the software link to the Control Box being installed. | |
| Controller ID Displays the Controller ID for the Control Box in the project. Use the Controller ID in the project to set the Controller ID Switch on the rear of the Control Box. The device configuration and viewer profile will be uploaded to the Control Box set with the same ID. | |
| ATEN Controller Type | Select the Control Box model you are installing. |
| Number of Rooms | Enter the number of rooms each Control Box will control. Each hardware device you add will be associated with a room. When buttons are configured in the Design tab, you can select a Room under Button Action to filter the Device list so that only hardware in that room appears. This link between the Control Box, devices and room is how the viewer profile knows which devices to control. |
| Name Enter the client name associated with the project. | |
| Address Enter the client address associated with the project. | |
| Phone Enter the client phone number associated with the project. | |
| Remove Controller Click to delete a Control Box from the project. | |
| Start Project Click to begin configuring hardware devices. The Select Device & Configuration tab will open. | |
Device
The Device tab is used to configure Control Box ports according to the connected hardware device. To add a device, select a port under Device Configuration and use the Device Library to find the hardware. If a device is not in the Device Library, use the Database Generator to create a custom device (see page 125).
![ATEN Configurator - [Untitled Project Iraq] File Edit View Object Tools Windows Help 1 Project 2 Device 3 Design 4 Upload Controller Viewers VK2100-D01 Room-1 Device Configuration VK2100-ID01 Type Device Mode Room Serial 1 Noise RS212 Room-1 Serial 2 Noise RS212 Room-1 Serial 3 Noise RS212 Room-1 Serial 4 Noise RS212 Room-1 Serial 5 Noise RS212 Room-1 Serial 6 Noise RS212 Room-1 I/O 1 Noise Output Room-1 I/O 2 Noise Output Room-1 I/O 3 Noise Output Room-1 I/O 4 Noise Output Room-1 IR 1 Noise IR Room-1 + Add More Devices IR 2 Noise IR Room-1 + Add More Devices IR 3 Noise IR Room-1 + Add More Devices IR 4 Noise IR Room-1 + Add More Devices Relay 1 Noise Room-1 Relay 2 Noise Room-1 Relay 3 Noise Room-1 Relay 4 Noise Room-1 Ethernet 1 Noise Room-1 + Add More Devices Add Controller in Exercise Add Room](/content/2026/05/817651/images/a668660113cb34d479e6a78429dadbd814bb8eb50559769036f5c2f6f5966ce4.jpg)
| Device Configuration | This section lists the ports for each Control Box. Select a Controller, Expander or Room in the left sidebar to display the ports. Each port needs to be configured according to the hardware device connected to it (see page 60). |
| Left Sidebar This section lists the Controllers, Expanders and Rooms. Use the sidebar to add a Control Box, Expander or Room. When a port is configured with a device, the device appears listed below the room on the sidebar (see page 61). | |
| Library | Click this icon to open the Library on the Device Library tab which contains a database of hardware devices that are used to configure VK2100 ports (see page 63). |
| Properties | The Properties section displays information about the selected controller, port or room (see page 61). |
Device Configuration
The Device Configuration page lists the Control Box ports by type. Click a port to view its Properties (page 61). Double-click a port to open the ATEN Device Library and search for the hardware device to configure the port. Configure each port according to the hardware device connected to it.
| Type | Device | Mode | Room | ||
| Serial 1 | None | RS232 | Room-1 | ||
| Serial 2 | None | RS232 | Room-1 | ||
| Serial 3 | None | RS232 | Room-1 | ||
| Serial 4 | None | RS232 | Room-1 | ||
| Serial 5 | None | RS232 | Room-1 | ||
| Serial 6 | None | RS232 | Room-1 | ||
| I/O 1 | None | Output | Room-1 | ||
| I/O 2 | None | Output | Room-1 | ||
| I/O 3 | None | Output | Room-1 | ||
| I/O 4 | None | Output | Room-1 | ||
| IR 1 | None | IR | Room-1 | + Add More Devices | |
| IR 2 | None | IR | Room-1 | + Add More Devices | |
| IR 3 | None | IR | Room-1 | + Add More Devices | |
| IR 4 | None | IR | Room-1 | + Add More Devices | |
| Relay 1 | None | Room-1 | |||
| Relay 2 | None | Room-1 | |||
| Relay 3 | None | Room-1 | |||
| Relay 4 | None | Room-1 | |||
| Ethernet 1 | None | Room-1 | + Add More Devices |
| Type Lists the VK2100 port type and number. | |
| Device Lists the device name entered in Properties. | |
| Mode Lists the port's communication mode. Click an arrow to select options:◆ Serial: RS232, RS422, or RS485◆ I/O: Input (VDC), Input (Dry Contact) or Output◆ IR: IR or RS232 | |
| Room Lists the room selected for a device. The rooms available depend on the number of rooms added to the controller. No drop-down menu appears if there is only one room. Each controller must have at least one room. Select the room where the device is installed. | |
| + Add More Devices | RS422, RS485, LAN and IR ports can cascade additional devices that are connected to the first unit. IR ports can cascade 1 device, RS422 and RS485 ports can cascade up to 2 devices and LAN ports can cascade up to 25 devices. |
Left Sidebar
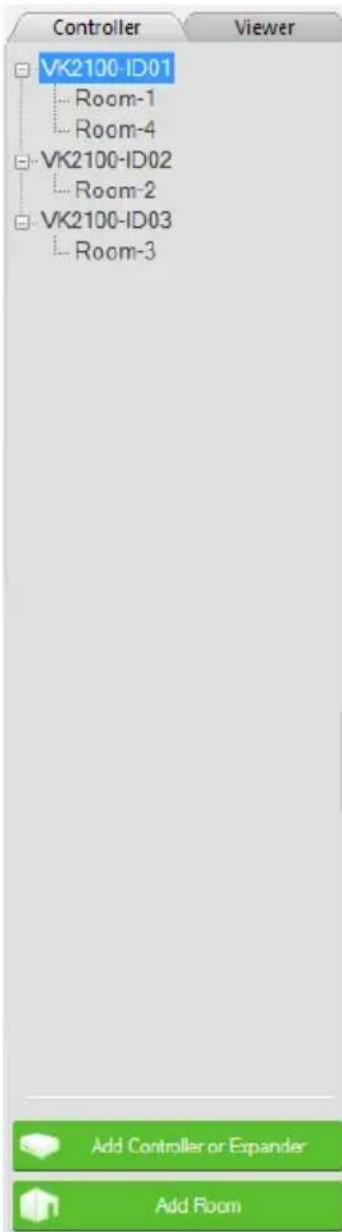
Controller
The Left Sidebar provides a tree view of the controllers, expanders and rooms. Each controller represents a Control Box with the room(s) it manages. Selecting a controller allows you to configure its ports. When a port is configured for a device, it appears listed under the Room.
Each controller must have one room. When installing multiple Control Boxes in one room, add a room with the same name to each controller.
Each controller name ends with an ID number: VK2100-ID01. Use this number to set the Controller ID Switch on the rear of the Control Box. This links the controller in the software to the Control Box being installed.
Right click a controller to Add Room or Delete Controller.
Room
Rooms are associated with a controller and the viewer profile so that the information is uploaded to the correct Control Box to control the hardware devices.
Right click a room to Delete or Rename the room.
Use the buttons at the bottom of the sidebar to Add Controller or Expander; or Add Room.
Expander
ATEN Expansion Boxes connect over a network to add ports to the Control Box via its Ethernet port. Clicking Add Controller or Expander opens a window which allows you to select a device to add:
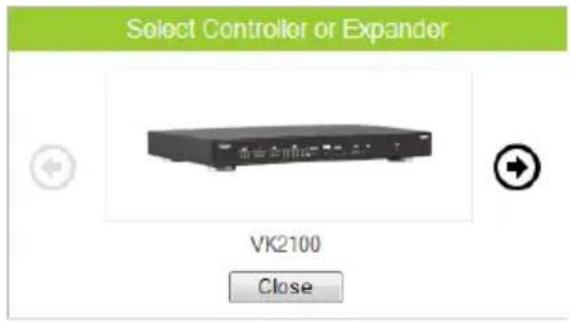

Library
The Project Bar provides the Library option. Use the Device Library tab (shown right) to configure VK2100 ports according to the hardware device connected to it. The Device Library provides an extensive database of hardware devices that can be double-clicked or drag and dropped into the Device Configuration page to configure the VK2100 ports. The Device Library is discussed on the next page.
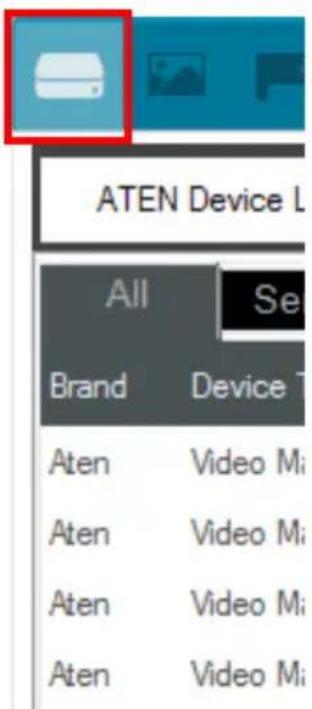
Device Library
The Device Library tab is a database of hardware devices that instantly configure VK2100 ports. Search the library for the device connected to a VK2100 port then add it to configure the port. For devices not in the library, use the ATEN Database Generator to create custom hardware (see page 125). Click Library on the Project bar or double-click a port on the Device Configuration page to open the ATEN Device Library.
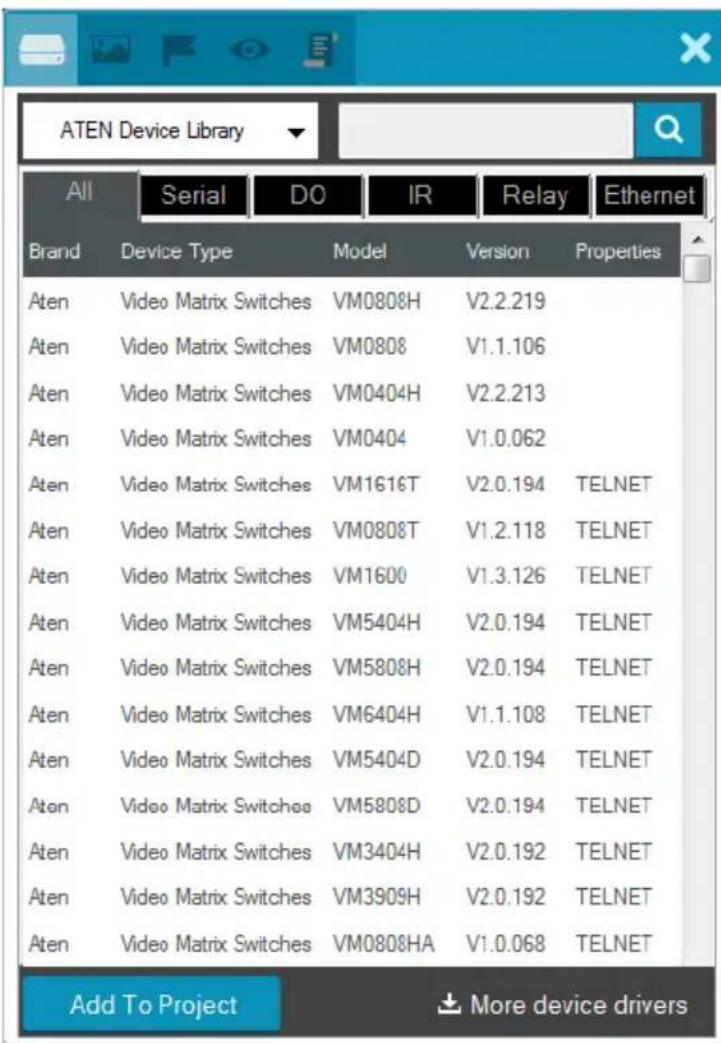
- Add a device by clicking Add to Project or by drag & drop.
- To search for a device type keywords into the box and click
- Click a tab to filter by All, Serial, DO, IR, Relay or Ethernet.
- Click headings to sort by Brand, Device Type, Model or Version.
◆ Use the drop-down menu to select:
♦ ATEN Device Library – ATEN’s database of hardware devices.
- My Device Library – Devices added from the Database Generator.
- Create Device – Opens the Database Generator to create custom hardware devices for My Device Library (page 125).
Properties
The Properties sidebar displays information about the device selected. The information available depends on the device or port selected. The table below describes information shown for all types, followed by sections for types that include additional Connection Settings options.
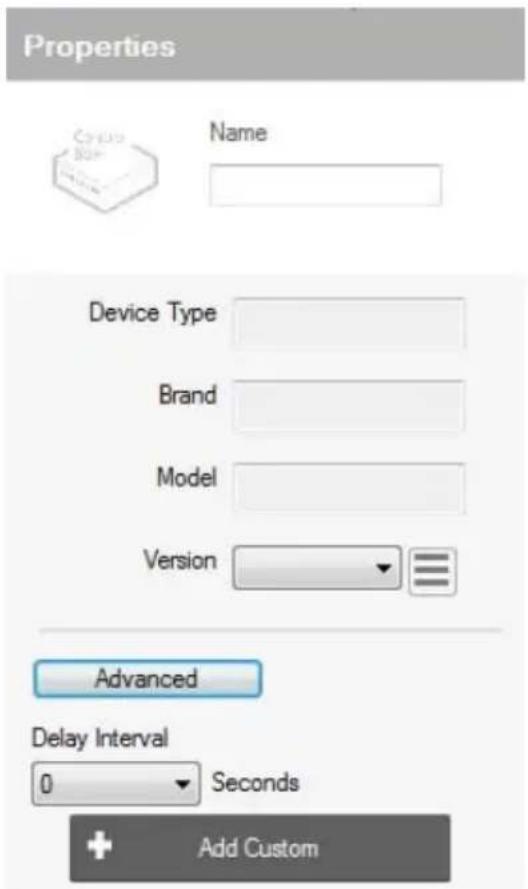
| Name Displays the | device name and allows you to edit it. |
| Device Type Displays the | the device of the selected device. |
| Brand Displays the | brand of the selected device. |
| Model Displays the | model of the selected device. |
| Version Shows the | firmware version selected for the device. Use the drop-down menu to select a different firmware version. Click the menu box next to the version number to open a PDF with the version history. The version history and different versions for a device can be manually added/updated via the Database Generator (see step 3 of Edit / Add New Device, page 129). |
| Advanced | Click Advanced and use the Delay Interval drop-down menu to set a timed delay for each command before it is sent to the device. |
| Add Custom | At the bottom of the Properties sidebar is Add Custom. Enter the name for a device and click Add Custom to reserve a VK2100 port for a new custom device. |
| Arrow Bar Use the | arrow bar on the left window frame to show or hide the Properties sidebar. |
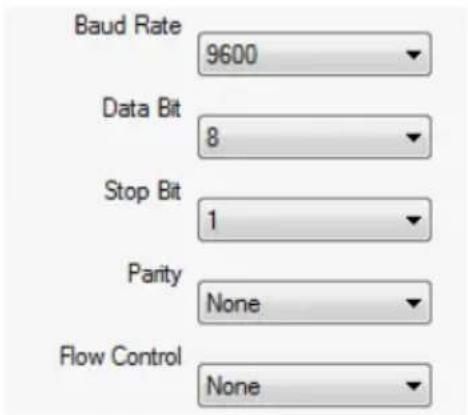
Serial
Provides drop-down menus to configure the Baud Rate, Data Bit, Stop Bit, Parity and Flow Control settings. Configure these options to match the serial device settings.
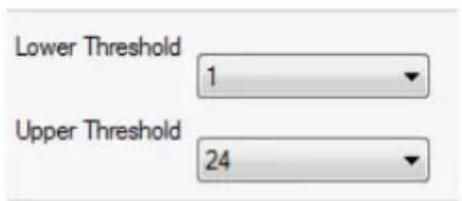
I/O
Two drop-down menus appear for Input (VDC) ports: Lower Threshold and Upper Threshold. Set the thresholds according to the hardware device you are connecting and then configure a Monitor (see page 107).
Ethernet
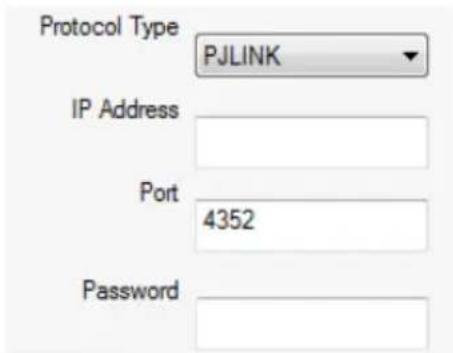
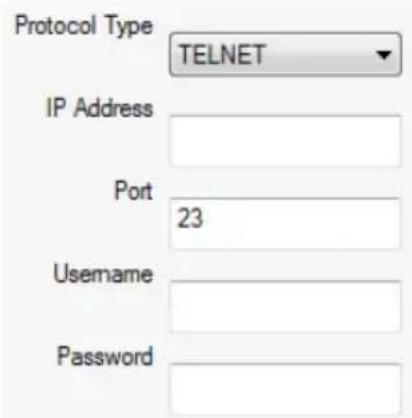
These options allow you to configure the settings for a PJLINK, TELNET, ONVIF or TCP LAN device. Select the Protocol Type and then enter the IP Address, Port, Username and/or Password as required by the option you select. Each Control Box can add 25 LAN devices that connect through the Ethernet port. Use the Protocol Type drop-down menu to select:
- PJLINK – allows control of data projectors over a network using the PJLink protocol. Enter the IP Address, Port and Password of the LAN projector or device used to control the projector.
- TELNET – allows control of a LAN device via telnet commands. Enter the IP Address, Port, Username and Password of the telnet controlled LAN device.
- Use the Advanced Telnet options to configure:
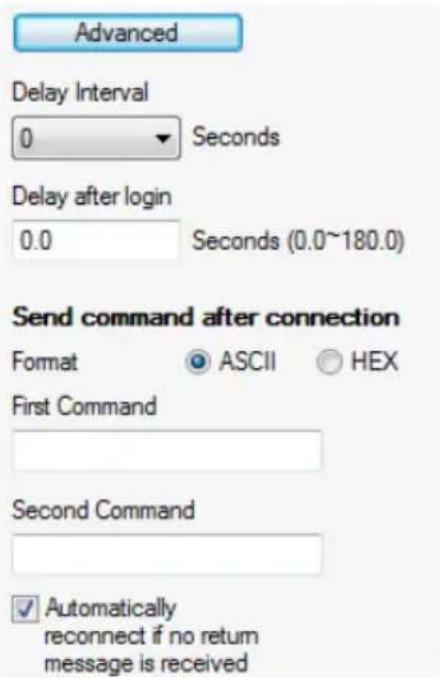
| Delay Interval | Use the Delay Interval drop-down menu to set a time delay for each command before they are sent to the device. |
| Delay after login Sets | ts a delay (to allow a connection to be established) before the First and Second Commands are sent to the device. |
| Send command after connection | Select the Format and enter a First and Second Command to send to the device after a successful connection has been established. |
| Automatically reconnect if no return message is received | Check this box if you want to continue reconnection attempts when no return message is received from the device. |
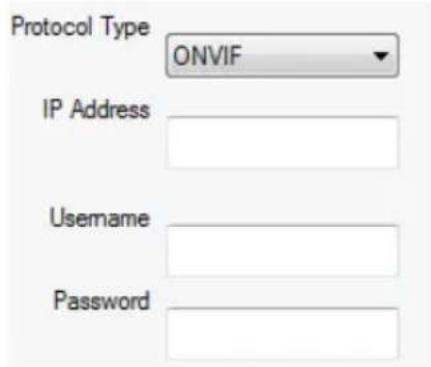
- ONVIF – allows use of the ONVIF protocol which allows video from devices to be controlled and displayed through the ATEN Control System App. Enter the IP Address, Username and Password of the ONVIF device you are adding.
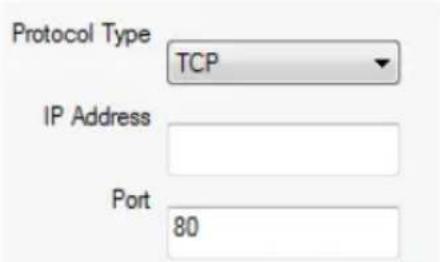
- TCP – allows control of a TCP LAN device. Enter the IP Address and Port of the device you are adding.
◆ Use the Advanced TCP options to configure:
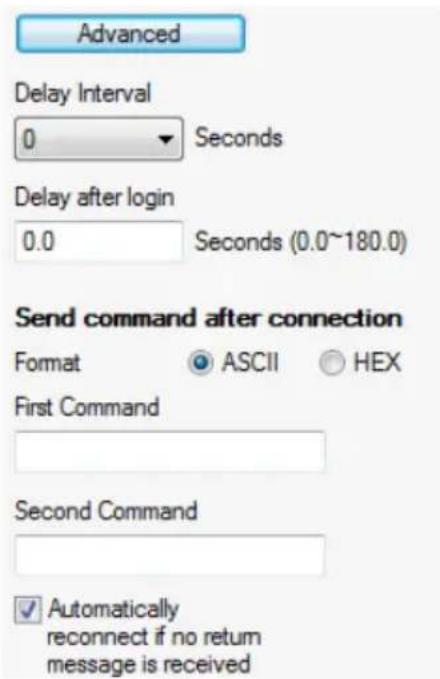
| Delay Interval | Use the Delay Interval drop-down menu to set a time delay for each command before they are sent to the device. |
| Delay after login Sets a delay (to allow a connection to be established) before the First and Second Commands are sent to the device. | |
| Send command after connection | Select the Format and enter a First and Second Command to send to the device after a successful connection has been established. |
| Automatically reconnect if no return message is received | Check this box if you want to continue reconnection attempts when no return message is received from the device. |
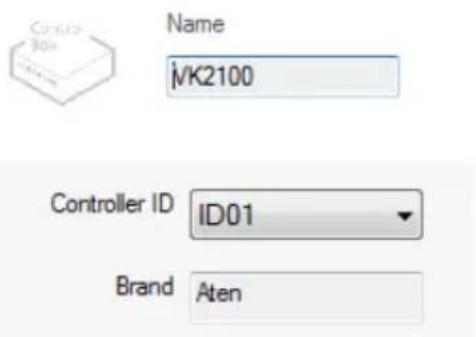
■ Controller
When you select a controller from the left side bar, the properties provides a drop-down menu to set the Controller ID (ID01\~ID16). See Controller ID, page 58, for details.
■ Expander
When you select an expander (VK224, VK236, VK248) from the left side bar, the properties provides a drop-down menu to set the Expander ID (ID01\~ID08) and the option to configure the IP Address.
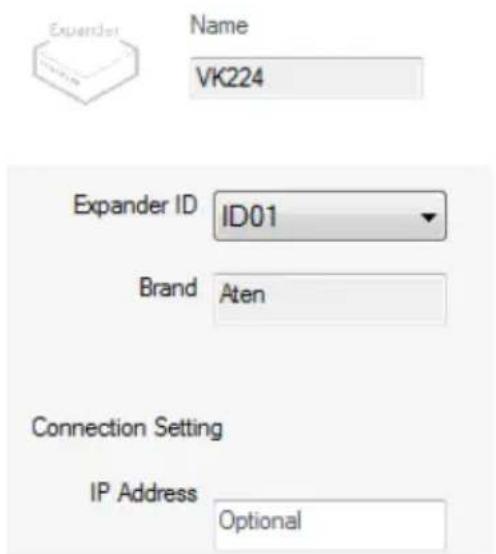
To add an expander, click Add Controller or Expander on the left sidebar, then use the arrow and select an ATEN Expansion Box to add. The expansion box and ports will be listed on the Device Configuration page, as shown below:
| VK224-ID01 | |||
| Type | Device | Mode | Room |
| Serial 1 | None | RS232 | Room-1 |
| Serial 2 | None | RS232 | Room-1 |
| Serial 3 | None | RS232 | Room-1 |
| Serial 4 | None | RS232 | Room-1 |
Design
The Design tab is for creating a Viewer – the user interface that controls the hardware from a mobile device or keypad. Create a viewer and add the pages to control the hardware according to the setup you are installing.
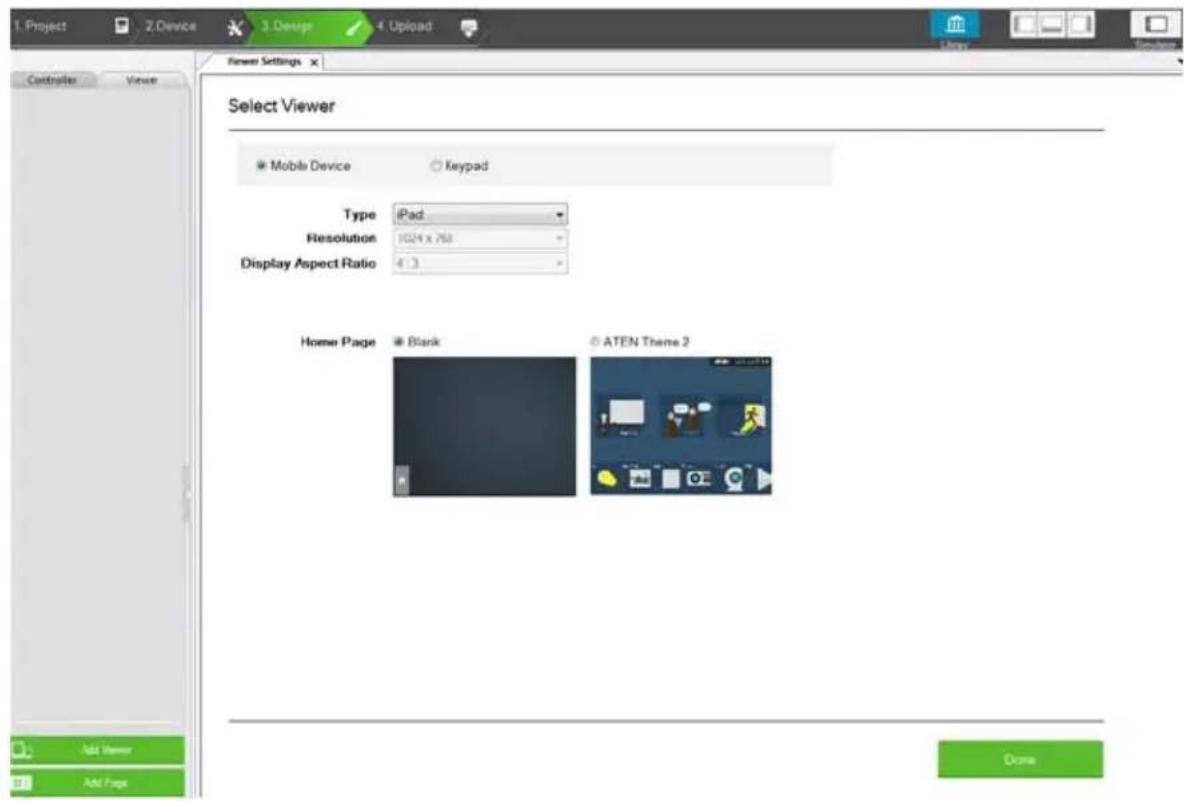
| Viewer Settings | The Viewer Settings page appears if no viewer has been created so that you can set the Viewer Properties. The viewer properties must be set before you begin configuring the viewer's pages. When you are finished, click Done to begin designing the viewer pages. See Select Viewer, page 71, for details. |
| Left Sidebar The left | asidebar lists each viewer and its pages. The sidebar allows you to add viewers and pages. These options become available after clicking Done on the Viewer Settings page. See Left Sidebar, page 61, for details. |
| Library | Click this icon to open the Library which provides access to the Graphic (page 102), Flag (page 105), Monitor (page 107) and Macro (page 120) options. |
| Simulator The Simulator | lator button is used to test a viewer's interface after it has been created. The simulator allows you to tryout the interface as it would work on a mobile device but without actually controlling devices. Use the mouse to click through the page links. |
| Select Viewer The | Select Viewer section allows you to configure the basic settings and type of viewer you want to create. See Select Viewer, page 71, for details. |
Select Viewer
The Select Viewer page sets the basic properties for the viewer that you create. A viewer is the interface designed for a mobile device or keypad with the pages and buttons used to control each hardware device. Use the table below to select the viewer settings, then click Done to continue.
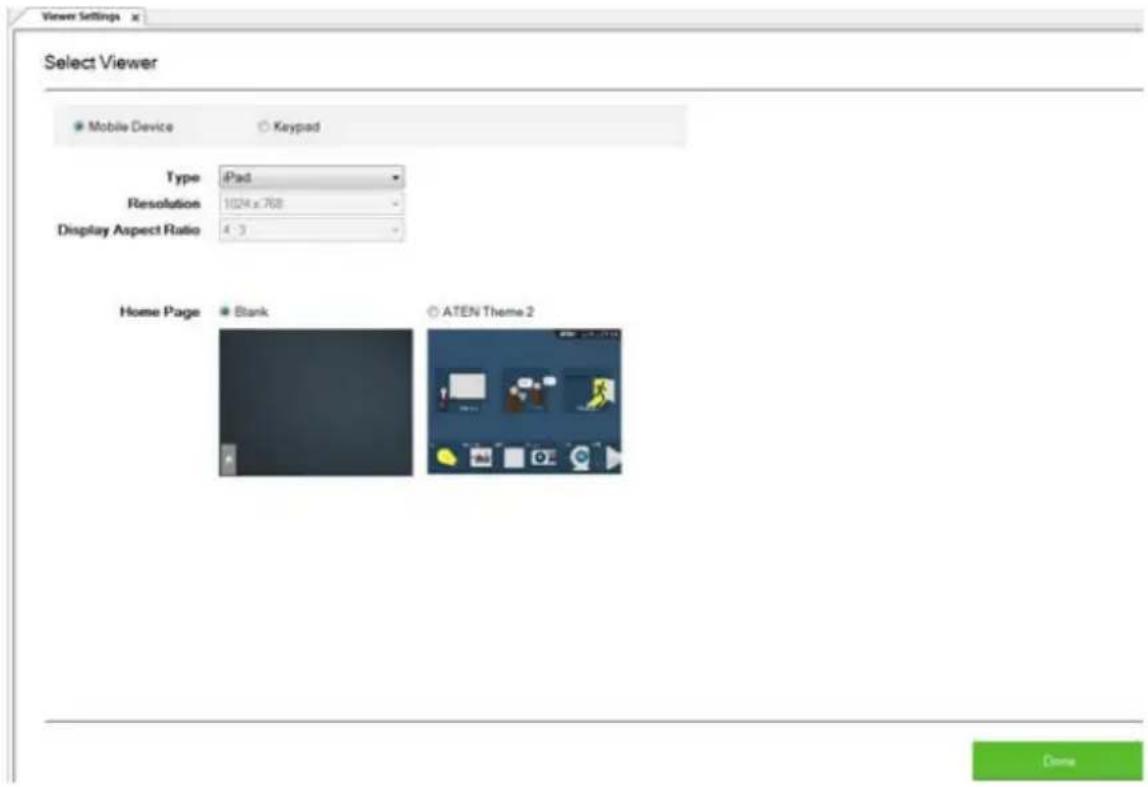
| Select Viewer Displays the basic settings that must be selected to create a viewer profile.♦ Mobile Device: Select to create a viewer profile that will be uploaded for use on a mobile device.♦ Keypad: Select to create a viewer profile that will be used to configure buttons for a keypad installation (see page 34 for details). |
| Type Use this drop-down menu to select the mobile device that will be used to control hardware devices in a room. This sets the resolution for the viewer to fit on the mobile device's screen.Choose a Custom selection to configure a screen size with the Resolution drop-down menu below it.Note: If you select Custom Windows Device – the Windows OS has a limitation for adding buttons to the viewer pages on Windows mobile devices. See Properties, page 78, for details. |
| Resolution Use this drop-down menu to set a custom screen resolution for the mobile device being used to control hardware devices. This option becomes available when you select one of the Custom selections from the Type drop-down menu. The Display Aspect Ratio menu is only provided as a reference and can not be set. |
| Home Page Sets the layout for the Viewer's home page:♦ Blank: Creates a custom home page that you design from scratch.♦ ATEN Theme 2: Creates a home page and device page templates with graphics. Each theme provides a template that can be customized into your own design. |
| Done / Replace Click Done to edit the Viewer pages. When you click Edit Preferences the Replace button appears to save changes. |
Left Sidebar
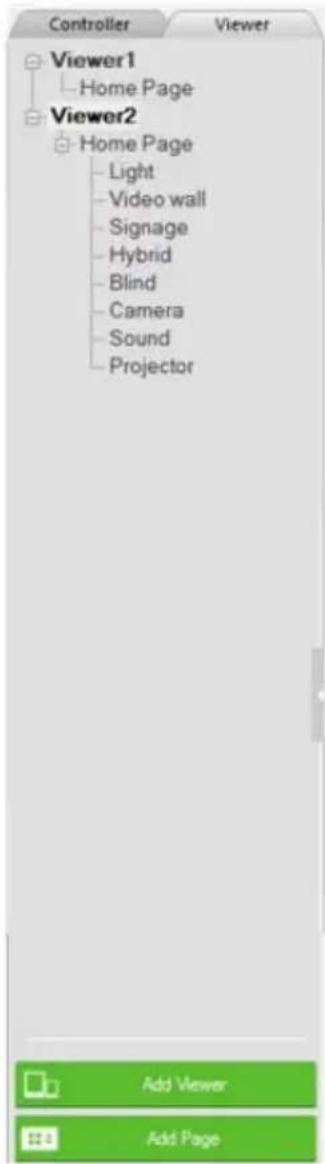
Viewer
The Left Sidebar provides a tree view of the Viewers and Pages. Clicking a viewer opens the Page Overview which is a layout of the viewer's pages.
Right click a viewer to Delete, Rename or Edit the viewer.
Use Add Viewer at the bottom of the sidebar to create a new viewer.
Pages
Each viewer lists the Home Page with each Viewer Page created for the viewer under it.
Clicking a Home or Viewer Page on the sidebar opens a new tab where the page can be edited.
Right click a page to Delete or Rename the page. The Home Page cannot be deleted.
Use Add Page at the bottom of the sidebar to add a page to the viewer.
Right Sidebar
The Right Sidebar provides the Properties options which displays information and various settings for objects that are selected in the main window. The Properties sidebar will appear when a viewer page is open for editing and an object is selected. The Properties sidebar is discussed starting on page 64.
Keypad
When you select the Keypad radio button on the Select Viewer page, configuration menus appear. The four drop-down menus allow you to configure the keypad layout and ID settings. After clicking Done, the viewer page will open allowing you to configure the keypad's label and buttons.
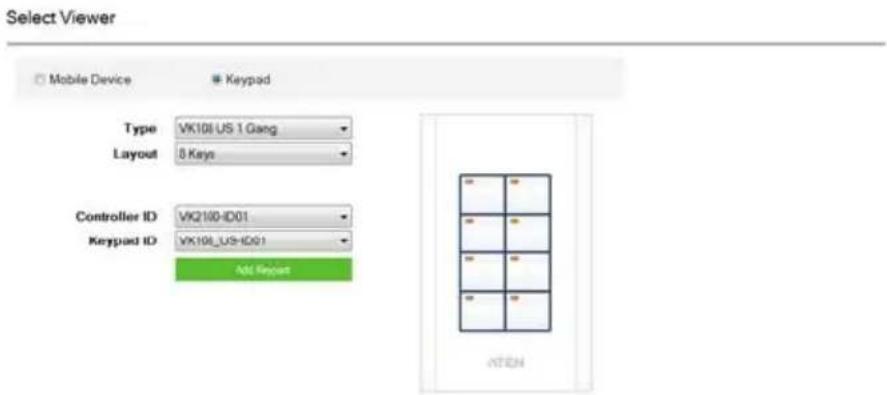
| Type Select the type of keypad that you are installing. | |
| Layout Use this drop-down menu to choose from 14 different button layouts. The layout should match the layout of the keypad hardware installation (see page 37 for details). When you make a selection the keypad image changes to reflect the choice. | |
| Controller ID Select the ID number of the Control Box that the keypad will connect through. This ID must match the Black ID Switch set on the keypad (see page 34). Up to 8 keypads can connect to one Control Box. | |
| Keypad ID Select the ID number to match the Blue ID Switch set on the keypad (see page 34). Up to 8 keypads can connect to one Control Box. | |
| Add Keypad | Click Add Keypad to add keypads that will connect to the same Control Box and control the same devices. Create a separate viewer profile for keypads with different layouts or that control different hardware devices. |
| Done / Replace | Click Done to edit the Viewer page for the keypad. When you click Edit Preferences, the Replace button appears to save changes. |
Page Overview
When you select Mobile Device or Keypad on the Select Viewer page and click Done, Page Overview appears with a preview of the viewer pages that control the hardware. From here you can edit and delete pages created for the viewer profile.
Edit and add pages to design the layout that will be used to control hardware from a mobile device or keypad. Each page can be fully customized with macros and buttons to control different hardware devices and with any object, background, size, shape and color of your choice. For keypads, a layout will be automatically created allowing you to configure the labels and buttons.
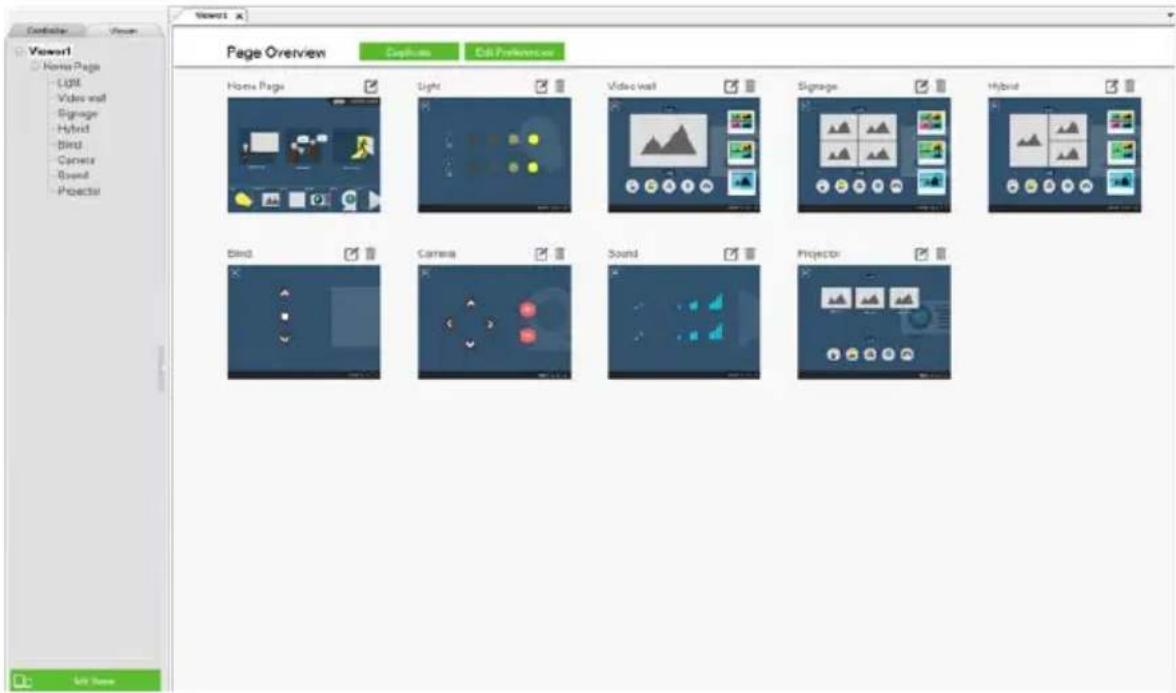
| Page Overview | Shows the Home Page and each Control Page that you add to the Viewer. |
| Duplicate | Click Duplicate to create a copy of the selected viewer and its pages. A new viewer will appear in the left sidebar. |
| Edit Preferences | Click Edit Preferences to enter the Select Viewer page (see page 71). This allows you to change the viewer's basic settings. To return to Page Overview, click Done. |
 | Click the Edit icon to customize a viewer page (see page 75). |
 | Click this icon to delete the viewer page. The viewer's Home Page can not be deleted. |
| Add Viewer | Click Add Viewer from the left sidebar to create a new viewer. |
| Add Page | Click Add Page from the left sidebar to add a new page to the viewer. Pages can only be added to Mobile Device viewers. |
| Viewer Sidebar | See Left Sidebar, page 72, for details. |
Edit
Clicking the Edit icon of a viewer page (see page 74) allows you to customize the layout and design. You can add buttons*, labels, images, scroll view windows, and slider bars to the page.
Buttons can be made into a Link, Macro or Function (page 82).
Use the Library on the Project Bar to design the layout and buttons using Graphics (page 102); or configure Flags (page 105), Monitors (page 107) and Macros (page 104) for button actions. Objects can be layered, images can be imported and labels can be applied anywhere.
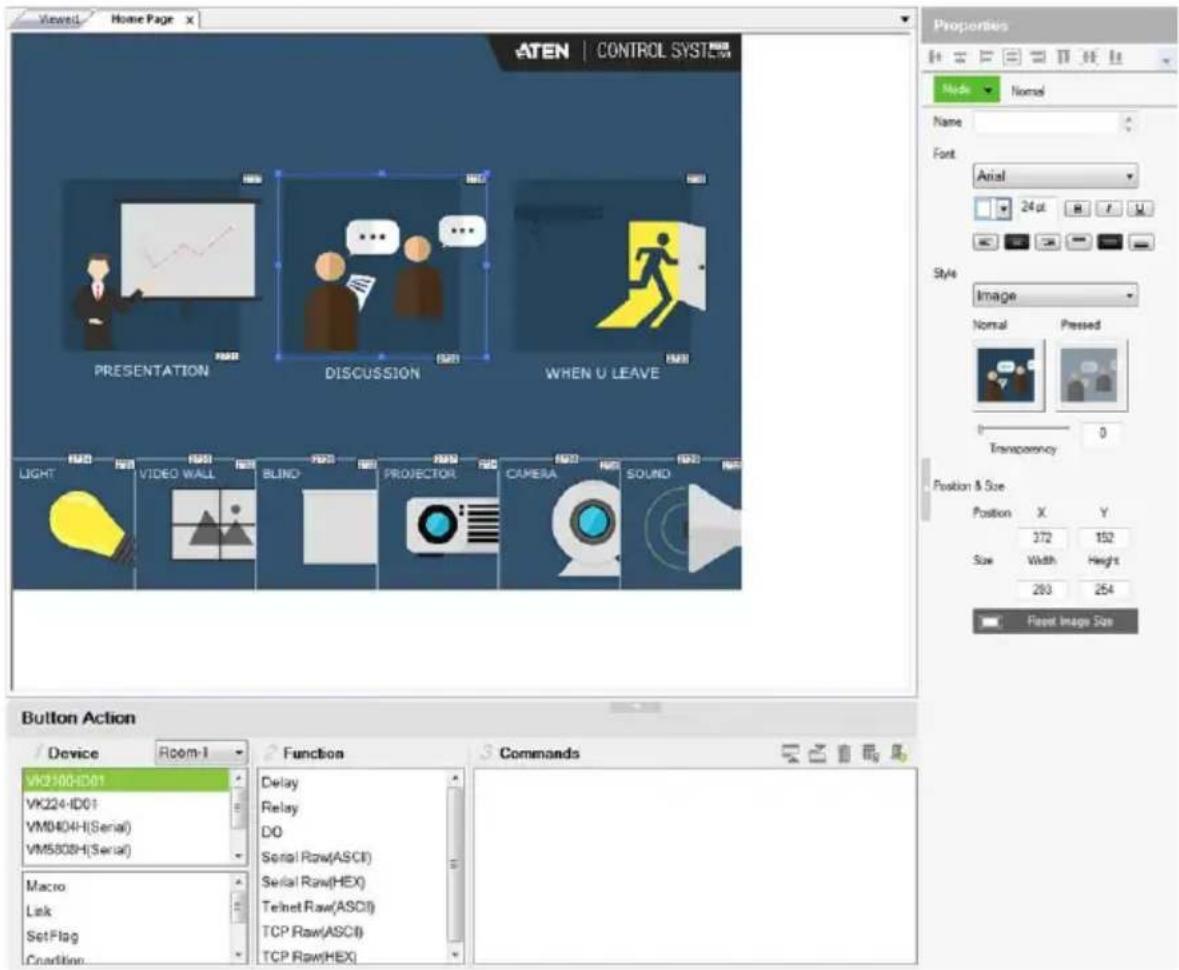
Note: The Windows OS has a limitation when adding buttons to viewer pages for use on Windows mobile devices. See Windows OS Button Limitation, page 76, for details.
- Right click on the page to add an object: Button, Label, Image, Scroll View, Video or Slider Bar.
- Select an object to open Properties on the right side.
- Select a button or slider bar to open Action on the bottom.
◆ Drag and drop objects anywhere on the page.
- Right click on an object to set Order options to layer objects.
- Click the mouse wheel to zoom the page in or out.
- Click the Library icon on the Project Bar to open the Graphic, Flag, Monitor or Macro libraries.
- Select and right-click multiple objects to Group or Align objects.
- Use the View menu options to select Show Grid and Align to Grid to set objects in perfect alignment.
Windows OS Button Limitation
When adding buttons to a viewer page for use on a Windows mobile device there is a Windows OS limitation for overlapping buttons. When two buttons are layered (A) on top of (B), the top most button (A) can not be pressed – instead (B) is activated each time. To resolve this issue, duplicate the top most button (A) and add it (C) directly under (A) and below (B) on the viewer page.
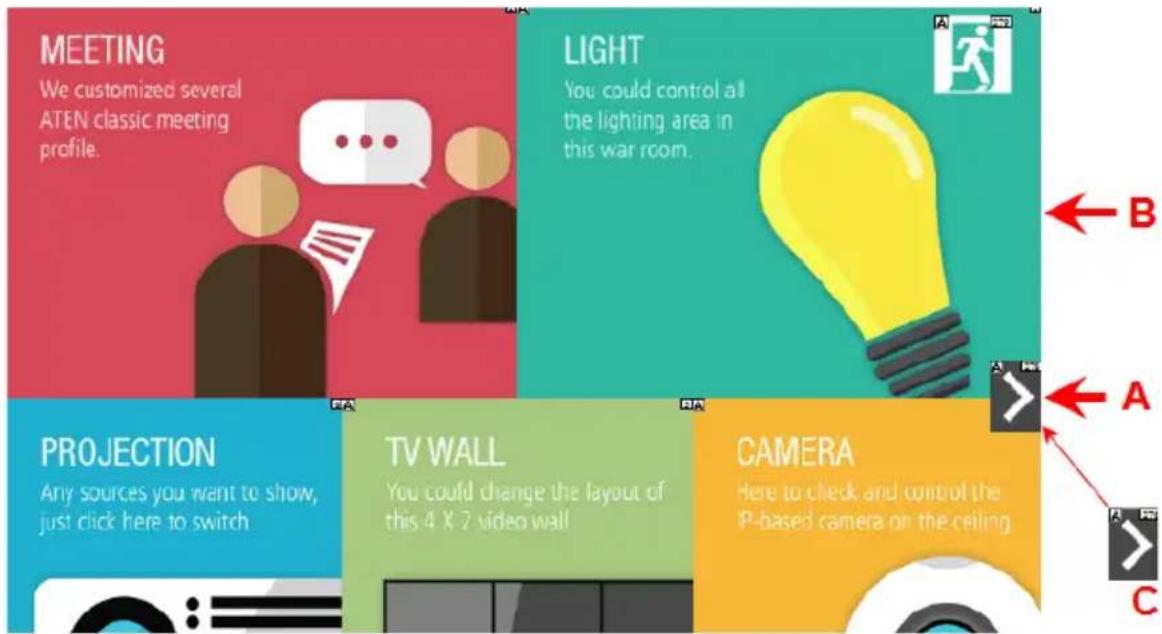
When the top button (A) is pressed, the lowest button (C) will execute the action.
Page Objects
A number appears at the top right corner of each object. The numbers are assigned in sequence, in the order that the object is added. These numbers help identify a label when configuring a Change Label (page 96) or a button when configuring a Change Button State (page 95).
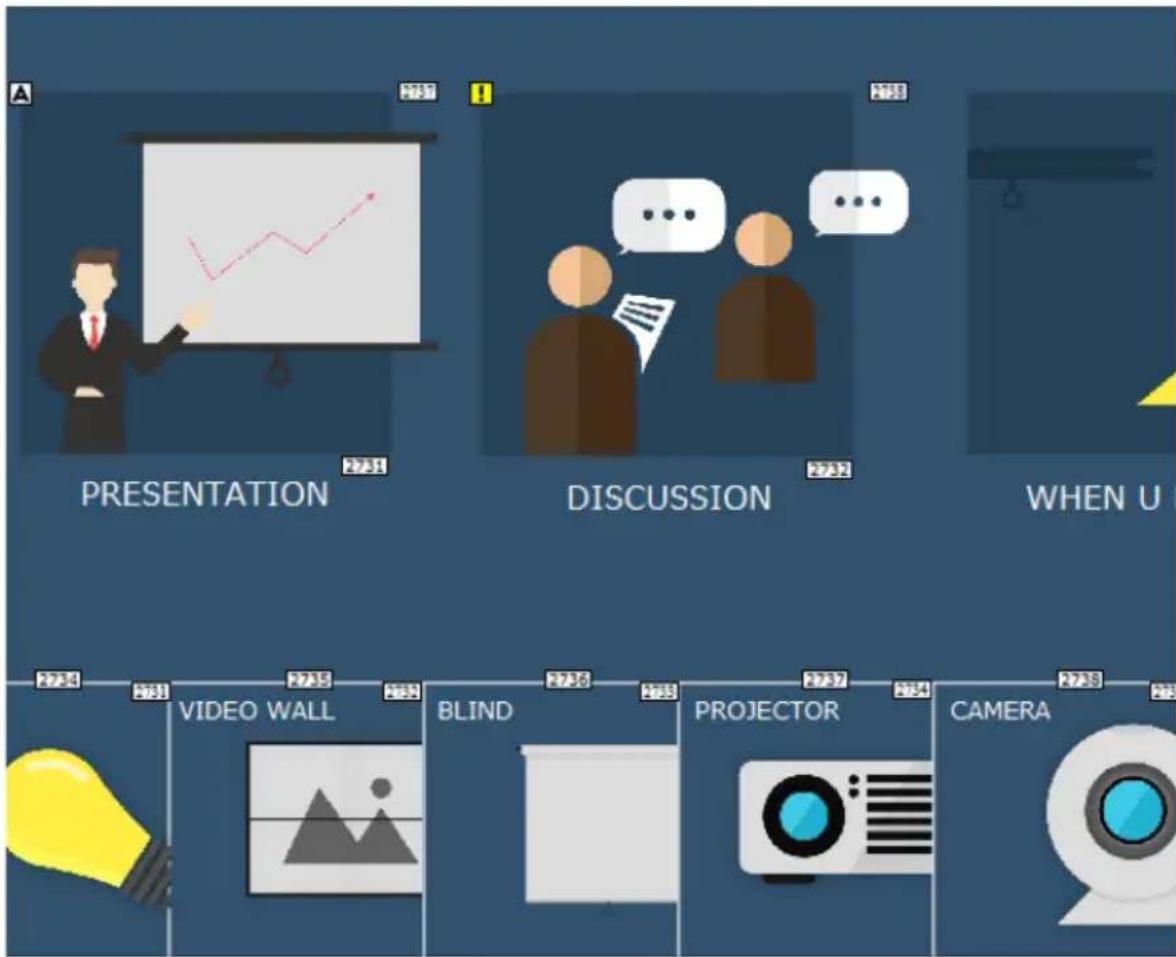
flowchart
graph TD
    A["PRESENTATION"] --> B["Blind"]
    C["DISCUSSION"] --> D["Projector"]
    E["WHEN U"] --> F["CAMERA"]
    G["VIDEO WALL"] --> H["Blind"]
    I["PROJECOR"] --> J["Camera"]
Each button has a symbol in the top left corner to indicate:
◆ “A” the button’s actions are configured correctly.
◆ “!” the button’s actions need to be modified or they will not work.
- Buttons with no symbol indicate that functions have not been added to it. For details on adding functions, see Button / Slider Bar Action, page 84.
Properties
The Properties side bar provides aliment buttons for when multiple objects are selected allowing you to arrange them accordingly:
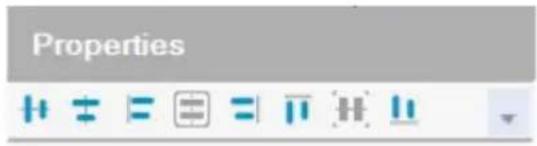
There are four types of properties that appear for selected objects:
■ Page Properties
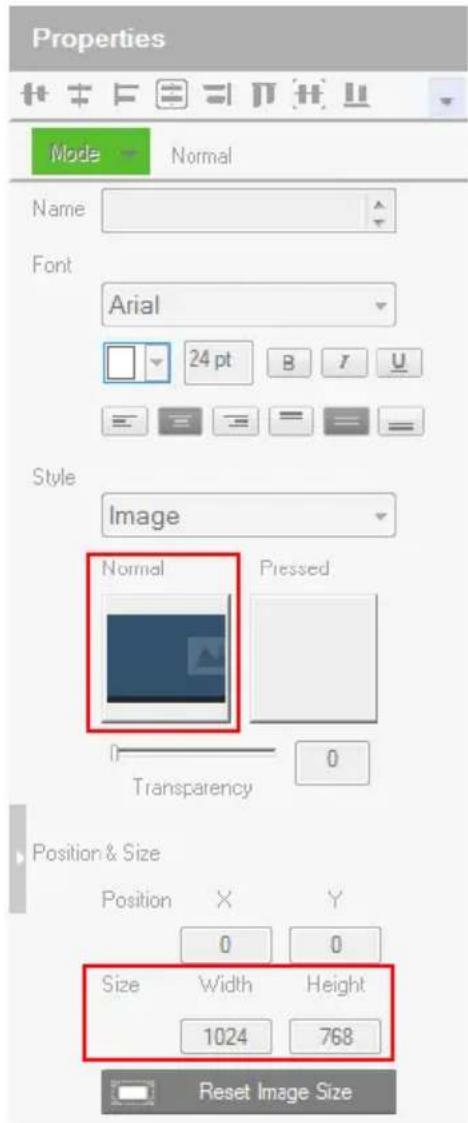
The Page properties provides an option to change the background image.
- Style – click the Normal box to import an image (*.png,*.jpg*.jpeg*.bmp) to use as the background for the page.
- Position and Size – displays the Width and Height of the page according to the Resolution set in the Viewer Properties. This option can not be changed.
■ Label Properties
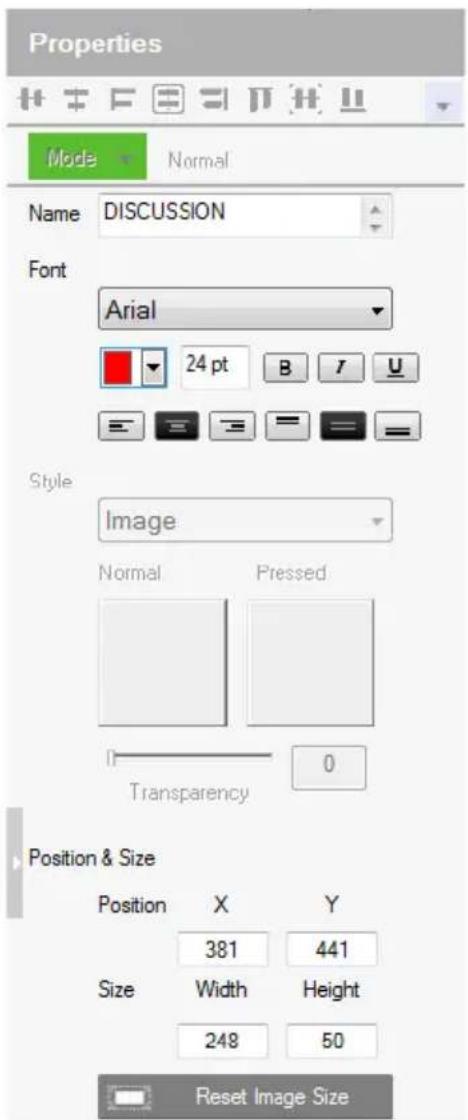
The Label properties provide options to change the text formatting of a label.
- Name – enter the text you want to use for the label or slow double-click the label on the Edit page.
-
Font – use the drop-down menu to select the font type.
-
Color – use the drop-down menu to change the color of the text.
- Size – enter a number (1-200) to set the size of the text.
- Format– format text to Bold, Italic or Underline.
- Alignment – click a box to align the text Right, Center or Left; and Top, Middle or Bottom within the label box.
- Position and Size – X and Y position the label at the coordinates entered. Width and Height set the size of the label.
■ Slider Bar Properties
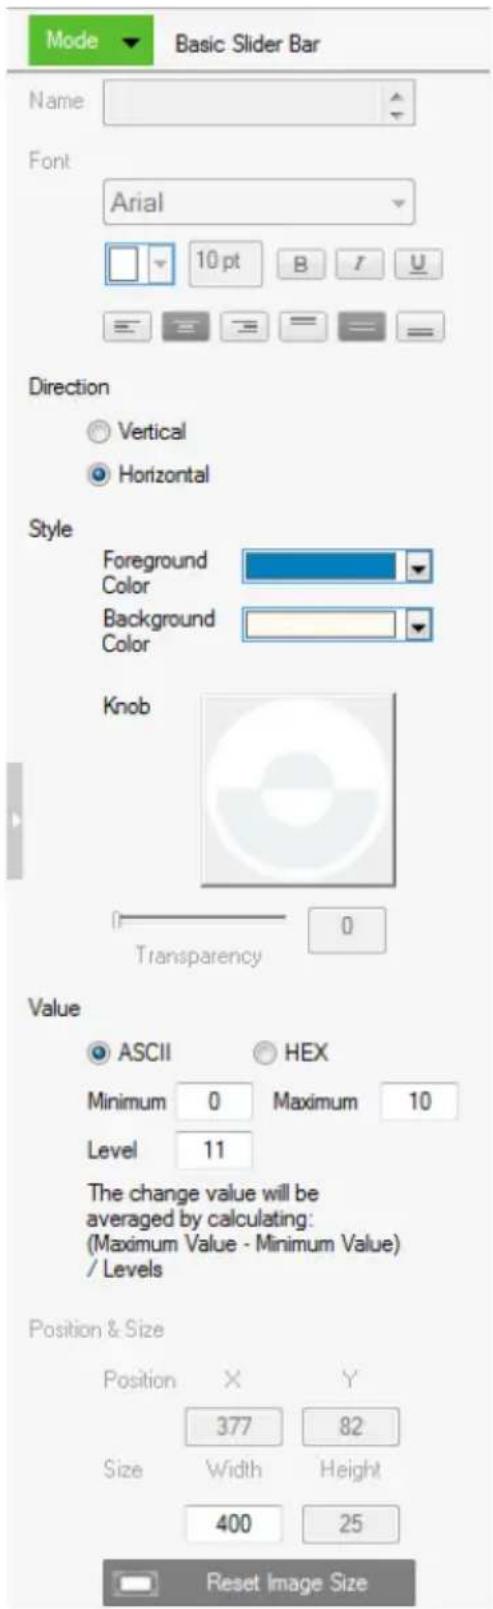
The Slider Bar properties provide options to configure a Slider Bar. Right click on a viewer page and select Slider Bar to add a bar. A Slider Bar can control a device, link to another page, or run a macro. The Slider Bar properties are discussed on the next page.
- Mode – use the drop-down menu to select the button type:
- Basic Slider Bar for a bar where you enter the minimum and maximum values to calculate the range and levels on a slider bar, and then add one command to configure the Basic Slider Bar's action (See Slider Value, page 89). Choose options under Value to configure the slider bar's range:
- ASCII / HEX – click a radio button to select the format for the slider bar values.
♦ Minimum – enter the lowest level on the bar.
♦ Maximum – enter the highest level on the bar. - Level – this represents the number of levels on the slider bar. You can calculate the value of each level with the formula: Maximum Value - Minimum Value / Level = Value Per Level. The Level is automatically calculated according to the Minimum and Maximum values you enter.
- Advanced Slider Bar for a bar where you set the number of levels and add a command for each level in the bar (see Level, in the table, on page 84). Choose options under Value to configure the slider bar's range:
- Level – this represents the number of levels on the slider bar. For each level you must add a separate command in the Slider Bar Action – Commands list (see Level, in the table, on page 84).
- Direction – sets the bearing of the slider bar. Options are Vertical or Horizon.
- Style – click the drop-down menus to select the Foreground Color and Background Color for the slider bar.
- Position and Size – depending on whether the bar is set Vertical or Horizontal you can use either the Size: Width or Height box to enter a number to resize the length of the slider bar.
■ Button Properties
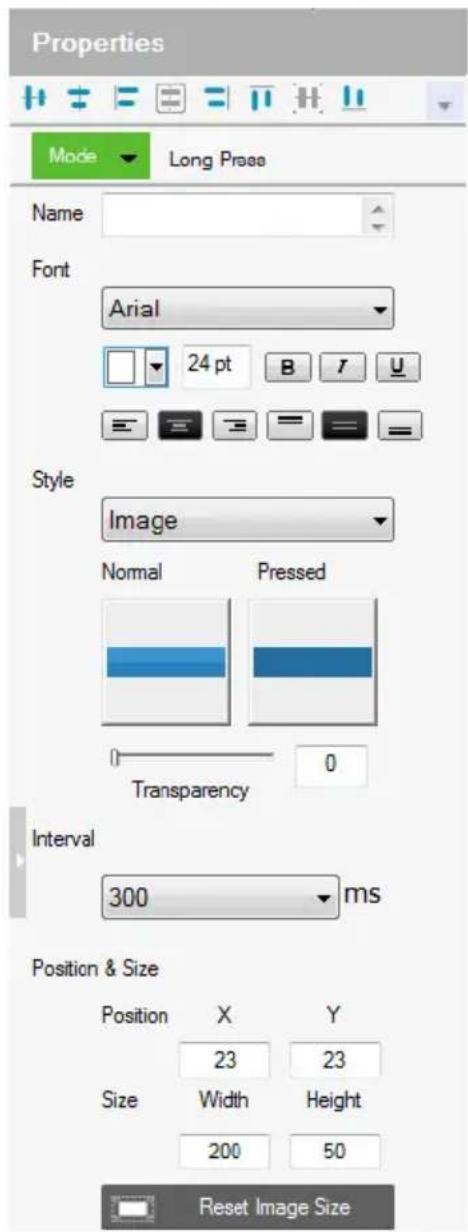
The Button properties provide options under Properties (right sidebar) to configure the look of a button, and Action (bottom bar) to configure the function of a button. A button can control a device, link to another page or run a macro.
Properties
- Mode – use the drop-down menu to select the button type:
♦ Normal for a button that stays the same when pressed.
- Toggle for a button that switches between two images/colors to indicate the button status. This also splits the Commands list under
Button Action (page 84) to provide two commands for the button: Toggle ON and Toggle OFF.
- Press and Release for a button that switches between two images/ colors when pressed and released. This splits the Commands list under Button Action (page 84) to provide two commands for the button: Press and Release.
- Long Press for a button that switches between two images/colors when pressed and released. This button continuously re-sends a command to a device as long as it is pressed, at the Interval specified (see Interval, below) and stops sending the command once the button is released.
-
Use the Normal and Pressed option to set the image or color of the button according to its state.
-
Name – (optional) type the text you want to use for the button (or slow double-click the button on the viewer page).
-
Font – use the drop-down menu to select the font type.
-
Color – use the drop-down menu to change the color of the text.
- Size – enter a number (1-200) to set the size of the text for the button.
- Format – formats text to Bold, Italic or Underline for the button.
- Alignment – click a box to align the text Right, Center or Left; and Top, Middle or Bottom within the button box.
- Style – use the drop-down menu to select the style type.
- Normal imports an image to use as the button's standard background and click Pressed to import an image to use when the button is pressed.
- Color allows you to use drop-down menus to select the buttons color for Normal and Pressed.
- Transparency – enter a number (0-100) or use the slider-bar to set the transparency of the button.
- Interval (Long Press only) – use the drop-down menu to select the amount of time between each command that is sent (repeatedly) to the device while the button is pressed.
- Position and Size – X and Y position the button at the coordinates entered. Width and Height set the size of the button box.
- Reset Image Size – resets the button size.
Button / Slider Bar Action
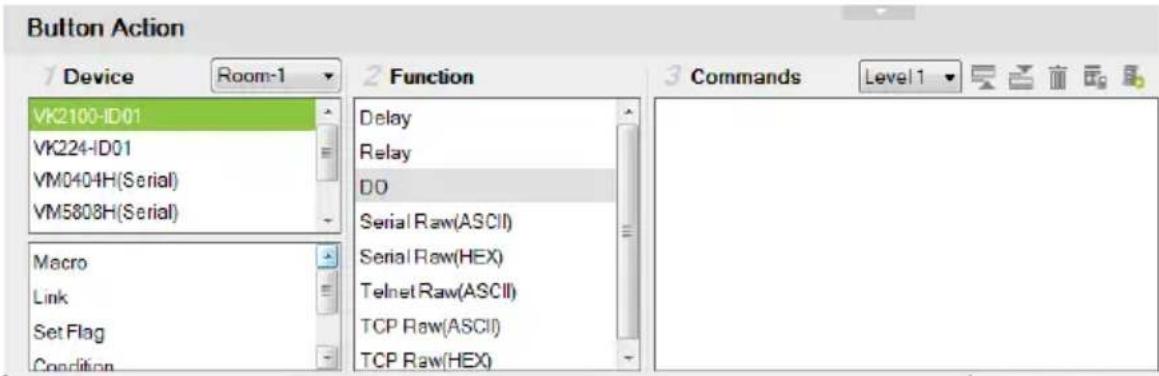
The Button Action is used to set what a button does when pressed. Select a button on the viewer page to configure the Button Action. Use the table below for an overview and the instructions on the next page to add Commands and Advanced Options to a button's action.
| Device Lists the devices and advanced options that can be selected to add commands to the Button Action. When one is selected, commands appear in the Function list. The upper box lists hardware, the lower box Advanced Options. | |
| Room Select the room that the viewer will control devices in. The viewer will only upload to a Control Box configured with the same Room name (see Left Sidebar, page 61). Select All Rooms to allow the viewer to control all rooms. Selecting All Rooms will upload the viewer profile to all Control Boxes.The Accessible Room defines what Devices are available to configure new Actions in Button Properties (see page 84). Only Devices listed under the same Room (see page 61) as the viewer's Accessible Room, will be listed for use in Button Properties. | |
| Function Lists commands that can be added to the Commands list. When a device or option is selected, commands in the Function list can be added to the Commands list to configure the button's action(s). | |
| Commands Lists the commands that will initiate when the button is pressed.Device and Advanced Option functions can be added and associated in the Commands list together. Commands initiate in the order that they are added to the list. Right-click in the Commands list to use the menu selections: Move Up, Move Down, Copy, Paste, Delete, Save as Macro, or Test Tool. | |
| Toggle ON / Toggle OFF or Press / Release | When the Button Mode (page 82) is set to Toggle or Press and Release, the Commands list splits to set the two c commands:Toggle ON / Press – lists the commands that initiate when the button is first pressed or pressed and held.Toggle OFF / Release – lists the commands that initiate when the button is pressed a second time (Toggle), or released (Press and Release). When the button is pressed again, Toggle ON initiates and the cycle repeats. |
The Level drop-down menu appears when an Advanced Slider Bar is selected on the viewer page. The number of levels in the drop-down menu reflect the Level set in the Advanced Slider Bar's properties (page 81). Use the drop-down menu to select a level and then add a command for each of the Advanced Slider Bar's levels (see page 89 for details).
Use Move up to move an action up in the Commands list, or Move down to move an action down in the Commands list.
Use Delete to remove an action from the Commands list.
Use Save as Macro to save the commands in the Commands list as a macro.
Use Test Tool to connect to a Control Box and test the action(s) in the Commands list.
Adding Commands
The Button Action section allows you to add and configure commands – to set what a button does when pressed. You can configure a button with Device commands (On, Off, Stop, Play, etc.); as a Macro to send multiple commands to one or more devices; or as a Link to other viewer pages. Advanced Options allow you to add conditions to the commands, as described on the next page.
To add a command to the button:
- Under Device, select a Room and then an option.
- Select a command from the Function list.
- Double-click the command to add it to the Commands list.
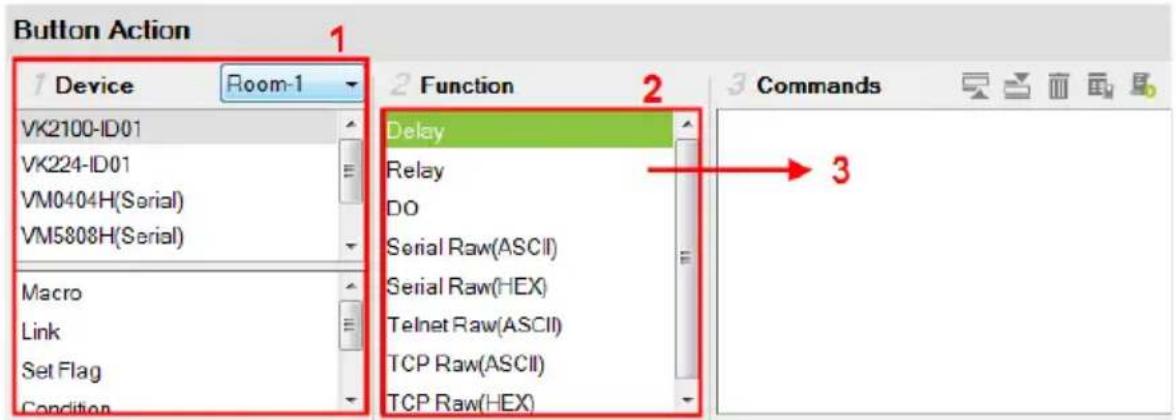
The commands listed under Function depend on which option is selected in the Device list.
- Use the information below to understand how each Button / Slider Bar Action section works and how to add Advanced Option to commands.
- Device – lists hardware devices and advanced options that can be selected to add commands to the Commands list. Commands appear in the Function list. Only hardware devices from the Room that is selected (via the drop-down menu) are listed here. The controller is listed first and allows you to add Special commands, as explained under Function, on page 87. In addition to hardware device commands, you can add options:
Macro - sends multiple commands to one or more devices. Select to add a macro command from the Function list. To create a macro, add multiple device actions to the Commands list, then click the Save as
Macro 📄 icon or use the Advanced Editor (page 104).
Link – makes the button into a link that directs you to a viewer page. Select to add a page link from the Function list. Double-click the page link in the Commands list to select a different page link.
Below lists Advanced Options that provide features to add conditions to button commands. For more information on these options, see Advanced Options, page 90.
Set Flag – sets a flag value to represent the new device status when a command changes a device setting. Set Flags are added to the Commands list after device commands to change the Flag (device status).
Condition – adds a condition that must be met for commands to initiate. A condition's set value must be equal to a Flag or Feedback value for the command(s) below it to initiate. Conditions are added before commands in the Commands list.
Change Button State – this command changes the image of another button when this button is pressed – allowing the image of any other button to change when the command from this button is sent. Change Button State is added to the end of the Commands lists. When adding this to a Toggle button it allows the image to switch with the toggle behavior: Normal or Pressed. In this situation the Change Button State is added to the end of both the Toggle ON and Toggle OFF Commands lists.
Change Label – this option changes a label’s text with text that you enter manually or with text from a device’s return message. A Manual Change Label can be added to the beginning or end and with a Condition in the Commands list. Adding it to a Condition guarantees the label only changes when the command initiates.
Change Group Button State – this option adds a command that changes the button selected in a Radio Group (page 56). Create a Radio Group and then a Function will be listed for it when Change Group Button State is selected. Add the Change Group Button State to the Commands list of a button and use the drop-down menu to select the button in the Radio Group you want selected.
Change Slider Bar Level – this option adds a command that changes the level of a Slider Bar (page 80). Create a Slider Bar and then a Function will be listed for it when Change Slider Bar Level is selected. Add the Change Slider Bar Level to the Commands list of a button and use the drop-down menus to select the Slider Bar and Level to change.
- Function – lists the commands that can be added to the Commands list. Select an option under Device, then double-click or drag & drop commands from the Function list to add them to the Commands list.
Associate Set Flag, Condition, Change Button State, or Change Label commands with device commands in the Commands list by dragging and dropping them into a tree view list, which allows them to initiate together (see Advanced Options, page 90).
If you select the controller from the Device list, you can add the Special commands listed below. Double-click to add, then double-click to configure:
Delay - adds a delay in seconds. Enter a number between 0.1-180.
Relay – adds an Open, Close, Toggle or Pulse action on the selected controller and Relay port.
D/O – adds an Open, Close, Toggle or Pulse action on the selected controller and Digital Output port.
Serial Raw (ASCII) – adds a serial command string that is entered for the port selected in ASCII mode.
Serial Raw (HEX) – adds a serial command string that is entered for the port selected in HEX mode.
Telnet Raw (ASCII) – adds a telnet command string that is entered for the device selected in ASCII mode.
TCP Raw (ASCII) – adds a TCP command string that is entered for the port selected in ASCII mode.
TCP Raw (HEX) – adds a TCP command string that is entered for the port selected in HEX mode.
- Commands – lists the commands that initiate when the button or slider bar is used. They can include Device Commands (on, off, switch, change setting or volume, etc.) and Conditions (Flag, Feedback) that must be met before a command can initiate; or Changes (Set Flag, Change Button State, Change Label, Change Group Button State, or Change Slider Bar Level) that initiate with device commands.
When a device command has multiple values you can double-click it and use the Show Flag Menu* to select a device setting.
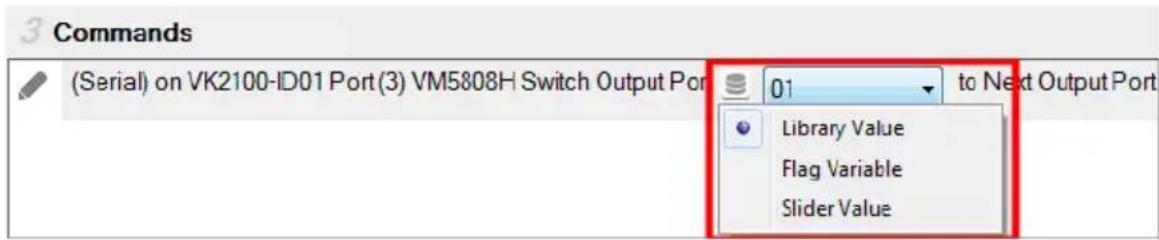
Library Value – use the drop-down menu to
select a device setting for the command. The selection of settings in the drop-down menu can be modified using the Database Generator to edit the command string (see Edit / Add New Device, page 129).
Flag Variable – clicking this button allows a Flag
with a set of values to be selected for the action. The button's action will select a setting according to the Flag value. Each value in a Flag can be set to a different device using a Set Flag (as a button to select the device). When that (Set Flag) button is pressed, the Flag value is set for that particular device, and will be used as the setting for this action, when it's button is pressed.

Slider Value - select this option to configure a
Basic Slider Bar's command. The range and change levels are automatically configured according to the minimum and maximum values set for the Basic Slider Bar (page 80). This option only appears when a Basic Slider Bar is selected on the viewer page and you are adding Slider Bar Action commands.
Note: The Show Flag Menu allows you to use a single Flag for all devices rather than adding a Conditional Flag for each device.
Level - When an Advanced Slider Bar is selected on
a viewer page, the Level drop-down menu appears above the Commands list. A command must be added to each level of an Advanced Slider Bar. To configure each level, use the drop-down menu to select a level and then add a command to it.
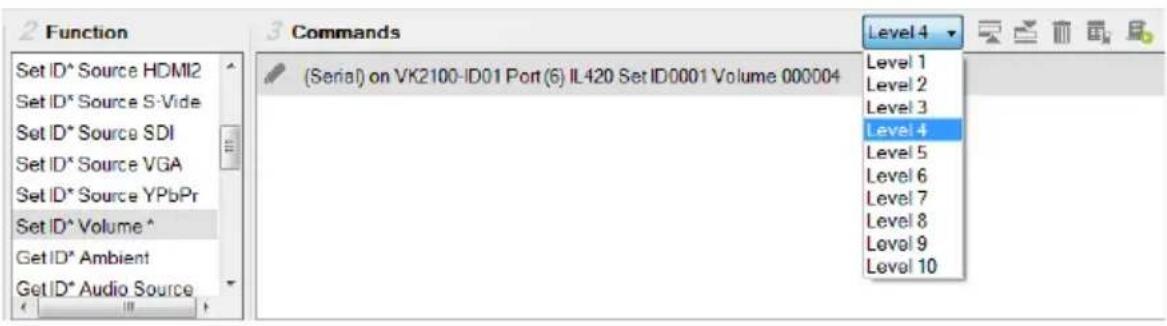
Advanced Options
Advanced Options allow you to include conditions with a commands in the Commands list. Associate Set Flag, Condition, Change Button State or Change Label functions with a command in the Commands list by dragging and dropping them into a tree view listed with the command, so that they initiate in the order listed.
- Set Flag – add a Set Flag to change a Flag’s value when a command changes a device setting. This sets the Flag value to match the new device setting (e.g. ON or OFF). Always add a Set Flag to a Condition Flag, after the device action(s):
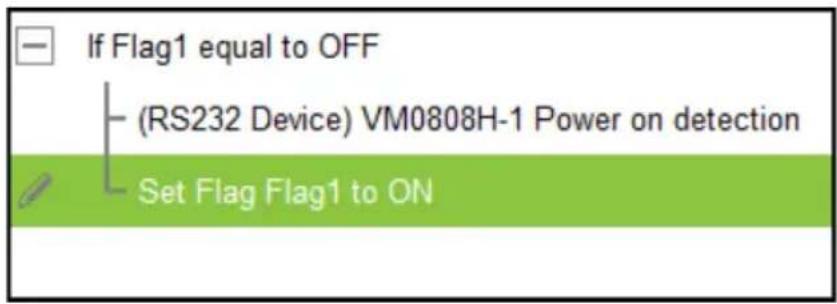
To add a Set Flag:
- Under Device, select Set Flag.
- From the Function list, select the Flag.
- From the Function list, drag and drop the Flag to add it to the end of the Condition Flag, in a tree view list:
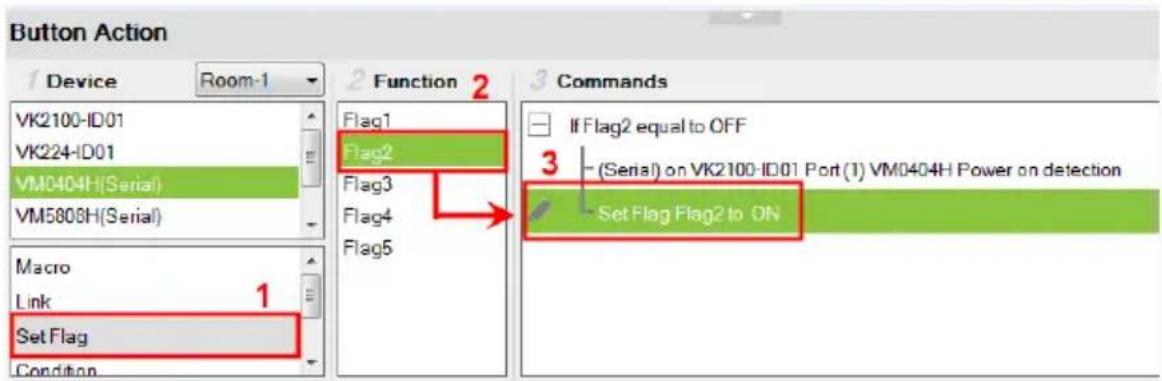
- Double-click Set Flag in the Commands list to use the drop-down menus to set the Flag and Value.

- Condition – adds a condition that must be met before the commands listed with it can initiate. When the button is pressed, the Condition's set value must equal the Flag or Feedback value for the command(s) to initiate. There are two condition types: Flag and Feedback.
- Flag – adds a condition based on a Flag’s value. “If Flag equals Value” is true, the condition is met and the commands listed with the Condition will initiate. Always add a Condition Flag at the top of the Commands list, drag and drop the device command(s) and then a Set Flag at the end, in a tree view list:
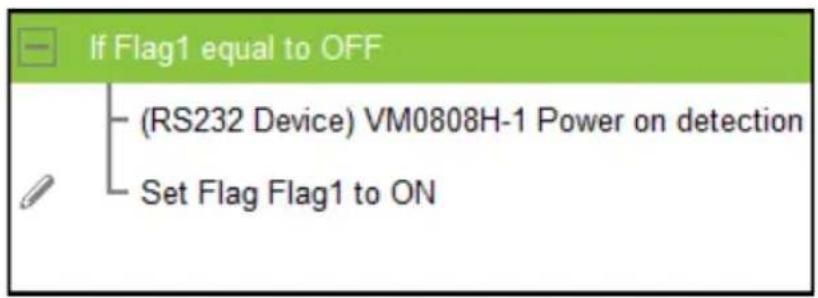
To add a Condition Flag:
- Under Device, click Condition.
- From the Function list, select Flag.
- Double-click Flag to add the Condition Flag to the Commands list.
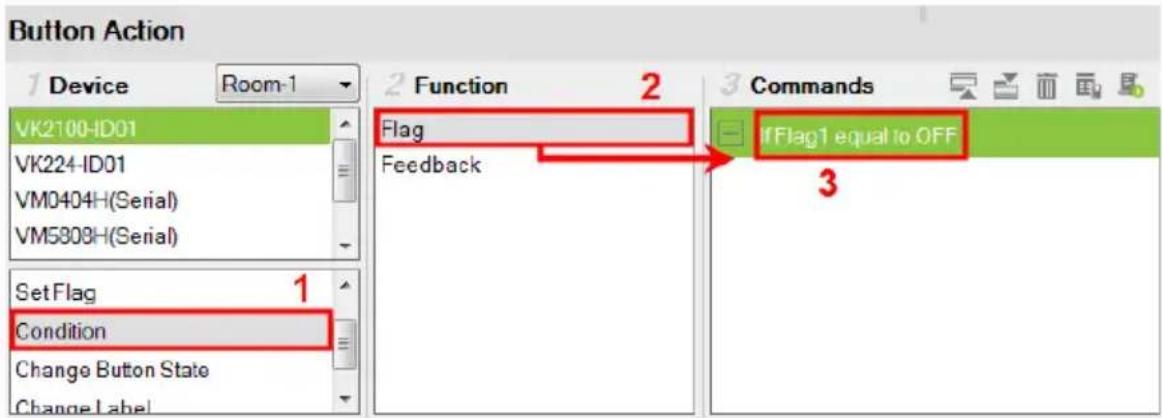
- Double-click the Condition Flag in the Commands list to use the dropdown menus to set the Flag and Value.

- From the Function list, drag & drop device commands to add them to the Condition Flag, in a tree view list:
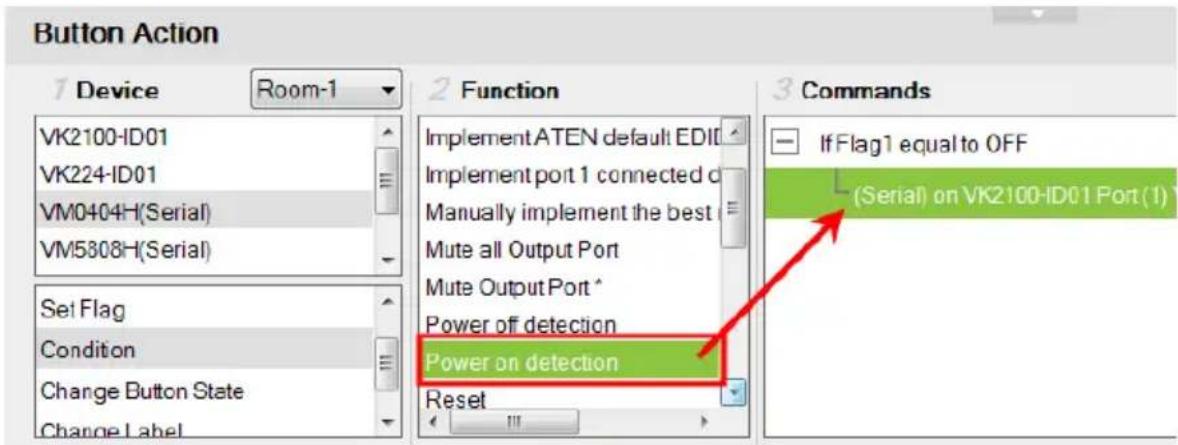
- Add a Set Flag after the last device command in the Commands list:

- Feedback – adds a condition based on the text from a serial/telnet/TCP device's return message. Always add a Condition Feedback to a serial/telnet/TCP command, with command(s) added below the Condition Feedback, in a tree view list:
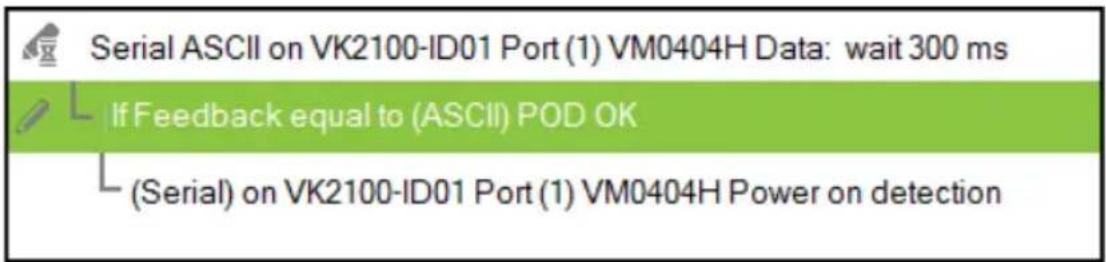
Receive Time – when a Feedback condition is added to a device command the wait to Receive Time drop-down menu appears allowing you to set the amount of time to wait before it stops receiving the return message from the device.
There are three Condition Feedback types:
- Equal – when the text sent from a serial/telnet/TCP device’s return message matches all of the text entered for a Condition Feedback Equals, the commands listed below it will initiate.
- Include – when the text sent from a serial/telnet/TCP device’s return message matches part of the text entered for a Condition Feedback Include, the commands listed below it will initiate.
- Bypass – this option bypasses matching text from the serial/telnet/TCP return message and initiates a Change Label command. The label’s text will change to the return message sent from the device (i.e. the Feedback Result). A Change Label must be added to the Feedback Bypass for it to work.
To add a Condition Feedback Equal/Include:
- Under Device, click Condition.
-
From the Function list, select Feedback.
-
From the Function list, drag and drop Feedback to add it to the Serial/Telnet/TCP command, in a tree view list:
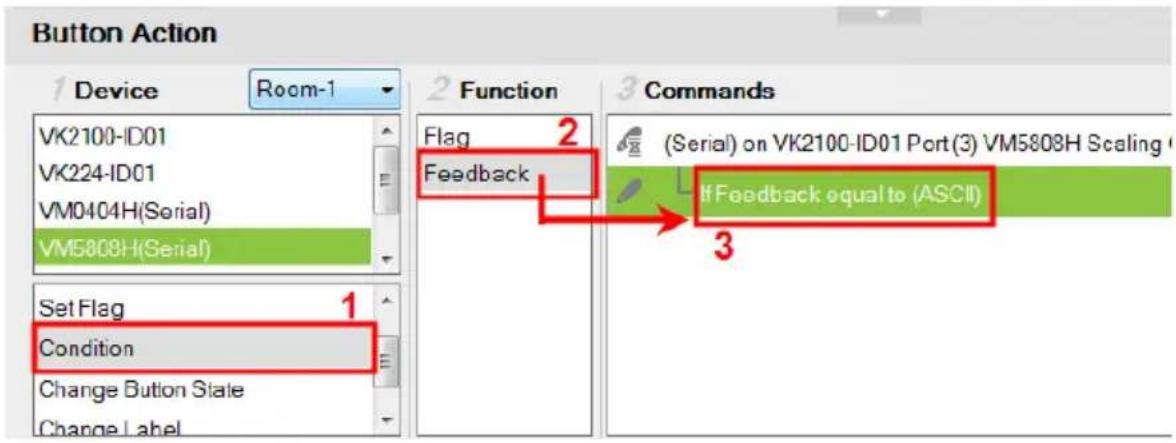
- Double-click If Feedback equals to in the Commands list and use the drop-down menu to select equal to or include and enter the Text.

Text entered here must match all (equal to) or part (include) of the text from a serial/telnet/TCP device's return message for the command(s) to initiate. Use the ASCII / HEX drop-down menu to select the format.
- From the Function list, drag & drop device command(s) to add them to the Feedback Equal/Include Condition, in a tree view list:
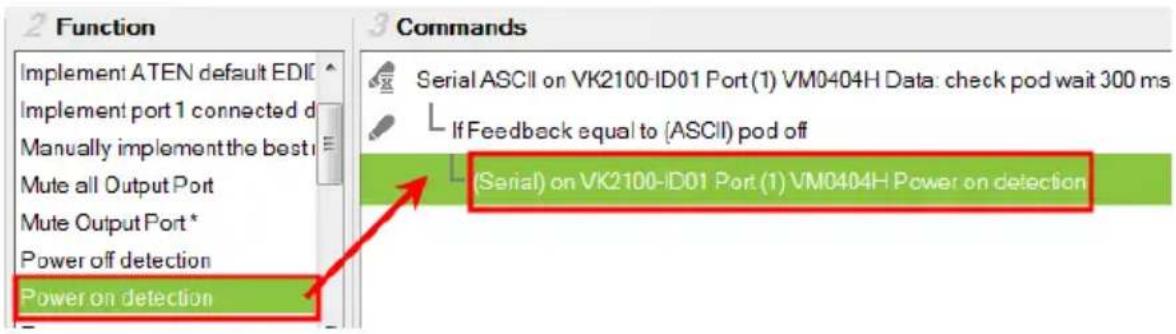
To add a Feedback Bypass Condition with Change Label:
- Under Device, click Condition.
- Select Feedback from the Function list.
- From the Function list, drag and drop Feedback to add it to the Serial/Telnet/TCP command, in a tree view list:
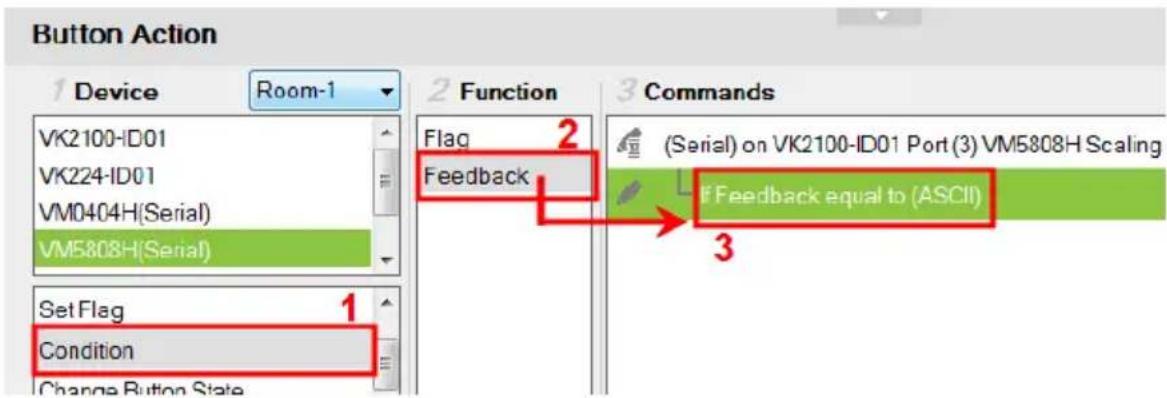
- Double-click If Feedback equals to in the Commands list and use the drop-down menu to select bypass.

- Under Device, select Change Label.
- From the Function list, select the Viewer Page where the label is located.
- From the Function list, drag and drop the Viewer Page to add it to the Feedback Bypass Condition, in a tree view list:
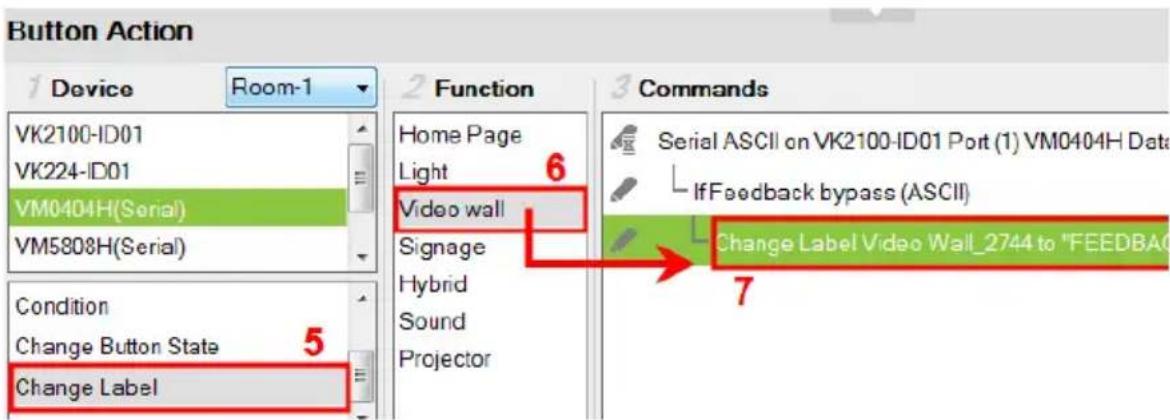
- Double-click Change Label in the Commands list and use the drop-down menu to select a label. Labels are identified by number (see page 77).

The label's text will change to the serial/telnet/TCP device's return message.
- Change Button State – this option is used to change another buttons image when this button is pressed – allowing the button image to switch depending on the status: Normal or Pressed. Change Button State is added to the end of the Commands lists and should point to a Toggle button. Adding this to a Toggle button allows the image to switch with the toggle behavior: Normal or Pressed.
To add a Change Button State:
- Under Properties, use the Mode drop-down menu to select a button type.
- Under Style, click the Normal and Pressed button to select an image/color* for the button's state.
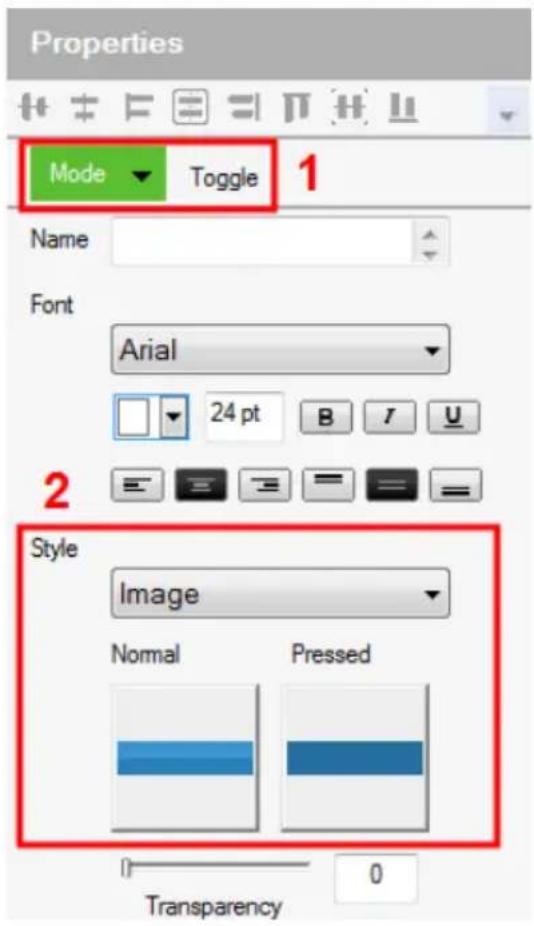
Note: Use the Style drop-down menu to select Image to import an image file for the button state, or Color to choose a color format for the button state.
- Add the Toggle ON and Toggle OFF device commands to the Commands lists.
- Under Device, select Change Button State.
-
In the Function list, select the viewer page.
-
Select the Toggle ON radio button, then in the Function list, double-click the viewer page to add it to the end of the Toggle ON commands in the Commands list.
- Select the Toggle OFF radio button, then in the Function list, double-click the viewer page to add it to the end of the Toggle OFF commands in the Commands list.
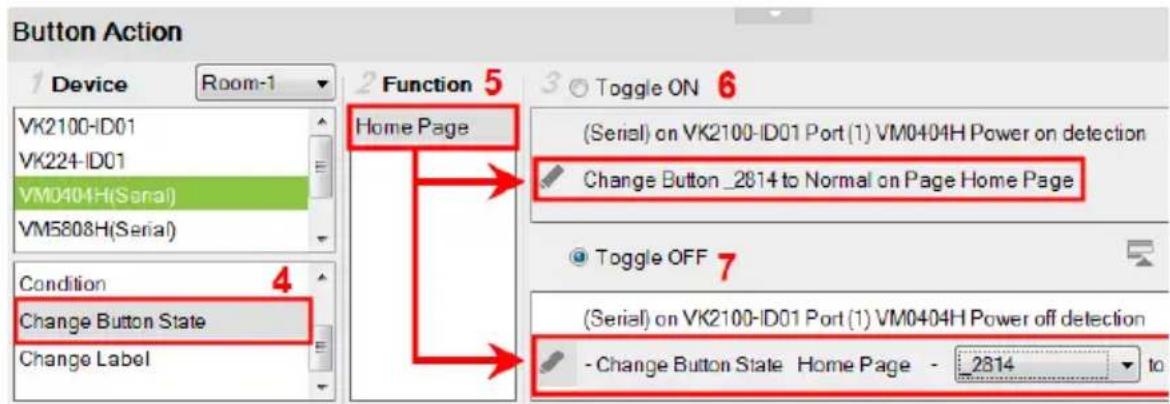
- In each Commands list, double-click the Change Button State command to set the Button and State (Normal or Pressed).

- Change Label – changes a label’s text with text that you enter manually or with text from a serial/telnet/TCP device’s return message (Feedback Result). A Change Label that uses a return message, must be added to a Feedback Bypass Condition (page 93). A Manual Change Label can be added anywhere in the Commands list. Adding it to a Condition guarantees the label changes only when the command initiates.
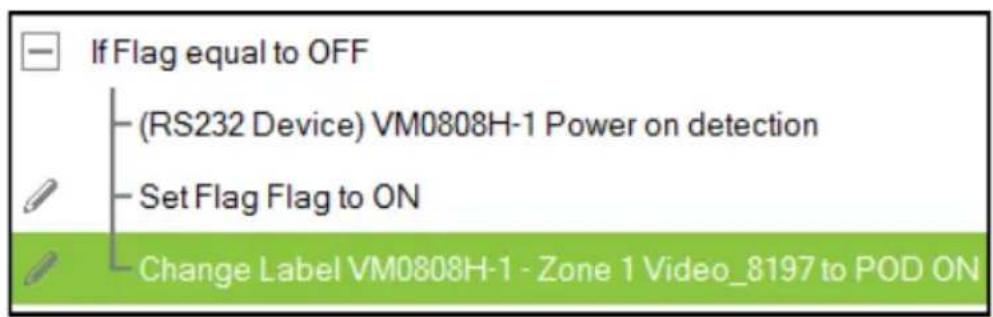
To add a Manual Change Label:
- Under Device, click Change Label.
-
In the Function list, select the viewer page where the label is located.
-
Double-click or drag and drop the viewer page to add the Change Label to the Commands list.
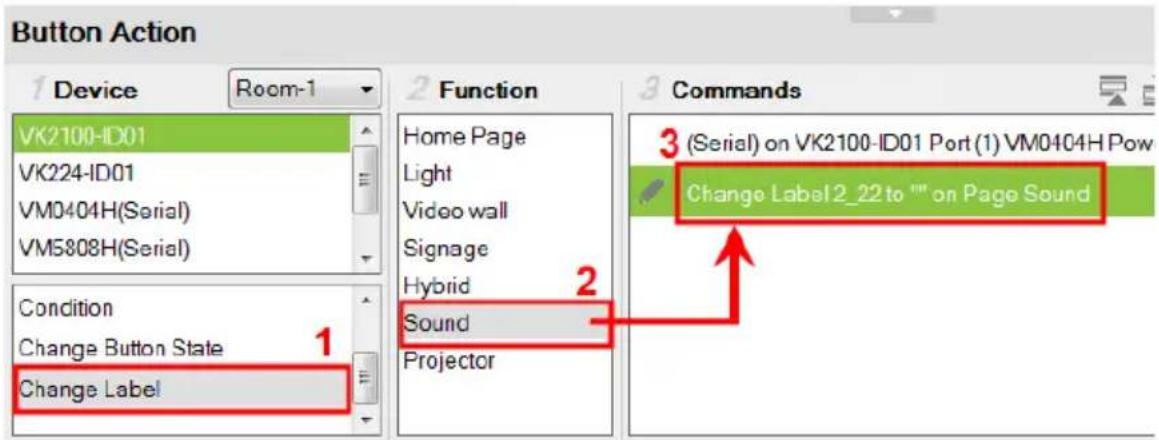
-
Add a Change Label to multiple or Toggle ON/Toggle OFF Command lists to have the same label change text for different actions.
-
In the Commands list, double-click Change Label to use the drop-down menu to select a Label and input the Text. This is the text in the label that will appear when the button is pushed.

Repeat the steps to add a Change Label for the reverse action (i.g., On and Off).
- Change Group Button State – adds a command that changes the selection in a Radio Group (see page 56). To use this function, first create a Radio Group and then add a button to the viewer page. Add a Change Group Button State independently or with a device command:
To add a Change Group Button State:
-
Under Device, select Change Group Button State.
-
From the Function list, select the Viewer Page where the Radio Group is located.
-
From the Function list, drag and drop the Viewer Page to add it to the Commands list:
(Continues on next page.)
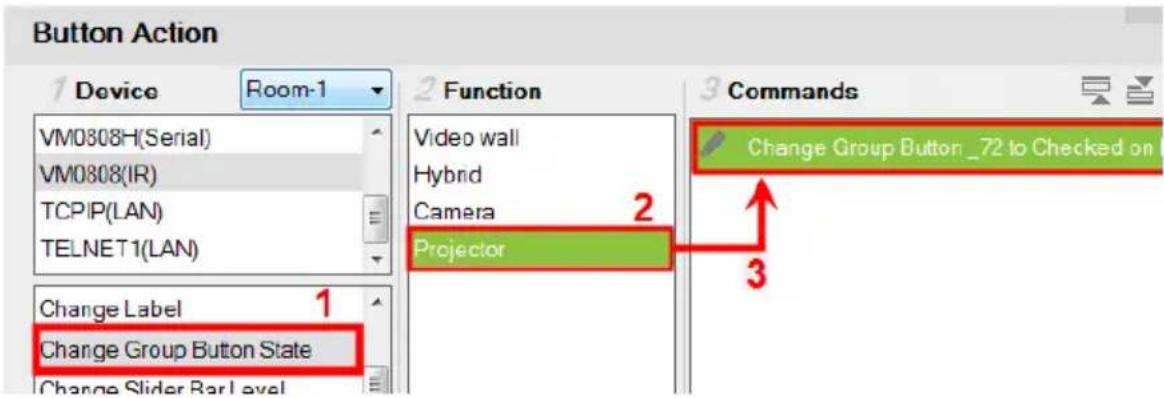
- Double-click Change Group Button in the Commands list and use the drop-down menu to select the Button.
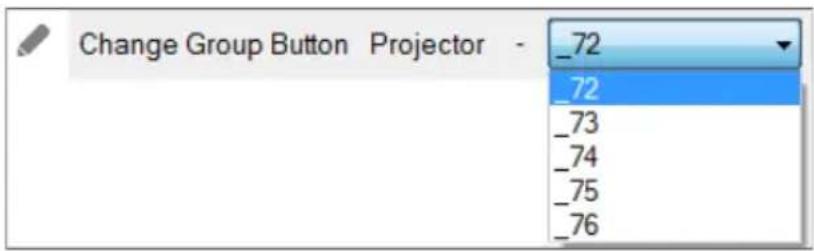
- Change Slider Bar Level – adds a command that changes the level of a Slider Bar. To use this function, first create a Slider Bar on a viewer page. Add a Change Slider Bar Level independently or with a device command:
To add a Change Slider Bar Level:
- Under Device, select Change Slider Bar Level.
- From the Function list, select the Viewer Page where the Slider Bar is located.
- From the Function list, drag and drop the Viewer Page to add it to the Commands list:
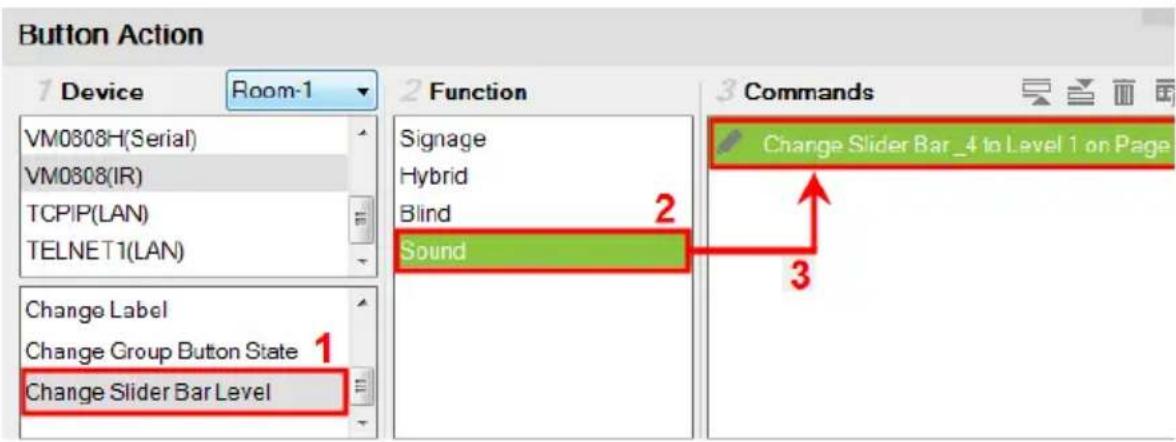
- Double-click Change Slider Bar in the Commands list and use the dropdown menus to select the Slider Bar and Level.

■ Image Properties
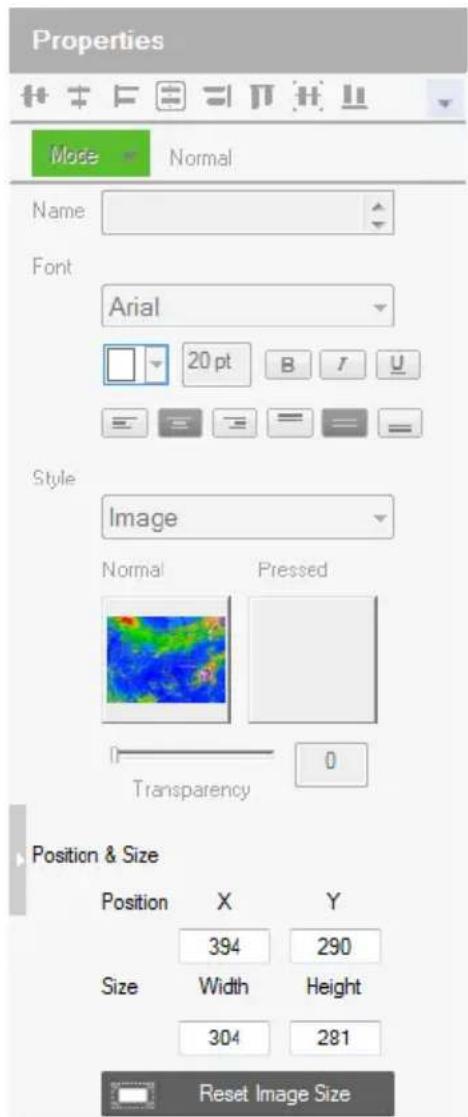
The Properties for an image provide options to change and import images to the page. Images can be layered with other objects so that they can be placed as a background or as highlights for buttons (see Layering Images, page 101). You can Group, Order, Align, Make Same Size or Space Evenly from the Object menu.
Style – shows the image selected. Click inside the box to import an image (*.png, *.jpg, *.jpeg, *.bmp) to the page.
- Transparency – enter a number (0-100) or use the slider-bar to set the transparency of the image selected.
- Position and Size – X and Y position the image at the coordinates entered. Width and Height set the size of the image.
- Reset Image Size – resets the image size.
Layering Images
Images can be layered with other objects, such as labels and buttons, so that they can be placed as a background or as highlight for the page and/or other objects.
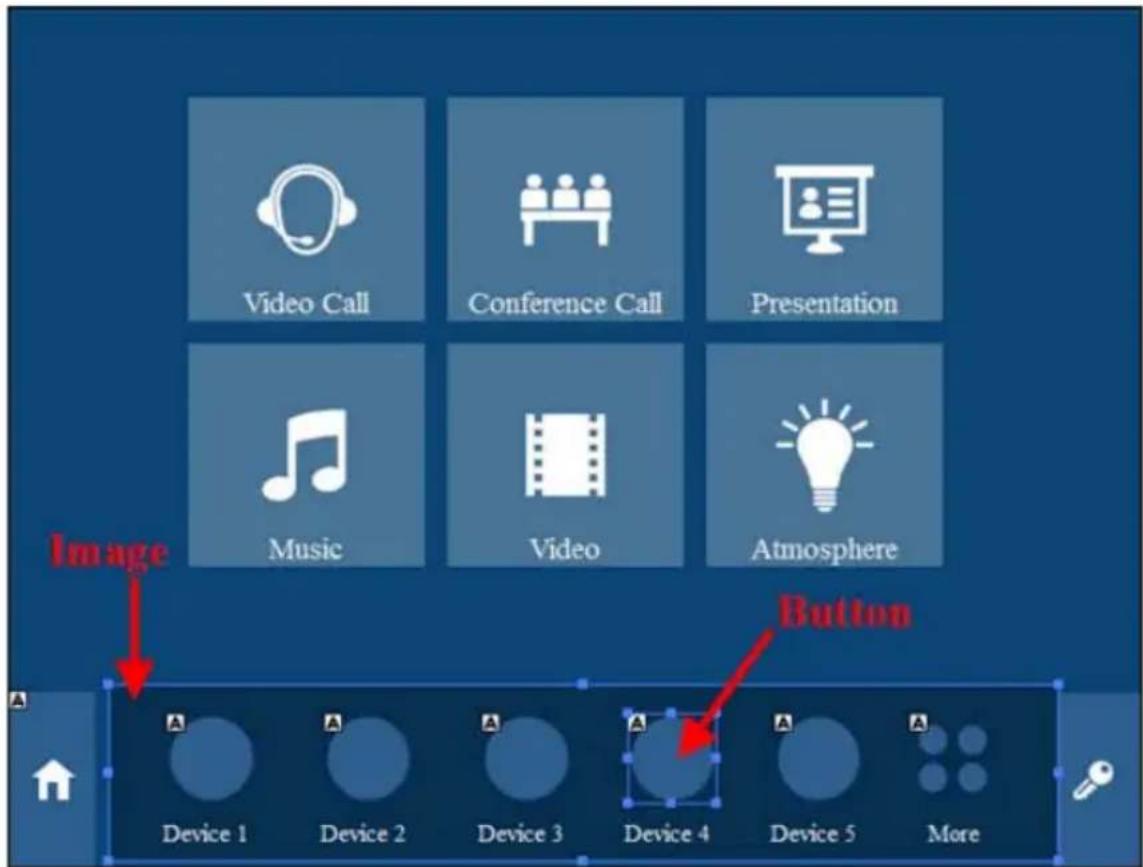

Graphic Library
The Library icon on the Project bar provides a Graphics tab and dropdown menus with ready-to-use graphics for backgrounds, buttons, icons and device interfaces. Device Interface provides entire page layouts that you can use as templates for different types of devices. Double-click or drag and drop graphics to add them to the page. Images can be imported for icons and buttons in various formats (*.png,*.jpg,*.jpeg,*.bmp).
Background Color
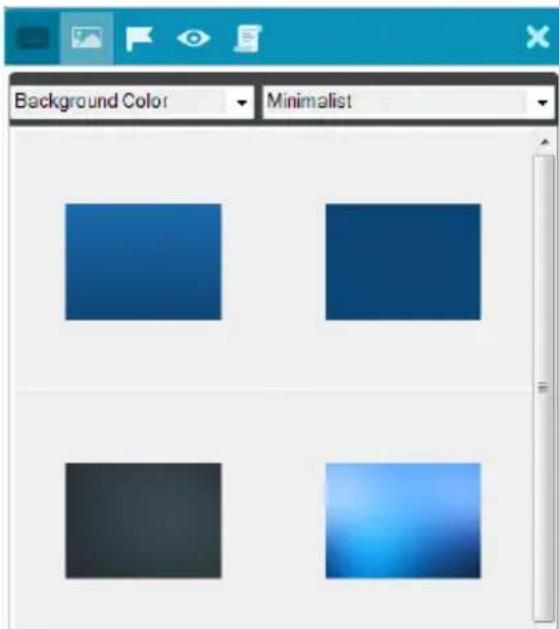
Button
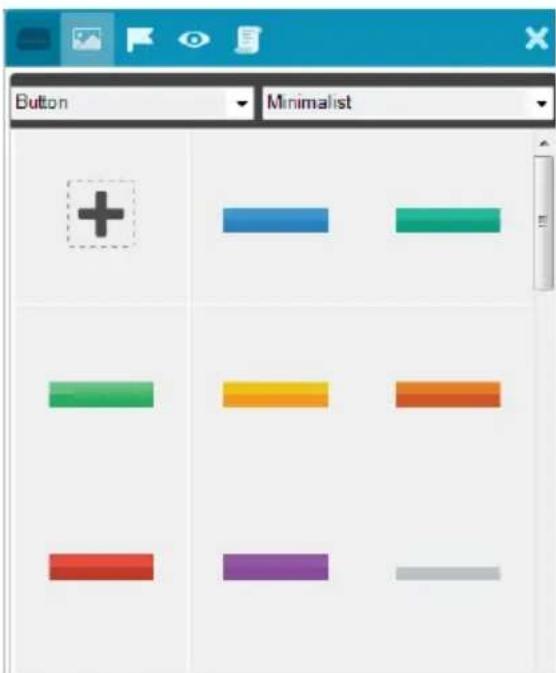
Icon
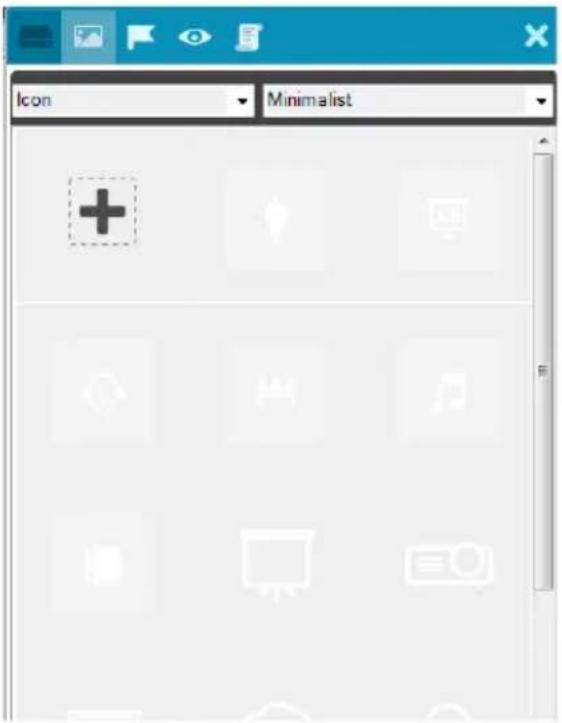
Device Interface
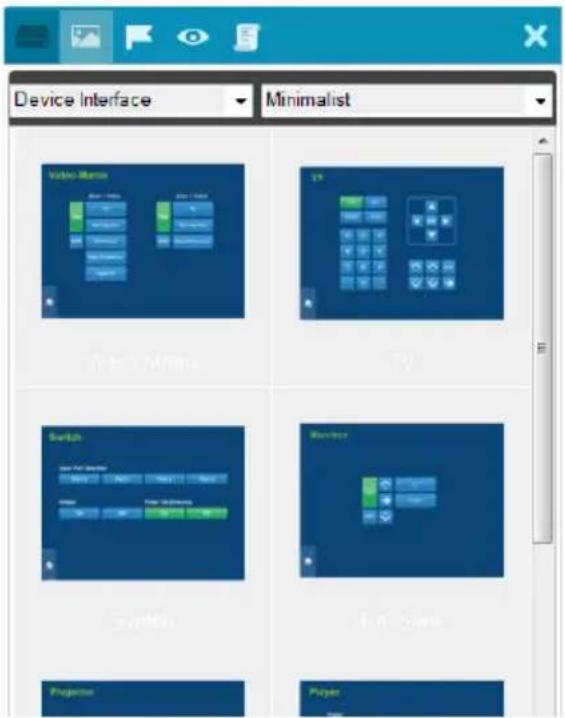
Advanced Library
The Library icon on the Project bar offers three Advanced Library tabs that provide settings to create a Flag to track settings, a Monitor for events or a Macro for buttons. The table below gives a brief description of each section and the pages that follow provide instructions to create a macro and Monitor.
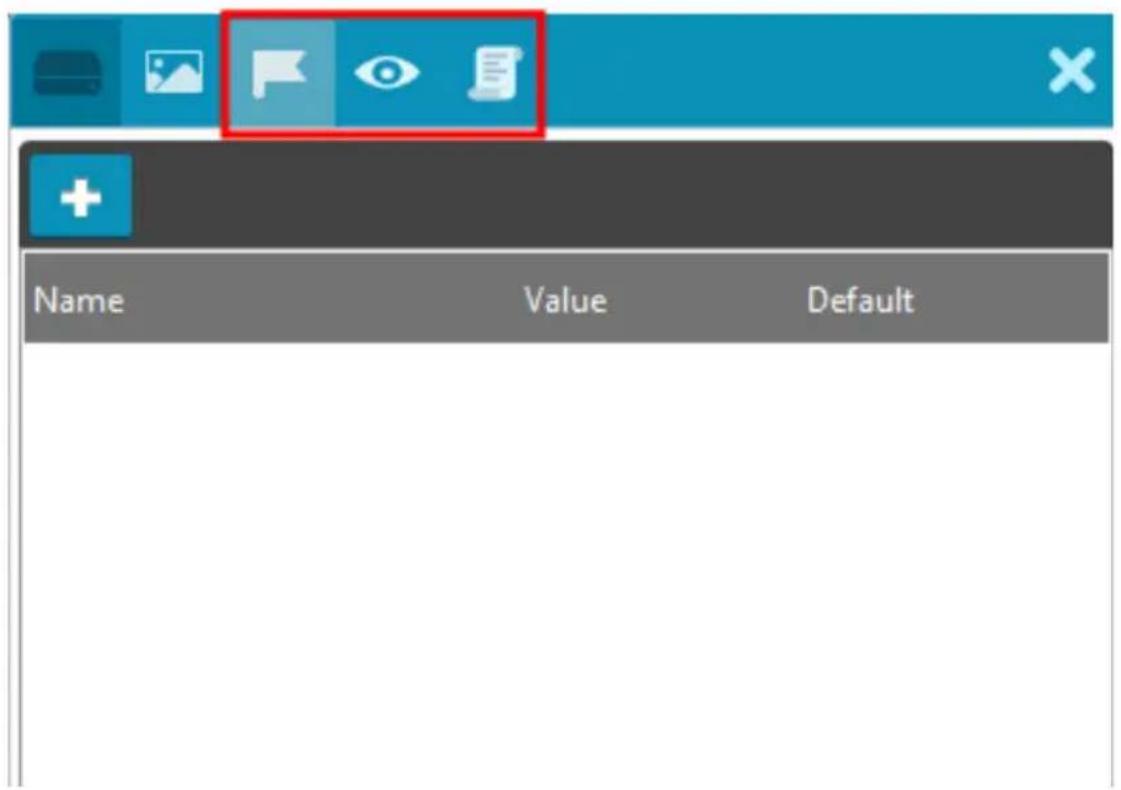
| Flag Flags are created to include parameters when settings are changed to indicate the current status. | |
| Monitor Monitors allow you to set Conditions for Digital Input (dry contact) and Digital Input (VDC) signals and Flags on a port that will initiate an Action. In addition, you can create Listen to port and Query port monitors which check a device's status to initiate actions. | |
| Macro Macros initiate a sequence of actions on one or more hardware devices. | |
| + | Opens a pop-up window to create a Flag, Monitor or Macro. |
| X | Closes the Library window. |

Flag
Flags are created for control buttons to include parameters for when settings are changed or requests are made to change settings on a device. Flags indicate what the status is and what action to take according to the value. Flags are added as actions to Button Properties as a Condition or Set Flag value.
Conditions tell a button to initiate associated actions if the flag value is true: "If Flag equals Value" initiate the action. Actions are associated with a condition so that they only initiate if the flag value is correct. That way an ON command is only sent to a device if the current flag value is OFF.
Set Flag changes the flag value when a device setting has changed. So that if a device is OFF and the action turns the device ON, adding a “Set Flag 1 to ON” will change the flag value to ON. Now the flag’s value matches the device status so that actions associated with flag Conditions will initiate accordingly.
Create flags for a device and add them as a Condition and Set Flag value in the Action – Button Properties (see Button / Slider Bar Action, page 84).
To create a Flag:
- Select Flag and click +.
- The New Flag menu appears:
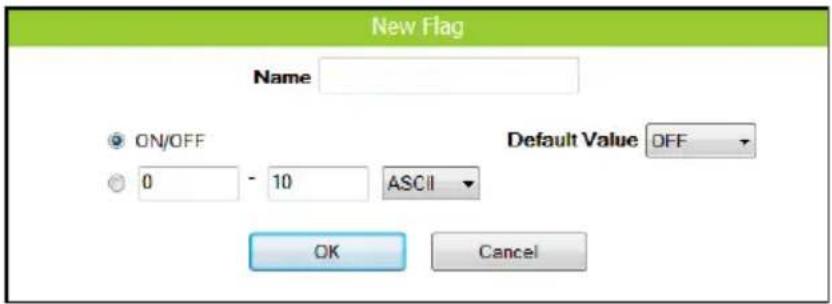
Enter a Name and select a radio button to set the flag value:
- Select On/Off and use the drop-down menu to select the Default Value.
- Enter a range (1-100) for the values in the two boxes and use the drop-down menu to select the Default Value. Use the drop-down menu to select the format ASCII or HEX.
- Click + to create more flags or double-click a flag to edit it. The flags will appear in the list, as shown below.
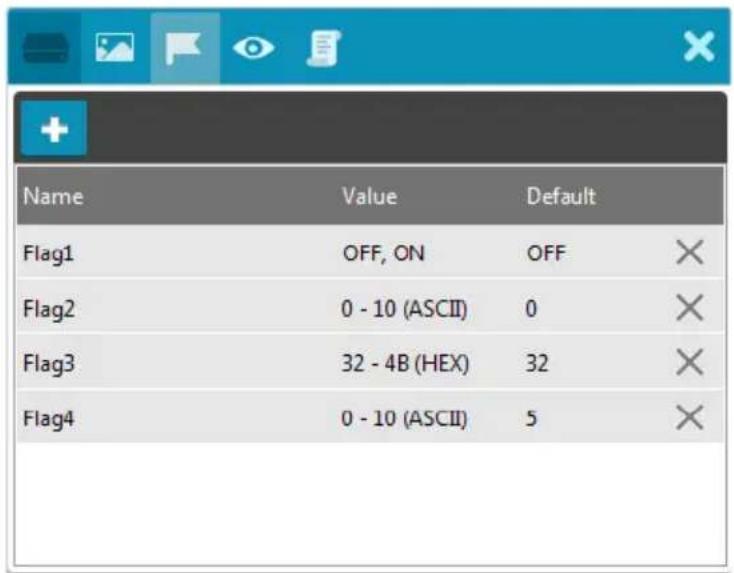
Name – Lists the Flag names which have been created.
Value – Lists the flag's values or range of values.
Default – Lists the flag's default value.
X – Deletes a flag from the list.
- Select Condition or Set Flag to add flags as a command in Button Action by selecting a button on a viewer page (see Button / Slider Bar Action, page 84).

Monitor
A Monitor allows you to set conditions on a port using Digital Input (VDC) and Digital Input (Dry Contact) signals, return messages, and Flags. When the condition is met, it will initiate the desired action. Digital Input (VDC) hardware devices provide voltage signals between 1 and 24. Digital Input (Dry Contact) hardware devices provide open and closed circuit signals. Hardware devices with return messages can be monitored using Listen to port or Query port conditions via text they transmit. These signals provide indicators from sensors or switches of an event. An event can be the temperature, power, dry contact, sensor, switch status, or message from a device. There are two parts to a monitor, the Condition and Action.
Condition & Action Overview
A monitor simply watches a port for a signal or message and when that message or signal is received – the condition is met and an action initiates. The Condition is where things seems to get complicated but if you keep in mind that the monitor is simply watching for a particular message or signal which is the Condition set by you, then creating a monitor to initiate an action is a breeze. Below is an summary of the steps needed to create a monitor.
To create a monitor, add the Condition and Action:
- Under Device, select a monitor.
- Under Status, add a device port to the Condition List.
- Double-click the device port in the Condition List to configure the condition settings.
- Add a device action that initiates when the condition is met.
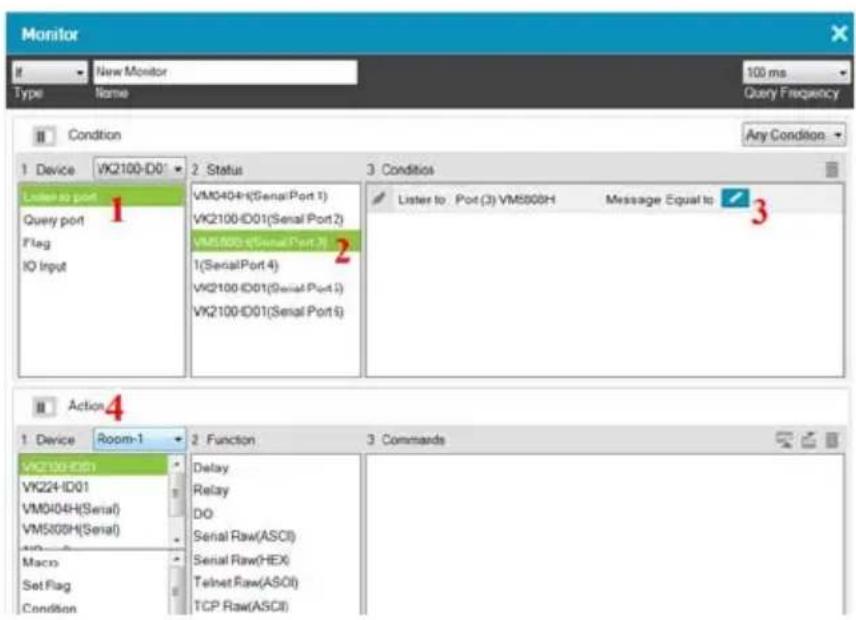
The table below provides a description of the Monitor page options.
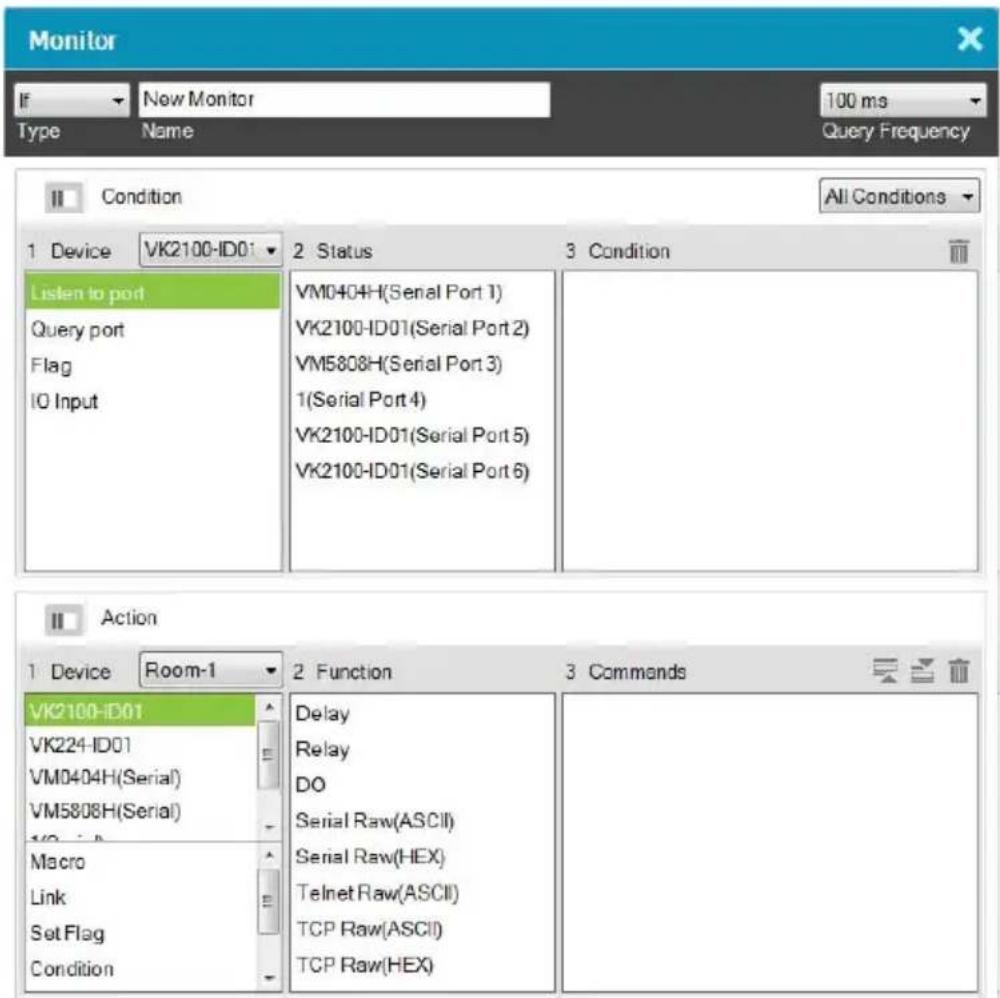
| Type Use this drop-down menu to select:If – select this option for a single condition monitor. “If” the single condition is met, the action initiates.Switch – select this option for multiple conditions that use more than one “If” conditions for the monitor. In this type, if one of the conditions is met, the monitor will initiate the action. | |
| Name Enter a unique name for the monitor. | |
| Query Frequency Use this drop-down menu to select how frequently the monitor checks a device for a signal. Options are: 100 ms - 1 second. | |
| Condition This sect on is for adding the condition that will need to be met for the Action to initiate. To add a condition:1. Select a monitor under Device.2. Add a device port under Status to the Condition List.3. Configure the condition settings by double-clicking the device port in the Condition List.Use the Type drop-down menu to select from two condition types: If or Switch. Both are configured similarly, but with Switch you can add multiple comparison conditions called Cases, each of which can initiate the Action. | |
| Action Use this section to create the commands that will initiate when the monitor's condition is met. See Button / Slider Bar Action, page 84, for details on configuring commands. | |
 | Click this icon to switch the Condition and Action list view so that you can see a complete row of the commands functions. This is a toggle button. |
| [XST2] | Closes the Monitor window. |
To create a monitor for a device port with a Condition that initiates an Action, click + from the Library's Monitor tab, and do the following:
To create an IF Monitor:
- Select IF from the drop-down menu and enter a name for the monitor.
- Use the drop-down menu to set the Query Frequency.
- Use the All Conditions / Any Conditions drop-down menu to select:
These options are only for advanced setups that require multiple events from hardware devices connected to multiple conditions. Most devices only require one signal Status added to the Condition List to initiate an Action. Most installations will not need to use this option, therefore it can be ignored.
All Conditions: Add multiple conditions – all of which must be met for the Action to initiate.
Any Conditions: Add multiple conditions – one of which must be met for the Action to initiate.
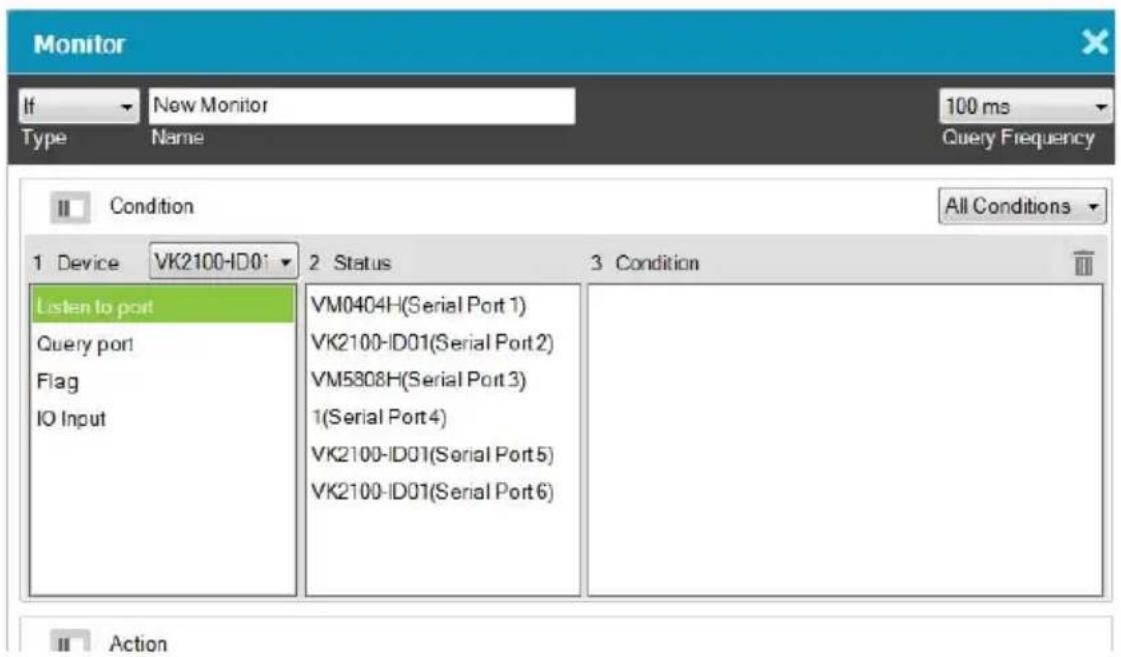
- Under Device, select a Controller from the drop-down menu, and then choose one of the following monitor types
Listen to port – to create a monitor that actively listens for a message from the device. Under Status, double-click a device port to add it to the Condition list.
Query port – to create a monitor that sends out a command to the device until a feedback message is received from the device.
Flag – to create a flag condition for the monitor.
IO Input - to create a trigger signal from a device according to the voltage.
- Under Status, double-click to add a device port or flag to the Condition list. Then double click the device port or flag in the Condition list to configure the condition settings. Each is explained below:
■ Listen to port / Query port
(Query port only) Click F(x) to open the drop-down menu to select a device command to send out; or enter a command string; and then the click Edit Return Message icon and do as explained below.
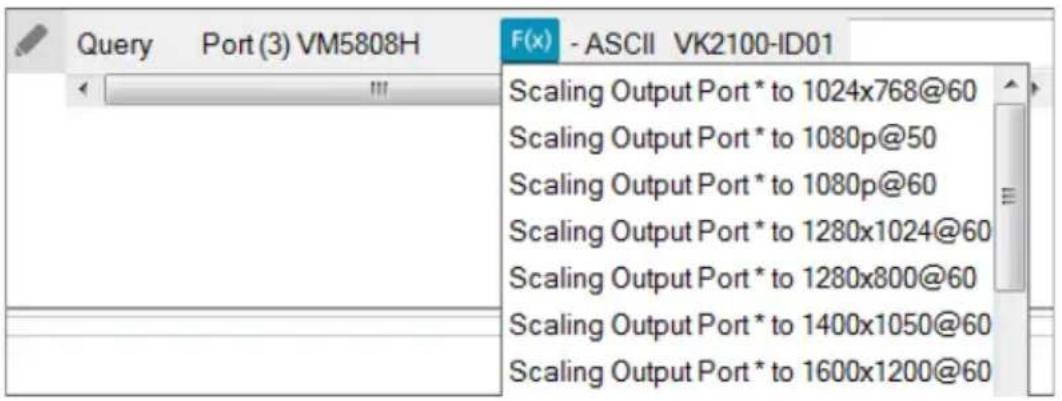
Edit Return Message
(Listen to port / Query port) Next configure the parameters for the return message from the device. This message must match for the condition to be met. In the Condition list double-click the command and then click to open the Edit Return Message window:
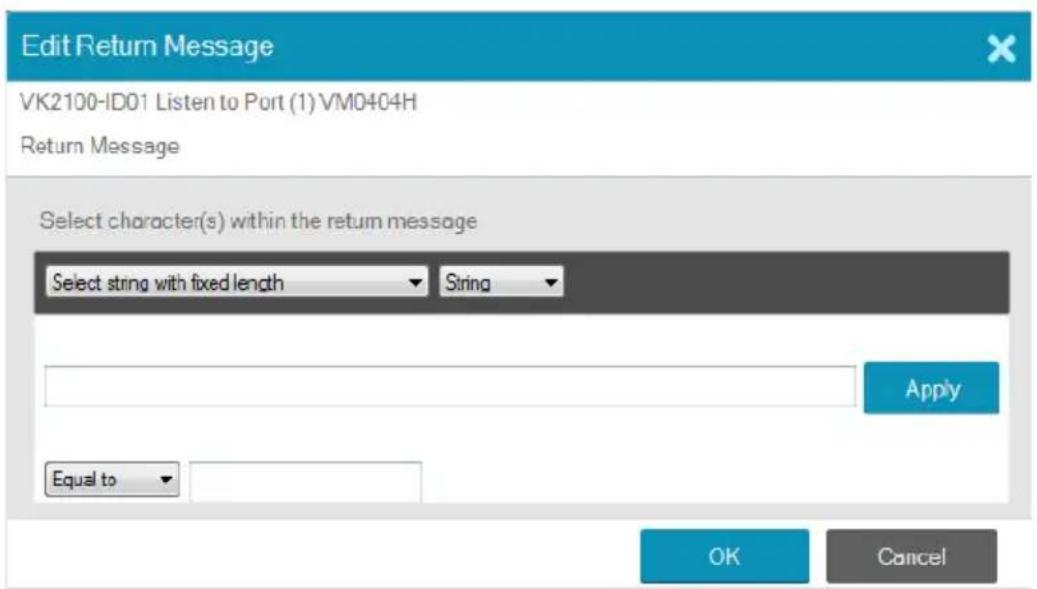
Use the drop-down menu and enter a string of that will represent the characters in a return message from the serial device:
- Select string with fixed length

Use this to set a string of characters that are set within a fixed parameter. Enter a string of characters and use the S to set the start of the string and E to set the end and then click Apply. The return message will need to fit the fixed string of characters set in the text box next to the Drop-Down Menu (see next page) for the monitor to be triggered.
- Select string with a non-fixed length

Use this to set a string of characters where the parameters are variable. Enter a string of characters and use the S to set the start of the string and E to set the end and then click Apply. The return message will need to fit the fixed string of characters set in the text box next to the Drop-Down Menu (see below) for the monitor to be triggered.
- Drop-Down Menu
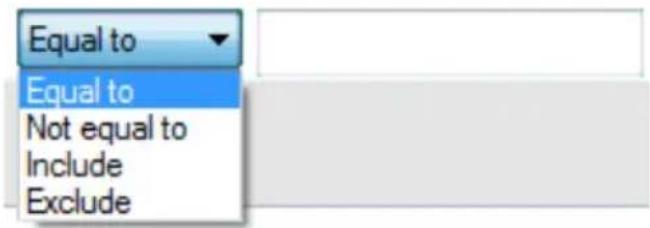
Above, enter characters that the Select string with fixed length or Select string with non-fixed length string must match and how they must be matched: Equal to, Not equal to, Include, or Exclude for the condition to be triggered.
Flag
Creates a flag condition for the monitor. Use the drop-down menus to set a format (how the flag value must be matched) and the flag value for the condition to be triggered.

■ IO Input
Create a trigger signal from a device according to the voltage. Only device with a Digital Input (dry contract) or Digital Input (VDC) port appear in the Status list. Double-click a device in the Status list to add it to the Condition list. Double-click the command in the Condition list to configure the setting:

The High or Low status tells the Monitor to initiate an Action when the device signal is above or below the threshold setting* for the port:
Digital Input (VDC)
- High - states that when the voltage signal is above the Upper Threshold to initiate the Action.
- Low - states that when the voltage signal is below the Lower Threshold to initiate the Action.
Digital Input (Dry Contact)
According to an open or closed circuit status for the port:
- Open - states that when the circuit is Open to initiate the Action.
- Closed - states that when the circuit is Closed to initiate the Action.
Note: To configure Upper and Lower thresholds see I/O, page 65.
- (Optional) Use the Operator option to add additional High or Low conditions (see step 4, page 110).
- Go to the Action section at the bottom of the page to select the hardware Device and add the Function to the Commands list, as explain in the steps that follow.
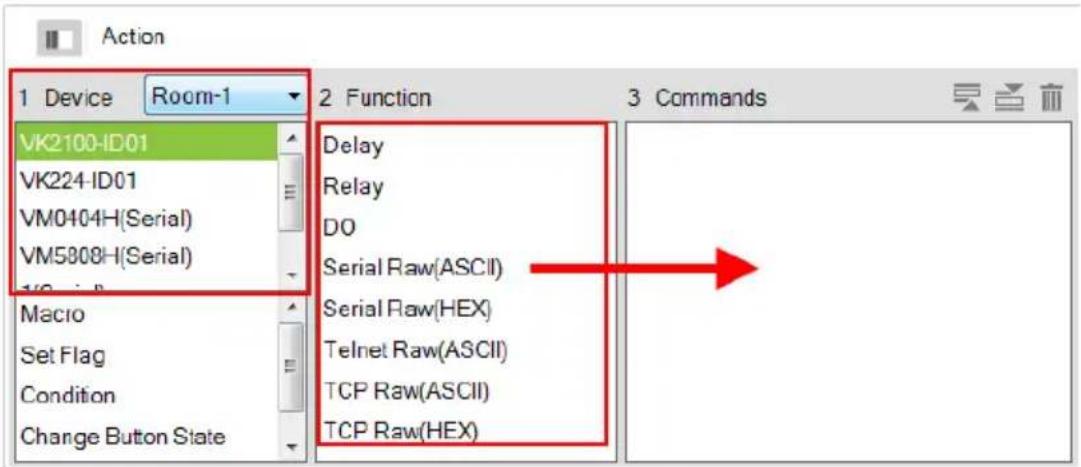
Note: For more information on Functions, see Button / Slider Bar Action, page 84.
- First select the hardware under Devices.
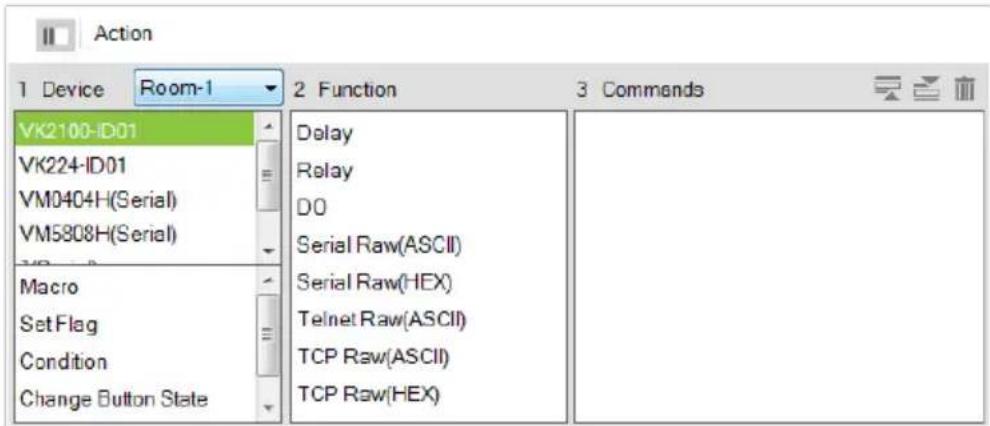
If you select a VK2100, you can add special commands:
Delay - adds a delay in seconds. Enter a number between 0.1-180.
Relay – adds an Open, Close, Toggle or Pulse action on the selected controller and Relay port.
D/O – adds an Open, Close, Toggle or Pulse action on the selected controller and Digital Output port.
Serial Raw (ASCII) – adds a serial command string that is entered for the port selected in ASCII mode.
Serial Raw (HEX) – adds a serial command string that is entered for the port selected in HEX mode.
Telnet Raw (ASCII) – adds a telnet command string that is entered for the device selected in ASCII mode.
TCP Raw (ASCII) – adds a TCP command string that is entered for the port selected in ASCII mode.
TCP Raw (HEX) – adds a TCP command string that is entered for the port selected in HEX mode.
- Under Function, double-click a command to add it to the Commands list.
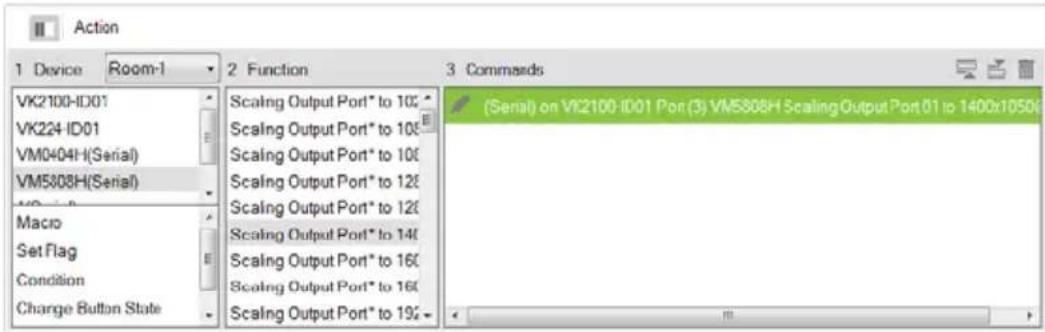
This is the Command that initiates when the Condition is met.
-
You can also add a Macro, Link, Set Flag or Monitor's Condition.
-
After adding all the functions to the Commands list, the IF monitor is complete.
To create a Switch Monitor:
- Select Switch from the drop-down menu and enter a name for the monitor.
- Use the drop-down menu to set the Query Frequency.
- Use the options to create multiple condition comparisons, as explained below.
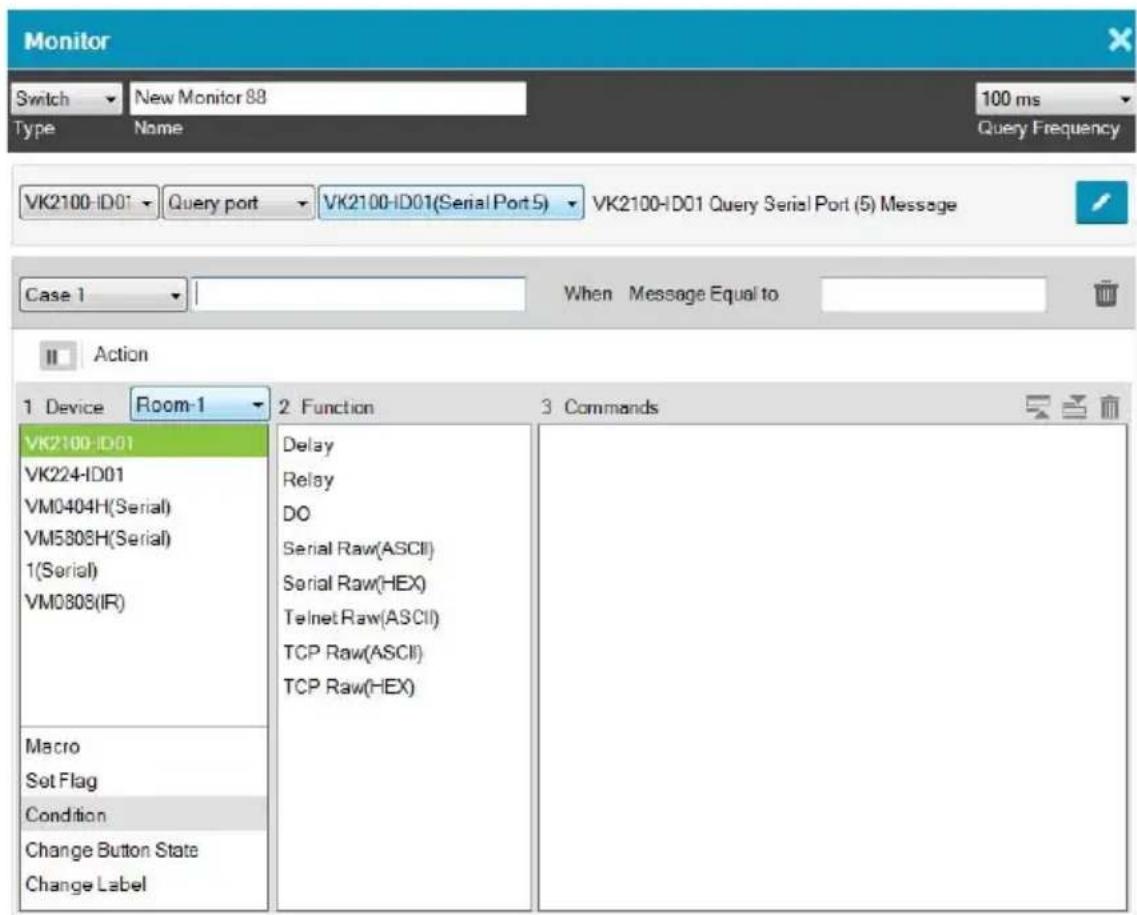
| Type Use the drop-down menu to select: | |
| If – select this option for a single condition comparison monitor.Switch – select this option for multi-condition comparisons that use multiple “If” comparisons for the command. | |
| Name Enter a unique name for the monitor. | |
| Query Frequency Use this drop-down menu to select how frequently the monitor checks a device for a signal. Options are: 100 ms - 1 second. | |
| Drop-Down Menus | Under the Type drop-down menu are four addition drop-down menus used to configure the Switch Condition:◆Controller– use the first drop-down to menu select the controller for a Switch condition.◆Listen to port / Query port– use the second drop-down menu to select the condition type for a Switch condition (see step 4, page 110 for details).◆Serial Device Port– use the third drop-down menu to select a serial device port and configure Edit Return Message (to configure, see Edit Return Message, page 111).◆Case– use the fourth drop-down menu to add cases by selecting Add More Cases for comparison that need to be met before monitor's condition will initiate. In the left text box enter a name for the Case, in the right text box enter the character string that the return message should match. |
| Action | Use this section to create commands for the monitor. See Button /Slider Bar Action, page 84, for details on configuring commands. |
| Click this icon to switch to the Action list view so that you can see a complete row of the command's functions. This is a toggle button. | |
| X | Closes the Monitor window. |
- Go to the Action section at the bottom of the page to select the hardware Device and add the Function to the Commands list, as explain in the steps that follow.
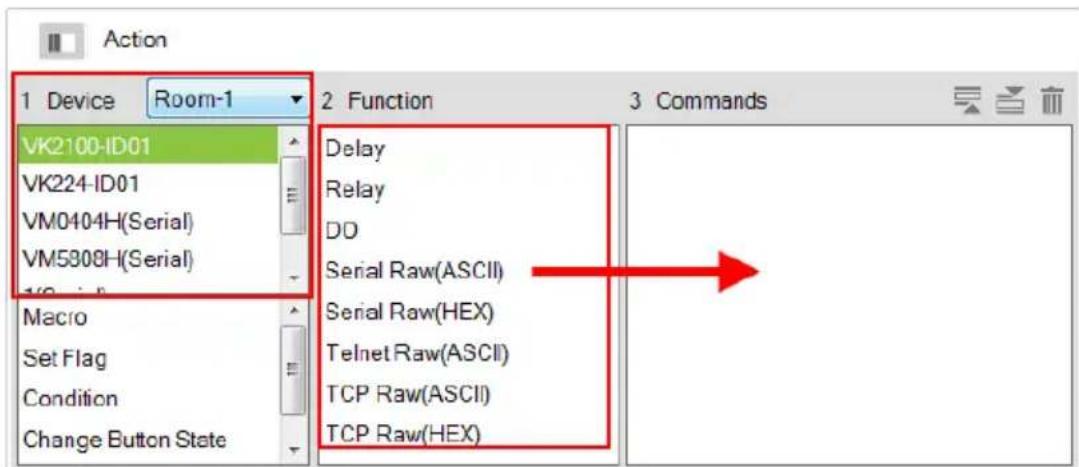
Note: For more information on Functions, see Button / Slider Bar Action, page 84.
- First select the hardware under Devices.
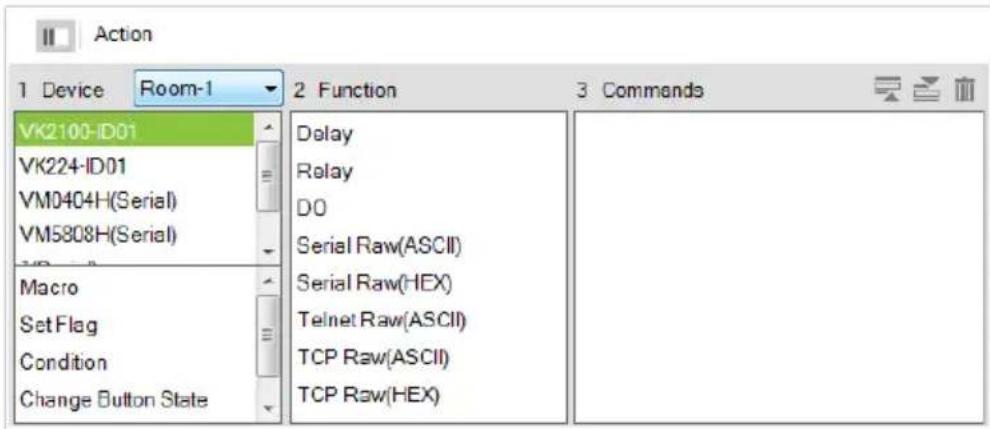
If you select a VK2100, you can add special commands:
Delay - adds a delay in seconds. Enter a number between 0.1-180.
Relay – adds an Open, Close, Toggle or Pulse action on the selected controller and Relay port.
D/O – adds an Open, Close, Toggle or Pulse action on the selected controller and Digital Output port.
Serial Raw (ASCII) – adds a serial command string that is entered for the port selected in ASCII mode.
Serial Raw (HEX) – adds a serial command string that is entered for the port selected in HEX mode.
Telnet Raw (ASCII) – adds a telnet command string that is entered for the device selected in ASCII mode.
TCP Raw (ASCII) – adds a TCP command string that is entered for the port selected in ASCII mode.
TCP Raw (HEX) – adds a TCP command string that is entered for the port selected in HEX mode.
- Under Function, double-click a command to add it to the Commands list.
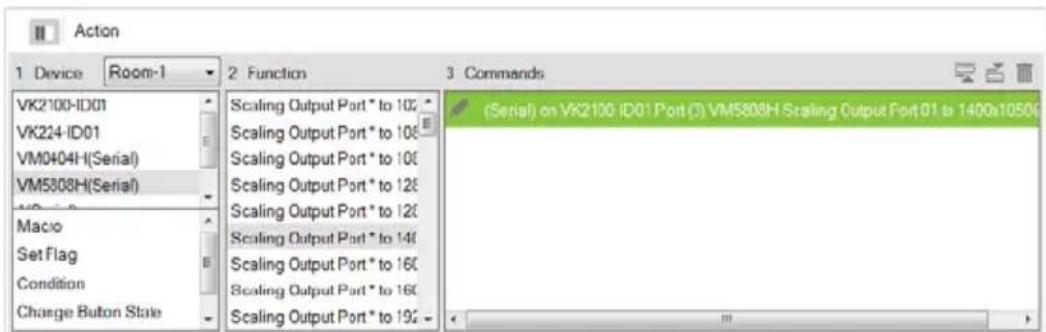
This is the Command that initiates when the Condition is met.
- You can also add a Macro, Link, Set Flag or Monitor's Condition.
- After adding all the functions to the Commands list, the Switch monitor is complete.

Macro
Macros allow you to create a button that will initiate a sequence of actions across the same or different hardware devices. This saves time by allowing multiple devices to initiate actions all at once from one button. For example, you can create a macro to start a video presentation by adding functions to: dim lights, power on source, power on display, lower screen and play source. You can also add time delays between actions in a macro.
When you click + from the Library's Macro tab, the window opens:
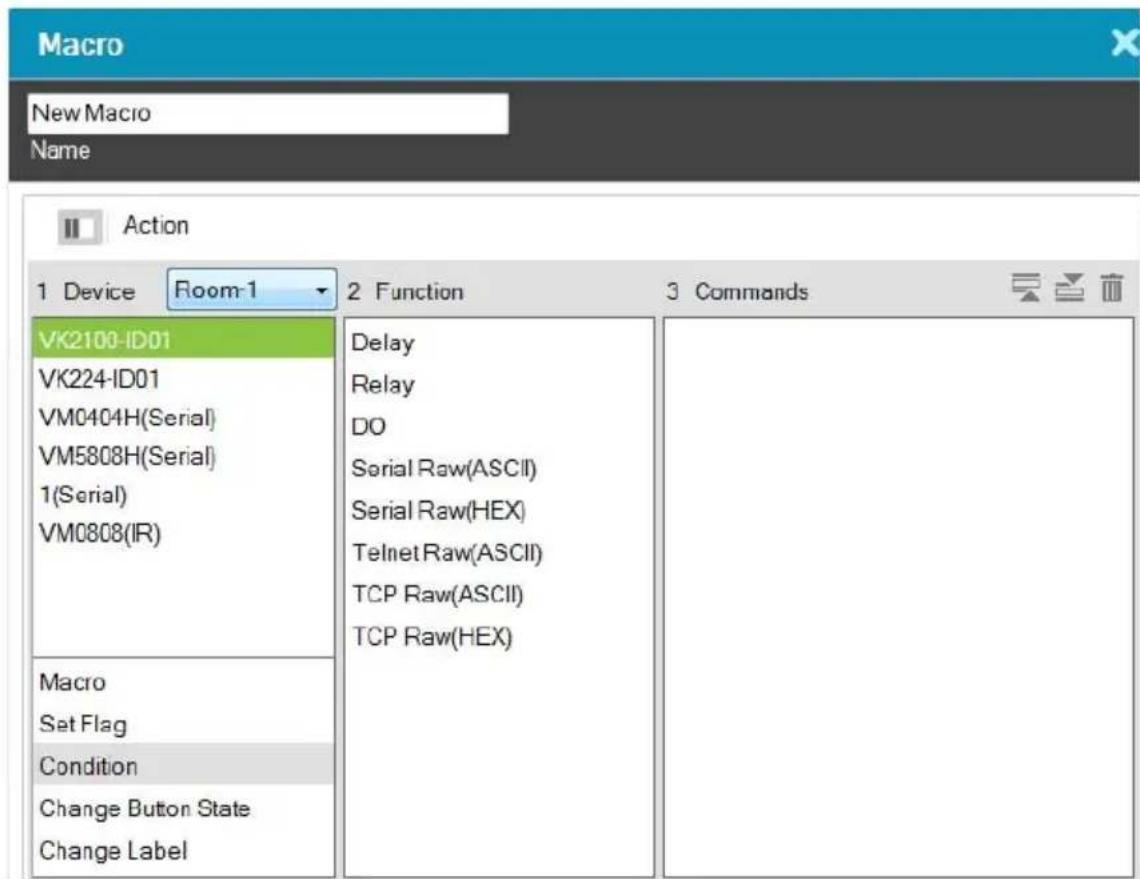
To create a macro:
- Select Macro and click +.
- Enter a Name and select a Viewer from the drop-down menu, then click OK.
- Go to the Actions section at the bottom of the page to select hardware under Device and add the Function to the Commands list:
(Continues on next page.)
(Continued from previous page.)
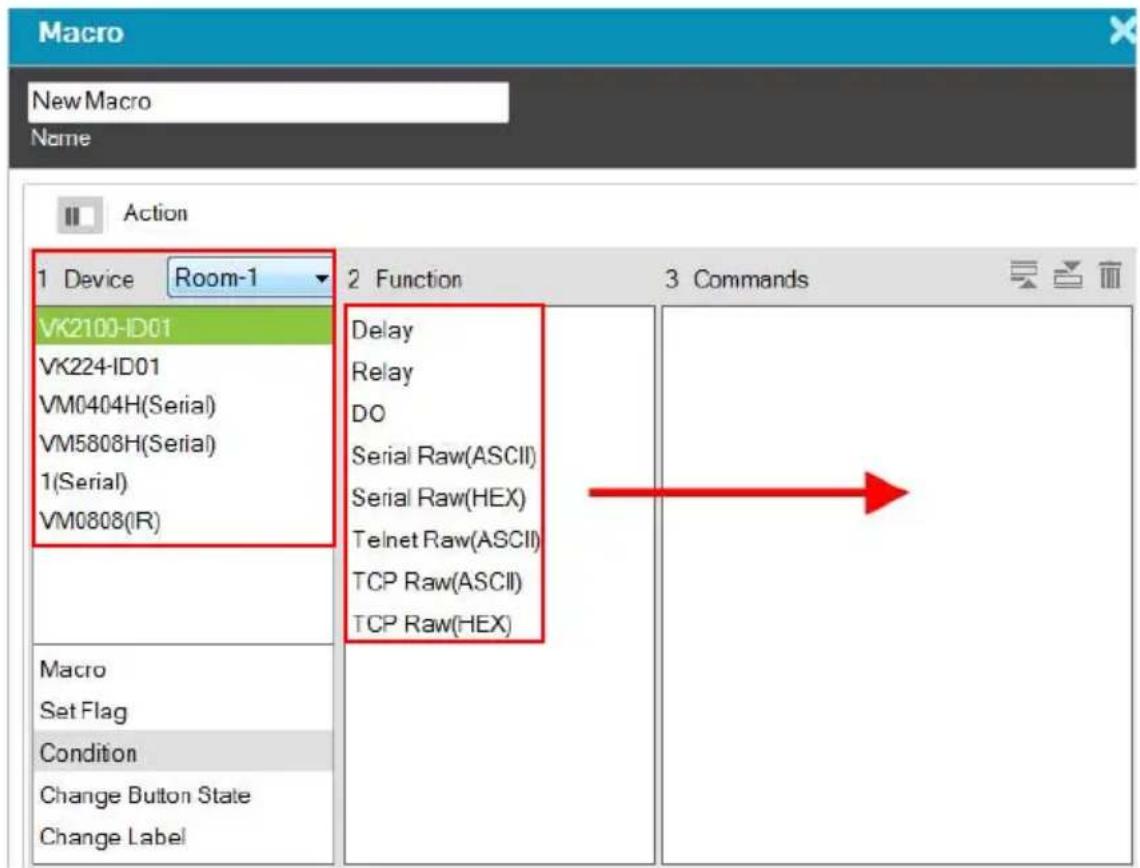
Note: For more information on adding Functions, see Button / Slider Bar Action, page 84.
- After adding all the functions to the Commands list, the macro is complete.
- In Create Viewer & Design, create a button and add a macro to the Button Action properties (see page 84) by selecting Macro under Devices (see Adding Commands, page 86 for details).
Upload
The Upload page lets you search for Control Boxes and upload the Viewers. Viewers created for each Control Box will be listed below the Controller. The Room selected for a viewer's buttons determines which Control Box it uploads to – based on both having the same room number.
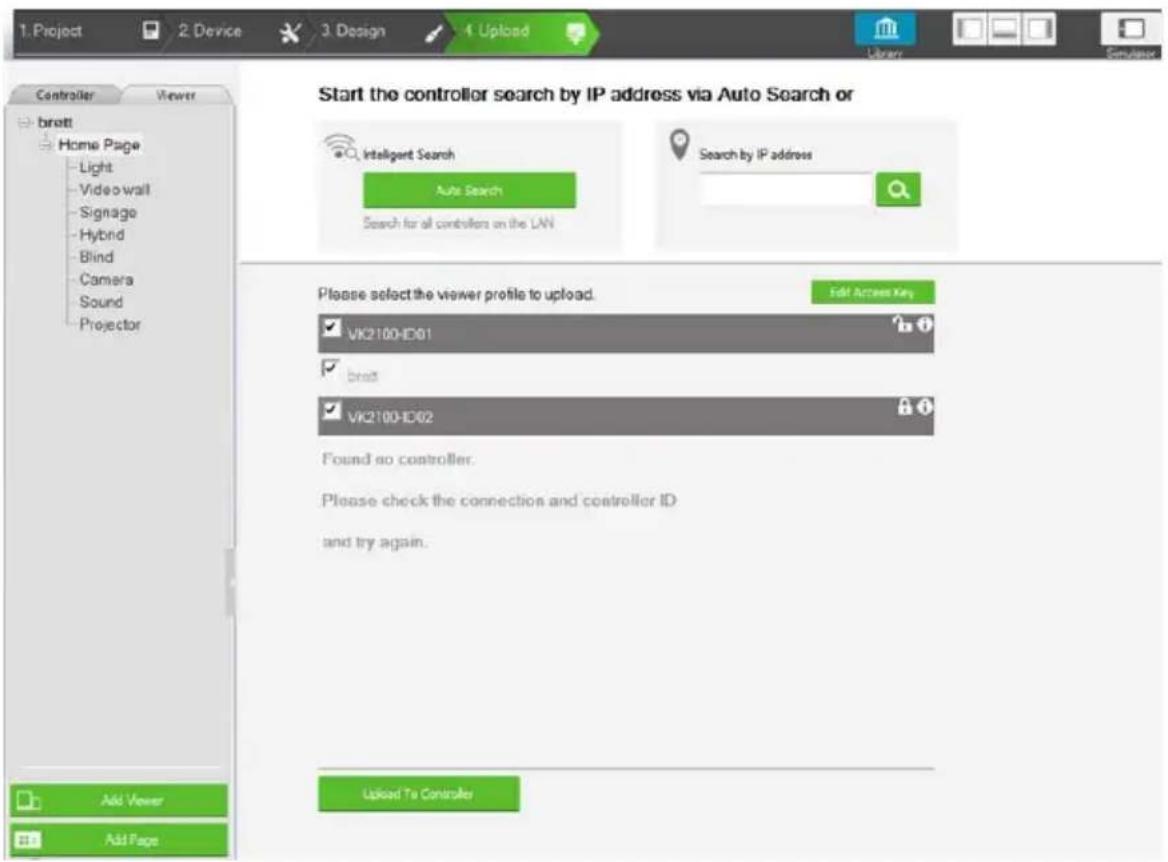
If a Control Box cannot be found, check the Controller ID Switch on the rear of the Control Box – it should match the ID # (VK2100-ID01) set in the ATEN Configurator software.
| Search by IP address | Enter the IP address and click Search to locate a Control Box. |
| Auto Search Click to | locate Control Boxes without specifying an IP address.This option only searches for Control Boxes on the same local area network. For Control Boxes across a network device, such as a router or switch, you must specify the IP address. |
Edit Access Key All | lows you to change the password required to upload viewers to the Control Box and download viewers from a mobile device.These icons can be clicked to enable or disable the Access Key:Locked: The Access Key is required to upload viewers to the Control Box and download viewers from a mobile device.Unlocked: The Access Key is not required to upload viewers to the Control Box and download viewers from a mobile device.Note: If you attempt to change the lock status and the Access Key has been changed from the Dashboard, a window will pop-up and you will need to enter the new Access Key. |
 | If the Access Key has been changed on the Control Box via the Dashboard, the lock icon will appear with an X, indicating you need to enter the new Access Key to change the Locked/Unlocked status. |
 | Click to view information about the Control Box:IP Address: Displays the IP address.MAC Address: Displays the MAC address.License: Displays the number of licenses available and in use.Select License: Allows you to load a new license file.Reset License: Resets all license(s) in use by mobile devices. This will disconnect all mobile device connections to the Control Box.Firmware Version: Displays the firmware version.Select Firmware: Allows you to load a firmware upgrade file to update the firmware.Capacity: Displays the amount of space available for uploading viewers.Viewers: Lists the viewers currently stored on the Control Box.Remove Viewer: Click the trash can icon to remove the viewer stored on the Control Box. |
| Upload to Controller | When Control Boxes are found, this option allows you to select Controller(s) to upload viewer(s). Once a selection is made, click Upload to Controller. |
This Page Intentionally Left Blank
ATEN Database Generator
Overview
The ATEN Database Generator lets you add, edit and manage hardware devices for My Device Library. To open the Database Generator from the ATEN Configurator, use the menu bar to select Tools → Database Generator. The first time the application is opened, a window appears with four options:
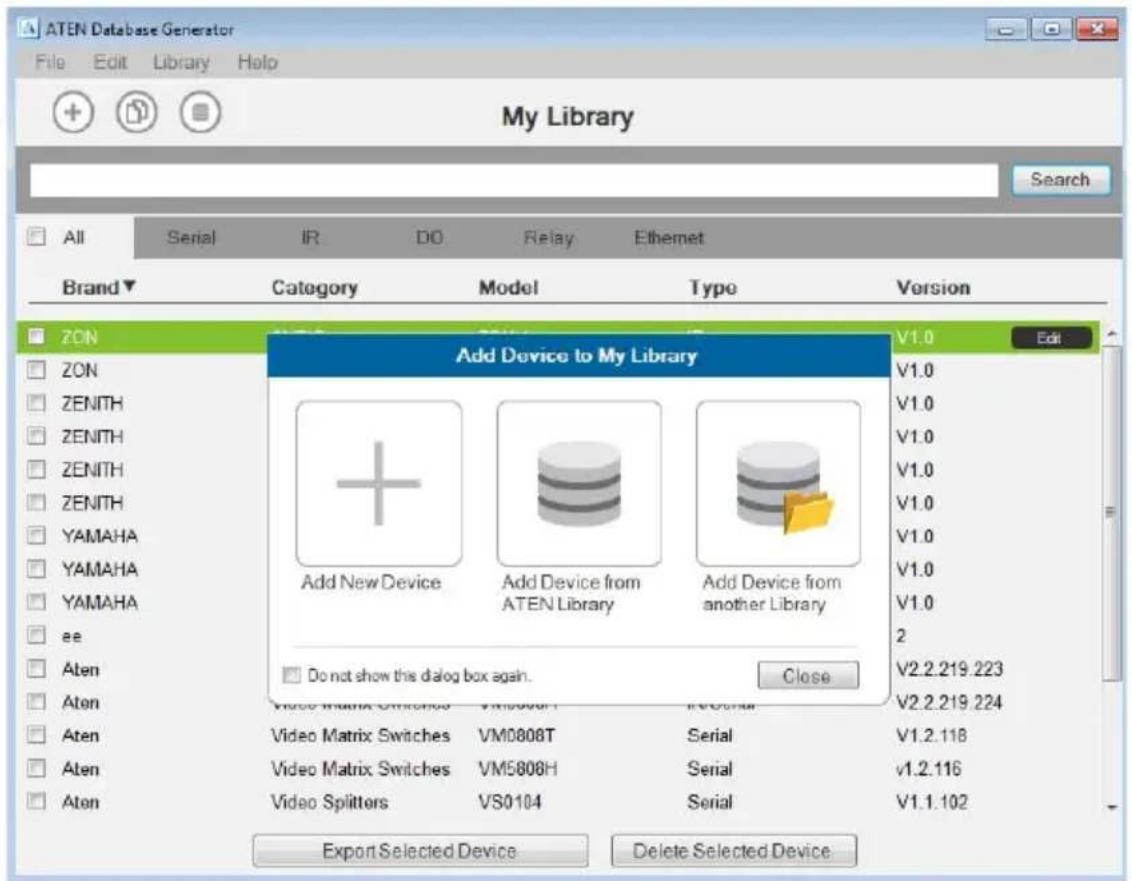
| Add New Device Configure a custom hardware device to add to My Library. | |
| Add Device from ATEN Library | Add devices from the ATEN Device Library to My Library. |
| Add Device from another Library | Add devices from a database file (*.vkd) to My Library. |
| Check Box | Click Do not show this dialog again to prevent the dialog from appearing when the Database Generator is opened. Use the Preferences menu option to bring the dialog window back. |
| Close Click the Close button to exit the dialog window. | |
My Library
My Library allows you to create custom hardware devices which can be selected to configure ports on the VK1100 and VK2100. My Library lists all the hardware devices that you have created, added and edited using the Database Generator. You can create new hardware devices and/or add existing devices from the ATEN Library (page 141). These devices can then be selected from My Device Library (page 63) for use.
![ATEN Database Generator File Edit Library Help My Library Search All Serial IR DO Relay Ethernet Brand ▲ Category Model Type Version ACME CABLE 56 Ethernet V1.0 ACME BD utkijld IR/Serial 546 ACME Converters ZAC SERIES-Copy IR/Serial/IO/RELAY V1.0 Aten Video Matrix Switches VM0808H IR/Serial V2.2.219.223 Aten Video Matrix Switches VM0808H IR/Serial V2.2.219.224 Aten Video Matrix Switches VM0808T Serial V1.2.118 Edit Aten Video Matrix Switches VM5808H Serial v1.2.116 Aten Video Splitters VS0104 Serial V1.1.102 Aten Video Splitters VS0108 Serial V1.1.102 Aten Video Switches VS0108HA Serial V1.0.068 at aa 1 Serial 2 YAMAHA AUDIO AX-497 IR V1.0 YAMAHA AUDIO AX-596 IR V1.0 YAMAHA TV DPX-1000[ID1] IR V1.0 ZENITH TV B25A74R IR V1.0 Export Selected Device Delete Selected Device](/content/2026/05/817651/images/02091a374ea9bfd872799fd70c78bb6b7903c1e2ab1dab8fb2d505f70c89e2a6.jpg)
Menu Description
File The File menu
provides options to:
- Add New Device: Configure a custom hardware device to add to Device Library.
- Add Device from ATEN Library: Add devices from the ATEN Device Library to My Library.
- Add Device from another Library: Add devices from a database file (*.vkd) to My Library.
- Export My Library: Saves My Library as a database file (*.vkd) that can be imported later.
- Export Selected Device: Saves the selected device(s) as a database file (*.vkd) that can be imported later.
◆ Controller Connection: Searches for a Control Box to test the connection or run the learning mode for the IR port. - Quit: Exits the program.
| Menu Description | |
| Edit The Edit menu | provides options to:◆ Delete: Deletes the selected devices from the database.◆ Duplicate: Makes a copy of the selected device(s) and adds them to the library with the extension “-Copy”◆ Preferences: Provides options to:◆ Set the Language◆ Show Add Device dialog on startup◆ Show IR Learning tips◆ Set the IR Learning Timeout - how long to attempt a connection to an IR device before IR learning stops. |
| Library Provides a list of the Libraries that you can open to select devices from and edit or add to My Library. The libraries that are listed here appear when you select a database using Add Device from another Library. | |
| Help The Help menu | provides two options:◆ Update ATEN Library: Allows you to browse for a database file (*.vdk) to import devices into the ATEN library.◆ About: Provides support and software version information. |
Managing My Library
When devices are added to My Library, they appear listed in the main window. New devices can be added by creating a new device, copying an existing device or by selecting a device from the ATEN Library. Use the check boxes to select individual devices or All to select the entire list.
![My Library Search All Serial IR DO Relay Ethernet Brand ▲ Category Model Type Version ACME CABLE 56 Ethernet V1.0 Edit ACME Converters ZAC SERIES-Copy IR/Serial/IO/RELAY V1.0 Aten Video Matrix Switches VM0808H IR/Serial V2.2.219.223 Aten Video Matrix Switches VM0808H IR/Serial V2.2.219.224 Aten Video Matrix Switches VM0808T Serial V1.2.118 Aten Video Matrix Switches VM5808H Serial v1.2.116 Aten Video Splitters VS0104 Serial V1.1.102 Aten Video Splitters VS0108 Serial V1.1.102 Aten Video Switches VS0108HA Serial V1.0.068 ee aa 1 Serial 2 YAMAHA AUDIO AX-497 IR V1.0 YAMAHA AUDIO AX-596 IR V1.0 YAMAHA TV DPX-1000[ID1] IR V1.0 ZENITH TV B25A74R IR V1.0 ZENITH TV B50M90W IR V1.0 ZENITH TV P42W22 IR V1.0 Export Selected Device Delete Selected Device](/content/2026/05/817651/images/ef7cb1e411281590394f15a7a913022f2b0d08477838ad4d68c6dc855c936901.jpg)
Click to add a new custom device to the database.

Select a device and click this icon to create a duplicate.

Click to add and edit a device from the ATEN Library.
EDIT
Select a device and click Edit to change the settings.
Search
Key in word strings then click Search to find a device.
- Click All, Serial, IR, DO, Relay or Ethernet to filter the list by type.
- Click Brand, Category, Model, Type or Version to sort the devices.
- Click Export Selected Device to save the selected devices.
- Click Delete Selected Devices to remove the selected devices.
Edit / Add New Device
To edit or add a device to My Library, do the following:
- From the menu select File → Add New Device, or select a device from My Library and click Edit.
- Under General, use the drop-down menus or type in the Brand Name, Category, Model and Version.
Note: The Category determines what buttons are auto generated when a viewer page is created for the device. - Use the History button to open the Version History editor and make notes about the updates being made to the device configuration. You can create and use different versions of the same device and track the changes. The version history can be viewed and different versions selected from the ATEN Configurator, under device Properties (see page 61).
- Check the hardware type and configure the device:
Serial
![General Brand Category Model Version History Type ✓ Serial ☐ IR ☐ Digital Output ☐ Relay ☐ Ethernet Settings Baud Rate 9600 Data Bit 8 Stop Bit 1 Parity None Flow Control None Mode RS232 Advanced Function List Serial R ISO Relay E Signal String Format HEX ASCII + [ ] [ ] [ ] [ ] Function ▲ Command Feedback Turn on Output Port* sw o[01-04] on!nn Retrieve Send](/content/2026/05/817651/images/a96f9843dbba342101cb65df676e9016cbfd8772b730aea05aa2f385dc8ca3a3.jpg)

Click to add an Action.

Click to create a duplicate of the Action.

Click to delete the selected action.

Click to enter a string within () which allows the text to be edited in the VK6000 in the Button Action - Commands list (see page 84).

Click to add a drop menu into a Command string, then enter the number sequence in the brackets []. The Function name must include an Astrix (*) for each drop menu in the Command string. The dropdown menu will appear where the (*) is entered in the Function name.

Click to add an Enter into the Command string.

Click to open a list of commands to add into the Command string.
- Settings – Use the drop-down menus to set the: Baud Rate, Data Bit, Stop Bit, Parity, Flow Control and Mode settings.
- Advanced – Click to use the Delay Interval drop-down menu to set a timed delay for each command before it is sent to the device.
- Function List – Use this section to configure the device functions by adding actions to the list.
String Format - Use the buttons to select HEX or ASCII.
Function – Lists the actions created for a device. A Function name must include an Astrix (*) if you are adding a drop menu to the Command string. Double click to edit the function name.
Command – Shows the command string created for the action. Double-click to edit the string.
Feedback – Provides the Retrieve and Send buttons used to test the command strings.
Retrieve - To use this button refer to the instructions on page 136.
Send - To use this button refer to the instructions on page 136.
Text Command Tools
The following formats allow you to enter command strings with text that provide special features. These formats work in Serial and Ethernet commands.
♦ () entering text in () allows the command to be edited in the VK6000.
Example: (A1 A9) (A8 B6) – this command string will provide two editable text boxes from the VK6000 in the Button Action - Commands list which allow you to change the command string:

- = using the equals sign before a text command allows you to type in words which will show up in a drop-down menu to describe the command, rather than show the text command itself.
Example: [Power On=0A, Power Off=0B, Standby Mode=0C] – this command string will provide a drop-down menu with three choices using the text before the equal signs to describe each command – from the VK6000 in the Button Action - Commands list:
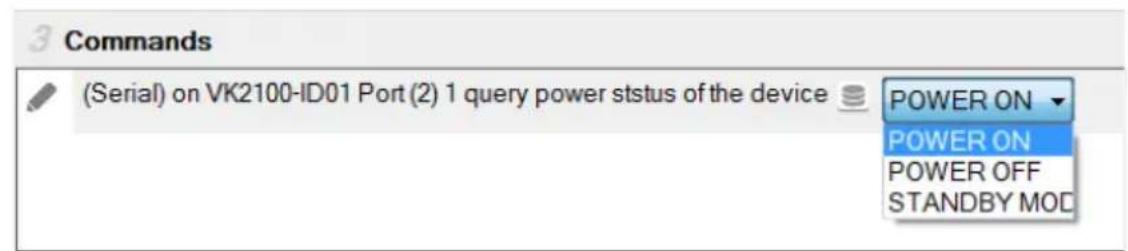
◆ “” quotation marks allow three symbols (, = @) to be added to a command that uses the equal sign as described in the example above. Three symbols not allowed within the quotation marks include (“” () []). Quotation marks can be used to the left of = in a HEX command; on either side of = in an ASCII command; and anywhere in an Ethernet command.
HEX Example: ["Power=On"=0A,"POWER=OFF"=0B]
ASCII Example: "Power=On" = 0A, POWER OFF = "0B = AC"
In the HEX example, “Power=On” allows the equal sign to be inserted before =0A. If the quotes are removed, the command Power=On=0A would fail as an Invalid String.
IR
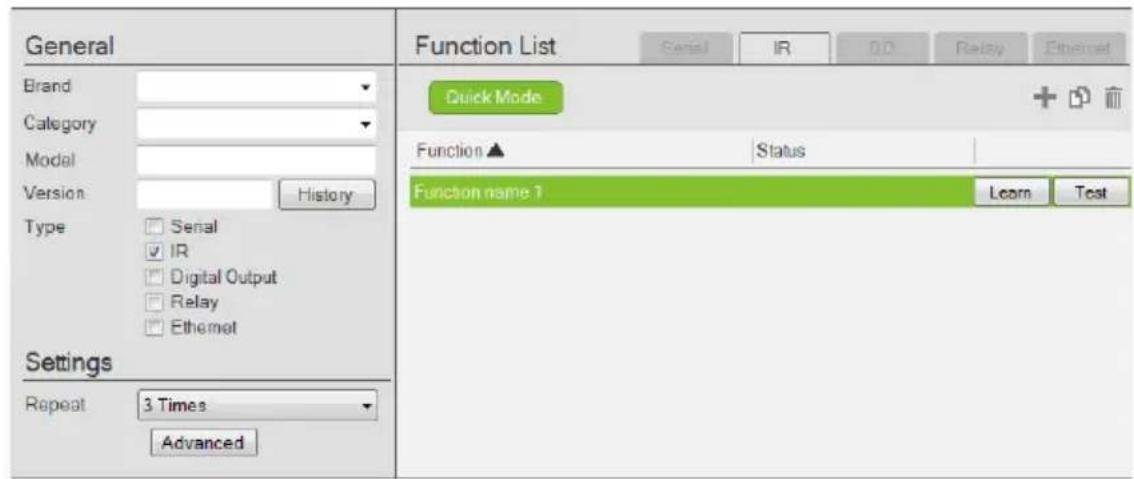

Click to add an Action.

Click to create a duplicate of the Action

Click to delete the selected action.
- Settings – Use the drop-down menu to set the Repeat setting (number of times a signal is sent): 1 Time, 2 Times or 3 Times (Default).
- Advanced – Click to use the Delay Interval drop-down menu to set a timed delay for each command before it is sent to the device.
- Function List – Use this section to configure the IR functions by adding actions to the list.
Quick Mode – Click to run Learning Mode for all IR actions in the Function List. When the Quick Mode window opens, click Start, a pop-up window appears to select a controller. Check a box to select a controller and click Select. Click Start a second time to run Quick Mode using the Learn instructions below.
Function – Lists the actions created for a device. Double-click to edit the Function the name.
Status – Reports the status (Tested, Failed, Learned) of the Learn and Test buttons.
Learn – Use to transfer commands from an IR remote to the Control Box.
Click Learn, a pop-up window appears to select a controller. Check a box to choose a controller and click Select.
Click Learn a second time to start learning mode. When the IR Learn LED flashes green, point the IR remote at the Control Box's front panel IR Receiver and push a button on the remote. Press the button on the remote just as you would when using it with the hardware device. If the device responds to a long hold or quick tap of the remote's button then you must press the button in the same manor (long hold or quick tap) when it using for Learning mode. The Control Box will beep and the Learn LED will light solid (then turn off) when IR learning is successful. The LED also turns off if Learning mode times out.
Test – Use to test if commands are sent successfully to the Control Box and hardware device.
Click Test, a pop-up window appears to select a controller and the IR port. Check a box to choose a controller and use the drop-down menu to select the IR port and then click Select.
Click Test a second time to test if the IR data transmits successfully to the Control Box. Check the hardware device to confirm that it responded appropriately.
The Status column reports the Learn and Test results.
■ Digital Output
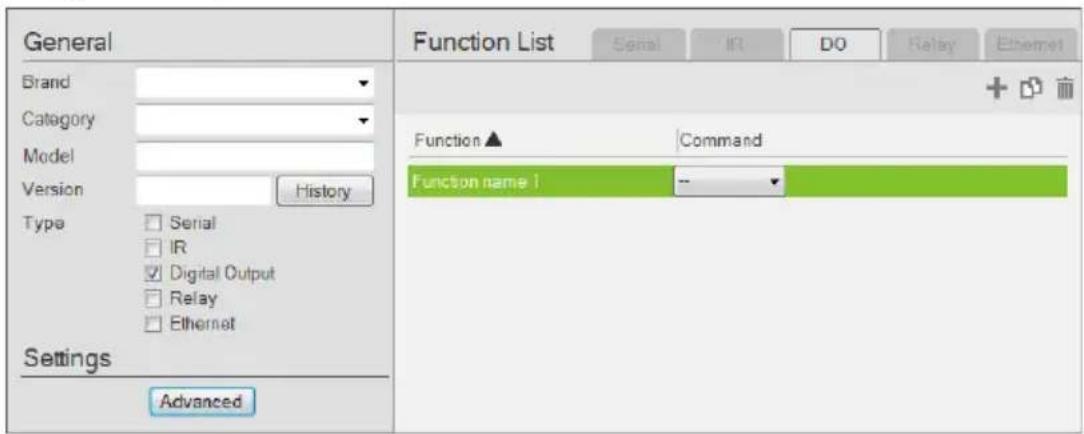

Click to add an Action.

Click to create a duplicate of the Action

Click to delete the selected Action.
- Advanced – Click to use the Delay Interval drop-down menu to set a timed delay for each command before it is sent to the device.
- Function List – Use this section to configure the Digital Output device functions by adding actions to the list.
Function – Lists the actions created for a device. Double-click to edit the Function name.
Command – Shows the command selected for the action. Click the drop-down menu to select an action (Open, Close, Toggle, Pulse).
Relay
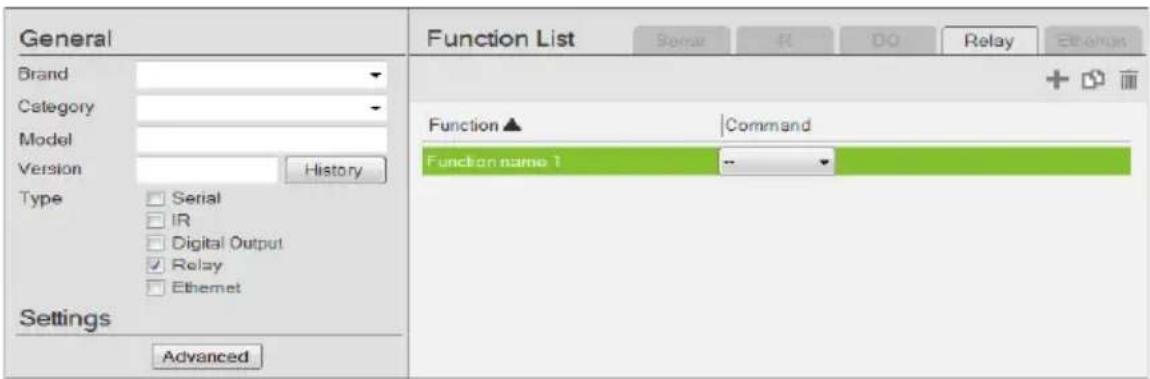

Click to add an Action.

Click to create a duplicate of the Action

Click to delete the selected Action.
- Advanced – Click to use the Delay Interval drop-down menu to set a timed delay for each command before it is sent to the device.
- Function List – Use this section to configure the Relay device functions by adding actions to the list.
Function – Lists the actions created for a device. Double-click to edit the Function name.
Command – Shows the command selected for the action. Click the drop-down menu to select an action (Open, Close, Toggle, Pulse).
Ethernet
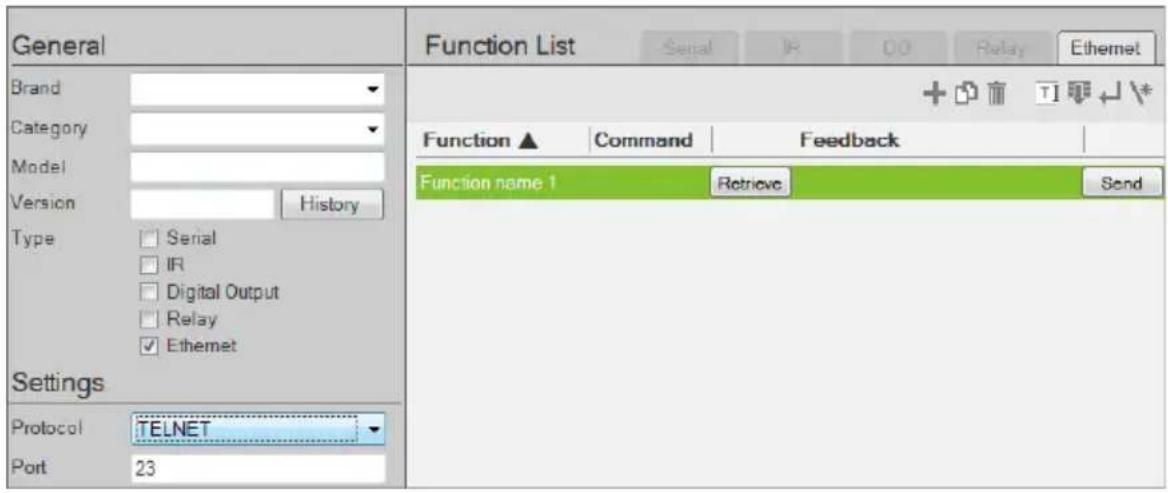

Click to add an Action.

Click to create a duplicate of the Action.

Click to delete the selected action.

Click to enter a string within () which allows the text to be edited in the VK6000 in the Button Action - Commands list (see page 84).

Click to add a drop menu into a Command string, then enter the ber sequence in the brackets []. The Function name must include a strix (*) for each drop menu in the Command string.

Click to add an Enter into the Command string.

Click to open a list of commands to add into the Command string.
For special command string tools, see Text Command Tools, page 130.
(Continues on next page.)
- Settings – Use the drop-down menu to select TELNET, PJLINK, ONVIF, or TCP and enter the Port number.
- Advanced
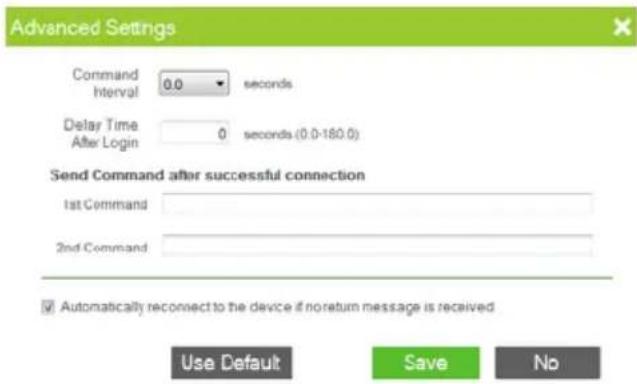
| Delay Interval | Use the Delay Interval drop-down menu to set a time delay for each command before they are sent to the device. |
| Delay after login Sets | a delay (to allow a connection to be established) before the First and Second Commands are sent to the device. |
| Send command after connection | Enter a First and Second Command to send to the device after a successful connection has been established. |
| Automatically reconnect if no return message is received | Check this box if you want to continue reconnection attempts when no return message is received from the device. |
| Use Default Click this button to reset back to the default settings. | |
- Function List – Use this section to configure the device functions by adding actions to the list.
String Format - Use the buttons to select HEX or ASCII. (TCP only)
Function – Lists the actions created for a device. A Function name must include an Astrix (*) for each drop menu you add to the Command string. Double-click to edit the function name. The drop-down menu will appear where the (*) is entered in the Function name
Command – Shows the command string created for the action. Double-click to edit the string.
Feedback – Provides the Return Messages when the Retrieve and Send buttons are used to test the command strings (Telnet, PJLink, and TCP only).
Retrieve – Use to test the Command string and receive return messages from a device.
Click Retrieve, a pop-up window appears to select a controller. Check a box to choose a controller and enter the IP Address, Username and/or Password of the Ethernet device, then click Select.
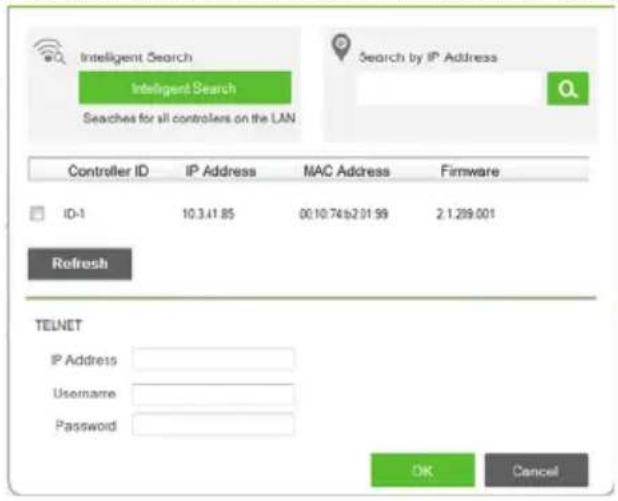
| Search by IP address | Enter the IP address and click Search to locate a Control Box. |
| Auto Search Click to | locate Control Boxes without specifying an IP address.This option only searches for Control Boxes on the same local area network. For Control Boxes across a network device, such as a router or switch, you must specify the IP address. |
| Controller ID Use the | check box to select the Controller, fill in the IP Address,Username and/or Password and then click OK. Next use the instructions below this table. |
Click Retrieve a second time, and the Get Feedback window appears to send the action and receive return messages from the device:
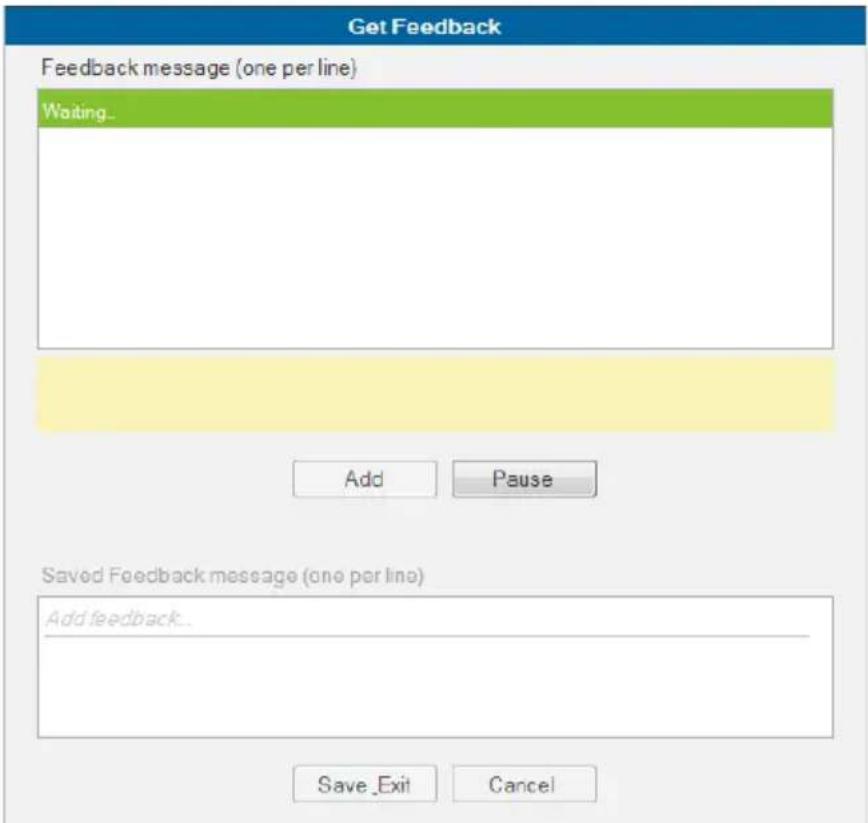
The top sections lists the Feedback message returned from the device. The bottom section lists saved Feedback messages. Once a message is received you can:
Add – Click to save a feedback message in the Saved Feedback message window.
Pause / Continue – Click to pause sending/receiving the command/return message.
Save Exit – Save the Feedback Message list and exit.
Cancel – Exit Get Feedback without saving.
Send – After the string is configured click to test the action. The device must be connected to the LAN for the action test to work.
Click Send, a pop-up window appears to select a controller. Check a box to choose a controller and enter the IP Address, Username and/or Password of the Ethernet device, then click Select.
(Continues on next page.)
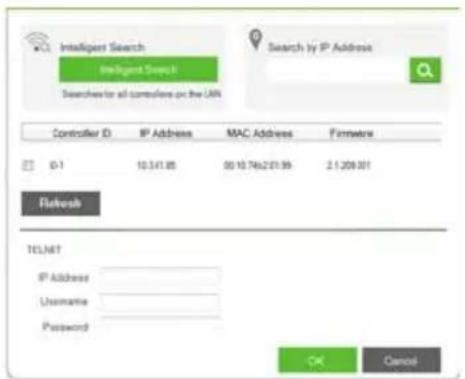
Click Send a second time, the Feedback Result window appears allowing you to select which device to send the command to. Use the radio button to choose Send to All or select a drop-down menu value (number) and click Send.
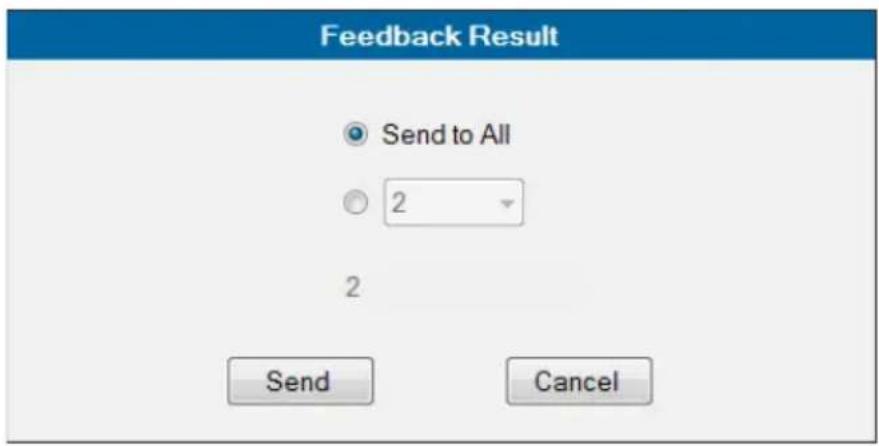
(Continues on next page.)
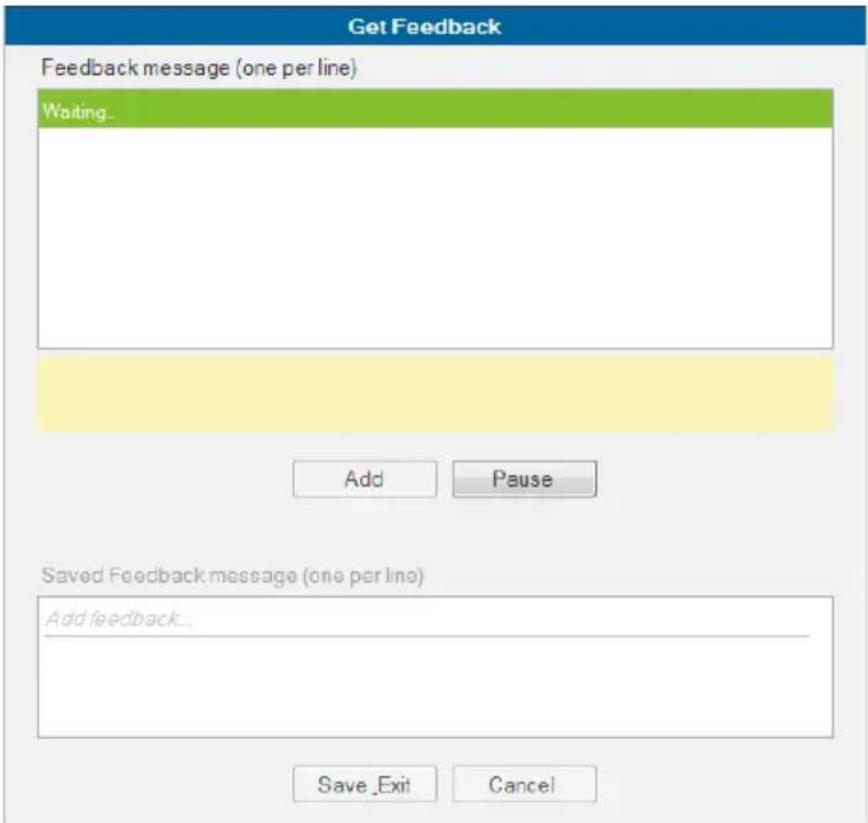
The top sections lists the Feedback message returned from the device. Once a message is received you can:
Add – Click to save a feedback message in the Saved Feedback message window.
Pause / Continue – Click to pause sending/receiving the command/return message.
Save Exit – Save the Feedback Message list and exit.
Cancel – Exit Get Feedback without saving.
- Click Save; or Save as to use a new name.
![Aten Video Matrix Switches VM0808... Save Save As Cancel General Brand Atan Category Video Matrix Switches Model VM0808H Version V2.2.219.223 History Type Serial IR Digital Output Relay Ethemat Settings Baud Rate 115200 Data Bit 8 Function List Serial IR DO Receive Send String Format HEX ASCII + - Functional ▲ Command Feedback Implement ATEN default... edid default\nRetrieve Implement port 1 connecte... edid port\nRetrieve load a Saved Profile * profile [00-31] load\nRetrieve Manually implement the b... edid remo\nRetrieve Mute Output Port* mute o[01-08] only\nRetrieve New String 1 Power off detection pod off\nRetrieve Power on detection pod only\nRetrieve](/content/2026/05/817651/images/732744cab3245cfec559440e0dd66fde8e54b3fc71717ff0b5478a79af23bac3.jpg)
- The device will appear in My Library.
ATEN Library
The ATEN Library is accessed on the Library menu bar selection and provides the complete list of hardware devices available in the database. The You can add any device in the ATEN Library to My Library. Once a device is added to My Library, the device settings can be edited as needed.
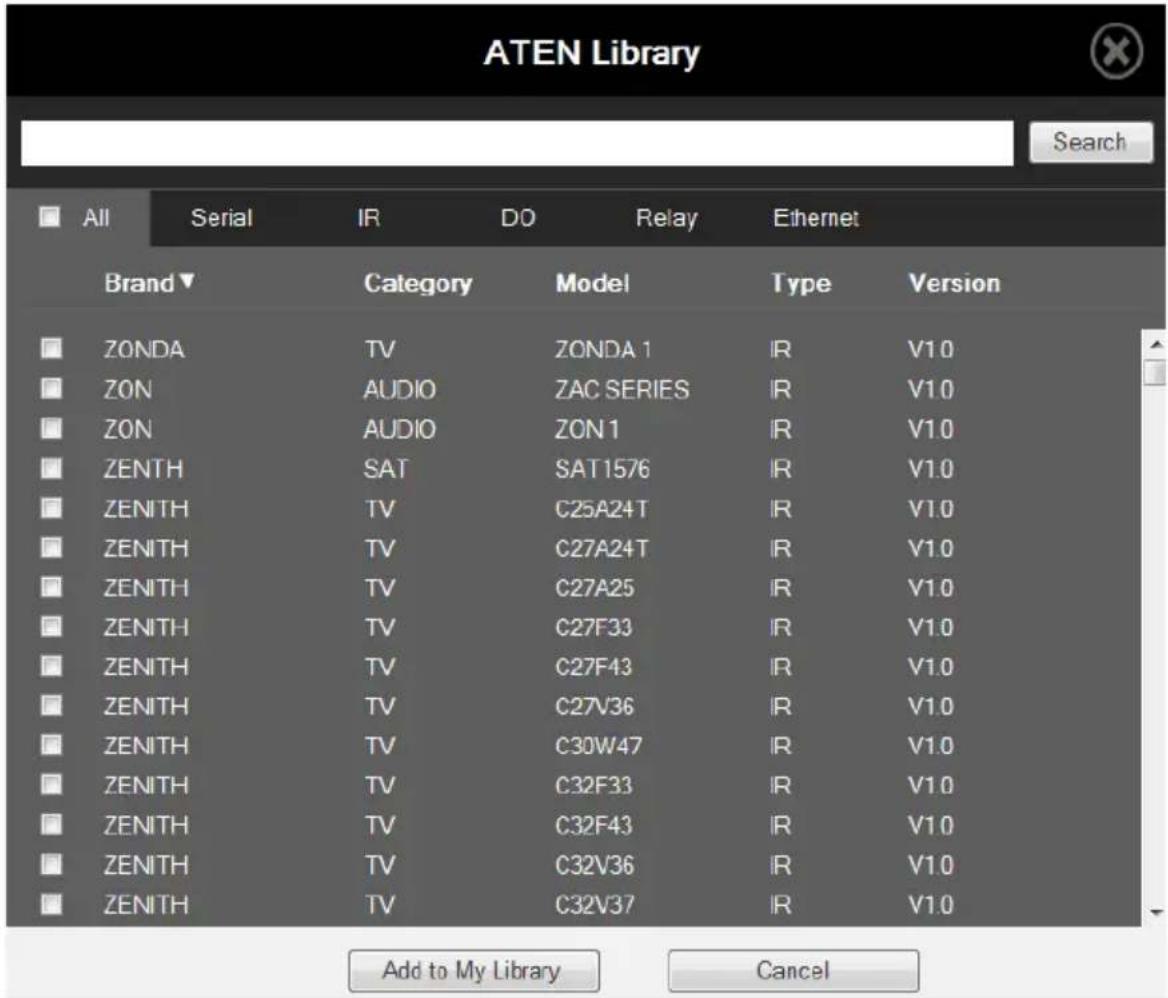
- Use the check boxes to select devices to add to My Library. Check All to select all devices in the list.
◆ Key in word strings then click Search to find a device. - Click All, Serial, DO, IR, Relay or Ethernet to filter the device list by type.
- Click Brand, Category, Model, Type or Version to sort the devices.
- Click Add to My Library to add the selected devices to My Library.
- Click Cancel to return to My Library.
This Page Intentionally Left Blank
ATEN Control System App
Overview
The ATEN Control System App is a free app for mobile devices which can be downloaded from Google Play or the Apple App Store. The app allows you to download the viewer profiles from a Control Box. These profiles provide the interface for remote control of hardware devices.
Installing the App
To install the ATEN Control System App on a mobile device, do the following:
- From the mobile device, tap the App Store icon.

or Google Play

- In the search box, type "aten control".
- Tap ATEN Control System, then download and install the app.
- The ATEN Control System icon will appear on the mobile device.
- Press the icon to open the app.
Note: The ATEN Control System App is supported on mobile devices installed with Android 4.2.2 and higher, iOS9 and higher, or Windows 7 and higher.
Button Sounds
After you install the app, go to the mobile device Settings and find the ATEN Control so that you can enable/disable the Button Sound setting.
ATEN Control System App
When you open the ATEN Control System app for the first time, the default Welcome screen appears:
flowchart
graph TD
    A["Start"] --> B["SYSTEM"]
    B --> C["OPEN"]
    C --> D["NO"]
    D --> E["DEMO"]
    style A fill:#000,stroke:#fff,color:#fff
    style B fill:#000,stroke:#fff,color:#fff
    style C fill:#000,stroke:#fff,color:#fff
    style D fill:#000,stroke:#fff,color:#fff
    style E fill:#000,stroke:#fff,color:#fff
    note right of A: Control Without Complication
Tap Demo to try the ATEN Control System app. Tap Start to find a Control Box and download viewer profiles (see Welcome, page 148).
Note: The default Welcome screen appears until a viewer profile is downloaded to the mobile device. After a viewer profile is downloaded, the default Welcome screen will reappear only if the app is reinstalled, which will also delete all viewer profiles.
Demo
The Demo page provides a preview of the ATEN Control System app with two sample rooms. Tap either room to view the controls of different hardware devices. Tap Quit Demo at the top right corner to exit.
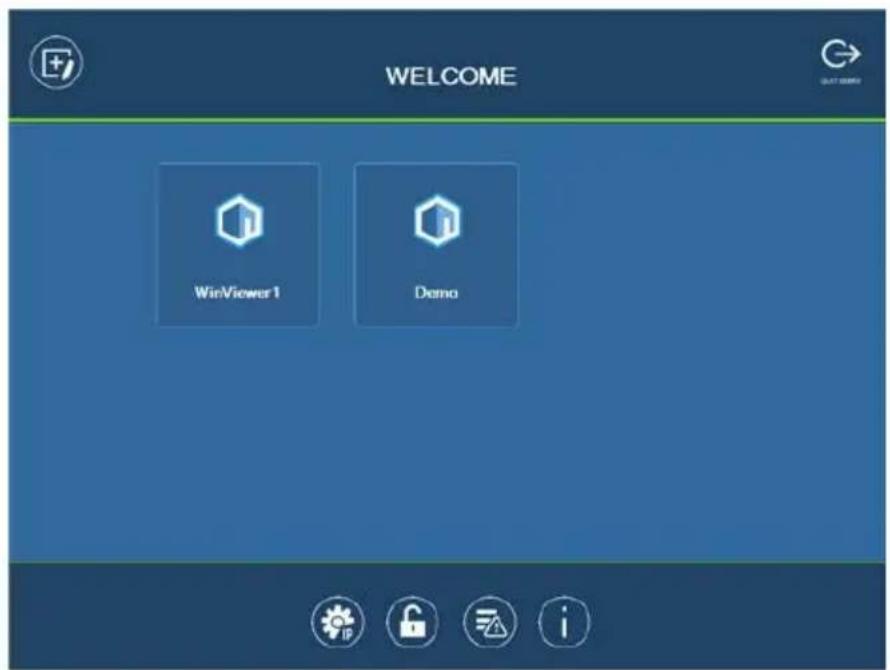
Select a viewer profile or press any of the buttons on the Welcome page to demo the app. The first profile's name will depend on the OS of the device.
WinViewer1 / iPad / Android1
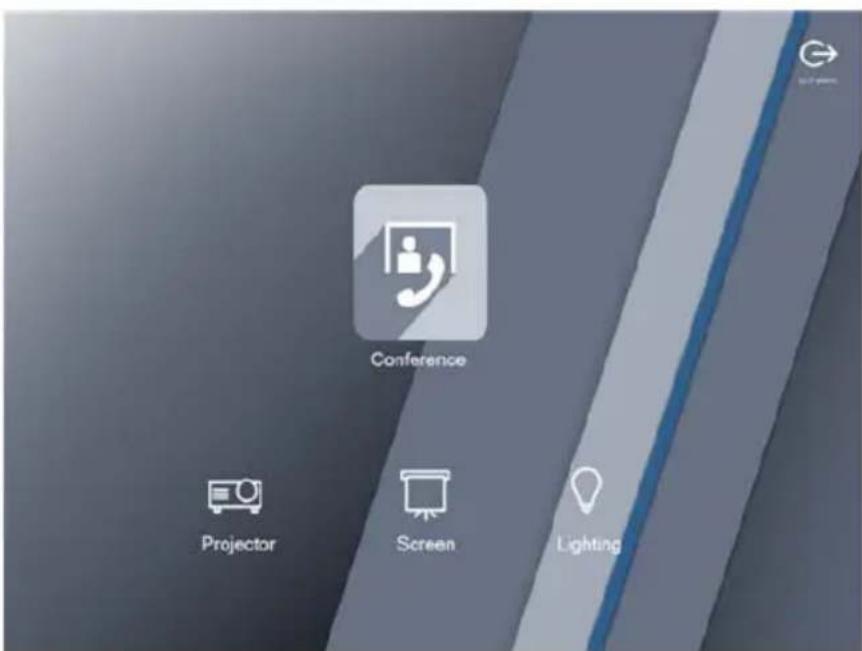
This demo shows a Conference call interface with controls for a Projector, Screen and Lighting. Tap any of the device icons to open the control page.
Control Pages
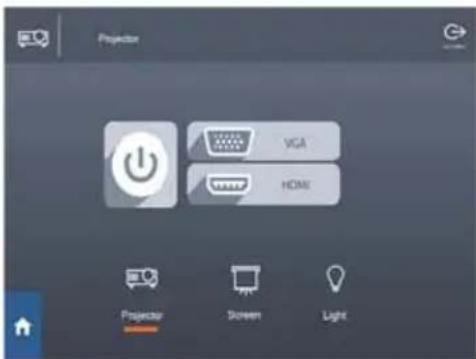
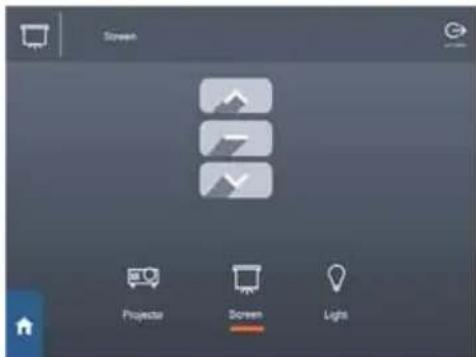
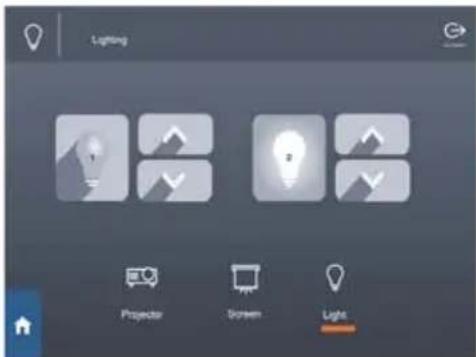
The images above show the Main page and pages for the Projector, Screen and Lights.
Demo
This demo shows different buttons that can be pressed to control the Projector, Lights, Video Wall and Camera. Tap the icons to view control pages for each device. Tap the Quit Demo icon to return to the previous page, or press on the viewer page background until the logout dialog appears.
Control Pages

The images above show control pages for the Projector, Lights, Video Wall and Camera in Demo. Tap the Home icon in the lower left corner to return to the previous page, or press on the viewer page background until the logout dialog appears.
Welcome
The Welcome screen is the home screen of the ATEN Control System app. It lists the viewer profiles and provides administrative options. Tap a viewer profile to open the controls for a room (see Design, page 70), or use the administrative options listed below.
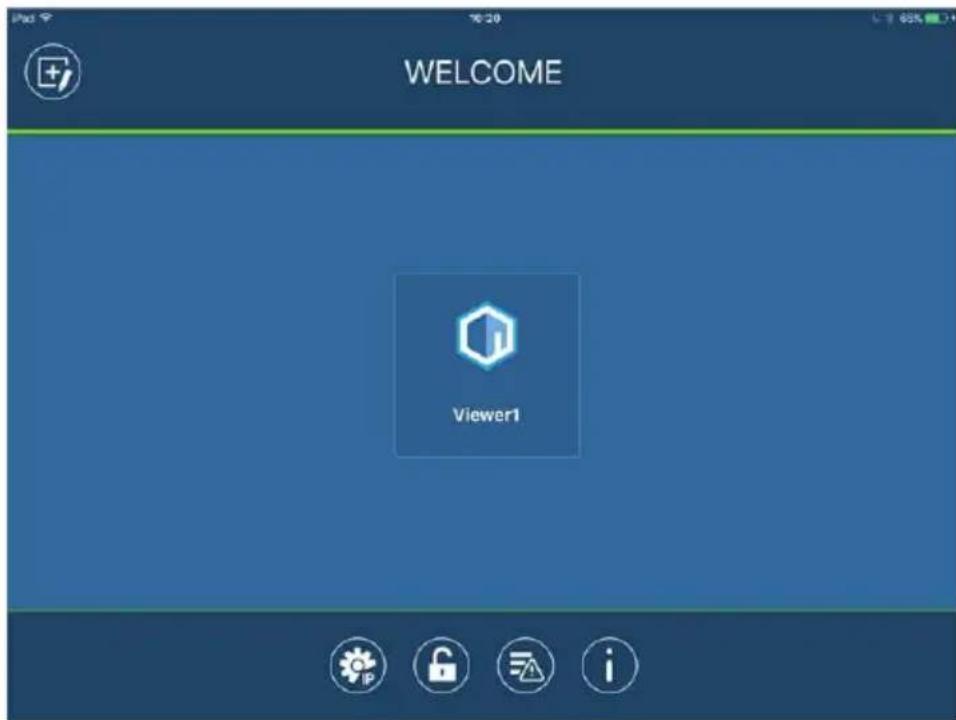
| Icon Description | |
 | Edit Viewer Profile – This page provides options to add, update and remove viewer profiles. See page 149 for details. |
 | Manage IP – This page provides options to configure network settings for Control Boxess and LAN devices. See page 150 for details. |
 | Set Password – This page provides options to set a password for access to the Welcome page when a viewer profile is in use. See page 153 for details. |
 | Log Report – This page provides an error log to troubleshoot connectivity issues. See page 154 for details. |
 | Information – This page provides information about the ATEN Control System's software version. See page 156 for details. |

Edit Viewer Profile
The Edit Viewer Profile page allows you to add, update and remove viewer profiles. To download viewer profiles, tap Add Viewer (see
Set Password, page 153).
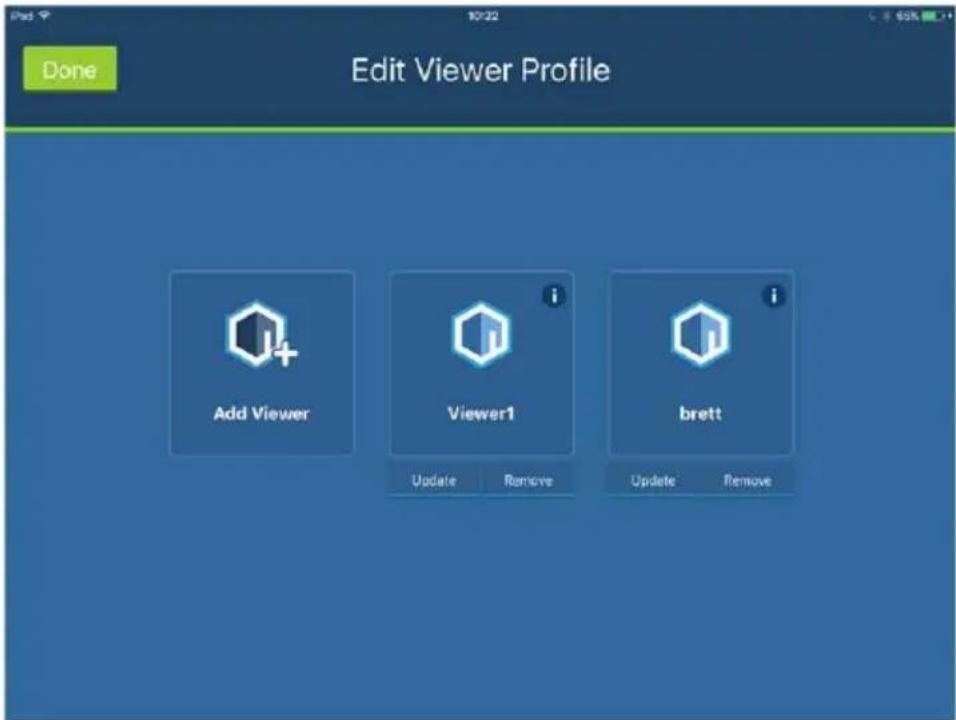
| Add Viewer | Tap Add Viewer to download viewer profiles from the Download Viewer Profile page. See page 157 for details. |
| Tap the Information icon to view the MAC Address, IP Address and Controller ID of the Control Box associated with the viewer profile. | |
| Update Tap Update | to connect to the Control Box and download an updated version of the viewer profile. After the update, the “Downloaded Successfully” prompt will appear |
| Remove | Tap Remove to delete the viewer profile. A dialog box will appear to confirm deletion of the viewer profile.Tap Delete to remove the viewer profile*, or Cancel to cancel the deletion.Note: Viewer profiles are only deleted on the mobile device, and will still be available on the Control Box. |
| Done Tap Done to | return to the Welcome page. |

Manage LAN Device
The Manage LAN Device page allows you to edit network settings for the Control Boxes and LAN devices added in the Configurator software (see Device Library, page 63).
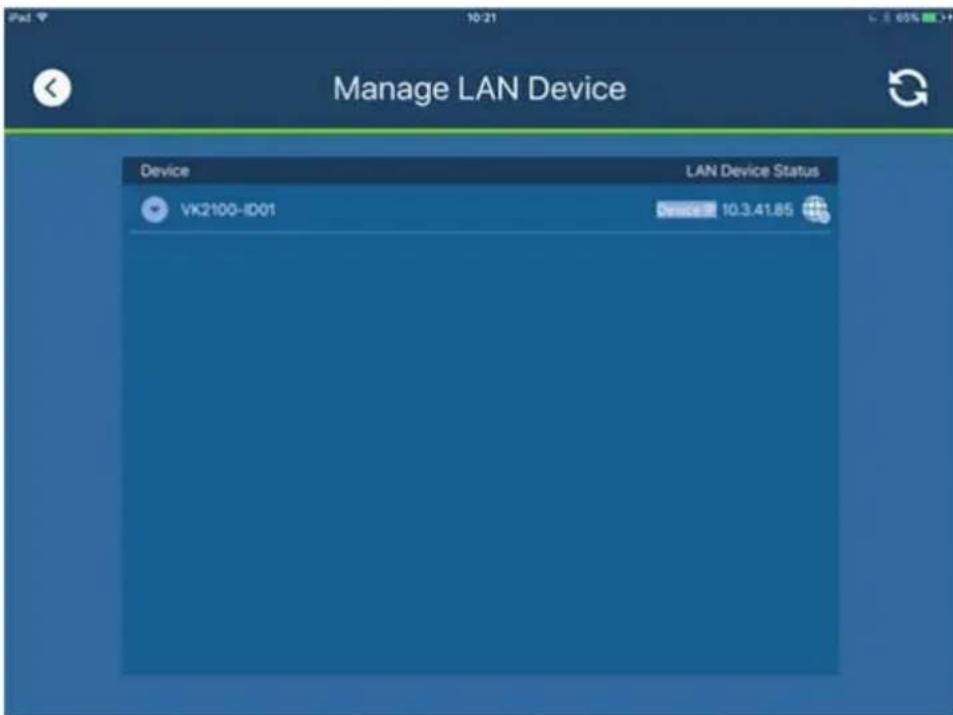
Tap to expand Control Boxes to view connected LAN devices.

Tap to open the web GUI (see Browser Operation, page 39).
Depending on the LAN device you select, different options are available. Tap on a device to open the settings page. Use Edit to change settings, Apply to save or OK to exit. Examples are provided on the next page.
Controller
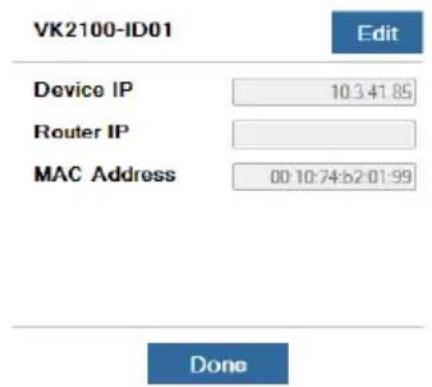
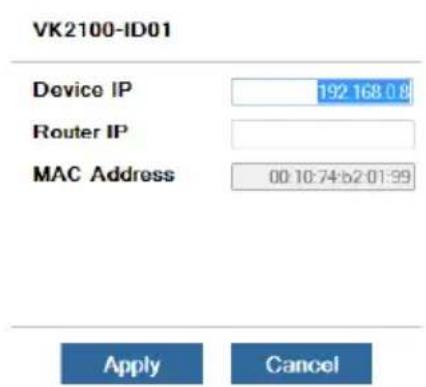
PJLink Projector
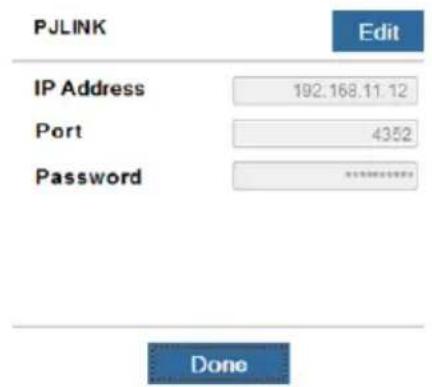
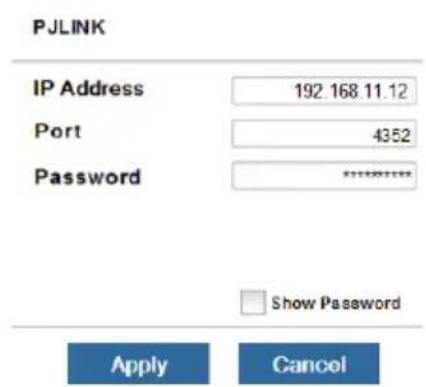
Telnet
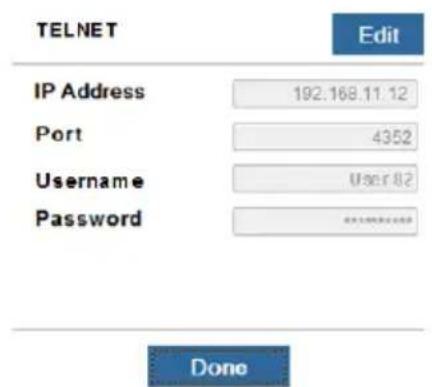
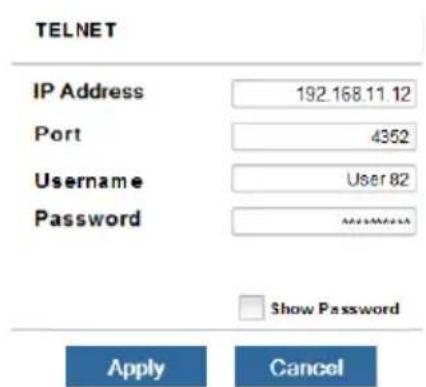
ONVIF
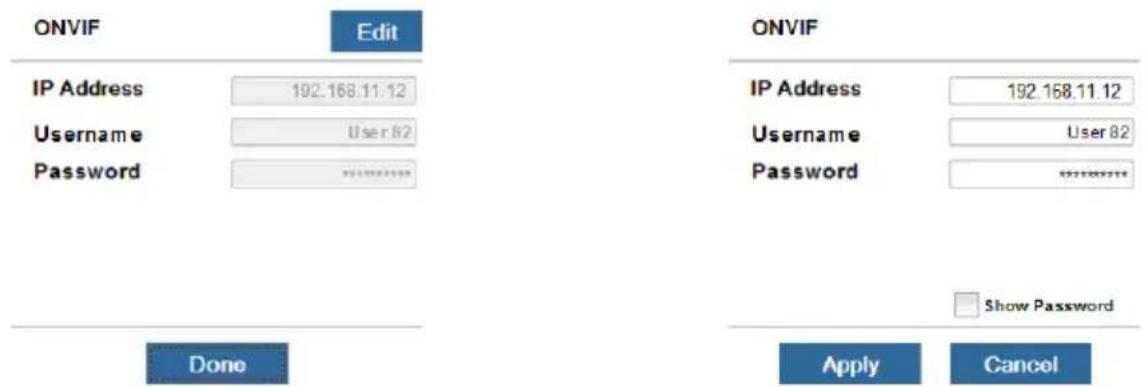
TCP
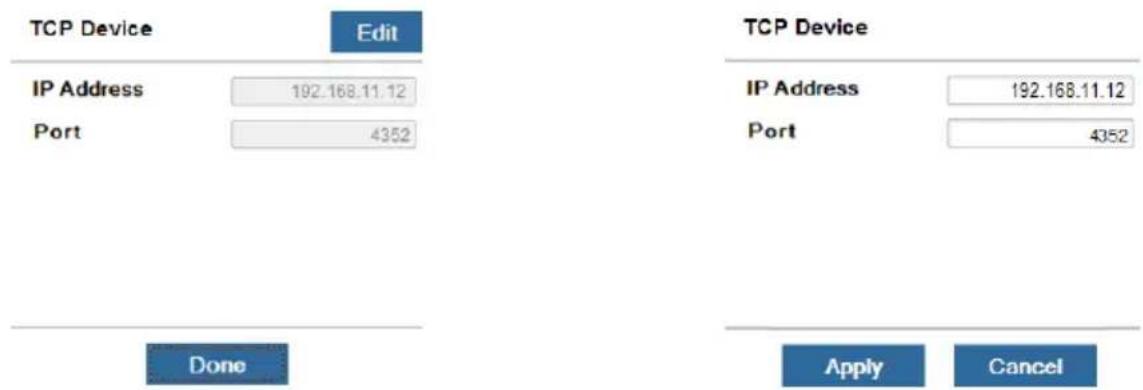

Set Password
The Set Password page sets a password to access the Welcome page from a viewer profile. This prevents unauthorized users from
changing the app settings. Users will be prompted for a password before they exit viewer profiles to access the Welcome page.
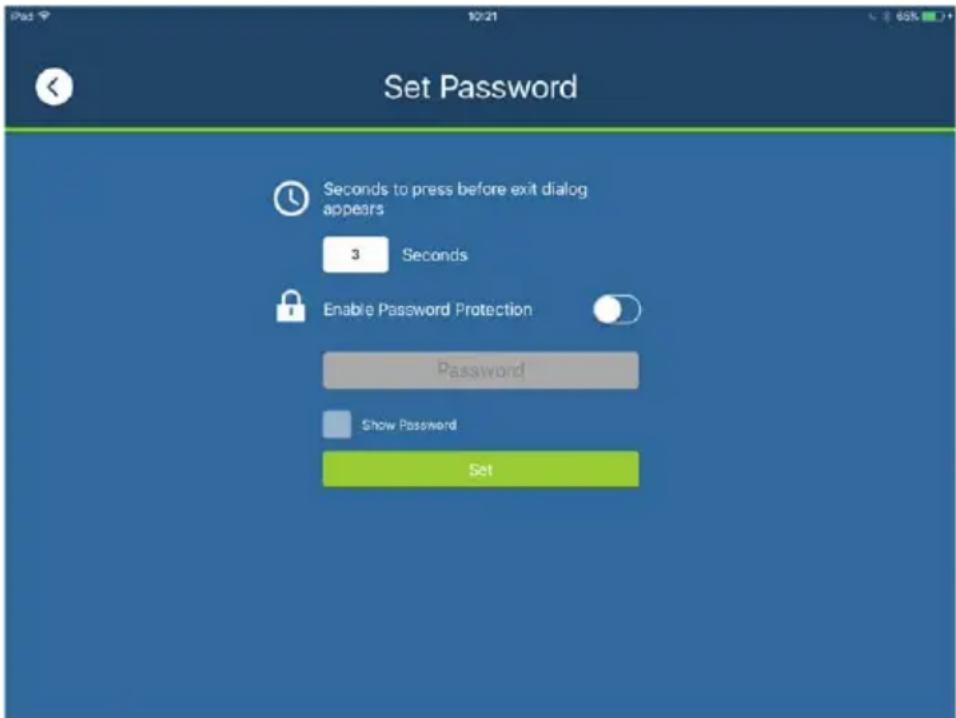
Slide the Enable Password Protect button, enter a password in the box and tap Set. The Show Password option appears after you check enable Password Protect, allowing you to display the characters typed in for the password. Enter a number in Seconds to press before exit dialog appears to set the amount of time to pass when pressing on a viewer page before a window appears asking if you want to exit. Tap Back to exit.

Log Report
The Log Report page lists information and errors which can be used to troubleshoot issues. Tap and drag the list to scroll through the logs.
Tap Back to exit.
![Log Report Latest report 2017-05-17 10:20:40:848 [00001022] Loading...](/content/2026/05/817651/images/e16702b14fbb1678b5f43e41bda60cd6f4f0e39ae6c071e8428ef58e757c4209.jpg)

Tap Save to save the log file.

Tap Report History to view saved logs (see page 155).

Tap Delete to delete the log information.
Tap Back to exit.

Report History
When you tap Report History, you can view and export logs. Saved log files are listed by date in the left column. Tap a log file to view it in the window to the right. Tap and drag the list to scroll through the logs. Tap Back to exit.
![Reports Apr 27, 2017 20170427_2 vklog 20170427 11:25 saved 20170427_1 vklog 20170427 11:20 saved Apr 28, 2017 20170426_2 vklog 20170426 15:42 saved 20170426_1 vklog 20170426 15:16 saved 2017-04-26 15:16:25.854 [20020903] Receive Quick Action FeedBack 2017-04-26 15:16:25.883 [00020112] Action Feedback: 4261415601 enable 2017-04-26 15:16:26.009 [00000006] Send Quick Action Request to (fe000ab1_press) 2017-04-26 15:16:26.009 [00020910] Send Quick Command 10.3:41.65 Success. 2017-04-26 15:16:26.157 [20020903] Receive Quick Action FeedBack 2017-04-26 15:16:26.203 [00020112] Action Feedback: 4261415601 enable 2017-04-26 15:16:26.322 [00000006] Send Quick Action Request to (fe000ab1_press) 2017-04-26 15:16:26.322 [00020910] Send Quick Command 10.3:41.65 Success. 2017-04-26 15:16:26.491 [20020903] Receive Quick Action FeedBack 2017-04-26 15:16:26.492 [00020112] Action Feedback: 4261415601 enable](/content/2026/05/817651/images/57f681555ac7db49338d1eba0c6a62b9c1671b765d5eefa9fed428d317f32487.jpg)

Tap Export to send the log as an e-mail attachment.

Information
The Information page displays the ATEN Control System's version.

Download Viewer Profile
The Download Viewer Profile page allows you to search for Control Boxes and download viewer profiles. This page is accessed from Welcome → Edit Viewer Profile → Add Viewer.
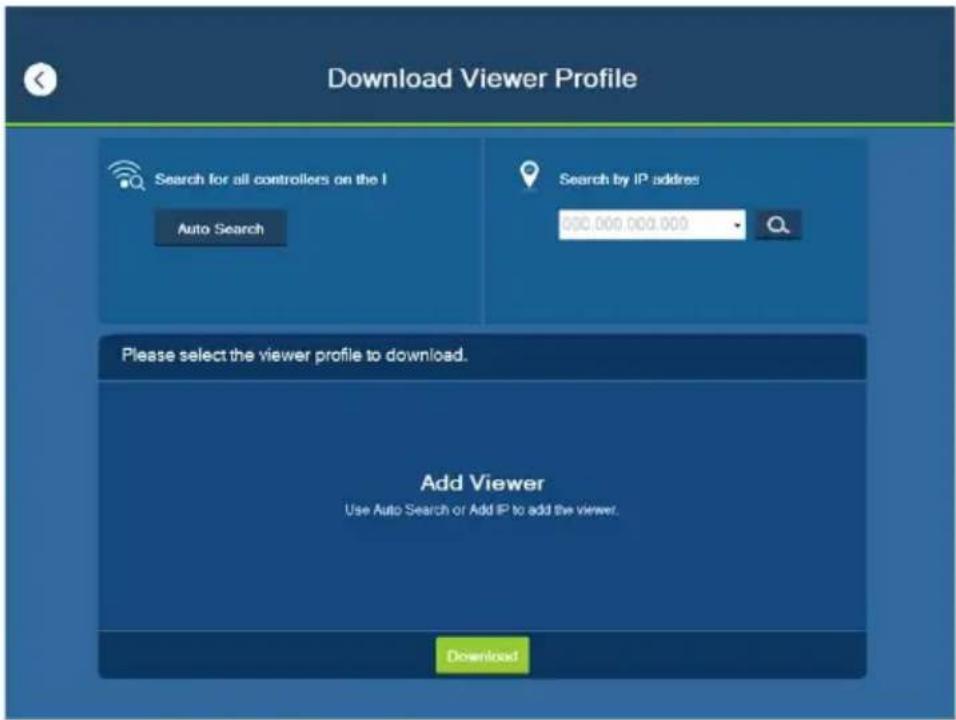
| Search by IP Address | Tap to enter a Control Box's IP address, then tap the Search icon to find it. When Control Boxes are found on the network, they are listed in the Add Viewer box.A Search History drop-down menu will appear for previously searched IP addresses. |
| Auto Search Auto S | Search allows you to search for Control Boxes without specifying an IP address. The Control Box must be powered on and connected to the same local network. |
| Add Viewer This panel lists the Control Boxes that have been found on the network. Each Control Box lists viewer profiles that can be downloaded to the mobile device. To upload viewer profiles to a Control Box, see Upload, page 122. | |
| Back Icon Back returns you to the Welcome page. | |
| Download After you | select the viewer profiles you want to download, click Download to start the process. |
Downloading Profiles
When Control Boxes are found, they appear in the Add Viewer panel. Check the boxes of the viewer profiles you
would like to download, then tap Download.
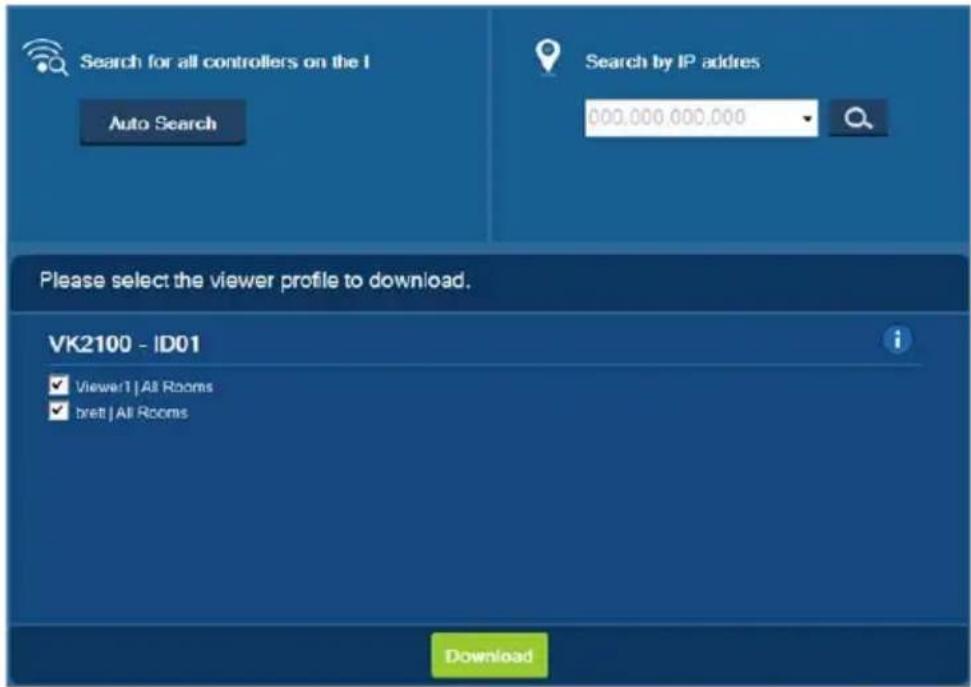
| Add Viewer The main window lists the Control Boxes that have been found on the network. Under each Control Box is a list of viewer profiles with a check box.Use the check boxes to select the viewer profiles you want to download, then click Download. If the Lock icon appears, you will be prompted to enter the access key.After viewer profiles download, the “Downloaded Successfully” prompt appears. Tap Done to return to the Welcome page where the viewer profiles will be listed.Note: After you download a viewer profile to the mobile device, the default Welcome screen no longer appears. | |
| Access Key | When the a viewer profile requires an access key a window appears prompting you to enter the key. Enter the correct access key and then click OK to download the viewer profiles from the Control Box. To set the access key, see Edit Access Key, page 122. |
 | Tap the Information icon to view the IP Address, MAC Address and License information of the Control Box. The license information provides the total number of licenses available and the number in use. |
Safety Instructions
General
- Read all of these instructions. Save them for future reference.
- Follow all warnings and instructions marked on the device.
- This product is for indoor use only.
- Do not place the device on any unstable surface (cart, stand, table, etc.). If the device falls, serious damage will result.
- Caution: Risk of explosion if the battery is replaced by an incorrect type. Always dispose of used batteries according to the proper instructions.
- Do not use the device near water.
- Do not place the device near, or over, radiators or heat registers.
- The device cabinet is provided with slots and openings to allow for adequate ventilation. To ensure reliable operation, and to protect against overheating, these openings must never be blocked or covered.
- The device should never be placed on a soft surface (bed, sofa, rug, etc.) as this will block its ventilation openings. Likewise, the device should not be placed in a built-in enclosure unless adequate ventilation has been provided.
- Never spill liquid of any kind on the device.
- Unplug the device from the wall outlet before cleaning. Do not use liquid or aerosol cleaners. Use a damp cloth for cleaning.
- The device should be operated from the type of power source indicated on the marking label. If you are not sure of the type of power available, consult your dealer or local power company.
- The device is designed for IT power distribution systems with 230V phase-to-phase voltage.
- To prevent damage to your installation it is important that all devices are properly grounded.
-
The device is equipped with a 3-wire grounding type plug. This is a safety feature. If you are unable to insert the plug into the outlet, contact your electrician to replace your obsolete outlet. Do not attempt to defeat the purpose of the grounding-type plug. Always follow your local/national wiring codes.
-
Do not allow anything to rest on the power cord or cables. Route the power cord and cables so that they cannot be stepped on or tripped over.
- If an extension cord is used with this device make sure that the total of the ampere ratings of all products used on this cord does not exceed the extension cord ampere rating. Make sure that the total of all products plugged into the wall outlet does not exceed 15 amperes.
- To help protect your system from sudden, transient increases and decreases in electrical power, use a surge suppressor, line conditioner, or un-interruptible power supply (UPS).
- Position system cables and power cables carefully; Be sure that nothing rests on any cables.
- Never push objects of any kind into or through cabinet slots. They may touch dangerous voltage points or short out parts resulting in a risk of fire or electrical shock.
- Do not attempt to service the device yourself. Refer all servicing to qualified service personnel.
- If the following conditions occur, unplug the device from the wall outlet and bring it to qualified service personnel for repair.
- The power cord or plug has become damaged or frayed.
◆ Liquid has been spilled into the device. - The device has been exposed to rain or water.
- The device has been dropped, or the cabinet has been damaged.
- The device exhibits a distinct change in performance, indicating a need for service.
- The device does not operate normally when the operating instructions are followed.
- Only adjust those controls that are covered in the operating instructions. Improper adjustment of other controls may result in damage that will require extensive work by a qualified technician to repair.
Rack Mounting
Before working on the rack, make sure that the stabilizers are secured to the rack, extended to the floor, and that the full weight of the rack rests on the floor. Install front and side stabilizers on a single rack or front stabilizers for joined multiple racks before working on the rack.
- Always load the rack from the bottom up, and load the heaviest item in the rack first.
- Make sure that the rack is level and stable before extending a device from the rack.
- Use caution when pressing the device rail release latches and sliding a device into or out of a rack; the slide rails can pinch your fingers.
- After a device is inserted into the rack, carefully extend the rail into a locking position, and then slide the device into the rack.
- Do not overload the AC supply branch circuit that provides power to the rack. The total rack load should not exceed 80 percent of the branch circuit rating.
- Make sure that all equipment used on the rack – including power strips and other electrical connectors – is properly grounded.
- Ensure that proper airflow is provided to devices in the rack.
- Ensure that the operating ambient temperature of the rack environment does not exceed the maximum ambient temperature specified for the equipment by the manufacturer.
- Do not step on or stand on any device when servicing other devices in a rack.
Technical Support
International
- For online technical support – including troubleshooting, documentation, and software updates: http://eservice.aten.com
- For telephone support, see Telephone Support, page iii:
North America
| Email Support support@aten-usa.com | ||
| Online Technical Support | Troubleshooting Documentation Software Updates | https://eservice.aten.com |
| Telephone Support 1-888-999-ATEN | ext 4988 | |
When you contact us, please have the following information ready beforehand:
◆ Product model number, serial number, and date of purchase.
- Your computer configuration, including operating system, revision level, expansion cards, and software.
◆ Any error messages displayed at the time the error occurred.
◆ The sequence of operations that led up to the error.
◆ Any other information you feel may be of help.
Specifications
VK2100
| Function VK2100 | |||
| Interface Serial 4 | x Programmable Bi-directional RS-232/422/485 Ports (4 x DB9 Male Connectors, Configurable via Pin Assignments)Baud Rate: 300 to 115200 (default: 9600)Data Bit: 8 (default) or 7Stop Bit: 1 (default) or 2Parity: None (default), Even or OddFlow Control: None (default) RTS/CTS | ||
| 2 x Bi-directional RS-232 Ports (2 x 3-Pole Terminal Block Connectors)Baud Rate: 300 to 115200 (default: 9600)Data Bit: 8 (default) or 7Stop Bit: 1 (default) or 2Parity: None (default), Even or Odd | |||
| IR/Serial 4 x Programmable IR / Uni-directional RS-232Ports (2 x 4-Pole Terminal Block Connectors)IR: TTL level (0 to 5 V)Carrier Frequency: 10KHz~455KHzSerial: Uni-directional RS-232 (+ - 5 V)Baud Rate: 300 to 115200 (default: 9600)Data Bit: 8 (default) or 7Stop Bit: 1 (default) or 2Parity: None (default), Even or Odd | |||
| I/O 4 x Programmable Digital Input / OutputChannels (1 x 5-Pole Terminal Block Connector)Digital Output: 250 mA sink from 12 VDCDigital Input:VDC ModeInput Voltage Range: 0 to 24 VDCProgrammable Range: 1 to 24 VDCDry Contact Mode:Pull-up 2k ohms to + 12 VDC | |||
| Relay 4 x Relay Channels (2 x 4-Pole Terminal Block Connector)Normally Open, Isolated RelaysContact Rating: Max 24 VDC, 2A | |||
| VDC 4 x 12 VDC Output Ports (2 x 4-Pole Terminal Block Connectors)Power Supply: 12 VDC, 2A Max (Shared By 4 Ports) | |||
| Connectors Ethernet 1 x RJ-45 Female, 10/100Base-T | |||
| Function | VK2100 | ||
| Switches Control | er ID 1 x 16-Segment Switch | ||
| Power 1 x Rocker Switch | |||
| Reset 1 x Semi-recessed pushbutton | |||
| LEDs Relay 4 (Green) | |||
| DC Output Overload 1 (Orange) | |||
| IR Learn 1 (Green) | |||
| USB 1 (Green / Orange) | |||
| Power 1 (Green) | |||
| IR Receiver 1 x IR Receiver Port | |||
| I/P Rating 100-240 VAC, 50-60 Hz | |||
| Power Consumption | 40 Watt | ||
| Environment | Operating Temp. | 0-50°C | |
| Storage Temp. | -20-60°C | ||
| Humidity | 0-80% RH, Non-condensing | ||
| Physical Properties | Housing | Metal | |
| Weight | 2.64 kg | ||
| Dimensions (L x W x H) | 43.72 x 16.32 x 4.40 cm | ||
VK1100
| Function VK1100 | |||
| Interface Serial 2 | x Programmable Bi-directional RS-232/422/485 Ports (2 x DB9 Male Connectors, Configurable via Pin Assignments)Baud Rate: 300 to 115200 (default: 9600)Data Bit: 8 (default) or 7Stop Bit: 1 (default) or 2Parity: None (default), Even or OddFlow Control: None (default) RTS/CTS | ||
| IR/Serial 2 x Programmable IR | / Uni-directional RS-232Ports (1 x 3-Pole Terminal Block Connectors)IR: TTL level (0 to 5 V)Carrier Frequency: 10KHz~455KHzSerial: Uni-directional RS-232 (0-5 V)Baud Rate: 300 to 115200 (default: 9600)Data Bit: 8 (default) or 7Stop Bit: 1 (default) or 2Parity: None (default), Even or Odd | ||
| Relay 4 x Relay Channels (2 x 4-Pole Terminal Block Connector)Normally Open, Isolated RelaysContact Rating: Max 24 VDC, 2A | |||
| VDC 1 x 12 VDC Output Ports | (1 x 2-Pole Terminal Block Connectors)Power Supply: 12 VDC, 1A Max | ||
| Connectors Ethernet 1 x RJ-45 Female, 10/100Base-T | |||
| Switches Controller ID 1 x 16-Segment Switch | |||
| Power | |||
| Reset | |||
| LEDs | Relay | 4 (Green) | |
| IR / Serial | 2 (Green) | ||
| Serial | RX 2 (Green) | ||
| TX | 2 (Green) | ||
| Ethernet | Link | 1 (Green) | |
| Act | 1 (Green) | ||
| DC Output Overload | 1 (Orange) | ||
| IR Learn | 1 (Green) | ||
| USB | 1 (Green / Orange) | ||
| Power | 1 (Green) | ||
| IR Receiver | 1 x IR Receiver Port | ||
| I/P Rating | 100-240 VAC, 50-60 Hz | ||
| Power Consumption 20 Watts | |||
| Environment Operating Temp. 0–50°C | |||
| Physical Properties | Housing Metal | ||
| Weight 1.19 kg | |||
| Dimensions (L x W x H) 21.50 x | 16.23 x 4.18 cm | ||
Limited Hardware Warranty
ATEN warrants its hardware in the country of purchase against flaws in materials and workmanship for a Warranty Period of two [2] years (warranty period may vary in certain regions/countries) commencing on the date of original purchase. This warranty period includes the LCD panel of ATEN LCD KVM switches. Select products are warranted for an additional year (see A+ Warranty for further details). Cables and accessories are not covered by the Standard Warranty.
What is covered by the Limited Hardware Warranty
ATEN will provide a repair service, without charge, during the Warranty Period. If a product is defective, ATEN will, at its discretion, have the option to (1) repair said product with new or repaired components, or (2) replace the entire product with an identical product or with a similar product which fulfills the same function as the defective product. Replaced products assume the warranty of the original product for the remaining period or a period of 90 days, whichever is longer. When the products or components are replaced, the replacing articles shall become customer property and the replaced articles shall become the property of ATEN.
To learn more about our warranty policies, please visit our website:
http://www.aten.com/global/en/legal/policies/warranty-policy/
- EMC Information
- FEDERAL COMMUNICATIONS COMMISSION INTERFERENCE STATEMENT
- KCC Statement
- Safety
- User Information
- Online Registration
- Telephone Support
- User Notice
- Package Contents
- VK2100
- VK1100
- Contents
- Introduction
- Hardware Setup
- Browser Operation
- Software Installation
- ATEN Configurator (VK6000)
- ATEN Database Generator
- ATEN Control System App
- Appendix
- About this Manual
- Conventions
- Product Information
- Overview
- Intelligent Control
- Optimized Performance
- Simplified Setup
- Effortless Expandability
- User Centered Convenience
- On-the-Go Control
- Features
- VK2100 (Control Box)
- VK1100 (Compact Control Box)
- VK6000 (Configurator Software)
- ATEN Control System App
- Requirements
- Hardware Devices
- Cables
- Computer & Software
- Minimum PC Requirements (VK6000)
- Optional Equipment
- Components
- VK2100 Front View
- VK2100 Rear View
- VK1100 Front View
- VK1100 Rear View
- Chapter 2
- Hardware Setup
- Rack Mounting
- Connections
- 12VDC Power Output
- Independent Power Supply
- Relay Power Supply
- Digital Output Power Supply (VK2100 only)
- Digital Output Dual Power Supply (VK2100 only)
- Relay
- IR / Serial
- One IR Transmitter
- Two IR Transmitters
- Digital I/O
- Digital Input (Dry Contact):
- Digital Input (VDC):
- Digital Output:
- RS-232
- RS-232 / 422 / 485
- Ethernet
- Expansion Box
- VK108US
- Keypad Installation
- Power Supply Information
- Keypad Layout Examples
- Logging In
- Dashboard
- Settings
- Licenses
- Capacity
- Access Key
- Monitor
- Network
- Configurator Software
- Installation
- The License Agreement appears:
- The Choose Destination Location screen appears:
- Preface
- Main Page
- Menu Bar
- Project
- Device
- Device Configuration
- Left Sidebar
- Controller
- Room
- Expander
- Library
- Device Library
- Properties
- Serial
- I/O
- ■ Controller
- ■ Expander
- Design
- Select Viewer
- Viewer
- Pages
- Right Sidebar
- Keypad
- Page Overview
- Edit
- Windows OS Button Limitation
- Page Objects
- ■ Page Properties
- ■ Label Properties
- ■ Slider Bar Properties
- ■ Button Properties
- Button / Slider Bar Action
- Adding Commands
- Library Value – use the drop-down menu to
- Flag Variable – clicking this button allows a Flag
- Slider Value - select this option to configure a
- Level - When an Advanced Slider Bar is selected on
- Advanced Options
- ■ Image Properties
- Layering Images
- Graphic Library
- Background Color
- Button
- Icon
- Device Interface
- Advanced Library
- Flag
- Condition & Action Overview
- ■ Listen to port / Query port
- Edit Return Message
- - Select string with fixed length
- - Select string with a non-fixed length
- - Drop-Down Menu
- ■ IO Input
- Digital Input (VDC)
- Digital Input (Dry Contact)
- To create a Switch Monitor:
- Macro
- (Continued from previous page.)
- Upload
- ATEN Database Generator
- My Library
- Menu Description
- Managing My Library
- Search
- Edit / Add New Device
- Text Command Tools
- IR
- ■ Digital Output
- ATEN Library
- Installing the App
- Button Sounds
- Demo
- WinViewer1 / iPad / Android1
- Control Pages
- Welcome
- Edit Viewer Profile
- Manage LAN Device
- PJLink Projector
- Telnet
- ONVIF
- TCP
- Set Password
- Log Report
- Report History
- Information
- Download Viewer Profile
- Downloading Profiles
- Safety Instructions
- General
- Technical Support
- International
- Specifications
- Limited Hardware Warranty
- What is covered by the Limited Hardware Warranty
Brand : ATEN
Model : VK1100
Category : Regulator