
X328BV-SR - Television Sceptre - Free user manual and instructions
Find the device manual for free X328BV-SR Sceptre in PDF.


| Product Type | LED TV |
| Screen Size | 31.5 inches (diagonal) |
| Display Resolution | 1366 x 768 (HD) |
| Aspect Ratio | 16:9 |
| Brightness | 180 cd/m² |
| Contrast Ratio | 5000:1 (Typical 1200:1) with Auto Contrast Enhancement |
| Response Time | 8 ms (gray to gray) |
| Viewing Angle | 178° / 178° (Horizontal/Vertical) |
| Backlight Life | >50,000 hours |
| Dimensions (with stand) | 28.78 x 18.39 x 7.95 inches |
| Dimensions (without stand) | 28.78 x 16.97 x 2.95 inches |
| Weight (with stand) | 8.84 lb |
| Weight (without stand) | 8.67 lb |
| Power Input | 100-240 VAC, 60/50 Hz, 3A Max (28W typical, 48W max) |
| Standby Power | < 1W |
| Speakers | 2 x 10W |
| Tuner | Hybrid NTSC/ATSC/QAM (optional) |
| Inputs | 1x RF (TV), 1x AV/YPbPr, 2x HDMI (HDMI2 with MHL), 1x VGA, 1x VGA Audio In, 1x USB |
| Outputs | 1x Digital Audio (SPDIF), 1x Headphone |
| Multimedia Playback | MP3, JPEG (Baseline), USB FAT32/FAT16 |
| Remote Control | Included with AAA batteries |
| Stand | Included (2 feet, 4 screws) |
| Wall Mount Pattern | 100 x 100 mm, M4 screws (max depth 6 mm) |
| Warranty | 1 year limited (parts and labor) |
Frequently Asked Questions - X328BV-SR Sceptre
User questions about X328BV-SR Sceptre
0 question about this device. Answer the ones you know or ask your own.
Ask a new question about this device
Download the instructions for your Television in PDF format for free! Find your manual X328BV-SR - Sceptre and take your electronic device back in hand. On this page are published all the documents necessary for the use of your device. X328BV-SR by Sceptre.
USER MANUAL X328BV-SR Sceptre
Congratulations on your new SCEPTRE X322BV-SR HD Display purchase. Thank you for your support. To ensure safety and many years of trouble free operation of your Sceptre Display, please read the manual carefully before making any adjustments, and keep them in a safe place for future references. We hope you enjoy your new SCEPTRE Display Unit.
For technical assistance, please call 1800-788-2878 and select option 3 or email our tech support group at SceptreTS@sceptre.com.
For all other inquiries, please call 1800-788-2878 and select option 4 or email our customer service group at SceptreCS@sceptre.com. Live Chat also available during business hours M-F 8:30AM-5:30PM.
We recommend you register your SCEPTRE HD Display Unit at our online website http://www.sceptre.com/registration.html.
This display is MHL ^TM ready using HDMI 2.
WARNING: TO REDUCE THE RISK OF FIRE OR ELECTRIC SHOCK, DO NOT EXPOSE THIS PRODUCT TO RAIN OR MOISTURE.

CAUTION
RISK OF ELECTRIC SHOCK DO NOT OPEN

CAUTION: TO REDUCE THE RISK OF ELECTRIC SHOCK, DO NOT REMOVE COVER (OR BACK). NO USER-SERVICEABLE PARTS INSIDE. REFER SERVICING TO QUALIFIED SERVICE PERSONNEL.

The lightning flash with arrow-head symbol, within an equilateral triangle, is intended to alert the user to the presence of uninsulated "dangerous voltage" within the product's enclosure that may be of sufficient magnitude to constitute a risk of electric shock to persons.

The exclamation point within a triangle is intended to alert the user to the presence of important operating and maintenance (servicing) instructions in the literature accompanying the product.
CAUTION: TO PREVENT ELECTRIC SHOCK, MATCH WIDE BLADE OF PLUG TO WIDE SLOT, FULLY INSERT.
CAUTION:
DO NOT PLACE THIS PRODUCT ON AN UNSTABLE CART, STAND, TRIPOD, BRACKET, OR TABLE. THE PRODUCT MAY FALL CAUSING SERIOUS PERSONAL INJURY AND SERIOUS DAMAGE TO THE PRODUCT. USE ONLY WITH A CART, STAND, TRIPOD, BRACKET, OR TABLE RECOMMENDED BY THE MANUFACTURER OR SOLD WITH THE PRODUCT. FOLLOW THE MANUFACTURER'S INSTRUCTIONS WHEN INSTALLING THE PRODUCT AND USE MOUNTING ACCESSORIES RECOMMENDED BY THE MANUFACTURER. A PRODUCT AND CART COMBINATION SHOULD BE MOVED WITH CARE. QUICK STOPS, EXCESSIVE FORCE, AND UNEVEN SURFACES MAY CAUSE THE PRODUCT AND CART COMBINATION TO OVERTURN.

WARNING: FCC Regulations state that any unauthorized changes or modifications to this equipment not expressly approved by the manufacturer could void the user's authority to operate this equipment.
CAUTION:
This product satisfies FCC regulations when shielded cables and connectors are used to connect the unit to other equipment. To prevent electromagnetic interference with electric appliances such as radios and televisions, use shielded cables and connectors for connections.
"Note to CATV system installer: This reminder is provided to call the CATV system installer's attention to Article 820-40 of the National Electrical Code that provides guidelines for proper grounding and, in particular, specifies that the cable ground shall be connected to the grounding system of the building, as close to the point of cable entry as practical."
This product utilizes tin-lead solder, and fluorescent lamp containing a small amount of mercury. Disposal of these materials may be regulated due to environmental considerations. For disposal or recycling information, please contact your local authorities or the Electronic Industries Alliance: www.eia.org
Electricity is used to perform many useful functions, but it can also cause personal injuries and property damage if improperly handled. This product has been engineered and manufactured with the highest priority on safety. However, improper use can result in electric shock and / or fire. In order to prevent potential danger, please observe the following instructions when installing, operating and cleaning the product. To ensure your safety and prolong the service life of your Liquid Crystal Television, please read the following precautions carefully before using the product.
- Read these instructions.
- Keep these instructions.
- Heed all warnings.
- Follow all instructions.
- Do not use this apparatus near water.
- Clean only with dry cloth.
- Do not block any ventilation openings. Install in accordance with the manufacturer's instructions.
- Do not install near any heat sources such as radiators, heat registers, stoves, or other apparatus (including amplifiers) that produce heat.
- Do not defeat the safety purpose of the polarized or grounding-type plug. A polarized plug has two blades with one wider than the other. A grounding type plug has two blades and a third grounding prong. The wide blade and the third prong are provided for your safety. If the provided plug does not fit into your outlet, consult an electrician for replacement of the obsolete outlet.
- Protect the power cord from being walked on or pinched particularly at the plugs, convenience receptacles, and the point where they exit from the apparatus.
- Only use attachments/accessories specified by the manufacturer.
- Use only with the cart, stand, tripod, bracket, or table specified by the manufacturer, or sold with the apparatus. When a cart is used, use caution when moving the cart/apparatus combination to avoid injury from tip-over.
- Unplug this apparatus during lightening storms or when unused for long periods of time.
- Refer all servicing to qualified service personnel. Servicing is required when the apparatus has been damaged in any way, such as power-supply cord or plug is damaged, liquid has been spilled or objects have fallen into the apparatus, the apparatus has been exposed to rain or moisture, does not operate normally, or has been dropped.
This product is designed and manufactured to operate within defined design limits, and misuse may result in electric shock or fire. To prevent the product from being damaged, the following rules should be observed for the installation, use and maintenance of the product. Read the following safety instructions before operating the display. Keep these instructions in a safe place for future reference.
- To avoid the risk of electric shock or component damage, switch off the power before connecting other components to the DISPLAY.
- Unplug the power cord before cleaning the DISPLAY. Please use the included custom bezel cleaning cloth for cleaning the bezel of the DISPLAY only. Do not use a liquid or a spray cleaner for cleaning the product. Do not use abrasive cleaners.
• Always use the accessories recommended by the manufacturer to insure compatibility. - When moving the DISPLAY from an area of low temperature to an area of high temperature, condensation may form on the housing. Do not turn on the DISPLAY immediately after this to avoid causing fire, electric shock or component damage.
- Do not place the DISPLAY on an unstable cart, stand, or table. If the DISPLAY falls, it can injure a person and cause serious damage to the appliance. Use only a cart or stand recommended by the manufacturer or sold with the DISPLAY.
- Any heat source should maintain a distance of at least 5 feet away from the DISPLAY, i.e. radiator, heater, oven, amplifier etc. Do not install the product too close to anything that produces smoke or moisture. Operating the product close to smoke or moisture may cause fire or electric shock.
- Slots and openings in the back and bottom of the cabinet are provided for ventilation. To ensure reliable operation of the DISPLAY and to protect it from overheating, be sure these openings are not blocked or covered. Do not place the DISPLAY in a bookcase or cabinet unless proper ventilation is provided.
- Never push any object into the ventilation slots of the DISPLAY. Do not place any objects on the top of the Product. It could short circuit parts causing a fire or electric shock. Never spill liquids on the DISPLAY.
- Do not use the DISPLAY in a portrait format (by rotating 90 degrees) under high temperature environment (25°C or higher), since this would retard heat dissipation and would eventually damage the DISPLAY.
- The DISPLAY should be operated only from the type of power source indicated on the label. If you are not sure of the type of power supplied to your home, consult your dealer or local power company.
- The power cable must be replaced when using different voltage from that specified in the User Manual. For more information, contact your dealer.
- The DISPLAY is equipped with a three-pronged grounded plug, a plug with a third (grounding) pin. This plug will fit only into a grounded power outlet as a safety feature. If your outlet does not accommodate the three-wire plug, have an electrician install the
correct outlet, or use an adapter to ground the appliance safely. Do not defeat the safety purpose of the grounded plug.
- Do not overload power strips and extension cords. Overloading can result in fire or electric shock.
- The wall socket should be installed near the equipment and should be easily accessible.
- Only the marked power source can be used for the product. Any power source other than the specified one may cause fire or electric shock.
- Do not touch the power cord during thunderstorms. To avoid electric shock, avoid handling the power cord during electrical storms.
- Unplug the unit during a lightning storm or when it will not be used for a long period of time. This will protect the DISPLAY from damage due to power surges.
- Do not attempt to repair or service the product yourself. Opening or removing the back cover may expose you to high voltages, the risk of electric shock, and other hazards. If repair is required, please contact your dealer and refer all servicing to qualified service personnel.
- Keep the product away from moisture. Do not expose this appliance to rain or moisture. If water penetrates into the product, unplug the power cord and contact your dealer. Continuous use in this case may result in fire or electric shock.
- Do not use the product if any abnormality occurs. If any smoke or odor becomes apparent, unplug the power cord and contact your dealer immediately. Do not try to repair the product yourself.
- Avoid using dropped or damaged appliances. If the product is dropped
and the housing is damaged, the internal components may function abnormally. Unplug the power cord immediately and contact your dealer for repair. Continued use of the product may cause fire or electric shock.
- Do not install the product in an area with heavy dust or high humidity. Operating the product in environments with heavy dust or high humidity may cause fire or electric shock.
- Hold the power connector when removing the power cable. Pulling the power cable itself may damage the wires inside the cable and cause fire or electric shocks. When the product will not be used for an extended period of time, unplug the power connector.
- To avoid risk of electric shock, do not touch the connector with wet hands.
- Insert batteries in accordance with instructions while using the remote control. Incorrect polarities may cause damage and leakage of the batteries, operator injury and contamination the remote control.
-
If any of the following occurs please contact the dealer:
-
The power connector fails or frays.
- Liquid sprays or any object drops into the DISPLAY.
- The Display is exposed to rain or other moisture.
- The Display is dropped or damaged in any way.
- The performance of the Display changes substantially.
- Operating environment: Temperature: 5°C \~ 35°C, Humidity: 10% to 90% non-condensing, Altitude: 0\~10,000 ft.
Television Antenna Connection Protection\*\*
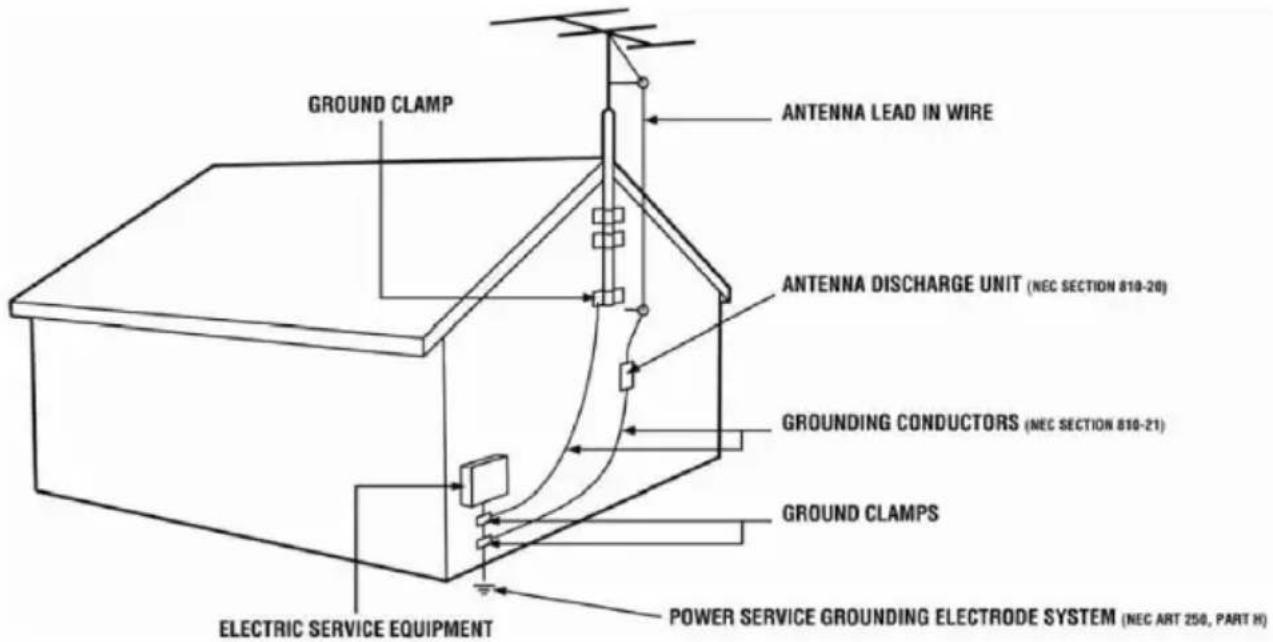
External Television Antenna Grounding
If an outside antenna or cable system is to be connected to the display, make sure that the antenna or cable system is electrically grounded to provide some protection against voltage surges and static charges. Article 810 of the National Electrical Code,
ANSI/NFPSA 70, provides information with regard to proper grounding of the mast and supporting structure, grounding of the lead-in wire to an antenna discharge unit, size of the grounding conductors, location of antenna discharge unit, connection to grounding electrodes, and requirements of the grounding electrode.
Lightning Protection
For added protection of the display during a lightning storm or when it is left unattended or unused for long periods of time, unplug the display from the wall outlet and disconnect the antenna or cable system.
Power Lines
Do not locate the antenna near overhead light or power circuits, or where it could fall into such power lines or circuits.
**TV tuner optional
The SCEPTRE DISPLAY is packaged in a carton. Any standard accessories are packed separately in another carton. Due to the size and weight of the product, it is suggested that it must be handled by a minimum of 2 or more persons. Since the glass can be easily scratched or broken, please handle the product gently. Never place the unit on a surface with the glass facing downwards unless it is on protective padding. When opening the carton, check that the product is in good condition and that all standard accessories and items are included. Save the original box and all packing materials for future shipping needs.
Package Contents
SCEPTRE Display x 1
TV Foot x 2
Screws x 4
Power Cord x 1
Warranty Card x 1
Display Remote Control (AAA Batteries included) x 1
User Guide x 1 (Complete manual available online at sceptre.com)
Installation
Please read the user manual carefully before performing the installation. Please use the power cord designated for the product. When an extension cord is required, use one with the correct power rating. The cord must be grounded and the grounding feature must not be defeated. The product should be installed on a flat surface to avoid tipping. Space should be maintained between the back of the product and the wall for proper ventilation. If you would like to mount the display onto the wall, please see page 8, and 10 for additional information. Avoid installing the product in the kitchen, bathroom or other places with high humidity dust or smoke, so as not to shorten the service life of the electronic components. Please ensure the product is installed with the screen in landscape orientation. Any 90° clockwise or counterclockwise installation may induce poor ventilation and successive component damage.
Attaching or Removing the Stand
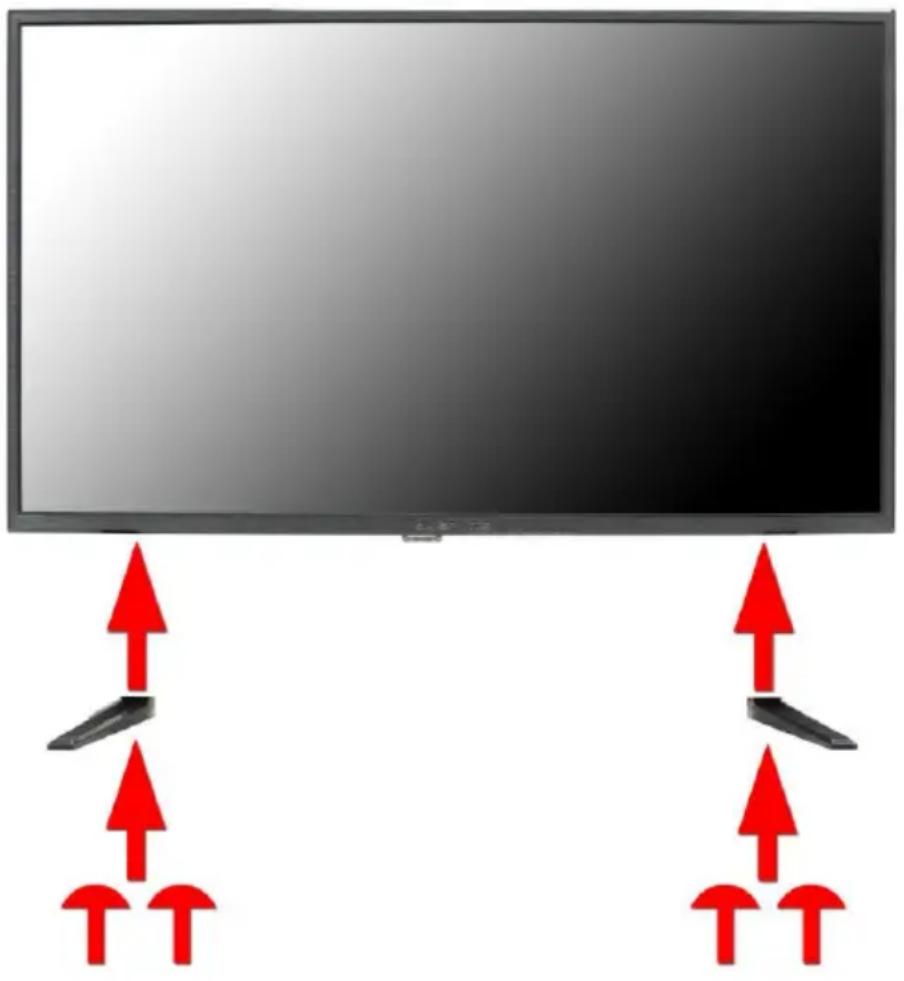
- To install the 2 TV feet, attach them to the bottom of the TV and screw in the 4 screws indicated in the picture. Remember the SCEPTRE word on the feet faces the front. To remove them, simply unscrew the 4 screws and the feet will come off.
natural_image
Diagram showing two identical devices with red arrows pointing upward and downward, no text or symbols present.- To finalize your installation of the Display, please read the following:
a. If you are placing the Display on a stand, we would recommend you to use a Display safety strap (not included) in order to minimize the possibility of the Display toppling over.
b. If you are mounting the Display on the wall
c. Make sure the wall is structurally safe for the weight of the Display
d. Make sure the wall mount kit is compatible with the Display
e. Read and follow all instructions provided by the wall mounting kit.
f. Securely install all screws and connections.
Table of Contents
IMPORTANT INFORMATION......2
SAFETY INSTRUCTIONS....3
SAFETY INSTRUCTIONS......4
IMPORTANT INFORMATION......6
Television Antenna Connection Protection** 6
Opening the Package 7
Package Contents....7
Installation 7
Attaching or Removing the Stand....8
Table of Contents 9
Identifying Front and Rear Panel....10
Front View 10
Rear View Mounting Pattern....10
TV Control Buttons 11
Rear View Connections....12
SCEPTRE Remote Control....13
Installing Batteries to the Remote Control 15
Connection Suggestions....16
If You Have Digital Cable without Cable Box or Antenna.... 16
Connecting DVD Player with Component YPbPr....17
Connecting Wii ^™ with Composite....18
Connecting Cable or Satellite boxes with HDMI....19
Connecting to a PC with HDMI 20
Connecting a Digital Audio Receiver with Coax SPDIF....21
Switching Sources....22
Ready to Watch Some HD video? ....Error! Bookmark not defined.
If You've Connected Antenna to the display....Error! Bookmark not defined.
OSD (On Screen Display) Controls 24
Via Remote Control 24
Via Display Side Panel Buttons....24
OSD (On Screen Display) Options 25
PICTURE......Error! Bookmark not defined.
SOUND......Error! Bookmark not defined.
CHANNEL Error! Bookmark not defined.
PARENTAL......Error! Bookmark not defined.
SETUP......Error! Bookmark not defined.
OTHERS......Error! Bookmark not defined.
Detailed Explanations....36
USB Connection Explained....36
Closed Captioning (digital and analog) Explained 38
MHL Explained 39
Direct Function Buttons 40
Ratings Explained 41
Aspect Ratio Explained 43
Shortcuts to Browsing Channels 44
How do I clean the display? 45
Troubleshooting 46
Call Us If You Need Help! 49
Specification....50
LIMITED PRODUCT WARRANTY....52
Disclaimer, Trademarks, & Copyright Information 54
FCC Compliance Statement 55
Recycling Information 55
Identifying Front and Rear Panel
Front View
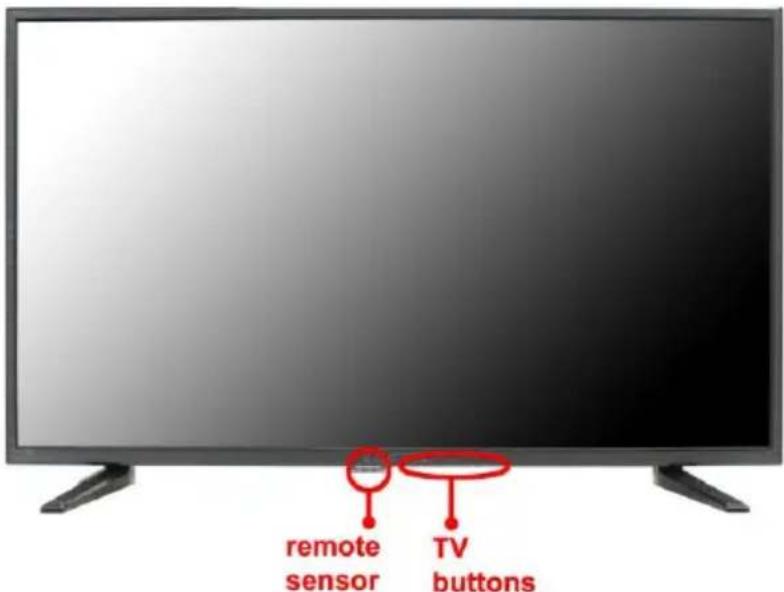
INDICATOR LIGHT – The light is red when power is plugged in but the display is not turned on. The light turns blue when the display is turned on. The display might take 10 – 12 seconds to power on. This is considered to be normal.
REMOTE SENSOR – The remote sensor receives all the commands from the remote control.
Rear View Mounting Pattern
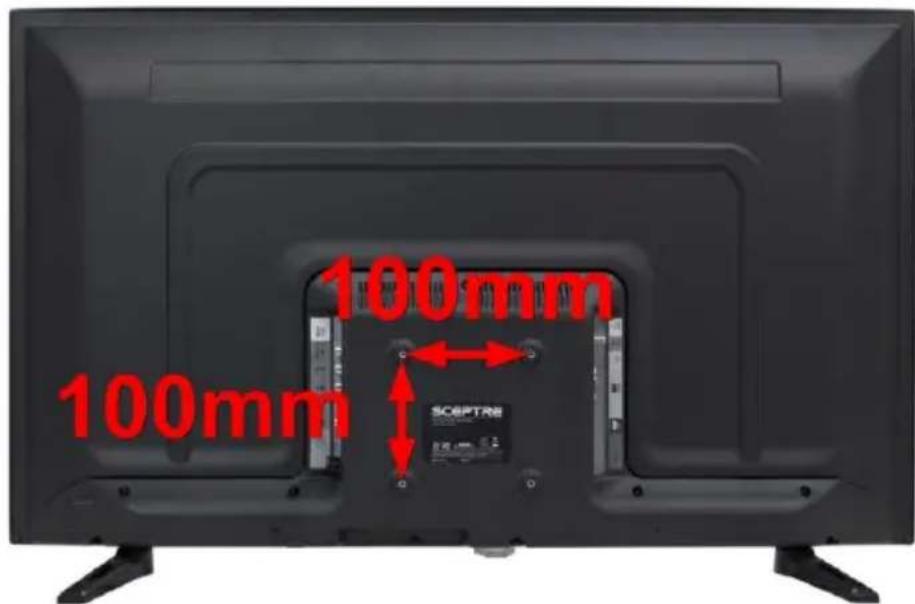
Mounting Specification: 100mm x 100mm using 4 screws sized at M4 (not included). Length of screw should not exceed 6mm. Please Note: The 6mm length of screw refers to how deep the screw can go inside the mounting holes. When you're buying screws, you should add the original 6mm to the thickness of your mounting plate in order to get the total screw length.
TV Control Buttons
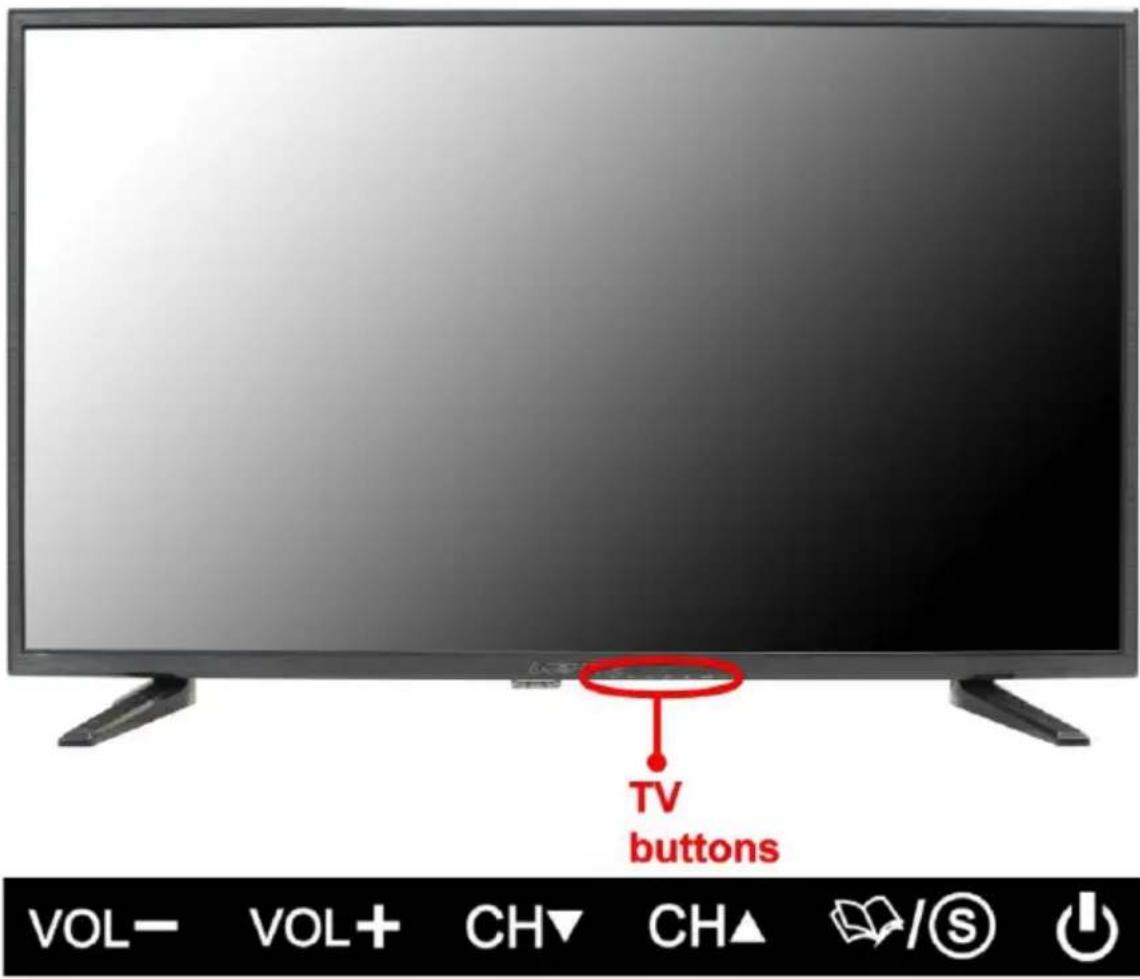
- VOL(-) – This button decreases the display's volume. If a sub-menu is active, pressing this button will move the selection left.
- VOL(+) – This button increases the display's volume. If a sub-menu is active, pressing this button will move the select right.
- CH(▼) – This button changes the display channel down. If the OSD is active, this button functions as down for the menu.
- CH(▲) – This button changes the display channel up. If the OSD is active, this button functions as up for the menu.
- ☐/☐ – Press this button quickly to activate the On Screen Display (OSD). If a sub-menu is active, pressing this button will exit the OSD. A long press (or pressing and holding down the button for 2 seconds) will activate the SOURCE menu, allowing the user to select various inputs of the display. While the OSD is active, a long press would functions as the enter button. Going into various options for adjustment.
- ⏻ – Turn on the display by pressing the button once. Press the button again to turn off the display.
Rear View Connections
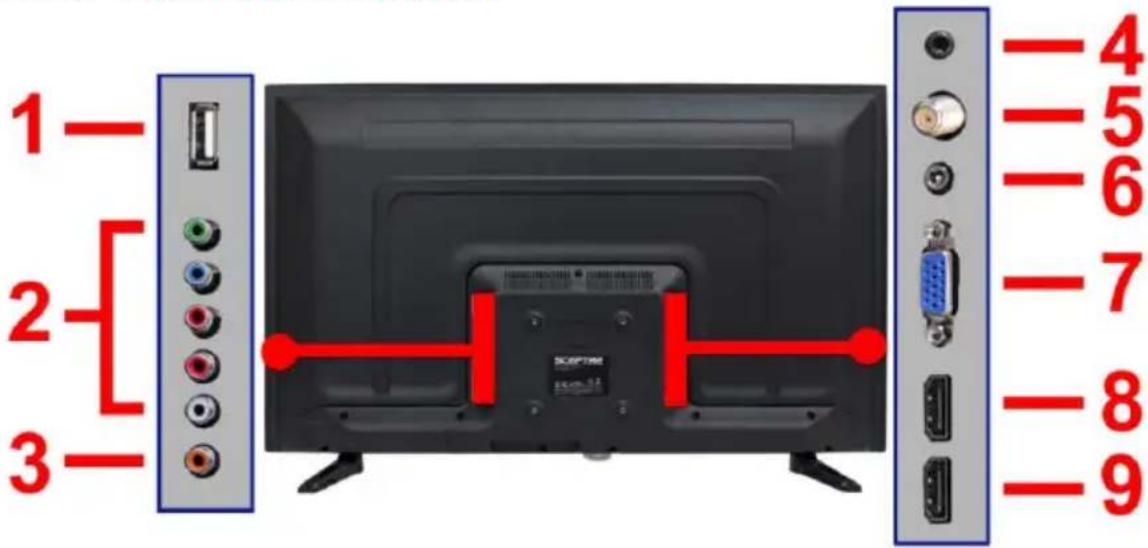
- USB – USB connects to USB flash drives for playing music and picture. The USB port is also used for updating the display's firmware.
- YPbPr/AV – This connection port is for DVD players or satellite / cable set-top boxes that use component or composite cables. For YPbPr connect green, blue, and red for video, and then connect white for left channel audio, and red for right channel audio. For AV connect the yellow plug to the green port, connect white for left channel audio, and red for right channel audio.
- SPDIF - This connection port is used for sending out digital audio signals to digital surround sound receivers. The orange (Coaxial SPDIF OUT) connector sends out either bit-stream or PCM digital sound signal to a home theater receiver with digital optical input.
- HEADPHONE – This connection is for headphones to be attached to the display.
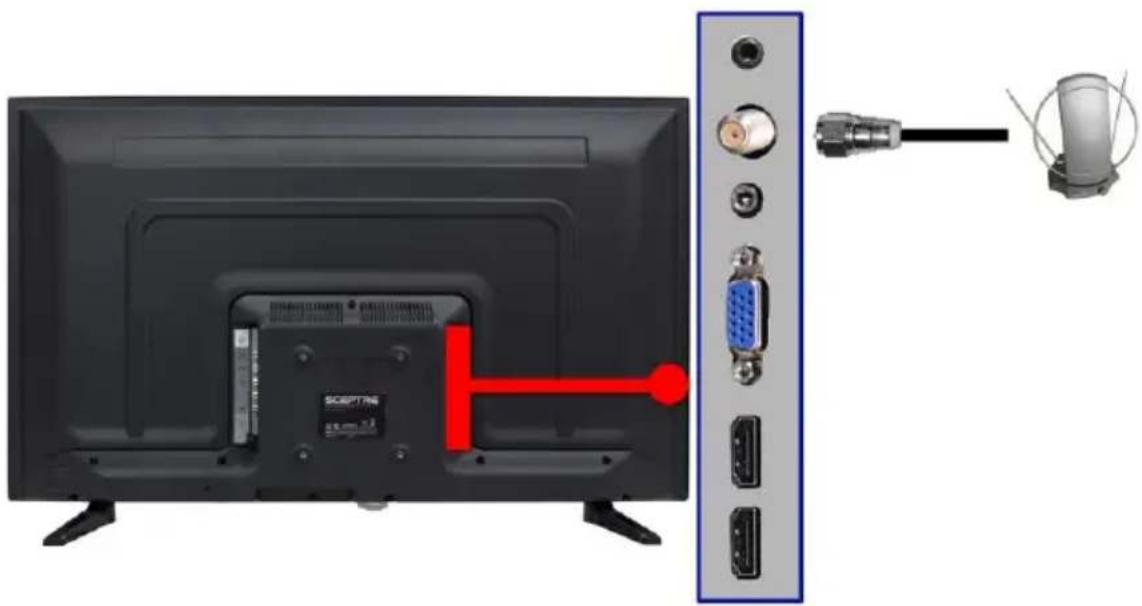
- TV(optional) – This connection is for analog cable without the cable box or over-the-airwave antennas. The tuner is a hybrid tuner that tunes to both analog and digital channels. This connection uses coaxial RF cable. For over-the airwave digital stations please check http://www.antennaweb.org. This tuner DOES NOT support QAM. For digital cable, you WILL need a cable box.
- Audio In - This connection port is for people who want to provide audio to the display when using a PC or a DVI video device. The sources use 3.5mm mini-jack audio cable.
- VGA - This connection port connects to a PC for video using VGA cable. Be sure to connect your audio cable to the VGA Stereo input if you want sound out of VGA video source.
- HDMI2/MHL – HDMI connects to devices that use HDMI cable, such as Blu-ray or HD DVD player, or HD cable / satellite set-top box. This connection port receives pure digital audio and high definition signal through one single cable. This port also can accept a HDCP video device for video. HDMI 2 also doubles as the MHL connection for cell phones. MHL is a protocol where the display will show what your cell phone screen shows. If your cell phone supports MHL you can purchase a MHL cable from any electronic store and connect it to HDMI 2 and also your cell phone. Make sure the display's source is changed to HDMI 2 and turn on your cell phone. You should see an image of your cell phone screen.
- HDMI1 – HDMI connects to devices that use HDMI cable, such as Blu-ray or HD DVD player, or HD cable / satellite set-top box. This connection port receives pure digital audio and high definition signal through one single cable. This port also can accept a HDCP video device for video.
Please Note:
- This display features a power saving function which will turn off the display automatically after 10 minutes of idling on a connection with no signal. This feature is present on all connection.
• This display does NOT support QAM under (the optional) TV tuner.
This remote control follows SONY's universal remote code. To find the actual code you need to consult your cable or satellite tech support.
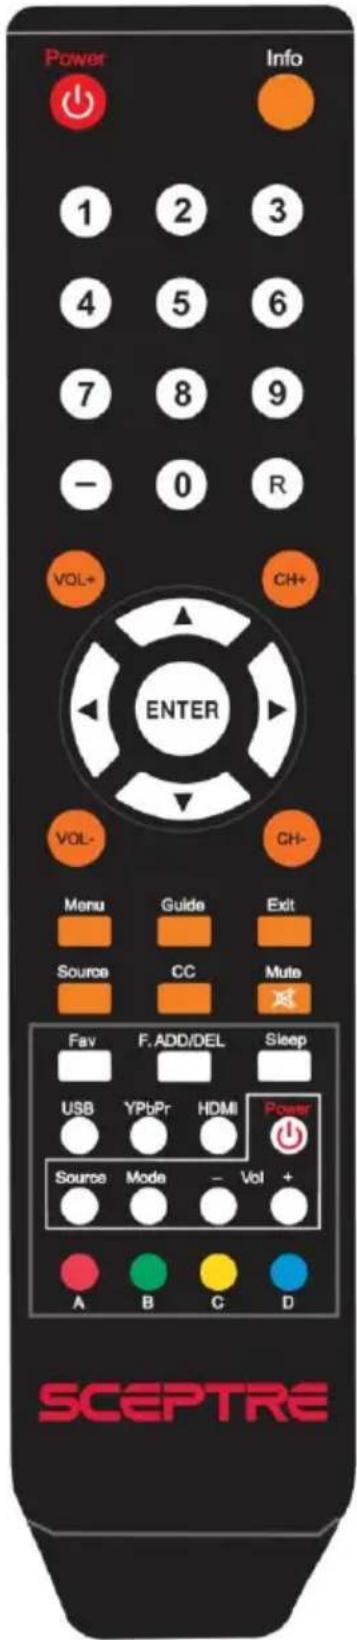
GENERAL FUNCTION BUTTONS
- POWER – Turns the display on or off.
- INFO – Shows the display info.
- NUMBER BUTTONS (0-9) – Press 0-9 to select a TV channel directly when you are watching the display. The channel will change after 2 seconds.
- (-) – Inserts the dash for selecting digital channels directly.
- R – Returns to the previous channel.
- VOL(+)/VOL(-) – Press the VOL buttons to increase or decrease the sound level.
- ▲/▼/◄/►/ENTER – These directional buttons allow you to move around in the display's menu. Press the ENTER button when you want to select a particular option.
- CH(+)/CH(-) – Press the CH buttons to switch to the next or previous channel.
- MENU – Brings up the main display menu on the screen.
- GUIDE – Opens the current digital channel information guide (antenna only).
- EXIT – Exit the main display menu on the screen.
- SOURCE – Press this button to cycle through INPUT source.
- CC – Cycles between different closed captioning modes.
- MUTE – Turns the sound off from the display. To un-mute either press VOL(+) or press the MUTE button again.
- FAV – Gives you your list of favorite channels.
- F.ADD/DEL – Adds or Deletes current channel from favorite list.
- SLEEP – Turns the TV off in a specific set of time dependent on your selection.
- USB – This button switches the source to USB.
- YPbPr - This button switches the source to YPbPr.
- HDMI – This button switches the source to HDMI.
The following buttons are functions designed to work with the optional, Sceptre Sound Bar.
- POWER – This button turns on the sound bar.
- SOURCE – This button selects the sound bar's source.
- MODE - This button selects the sound bar's sound modes.
- VOL(-) – This button decreases the volume of the sound bar.
- VOL(+) – This button increases the volume of the sound bar.
Color Function Buttons
- A - This button has no function assigned.
- B – This button turns on or off the TV's voice guidance for the visually impaired.
- C - This button has no function assigned.
- D - This button has no function assigned.
Please Note:
- Buttons encircled by the word SOUND BAR are to be used with a Sceptre's sound bar only.
Installing Batteries to the Remote Control
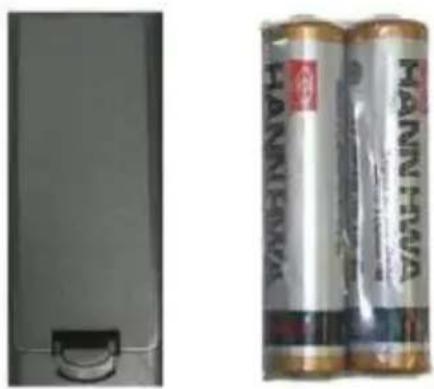
Please insert two AAA batteries into the remote control. Make sure that you match the (+) and (-) symbols on the batteries with the (+) and (-) symbols inside the battery compartment. Afterwards, re-attach the battery cover.
Please note:
- Only use AAA batteries.
- Do not mix new and old batteries. This may result in cracking or leakage that may pose a fire risk or lead to personal injury.
- The batteries used with this product contain chemicals that are harmful to the environment. Please dispose the batteries in accordance with local laws and regulations.
- To preserve our environment, dispose of used batteries according to your local laws or regulations.
- Do not dispose of batteries with normal household waste.
- For more information please contact the local authority or your retailer where you purchased the product.
- Inserting the batteries incorrectly may also result in cracking or leakage that may pose a fire risk or lead to personal injury.
- Keep the batteries away from children and pets.
- If the remote control is not used for a long time, remove the batteries.
- Keep the remote control away from moisture, sunlight, and high temperatures.
• For Recycling Batteries please visit the web at http://www.call2recycle.org/
If You Have Digital Cable without Cable Box or Antenna...
natural_image
Back view of a flat-screen TV with attached cable and connector (no visible text or symbols)-
Make sure the power of HD display is turned off.
-
Connect the Coaxial RF cable from your antenna or digital cable to the (optional) TV port on the back of your HD display.
-
Turn on the HD display.
-
Follow the first time on screen instructions.
Please Note:
- Not all broadcasts are in High Definition (HD). Please refer to your local broadcasting stations for more information.
- The HD display's tuner is designed for HD displays specifically, therefore requires a stronger signal than normal TVs. If you cannot achieve that signal level with your antenna or cable, your HD display might lose picture or sound.
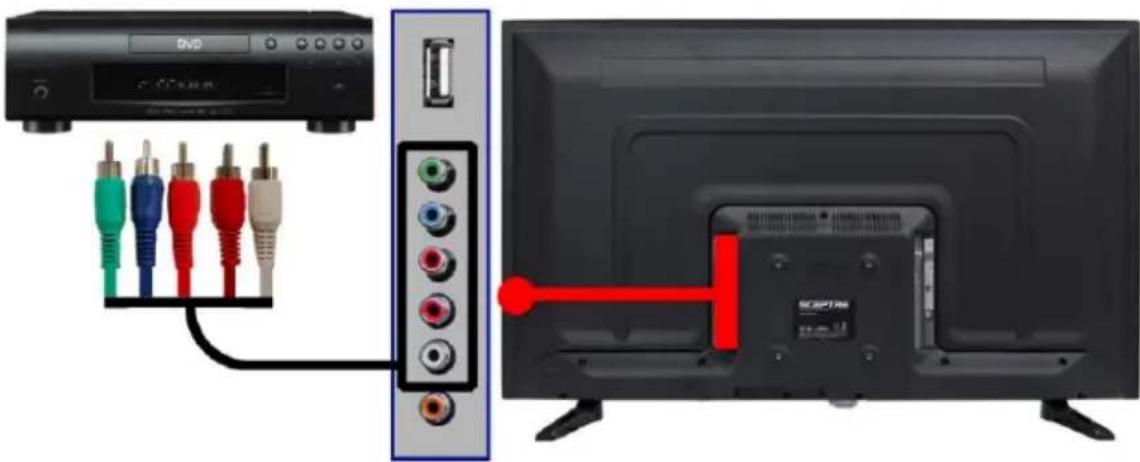
Connecting DVD Player with Component YPbPr...
natural_image
Diagram showing a DVD connected to a wall-mounted cable with colored cables (no text or symbols visible)- Make sure the power of HD display and your DVD player is turned off.
- Obtain a Component Cable. Connect the green color connector to both your DVD player and YPbPr's green connector port on the back of your HD display.
- Connect the blue color connector to both your DVD player and YPbPr's blue connector port on the back of your HD display.
- Connect the red color connector to both your DVD player and YPbPr's red connector port on the back of your HD display.
- Obtain a RCA Audio Cable. Connect the white color connector to both your DVD player and YPbPr's white connector port on the back of your HD display.
- Connect the red color connector to both your DVD player and YPbPr's red connector port on the back of your HD display.
- Turn on the HD display and your DVD player.
- Use the remote control's source button or the source button on the display to switch to YPbPr.
Please Note:
- Sometimes DVD players will not automatically output to YPbPr. You will need to configure your DVD player with AV connection first then switch to YPbPr. Please reference the DVD player's manual, to make sure the DVD player is configured to output correctly to the display.
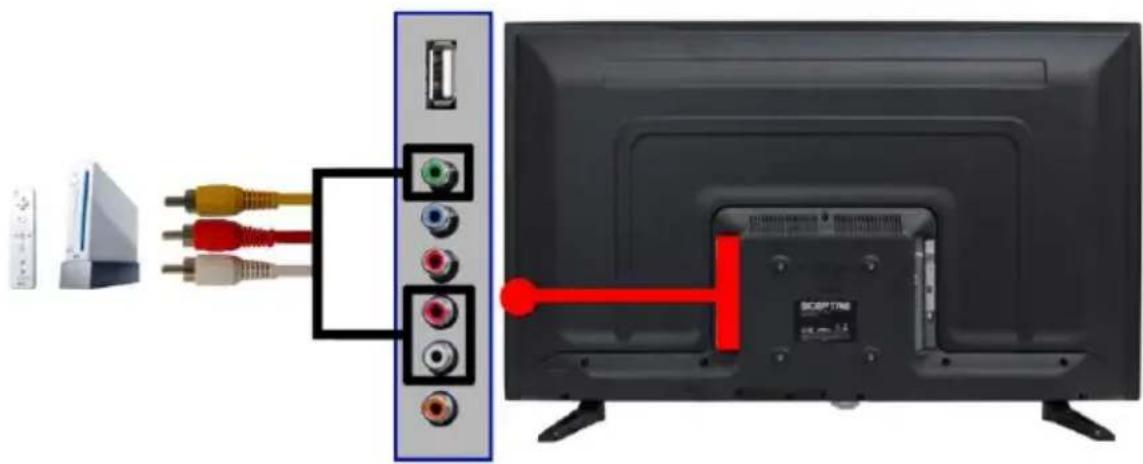
Connecting Wii™ with Composite...
natural_image
Diagram showing connections between a TV unit and a monitor, with colored cables and a red connector (no text or symbols present)-
Make sure the power of HD display and your Wii ^™ is turned off.
-
Obtain a Yellow Video Cable. Connect the Yellow Video connector to both your Wii™ and the green video connector port on the back side of your HD display.
-
Obtain a RCA Audio Cable. Connect the white color connector to both your Wii ^™ and AV's white connector port on the back side of your HD display.
-
Connect the red color connector to both your Wii ^™ and AV's red connector port on the back side of your HD display.
-
Turn on the HD display and your Wii ^TM .
-
Use the remote control's source button or the source button on the display to switch to AV.
Please Note:
- Make sure to read your Wii™ installation guide for further information.
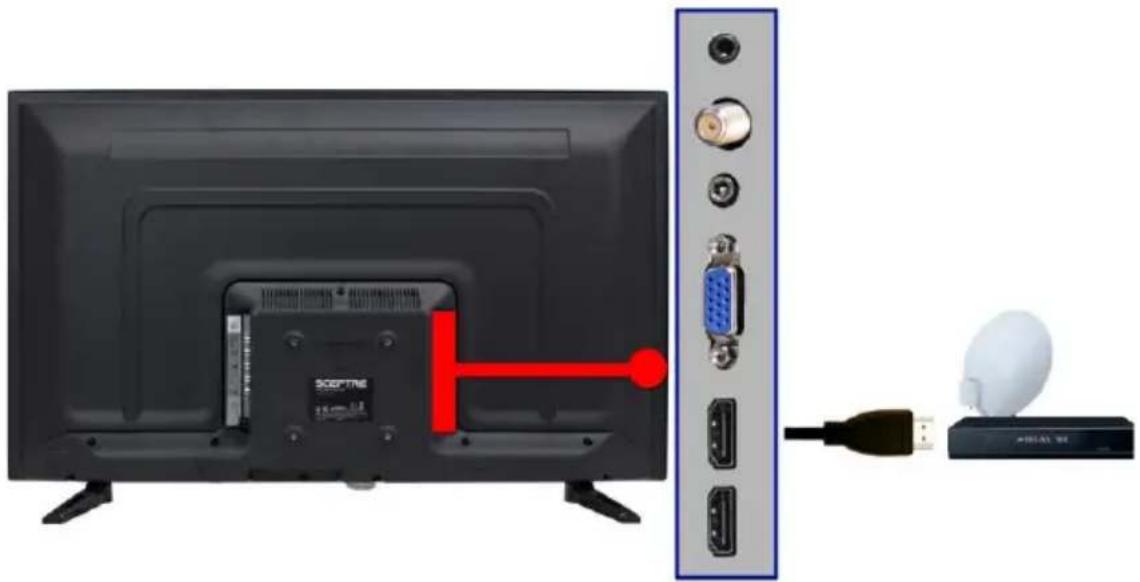
Connecting Cable or Satellite boxes with HDMI...
natural_image
Back view of a black TV remote with a red cable connector, connected to a USB cable via a white satellite dish (no text or symbols visible)- Make sure the power of HD display and your set-top box is turned off.
- Connect a HDMI cable to the HDMI output of your set-top box and the other end to the HDMI port on the back of your HD display.
- Turn on the HD display and your set-top box.
- Use the remote control's source button or the source button on the display to switch to HDMI.
Please Note:
- Please reference the set-top box's manual, to make sure the set-top box is configured to output correctly to the display.
- Sceptre's HD display supports SONY's universal remote code. Please look up SONY's codes in your universal remote's hand book.
Connecting to a PC with HDMI ...
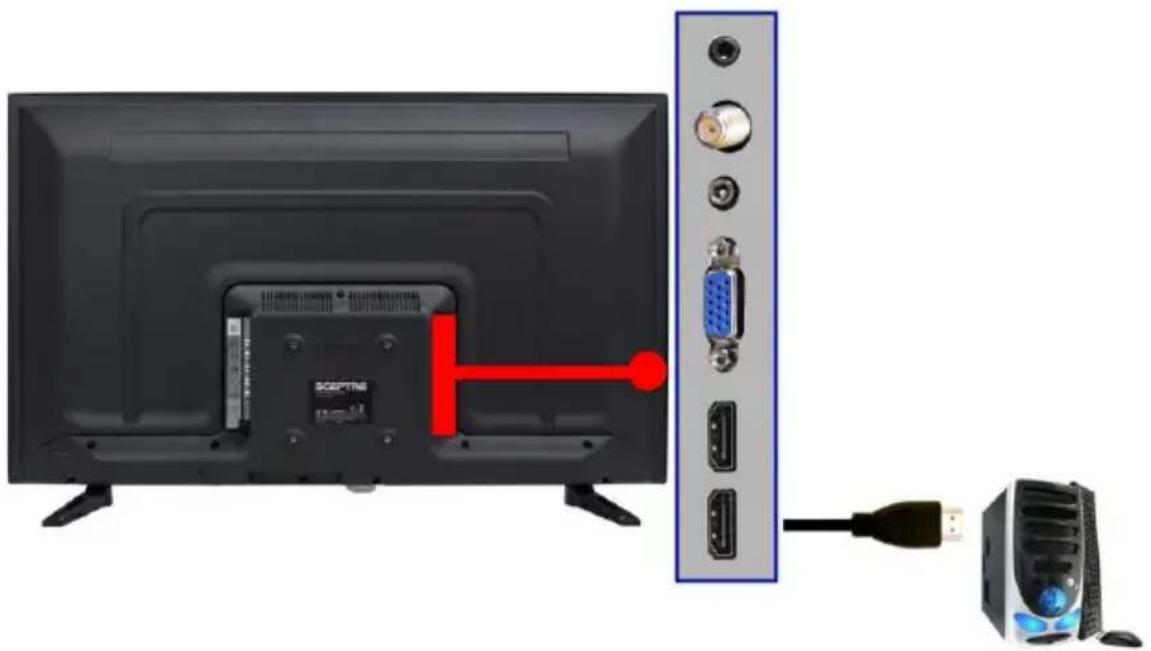
natural_image
Diagram showing a computer monitor connected to a server tower via USB cable (no text or symbols visible)- Make sure the power of HD display and your PC is turned off.
- Obtain a HDMI cable; connect to the HDMI output of your PC and the other end to the HDMI port on the back of your HD display.
- Turn on the power of the HD display and your PC.
- Use the remote control's source button or the source button on the display to switch to HDMI.
- Change your PC resolution to 1360x768 at 60 Hz refresh rate.
Please Note:
- For the best results, please set your PC resolution to 1360x768 at 60 Hz. Please refer to the PC or graphic card's manual for further instructions on how to set your resolution and refresh rate.
- Please refer to your PC manual for video output requirements of the video card.
•
Connecting a Digital Audio Receiver with Coax SPDIF...
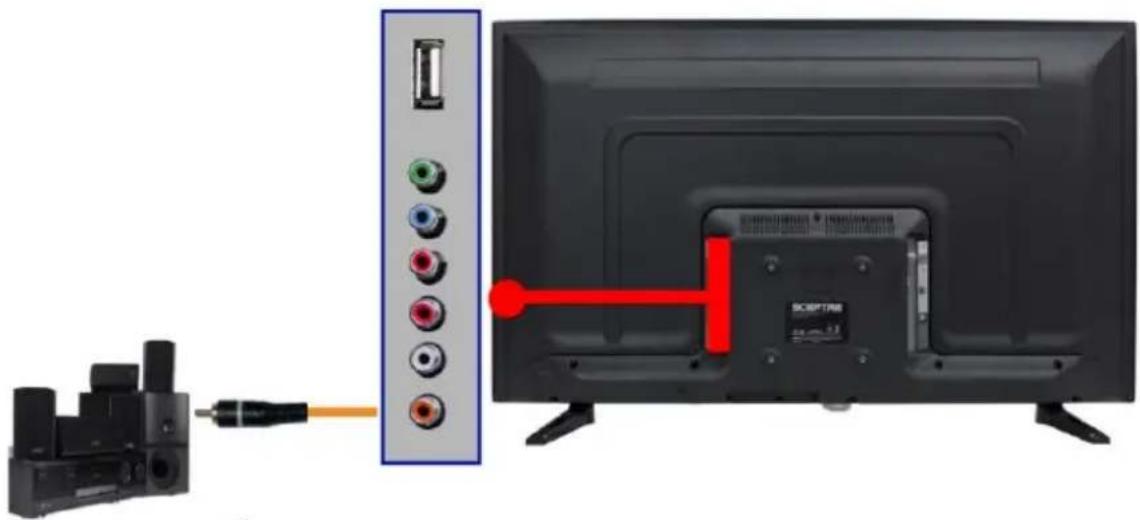
natural_image
Diagram showing a cable connector connected to a TV screen with an attached red cable (no text or symbols visible)-
Make sure the power of HD display and your receiver is turned off.
-
Obtain a coaxial SPDIF cable. Connect it to your receiver's coaxial SPDIF digital input and the coaxial SPDIF connection on the back of the HD display.
-
Turn on the HD display and your receiver.
Please Note:
- If you want pure digital stream for your receiver to decode, you must also configure the display's OSD Sound->Digital Audio Out function. Make sure the option is on 5.1CH.
- If your receiver is making static noises when receiving 5.1CH, you must use the PCM option instead.
- Please reference the receiver's manual as well, to make sure the receiver is configured to receive signals correctly from the display.
- The display's SPDIF out for 5.1CH is ONLY used for antenna/cable connection. Any other incoming audio signal will be passed out of SPDIF in PCM format.
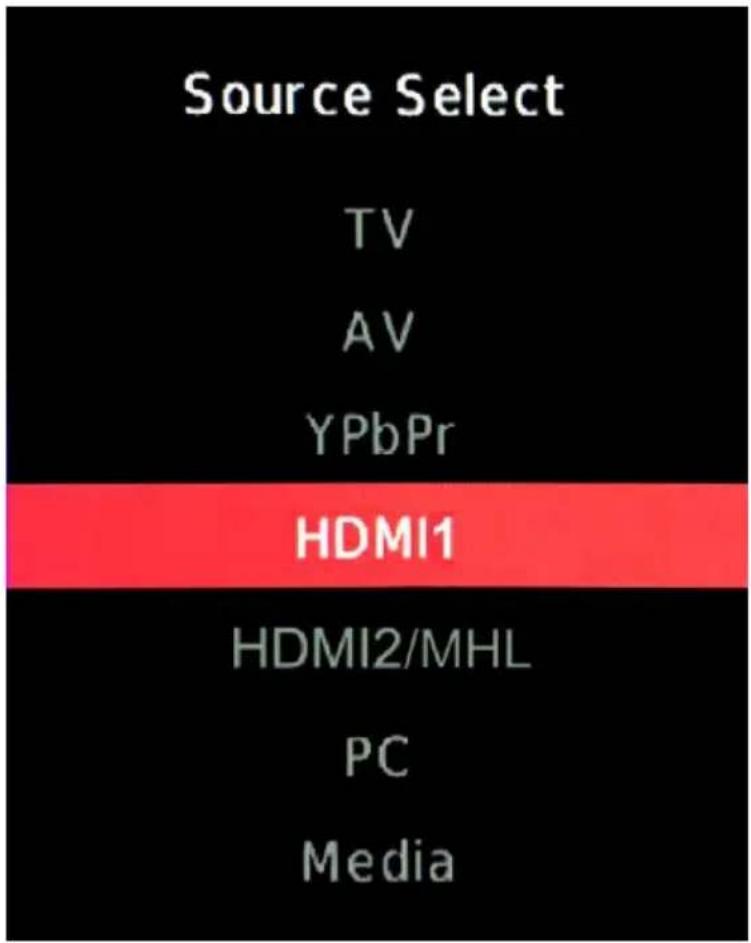
- Press the SOURCE button on the right of the display to switch sources.
Starting up the HDTV
- Make sure your power cable is connected and the standby red light in the front of the TV is lit up.
- Check all your connection cables off the side or the back of your TV and also your AV devices. Make sure they are all connected securely.
- Turn on your TV and other AV devices if necessary.
- Select the correct source according to the Connecting pages.
If You've Connected Antenna to the TV...
If an antenna or cable (without a cable box) is connected to your TV's tuner, you will need to go through an INITIAL SETUP process in order to watch the TV.
- Press MENU to open the menu
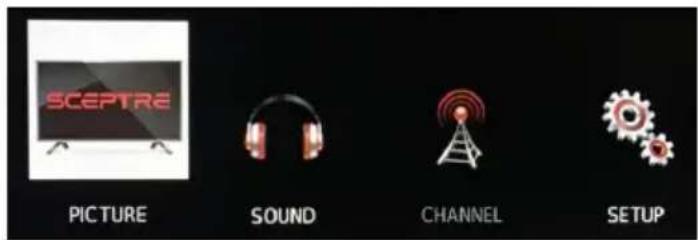
- Use the ◀ or ▶ button to select the CHANNEL icon and press ENTER.
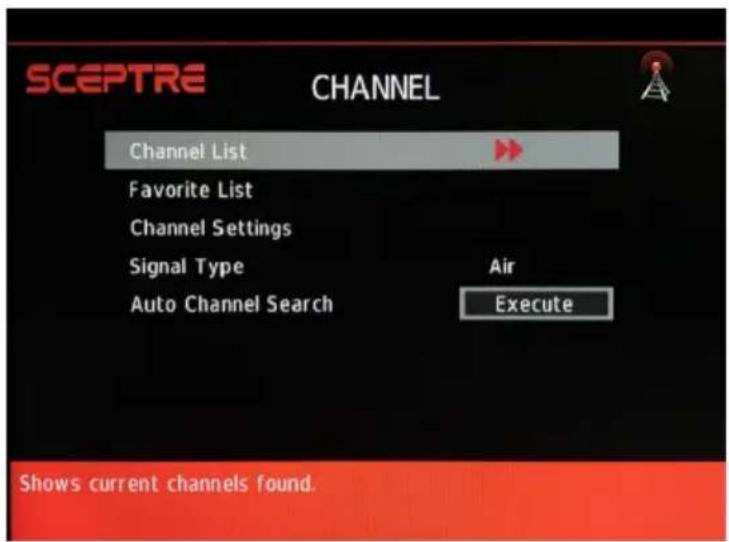
- Use the ▲ or ▼ buttons to highlight the signal type and press ◀ or ▶ to select your connection either AIR or CABLE.
- Use the ▲ or ▼ buttons to select AUTO CHANNEL SEARCH and press ENTER to scan for channels.
- Once the scanning finishes, you can begin to watch TV.
Via Remote Control
In order to adjust most of the options inside the On Screen Display (OSD), the picture below shows all the buttons used on the remote control.

- This button opens the OSD and also exits the OSD by going to the previous level of the OSD.
- This button exits the OSD entirely.
▲ – This button functions as up direction in the OSD.
▼ – This button functions as down direction in the OSD.
◀ – This button functions as left direction in the OSD.
▶ – This button functions as right direction in the OSD.
ENTER – This button changes the channel in conjunction with the number pad and also functions as ENTER for selecting options in the OSD.
Via Display Side Panel Buttons
In order to provide more than one type of OSD control buttons, the side panel's buttons have also been made functional for adjusting the OSD.

-
📋/® – Press this button quickly to activate the On Screen Display (OSD). If a sub-menu is active, pressing this button will exit the OSD. A long press (or pressing and holding down the button for 2 seconds) will activate the SOURCE menu, allowing the user to select various inputs of the display. While the OSD is active, a long press would function as the enter button. Going into various options for adjustment.
-
CH(▲/▼) – These buttons functions as up/down direction in the OSD.
- VOL(+/-) – These buttons functions as left/right direction in the OSD or increases/decreases the value of an option.
OSD (On Screen Display) Options
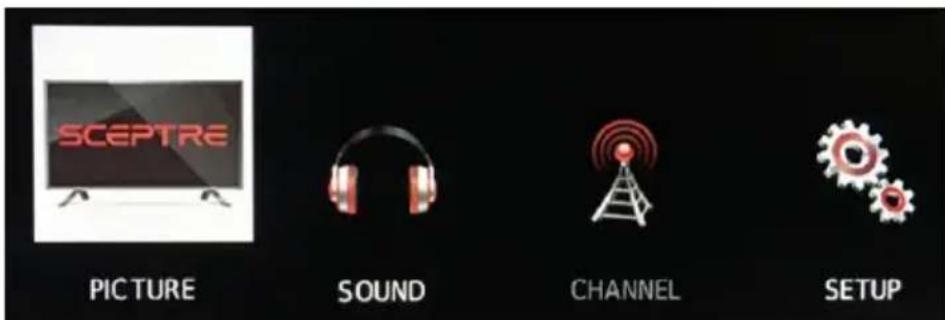
PICTURE – This main option has functions for changing the picture settings for all ports, such as tint, contrast, sharpness.
SOUND – This main option has functions for changing sound settings for all ports, such as SPDIF Type, treble, bass, and AVL....etc.
CHANNEL – This main option has functions for the tuner port, such as scanning channels, editing channels, audio language, tuner mode....etc.
PARENTAL – This main option has functions for only composite and (the optional) TV port. The purpose of this option is to block channels inappropriate for children.
SETUP – This main option has functions for all ports, OSD language, caption styles, time setup, and sleep.
OTHERS – This main option has functions for resetting the display.
PICTURE
This option allows users to adjust the Display's picture sharpness, color, tint, and other various functions.
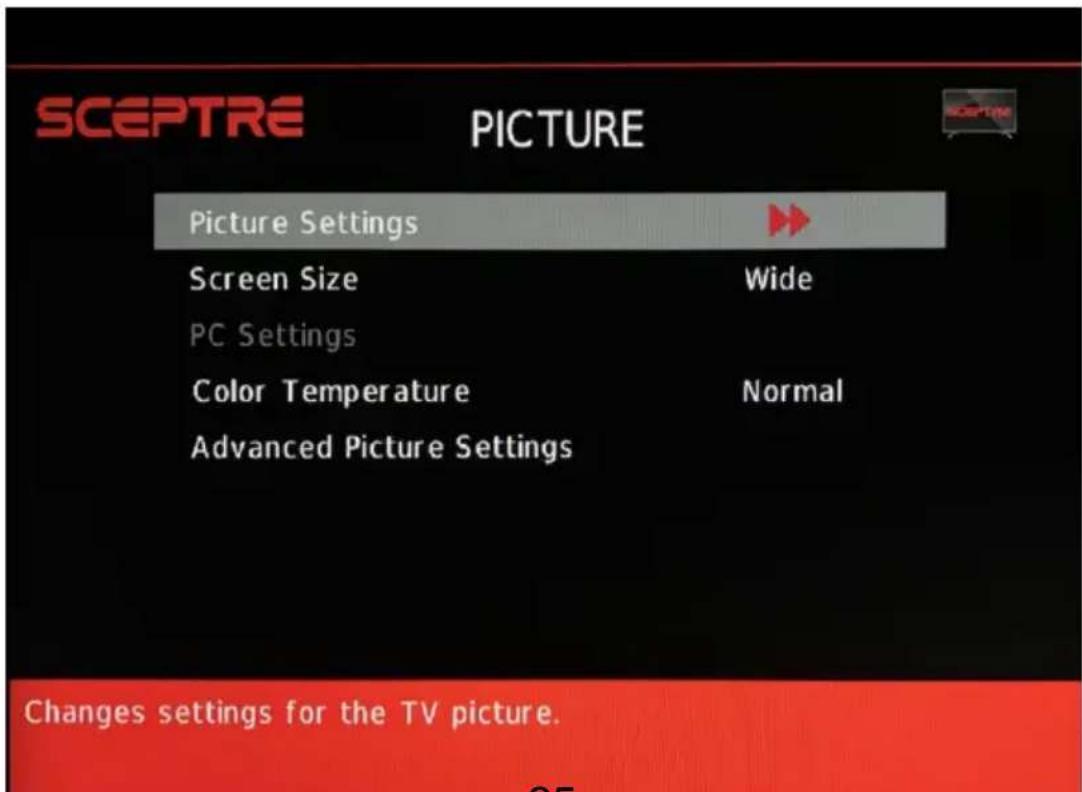
-
Press MENU to open the OSD.
-
Press ◀ or ▶ to select PICTURE and press ENTER.
-
Use ▲ or ▼ to select the one you want to adjust and ◀ or ▶ or ENTER to adjust them.
I. PICTURE SETTINGS
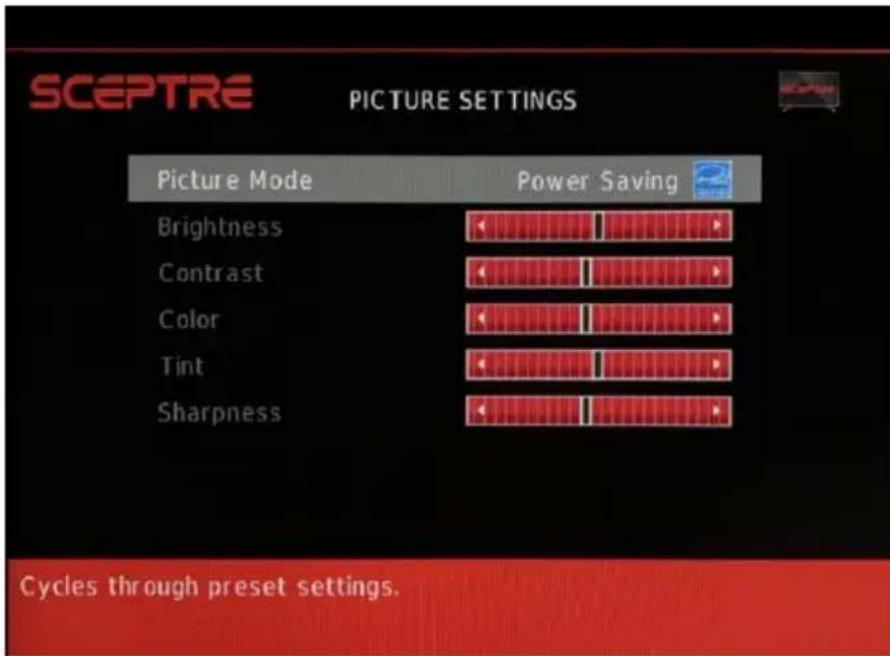
i. PICTURE MODE –This feature changes various color modes for the Display.
ii. BRIGHTNESS – This feature changes the picture's detail in dark colors.
iii. CONTRAST – This feature changes the difference between dark and bright objects.
iv. COLOR – This feature changes the amount of color in the picture.
v. TINT – This feature changes the white balance of the color.
vi. SHARPNESS – This feature changes the picture quality.
II. SCREEN SIZE – This feature changes the various aspects of the Display's video. (Normal, Wide, Cinema, Zoom, FULL 100%).
III. PC SETTINGS
i. AUTO ADJUST – This feature automatically adjusts the picture syncing in with the signal of the PC.
ii. HORIZONTAL POSITION – This feature adjusts the to the left or right position of the PC picture.
iii. VERTICAL POSITION – This feature adjusts the up or down position of the PC picture.
iv. CLOCK – This tunes in large increments the picture quality of the PC picture.
v. PHASE – This tunes in small increments the picture quality of the PC.
vi. RESET – This resets the settings of PC settings.
IV. COLOR TEMPERATURE – This feature adjusts the color temperature of the Display, giving warm, normal, cool, (warm being more red, cool being more blue and normal being neutral color).
V. ADVANCED PICTURE SETTINGS
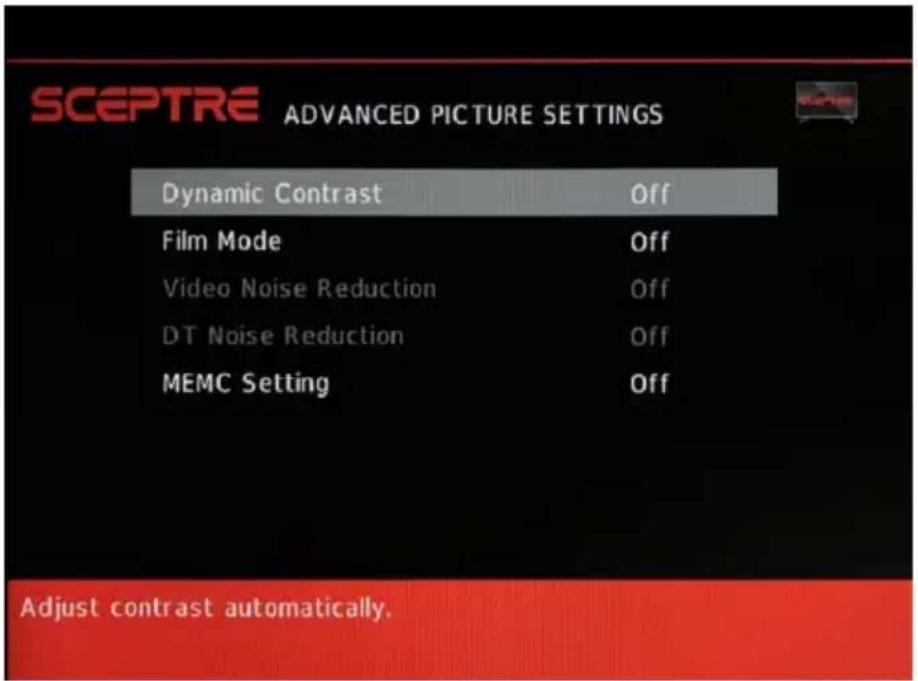
i. DYNAMIC CONTRAST – This feature allows the Display to automatically adjust the contrast of the Display depending on the picture you are viewing.
ii. FILM MODE – This feature is 24p that syncs with DVD movies, and should be enabled when viewing DVD video to allow smoother frame rate.
iii. VIDEO NOISE REDUCTION – This feature reduces general pixilation by blurring them.
iv. DT NOISE REDUCTION – This feature reduces DVD video pixilation by blurring them.
v. MEMC Setting – MEMC Stands for Motion Estimation Motion Compensation. This feature controls the picture smoothing picture effects.
SOUND
This option allows users to adjust the Display's sound functions.
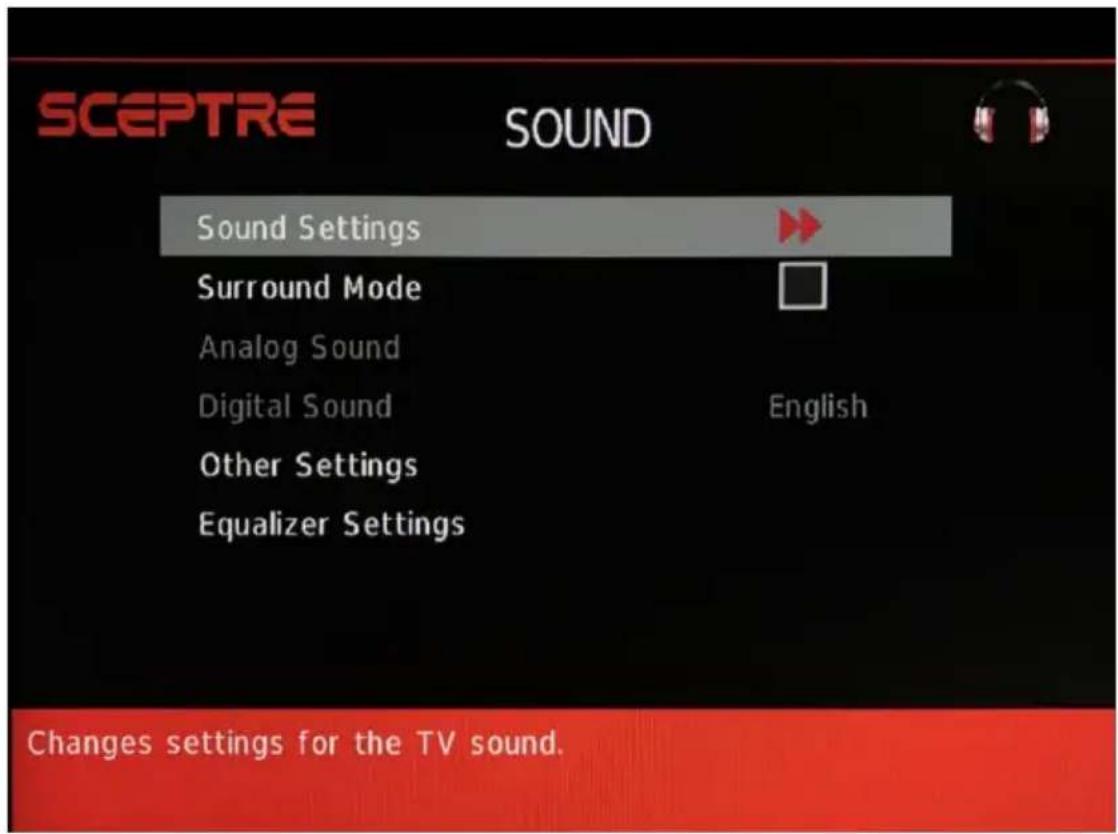
- Press MENU to open the OSD.
- Press ◀ or ▶ to select SOUND and press ENTER.
- Use ▲ or ▼ to select the one you want to adjust and ◀ or ▶ or ENTER to adjust them.
I. SOUND SETTINGS
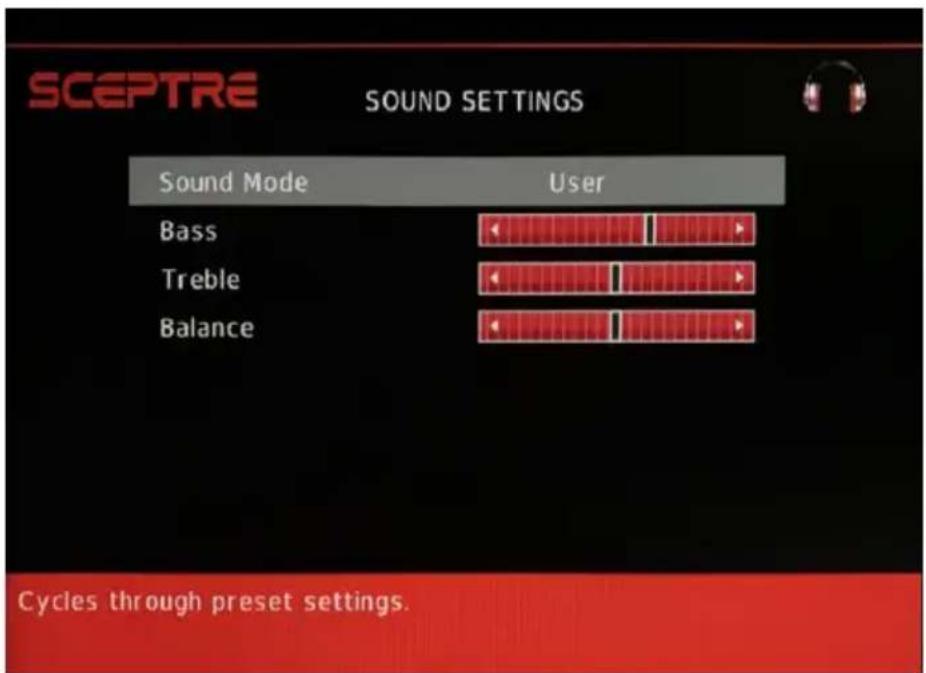
i. SOUND MODE – This feature switches between preset settings (presets include standard, soft, user, and dynamic).
ii. BASS – This feature adjusts the audio bass level of the Display.
iii. TREBLE – This feature adjusts the audio treble level of the Display.
iv. BALANCE – This feature adjusts the balance between the two speakers moving sound from left to right.
II. SURROUND MODE – This feature enables the Display two speakers to provide a wider sound effect.
III. ANALOG SOUND – This feature adjusts the second audio programming in analog channels.
IV. DIGITAL SOUND – This feature adjusts the digital second audio programming in digital channels.
V. OTHER SETTINGS
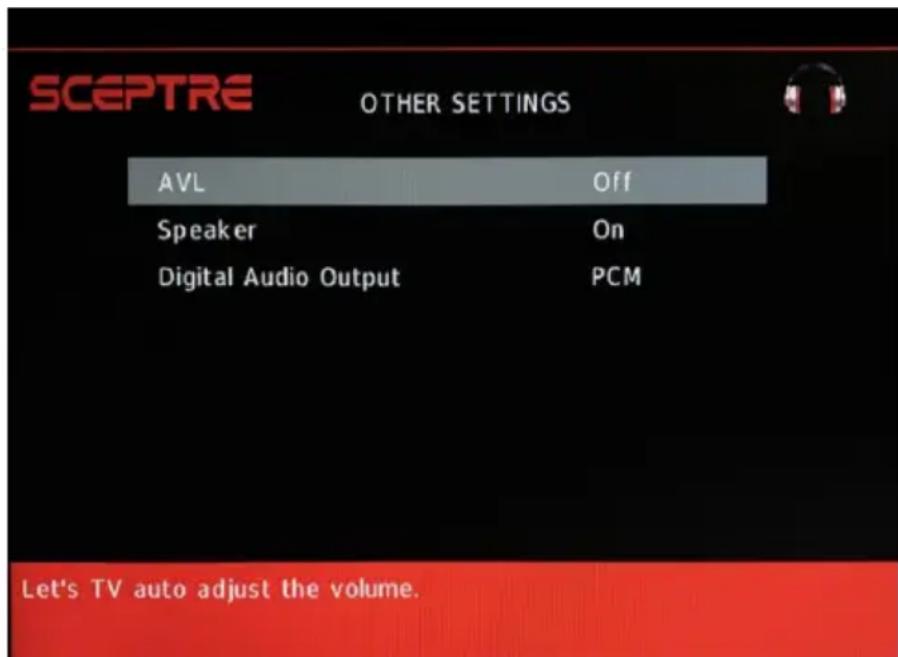
i. AVL – This feature adjusts the auto volume leveler enabling volume protection from overly loud commercials.
ii. SPEAKER – This feature turns the speakers on or off.
iii. DIGITAL AUDIO OUTPUT – This feature adjusts the digital audio output.
VI. EQUALIZER SETTINGS – This feature enables the internal equalizer of the speakers. You can adjust the settings individually or use the presets (user, off, rock, pop and jazz).
Please Note:
- Second audio programming is dependent on the support of the TV station you are watching. If they do not have a second audio programming (SAP), this function will not work.
CHANNEL (OPTIONAL)
This option allows user to adjust the TV's tuner functions.
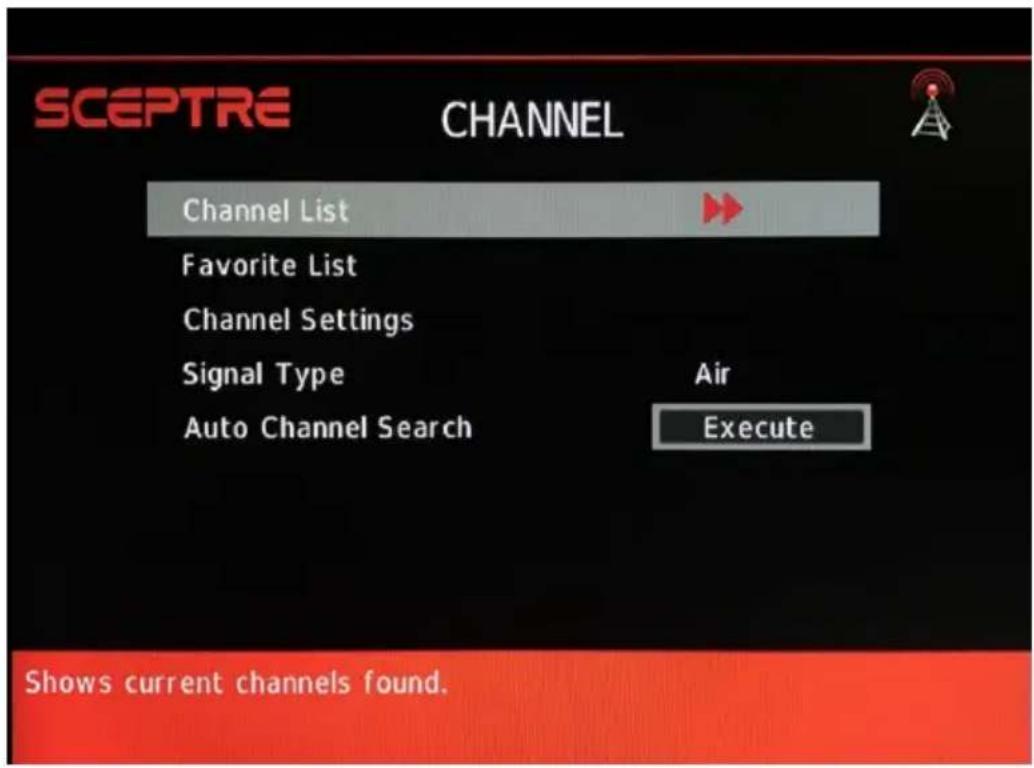
- Press MENU to open the OSD.
- Press ◀ or ▶ to select CHANNEL and press ENTER.
- Use ▲ or ▼ to select the one you want to adjust and ◀ or ▶ or ENTER to adjust them.
I. CHANNEL LIST – This feature gives you the list of channels currently found by the TV.
II. FAVORITE LIST – This feature gives the favorite list of channels added.
III. CHANNEL SETTING
i. CHANNEL NUMBER – This feature shows the channel number.
ii. SKIP – This feature tells you if you have chosen for channel to be skipped.
iii. FAVORITE – This feature tells you if you have the current channel in your favorite list. Press ENTER to add or remove the current channel into the favorite list.
iv. LABEL – This feature changes the name of the channel.
IV. SIGNAL TYPE – This feature allows you to switch between air (such as using antenna) and analog cable.
V. AUTO CHANNEL SEARCH – This feature searches channels automatically for you.
Please Note:
- The TV tuner in this TV does not support QAM for digital cable TV service.
SETUP
This option allows user to adjust the display's miscellaneous options.
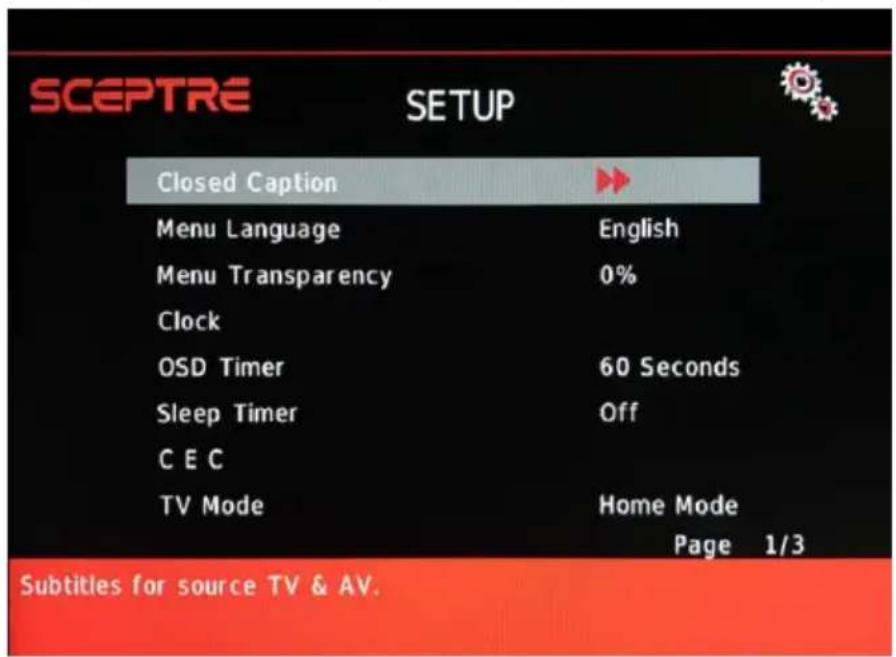
- Press MENU to open the OSD.
- Press ◀ or ▶ to select SETUP and press ENTER.
- Use ▲ or ▼ to select the one you want to adjust and ◀ or ▶ or ENTER to adjust them.
I. CLOSED CAPTION – This provides your display tuner, AV ports with subtitles.
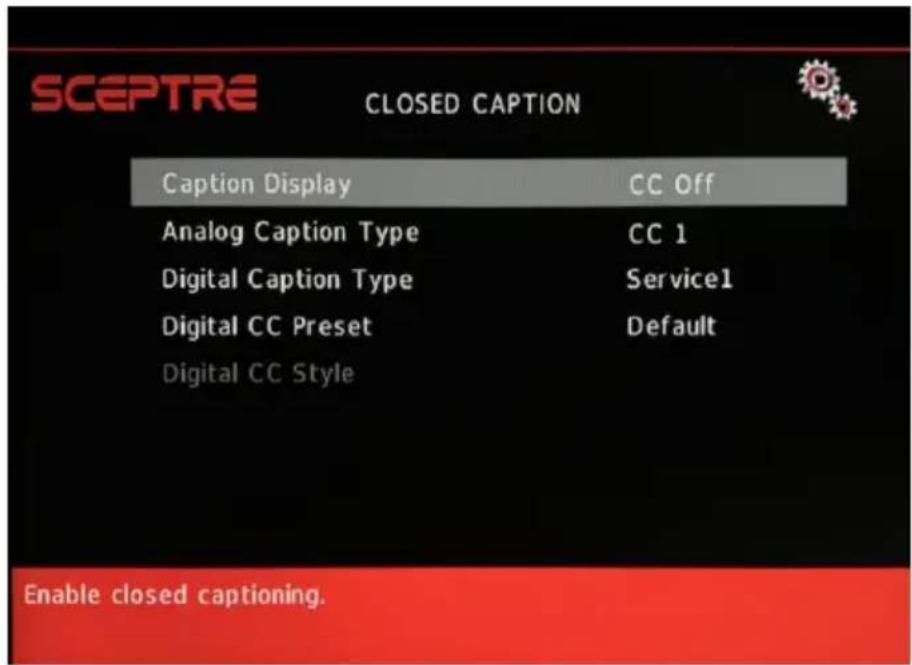
i. CAPTION DISPLAY – This turns on or off the closed captioning.
ii. ANALOG CAPTION TYPE – This chooses the subchannel that supplies the closed captioning. For United States, usually the setting is CC1. TEXT1-4 displays advertisements of the channel.
iii. DIGITAL CAPTION TYPE – This chooses the subchannel for digital channel closed captioning.
iv. DIGITAL CC PRESET – This unlocks users ability to change caption styles.
v. DIGITAL CC STYLE – This feature changes caption options of digital closed captioning.
a) CC SIZE – This changes the size of the text.
b) CC FONT – This changes the text font style.
c) CC OPACITY – This changes the transparency of the captioning.
d) TEXT COLOR – This changes the color of the text.
e) CC BACKGROUND OPACITY – This changes the transparency of background of the text.
f) CC BACKGROUND COLOR – This changes the color of the background.
II. MENU LANGUAGE – This function adjusts the language of the menu (English, French, and Spanish).
III. MENU TRANSPARENCY – This function adjusts the opacity of the OSD menu.
IV. CLOCK
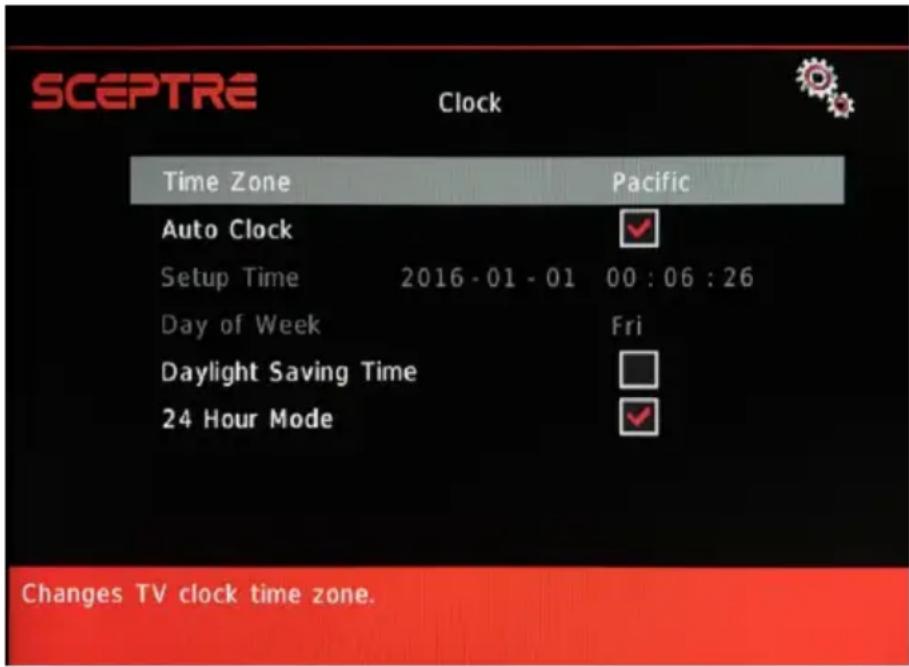
i. TIME ZONE – This adjusts the time zone for the display's clock.
ii. AUTO CLOCK – This feature sets the display clock to the TV channel's clock. (You must have antenna to use this feature.)
iii. SETUP TIME – This feature manually lets you adjust the time and date.
iv. DAY OF THE WEEK – This feature tells you the day of the week.
v. Daylight Savings Time – This feature toggles the daylight savings time options.
vi. 24 Hour Mode – This feature tells time in a 24 hour fashion instead of showing AM and PM.
V. OSD TIMER – This function adjusts the idle duration the MENU stays on the screen.
VI. SLEEP TIMER – This function adjusts the time duration for the display to turn off automatically.
VII. CEC – This function adjusts consumer electronics control options.
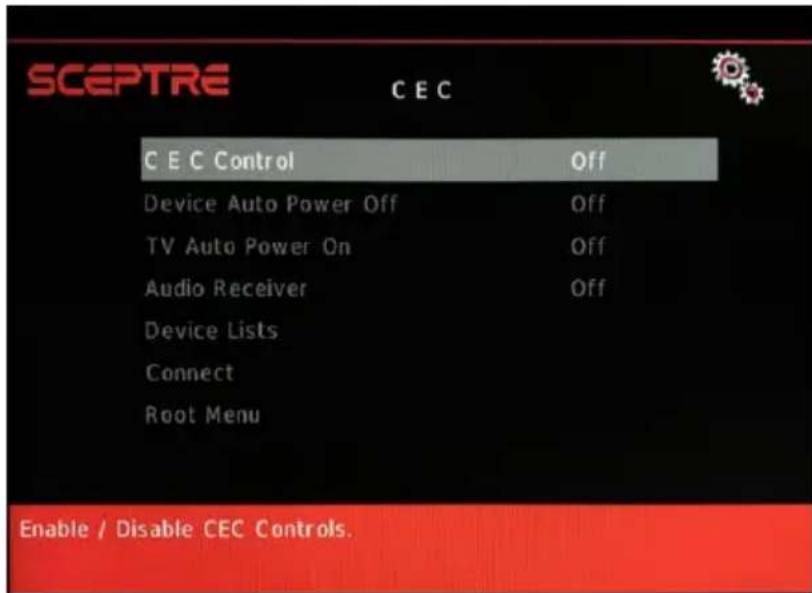
i. CEC CONTROL – This turns on or off the CEC controls.
ii. DEVICE AUTO POWER OFF – This enables the display remote to turn off CEC compatible devices (ie DVD player that supports CEC).
iii. TV AUTO POWER ON – This enables the display to turn on if you press the CEC compatible device's remote to power on.
iv. AUDIO RECEIVER – This enables the display to use audio return channel function via source HDMI 1.
v. DEVICE LISTS – This shows the current CEC compatible devices connected.
vi. CONNECT – This turns on CEC devices through this menu.
vii. ROOT MENU – This shows CEC compatible device's own menu.
VIII. TV MODE – Allows the user to select between RETAIL MODE or HOME MODE. Retail mode uses more electricity however offers better performance. Home mode offers less power usage at the expense of just regular performance.
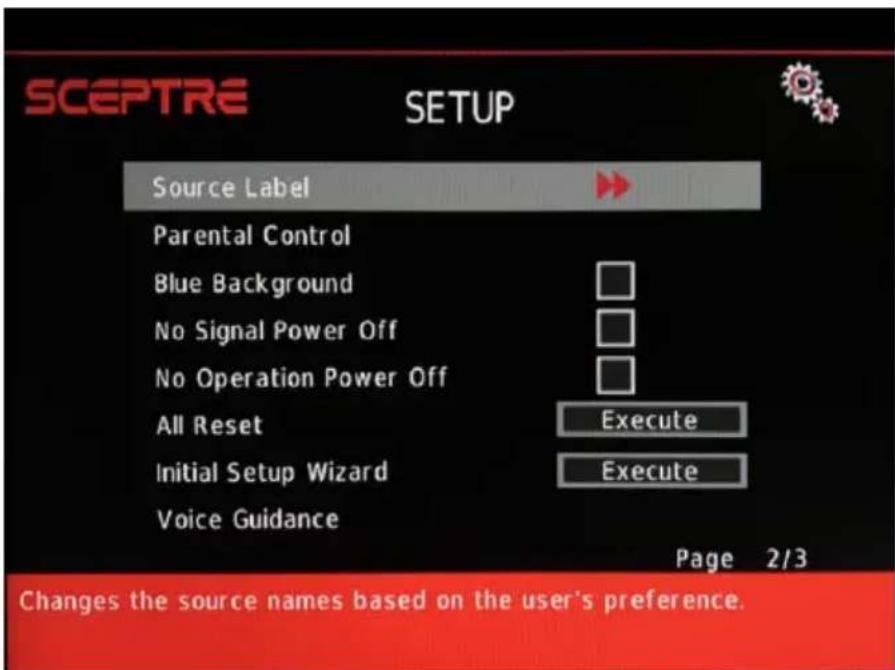
IX. SOURCE LABEL – This feature edits the name of each source.
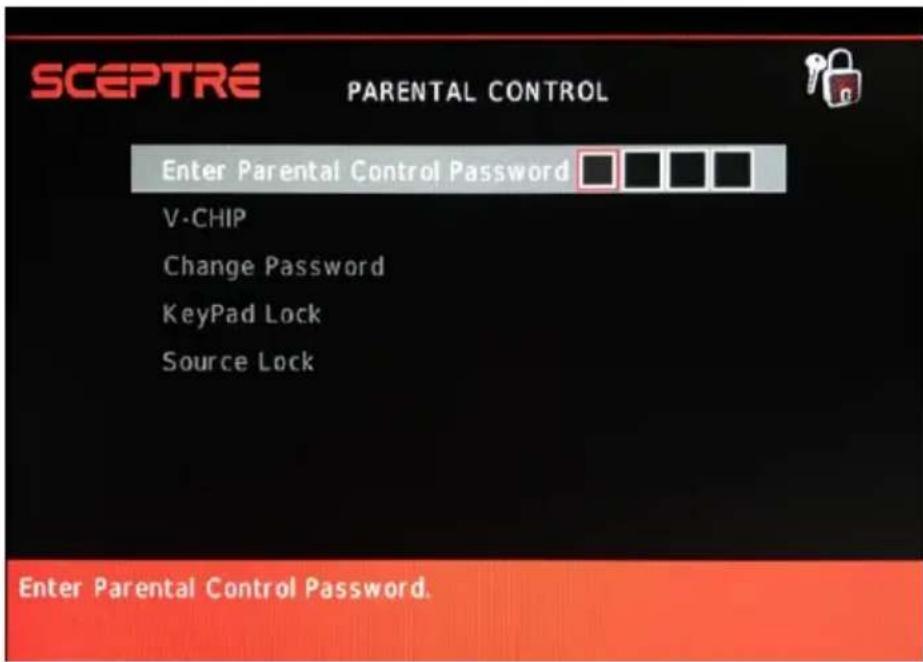
X. PARENTAL CONTROL – This feature allows you to input a password in order to access the other features. (The default password is "0000")
i. V-CHIP – This feature blocks shows under the TV tuner.
a) US V-CHIP
a. MOVIE RATING – This feature blocks movies.
b. TV RATING – This blocks shows based on TV ratings.
b) CANADA V-CHIP
a. ENGLISH RATING – This blocks English TV shows in Canada.
b. FRENCH RATING – This blocks French TV shows in Canada.
c) BLOCK UNRATED SHOW – This blocks TV shows with no ratings supplied.
d) DOWNLOADABLE RATING – This is a feature under the new V-chip where ratings can be downloaded from the channel.
e) CLEAR DOWNLOADABLE DATA – This feature clears the downloaded ratings data.
ii. CHANGE PASSWORD – This feature changes the password of the parental control function.
iii. KEYPAD LOCK – This feature locks the buttons on the display from functioning, except for the POWER button.
iv. SOURCE LOCK – This feature locks different sources from working.
XI. BLUE BACKGROUND – This feature gives the display a blue default background when there is no signal.
XII. NO SIGNAL POWER OFF – This feature turns the display off if there is no signal given to the display after a certain (10 minutes) time.
XIII. NO OPERATIONS POWER OFF – This feature turns the display off if there are no commands given to the display after a certain (2 hour) time.
XIV. ALL RESET – This reset all the options in the MENU back to its default values.
XV. INITIAL SETUP WIZARD – This function sends you back to the initial setup when you first turn on the display.
XVI. VOICE GUIDANCE – These options help the poor sighted with a voice description of the menu.
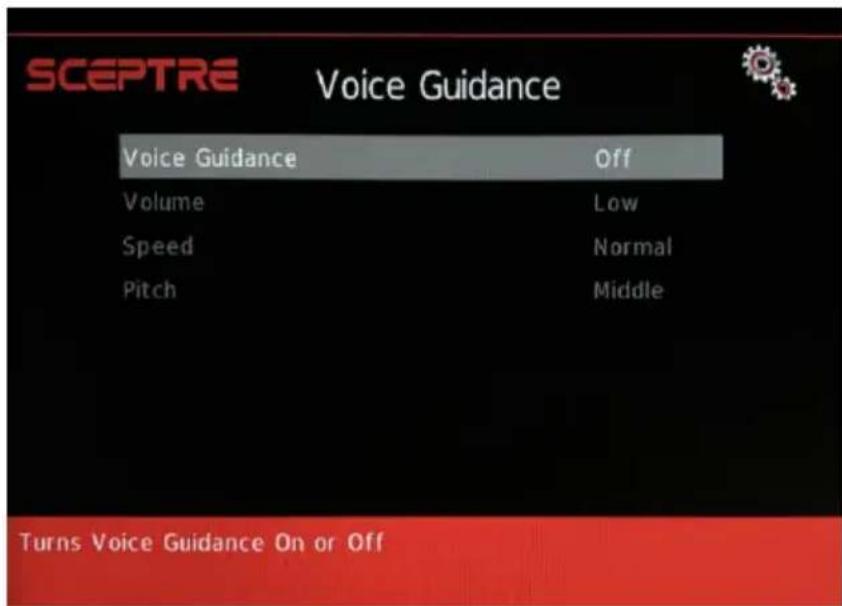
i. VOICE GUIDANCE – This display features voice guidance for the visually impaired. Enable this by pressing the green B button.
ii. VOLUME – This option changes the volume of the voice guidance speech.
iii. SPEED – This option changes the speed of the voice guidance speech.
iv. PITCH – This option changes the sound pitch of the voice guidance speech.
XVII. VIDEO DESCRIPTION – This option offers a speech description of the video being played. Video description is provided through the TV's secondary audio feature known as SAP. Depending on the TV station's support either you will hear the description through the main channel or the secondary audio channel.
Please Note:
- Please refer to RATINGS EXPLAINED for more information on ratings definitions.
- Downloadable rating and clear downloadable data might be grayed out depending on the TV stations support.
- Closed captioning is only available under AV, and antenna ports.
- Closed captioning depends on your TV program's support. Sometimes due to the TV channel or the signal, closed captioning will not be available.
• In United States, closed captioning under analog signals is CC1.
- In United States, closed captioning under digital signal is Service1.
- TEXT1-TEXT4 offers you local information; however it might not be support by your local broadcasting station. When no information is offered, you will see a large black box in the middle of the screen.
- Video description is dependent on the support of the program being played. Not all videos will support this feature.
USB Connection Explained
This Display is equipped with a USB port. The USB ports displays pictures or play MP3 files. To use this feature connect a USB flash drive to the USB port of the Display and press the source button to select USB as your source.


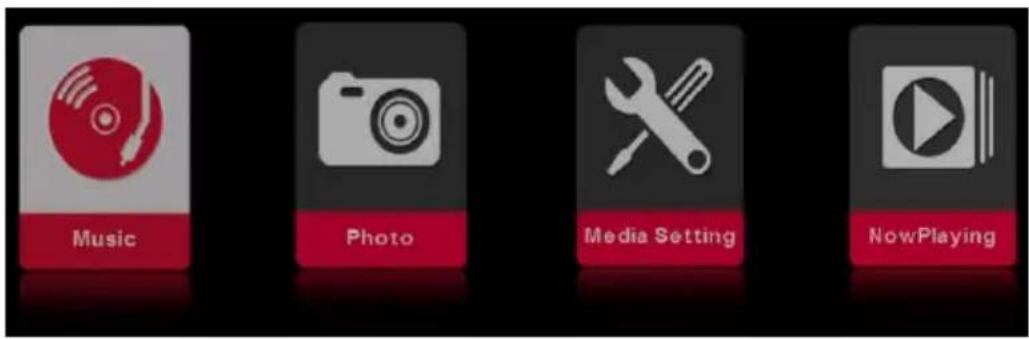
Once you press the USB button the USB menu will come up. Select either the music or picture you want to browse using the arrow buttons. Press the ENTER button to select the file you want.
Browsing Music and Photo
In the USB function, select Music or Photo.
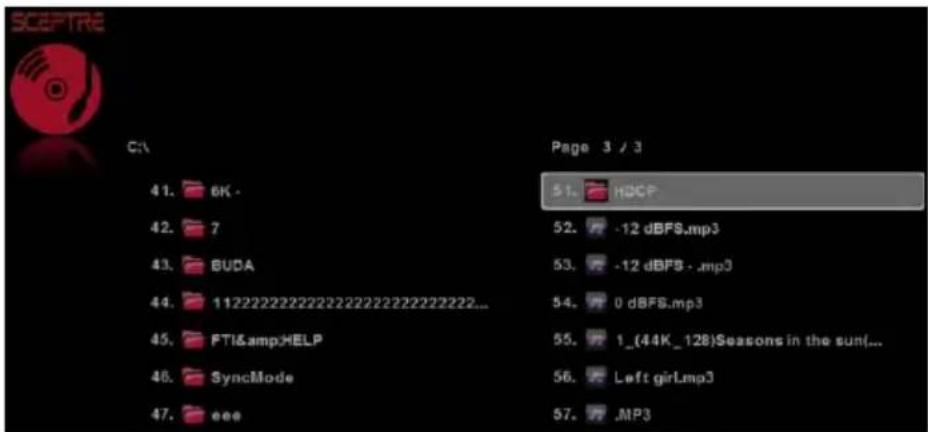
Use the ▲ or ▼ button to select the file you want and use the ENTER to play the file. Use the EXIT button to exit a folder.
Media Setting
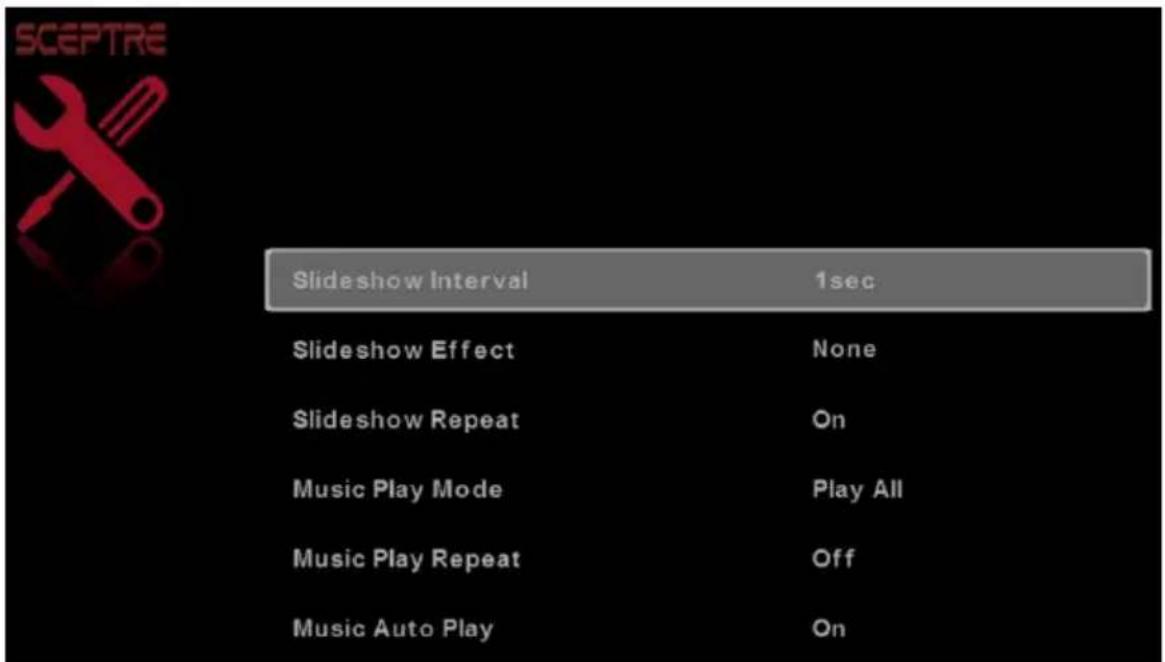
- SLIDESHOW INTERVAL – This option adjusts the time interval of a displayed picture.
- SLIDESHOW EFFECT – This option adjusts the video effects when pictures interchange.
- SLIDESHOW REPEAT – This option toggles the repeat function for displaying pictures.
- MUSIC PLAY MODE – This option adjusts the music playing option.
- MUSIC PLAY REPEAT – This option toggles the repeat function for playing music.
- MUSIC AUTO PLAY – This function toggles the auto play feature which will play any music found in the USB flash drive once you insert the flash drive.
Technical Limitation
- The USB port does not support USB hubs.
- The USB flash drive supports FAT32 and FAT16 file system only.
- The biggest file size is 2 gigabyte (FAT32).
- The picture function only supports JPEG file (baseline only, progressive is not supported).
- The music function only supports MP3 that is from 32-48k Hz using a data rate of 32-320 kbps.
- All USB functions are operated by the remote control. None of the buttons physically located on the Display will respond to USB functions.
Closed Captioning (digital and analog) Explained
Your Display is equipped with an internal Closed Caption decoder. It allows you to view conservations, narration and sound effects as subtitles on your display. Closed Captions are available on most TV program, and on some VHS home video tapes, at the election of the program provider.

You can access the closed captioning via the OSD menu. Start by pressing MENU then select SETUP. You will see Closed Captioning under SETUP.
Please Note:
- Digital Closed Caption service is a new caption service available on digital TV programs (also at the election of the service provider). It is a more flexible system than the original Closed Caption system, because it allows a variety of caption sizes and font styles.
- Not all programs and VHS video tapes offer closed caption. Please look for the CC symbol to ensure that captions will be shown.
- In the Closed Caption system, there can be more than one caption service provided. Each is identified by its own number. The CC1 and CC2 services display subtitles of Display programs superimposed over the program's picture.
- In the Closed Caption system, the TEXT1 or TEXT2 services display text that is unrelated to the program being viewed (e.g., weather or news). These services are also superimposed over the program currently being viewed.
- Closed Captioning for this Display only works under sources TV and AV. (OPTIONAL)
MHL Explained
MHL® stands for mobile high definition link. It is a protocol and cable that enables mobile devices (tablets, cell phones...etc) to be displayed and charging at the same time on a display. This Sceptre display supports MHL on HDMI2. If you see your mobile device supporting MHL then you can purchase a MHL cable and connect one end (usually micro USB) to your mobile device and the other end to HDMI 2. Turn on both the mobile device and the Sceptre display and press the MHL button and things displayed on the mobile device will be displayed on the display.
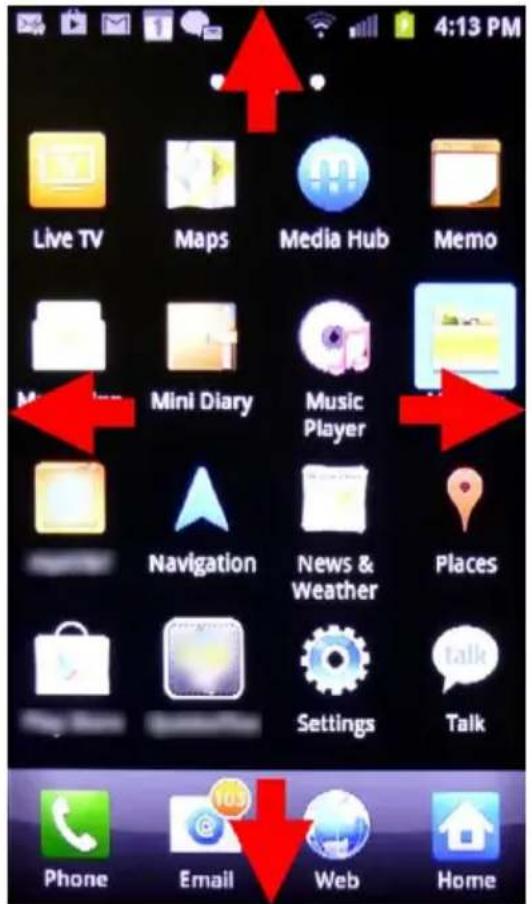

Once you see the cell phone screen on the display you can either use the cell phone itself to control the screen or use the display remote's buttons shown above to control the cell phone screen.
Please Note:
- Not every cell phone supports MHL. Please contact your cell phone company for support information or search MHL on the web for more information.
- Not every MHL cable supports your cell phone. There are different versions of MHL cables for different cell phones. The wrong type of cable will not produce an image on the display. Please contact your cell phone company to ensure you have the correct MHL cable.
- The directional button and ENTER buttons on the display's remote have limited control over the cell phone's OS and the programs within. Some programs will respond to the control, some will not. For maximum control please use the cell phone's touch screen instead of the display's remote.
Direct Function Buttons
Sceptre Sound Bar
The Sceptre Sound Bar is an add-on speakers designed to connect to any flat panel HD Display including Sceptre's own. These direct function buttons above help eliminate the use of the Sound Bar remote.
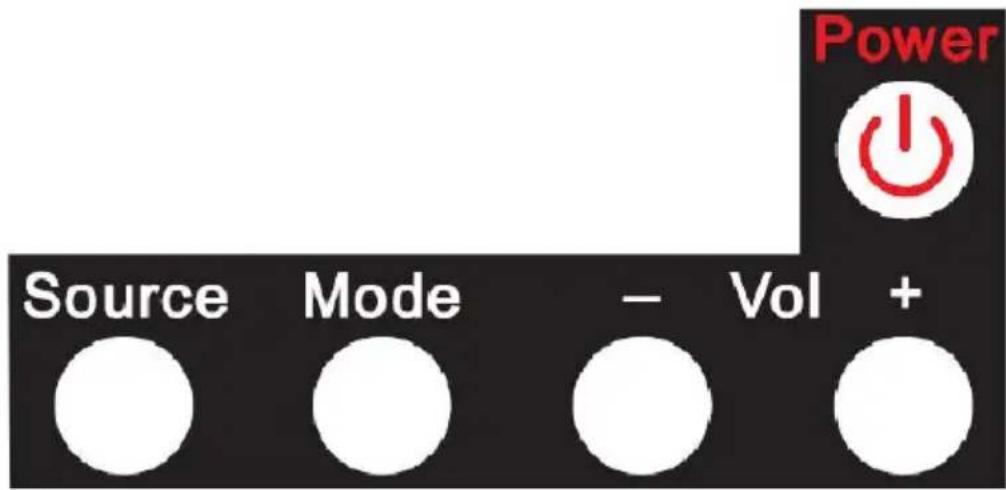
• Power –This button turns the Sound Bar on or off.
- Source – This button changes the audio signal of the Sound Bar.
• Mode – This button changes the sound mode of the Sound Bar.
- Vol(-) – This button decreases the volume of the Sound Bar.
- Vol(+) – This button increases the volume of the Sound Bar.
Please Note:
- If you own a Sceptre Sound Bar with the Sceptre Display, the Display remote's power button will turn on both the Sound Bar and the Display.
Ratings Explained
General Operation
To block channels you don't want your children to watch, you can filter them with the ratings function. MPAA lets you control ratings for movies. For regular TV programs you can use USTV settings. USTV settings lets you filter what content you want at each age level, TV-Y, to TV-MA (refer to definitions below). Below are definitions for each setting.
USTV Rating
TV-Y (USTV) – For All Children
This program is designed to be appropriate for all children. Whether animated or live-action, the themes and elements in this program are specifically designed for a very young audience, including children from ages 2-6. This program is not expected to frighten younger children.
TV-Y7 (USTV) – Directed to Older Children
This program is designed for children age 7 and above. It may be more appropriate for children who have acquired the developmental skills needed to distinguish between make-believe and reality. Themes and elements in this program may include mild fantasy violence or comedic violence, or may frighten children under the age of 7. Therefore, parents may want to consider the suitability of this program for their very young children. Note: For those programs where fantasy violence may be more intense or more combative than other programs in this category, such programs will be designated TV-Y7-FV.
TV-G (USTV) – General Audience
Most parents would find this program suitable for all ages. Although this rating does not signify a program designed specifically for children, most parents may let younger children watch this program unattended. It contains little or no violence, no strong language and little or no sexual dialogue or situations.
TV-PG (USTV) – Parental Guidance Suggested
This program contains material that parents may find unsuitable for younger children. Many parents may want to watch it with their younger children. The theme itself may call for parental guidance
and/or the program contains one or more of the following: moderate violence (V), some sexual situations (S), infrequent coarse language (L), or some suggestive dialogue (D).
TV-14 (USTV) – Parents Strongly Cautioned
This program contains some material that many parents would find unsuitable for children less than 14 years of age. Parents are strongly urged to exercise greater care in monitoring this program and are cautioned against letting children under the age of 14 watches unattended. This program contains one or more of the following: intense violence (V), intense sexual situations (S), strong coarse language (L), or intensely suggestive dialogue (D).
TV-MA (USTV) – Mature Audience Only
This program is specifically designed to be viewed by adults and therefore may be unsuitable for children under 17. This program contains one or more of the following: graphic violence (V), explicit sexual activity (S), or crude indecent language (L).
TV program description
FV - Fantasy Violence
V - Violence
S - Sexual Situations
L - Adult Language
D - Sexually Suggestive Dialog
MPAA Rating
G (MPAA)
General audiences. All ages admitted.
PG (MPAA)
Parental guidance suggested. Some material may not be suitable for children.
PG-13 (MPAA)
Parents strongly cautioned. Some material may be inappropriate for children under 13.
R (MPAA)
Restricted. Under 17 requires accompanying parent or adult guardian (age varies in some jurisdictions).
NC-17 (MPAA)
No one 17 and under admitted.
X (MPAA)
X is an older rating that is unified with NC-17 but may be encoded in the data of older movies.
Aspect Ratio Explained
The display is a widescreen display, but most TV programs are still broadcasting in a square format, therefore the display is offering multiple ways of viewing videos. There are mainly two types of signal format, Full (16:9 format), Normal (4:3 format), while others offer a novelty ways to view the display. Simply use the ASPECT button on the display's remote control to cycle between the multiple modes.
1. NORMAL
Most analog TV channels have 4:3 signal formats. If the original 4:3 aspect ratio (1.33:1 source) is preserved, black bars are added to the left and right of the display image. This aspect keeps that aspect ratio and shows you the black bars on the side.
2. WIDE
This mode will stretch the picture to a widescreen ratio. If you have a perfect 16:9 ratio picture you will not see any black bars. If you are watching a widescreen movie in 1.85:1 or 2.35:1 ratio, you will still get black bars on the top and bottom of the screen. If you use this mode on 4:3 pictures they will be stretched and distorted horizontally.
3. CINEMA
This mode cuts off all 4 sides to try to make a widescreen movie fit better on the display screen.
4. ZOOM
When watching a 4:3 aspect ratio televised channels or movie, this mode zooms in to cut off most of the black bars on the side while preserving the 16:9 ratio. Because of the zoom, the top and bottom are cut off as well.
5. DOT BY DOT
This mode is only available under PC. It will map dot by dot to the screen. Any resolution will be proportionate.
Shortcuts to Browsing Channels
Browsing through the entire channel list on the display can be tedious. This display features a favorite channel list, where you can add in channels that you always want to watch
TO ADD TO THE FAVORITE LIST
- Go to any channel you would like to include in your favorites list.
- Press the ADD/DEL button on the remote control. You will see a (FAV) on the INFO banner denoting that this channel is in the favorites list.
TO DELETE FROM THE FAVORITE LIST
- Go to any channel you would like to remove from your favorites list.
- Press the ADD/DEL button on the remote control. You will then see the (FAV) disappear on the INFO banner denoting that this channel is no longer in the favorites list.
BROWSING CHANNELS WITH THE FAVORITE LIST
- Press the FAVORITE button, and the list of channels you have added will be in a window.
- Use the ▲ or ▼ buttons to select the channel you want to jump to and press ENTER to confirm.
- You can also use the FAV+/- keys to switch up and down the favorites list automatically.
How do I clean the display?
IMPORTANT
- The power cable has to be removed from the socket before cleaning the display.
- Do not use volatile solvent (alcohol, rosin, and toluene) to clean the display. These types of chemicals might damage the housing and the LCD glass.
Cleaning the bezel and remote control
- Use a 100% cotton cloth or micro-fiber cloth for cleaning.
- If the remote control or bezel is dirty to the point where you cannot simply dry wipe it, please lightly dampen the wiping material (the wiping material cannot be dripping wet, because if water drips into the panel it will cause malfunction and possible permanent damage to the panel which will not be covered under the warranty) with clean water and wipe again. Wipe the display with a dry micro-fiber cloth or 100% cotton cloth afterwards.
Please Note:
- Make sure you wring the water out of the cloth before cleaning the bezel or remote in order to prevent water from penetrating into the electronics.
Cleaning the Screen
- Use a 100% cotton cloth or micro-fiber cloth for cleaning.
- The LCD screen glass is extremely fragile. Do not scrape it with any material. Do not press or tap the screen to avoid cracking. When the screen is dirty to the point where you cannot simply dry wipe it, please lightly dampen the wiping material with clean water and wipe again. Wipe the display with a dry micro-fiber cloth or 100% cotton cloth afterwards.
The following table contains the common problems and the solutions to these problems. Please check this list before you contact the technicians.
| Problems | Solutions |
| NO PICTURE | Connect power cord correctly. |
| Turn on power. | |
| Connect video cable correctly. | |
| Select the input signal source with proper cable connection with the source button. | |
| ABNORMAL COLORS | Match the colors on the cables to the ports off the back of the television. I.E. red cable to red colored port. |
| PICTURE IS TOO DARK | Adjust your contrast, brightness and lamp settings from the OSD Menu. For adjust controls, refer to page 27. |
| AUDIO ONLY NO PICTURE | Make sure you have connected both your video and audio cables. |
| The (optional) TV's tuner signal must not be lower than 65%. | |
| PICTURE ONLY NO AUDIO | Make sure the audio cable is connected. |
| Readjust your volume via the remote control. | |
| The (optional) TV's tuner signal must not be lower than 65%. | |
| REMOTE CONTROL DOES NOT WORK | Turn off the display, unplug it from the socket. Remove the batteries out of the remote for 30 seconds. Press the remote buttons and the power button randomly for a good 2 seconds, and then reinstall the batteries. Try the remote to see if it works. For battery removal instructions, refer to page 16. |
| The display's remote sensor is also housed in the same place as the power indicator light. Please make sure there is line of sight from the remote control's front sensor to the remote sensor of the display. | |
| CANNOT RECEIVE SUFFICIENT CHANNELS THROUGH THE ATSC/NTSC TUNER | The display's optional tuner signal must not be lower than 65%. Change the direction of your antenna and rescan your channels. If you have cable services call up your cable company and ask about signal strength of your local cable. |
| NO COLOR | Please adjust your picture setup and make sure the saturation and the RGB are not turned all the way down. For adjustment controls refer to page 27. |
| The (optional) TV's tuner signal must not be lower than 65%. Check your signal. | |
| WEAK SIGNAL OR NO PROGRAM SYMBOL ON SCREEN | The (optional) TV's tuner signal must not be lower than 65%. Change the direction of your antenna and rescan your channels. If you have cable services call up your cable company and ask about signal strength of your local cable. |
| DISPLAY'S UNIVERSAL REMOTE CODE | This television follows SONY's universal remote code. To find the actual code you must read through your own universal remote's guide book. |
| CHANNELS ARE BLOCKED | Check your auto lock function's settings inside the OSD. You may have locked up some channels but forgot about them. Refer to page 32 for more instructions. |
| UNIVERSAL REMOTE CODE | This display follows SONY's universal remote code. Please check your hand book for SONY's codes then apply them. |
| THE DISPLAY TURNS ON OR OFF SLOWLY AND THE SCREEN SHOWS UP SLOWLY | This display is a High Definition liquid crystal display panel. It requires a few more seconds than normal TVs to power up and show the picture. |
| NO SOUND ON PC | Make sure you have a 3.5 mm mini-jack cable connected from your pc's sound output to the display's VGA STEREO INPUT. |
| HDCP VIDEO SAYS NO HDCP SUPPORT | Reboot your HDCP video device but turning them off and unplugging the power cord. Wait up to 8 minutes to plug the power back in to see if it works or not. |
| HDCP VIDEO HAS NO AUDIO | Make sure you have a 3.5 mm mini-jack cable connected from your HDCP video device's sound output to the display's VGA STEREO INPUT. If your HDCP video device uses RCA AUDIO jacks, you'll need to obtain a RCA audio converted into 3.5 mm mini-jack cable. |
| CANNOT GET 1360X768 ON PC VGA | Make sure the display is recognized as plug and play monitor. Try updating your video card's drivers as well. If that does not help, most likely you'll need to upgrade your video card to a newer one. |
| PICTURE IS DISTORTED OR HAS ABNORMAL SOUND | This might be from interference from large electrical appliances, cars, motorcycles, or fluorescent lights. If the display is close to the wall, try moving the display to another room in your house to see if the problem still occurs. |
| PICTURE DOES NOT COVER THE ENTIRE SCREEN | If you're using HDMI or a display digital channel make sure you use the ASPECT button to switch to 16:9 format. If you are using VGA, use the AUTO ADJUST function to adjust to the screen. Please Note: If you are using regular analog channel, AV, or component in 480i resolution, use the ASPECT button to switch to 16:9 in order to fill up the screen. Please Note: This note this feature will distort the picture. |
| PICTURE QUALITY IS HORRIBLE!! | For best image quality, view HD widescreen programs where possible. If HD content is not available view "Standard Definition" from a digital source. Standard, analog channels will always be noticeable inferior to HD because your display has video that is many times better than old TV's and so you can see interference and deficiencies you did not KNOW you had. |
| PICTURE HAS PIXELS THAT ARE ALWAYS DISPLAYING THE SAME COLOR | Your display is manufactured using an extremely high level of precision technology, however, sometimes some pixels of your display may not show up. Pixels defects within industry specifications are inherent to this type of product and do not constitute a defective product. |
| I CANNOT CHANGE THE TIME MANUALLY | Your display syncs time automatically according to your local televised channel. This function only works while the (optional) TV tuner is connected to an ANTENNA. |
| BIG BLACK BOX IN THE MIDDLE OF SCREEN | You have turned on closed captioning and are using TEXT1 - TEXT4. Change the setting to CC1 or turn off closed captioning and the box will disappear. Refer to page 34 for more information. |
| SWITCHING A CHANNEL OR SOURCE CHANGES THE VOLUME | Different channels and inputs will sometimes have this effect because the channel signal's own volume is already loud. There is no way remove this completely. The display has an AUTO VOLUME LEVEL function that can combat this type of effect. Please make sure that function is turned on. |
| THERE IS NOISE OR TRASH PIXELS ON THE SCREEN | When your display's resolution is higher than the digital channel's broadcast resolution, the signal is up-converted to match your display's resolution. Up-converting can cause this type of effect. |
| TIPS FOR LETTERBOX CONTENT USERS | Letterboxed (Widescreen) versions of DVD movies are most commonly formatted for standard 4:3 TVs. The display has the capability of expanding this content so the entire screen is filled at the expense of the image proportion. To use this function press the aspect button on the remote control and cycle among the available options. |
| I CANNOT FIND THE VOLUME AND CHANNEL CHANGING BUTTONS | The buttons are represented by the ▲▼◀▶ buttons located on the remote control. ▲▼ changes the channels and ◀▶ changes the volume. |
| DISPLAY TURNS OFF AUTOMATICALLY AFTER 10 MINUTES | The display features a power saving mode which will automatically turn off the display, if there's no signal provided for more than 10 minutes. |
| My cell phone doesn't work when I connect the MHL cable to HDMI. | Check if you connected to HDMI2 or another HDMI since ONLY HDMI2 works with MHL. If it still doesn't work make sure you have the correct MHL cable (some have more pins than others). Ultimately, please consult your cell phone manufacturer for compatibility issues. |
| Under MHL the DISPLAY's remote won't control the cell phone screen fully. | For total control you will need to use the cell phone's touch screen. The display's remote have limited functions and its controls are dependent on the program you are using. |
| UNDER MHL THE DISPLAY'S REMOTE WON'T CONTROL THE CELL PHONE SCREEN FULLY | For total control you will need to use the cell phone's touch screen. The display's remote have limited functions and its controls are dependent on the program you are using. |
| THE DISPLAY DOES NOT SCAN IN DIGITAL CABLE CHANNELS | This display only (optionally) supports digital antenna signal and analog cable signal. This display does not support QAM. |
Products are often returned due to a technical problem rather than a defective product that may result in unnecessary shipping charges billed to you. Our trained support personnel can often resolve the problem over the phone or email. For more information on warranty services or repairs after the warranty period, please contact our support department at the number below.
For technical help, contact our Sceptre Technical Support Group via email or phone. Please have your Sceptre p/n number, serial number, and date of purchase available before you call.
Tech Support E-mail : SceptreTS@sceptre.com
Customer Service Email : SceptreCS@sceptre.com
TEL : 1800-788-2878
Operation Hours : Mon - Fri at 8:30 AM – 5:30 PM (PST)

16800 East Gale Ave.
City of Industry, CA 91745
TEL:626-369-3698
FAX : 626-855-5711
Website : www.SCEPTRE.com
| Display panel | |
| Item | Illustration |
| Active Area / Screen Size | Diagonal 31.5 inches |
| Aspect Ratio | Widescreen 16:9 |
| Max. of Pixels (Resolution) | HD (1366 x 768 pixels) resolution |
| Brightness | 180 cd/m2 |
| Contrast | 5,000:1 (Typical 1,200:1) with Auto Contrast Enhancement |
| Response Time | 8 ms (gray to gray) |
| Viewing Angle | Typical 178 / 178 Degree (Horizontal/Vertical) |
| Lamp Life of Backlight | >50,000hrs |
| DISPLAY | |
| Dimension | 28.78" x 18.39" x 7.95" (with stand)28.78" x 16.97" x 2.95" (without stand) |
| Weight | 8.84 lb (with stand)8.67 lb (without stand) |
| Power input | 100 – 240VAC, 60/50 Hz, 3A (Max.) 28W typical 48W max |
| Function | |
| (1)Video | |
| De-interlace | 3D |
| Frame recover | 3:2 |
| Noise reducing core technology | 3D |
| Aspect ratio | Full, Normal, Cinema, Zoom |
| Gamma | Fixed Gamma |
| Lamp adjust | Yes |
| Picture mode | Vivid / Standard / Mild / Power Saving / User |
| Video adjust | Brightness / Contrast / Color / Tint / Sharpness |
| (2)Audio | |
| Sound Mode | Dynamic / Standard / Soft / User |
| Auto Volume Control | Yes |
| Tone | Bass / Treble / Balance |
| SPDIF Out | Yes (optical) |
| Speakers | 2 x 10 watt per channel |
| (3) General | |
| Hybrid TV Tuner (optional) | NTSC / ATSC / QAM (Digital Cable Ready) |
| Channel auto scan | Yes |
| Sleep timer | Off / 10mins / 20mins / 30mins / 40mins / 50mins / 60mins/ 90mins / 120mins |
| Standby power | Under 1W |
| Timing support-Video | 480i / 480p / 720p / 1080i / 1080/24p / 1080/60p |
| PC timing | 1360 x 768 @ 60Hz (Native & Max)1280 x 768 @ 60Hz1024 x 768 @ 60Hz800 x 600 @ 60Hz |
| Multimedia Format | Audio: MP3 (32-48k Hz)Picture: JPEG (Baseline) up to 5000x5000USB file system: FAT32/FAT16 |
| (4)NTSC/ATSC | |
| NTSC | Sound: Mono / Stereo / SAP |
| Favorite Channel | |
| V-chip | |
| Closed caption(CC1-CC4, Text 1-Text 4) | |
| ATSC | Favorite Channel |
| V-chip | |
| Video input format: 1080i, 720p, 480p, 480i | |
| Analog closed caption:(CC1-CC4, Text 1-Text 4)Digital closed caption:(Service 1-Service 6) | |
| (5)I/O | |
| 1 input x (optional) TV Tuner (NTSC/ATSC/QAM),1 input x AV (shared with YPbPr)1 input x YPbPr (video/audio shared with AV),2 inputs x HDMI/HDCP (optional, HDCP audio shared with VGA Audio In), HDMI2 supports MHL®1 input x VGA,1 input x VGA Audio In,1 input x USB1 output x SPDIF (digital audio) out,1 output x Headphone out, | |
*The product's specifications may change without notice or obligation.
**This manual's pictures and words are for references only and are subject to change without notice or obligation. Sceptre Inc is not liable for the misuse or misinterpretation of this manual.
Please read this warranty card carefully, it is a "ONE-YEAR LIMITED WARRANTY" on parts and labor (90 days for commercial use) and is only valid when purchased from an Authorized Reseller, only on new and non-refurbished product, and available to customers in the Continental US, Alaska, Hawaii and Puerto Rico. See below for the SCEPTRE Extended Service warranty.
SCEPTRE's Responsibility
SCEPTRE units purchased from an authorized SCEPTRE U.S. Reseller in the United States and that are used in the fifty (50) United States or Puerto Rico and Canada are warranted to be free from manufacturing defects in materials and workmanship for a period of one (1) year from the date of their original retail purchase (or a period of ninety (90) days for commercial use). If the unit fails to conform to this warranty, we will service the units using new or refurbished parts. In the event that the part required for replacement is no longer in production and/or is obsolete, SCEPTRE will repair or replace the unit with similar or like parts of equal value. If a similar or like part is not available, a charge may be incurred to the owner, for any upgraded parts substituted.
Service Labor
During a period of one (1) year from the effective warranty date (or a period of ninety (90) days for commercial use), SCEPTRE will provide, when needed, service labor to repair a manufacturing defect at its designated Service Center. To obtain warranty service in the United States, you must first call our Customer Support at (800) 788-2878. The determination of service will be made by SCEPTRE Customer Support. PLEASE DO NOT RETURN YOUR UNIT TO SCEPTRE WITHOUT PRIOR AUTHORIZATION.
Parts
New or remanufactured parts will be used for repairs by SCEPTRE at its designated Service Center for one (1) year (or ninety (90) days for commercial use) from the effective warranty date. Such replacement parts are warranted for the remaining portion of the original warranty period.
Service
During the one (1) year (or ninety (90) days for commercial use) warranty period, SCEPTRE will, at its option and sole discretion, repair or replace defective parts, including replacement of the entire Panel. The Customer will be required to ship the unit to the Service Center indicated at the time Customer Support is contacted to make the necessary repairs, you are responsible for all transportation charges to the service facility. SCEPTRE is not responsible for the de-installation or re-installation of the unit.
Packaging and Shipping Instruction
When you send the product to an authorized SCEPTRE service facility you must use the original carton box and packing material or an equivalent as designated by SCEPTRE. If you no longer have them please contact Sceptre's Customer Support.
Not Covered
This warranty does not cover the following: cosmetic defects; damage, malfunctions, or failures resulting from shipping or transit accidents, abuse, misuse, operation contrary to furnished instructions, operation on incorrect power supplies, operation with faulty associated equipment, modification, alteration, improper servicing, tampering and or, damage from fire, water, lightning, power surges, abnormal environmental conditions, or other acts of nature; normal wear and tear (SCEPTRE reserves the right to determine “wear and tear” on any and all products); unsatisfactory visual or audio performance not caused by a manufacturing defect; or displays on which the serial number has been removed or defaced. Image Sticking
caused by operating at excessive brightness levels for extended periods or mishandling are not covered by this warranty. Installation, removal, transportation and reinstallation of a display and routine maintenance and cleaning, are not covered by this warranty. Any hardware, components, and/or software bundled with the display are not covered by this warranty. Any damages caused directly or indirectly by Buyer's or Reseller's "Value Added Feature" are not covered by this warranty or Sceptre, Inc. Any damages of any kind including, but not limited to, direct or indirect damages, lost profits, lost savings, or other special incidental, exemplary or consequential damages whether for breach of contract, tort, or otherwise, or whether arising out of the use of or inability to use the product, even if SCEPTRE, INC. or any dealer, distributor of authorized service provider/partner has been advised of the possibility of such damages, or any claim by any other warranty are not covered by this warranty or Sceptre Inc.
ANY IMPLIED WARRANTIES, INCLUDING ANY IMPLIED WARRANTY OF MERCHANTABILITY AND FITNESS FOR A PARTICULAR PURPOSE SHALL BE LIMITED IN DURATION TO THE PERIOD OF TIME SET FORTH ABOVE. OUR LIABILITY FOR ANY AND ALL LOSSES AND DAMAGES RESULTING FROM ANY CAUSE WHATSOEVER, INCLUDING OUR NEGLIGENCE, ALLEGED DAMAGE OR DEFECTIVE GOODS, WHETHER SUCH DEFECTS ARE DISCOVERABLE OR LATENT, SHALL IN NO EVENT EXCEED THE PURCHASE PRICE OF THE DISPLAY. WE SHALL NOT BE RESPONSIBLE FOR LOSS OF USE, COMMERCIAL LOSS OR OTHER INCIDENTAL OR CONSEQUENTIAL DAMAGES. SOME STATES DO NOT ALLOW LIMITATIONS ON HOW LONG AN IMPLIED WARRANTY LASTS OR THE EXCLUSION OR LIMITATION OF INCIDENTAL OR CONSEQUENTIAL DAMAGES, SO THE ABOVE LIMITATIONS OR EXCLUSIONS MAY NOT APPLY TO YOU. This warranty gives you specific legal rights, and you may also have other rights which vary from state to state. This is the only warranty applicable; no one is authorized to extend or modify it or to grant any other warranty. SCEPTRE retains the right to assess all warranty claims and to determine if damages are covered by the warranty. In case of a claim that is not covered by the warranty, you will be contacted to determine whether SCEPTRE should repair the damage for a fee or whether the product should be returned to you as received by the repair center.
Dead Pixel Policy
SCEPTRE sets limit on the LCD at 3 dead pixels in a cluster adjacent to each other, or 5 dead pixels in a combination of color and brightness. Any number of dead or bad pixels under the limit is considered to be within normal performance specification of the LCD and is not considered defective.
Owner's Responsibility
Effective Warranty Date
Warranty begins on the date of sale to the end user. To ensure warranty service, keep the dated bill or sale receipt as evidence of the purchase date. If you can no longer obtain your receipt, the warranty will revert to the unit's manufacture date according to the serial number of the unit. This limited warranty applies only to the original purchaser and is non-transferable.
Warranty Service
For warranty service information, contact SCEPTRE Technical Support at email address SceptreTS@SCEPTRE.com, via phone at (800) 788-2878, or via World Wide Web chatting service at www.Sceptre.com. SCEPTRE Technical Support is available Monday to Friday 8:30 AM to 5:30 PM Pacific Time. Parts and service labor that are SCEPTRE's responsibility (see above) will be provided without charge. Other services or services not covered by the warranty are at the owner's expense. You must provide the model, serial number and date of purchase. Before you ask for warranty service, read your User Manual. You might avoid a service call.
Warranty conditions are subject to change, for latest Warranty Terms and Conditions and additional information regarding your warranty, please see complete details online at www.SCEPTRE.com.
• HDMI® "HDMI, the HDMI logo and High-Definition
HIGH-DEFINITION MULTIMEDIA INTERFACE
Multimedia Interface are trademarks or registered trademarks of HDMI Licensing LLC."
- Wii ^™ is a registered trademark or trademark of Nintendo of America, Inc. in the United States and other countries.
• MHL™ MHL® and the MHL logo are a trademark,
registered trademark or service mark of MHL, LLC in the United States and /or other countries.
This HDTV meets the ENERGY STAR® guidelines under the default picture setting called POWER SAVING. Changing this setting or enabling other options will increase power consumption which could possibly exceed the guidelines of ENERGY STAR®.
For more information on the ENERGY STAR program, please refer to www.energystar.gov.
- Figure estimates off the EnergyGuide yellow label are based on a specific usage pattern with the power saving mode selected under picture mode / picture setting of this product. Other picture settings / picture modes selected will consume more power than the estimate. EnergyGuide labels will not always reflect your current electricity prices. They may also vary due to local energy prices and user's usage habits.
- SCEPTRE is a trademark or registered trademark of Sceptre Group.
- Sceptre, Inc. shall not be liable for technical or editorial errors or omissions contained herein; nor for incidental or consequential damages resulting from furnishing this material, or the performance or use of this product.
- In the interest of continuing product improvement, Sceptre, Inc. reserves the right to change product specifications without notice. Information in this document may change without notice.
- No part of this document may be copied, reproduced, or transmitted by any means, for any purpose without prior written permission from Sceptre, Inc.
This device complies with Part 15 of the FCC Rules.
Operation is subject to the following two conditions:
(1) this device may not cause harmful interference, and (2) this device must accept any interference received, including interference that may cause undesired operation.
Please Note: This equipment has been tested and found to comply with the limits for a Class B digital device, pursuant to part 15 of the FCC Rules. These limits are designed to provide reasonable protection against harmful interference in a residential installation. This equipment generates uses and can radiate radio frequency energy and, if not installed and used in accordance with the instructions, may cause harmful interference to radio communications. However, there is no guarantee that interference will not occur in a particular installation. If this equipment does cause harmful interference to radio or television reception, which can be determined by turning the equipment off and on, the user is encouraged to try to correct the interference by one or more of the following measures:
- Reorient or relocate the receiving antenna.
- Increase the separation between the equipment and the receiver.
- Connect the equipment into an outlet on a circuit different from that to which the receiver is connected.
Caution: To comply with the limits for an FCC Class B computing device, always use the signal cord and power cord supplied with this unit.
The Federal communications Commission warns that changes or modifications to the unit not expressly approved by the party responsible for compliance could void the user's authority to operate the equipment.
European Notice
Products with the CE marking comply with both the EMC Directive (89/336/EEC), (93/68/EEC) and the Low Voltage Directive (72/23/EEC) issued by the Commission of the European Community.
Recycling Information
Dispose unwanted electronics and batteries through an approved recycler.
For TVs please visit the web at http://www.earth911.com/recycling-guide/how-to-recycle-large-electronics/
For Batteries please visit the web at http://www.call2recycle.org/
- CAUTION
- CAUTION:
- Television Antenna Connection Protection\*\*
- External Television Antenna Grounding
- Lightning Protection
- Power Lines
- Package Contents
- Installation
- Attaching or Removing the Stand
- Table of Contents
- IMPORTANT INFORMATION......2
- SAFETY INSTRUCTIONS....3
- SAFETY INSTRUCTIONS......4
- IMPORTANT INFORMATION......6
- Opening the Package 7
- Package Contents....7
- Installation 7
- Attaching or Removing the Stand....8
- Table of Contents 9
- Identifying Front and Rear Panel....10
- SCEPTRE Remote Control....13
- Connection Suggestions....16
- Switching Sources....22
- Ready to Watch Some HD video? ....Error! Bookmark not defined.
- OSD (On Screen Display) Controls 24
- OSD (On Screen Display) Options 25
- Detailed Explanations....36
- Troubleshooting 46
- Call Us If You Need Help! 49
- Specification....50
- LIMITED PRODUCT WARRANTY....52
- Disclaimer, Trademarks, & Copyright Information 54
- FCC Compliance Statement 55
- Recycling Information 55
- Identifying Front and Rear Panel
- Front View
- Rear View Mounting Pattern
- TV Control Buttons
- Rear View Connections
- Please Note:
- GENERAL FUNCTION BUTTONS
- The following buttons are functions designed to work with the optional, Sceptre Sound Bar.
- Color Function Buttons
- Installing Batteries to the Remote Control
- If You Have Digital Cable without Cable Box or Antenna...
- Connecting DVD Player with Component YPbPr...
- Connecting Wii™ with Composite...
- Connecting Cable or Satellite boxes with HDMI...
- Connecting to a PC with HDMI ...
- Connecting a Digital Audio Receiver with Coax SPDIF...
- Starting up the HDTV
- If You've Connected Antenna to the TV...
- Via Remote Control
- Via Display Side Panel Buttons
- OSD (On Screen Display) Options
- PICTURE
- ADVANCED PICTURE SETTINGS
- SOUND
- CHANNEL (OPTIONAL)
- SETUP
- USB Connection Explained
- Browsing Music and Photo
- Media Setting
- Technical Limitation
- Closed Captioning (digital and analog) Explained
- MHL Explained
- Direct Function Buttons
- Sceptre Sound Bar
- Ratings Explained
- General Operation
- USTV Rating
- TV-Y (USTV) – For All Children
- TV-Y7 (USTV) – Directed to Older Children
- TV-G (USTV) – General Audience
- TV-PG (USTV) – Parental Guidance Suggested
- TV-14 (USTV) – Parents Strongly Cautioned
- TV-MA (USTV) – Mature Audience Only
- TV program description
- MPAA Rating
- G (MPAA)
- PG (MPAA)
- PG-13 (MPAA)
- R (MPAA)
- NC-17 (MPAA)
- X (MPAA)
- Aspect Ratio Explained
- NORMAL
- WIDE
- CINEMA
- ZOOM
- DOT BY DOT
- Shortcuts to Browsing Channels
- TO ADD TO THE FAVORITE LIST
- TO DELETE FROM THE FAVORITE LIST
- BROWSING CHANNELS WITH THE FAVORITE LIST
- How do I clean the display?
- IMPORTANT
- Cleaning the bezel and remote control
- Cleaning the Screen
- SCEPTRE's Responsibility
- Service Labor
- Parts
- Service
- Packaging and Shipping Instruction
- Not Covered
- Dead Pixel Policy
- Owner's Responsibility
- Warranty Service
- European Notice
- Recycling Information
Brand : Sceptre
Model : X328BV-SR
Category : Television