
ME-500 - Headphones ALLEN & HEATH - Free user manual and instructions
Find the device manual for free ME-500 ALLEN & HEATH in PDF.


| Product Type | Personal Monitor Mixer (Headphone Mixer) |
| Model | ME-500 |
| Brand | Allen & Heath |
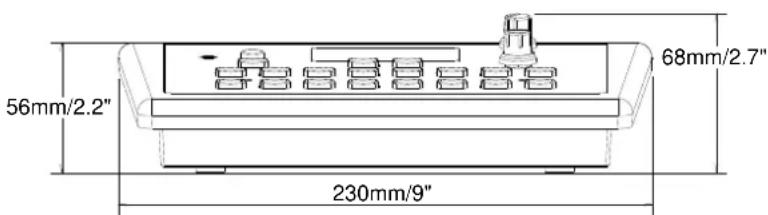
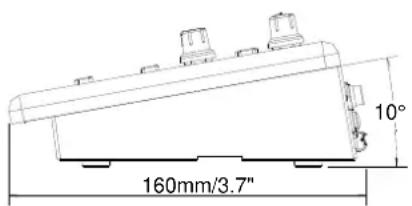
| Dimensions (W x D x H) | 225 x 150 x 55 mm (8.9 x 5.9 x 2.2 in) |
| Weight | 900 g (2 lbs) |
| Power Supply | 100-240 V AC, 50/60 Hz; 12 V DC 1.25 A external PSU; PoE (802.3af/at) 10 W (recommend 15 W) |
| Number of Input Channels | Up to 16 mono/stereo (from up to 32 ME channels) |
| Headphone Outputs | 1/4" TRS and 3.5 mm stereo jacks; 300+300 mW into 100 Ω; compatible 16-600 Ω headphones |
| Mono Output | Balanced TRS jack; max +18 dBu |
| Stereo Line Output Level | Max +21 dBu |
| Frequency Response | +0/-1 dB, 10 Hz to 20 kHz |
| Residual Output Noise | -95 dBu (level min) |
| Audio Conversion | 48 kHz digital audio via Cat5 (ME Link) |
| Functions | Level, Pan, Mute, Solo, 2-band EQ (Bass/Treble), Limiter, 8 User Presets, Standby, Dimmer, Trim All, USB transfer |
| Controls | 16 Select keys, Master key, Shift, Recall, Store, Solo, Mute, Rotary encoder |
| Display | Backlit LCD showing level, pan, EQ, limiter, signal presence, clipping, USB status |
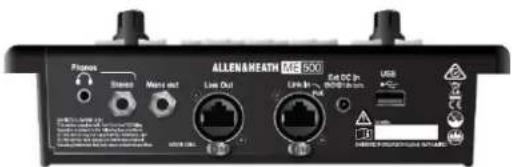
| Connectivity | Link In/Out (EtherCON), USB Type A, DC In |
| Mounting Options | Surface (non-slip feet), mic stand top (3/8" thread), mic stand side (optional bracket), plinth/panel |
| Included Accessories | Mains PSU with 4 plug adapters, Safety Instruction Sheet, User Guide |
| Optional Accessories | Side-mount bracket (AB8999), Headphone hook (AB8705), Cat5 cables (AH9997/AH9651/AH9650) |
| Compatibility | Allen & Heath digital mixers; third-party 48 kHz via ME-U hub; Aviom A-Net 16 |
| Warranty | One year limited manufacturer's warranty (see manual for details) |
| Cleaning | Soft brush and dry lint-free cloth; no chemicals, abrasives or solvents |
| Service | By authorized Allen & Heath agent only |
Frequently Asked Questions - ME-500 ALLEN & HEATH
User questions about ME-500 ALLEN & HEATH
0 question about this device. Answer the ones you know or ask your own.
Ask a new question about this device
Download the instructions for your Headphones in PDF format for free! Find your manual ME-500 - ALLEN & HEATH and take your electronic device back in hand. On this page are published all the documents necessary for the use of your device. ME-500 by ALLEN & HEATH.
USER MANUAL ME-500 ALLEN & HEATH
Limited One Year Manufacturer's Warranty
Allen & Heath warrants the Allen & Heath -branded hardware product and accessories contained in the original packaging ("Allen & Heath Product") against defects in materials and workmanship when used in accordance with Allen & Heath's user manuals, technical specifications and other Allen & Heath product published guidelines for a period of ONE (1) YEAR from the date of original purchase by the end-user purchaser ("Warranty Period").
This warranty does not apply to any non-Allen & Heath branded hardware products or any software, even if packaged or sold with Allen & Heath hardware.
Please refer to the licensing agreement accompanying the software for details of your rights with respect to the use of software/firmware ("EULA").
Details of the EULA, warranty policy and other useful information can be found on the Allen & Heath website: www.allen-heath.com/legal.
Repair or replacement under the terms of the warranty does not provide right to extension or renewal of the warranty period. Repair or direct replacement of the product under the terms of this warranty may be fulfilled with functionally equivalent service exchange units.
This warranty is not transferable. This warranty will be the purchaser's sole and exclusive remedy and neither Allen & Heath nor its approved service centres shall be liable for any incidental or consequential damages or breach of any express or implied warranty of this product.
Conditions Of Warranty
The equipment has not been subject to misuse either intended or accidental, neglect, or alteration other than as described in the User Guide or Service Manual, or approved by Allen & Heath. The warranty does not cover fader wear and tear.
Any necessary adjustment, alteration or repair has been carried out by an authorised Allen & Heath distributor or agent.
The defective unit is to be returned carriage prepaid to the place of purchase, an authorised Allen & Heath distributor or agent with proof of purchase. Please discuss this with the distributor or the agent before shipping. Units returned should be packed in the original carton to avoid transit damage.
DISCLAIMER: Allen & Heath shall not be liable for the loss of any saved/stored data in products that are either repaired or replaced.
Check with your Allen & Heath distributor or agent for any additional warranty information which may apply. If further assistance is required please contact Allen & Heath Ltd.

The ME range of products complies with the European Electromagnetic Compatibility directive 2014/30/EU and the European Low Voltage directive 2014/35/EU.
Any changes or modifications to the product not approved by Allen & Heath could void the compliance of the product and therefore the users authority to operate it.
ME-500 Personal Mixer User Guide AP11137 Issue 1
Copyright © 2017 Allen & Heath. All rights reserved
ALLEN&HEATH
http://www.allen-heath.com
READ THESE INSTRUCTIONS FIRST:

Safety instructions
Before starting, read the IMPORTANT SAFETY INSTRUCTIONS sheet supplied with the product and downloadable from the Allen & Heath web site. For your own safety and that of the operator, crew and performers, follow all instructions and heed all warnings printed in the sheet, this guide and on the product.

Sound levels
This product is capable of producing high sound levels which may be harmful to your hearing. To avoid the risk of damage to your hearing when working with headphones, ear pieces or loudspeakers do not operate at high volumes for an extended period of time. The ME-500 mixer provides a limiter function which can be set to prevent the level exceeding a comfortable maximum.

General precautions
- The mixer is designed to be used on a flat surface or mounted to a microphone stand. Locate it so that it is stable and will not topple over and cause damage or injury. Ensure cables are routed to avoid a trip hazard.
- To prevent damage to the mixer, avoid dropping it, placing objects on the control surface, scratching the surface or screen with sharp objects, or rough handling and vibration in operation or transit.
- Protect the mixer from damage through liquid or dust contamination. Cover the mixer when it is not being used for a long period.
- If the mixer has been stored in extreme cold allow time for it to reach normal operating temperature before use. Avoid using the mixer in direct sunlight. Recommended operating temperature is 5 to 35 degrees Celsius.
- Clean the control surface with a soft brush and dry lint-free cloth. Do not use chemicals, abrasives or solvents.
- It is recommended that servicing is carried out only by an authorised Allen & Heath agent. Allen & Heath do not accept liability for damage or data loss caused by maintenance, repair or modification by unauthorised personnel.
Operating firmware
The function of the ME-500 mixer is determined by the operating firmware that runs within it. Firmware is updated when improvements are made. Check the Allen & Heath web site for the latest version available. This can be downloaded, transferred to USB key and then loaded into the mixer.
Software licence agreement
By using this Allen & Heath product and the software within it (the firmware) you agree to be bound by the terms of the relevant End User Licence Agreement (EULA), a copy of which can be found on the Allen & Heath web site.
www.allen-heath.com/legal
1. Contents
- Contents ...... 4
- Introduction ......7
- Front Panel 8
- Rear Panel 9
- Installing ME-500....10
5.1 Mounting the unit....10
5.2 Cat5 cable....10
5.3 Ethernet PoE Switch....10
5.4 Connecting audio....11
6. Using ME-500....12
6.1 Powering up the mixer .....12
6.2 Dimmer 12
6.3 Standby....12
6.4 Mapping channels to keys......12
6.5 The display ....13
6.6 Adjusting Master level .....13
6.7 Working with Channels .....13
6.8 Working with the Master......13
6.9 Setting the output limiter....13
6.10 Trimming all levels....13
6.11 ME-500 Presets 14
6.12 USB Preset transfer....14
6.13 Recalling Presets....14
6.14 Storing Presets....14
6.15 Clearing all mix settings .....14
6.16 Hard Reset....14
6.17 Specification 15
Please refer to the Allen & Heath website for further information, knowledgebase and technical support. You can join our Allen & Heath Digital Community to share knowledge and information with other ME users.
Further information
Packed Contents
ME-500 Personal Mixer
This mixer.
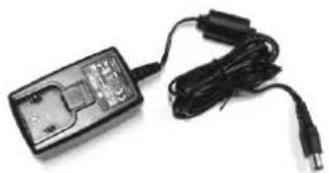
DC Power Supply for the ME mixer
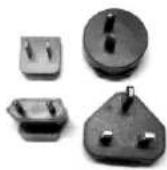
Universal voltage mains power supply unit. This comes with a choice of 4 different worldwide plug adapters.
AM10314
natural_image
Electric power adapter with attached cable and connector (no visible text or symbols)Safety Instruction Sheet AP9241/CL2-1
Note Read this sheet before starting
User Guide
This user guide AP11137
Note Cat5 Link cables are not provided. Source cables of suitable length to meet your application requirements. More information provided later in this guide.
Accessories
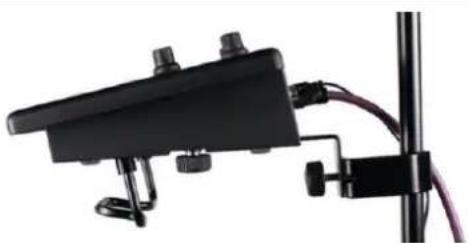
Microphone stand side mounting bracket
The mixer has a built-in 3/8" thread to mount it to the top of a microphone stand. A bracket is also available for mounting to the side of a microphone stand.
Order code AB8999
natural_image
Close-up of a black electronic device with attached cable and stand (no visible text or symbols)Headphone holder
A hook that presses into the underside of the mixer to hang headphones or ear pieces while mounted to a microphone stand.
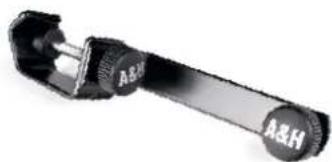
natural_image
Close-up of a black mechanical clamp or tool with two labeled ends (A&H), no visible text or symbols on the device itself.Order code AB8705

natural_image
Close-up of a black U-shaped metal clamp or clip against white background (no text or symbols)Cat5 cables with EtherCON connectors
The following cables are available from Allen & Heath:
AH9997 2m (6.6') short patch
AH9651 20m (66') coil
AH9650 100m (330') drum
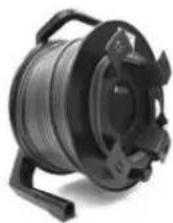
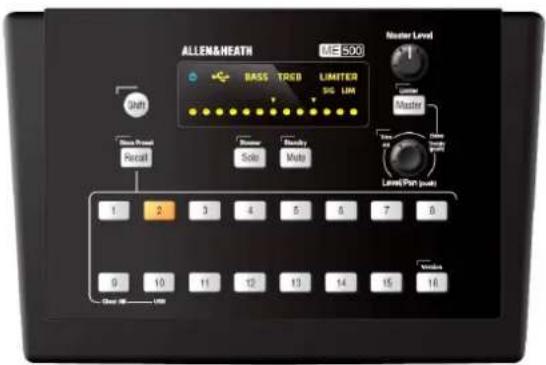
ME Range
ME-500 Personal mixer
The standard model (this user guide):
- Up to 16 mono/stereo channels
• Auto key assignment
• Master limiter and 2-band EQ - 8 User presets
ME-1 Personal mixer
The premium model:
- Up to 40 channels
- User assignable keys
• Master limiter and 3-band EQ
• 16 User presets - Group function
- Name display
• 3.5mm Jack Aux input
• Built-in ambient mic
• Built-in signal generator - Includes stand bracket
• Includes headphone hook
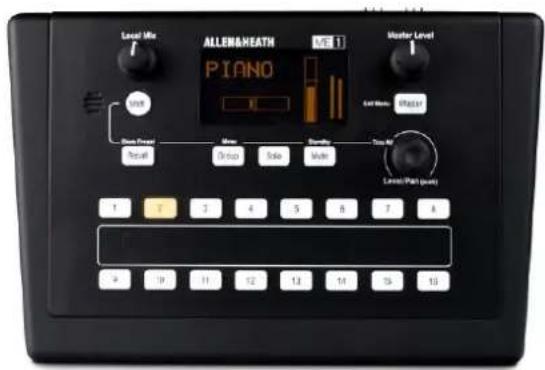
ME-500 and ME-1 mixers can be combined within the same ME system.
ME-U Hub
Touring grade PoE hub:
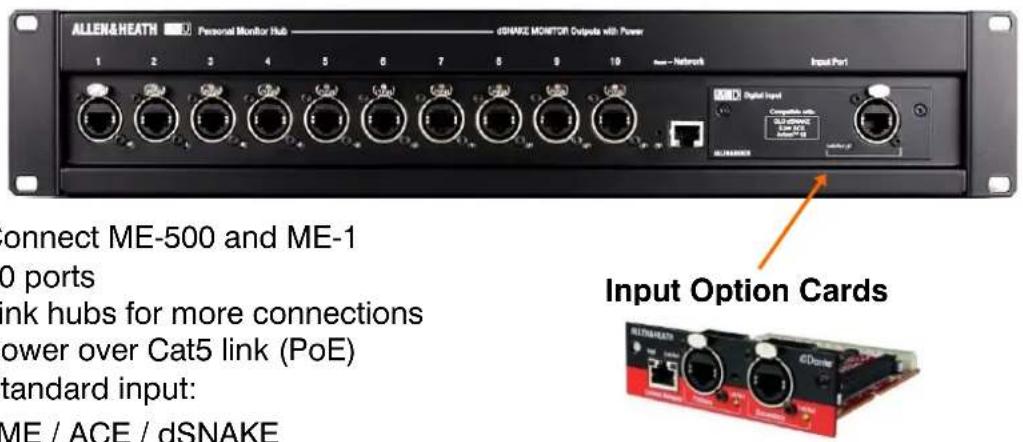
- Connect ME-500 and ME-1
• 10 ports - Link hubs for more connections
• Power over Cat5 link (PoE) - Standard input: ME / ACE / dSNAKE
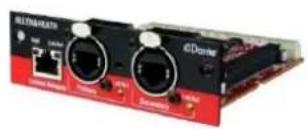
- Option cards available for: Dante / MADI / Waves / ES
• Network port for setup
2. Introduction
natural_image
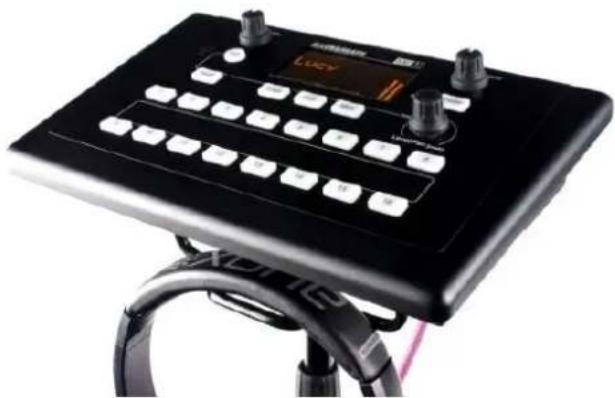
Black electronic device with control buttons and a digital display (no visible text or symbols)Welcome to the ME Personal Mixing System, a flexible and easy to operate solution for individual musicians, performers and presenters to control their own monitor sound whether on stage, in houses of worship, rehearsal rooms, studios, conferences or live events.
ME-500 is a stand-alone digital personal mixer receiving up to 16 mono or stereo sources from the mixer over a single Cat5 cable and mixing these to its own outputs typically feeding headphones, in-ears or local loudspeaker.
ME is a 48kHz system which works with Allen & Heath digital mixers. It can also work with 48kHz third party equipment by adding the ME-U hub with suitable input card fitted.
ME-500 is the standard model in the range which also includes the greater featured ME-1 premium model. Any number of ME mixers can be connected in a system.
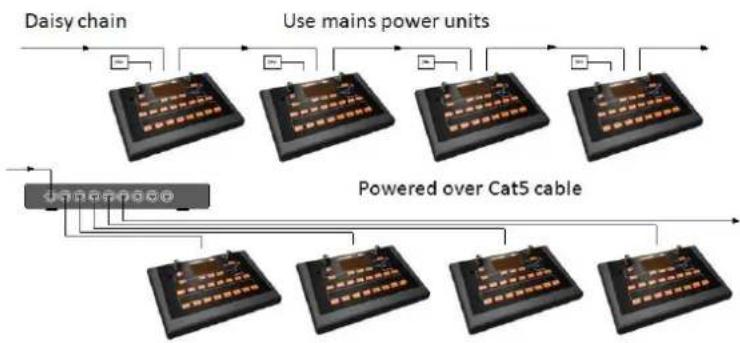
ME mixers are shipped with a universal voltage mains power supply unit. Alternatively you can power the mixer over its Cat5 input cable by using a standard PoE (Power over Ethernet) switch or the 10-port Allen & Heath ME-U PoE hub.
Designed for the application
- Compact and smart on stage
- Easy to read display screen
- Backlit keys for viewing in the dark
• Surface, plinth or mic stand mounting
• Built-in top of stand mount - Optional side of stand bracket
- Optional headphones hook
Easy for the musician to operate
- Press a Select key.
- Turn the rotary to adjust Level
- Press and turn to adjust Pan
- Hold shift and turn to trim all levels
- Mute individual channels or master
- Solo individual channels
- Adjust tone using the master EQ
- Use the Limiter to prevent loud peaks
- Store and recall presets of your mix.
- Protect while away using Standby mode
Configure the system
- Patch outputs at the source console.
- Link outputs for single key stereo select.
- Use the label strip to identify keys.
- Transfer settings via USB key.
- Update firmware via USB key
Convenient connection
- Connect using Cat5 cable up to 100m
- Locking EtherCON connectors
• Daisy chain any number of ME mixers
• Parallel connect using Ethernet switches - Direct connection to A&H mixers.
- Direct connection to Aviom® A-Net 16
- Connect to other networks via ME-U hub:
• 48kHz Dante, MADI, EtherSound - Use the power unit or PoE via Cat5 cable
• Touring grade 10-port ME-U PoE hub
flowchart
graph TD
    A["Daisy chain"] --> B["Powered over Cat5 cable"]
    C["Use mains power units"] --> B
    D["Unrecovered"] --> B
    B --> E["Output"]
3. Front Panel
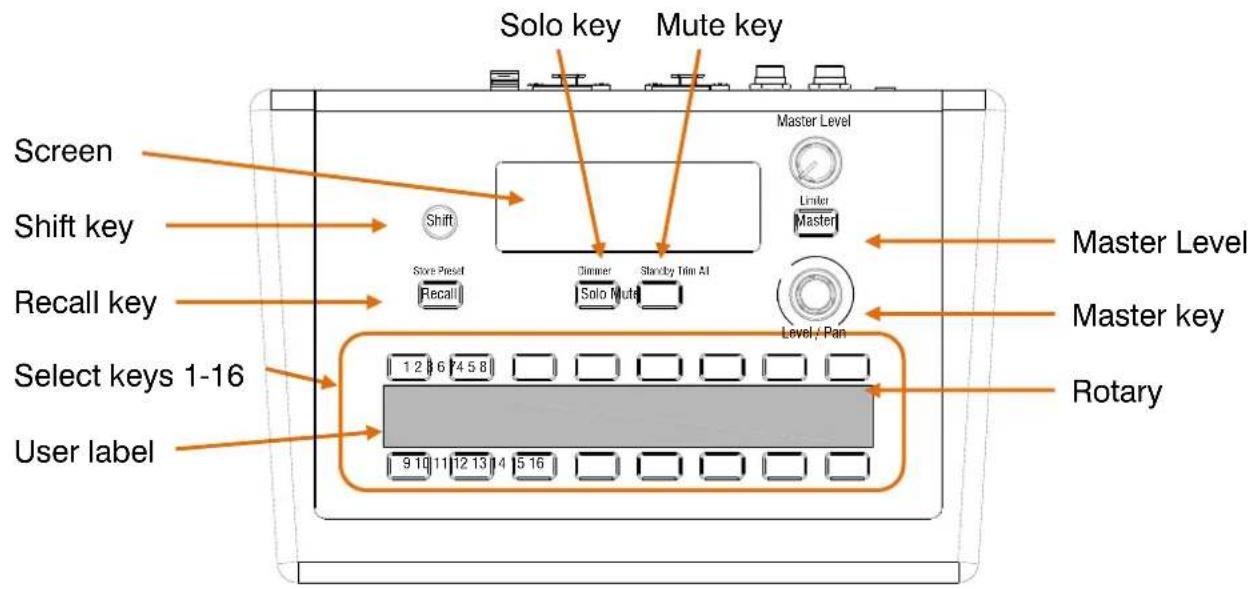
Shift key – Hold and press:
+Master = Output Limiter
+Rotary = Trim all levels
+Recall = Store preset
+Solo = Toggle brightness
+Mute = Enter/exit standby
+Key16 = Firmware version
Screen – Displays level and pan settings for the selected channel, output EQ and limiter settings, USB status and signal indication.
Shift+Solo to toggle dim or bright display.
Master Level – Adjusts the overall mix level.
Master Key – Press to access the output EQ. Turn the rotary to boost or cut. Press the rotary to toggle between bass and treble.
Shift+Master to adjust the Limiter threshold.
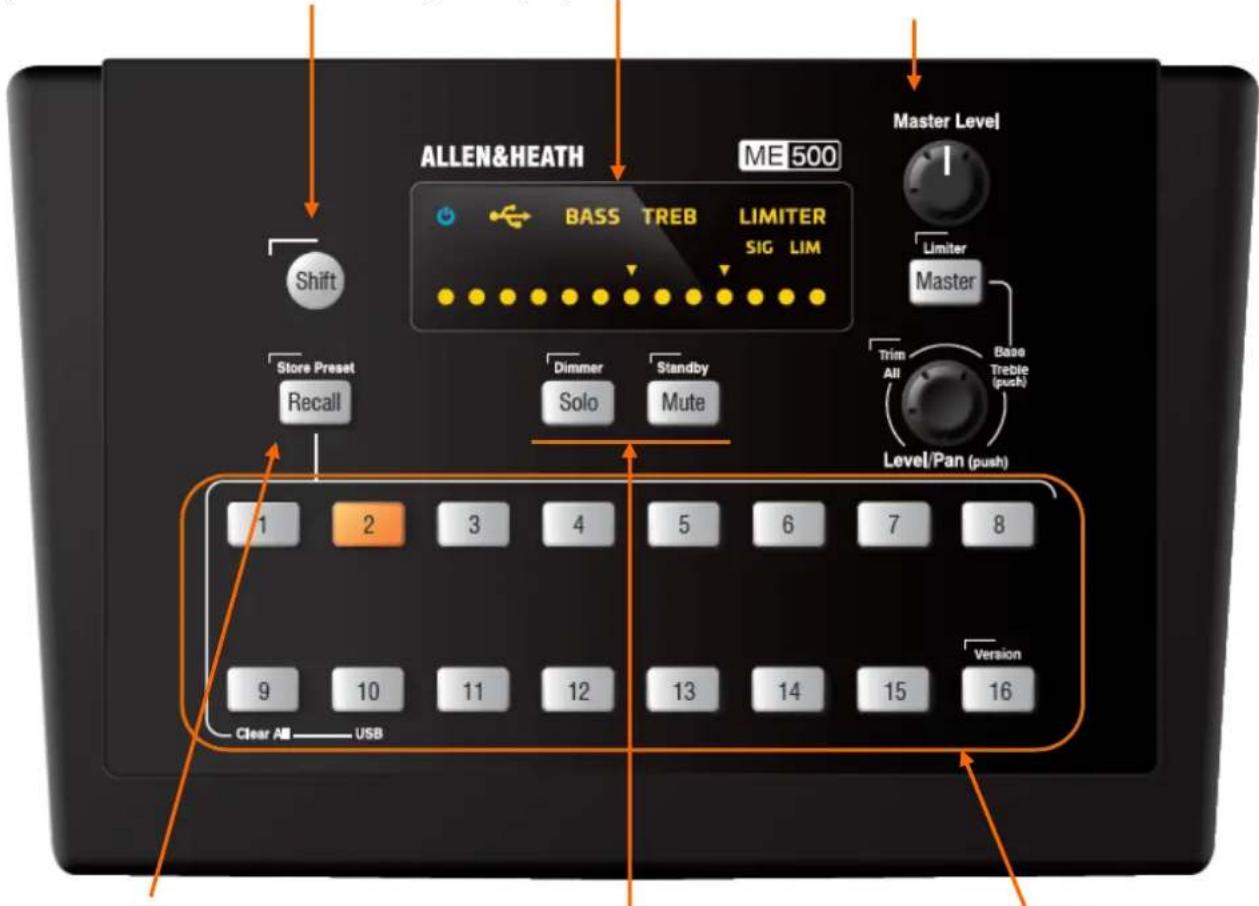
Preset Recall key – Hold and press a select key to recall a preset:
Key1-8 = From user presets Key9 = Clear mix settings Key10 = From USB key
Preset Store mode – Hold Shift+Recall and press a select key to store current level, pan and mute settings: Key1-8 = To user presets Key10 = To USB key
Solo key – Press to enter solo mode and listen to just the selected channel. Press and hold for momentary solo. Solo flashes while active.
Shift+Solo to toggle display brightness.
Mute key – Press to mute the selected channel. The key lights red when muted. Keys flash to show which channels are muted.
Shift+Mute to enter or exit standby mode.
Select keys – Press one of 16 keys to adjust level, pan, mute or to solo a channel. A fast flash shows when channels are muted.
Also used for preset store and recall or to clear the mix.
Shift+Key16 to view firmware version and update using USB.
Rotary – Turn to adjust Level.
Press and turn to adjust Pan.
Press Shift + turn the rotary to trim all levels.
The rotary is also used to adjust output EQ and limiter.
4. Rear Panel
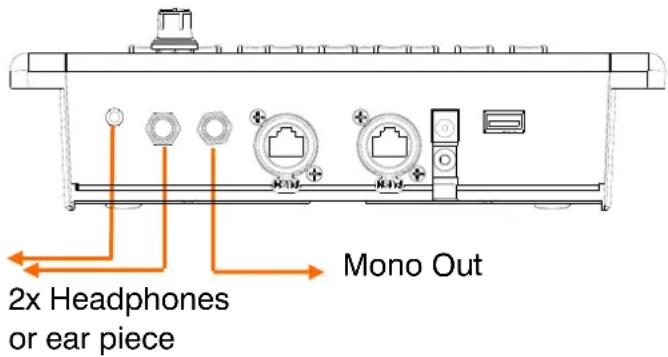
Phones – 3.5mm mini-jack and 14 " TRS stereo jack to connect one or two headphones or earpieces, or stereo line level equipment such as a wireless in-ear transmitter. Tip=Left, Ring=Right.
Mono Out – Balanced TRS jack to connect to mono line level equipment such as a powered speaker or drum throne.
The output is the mono sum of the Left and Right mix.
Tip=Hot, Ring=Cold
USB port – For data transfer between ME-500 mixers or to back up the settings to computer.
The preset is stored as a file named PRESET.ME5 in the ME500PST folder on the USB device.
Also used for updating the ME-500 operating firmware.
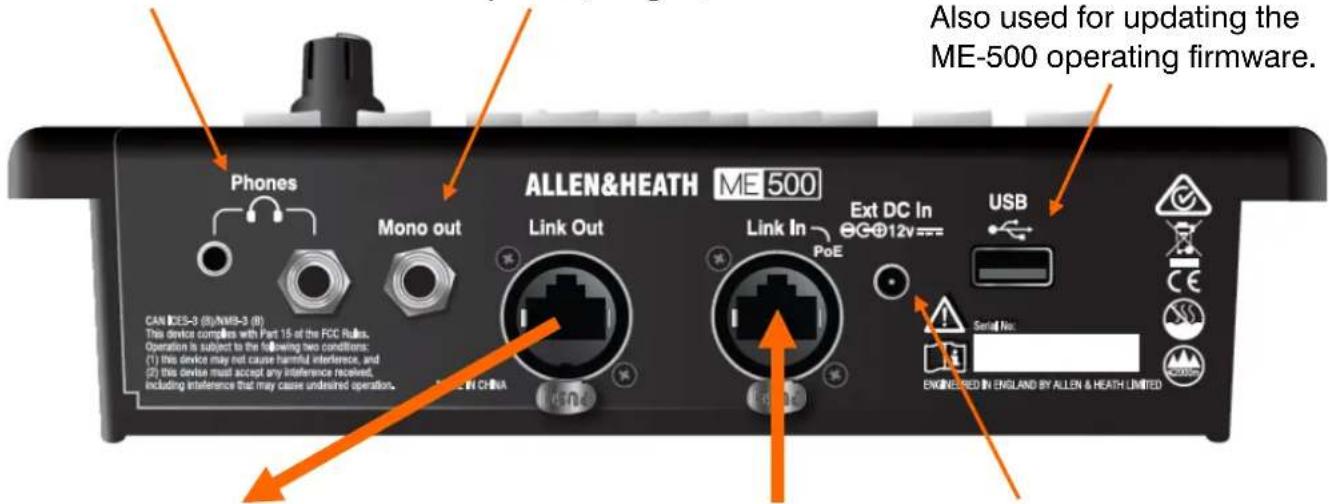
Link Out – Locking EtherCON connector to plug a Cat5 cable to feed audio to the next ME mixer when daisy chaining them together.
Link Out does not carry PoE power. Daisy chained mixers are powered using their external power units.
Link In– Locking EtherCON connector to plug a Cat5 cable from the source.
Receives up to 32 channels of audio and stereo link information when connected to a ME compatible Allen & Heath console, or 16 channels when connected to Aviom® A-Net 16.
The mixer can receive power over this Cat5 link if connected to a PoE switch or the ME-U hub.
DC In – External PSU (power supply) input. Plug in the DC cable of the mains power unit provided with the ME mixer.
Note Only use power supply: ENG Electric 6A-161WP12 (A&H part code AM10314)
Alternatively, the mixer can be powered via the Link In Cat5 cable when connected to a PoE (Power over Ethernet) switch or the ME-U hub.
Monitor Link – Proprietary Allen & Heath Ethernet based Cat5 connection that carries 40 channels of 48kHz digital audio and stereo link data from the source console to ME personal monitor mixers.
ME-1 uses CH1-40. Channels can be assigned to its keys in any order and be configured for single, stereo or grouped operation at the ME-1.
ME-500 uses CH1-32 depending on how many channels are linked for stereo operation at the source console. Channels are automatically assigned to the 16 keys starting with CH1. Stereo linked pairs are assigned to a single key.
5. Installing ME-500
5.1 Mounting the unit
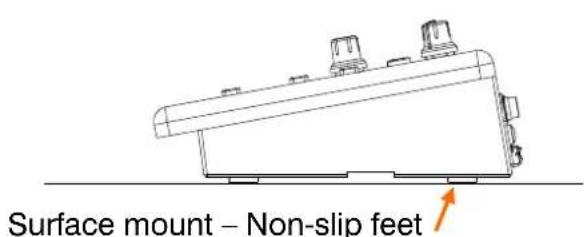
Note Do not place near hot equipment.
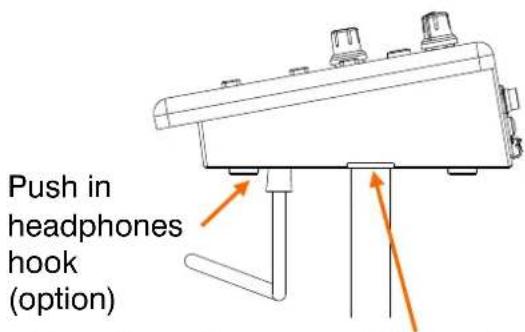
Top of stand mount - 3/8" thread
Note Ensure the mic stand is stable.
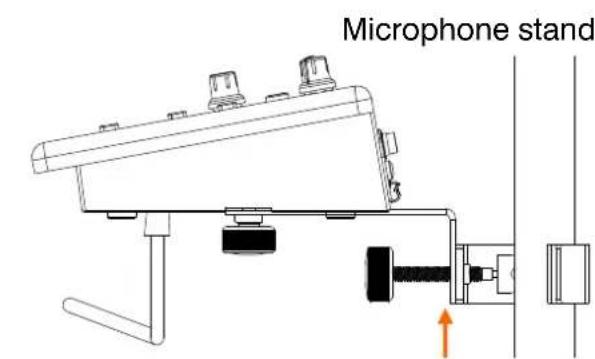
Side of stand mount – Bracket option
Plinth or panel mount – Holes for 6B screws
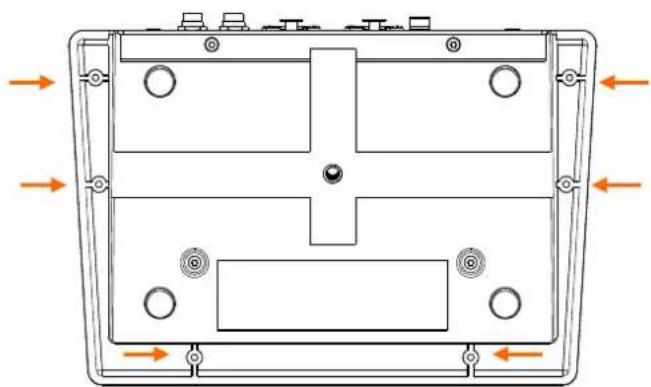
natural_image
Technical diagram of a rectangular electronic device with internal components and directional arrows indicating flow or movement (no text or symbols)5.2 Cat5 cable
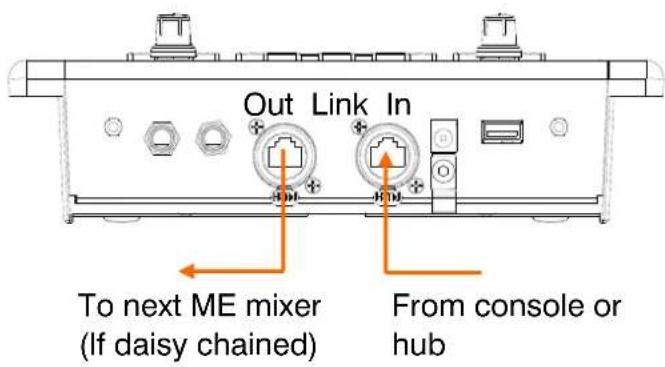
Use tour grade STP (shielded twisted pair) CAT5e or higher cable. Stranded core cables are less prone to damage when kinked or repeatedly coiled.
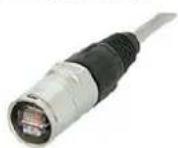
ME-500 provides locking Neutrik EtherCON sockets to protect the connections. We recommend the use of cables fitted with locking EtherCON plugs.
Maximum length per cable = 100m (330')
5.3 Ethernet PoE Switch
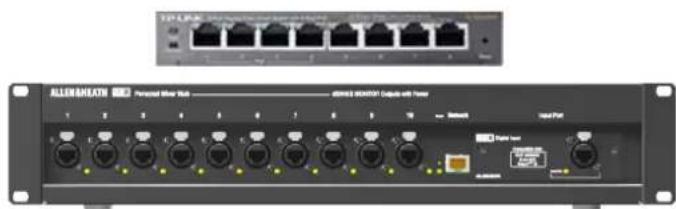
Use a standard off-the-shelf Ethernet PoE switch or the 10 port Allen & Heath ME-U hub for parallel connection of audio and power to multiple ME mixers.
natural_image
Front view of a network switch device with multiple ports and an upper rack-mounted interface (no visible text or symbols)Use a Layer 2 unmanaged switch that supports 100 Mbit/s (Fast Ethernet).
Note Layer 3 or 4 protocols can cause audio clicks or interruption.
Note Aviom® A-Net 16 is not compatible with standard Ethernet switches.
PoE (Power over Ethernet) - Either of the two standards 802.3af (15.4W at source) or 802.at (25.5W at source) is suitable. Check that the overall power rating is enough to power all the ME mixers you wish to connect (allow 15W per mixer).
5.4 Connecting audio
Stereo Headphones – Two output sockets let you plug in headphones or ear pieces with either a large (1/4") or small (3.5mm) stereo plug. Headphones with impedance between 16Ω and 600Ω are recommended. Lower impedance headphones tend to be louder.
You can use either socket or both at the same time, for example to feed two musicians with the same mix.
Stereo line equipment – You can use the stereo outputs to feed line level equipment such as a recording device or wireless in-ear transmitter.
Maximum line output level = +21dBu.
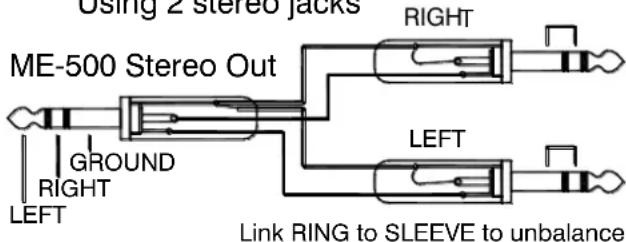
The ME-500 presents both the left and right signals on the same TRS (3-pole stereo) output jack. The stereo signal is duplicated on the large and small output sockets.
Use a stereo Y-cable to feed equipment with separate left and right inputs.
The output is unbalanced. To connect to balanced equipment link the input cold (-) signal to ground within the destination plug.
Mono output – The output can feed balanced or unbalanced line level equipment such as a powered speaker.

Warning If you use a speaker be careful to avoid loud levels that may cause feedback. Start with the master level turned down and the level increase gradually.
Using 2 mono jacks
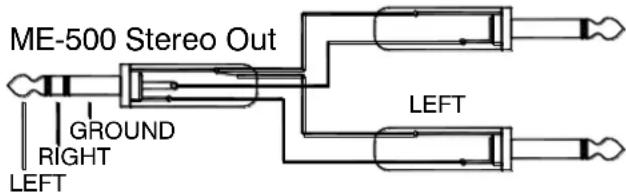
Connecting to equipment with Jack inputs
Using 2 stereo jacks
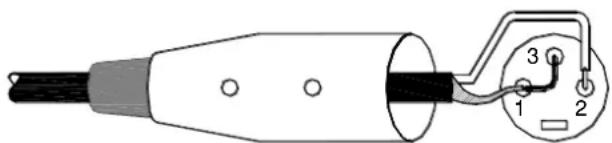
Connecting to equipment with XLR inputs
Link PIN3 (cold, -) to PIN1 (ground) to unbalance
natural_image
Pure electrical circuit lines without any symbols6. Using ME-500
6.1 Powering up the mixer
To turn the mixer on - Plug the external power unit into the DC In socket, or use PoE (powered via the Cat5 cable) by connecting a PoE switch or ME-U hub to the Link In socket. The blue power indicator lights. ME-500 starts with its previous settings restored and nothing selected.
Note PoE is not available from the Link Out socket when mixers are daisy chained.
To turn the mixer off - Unplug the DC cable or the Link In cable if you are using PoE.
Note Removing power will turn off audio to other mixers in the chain If they are daisy chained from the Link Out socket.
6.2 Dimmer
Press Shift+Solo to toggle the screen and key illumination bright or dim.
6.3 Standby
Use Standby when you leave the mixer unattended. This locks the controls and mutes the audio. Press Shift+Mute to enter standby. Press both keys again to exit.
6.4 Mapping channels to keys
Source patching - Use the source console output patch page to send audio and stereo link information to the ME mixers. Refer to the console user guide for instructions.
You can patch any combination of input channels, group and mix outputs to the 40 ME monitor channels. ME-500 uses up to 32 channels depending on how many are linked for stereo operation.
Input channel source - We recommend you patch input channels from their Direct Outputs with these set to post-EQ, post-mute, pre-fader. This means the monitor sends will be affected by the console channel EQ and mutes but not by the FOH mix faders.
Stereo links – Odd/even pairs of channels can be linked for stereo operation at the source console output patch page.
ME key assignment – The 16 select keys auto assign to the received ME monitor channels starting from CH1. Odd/even linked pairs of channels assign to single keys.
Note If you change stereo links while the ME mixer is turned on then it will re-assign its keys up or down starting from CH1.
User label - Once you have set the monitor patch and stereo links you can label the 16 keys using the space provided.
6.5 The display
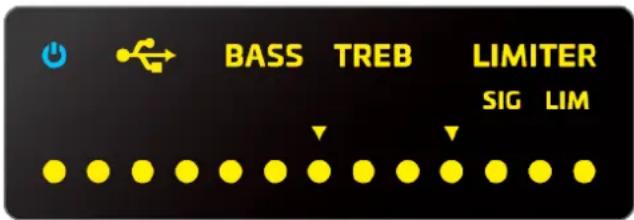
The display indicates the parameter being controlled by the rotary - level, pan, bass, treble, limiter threshold.
SIG lights to show audio signal activity:
Green = -40dB signal presence
Orange = +3dB normal level
Red = Peak 3dB before clipping
LIM lights when the limiter is active.
USB lights when a USB device is recognised.
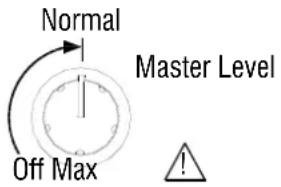
6.6 Adjusting Master level
Turn to adjust output volume. Start with the Master at minimum. Adjust sources for optimum meter reading then turn up the rotary for comfortable listening level. Typical setting is around mid-position.
6.7 Working with Channels
Press a select key to work with a channel:
Level – Turn the rotary. The bar shows the level from off to +10dB boost. The pointer indicates 0dB level, typical setting for the main source in your mix.
Pan - Press and turn the rotary to adjust the balance between left and right. The pointer indicates mid position.
Mute – Press the Mute key to toggle the channel on or off (muted). The select keys flash to show channels which are muted.
Solo – Press the Solo key to listen to just the selected channel. The key flashes when solo is active. Press and hold for more than 1 second for momentary action.
6.8 Working with the Master
Press the Master key to work with the output:
Mute – Press the Mute key to toggle the mix output on or off.
Bass - Turn the rotary to boost or cut low frequencies (BASS) by up to 15dB.
Treble – Press the rotary to toggle between bass and treble. Boost or cut high frequencies (TREB) by up to 15dB.
6.9 Setting the output limiter
The limiter can provide ear protection by preventing the output volume exceeding a maximum level set by the user.
Press Shift+Master to access the limiter:
Threshold - Set the output to the loudest volume required and turn the rotary until the LIM indicator starts to flash.

Warning To avoid the risk of hearing damage do not operate at high volumes for an extended period of time.
6.10 Trimming all levels
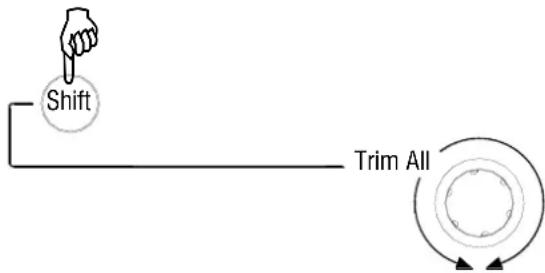
Hold Shift and turn the Rotary to simultaneously trim all levels up or down.
flowchart
graph TD
    A["Hand with Shift"] --> B["Line"]
    B --> C["Trim All"]
    style A fill:#f9f,stroke:#333
    style C fill:#ccf,stroke:#333
Use Trim All to reduce a hot mix if SIG flashes red, to bring up a mix with low meter reading, or to turn all levels off.
Note The mix balance will change when the source with highest level reaches maximum or source with lowest level reaches minimum. Use Trim All carefully to make small adjustments if you want to keep the relative balance between the sources.
6.11 ME-500 Presets
ME-500 can store and recall up to 8 presets. These store all channel levels, pans and mutes. Master EQ and limiter settings are not stored.
Use Keys1-8 to store presets within the mixer. Use Key9 to quickly clear all mix settings.
6.12 USB Preset transfer
Settings can be transferred between ME-500 mixers or archived to computer using a USB device. This transfers all channel levels, pans and mutes.
Use Key10 to store settings to USB.
The USB icon lights solid if a valid device is recognised. It flashes if there is a problem with the device.

natural_image
User interface toolbar with power button and USB symbol (no text or labels)The settings are stored as a file named PRESET.ME5 in a ME500PST folder on the USB device.
Note ME-500 and ME-1 presets are not compatible.
Note Presets cannot be named. Do not rename the USB file.
6.13 Recalling Presets
Hold down Recall. The Select keys light to show preset status:
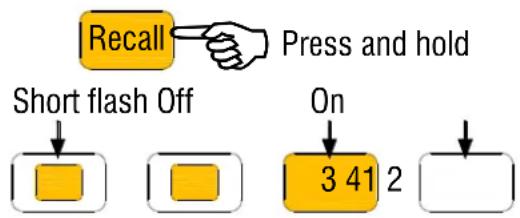
Off – Preset not available
On – Last preset recalled
Short flash – Preset available to recall
While holding down Recall, press a Select key to recall its preset. The current mixer settings are overwritten with the contents of the preset.
Use Keys1-8 to recall mixer presets.
Use Key10 to recall settings from USB.
6.14 Storing Presets
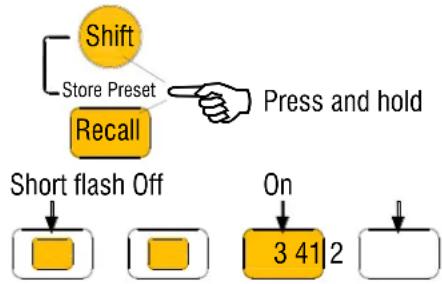
Hold down Shift+Recall. The Select keys light to show preset status:
flowchart
graph TD
    A["Shift"] --> B["Store Preset"]
    B --> C["Recall"]
    C --> D["Press and hold"]
    E["Short flash Off"] --> F["3 41 2"]
    G["On"] --> H["3 41 2"]
Off – Preset not available
On – Last preset stored
Short flash – Preset available for store
While holding down Shift+Recall, press a Select key to store the current settings to its preset.
Use Keys1-8 to store to mixer presets.
Use Key10 to store settings to USB.
6.15 Clearing all mix settings
Hold down Recall and press Key9 to instantly clear all channel levels, pans, mutes and solo. The Master EQ, limiter and stored presets are not affected.
6.16 Hard Reset
Hard reset returns the mixer to factory default by clearing all mix and master settings and clearing all stored presets.
To perform a hard reset:
Turn the mixer off.
Hold down the Shift+Recall+Master keys and power up the mixer. Release the keys after 5 seconds.
6.17 Firmware Version
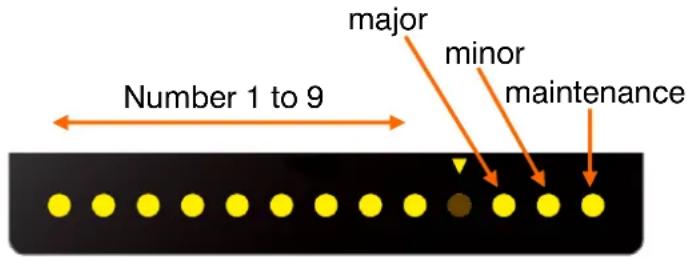
ME500 firmware is numbered
Version 1.23 where:
1 = major version
2 = minor version
3 = maintenance version
To check the current mixer version make sure the USB device is not plugged in:
To check a USB device version plug it in first.
Hold Shift + press Key16 to view the major version on the screen:
While holding Shift press Key16 again to view the minor version.
Press again to view the maintenance version.
6.18 Update Firmware
Check the Allen & Heath web site for the latest version of firmware. This can be downloaded and transferred to the ME mixer via USB key.
To start the update, press and release the rotary while holding down Shift+Key16.
For more information refer to the release notes and instructions on the web site.
6.19 Specification
Stereo Out – Stereo 14 " and 3.5mm jacks for:
Headphones >16 Ω, power 300+300mW into 100 Ω load, or line out max +21dBu
Mono Out – Balanced TRS jack, nom 0dBu, max +18dBu
Residual Output Noise - -95dBu (level min)
Freq Response - +0/-1dB 10Hz to 20kHz
Mains Power Unit - 100-240V AC 50/60Hz, +12V DC 1.25A out
PoE Requirement - 10W at ME-500 (We recommend 15W at PoE hub)
Dimensions – Width x Depth x Height 225 x 150 x 55mm (8.9" x 5.9" x 2.2")
Weight - 900g (2lbs)

The right hand dot indicates major, minor or maintenance version. The left hand dot displays its number.

- Limited One Year Manufacturer's Warranty
- Conditions Of Warranty
- READ THESE INSTRUCTIONS FIRST:
- Safety instructions
- Sound levels
- General precautions
- Operating firmware
- Software licence agreement
- Contents
- Further information
- Packed Contents
- ME-500 Personal Mixer
- DC Power Supply for the ME mixer
- Safety Instruction Sheet AP9241/CL2-1
- User Guide
- Accessories
- Microphone stand side mounting bracket
- Headphone holder
- Cat5 cables with EtherCON connectors
- ME Range
- ME-1 Personal mixer
- ME-U Hub
- Introduction
- Designed for the application
- Easy for the musician to operate
- Configure the system
- Convenient connection
- Front Panel
- Rear Panel
- Installing ME-500
- Mounting the unit
- Cat5 cable
- Ethernet PoE Switch
- Connecting audio
- Using ME-500
- Powering up the mixer
- Dimmer
- Standby
- Mapping channels to keys
- The display
- Adjusting Master level
- Working with Channels
- Working with the Master
- Setting the output limiter
- Trimming all levels
- ME-500 Presets
- USB Preset transfer
- Recalling Presets
- Storing Presets
- Clearing all mix settings
- Hard Reset
- Firmware Version
- Update Firmware
- Specification
Brand : ALLEN & HEATH
Model : ME-500
Category : Headphones