
5FGA - Kitchen appliance KITCHENAID - Free user manual and instructions
Find the device manual for free 5FGA KITCHENAID in PDF.


| Product Type | Stand Mixer Attachment |
| Brand | KitchenAid |
| Model | 5FGA (Food Grinder), compatible with 5FVSP (Fruit/Vegetable Strainer) and 5FVSGA (combination) |
| Compatibility | All KitchenAid® Household Stand Mixers |
| Primary Functions | Grinding meat, vegetables, fruits, bread; straining fruits and vegetables (with optional strainer kit) |
| Included Components (Food Grinder) | Grinder body, grind worm, knife, coarse grinding plate, fine grinding plate, ring, combination food pusher/wrench |
| Included Components (Fruit/Vegetable Strainer) | Spring and shaft assembly, larger worm, strainer cone, ring, strainer tray, splash shield, combination food pusher/wrench |
| Grinding Plate Sizes | Coarse and Fine |
| Recommended Speed Setting | Speed 4 on the mixer |
| Material | Metal (aluminum/stainless steel) and plastic components |
| Weight (approx.) | 1.5 kg (3.3 lbs) |
| Dimensions (approx.) | 25 cm (length) x 10 cm (width) x 10 cm (height) |
| Dishwasher Safe Parts | Grinder body, worm, ring, pusher/wrench; strainer cone, tray, splash shield, ring, pusher/wrench |
| Hand Wash Only Parts | Knife, grinding plates, spring and shaft assembly |
| Warranty Period | 2 years full warranty (Europe, Australia, New Zealand); 1 year full warranty (other regions) |
| Safety Features | Rotating blade hazard warning, use food pusher, keep fingers out of openings, unplug when not in use |
| Maintenance Tips | Clean after each use; hand wash sharp parts; dishwasher safe parts can be placed on top rack; remove pulp with bottle brush |
| Recipes Included | Smoky Salsa, Swedish Meatballs, Bolognese Sauce, Pesto Sauce, Golden Peach Chutney, Harvest Apple Butter, Hummus |
Frequently Asked Questions - 5FGA KITCHENAID
User questions about 5FGA KITCHENAID
0 question about this device. Answer the ones you know or ask your own.
Ask a new question about this device
Download the instructions for your Kitchen appliance in PDF format for free! Find your manual 5FGA - KITCHENAID and take your electronic device back in hand. On this page are published all the documents necessary for the use of your device. 5FGA by KITCHENAID.
USER MANUAL 5FGA KITCHENAID
natural_image
Exterior view of a kitchen stand mixer with food being handled (no text or symbols visible)Model 5FGA Food Grinder
Model 5FVSP Fruit/Vegetable Strainer
Model 5FVSFGA Fruit/Vegetable Strainer and Food Grinder
Designed exclusively for use with all KitchenAid® Household Stand Mixers.
Table of Contents
Stand Mixer Attachment Safety ....1
Important Safeguards....1
To Attach Stand Mixer Attachment ....2
Before Attaching Stand Mixer Attachment 2
Food Grinder Attachment ....3
To Assemble Food Grinder Attachment 3
To Use Food Grinder Attachment 4
To Clean Food Grinder Attachment 4
Fruit/Vegetable Strainer....5
To Assemble Fruit/Vegetable Strainer 5
To Use Fruit/Vegetable Strainer 6
To Clean Fruit/Vegetable Strainer 7
Recipes 8
KitchenAid ^® Household Stand Mixer Attachment Warranty ....13
Service Centers....13
Customer Service 13
Your safety and the safety of others are very important.
We have provided many important safety messages in this manual and on your appliance. Always read and obey all safety messages.

This is the safety alert symbol.
This symbol alerts you to potential hazards that can kill or hurt you and others.
All safety messages will follow the safety alert symbol and either
the word "DANGER" or "WARNING." These words mean:
! DANGER
You can be killed or seriously injured if you don't immediately follow instructions.
WARNING
You can be killed or seriously injured if you don't follow instructions.
All safety messages will tell you what the potential hazard is, tell you how to reduce the chance of injury, and tell you what can happen if the instructions are not followed.
IMPORTANT SAFEGUARDS
When using electrical appliances, basic safety precautions should always be followed including the following:
- Read all instructions.
- To protect against risk of electrical shock, do not put mixer in water or other liquid.
- The appliance is not intended for use by young children or infirm persons without supervision.
- Unplug from outlet when not in use, before putting on or taking off parts, and before cleaning.
- Avoid contacting moving parts. Keep fingers out of discharge opening.
- Do not operate the mixer with a damaged cord or plug or after the mixer malfunctions, or is dropped
or damaged in any manner. Return the mixer to the nearest Authorized Service Center for examination, repair or electrical or mechanical adjustment.
- The use of attachments not recommended or sold by KitchenAid may cause fire, electric shock or injury.
- Do not use the mixer outdoors.
- Do not let the cord hang over the edge of table or counter.
- Never feed food by hand. Always use combination food pusher/wrench.
- Blades are sharp. Handle carefully.
- This product is designed for household use only.
SAVE THESE INSTRUCTIONS
To Attach Stand Mixer Attachment
before Attaching Stand Mixer Attachment
- Turn Stand Mixer speed control to "0" (OFF).
- Unplug mixer or disconnect power.
- Depending on which type of hub you have, either flip-up the hinged cover or loosen the attachment knob (A) by turning it counterclockwise and remove attachment hub cover.
- Insert the attachment shaft housing (B) into the attachment hub (C) making certain that attachment power shaft fits into square hub socket.
-
It may be necessary to rotate the attachment back and forth. When the attachment is in proper position, the pin on the attachment housing will fit into the notch on the hub rim.
-
Tighten the attachment knob by turning it clockwise until the attachment is completely secured to mixer.

Food Grinder Attachment
To Assemble Food Grinder Attachment
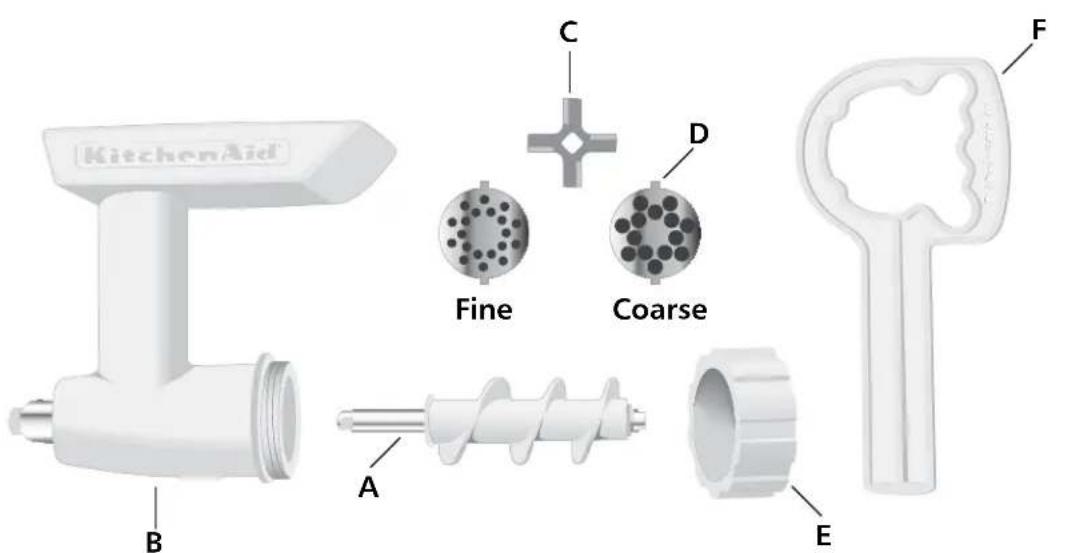
- Insert the grind worm (A) into the grinder body (B).
- Place the knife (C) over the square shank at the exposed end of the grind worm.
- Place grinding plate (D) over the knife, matching the tabs of the plate with the notches of the grinder body.
- Place ring (E) on grinder body, turning by hand until secured but not tightened.
NOTE: The combination food pusher/wrench (F) is used for removal of ring (E) only. Do not use it to tighten ring (E).
NOTE: Fruit/Vegetable Strainer (Model 5FVSP) is available to convert Food Grinder to a Fruit/Vegetable Strainer. Sausage Stuffer (Model 5SSA) is available to convert Food Grinder to Sausage Stuffer.
Food Grinder Attachment
To Use Food Grinder Attachment
WARNING

Rotating Blade Hazard Always use food pusher. Keep fingers out of openings. Keep away from children. Failure to do so can result in amputations or cuts.
- Cut food into small strips or pieces and feed them into hopper. Meat should be cut into long narrow strips.
- Turn mixer to Speed 4 and feed food into hopper using combination food pusher/wrench.
NOTE: Liquid may appear in hopper when processing large amounts of high moisture foods such as tomatoes or grapes. To drain liquid, continue to operate mixer. To avoid damage to mixer, do not process additional food until liquid has drained from hopper.

Coarse Plate – Use for grinding raw or cooked meats, firm vegetables, dried fruits and cheese.

Fine Plate – Use for grinding raw meat, cooked meats for spreads and breadcrumbs.
Grinding Meat – For better mix and more tender results, grind beef twice. Best texture results from grinding very cold or partially frozen meat. Fatty meats should be ground only once.
Grinding bread – To grind bread for crumbs, be sure that bread is either oven dried thoroughly to remove all moisture, or not dried at all. Partially dried bread may jam the Food Grinder.
NOTE: Very hard, dense foods such as totally dried homemade bread should not be ground in the Food Grinder. Homemade bread should be ground fresh and then oven or air-dried.
To Loosen Ring – If ring is too tight to remove by hand, slip the combination food pusher/wrench over the grooves and turn counterclockwise.
NOTE: To avoid damage to the food grinder attachment, do not use combination food pusher/wrench to tighten ring to grinder body.
To Clean Food Grinder Attachment
First completely disassemble food grinder attachment.
The following parts are dishwasher safe:
- Grinder body
- Grinder worm
- Ring
- Combination food pusher/wrench The following parts should be hand washed in warm, sudsy water and dried thoroughly:
- Knife
- Grinding plates
Fruit/Vegetable Strainer
To Assemble Fruit/Vegetable Strainer
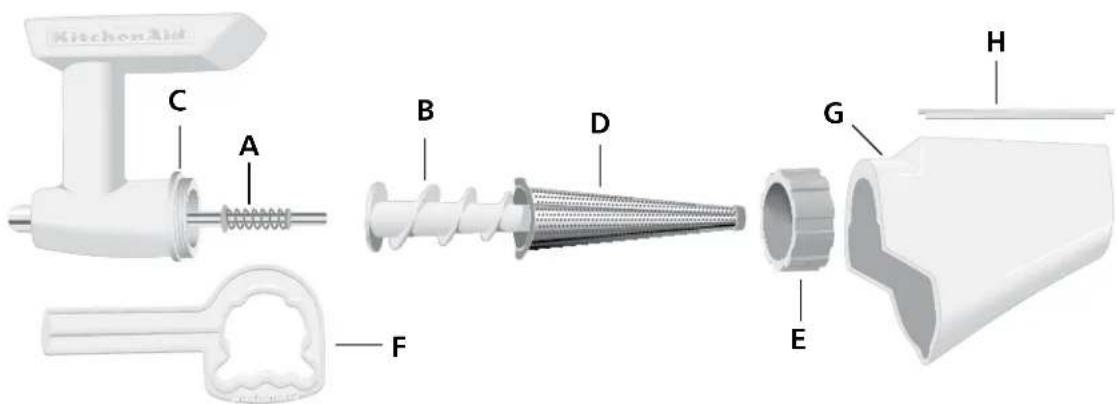
- Slide the smaller end of spring and shaft assembly (A) into opening in larger worm (B) until secured firmly in place.
- Insert the larger worm into the grinder body (C).
- Attach strainer cone (D) over the exposed end of the worm matching the tabs of the cone with the notches in the grinder body (C).
- Place ring (E) onto the grinder body, turning by hand until finger tight, but not overtightened.
NOTE: The combination food pusher/wrench (F) is used for removal of ring (E) only. Do not use it to tighten ring (E).
- Slide the strainer tray (G) over the cone and latch on the top of ring.
- Place splash shield (H) on strainer tray (G).
Fruit/Vegetable Strainer
To Use Fruit/Vegetable Strainer
WARNING

Rotating Blade Hazard Always use food pusher. Keep fingers out of openings. Keep away from children. Failure to do so can result in amputations or cuts.
-
After attaching Fruit/Vegetable Strainer attachment to mixer, place mixer bowl under strainer tray to catch strained food and a smaller bowl under open end to catch food waste.
-
Cut food into pieces that will fit in the hopper.
- Turn mixer to Speed 4 and feed food into hopper using the combination food pusher/wrench.
To Strain Fruits and Vegetables
- Cut into pieces that will fit into hopper
- Remove tough, thick skin or rind, i.e., oranges
- Remove all large pits, i.e., peaches
- Remove hulls or stems, i.e., strawberries, grapes
• Cook all tough or firm fruits and vegetables before straining
NOTE: Liquid may appear in hopper when processing large amounts of high moisture foods such as tomatoes or grapes. To drain liquid, continue to operate mixer. To avoid damage to mixer, do not process additional food until liquid has drained from hopper.
Fruit/Vegetable Strainer
NOTE: To avoid damage to the fruit/vegetable strainer attachment and/or mixer, Labruscan or slip-skin type grapes such as Concord, Catawba and Ontario grapes should not be processed in the Fruit/Vegetable Strainer. Only Ninifera family grapes such as Tokay and Thompson Seedless may be processed.
To Clean Fruit/Vegetable Strainer
First completely disassemble Fruit/Vegetable Strainer attachment.
The following parts are dishwasher safe:
- Grinder body
- Grinder worm
- Strainer cone
- Strainer tray
- Splash shield
- Ring
- Combination food pusher/wrench
The following parts should be hand washed in warm, sudsy water and dried thoroughly:
- Spring and shaft assembly
Some foods may stain certain parts. These stains may be removed by using one of the following methods: (1) place dishwasher safe parts in dishwasher and use cycle for normally soiled dishes, or (2) rub a small amount of oil or shortening over the stains, wash in warm, sudsy water and rinse. A small bottle brush can be used to help remove pulp from the strainer cone.
To Loosen Ring – If ring is too tight to remove by hand, slip the combination food pusher/wrench over the grooves and turn counterclockwise.
NOTE: To avoid damage to the Fruit/Vegetable Strainer attachment, do not use combination food pusher/wrench to tighten ring to grinder body.
Smoky Salsa
4 large tomatoes, peeled and cut into sixths
1 or 2 chipotle peppers
1 medium onion, cut into sixths
1 clove garlic
80 ml ( ^1/_3 cup) vinegar
1 teaspoon (5 g) salt
Assemble Food Grinder, using coarse grinding plate. Attach Food Grinder to mixer. Turn to Speed 4 and grind tomatoes, peppers, onion, and garlic into large bowl or saucepan placed under grinder. Add all remaining ingredients; mix well. For thicker salsa, heat mixture to boiling in saucepan. Reduce heat to low. Cook 5 to 10 minutes, or until desired consistency.
Tip: Chipotle peppers are dried, smoked jalapeño peppers. If they are not available, substitute fresh jalapeño peppers and 2 tablespoons (10 ml) barbecue sauce.
Yield: 20 servings (30 ml [2 tablespoons] per serving).
Swedish Meatballs with Cream Sauce
Swedish Meatballs
500 g (1 pound) boneless beef round steak, cut into 1-inch (2.5-cm) strips
250 g ( 12 pound) boneless veal, cut into 1-inch (2.5-cm) strips
1 medium onion, cut into sixths
2 slices whole wheat bread, broken into pieces
1 teaspoon (5 g) salt
1 teaspoon (5 g) nutmeg 12 teaspoon (3 g) allspice
^1/_2 teaspoon (3 g) black pepper
60 ml (1/4 cup) fat-free egg substitute or 1 egg
120 ml ( ^1/_2 cup) low-fat milk
Cream Sauce
60 ml (1/4 cup) drippings from meatballs or margarine or butter
60 g ( ^1/_4 cup) flour
500 ml (2 cups) whole milk
2 teaspoons (10 g) instant beef bouillon granules or 1 beef bouillon cube
12 teaspoon (3 g) black pepper
Assemble Food Grinder, using fine grinding plate. Attach Food Grinder to mixer. Turn to Speed 4 and grind beef, veal, onion, and bread into bowl placed under grinder. (Return mixture to grinder and grind once or twice more for extra fine meatballs.) Add all remaining ingredients; mix well.
Shape mixture into 2.5-cm (1-inch) meatballs and arrange in 40 x 26 x 2.5 cm (16 x 10 12 x 1-inch) baking pans. Bake at 230°C (450°F) for 15 minutes, or until browned and no longer pink in center.
While meatballs are baking, prepare Cream Sauce. Heat drippings or melt margarine in large saucepan. Add flour and stir until bubbly. Gradually stir in all remaining ingredients. Cook over medium-low heat until mixture thickens and just begins to bubble. Pour over Swedish Meatballs.
Serve meatballs as an appetizer or combine with cooked noodles as a main dish.
Yield: 20 appetizer servings (4 meatballs per serving) or 10 main dish servings (8 meatballs per serving).
bolognese Sauce
30 ml (2 tablespoons) olive oil
2 carrots, peeled and cut into 2.5-cm (1-inch) pieces
2 stalks celery cut into 2.5-cm (1-inch) pieces
1 large onion, cut into eigths
20 g parsley sprigs
700 g (1 12 pounds) ground beef
250 g ( 12 pound) ground pork
3 cloves garlic
10 large ripe tomatoes, cut into sixths
1 teaspoon (5 g) basil
1 teaspoon (5 g) oregano
1 bay leaf
1 teaspoon (5 g) salt
^1/_2 teaspoon (3 g) pepper
60 ml ( 14 cup) water
60 ml ( 14 cup) dry red wine
200 g ( ^3/_4 cup) tomato concentrate
Heat oil in a 30-cm (12-inch) skillet over medium heat. Add carrots, celery, onion, parsley, ground beef, ground pork, and garlic. Sauté 20 minutes. Remove mixture from heat and cool 10 minutes.
Assemble Food Grinder using coarse grinding plate and attach to mixer. Turn to Speed 4 and grind mixture into a 5.7 L (6-quart) pot.
Assemble Fruit/Vegetable Strainer and attach to mixer. Turn to Speed 4 and strain tomatoes. Measure out 950 ml (4 cups) puree. Add tomato puree and concentrate, basil, oregano, bay leaf, salt, pepper, water, and wine to meat mixture. Cover and simmer on medium-low heat for 1 hour.
Yield: 2 L (2 quarts).
Pesto Sauce
80 g ( 13 cup) fresh basil leaves
40 g ( ^1/_6 cup) parsley sprigs
2 cloves garlic
1 teaspoon (5 g) salt
12 teaspoon (3 g) pepper
100 g Parmesan cheese
120 ml ( ^1/_2 cup) olive oil
50 g ( ^1/_4 cup) pine nuts (optional)
Assemble Food Grinder using fine grinding plate and attach to mixer. Turn to Speed 4 and grind basil leaves, parsley sprigs, and garlic into mixer bowl. Add salt, pepper, and Parmesan cheese. Attach bowl and wire whip. Turn to Speed 6 and whip 1 minute. Stop and scrape bowl. Turn to Speed 8 and gradually add olive oil in a thin, steady stream, whipping until absorbed. Use about 30 ml (2 tablespoons) of Pesto Sauce per serving of pasta.
Tip: If Pesto Sauce is not used at once, place it in a jar and cover with a thin layer of olive oil to keep it from darkening. Refrigerate for a week or freeze for longer storage.
Yield: 500 ml (2 cups).
Golden Peach Chutney
4 large peaches, peeled and cut into chunks or 1 package (450 g (16 oz)) frozen peaches, thawed
120 ml ( ^1/2 cup) vinegar ^1/2 finely chopped onion
60 g ( ^1/_4 cup) dried fruit bits
120 g ( 12 cup) firmly packed brown sugar
60 g ( ^1/_4 cup) sugar
40 g (2 tablespoons) finely chopped crystallized ginger
4 or 5 cloves
^1/_4 teaspoon (2 g) allspice
Assemble Fruit/Vegetable Strainer and attach to mixer. Turn to Speed 4 and strain peaches into large saucepan placed under strainer. Add all remaining ingredients. Heat to boiling. Reduce heat to low. Cook about 20 minutes, or until thick, stirring frequently.
Yield: 24 servings (20 g [1 tablespoon] per serving).
Harvest Apple butter
1.5 kg (3 lbs.) cooking apples, cut into fourths
200 ml ( ^3/_4 cup) apple cider
120 ml ( ^1/_2 cup) vinegar
450 g (2 cups) sugar
2 teaspoons (10 g) cinnamon
4 cloves
1^1/2 teaspoon (8 g) allspice
Place apples, cider, and vinegar in large saucepan or Dutch oven. Cook over medium heat about 15 minutes, or until very soft, stirring occasionally.
Assemble Fruit/Vegetable Strainer and attach to mixer. Turn to Speed 4 and strain cooked apples into mixer bowl placed under strainer. Return apples to pan. Add sugar and spices; mix well. Cook over low heat until sugar is dissolved, stirring constantly. Cook 15 to 20 minutes longer, or until thick, stirring frequently. Ladle into hot, sterilized 235 ml ( 12 -pint) jars. Process 10 minutes in boiling water bath. Remove jars from water. Cool; check seals.
Yield: About 1.2 L (5 cups) (10 ml [2 teaspoons] per serving).
Hummus
1 can (565 g [20 ounces]) chickpeas, drained
60 ml ( 1/4 cup) cold water
60 ml ( 14 cup) fresh lemon juice
60 g ( ^1/_4 cup) tahini (sesame seed paste) or 2 teaspoons (10 ml) sesame oil
2 cloves garlic, minced
1 teaspoon (5 g) salt
^1/2 teaspoon (3 g) paprika (optional)
Assemble Fruit/Vegetable Strainer and attach to mixer. Turn to Speed 4 and strain chickpeas into mixer bowl. Return waste to strained chickpeas.
Add water, lemon juice, tahini, garlic, salt, and paprika. Attach bowl and wire whip to mixer. Turn to Speed 4 and whip 1 minute. Stop and scrape bowl. Increase to Speed 10 and whip 1 minute or until smooth. Serve with Pita Bread.
Yield: 475 ml (2 cups).
KitchenAid® Household Stand Mixer Attachment Warranty
| Length of Warranty: | KitchenAidWill Pay For: | KitchenAidWill Not Pay For: |
| Europe, Australia and New Zealand:Two years Full Warranty from date of purchase.Other:One Year Full Warranty from date of purchase. | Replacement parts and repair labor costs to correct defects in materials or workmanship. Service must be provided by an Authorized KitchenAid Service Center. | A. Repairs when Food Grinder or Fruit/ Vegetable Strainer are used for operations other than normal household food preparation.B. Damage resulting from accident, alterations, misuse, abuse, or installation/ operation not in accordance with local electrical codes. |
KITCHENAID DOES NOT ASSUME ANY RESPONSIBILITY FOR INDIRECT DAMAGES.
Service Centers
All service should be handled locally by an Authorized KitchenAid Service Center. Contact the dealer from whom the attachments were purchased to obtain the name of the nearest Authorized KitchenAid Service Center.
In the U.K.: Call: 0845 6011 287
In Ireland: M.X. ELECTRIC Service Department 25 Alymer Crescent Kilcock, CO.KILDARE Call: 1 679 2398/87 2581574 Fax: 1 628 4368
In Australia: Call: 1800 990 990 In New Zealand: Call: 0800 881 200
Customer Service
In U.K. & Ireland: Tollfree number 00800 38104026
Address: KitchenAid Europa, Inc.
PO BOX 19
B-2018 ANTWERP 11
BELGIUM
www.KitchenAid.com

® Registered Trademark of KitchenAid, U.S.A.
™ Trademark of KitchenAid, U.S.A.
The shape of the stand mixer is a trademark of KitchenAid, U.S.A.
© 2007. All rights reserved.
Specifications subject to change without notice.
9709881A
(5562dZw207)

- Table of Contents
- Your safety and the safety of others are very important.
- ! DANGER
- WARNING
- IMPORTANT SAFEGUARDS
- SAVE THESE INSTRUCTIONS
- To Attach Stand Mixer Attachment
- before Attaching Stand Mixer Attachment
- Food Grinder Attachment
- To Assemble Food Grinder Attachment
- To Use Food Grinder Attachment
- To Clean Food Grinder Attachment
- Fruit/Vegetable Strainer
- To Assemble Fruit/Vegetable Strainer
- To Use Fruit/Vegetable Strainer
- To Strain Fruits and Vegetables
- To Clean Fruit/Vegetable Strainer
- Smoky Salsa
- Swedish Meatballs with Cream Sauce
- Swedish Meatballs
- Cream Sauce
- bolognese Sauce
- Pesto Sauce
- Golden Peach Chutney
- Harvest Apple butter
- Hummus
- KitchenAid® Household Stand Mixer Attachment Warranty
- Service Centers
- Customer Service
Brand : KITCHENAID
Model : 5FGA
Category : Kitchen appliance