
MicroBook IIc - Hi-Fi System MOTU - Free user manual and instructions
Find the device manual for free MicroBook IIc MOTU in PDF.


| Product Type | USB Audio Interface / Hi-Fi System |
| Model | MicroBook IIc |
| Brand | MOTU (Mark of the Unicorn) |
| Dimensions | Approximately 1.7 x 6.3 x 4.5 inches (H x W x D) |
| Weight | Approximately 1.0 lb (0.45 kg) |
| Power Supply | Bus-powered via USB 2.0 (Type A to Type B) or optional external USB power adapter (Micro-B) for iOS use; 5V DC, 500mA |
| Sample Rate | 44.1 to 96 kHz (standard rates) |
| Bit Depth | 16-bit or 24-bit recording/playback |
| Inputs | 1 x Mic (XLR/TRS combo) with preamp, 48V phantom, -20dB pad; 1 x Guitar (1/4" TS) Hi-Z; 2 x Line (1/4" TRS) balanced; 1 x Stereo Mini line in (3.5mm) for line inputs 3-4 |
| Outputs | 2 x Main Out (1/4" TRS) balanced; 1 x Line Out (3.5mm stereo mini); 1 x Headphone (1/4" TRS); 1 x S/PDIF Digital Out (RCA) mirroring Main Out |
| Digital Mixer | 4 stereo mix busses (8-bus) with hardware DSP; CueMix FX software control |
| On-board Effects | 7-band parametric EQ per channel; Compressor/Limiter with threshold, ratio, attack, release, knee, trim |
| Monitoring | Zero-latency hardware monitoring via CueMix FX; adjustable buffer sizes in host software |
| Computer Connectivity | USB 2.0 (USB Audio Class Compliant); compatible with Mac, Windows, and iOS (iPad/iPhone via Camera Connection Kit) |
| Software Included | CueMix FX mixer/effects control; AudioDesk DAW (Mac/Windows) |
| Operating Temperature | 10°C to 40°C (50°F to 104°F) |
| Safety Precautions | Do not expose to moisture; use only shielded interface cables; unplug during lightning; refer servicing to qualified personnel |
| Cleaning | Unplug from computer; clean with a damp cloth; do not use liquid or aerosol cleaners |
| Warranty | 2 years limited warranty on hardware (parts and labor); 90 days on software media |
| Spare Parts / Repairability | No user-serviceable parts inside; contact MOTU or authorized service center for repairs |
Frequently Asked Questions - MicroBook IIc MOTU
User questions about MicroBook IIc MOTU
0 question about this device. Answer the ones you know or ask your own.
Ask a new question about this device
Download the instructions for your Hi-Fi System in PDF format for free! Find your manual MicroBook IIc - MOTU and take your electronic device back in hand. On this page are published all the documents necessary for the use of your device. MicroBook IIc by MOTU.
USER MANUAL MicroBook IIc MOTU
MICROBOOK IIc
USER GUIDE
About the Mark of the Unicorn License Agreement and Limited Warranty on Software
TO PERSONS WHO PURCHASE OR USE THIS PRODUCT: carefully read all the terms and conditions of the "click-wrap" license agreement presented to you when you install the software. Using the software or this documentation indicates your acceptance of the terms and conditions of that license agreement.
Mark of the Unicorn, Inc. ("MOTU") owns both this program and its documentation. Both the program and the documentation are protected under applicable copyright, trademark, and trade-secret laws. Your right to use the program and the documentation are limited to the terms and conditions described in the license agreement.
Reminder of the terms of your license
This summary is not your license agreement, just a reminder of its terms. The actual license can be read and printed by running the installation program for the software. That license agreement is a contract, and clicking "Accept" binds you and MOTU to all its terms and conditions. In the event anything contained in this summary is incomplete or in conflict with the actual click-wrap license agreement, the terms of the click-wrap agreement prevail.
YOU MAY: (a) use the enclosed program on a single computer; (b) physically transfer the program from one computer to another provided that the program is used on only one computer at a time and that you remove any copies of the program from the computer from which the program is being transferred; (c) make copies of the program solely for backup purposes. You must reproduce and include the copyright notice on a label on any backup copy.
YOU MAY NOT: (a) distribute copies of the program or the documentation to others; (b) rent, lease or grant sublicenses or other rights to the program; (c) provide use of the program in a computer service business, network, time-sharing, multiple CPU or multiple user arrangement without the prior written consent of MOTU; (d) translate, adapt, reverse engineer, decompile, disassemble, or otherwise alter the program or related documentation without the prior written consent of MOTU.
MOTU warrants to the original licensee that the disk(s) on which the program is recorded be free from defects in materials and workmanship under normal use for a period of ninety (90) days from the date of purchase as evidenced by a copy of your receipt. If failure of the disk has resulted from accident, abuse or misapplication of the product, then MOTU shall have no responsibility to replace the disk(s) under this Limited Warranty.
THIS LIMITED WARRANTY AND RIGHT OF REPLACEMENT IS IN LIEU OF, AND YOU HEREBY WAIVE, ANY AND ALL OTHER WARRANTIES, BOTH EXPRESS AND IMPLIED, INCLUDING BUT NOT LIMITED TO WARRANTIES OF MERCHANTABILITY AND FITNESS FOR A PARTICULAR PURPOSE. THE LIABILITY OF MOTU PURSUANT TO THIS LIMITED WARRANTY SHALL BE LIMITED TO THE REPLACEMENT OF THE DEFECTIVE DISK(S), AND IN NO EVENT SHALL MOTU OR ITS SUPPLIERS, LICENSORS, OR AFFILIATES BE LIABLE FOR INCIDENTAL OR CONSEQUENTIAL DAMAGES, INCLUDING BUT NOT LIMITED TO LOSS OF USE, LOSS OF PROFITS, LOSS OF DATA OR DATA BEING RENDERED INACCURATE, OR LOSSES SUSTAINED BY THIRD PARTIES EVEN IF MOTU HAS BEEN ADVISED OF THE POSSIBILITY OF SUCH DAMAGES. THIS WARRANTY GIVES YOU SPECIFIC LEGAL RIGHTS WHICH MAY VARY FROM STATE TO STATE. SOME STATES DO NOT ALLOW THE LIMITATION OR EXCLUSION OF LIABILITY FOR CONSEQUENTIAL DAMAGES, SO THE ABOVE LIMITATION MAY NOT APPLY TO YOU.
Update Policy
In order to be eligible to obtain updates of the program, you must register the software at motu.com.
Copyright Notice
Copyright © 2015, 2014, 2013, 2012 by Mark of the Unicom, Inc. All rights reserved. No part of this publication may be reproduced, transmitted, transcribed, stored in a retrieval system, or translated into any human or computer language, in any form or by any means whatsoever, without express written permission of Mark of the Unicom, Inc., 1280 Massachusetts Avenue, Cambridge, MA, 02138, U.S.A.
Limited Warranty on Hardware
Mark of the Unicorn, Inc. and S&S Research ("MOTU/S&S") warrant this equipment against defects in materials and workmanship for a period of TWO (2) YEARS from the date of original retail purchase. This warranty applies only to hardware products; MOTU software is licensed and warranted pursuant to separate written statements.
If you discover a defect, first write or call Mark of the Unicorn at (617) 576-2760 to obtain a Return Merchandise Authorization Number. No service will be performed on any product returned without prior authorization. MOTU will, at its option, repair or replace the product at no charge to you, provided you return it during the warranty period, with transportation charges prepaid, to Mark of the Unicorn, Inc., 1280 Massachusetts Avenue, MA 02138. You must use the product's original packing material for in shipment, and insure the shipment for the value of the product. Please include your name, address, telephone number, a description of the problem, and the original, dated bill of sale with the returned unit and print the Return Merchandise Authorization Number on the outside of the box below the shipping address.
This warranty does not apply if the equipment has been damaged by accident, abuse, misuse, or misapplication; has been modified without the written permission of MOTU, or if the product serial number has been removed or defaced.
ALL IMPLIED WARRANTIES, INCLUDING IMPLIED WARRANTIES OF MERCHANTABILITY AND FITNESS FOR A PARTICULAR PURPOSE, ARE LIMITED IN DURATION TO TWO (2) YEARS FROM THE DATE OF THE ORIGINAL RETAIL PURCHASE OF THIS PRODUCT.
THE WARRANTY AND REMEDIES SET FORTH ABOVE ARE EXCLUSIVE AND IN LIEU OF ALL OTHERS, ORAL OR WRITTEN, EXPRESS OR IMPLIED. No MOTU/S&S dealer, agent, or employee is authorized to make any modification, extension, or addition to this warranty.
MOTU/S&S ARE NOT RESPONSIBLE FOR SPECIAL, INCIDENTAL, OR CONSEQUENTIAL DAMAGES RESULTING FROM ANY BREACH OF WARRANTY, OR UNDER ANY LEGAL THEORY, INCLUDING LOST PROFITS, DOWNTIME, GOODWILL, DAMAGE OR REPLACEMENT OF EQUIPMENT AND PROPERTY AND COST OF RECOVERING REPROGRAMMING, OR REPRODUCING ANY PROGRAM OR DATA STORED IN OR USED WITH MOTU/S&S PRODUCTS.
Some states do not allow the exclusion or limitation of implied warranties or liability for incidental or consequential damages, so the above limitation or exclusion may not apply to you. This warranty gives you specific legal rights, and you may have other rights which vary from state to state.
MOTU, AudioDesk, Mark of the Unicorn and the unicorn silhouette logo are trademarks of Mark of the Unicorn, Inc.
This equipment has been type tested and found to comply with the limits for a class B digital device, pursuant to Part 15 of the FCC Rules. These limits are designed to provide reasonable protection against harmful interference in a residential installation. This equipment generates, uses, and can radiate radio frequency energy and, if not installed and used in accordance with the instruction manual, may cause harmful interference to radio communications. However, there is no guarantee that interference will not occur in a particular installation. If this equipment does cause interference to radio or television equipment reception, which can be determined by turning the equipment off and on, the user is encouraged to try to correct the interference by any combination of the following measures:
- Relocate or reorient the receiving antenna
- Increase the separation between the equipment and the receiver
- Plug the equipment into an outlet on a circuit different from that to which the receiver is connected
If necessary, you can consult a dealer or experienced radio/television technician for additional assistance.
PLEASE NOTE: only equipment certified to comply with Class B (computer input/output devices, terminals, printers, etc.) should be attached to this equipment, and it must have shielded interface cables in order to comply with the Class B FCC limits on RF emissions.
WARNING: changes or modifications to this unit not expressly approved by the party responsible for compliance could void the user's authority to operate the equipment.

MicroBook llc
User Guide
MOTU
1280 Massachusetts Avenue
Cambridge, MA 02138
Business voice: (617) 576-2760
Business fax: (617) 576-3609
Web site: www.motu.com
Tech support: www.motu.com/support
SAFETY PRECAUTIONS AND ELECTRICAL REQUIREMENTS
WARNING: TO REDUCE THE RISK OF FIRE OR ELECTRICAL SHOCK, DO NOT EXPOSE THIS APPLIANCE TO RAIN OR OTHER MOISTURE.
CAUTION: TO REDUCE THE RISK OF ELECTRICAL SHOCK, DO NOT REMOVE COVER. NO USER-SERVICEABLE PARTS INSIDE. REFER SERVICING TO QUALIFIED SERVICE PERSONNEL.
WARNING: DO NOT PERMIT FINGERS TO TOUCH THE TERMINALS OF POWER PLUGS WHEN INSTALLING OR REMOVING THE PLUG TO OR FROM A POWER SOURCE.
IMPORTANT SAFEGUARDS
- Read instructions — All the safety and operating instructions should be read before operating the MicroBook.
- Retain instructions — The safety instructions and owner's manual should be retained for future reference.
- Heed Warnings — All warnings on the MOTU MicroBook and in the owner's manual should be adhered to.
- Follow Instructions — All operating and use instructions should be followed.
- Cleaning — Unplug the MOTU MicroBook from the computer before cleaning and use a damp cloth. Do not use liquid or aerosol cleaners.
- Power Sources — This MOTU MicroBook should be operated only from the type of power source indicated on the marking label.
- Power-Cord Protection — Power-supply cords should be routed so that they are not likely to be walked on or pinched by items placed upon or against them. Pay particular attention to cords and plugs, convenience receptacles, and the point where they exit from the MOTU MicroBook.
- Lightning — For added protection for the MOTU MicroBook during a lightning storm, unplug its power supply from any wall outlets. This will prevent damage to the MOTU MicroBook due to lightning and power line surges.
- Servicing — Do not attempt to service this MOTU MicroBook yourself as opening or removing covers will expose you to dangerous voltage and other hazards. Refer all servicing to qualified service personnel.
- Damage Requiring Service — Unplug the MOTU MicroBook from the computer and refer servicing to qualified service personnel under the following conditions.
a. When the power supply cord or plug is damaged.
b. If liquid has been spilled or objects have fallen into the MOTU MicroBook.
c. If the MOTU MicroBook has been exposed to rain or water.
d. If the MOTU MicroBook does not operate normally by following the operating instructions in the owner's manual.
e. If the MOTU MicroBook has been dropped or the cabinet has been damaged.
f. When the MOTU MicroBook exhibits a distinct change in performance, this indicates a need for service.
-
Replacement Parts — When replacement parts are required, be sure the service technician has used replacement parts specified by the manufacturer or have the same characteristics as the original part. Unauthorized substitutions may result in fire, electric shock or other hazards.
-
Safety Check — Upon completion of any service or repairs to this MOTU MicroBook, ask the service technician to perform safety checks to determine that the product is in safe operating conditions.
ENVIRONMENT
Operating Temperature: 10°C to 40°C (50°F to 104°)
AVOID THE HAZARDS OF ELECTRICAL SHOCK AND FIRE
Do not handle the power supply, or power cables with wet hands.
CAUTION: DANGER OF EXPLOSION IF BATTERY IS REPLACED. REPLACE ONLY WITH THE SAME OR EQUIVALENT TYPE RECOMMENDED BYMANUFACTURER. DISPOSE OF USED BATTERY ACCORDING TO MANUFACTURER'S INSTRUCTIONS.
Contents
4 Quick Reference: MicroBook Front Panel
5 Quick Reference: MicroBook Rear Panel
6 Quick Reference: MicroBook Top Panel
7 Quick Reference: CueMix FX
9 About the MicroBook
13 Packing List and System Requirements
15 Installing the MicroBook Software
17 Installing the MicroBook Hardware
25 Mac OS X Audio Software
33 Windows Audio Software
37 CueMix FX
47 Troubleshooting
49 Index
Quick Reference: MicroBook Front Panel
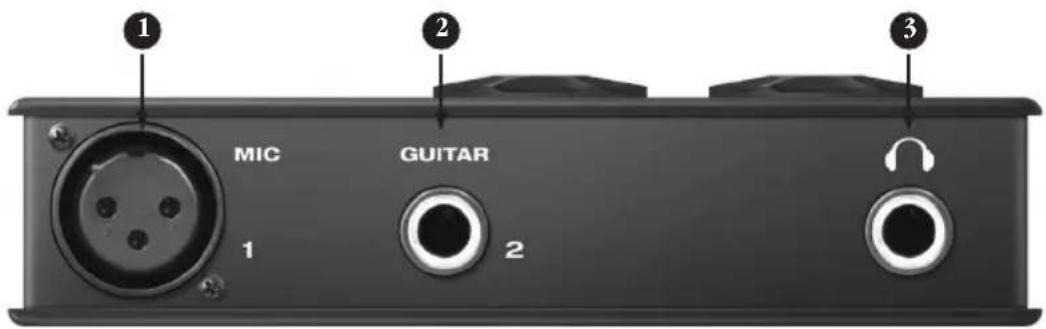
- Plug in your dynamic or condenser mic here.
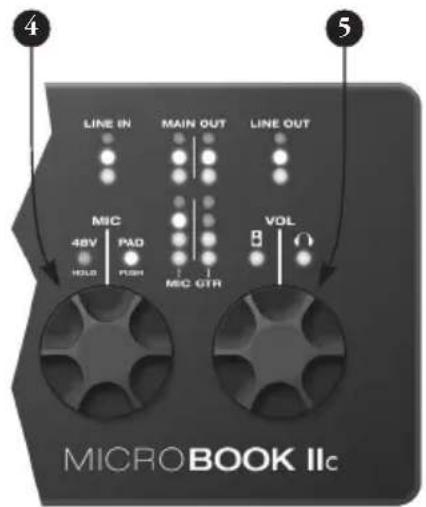
Use the MIC digital rotary encoder on the top panel (4) to engage the -20 dB pad (push) and/or 48V phantom power (push and hold) for a condenser mic, if necessary.
Make sure 48V power is turned OFF BEFORE plugging anything in to the mic input. Only engage 48V power when a device that requires it is plugged in.
-
Plug in your guitar here using a standard quarter-inch guitar cable. This input is designed with the high-impedance characteristics necessary to properly handle both passive and active guitar pickups. To make your guitar sound and "feel" even more like it is plugged directly into a actual guitar amplifier, consider using MOTU's ZBox guitar impedance adapter (sold separately), which simply goes between your guitar cable and this input (no extra cable needed).
-
This is a standard quarter-inch headphone jack. To control volume, push the VOL rotary encoder (5) repeatedly until the phones LED is lit. You can control phone volume independently or together with main out volume.
To obtain your product serial number, see "Obtaining your MicroBook serial number" on page 14.
Quick Reference: MicroBook Rear Panel
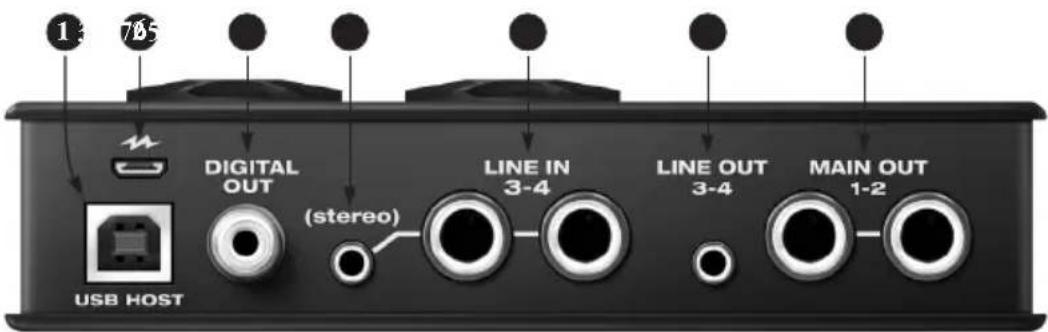
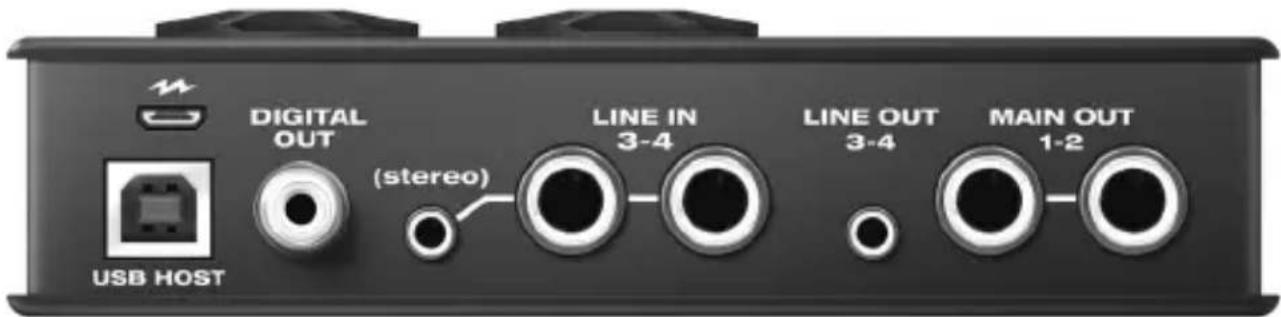
- Connect to a host computer with a standard USB cable (Type A to Type B). When connected to laptop or desktop computer, the MicroBook IIc is powered by this USB 2.0 connection.
- This USB 2.0 Micro-B jack is for power only. DO NOT use this port to connect to a host computer. Use it for power when connecting the MicroBook IIc to an iPad. For details, see "Connecting to an iOS device" on page 18.
- This stereo, 24-bit S/PDIF digital output mirrors the Main Out.
- This eighth-inch "stereo mini" jack serves as an alternative input for Line Inputs 3-4. For example, you
can plug in an iPod or CD player here, instead of using the quarter-inch jacks to the right. DO NOT plug a cable into this mini jack at the same time as the quarter-inch jacks. To avoid ground loop noise, don't connect a device with another power source (such as an iPod connected to a computer).
- These two analog inputs are balanced TRS (tip/ring/sleeve) quarter-inch connectors that can also accept an unbalanced plug. These inputs (3-4) do not have mic pre-amps, so they are best used for synthesizers, drum machines, effects processors, and other devices with line level signals (either -10 or +4). The CueMix FX software lets you adjust the input
level for recording. If you use these quarter inch jacks, DO NOT plug a cable in to the stereo mini jack.
- This eighth-inch "stereo mini" jack serves as a stereo line level analog output that is completely independent from the Main Out (to the right).
- These two balanced, quarter-inch jacks serve as the MicroBook's main outputs. You can connect them to a set of powered studio monitors. To control volume, push the VOL knob on the top repeatedly until the speaker LED is lit. You can hear the output of your audio software on these Main Outs, and also use CueMix FX to monitor live MicroBook inputs.
To minimize noise that may be produced by connected devices:
- Use balanced TRS quarter-inch cables whenever possible.
- Use the MicroBook's balanced quarter-inch connectors instead of the eighth-inch stereo "mini" connectors whenever possible.
- Don't make unbalanced audio connections between the MicroBook and a FireWire or USB device while the other device is connected to any computer.
Quick Reference: MicroBook Top Panel
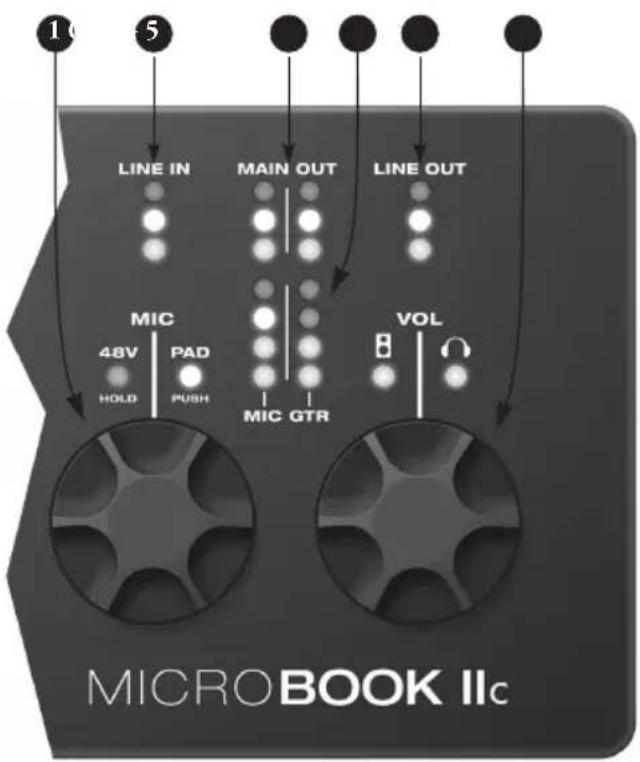
- The MIC digital rotary encoder controls the trim for the mic input. The preamp provides 53 dB of gain. Push to toggle the -20 dB pad; push and hold to toggle the 48V phantom power.

Make sure 48V power
is turned OFF BEFORE plugging anything in to the mic input. Only engage 48V power when a device that requires it is plugged in.
-
Three-LED metering for the LINE IN jacks.
-
Stereo three-LED metering for the MAIN OUTs.
-
Four-LED metering for the MIC input and GUITAR input. In "Guitar Trim Mode" (see below), these meters indicate the input level setting (not signal activity).
-
Three-LED metering for the LINE OUTs.
-
The VOL digital rotary encoder controls the volume of the main outs and phones. Push it repeatedly to cycle among three states:
a) Main outs (speaker icon)
b) Phones (headphone icon)
c) Both
Push and hold the VOL encoder to enable Guitar Trim Mode. In this mode, you can use the VOL knob to adjust the guitar input level; the MIC knob continues to adjust the mic input level, as usual. The MIC and GTR signal activity meters (4) become level indicators. If the level is turned all the way down, the the bottom LED flashes.
flowchart
graph TD
    A["1"] --> B["LINE IN"]
    C["5"] --> D["MAIN OUT"]
    E["..."] --> F["LINE OUT"]
    G["MIC"] --> H["48V HOLD"]
    G --> I["PAD PUSH"]
    G --> J["MIC GTR"]
    K["VOL"] --> L["B"]
    K --> M["O"]
Quick Reference: CueMix FX
Launch CueMix FX (in your Mac Applications folder or in the Windows Start menu under Programs>MOTU>CueMix FX) to control the MicroBook. This chapter gives you a quick overview. For further details, see chapter 7, "CueMix FX" (page 37).
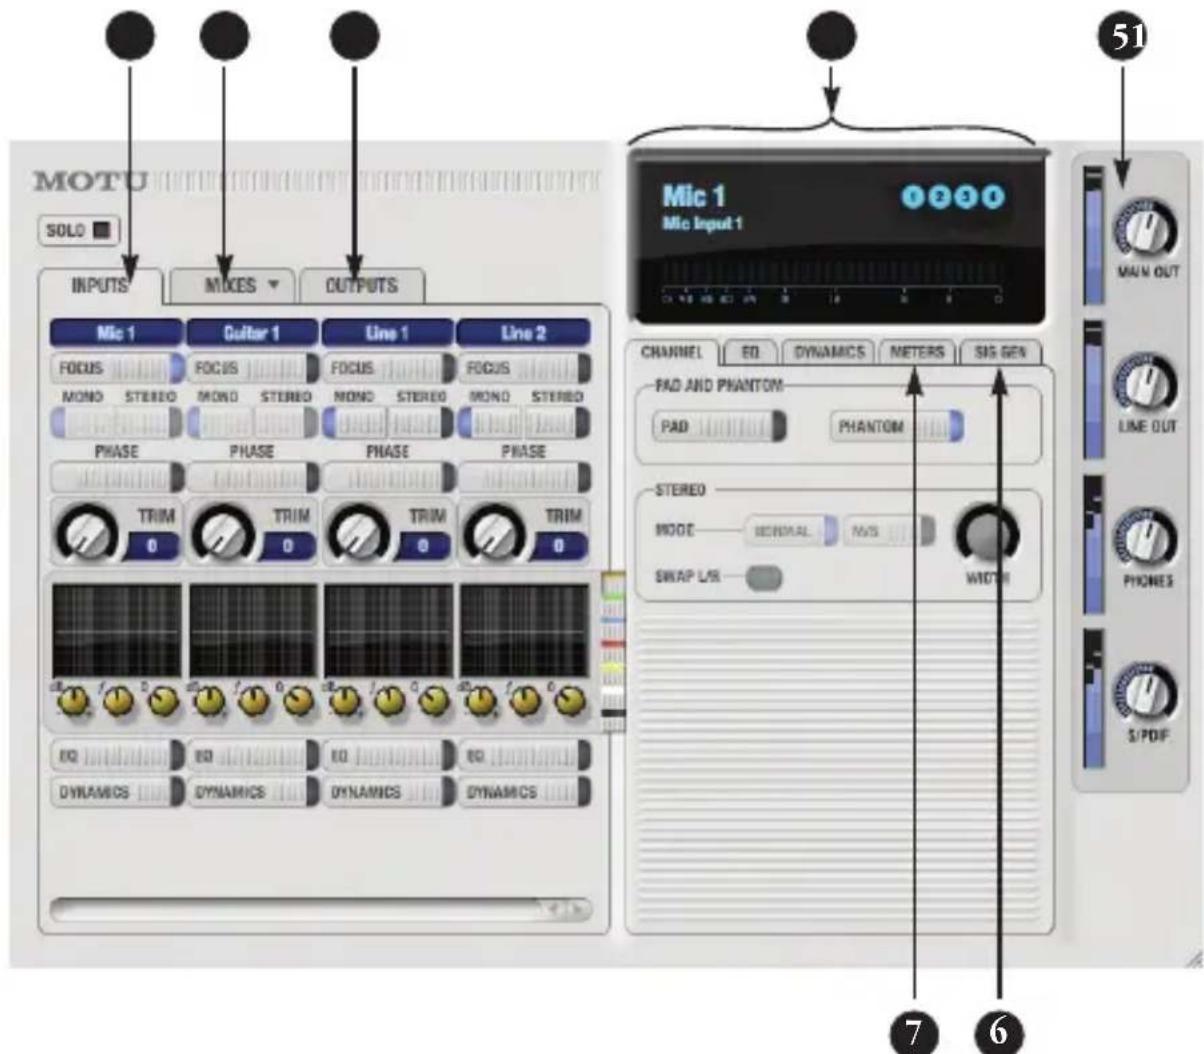
-
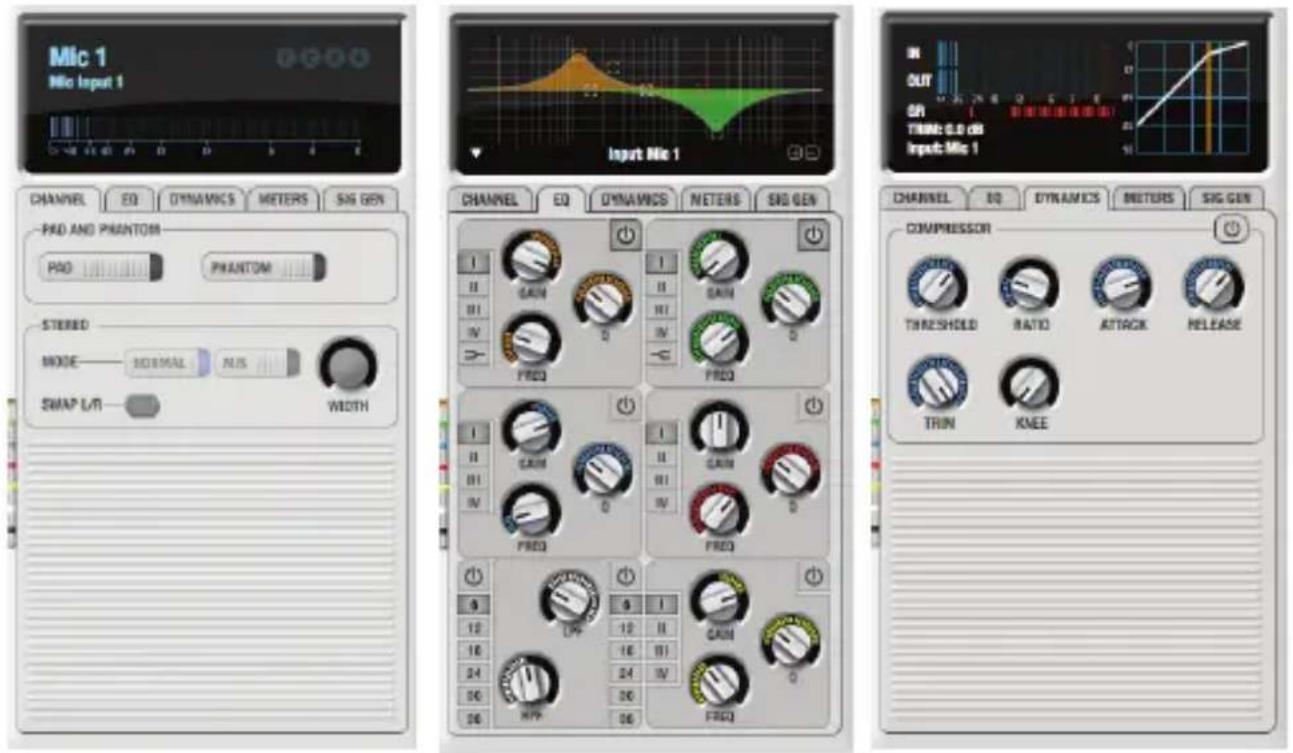
Input settings include trim level, mono/stereo toggle, EQ and dynamics. For more input settings (pad, phantom power, etc.) click the Focus button and go to the Channel tab.
-
The MicroBook provides four stereo mix busses. Use the Mix tab to mix sources (inputs, host computer audio, etc.) for each mix bus. See "The Mixes tab" on page 41.
-
Output settings include choosing what you will hear on each output (a mix bus, host computer audio, or a signal generator), EQ, and dynamics. See the next page, or "The Outputs tab" on page 42 for more info.
-
Click a focus button (in the Inputs, Outputs, or Mixes tabs) to view individual channel settings here in the Channel, EQ and Dynamics tabs.
-
Control the volume of the MicroBook's outputs here.
-
Signal Generator tab provides settings for white/pink noise and a sine wave generator.
-
Meters for all ins/outs/busses.
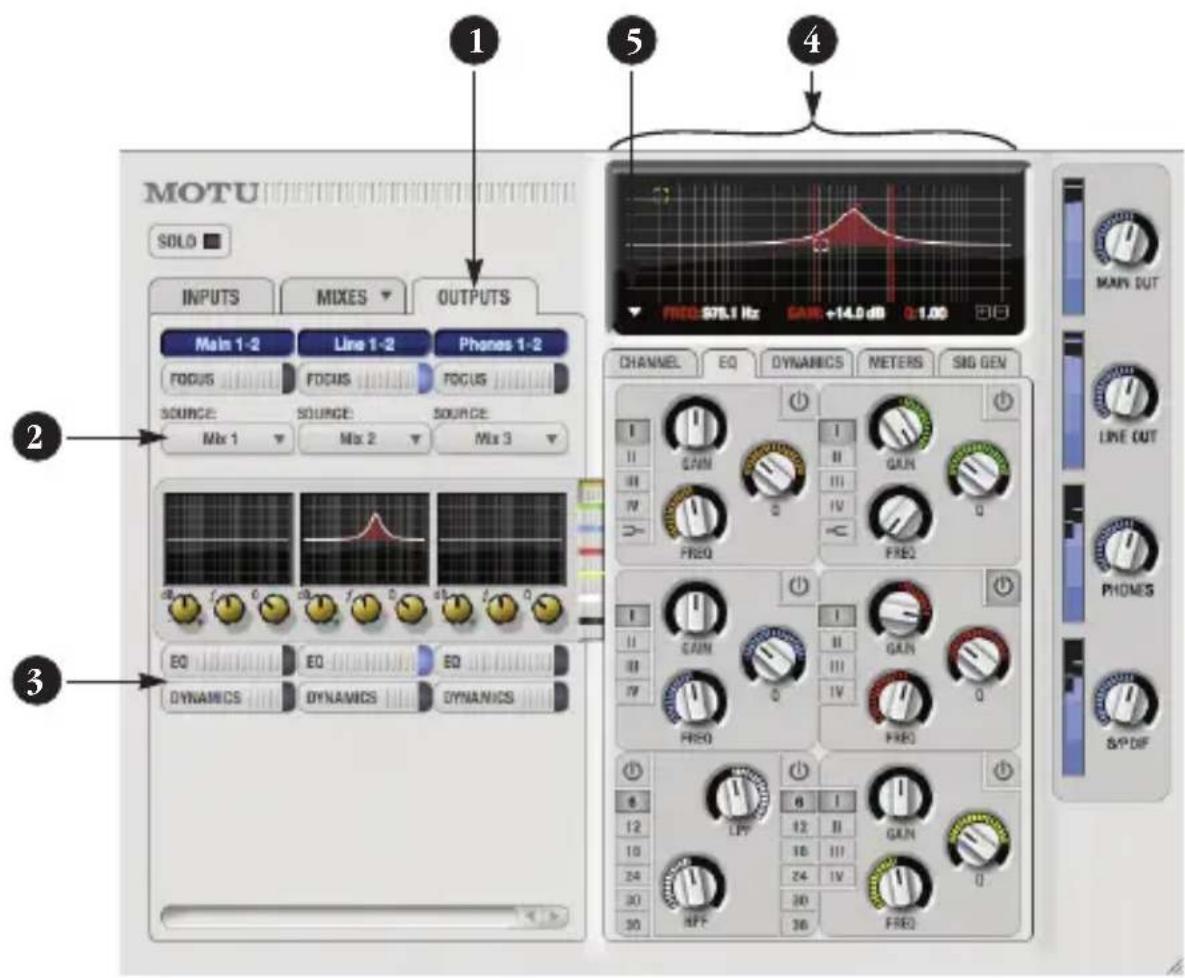
- Click the Outputs tab to access settings for the MicroBook's outputs. For example, you can choose one of four different mixes for each output.
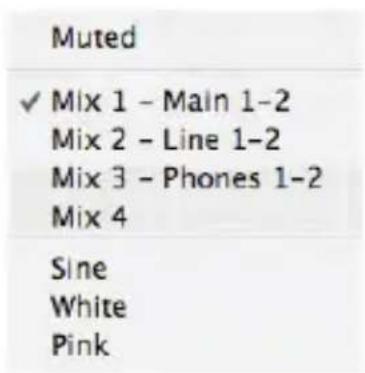
- Choose the audio source for each output pair from these menus. The MicroBook gives you a lot of flexibility, as shown in the menu to the right. You can choose one of the four mixes, which let you mix inputs with computer audio. Or you can choose an input or computer audio directly (the Aux option). A mix can go to as many outputs as you want. Choosing Sine,
White, or Pink produces a sine wave or white/pink noise from the MicroBook's signal generator (item 8 on the previous page).
- If you want to apply EQ or dynamics processing to the output, click here to enable it and then adjust settings in the channel section (4).
- Adjust output settings in the EQ and dynamics tabs here. In the EQ tab, click the power icon to enable an EQ band and then either adjust its knobs or drag its settings directly in the graph above.
- Use this menu to access the spectrogram waterfall, real time FFT display, and other diagnostic tools. See "Audio analysis tools" on page 45.
CHAPTER 1 About the MicroBook
Obtaining your MicroBook serial number
The MicroBook holds its serial number electronically in the unit itself. To obtain the serial number, follow the hardware and software installation instructions in this booklet, and then do the following:
1 Launch the CueMix FX software.
2 Choose Devices menu> MicroBook> Setup.
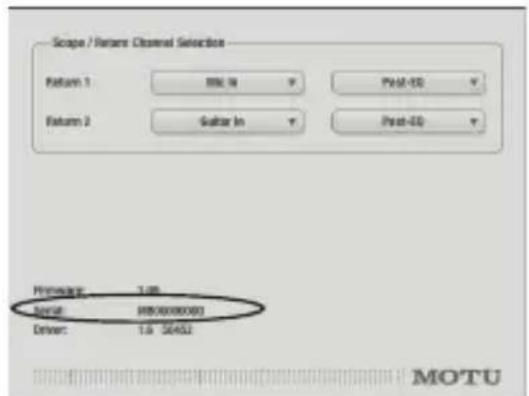
Figure 1-1: The Setup window.
3 The serial number is shown at the bottom of the Setup window, as shown in Figure 1-1.
Overview
The MicroBook IIc is an audio class-compliant USB audio interface for Mac, Windows and iOS devices, with on-board effects and mixing that offers six inputs and eight outputs for recording and playback at industry standard sample rates from 44.1 to 96 kHz. All inputs and outputs can be accessed simultaneously. The MicroBook consists of a light and small aluminum alloy-encased interface that connects directly to a computer via a standard USB cable. Alternately, it can connect to an iOS device with a standard USB camera connection kit.
MicroBook feature highlights include:
■ 4-input, 6-output bus-powered "plug-and-play" high-speed USB 2.0 audio interface for Mac and Windows.
■ Supports Apple® iPad® and other iOS® devices with camera connection kit (sold separately).
■ 6 x 8 physical inputs/outputs.
■ 8-bus digital mixer to route and mix live inputs with live computer tracks.
■ Preamp-equipped mic input with Precision Digital Trim™, 48V phantom power, and -20 dB pad.
■ Hi-Z guitar input with Precision Digital Trim.
■ Stereo line level analog input on balanced quarter-inch (TRS) or stereo mini connectors.
■ Stereo line level analog main outs on balanced quarter-inch (TRS) connectors.
■ Stereo eighth-inch “mini” line-level input and output.
■ S/PDIF digital out on RCA (duplicates Main Out).
■ Headphone output on a quarter-inch stereo jack with independent volume control.
■ Operation on all analog and digital I/O at standard sample rates from 44.1 to 96 kHz.
■ Digitally controlled analog trim for the mic and guitar inputs.
■ Digital trim for all outputs.
■ Output volume digital rotary encoder. Push to cycle among three modes: main out, phones, or both.
■ Mic input digital rotary encoder for adjusting trim level, 48V and pad.
■ Dedicated 3- or 4-segment LED meters for all inputs and outputs.
■ CueMix™ FX no-latency mixing and monitoring with EQ and dynamics processing.
■7-band parametric EQ and compression.
■ Test tone and white/pink noise generator.
■ Instrument tuner.
■ Advanced audio analysis software tools, including FFT “waterfall” display, oscilloscope, X-Y plot, and phase torch.
■ USB audio class compliant operation for plug-and-play operation with all current and recent generation Macs and iOS devices (with a USB camera connection kit).
■ Across-the-board compatibility with any audio software.
■ AudioDesk™ full-featured audio workstation software for Mac OS X and Windows (7, 8 and 10).
■ Standard USB cable included.
■ Micro-B USB cable with power adapter included for iOS operation.
With a variety of I/O formats, dedicated mic and guitar inputs, and no-latency mixing and processing of live input, the MicroBook is a complete, portable “studio in a box” when used with a Mac, PC or iOS device.
Precision Digital Trim™
The MicroBook's mic and guitar inputs are equipped with digitally controlled analog trims with up to 51 dB and 32 dB of boost, respectively, using the included CueMix FX software for Mac OS X and Windows. This allows you to fine-tune trim settings for optimum levels.
Different trim configurations can then be saved as files on disk for instant recall.
16-bit and 24-bit recording
The MicroBook system handles all data with a 24-bit signal path, regardless of the I/O format. You can record and play back 16-bit or 24-bit audio files at any supported sample rate via any of the MicroBook's inputs and outputs.
CueMix FX mixing and effects
All MicroBook inputs and outputs can be routed to the on-board CueMix FX 8-bus (four stereo) digital mixer driven by hardware-based DSP. The mixer allows you to apply no-latency EQ and dynamics processing to inputs, outputs or busses directly in the MicroBook hardware, independent of the computer. Input signals to the computer can be recorded wet, dry, or dry with a wet monitor mix (for musicians during recording, for example).
Effects include parametric EQ and compression/limiting. Standard compression provides conventional threshold, ratio, attack, release, trim, and knee controls. The 7-band parametric EQ is modeled after British analog console EQs, featuring four filter styles (gain/Q profiles) to effectively cover a wide range of audio material. Low-pass and high-pass filters are also supplied with slopes that range from 6 to 36 dB.
The MicroBook's flexible effects architecture allows you to apply EQ and compression on every input and output.
CHAPTER 2 Packing List and System Requirements
PACKING LIST
The MicroBook ships with the items listed below. If any of these items are not present in your MicroBook box when you first open it, please immediately contact your dealer or MOTU.
■ One MicroBook IIc audio interface
■ One USB cable for connection to a host computer (Type A to Type B)
■ One USB cable for power (Type A to Micro B)
■ One USB power adapter (USB Type A jack to two-prong North American power)
■ (International only) one international power adapter
■ One MicroBook Mac/Windows User Guide
■ One cross-platform Universal Audio Installer disc
■ MicroBook product registration card
■ One sheet of four peel-off rubber feet
MAC SYSTEM REQUIREMENTS
The MicroBook system requires the following Mac system:
■ Any Mac with an Intel processor
■ 4 GB of RAM or more
■ Mac OS X version 10.6.8 or later
■ A large hard drive, preferably at least 100 GB
WINDOWS SYSTEM REQUIREMENTS
The MicroBook system requires the following Windows system:
■ Pentium 4 CPU (or equivalent) 1 GHz or faster
■ 4 GB of RAM or more
■ Windows 7, 8 or 10
■ A large hard drive, preferably at least 100 GB
PLEASE REGISTER TODAY!
Please register your MicroBook today. There are two ways to register.
■ Visit www.motu.com/register to register online
OR
■ Fill out and mail the included product registration card
As a registered user, you will be eligible to receive technical support and announcements about product enhancements as soon as they become available. Only registered users receive these special update notices, so please register today.
You need your MicroBook serial number to register
To register your MicroBook, you need your unit's serial number. See "Obtaining your MicroBook serial number" below.
Be sure to register AudioDesk
Be sure to register the included AudioDesk software, which must be registered separately. You can do so online at motu.com/register. Doing so will allow you to be eligible to receive technical support and announcements about software enhancements as soon as they become available.
Thank you for taking the time to register your new MOTU products!
OBTAINING YOUR MICROBOOK SERIAL NUMBER
The MicroBook holds its serial number electronically in the unit itself. To obtain the serial number, follow the hardware and software installation instructions in the next two chapters, and then do the following:
1 Launch CueMix FX.
2 Choose Devices menu> MicroBook> Setup.
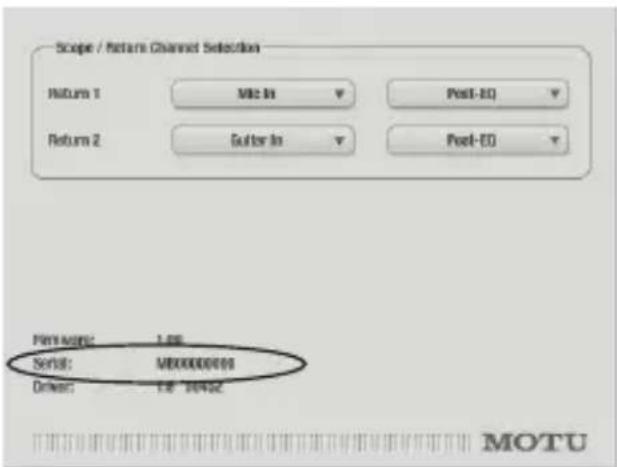
Figure 2-1: The Setup window.
3 The serial number is shown at the bottom of the Setup window, as shown in Figure 2-1.
CHAPTER 3 Installing the MicroBook Software
NO SOFTWARE INSTALLATION FOR iOS DEVICES
The MicroBook IIc is a USB audio class compliant device, so it can be used as a simple 4-input, 6-output audio interface (with no mixing or processing features) for iPad and other iOS devices. No software installation is required. Just connect the MicroBook to your iOS device as explained in “Connecting to an iOS device” on page 18, and access it in your iOS audio software as instructed for your audio software.
MAC SOFTWARE INSTALLATION
To install the MicroBook software:
1 Insert the MOTU Universal Installer disc or download the installer from motu.com/download.
2 Launch the installer.
3 Follow the directions that the installer gives you.
What does the installer do?
The installer checks the computer to make sure it satisfies the minimum system requirements for your MOTU interface. If so, the installer proceeds with the Mac OS X installation. Drivers are installed, along with the CueMix FX application.
Class compliant operation under OS X
The MicroBook IIc is a USB audio class compliant device, so OS X will recognize it as a simple 4-input, 6-output audio interface, even without the MicroBook drivers installed. When operating in this mode, the MicroBook can be used as a simple audio interface (with no mixing or processing) with any Mac audio software. However, it is still recommended that you run the software installer, so that you can take full advantage of all the professional features offered by the MicroBook.
WINDOWS SOFTWARE INSTALLATION
Before you connect the MicroBook audio interface to your PC and turn it on, it is best to install the software drivers first. This ensures that all the MicroBook components are properly installed in your system.
PC installation goes more smoothly if you install the software before connecting the MicroBook hardware.
To install the MicroBook software on your PC:
1 Insert the MOTU Universal Installer disc or download the installer from motu.com/download.
2 Launch the installer.
3 Follow the directions that the installer gives you.
If Windows asks you to locate the drivers
If you've already connected the MicroBook to your computer, Windows probably issued an alert notifying you that the MicroBook requires drivers, followed by another window asking you to locate the drivers on disk. If this happens:
1 Cancel the driver search.
2 Disconnect the MicroBook.
3 Run the MicroBook Software Installer as instructed in the previous section.
CUEMIX FX
The CueMix FX application (for Mac and Windows) is installed on your hard drive during software installation. It provides a mixing console that gives you control over the MicroBook's on-board mixing, EQ and dynamics processing. It also provides access to all MicroBook settings. For details, see chapter 7, "CueMix FX" (page 37).
- CueMix FX is not required for iOS operation, as the MicroBook IIc operates as a simple 4-input, 6-output audio interface for iOS, with no mixing or processing features.
AUDIODESK WORKSTATION SOFTWARE (MAC AND WINDOWS)
AudioDesk is an advanced digital audio workstation software package for the MicroBook that lets you record, edit, mix, process, bounce and master multi-track audio projects. Advanced features include real-time 32-bit effects processing, 24-bit recording, and much more. See the AudioDesk User Guide PDF in the AudioDesk Help menu for details.
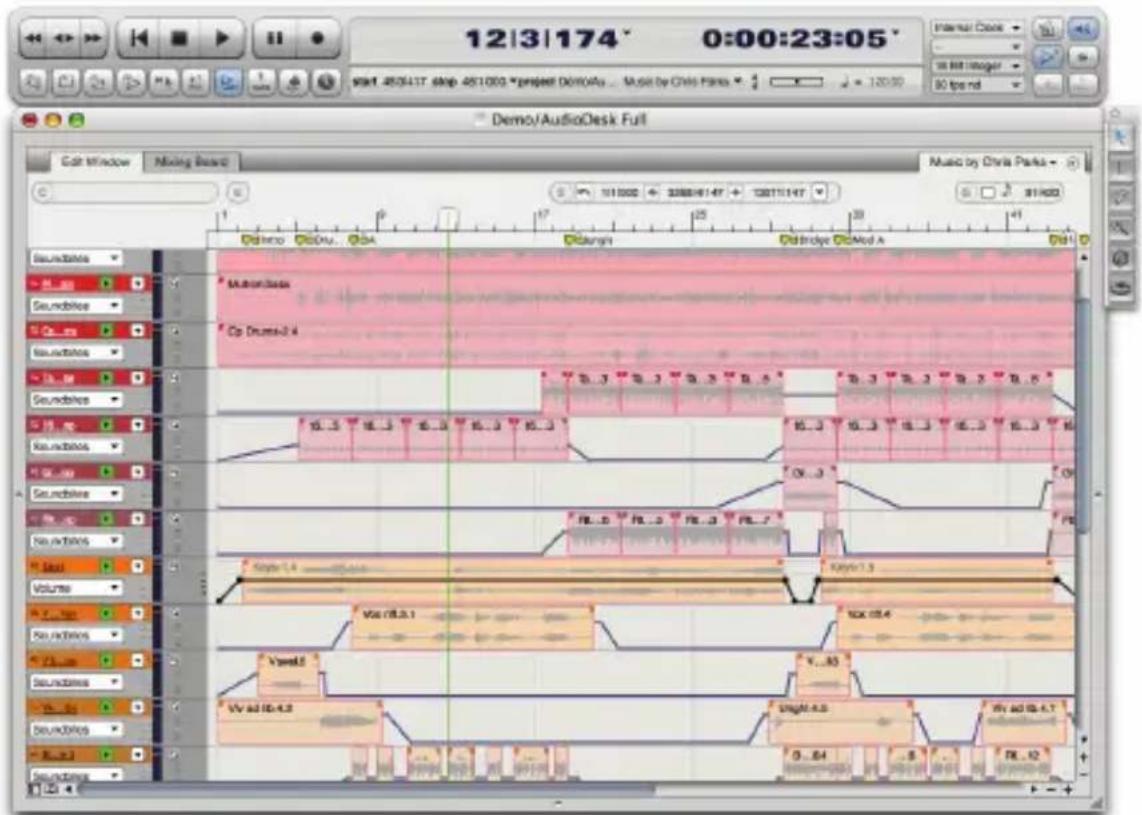
Figure 3-1: AudioDesk for Mac OS X and Windows.
CHAPTER 4 Installing the MicroBook Hardware
OVERVIEW
Windows users: install the software first .... 17
About USB cables....17
Connecting to a computer 18
Connecting to an iOS device .... 18
Connect inputs and outputs....19
Input settings....21
Bus power 22
AC power 22
A typical MicroBook setup....23
WINDOWS USERS: INSTALL THE SOFTWARE FIRST
PC installation goes more smoothly if you install the MicroBook software (previous chapter) before you connect the MicroBook hardware (this chapter).
ABOUT USB CABLES
The MicroBook IIc includes two USB cables: one for connecting to a host computer, and another for connecting to a power outlet (for iOS device operation).
Host computer USB 2.0 cable
The standard host computer USB cable (included) has Type A and Type B connectors.
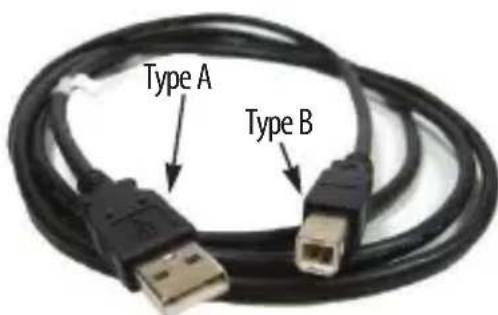
Figure 4-1: Use this standard Type A to Type B cable for connection to a host computer.
Micro-B USB 2.0 cable for power
The Micro-B USB cable (included) is a standard USB 2.0 cable with Type A and Micro-B connectors. You can use any similar standard USB cable.
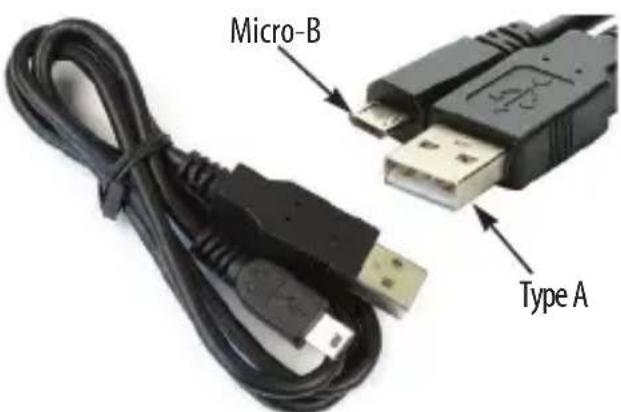
Figure 4-2: Use this cable for connecting the MicroBook IIc to a power outlet when using it with an iPad or other iOS device.
Use the included USB-to-power adapter to connect the Micro-B USB cable to a power outlet. If you are outside North America, use the supplied international power adapter as shown below, if needed.
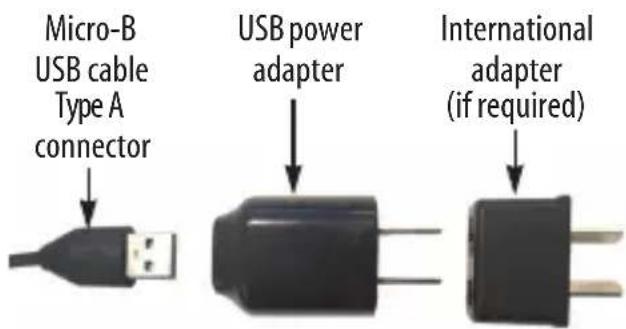
Figure 4-3: Attach the supplied USB power adapter to the Type A connector on the Micro-B USB cable. Add the International adapter, if needed.
CONNECTING TO A COMPUTER
1 Plug the MicroBook Host Computer USB cable (Figure 4-1, included) into a USB socket on the computer as shown below.
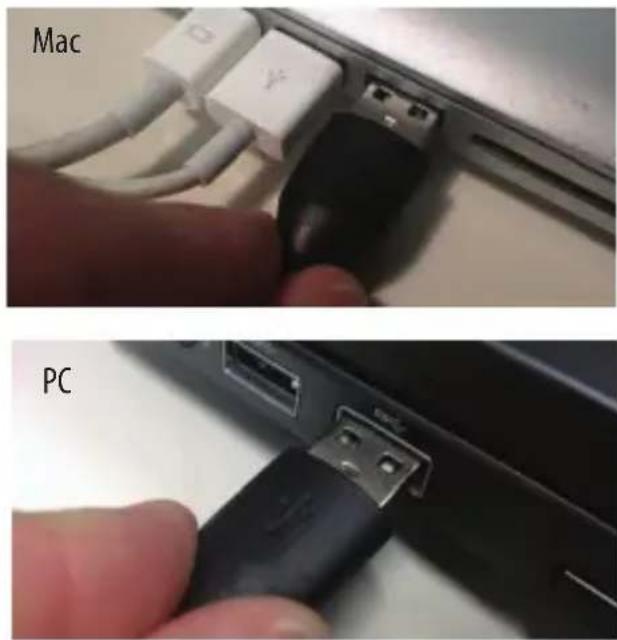
2 Plug the other end of the USB cable into the MicroBook as shown below.
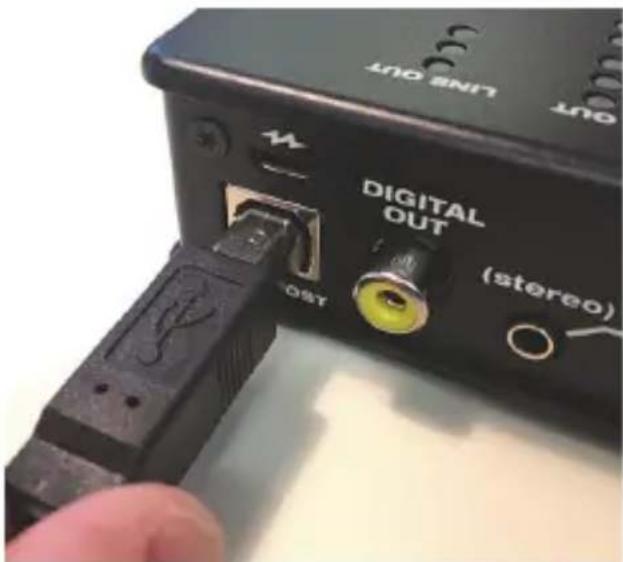
Figure 4-4: Connecting the MicroBook to a computer.
When connected to a computer, the MicroBook IIc is bus-powered from this USB connection.
CONNECTING TO AN iOS DEVICE
1 Using a standard iOS camera connection kit cable (purchased separately), connect the MicroBook host USB cable to your iPad or other iOS device, as shown below in Figure 4-5.
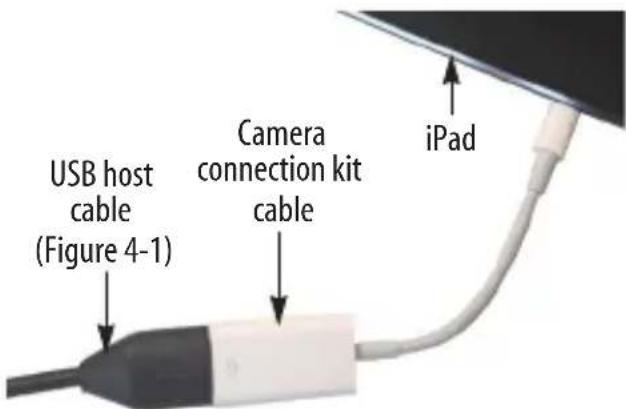
Figure 4-5: Connecting the MicroBook to an iPad or other iOS device.
2 Connect the other end of the host USB cable to the MicroBook, as shown in Figure 4-4.
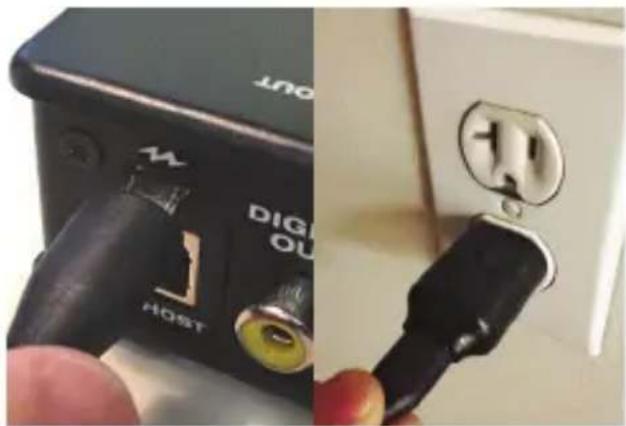
3 (Optional) Using the Micro-B USB cable (Figure 4-2, included) and USB power adapter (Figure 4-3, included), connect the MicroBook to a power outlet, as shown below in Figure 4-6.
natural_image
Close-up of a black electrical outlet switch with labeled ports, showing wiring and socket (no readable text or symbols)Figure 4-6: Powering the MicroBook from a power outlet when connected to an iPad or other iOS device.
CONNECT INPUTS AND OUTPUTS
Here are a few things to keep in mind as you connect other devices.
Mic input with preamp
Connect a dynamic or condenser microphone to the mic input (Figure 4-7) with a standard mic cable.
Do not connect a +4 (line level) input to the mic input (because it will overdrive the preamp).
Phantom power
If you are connecting a condenser microphone or other device that requires 48V phantom power, you can enable phantom power for the mic input using the MIC knob on the top panel: push and hold the knob to toggle 48V, as indicated by the 48V LED. See “Quick Reference: MicroBook Top Panel” on page 6.
Alternately, you can use the MicroBook's CueMix FX software. See "Input settings" on page 21.
Make sure 48V power is turned OFF before plugging anything in to the mic input.

Only engage 48V power when a device that requires it is plugged in.
20 dB pad
If the input signal is still too hot with the trim turned all the way down, engage the -20dB pad by pushing the MIC knob or by enabling it in the CueMix FX Channel tab (Figure 4-9). See “Input settings” on page 21.
Guitar input
Plug in your guitar to the guitar input (Figure 4-7). You can trim the level using the CueMix FX software. See “Input settings” on page 21.
For ultra-realistic sound and feel when producing guitar tones with processing software (amp modeling, cabinet modeling, virtual effects pedals, etc.), consider using MOTU's ZBox guitar impedance adapter (sold separately), which adds proper impedance characteristics that cannot be modeled in software. Visit motu.com for details.
Line level inputs
The quarter-inch analog line level inputs 3-4 (Figure 4-8) are balanced (TRS) connectors that can also accept an unbalanced plug. Alternately, you can use the eighth-inch stereo mini plug for line level input (from an iPod or other source).
Figure 4-7: MicroBook llc front panel
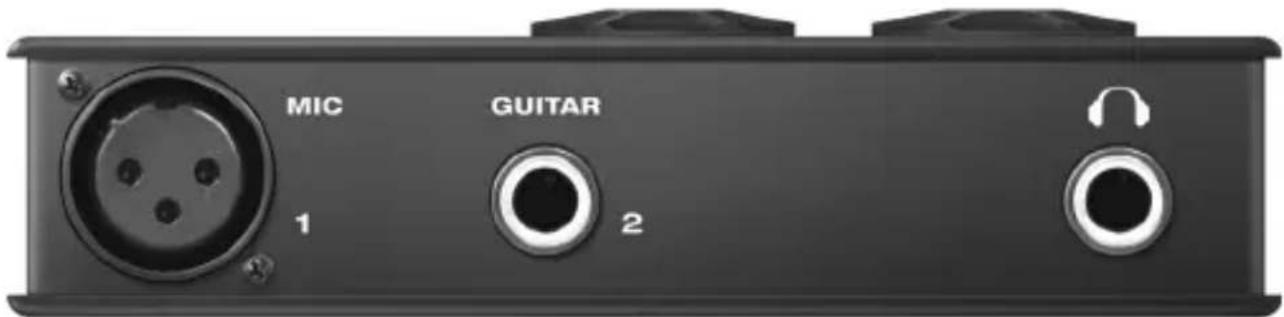
Do not use the stereo mini input and quarter-inch inputs at the same time. If you are using the mini jack, unplug the quarter-inch jacks. If you are using the quarter-inch jacks, unplug the mini jack.
Further settings for the line inputs, such as stereo pairing and pan settings for mid/side micing are available in the CueMix FX software. See “Input settings” on page 21.
Trim
The mic and guitar inputs are equipped with 51 dB and 32 dB (respectively) of digitally controlled analog trim (boost). The line inputs can also be trimmed. Adjust the trim level for the mic input using the MIC knob. Other inputs can be trimmed using the MicroBook's CueMix FX software. See “Input settings” on page 21.
Main outs
In a standard studio configuration, the main outs (Figure 4-8) are intended for a pair of studio monitors, but they can also be used as outputs for any purpose. The quarter-inch main outs are calibrated to produce a +4 dBu line level output signal.
Line out
Use the eighth-inch stereo mini line out jack for output to desktop speakers or any other line level destination.
Digital out
The S/PDIF RCA “digital out” connector provides stereo digital audio output to another device: the S/PDIF output always mirrors the Main Outs.
Tips for connecting other devices
Follow these simple guidelines to minimize noise that may be produced by other devices connected to the MicroBook:
■ Use balanced TRS quarter-inch cables whenever possible. Balanced connections greatly reduce noise resulting from electrical interference.
■ Use the MicroBook's balanced quarter-inch connectors instead of the eighth-inch stereo “mini” connectors whenever possible.
- Don’t make unbalanced audio connections between the MicroBook and a FireWire or USB device while the other device is connected to any computer, as this could significantly reduce the audio quality performance of the MicroBook.
Figure 4-8: MicroBook IIc back panel
INPUT SETTINGS
To access input channel settings such as 48V phantom power, pad and trim, launch the MicroBook's CueMix FX software and follow this procedure:
1 Click the Inputs tab (Figure 4-9).
2 Adjust the settings for each input channel as desired. The Focus button exposes further settings for the input in the Channel tab (4).
3 Each input can be trimmed.
4 Click the Channel tab (4) to access the channel's input settings.
Input metering while adjusting trim Use the long-throw, horizontal input level meter (5) at the top of the channel settings section (Figure 4-9) to calibrate the level.
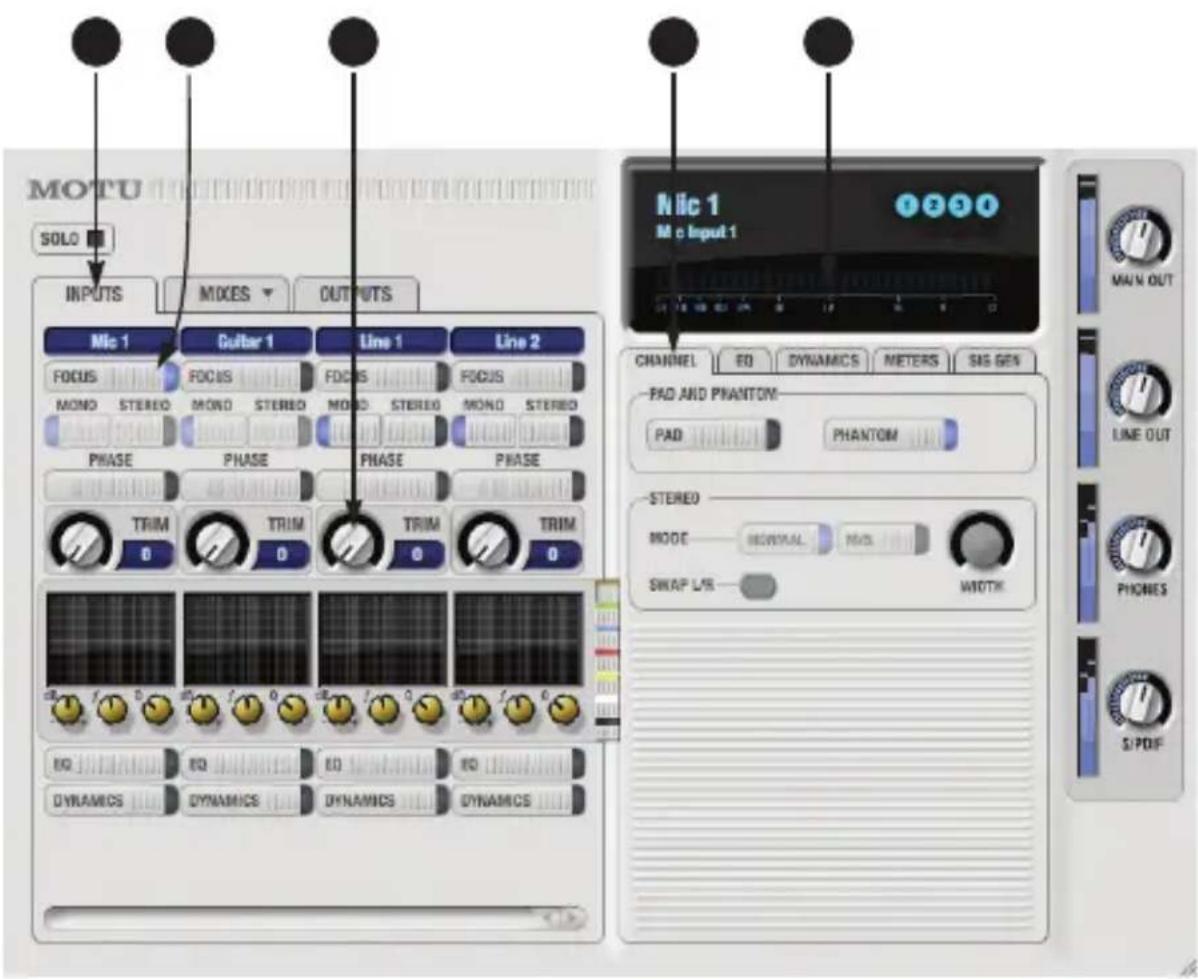
Figure 4-9: CueMix FX input settings
BUS POWER
Bus power requirements
When connected to a computer, the MicroBook draws all the power it needs from the USB HOST connection to the computer. However, the USB connection to the computer must meet all of the requirements discussed below.
USB adapter products must be powered. If you are using a USB adapter or hub (a third-party product that supplies one or more USB ports to your computer), it must have direct access to a power supply:
■ PCI USB cards — If you plan to connect the MicroBook to a PCI card and run the MicroBook under bus power, the PCI card must have a direct connection to the power supply harness inside your computer. This is the same power supply harness to which you connect internal hard drives, CD/DVD drives, etc.
■ PCMCIA, Cardbus or ExpressCard slot adapters — If you plan to connect the MicroBook to a PC card, Cardbus or ExpressCard USB adapter (inserted in the card slot in your laptop), it must provide a powered connection and it must also have its own power supply. Most commonly, these types of products have a DC power adapter that plugs into an AC wall outlet. As you can see, however, this situation does not allow for remote battery operation, as the card adapter requires AC.
Examples of bus-powered operation
Bus power from a desktop computer Your desktop computer is running off of its usual AC power connection, and the MicroBook draws power from the USB cable connected to the computer. There are no limits to running time.
Bus power from an AC-powered laptop This scenario is identical to the desktop situation described above: the laptop is powered by AC, the MicroBook is powered via the USB bus and there are no limits to running time.
Bus power from a battery-powered laptop
The laptop is being powered by its own battery, and the MicroBook is being powered by its USB connection to the computer, so the laptop battery is supplying power to both the laptop and the MicroBook. This is the most compact and portable operating scenario. Running time is determined by the capacity of the laptop battery. Alternately, you can power the MicroBook through its Micro-B USB power port (see below).
AC POWER
As shown in Figure 4-6 on page 18, the MicroBook IIc can be powered from a wall outlet or other AC power source using the supplied power adapter and a Micro-B USB cable. This connection is required when using the MicroBook with iOS devices. This connection can be used optionally to power the MicroBook when it is connected to a battery-powered laptop.
A TYPICAL MICROBOOK SETUP
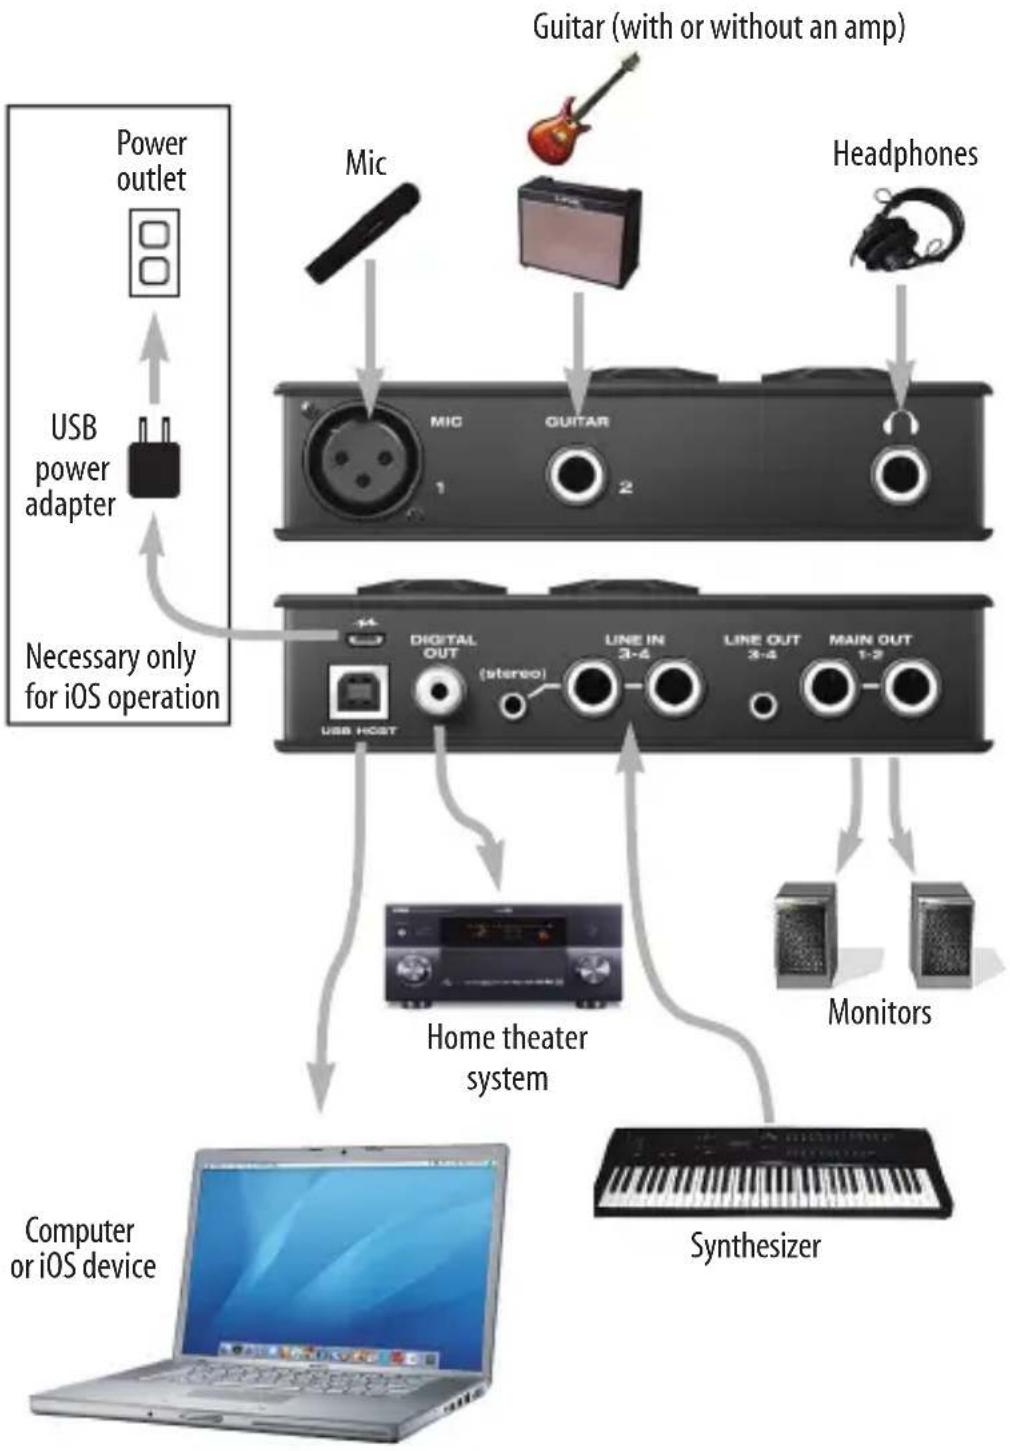
Here is a typical MicroBook studio setup. When using it with a computer, all mixing and processing can be done either in the MicroBook, in the computer with audio software, or both. During recording, you can use the MicroBook's
CueMix™ FX mixer to apply EQ and compression to what you are recording and monitor it via the main outs, headphone outs, or any other output pair. You can control everything from the included CueMix FX software.
flowchart
graph TD
    A["Power outlet"] --> B["USB power adapter"]
    B --> C["Necessary only for iOS operation"]
    D["Mic"] --> E["μM"]
    F["Guitar (with or without an amp)"] --> G["μM"]
    H["Headphones"] --> I["μM"]
    J["Home theater system"] --> K["Home theater device"]
    L["Monitors"] --> M["Home theater device"]
    N["Computer or iOS device"] --> O["Synthesizer"]
    E --> P["Digital OUT (stereo)"]
    G --> Q["Line IN 3-4"]
    I --> R["Line OUT 3-4"]
    M --> S["Main OUT 1-2"]
Figure 4-10: A typical MicroBook studio setup.
CHAPTER 5 Mac OS X Audio Software
OVERVIEW
The MicroBook provides audio input and output for all OS X Core Audio applications, including AudioDesk, Digital Performer, Logic Pro and GarageBand. Other third-party software applications are also supported, such as Ableton Live, Avid Pro Tools, Cockos Reaper, Propellerhead Reason, Steinberg Cubase and others.
Installing the MicroBook OS X drivers..... 25
Running CueMix FX....25
Choosing the MicroBook driver....25
Sample rate....27
Clock Source 27
Buffer Size 27
Inputs and outputs ...... 27
Processing live inputs with host-based effects plug-ins....27
Working with CueMix FX mixing and effects 27
24-bit operation 27
Monitoring live input 28
Adjusting the audio I/O buffer ..... 29
CueMix FX hardware monitoring ..... 31
INSTALLING THE MICROBOOK OS X DRIVERS
To install the MicroBook's OS X audio drivers, just run the installer as detailed in chapter 3, "Installing the MicroBook Software" (page 15).
RUNNING CUEMIX FX
Before you run your host audio software, launch CueMix FX to configure your MicroBook hardware. Running CueMix FX confirms that the MicroBook
hardware is connected, powered up, and functioning normally. It also lets you configure the MicroBook's inputs and outputs. For a quick overview, see chapter, "Quick Reference: CueMix FX" (page 7). For further details about the MicroBook settings, see chapter 7, "CueMix FX" (page 37).
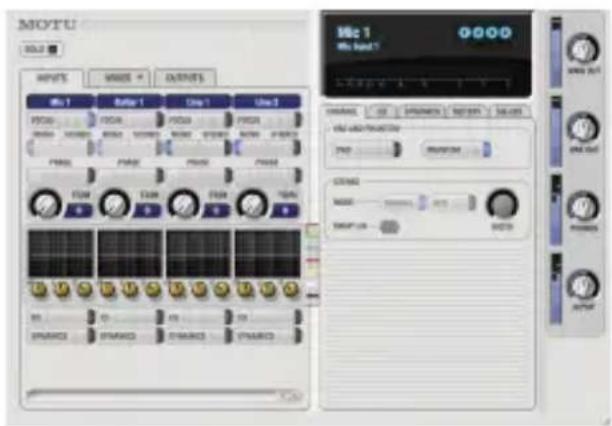
Figure 5-1: CueMix FX.
CHOOSING THE MICROBOOK DRIVER
Once you've made the preparations described so far in this chapter, you're ready to run your audio software and enable the MOTU MicroBook Core Audio driver. Check the audio system or audio hardware configuration window in your software. There will be a menu there that lets you choose among various drivers that may be in your system. Choose the MOTU MicroBook from this menu, as discussed in the following sections.
Digital Performer and AudioDesk
Choose the MicroBook as your audio input output device by choosing Configure Audio System>Configure Hardware Driver from the Setup menu. This window shows MicroBook settings such as sample rate and clock source.
Pro Tools
In Avid Pro Tools, go to the Setup menu and choose Playback Engine. Choose the MicroBook from the Current Engine menu. For information about the H/W Buffer Size setting, see “Adjusting the audio I/O buffer” on page 29.
Pro Tools 9 or later is required.
Logic Pro
In Logic Pro, go to the Preferences window, click the Audio tab, click the Drivers tab and click the Core Audio tab. Choose the MOTU MicroBook from the Output and Input device menus. For info about the I/O Buffer Size setting, see “Adjusting the audio I/O buffer” on page 29.
Garage Band
In Garage Band, go to the Audio/MIDI preferences and choose MOTU MicroBook from the Audio Output and Audio Input menus. For information about the Optimize for setting, see “Adjusting the audio I/O buffer” on page 29.
Cubase and Nuendo
Go to the Device Setup window. Click the VST Audio System item in the Devices list and choose MOTU MicroBook from the ASIO Driver menu. For information about the Audio Buffer Size setting, see “Adjusting the audio I/O buffer” on page 29.
Live
In Ableton Live, access the preferences window and click the Audio tab. Choose CoreAudio from the Driver Type menu. Choose the MOTU MicroBook from the Input Audio Device and Output Audio Device menus. For information about the Buffer Size setting, see “Adjusting the audio I/O buffer” on page 29.
Reason and Record
In Propellerhead Reason and Record, go to the Preferences window, choose Audio preferences from the menu and choose MOTU MicroBook from the Audio Output menu. For information about the Buffer Size setting, see “Adjusting the audio I/O buffer” on page 29.
Reaper
In Cockos Reaper, access the Preferences and click Devices under the Audio preferences. Choose MOTU MicroBook from the Audio Device menu.
Other audio software
For other audio applications, the procedure is similar to that shown above. Consult your owner's manual for further information.
SAMPLE RATE
Choose the desired overall sample rate for the MicroBook system in your host software. Newly recorded audio will have this sample rate.
CLOCK SOURCE
Some host software may have a “clock source” setting. For the MicroBook, there is only one choice for clock source: Internal.
BUFFER SIZE
Most host applications provide a Buffer setting, which can be adjusted to reduce the delay — or monitoring latency — that you hear when live audio is patched through your host software. For example, you might have a mic, guitar, and MIDI synth connected to the analog inputs of the MicroBook. If so, you will often be mixing their live input with audio material recorded in your host software. See “Monitoring live input” below.
INPUTS AND OUTPUTS
Once you've enabled the MicroBook's Core Audio driver, MicroBook audio inputs and outputs will appear in your host software wherever audio inputs and outputs are listed.
PROCESSING LIVE INPUTS WITH HOST-BASED EFFECTS PLUG-INS
If you patch a live input (such as a microphone or guitar) through a plug-in effect in your host software, you might hear a slight delay. There are several ways to reduce this delay. For details, see “Monitoring live input” on page 28.
WORKING WITH CUEMIX FX MIXING AND EFFECTS
The MicroBook provides powerful external mixing, EQ and compression, which you can operate hand-in-hand with your host's mixing environment. For example, the MicroBook can serve as a monitor mixer routing channels to musicians, or it can serve as an integrated extension of your host's mixing environment. If you program a MicroBook mixing and processing configuration that goes hand in hand with your host project, be sure to use the configuration export features in CueMix FX to save the MicroBook settings as a file in your host project folder for instant recall of all settings. See chapter 7, "CueMix FX" (page 37) for complete details.
24-BIT OPERATION
Your MicroBook hardware fully supports 24-bit recording with host software that also supports 24-bit operation. Consult the documentation for your host software for further information about enabling 24-bit operation.
MONITORING LIVE INPUT
There are two ways to monitor live audio input with a MicroBook:
1 Through the computer
2 Via the MicroBook CueMix FX hardware mixer
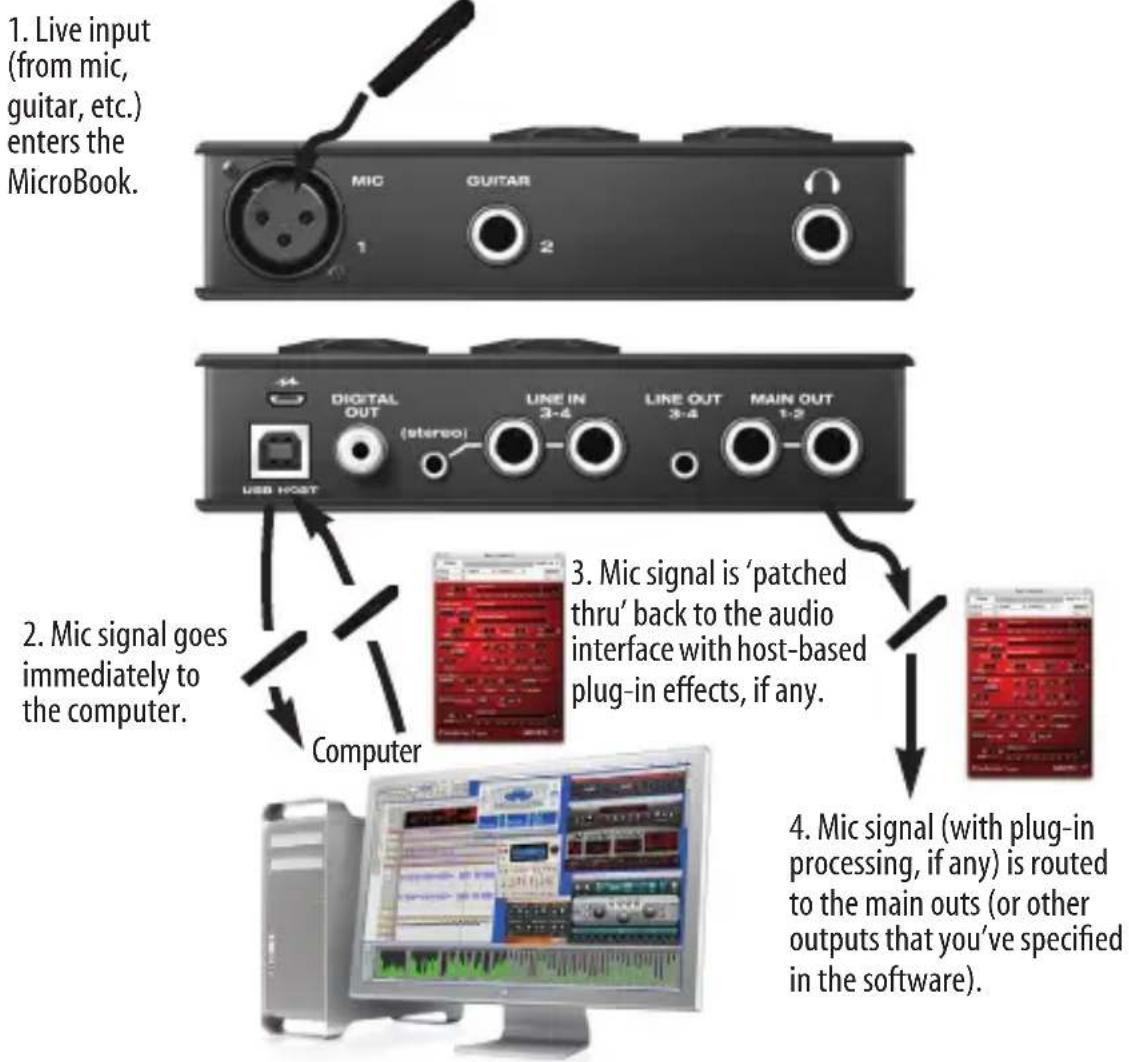
Figure 5-2 below shows method #1, which allows you to apply host-based effects processing via plug-ins in your audio software. See the next section,
“Adjusting the audio I/O buffer” for details about how to reduce or eliminate the audible monitoring delay that the computer introduces.
Figure 5-3 on page 29 shows method #2. CueMix FX hardware-based monitoring lets you hear what you are recording with no monitoring delay and no computer-based effects processing. Rather, input is routed directly to an output, either with or without MicroBook-based effects processing (EQ or compression). See
flowchart
graph TD
    A["1. Live input (from mic, guitar, etc.) enters the MicroBook."] --> B["2. Mic signal goes immediately to the computer."]
    B --> C["3. Mic signal is 'patched thru' back to the audio interface with host-based plug-in effects, if any."]
    C --> D["4. Mic signal (with plug-in processing, if any) is routed to the main outs (or other outputs that you've specified in the software)."]
Figure 5-2: There are two ways to monitor live audio inputs with a MicroBook: 1) through the computer or 2) via CueMix FX hardware monitoring. This diagram shows method 1 (through the computer). When using this method, use your host software's buffer setting to reduce the slight delay you hear when monitoring the live input, but don't lower it too much, or your computer might get sluggish.
"CueMix FX hardware monitoring" later in this chapter for details on how to use CueMix FX with your audio software, or with CueMix FX.
If the material you are recording is suitable, there is a third way to monitor live input: use both methods (Figure 5-2 and Figure 5-3) at the same time. For example, you could route guitar to both the computer (for an amp model effect) and mix that processed signal on the main outs with dry guitar from CueMix FX.
ADJUSTING THE AUDIO I/O BUFFER
A buffer is a small amount of computer memory used to hold data. For audio interfaces like the MicroBook, buffers are used for the process of transferring audio data in and out of the computer. The size of the buffers determines how much delay you hear when monitoring live inputs through your audio software: larger buffers produce more delay; smaller buffers produce less.
- Live input (from mic, guitar, etc.) enters the MicroBook.
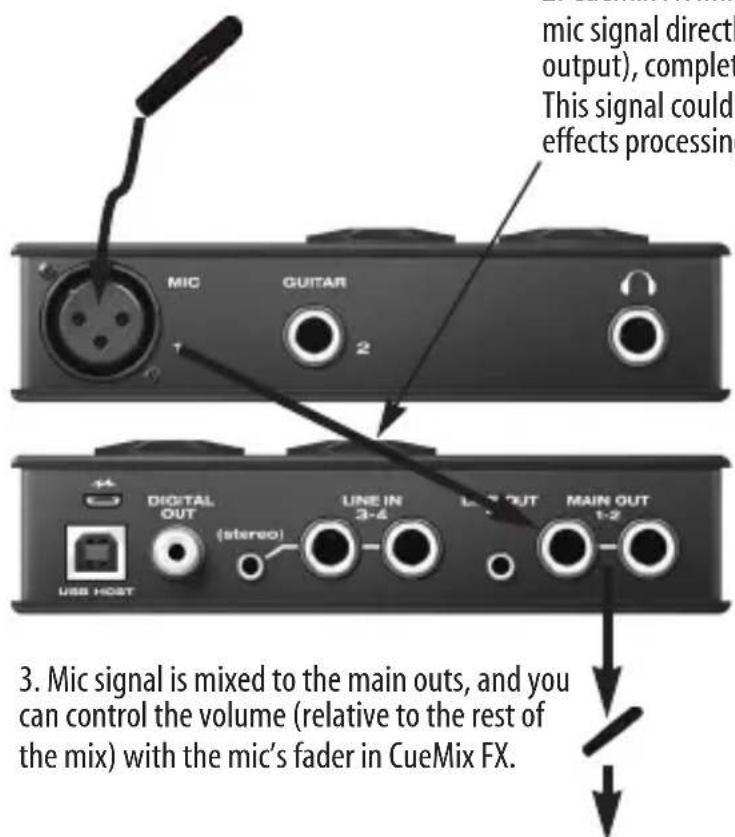
- CueMix FX immediately patches the live mic signal directly to the main outs (or other output), completely bypassing the computer. This signal could be dry, or with MicroBook effects processing, such as EQ or compression.
Figure 5-3: This diagram shows the signal flow when using CueMix FX no-latency monitoring. Notice that this method does not process the live input with plug-ins in your audio software. Instead, you can apply MicroBook effects, such as the EQ and/or compression.
Under OS X, audio I/O buffer size is handled by the host audio application (not the MicroBook Core Audio driver). Most audio software applications provide an adjustable audio buffer setting that lets you control the amount of delay you'll hear when monitoring live inputs or processing them with software plug-ins. Below are a few examples. For more examples, see chapter 5, "Mac OS X Audio Software" (page 25).
Digital Performer
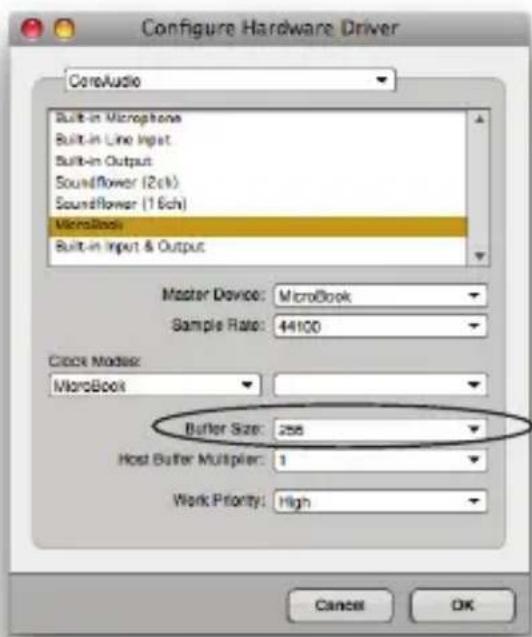
Figure 5-4: In Digital Perfor AudioDesk, choose Setup menu> Configure Audio System> Configure Hardware Driver to open the dialog shown above and access the Buffer Size setting. Refer to your Digital Performer or AudioDesk user guide for information about the Host Buffer Multiplier setting.
Cubase
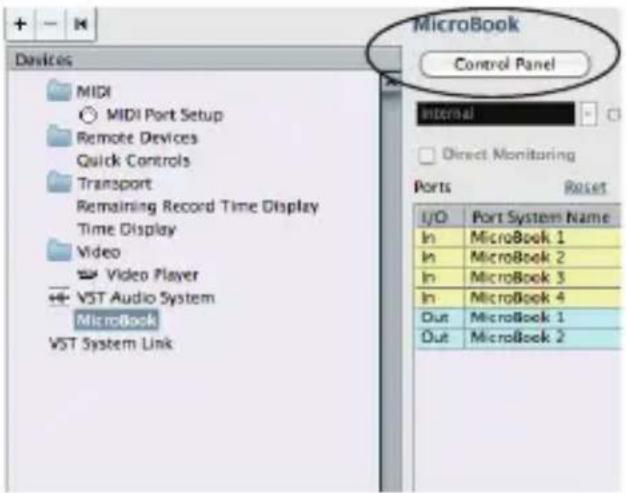
Figure 5-5: In Cubase or Nuendo, choose Devices menu> Device Setup and select the MicroBook to access the window above and the Audio Buffer Size setting (via the Control Panel button).
Logic
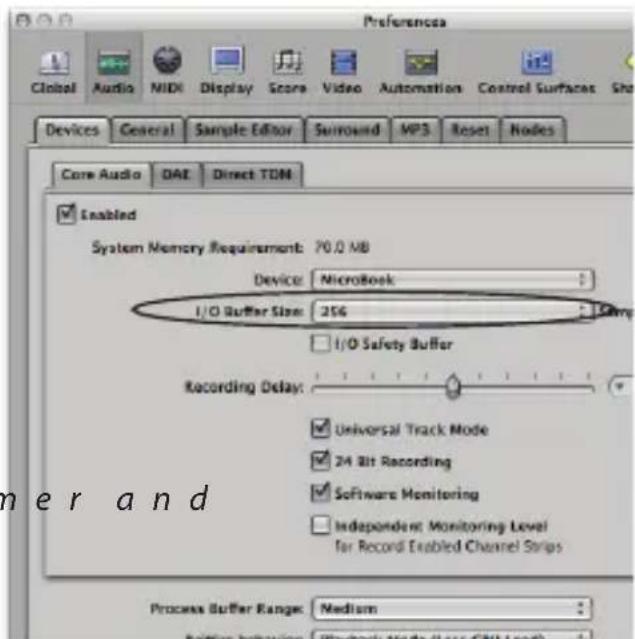
Figure 5-6: In Logic Pro or Logic Express, go to the Audio Driver preferences to access the I/O Buffer Size option shown above.
Lower latency versus higher CPU overhead
The buffer setting has a large impact on the following things:
■ Patch thru latency
■ The load on your computer's CPU
■ Possible distortion at the smallest settings
■ How responsive the transport controls are in your host audio software
The buffer setting presents you with a trade-off between the processing power of your computer and the delay of live audio as it is being patched through your software. If you reduce the size, you reduce patch thru latency, but may significantly increase the overall processing load on your computer, leaving less CPU bandwidth for things like real-time effects processing. On the other hand, if you increase the buffer size, you reduce the load on your computer, freeing up bandwidth for effects, mixing and other real-time operations.
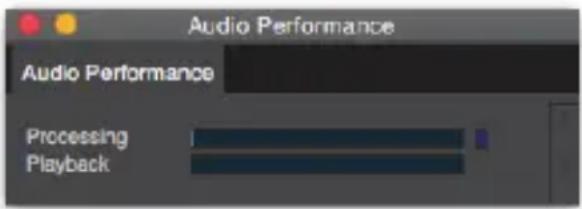
Figure 5-7: When adjusting the buffer size to reduce monitoring latency, watch the 'Processing' meter in Digital Performer or AudioDesk's Performance Monitor. If you hear distortion, or if the Performance meter is peaking, try raising the buffer size.
If you are at a point in your recording project where you are not currently working with live, patched-thru material (e.g. you're not recording vocals), or if you have a way of externally processing inputs, choose a higher buffer size.
Depending on your computer's CPU speed, you might find that settings in the middle work best (256 to 1024).
Transport responsiveness
Buffer size also impacts how quickly your audio software will respond when you begin playback, although not by amounts that are very noticeable. Lowering the buffer size will make your software respond faster; raising the buffer size will make it a little bit slower, but barely enough to notice.
Effects processing and automated mixing
Reducing latency with the buffer size setting has another benefit: it lets you route live inputs through the real-time effects processing and mix automation of your audio software.
CUEMIX FX HARDWARE MONITORING
The MicroBook has a more direct method of patching audio through the system. This method employs the MicroBook's CueMix FX digital mixer. When enabled, CueMix FX activates hardware patch-thru in the MicroBook itself. CueMix FX has two important benefits:
- It completely eliminates the patch thru delay (reducing it to a small number of samples — about the same amount as one of today's advanced digital mixers).
■ CueMix FX imposes no strain on the computer.
The trade-off, however, is that CueMix FX bypasses your host audio software. Instead, live audio inputs are patched directly through to outputs in the MicroBook itself and are mixed with disk tracks playing back from your audio software. This means that you cannot apply host-based plug-ins, mix automation, or other real-time effects that your audio software provides. But for inputs that don't need these types of features, CueMix FX is the way to go.
On the other hand, if you really need to use the mixing and processing provided by your audio software, you should not use CueMix FX. Instead, reduce latency with the buffer setting (as explained earlier in this chapter).
Using CueMix FX
The CueMix FX software manages your monitor mix and runs side-by-side with your host audio software.
CueMix FX allows you to create up to four separate MicroBook stereo mixes, or any other desired routing configurations. These routings are independent of your host audio software. For complete details, see chapter 7, “CueMix FX” (page 37).
CHAPTER 6 Windows Audio Software
OVERVIEW
The MicroBook includes an ASIO driver that provides multi-channel I/O with ASIO-compatible hosts such as Cubase, Nuendo, SONAR, Live, Reason, and more.
A standard Windows audio driver is also included for multi-channel audio input and output for any audio application that supports Windows multimedia audio drivers.
Installing the MicroBook Windows drivers .. 33
Running CueMix FX....33
Choosing the MicroBook driver....33
Sample rate....34
Clock Source 34
Inputs and outputs ....34
Working with CueMix FX mixing and effects 34
24-bit operation ....35
INSTALLING THE MICROBOOK WINDOWS DRIVERS
To install the MicroBook's Windows audio drivers, just run the installer as detailed in chapter 3, "Installing the MicroBook Software" (page 15).
RUNNING CUEMIX FX
Before you run your host audio software, launch CueMix FX to configure your MicroBook hardware. Running CueMix FX confirms that the MicroBook hardware is connected, powered up, and functioning normally. It also lets you configure the MicroBook's inputs and
outputs. For a quick overview, see chapter, "Quick Reference: CueMix FX" (page 7).
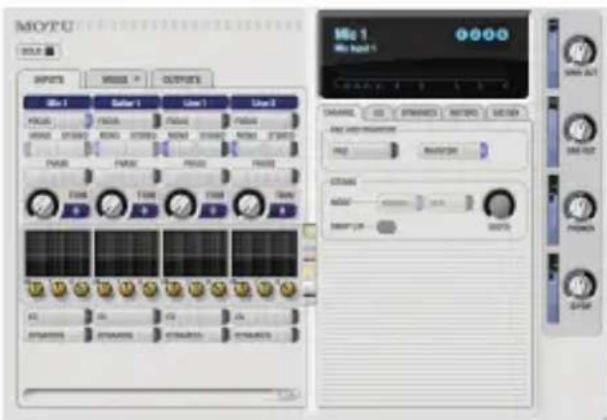
Figure 6-1: CueMix FX.
For further details about the MicroBook settings, see chapter 7, “CueMix FX” (page 37).
CHOOSING THE MICROBOOK DRIVER
Once you've made the preparations described so far in this chapter, you're ready to run your audio software and enable the MOTU MicroBook ASIO or Windows multimedia driver. Check the audio system or audio hardware configuration window in your software. There will be a menu there that lets you choose among various drivers that may be in your system. Choose the MOTU ASIO or Windows multimedia driver from this menu, as explained briefly in the following sections for several popular Windows applications.
Pro Tools
In Avid Pro Tools, go to the Setup menu and choose Playback Engine. Choose the MOTU MicroBook ASIO from the Current Engine menu.34
Pro Tools 9 or later is required.
Cubase and Nuendo
In Cubase or Nuendo, go to the Device Setup window, choose VST Audio System and select MOTU MicroBook ASIO from the ASIO Driver menu. Activate the inputs and outputs within Cubase or Nuendo as usual.
Live
In Ableton Live, access the preferences window and click the Audio tab. Choose ASIO from the Driver Type menu. Choose the MOTU MicroBook ASIO from the Audio Device menu. To enable or disable input or output channels, click the Input Config or Output Config buttons.
Reason and Record
In Propellerhead Reason and Record, go to the Preferences window, choose Audio preferences from the menu and choose ASIO MOTU MicroBook ASIO from the Audio Card Driver menu.
Reaper
In Cockos Reaper, access the Preferences and click Devices under the Audio preferences. Choose ASIO for the audio system and choose MOTU MicroBook ASIO from the ASIO driver menu.
Other audio software
For other audio applications, the procedure is similar to that shown above. Consult your owner's manual for further information.
SAMPLE RATE
Choose the desired overall sample rate for the MicroBook system in your host audio software. Newly recorded audio will have this sample rate.
CLOCK SOURCE
Some host software may have a “clock source” setting. For the MicroBook, there is only one choice for clock source: Internal.
INPUTS AND OUTPUTS
Once you've enabled the MicroBook's driver, MicroBook audio inputs and outputs will appear in your host software wherever audio inputs and outputs are listed.
WORKING WITH CUEMIX FX MIXING AND EFFECTS
The MicroBook provides powerful external mixing, EQ and compression, which you can operate hand-in-hand with your host software's complete mixing environment. For example, the MicroBook can serve as a monitor mixer routing channels to musicians, or it can serve as an integrated extension of your digital audio workstation's mixing environment. If you program a MicroBook mixing and processing configuration that goes hand in hand with your digital audio workstation's project, be sure to use the file save features in CueMix FX to save the
MicroBook settings as a file in the same folder as your digital audio workstation's project file for instant recall of all settings. See chapter 7, "CueMix FX" (page 37) for complete details.
24-BIT OPERATION
Your MicroBook hardware fully supports 24-bit recording capabilities. Simply enable 24-bit operation as instructed in your digital audio workstation's manual. The MicroBook always supplies a 24-bit data stream.
CHAPTER 7 CueMix FX
OVERVIEW
CueMix FX is a cross-platform software application that provides graphic, on-screen control for the MicroBook's flexible CueMix FX on-board mixer and effects processing.
For more information
For complete information about CueMix FX, refer to the CueMix FX PDF manual, which is placed on your hard drive by the MicroBook installer.
An 8-bus mixer with EQ and compression ..37
CueMix FX versus host mixing....37
CueMix FX installation 38
CueMix FX basic operation....38
The Inputs tab ....40
The Mixes tab....41
The Outputs tab ....42
The Meters tab....43
The Signal Generator tab ....43
Scope/Return channels 44
Audio analysis tools....45
AN 8-BUS MIXER WITH EQ AND COMPRESSION
All MicroBook inputs and outputs can be mixed and controlled by the on-board CueMix FX 8-bus (4 stereo bus) digital mixer driven by hardware-based DSP.
The CueMix FX mixer allows you to apply no-latency EQ and dynamics to inputs and outputs directly in the MicroBook hardware, independent of the computer. Input signals to the computer can be recorded wet, dry, or dry with a wet monitor mix (for musicians during recording, for example).
Effects include:
■ 7-band parametric EQ modeled after British analog console EQs
■ A standard compressor with conventional threshold, ratio, attack, release, and gain controls
The MicroBook's flexible effects architecture allows you to apply seven bands of EQ and compression on every input and output simultaneously.
CueMix FX provides several major advantages over mixing and processing in your host audio software:
- CueMix FX has no buffer latency. Thanks to the MicroBook’s DSP chip, CueMix FX provides the same throughput performance as a digital mixer.
- CueMix FX mixing and effects processing imposes no processor drain on the computer's CPU.
■ CueMix FX routing can be maintained independently of individual software applications or projects.
CueMix FX is installed with the rest of your MicroBook software.
Here is a brief overview of the CueMix FX mixer.
Four stereo mix busses
CueMix FX provides four stereo mix busses: Mix 1, Mix 2, Mix 3, and Mix 4. Each mix bus can take any number of inputs and mix them together into a
single stereo audio stream that you can then assign to any MicroBook output pair — or combination of output pairs — that you choose. For example, Mix 1 could go to the headphones, Mix 2 could go to the main outs, Mix 3 could go to a piece of outboard gear connected to analog outputs 3-4, and so on. You can also assign a mix to multiple output pairs. For example, you could assign Mix 1 to the Main Out, Phones, and Line Out.

Figure 7-1: CueMix FX is a virtual mixer that gives you control over the MicroBook's on-board mixing features.
Viewing one mix bus at a time
CueMix FX displays one mix bus at a time in the Mixes tab (Figure 7-1 on page 38). To select which mix you are viewing, choose it from the mix bus menu. The mix name appears above the mix bus master fader, where you can click the name to change it.
Each mix bus is independent
Each mix bus has its own settings. Settings for one bus will not affect another. For example, if an input is used for one bus, it will still be available for other busses. In addition, inputs can have a different volume, pan, mute and solo setting in each bus.
Input channels
The Inputs tab (Figure 7-2 on page 40) gives you access to settings for individual MicroBook inputs (or input pairs), such as phase, trim, EQ and dynamics processing. These settings are applied to the signal before it goes anywhere else (to a mix bus or the computer).
Output channels
The Outputs tab (Figure 7-4 on page 42) gives you access to settings for each MicroBook output pair, including EQ and dynamics processing. These settings are applied to the signal just before it is sent to the output.
Channel focus and settings
Click the focus button for a channel (Figure 7-1) to view channel-specific parameters in the Channel Settings section of the CueMix FX window (Figure 7-1). Separate tabs are provided for channel-specific settings (channel strip, EQ and dynamics), plus the global meter bridge and signal generator.
Output volume controls
The Output volume controls(Figure 7-1) provide independent volume control for all of the MicroBook's outputs.
Other features
CueMix FX offers many additional features, such as extensive metering, graphic editing of certain effects parameters, and more. For complete information, refer to the CueMix FX PDF manual, which is placed on your hard drive by the MicroBook installer.
Widening the CueMix FX window
To view more input faders at once, resize the window.
THE INPUTS TAB
Click the Inputs tab (Figure 7-2) to access and control all of these input channel settings for each MicroBook input or
input pair. Use the Focus button (Figure 7-2) to access the Channel, EQ, and dynamics tab settings for each input.
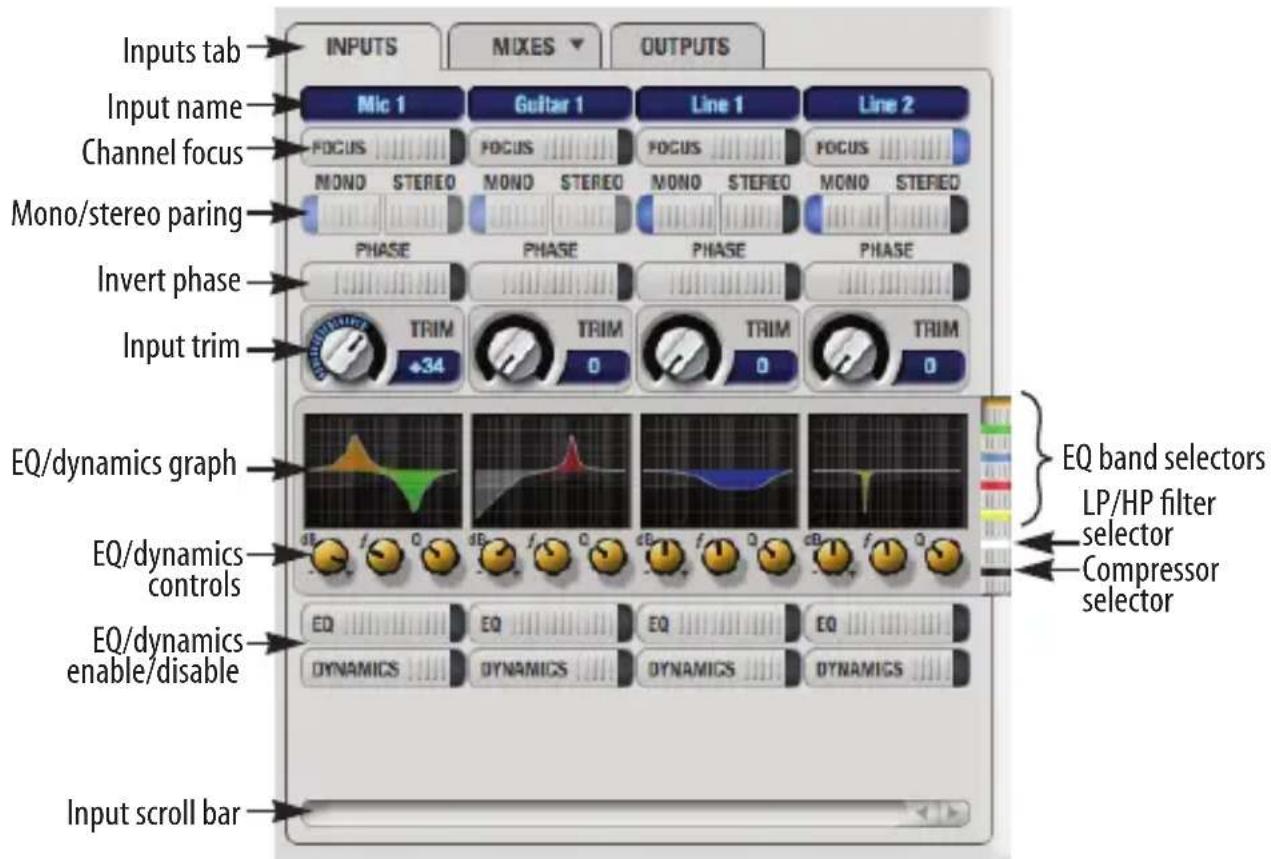
Figure 7-2: The Inputs tab.
The Channel tab. The EQ tab. The Dynamics tab.
THE MIXES TAB
Click the Mixes tab (Figure 7-3) to gain access to the MicroBook's four stereo mix busses. The Mixes tab displays one mix bus at a time: choose each mix from the Mix bus menu in the tab itself. Each fader represents an input to the mix, except the fader on the right, which is the master fader for the mix. To assign each mix to a MicroBook output, visit the Outputs tab.
Aux 1-2
Inputs consist of physical inputs on the MicroBook interface (mic, guitar, etc.), but there is also a stereo input channel for Aux 1-2. This is audio being routed to the MicroBook from your host audio software. By bringing up this fader, you can combine live inputs (mic, guitar, and line 1-2) with any audio from the computer.
Stereo grouping
The input channel strips in the Mixes tab can represent either a mono input channel or a stereo pair. For the line inputs, this is controlled by their grouping in the Inputs tab, using the Mono/Stereo buttons in the channel strips for the line inputs (Figure 7-2).
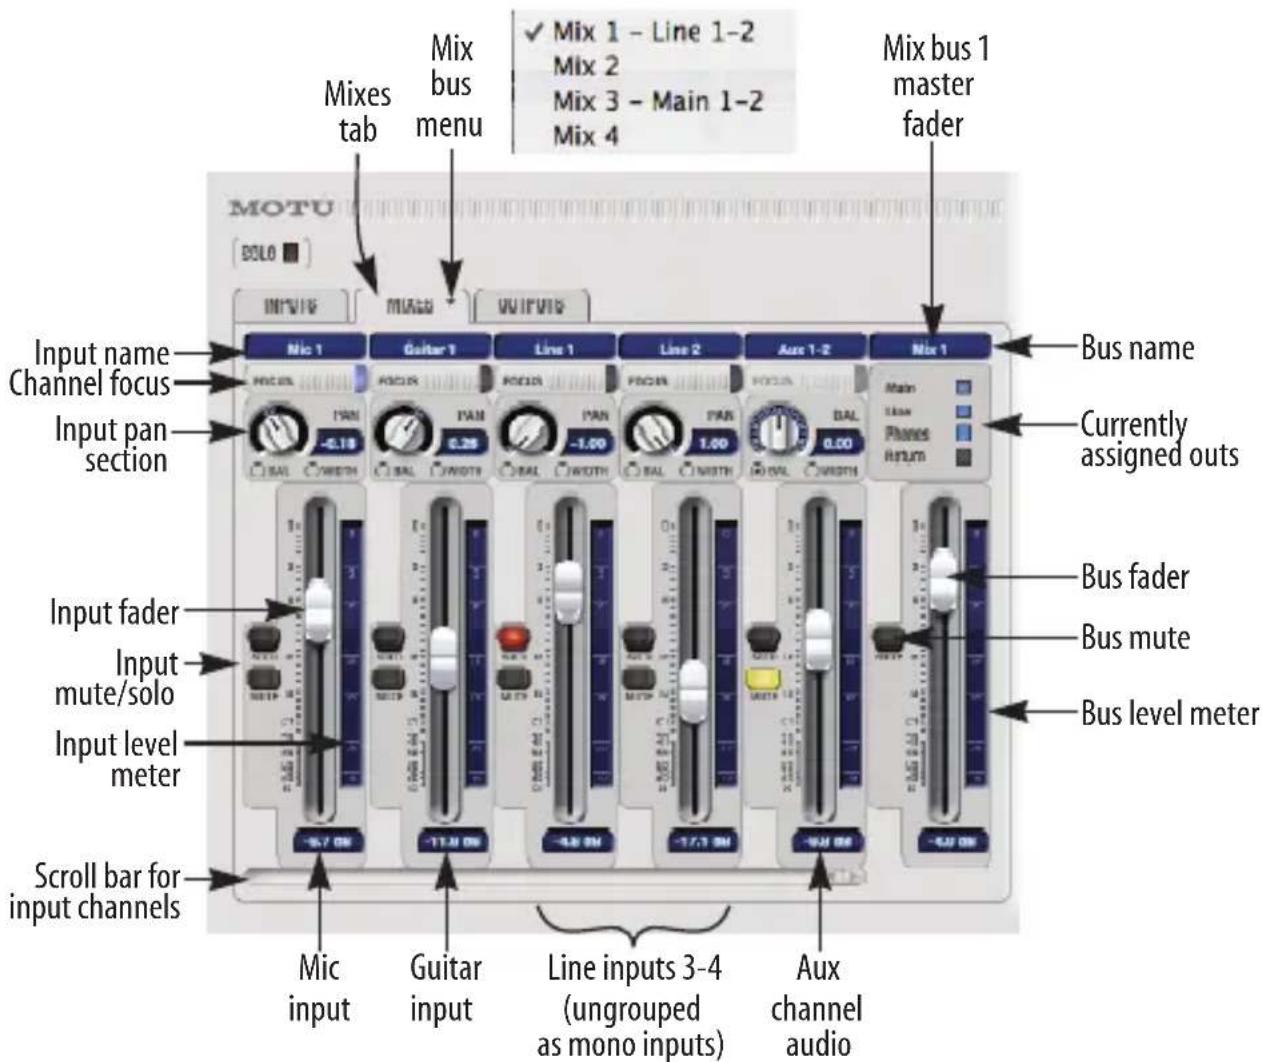
Figure 7-3: The Mixes tab.
THE OUTPUTS TAB
The Outputs tab (Figure 7-4) lets you apply EQ and dynamics to any output pair, just before the signal leaves the MicroBook. This is processing that occurs at the very end of the signal flow, after everything else (host based effects, MicroBook input or bus processing, mixing, and so on). Processing is done in the digital domain, just before the signal goes analog through the D/A converter. Output tab processing is applied to the entire output mix (all signals being mixed to the output from various sources).
Signal flows from top to bottom
Settings in each Output tab channel strip are applied to the signal in order from top to bottom. For example, EQ occurs before Dynamics.
Output channel focus
Click the channel focus button (Figure 7-4) to view and edit parameters, such as EQ and dynamics, in the Output Settings section of the CueMix FX window.
Output source
Choose the Source for the audio output. The source can be a mix bus (which can have multiple sources itself) or the MicroBook's signal generator.
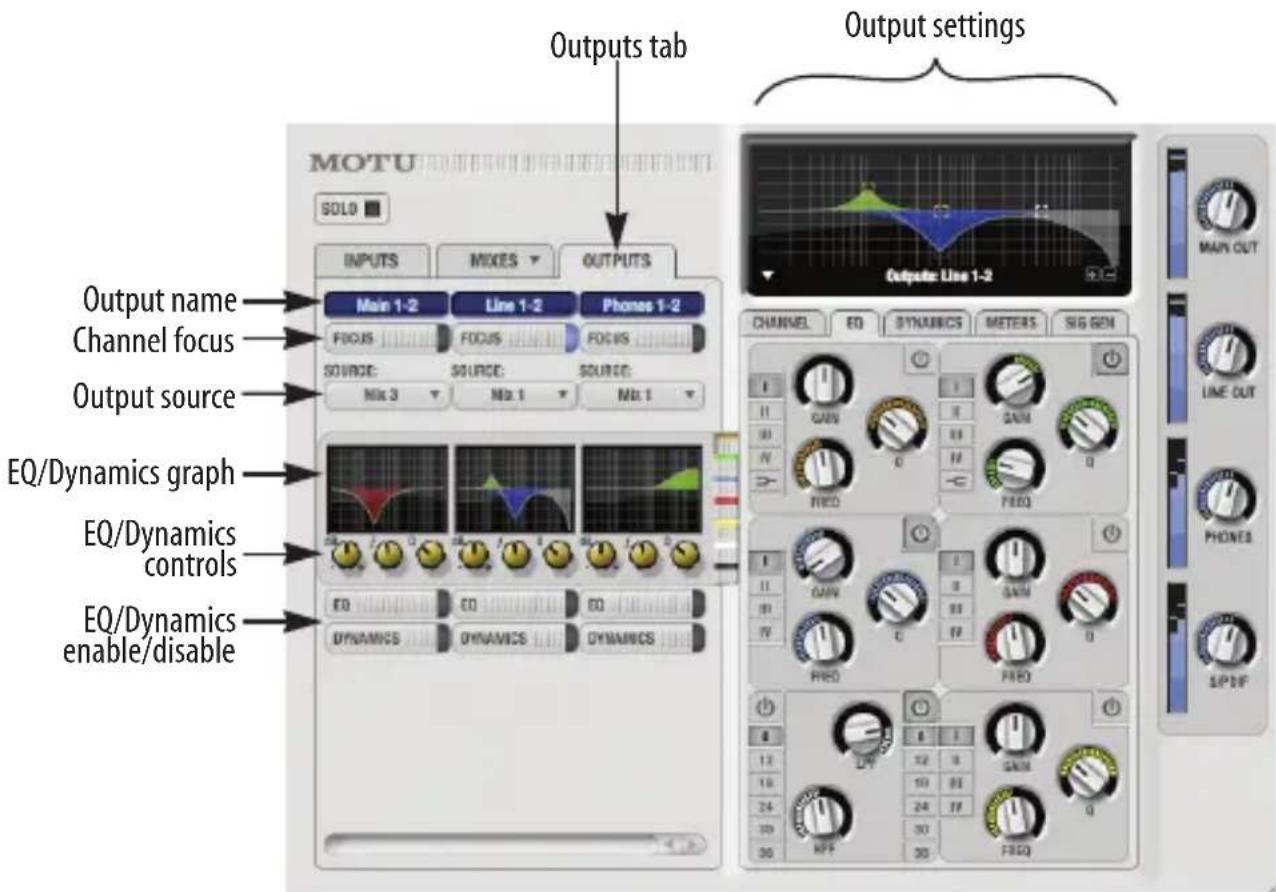
Figure 7-4: The Outputs tab.
THE METERS TAB
The Meters tab (Figure 7-5) serves as a comprehensive meter bridge for all inputs, outputs and mix busses in the MicroBook, giving you a “bird’s-eye” view of all signal activity.
Channel meter display
The channel meter display (Figure 7-5) provides a long-throw meter for the input or output that currently has the focus in the Input/Output tabs.
Pre/post processing switch
The pre/post processing switch
(Figure 7-5) affects all input meters (and the meter in the channel meter display above the tab, if this area is displaying an input meter). Click Pre to view levels before any EQ or dynamics processing; click Post to view levels after EQ or dynamics processing.
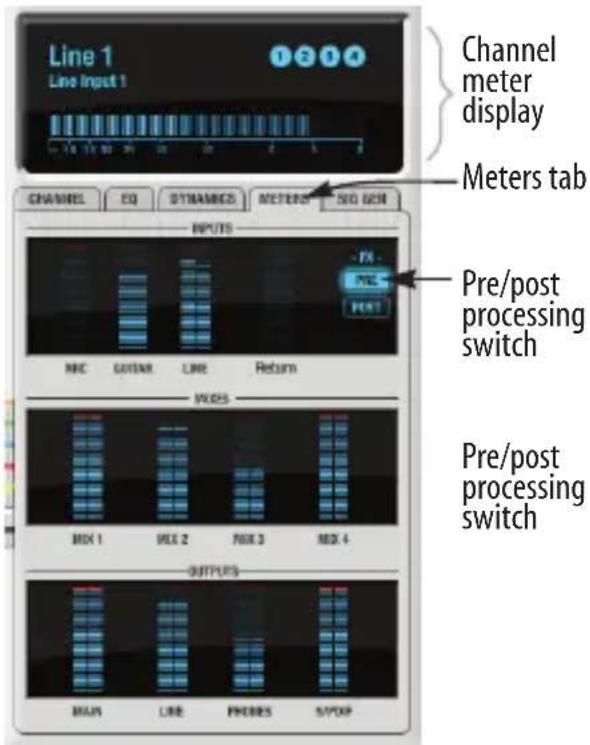
Figure 7-5: The Meters tab.
THE SIGNAL GENERATOR TAB
The Signal Generator tab (Figure 7-6) provides settings for the Sine Wave generator (frequency and amplitude) and the White/Pink noise generators (amplitude). Use the Output Source menus in the Outputs tab (Figure 7-4) to choose the desired output(s) for these test signals.
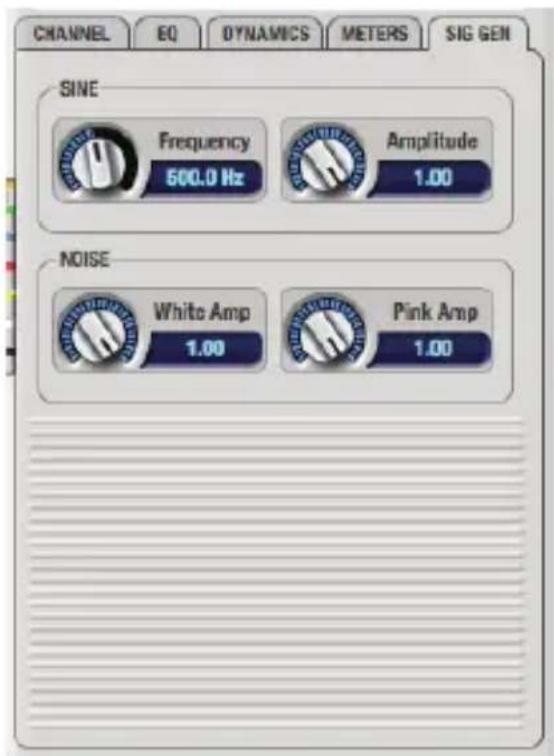
Figure 7-6: The Signal Generator tab.
SCOPE/RETURN CHANNELS
Choose Devices menu> MicroBook> Setup to access the Scope/Return Channel Selection settings below (Figure 7-7). The MicroBook sends two extra return channels to the host audio software running on your computer. This window lets you control the audio source for each channel and whether or not the signal will be processed with the MicroBook EQ and/or Dynamics processing settings via the Pre/post effects menu.
Note that you can route entire mix busses, and even MicroBook output signals, back to the computer.
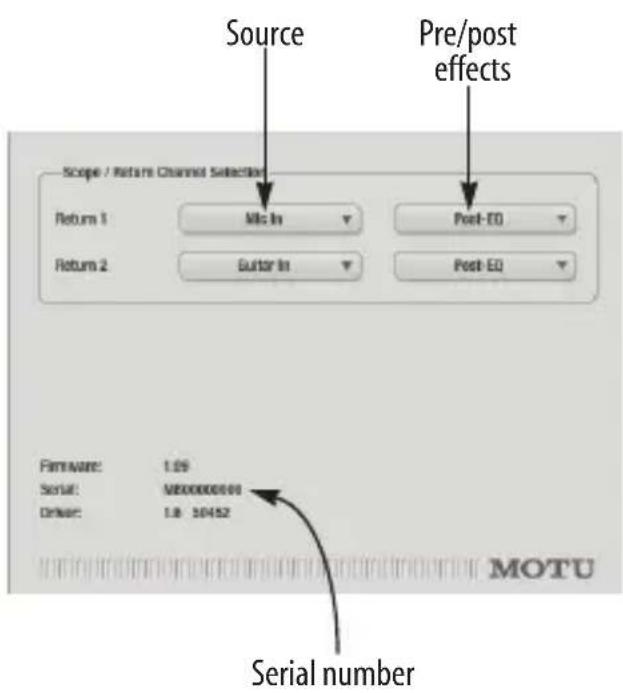
Figure 7-7: MicroBook Device Setup.
Return channels
The source for the Return 1 and Return 2 channels in your host audio software (provided by the MicroBook Core Audio and ASIO driver) are determined by Scope/Return channel settings (Figure 7-7).
For example, if you want to mix inputs with effects and send the result to MicroBook outputs, but you also want to send those same inputs dry (no processing) to the host, then select those inputs in the Scope/Return menus and choose Return 1 and/or Return 2 as the input to your host software.
Scope channels
The CueMix FX tuner and audio analysis (scoping) features described on the next few pages always look at the two Scope/Return channels (Figure 7-7).
TUNER
The Tuner window is an accurate and easy to use tuner. Choose the Tuner item from the Devices menu, under the MicroBook. The Tuner follows the currently chosen Scope/Return channels. The displayed channel pair is shown in the lower left corner. Each channel has a check box to enable or disable its input to the tuner.
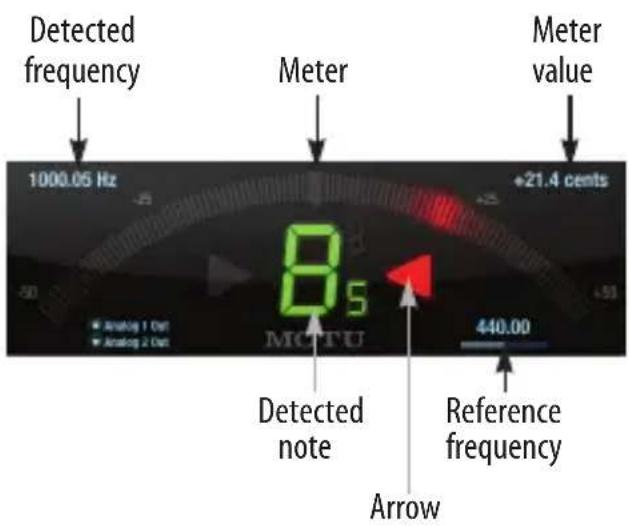
AUDIO ANALYSIS TOOLS
CueMix FX provides advanced audio analysis tools. This section gives a brief summary. For complete information, refer to the CueMix FX PDF manual, which is placed on your hard drive by the MicroBook installer.
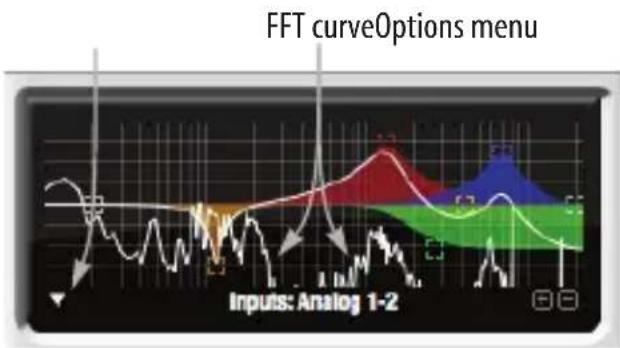
FFT display
The Filter response display section in CueMix FX can display real-time FFT and spectrogram information.
Choose Show FFT from the Filter display options menu (Figure 7-8) to superimpose a real-time Fast Fourier Transform (FFT) frequency measurement curve over the EQ filter display, as show below:
line
| Time | Value | |------|-------| | 0 | 0 | | 1 | 0 | | 2 | 0 | | 3 | 0 | | 4 | 0 | | 5 | 0 | | 6 | 0 | | 7 | 0 | | 8 | 0 | | 9 | 0 | | 10 | 0 | | 11 | 0 | | 12 | 0 | | 13 | 0 | | 14 | 0 | | 15 | 0 | | 16 | 0 | | 17 | 0 | | 18 | 0 | | 19 | 0 | | 20 | 0 | | 21 | 0 | | 22 | 0 | | 23 | 0 | | 24 | 0 | | 25 | 0 | | 26 | 0 | | 27 | 0 | | 28 | 0 | | 29 | 0 | | 30 | 0 | | 31 | 0 | | 32 | 0 | | 33 | 0 | | 34 | 0 | | 35 | 0 | | 36 | 0 | | 37 | 0 | | 38 | 0 | | 39 | 0 | | 40 | 0 | | 41 | 0 | | 42 | 0 | | 43 | 0 | | 44 | 0 | | 45 | 0 | | 46 | 0 | | 47 | 0 | | 48 | 0 | | 49 | 0 | | 50 | 0 | | 51 | 0 | | 52 | 0 | | 53 | 0 | | 54 | 0 | | 55 | 0 | | 56 | 0 | | 57 | 0 | | 58 | 0 | | 59 | 0 | | 60 | 0 | | 61 | 0 | | 62 | 0 | | 63 | 0 | | 64 | 0 | | 65 | 0 | | 66 | 0 | | 67 | 0 | | 68 | 0 | | 69 | 0 | | 70 | 0 | | 71 | 0 | | 72 | 0 | | 73 | 0 | | 74 | 0 | | 75 | 0 | | 76 | 0 | | 77 | 0 | | 78 | 0 | | 79 | 0 | | 80 | 0 | | 81 | 0 | | 82 | 0 | | 83 | 0 | | 84 | 0 | | 85 | 0 | | 86 | 0 | | 87 | 0 | | 88 | 0 | | 89 | 0 | | 90 | 0 | | 91 | 0 | | 92 | 0 | | 93 | 0 | | 94 | 0 | | 95 | 0 | | 96 | 0 | | 97 | 0 | | 98 | 0 | | 99 | 0 | | Note: The data is extracted from the code and presented in CSV format as requested. The input values are all 'Analog' and '1-2'. There is no additional data series in this case. The output values for the line charts are not explicitly provided in the code. Therefore, the output values for the line charts are calculated based on the formula 'FFT curveOptions menu'.Figure 7-8: FFT display. Make sure that the Scope Channels (Figure 7-7) match the channels that are currently in focus via the Focus buttons (Figure 7-1).
The FFT curve is post-filter. Therefore, the FFT shows the results of the EQ filter(s) being applied.
Spectrogram
Choose Options menu> Show Spectrogram (Figure 7-8) to superimpose a real-time spectrogram “waterfall” display in the EQ display background:
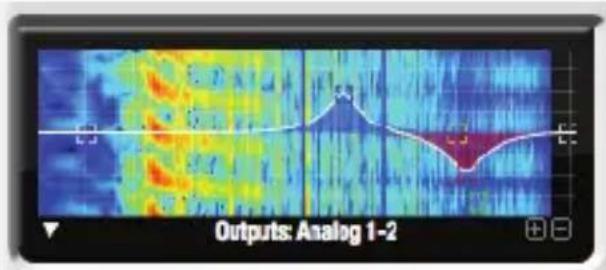
Figure 7-9: Spectrogram display.
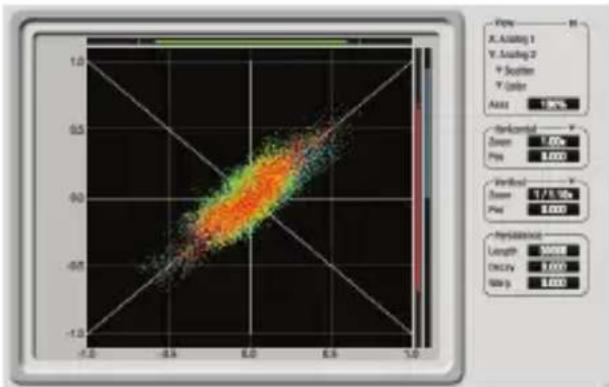
X-Y Plot
The X-Y Plot window (Figure 7-10) graphs the amplitude of a stereo audio signal on a two-dimensional grid. To open the X-Y Plot, choose it from the Devices menu.
heatmap
| Parameter | Value | | --------- | ----- | | Random | 2.00 | | Pixel | 4.000 | | Vertical | 7.5/10.0x | | Pixel | 4.000 | | Thickness | 3000 | | Length | 1.000 | | Density | 1.000 | | Mg % | 1.000 |Figure 7-10: X-Y Plot.
For each unit of time (i.e. each sample), the amplitude of the left channel is displayed on the x-axis and the amplitude of the right channel is displayed on the y-axis. A thick white vertical line marks where left channel amplitude equals zero; a thick white horizontal line marks where
right channel amplitude equals zero (Figure 7-10, below). There are also thick white diagonal lines for y = x and y = -x.
Phase Analysis
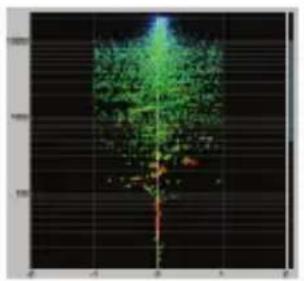
To open the Phase Analysis window (Figure 7-11), choose it from the Devices menu. Phase Analysis graphs frequency versus phase difference versus amplitude of a stereo signal on either rectangular or polar coordinates.
In rectangular coordinates, the vertical axis represents frequency, and the horizontal axis represents the phase of the left channel minus the phase of the right channel (measured in radians).
In polar coordinates, the radius represents frequency and the angle (theta) from the +y vertical axis represents the phase difference of left channel minus the right channel.
natural_image
Black-and-white image showing a vertical green tree with a red trunk, no visible text or symbols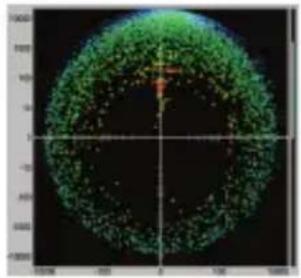
Figure 7-11: Rectangular versus Polar display with a logarithmic plot.
Oscilloscope
CueMix FX provides a full-featured oscilloscope (Figure 7-12). To open an oscilloscope, choose the Oscilloscope item from the Devices menu.
The oscilloscope follows the currently chose scope channels (Figure 7-7 on page 44).
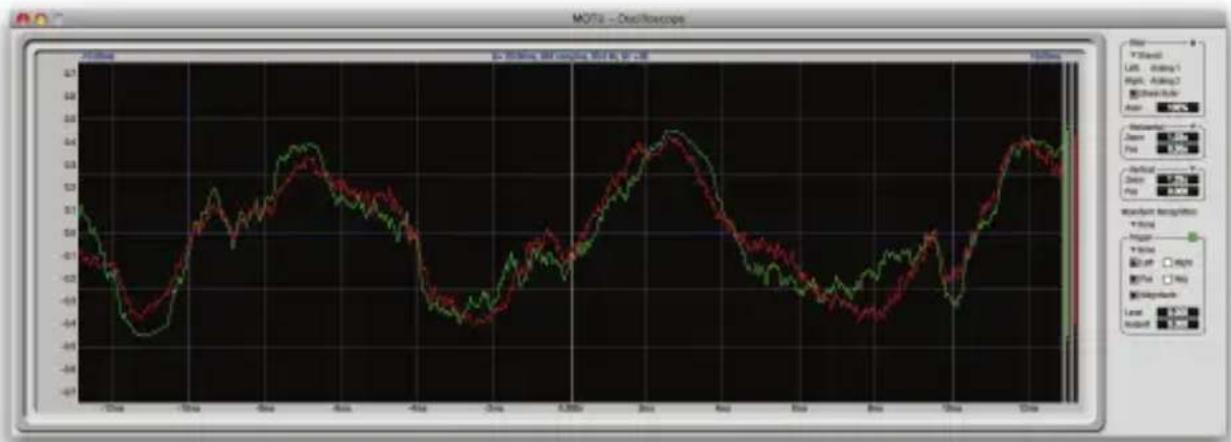
Figure 7-12: Oscilloscope
APPENDIX A Troubleshooting
AudioDesk authorization doesn't succeed When authorizing AudioDesk, the OK button does not become active until you have entered in your name and a valid keycode. Your name must contain at least 3 characters, and you must enter the keycode provided with your AudioDesk installer disc. Additionally, the AudioDesk installer disc must be inserted.
Clicks and pops due to hard drive problems
You may have a drive related problem. Try recording just using the analog inputs and outputs of the MicroBook. If you encounter the same artifacts you may want try using another drive in your computer. Clicks and pops can also occur when the drive is severely fragmented, the disk drivers are outdated, or other drive-related issues. If you are using a USB hard drive on the same bus as the MicroBook, it could be that the USB bus is overloaded (too many devices on the same bus). Try removing all devices except the MicroBook.
Connecting or powering gear during operation
It is not recommended that you connect/disconnect, or power on or off devices connected to the MicroBook while recording or playing back audio. Doing so may cause a brief glitch in the audio.
Monitoring - How to monitor inputs?
Please refer to the documentation for the audio application that you are using. If your application does not support input monitoring, you will need to use the MicroBook's hardware-based CueMix FX monitoring feature. Please see chapter 7, "CueMix FX" (page 37).
Controlling monitoring latency
See chapter 7, "CueMix FX" (page 37).
CUSTOMER SUPPORT
We are happy to provide customer support to our registered users. If you haven't already done so, please take a moment to register on line at motu.com, or fill out and mail the registration card included with your MicroBook. Doing so entitles you to technical support and notices about new products and software updates.
REPLACING DISKS
If your MicroBook software installer disc becomes damaged and fails to provide you with fresh, working copies of the software, our Customer Support Department will be glad to replace it. You can request a replacement disc by calling our business office at (617) 576-2760 and asking for the customer service department. In the meantime, you can download the latest drivers from www.motu.com.
TECHNICAL SUPPORT
If you are unable, with your dealer's help, to solve problems you encounter with the MicroBook system, you may contact our technical support department in one of the following ways:
■ Tech support hotline, Monday through Friday, 9 AM to 6 PM EST: (617) 576-3066
■ Online support: www.motu.com/support
Please provide the following information to help us solve your problem as quickly as possible:
■ The serial number of the MicroBook system. Please see “Obtaining your MicroBook serial number” on page 14. You must be able to supply this number to receive technical support.
■ A brief explanation of the problem, including the exact sequence of actions which cause it, and the contents of any error messages which appear on the screen.
■ The pages in the user guide which refer to the parts of the MicroBook or AudioDesk with which you are having trouble.
■ The version of your computer's operating system.
We're not able to solve every problem immediately, but a quick call to us may yield a suggestion for a problem which you might otherwise spend hours trying to track down.
If you have features or ideas you would like to see implemented, we'd like to hear from you. Please contact us online at www.motu.com/suggestions or write to:
MicroBook Development Team MOTU Inc. 1280 Massachusetts Avenue, Cambridge, MA 02138.
20 dB pad 19
24-bit 27, 35
recording 10
48V phantom power 4
A
Analog inputs/outputs connecting to 19
Apple
GarageBand 26
Logic Pro/Express 26, 30
ASIO 26
Cubase 34
Live 34
Nuendo 34
Reason 34
Record (application) 34
AudioDesk 16
enabling MicroBook driv- er 26
Aux 1-2 41
Avid Pro Tools 26, 34
B
Balanced analog 19
Bit depth 5, 10
Buffer size 27, 29
Bus power 5
requirements 22
C
Cardbus adaptors 22
Channel tab 21, 40
Clock source 27, 34
Cockos Reaper 26, 34
Condenser mic 4
Converters 5
Core Audio 25
Cubase 25, 34
Audio Buffer Size 26
buffer size 30
Mac OS X 26
Windows 34
CueMix FX 31, 33, 34, 37-46
Channel tab 40
Dynamics tab 40
EQ tab 40
focus 39
Inputs tab 40
installation 16, 38
launching 7
Mac OS X software 27
Meters tab 43
Mixes tab 41
Outputs tab 42
overview 37, 38
Sig Gen tab
Customer support 47
D
Digital (S/PDIF) output 20
Digital Performer 25
buffer size 30
enabling MicroBook
Driver 26
Disc
replacing 47
Drivers
installing 15
Mac OS X 25
Windows 33
DSP
resources 37
Dynamic mic 4
Dynamics tab 40
E
EQ tab 40
ExpressCard adaptors 22
F
FFT display 45
Focus 7, 21, 39, 40, 41
Outputs tab 42
G
GarageBand 25, 26
Guitar/mic inputs connecting 19, 23
setting input trim level 6
H
Headphones
connecting 23
jack 4
Host-based processing 27
HP/LP filter 40
I
Input level 20
Input trim 40
Inputs
guitar 19
line 19
mic 19
trim 20
Inputs tab 7, 21, 39, 40
Installation
hardware 15, 17
software 15, 25, 33
Installer disc
replacing 47
Invert phase 40
L
Latency 28, 31, 37
Line inputs/outputs 20
quarter-inch jacks 5
stereo mini jacks 5
Live 25, 26, 34
Logic Pro/Express 25, 26, 30
LP/HP filter 40
M
Mac OS X
audio software 25
Main outs
connecting 20
jacks 5
volume
Main volume
Master fader
mix busses 41
Meters 21
Meters tab 7, 43
Mic/guitar inputs 19
connecting 23
setting input trim level 6
MicroBook
hardware installation 15, 17
serial number 9, 14, 44
software installation 15
summary of features 9
Mini jacks 20
Mix bus
master fader 41
Mixes tab 7, 41
Monitoring 28
Monitors
connecting 20
N
Nuendo 34
Mac OS X 26
Windows 34
0
Optimization 31
Oscilloscope 46
Outputs
line 20
main 20
phones
§/PDIF 5
signal flow 42
Outputs tab 8, 39, 42
P
Packing list 13
Pad 19
Patch thru
latency 31
PCMCIA adaptors 22
Performance 31
Phantom power 4, 19
Phase Analysis 46
Phones (see Headphones)
Pink noise
Plug-in processing 27
Post-EQ/Compressor 44
Pre/post FX buttons 43
Precision Digital Trim 10
Pre-Effects/EQ/Compressor 44
Pro Tools 26, 34
Propellerhead (see Reason, Record)
R
Reaper 26, 34
Reason 25, 34
Record (application) 34
Registration 13
Return 1-2 44
S
S/PDIF 5, 20
Sample rate 27, 34
Samplers
connecting 23
Scope/Return Channel 44
Serial number 9, 14, 44
Setup 14
Show
FFT 45
Spectrogram 45
Sig Gen tab (see Signal Generator tab)
Signal Generator tab 7, 43
Sine wave
Software installation 15
Mac OS X 25
Windows 33
Soundtrack Pro 25
Source 8, 42, 44
Spectrogram 45
Steinberg Cubase 25, 26
Technical support 47, 48
Trim 20
Troubleshooting 47-48
TRS connectors 19
Tuner 44
U
Unbalanced analog 19
USB
bus power 5
connecting 18
PC card adapters 22
PCI cards 22
V
Volume control 7, 39
W
White noise
Windows
drivers 33
X
X-Y Plot 45
Z
ZBox guitar adapter 4


- MICROBOOK IIc
- About the Mark of the Unicorn License Agreement and Limited Warranty on Software
- Reminder of the terms of your license
- Update Policy
- Copyright Notice
- Limited Warranty on Hardware
- MicroBook llc
- User Guide
- SAFETY PRECAUTIONS AND ELECTRICAL REQUIREMENTS
- IMPORTANT SAFEGUARDS
- ENVIRONMENT
- AVOID THE HAZARDS OF ELECTRICAL SHOCK AND FIRE
- Contents
- Quick Reference: MicroBook Front Panel
- Quick Reference: MicroBook Top Panel
- Quick Reference: CueMix FX
- CHAPTER 1 About the MicroBook
- Obtaining your MicroBook serial number
- Overview
- Precision Digital Trim™
- 16-bit and 24-bit recording
- CueMix FX mixing and effects
- CHAPTER 2 Packing List and System Requirements
- PACKING LIST
- MAC SYSTEM REQUIREMENTS
- WINDOWS SYSTEM REQUIREMENTS
- PLEASE REGISTER TODAY!
- OR
- You need your MicroBook serial number to register
- Be sure to register AudioDesk
- CHAPTER 3 Installing the MicroBook Software
- NO SOFTWARE INSTALLATION FOR iOS DEVICES
- MAC SOFTWARE INSTALLATION
- What does the installer do?
- Class compliant operation under OS X
- WINDOWS SOFTWARE INSTALLATION
- If Windows asks you to locate the drivers
- CUEMIX FX
- AUDIODESK WORKSTATION SOFTWARE (MAC AND WINDOWS)
- CHAPTER 4 Installing the MicroBook Hardware
- WINDOWS USERS: INSTALL THE SOFTWARE FIRST
- ABOUT USB CABLES
- Host computer USB 2.0 cable
- Micro-B USB 2.0 cable for power
- CONNECTING TO A COMPUTER
- CONNECTING TO AN iOS DEVICE
- CONNECT INPUTS AND OUTPUTS
- Mic input with preamp
- Phantom power
- Guitar input
- Line level inputs
- Trim
- Main outs
- Line out
- Digital out
- Tips for connecting other devices
- INPUT SETTINGS
- BUS POWER
- Bus power requirements
- Examples of bus-powered operation
- Bus power from a battery-powered laptop
- AC POWER
- A TYPICAL MICROBOOK SETUP
- CHAPTER 5 Mac OS X Audio Software
- INSTALLING THE MICROBOOK OS X DRIVERS
- RUNNING CUEMIX FX
- CHOOSING THE MICROBOOK DRIVER
- Digital Performer and AudioDesk
- Pro Tools
- Logic Pro
- Garage Band
- Cubase and Nuendo
- Live
- Reason and Record
- Reaper
- Other audio software
- SAMPLE RATE
- CLOCK SOURCE
- BUFFER SIZE
- INPUTS AND OUTPUTS
- PROCESSING LIVE INPUTS WITH HOST-BASED EFFECTS PLUG-INS
- WORKING WITH CUEMIX FX MIXING AND EFFECTS
- 24-BIT OPERATION
- MONITORING LIVE INPUT
- ADJUSTING THE AUDIO I/O BUFFER
- Lower latency versus higher CPU overhead
- Transport responsiveness
- Effects processing and automated mixing
- CUEMIX FX HARDWARE MONITORING
- Using CueMix FX
- CHAPTER 6 Windows Audio Software
- INSTALLING THE MICROBOOK WINDOWS DRIVERS
- CHAPTER 7 CueMix FX
- For more information
- AN 8-BUS MIXER WITH EQ AND COMPRESSION
- Four stereo mix busses
- Viewing one mix bus at a time
- Each mix bus is independent
- Input channels
- Output channels
- Channel focus and settings
- Output volume controls
- Other features
- Widening the CueMix FX window
- THE INPUTS TAB
- THE MIXES TAB
- Aux 1-2
- Stereo grouping
- THE OUTPUTS TAB
- Signal flows from top to bottom
- Output channel focus
- Output source
- THE METERS TAB
- Channel meter display
- Pre/post processing switch
- THE SIGNAL GENERATOR TAB
- SCOPE/RETURN CHANNELS
- Return channels
- Scope channels
- TUNER
- AUDIO ANALYSIS TOOLS
- FFT display
- Spectrogram
- X-Y Plot
- Phase Analysis
- Oscilloscope
- APPENDIX A Troubleshooting
- Clicks and pops due to hard drive problems
- Connecting or powering gear during operation
- Monitoring - How to monitor inputs?
- Controlling monitoring latency
- CUSTOMER SUPPORT
- REPLACING DISKS
- TECHNICAL SUPPORT
- A
- B
- C
- D
- E
- F
- G
- H
- I
- L
- M
- N
- 0
- P
- R
- S
- U
- V
- W
- X
- Z
Brand : MOTU
Model : MicroBook IIc
Category : Hi-Fi System