.
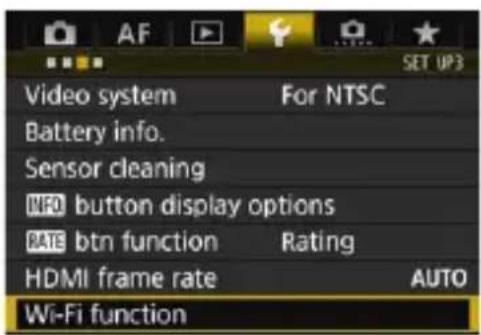
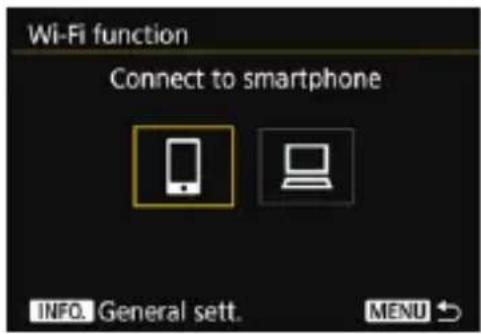
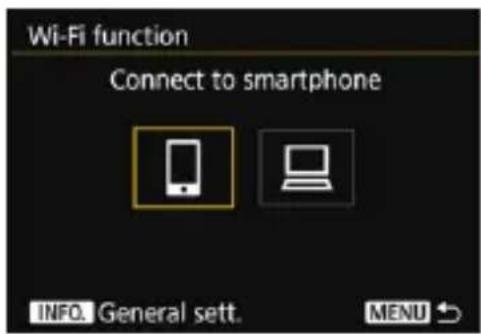
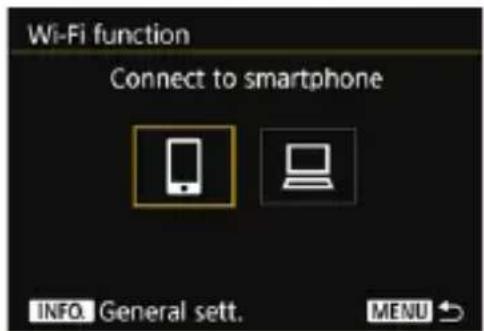
2 Select the Wi-Fi function to connect to.
- Use <> or <> to select an item, then press <> .
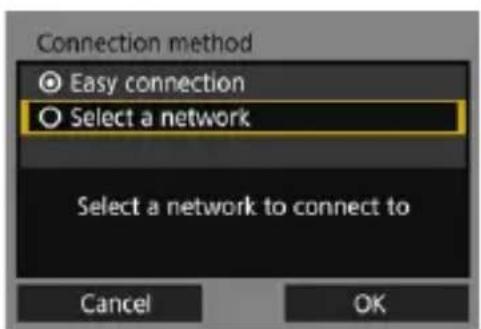
When the connection settings are not registered, the setting screen is displayed.
When the connection settings are already registered, the reconnection screen is displayed (p.64).
- For further connection settings, see “Easy Connection” (p.19) or “Advanced Connection” (p.33).

- When multiple-exposure shooting is set, you cannot select [⚡3: Wi-Fi function].
Interface Cable Connection Cautions
- When the W-E1 is installed in the camera, you cannot use the camera by connecting it to Connect Station, a computer, a Wireless File Transmitter, a printer, or another device with a cable. Remove the W-E1 from the camera before connecting a cable.
Cards
- For [☐], the camera cannot be connected wirelessly if there is no CF card in the camera.
Using the Camera with a Wireless Connection Established
- When you want to prioritize the wireless connection, do not operate the power switch, card slot cover, battery compartment cover, Mode Dial, Live View shooting/Movie shooting switch, or other parts. Otherwise, the wireless connection may be terminated.
Wireless Connection Status
Wireless connection status can be checked on the camera's LCD monitor.
LCD monitor
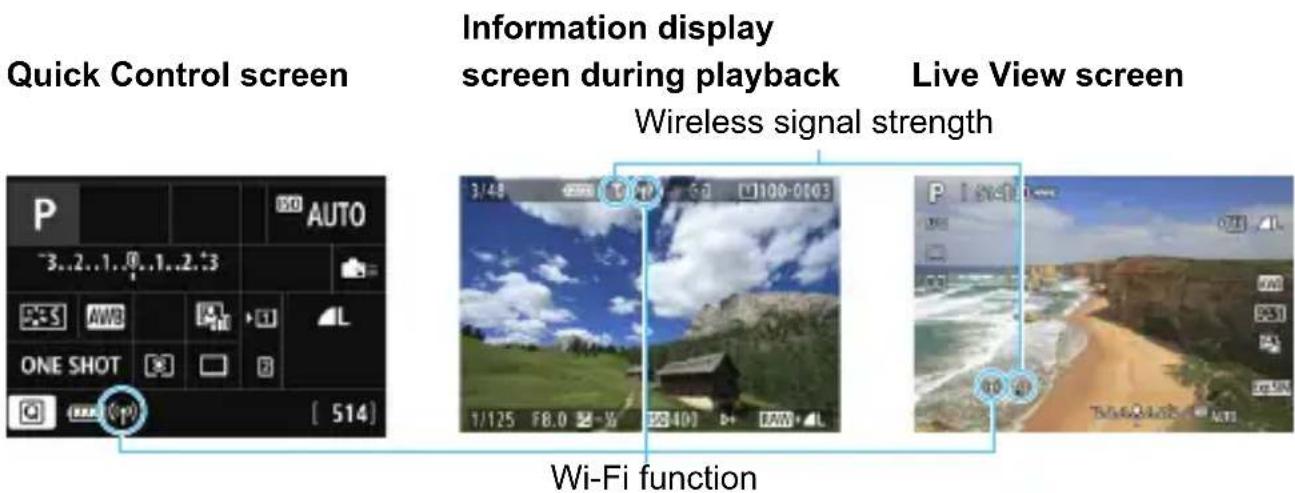
| Connection status Wi-Fi function | Wireless signal strength |
| Not connected (Off) | ( p \ 1 )_OFF | |
| Connected | ( p \ 1 ) | Y,II |
| Sending data ( ) | ( p \ 1 ) | Y,II |
| Waiting for reconnection (Blinking) | Y |
| Connection error (Blinking) | ( p \ 1 ) | Y |
* is not displayed when the camera is connected with [Easy connection] or [Camera access point mode].
* The LCD monitor turns off when you connect the camera to a smartphone.
Preparation for Smartphones
To use [☐] (Connect to smartphone), a smartphone on which iOS or Android is installed is necessary. In addition, the dedicated application Camera Connect (free of charge) must be installed on the smartphone.
- Camera Connect can be downloaded from the App Store or Google Play.
- For the operating system versions supported by Camera Connect, refer to the download site of Camera Connect.
- Interface or functions of the camera and Camera Connect are subject to change for firmware update of the camera or application update of Camera Connect, iOS, Android, etc. In such a case, features of the camera or Camera Connect may differ from sample screens or operation instructions in this manual.
Easy Connection
Wireless Function Operation Flowchart (Easy Connection)
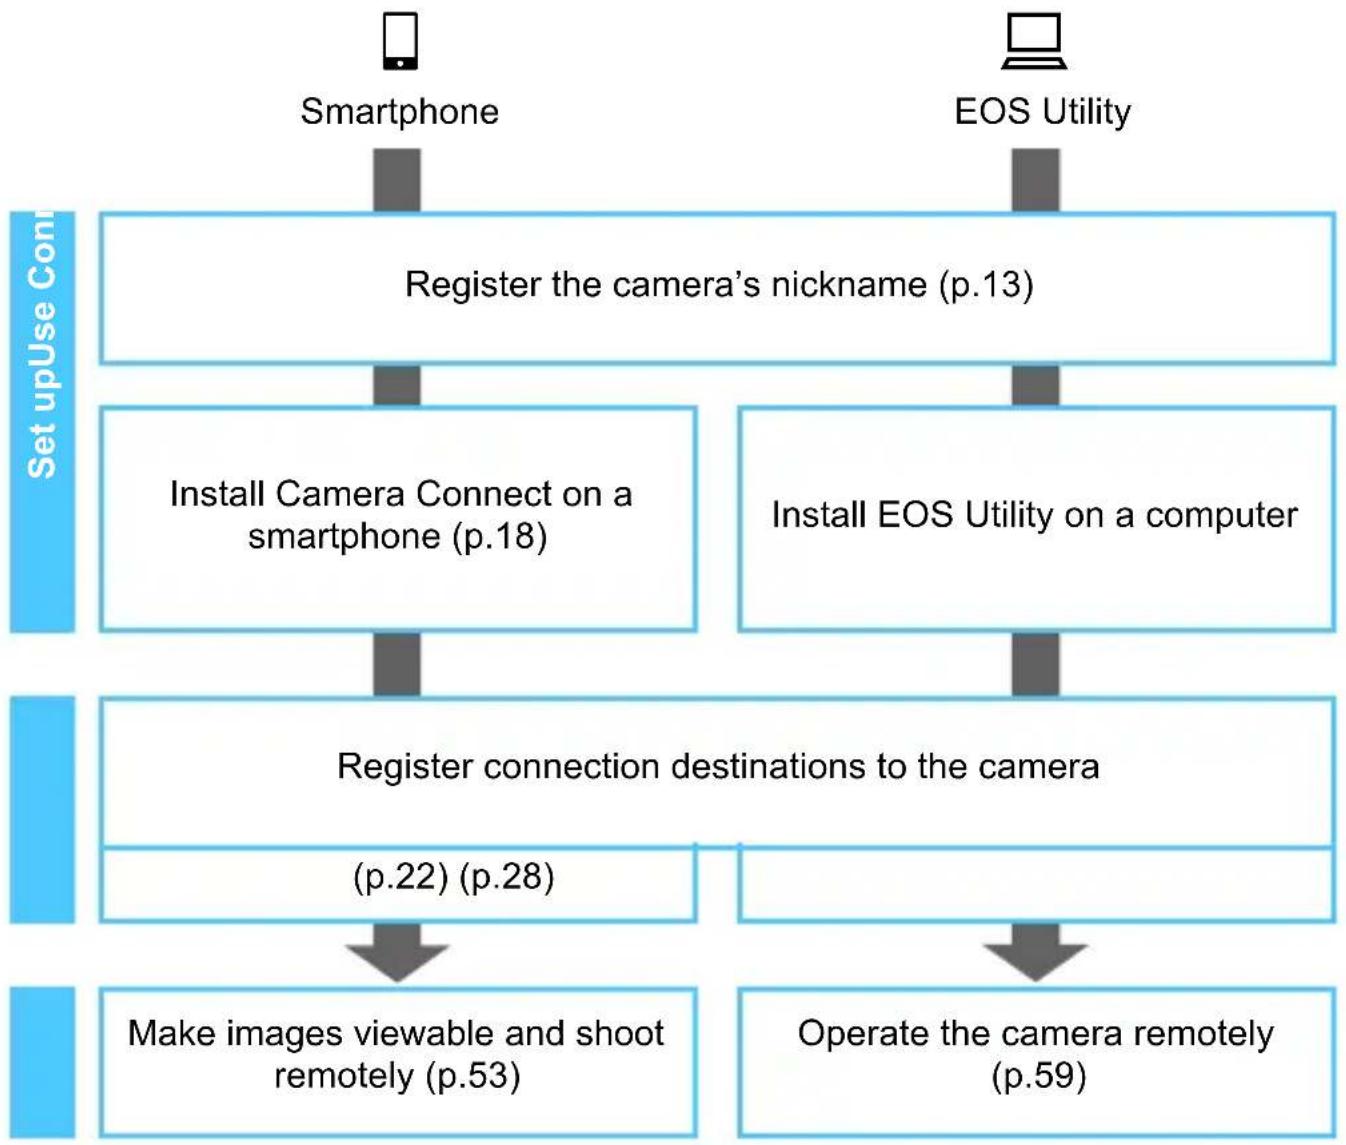
flowchart
graph TD
    A["Set upUse Control"] --> B["Smartphone"]
    A --> C["EOS Utility"]
    B --> D["Register the camera's nickname (p.13)"]
    C --> E["Install Camera Connect on a smartphone (p.18)"]
    C --> F["Install EOS Utility on a computer"]
    D --> G["Register connection destinations to the camera"]
    E --> G
    F --> G
    G --> H["(p.22) (p.28)"]
    H --> I["Make images viewable and shoot remotely (p.53)"]
    F --> J["Operate the camera remotely (p.59)"]
2
Easy Connection to a Smartphone
Communicating with a smartphone enables you to perform the following:
- View images stored in the camera on a smartphone or save viewed images to a smartphone.
- Operate the camera to shoot still photos or change camera settings using a smartphone.
This section explains how to connect the camera directly to a smartphone.
• Install Camera Connect on the smartphone before setting up a connection (p.18).
- To connect using a Wi-Fi access point or connect manually in camera access point mode, see “Advanced Connection” (p.33).

The camera cannot be connected to a smartphone when the Live View shooting/Movie shooting switch is set to <▶>.
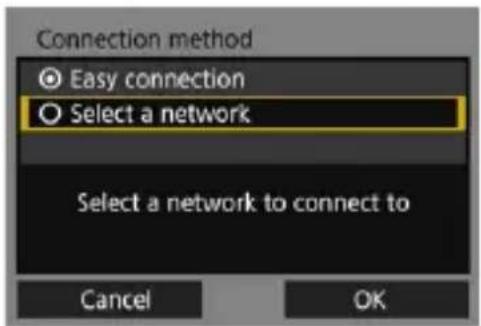
Connecting with [Easy connection]
The camera and a smartphone can be directly connected wirelessly. To establish connection, operations on the smartphone are required. For details, refer to the smartphone's instruction manual.
Operation on the Camera-1
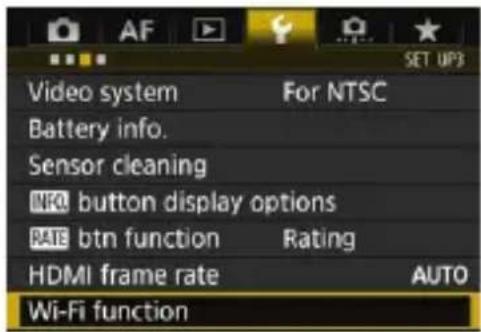
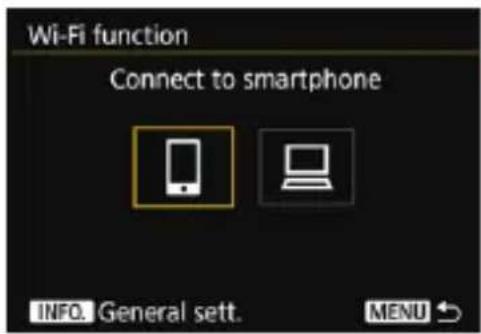
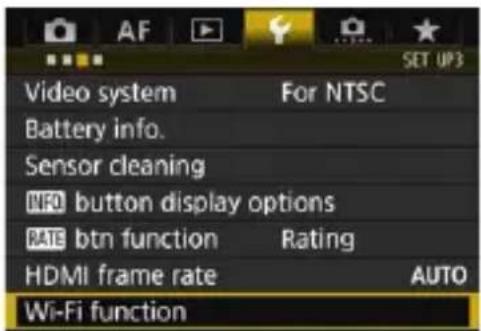
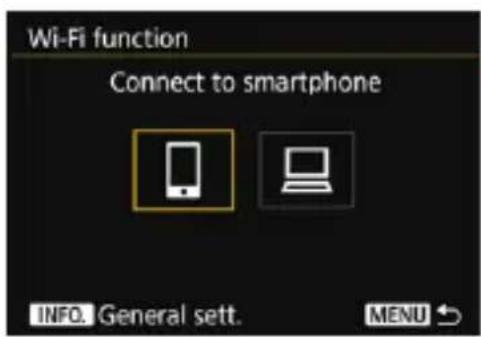
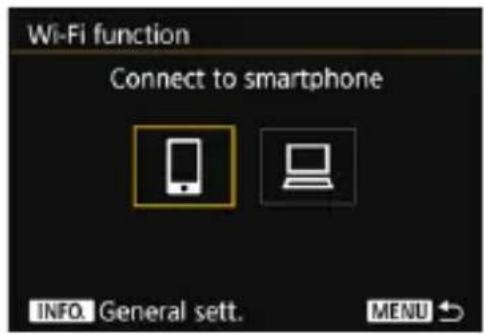
1 Select [Wi-Fi function].
Under the [3] tab, select [Wi-Fi function], then press .
2 Select [☐] (Connect to smartphone).
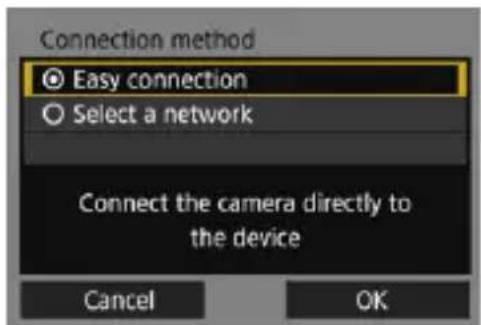
3 Select [Easy connection].
- Select [OK] and press < SET> to go to the next screen.
Operation on the Smartphone
Smartphone's screen (sample)
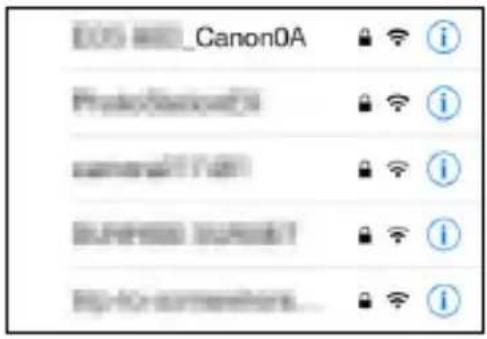
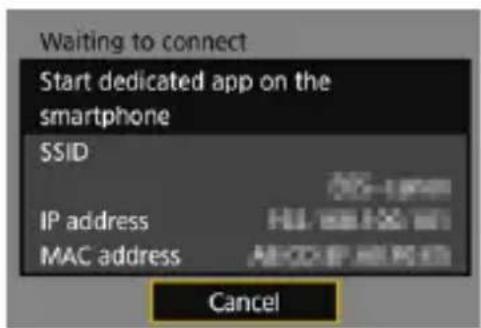
4 Operate the smartphone and connect it to the camera.
Activate the smartphone's Wi-Fi function, then select the SSID (network name) displayed on the camera's LCD monitor.
For the password, enter the encryption key displayed on the camera's LCD monitor.
Camera's screen
SSID (network name)
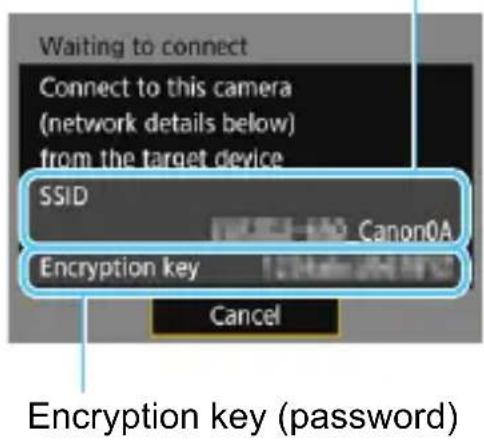

When connecting by selecting [Easy connection], “_Canon0A” is displayed at the end of the SSID.

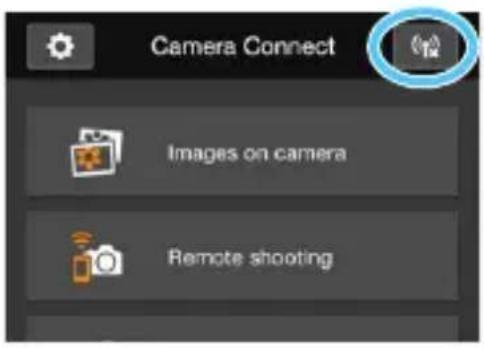
5 Start Camera Connect on the smartphone.
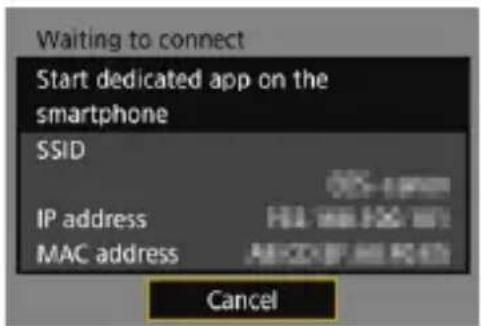
- When the [Waiting to connect] screen is displayed on the camera's LCD monitor, start Camera Connect on the smartphone.
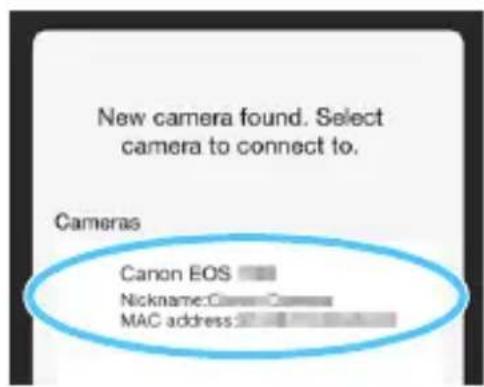
6 Select the camera to connect to on the smartphone.
- Select and tap on the camera to connect to from [Cameras] on Camera Connect.
Operation on the Camera-2
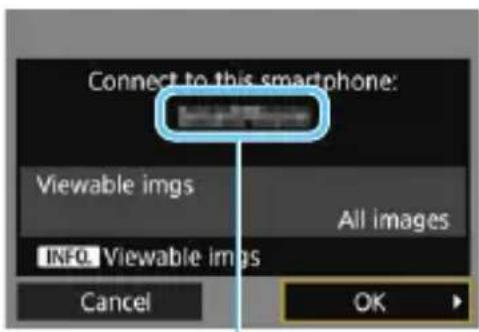
The device name set on Camera Connect
7 Connect to the camera.
- When a connection is established, the screen on the left will appear on the camera's LCD monitor.
To specify viewable images, press the button. See step 5 on page 57 to set them.
- Select [OK] and press .
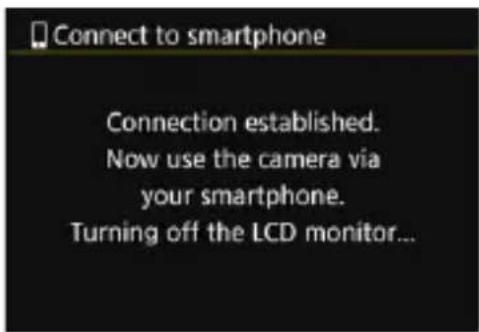
After a message is displayed, the camera's LCD monitor will turn off. The LCD panel will also turn off and the camera's buttons and dials will be disabled.
The main window of Camera Connect will be displayed on the smartphone.
The settings for connecting to a smartphone are now complete. For operations after setting up a connection, see page 53.

- You can check or change the device name on the setting screen of Camera Connect.
While connected, the camera's auto power off does not function.
MEMO
3
Easy Connection to EOS Utility
This section explains how to connect the camera directly to a computer.
- Install EOS Utility on the computer before setting up a connection.
- To connect using a Wi-Fi access point or connect manually in camera access point mode, see “Advanced Connection” (p.33).

Settings may be disabled when an older version of software is used. Install a version of EOS Utility that is compatible with this camera.
Connecting with [Easy connection]
The camera and a computer can be directly connected wirelessly.
To establish a connection, operations on the computer are required. For details, refer to the computer's instruction manual.
- The configuration procedure is as follows, using Windows 8.1 as an example.
Operation on the Camera-1

1 Select [Wi-Fi function].
Under the [3] tab, select [Wi-Fi function], then press .
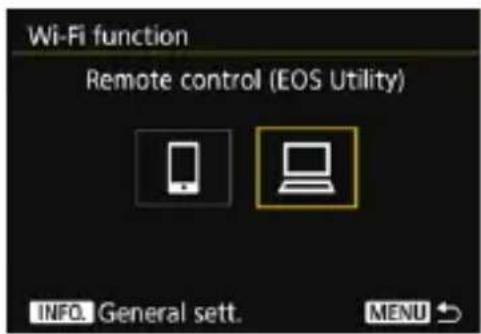
2 Select [☐] (Remote control (EOS Utility)).
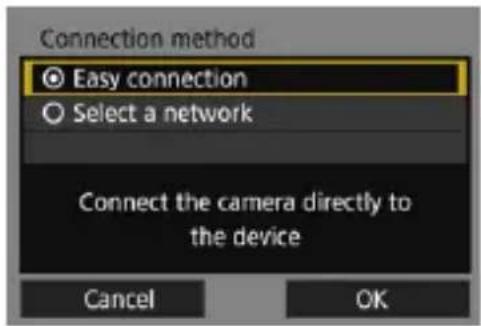
3 Select [Easy connection].
- Select [OK] and press to go to the next screen.
Operation on the Computer-1
Computer's screen (sample)

4 Operate the computer and connect it to the camera.
In the wireless settings of the computer to be used, select the SSID (network name) displayed on the camera's LCD monitor.
For the password, enter the encryption key displayed on the camera's LCD monitor.
Camera's screen
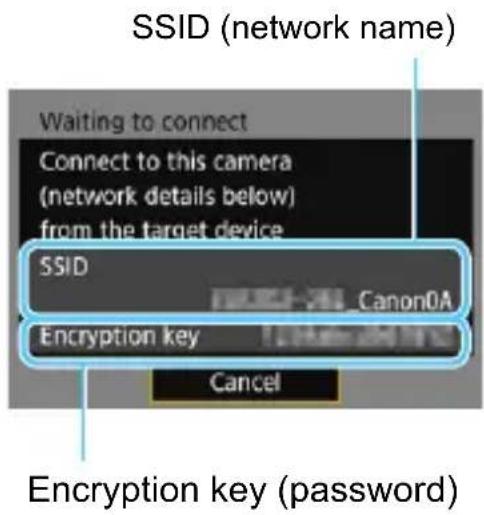

When connecting by selecting [Easy connection], “_Canon0A” is displayed at the end of the SSID.
Operation on the Camera-2
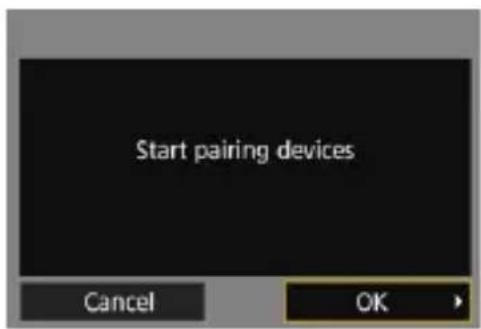
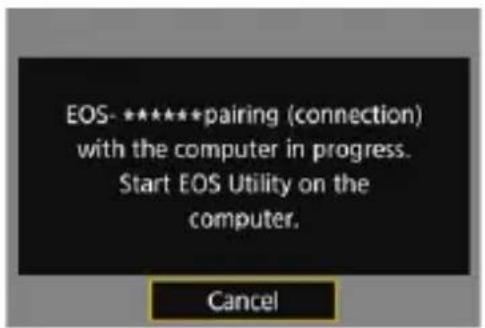
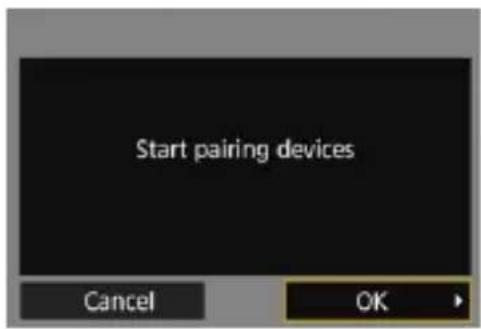
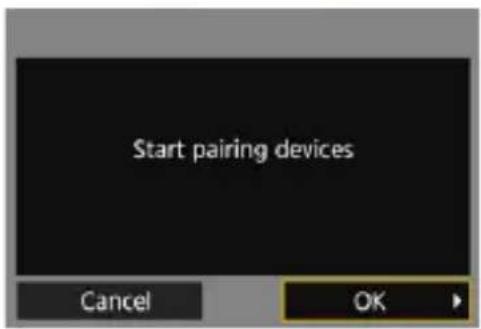
5 Select [OK].
- Select [OK] and press < SET> . The following message is displayed. "*******" represents the last six digits of the MAC address of the W-E1.
Operation on the Computer-2
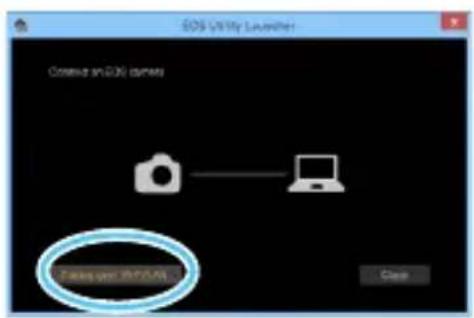
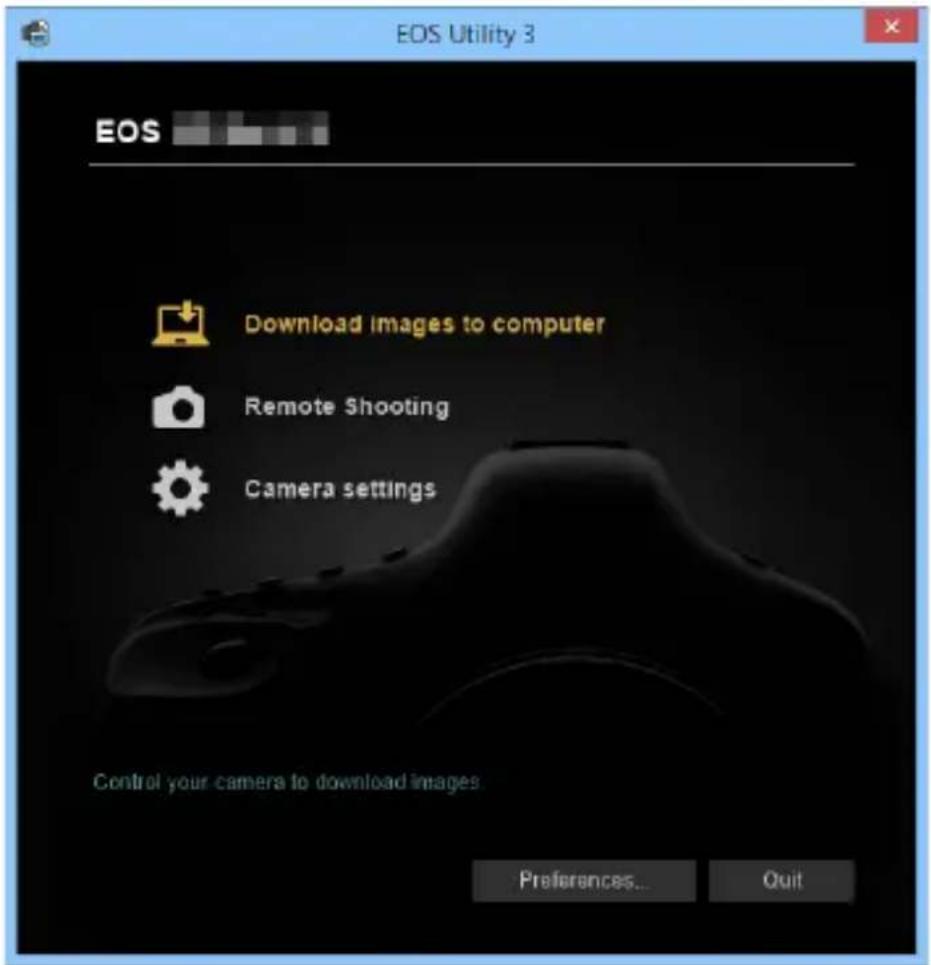
6 Start EOS Utility on the computer.
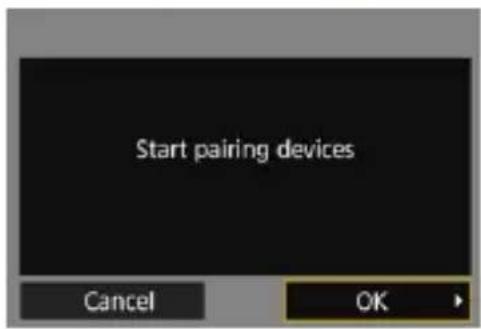
7 In EOS Utility, click [Pairing over Wi-Fi/LAN].
If a firewall-related message is displayed, select [Yes].

8 Click [Connect].
- Select the camera to connect to, then click [Connect].
Operation on the Camera-3
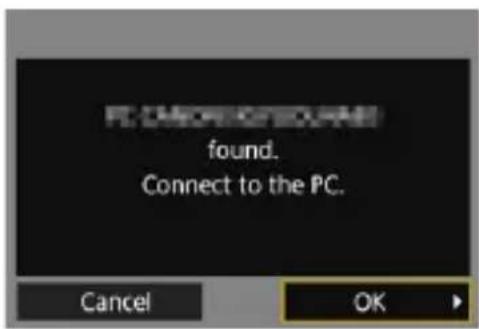

Connect to the camera.
- When the camera detects the computer on which you clicked [Connect] in step 8, the screen on the left is displayed.
- Select [OK] and press . The [Wi-Fi on] screen will appear.
To return to the menu, press the
- Communicating with a smartphone
- Operating remotely using EOS Utility
Checking the Type of Access Point
To start with, check if the access point supports WPS* that allows easy connection between Wi-Fi devices.
If you do not know if the access point you use is WPS-compatible, refer to the access point instruction manual or other documentation.
* Wi-Fi Protected Setup
- When WPS is supported
The following two connection methods are available. Connection can be established easier with WPS (PBC mode).
- Connecting via WPS (PBC mode): Perform the operations described on page 37.
- Connecting via WPS (PIN mode): Perform the operations described on page 41.
- When WPS is not supported
- Connecting to a detected network manually: Perform the operations described on page 45.
Access Point Encryption
This camera supports the following options for [Authentication] and [Encryption settings]. Therefore, when connecting to a detected network manually, the encryption used by the access point must be one of the following.
- [Authentication]: Open system, Shared key, or WPA/WPA2-PSK
• [Encryption settings]: WEP, TKIP, or AES

- If stealth functions of the access point are active, connection may be disabled. Deactivate stealth functions.
- When connecting to a network that has a network administrator, ask the administrator about the detailed setting procedures.

If the network you use filters by MAC address, register the MAC address of the W-E1 at the access point. The MAC address can be checked on the [General sett.] screen (p.72).
Connecting via WPS (PBC Mode)
This is a connection mode available when using an access point compatible with WPS. In pushbutton connection mode (PBC mode), the camera and the access point can be connected simply by pressing the WPS button on the access point.
If multiple access points are active in the surrounding area, it may be more difficult to establish a connection. In such a case, try using [WPS (PIN mode)] to establish a connection.
- Check the position of the WPS button on the access point in advance.
It may take approx. one minute to establish a connection.
1 Select [Wi-Fi function].
Under the [3] tab, select [Wi-Fi function], then press .

Select an item.
- Use <> or <> to select an item, then press < T> .
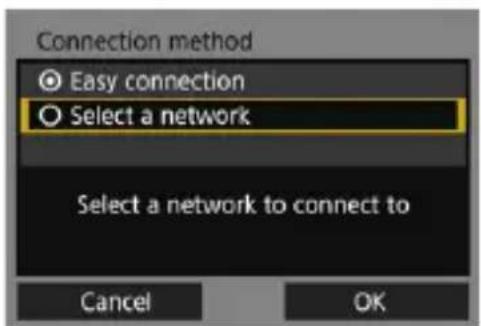
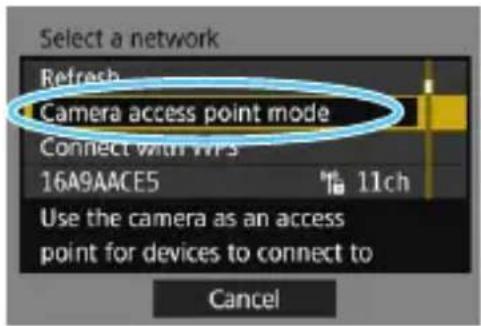
3 Select [Select a network].
- Select [OK] and press to go to the next screen.
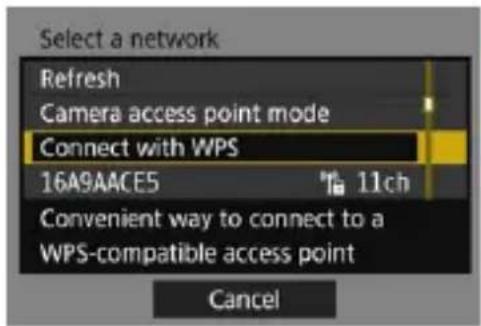
4 Select [Connect with WPS].
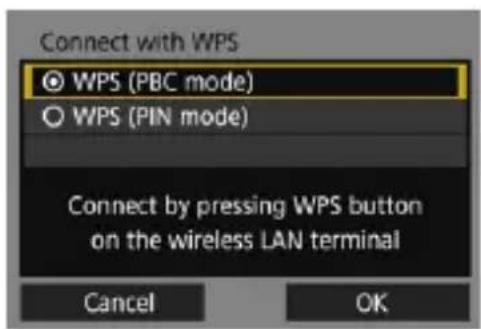
5 Select [WPS (PBC mode)].
- Select [OK] and press < SET> to go to the next screen.
![WPS Press WPS button of wireless LAN terminal. Connection starts after you press [OK]. Cancel OK](/content/2026/05/812798/images/9fbf7ac6b9be959bec75e5c623480f9675b328d4e51f5a94a52056147978b00f.jpg)
6 Connect to the access point.
- Press the access point's WPS button. For details about where the button is located and how long to press it, refer to the access point's instruction manual.
- Select [OK] and press < SET> to establish a connection with the access point.
When a connection with the access point is established, the next screen is displayed.

For [Camera access point mode] displayed in step 4, see page 50.
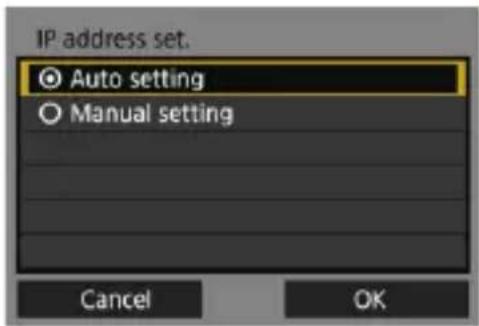
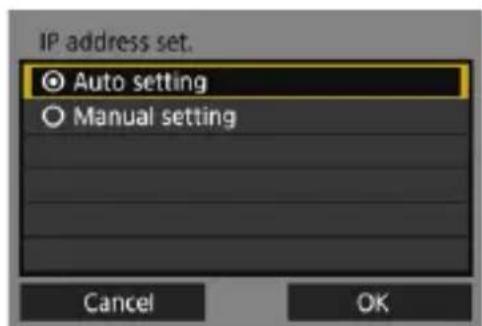
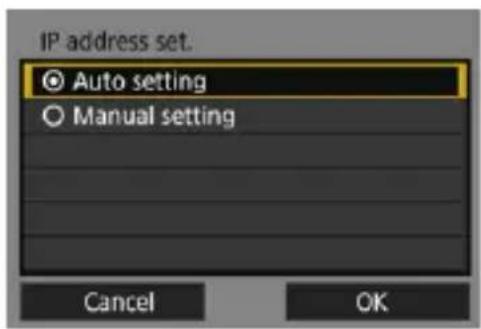
7 Select [Auto setting].
- Select [OK] and press < SET> to display the setting screen for the Wi-Fi function selected in step 2 (p.40).
- If [Auto setting] results in an error or if you want to specify the settings manually, see page 92.
![CANON W-E1 - Select [Auto setting]. - 1](/content/2026/05/812798/images/2d93ab92de38cec70f8e0591b9a89e6cf5d97d00865e56e8b9e806c3d3c1d2cd.jpg)
The IP address can only be set automatically in environments using DHCP servers, or access points or routers with DHCP server functionality, such that the IP addresses, etc. are required to be assigned automatically.
Specifying Settings for the Wi-Fi Function
This section explains how to set the screens for the Wi-Fi function. Read the page that introduces the selected Wi-Fi function.
Communicating with a Smartphone
Step 6 on page 24
Operating Remotely Using EOS Utility
Step 6 on page 30
Connecting via WPS (PIN Mode)
This is a connection mode available when using an access point compatible with WPS. In PIN code connection mode (PIN mode), an 8-digit identification number specified on the camera is set at the access point to establish a connection.
Even if there are multiple access points active in the surrounding area, a relatively reliable connection can be established using this shared identification number.
It may take approx. one minute to establish a connection.
1 Select [Wi-Fi function].
Under the [3] tab, select [Wi-Fi function], then press .

2 Select an item.
- Use <> or <> to select an item, then press < T> .
3 Select [Select a network].
- Select [OK] and press to go to the next screen.
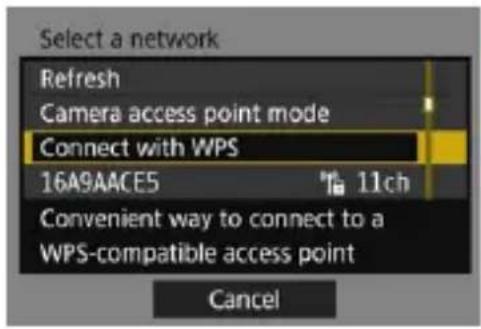
4 Select [Connect with WPS].

5 Select [WPS (PIN mode)].
- Select [OK] and press < SET> to go to the next screen.
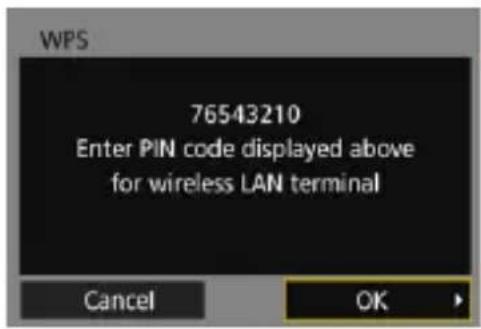
6 Specify the PIN code at the access point.
At the access point, specify the 8-digit PIN code displayed on the camera's LCD monitor.
For instructions on setting PIN codes at the access point, refer to the access point's instruction manual.
After the PIN code is specified, select [OK] and press < SET> .

For [Camera access point mode] displayed in step 4, see page 50.
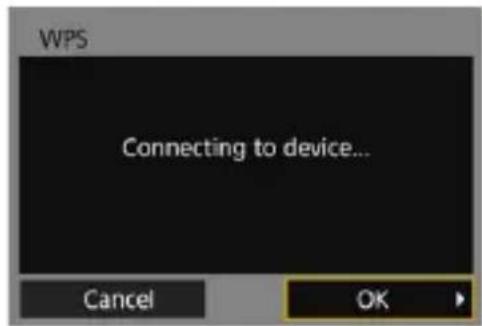
7 Connect to the access point.
- Select [OK] and press < SET> to establish a connection with the access point.
When a connection with the access point is established, the next screen is displayed.
8 Select [Auto setting].
- Select [OK] and press < SET> to display the setting screen for the Wi-Fi function selected in step 2 (p.44).
- If [Auto setting] results in an error or if you want to specify the settings manually, see page 92.
![CANON W-E1 - Select [Auto setting]. - 1](/content/2026/05/812798/images/1ff3b0f0f620c3966e9109016eddd2e68544b3da4a3a969d40d15946fad230a6.jpg)
The IP address can only be set automatically in environments using DHCP servers, or access points or routers with DHCP server functionality, such that the IP addresses, etc. are required to be assigned automatically.
Specifying Settings for the Wi-Fi Function
This section explains how to set the screens for the Wi-Fi function. Read the page that introduces the selected Wi-Fi function.

Communicating with a Smartphone
Step 6 on page 24
Operating Remotely Using EOS Utility
Step 6 on page 30
Connecting to a Detected Network Manually
Establish a connection by selecting the SSID (or ESS-ID) of the access point to connect to from a list of active access points nearby.
Selecting the Access Point
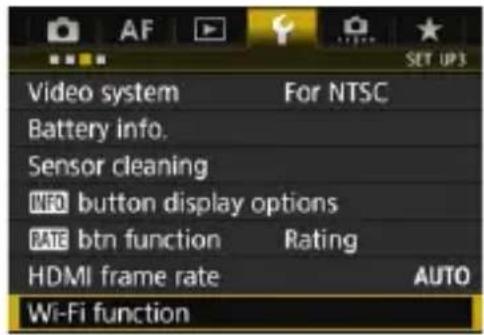
1 Select [Wi-Fi function].
Under the [⚡3] tab, select [Wi-Fi function], then press .

2 Select an item.
- Use <> or <> to select an item, then press <SET> .
3 Select [Select a network].
- Select [OK] and press to go to the next screen.
(1) (2) (3)
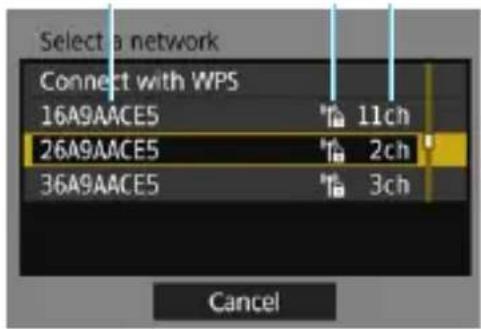
4 Select an access point.
- Use <◆> to select the access point to connect to from the list of access points.
(1) SSID
(2) An icon is displayed if the access point is encrypted
(3) Channel used
[Refresh] and [Manual settings]
- Scroll down the screen in step 4 to display [Refresh] and [Manual settings].
To search for access points again, select [Refresh].
- To configure settings for the access point manually, select [Manual settings]. Enter the SSID using the virtual keyboard and then configure settings following the instructions displayed.
![CANON W-E1 - [Refresh] and [Manual settings] - 1](/content/2026/05/812798/images/f19ff64e34922cc1c00e48ad32d33a227dad2cb50c88a93cc065642ecf7be20b.jpg)
For [Camera access point mode] displayed in step 4, see page 50.
Entering the Access Point Encryption Key
- Enter the encryption key (password) specified for the access point. For details on the specified encryption key, refer to the access point's instruction manual.
The screens displayed in steps 5 to 7 below vary depending on the authentication and encryption specified for the access point.
- Go to step 8 when the [IP address set.] screen is displayed instead of the screens for steps 5 to 7.
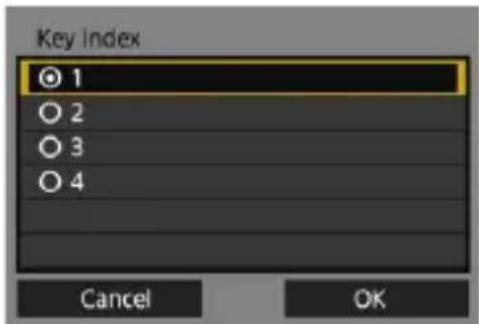
5 Select a key index.
The [Key index] screen is displayed only if WEP encryption is used by the access point.
- Select the key index number specified for the access point, then press < SET> .
- Select [OK] and press to go to the next screen.
- Select [OK] and press to go to the next screen.
![.@-_/:!?()[]<>0123456789 abcdefghijklmnopqrstuvwxyz ABCDEFGHIJKLMNOPQRSTUVWXYZ *#, +=$%&"{}\-|^_ INFO. Cancel MENU OK](/content/2026/05/812798/images/2d72ed72cbde6d5930966b5e28788fb71d7c97248000902e5376fa606bdd54c4.jpg)
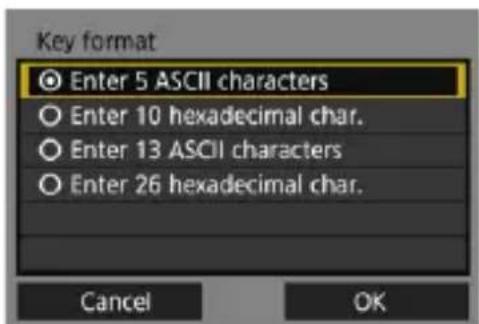
7 Enter the encryption key.
- Enter the encryption key using the virtual keyboard (p.15), then press the
Setting the IP Address
8
Select [Auto setting].
- Select [OK] and press < SET> to display the setting screen for the Wi-Fi function selected in step 2 (p.49).
If [Auto setting] results in an error or if you want to specify the settings manually, see page 92.
![CANON W-E1 - Select [Auto setting]. - 1](/content/2026/05/812798/images/13f2ac41be50f4b2c7aecfced42ece385be2cd35305fe81817d76fc2a1e4d9ad.jpg)
The IP address can only be set automatically in environments using DHCP servers, or access points or routers with DHCP server functionality, such that the IP addresses, etc. are required to be assigned automatically.
Specifying Settings for the Wi-Fi Function
This section explains how to set the screens for the Wi-Fi function. Read the page that introduces the selected Wi-Fi function.
Communicating with a Smartphone
Step 6 on page 24
Operating Remotely Using EOS Utility
Step 6 on page 30
Camera Access Point Mode
Camera access point mode is a connection mode for connecting the camera directly to each device.
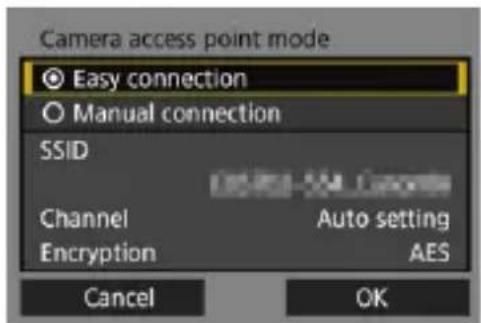
In camera access point mode, the following two connection methods are available.
[Easy connection]: See “Easy Connection” (p.19) to establish a connection.
[Manual connection]: See page 90 to establish a connection.
When Connected
This section explains how to use the camera after a connection is established.
See the following pages according to your needs.
Communicating with a Smartphone
Operating the Camera Using a Smartphone ......p.54
Specifying Viewable Images ......p.56
- Operating Remotely Using EOS Utility
Using EOS Utility ......p.60
Reconnecting and Adding Settings
Reconnecting....p.64
Registering Multiple Connection Settings ......p.66
- Checking and Operating Connection Settings
Checking, Changing, or Deleting Connection Settings......p.68
Clearing Wi-Fi Function Settings ......p.71
5
Communicating with a Smartphone
Communicating with a smartphone enables you to perform the following:
- View images stored in the camera on a smartphone or save viewed images to a smartphone.
- Operate the camera to take a picture or change camera settings using a smartphone.
Operating the Camera Using a Smartphone
You can use a smartphone with Camera Connect installed to view images stored in the camera or perform remote shooting, etc.
Camera Connect Main Window
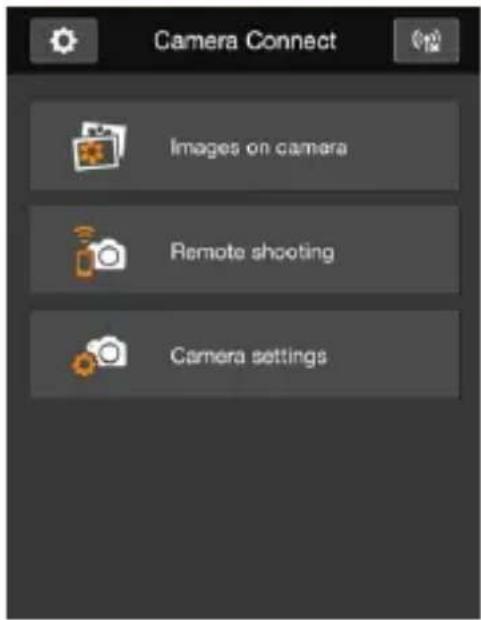
The main functions of Camera Connect are described below. Touch the screen to learn the operation procedures.
[Images on camera]
Images stored in the camera can be viewed.
Images stored in the camera can be saved on a smartphone.
Operations such as erasure can be performed on images stored in the camera.
[Remote shooting]
The camera's Live View image can be viewed using a smartphone.
- You can shoot using remote operation.
[Camera settings]
- Camera settings can be changed.
- Use this button to access various settings for Camera Connect.
Terminating the Connection
To terminate the connection, perform the following operations.
- On the smartphone's Camera Connect screen, tap [(p)]
- Set the camera's power to .

While connected, a picture cannot be taken even if the camera's shutter button is pressed.
While connected, movie shooting is not possible.
In remote shooting, the AF speed may become slower.
- Depending on the transmission range and connection status, image display may be delayed, images may not be displayed smoothly, or shutter release timing may be delayed.

The connection will also be terminated if you operate the Live View shooting/Movie shooting switch, turn the Mode Dial, or open the card slot cover or battery compartment cover.
- When saving RAW images to a smartphone, they are saved as JPEG images.
While connected, the camera's auto power off does not function.
While connected, disabling the smartphone's power saving function is recommended.
Specifying Viewable Images
You can specify images viewable on a smartphone by operating the camera. Images can be specified during connection setup or after the connection is terminated.

1 Select [Wi-Fi function].
Under the [3] tab, select [Wi-Fi function], then press .
2 Select [☐].
3 Select [Review/change settings].
4 Select [Viewable imgs].
![CANON W-E1 - Select [Viewable imgs]. - 1](/content/2026/05/812798/images/6f156e6930c261ef0f70d4e30b29e685b4f4ecdd1158d6aa390be9643e60eb0b.jpg)
If [Viewable imgs] is set to any setting other than [All images], remote shooting is not possible.
![CANON W-E1 - Select [Viewable imgs]. - 2](/content/2026/05/812798/images/565add6f8a2eeda7d09eb66b238ae22598c04e51426cdd8ae9d853622d9ef7aa.jpg)
When reconnecting to a smartphone, check the settings of viewable images before establishing a connection.
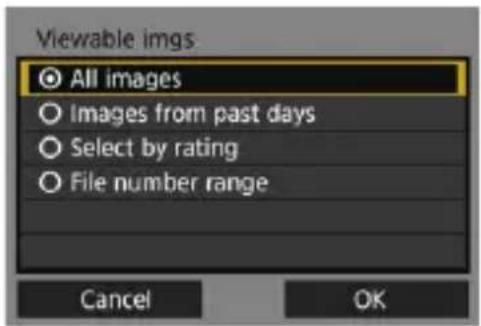
5 Select an item.
- Select [OK] and press to display the setting screen.
[All images]
All images stored on the card become viewable.
[Images from past days]
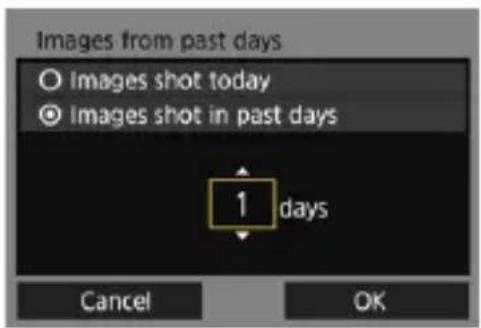
Specify viewable images on the shooting-date basis. Images shot up to nine days ago can be specified.
- Select an item, then press < SET> .
- When [Images shot in past days] is selected, images shot up to the specified number of days before the current date become viewable. When <> is shown for the number of days, use <> to specify the number of days, then press <> to complete the selection.
- Select [OK] and press < SET> to specify the viewable images.
[Select by rating]
![★Select by rating ★All 25 [·] 5 [·] 0 [·:] 12 [·:] 8 [·:] 0 OFF 18](/content/2026/05/812798/images/4572142ff3f4cf4567660d6296432c3f86abedd724d8aa3c6d7da24193808cd1.jpg)
Specify viewable images depending on whether a rating is appended (or not appended) or by the type of rating.
- Select a rating, then press < SET> to specify the viewable images.
[File number range] (Select range)
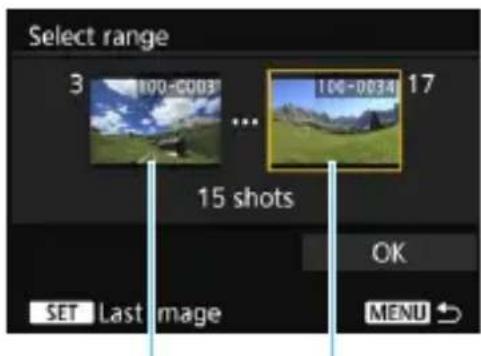
First image Last image
Select the first and last images from images arranged by the file number to specify the viewable images.
1 Use <○> or <◆> to select the first image file.
2 Press < SET> to display the image selection screen.
Use <○> to select an image.
By pressing the button and turning the <☀> dial counterclockwise, you can select an image from the index display.
3 Select an image and press < SET> to complete the selection.
4 Use the same operation to specify the last image file to be set as viewable. Select an image shot later than the image selected as the first image.
5 When the first and last images are specified, select [OK], then press .
6
Operating Remotely Using EOS Utility
You can perform remote operation using EOS Utility wirelessly. In addition to remote shooting, various camera operations are available because wireless communications are used instead of an interface cable.
Using EOS Utility
For EOS Utility instructions, refer to the EOS Utility Instruction Manual. In addition to remote shooting, various camera operations are available. For how to obtain the EOS Utility Instruction Manual, refer to the Camera Instruction Manual.
Terminating the Connection
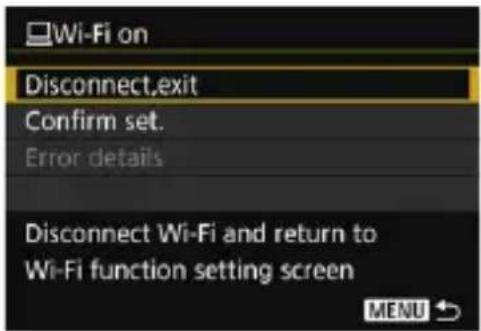
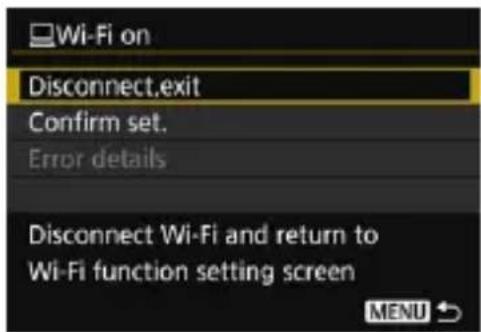
On the [☐ Wi-Fi on] screen, select [Disconnect,exit].
- If the [☐ Wi-Fi on] screen is not displayed, select [Wi-Fi function] under the [¶3] tab.
- Select [Disconnect,exit], then select [OK] on the confirmation dialog to terminate the connection.
![CANON W-E1 - On the [☐ Wi-Fi on] screen, select [Disconnect,exit]. - 1](/content/2026/05/812798/images/686693e92235bcd76fe86321dde222c8b135603e1bb438682ddef34d14e3411b.jpg)
While connected, movie shooting is not possible.
While connected, the following operations cannot be performed: Multiple exposures, interval timer, RAW image processing, resizing, movie editing, image transfer by camera operation, cropping (EOS 5DS, EOS 5DS R)
In remote shooting, the AF speed may become slower.
- Depending on the transmission range and connection status, image display may be delayed, images may not be displayed smoothly, or shutter release timing may be delayed.
In Remote Live View shooting, the rate of image transmission is slower compared to a connection via an interface cable. Therefore, moving subjects cannot be displayed smoothly.
While connected, battery power is consumed. If you will not use the wireless communication functions for a prolonged period, terminate the connection.
![CANON W-E1 - On the [☐ Wi-Fi on] screen, select [Disconnect,exit]. - 2](/content/2026/05/812798/images/f411503834f55b978a686b7715d9f10fb5bc30629e4c6f3ccbac572aa83c3e70.jpg)
The wireless connection will also be terminated if you set the camera's power to or open the card slot cover or battery compartment cover.
If the camera's auto power off is activated while connected, the connection will be terminated. If necessary, set [¶2: Auto power off] to [Disable]. To continue to use EOS Utility, perform the reconnection procedure (p.64).
MEMO
7
Reconnecting and Adding Settings
This section explains how to reconnect the camera to the device for which you set up a connection and how to register multiple connection settings.
Reconnecting
The camera can reconnect to a Wi-Fi function for which connection settings is already registered.
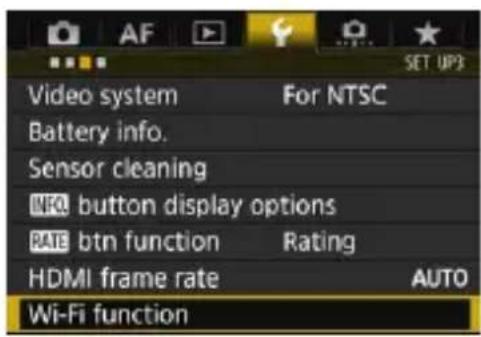
1 Select [Wi-Fi function].
Under the [3] tab, select [Wi-Fi function], then press .
2 Select the Wi-Fi function to connect to.
- Use <> or <> to select an item, then press < T> .
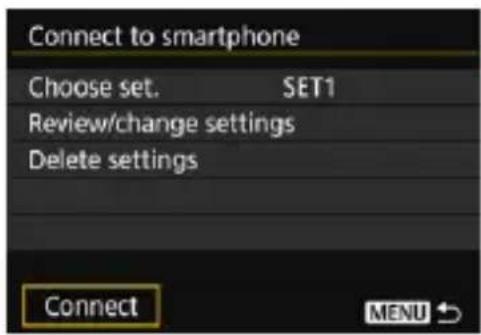
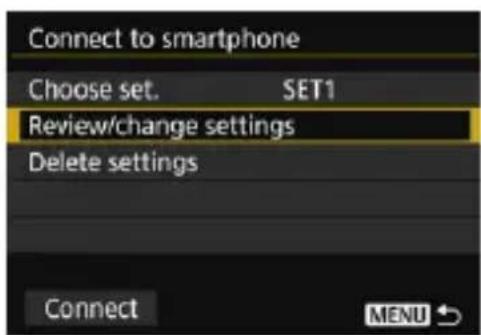
3 Select [Connect].
- When settings for multiple connection destinations are registered, select [Choose set.], select the connection destination, then connect to the destination.
- Select [OK] on the confirmation dialog.
4 Operate the connected device.
Smartphone
Activate the smartphone's Wi-Fi function, then start Camera Connect.
If the smartphone's connection destination has been changed, restore the setting to connect to the camera or the same access point as the camera.
EOS Utility
- Start EOS Utility on the computer.
If the computer's connection destination has been changed, restore the setting to connect to the camera or the same access point as the camera.

- If you do not know the SSID of the destination when reconnecting, select [Review/change settings] → [Confirm set.] on the screen for step 3 to check it (p.69).
- When connecting by selecting [Easy connection], “_Canon0A” is displayed at the end of the SSID.
Registering Multiple Connection Settings
You can register up to three connection settings for each Wi-Fi function.
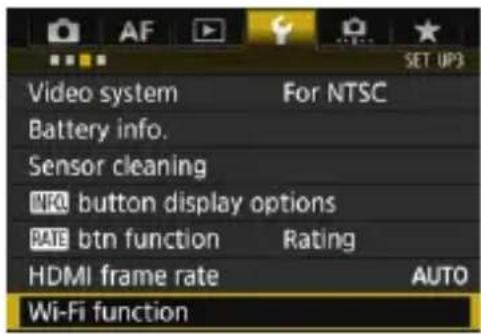
1 Select [Wi-Fi function].
Under the [3] tab, select [Wi-Fi function], then press .
2 Select the Wi-Fi function to connect to.
- Use <> or <> to select an item, then press < T> .
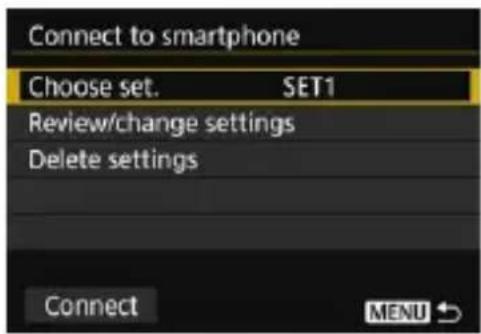
3 Select [Choose set.].
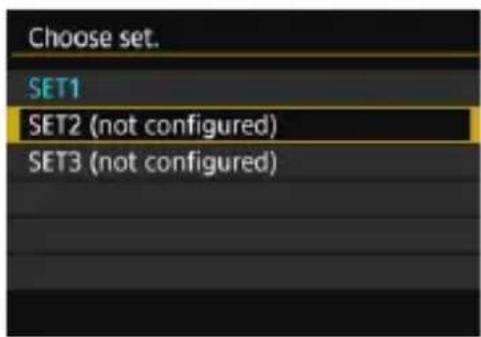
The connection settings screen is displayed. Follow the procedures displayed to complete the connection settings.
![CANON W-E1 - Select [SET\* (not configured)]. - 1](/content/2026/05/812798/images/9384a874f6e030a76b7e8e6c7f87055c58daa496fac7df9b8e826860d60da58a.jpg)
To delete settings, see page 70.
8
Checking and Operating Connection Settings
This section explains how to check or change the connection settings, delete the settings, clear the wireless function settings, etc.
Checking, Changing, or Deleting Connection Settings
Check, change, or delete connection settings saved on the camera. To change or delete the settings, terminate the connection first.

1 Select [Wi-Fi function].
Under the [3] tab, select [Wi-Fi function], then press .
2 Select the item to check settings for.
- Use <> or <> to select an item, then press <> .
- When you select an item for which no setting is saved, the connection settings screen is displayed.
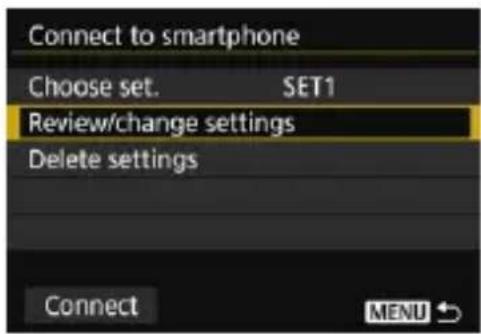
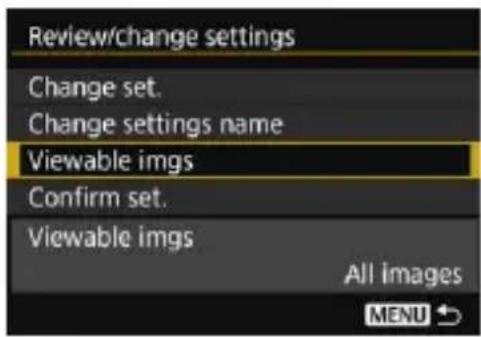
3 Select [Review/change settings].
- Select the connection destination on the [Choose set.] screen, select [Review/change settings], then press .
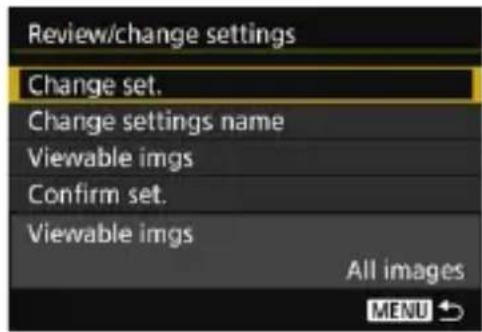
4 Check or change the settings.
- Select an item and press < SET> , then check or change the settings on the displayed screen.
[Change set.]
Change the settings. When [Change set.] is selected, a screen for connection settings configuration appears. Configure connection settings again following the procedures displayed.
[Change settings name]
Change the name of the settings. Select [Change settings name], then enter the name of the settings using the virtual keyboard (p.15).
[Viewable imgs] (p.56)
Displayed when [☐] (Connect to smartphone) is selected. Settings will appear at the bottom of the screen.
[Confirm set.]
Check the settings. When you select [Confirm set.], the settings will be displayed.
Deleting Settings
Select [Delete settings] on the following screen to delete connection settings saved on the camera.
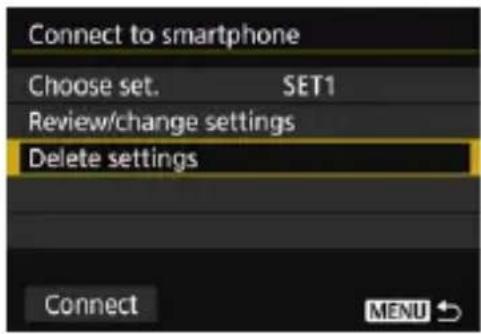
1 Select [Delete settings].
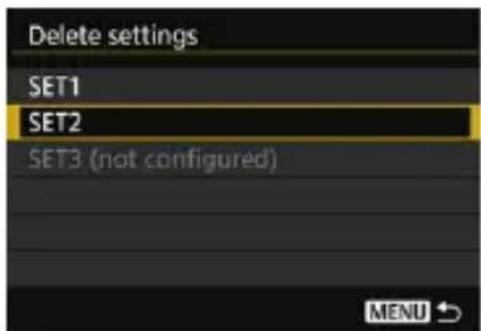
Select the setting to delete.
- Select [OK] on the confirmation dialog to delete the setting.
During a Connection
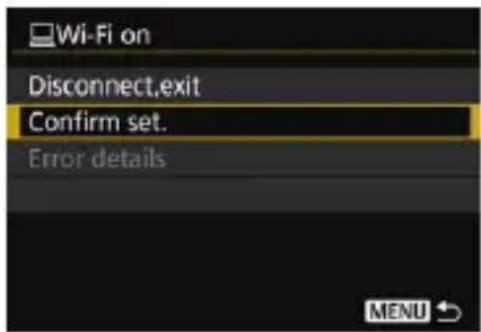
When the [Wi-Fi on] screen is displayed during a wireless connection, select [Confirm set.] to check the settings.
Clearing Wi-Fi Function Settings
All Wi-Fi function settings can be deleted. By deleting the Wi-Fi function settings, you can prevent them from being exposed when you lend or give your W-E1 to other people.

1 Select [Wi-Fi function].
Under the [⚡3] tab, select [Wi-Fi function], then press .
The [General sett.] screen is displayed.
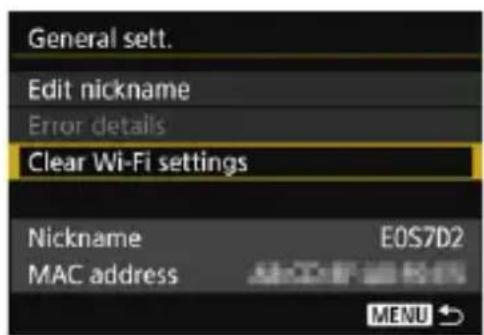
3 Select [Clear Wi-Fi settings].
- Select [Clear Wi-Fi settings], then press .
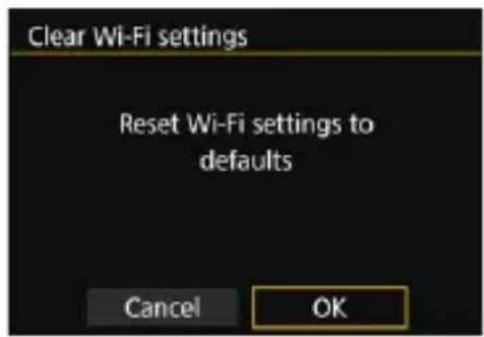
4. Select [OK].
Wi-Fi settings are cleared and the menu screen will reappear.
![CANON W-E1 - Select [OK]. - 1](/content/2026/05/812798/images/e4716b834acca6dcbc242725ff00fb2eeb8aebe5ef22ea423ab5cc8b997b1446.jpg)
Performing [4: Clear all camera settings] does not clear settings to defaults for [Wi-Fi function].
General Settings Screen
On the [General sett.] screen displayed in step 3 on the preceding page, you can change or check the wireless LAN settings.
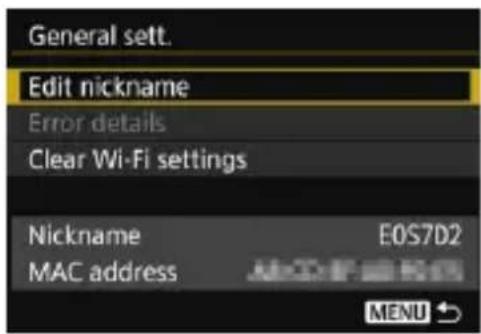
[Edit nickname]
Change the nickname. Select [Edit nickname], then enter the nickname using the virtual keyboard (p.15).
[Error details]
Selectable when a connection error has occurred. When you select [Error details], you can check the connection error content (p.76).
[Clear Wi-Fi settings] (p.71)
Delete all wireless LAN settings.
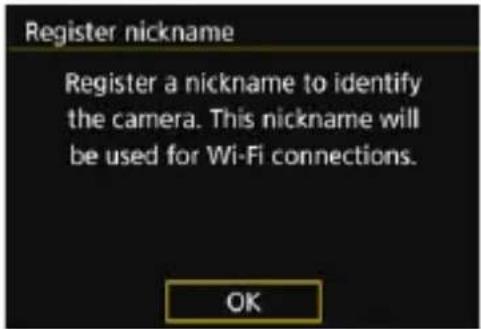
[Nickname]
The nickname set for the camera can be checked.
[MAC address]
The MAC address of the camera can be checked.
![CANON W-E1 - [MAC address] - 1](/content/2026/05/812798/images/8e2767894989b51ff353394e8cbe0411f27522ca918019c5179a59ec0a6cb23e.jpg)
Since the nickname is necessary for Wi-Fi settings, you cannot delete all the characters in [Edit nickname].
Reference
MEMO
9
Troubleshooting Guide
Responding to Error Messages
When a connection error occurs, display the details of the error by following one of the procedures below. Then, eliminate the cause of the error referring to the examples shown in this chapter.
- Select [Error details] on the [General sett.] screen, then press < > (p.72).
- Select [Error details] on the [Wi-Fi on] screen, then press .
Click the error code number's page in the following chart to jump to the corresponding page.
| 11 (p.77) 12 (p.77) | |
| 21 (p.78) 23 (p.79) |
| 61 (p.80) 63 (p.81) 64 (p.81) 65 | (p.82) 66 (p.82) | | |
| 67 (p.82) 68 (p.83) 69 (p.83) | | |
| 91 (p.83) | |

When an error occurs, [Err**] is displayed on the upper right of the [Error details] screen. It disappears when the camera's power is set to .
11: Connection target not found
In the case of [☐], is Camera Connect running?
Establish a connection using Camera Connect (p.24).
In the case of [☐], is EOS Utility running?
Start EOS Utility and re-establish the connection (p.29).
Are the camera and the access point set to use the same encryption key for authentication?
This error occurs if the encryption keys do not match when the authentication method for encryption is set to [Open system]. The setting is case-sensitive, so check upper- and lower-case characters. Make sure that the correct encryption key for authentication is set on the camera (p.47).
12: Connection target not found
Is the power of the target device and access point on?
Turn on the target device and access point, then wait a while. If a connection still cannot be established, perform the procedures to establish the connection again.
- Is the camera too far from the target device or the antenna of the access point?
Bring the camera and the target device or the antenna of the access point closer together.
21: No address assigned by DHCP server
What to check on the camera
- On the camera, IP address is set to [Auto setting]. Is this the correct setting?
If no DHCP server is used, configure settings after setting the IP address to [Manual setting] on the camera (p.92).
What to check on the DHCP server
Is the power of the DHCP server on?
▶ Turn on the DHCP server.
Are there enough addresses for assignment by the DHCP server?
▶ Increase the number of addresses assigned by the DHCP server.
Remove devices assigned addresses by the DHCP server from the network to reduce the number of addresses in use.
Is the DHCP server working correctly?
▶ Check the DHCP server settings to make sure it is working correctly as a DHCP server.
If applicable, ask your network administrator to ensure the DHCP server is available.
23: Device with same IP address exists on selected network
What to check on the camera
- Is another device on the camera network using the same IP address as the camera?
Change the camera's IP address to avoid using the same address as another device on the network. Otherwise, change the IP address of the device that has a duplicate address.
If the camera's IP address is set to [Manual setting] in network environments using a DHCP server, change the setting to [Auto setting] (p.48).

Responding to Error Messages 21 - 23
Check also the following points when responding to errors numbered 21 - 23.
Are the camera and the access point set to use the same encryption key for authentication?
This error occurs if the encryption keys do not match when the authentication method for encryption is set to [Open system]. The setting is case-sensitive, so check upper- and lower-case characters. Make sure that the correct encryption key for authentication is set on the camera (p.47).
61: Selected SSID wireless LAN network not found
Are any obstacles blocking the line of sight between the camera and the antenna of the access point?
Move the antenna of the access point to a position clearly visible from the point of view of the camera (p.85).
Is the camera too far from the antenna of the access point?
Bring the camera and the antenna of the access point closer together.
What to check on the camera
- Does the SSID set on the camera match that of the access point?
Check the SSID at the access point, then set the same SSID on the camera (p.46).
What to check at the access point
Is the access point turned on?
▶ Turn on the power of the access point.
If filtering by MAC address is active, is the MAC address of the W-E1 used registered at the access point?
Register the MAC address of the W-E1 used at the access point. The MAC address can be checked on the [General sett.] screen (p.72).
63: Wireless LAN authentication failed
Are the camera and the access point set to use the same authentication method?
The camera supports the following authentication methods: [Open system], [Shared key], and [WPA/WPA2-PSK] (p.36).
Are the camera and the access point set to use the same encryption key for authentication?
The setting is case-sensitive, so check upper- and lower-case characters. Make sure that the correct encryption key for authentication is set on the camera (p.47).
If filtering by MAC address is active, is the MAC address of the W-E1 used registered at the access point?
Register the MAC address of the W-E1 used at the access point. The MAC address can be checked on the [General sett.] screen (p.72).
64: Cannot connect to wireless LAN terminal
Are the camera and the access point set to use the same encryption method?
The camera supports the following encryption methods: WEP, TKIP, and AES (p.36).
If filtering by MAC address is active, is the MAC address of the W-E1 used registered at the access point?
Register the MAC address of the W-E1 used at the access point. The MAC address can be checked on the [General sett.] screen (p.72).
65: Wireless LAN connection lost
Are any obstacles blocking the line of sight between the camera and the connected device or the antenna of the access point?
Move the antenna of the access point to a position clearly visible from the point of view of the camera (p.85).
- Is the camera too far from the connected device or the antenna of the access point?
Bring the camera and the connected device or the antenna of the access point closer together.
- The wireless connection was lost for some reason, and the connection cannot be restored.
The following are possible reasons: excessive access to the access point from other device, a microwave oven or similar appliance in use nearby (interfering with IEEE 802.11b/g/n (2.4 GHz band)), or influence of rain or high humidity (p.85).
66: Incorrect wireless LAN encryption key
Are the camera and the access point set to use the same encryption key for authentication?
The setting is case-sensitive, so check upper- and lower-case characters. Make sure that the correct encryption key for authentication is set on the camera (p.47).
67: Incorrect wireless LAN encryption method
Are the camera and the access point set to use the same encryption method?
The camera supports the following encryption methods: WEP, TKIP, and AES (p.36).
If filtering by MAC address is active, is the MAC address of the W-E1 used registered at the access point?
Register the MAC address of the W-E1 used at the access point. The MAC address can be checked on the [General sett.] screen (p.72).
68: Cannot connect to wireless LAN terminal. Retry from the beginning.
Did you hold down the access point's WPS (Wi-Fi Protected Setup) button for the specified period of time?
Hold down the WPS button for the period of time specified in the access point's instruction manual.
Are you trying to establish a connection near the access point?
Try establishing the connection when both devices are within reach of each other.
69: Multiple wireless LAN terminals have been found. Cannot connect. Retry from the beginning.
- Connection is in progress by other access points in Pushbutton Connection mode (PBC mode) of Wi-Fi Protected Setup (WPS).
▶ Wait a while before trying to establish the connection, or try to establish a connection in PIN code connection mode (PIN mode) (p.41).
91: Other error
A problem other than error code number 11 to 69 occurred.
Turn off and on the camera's power switch.
Troubleshooting Guide
If a problem occurs with the camera or W-E1, first refer to this Troubleshooting Guide. If this Troubleshooting Guide does not resolve the problem, contact the nearest Canon Service Center.
A device connected with an interface cable cannot be used.
- When the W-E1 is installed in the camera, you cannot use the camera by connecting it to Connect Station, a computer, a Wireless File Transmitter, a printer, or another device with a cable. Remove the W-E1 from the camera before connecting a cable.
Operations such as shooting and playback are not possible.
- Operations such as shooting and playback may not be possible during a wireless LAN connection. Terminate the connection, then perform the operation.
Cannot reconnect to a smartphone.
Even with a combination of the same camera and smartphone, if you have changed the settings or selected a different setting, reconnection may not be established even after selecting the same SSID. In such a case, delete the camera connection settings from the Wi-Fi settings on the smartphone and set up a connection again.
- If Camera Connect is left running while setting up a connection again, the connection may not be established. In such a case, restart Camera Connect.
Wireless Function Notes
If the transmission rate drops, the connection is lost, images are not displayed smoothly, or other problems occur when using the wireless functions, try the following corrective actions.
Distance Between the Camera and the Connected Device or the Antenna of the Access Point
- When using indoors, install the antenna of the access point in the room where you are using the camera.
- Do not let people or objects come between the camera and the connected device or the antenna of the access point.
If the camera's grip is covered by your hand, the wireless communication speed may decrease or the wireless communication may be terminated. It is recommended to shoot with the camera fixed to a tripod.
Nearby Electronic Devices
If the transmission rate of a wireless LAN drops because of the influence of the following electronic devices, stop using them or move further away from the devices to transmit communication.
The camera communicates over wireless LANs via IEEE 802.11b/g/n using radio waves in the 2.4 GHz band. For this reason, the wireless LAN transmission rate will drop if there are Bluetooth devices, microwave ovens, cordless telephones, microphones, smartphones, other cameras, or similar devices operating on the same frequency band nearby.
Notes for Using Multiple Cameras
- When connecting multiple cameras to one access point, make sure the cameras' IP addresses are different.
- When multiple cameras are connected to one access point, the transmission rate drops.
- When there are multiple IEEE 802.11b/g/n (2.4 GHz band) access points, leave a gap of four channels between each wireless LAN channel to reduce radio wave interference. For example, use channels 1, 6, and 11, channels 2 and 7, or channels 3 and 8.
Security
If security settings have not been properly set, the following problems may occur.
- Transmission monitoring
Third parties with malicious intent may monitor the wireless LAN transmissions and attempt to acquire the data you are sending.
- Unauthorized network access
Third parties with malicious intent may gain unauthorized access to the network you are using to steal, modify, or destroy information. Additionally, you could fall victim to other types of unauthorized access such as impersonation (where someone assumes an identity to gain access to unauthorized information) or springboard attacks (where someone gains unauthorized access to your network as a springboard to cover their tracks when infiltrating other systems).
It is recommended to thoroughly secure your network to prevent these types of problems from occurring.
Checking Network Settings
Windows
Open the Windows [Command Prompt], then type ipconfig/all and press the key.
The IP address assigned to the computer is displayed and so as the subnet mask, gateway, and DNS server information.
Mac OS
In Mac OS X, open the [Terminal] application, enter ifconfig -a, and press the key. The IP address assigned to the computer is indicated in the [en0] item next to [inet], in the format “***.***.***.***”.
* For information about the [Terminal] application, refer to the Mac OS X help.
To avoid using the same IP address for the computer and other devices on the network, change the rightmost number when setting the IP address assigned to the camera in the processes described on page 92.
Example: 192.168.1.10
MEMO
10
Reference
Setting up the Network Manually
You can set up the network settings for the camera access point mode manually. [SSID], [Channel setting], and [Encryption settings] can be set on each screen displayed.
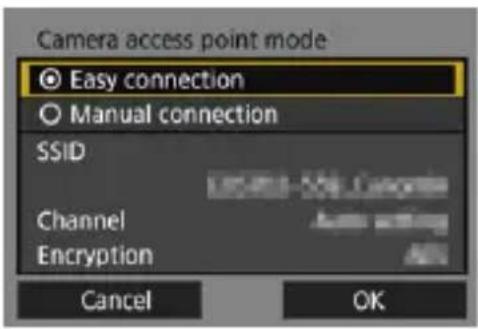
1 Select [Manual connection].
- Select [OK] and press < SET> to go to the next screen.
![.@-_/::!?()[]<>0123456789 abcdefghijklmnopqrstuvwxyz ABCDEFGHIJKLMNOPQRSTUVWXYZ *#, +=$%&'{}\~|^' INFO. Cancel MENU OK](/content/2026/05/812798/images/31f9470d6c83410cf6e7992fe73e9508339f340eb59019401667703c6eea3f11.jpg)
Enter an SSID (network name).
- Enter any characters using the virtual keyboard (p.15).
- When you are finished, press the
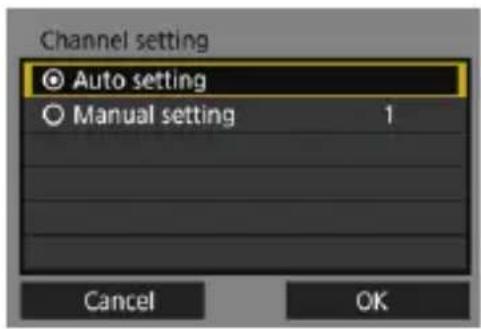
3 Select the desired channel setting.
To specify the settings manually, select [Manual setting], then turn the <☀> dial.
- Select [OK] and press < SET> to go to the next screen.
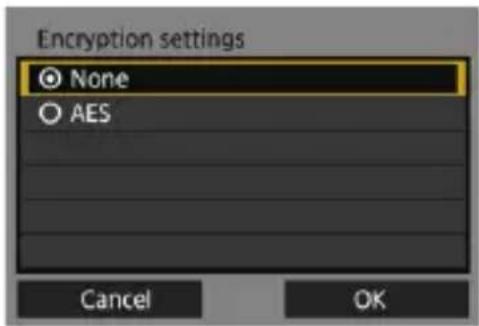
4 Select the desired encryption setting.
- For encryption, select [AES].
- Select [OK] and press < SET> .
- When [AES] is selected, the virtual keyboard (p.15) is displayed. Enter any encryption key of eight characters, then press the
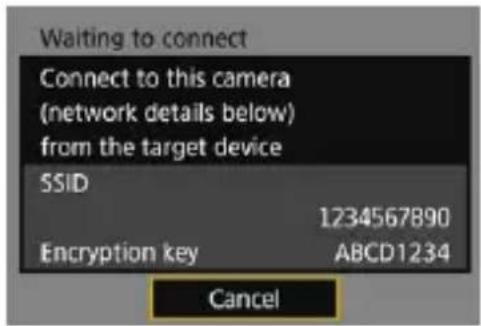
For subsequent operations, see "Easy Connection" (p.19).
Setting up the IP Address Manually
Set up the IP address settings manually. The items displayed vary depending on the Wi-Fi function.
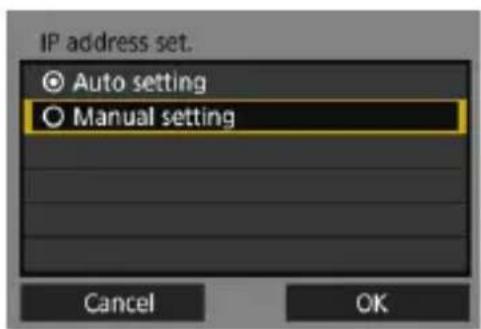
1 Select [Manual setting].
- Select [OK] and press < SET> to go to the next screen.
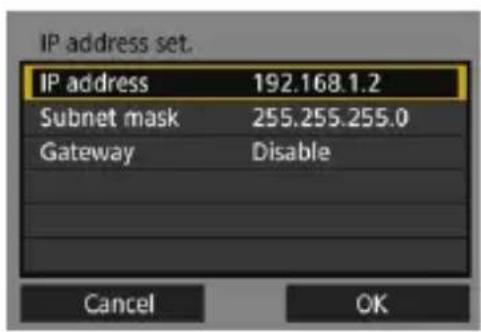
Select the item to be set.
- Select an item and press < SET> . The number entry screen will appear.
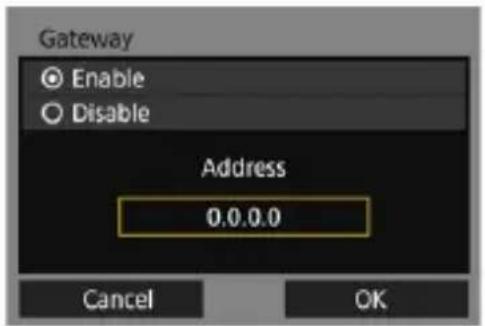
To use a gateway, select [Enable], select [Address], then press .
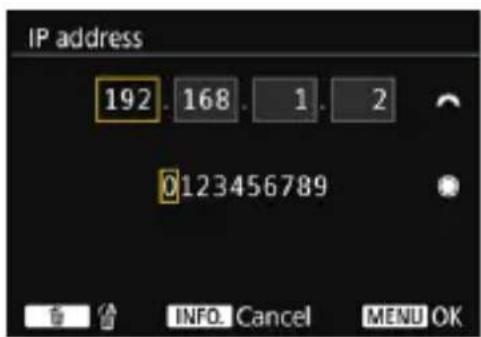
3 Enter the desired values.
- Turn the <> dial to move the input position in the upper area and turn the <> dial to select the number. Press <> to enter the selected number.
- To set the entered values and return to the screen for step 2, press the
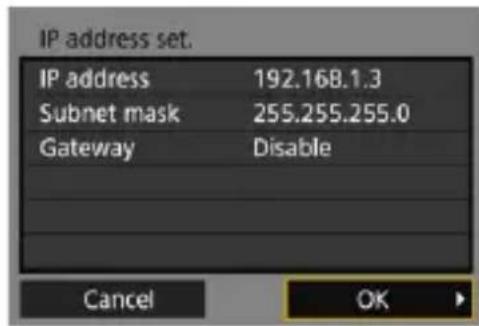
4 Select [OK].
- When you have completed setting the necessary items, select [OK] and press < > .
The setting screen for the Wi-Fi function will appear.
If you are not sure what to enter, see "Checking Network Settings" (p.87), or ask the network administrator or another person knowledgeable about the network.
Specifications
■Dimensions and Weight
Dimensions Approx. 24.0 x 32.0 x 2.1 mm / 0.94 x 1.26 x 0.08 in.
(W x H x D):
Weight: Approx. 2 g / 0.07 oz.
■Operation Environment
Working temperature 0^ C - 40^ C / 32^ F - 104^ F
range:
Working humidity: 85% or less
■ Wireless Communications
Standards compliance: IEEE 802.11b/g/n
Transmission method: DS-SS modulation (IEEE 802.11b)
OFDM modulation (IEEE 802.11g/n)
Transmission range: Approx. 10 m / 32.8 ft.
* When communicating with a smartphone
* With no obstructions between the transmission and reception antennas and no radio interference (In the general environment, image display may be delayed or images may not be displayed smoothly.)
Transmission frequency (central frequency):
| Frequency | Channels |
| 2412 to 2462 MHz | 1 to 11 ch |
Connection method: Camera access point mode, Infrastructure*
* Wi-Fi Protected Setup supported
Security: Authentication method: Open system, Shared key, WPA/
WPA2-PSK
Encryption: WEP, TKIP, AES
■ Wi-Fi Functions
Communication with Images can be viewed, controlled, and received using a smartphones: smartphone.
Remote control of the camera using a smartphone is possible.
Remote operation using EOS Utility: Remote control functions and image viewing functions of EOS Utility can be used wirelessly.
All the data above is based on Canon's testing standards.
Trademarks
- Microsoft and Windows are trademarks or registered trademarks of Microsoft Corporation in the United States and/or other countries.
Macintosh and Mac OS are trademarks of Apple Inc., registered in the U.S. and other countries.
The Wi-Fi CERTIFIED logo and the Wi-Fi Protected Setup mark are trademarks of the Wi-Fi Alliance.
WPS used on camera settings screens and in this manual stands for Wi-Fi Protected Setup.
UPnP is a trademark of the UPnP Implementers Corporation.
All other trademarks are the property of their respective owners.
Index
A
Access point 36
Encryption 36
Android 18
C
Cable 16
Camera access point mode .....50
Camera Connect....18, 54
Clearing wireless communication settings ....71
Communicating with a smartphone....21, 53
Connection settings ......68
Changing 69
Changing names ......69
Checking 68
Deleting 70
Registering 66
E
EOS Utility 27,59
|
iOS....18
IP address....39, 43, 48, 92
K
Keyboard 15
M
MAC address....36, 72
N
Nickname.... 13
Notes 85
P
PIN code connection mode...... 41
Pushbutton connection mode...... 37
R
Reconnecting 63
Remote operation.... 54, 59
Responding to error messages ..... 76
S
Specifying viewable images ..... 56
Stealth functions.... 36
T
Troubleshooting guide...... 75
V
Viewing images 54
W
WPS (Wi-Fi Protected Setup) ...... 37
PBC mode 37
PIN mode.... 41
MEMO
Canon


![.@-_/::!?()[]<>0123456789 abcdefghijklmnopqrstuvwxyz ABCDEFGHIJKLMNOPQRSTUVWXYZ *#.+=$%&"{}](/content/2026/05/812798/images/b47077d523f90a5a9db5f54b3b4d59031d439a6727b7a31311c253f5c6a513d6.jpg)

![CANON W-E1 - Display the [Wi-Fi function] screen. - 2](/content/2026/05/812798/images/26640dc7c0646e124e8d334466c723d4e963104ef18d27bcc90147a816a5518a.jpg)