
KW-14 - Audio/video extender Kramer - Free user manual and instructions
Find the device manual for free KW-14 Kramer in PDF.


| Product Type | Wireless HD Extender (Transmitter + Receiver) |
| Model | KW-14T (Transmitter), KW-14R (Receiver) |
| Video Resolution | Up to 1080p @60Hz, Deep Color up to 12-bit |
| Maximum Data Rate | 6.75 Gbps (2.25 Gbps per channel) |
| Transmission Range | Up to 30 m (100 ft) unobstructed |
| Wireless Technology | MIMO with AES-128 encryption |
| Audio Formats | PCM, Dolby Digital 2/0/5.1, DTS 2-channel/5.1 |
| Latency | <1 ms (zero latency) |
| Number of Receivers per Transmitter | Up to 4 |
| IR Control | Unidirectional, 38 kHz; IR emitter cable included |
| OSD Menu | On-Screen Display for setup and source management |
| Dimensions (Transmitter) | 8.0 cm x 10.2 cm x 3.6 cm (3.15" x 4.02" x 1.42") |
| Dimensions (Receiver) | 9.5 cm x 9.5 cm x 3.4 cm (3.74" x 3.74" x 1.34") |
| Weight (each) | 0.1 kg (0.22 lbs) |
| Power Supply (Transmitter) | 5V DC, 1A |
| Power Supply (Receiver) | 5V DC, 1.2A |
| Power Consumption | 5W (transmitter), 6W (receiver) approx. |
| Operating Temperature | 0° to 40°C (32° to 104°F) |
| Storage Temperature | -40° to 70°C (-40° to 158°F) |
| Humidity | 10% to 90% RH non-condensing |
| Enclosure Material | Plastic |
| Cooling | Convection, vented |
| Included Accessories | 2x power adapters, 2x HDMI 0.9m cables, 1x IR emitter cable, 1x IR remote with battery, Quick Start Guide |
| Standards Compliance | HDMI with Deep Color, HDCP 2.0, DVI 1.0 |
| Regulatory Compliance | CE, FCC Class B, RoHS, WEEE |
Frequently Asked Questions - KW-14 Kramer
User questions about KW-14 Kramer
0 question about this device. Answer the ones you know or ask your own.
Ask a new question about this device
Download the instructions for your Audio/video extender in PDF format for free! Find your manual KW-14 - Kramer and take your electronic device back in hand. On this page are published all the documents necessary for the use of your device. KW-14 by Kramer.
USER MANUAL KW-14 Kramer
Wireless HD Transmitter
KW-14R
Wireless HD Receiver
Step 1: Check what's in the box
KW-14T, KW-14R Wireless HD Transmitter and Receiver
√ IR remote control transmitter with battery
2 Power adapters
1 Quick Start Guide
2 HDMI 0.9m cables
1 IR Emitter cable
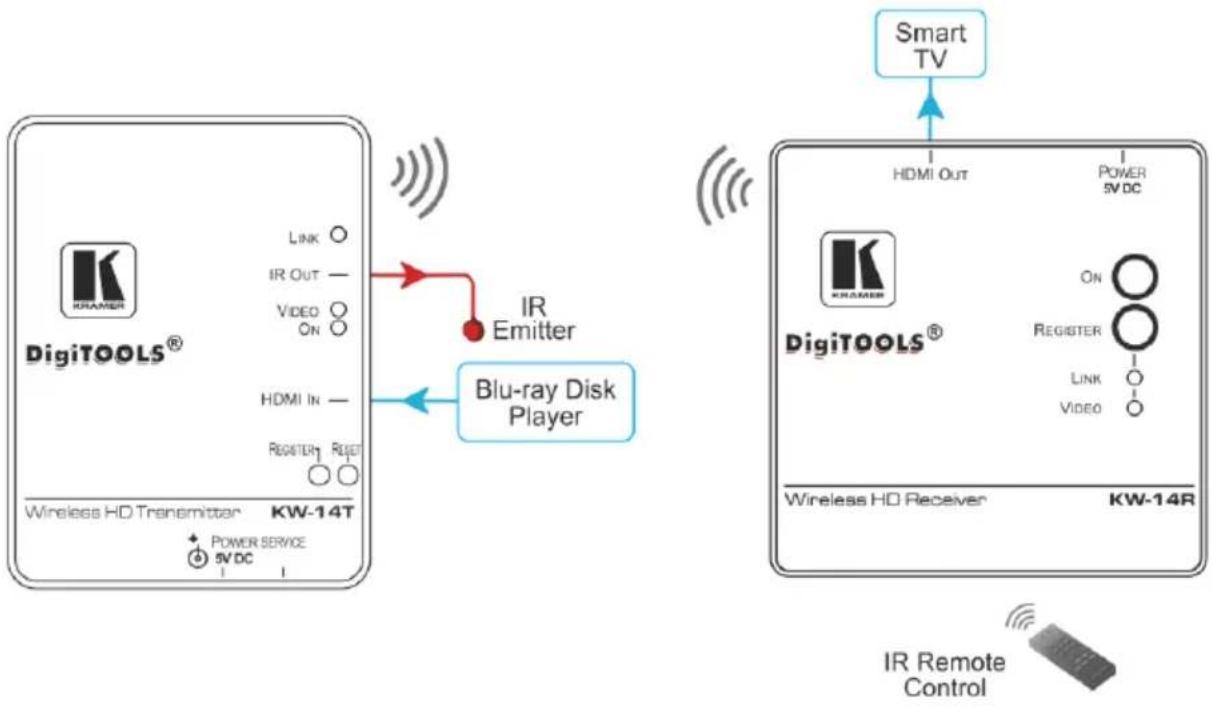
Step 2: Connect the inputs and outputs
Always switch off the power on each device before connecting it to your KW-14T, KW-14R. For best results, always use Kramer high-performance cables to connect your AV equipment to the KW-14T, KW-14R.
flowchart
graph TD
    A["Smart TV"] --> B["DigiTOOLS®"]
    B --> C["IR Emitter"]
    C --> D["Blu-ray Disk Player"]
    D --> E["IR Remote Control"]

    subgraph_A["Smart TV"]
        F["DigiTOOLS®"] --> G["LED System"]
        H["LED System"] --> I["LED System"]
        J["LED System"] --> K["LED System"]
        L["LED System"] --> M["LED System"]
        N["LED System"] --> O["LED System"]
        P["LED System"] --> Q["LED System"]
    end

    subgraph_B["DigiTOOLS®"]
        R["DigiTOOLS®"] --> S["LED System"]
        T["DigiTOOLS®"] --> U["LED System"]
        V["DigiTOOLS®"] --> W["LED System"]
        X["DigiTOOLS®"] --> Y["LED System"]
        Z["DigiTOOLS®"] --> AA["LED System"]
    end

    style A fill:#f9f,stroke:#333
    style B fill:#ccf,stroke:#333
    style C fill:#cfc,stroke:#333
    style D fill:#fcc,stroke:#333
    style E fill:#ffc,stroke:#333
    style F fill:#fcc,stroke:#333
    style G fill:#cff,stroke:#333
    style H fill:#ffc,stroke:#333
    style I fill:#cff,stroke:#333
    style J fill:#ffc,stroke:#333
    style K fill:#ffc,stroke:#333
    style L fill:#ffc,stroke:#333
    style M fill:#ffc,stroke:#333
    style N fill:#ffc,stroke:#333
    style O fill:#ffc,stroke:#333
    style Q fill:#ffc,stroke:#333
    style R fill:#fcc,stroke:#333
    style S fill:#fcc,stroke:#333
    style T fill:#fcc,stroke:#333
    style U fill:#fcc,stroke:#333
    style V fill:#fcc,stroke:#333
    style W fill:#fcc,stroke:#333
    style X fill:#fcc,stroke:#333
    style Y fill:#fcc,stroke:#333
    style Z fill:#fcc,stroke:#333
Step 3: Connect the power
Connect the 5V DC power adapters to the KW-14T and KW-14R and plug the adapters into the mains electricity.

Step 4: Register the Receiver with the Transmitter
When purchased as a pair, the KW-14T and the KW-14R are delivered pre-registered. Registration needs to be performed only when the transmitter or receiver is replaced or when adding additional receivers to a transmitter.
Note: You can register up to four receivers with a transmitter.
You can register a receiver with a transmitter using either the buttons on the units or via the IR remote control.
Note: Registration requires video disconnection
Front Panel Buttons
To register a receiver with a transmitter using the front panel buttons:
- Press and hold the Register button on the receiver until the following message is displayed on the OSD: "Please activate registration on Transmitter unit".
- Press and hold the Register button on the transmitter until the following message is displayed on the OSD: "Adding
. Press OK to continue or EXIT to cancel". - Press the Register button on the receiver to confirm. The message "Adding
..." and a progress bar is displayed on the OSD while the registration process completes.
Note: The registration process can take up to 60 seconds to complete.
IR Remote Control
To register a receiver with a transmitter using the IR remote control:
- Connect and apply power to the transmitter, input source, receiver, and output acceptor.
- Press the Add button on the IR remote control. The following message is displayed on the OSD: "Please activate registration on Transmitter unit".
-
Press and hold the Register button on the transmitter until the following message is displayed on the OSD:
"Adding. Press OK to continue or EXIT to cancel". -
Press the OK button on the IR remote control to confirm.
The message *Adding... and a progress bar is displayed on the OSD while the registration process is completing.
Note: The registration process can take up to 60 seconds to complete. If the process takes longer than this, power cycle both devices and then start the registration process from the beginning. When the registration process is complete, the message and progress bar disappear from the display. The Link and Video LEDs light solid. -
Repeat steps 1 to 4 to register up to three more receivers to a transmitter.
Contents
1 Introduction 1
2 Getting Started 2
2.1 Achieving the Best Performance 2
2.2 Safety Instructions 2
2.3 Recycling Kramer Products 3
3 Overview 4
4 Defining the KW-14T Wireless HD Transmitter and Receiver 6
4.1 Defining the KW-14T Wireless HD Transmitter 6
4.2 Defining the KW-14R Wireless HD Receiver 8
5 Connecting the KW-14T and KW-14R 10
5.1 Connecting the KW-14T and KW-14R 10
5.2 Registering a Transmitter and Receiver 11
5.3 Standby Mode 13
6 Using IR Remote Control and OSD Menu 14
6.1 Using the Setup Menu 15
7 Mounting the KW-14T and the KW-14R 18
7.1 Mounting Locations Best Practices 18
7.2 Mounting the Transmitter and Receiver 18
8 Frequently Asked Questions 21
9 Technical Specifications 25
9.1 Country Certification 26
9.2 Supported Video Resolutions and Rates 27
9.3 KW-14T Mini USB Pinout 27
9.4 Operating Frequencies 28
10 FCC Radio Frequency Interference Statement 29
Figures
Figure 1: KW-14T Wireless HD Transmitter Top Panel 6
Figure 2: KW-14T Wireless HD Transmitter Side and Front Panels 7
Figure 3: KW-14R Wireless HD Receiver Top Panel 8
Figure 4: KW-14R Wireless HD Receiver Rear and Side Panels 9
Figure 5: Connecting the KW-14T and KW-14R 10
Figure 6: The IR Remote Control Buttons 14
Figure 7: Select Video Source Menu 15
Figure 8: Setup Menu 15
Figure 9: Choose Source to Remove Menu 16
Figure 10: Drilling Pilot Holes in the Center of the Mounting Holes. Not to scale 19
Figure 11: KW-14T Mini USB Pinout 27
1 Introduction
Welcome to Kramer Electronics! Since 1981, Kramer Electronics has been providing a world of unique, creative, and affordable solutions to the vast range of problems that confront video, audio, presentation, and broadcasting professionals on a daily basis. In recent years, we have redesigned and upgraded most of our line, making the best even better!
Our 1,000-plus different models now appear in 14 groups that are clearly defined by function: GROUP 1: Distribution Amplifiers; GROUP 2: Switchers and Routers; GROUP 3: Control Systems; GROUP 4: Format/Standards Converters; GROUP 5: Range Extenders and Repeaters; GROUP 6: Specialty AV Products; GROUP 7: Scan Converters and Scalers; GROUP 8: Cables and Connectors; GROUP 9: Room Connectivity; GROUP 10: Accessories and Rack Adapters; GROUP 11: Sierra Video Products; GROUP 12: Digital Signage; GROUP 13: Audio; and GROUP 14: Collaboration.
Thank you for purchasing the Kramer KW-14T Wireless HD Transmitter and KW-14R Wireless HD Receiver which are ideal for:
- Meeting rooms
- Presentation and multimedia applications
- Short range video and audio distribution
2 Getting Started
We recommend that you:
- Unpack the equipment carefully and save the original box and packaging materials for possible future shipment
- Review the contents of this user manual

Go to www.kramerav.com/downloads/KW-14 to check for up-to-date user manuals, application programs, and to check if firmware upgrades are available (where appropriate).
2.1 Achieving the Best Performance
To achieve the best performance:
- Use only good quality connection cables (we recommend Kramer high-performance, high-resolution cables) to avoid interference, deterioration in signal quality due to poor matching, and elevated noise levels (often associated with low quality cables)
- Do not secure the cables in tight bundles or roll the slack into tight coils
- Avoid interference from neighbouring electrical appliances that may adversely influence signal quality
- Position your KW-14T and KW-14R away from moisture, excessive sunlight and dust

This equipment is to be used only inside a building. It may only be connected to other equipment that is installed inside a building.
2.2 Safety Instructions

Caution: There are no operator serviceable parts inside the unit
Warning: Use only the Kramer Electronics power supplies that are provided with the units
Warning: Disconnect the power and unplug the unit from the wall before installing
2.3 Recycling Kramer Products
The Waste Electrical and Electronic Equipment (WEEE) Directive 2002/96/EC aims to reduce the amount of WEEE sent for disposal to landfill or incineration by requiring it to be collected and recycled. To comply with the WEEE Directive, Kramer Electronics has made arrangements with the European Advanced Recycling Network (EARN) and will cover any costs of treatment, recycling and recovery of waste Kramer Electronics branded equipment on arrival at the EARN facility. For details of Kramer's recycling arrangements in your particular country go to our recycling pages at www.kramerav.com/support/recycling.
3 Overview
The KW-14T and KW-14R are a high-definition, wireless HDMI transmitter and receiver for use indoors over short ranges.
The KW-14T converts an HDMI signal into a wireless signal. The KW-14R converts the wireless signal back into HDMI.
The transmitter and receiver use MIMO (Multi-Input and Multi-Output) wireless communication technology to transfer HDMI, multi-channel embedded audio, and IR signals. AES-128 encryption provides a secure link. Multiple receivers can be associated with a single transmitter.
The KW-14T and KW-14R support:
- Uncompressed video resolutions up to 1080p @60Hz
- Embedded audio
- Zero latency
- Automatic sleep mode triggered when there with no input or link for three minutes
• EDID
• HDCP
Note: HDCP sources are supported only when all connected displays support HDCP
- OSD (On Screen Display) for simplified setup and configuration
- IR remote control which enables the OSD menu to be displayed on the output display
- Up to four receivers associated with one transmitter
- Up to three transmitters can be associated with one receiver
• Transmission through walls and furniture
• A secure link using AES-128 bit encryption -
A data rate of 6.75Gbps, Deep Color up to 12 bit
-
A transmission range of up to 30m (100ft)
- Automatic frequency selection which selects the most suitable frequencies and prevents RF interference
4 Defining the KW-14T Wireless HD Transmitter and Receiver
4.1 Defining the KW-14T Wireless HD Transmitter
Figure 1 defines the top panel of the KW-14T.
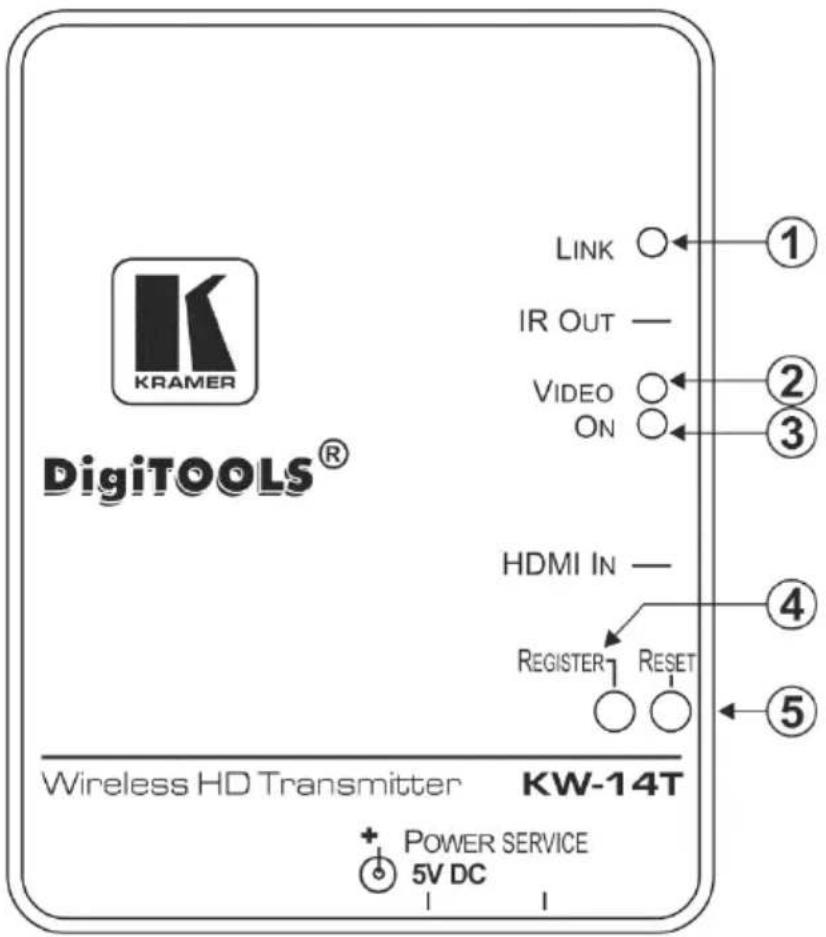
Figure 1: KW-14T Wireless HD Transmitter Top Panel
| # | Feature | Function |
| 1 | LINK LED | Flashes blue while the receiver is searching for a link to register with the transmitter. Lights green when the link to the receiver is established |
| 2 | VIDEO LED | Lights blue when a valid video signal is present and transmitted, (only when a link is established) |
| 3 | ON LED | Lights green when the device is powered on |
| 4 | REGISTER Button | Hold this button after starting the registration process on the receiver |
| 5 | RESET Button | Press to reset the device |
Figure 2 defines the side and front panels of the KW-14T.
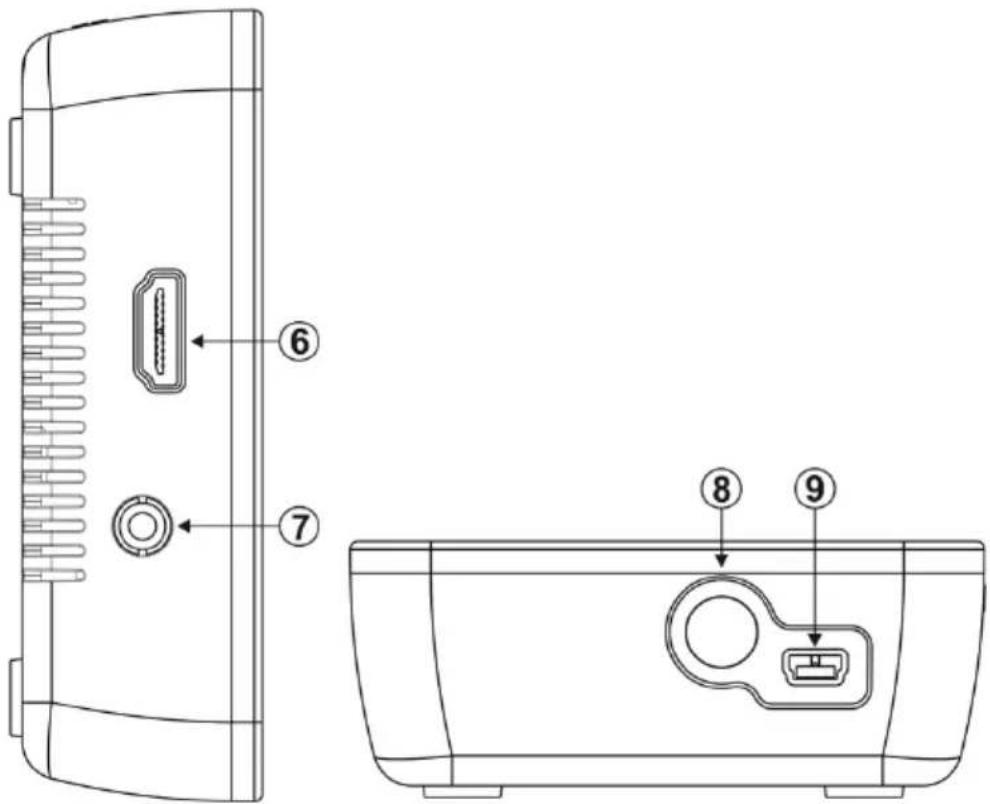
Figure 2: KW-14T Wireless HD Transmitter Side and Front Panels
| # | Feature | Function |
| 6 | HDMI IN Connector | Connect the HDMI source |
| 7 | 3.5mm Mini Jack IR Output Connector | Connect to the IR emitter |
| 8 | POWER Connector | Connect to the power supply provided with the device |
| 9 | Mini USB Connector | For the use of Kramer service personnel only |
4.2 Defining the KW-14R Wireless HD Receiver
Figure 3 defines the top panel of the KW-14R.
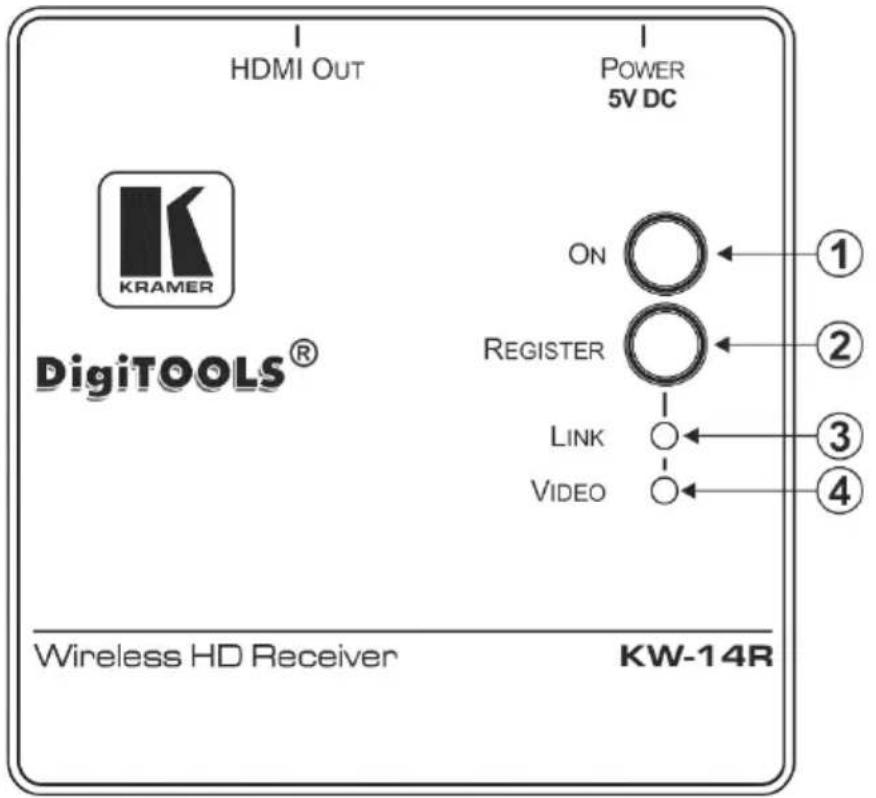
Figure 3: KW-14R Wireless HD Receiver Top Panel
| # | Feature | Function |
| 1 | ON Button | Press to turn on the device. Lights blue when the device is turned on. |
| 2 | SOURCE Button | Press to initiate the registration process with a transmitter |
| 3 | LINK LED | Flashes blue while the receiver is searching for a transmitter. Lights blue when a link is established |
| 4 | VIDEO LED | Lights blue when a valid video signal is present and transmitted, (only when a link is established) |
Figure 4 defines the rear and side panels of the KW-14R.
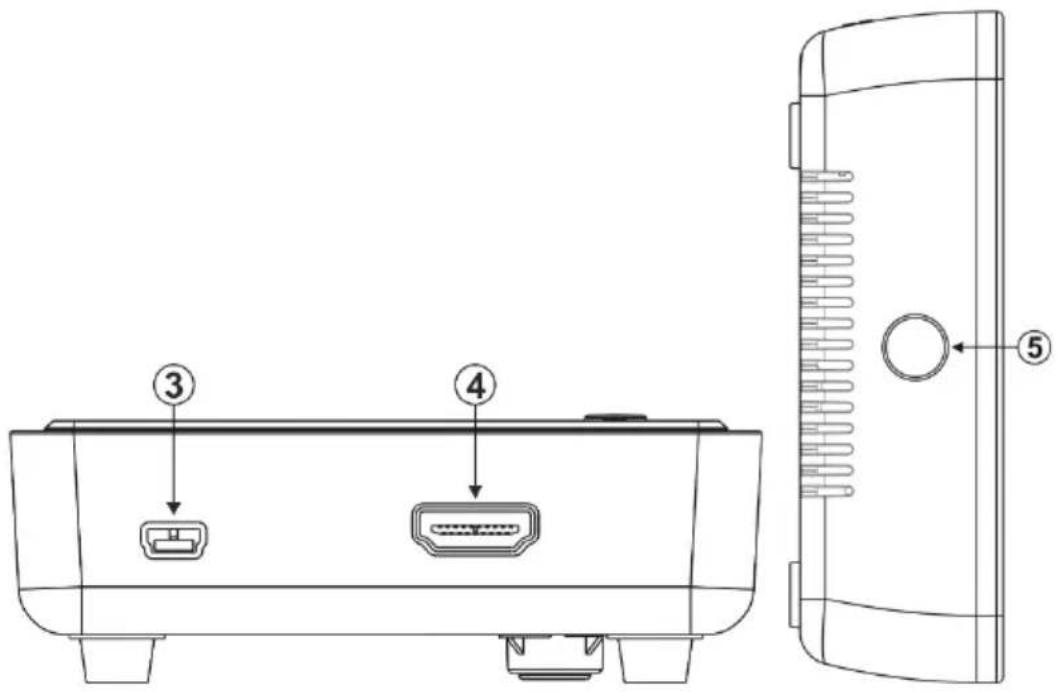
Figure 4: KW-14R Wireless HD Receiver Rear and Side Panels
| # | Feature | Function |
| 3 | Mini USB Power Connector | Connect to the USB power supply provided |
| 4 | HDMI OUT Connector | Connect the HDMI acceptor |
| 5 | IR Window | Sensor for receiving IR commands from the IR remote control |
5 Connecting the KW-14T and KW-14R

Always switch off the power to all devices before connecting your KW-14T and KW-14T.
5.1 Connecting the KW-14T and KW-14R
flowchart
graph TD
    A["DPITODLS®"] -->|HDMI| B["Screen"]
    B -->|HDMI| C["HDMI"]
    C -->|HDMI| D["DPITODLS®"]
    D -->|HDMI| E["HDMI"]
    style A fill:#f9f,stroke:#333
    style B fill:#ccf,stroke:#333
    style C fill:#cfc,stroke:#333
    style D fill:#fcc,stroke:#333
    style E fill:#cff,stroke:#333
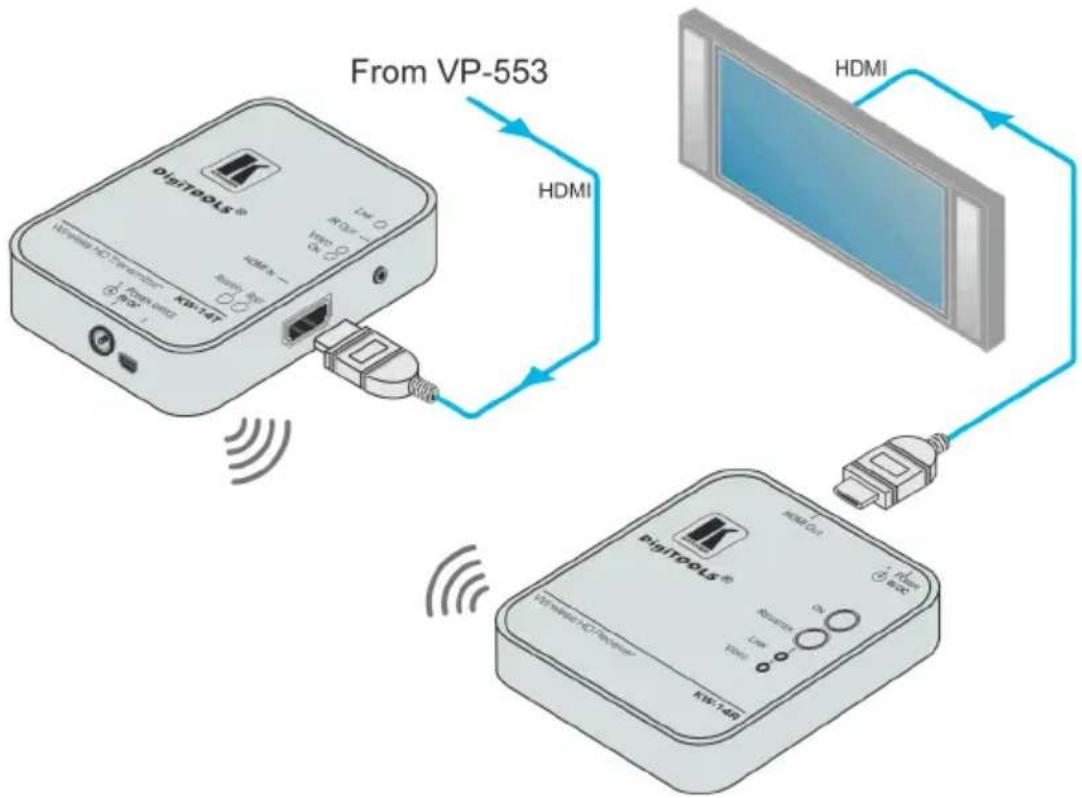
Figure 5: Connecting the KW-14T and KW-14R
Note: The HDCP status of the KW-14R follows the combination of all outputs.
To connect the KW-14T and the KW-14R as illustrated in the example in
Figure 5:
- On the KW-14T connect the HDMI source, (for example, a VP-553) to the HDMI connector.
- On the KW-14R connect the HDMI Out connector to the HDMI acceptor, (for example, a smart TV).
5.2 Registering a Transmitter and Receiver
A transmitter can be registered with either one or multiple, (up to four) receivers. A receiver can be associated with up to three transmitters. Registration of one or more receivers to a transmitter is performed using either the buttons on the devices or the remote IR control in conjunction with the OSD. Registration of more than one transmitter to a receiver can only be done using the IR remote control and the OSD.
When purchased as a pair, the KW-14T and the KW-14R are delivered pre-registered. Registration needs to be performed only when:
- The transmitter or receiver is replaced
—OR—
- Adding additional receivers to a transmitter or additional transmitters to a receiver
Note: Registration is not lost when the devices are powered off.
When registering multiple receivers separate them by at least 2m (6.5ft). When employing multiple transmitters at the same site, separate them by at least 2m (6.5ft).
Note: The video link must be off when registering additional transmitters.
5.2.1 Registering by Using the Buttons on the Devices
To register a transmitter with a receiver by using the panel buttons:
- Connect and apply power to the transmitter, input source, receiver, and output acceptor.
- Press and hold the Register button on the receiver until the following message is displayed on the OSD:
"Please activate registration on Transmitter unit". -
Press and hold the Register button on the transmitter until the following message is displayed on the OSD:
"Adding. Press OK to continue or EXIT to cancel". -
Press the Register button on the receiver to confirm.
The message "Adding
Note: The registration process can take up to 60 seconds to complete. If the process takes longer than this, power cycle both devices and then start the registration process from the beginning.
When the registration process is complete, the message and progress bar disappear from the display. The Link and Video LEDs light solid.
- Repeat steps 1 to 4 to register up to three transmitters to a receiver.
5.2.2 Registering Using the IR Remote Control
Note: The IR remote control must be pointed at the front panel of the receiver from a distance of no more than 9m (30ft) and no more than 40° from center.
Note: The OSD is best displayed when the resolution is set to 1080p.
To register a transmitter with a receiver with the IR remote control:
- Connect and apply power to the transmitter, input source, receiver, and output acceptor.
-
Press the Add button on the IR remote control. The following message is displayed on the OSD:
"Please activate registration on Transmitter unit". -
Press and hold the Register button on the transmitter until the following message is displayed on the OSD:
"Adding
- Press the OK button on the IR remote control to confirm.
The message "Adding
Note: The registration process can take up to 60 seconds to complete. If the process takes longer than this, power cycle both devices and then start the registration process from the beginning.
When the registration process is complete, the message and progress bar disappear from the display. The Link and Video LEDs light solid.
- Repeat steps 1 to 4 to register up to three transmitters to a receiver.
5.2.3 Registering Multiple Receivers
Note: Registration cannot be performed if the transmitter is currently broadcasting a signal.
To register an additional receiver with a transmitter:
- Power down all receivers except the one you want to register.
- Perform steps 2 through 4 of the registration procedures, (see Section 5.2.1 or Section 5.2.2) depending on the method of registration).
- When registration is complete, power-on the other receivers.
5.3 Standby Mode
The KW-14R automatically enters a sleep mode when any of the following occurs:
- No input is connected
- No valid input (resolution) is connected
- When the link is lost or not established
When entering sleep mode, the OSD is displayed for three minutes and the video output is muted. When the valid video link is restored the signal is automatically transmitted.
6 Using IR Remote Control and OSD Menu
Note: The OSD is best displayed when the resolution is set to 1080p.
Note: You can only send IR commands to one receiver at a time.
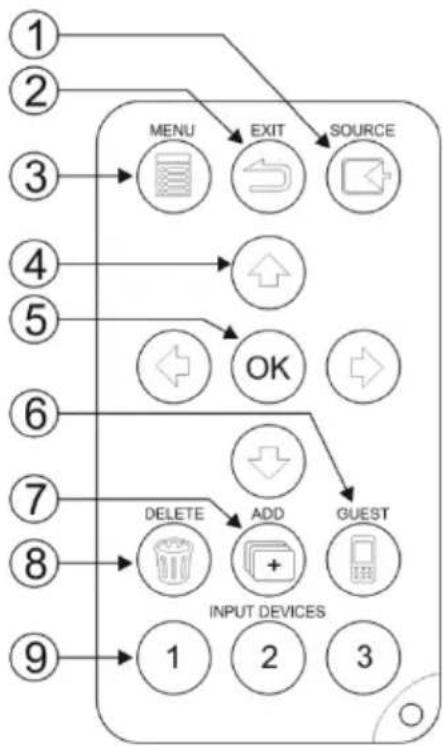
flowchart
graph TD
    1["INPUT DEVICES"] --> 2["DELETE"]
    2 --> 3["MENU"]
    3 --> 4["EXIT"]
    4 --> 5["SOURCE"]
    5 --> 6["OK"]
    6 --> 7["GUEST"]
    7 --> 8["ADD"]
    8 --> 9["INPUT DEVICES"]
Figure 6: The IR Remote Control Buttons
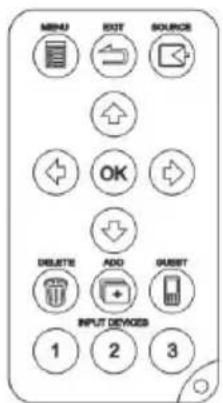
| # | Feature | Function |
| 1 | Source | Displays the Select Video Source menu, which lists the transmitter that is registered to the receiver, (see Figure 7) |
| 2 | Exit | Returns to the previous menu. If the Setup menu is displayed, pressing this button closes the OSD |
| 3 | Menu | Displays the OSD menu |
| 4 | Arrows | The up and down arrow buttons scroll through the menu items. The right and left arrow buttons select characters when changing a video source name.Note: In the OSD screen, the yellow arrows on the right indicate that there are additional items to scroll through |
| 5 | OK | Selects the currently selected menu item |
| 6 | Guest | Not used |
| 7 | Add | Begins the registration process |
| 8 | Delete | Displays the Choose Source to Remove submenu. This menu may also be accessed from the Setup menu by selecting Remove Video Source. |
| 9 | Input Devices | Press to select the required transmitter if more than one transmitter is registered with the receiver |
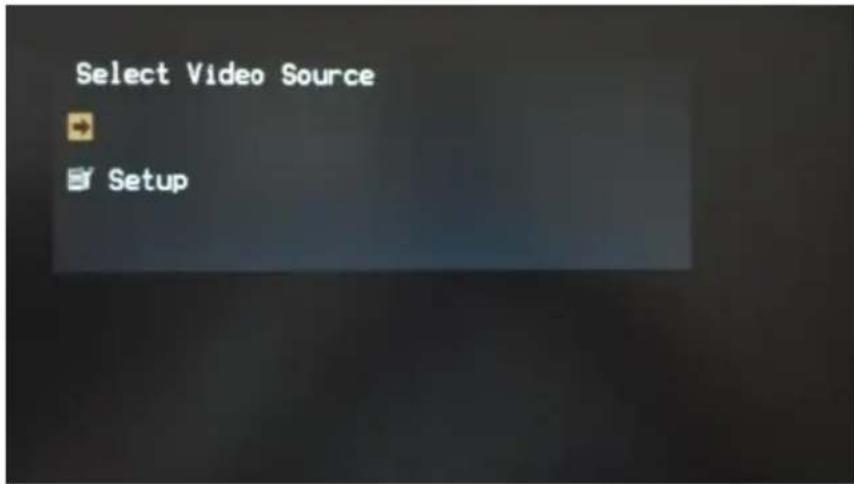
Figure 7: Select Video Source Menu
6.1 Using the Setup Menu
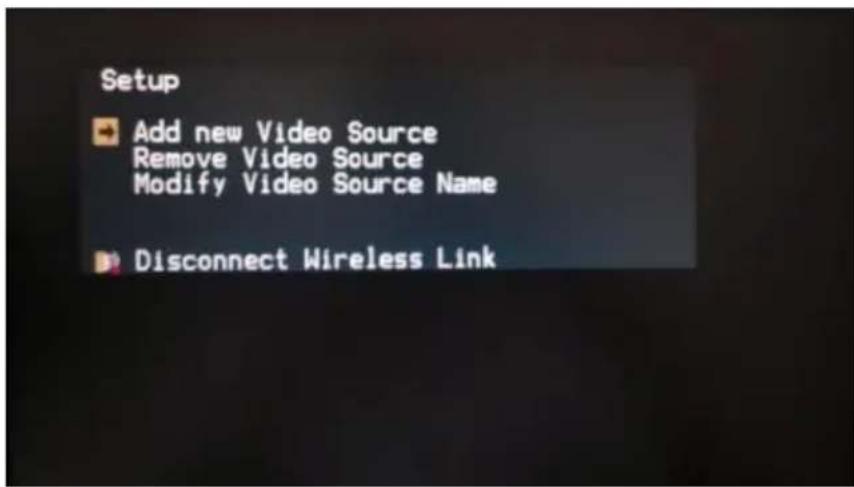
Figure 8: Setup Menu
The Setup menu enables you to set up the KW-14T and the KW-14R and includes the following options:
- Add new Video Source—Select this option to register a transmitter with a receiver. The message “Please Activate Registration on Transmitter Unit” appears
- Remove Video Source—Select this option to unregister a transmitter
- Modify Video Source Name—Select this option to edit the name of an existing video source
- Disconnect Wireless Link—This appears on the menu only if the source is displayed. Select this option to remove the connection between the source and the display
6.1.1 Unregistering a Transmitter
To unregister a transmitter from a receiver:
- Power the receiver on.
-
From the Setup menu, select Remove Video Source.
This displays the Choose Source to Remove menu. Alternatively, press Delete on the IR remote control to access this menu. -
From the Choose Source to Remove menu, select the name of the source to be unregistered.
The message "Removing transmitter name. Press OK to continue or EXIT to Cancel" is displayed.
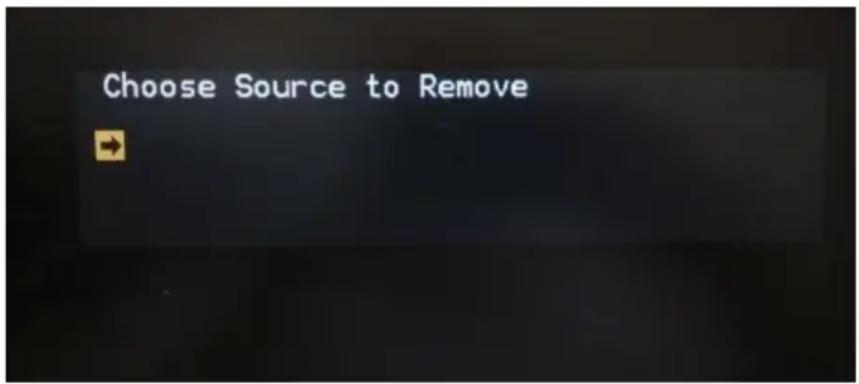
Figure 9: Choose Source to Remove Menu
Press OK again to delete the source.
While the transmitter is being unregistered, the message “Removing
6.1.2 Modifying a Video Source Name
To modify a video source name:
- Press Menu on the IR remote control to display the Setup menu.
- From the Setup menu, select Modify Video Source Name.
-
From the Choose Source to Rename menu, select the source to be renamed.
The Rename Video Source Name screen appears, displaying only the name to be changed. -
Use the left and right arrow buttons on the IR remote control to highlight the first character that you want to change.
-
Press the up or down arrow buttons repeatedly until the desired replacement letter or number is displayed.
- To step through the alphabet in ascending (A to Z) order, use the up arrow. The down arrow moves through the alphabet in descending (Z to A) order.
- When you scroll through the characters in ascending order, the OSD displays the letters of the uppercase alphabet, followed by the lowercase alphabet, then a space, then digits 0 through 9, after which the display cycles back through, starting with the uppercase letters. In descending order, this sequence is reversed.
- Press OK.
The Select a Video Source menu is displayed.
- Select a source from the menu to display or press the Exit button to close the OSD.
Note: The name is valid only for this specific receiver and does not affect the actual name of the transmitter.
7 Mounting the KW-14T and the KW-14R
The KW-14T and the KW-14R can be mounted to a wall or furniture and should not be more than 30m (100ft) apart.
7.1 Mounting Locations Best Practices
For single transmitter installations:
- Ensure that the receiver(s) is within 30m (100ft) of the transmitter, (the distance is reduced if transmission is not line-of-sight).
- Maintain a distance of at least 2m (6.5ft) between the transmitter and the receiver(s). Be mindful of units located beyond walls in adjacent rooms.
For multiple transmitter installations:
- Up to four transmitters can operate in the same room or environment depending on local regulations. When installing more than four transmitters in the same environment, the next group of units must be separated to prevent interference. Ensure that there is at least a 45m (150 feet) radius around the outermost units in each group.
- Maintain a distance of at least 2m (6.5ft) between individual transmitters and receivers. Be mindful of units located beyond walls in adjacent rooms.
7.2 Mounting the Transmitter and Receiver
To mount the transmitter or receiver to a wall or furniture:
- Print and cut out the mounting templates for the devices. Templates can be downloaded from www.kramerav.com.
Note: The diagrams shown below in Figure 10 are not to scale and you should download the scale drawings from our Web site.
- Tape the template in the required location.
- Drill pilot holes into the wall or furniture through each of the mounting-hole centers on the template, (see Figure 10).
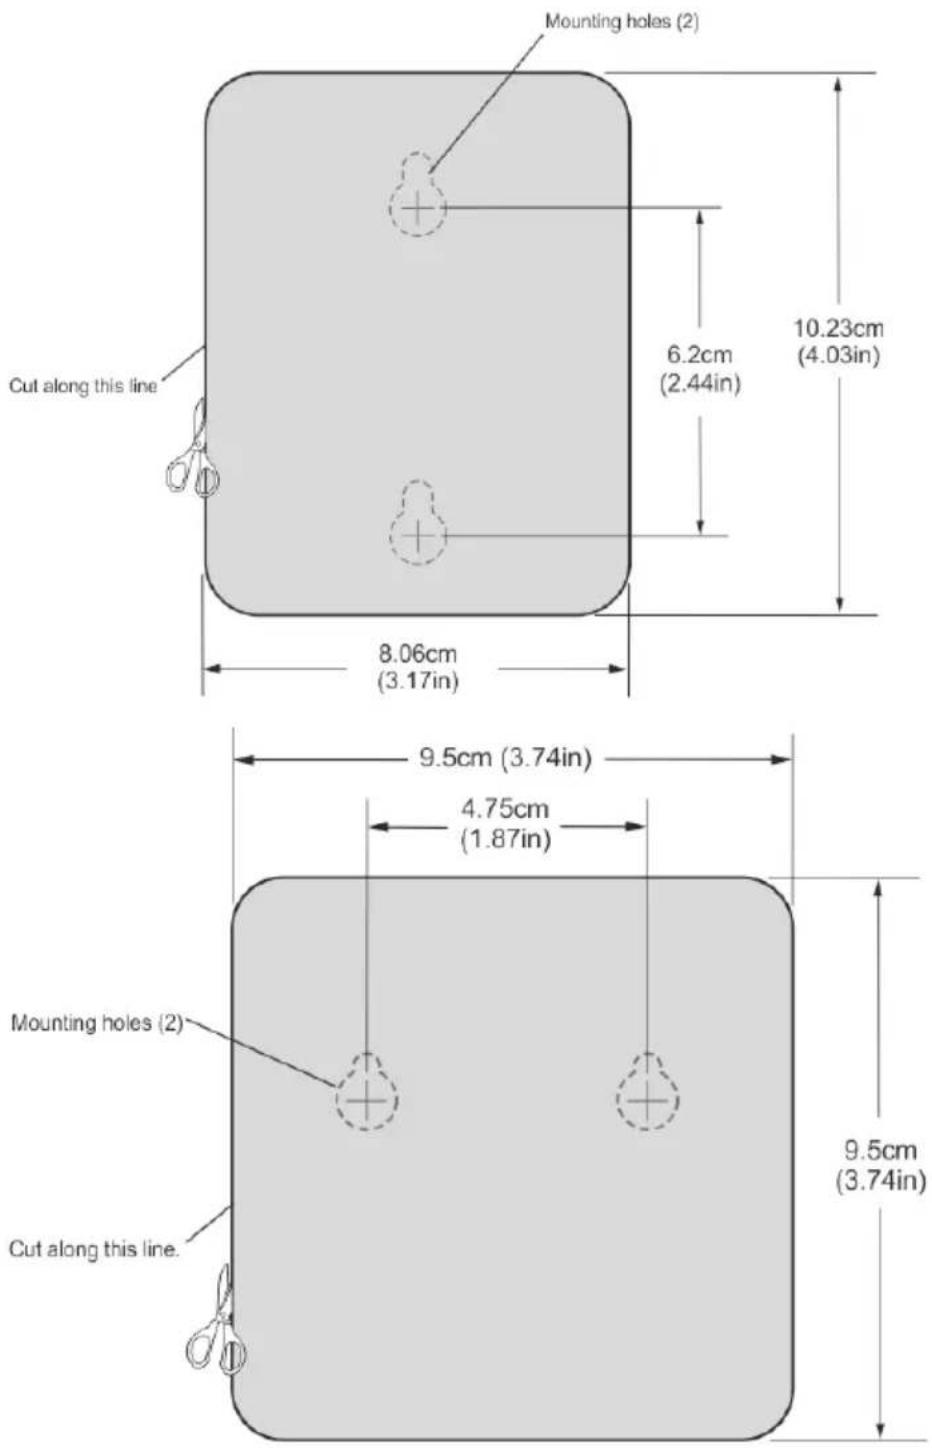
Figure 10: Drilling Pilot Holes in the Center of the Mounting Holes. Not to scale
- Remove the template.
- Insert two screws (the type of screw depends on the surface on which you are mounting the units) into the mounting holes and tighten them until the screw heads protrude from the wall at the following distances:
• Transmitter—approximately 4.7mm (3/16 inch)
- Receiver—approximately 6.4mm (1/4 inch)
-
Align the mounting holes on the back panel of the device with the two screws protruding from the wall.
-
Slide the device downward until both screws are seated in the narrow parts of the two keyholes.
8 Frequently Asked Questions
Q: Why did my registration fail?
A: Ensure that both the paired units are the only Kramer devices currently powered on.
A: Ensure that the transmitter and receiver are no closer than 2m (6ft) to each other.
A: Keep the number of walls and obstructions between the transmitter and receiver to a minimum.
A: Reduce the distance between the transmitter and receiver.
Q: Why is the OSD not displayed?
A: Ensure that the resolution on the display is set to 1080p.
A: Ensure that the link is not in standby mode, that is, there is a valid video link and a valid source is connected.
Q: Why is there no signal on my display?
A: Ensure that the receiver is powered on.
A: Ensure that the display is powered on.
A: Ensure that the receiver is properly connected to the display.
A: Ensure that the display is set to display video from the correct source, (HDMI 1, HDMI 2, and so on).
A: Disconnect then reconnect the HDMI cable between the receiver and the display.
A: Replace the HDMI cable.
A: Ensure that the video resolution is supported by the display.
A: Power-cycle the receiver and transmitter. You can also reset the transmitter by pressing the Reset button.
Q: Why is there no video over the wireless link?
A: Ensure that the transmitter is properly connected to the video source.
A: Ensure that the Link LED is lit.
A: Ensure that the source device is powered on.
A: Disconnect then reconnect the HDMI cable between the source device and the transmitter.
Q: Why is there abnormal color or noise on the display?
A: Disconnect then reconnect the HDMI cable between the receiver and the display.
A: Disconnect then reconnect the HDMI cable between the transmitter and the source.
A: Place the transmitter and receiver closer together, but no closer than 2m (6ft).
A: Keep the number of walls and obstructions between the transmitter and receiver to a minimum.
A: Power-cycle the receiver and transmitter. You can also reset the transmitter by pressing the Reset button.
Q: Why is there no audio?
A: Check the mute and volume settings on the display.
A: Check if the audio format setting on the source is compatible with the KW-14 system.
Q: Why does the IR remote control not work?
A: Ensure that the clear plastic film covering the battery contacts is removed before using the IR remote control.
A: Ensure that the IR remote control batteries are fully charged.
A: Ensure that there is enough distance between the receiver IR sensor and any fluorescent lights or radiation that could interfere with the IR signal.
Q: Why do I get a "Searching ..." message and the Link LED is flashing?
A: The KW-14 can take up to 60 seconds to establish a wireless link. If the wireless link is not established within 60 seconds, verify that the transmitter is powered on and not connected to another receiver.
Q: Why do I get a "Connected to source name, please check video source" message?
A: Check the HDMI connection between the transmitter and the video source.
Q: Why is the message "Please wait, this action may take up to 60 seconds" displayed for more than 60 seconds?
A: This message may appear during the registration process. If the message appears for more than 60 seconds, power-cycle both units, then restart the registration process.
A: Power-cycle the receiver and transmitter. You can also reset the transmitter by pressing the Reset button.
Q: Why does the Link LED flash rapidly and there is no video on the display?
A: Power-cycle the receiver. If the problem persists, contact Kramer technical support.
A: Power-cycle the receiver and transmitter. You can also reset the transmitter by pressing the Reset button.
Q: Why does a connection failure message appear and the message "Wireless off" is displayed?
A: If more than one registered transmitter is present and the receiver fails to connect with a transmitter within one to two minutes, the receiver goes into standby mode and shuts down the radio frequency transmission. To connect to the required source, press the Source button on the IR remote control and select the required source from the OSD menu.
Q: Why can my devices not establish a link, or the audio or video quality is poor?
A: Decrease the distance between the transmitter and receiver units, but not to less than 2m (6ft), and remove any obstructions between them.
9 Technical Specifications
| KW-14T | KW-14R | |
| INPUT: | 1 HDMI on an HDMI type A female connector | Internal antenna |
| OUTPUT: | 1 IR on a 3.5mm mini jack Internal antenna | 1 HDMI on an HDMI type A female connector |
| VIDEO RESOLUTION: | Up to 1080p @60Hz; 8, 10, or 12 bit color depth and VESA up to 1920 x 1080 @60Hz | |
| FORMATS: | RGB and YCbCr digital video | |
| MAXIMUM DATA RATE: | 6.75Gbps (2.25Gbps per channel) | |
| MAXIMUM PIXEL CLOCK: | 148.5MHz | |
| AUDIO FORMATS: | PCM, Dolby Digital 2/0Dolby Digital 2/0 SurroundDolby Digital 5.1Dolby Digital Surround EXDTS 2-channelDTS Digital Surround 5.1DTS 96/24 | |
| AUDIO RATE: | Digital audio from the HDMI input up to 6Mb/s | |
| IR COMMUNICATION: | Unidirectional, 38 kHz | |
| TRANSMISSION POWER: | <18dBm conducted | <12dBm per channel conducted |
| RECEIVING SENSITIVITY: | -75dBm | -65dBm |
| SYSTEM LATENCY: | <1ms | |
| STANDARDS: | HDMI with Deep Color, x.v.ColorTM and 3DHDCP 2.0—works with sources that support HDCP repeater mode DVI 1.0 | |
| RF COMMUNICATION FREQUENCY: | 5.19 to 5.795GHz(In Israel operation is limited to 5.15 to 5.35GHz) | |
| UNOBSTRUCTED TRANSMISSION RANGE: | 30m (100ft) | 30m (100ft) |
| POWER CONSUMPTION: | 5V DC 1A | 5V DC 1.2A |
| OPERATING TEMPERATURE: | 0° to +40°C (32° to 104°F) | |
| STORAGE TEMPERATURE: | -40° to +70°C (-40° to 158°F) | |
| HUMIDITY: | 10% to 90%, RHL non-condensing | |
| COOLING: | Convection, vented | |
| ENCLOSURE TYPE: | Plastic | |
| DIMENSIONS: | 8.0cm x 10.2cm x 3.6cm (3.15" x 4.02" x 1.42") W, D, H | 9.5cm x 9.5cm x 3.4cm (3.74" x 3.747" x 1.34") W, D, H |
| WEIGHT: | 0.1 kg (0.22lbs.) approx. | 0.1 kg (0.22lbs.) approx. |
| SHIPPING WEIGHT: | 0.45kg (1.0lbs) approx. | |
| ENVIRONMENTAL REGULATORY COMPLIANCE: | Complies with appropriate requirements of RoHs and WEEE | |
| VIBRATION: | ISTA 1A in carton (International Safe Transit Association) | |
| COMPLIANCE STANDARDS: | CE, c-UL, UL | |
| EMMISSION STANDARDS: | CE, C-tick, FCC Class B, ICES, VCCI, KC | |
| INCLUDED ACCESSORIES: | 1 Power supply 5V DC 2A2 HDMI cables 0.9m (2.95ft) C-HM/HM-31 IR Emitter cable KW-14 | |
Note: when multiple displays are connected, the name of the manufacturer in the EDID is shown as "@@@@".
9.1 Country Certification
The KW-14T and KW-14R are wireless devices and are subject to wireless certification restrictions. They are currently certified for use in various countries including the US and EU. Consult your local sales office for details regarding certification in your country.
The KW-14T and KW-14R are certified in the countries listed in the following table.
| Country Certification | |
| Australia | Liechtenstein |
| Austria | Lithuania |
| Belgium | Luxembourg |
| Bulgaria | Malta |
| Croatia | Netherlands |
| Cyprus | New Zealand |
| Czech Republic | Norway |
| Denmark | Poland |
| Estonia | Portugal |
| Finland | Romania |
| France | Slovakia |
| Germany | Slovenia |
| Greece | Spain |
| Hungary | Sweden |
| Iceland | Switzerland |
| Ireland | Turkey |
| Italy | United Kingdom |
| Japan | United States |
| Latvia | |
9.2 Supported Video Resolutions and Rates
Note: The Connected/Link LED flashes to indicate that the input video rate being received is not supported.
| Format | Resolution | Refresh Rates (Hz) | |||||||||
| 50Hz | 60Hz | 72Hz | 23.96Hz | 24Hz | 25Hz | 59.94Hz | 29.97Hz | 30Hz | 70Hz | ||
| 480i | 720 (1440) x 480 | X | X | ||||||||
| 480p | 640 x 480 | X | X | ||||||||
| 720 x 480 | X | X | |||||||||
| 576i | 720 (1440) x 576 | X | |||||||||
| 576p | 720 x 576 | X | |||||||||
| 720p | 1280 x 720 | X | X | X | |||||||
| 1080i | 1920 x1080 | X | X | X | |||||||
| 1080p | 1920 x 1080 | X | X | X | X | X | X | X | X | ||
| VGA | 640 x 480 | X | X | ||||||||
| SVGA | 800 x 600 | X | X | ||||||||
| XGA | 1024 x 768 | X | X | ||||||||
| WXGA | 1280 x 800 | X | |||||||||
| WXGA | 1366 x 768 | X | |||||||||
| WXGA+ | 1440 x 900 | X | |||||||||
| SXGA+ | 1400 x 1050 | X | |||||||||
| 1600 x 900 | X | ||||||||||
| WSXGA+ | 1680 x 1050 | X | |||||||||
| 3D Rates | |||||||||||
| 720p | 1280 x 720 | X | X | X | X | X | X | X | |||
| 1080i | 1920 x 1080 | X | X | X | |||||||
| 1080p | 1920 x 1080 | X | X | X | X | X | X | X | |||
9.3 KW-14T Mini USB Pinout
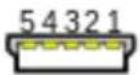
Figure 11: KW-14T Mini USB Pinout
| USB Pin Number | Description |
| 1 | +5V |
| 2 | Do not connect |
| 3 | Do not connect |
| 4 | Do not connect |
| 5 | 0V Ground |
9.4 Operating Frequencies
The KW-14T and KW-14R employ the DFS (Dynamic Frequency Selection) technology which actively monitors the RF spectrum to select the most appropriate operating frequencies. The table below lists the operating frequencies and their range, (DFS or non-DFS).
| Regions | |||
| Frequency (MHz) | Range | US | Europe |
| 5190 | Non-DFS | X | X |
| 5230 | X | X | |
| 5270 | DFS | X | X |
| 5310 | X | X | |
| 5510 | X | X | |
| 5550 | X | X | |
| 5590 | X | ||
| 5630 | X | ||
| 5670 | X | X | |
| 5755 | Non-DFS | X | |
| 5795 | X | ||
Notes:
- Up to four transmitters can operate in the same room or environment. Each transmitter occupies one of the frequencies listed in the above table
- Some Wi-Fi routers and access points also use the 5GHz frequency band. Monitor the 5GHz frequency usage between these products and multiple KW-14T and KW-14R units and plan systems to avoid interference.
10 FCC Radio Frequency Interference Statement
This equipment has been tested and found to comply with the limits for a Class B digital device, pursuant to part 15 of the FCC Rules. These limits are designed to provide reasonable protection against harmful interference in a residential installation. This equipment generates uses and can radiate radio frequency energy and, if not installed and used in accordance with the instructions, may cause harmful interference to radio communications. However, there is no guarantee that interference will not occur in a particular installation. If this equipment does cause harmful interference to radio or television reception, which can be determined by turning the equipment off and on, the user is encouraged to try to correct the interference by one or more of the following measures:
• Reorient or relocate the receiving antenna
- Increase the separation between the equipment and receiver
- Connect the equipment into an outlet on a circuit different from that to which the receiver is connected
- Consult the dealer or an experienced radio/TV technician for help
Kramer Electronics is not responsible for any radio or communication interference caused by using other than specified or recommended cables and battery or by unauthorized changes or modifications to this equipment. Changes or modifications not expressly approved by the manufacturer could void the user's authority to operate the equipment.
This device complies with part 15 of the FCC Rules. Operation is subject to the following two conditions:
- This device may not cause harmful interference,
—and— - This device must accept any interference received, including interference that may cause undesired operation.
The warranty obligations of Kramer Electronics Inc. ("Kramer Electronics") for this product are limited to the terms set forth below:
What is Covered
This limited warranty covers defects in materials and workmanship in this product.
What is Not Covered
This limited warranty does not cover any damage, deterioration or malfunction resulting from any alteration, modification, improper or unreasonable use or maintenance, misuse, abuse, accident, neglect, exposure to excess moisture, fire, improper packing and shipping (such claims must be presented to the carrier), lightning, power surges, or other acts of nature. This limited warranty does not cover any damage, deterioration or malfunction resulting from the installation or removal of this product from any installation, any unauthorized tampering with this product, any repairs attempted by anyone unauthorized by Kramer Electronics to make such repairs, or any other cause which does not relate directly to a defect in materials and/or workmanship of this product. This limited warranty does not cover cartons, equipment enclosures, cables or accessories used in conjunction with this product.
Without limiting any other exclusion herein, Kramer Electronics does not warrant that the product covered hereby, including, without limitation, the technology and/or integrated circuit(s) included in the product, will not become obsolete or that such items are or will remain compatible with any other product or technology with which the product may be used.
How Long this Coverage Lasts
The standard limited warranty for Kramer products is seven (7) years from the date of original purchase, with the following exceptions:
- All Kramer VIA products are covered by a standard three (3) year warranty for VIA hardware and a standard one (1) year warranty for firmware and software updates. (An extended software warranty plan for an additional 2 years can be purchased separately).
- All Kramer fiber optic cables and adapters, all Kramer speakers and Kramer touch panels are covered by a standard one (1) year warranty.
- All Kramer Cobra products, all Kramer Calibre products, all Kramer Minicom digital signage products, all HighSecLabs products, all streaming, and all wireless products are covered by a standard three (3) year warranty.
- All Sierra Video MultiViewers are covered by a standard five (5) year warranty.
- Sierra switchers & control panels are covered by a standard seven (7) year warranty (excluding power supplies and fans that are covered for three (3) years).
- K-Touch software is covered by a standard one (1) year warranty for software updates.
- All Kramer passive cables are covered by a ten (10) year warranty.
Who is Covered
Only the original purchaser of this product is covered under this limited warranty. This limited warranty is not transferable to subsequent purchasers or owners of this product.
What Kramer Electronics Will Do
Kramer Electronics will, at its sole option, provide one of the following three remedies to whatever extent it shall deem necessary to satisfy a proper claim under this limited warranty:
- Elect to repair or facilitate the repair of any defective parts within a reasonable period of time, free of any charge for the necessary parts and labor to complete the repair and restore this product to its proper operating condition. Kramer Electronics will also pay the shipping costs necessary to return this product once the repair is complete.
- Replace this product with a direct replacement or with a similar product deemed by Kramer Electronics to perform substantially the same function as the original product.
- Issue a refund of the original purchase price less depreciation to be determined based on the age of the product at the time remedy is sought under this limited warranty.
What Kramer Electronics Will Not Do Under This Limited Warranty
If this product is returned to Kramer Electronics or the authorized dealer from which it was purchased or any other party authorized to repair Kramer Electronics products, this product must be insured during shipment, with the insurance and shipping charges prepaid by you. If this product is returned uninsured, you assume all risks of loss or damage during shipment. Kramer Electronics will not be responsible for any costs related to the removal or re-installation of this product from or into any installation. Kramer Electronics will not be responsible for any costs related to any setting up this product, any adjustment of user controls or any programming required for a specific installation of this product.
How to Obtain a Remedy Under This Limited Warranty
To obtain a remedy under this limited warranty, you must contact either the authorized Kramer Electronics reseller from whom you purchased this product or the Kramer Electronics office nearest you. For a list of authorized Kramer Electronics resellers and/or Kramer Electronics authorized service providers, visit our web site at www.kramerav.com or contact the Kramer Electronics office nearest you. In order to pursue any remedy under this limited warranty, you must possess an original, dated receipt as proof of purchase from an authorized Kramer Electronics reseller. If this product is returned under this limited warranty, a return authorization number, obtained from Kramer Electronics, will be required (RMA number). You may also be directed to an authorized reseller or a person authorized by Kramer Electronics to repair the product. If it is decided that this product should be returned directly to Kramer Electronics, this product should be properly packed, preferably in the original carton, for shipping. Cartons not bearing a return authorization number will be refused.
Limitation of Liability
THE MAXIMUM LIABILITY OF KRAMER ELECTRONICS UNDER THIS LIMITED WARRANTY SHALL NOT EXCEED THE ACTUAL PURCHASE PRICE PAID FOR THE PRODUCT. TO THE MAXIMUM EXTENT PERMITTED BY LAW, KRAMER ELECTRONICS IS NOT RESPONSIBLE FOR DIRECT, SPECIAL, INCIDENTAL OR CONSEQUENTIAL DAMAGES RESULTING FROM ANY BREACH OF WARRANTY OR CONDITION, OR UNDER ANY OTHER LEGAL THEORY. Some countries, districts or states do not allow the exclusion or limitation of relief, special, incidental, consequential or indirect damages, or the limitation of liability to specified amounts, so the above limitations or exclusions may not apply to you.
Exclusive Remedy
TO THE MAXIMUM EXTENT PERMITTED BY LAW, THIS LIMITED WARRANTY AND THE REMEDIES SET FORTH ABOVE ARE EXCLUSIVE AND IN LIEU OF ALL OTHER WARRANTIES, REMEDIES AND CONDITIONS, WHETHER ORAL OR WRITTEN, EXPRESS OR IMPLIED. TO THE MAXIMUM EXTENT PERMITTED BY LAW, KRAMER ELECTRONICS SPECIFICALLY DISCLAIMS ANY AND ALL IMPLIED WARRANTIES, INCLUDING, WITHOUT LIMITATION, WARRANTIES OF MERCHANTABILITY AND FITNESS FOR A PARTICULAR PURPOSE. IF KRAMER ELECTRONICS CANNOT LAWFULLY DISCLAIM OR EXCLUDE IMPLIED WARRANTIES UNDER APPLICABLE LAW, THEN ALL IMPLIED WARRANTIES COVERING THIS PRODUCT. INCLUDING WARRANTIES OF MERCHANTABILITY AND FITNESS FOR A PARTICULAR PURPOSE, SHALL APPLY TO THIS PRODUCT AS PROVIDED UNDER APPLICABLE LAW.
IF ANY PRODUCT TO WHICH THIS LIMITED WARRANTY APPLIES IS A "CONSUMER PRODUCT" UNDER THE MAGNUSON-MOSS WARRANTY ACT (15 U.S.C.A. §2301, ET SEQ.) OR OTHER APPLICABLE LAW, THE FOREGOING DISCLAIMER OF IMPLIED WARRANTIES SHALL NOT APPLY TO YOU, AND ALL IMPLIED WARRANTIES ON THIS PRODUCT, INCLUDING WARRANTIES OF MERCHANTABILITY AND FITNESS FOR THE PARTICULAR PURPOSE, SHALL APPLY AS PROVIDED UNDER APPLICABLE LAW.
Other Conditions
This limited warranty gives you specific legal rights, and you may have other rights which vary from country to country or state to state. This limited warranty is void if (i) the label bearing the serial number of this product has been removed or defaced, (ii) the product is not distributed by Kramer Electronics or (iii) this product is not purchased from an authorized Kramer Electronics reseller. If you are unsure whether a reseller is an authorized Kramer Electronics reseller, visit our web site at www.kramerav.com or contact a Kramer Electronics office from the list at the end of this document. Your rights under this limited warranty are not diminished if you do not complete and return the product registration form or complete and submit the online product registration form. Kramer Electronics thanks you for purchasing a Kramer Electronics product. We hope it will give you years of satisfaction



P/N:

Rev:


SAFETY WARNING
Disconnect the unit from the power supply before opening and servicing
For the latest information on our products and a list of Kramer distributors, visit our Web site to find updates to this user manual.
We welcome your questions, comments, and feedback.
- Step 1: Check what's in the box
- Step 2: Connect the inputs and outputs
- Step 3: Connect the power
- Step 4: Register the Receiver with the Transmitter
- Front Panel Buttons
- To register a receiver with a transmitter using the front panel buttons:
- IR Remote Control
- To register a receiver with a transmitter using the IR remote control:
- Contents
- Figures
- Introduction
- Getting Started
- Achieving the Best Performance
- Safety Instructions
- Recycling Kramer Products
- Overview
- The KW-14T and KW-14R support:
- Defining the KW-14T Wireless HD Transmitter and Receiver
- Defining the KW-14T Wireless HD Transmitter
- Defining the KW-14R Wireless HD Receiver
- Connecting the KW-14T and KW-14R
- Connecting the KW-14T and KW-14R
- To connect the KW-14T and the KW-14R as illustrated in the example in
- Figure 5:
- Registering a Transmitter and Receiver
- Registering by Using the Buttons on the Devices
- To register a transmitter with a receiver by using the panel buttons:
- Registering Using the IR Remote Control
- To register a transmitter with a receiver with the IR remote control:
- Registering Multiple Receivers
- To register an additional receiver with a transmitter:
- Standby Mode
- Using IR Remote Control and OSD Menu
- Using the Setup Menu
- Unregistering a Transmitter
- To unregister a transmitter from a receiver:
- Modifying a Video Source Name
- To modify a video source name:
- Mounting the KW-14T and the KW-14R
- Mounting Locations Best Practices
- Mounting the Transmitter and Receiver
- To mount the transmitter or receiver to a wall or furniture:
- Frequently Asked Questions
- Technical Specifications
- Country Certification
- Supported Video Resolutions and Rates
- KW-14T Mini USB Pinout
- Operating Frequencies
- Notes:
- FCC Radio Frequency Interference Statement
- What is Covered
- What is Not Covered
- How Long this Coverage Lasts
- Who is Covered
- What Kramer Electronics Will Do
- What Kramer Electronics Will Not Do Under This Limited Warranty
- How to Obtain a Remedy Under This Limited Warranty
- Limitation of Liability
- Exclusive Remedy
- Other Conditions
- SAFETY WARNING
Brand : Kramer
Model : KW-14
Category : Audio/video extender