
SW800 - Hi-Fi System AmpliVox - Free user manual and instructions
Find the device manual for free SW800 AmpliVox in PDF.


User questions about SW800 AmpliVox
0 question about this device. Answer the ones you know or ask your own.
Ask a new question about this device
Download the instructions for your Hi-Fi System in PDF format for free! Find your manual SW800 - AmpliVox and take your electronic device back in hand. On this page are published all the documents necessary for the use of your device. SW800 by AmpliVox.
USER MANUAL SW800 AmpliVox
AMPLIVox® PORTABLE SOUND SYSTEMS
User Guide
SW800 with Bluetooth
Battery Powered PA System
READ FIRST ABOUT BATTERY OPERATIONS!
BY OBSERVING A FEW SIMPLE RULES, YOU CAN EXTEND THE LIFESPAN OF THE SEALED LEAD ACID (SLA) BATTERIES THAT OPERATE YOUR AMPLIVOX BATTERY POWERED PORTABLE PA SYSTEM OR ACCESSORY:
ALWAYS KEEP YOUR AMPLIVOX PORTABLE PA SYSTEM PLUGGED IN AND CHARGING WHEN NOT IN USE.
FOR LONG TERM STORAGE (OVER 1 MONTH) WE RECOMMEND DISCONNECTING THE SLA BATTERIES TO AVOID GRADUAL, CONTINUOUS DISCHARGE.
ALWAYS STORE SLA BATTERIES IN A CHARGED CONDITION WHEN REMOVED FROM SERVICE.
NEVER LET THE BATTERY VOLTAGE DROP BELOW 10V.
FOR SLA BATTERIES IN STORAGE, APPLY A TOPPING CHARGE EVERY SIX MONTHS.
AVOID REPEATED DEEP DISCHARGES. THIS PRACTICE WILL CUT THE LIFE OF THE BATTERY SIGNIFICANTLY.
.AVOID OPERATING SLA BATTERIES AT ELEVATED AMBIENT TEMPERATURES.
BATT STAT INDICATOR - RED = NO BATTERY POWER, YELLOW = 1 HOUR LEFT. CHARGE BATTERY OVERNIGHT FOR BEST RESULTS.
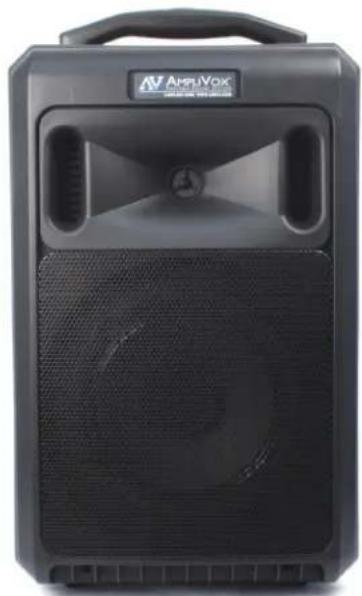
natural_image
Exterior view of a black AmpiVox audio amplifier device (no visible text or symbols on body)Thank you for choosing the SW800 PA System from AmpliVox Portable Sound Systems.
We are excited in introducing this truly unique system. Our system combines flexibility with functionality. Please refer to this user guide as you enjoy the unique capabilities of another quality product from AmpliVox Portable Sound Systems.
We encourage you to visit our website www.ampli.com to register your product for its warranty coverage, sign up to receive our newsletter, download our catalog, and learn more about the complete line of AmpliVox audio visual products, including portable PA systems, and lecterns.
TABLE OF CONTENTS
GETTING STARTED/QUICK SETUP.... 3
CONTROLS / BACK PANEL 4
AUDIO FUNCTIONS & ADJUSTMENT 5
UHF WIRELESS BODYPACK 5
WIRELESS HANDHELD MICROPHONE 6
BLUETOOTH MODULE 6
CD / MEDIA PLAYER Á Á ....7
IMPORTANT SAFETY INSTRUCTIONS
Before using this product, read the instruction manual for important safety information. Please retain this manual for future reference and warranty information.
Troubleshooting & Servicing
Do not attempt to service or repair the device yourself. Refer all servicing to qualified service personnel. Do not attempt to modify the device in anyway. Doing so could invalidate your warranty.
Cleaning
When cleaning the device, please use a soft, dry cloth. Never use benzene, paint-thinner, or other chemicals on the device.
Location
Place the device in stable location, so it will not fall causing damage to the device or bodily harm.
Intended use
The product may only be used with the original parts intended for it. The intended use includes adherence to the specified installation instructions. The manufacturer accepts no liability for damage arising due to improper use.
WARNING: Changes or modifications to this unit not expressly approved by the party responsible for compliance could void the users authority to operate the equipment.
IMPORTANT
This device complies with Part 15 of the FCC Rules. Operation is subject to the following two conditions:
(1) This device may not cause harmful interference, and (2) this device must accept any interference received, including interference that may cause undesired operation.
The unit's circuitry may cause interference to nearby radios. To prevent interference, either switch the unit off or move away from the affected radio.
NOTE: This equipment complies within the limits for a class B digital device, pursuant to Part 15 of the FCC Rules.
These limits are designed to provide reasonable protection against harmful interference in a residential installation.
This equipment generates, uses and can radiate radio frequency energy and, if not installed and used in accordance with the instructions, may cause harmful interference to radio communications. However, there is no guarantee that interference will not occur in a particular installation. If this equipment does cause harmful interference to radio or television reception, which can be determined by turning the equipment off and on, the user is encouraged to try to correct the interference by one or more of the following measures:
- Increase the separation between the equipment and receiver.
- Connect the equipment into an outlet on a circuit different from that to which the receiver is connected.
- Consult the dealer or an experienced radio / TV technician for help.
NOTE: Shielded cables may be required to be used with this unit to en-sure compliance with the Class B FCC limits.
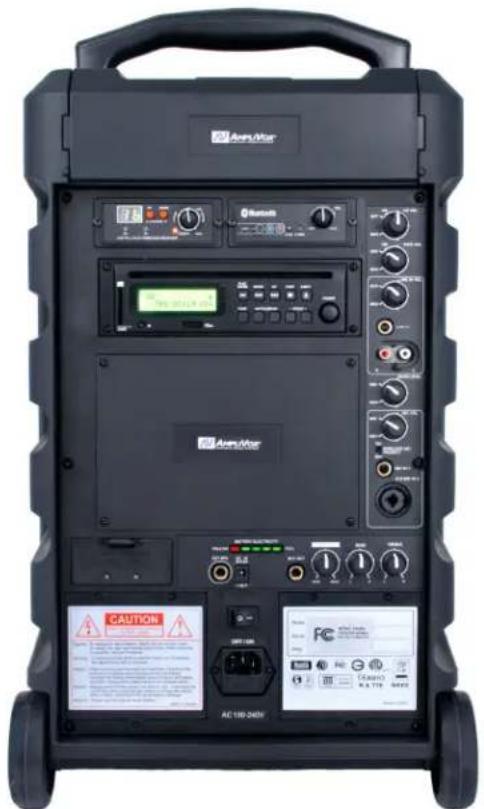
- Power unit on with rocker switch.
- The WIRELESS RECEIVER has its own POWER / VOLUME Control. Turn Receiver Power On. A Frequency Channel will appear in the Channel Display. Press UP/DOWN Buttons to select a channel. Channel number must match channel number on wireless transmitter.
- Wireless Bodypack Transmitter- Before turning on the transmitter, set the transmitter channel selector switch to the same number that is displayed on the receiver. Select channels 1-16. Install 2 - ÉAAÉ batteries into battery compartment of wireless transmitter pack.
- MAIN BATTERY STATUS indicator - Red = no battery power, If four GREEN LED is are glowing, means fully charged. Charge batteries overnight for best results.
If you need further assistance, please call 1-800-267-5486, 8am-6pm M-F CST.
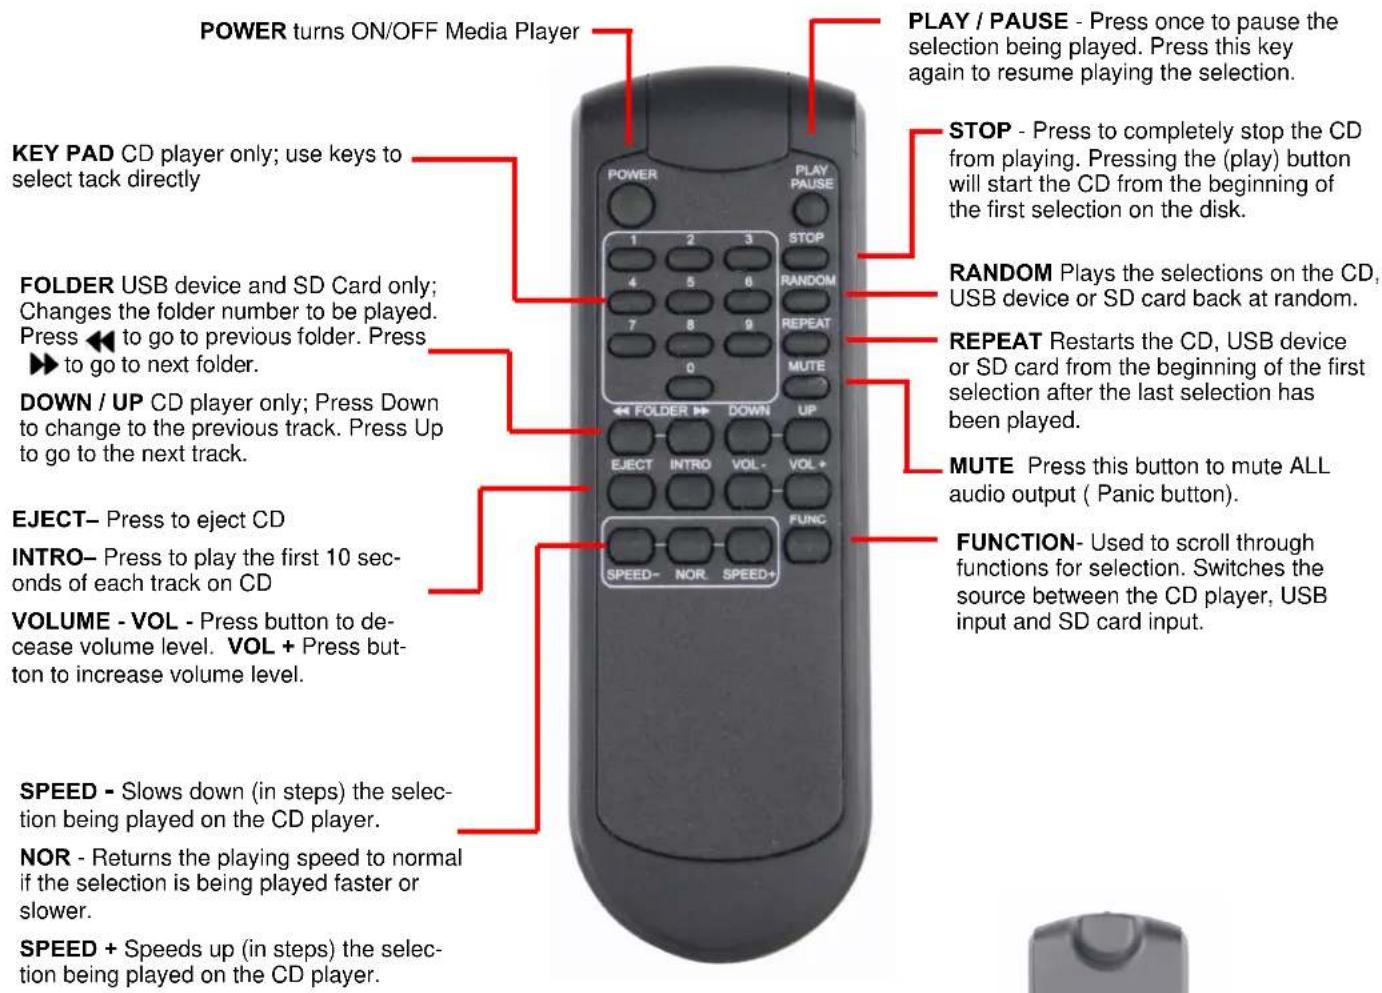
PLEASE NOTE: THE REMOTE DOES NOT TURN THE UNIT ON OR OFF. YOU MUST DO THAT ON THE CONTROL PANEL
SW800 SPECIFICATIONS
Rated Power Output 100W RMS
Speaker 8" Full Range
Battery (2) 12 volt rechargeable SLA, 5 AH, User accessible and replaceable
AC Power 100-240 V Auto sensing, 50/60 Hz,
Wireless Range Up to 300 Feet
UHF Wireless Frequency 678É 697 MHz
Frequency Response: 40Hz to 20Khz
Sensitivity 96dB
Equalization (tone) Separate Bass and Treble
Line output: Buffered, 600 ohm, 1/4in.jack (pre fader)
Microphone Input: 1/4" and Balanced Combo XLR / 1/4"
Weight: 35 lbs.
Dimensions (HWD): 20" H x 13" W x 11" D
Extension Handle: 21 1/2"
Warranty 1 year Limited Warranty; Remote Control, Wireless Microphones, Wireless Receiver, Bluetooth Module, CD / Media Player, Rechargeable SLA Batteries.
OPERATION
POWER SWITCH: When power switch is in the ON position, the BATTERY STATUS LIGHT (RED) will be illuminated. The other 4 green ledls will indicate the condition of the battery. Each green led represents about 25% of battery charge. If no green ledls are lit, battery must be recharged before use.
To charge the batteries, connect the unit to 110-220VAC using the supplied power cord. The 4 green ledls will flash indicating battery is charging. The batteries will charge when unit is operating with AC power, HOWEVER the unit will charge faster with the power switch in the "off" position.
THE SW800 MUST BE PLUGGED IN AND CHARGING WHEN NOT IN USE TO MAXIMIZE BATTERY LIFE. RECHARGING THE UNIT ONLY WHEN THE BATTERY STATUS LIGHT IS RED WILL SHORTEN THE USEFUL LIFE OF THE BATTERIES.
FUSE: When the AC cord is plugged in, and the battery charging does not start, please check fuse. There is a fuse in the AC jack. It is identified on the plastic with a drawing of a fuse.
Detach the AC cord from the unit before replacement
This fuse protects the AC circuitry. Use a flat blade screwdriver in the slot on the top of fuse holder to slide the fuse holder out. Replace the fuse with a 10A/250V fuse if needed.
If after replacing fuse, the SW800 does not Épower onÉ, please call AmpliVox Customer Service at 800-267-5486.
WARNING! RISK OF SHOCK! DO NOT OPEN UNIT NO USER SERVICEABLE PARTS INSIDE!
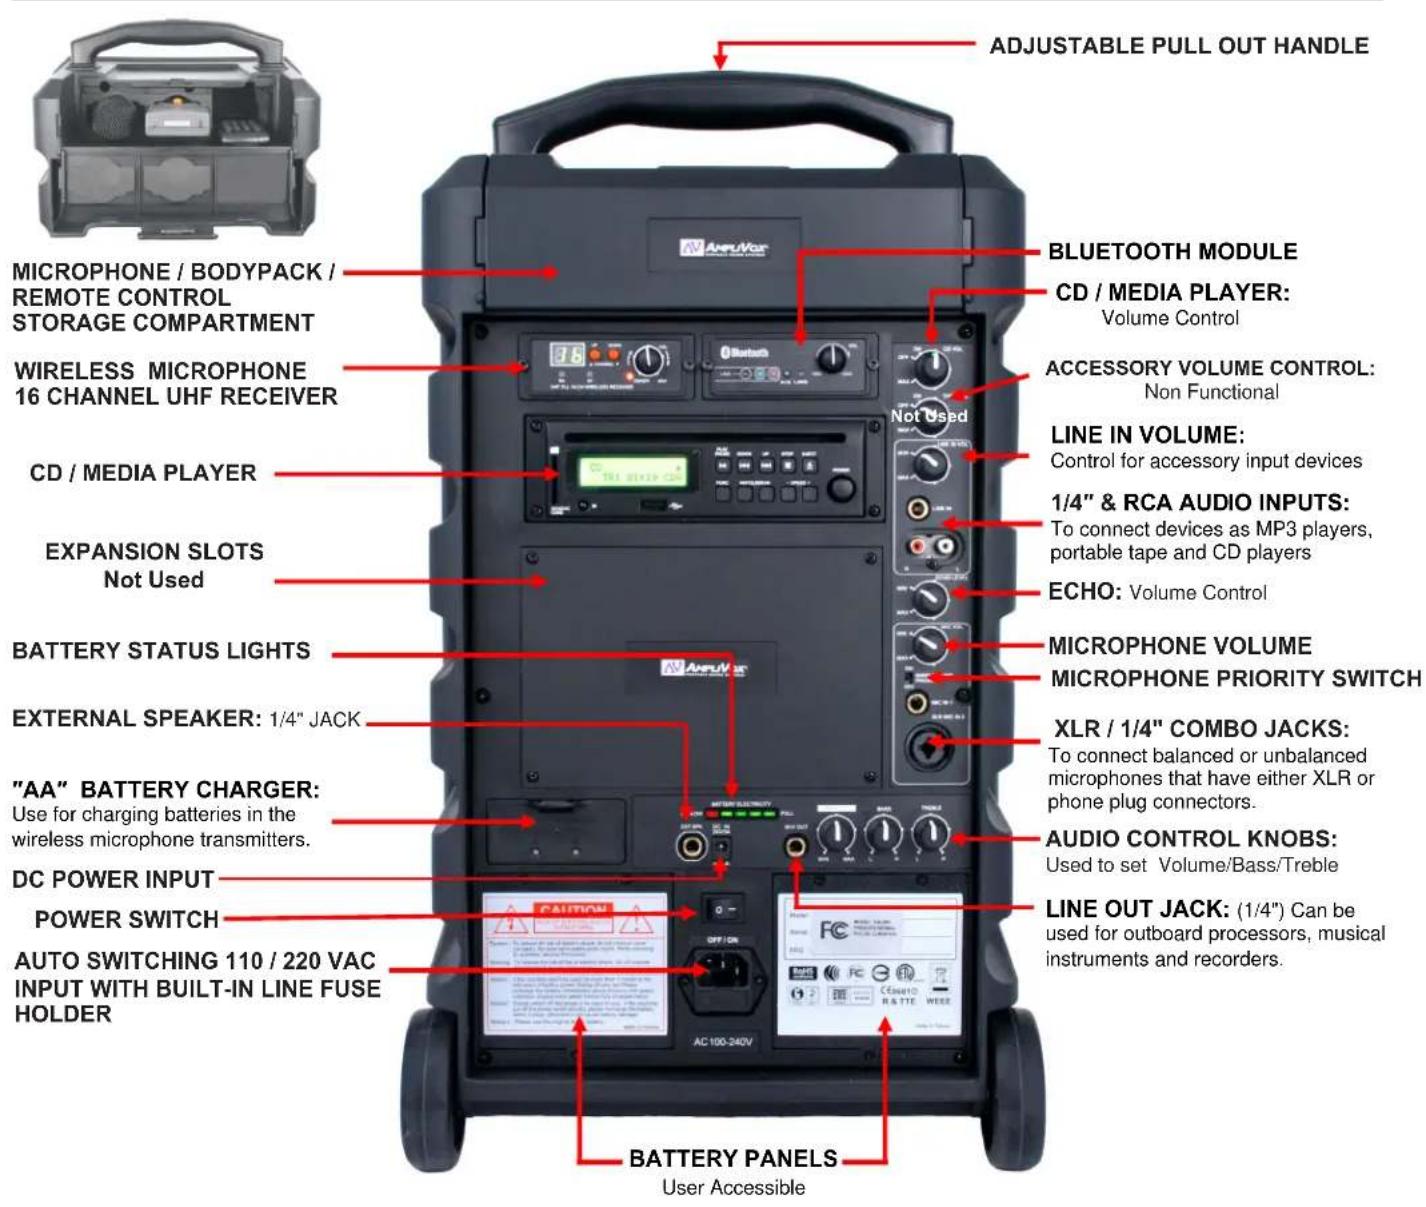
3 MASTER AUDIO CONTROLS:
VOLUME: This is the master volume control for the system.
BASS: This control cuts or boosts the bass level.
TREBLE: This control cuts or boosts the treble level.
WIRELESS UHF RECEIVER: A separate volume control can be used to set level on the wireless microphone. Set WIRELESS LEVEL and MASTER VOLUME level at desired setting.
CD / MEDIA PLAYER LEVEL: Use to change output level of player. Set CD LEVEL and MASTER VOLUME level at desired setting.
ACCESSORY VOLUME CONTROL: NOT USED WITH THIS MODEL
LINE IN INPUTS: Add pre-recorded music to your presentations from an external source such as a computer or MP3 player can be used by connecting to the 1/4 jack or the L/R RCA jacks. A separate LINE IN VOLUME CONTROL is also provided for controlling sound level of the external source.
ECHO CONTROL: This is a sound effect feature that makes the audio signal sound as though it's in a large area, such as a large cathedral or a cave, by repeating the sounds that come into the SW800 through the microphones or any of the accessories. The listener will hear the original sound, plus the repeated sounds created by this feature.
MICROPHONE INPUTS: One 1/4 ^♠ microphone jack and one combination XLR / 1/4 ^♠ jack (this jack will accept either type microphone).
AA BATTERY CHARGER: Pull out drawer recharges both sets of batteries that are used in the wireless handheld microphone and the wireless microphone body pack transmitter.
ONLY USE RECHARGEABLE BATTERIES. CAN NOT BE USED FOR ALKALINE BATTERIES. ALKALINE BATTERIES MAY EXPLODE AND CAUSE A FIRE.
Red LED means charging. Green LED means fully charged.
LINE OUT JACKS: The SW800 panel has 2É ¼ phone jacks labeled EXT SPK / MIX OUT
16 CHANNEL UHF WIRELESS
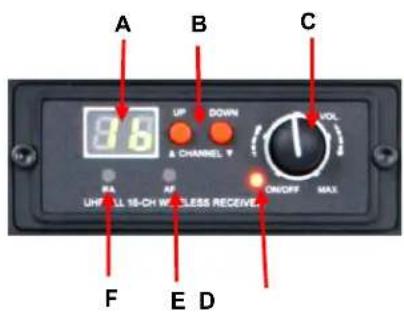
WIRELESS RECEIVER PANEL
- Channel Display (A)
- Select Buttons - Manual Channel Selection (B)
- On/Off/Volume Control (C)
- On Indicator Light (D)
• AF - Audio Frequency Indicator (E)
• RF - Radio Frequency Indicator (F)
RECEIVER / TRANSMITTER SETUP:
- The receiver has its own POWER / VOLUME Control (C). Turn Power On. A Frequency Channel will appear in the Channel Display (A). Press Select Buttons (B) to select a channel. Channel number must match channel number on wireless transmitter or wireless microphone.
- The wireless transmitter bodypack is operated by 2 - "AA" 1.5 Volt Rechargeable batteries. Slide off battery cover (G) and install batteries as shown. Make certain the battery is fully seated in its compartment so the cover slides in place easily. Battery life with rechargeable batteries is approximately 8 hours of operating time.
- Select a channel (1-16) on front panel (H) using the knob to select channel number. Channel selected should match channel on receiver. When transmitter and receiver are set to correct channel, the RF indicator (F) will glow red when transmitter is turned on.
- Plug the Lapel microphone into the Mic Input Jack (I). The microphone can be clipped to a necktie or other clothing, using the supplied clip. The lapel mic should be placed under the chin, as close to the center of the body as possible
- Slide the power ON/OFF switch (J) to the ON position (the LED indicator light will illuminate green). Recharge batteries when this LED turns red.
IMPORTANT: BODYPACK GOES INTO STORAGE COMPARTMENT, ANTENNA FIRST, WITH ANTENNA POSITIONED ON LEFT SIDE
Wireless Transmitter - Bodypack
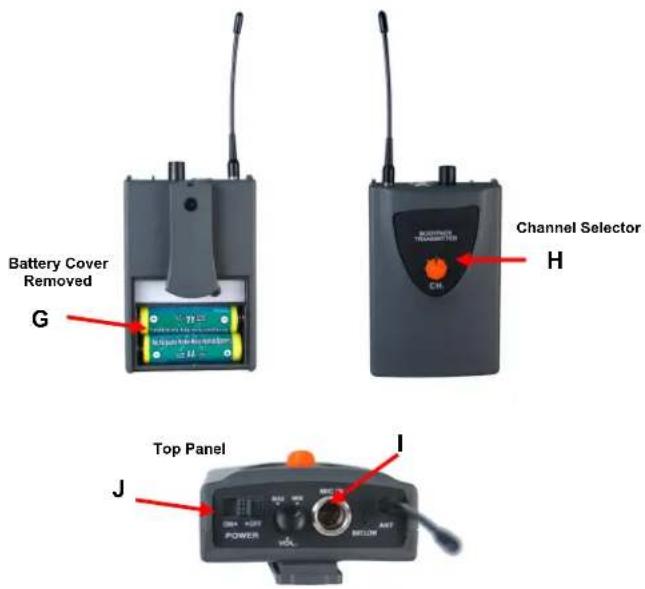
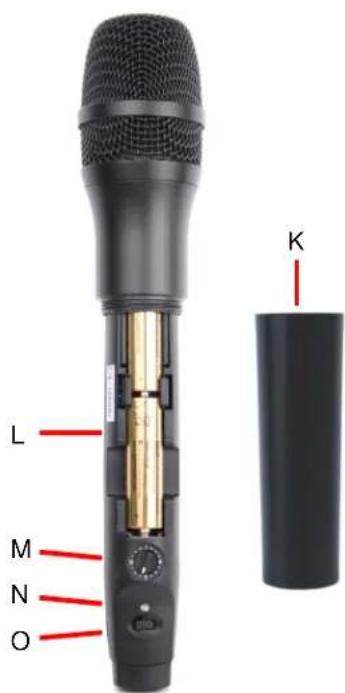
- Battery Compartment: Screw off the lower bottom section of microphone (K) and insert 2 - "AA" 1.5 Volt rechargeable batteries as shown (L). Battery life with rechargeable batteries is approximately 8 hours of operating time.
- Channel Selector Switch: Select a channel (1-16) on microphone using the knob (M) to select channel number. Channel selected should match channel on receiver. When microphone and receiver are set to correct channel, the RF indicator (F) on receiver will glow red when microphone is turned on.
- Screw back on the lower bottom section of microphone (K).
- Battery Indicator: Power On - Green. When batteries are low will turn RED (N).
• Power ON/OFF Switch (O). - NOTE: Keep batteries always charged and remove when not using for long periods of time.
• IMPORTANT: INSERT BASE OF MICROPHONE FIRST WHEN PLACING INTO THE STORAGE COMPARTMENT.
BLUETOOTH MODULE
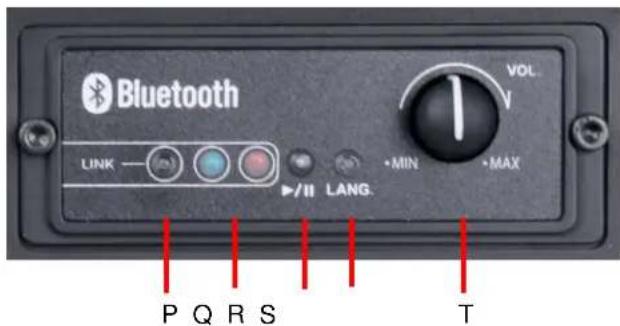
- With main power switch on, press "LINK" button (P) to turn Bluetooth module on and hold for 4 seconds to enter into the pairing mode.
- The BLUE/RED LED's (Q) will start to flash, searching for a Bluetooth signal. Search function will stay active for 10 minutes. If no signal is found, this function will shut off. During the search function you will hear instructions telling you to turn on your Bluetooth device for pairing. On your Bluetooth menu of your device, choose pin code 0000. Once paired, blue LED will stay on.
- Π / II (R) Use this button to move to the next song or to pause. When paused you will need to press again to start playing.
• LANG (S) Use this button to change the language of the Bluetooth pairing instructions. Choices: English/Chinese/Spanish/French/German.
• VOLUME CONTROL (T) Use to adjust the volume of the Bluetooth material. - NOTE: Always turn off Bluetooth power (LINK Button) before turning main power off. If you turn off main power first, you will need to cycle thru a power off/on the next time you use the Bluetooth module.
The Bluetooth® word mark and logos are registered trademarks owned by Bluetooth SIG, Inc. and any use of such marks by Amplivox Portable Sound Systems is under license. Other trademarks and trade names are those of their respective owners.
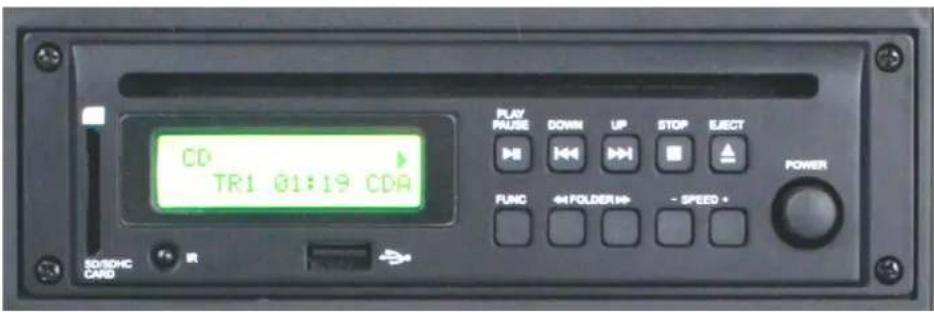
- HANDLING THE DISCS: Always insert a CD, CD-R, CD-R/W into player with label side up! Proper handling and care of CDs should be taken to insure proper operation. Fingerprints and dust should be carefully wiped off the surface, starting from the center of the disc and moving out towards the edge. It is best to avoid touching the surface opposite the label to prevent scratching or leaving fingerprints on the surface area. Always remove disc from player before transporting unit.
- LOADING AND UNLOADING DISCS: To insert disc, gently insert into disc player slot until engagement mechanism pulls CD into player. Do not force CD into unit. To remove disc press STOP/EJECT button twice and gently remove CD, place CD back into jewel case.
- NORMAL DISC PLA Y: Insert CD into player and press PLAY/PAUSE ▶ button if CD hasn't already begun to play. Disc play will start at first track. Player display will indicate track number and time.
- REMOTE: To operate the CD player with the remote control, the button on the remote labeled CD must be pressed first, in the same manner as when adjusting the volume for the CD player. Once the CD button is pressed, all buttons will continue to control their respective functions on the CD Player until one of the other input buttons is pressed.
INPUTS
- USB 2.0 / SD CARD SLOT: For Flash / Thumb drive memory devices and SD cards containing MP3 files.
FUNCTIONS
- POWER: Press Power button to turn CD Player on. This knob increases the output level when turned clockwise, and decreases the volume when turned counter clockwise. This is in addition to the volume control function CD Volume in the preamp, and is a convenience for balancing the output with other sources. For optimum playback leave the master volume at 1 o'clock and adjust the preamp volume for proper listening levels.
- FUNC: SD /USB/CD Button on far left of second row of buttons, selects between SD, USB and CD playback.
CD FUNCTIONS (top row of buttons)
- PLAY/PAUSE starts playback of the current selection, and also stops the selection when pressed during playback. When the button is pressed again, playback resumes at the point where the selection was stopped.
• Down skips back to the previous selection.
• UP skips forward to the next selection.
• ■ STOP stops the selection from playing. - EJECT press and hold the button for a couple seconds. After the CD has stopped playing, CD disk will eject from the player.
-
SPEED - Pitch Control (second row of buttons)
-
Press and hold + to speed up playback material over a range.
- Press and hold - to slow down playback material over a range.
USB 2.0 / SD CARD FUNCTIONS (second row of buttons)
- FOLDER button selects which folder in USB or SD storage devices to playback.
- moves forward on the current folder or selection.
• backs up on the current folder or selection.
The remote control for the SW800 is used only to operate the controls of the Media Player ONLY from the backside (control side). The remote control can be used up to 50 feet from player. Must be in direct line of sight for best results.
natural_image
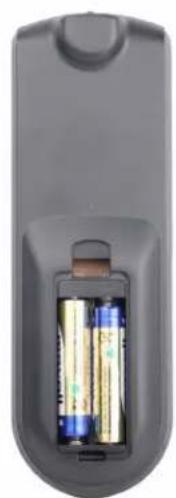
Close-up of a black remote control with two batteries inside, showing internal structure (no text or symbols visible)BATTERIES - Remove the battery cover on the backside and install 2É AAA batteries as shown. Remove batteries when not using for a long period of time.
PROBLEM & ITEMS TO CHECK
UNIT WILL NOT TURN ON
- Is unit plugged in?
- Are batteries charged?
- Are fuses blown?
UNIT OPERATES ON AC BUT NOT BATTERY
- Check battery terminals
- Check Fuse in Power Receptacle. Replace if needed.
SOUND IS MUFFLED
- Bass too high
- Treble too low
FEEDBACK: A LOUD SQUEALING, SHRILL OR HOWLING SOUND THAT IS SELF GENERATED
- Feedback occurs when a microphone is too close to the speaker or the microphone volume is too high, or the microphone is pointed towards the speaker. It is also caused by sound reflecting off hard surfaces.
-
Reduce or eliminate Feedback by
-
Pointing the microphone in a different direction
- Keeping the microphone BEHIND the speakers
- Turn down the volume levels
POWER IS ON, BUT NO SOUND
- Check main volume level.
- If using wireless, be sure receiver and transmitter battery is installed and both units are turned on.
- If microphone has batteries, check batteries.
- Check cables/connectors.
WIRELESS MIC DOES NOT WORK
- Check that transmitter batteries are fully charged and ensure transmitter is on.
- Does yellow ÉsignalÉ LED light when transmitter is turned on?
- Are the transmitter and receiver on the same channel? (1-16)
WIRELESS MIC CUTS IN AND OUT
- Is unit visible (line of sight) from user? If not, move unit into view when using wireless microphone.
- Does the yellow ÊsignalÊ LED go out when signal drops out? Check battery in transmitter.
SW800 MAKES BUZZING NOISE
- Check cables a damaged cable will cause this. Unplug cables one at a time until buzzing stops.
- Check for Ground loops use a ground loop isolator where needed.
BATTERIES WILL NOT HOLD CHARGE
- Replace Main Batteries every 1-2 years if unit is not left charging when not in use.
- A full charge is best obtained when the unit is off and plugged into the AC outlet for several hours. After a year or two the battery may need to be replaced. Batteries are available from Amplivox.
- To replace the batteries use a Phillips screwdriver and take out the 3 screws from each battery cover (there are two batteries) on the back panel. Remove the foam spacer, set aside. Pull out the batteries to access the terminals.
- Carefully hold the battery with one hand while you remove the mating connector. Replace with new battery and push mating connector of battery wire onto the corresponding color/polarity. RED = POSITIVE, BLACK = NEGATIVE.
- Place the batteries back in the compartment. Replace the foam and screw on the covers.
CD DOES NOT PLAY
- Is unit turned on?
- Be sure CD or CD-R is loaded into tray correctly.
UNIT WILL NOT PLAY CD-R/W MEDIA.
- Inspect disc for deep scratches or cracks
- Check if player is in ÉpauseÉ mode
CD SKIPS
- Be sure unit is steady. If it is jarred, this may occur.
- Check for scratches on disc surface
NEED HELP? Call 800-267-5486
DISCLAIMER
AmpliVox Portable Sound Systems, operates a policy of continuous development. AmpliVox reserves the right to make changes and improvements to any of the products described in this document without prior notice.
Under no circumstances shall AmpliVox be responsible for any loss of data or income or any special, incidental, consequential or indirect damages howsoever caused.
In some countries there may be some restrictions in using this equipment. Please check with your local radio frequency authorities.
WARRANTY
Limited One (1) -Year Warranty
AmpliVox warrants this product to be free from defects in materials and workmanship (subject to the terms set forth below) for a period of one(1) year from the date of purchase (ÊWarranty PeriodÊ). All accessories and the batteries are warrantee for 1 year. Accessories are; wireless and wired microphones, receivers and transmitters, CD players, cassette players, and digital players.
During the Warranty Period, AmpliVox will repair or replace (at AmpliVox's discretion) this product or any defective parts (ÊWarranty ServiceÊ).
Repair or replacement under the terms of this warranty does not give right to any extension or a new beginning of the period of warranty.
CLAIMS UNDER THE WARRANTY
To obtain Warranty Service, contact AmpliVox (800-267-5486) to be assigned a Return Authorization number (RA#). After receiving a RA#, the defective unit is to be returned to AmpliVox in either its original packaging or packaging affording an equal degree of protection. You will bear the cost of shipping the product to AmpliVox. If the product is covered by the warranty, AmpliVox will bear the cost of shipping product back to you after the completion of service under this warranty.
Return shipping will be charged to you for products not covered by the warranty or requiring no warranty repair.
The following information must be presented to obtain Warranty Service: (a) the RA# must be clearly and legibility marked on the outside of shipping carton, (b) proof of purchase, which clearly indicates the name and address of the seller, the date of purchase and the product type, which is evidence that this product is within the Warranty Period. Please further include (c) your return address, (d) daytime telephone number, and (e) reason for return.
LIMITATION OF WARRANTY
This warranty is only valid for the original purchaser and will automatically terminate prior to expiration if this product is sold or otherwise transferred to another party. The warranty provided by AmpliVox in this statement applies only to products purchased for use, and not for resale. It does not apply to open box purchases, which are sold éas isé and without any warranty. Specifically exempt from warranty are limited-life consumable components subject to normal wear and tear, such as microphone windscreens, ear cushions, modular plugs, ear tips, decorative finishes, batteries, and other accessories. This warranty is invalid if the factory-applied serial number, date code label, or product label has been altered or removed from this product. This Warranty does not cover cosmetic damage or damage due to misuse, abuse, negligence, Acts of Nature, accident, disassembling or modification of, or to any part of, the product. This Warranty does not cover damage due to improper operation, maintenance or installation, or attempted repair by anyone other than AmpliVox. Any unauthorized repairs will void this warranty.
REPAIRS OR REPLACEMENTS AS PROVIDED UNDER THIS WARRANTY ARE THE EXCLUSIVE REMEDY OF THE CONSUMER. AMPLIVOX SHALL NOT BE LIABLE FOR ANY INCIDENTAL OR CONSEQUENTIAL DAMAGES FOR BREACH OF ANY EXPRESS OR IMPLIED WARRANTY ON THIS PRODUCT. EXCEPT TO THE EXTENT PROHIBITED BY LAW, THIS WARRANTY IS EXCLUSIVE AND IN LIEU OF ALL OTHER EXPRESS AND IMPLIED WARRANTIES WHAT SO EVER, INCLUDING BUT NOT LIMITED TO THE WARRANTY OF MERCHANTABILITY AND FITNESS FOR A PRACTICAL PURPOSE.
NOTE! This warranty gives you specific legal rights. You may have other rights which vary from location to location. Some jurisdictions do not allow the exclusion or limitation of incidental or consequential damages or implied warranties, so the above exclusions may not apply to you. This warranty does not affect your legal (statutory) rights under your applicable national or local laws.

Dispose of the product according to local standards and regulations
DEC, 2013
AmpliVox • 650 Anthony Trail Suite D, Northbrook, IL 60062 • Phone: (800)267-5486 • Fax: (800)267-5489 www.ampli.com
- AMPLIVox® PORTABLE SOUND SYSTEMS
- User Guide
- SW800 with Bluetooth
- Battery Powered PA System
- READ FIRST ABOUT BATTERY OPERATIONS!
- TABLE OF CONTENTS
- IMPORTANT SAFETY INSTRUCTIONS
- Troubleshooting & Servicing
- Cleaning
- Location
- Intended use
- IMPORTANT
- SW800 SPECIFICATIONS
- OPERATION
- Detach the AC cord from the unit before replacement
- MASTER AUDIO CONTROLS:
- ACCESSORY VOLUME CONTROL: NOT USED WITH THIS MODEL
- CHANNEL UHF WIRELESS
- WIRELESS RECEIVER PANEL
- RECEIVER / TRANSMITTER SETUP:
- BLUETOOTH MODULE
- INPUTS
- FUNCTIONS
- CD FUNCTIONS (top row of buttons)
- USB 2.0 / SD CARD FUNCTIONS (second row of buttons)
- PROBLEM & ITEMS TO CHECK
- UNIT WILL NOT TURN ON
- UNIT OPERATES ON AC BUT NOT BATTERY
- SOUND IS MUFFLED
- FEEDBACK: A LOUD SQUEALING, SHRILL OR HOWLING SOUND THAT IS SELF GENERATED
- POWER IS ON, BUT NO SOUND
- WIRELESS MIC DOES NOT WORK
- WIRELESS MIC CUTS IN AND OUT
- SW800 MAKES BUZZING NOISE
- BATTERIES WILL NOT HOLD CHARGE
- CD DOES NOT PLAY
- UNIT WILL NOT PLAY CD-R/W MEDIA.
- CD SKIPS
- DISCLAIMER
- WARRANTY
- CLAIMS UNDER THE WARRANTY
- LIMITATION OF WARRANTY
Brand : AmpliVox
Model : SW800
Category : Hi-Fi System