
24" Nighthawk Boys Mountain Bike - Bicycle Huffy - Free user manual and instructions
Find the device manual for free 24" Nighthawk Boys Mountain Bike Huffy in PDF.


| Product Type | Mountain Bike |
| Brand | Huffy |
| Model | 24" Nighthawk Boys Mountain Bike |
| Wheel Size | 24 inches |
| Frame Material | Steel (warranted lifetime) |
| Suspension | Front shock fork, adjustable spring |
| Brakes | Front and rear linear pull rim brakes (disc on some models) |
| Shift System | Twist grip or thumb shift, 21-speed (3 front, 7 rear derailleurs) |
| Seat | Adjustable height with quick-release lever or bolt |
| Pedals | Resin pedals with right/left markings |
| Reflectors | Front, rear, and wheel reflectors included |
| Handlebar | Riser handlebar with adjustable stem |
| Grips | Rubber grips |
| Chain Guard | Derailleur guard included |
| Kickstand | Included |
| Maximum Rider Weight | Approx. 150 lbs (68 kg) |
| Recommended Age | Ages 8 and up |
| Assembly Required | Yes, adult assembly required |
| Tools Needed | Adjustable wrench, screwdrivers, Allen wrenches, pliers (not included) |
| Maintenance | Lubricate chain and pivots every 6 months; check tire pressure and brakes before each ride |
| Warranty | Lifetime on steel frame, 1 year on fork, 6 months on components |
| Safety Standards | Meets CPSC safety requirements; helmet required |
Frequently Asked Questions - 24" Nighthawk Boys Mountain Bike Huffy
User questions about 24" Nighthawk Boys Mountain Bike Huffy
0 question about this device. Answer the ones you know or ask your own.
Ask a new question about this device
Download the instructions for your Bicycle in PDF format for free! Find your manual 24" Nighthawk Boys Mountain Bike - Huffy and take your electronic device back in hand. On this page are published all the documents necessary for the use of your device. 24" Nighthawk Boys Mountain Bike by Huffy.
USER MANUAL 24" Nighthawk Boys Mountain Bike Huffy
Owner's Manual for Mountain Bikes
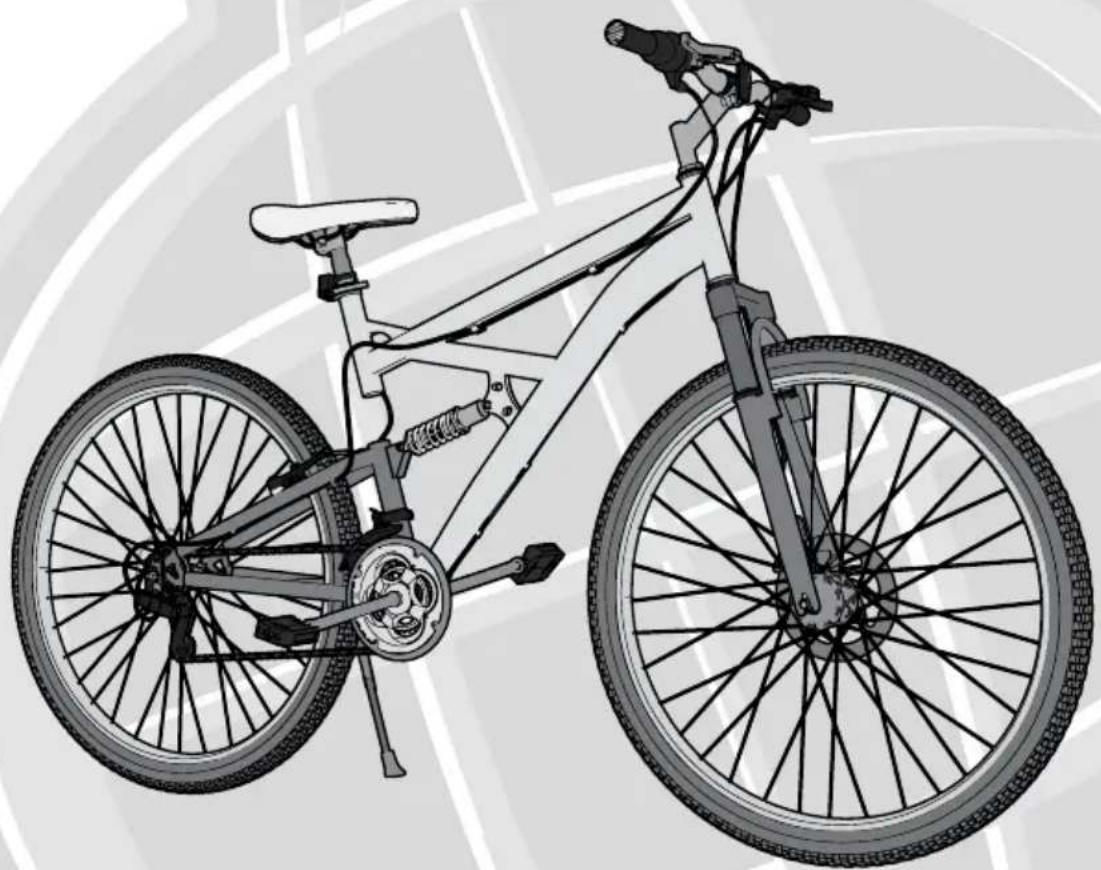
This manual contains important safety, assembly, operation and maintenance information.
Please read and fully understand this manual before operation.
Save this manual for future reference.
Owner's Manual Index
Your Bike
- Owner's Bicycle Identification Record....3
- Fitting the Rider to the Bicycle....3
- Warning and Safety Information......4
- The Owner's Responsibility - Rules of the Road......4-5
Bicycle Assembly
- Parts Assembly 6-7
- Introduction to Assembly / Tools Needed ....8
- Accessories....9
- Handlebar and Stem Installation 10-12
- Front Wheel Installation ....13
- Quick Release Axle (as equipped).... 14-15
- Testing Stem and Handlebar Tightness....16
- Seat Installation.... 17-18
- Testing Seat Clamp and Post Clamp Tightness....18
- Pedal Installation and Three-Piece Cranks (on some models)....19
- Reflector Brackets Installation....20
- Installing Derailleur Guard (as equipped)....20
Brake System
- Rim Brake Setup 21-24
- Brake Pad Replacement....24
- Disc Brake Setup (as equipped) 25-26
Shift System
- Shift System Setup 27-29
- Rear/ Front Derailleur Adjustments 30-33
Maintenance and Service
- Repair and Service - Torque Table....34
• Tires 35 - Lubrication/ Lubrication Table 36
• Inspection of the Bearings ....37 - Suspension Frame (on some models) 37
Warranty 38

IMPORTANT!! BEFORE YOUR FIRST RIDE:
- Read entire manual, including all safety warnings.
- Check Tire Pressure.
- Check Brake Adjustment.
- Check Shift/Derailleur Adjustments.
See Maintenance section to:
Owner's Bicycle Identification Record
NOTE: This information is only available on the bicycle itself. It is not available from Huffy.
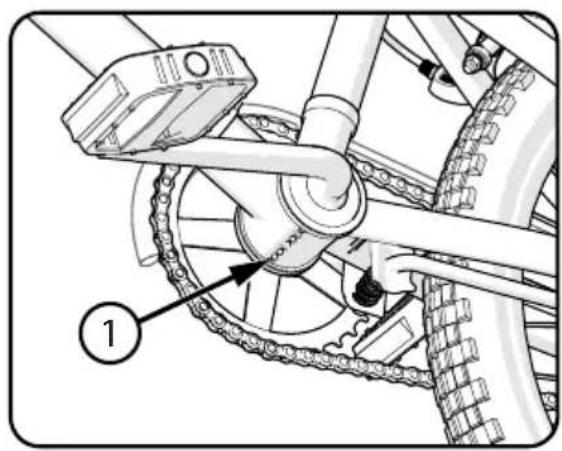
Each Huff y bicycle has a Recovery Code stamped into the frame. The Recovery Code ① can be found on the bottom of the crank housing as shown.
Write this number below to keep it for future reference.
If the bicycle is stolen, give this number and a description of the bicycle to the police. This will help them find the bicycle.
Recovery Code:
Purchase Date:
Model Name:
Fitting the Rider to the Bicycle
To determine the correct size of bicycle for the rider:
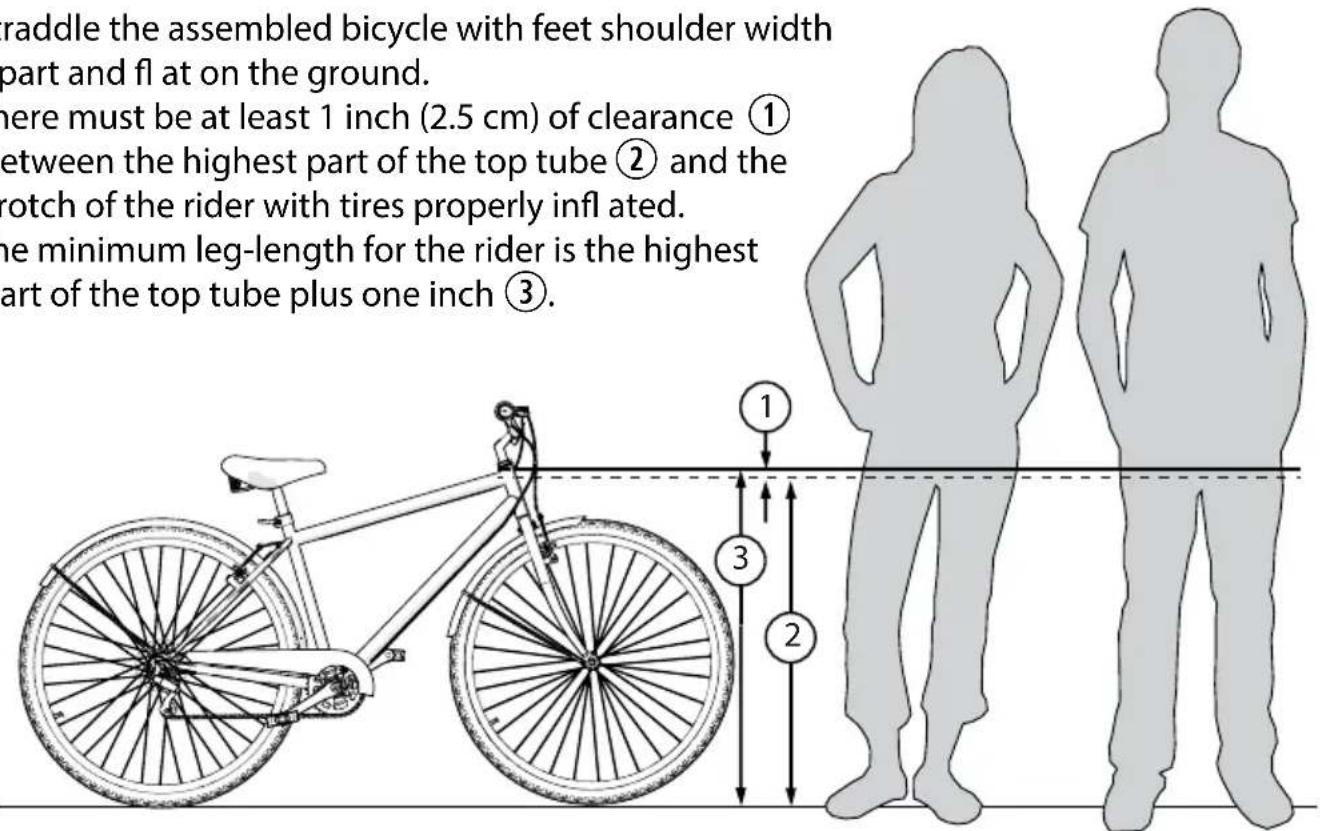
- Straddle the assembled bicycle with feet shoulder width apart and flat on the ground.
- There must be at least 1 inch (2.5 cm) of clearance ① between the highest part of the top tube ② and the crotch of the rider with tires properly inflated.
- The minimum leg-length for the rider is the highest part of the top tube plus one inch ③.
Warning and Safety Information
Meanings of Warnings:

This symbol is important. See the word "CAUTION" or "WARNING" which follows it.
The word "CAUTION" is before mechanical instructions. If you do not obey these instructions, mechanical damage or failure of a part of the bicycle can occur.
The word "WARNING" is before personal safety instructions. If you do not obey these instructions, injury to the rider or to others can occur.
- CHOKING HAZARD. Small parts. Not for children under 3 years.
• Adult assembly is required. - Handlebar hand grip or tube end plugs should be replaced if damaged as bare tubes have been known to cause injury. All products with capped handlebar ends should be checked regularly to ensure that adequate protection for the ends of the handlebars are in place.
- Replacement forks must have the same rake and tube inner diameter as the original product.
- Do not add a motor to the product.
- Do not tow or push the product.
- Do not modify the product.
- Replace worn or broken parts immediately.
- If anything does not operate properly, discontinue use.
The Owner's Responsibility

WARNING: This bicycle is made to be ridden by one rider at a time for general portation and recreational use. It is not made to withstand the abuse of stunting and ung.
If the bicycle was purchased unassembled, it is the owner's responsibility to follow all assembly and adjustment instructions exactly as written in this manual, and any "Special Instructions" supplied and to make sure all fasteners and components are securely tightened.
NOTE: Periodically check that all fasteners and components are securely tightened.
If the bicycle was purchased assembled, it is the owner's responsibility, before riding the bicycle for the first time, to make sure the bicycle has been assembled and adjusted exactly as written in this manual, and any "Special Instructions" supplied and to make sure all fasteners and components are securely tightened.
NOTE:
If product is assembled, please proceed to sections:
- Testing Stem, Handlebar
- Seat Clamp tightness.

WARNING: Failure of the rider to obey the following "Rules of the Road" can result
in injury to the rider or to others.
- Obey all traffic regulations, signs, and signals.
• Always wear a bicycle helmet that meets safety standards, as well as local safety standards. - Ride on the correct side of the road, in a single file, and in a straight line.
- If possible, avoid riding at night, dusk, dawn and any other time of poor visibility.
- If you must ride at night or at time of poor visibility:
• Purchase, install, and use a headlight and taillight.
- Headlights are required by all states for nighttime riding and taillights are required in some states.
- Battery-powered lights or flashing safety lights are also recommended.
- Reflectors: For your own safety, do not ride the bicycle if the reflectors are incorrectly installed, damaged, or missing. Make sure the front and rear reflectors are vertical. Do not allow the visibility of the reflectors to be blocked by clothing or other articles. Dirty reflectors do not work well. Clean the reflectors, as necessary, with soap and a damp cloth.
- Make yourself more visible to motorists.
- Wear light-colored or reflective clothing, such as a reflective vest and reflective bands for your arms and legs.
- Use reflective tape on your helmet.
- Do not let anything cover the reflectors.
- Use extra caution in wet weather:
- Ride slowly on damp surfaces because the tires will slide more easily.
- Allow increased braking distance in wet weather.
- Avoid these hazards to prevent loss of control or damage to your wheels:
- Be aware of drain grates, soft road edges, gravel or sand, pot holes or ruts, wet leaves, or uneven paving.
- Cross railroad tracks at a right angle to prevent the loss of control.
- Avoid unsafe actions while riding.
- Do not carry any passengers.
- Do not carry any items or attach anything to your bicycle that could hinder your vision, hearing, or control.
- Do not ride with both hands off the handlebar.
- Do not add a motor to the product.
- Do not tow or push the product.
- Do not modify the product.
- Replace worn or broken parts immediately with original equipment.
- If anything does not operate properly, discontinue use.
Parts View
Parts Assembly View
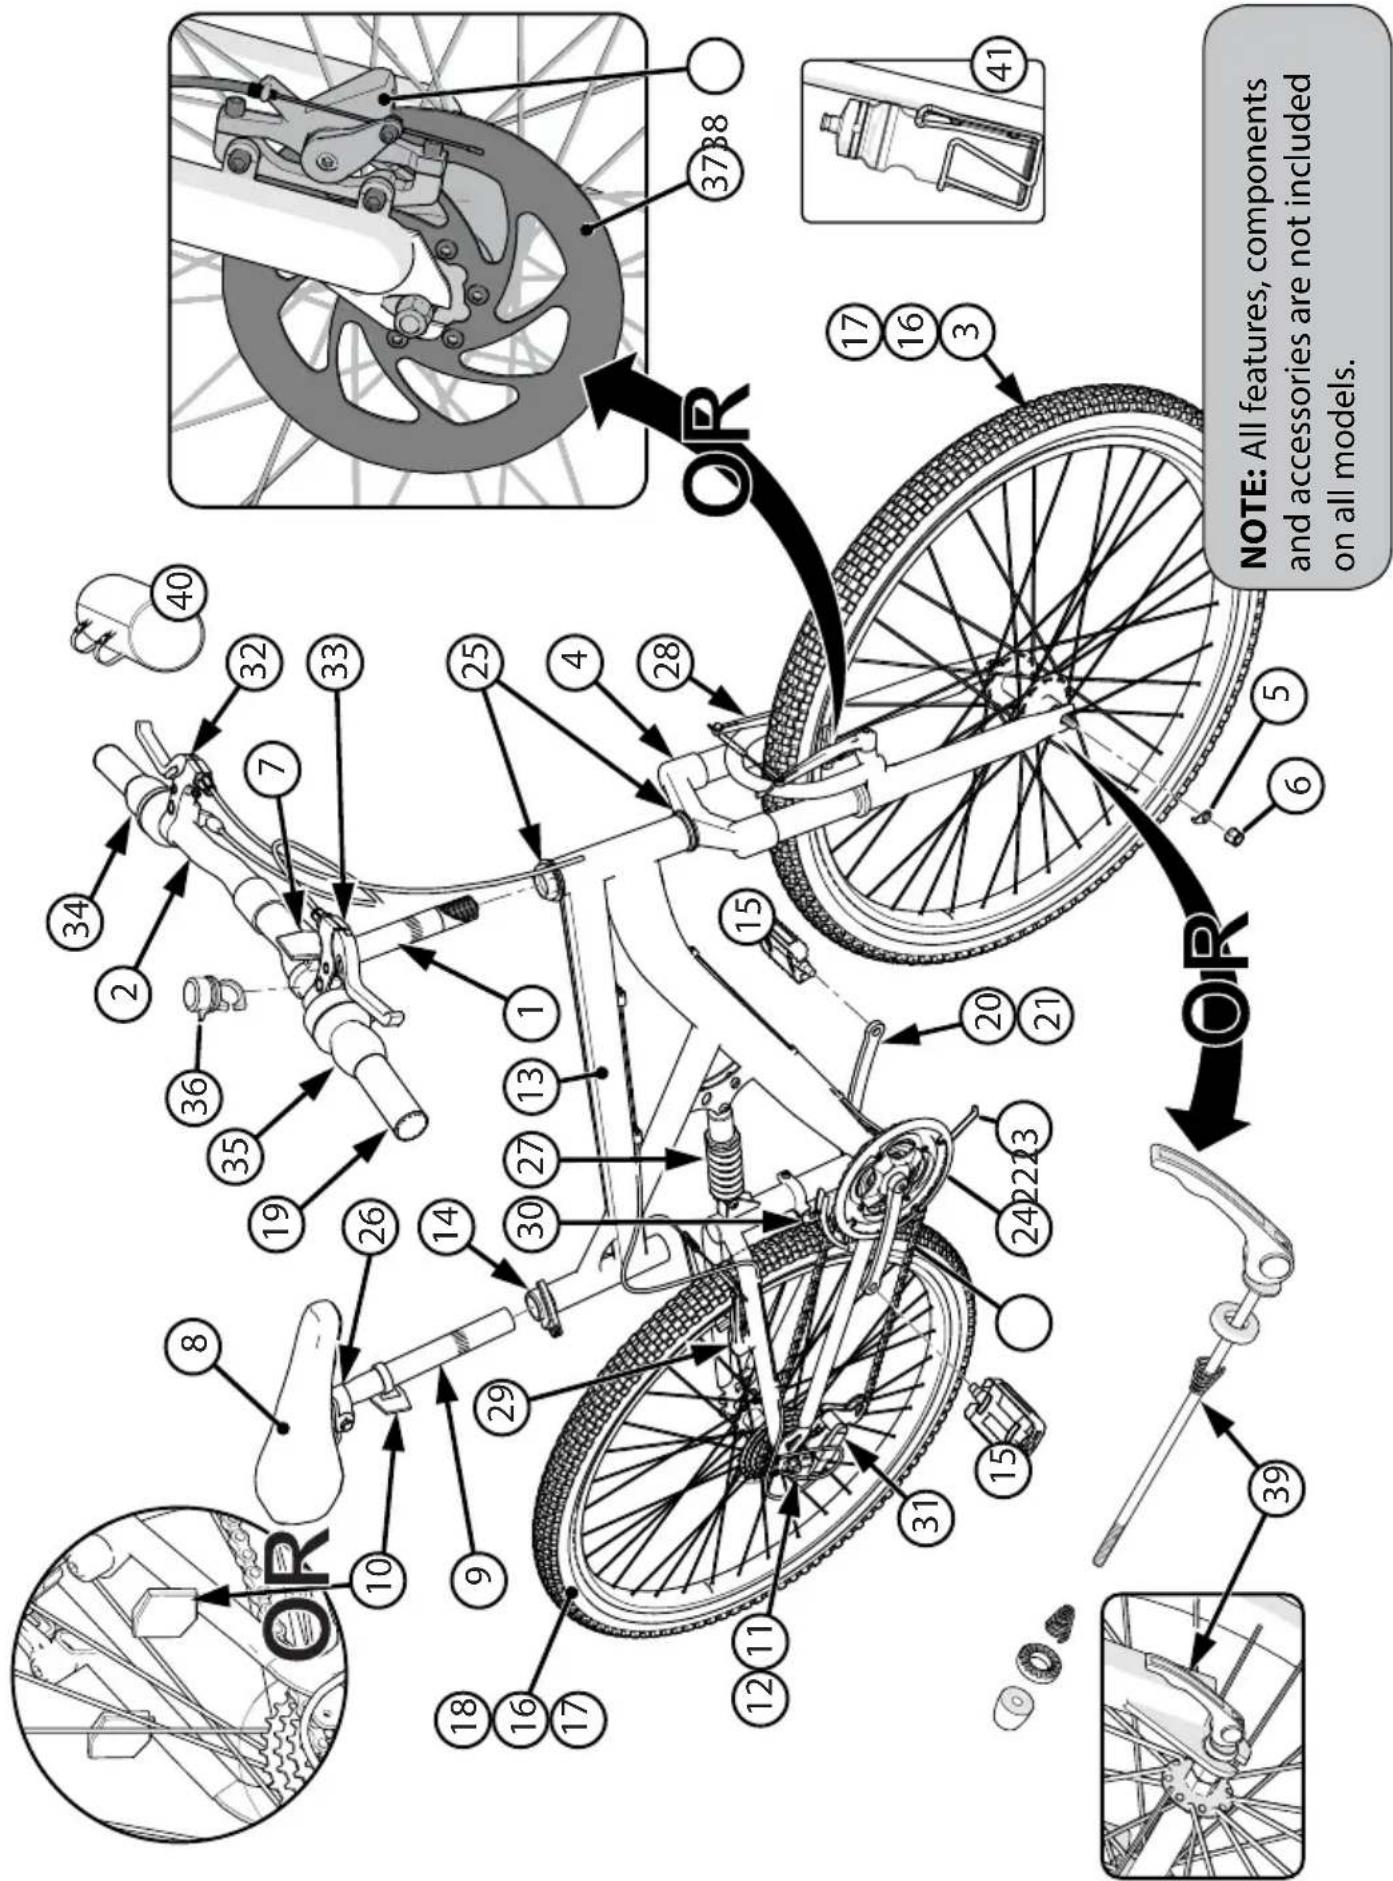
Parts Assembly List
| No. | Description No. Description | ||
| 1 | Handlebar Stem 22 Kickstand (various) | ||
| 2 | Handlebar 23 Chain | ||
| 3 | Front Wheel Assembly 24 Chain guard | ||
| 4 | Fork 25 Head Set Bearing | ||
| 5 | Wheel Retainer (x2) | 26 | Seat Post Hardware |
| 6 | Axle Nut (x4) | 27 | Spring Shock |
| 7 | Front Reflector | 28 | Front Linear Pull Brake (various models) |
| 8 | Seat 29 Rear Brake | ||
| 9 | Seat Post 30 | Front Derailleur | |
| 10 | Rear Reflector | 31 | Rear Derailleur |
| 11 | Guard Screws (x2) | 32 | Brake Lever - Left (Front Wheel) |
| 12 | Derailleur Guard | 33 | Brake Lever - Right (Rear Wheel) |
| 13 | Frame | 34 | Shift Mechanism, Front |
| 14 | Quick Release Lever & Nut | 35 | Shift Mechanism, Rear |
| 15 | Pedal (Left & Right Set) | 36 | Bell (if equipped) |
| 16 | Tire (x2) | 37 | Disc Brake (various models) |
| 17 | Tube (x2) | 38 | Disc Brake Caliper (various models) |
| 18 | Rear Wheel Assembly | 39 | Quick Release Axle (various models) |
| 19 | Grips (x2) 40 Bag/Basket (if equipped) | ||
| 20 | Crank & Spindle Set | 41 | Water Battle (if equipped) |
| 21 | Crank Bearings | ||
Introduction to Assembly
This Owner's Manual is made for several different bicycles:
• Some illustrations may vary slightly from the actual product.
- Follow instructions completely.
- If the bicycle has any parts that are not described in this manual, look for separate "Special Instructions" that are supplied with the bicycle.
- Models may have different accessory items such as bags, baskets, reflectors, cup holders, racks, etc.
- All features, components and accessories are not included on all models.
- Use the Index page to locate specific sections of this manual.
- Please read through this entire manual before beginning assembly or maintenance.
- If you are not confident with assembling this unit, refer to a local bike shop.

WARNING: Keep small parts away from children during assembly.
NOTE: All of the directions (right, left, front, rear, etc.) in this manual are as seen by the rider while seated on the bicycle.
Do not dispose of the carton and packaging until you complete the assembly of the bicycle. This can prevent accidentally discarding parts of the bicycle.
Tools Needed (not included)
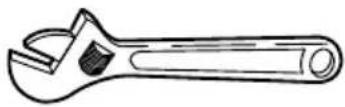
Small Adjustable Wrench
(Jaws must open at least 9/16 inch.)
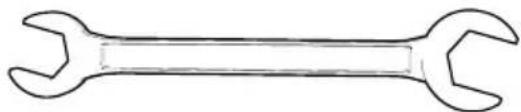
Open-end Wrenches

Flat-blade Screwdriver

Phillips Screwdriver
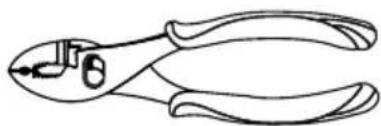
Slip-Joint Pliers
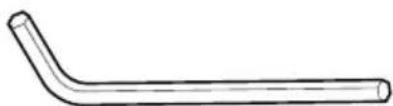
Metric Allen Wrenches
Accessories (various models)
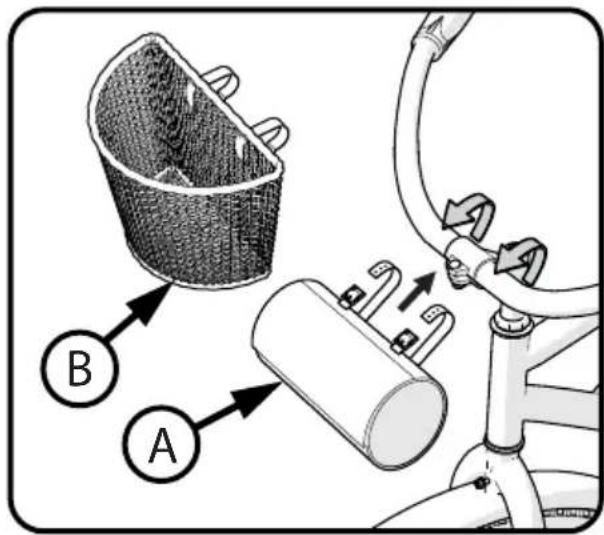
BAG OR BASKET INSTALLATION:
- Attach Bag Ⓐ or Basket Ⓑ to Handlebar using the two Straps.
- Tighten Straps so Bag/Basket does not move.
NOTE: Do not over tighten. The Straps may break.
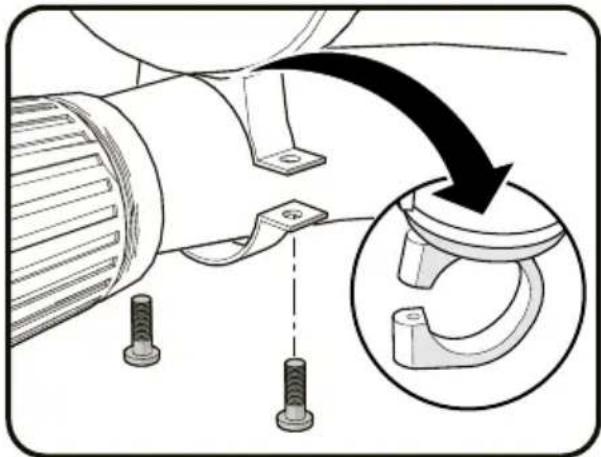
HANDLEBAR BELL INSTALLATION:
- Remove screws from Bell.
- Position Bell on handlebar within easy reach, with hands on the handlebar grips.
- Install screws and tighten.
NOTE: Bell may attach with 1 or 2 screws.
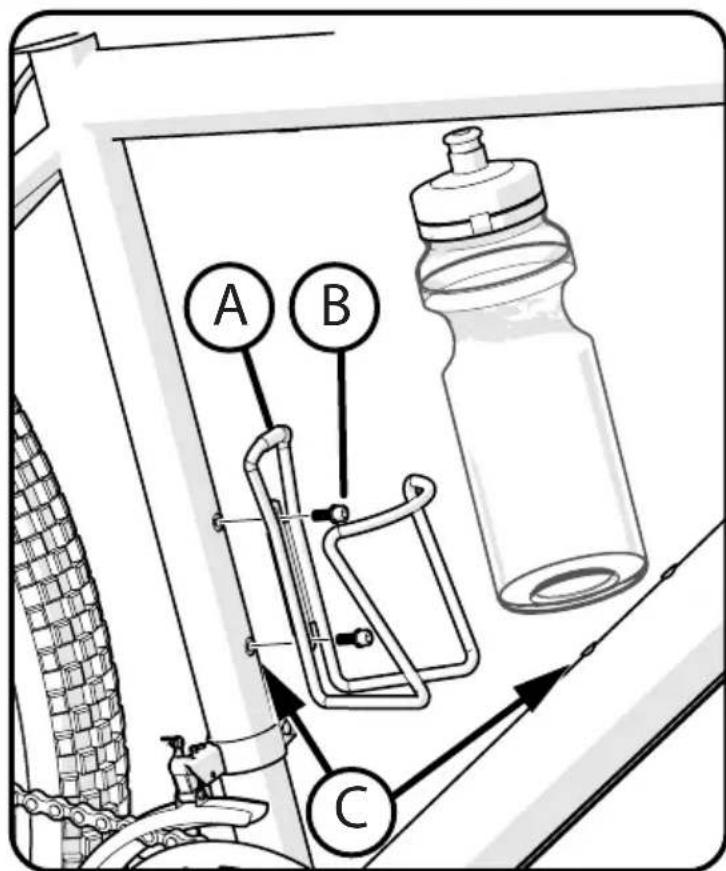
WATER BOTTLE AND CAGE:
- Remove the Water Bottle from the Cage Ⓐ.
- Locate the Cage Screws Ⓑ - they may be packaged with the Water Bottle Cage or installed in the Bicycle Frame.
- Position the Cage in the desired location and install the two Cage Screws through the Cage and into the Frame Nuts Ⓒ.
- Tighten securely. Do not over tighten, this can damage the Frame Nuts.
- Insert the Water Bottle into the Cage as shown.
Handlebar and Stem Installation

WARNINGS:
- To prevent steering system damage and possible loss of control, the "MIN-IN" (minimum insertion) mark Ⓐ on the stem must be below the top of the Fork Locknut Ⓑ.
- The Front Brake Ⓖ (if equipped) must be positioned in FRONT of the Fork. Ensure the Fork is pointing FORWARD before proceeding.
- Do not over tighten the stem bolt. Over tightening the stem bolt can damage the steering system and cause loss of control.
- If the handlebar clamp in not tight enough, the handlebar can slip in the stem. This can cause damage to the handlebar or stem, and can cause loss of control.
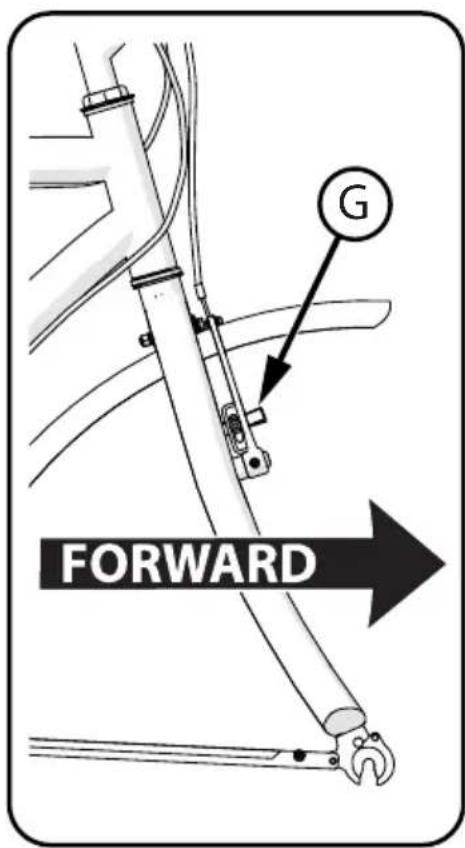
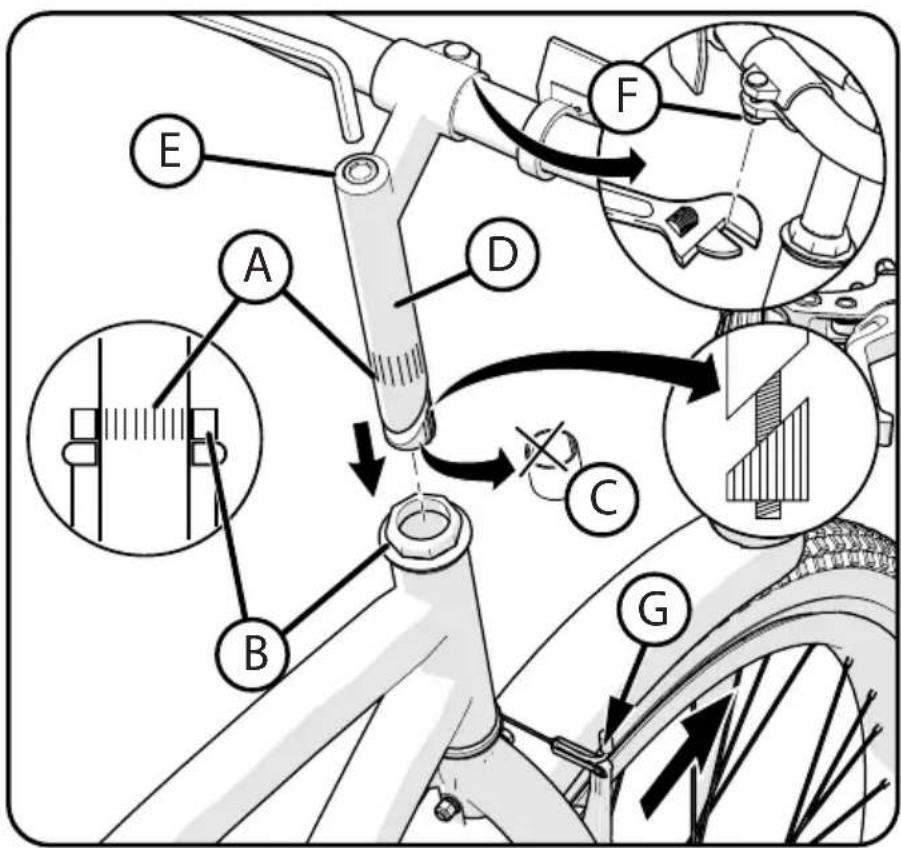
NOTE: Remove plastic Cap Ⓐ from the end of the Stem Ⓓ. Loosen Stem Bolt Ⓔ as needed.
- Insert the Stem into the Fork Locknut Ⓑ up to the top of the MIN-IN mark Ⓐ.
- Tighten the Stem Bolt Ⓔ just enough to hold it in position.
- If necessary, loosen the Handlebar Clamp Nut Ⓕ and rotate Handlebar into a comfortable riding position.
- Tighten Handlebar Clamp Nut Ⓕ just enough to hold it in position.
- Align the Stem with the front tire and tighten the Stem Bolt Ⓔ securely (see Testing Stem, next section)
- If necessary, re-adjust Handlebar and tighten Clamp Nut Ⓕ securely.
Handlebar and Stem Installation - Threadless Stem:
CAUTION:
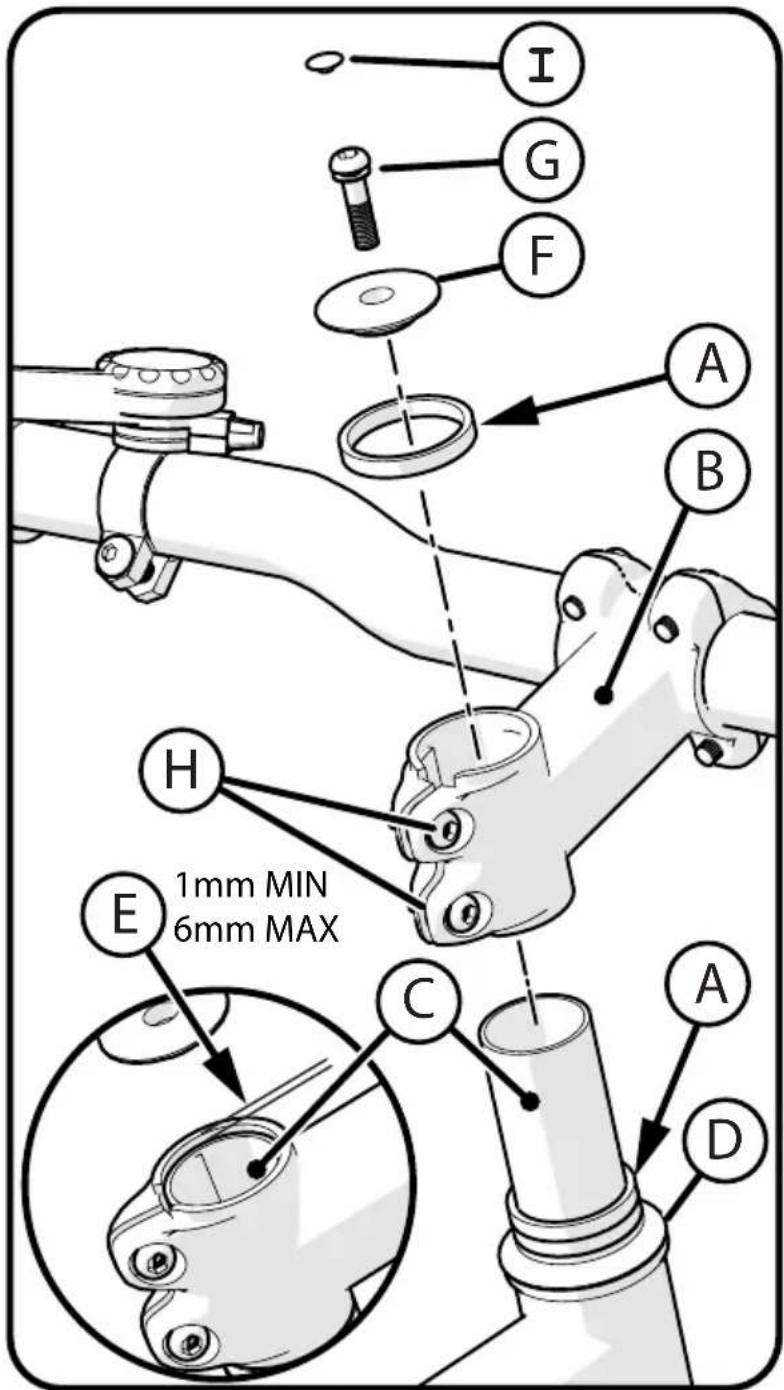
- Threadless Stem Ⓑ should be installed with bike sitting on the ground and both wheels installed.
• Make sure Fork is fully inserted from the bottom and Front Brake is pointing FORWARDS.
- Disc Brake models: Disc Brake will generally be on the LEFT side of the Fork.
STEP 1:
- Add Spacers Ⓐ as needed for proper Gap Ⓔ.
- Insert the Stem Ⓑ fully onto the Fork Tube Ⓒ.
- Point the Stem towards the front of the bike and in line with the fork and wheel.
- With downward pressure on Stem, move bicycle fork/wheel back and forth so there is no looseness in Headset Bearings D.
NOTE: Ensure there is BETWEEN 1mm and 6mm gap between Fork Tube and top of Stem Ⓔ.
-
Place Cap Ⓕ into stem and tighten screw securely Ⓖ. Try to move Fork back and forth. There should be no movement in Headset Bearings Ⓓ. If needed, redo above steps.
-
If supplied, insert Rubber Cap Ⓘ securely.
STEP 2:
- Tighten the stem bolts Ⓗ securely. See Torque Table for recommended torque - Do not over-tighten.

WARNING: Ensure handlebar and fork turn left to right smoothly and without friction.
Handlebar Installation - various Stem Clamps
ONE BOLT STEM:
- If necessary, loosen the Handlebar Clamp Bolt(s) A and rotate Handlebar B into a comfortable riding position.
- Tighten Handlebar Clamp Bolts(s) ① securely.
See Torque Table for recommended torque.
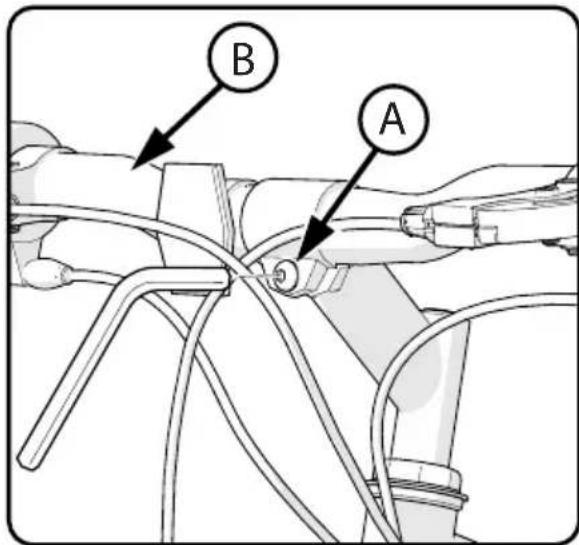
TWO BOLT STEM:
- If necessary, loosen the Handlebar Clamp Bolt(s) Ⓐ and rotate Handlebar Ⓑ into a comfortable riding position.
- Tighten Handlebar Clamp Bolts(s) ① securely.
See Torque Table for recommended torque.

FOUR BOLT STEM:
- If necessary, loosen the Handlebar Clamp Bolt(s) A and rotate Handlebar B into a comfortable riding position.
- Tighten Handlebar Clamp Bolts(s) ① securely.
NOTE: On four bolt stems, tighten Bolts Ⓐ evenly in a cross-pattern as shown. Do not over tighten. See Torque Table for recommended torque.
![graph TD A["A"] --> B["B"] B --> C["Diagram ③"] C --> D["①"] C --> E["②"] C --> F["④"] style C fill:#f9f,stroke:#333 style D fill:#ccf,stroke:#333 style E fill:#cfc,stroke:#333 style F fill:#fcc,stroke:#333](/content/2026/05/810167/images/523f46756c77c330d0d553a8fa4ddda606670f8f0de19acf644b73dfa1e23028.jpg)
WARNING: If the handlebar clamp in not tight enough, the handlebar can slip in the stem. This can cause damage to the handlebar or stem, and can cause loss of control.
Installing the Front Wheel
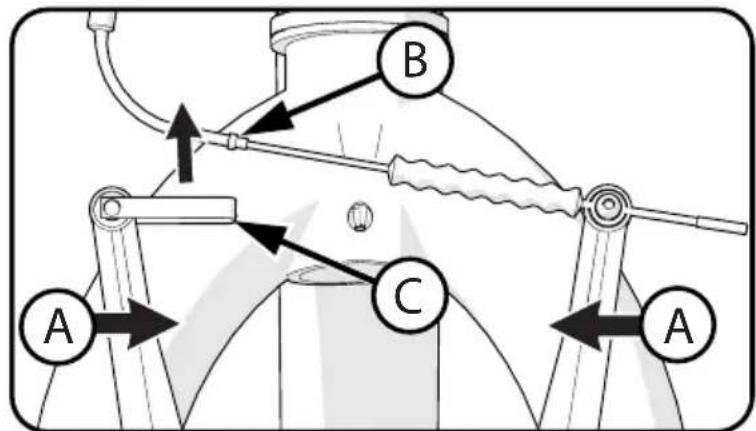
Loosen the Front Brakes:
- Squeeze the two Brake arms together Ⓐ.
- Lift out the Brake Cable Guide ⑧ from the Guide Bracket ⑨.
Install the Front Wheel:
- Set the Front Wheel into the front fork with Brakes pointing forward.
- Install wheel retainers ⑭ making sure the tabs are in the Fork Retainer Holes ⑧.
- Attach the front wheel with the Axle Nuts Ⓕ. - See Torque Table for recommended torque.
NOTE: For Quick Release Axle, see next section.
WARNING: Do not use Nuts Ⓕ without serrations to attach the front wheel.
NOTE: Ensure wheel spins freely without contacting fork or fender.
WARNING: Failure to obey these steps can allow the front wheel to loosen while riding. This can cause injury to the rider or to others.
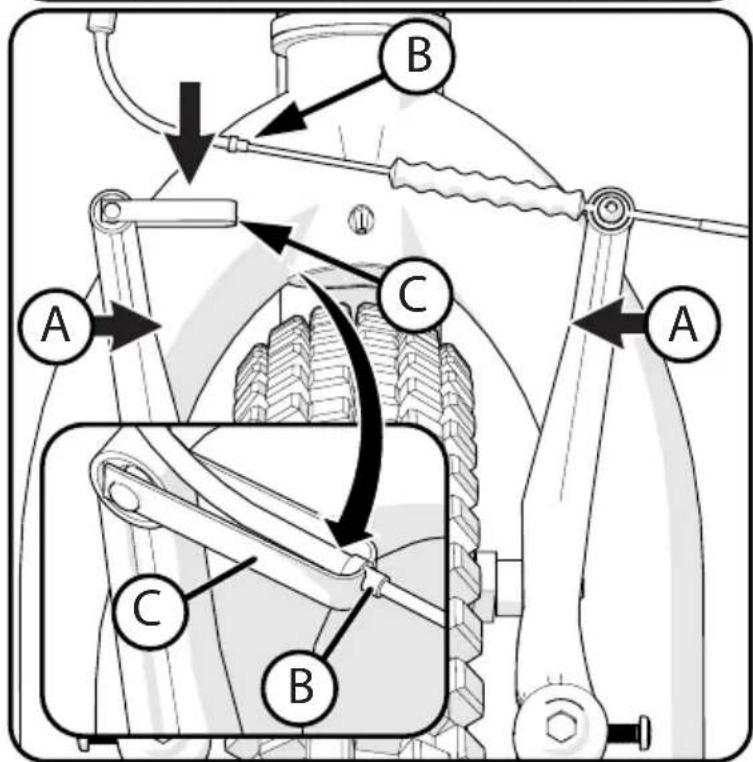
RE-ATTACH FRONT BRAKE CABLE:
- Squeeze the two Brake arms together Ⓐ.
- Insert the Brake Cable Guide Ⓑ into the cutout in the Guide Bracket ⓒ.
- Make sure the Brake Cable Guide Ⓑ is seated securely in the Guide Bracket Ⓒ cutout.

WARNING:
Check Front Brake Adjustment Before Riding! See Brakes Section
![graph TD A["Component F"] --> B["Component D"] B --> C["Component E"] C --> D["Output"] style A fill:#f9f,stroke:#333 style B fill:#ccf,stroke:#333 style C fill:#cfc,stroke:#333 style D fill:#fcc,stroke:#333](/content/2026/05/810167/images/f924f420b0baecaabed83a5e07bf9c56396dbafa0afd94d3f4c1ac2178dda54e.jpg)
Quick Release Axle Guide (various models)

WARNING:
- Check QR axle and secure before every ride.
- If you hear any unusual noise from the wheels when riding - check the QR axle system.
- Do not ride with improperly adjusted or worn QR axle, this can result in serious injury.
- If you have any problems with the QR axle system, contact the bicycle manufacturer or a local bicycle shop.
- This product is not intended for use in stunt riding, ramp jumping, acrobatics, or similar activities.
- Understand all operating procedures before riding.
- Replace worn or broken parts immediately.
If you have any difficulties adjusting or maintaining the QR Axle system, refer to a local bicycle repair shop. The bicycle technicians are trained to work on QR Axle systems and components.
STEP 1: STE
![graph TD A["A"] --> B["B"] B --> C["C"] C --> D["D"] D --> E["E"] E --> A](/content/2026/05/810167/images/7914b7473bb985f22827fdfb5b21b27de5bf23f12cf99c6919cf834523534751.jpg)
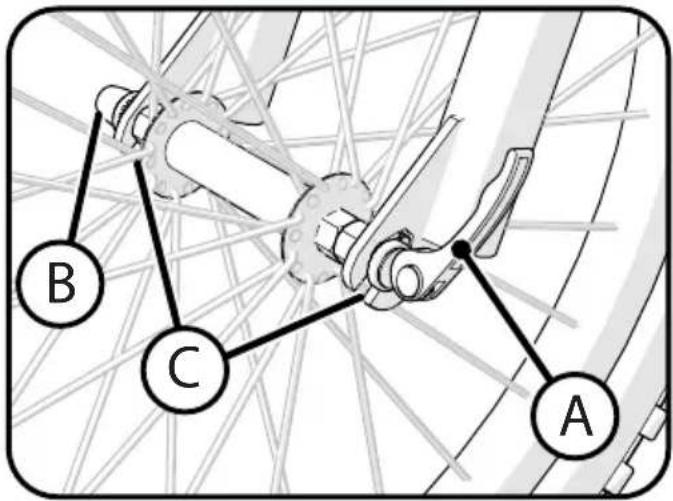
- Move the QR Lever Ⓐ to the OPEN position and loosen QR Nut Ⓑ (turn counter-clock-wise) enough so the wheel axle fi ts into the Fork Dropouts Ⓒ.
- Ensure the serrated Washers Ⓓ sit inside Fork Recess Ⓔ on both sides.
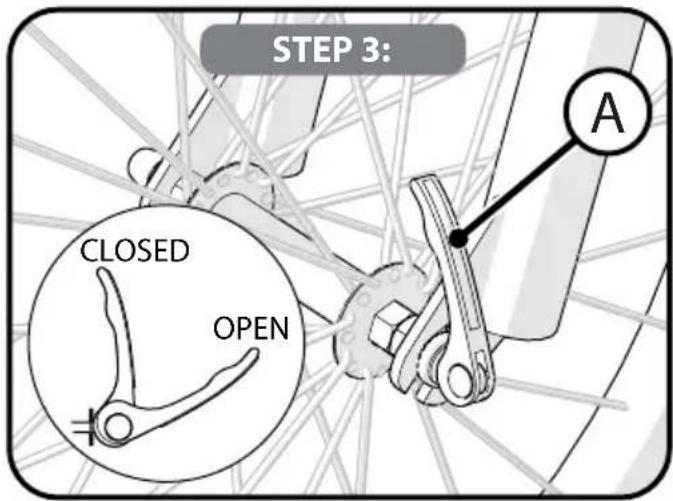
- Pushing down on fork to ensure wheel axle is fully seated in Fork Dropouts, tighten QR Nut Ⓑ (turn clock-wise) hand tight.
- Position QR Lever pointing UP or BACK and partially close.
- Adjust QR Nut and push QR Lever Ⓐ closed with palm of hand.
Quick Release Axle Guide - continued
- Ensure QR Lever is tight and fully closed.
- Ensure wheel is centered in fork and held securely.
Wheel shown with QR LeverⒶ in Closed position.
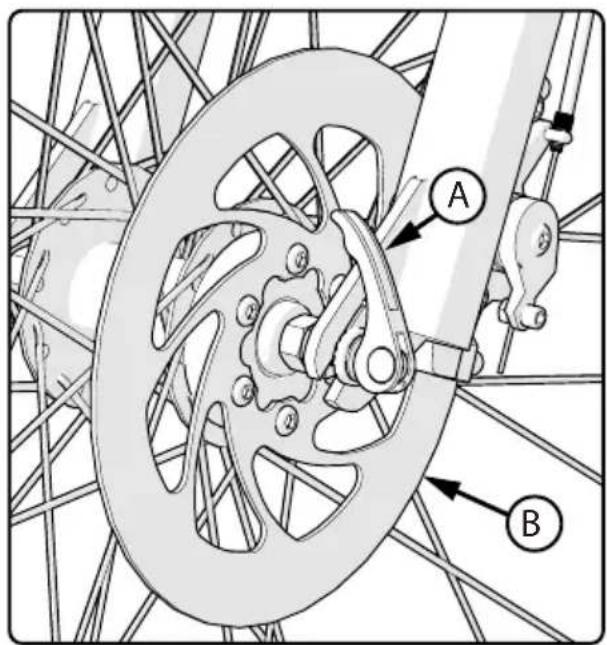
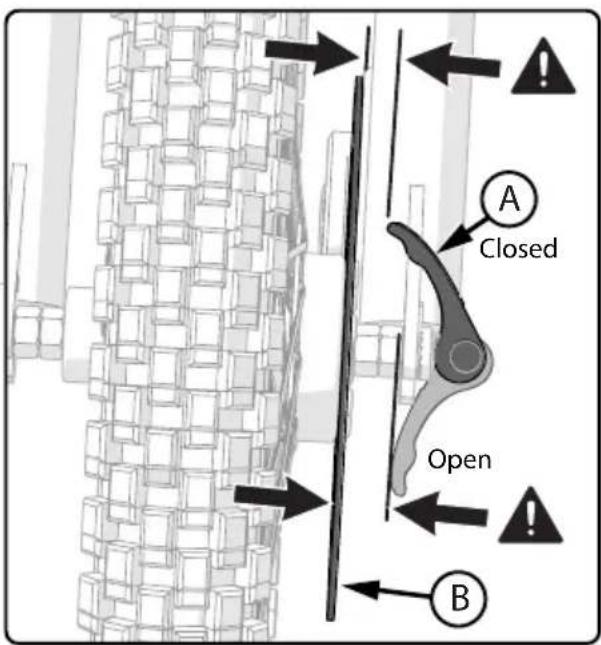

WARNING:
- Ensure the Quick-Release (QR) is properly tightened before each ride (refer to QR use instructions in this manual).
- Ensure QR Lever Ⓐ does not come in contact with Disc Brake Ⓑ or Spokes before each ride.
• DO NOT RIDE WITH THE QR IN THE OPEN POSITION.
Testing Stem and Handlebar Tightness
TO TEST THE TIGHTNESS OF THE STEM:
• Straddle the front wheel between your legs.
- Try to turn the front wheel by turning the handlebar.
- If the handlebar and stem turn without turning the front wheel, realign the stem with the wheel and tighten the stem bolt(s) tighter than before (about 1/2 revolution only at a time).
- Do this test again, until the handlebar and stem do not turn without turning the front wheel.
TO TEST THE TIGHTNESS OF THE HANDLEBAR CLAMP:
- Hold the bicycle stationary and try to move the ends of the handlebar up and down.

CAUTION: Do not exceed 100 lbs (45 kg) downward force.
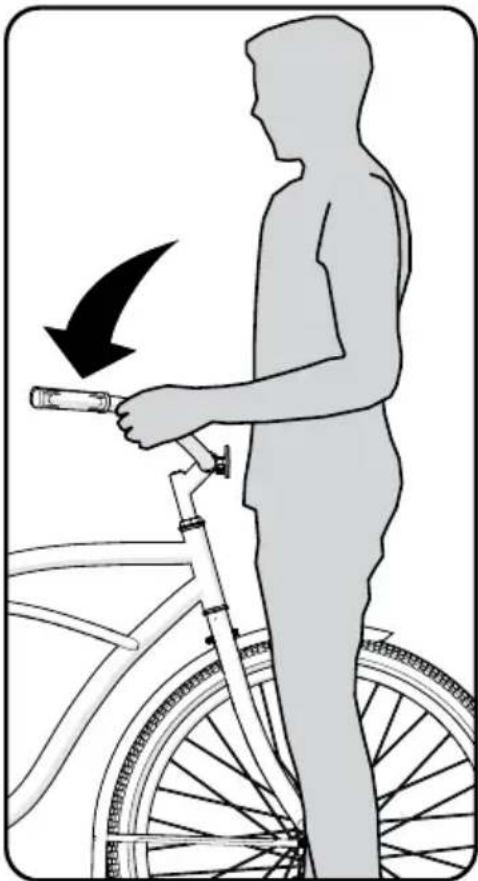
- If the handlebar moves, loosen the bolt(s) of the handlebar clamp.
- Put the handlebar in the correct position and tighten the bolt(s) of the handlebar clamp tighter than before.
- If the handlebar clamp has more than one bolt, tighten the bolts equally.
- Do this test again, until the handlebar does not move in the handlebar clamp.
Seat Installation

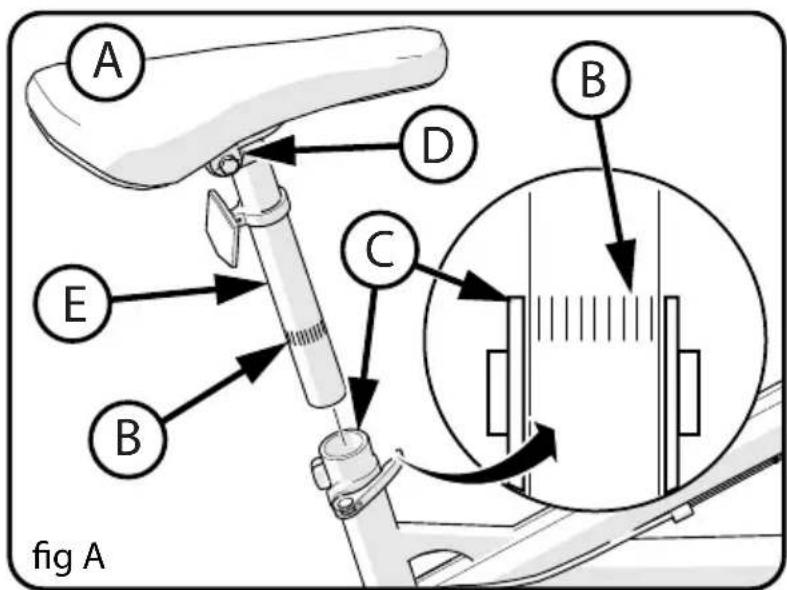
WARNING: To prevent the Seat Ⓐ coming loose and possible loss of control, the
"MIN-IN" (minimum insertion) mark Ⓑ on the Seat Post must be below the top of the Seat Tube Ⓒ.
SEAT AND SEAT POST SETUP:
- If needed, loosen Nuts on Seat Clamp ⑭ and rotate Seat into riding position.
- Ensure the Seat Post Ⓔ is fully through the TOP Seat Clamp Ⓓ.
- Tighten the Seat Clamp so the Seat does not move on the seat post.
- If the Seat Clamp has a Nut on each side, tighten both nuts equally.
- Point the Seat forward and put the Seat Post Ⓔ into the Seat Tube Ⓒ and proceed to next step.
NOTE: The words "open" and "close" are on opposite sides of the quick release lever.

CAUTION: Operate the Quick Release Lever Ⓕ
by hand only. Do not use a hammer or any other tool to tighten the quick release lever.
- Move the Quick Release Lever Ⓕ to the "open" position so the word "open" is pointing away from the Seat Post Clamp Ⓖ.

WARNING: You must use strong force to move quick release lever to the "close" position. If you can move the lever to the "close" position, the clamping is too light. If the clamping force of the Quick Release is too light, the seat post can loosen while riding.
This can cause injury to the rider or to others.
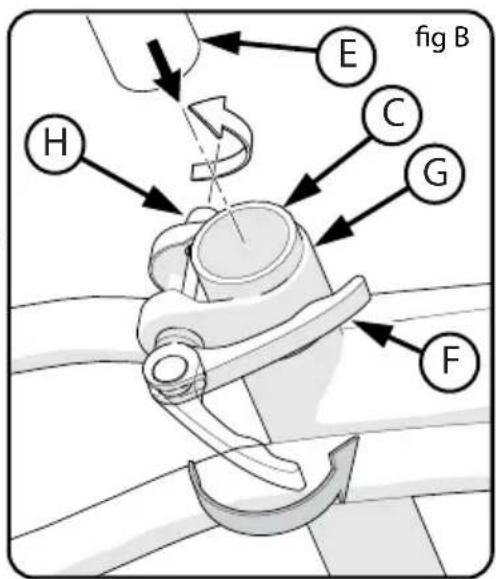
- Open and close the Quick Release Lever with one hand while you turn the Adjusting Nut with the other hand.
- Tighten or loosen the adjusting nut by hand, so that you first feel resistance to the quick release lever when it perpendicular to the bicycle frame.
- Push the Quick Release Lever to the "close" position.
- When in the "close" position, make sure the Quick Release Lever lays against the Seat
Seat Installation - continued
Post Clamp Ⓖ.
- The tightening torque of the Quick Release Lever should be tight enough so that the seat does not move during normal operation.
Seat Bolt Mount (various models)
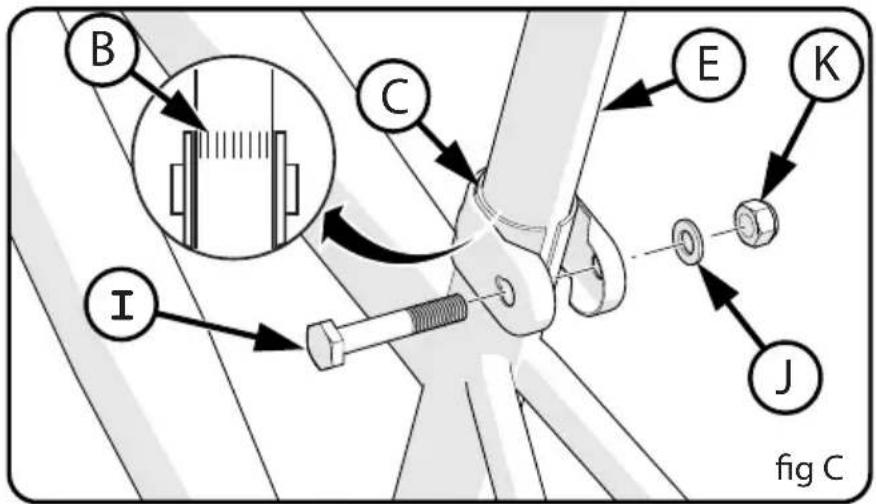
Some models have a Bolt ① , Washer ② and Nut ③ instead of a Quick Release Lever.
- If needed, loosen the nut enough to insert the Seat Post Ⓔ.
- Point the seat forward and insert Seat Post to the Minimum Insertion marks Ⓑ.
- Tighten Nut securely so it supports the rider without moving.
Testing Seat Clamp and Post Clamp Tightness
To test the tightness of the seat clamp and the post clamp:
- Try to turn the seat side-to-side and to move the front of the seat up and down.
- If the seat moves in the Seat Clamp:
- Loosen the Seat Clamp Nut.
- Put the seat in the correct position and tighten the Seat Clamp tighter than before.
- Do this test again, until the seat does not move in the Seat Clamp.
- If the Seat Post moves in the Seat Tube Clamp:
- Loosen the Seat Clamp Lever.
- Put the Seat Post in the correct position and tighten the Seat Clamp Nut tighter than before.
- If necessary, tighten or loosen Hand Nut so that Quick Release tightens securely.
- Do this test again, until the Seat Post does not move in the Seat Tube Clamp.
Pedal Installation

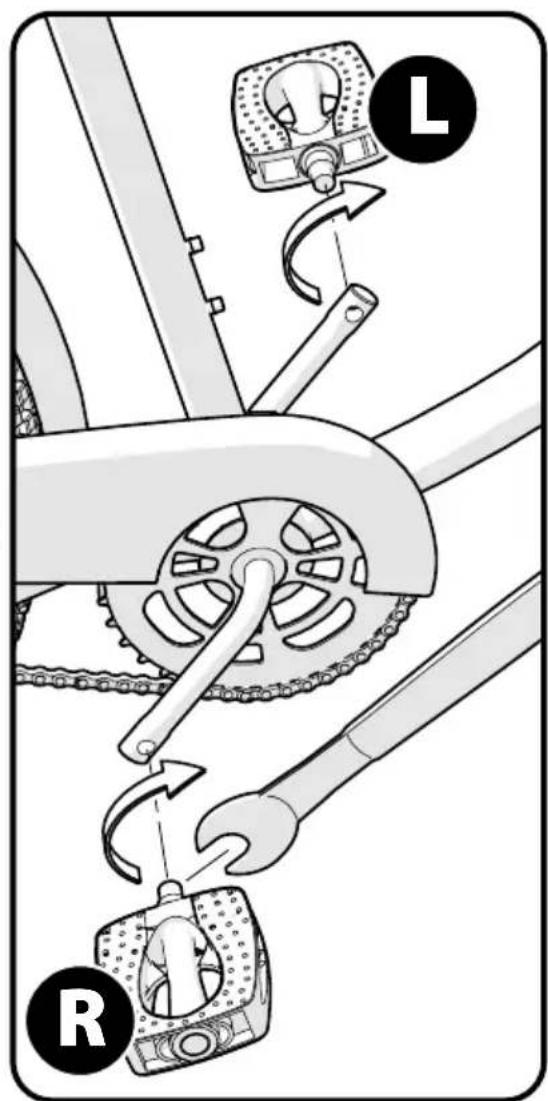
CAUTION: There is a RIGHT pedal marked Ⓡ and a LEFT pedal marked Ⓛ.
NOTE: A Pedal Wrench is preferred for attaching Ped-als. A thin open-end wrench can also be used.
- The pedal marked R has right-hand threads. Tighten it in a clockwise direction.
- The pedal marked Ⓛ has left-hand threads. Tighten it in a counterclockwise direction (anti-clockwise).
- Turn the right pedal marked Ⓡ into the right side of the crank arm, and the left pedal marked Ⓛ into the left side of the crank arm.
Tighten the pedals:
• Make sure the threads of each pedal are fully into the crank arm.
NOTE: See Torque Chart for recommended torque.

WARNING: Ensure pedals are secure in crank arms so they will not loosen. Periodically check tightness.
Three-Piece Cranks (various models)
Maintenance: Both Crank Arms Ⓐ were tightened to the spindle Ⓑ at the factory. After riding the bicycle the first few times, make sure the crank arms have not loosened. If either crank arm has loosened during this “break-in” period, re-tighten or have it tightened by a
bicycle service shop.
Frequently check the tightness of the crank arms. If loose, tighten or have them tightened by a bicycle service shop.
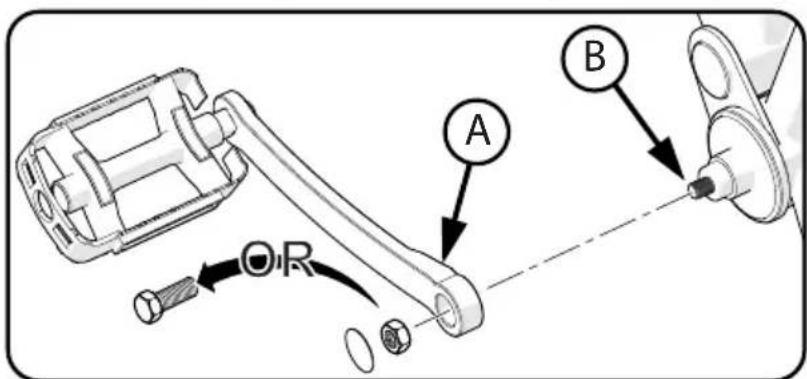

WARNING: If you ride the bicycle with a loose crank arm, the crank arm may fall off. The spindle may also damage the crank arm.
Reflector Installation (as equipped)
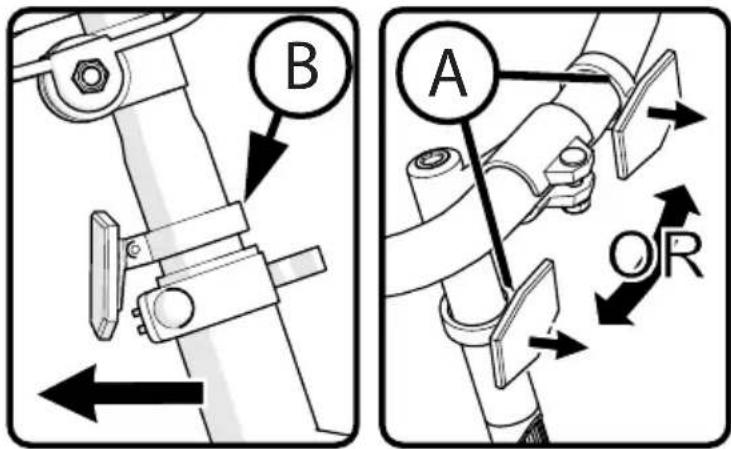
Reflector Installation:
- Position FRONT Reflector Ⓐ so it points straight forward.
- Tighten Clamp Screw.
- Position Seat Post Reflector (if equipped) Ⓑ so it points straight backwards.
- Tighten Clamp Screw.
NOTE: Do not over-tighten. This will damage the Clamp.
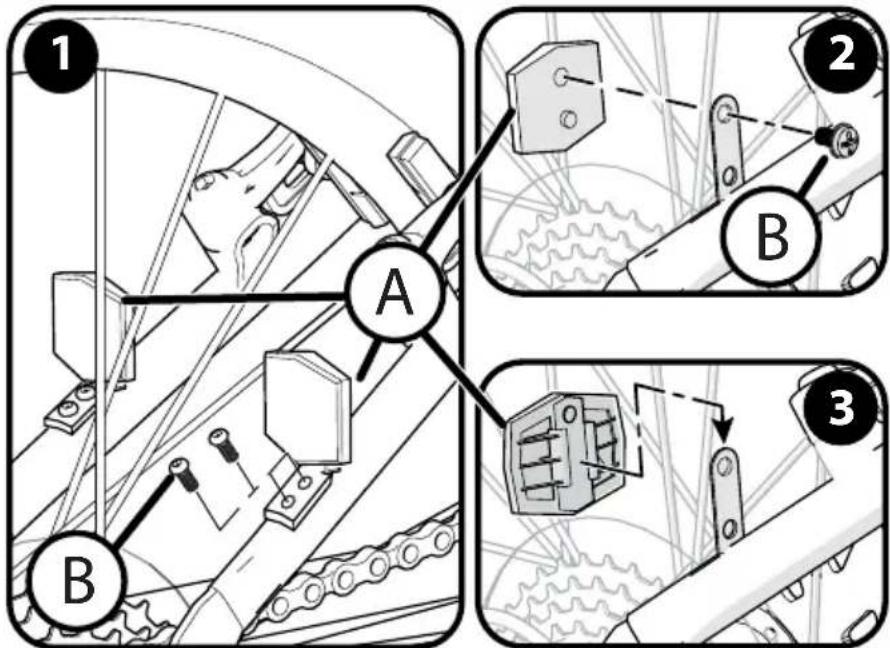
Dual Rear Refl ectors (various models):
The Rear Refl ectorsⒶ may be pre-installed on the bike chain stays. Make sure they are secure, not bent and are pointing straight backwards.
NOTE: Refl ectorsⒶ either attach with Screws Ⓑ or are SNAP on (see images).
① BRACKET MOUNT: Attach Bracket to Chain Stay securely using Screws Ⓑ.
② SCREW MOUNT: Attach Reflector to Bracket securely using Screws Ⓑ.
③ SNAP MOUNT: Slide Reflector DOWN onto Bracket until it SNAPS into place.
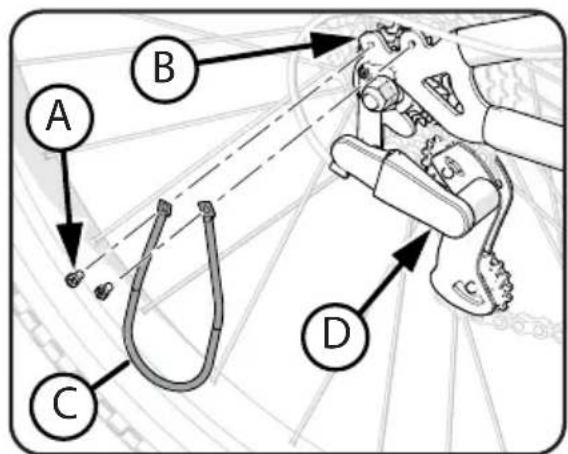
Installing Derailleur Guard (on some models)
- Remove Screws ① from Frame Tabs ②.
- Install Guard Ⓐ using two Screws Ⓐ.
- Make sure the Guard does not contact the Derailleur Ⓓ.
- Tighten Screws Ⓐ securely.
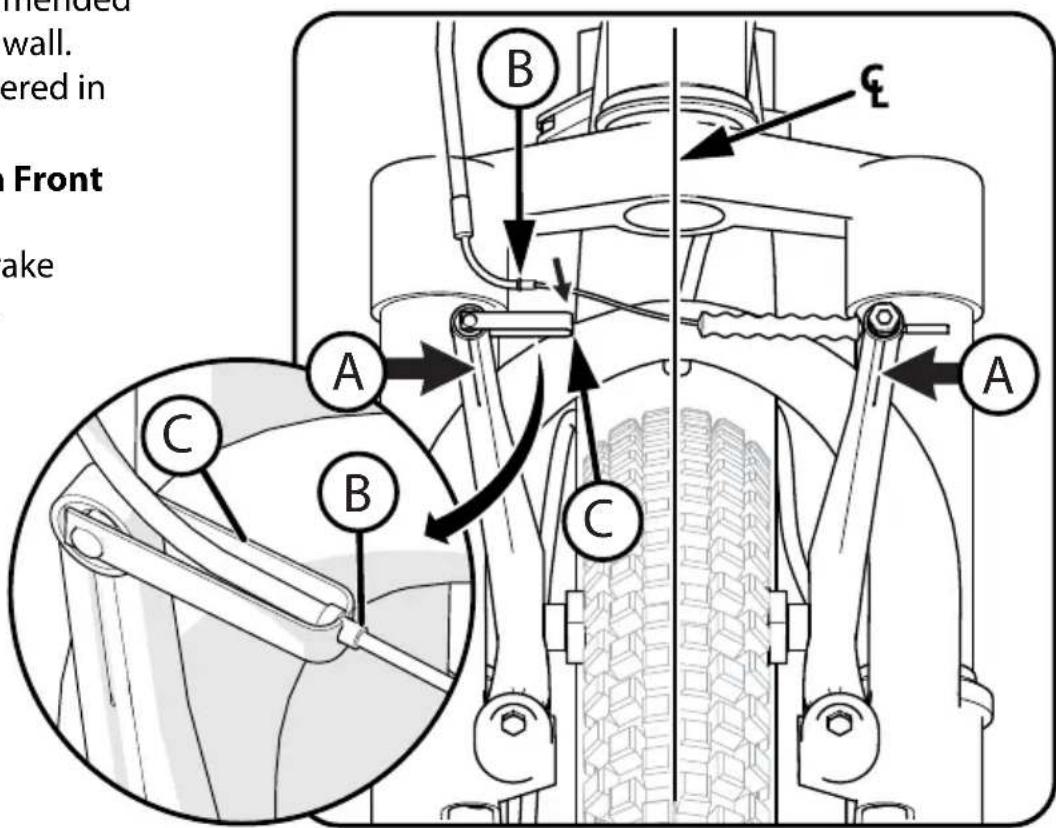
Linear Pull Brake System Adjustment - Before Starting
IF EQUIPPED: The Following Sections Describe Final Brake System Adjustments Required Before Riding.
• Infl ate Tires to recommended pressure on Tire side wall.
• Make sure Tire is centered in Fork.
- If Needed, Re-attach Front Brake Cable:
- Squeeze the two Brake arms together Ⓐ.
- Insert the Brake Cable Guide Ⓑ into the cutout in the Guide Bracket Ⓒ.
• Make sure the Brake Cable Guide Ⓑ is seated securely in the Guide Bracket ⓒ cutout.
Final Brake Adjustment Before Riding
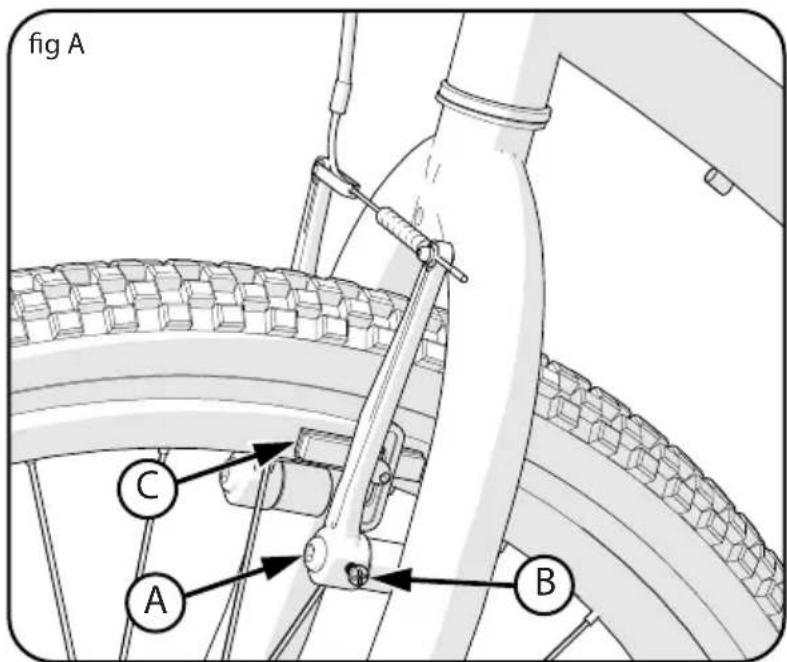
Check tightness of the cantilever mounting Bolt Ⓐ (fi g A):
- Make sure each cantilever mounting Bolt is tightened securely.
Center brake shoes on rim:
- Turn the Adjustment Screw Ⓑ on the cantilever arm to move the arm in or out so each Brake Shoe Ⓒ is the same distance from the rim.
- Squeeze the brake lever two times.
- Do this step again, until both brake shoes are the same distance from the rim.
Linear Pull Brake System - Adjustment continued
NOTE: The front and rear break adjustments are the same.

WARNING: You must adjust the front and rear brakes before you ride the bicycle.
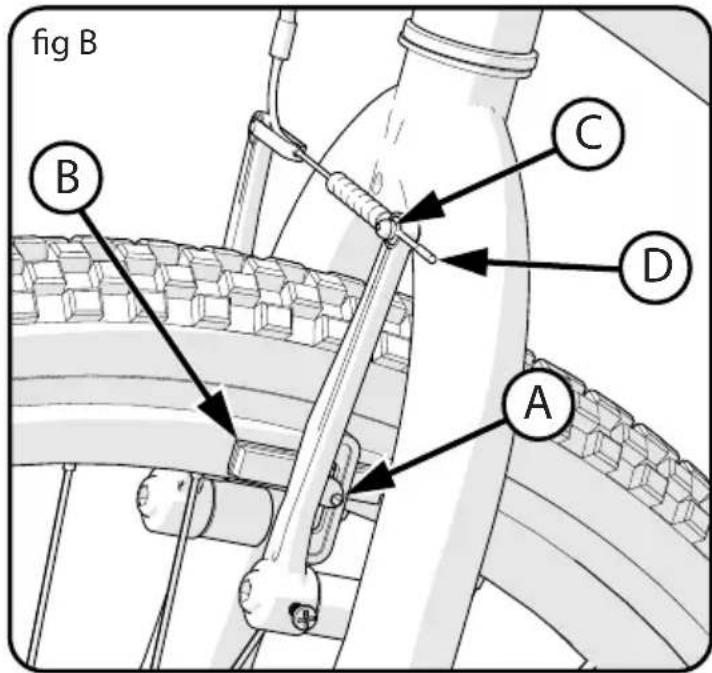
Step 1: Put the brake shoes Ⓑ in the correct position (fi g B):
- Loosen the Screw Ⓐ of each Brake Shoe Ⓑ.
- Adjust each Brake Shoe so it is fl at against the rim and aligned with the curve of the rim.
- Make sure each Brake Shoe does not rub the tire.
-
If the surface of the Brake Shoe has arrows, make sure the arrows point toward the rear of the bicycle.
-
Hold each Brake Shoe in position and tighten the Screw.
Step 2: Test the tightness of each Brake Shoe:
- Try to move each Brake Shoe out of position.
- If a Brake Shoe moves, do Step 1 again, but tighten the nut tighter than before.
- Do this test again, until each Brake Shoe does not move.
Step 3. Stretching the cable (fi g B):
- Hold both Brake Shoes against the rim.
- Loosen the cable clamp Screw ©.
- Pull the Cable Ⓓ tight and tighten the Screw.

WARNING: Do not over tighten the cable clamp Screw. Over tightening the cable clamp Screw may cut the cable and cause injury to the rider or to others.
- Squeeze each brake lever firmly 20 times.
- Hold both Brake Shoes against the rim and loosen the cable clamp Screw.
- Pull the Cable tight and tighten the cable clamp Screw.
Linear Pull Brake System Adjustment - continued
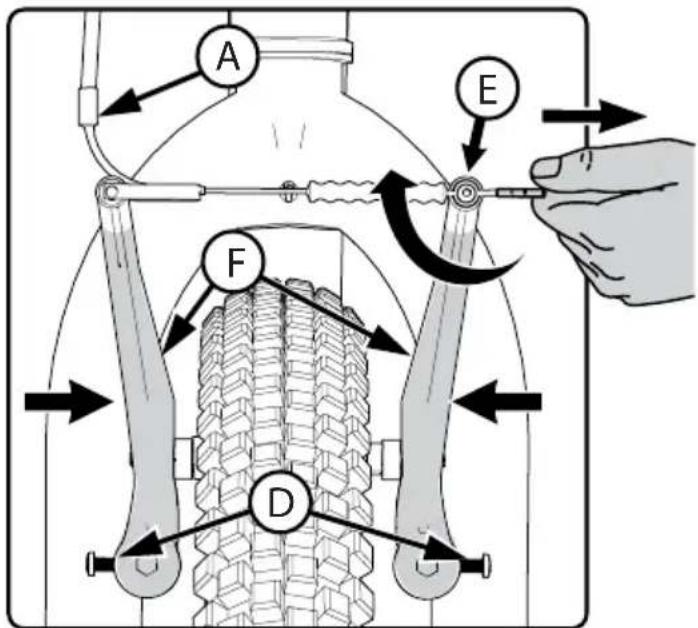
- If desired, adjust Brake Levers Ⓖ to a comfortable distance from the grip using the Adjustment Screw Ⓗ. Turning the screw IN brings it closer to the grip.
- Make sure brake line Sheaths Ⓐ, Ⓑ are seated correctly.
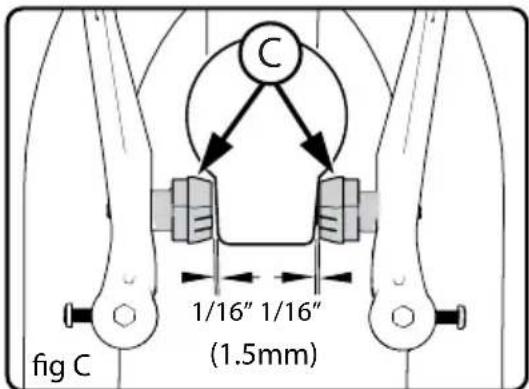
- Position each Brake Shoe 1/16 inch away from the rim:
- Turn the caliper brake adjusting Screws (D) in or out to make the adjustment.
- If the brake shoes cannot be positioned
the correct distance from the rim, hold both Brake Shoes against the rim and loosen the cable clamp Screw Ⓔ
-
Squeeze the Brake Arms Ⓕ together and pull or loosen the cable wire slightly.
-
Tighten the cable clamp Screw.
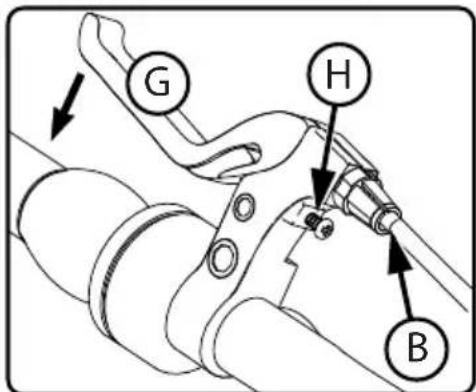

WARNING: Do not over tighten the cable clamp. Over tightening the cable clamp may cut the cable and cause injury to the rider or to others.
- Repeat these steps until the brake shoes are 1/16 inch from the rim and the Brake Lever G does not go all the way to the grip when squeezed (fig C).
WARNING: Do not move the brake shoes away from a wheel rim that is not true (straight). This can cause the caliper brake to be less effective and unsafe. To allow safe adjustment of the caliper brake, have a bicycle service shop true the wheel.
continued >>
Linear Pull Brake System - continued
Test the tightness of the cable clamp (fig C):
- Squeeze each Brake Levers Ⓖ with firm pressure.
- Make sure the cable does not move in the Cable Clamp Ⓔ.
- If the cable moves in the cable clamp, adjust the brakes again but tighten the cable clamp tighter than before.
- Do this test again, until the cable does not move in the cable clamp.
Test the travel of each brake lever:
- Squeeze each Brake Lever Ⓖ with strong pressure
- If the brake lever touches the grip, adjust the brakes again.

WARNING: After you adjust the brakes again, if either brake lever touches the grip is not work well, have a bicycle service shop repair or adjust the brakes.
Linear Pull Brake Pad Replacement
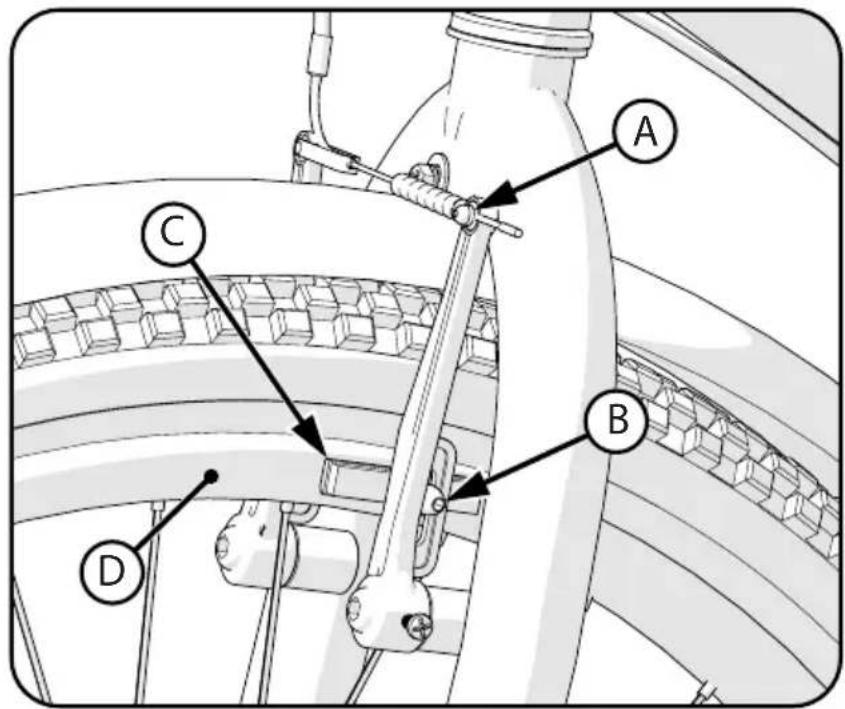
- If necessary, loosen brake cable Adjustment Bolt Ⓐ.
- Loosen and remove brake pad Bolt/Screws Ⓑ.
- Remove old Brake Shoe ©.
- Install new Brake Shoe, making sure it is pointing forward and lined up evenly with the Wheel Rim Ⓓ.
- Tighten brake pad Bolt/ Screw and Adjustment Bolt according to Torque Chart.

WARNING: Replace Brake Pad with same model and type as original.
Disc Brake System Adjustment: (various models)
NOTE: See Torque Table for recommended torques.
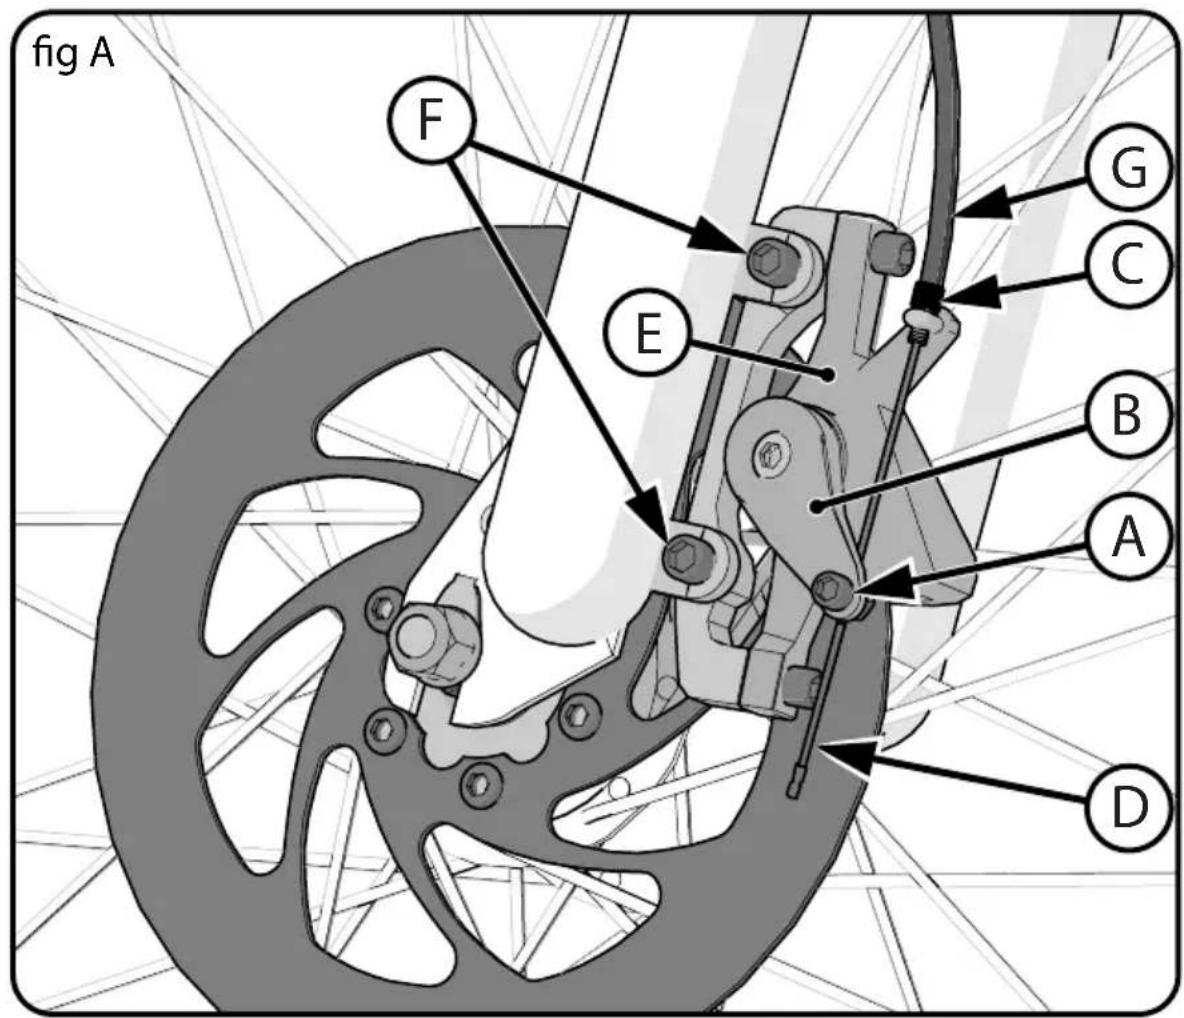
BRAKE ADJUSTMENT (see fi g-A):
- Loosen the Cable Clamp Bolt (A).
- Push the Brake Arm Ⓑ toward the Adjusting Barrel Ⓒ (this applies the brake).
- While holding the Brake Arm, pull the slack out of the Cable End Ⓓ (through the Cable Clamp) and tighten the Cable Clamp Bolt Ⓔ.

WARNING: Do not over tighten the Cable Clamp. Over tightening the Cable Clamp
may cut the Cable and cause injury to the rider or to others.
- Pull and release the brake lever several times to set the Brake Cable.
- Spin the wheel. It should spin freely. If the Disc cannot spin freely in the Caliper, the Cable might be too tight. Loosen the Cable Clamp Bolt and allow the brake arm to move away from the adjusting barrel – repeat steps 1 through 4 until the wheel spins freely.
NOTE: An initial gap of 0.3mm (0.01 inch) is recommended.
- A properly adjusted Caliper is set such that, the pads contact the Disc at approximately 1/3 lever travel and stops the disc at approximately 2/3 lever travel.
- Minor adjustment can be made by turning the Adjusting Barrel on the brake lever or the
Disc Brake System - continued
Adjusting Barrel Ⓐ on the Caliper. Turn the Adjusting Barrel OUT to tighten the brakes or IN to loosen the brakes.
NOTE: Make sure the Adjusting Barrel threads are fully engaged. Check adjustment again.
- If you cannot reduce the gap by turning the Adjusting Barrel, the brake pads might be worn out and need to be replaced.
PAD REPLACEMENT:
- Remove the Caliper Mounting Bolts Ⓕ.
- Remove the Caliper assembly Ⓔ.
- Remove the Brake Pads from the Caliper.
- Install the new Pads using same type and size.
- Install the Caliper assembly Ⓔ to the mounts on the fork (front), or frame (rear) (front shown).
- Tighten the caliper Mounting Bolts Ⓕ securely. See Torque Table for recommended torque.
- Route the Cable ⑭ through the lower Adjusting Barrel ⑤ and Cable Clamp ④.
- Ensure Cable Housing Ⓖ is fully inside Adjusting Barrel Ⓒ.
- Pull the Cable through the Cable Clamp, and tighten the Clamp Ⓐ Bolt.
NOTE: Brake adjustment involves loosening the Cable Clamp Bolt. During installation, it only needs to be tightened enough to make sure the Cable End doesn't pull back through the Camp.
- Adjust the Brake (as described above).
- Check brake operation and adjustment before each ride.
- Keep the brake system free of dirt, mud, oil, and other foreign substances that will inhibit proper operation.
-
Frequently check:
-
All components for damage.
- The pads - for wear.
- The lever - for smooth operation.
- The cable - ensure there are no frayed ends, cuts, or kinks that inhibit operation. Add cable lube if the cable is dry.
- All bolts and fasteners - ensure the bolts are tightened, replace any that are damaged.
Shift System
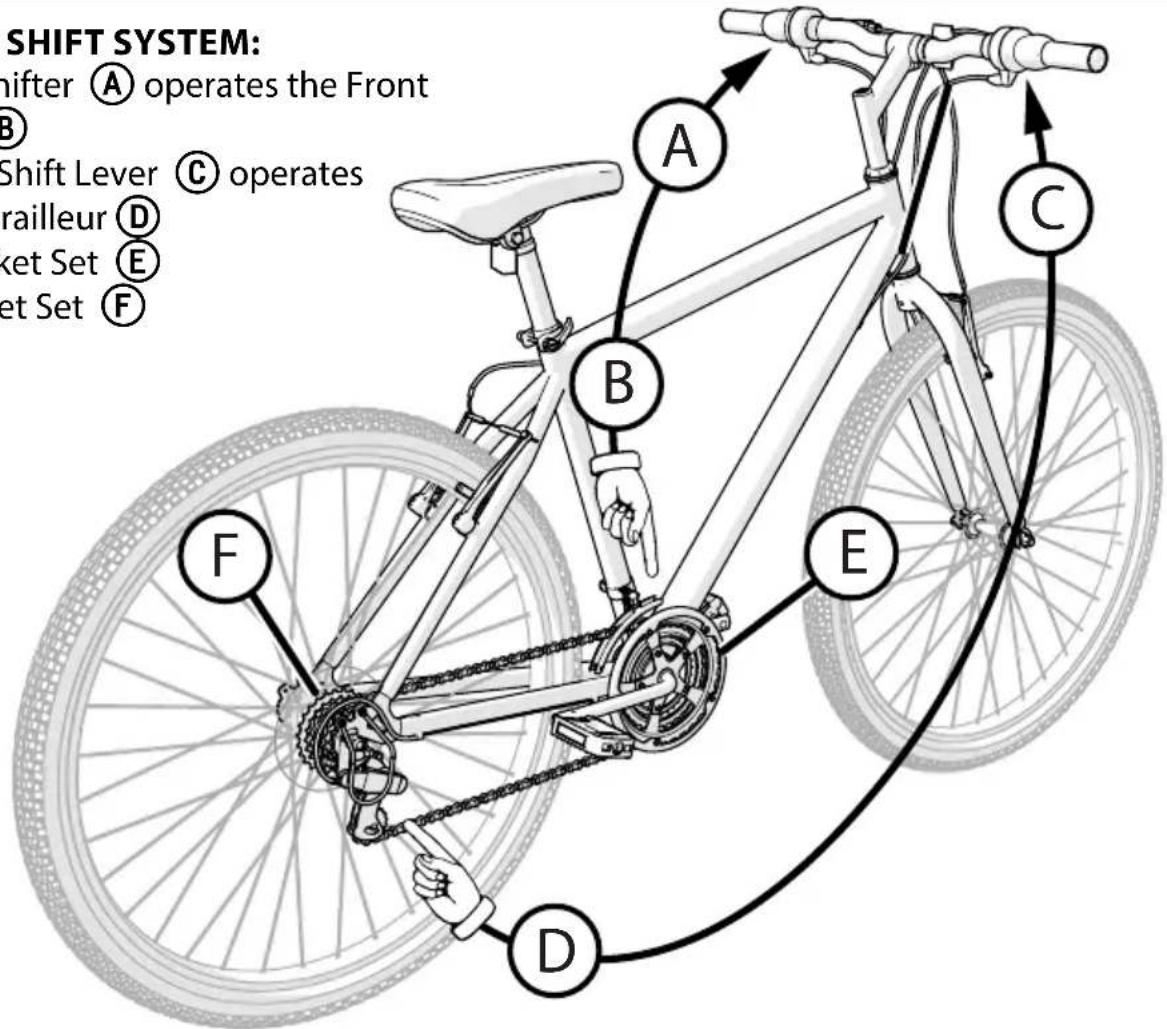
PARTS OF THE SHIFT SYSTEM:
- Left-hand Shifter Ⓐ operates the Front Derailleur Ⓑ
- Right-hand Shift Lever Ⓓ operates the Rear Derailleur Ⓓ
- Front Sprocket Set Ⓔ
- Rear Sprocket Set Ⓕ

WARNING:
- Never shift a derailleur onto the largest or the smallest sprocket if the derailleur is not shifting smoothly. The derailleur may be out of adjustment and the chain could jam, causing loss of control and injury.
- Never move the shifter while pedaling backward, nor pedal backwards immediately after having moved the shifter. This could jam the chain and cause damage to the bicycle and/or loss of control and injury.
- The rider turns the Rear Shift Control Ⓐ around the handlebar (for twist shift models) or moves the shift lever (thumb shift models) to an index position
- When the rear shift control moves into each position with a "click" sound, the shift is complete
- The rider turns the Front Shift Control Ⓐ around the handlebar (for twist shift models) or moves the shift lever to an index position (thumb shift models)
- Each shift control pulls a cable wire that is attached to the derailleur.
- The derailleur moves and guides the chain from one sprocket to another.
- If there is some chain noise after the shift, turn the rear shift control a small amount to "trim" the rear derailleur.
Shift System - continued

CAUTION: Do not force the shift levers. Shift only when pedaling forward and without strong force. Do not backpedal. Backpedaling can cause the chain to come off the sprockets. Backpedaling and shifting while not pedaling can damage the sprockets and stretch the cable wire.
There is no "correct gear" in which to ride the bicycle. The "correct gear" is the one that is comfortable to you.
To select a gear or sprocket combination while riding:
- While pedaling, shift the chain onto different front and rear sprocket combinations.
- You will feel a difference in the rhythm and ease of pedaling.
- Shift the chain to the gear that allows you to pedal at a rhythm and effort that is comfortable to you.
- When riding uphill or against the wind, you may wish to keep the chain on the smallest front sprocket Ⓐ and shift the chain on the rear sprocket cluster Ⓑ.
THESE ARE THE LOWER GEAR COMBINATIONS:
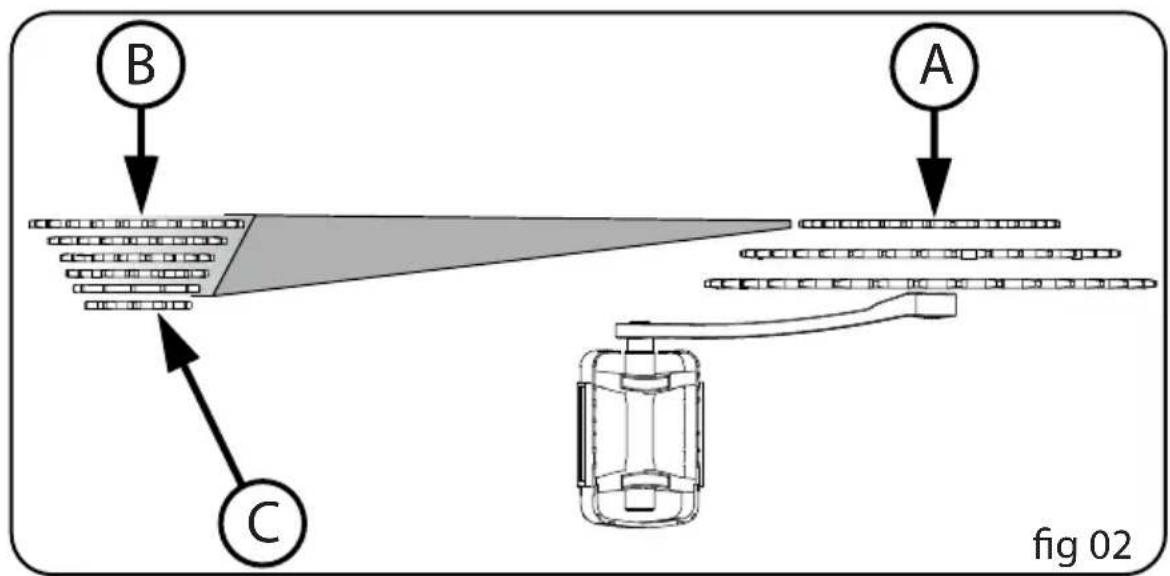
- They allow you to pedal easier and at a faster rhythm, but with less distance traveled per pedal revolution.
- For the best performance in this case, do not use the smallest rear sprocket Ⓒ.
- When riding downhill or with the wind, you may wish to keep the chain on the largest front sprocket Ⓓ and shift the chain on the rear sprocket cluster.
THESE ARE THE HIGHER GEAR COMBINATIONS:
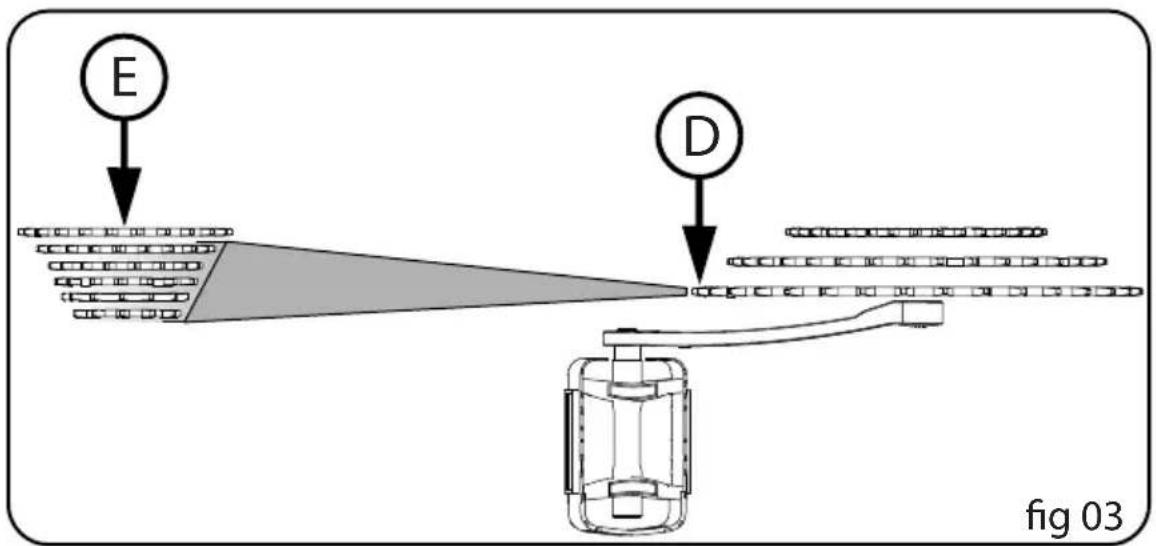
• They allow you to pedal harder and at a slower rhythm, but with more distance traveled per pedal revolution.
- For the best performance in this case, do not use the largest rear sprocket Ⓔ.
THESE ARE THE MIDDLE RANGE GEAR COMBINATIONS:
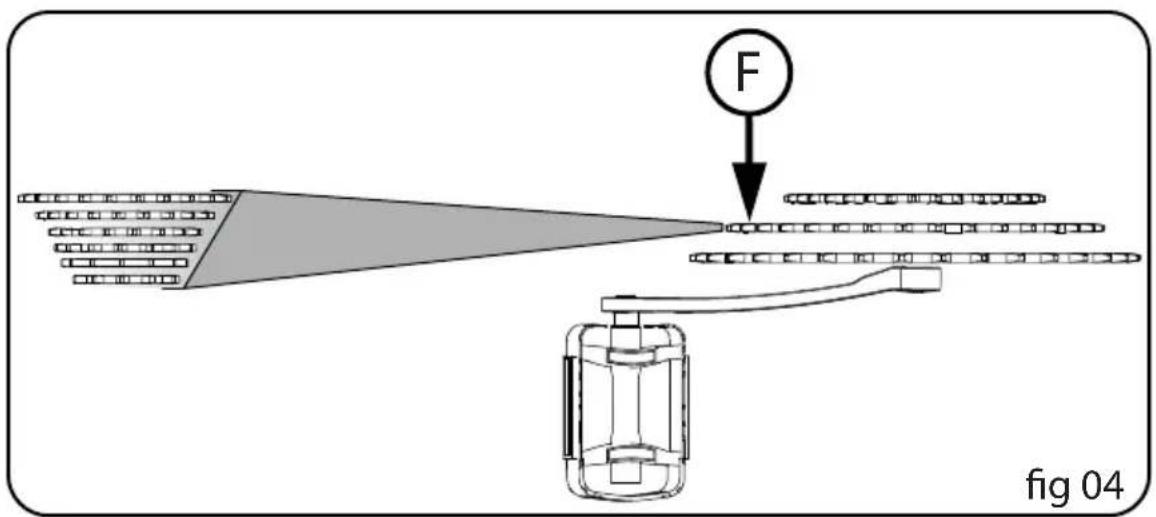
• These overlap some of the higher and some of the lower gear combinations.
- On bicycles with three front sprockets, you may wish to keep the chain on the middle front sprocket (F) and shift the chain on the rear sprocket cluster.
Rear Derailleur Adjustments
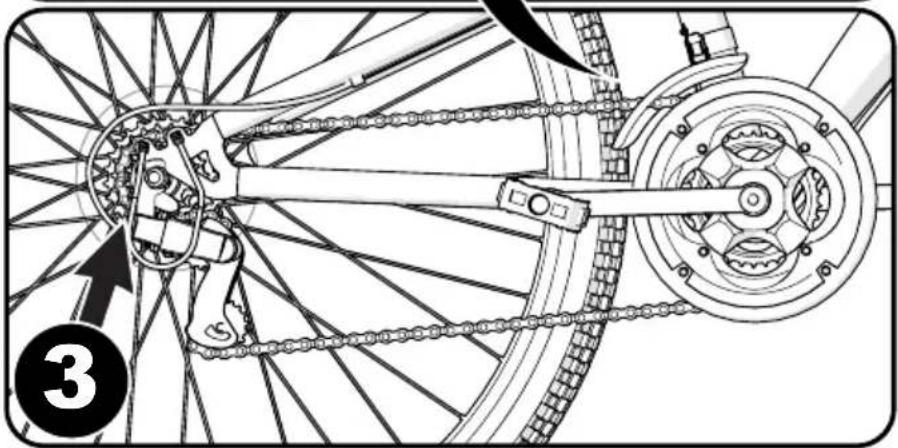
The rear derailleur has two adjusting screws. The "low" adjusting screw, sometimes marked Ⓛ, limits how far the rear derailleur and chain can move toward the wheel. The "high" adjusting screw, sometimes marked Ⓗ, limits how far the rear derailleur and chain can move away from the wheel.
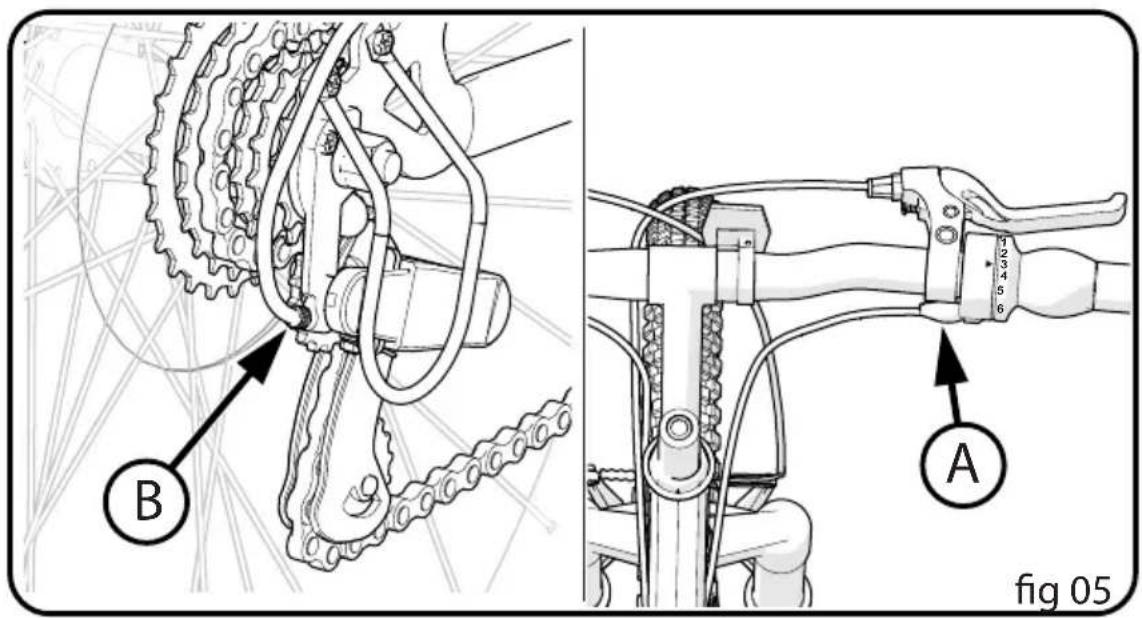
Put the "high" adjusting screw in the correct position as follows:
- Shift the chain onto the smallest rear sprocket. Loosen Nut © of the cable clamp.
- Turn the lever Barrel Adjuster Ⓐ and rear Derailleur Adjustor Ⓑ all the way IN (fig 5).
- Turn the "high" adjusting Screw Ⓖ so the Jockey Roller Ⓓ is in line with the outside edge of the smallest rear Sprocket Ⓔ (fig 6)
- Remove the slack from the cable wire and tighten the Nut of the cable clamp.
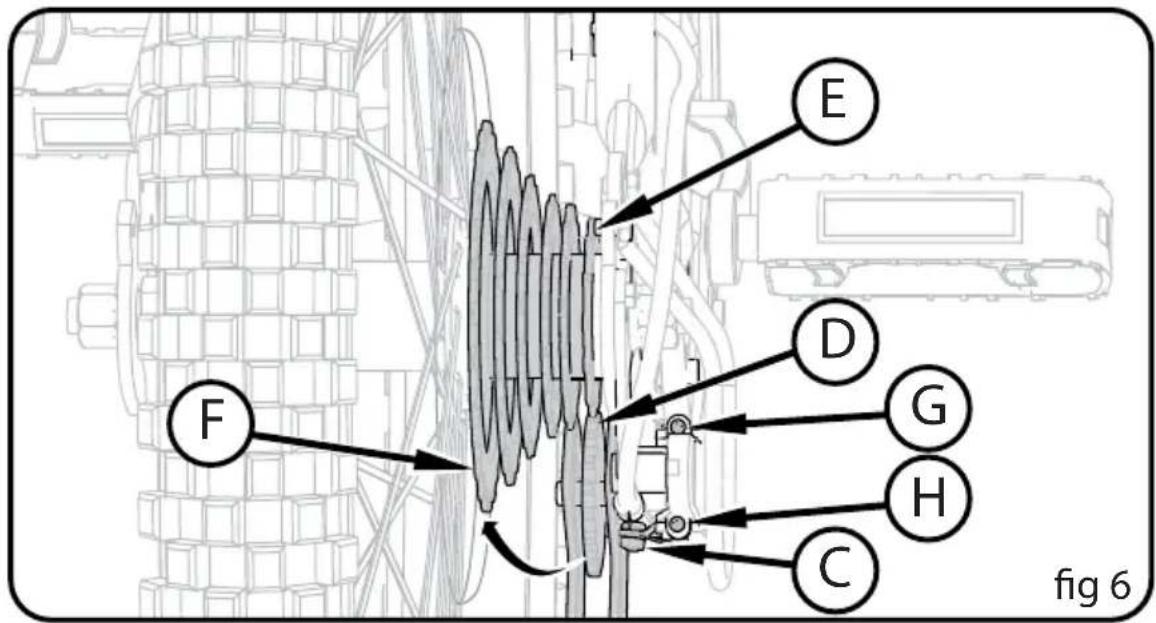
continued >>
Rear Derailleur Adjustments - continued
Put the "low" adjusting Screw in the correct position as follows:
- Shift the chain onto the largest rear Sprocket Ⓕ.
- Loosen Nut of the cable clamp.
- Turn the "low" adjusting Screw Ⓗ so the Jockey Roller is exactly below the largest rear sprocket.
- Tighten the Nut of the cable clamp.
Adjust the Index Shift System:
- Shift the chain onto the smallest rear sprocket.
- Without turning the crank, turn the Right Shift Control Ⓐ one "click" rearward.
- Slowly turn the crank forward.
- The chain should move from the smallest rear sprocket to the next larger rear sprocket.
- Turn the Adjusting Barrel Ⓑ OUT as needed so the chain moves exactly on to the second rear sprocket and does not rub, jump, or delay.
When adjusted properly, the shift system will operate smoothly with no chain rubbing.
Note: If you have trouble, take the bike to a bike shop.
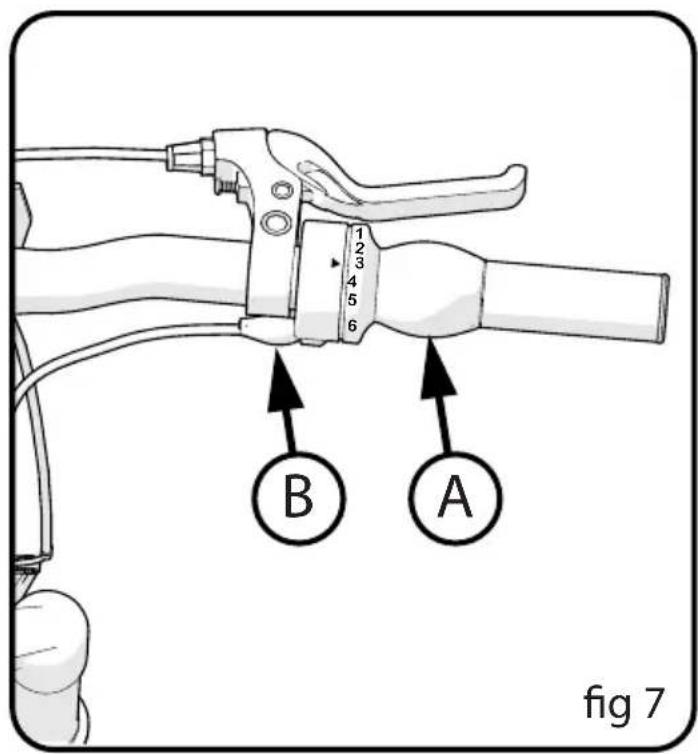
These instructions describe most adjustments that the shift system may need. If you can not adjust the shift system using these instructions, have a bicycle service shop do the adjustments that are needed.
The Handlebar Twist Grips (View 1) control the Shift System. The Left Grip Ⓐ shifts the chain on the front sprockets (View 2). The Right Grip Ⓑ shifts the chain on the Rear Sprocket (View 3).
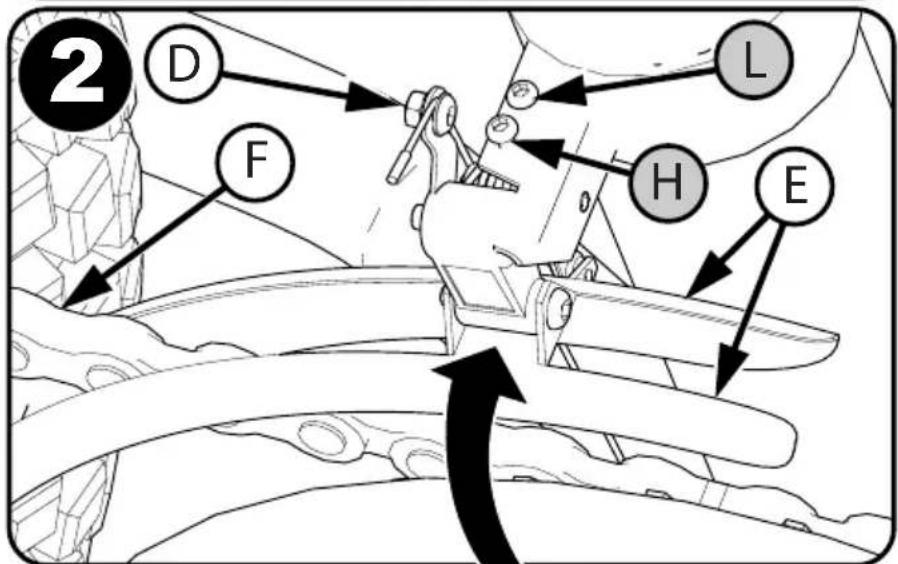
The front derailleur (View 2) has two adjusting screws. The "low" adjusting screw, sometimes marked "L", limits how far the front derailleur and chain can move toward the frame. The "high" adjusting screw, sometimes marked "H", limits how far the front derailleur and chain can move away from the frame.
Put the "low" adjusting screw in the correct position as follows:
- Shift the chain onto the third largest rear sprocket and the smallest front sprocket.
- Turn the lever Barrel Adjuster Ⓐ all the way IN.
- Loosen Nut Ⓓ of the cable clamp.
- Turn the "low" adjusting screw Ⓛ so the left inside edge of the chain cage Ⓔ and the chain Ⓕ just do not touch.
- Remove the slack from the cable wire and tighten Nut Ⓓ securely.
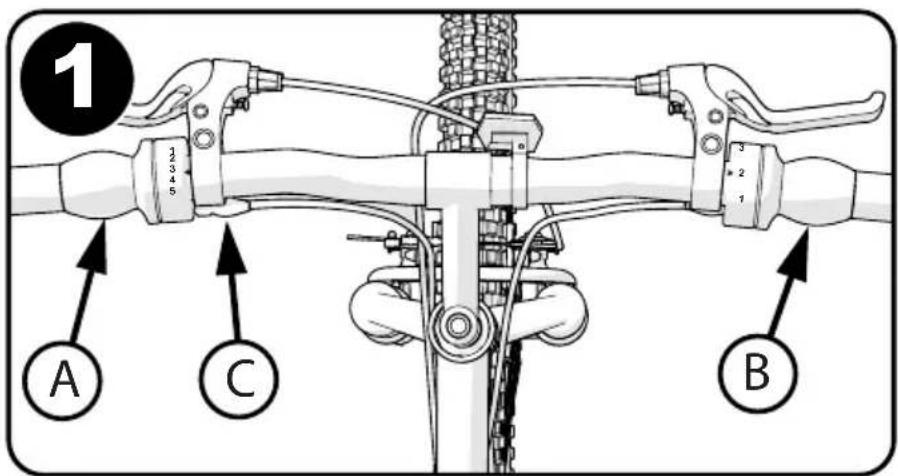
Front Derailleur Adjustments - continued
Put the "high" adjusting screw in the correct position as follows:
- Shift the chain onto the largest front sprocket and the smallest rear sprocket.
- Turn the "high" adjusting screw H so the right inside edge of the chain cage and the chain just do not touch.
NOTE: If the shift lever does not move easily:
- If the shift cable seems to stick, lubricate it.
- Do not lubricate the shift control.
- If the shift cable is sharply bent, rusted or has broken strands, replace it.
Perform the "Rear Derailleur Adjustments" if:
- The chain will not shift onto all the rear sprockets.
- The chain comes off the rear sprockets.
- The chain makes noise while on the smallest or largest rear sprocket.
- The rear derailleur rubs the spoke protector.
Repair and Service

WARNING:
- Inspect the product frequently. Failure to inspect the product and to make repairs or adjustments, as necessary, can result in injury to the rider or to others. Make sure all parts are correctly assembled and adjusted as written in this manual and any “Special Instructions”.
- Immediately replace any damaged, missing, or badly worn parts with original equipment.
- Make sure all fasteners are correctly tightened as written in this manual and any "Special Instructions". Parts that are not tight enough can be lost or operate poorly. Over tightened parts can be damaged. Make sure any replacement fasteners are the correct size and type.
NOTE: Have a bicycle service shop make any repairs or adjustments for which you do not have the correct tools or if the instructions in this manual or any "Special Instructions" are not sufficient for you.
Tires
Maintenance:
- Frequently check the tire inflation pressure because all tires lose air slowly over time. For extended storage, keep the weight of the off the tires.
- Do not use unregulated air hoses to infl ate the tire/tubes. An unregulated hose can suddenly over infl ate tires and cause them to burst.
- Replace worn tires.

WARNING: Do not ride or sit on the unit if a tire is under inflated. This can damhe tire, inner tube and rim.
Inflating the Tires:
- Use a hand or a foot pump to inflate the tires.
• Service station meter-regulated air hoses are also acceptable.
• The maximum inflation pressure is shown on the tire sidewall. - If two inflation pressures are on the tire sidewall, use the higher pressure for on-road riding and the lower pressure for off-road riding.
• The lower pressure will provide better tire traction and a more comfortable ride.
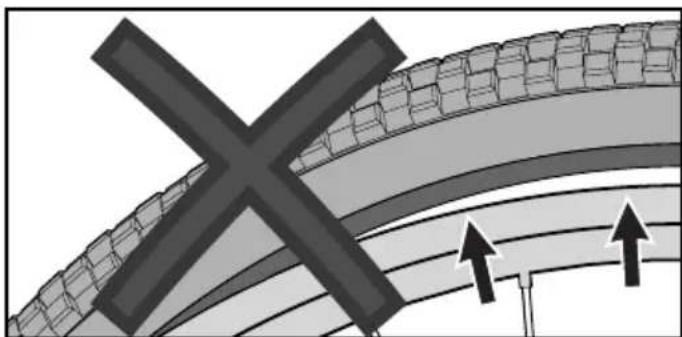
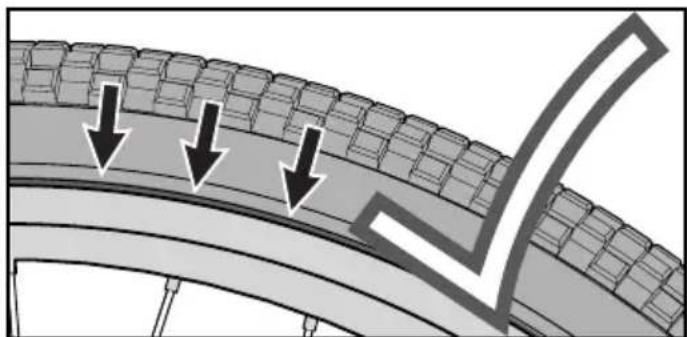
Before adding air to any tire, make sure the edge of the tire (the bead) is the same distance from the rim, all around the rim, on both sides of the tire. If the tire does not appear to be seated correctly, release air from the inner tube until you can push the bead of the tire into the rim where necessary. Add air slowly and stop frequently to check the tire seating and the pressure, until you reach the correct inflation pressure.
Lubrication

WARNING:
- Do not over lubricate. If oil gets on the wheel rims or the brake shoes, it will reduce brake performance and a longer distance to stop the bicycle will be necessary. Injury to the rider or to others can occur.
- The chain can throw excess oil onto the wheel rim. Wipe excess oil off the chain.
- Keep all oil off the surfaces of the pedals where your feet rest.
- Using soap and hot water, wash all oil off the wheel rims, the brake shoes, the pedals, and the tires.
- Rinse with clean water and dry completely before you ride.
- Using a light machine oil (20W), lubricate the bicycle according to the following table:
Lubrication Table (as equipped)
| What When How | ||
| Pedals every six months | months Put four drops of oil where the axles go into the pedals. | |
| Chain every six months | months Put one drop of oil on each roller of the chain.Wipe all excess oil off the chain. | |
| Derailleurs every six months | six months Put one drop of oil on each pivot point of the derailleurs. | |
| Brake Levers every six months | six months Put one drop of oil on the pivot point of each brake lever. | |
| Wheel Brakes every six months | six months Put one drop of oil on the pivot point of each cantilever brake. | |
| Brake and cable every six months | six months Put four drops of oil into both ends of each cable.Allow oil to soak back along the cable wire. | |
| Rear Sprocket Cluster | every six months Lay the bicycle on its left side. Slowly turn the rear wheel clockwise. Put four drops of oil in the crack between the rear sprockets (which are stationary) and the freewheel body (which is turning clockwise). | |
| Shock Fork | every six months Lift up the rubber fork boot and dab a small amount of grease on the fork leg just above the plastic bushing. |
Inspection of the Bearings
Maintenance
Frequently check the bearings of the bicycle. Have a bicycle service shop lubricate the bearings once a year or any time they do not pass the following tests:
Head Tube Bearings
The fork should turn freely and smoothly at all times. With the front wheel off the ground, you should not be able to move the fork up, down, or side-to-side in the head tube.
Crank Bearings
The crank should turn freely and smoothly at all times and the front sprockets should not be loose on the crank. You should not be able to move the pedal end of the crank from side-to-side.
Wheel Bearings
Lift each end of the bicycle off the ground and slowly spin the raised wheel by hand. The bearings are correctly adjusted if:
• The wheel spins freely and easily.
- The weight of the spoke reflector, when you put it toward the front or rear of the bicycle, causes the wheel to spin back and forth several times.
- There is no side-to-side movement at the wheel rim when you push it to the side with light force.
Suspension Frame (various models)
Adjustment: The bicycle may have an adjustable shock-absorbing suspension. You can change the suspension, as you prefer, for a softer or a firmer ride.

WARNING: Make sure there are at least two threads showing Ⓐ above the Adjusting Nut Ⓐ so the shock does not come loose.
To change the suspension:
- For a softer ride, turn the Adjusting Nut Ⓐ clockwise so the Suspension Spring Ⓑ is compressed less.
- For a firmer ride, turn the Adjusting Nut Ⓑ is compressed more.
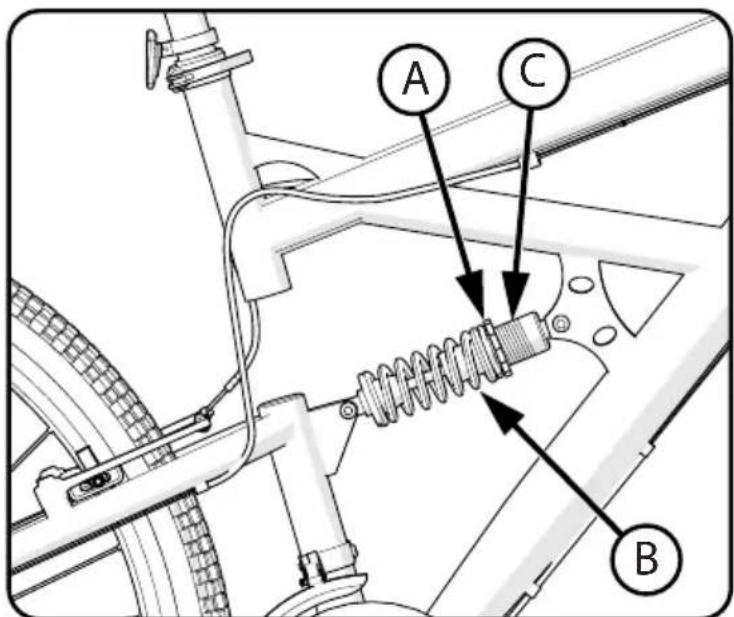
Ⓐ counter clockwise so the Suspension Spring
Limited Warranty
General:
- Part or model specifications are subject to change without notice.
- This Limited Warranty is the only warranty for the product. There are no other express warranties.
- The only uses for this product are described in this manual.
- Warranty registration is not required.
- The Limited Warranty extends only to the original consumer and is not transferable to anyone else.
What does this Limited Warranty cover?
This Limited Warranty covers all parts of the product except those indicated below as not warranted.
What must you do to keep the Limited Warranty in effect?
This Limited Warranty is effective only if:
- Product is completely and correctly assembled.
- Product is used under normal conditions for its intended purpose (see the following section for excluded activities).
- Product receives all necessary maintenance and adjustments.
- Product is used for general transportation and recreational use only.
What is not covered by this Limited Warranty?
This product is designed for recreational use only. This Limited Warranty does not cover normal wear and tear, normal maintenance items, or any damage, failure, or loss that is caused by improper assembly, maintenance, adjustment, storage, or use of the product.
This Limited Warranty will be void if the product is ever:
• Used in any competitive sport
• Used for stunt riding, jumping, aerobatics or similar activity
- Modified in any way
- Modified with the addition of a motor
- Ridden by more than one person at a time
- Rented, sold, or given away
- Used in a manner contrary to the instructions and warnings in this Owner's Manual
Huff y will not be liable for incidental or consequential loss or damage due directly or indirectly from use of this product. Some States do not allow the exclusion or limitation of incidental or consequential damages, so the above limitation may not apply to you.
What will Huff y do?
Huff y will replace, without charge to you, any part, or component found to be defective by Huff y.
How do you get service?
Contact the Customer Service Department.
• See included list for Customer Contact information or visit www.huffybikes.com/contact.
What rights do you have?
This warranty gives you specific legal rights. You may also have other rights which vary from State to State.
For how long does this Limited Warranty last?
• Steel Frame and Fork: Lifetime
• Aluminum Frame: 10 years
- Shock Fork/Aluminum Fork: 1 year
• Electronics: 90 days
• All other components: 6 months
All warranties are from date of original purchase.
WARNING:
ALWAYS WEAR YOUR HELMET WHEN RIDING THIS PRODUCT!
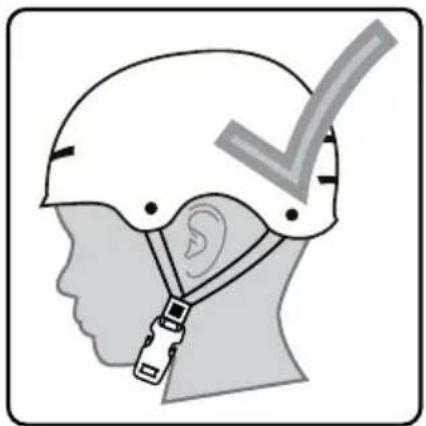
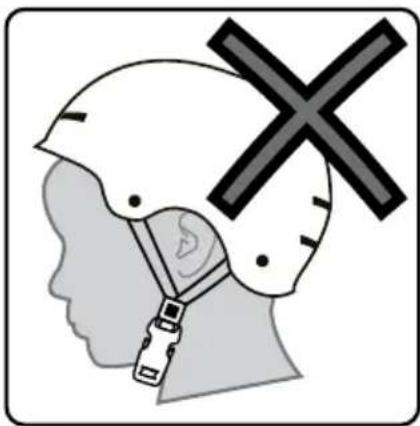
- Helmet should sit level on your head and low on your forehead
- Adjust the strap sliders below the ear on both sides.
- Buckle the chin strap. Adjust strap until it is snug.
- No more than two fingers should fit between the strap and your chin.
- A proper fitting helmet should be comfortable and not rock forward/backward or side to side.
- Always read the user manual that comes with your helmet to make sure it is fitted and attached properly to the wearer's head according to the fitting instructions described in the user manual.
Check
www.Huffybikes.com/contact
for the current contact information
[ In the US ] PLEASE - BEFORE RETURNING TO STORE, CONTACT HUFFY CUSTOMER SERVICE. WE ARE GLAD TO ASSIST YOU WITH ANY PARTS OR ASSEMBLY PROBLEMS YOU MIGHT HAVE!
For Fast Customer Service, go to:
http://www.huffybikes.com/contact
To Order Parts (US only), go to:
http://www.huffybikes.com/parts
OR TEL: 1 800 872 2453 (US only)
For email, go to http://www.huffybikes.com/contact
[ CANADA ]
VEUILLEZ NOTER : AVANT DE RETOURNER AU MAGASIN, COMMUNIQUEZ AVEC LE SERVICE À LA CLIENTÈLE DE HUFFY. NOUS VOUS AIDERONS VOLONTIERS AVEC TOUT PROBLÈME CONCERNANT LES PIÈCES OU LE MONTAGE!
http://www.huffybikes.com/contact
To Order Parts (CANADA only), go to:
http://www.huffybikes.com/parts
OU appelez le 1 800 872 2453
(CANADA only)
for the current contact information
http://www.huffybikes.com/home/globalcontact

- OWNER'S MANUAL FOR MOUNTAIN BIKES
- OWNER'S MANUAL INDEX
- YOUR BIKE
- BICYCLE ASSEMBLY
- BRAKE SYSTEM
- SHIFT SYSTEM
- MAINTENANCE AND SERVICE
- IMPORTANT!! BEFORE YOUR FIRST RIDE
- SEE MAINTENANCE SECTION TO
- OWNER'S BICYCLE IDENTIFICATION RECORD
- RECOVERY CODE
- PURCHASE DATE
- FITTING THE RIDER TO THE BICYCLE
- WARNING AND SAFETY INFORMATION
- MEANINGS OF WARNINGS
- THE OWNER'S RESPONSIBILITY
- NOTE
- WARNING: FAILURE OF THE RIDER TO OBEY THE FOLLOWING "RULES OF THE ROAD" CAN RESULT
- PARTS VIEW
- INTRODUCTION TO ASSEMBLY
- TOOLS NEEDED (NOT INCLUDED)
- ACCESSORIES (VARIOUS MODELS)
- BAG OR BASKET INSTALLATION
- HANDLEBAR BELL INSTALLATION
- WATER BOTTLE AND CAGE
- HANDLEBAR AND STEM INSTALLATION
- WARNINGS
- HANDLEBAR AND STEM INSTALLATION - THREADLESS STEM
- CAUTION
- STEP 1
- STEP 2
- HANDLEBAR INSTALLATION - VARIOUS STEM CLAMPS
- ONE BOLT STEM
- TWO BOLT STEM
- FOUR BOLT STEM
- INSTALLING THE FRONT WHEEL
- LOOSEN THE FRONT BRAKES
- INSTALL THE FRONT WHEEL
- RE-ATTACH FRONT BRAKE CABLE
- WARNING
- QUICK RELEASE AXLE GUIDE (VARIOUS MODELS)
- QUICK RELEASE AXLE GUIDE - CONTINUED
- TESTING STEM AND HANDLEBAR TIGHTNESS
- TO TEST THE TIGHTNESS OF THE STEM
- TO TEST THE TIGHTNESS OF THE HANDLEBAR CLAMP
- SEAT INSTALLATION
- SEAT AND SEAT POST SETUP
- SEAT INSTALLATION - CONTINUED
- SEAT BOLT MOUNT (VARIOUS MODELS)
- TESTING SEAT CLAMP AND POST CLAMP TIGHTNESS
- TO TEST THE TIGHTNESS OF THE SEAT CLAMP AND THE POST CLAMP
- IF THE SEAT MOVES IN THE SEAT CLAMP
- IF THE SEAT POST MOVES IN THE SEAT TUBE CLAMP
- PEDAL INSTALLATION
- TIGHTEN THE PEDALS
- THREE-PIECE CRANKS (VARIOUS MODELS)
- REFLECTOR INSTALLATION (AS EQUIPPED)
- REFLECTOR INSTALLATION
- DUAL REAR REFL ECTORS (VARIOUS MODELS)
- INSTALLING DERAILLEUR GUARD (ON SOME MODELS)
- LINEAR PULL BRAKE SYSTEM ADJUSTMENT - BEFORE STARTING
- IF EQUIPPED: THE FOLLOWING SECTIONS DESCRIBE FINAL BRAKE SYSTEM ADJUSTMENTS REQUIRED BEFORE RIDING
- FINAL BRAKE ADJUSTMENT BEFORE RIDING
- CHECK TIGHTNESS OF THE CANTILEVER MOUNTING BOLT Ⓐ (FI G A)
- CENTER BRAKE SHOES ON RIM
- LINEAR PULL BRAKE SYSTEM - ADJUSTMENT CONTINUED
- STEP 2: TEST THE TIGHTNESS OF EACH BRAKE SHOE
- STEP 3. STRETCHING THE CABLE (FI G B)
- LINEAR PULL BRAKE SYSTEM ADJUSTMENT - CONTINUED
- LINEAR PULL BRAKE SYSTEM - CONTINUED
- TEST THE TIGHTNESS OF THE CABLE CLAMP (FIG C)
- TEST THE TRAVEL OF EACH BRAKE LEVER
- LINEAR PULL BRAKE PAD REPLACEMENT
- DISC BRAKE SYSTEM ADJUSTMENT: (VARIOUS MODELS)
- BRAKE ADJUSTMENT (SEE FI G-A)
- DISC BRAKE SYSTEM - CONTINUED
- PAD REPLACEMENT
- PARTS OF THE SHIFT SYSTEM
- SHIFT SYSTEM - CONTINUED
- TO SELECT A GEAR OR SPROCKET COMBINATION WHILE RIDING
- THESE ARE THE HIGHER GEAR COMBINATIONS
- THESE ARE THE MIDDLE RANGE GEAR COMBINATIONS
- REAR DERAILLEUR ADJUSTMENTS
- PUT THE "HIGH" ADJUSTING SCREW IN THE CORRECT POSITION AS FOLLOWS
- REAR DERAILLEUR ADJUSTMENTS - CONTINUED
- PUT THE "LOW" ADJUSTING SCREW IN THE CORRECT POSITION AS FOLLOWS
- ADJUST THE INDEX SHIFT SYSTEM
- FRONT DERAILLEUR ADJUSTMENTS - CONTINUED
- NOTE: IF THE SHIFT LEVER DOES NOT MOVE EASILY
- PERFORM THE "REAR DERAILLEUR ADJUSTMENTS" IF
- REPAIR AND SERVICE
- TIRES
- MAINTENANCE
- INFLATING THE TIRES
- LUBRICATION
- INSPECTION OF THE BEARINGS
- HEAD TUBE BEARINGS
- CRANK BEARINGS
- WHEEL BEARINGS
- SUSPENSION FRAME (VARIOUS MODELS)
- TO CHANGE THE SUSPENSION
- LIMITED WARRANTY
- GENERAL
- WHAT DOES THIS LIMITED WARRANTY COVER
- WHAT MUST YOU DO TO KEEP THE LIMITED WARRANTY IN EFFECT
- WHAT IS NOT COVERED BY THIS LIMITED WARRANTY
- THIS LIMITED WARRANTY WILL BE VOID IF THE PRODUCT IS EVER
- WHAT WILL HUFF Y DO
- HOW DO YOU GET SERVICE
- WHAT RIGHTS DO YOU HAVE
- FOR HOW LONG DOES THIS LIMITED WARRANTY LAST
- ALWAYS WEAR YOUR HELMET WHEN RIDING THIS PRODUCT
- [ IN THE US ] PLEASE - BEFORE RETURNING TO STORE, CONTACT HUFFY CUSTOMER SERVICE. WE ARE GLAD TO ASSIST YOU WITH ANY PARTS OR ASSEMBLY PROBLEMS YOU MIGHT HAVE
- [ CANADA ]
Brand : Huffy
Model : 24" Nighthawk Boys Mountain Bike
Category : Bicycle