
5KSB1585BOB - Blender KITCHENAID - Free user manual and instructions
Find the device manual for free 5KSB1585BOB KITCHENAID in PDF.


| Product Type | Blender |
| Brand | KitchenAid |
| Model | 5KSB1585BOB |
| Power | 615 Watts |
| Voltage | 220-240 Volts |
| Frequency | 50/60 Hz |
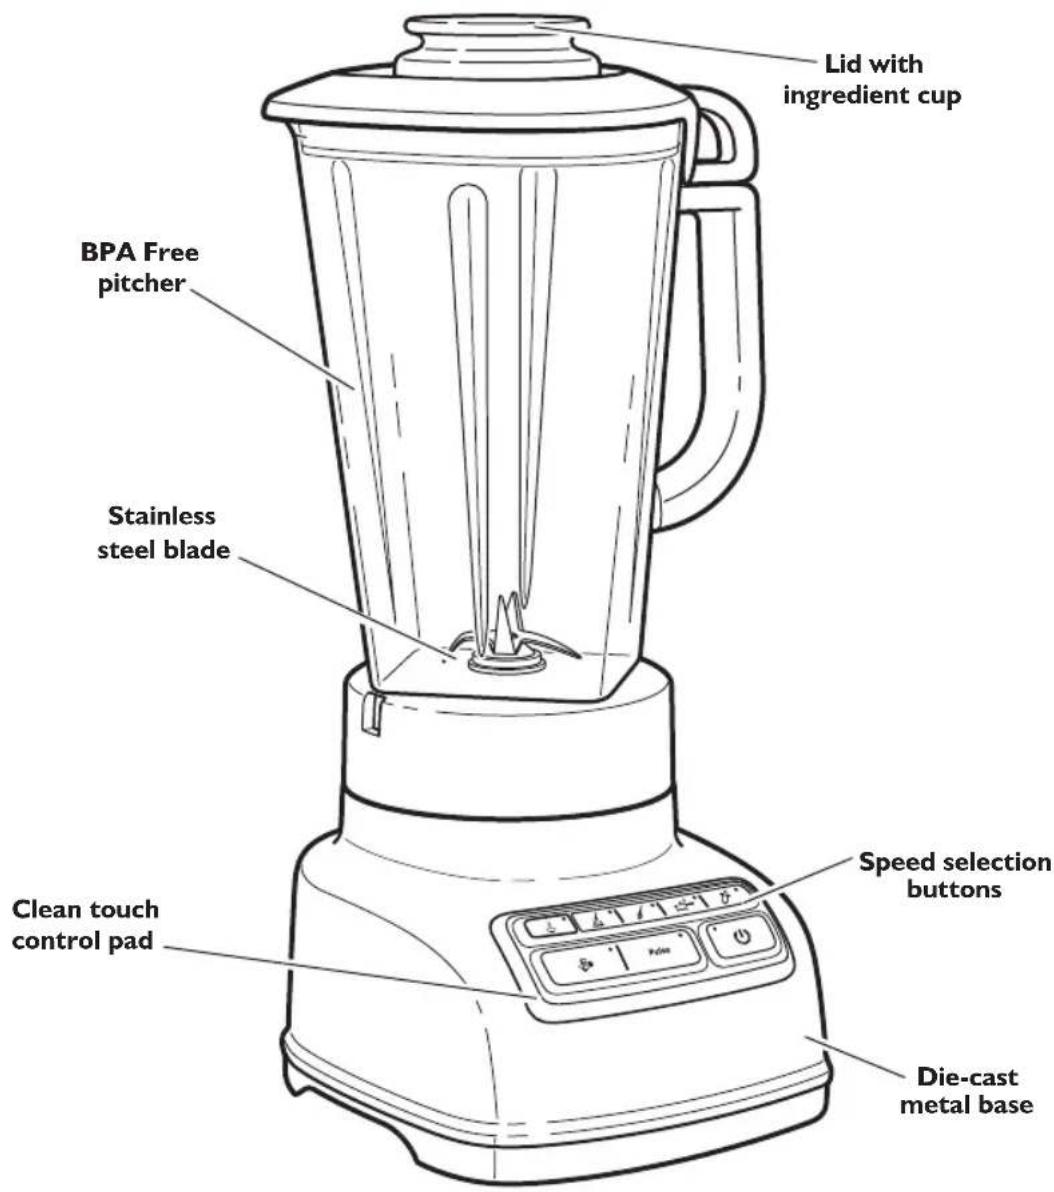
| Speed Settings | 4 speeds: Chop, Mix, Puree, Liquefy |
| Special Functions | Hot Foods, Crush Ice, Pulse |
| Blending Technology | Soft Start (starts at low speed then increases) |
| Blade Material | Stainless Steel |
| Pitcher Material | BPA-Free Plastic |
| Base Material | Die-cast Metal |
| Control Type | Touchpad with indicator lights |
| Safety Features | Automatic shut-off when overloaded or jammed |
| Cleaning | Pitcher dishwasher safe; lid and cup hand wash; base wipe clean |
| Warranty | 2 years full warranty (Europe, Middle East, Africa) |
| Included Accessories | Lid with ingredient cup |
| Certifications | CE, WEEE compliant |
Frequently Asked Questions - 5KSB1585BOB KITCHENAID
User questions about 5KSB1585BOB KITCHENAID
0 question about this device. Answer the ones you know or ask your own.
Ask a new question about this device
Download the instructions for your Blender in PDF format for free! Find your manual 5KSB1585BOB - KITCHENAID and take your electronic device back in hand. On this page are published all the documents necessary for the use of your device. 5KSB1585BOB by KITCHENAID.
USER MANUAL 5KSB1585BOB KITCHENAID
area
| Label | Value | | ----------- | ----- | | 5KSB1585 | 500 |




English 5
Deutsch 00
Français 00
Italiano 00
Nederlands 00
Español 00
Português 00
Ελληνικά 00
Svenska 00
Norsk 00
Suomi 00
Dansk 00
Íslenska 00
Русский 00
Polski 00
Český 00
العربية 00

natural_image
Color palette bar with grayscale shades and a small crosshair symbol (no text or symbols)
natural_image
Solid gray rectangular bar with no text, symbols, or discernible features

BLENDER INSTRUCTIONS
TABLE OF CONTENTS
BLENDER SAFETY
Important safeguards....6
Electrical requirements 7
Electrical equipment waste disposal 8
PARTS AND FEATURES......8
ASSEMBLING THE BLENDER
Preparing the Blender for use 9
Using the Blender pitcher ingredient cup, and Soft Start blending feature ..... 14
Speed control guide.... 14
TIPS FOR GREAT RESULTS
Quick tips 15
How to.... 15
CARE AND CLEANING
Cleaning the Blender 16
TROUBLESHOOTING
Blender does not operate when a setting is selected 17
Blender stops while blending.... 17
WARRANTY AND SERVICE
KitchenAid Blender warranty 18
Customer service 18
BLENDER SAFETY
Your safety and the safety of others are very important.
We have provided many important safety messages in this manual and on your appliance. Always read and obey all safety messages.

This is the safety alert symbol.
This symbol alerts you to potential hazards that can kill or hurt you and others.
All safety messages will follow the safety alert symbol and either the word "DANGER" or "WARNING." These words mean:
! DANGER
You can be killed or seriously injured if you don't immediately follow instructions.
WARNING
You can be killed or seriously injured if you don't follow instructions.
All safety messages will tell you what the potential hazard is, tell you how to reduce the chance of injury, and tell you what can happen if the instructions are not followed.
IMPORTANT SAFEGUARDS
When using electrical appliances, basic safety precautions should always be followed, including the following:
I. Read all instructions.
2. To protect against risk of electrical shock, do not put Blender in water or other liquid.
3. This appliance can be used by children aged from 8 years and above and persons with reduced physical, sensory or mental capabilities or lack of experience and knowledge if they have been given supervision or instruction concerning use of the appliance in a safe way and understand hazards involved. Children shall not play with the appliance.
Cleaning and user maintenance shall not be made by children without supervision.
- Unplug from outlet when not in use, before putting on or taking off parts, and before cleaning.
- Avoid contact with moving parts.
- Do not operate the Blender with a damaged cord or plug or after appliance malfunctions, or is dropped or damaged in any manner. Return appliance to the nearest Authorized Service Center for examination, repair or electrical or mechanical adjustment.
BLENDER SAFETY
- Do not use outdoors.
- Do not let cord hang over edge of table or counter.
- Keep hands and utensils out of container while blending to reduce the risk of severe injury to persons or damage to the Blender. A scraper may be used but must be used only when the Blender is not running.
- Blades are sharp. Handle carefully.
II. Always operate Blender with cover in place. - The use of attachments not recommended by KitchenAid may cause a risk of injury to persons.
- Always operate Blender with cover securely in place and be sure to use only the Hot Foods function when blending hot foods.
- Flashing light indicates ready to operate - avoid any contact with blades or moveable parts.
- This product is designed for household use only.
SAVE THESE INSTRUCTIONS
Electrical requirements
WARNING

Electrical Shock Hazard
Plug into a grounded outlet.
Do not remove ground prong.
Do not use an adapter.
Do not use an extension cord.
Failure to follow these instructions can result in death, fire, or electrical shock.
Wattage: 615 Watts
Voltage: 220-240 Volts
Frequency: 50/60 Hz
NOTE: If the plug does not fit in the outlet, contact a qualified electrician. Do not modify the plug in any way. Do not use an adapter.
Do not use an extension cord. If the power supply cord is too short, have a qualified electrician or serviceman install an outlet near the appliance.
BLENDER SAFETY
Electrical equipment waste disposal
Disposal of packing material
The packing material is 100% recyclable and is marked with the recycle symbol. The various parts of the packing must therefore be disposed of responsibly and in full compliance with local authority regulations governing waste disposal.
Scrapping the product
- This appliance is marked in compliance with European Directive 2002/96/EC, Waste Electrical and Electronic Equipment (WEEE).
- By ensuring this product is disposed of correctly, you will help prevent potential negative consequences for the environment
and human health, which could otherwise be caused by inappropriate waste handling of this product.
- The symbol ✗ on the product or on the accompanying documentation indicates that it should not be treated as domestic waste but must be taken to an appropriate collection centre for the recycling of electrical and electronic equipment.
For more detailed information about treatment, recovery and recycling of this product, please contact your local city office, your household waste disposal service or the shop where you purchased the product.
PARTS AND FEATURES
ASSEMBLING THE BLENDER
Preparing the Blender for use
Before First Use
Before using your Blender for the first time, wipe Blender base with a warm damp cloth, then wipe clean with a damp cloth. Dry with a soft cloth. Wash pitcher, lid, and ingredient cup in warm, sudsy water (see "Care and Cleaning" section). Rinse parts and wipe dry.
English
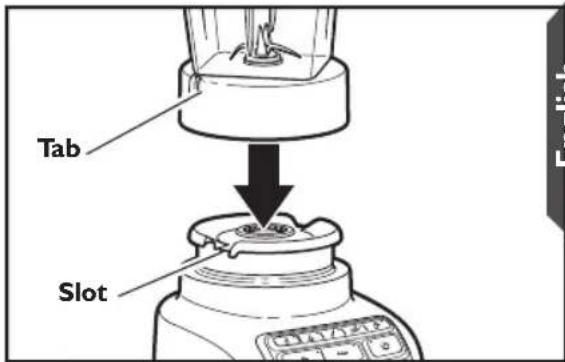
Align the pitcher tabs with the slots on the base. The pitcher handle may be on the right or left side of the blender base.
natural_image
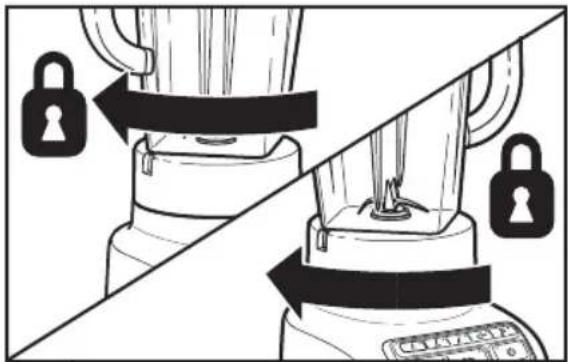
Diagram showing a blender being locked on top, with no text or symbols present2 Rotate pitcher clockwise, approximately 1/8 turn until pitcher clicks into place.
natural_image
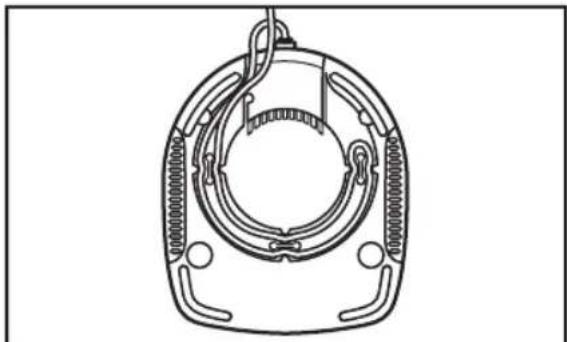
Technical line drawing of a mechanical component with no visible text or symbols3 Adjust the length of the Blender power cord.
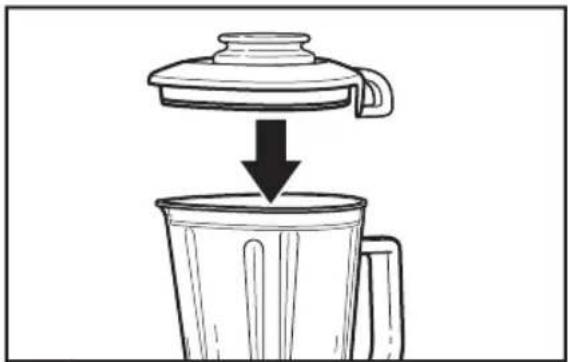
natural_image
Diagram showing a lid being inserted into a cup, with no text or symbols present.4 Securely attach lid to pitcher, making sure the handle on the lid aligns with the handle on the pitcher, as shown.

Electrical Shock Hazard
Plug into a grounded outlet.
Do not remove ground prong.
Do not use an adapter.
Do not use an extension cord.
Failure to follow these instructions can result in death, fire, or electrical shock.
NOTE: When properly positioned, pitcher will rest completely on Blender base. If not, repeat steps 1 and 2.
PREPARING THE BLENDER FOR USE
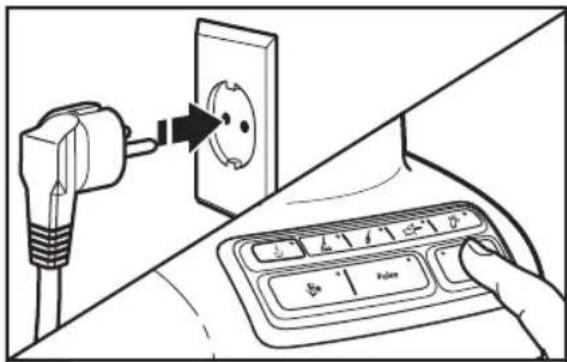
5
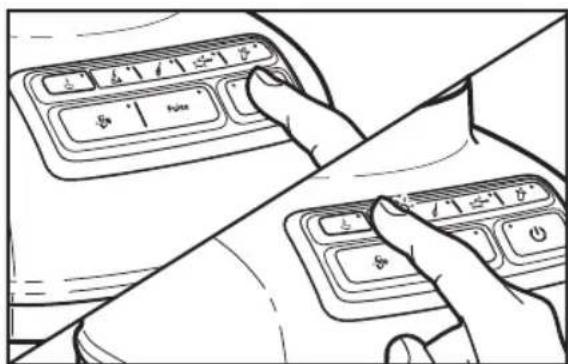
Before using the Blender, plug into a grounded outlet, and press POWER (The Power indicator light will flash when ready.
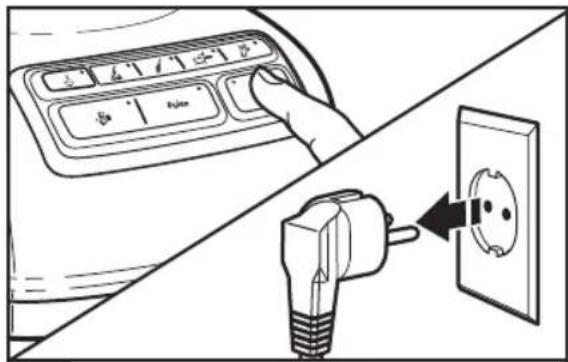
6
Before removing the pitcher from the base, always press POWER (☐) to stop the flashing lights and unplug the power cord.
While the Blender Power indicator light or the PULSE mode indicator light is on:
- Do not interfere with blade movement.
- Do not remove pitcher lid.
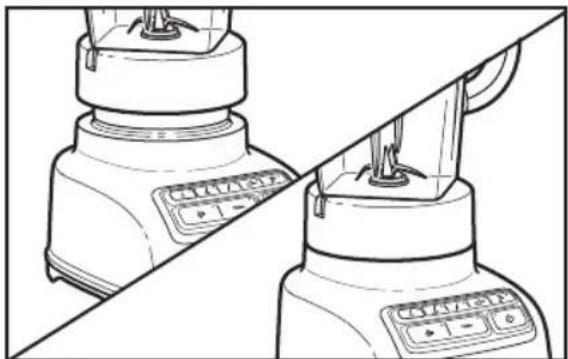
Before operating the Blender, make sure the pitcher is properly locked onto the Blender base.
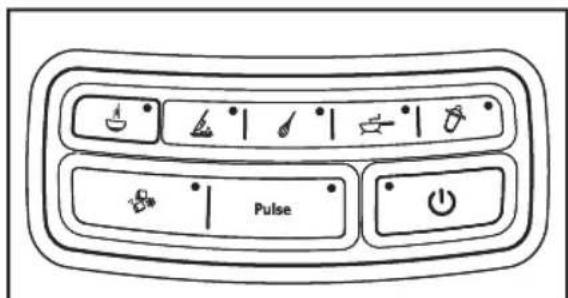
The Blender has four speeds: CHOP ( ) MIX ( ), PUREE ( ) and LIQUEFY ( ). It also features 3 special functions: HOT FOODS ( ) CRUSH ICE ( ) and PULSE ( Pulse ) mode.
natural_image
Diagram of a coffee maker with a lid and handle, showing liquid level being poured into a container (no text or symbols)1
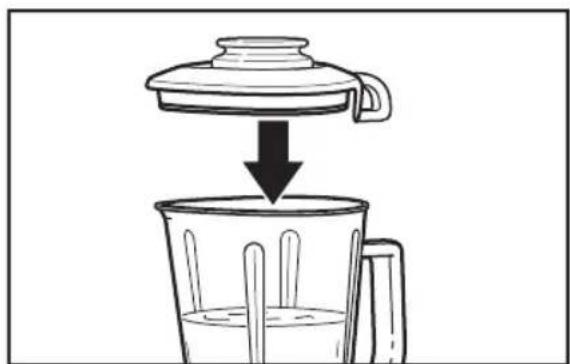
Put ingredients in pitcher and firmly secure lid around the entire opening of the pitcher.
2
Press POWER (☐). The Power indicator light will flash when ready. Then press desired speed button for continuous operation at that speed. The white indicator light by the selected speed will stay lit. You may change settings without stopping by pressing a new speed button.
3 When finished, press POWER (⏻) to stop the Blender, then press POWER (⏻) a second time to turn off. Unplug Blender before removing the pitcher.
NOTE: The Blender will operate only when pressing the POWER (⏻) button (Power LED will flash) before selecting the desired speed.
English

natural_image
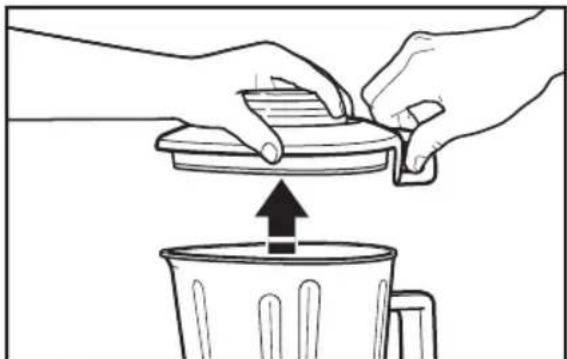
Line drawing of a hand opening a trash bin with an upward arrow indicating motion (no text or symbols)4 To remove the lid, first use the loop on the back of the lid to lift the lid and break the seal.
natural_image
Illustration of hands pouring liquid into a trash bin with an upward arrow (no text or symbols)5 Then lift the lid from the side to remove completely from the pitcher.
Using the Hot Foods function
IMPORTANT: If blending hot foods or liquids – such as soups or sauces – be sure that the lid is securely in place and use only the HOT FOODS ( ) function.
natural_image
Diagram of two identical blowers with control buttons, no text or symbols presentBefore operating the Blender, make sure the pitcher is properly positioned on the base.
natural_image
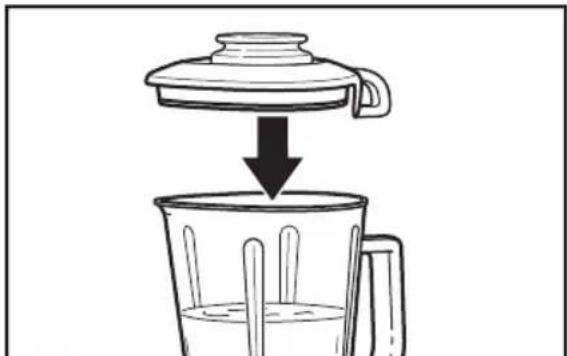
Diagram showing a lid being poured into a glass bowl with chopsticks (no text or symbols)2 Put ingredients into the pitcher, and securely attach lid to pitcher, making sure the handle on the lid aligns with the handle on the pitcher, as shown.
3 Press POWER (💡), then press the HOT FOODS (💡) button. The indicator light above the Hot Foods button will light up. The Hot Foods feature starts at a low speed and slowly ramps up to higher speeds over 90 seconds to avoid splashing of hot liquids.
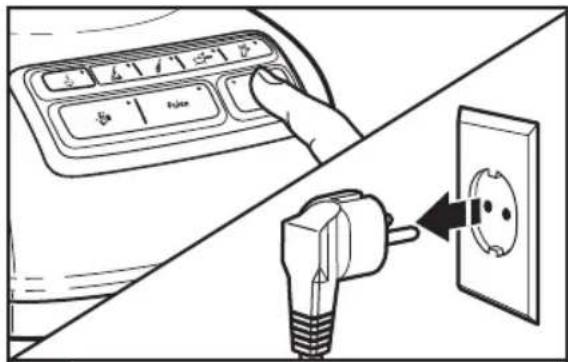
4 When the Hot Foods function is finished, the Blender will stop. Press the POWER (⏻) button to turn off. Unplug Blender before removing the pitcher.
Using the Crush Ice function
Your Blender offers a CRUSH ICE ( - ) function. When selected, the Blender will automatically pulse for 30 seconds at staggered intervals at the optimal speed for crushing ice or other ingredients.
natural_image
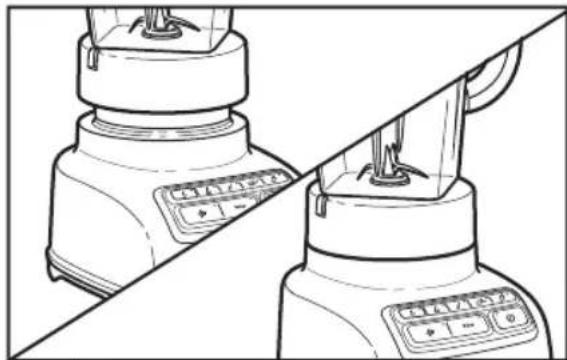
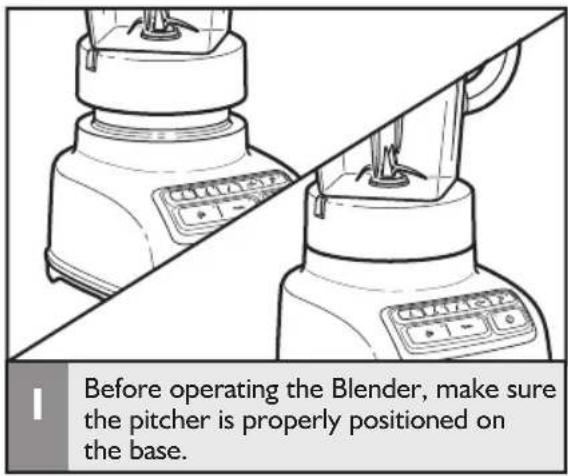
Line drawing of a blender with a digital display and control panel, showing two views (no text or symbols)Before operating the Blender, make sure the pitcher is properly positioned on the base.
natural_image
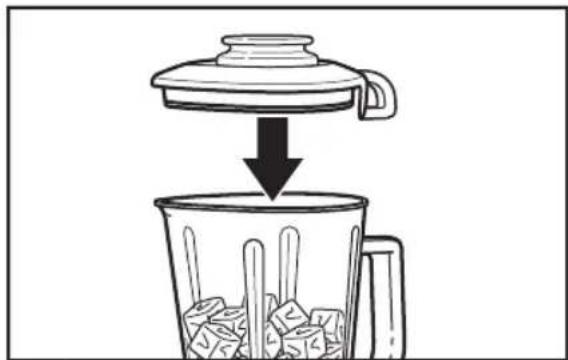
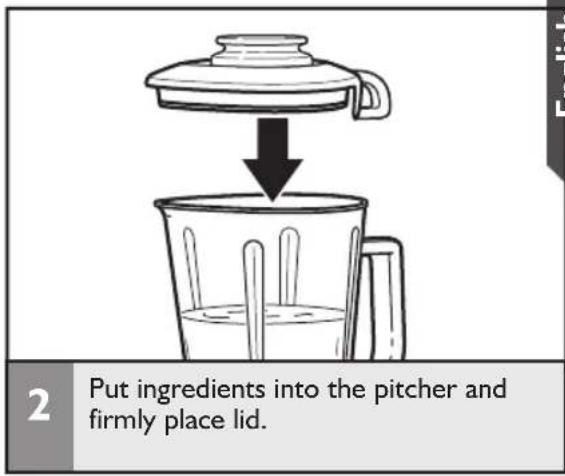
Simple line drawing of a lid pouring liquid into a container with ice cubes (no text or symbols)2 Put ingredients into the pitcher and firmly place lid. Use up to 1/2 tray of cubed ice.
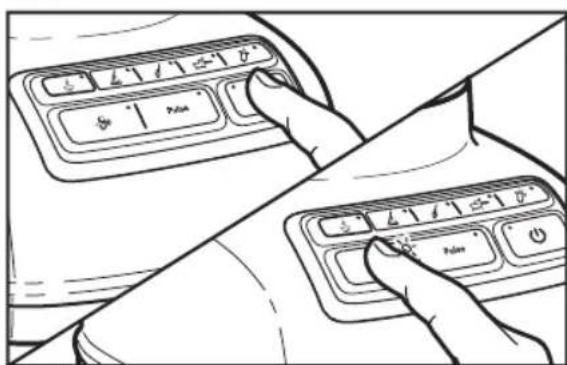
3 Press POWER (☐), then press CRUSH ICE (✗) The CRUSH ICE function is a timed function.
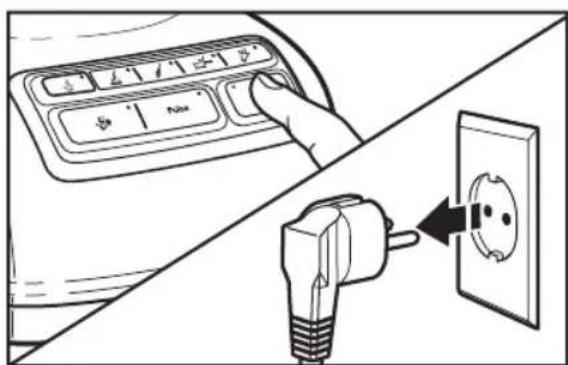
4 When the timed function is finished, the Blender will stop. Press POWER (⏻) to turn off. Unplug Blender before removing the pitcher.
TIP: Process up to 1/2 standard ice cube tray or 6 to 7 standard ice cubes at a time. Occasional stirring with a spatula will be helpful only when Blender is off. The CRUSH ICE (8*)feature has been optimized to crush and chop ice without adding any liquid ingredients.
Your Blender offers a PULSE (P) function, which allows a "Pulse-at-any-speed" feature.
English
NOTE: PULSE mode will not work with the HOT FOODS (💡) or CRUSH ICE (💡) modes.
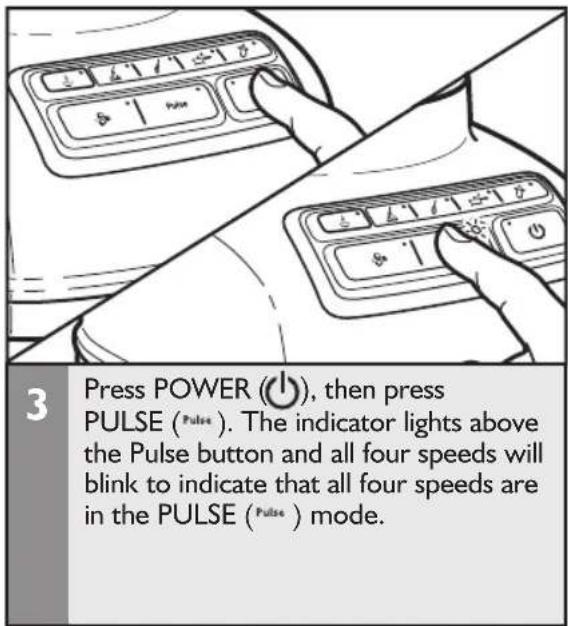
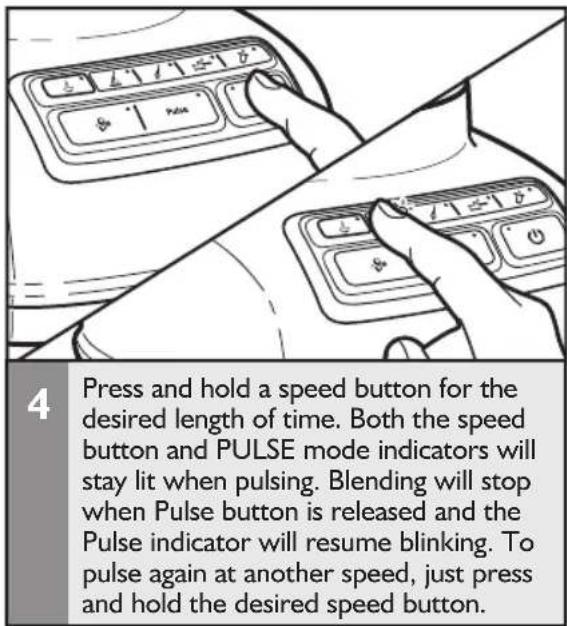
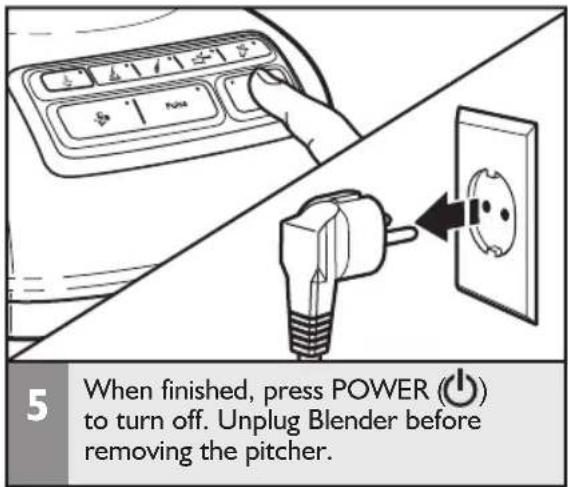
Using the Blender pitcher ingredient cup, and Soft Start blending feature
- The Blender pitcher ingredient cup can be used to measure and add ingredients. Remove cup and add ingredients at CHOP or MIX speeds. When operating at higher speeds with a full pitcher or with hot contents, stop the Blender and then add ingredients.
IMPORTANT: If blending hot foods or liquids, be sure that the lid is securely in place and use only the HOT FOODS (💡) function.
- The Soft Start blending feature automatically starts the Blender at a lower speed to draw ingredients into the blades, then quickly increases to the selected speed for optimal performance. The Soft Start blending feature only works when a speed is selected and does not work with the PULSE (Pulse) mode or CRUSH ICE (8*) features.
Speed control guide
| Speed Item | ||||
| [40Y7]HOT FOODS | SoupHot sauces (gravy, white sauce)Hot Drinks | |||
| [4W22]CHOP | Chopped fruits Chopped vegetables | Meat salad for sandwich filling | Pesto Dips Cold fruit or vegetable sauce | Savory crumb topping Sweet crumb topping |
| [4681]MIX | Fruit juice from frozen concentrate Salad dressing | Gravy Pancake batter | Waffle batter | Smooth ricotta or cottage cheese |
[7THW]PUREE | Oatmeal Pureed fruit/Baby foodPureed meat/Baby food meatPureed vegetables/Baby food vegetables | |||
[1567]LIQUIFY | Blended ice drink Frozen yogurt-based drink Fruit-based drink (thin) Ice milk-based drink Sherbet-based drink | Fluffy gelatin for pie/desserts Cheesecake Mousse | Grated hard cheese | |
| CRUSH ICE[1330] | Crushed Ice Finely chopped fresh fruitsFinely chopped fresh vegetables | Frozen chopped fruit (defrost slightly until it can be probed with a knife tip) | ||
PulseP' 11.5E | Chopped fruits Chopped vegetables | Meat salad for sandwich filling | Savory crumb topping Sweet crumb topping | |
TIPS FOR GREAT RESULTS
Quick tips
- If you're making beverages using ice, start with CRUSH ICE (💡), then finish with LIQUIFY (💡) in order to produce a smoother texture.
- Ice directly from the freezer will crush better than partially melted ice for snow.
- Smaller ice cubes can be chopped or crushed faster than large ones.
- For many ingredient mixtures, start the blending process at CHOP ( kg ) to thoroughly combine the ingredients. Then increase to a higher speed, as desired.
- If desired, remove center ingredient cup of pitcher lid to add liquids or ice cubes while the Blender is operating at CHOP ( ), or MIX ( ) speeds.
- Stop the Blender before using utensils in the pitcher. Use a rubber spatula to mix ingredients only when the Blender is off. Never use any utensil, including spatulas, in the pitcher while the motor is running.
How to...
Dissolve flavored gelatin: Pour boiling water into the pitcher; add gelatin. Blend on HOT FOODS (💡) until gelatin is dissolved, about 10 to 30 seconds. Add other ingredients.
Make cookie, cracker, or bread crumbs: Break cookies, crackers, or bread into pieces about 4 cm in diameter. Place in pitcher. In PULSE (Pulse) mode, cover and pulse a few times, about 3 seconds each time, until reaching desired consistency.
Make finer crumbs for pie and dessert crusts: Break cookies, crackers, or bread into pieces about 4 cm in diameter and place in the pitcher. In PULSE (Pulse) mode, cover and pulse a few times until reaching desired consistency, about 20 to 30 seconds.
Chop fruits and vegetables: Put 2 cups (475 mL) of fruit or vegetable chunks in pitcher. In PULSE (Pulse) mode, cover and blend at LIQUIFY (☐) pulsing a few times, about 2 to 3 seconds each time, until reaching desired consistency.
Puree fruits: Place 2 cups (475 mL) canned or cooked fruit in pitcher. Add 2 to 4 tablespoons (30 to 60 mL) fruit juice or water per cup (240 mL) of fruit. Cover and blend at PUREE (→) about 5 to 10 seconds.
Puree vegetables: Place 2 cups (475 mL) canned or cooked vegetables in pitcher. Add 2 to 4 tablespoons (30 to 60 ml) broth, water, or milk per cup (240 mL) of vegetables. Cover and blend at PUREE (→) about 10 to 20 seconds.
Puree meats: Place cooked, cubed, tender meat in pitcher. Add 3 to 4 tablespoons (45 to 60 mL) broth, water, or milk per cup (240 mL) of meat. Cover and blend on CHOP (✗) 10 seconds. Stop the Blender and scrape sides of pitcher. Cover and blend on PUREE (✗) 10 to 20 seconds longer.
Take lumps out of gravy: If sauce or gravy becomes lumpy, place in the pitcher. Cover and blend at MIX ( ⏻ ) until smooth, about 5 to 10 seconds.
Combine flour and liquid for thickening: Place flour and liquid in pitcher. Cover and blend at MIX ( ⏻ ) until smooth, about 5 to 10 seconds.
Prepare white sauce: Place milk, flour, and salt, if desired, in pitcher. Cover, and blend at MIX ( ✉ ) until well-mixed, about 5 to 10 seconds. Pour into saucepan and cook as usual.
Make smoothies: Place liquids and frozen ingredients in pitcher first, then add other ingredients on top. Cover and blend on CRUSH ICE (✗) for 10 to 15 seconds, then LIQUIFY (✗) for 10 to 15 seconds, as desired.
TIPS FOR GREAT RESULTS
Prepare pancake or waffle batter from mix: Place mix and other ingredients in pitcher. Cover and blend at MIX (♩) until well-mixed, 10 to 20 seconds. Stop the Blender and scrape sides of the pitcher as needed.
Grate cheese: Cut very cold cheese into 1.5 cm cubes. Place up to 1/2 cup (120 mL) cheese in the pitcher. Cover, and blend at LIQUIFY (✗) about 5 to 10 seconds. For hard cheeses, such as Parmesan, bring to room temperature then blend at LIQUIFY (✗) for 10 to 15 seconds.
CARE AND CLEANING
Cleaning the Blender
The Blender pitcher can be easily cleaned while still attached to the base, or individually.
- Clean the Blender thoroughly after every use.
- Do not immerse the Blender base or cord in water.
- Do not use abrasive cleansers or scouring pads.
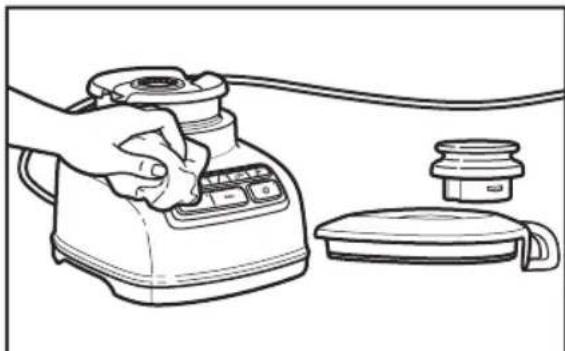
natural_image
Line drawing of a hand using a portable electric stove with control panel and lid (no text or symbols)To clean the Blender base, control band, cord, lid, and ingredient cup: Unplug the Blender before cleaning. Wipe with a warm, damp cloth; wipe clean with a damp cloth, and dry with a soft cloth.
natural_image
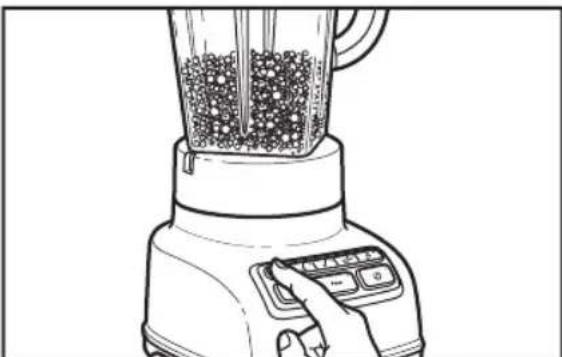
Line drawing of a blender with granular contents and control buttons (no text or symbols)2 To clean the pitcher while attached to the base: With the pitcher off of the base, fill half full with warm (not hot) water, and add 1 or 2 drops of dishwashing liquid. Put the lid on the pitcher and attach the pitcher to the base, press the STIR speed setting, and run the Blender for 5 to 10 seconds. Remove the pitcher and rinse with warm water.
natural_image
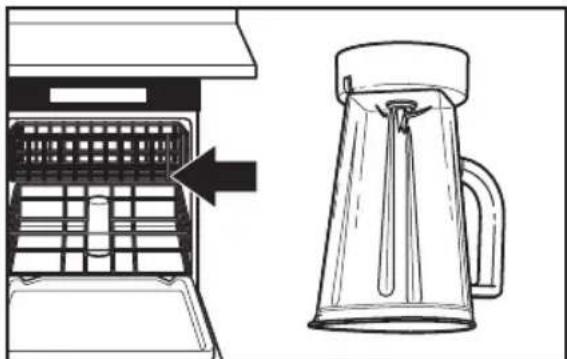
Diagram showing a device with internal grid structure and a separate view of a glass mug filled with liquid (no text or symbols)3 To clean pitcher individually: Wash pitcher in dishwasher flipped upside down. Or handwash with soapy water, rinse, and wipe dry.
IMPORTANT: Hand wash the lid and ingredient cup for best results.
TROUBLESHOOTING
IMPORTANT: The Blender will not operate at any speed unless the POWER (⏻) button is pressed first.
Blender does not operate when a setting is selected
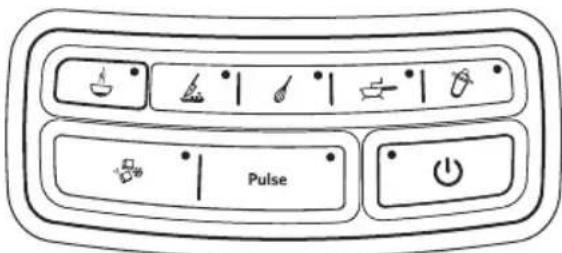
No indicator lights are lit.
Check to see if the Blender is plugged into a grounded outlet. If it is, press POWER (⏻); then unplug the Blender. Plug it back in to the same outlet, and Press POWER (⏻).
If the Blender still does not work, check the fuse or circuit breaker on the electrical circuit the Blender is connected to and make sure the circuit is closed.
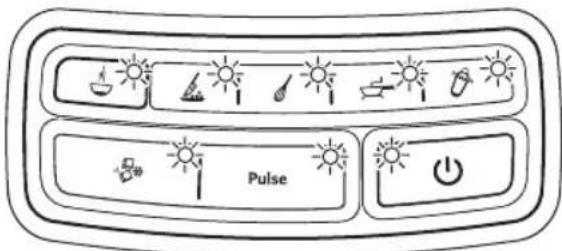
All indicator lights are flashing at the same time.
If Blender is plugged in, but nothing happens when POWER (⏻) is pressed, and all indicator lights are flashing, the motor rotor may be locked. Press POWER (⏻); then unplug the Blender. Plug it back in; then press POWER (⏻) and select the desired speed.
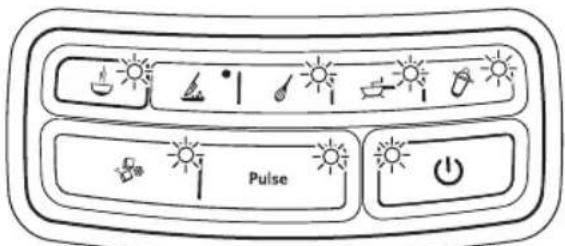
One indicator light is flashing alternately.
If the Blender is plugged in, but will not start and one light is flashing alternately from all the other indicator lights, the Blender may have a stuck key. Press POWER (⏻) to turn off the Blender; then unplug the Blender. Plug the Blender back in and press POWER (⏻) to turn back on to reset the stuck key.
Blender stops while blending
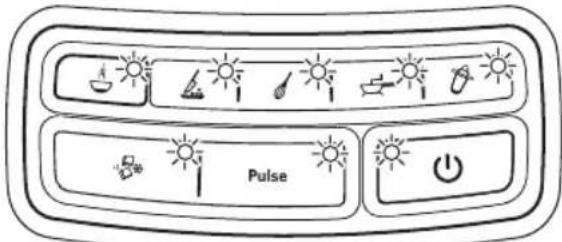
All indicator lights are flashing at the same time.
The Blender may be overloaded. If the Blender becomes overloaded when blending heavy ingredients, it will automatically shut off to avoid damage to the motor. Press POWER(⏻) to reset the Blender and unplug the power cord. Remove the pitcher assembly from the base and divide contents into smaller batches. Adding liquid to the pitcher may also reduce the load on the Blender.
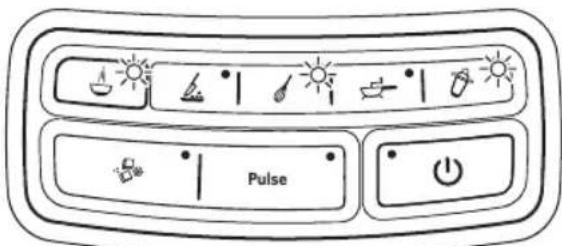
All indicator lights are flashing alternately.
The Blender may be jammed. If it is jammed, the Blender will stop running to avoid damage to the motor. Press POWER (⏻) to reset the Blender and unplug the power cord. Remove the pitcher assembly from the base and, with a scraper, free the blades by breaking-up or removing the contents at the bottom of the pitcher.
If the problem cannot be fixed with the steps provided in this section, contact an authorized service center (see "Warranty and service" section).
WARRANTY AND SERVICE
KitchenAid Blender warranty
| Length of Warranty: | KitchenAid Will Pay For: | KitchenAid Will Not Pay For: |
| Europe, Middle East and Africa:For model 5KSB1585:Two years full warranty from date of purchase. | The replacement parts and repair labor costs to correct defects in materials or workmanship. Service must be provided by an Authorized KitchenAid Service Center. | A. Repairs when Blender is used for operations other than normal household food preparation.B. Damage resulting from accident, alterations, misuse, abuse, or installation/operation not in accordance with local electrical codes. |
KITCHENAID DOES NOT ASSUME ANY RESPONSIBILITY FOR INDIRECT DAMAGES.
Customer service
In U.K. and Ireland:
For any questions, or to find the nearest KitchenAid Authorized Service Center, please find our contact details below.
NOTE: All service should be handled locally by an Authorized KitchenAid Service Center.
Contact number for U.K. and Northern Ireland:
Tollfree number 0800 988 1266 (calls from mobile phones are charged standard network rate)
Contact number for Ireland:
Tollfree number +44 (0) 20 8616 5148
E-mail contact for U.K. and Ireland:
Go to www.kitchenaid.co.uk, and click on the link "Contact Us" at the bottom of the page.
Address for U.K. and Ireland:
KitchenAid Europa, Inc.
PO BOX 19
B-2018 ANTWERP II
BELGIUM
In other countries:
For all product related questions and after sales matters, please contact your dealer to obtain the name of the nearest Authorized KitchenAid Service/Customer Center.
www.KitchenAid.eu
© 2013. All rights reserved.
Specifications subject to change without notice.





KitchenAid
W10517477A
© 2013. All rights reserved.
Specifications subject to change without notice.
12/13


- BLENDER INSTRUCTIONS
- TABLE OF CONTENTS
- BLENDER SAFETY
- PARTS AND FEATURES......8
- ASSEMBLING THE BLENDER
- TIPS FOR GREAT RESULTS
- CARE AND CLEANING
- TROUBLESHOOTING
- WARRANTY AND SERVICE
- Your safety and the safety of others are very important.
- ! DANGER
- WARNING
- IMPORTANT SAFEGUARDS
- When using electrical appliances, basic safety precautions should always be followed, including the following:
- SAVE THESE INSTRUCTIONS
- Electrical requirements
- Electrical equipment waste disposal
- Disposal of packing material
- Scrapping the product
- PARTS AND FEATURES
- Preparing the Blender for use
- Before First Use
- Using the Hot Foods function
- Using the Crush Ice function
- Using the Blender pitcher ingredient cup, and Soft Start blending feature
- Quick tips
- How to...
- Cleaning the Blender
- Blender does not operate when a setting is selected
- Blender stops while blending
- KITCHENAID DOES NOT ASSUME ANY RESPONSIBILITY FOR INDIRECT DAMAGES.
- Customer service
- In U.K. and Ireland:
- In other countries:
- KitchenAid
Brand : KITCHENAID
Model : 5KSB1585BOB
Category : Blender