
BarkLimiter Deluxe - Pet electronic collar GARMIN - Free user manual and instructions
Find the device manual for free BarkLimiter Deluxe GARMIN in PDF.


| Product Type | Bark Correction Collar |
| Brand | Garmin |
| Model | BarkLimiter Deluxe |
| Battery Type | Rechargeable lithium-ion (user-replaceable) |
| Battery Life | Up to 3 months typical use |
| Charging Time | Approximately 2 hours |
| Water Resistance | IPX7 |
| Operating Temperature | -15°C to 60°C (5°F to 140°F) |
| Charging Temperature | 0°C to 40°C (32°F to 104°F) |
| Correction Modes | Vibration, Automatic Intensity, Manual Intensity (levels 1-7) |
| Detection Method | Motion and sound/vibration detection |
| Bark Odometer | Reports number of barks since last turn on (red/green LED flashes) |
| Status LED | Indicates charging, battery level, bark/motion detection |
| Collar Fitting | Contact points against dog's throat, snug fit |
| Safety | Remove collar for at least 8 hours every 24 hours to prevent irritation |
| Battery Replacement | Security screws, includes gasket and connector; sold separately |
| Registration | Online at my.garmin.com (keep original sales receipt) |
| Support | Website: www.garmin.com/support; Phone: various country numbers |
Frequently Asked Questions - BarkLimiter Deluxe GARMIN
User questions about BarkLimiter Deluxe GARMIN
0 question about this device. Answer the ones you know or ask your own.
Ask a new question about this device
Download the instructions for your Pet electronic collar in PDF format for free! Find your manual BarkLimiter Deluxe - GARMIN and take your electronic device back in hand. On this page are published all the documents necessary for the use of your device. BarkLimiter Deluxe by GARMIN.
USER MANUAL BarkLimiter Deluxe GARMIN
natural_image
Black Garmin VR headset with curved arm and sensor icon (no text or symbols on body)All rights reserved. Under the copyright laws, this manual may not be copied, in whole or in part, without the written consent of Garmin. Garmin reserves the right to change or improve its products and to make changes in the content of this manual without obligation to notify any person or organization of such changes or improvements. Go to www.garmin.com for current updates and supplemental information concerning the use of this product.
Garmin® and the Garmin logo are trademarks of Garmin Ltd. or its subsidiaries, registered in the USA and other countries. BarkLimiter™ and Bark Odometer™ are trademarks of Garmin Ltd. or its subsidiaries. These trademarks may not be used without the express permission of Garmin.
Introduction
WARNING
See the Important Safety and Product Information guide in the product box for product warnings and other important information.
Device Overviews
BarkLimiter Device

| 1 | Contact points |
| 2 | Mode and intensity dial |
| 3 | Status LED |
BarkLimiter Deluxe Device

| 1 | Contact points |
| 2 | Mode and intensity dial |
| 3 | Status LED |
| 4 | Charging clip contacts (BarkLimiter Deluxe model only) |
Attaching the Dog Collar Device to the Collar Strap
1 With the buckle ① facing outward, insert the end of the collar strap through the slot ② on the collar device.
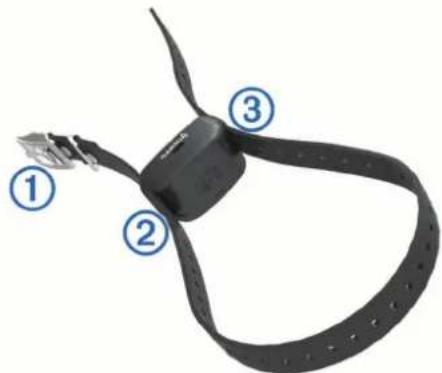
2 Pull approximately two-thirds of the collar strap through the slot.
3 Insert the end of the collar strap through the slot ③ on the opposite side of the device.
4 Pull the strap until it is tight across the front of the device.
Charging the BarkLimiter Deluxe Device
NOTICE
To prevent corrosion, thoroughly dry the contacts on the collar and the surrounding area before connecting the charging clip.
Before you put the collar on the dog, remove the charging clip. If you do not remove the clip, it may become detached from the collar and become lost.
You should fully charge the battery before you use the device for the first time. Charging a fully depleted battery takes about two hours. The device will not charge when outside the temperature range of 32^ to 104^ F ( 0^ to 40^ C).
1 Snap the charging clip ① onto the device.

natural_image
Close-up of a black handheld device with two ports and an orange arrow indicating rotation (no text or symbols)2 Plug the small end of the power cable into the mini-USB port ② on the charging clip.
3 Plug the other end of the power cable into a power source. The status LED is solid red when the collar is charging.
4 After the status LED turns solid green, remove the charging clip from the collar.
Turning On the Dog Collar Device
Rotate the dial away from N.
There is a 30-second delay before the device becomes active. The status LED indicates the battery charge level for five seconds and turns off. After an additional 25 seconds, the unit is active. The status LED flashes occasionally to indicate that the unit is detecting sound, motion, or vibration.
Turning Off the Dog Collar Device
Rotate the dial to N.
Rotating the Dial
NOTICE
Do not over-rotate the dial. The dial does not rotate past 7.
The dial is intentionally difficult to rotate. This helps to prevent accidental rotation while the device is in use on the dog.
Insert a coin or similar object into the slot to rotate the dial.
Bark Correction
When the device is active and properly fitted on the dog, it detects and corrects barks automatically. You can adjust the method and intensity of the corrections.
The status LED flashes briefly when the device detects motion or corrects a bark.
Short flash Motion was detected, and no correction was applied.
Long flash A bark was detected, and a correction was applied.
Fitting the Collar on Your Dog
CAUTION
To prevent irritation from the contact points, remove the collar for at least eight hours out of every 24-hour period.
This device is not intended for human use. Do not attempt to use on any person.
NOTICE
Before you put the collar on the dog, remove the charging clip. If you do not remove the clip, it may become detached from the collar and become lost.
In order to properly detect and correct barks, the collar and device must fit the dog properly. If the collar is too loose or positioned incorrectly, bark corrections may be inconsistent. This can delay or prevent the dog from learning not to bark.
1 Place the collar around the middle of the dog's neck.
2 Position the device at the front of the dog's neck, with the status LED facing towards the dog's chin and the contact points against the throat.
TIP: The device contact points should be positioned near the dog's vocal cords. This location varies based on the breed of dog. If the device does not seem to detect the dog's barks, you should move the device closer to or further from the dog's body to find the ideal location.
3 Tighten the strap so that it is very snug around the dog's neck, and fasten the buckle.
NOTE: The collar should fit tightly and should not be able to rotate or slide on the dog's neck. The dog must be able to swallow food and water normally. You should observe your dog's behavior to verify that the collar is not too tight.

natural_image
Line drawing of a dog's leg and hand wearing a zipper (no text or symbols)4 Wiggle the device to work the contact points through the dog's coat.
NOTE: The contact points must have contact with the dog's skin to effectively detect and correct barks.
5 If the strap is too long, cut off the excess, leaving at least 3 in. (8 cm) to spare.
TIP: You can mark the hole used to fasten the buckle for future reference.
Changing the Bark Correction Mode and Intensity Level
Rotate the dial to select an option:
- To correct using vibration, select V (page 2).
- To correct using automatic intensity, select A (page 2).
- To correct using a set intensity level, select 1 to 7 (page 2).
A higher number indicates a higher intensity level.
Vibration
The device can use a short vibration to correct the dog. When using vibration, no electrical stimulation is used.
Automatic Intensity
The device can set the stimulation intensity level automatically based on the barking behavior of the dog. The device starts at the lowest intensity level and increases the intensity level gradually until the dog stops barking. When the dog is quiet, the intensity decreases over time.
The automatic intensity feature is designed to eliminate excessive nuisance barking. To stop barks more immediately, you should set the intensity level manually.
Choosing the Correct Intensity Level
CAUTION
To prevent irritation from the contact points, remove the collar for at least eight hours out of every 24-hour period.
You can set the stimulation intensity level manually from 1 to 7. You should choose the lowest intensity level that discourages the dog from barking. If you have never used a bark correction collar with the dog, the dog requires time and experience to learn that the bark is the cause of the stimulation.
1 Set the intensity to the lowest level.
2 For thirty minutes, when the dog barks, observe the dog for a reaction, such as a head shake, neck movement, a change in the way the dog barks, or just a change in expression.
3 If there is no reaction, increase the intensity by one level until the dog has a slight but recognizable reaction to the stimulation.
4 Allow 24 hours for the dog to learn to respond by not barking.
5 If the dog continues barking while wearing the collar, increase the intensity level gradually until you find the level that discourages the dog from barking.
Bark Odometer™
When you turn off the device, the LED flashes red and green to report the number of times the device detected a bark since it was last turned on. This can help you track your dog's barking behavior.
| Red flash 10 barks | |
| Green flash 1 bark |
For example, one red flash followed by four green flashes indicates the device detected 14 barks.
Checking the Bark Odometer
1 Remove the device from the dog.
2 Position the device so that you can see the status LED.
3 Rotate the dial to N.
4 Count the red and green flashes.
Troubleshooting
My device does not seem to be active
When the device is active, the status LED flashes only when the device detects a bark or motion.
- Verify the collar is turned on (page 1).
- Verify the battery is not low (page 3).
- Remove the device from the dog, and shake the device briefly.
When the device is active, the device detects the motion, and the status LED flashes.
My dog is still barking
If the dog continues barking while wearing the device, you can try any of these options to improve the effectiveness of the device.
- Tighten the collar until it is very snug (page 2).
- Adjust the position of the device on the dog's neck (page 2).
- Wiggle the device to work the contact points through the dog's coat.
• Gradually increase the intensity level (page 2).
Device Information
BarkLimiter Specifications
| Battery type User-replaceable | 3V CR2 lithium cylindrical |
| Battery life 6 months, typical | use |
| Operating temperature range | From 5^ to 140^ (from -15^ to 60^ ) |
| Water resistance IPX7 |
BarkLimiter Deluxe Specifications
| Battery type Rechargeable, replaceable lithium-ion | |
| Battery life 3 months, typical use | |
| Operating temperature range From 5° to 140°F (from -15° to 60°C) | |
| Charging temperature range From 32° to 104°F (from 0° to 40°C) | |
| Storage temperature range (up to 1 month) | From -4° to 122°F (from -20° to 50°C) |
| Storage temperature range (up to 3 months) | From -4° to 104°F (from -20° to 40°C) |
| Storage temperature range (up to 1 year) | From -4° to 68°F (from -20° to 20°C) |
| Water resistance IPX7 | |
Sleep Mode
To conserve battery life, the device goes into sleep mode when no barks or motion are detected. The activity level of your dog affects the battery life of the device.
Checking the Battery Charge Level
Rotate the dial away from N.
The color of the status LED indicates the battery charge level for five seconds.
| Green | The battery has a good charge. |
| Yellow | The battery should be charged or replaced soon. |
| Red The | the battery should be charged or replaced immediately. Bark correction features are disabled. |
BarkLimiter Battery Replacement Instructions
WARNING
Do not use a sharp object to remove batteries.
CAUTION
Contact your local waste disposal department to properly recycle the batteries.
BarkLimiter Components

| 1 | Back plate |
| 2 | Gasket |
| 3 | Battery |
| 4 | Polarity indicators |
Replacing the BarkLimiter Battery
Before you replace the battery, you must remove all dirt, water, and debris from the device. You also need a small Phillips screwdriver.
You must replace the battery with a 3V CR2 lithium battery.
1 Remove the four screws from the corners of the back plate.
2 Remove the back plate.
The battery comes out with the back plate.
3 Remove the battery.
4 Install the new battery into the back plate according to the polarity indicators engraved on the back plate.
When properly installed, the battery snaps into the back plate.
5 Verify that the gasket is not damaged and that it is completely seated in the groove.
6 Replace the back plate.
7 Replace the four screws to secure the back plate.
BarkLimiter Deluxe Battery Replacement Instructions
WARNING
This product contains a lithium-ion battery. To prevent the possibility of personal injury or product damage caused by battery exposure to extreme heat, store the device out of direct sunlight.
Do not use a sharp object to remove batteries.
CAUTION
Contact your local waste disposal department to properly recycle the batteries.
BarkLimiter Deluxe Components

| 1 | Battery assembly |
| 2 | Gasket |
| 3 | Battery connector |
| 4 | Device |
| 5 | Security screws |
Replacing the BarkLimiter Deluxe Battery Assembly
Before you replace the battery, you must remove all dirt, water, and debris from the device. You also need the security screwdriver included with the new battery assembly.
You can purchase a replacement battery assembly at http://buy.garmin.com or from your Garmin dealer. The battery assembly includes a pre-assembled back plate with a gasket, battery, and battery connector.
1 Remove the four security screws from the corners of the device.
2 Lift up the battery assembly.
3 Disconnect the battery connector from the device.
TIP: You should grip the wires close to the connector and pull the connector outward from the circuit board.
4 With the new battery assembly, connect the battery connector to the device.
When properly installed, the connector plug snaps into the port and the top face of the connector plug is flush with the edges of the port.
5 Verify that the gasket is not damaged and that it is completely seated in the groove.
6 Hold the battery assembly and the device firmly together, and replace all four security screws without tightening.
7 Verify that the battery assembly and the device are aligned with no gaps.
8 Tighten the screws evenly.
Getting More Information
You can find more information about this product on the Garmin® website.
- Go to www.garmin.com/outdoor.
- Go to www.garmin.com/learningcenter.
- Go to http://buy.garmin.com, or contact your Garmin dealer for information about optional accessories and replacement parts.
Registering Your Device
Help us better support you by completing our online registration today.
- Go to http://my.garmin.com.
- Keep the original sales receipt, or a photocopy, in a safe place.
www.garmin.com/support
bar
| Country | Value | | :--- | :--- | | United States | 913-397-8200 | | United Kingdom | 0808 238 0000 | | Canada | 1-866-429-9296 +43 (0) | | France | 820 220 230 | | Belgium | +32 2 672 52 54 +45 4810 5050 +358 96937 9758 + 331 55 69 33 99 | | Germany | +49 (0)180 6 427646 + 39 02 36 699690 | | Norway | 0800 - 023 3937 | | Sweden | +47 815 69 555 | | Poland | 00800 4412 454 | | Spain | +35 1214 447 460 + 34 93 475 44 97 + 46 7744 52020 | | United Kingdom | +44 870 850 1242 |Garmin International, Inc.
1200 East 151st Street
Olathe, Kansas 66062, USA
Garmin (Europe) Ltd.
Liberty House, Houndown Business Park
Southampton, Hampshire, SO40 9LR UK
Garmin Corporation
No. 68, Zhangshu 2nd Road, Xizhi Dist.
New Taipei City, 221, Taiwan (R.O.C.)


- Introduction
- WARNING
- Device Overviews
- Attaching the Dog Collar Device to the Collar Strap
- Charging the BarkLimiter Deluxe Device
- NOTICE
- Turning On the Dog Collar Device
- Turning Off the Dog Collar Device
- Rotating the Dial
- Bark Correction
- Fitting the Collar on Your Dog
- CAUTION
- Changing the Bark Correction Mode and Intensity Level
- Vibration
- Automatic Intensity
- Choosing the Correct Intensity Level
- Bark Odometer™
- Checking the Bark Odometer
- Troubleshooting
- My device does not seem to be active
- My dog is still barking
- Device Information
- Sleep Mode
- Checking the Battery Charge Level
- BarkLimiter Battery Replacement Instructions
- Replacing the BarkLimiter Battery
- BarkLimiter Deluxe Battery Replacement Instructions
- Replacing the BarkLimiter Deluxe Battery Assembly
- Getting More Information
- Registering Your Device
Brand : GARMIN
Model : BarkLimiter Deluxe
Category : Pet electronic collar