
Touch Panel 4” - Touch panel Neets - Free user manual and instructions
Find the device manual for free Touch Panel 4” Neets in PDF.


| Product Type | Touch Panel 4" |
| Display | 4" IPS, 800x480 resolution, 400 nits brightness, 234 DPI |
| Touchscreen | 2-point capacitive, scratch-resistant glass |
| Power Supply | PoE IEEE802.3af, 48V, Class 2 (max 6.5W) |
| Dimensions (W x H x D) | 77 mm x 115 mm x 41.4 mm (on wall: 17 mm) |
| Weight | 0.16 kg (product), 0.09 kg (bracket) |
| Connectivity | RJ45 with PoE, Micro USB (firmware upgrade only) |
| Sensors | Proximity for auto wake, Ambient light for auto brightness |
| Compatibility | Neets Control Systems: SieRRa II, TanGo, AlFa II, DelTa, LiMa |
| Mounting | Wall mount, fits standard 1-gang DK/EU/US back box |
| Operating Temperature | 0 to 40°C (32 to 104°F) |
| Storage Temperature | 0 to 60°C (32 to 140°F) |
| Humidity | 10% to 90% RH (non-condensing) |
| Compliance | CE, FCC |
| Item Number | 313-0005 |
| Security | Password-protected settings (default: 1234) |
| Customization | GUI customizable via graphical templates or Project Designer |
| Factory Reset | Via pinhole switch near Micro USB port |
| Firmware Upgrade | Via USB OTG and flash drive |
Frequently Asked Questions - Touch Panel 4” Neets
User questions about Touch Panel 4” Neets
0 question about this device. Answer the ones you know or ask your own.
Ask a new question about this device
Download the instructions for your Touch panel in PDF format for free! Find your manual Touch Panel 4” - Neets and take your electronic device back in hand. On this page are published all the documents necessary for the use of your device. Touch Panel 4” by Neets.
USER MANUAL Touch Panel 4” Neets
Neets - Touch Panel 4"
Configuration guide
Neets
Foreword
This document describes how to configure and operate the Neets – Touch Panel 4"
COPYRIGHT - All information contained in this manual is the intellectual property and copyrighted material of Neets. All rights are reserved. You may not allow any third party access to content, information or data in this manual without Neets' express written consent.
CHANGES - Neets reserve the right to change the specification and functions of this product without prior notice.
Questions, AFTER reading this manual, can be addressed to your local distributor or:
Neets A/S
Langballe 4
8700 Horsens
Denmark
by E-Mail: Support@Neets.dk
or you may use our contact form at www.neets.dk
Revision list
This document has the following revision changes:
| Author: Date | Description | Pages | Rev |
| DB, 20-07-2018 | First version | REV 0 |
Contents
Foreword....2
Revision list....2
Contents 3
Specifications....4
Installation....4
Configurations of the Touch Panel 5
Entering the settings 5
Set the Touch Panel IP address 5
Customizing the Touch Panel....7
Display....7
Security: 8
System 8
Factory reset....10
Application upgrade....11
Specifications
4" touch panel
800x480 resolution IPS panel with full viewing angle (brightness 400 nits).
Dpi:234
PoE support
Power through PoE (Power over Ethernet). Class 2 (up to 6,5 watt)
Sensors
Proximity sensor – For automatic display activation
Ambient Light sensor – For automatic backlight dimming.
Touch Screen
2-point capacitive touch screen
Scratch resistant glass-on-glass touch screen.
Connections
RJ45 with POE – For both Power and Ethernet communication
Micro USB (for FW upgrade only)
Power
Power over Ethernet (PoE), IEEE802.3af, 48V
Compliancy
Approval: CE, FCC
Swithces
Pen hole switch:
-
Recover
-
Home
-
Reboot
-
Settings
Wall mount
Fits standard 1-gang DK, EU or US back box and wall bracket included.
Design Templates
Use graphical templates or completely customize the GUI in Project Designer.
Control System compatibility
Compatible with Neets Control Systems SieRRa II, TanGo, AlFa II, DelTa and LiMa.
Dimensions
Width: 77 mm / 3.03 inches
Height: 115 mm / 4.53 inches
Depth: 41,4 mm / 1.63 inches
- On wall: 17mm / 0.67 inch
Shipping dimensions
Width: 135 mm / 5.31 inches
Height: 165 mm / 6.5 inches
Depth: 60 mm / 2.36 inches
Weight
Product: 0,16 kg
Wall Bracket: 0,09 kg
Shipping: 0,36 kg
Environment
Operating Temp: 0 to 40 C / 32 to 104F
Storage Temp: 0 to 60 C / 32 to 140F
Operation moisture: Humidity: 10% to 90% RH
Product item number
313-0005
Installation
The Neets – Touch Panel 4" is designed to be easily installed on the wall.
When you receive the Touch Panel, an "Installation Guide" will be included. The Installation Guide is also available at neets.dk in the Touch Panel 4" section.
Configurations of the Touch Panel 4"
Entering the settings
To change the settings of the Touch Panel you need to press the settings button located at the button right hand side of the Touch Panel.
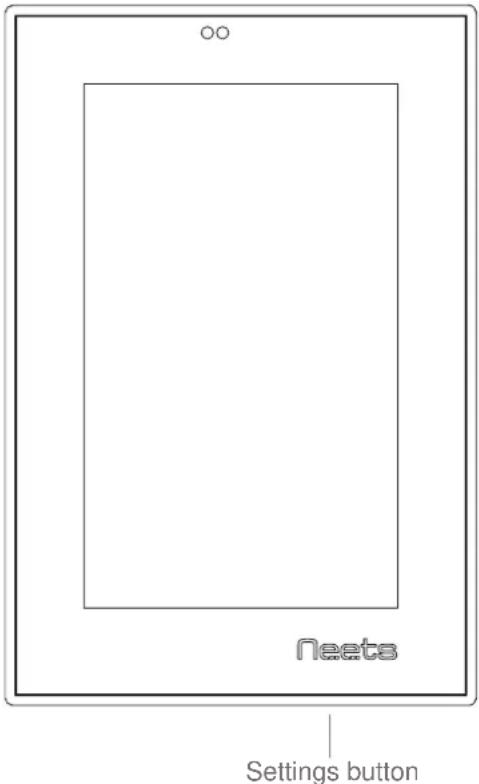
To access the settings menu, use the included ejector pin and press gently on the settings button.
If the settings are protected by password, you need to enter this in order to get access to the settings (default password is: 1234).
Setting the Touch Panel IP address
IP address from DHCP
To configure the Touch Panel with DHCP (default setting):
- In "Control system IP address" -> Enter the IP address of the control system
- In Ethernet settings → Ethernet → Ethernet IP mode ○ Choose DHCP (which will automatically assign the IP address)
- Jump back to the application settings menu by pressing "back arrow" button twice
- Choose "Connect to the control system"
Now, the project GUI from the control system will load and you can take control.
Static IP address
To configure the Touch Panel with static IP:
- In "Control system IP address" -> Enter the IP address of the control system
- In Ethernet settings → Ethernet → Ethernet IP mode
○ Choose Static
- Enter the static IP address (must be in the same range as the control system)
- Enter gateway, netmask address and DNS in accordance with the network configuration
-
Press Connect
-
Jump back to the application settings menu by pressing "back arrow" button twice
- Choose "Connect to the control system"
Now, the project GUI from the control system will load and you can take control.
Customizing the Touch Panel 4"
Display
The display backlight of the Touch Panel will turn off after a period without user activity.
When off, the display backlight will turn on immediately by tapping the display or by using the proximity sensor feature; see below.
The Touch Panel supports automatic brightness adjustment using the built-in ambient light sensor.
In the display menu the following settings are available:
Automatic brightness
When enabled, the built-in ambient light sensor will adjust the brightness of the screen depending on the current lighting conditions in the room
Display brightness
You can set a fixed brightness in "Display brightness". Be aware that this is only available if Automatic brightness is disabled.
Blank screen after timeout (Enabled by default)
When enabled, the display backlight will turn off after timeout set in "Blank timeout".
NOTE: It is strongly recommended to keep this function enabled. If this feature is disabled the backlight will turn off after 120 minutes to increase the lifetime of display backlight.
Blank timeout
The number of minutes before the Display backlight turns off. (default: 10 minutes).
The blank timeout can be set between 1 to 120 minutes.
Dimming duration
This is the amount of seconds it takes for the display to go from dim to blank mode (Default: 10 seconds)
Proximity sensor integration (Enabled by default)
When enabled, the built-in proximity sensor will turn on the display backlight when movement is detected in front of the Touch Panel.
Proximity sensitivity
The sensitivity level can be adjusted to fit the actual usage and location of installation. The sensitivity level can be set between 0 - 100. The default sensitivity level is 15.
The detection range increases the lower the sensitivity level is.
Change orientation
To accommodate if the Touch Panel is mounted in portrait mode, the orientation of the device can be changed from the 'change orientation' setting.
Note: This change require a reboot of the device.
Security:
To prevent daily users from entering the settings menu, you can set a password.
Then the user will be prompted for a password when the admin pinhole button is pressed, the user will be prompted for the password before the settings menu is displayed.
Note: It is highly recommended to activate this protection feature to avoid unauthorized usage.
Password protected
Enable this to activate password protection.
Password
Set the password (Default password is '1234').
Note: If the password is lost you will need to reset the device to factory settings (see more at page 10).
System
Clear browser cache
Clear the graphical interface memory that is used to ensure quick updating of the graphical interface.
(After the cache has been cleared, it will be reloaded when reconnecting with the control system)
Under normal condition this function is not necessary to use.
Application settings
From the application settings the Neets Application can be restarted by pressing force stop.
Debug overlay
Can be used to monitor the values of the proximity and built-in ambient light sensor.
Factory reset
If the device is not responding and a reboot does not recover the device, a factory reset can be performed.
The reset is initiated by pressing the pinhole switch in the hole nearest the micro USB port on the backside of the Touch Panel.
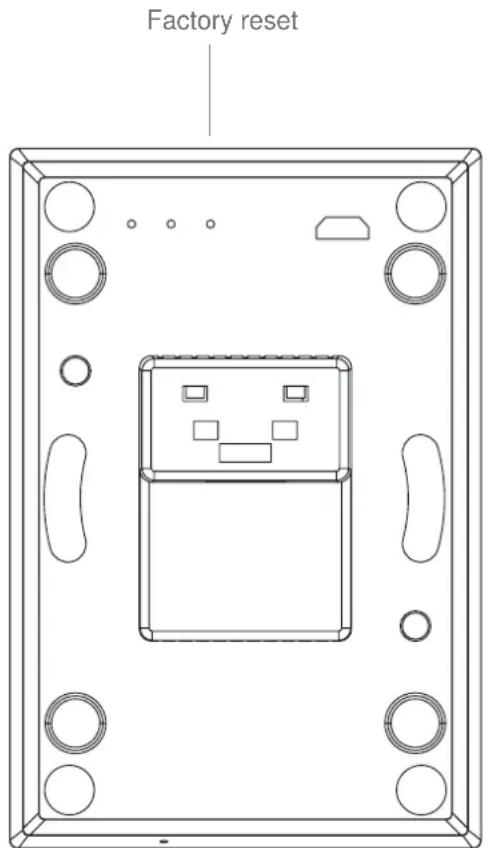
After the reset, the Neets application will need to be updated (See how to on page 11).
Note: A factory reset should only be performed by authorized personnel. Please contact Neets Support before the factory reset is performed.
Application upgrade
When new functions or updates are available in the software you can choose to update the software in the Touch Panel. This is done as described in the steps below.
The latest version of the software can be found on Neets.dk under the Touch Panel 4" section.
- Insert USB OTG adapter (included in the Touch Panel package) in the USB connector on the back plate
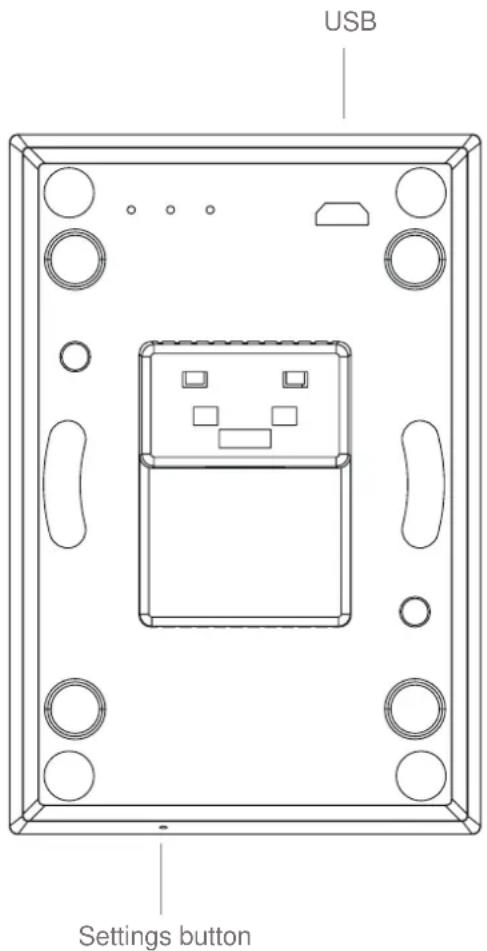
- Insert USB flash disk with new Neets Remote APK (Found on Neets.dk)
- Push the Settings switch at the button of the Touch Panel using the included ejector pin
- Scroll down to "Application settings"
- Press the "Neets Remote"
- Scroll down to the "Clear defaults" button and press
- Now scroll up to the "Force stop" button and press
a. Select OK when prompted "If you force stop an app, it may misbehave" - A dialog with "Select a home app" is displayed
- Now select the "Launcher" option and press the "Just once" button
-
!Important! Find the Neets Control app and uninstall it: "Settings" -> "Apps" -> "Neets Remote" -> "Uninstall" or select and hold the app on the home screen and move to the garbage bin to delete it
-
Select the "File Manager" from the home screen (Top right corner)
- In the "File Manager" -> select USB "tab" and select the "usbhost0" folder
- Select "NeetsRemote.apk" file
- The APP will install
- Push the Settings switch
- Pres "Home" button -> Select "Neets Remote" and press the button "Always"
- Reboot the device by disconnecting and connecting the PoE connector
- Neets - Touch Panel 4"
- Foreword
- Revision list
- Specifications
- Installation
- Configurations of the Touch Panel 4"
- Static IP address
- Customizing the Touch Panel 4"
- Display
- Automatic brightness
- Display brightness
- Blank screen after timeout (Enabled by default)
- Blank timeout
- Dimming duration
- Proximity sensor integration (Enabled by default)
- Proximity sensitivity
- Change orientation
- Security:
- Password protected
- Password
- System
- Clear browser cache
- Application settings
- Debug overlay
- Factory reset
- Application upgrade
Brand : Neets
Model : Touch Panel 4”
Category : Touch panel