
X-Sign 2.0 - Software BENQ - Free user manual and instructions
Find the device manual for free X-Sign 2.0 BENQ in PDF.


| Product Type | Digital Signage Content Management Software |
| Version | 2.0 |
| Key Functions | Content creation, scheduling, remote management, real-time messaging, video wall support, interactive templates, API integration |
| User Roles | Administrator, regular user; up to 3 admins per company |
| License Types | Basic, Premium; purchase via PayPal or credit card |
| Supported Platforms | Windows, Android (Player); web-based Manager |
| Content Creation Tools | X-Sign Designer with text, images, videos, widgets (clock, weather, slideshow, QR code, web, RSS, data connection, timer, TV input, API) |
| Player Modes | Standalone (USB), Local Delivery (same subnet), Manager (cloud) |
| Maximum Devices (Local Delivery) | 16 |
| Video Wall Support | Up to 4 devices (Android); bezel correction, fine-tune adjustment |
| Scheduling | By channel or by device; priority (normal/high); periodic daily/weekly; calendar mode |
| Remote Control | Power on/off, reboot, screen settings, volume, clear data |
| Real-Time Message | Push instant messages to channel; customizable style and duration |
| Interactive Templates | Three-level hierarchy (main page, category, item); touch statistics (Premium license) |
| API Integration | Create API tables from JSON; display in Designer; data from Google Sheets |
| Reporting | Activity report, player content report, touch usage report (Premium) |
| Project Encryption | Six-digit code to prevent unauthorized playback |
| System Requirements (Designer) | Internet connection for Manager mode; account registration required |
| Supported Browsers (Manager) | Chrome, Firefox |
| USB Autoplay | Supports .jpeg, .png, .gif, .bmp, .svg, .avi, .mp4, .mov, .mkv; up to 30 items; alphabetical order |
Frequently Asked Questions - X-Sign 2.0 BENQ
User questions about X-Sign 2.0 BENQ
0 question about this device. Answer the ones you know or ask your own.
Ask a new question about this device
Download the instructions for your Software in PDF format for free! Find your manual X-Sign 2.0 - BENQ and take your electronic device back in hand. On this page are published all the documents necessary for the use of your device. X-Sign 2.0 by BENQ.
USER MANUAL X-Sign 2.0 BENQ
natural_image
Abstract grayscale pattern with concentric dotted lines forming a wave-like structure (no text or symbols)Copyright
Copyright 2020 by BenQ Corporation. All rights reserved. No part of this publication may be reproduced, transmitted, transcribed, stored in a retrieval system or translated into any language or computer language, in any form or by any means, electronic, mechanical, magnetic, optical, chemical, manual or otherwise, without the prior written permission of BenQ Corporation.
All other logos, products, or company names mentioned in this manual may be the registered trademarks or copyrights of their respective companies, and are used for informational purposes only.
Disclaimer
BenQ Corporation makes no representations or warranties, either expressed or implied, with respect to the contents hereof and specifically disclaims any warranties, merchantability or fitness for any particular purpose. Further, BenQ Corporation reserves the right to revise this publication and to make changes from time to time in the contents hereof without obligation of BenQ Corporation to notify any person of such revision or changes.
This user manual aims to provide the most updated and accurate information to customers, and thus all contents may be modified from time to time without prior notice. Please visit http://business-display.benq.com/ for the latest version of this manual.
Table of contents
BenQ X-Sign 5
Basic 5
Account 5
Registering an account for X-Sign Manager (Admin) 5
Accessing your account ....7
Setting the permission for users 8
Authorizing other users as admins 10
License 12
Purchasing the license from X-Sign Manager 12
Importing the license(s) to X-Sign Manager 14
Checking the License upgrade notice ....17
Manager 18
Pairing the device with X-Sign Manager 18
Creating the channel 22
Scheduling the content by channel 24
Scheduling the content by device 26
Editing the device management structure 27
Pushing Real-Time Message to your BenQ Smart Signage remotely 30
Controlling the device remotely 32
Updating device Player remotely ....33
Managing the calling system 34
Creating an API table in X-Sign Manager 38
Setting Verification ....41
Getting the system notification ....45
Updating device status immediately 48
Player report (proof-of-play) 50
Using Designer Express ....50
Designer 53
Creating a new project file in X-Sign Designer 53
Uploading your content from Designer 55
Creating content in X-Sign Designer 58
Creating content from Designed Templates 62
Creating a clock widget in X-Sign Designer 65
Setting a weather widget 67
Creating an Image or Video slideshow 69
Rotating an image or video 71
Generating a QR Code 73
Adding a data connection ....74
Setting a timer widget ....76
Creating an API template using the demo kit ....79
Creating a TV Input source widget in X-Sign Designer 83
Setting background music in X-Sign Designer 83
Changing the playing order of pages 86
Encrypting a project in X-Sign Designer 87
Opening an X-Sign I.x project file 89
Changing your language in X-Sign Designer 90
Player 92
Switching the mode of Player 92
Playing files with USB 93
USB autoplay 97
Activating an Interactive function in Standalone mode 98
Playing encrypted projects on X-Sign Player 101
Changing Picture Settings in X-Sign Player (SL4302K/L5502K/SL6502K/SL7502K/SL8502K) 103
Local Delivery.... 105
Playing content with Local Delivery 105
Searching for devices in Local Delivery Mode 110
Setting a schedule for Local Delivery Mode .... III
Report.... 116
Getting the activity report of X-Sign Manager 116
Downloading player content report 116
Video Wall.... 118
Setting up the environment for video wall 118
Creating the Video Wall content from X-Sign Designer 120
Fine-tuning the Video Wall from X-Sign Designer 122
Premium 124
Interactive 124
Creating interactive content with Interactive template 124
Creating interactive content from designed templates with Area Link 130
Viewing the structure of an Interactive Template 133
Enabling Interactive Statistics 140
Viewing an Interactive Report 142
Setting the device group control 143
API 146
Creating an API template using the designed template 146
GPL/LGPL Software Licenses Used by X-Sign 147
BenQ X-Sign
Created to help users of BenQ interactive flat panels and digital signages to better utilize their equipment, BenQ X-Sign includes BenQ X-Sign Designer for content creation and standalone mode schedule setting. BenQ X-Sign also includes BenQ X-Sign Manager and BenQ X-Sign Player for cloud-based content management and distribution, to show X-Sign Player in single or group displays.
Basic
Account
Registering an account for X-Sign Manager (Admin)
Watch demonstration video:
With BenQ IAM (Identify and Access Management), you can manage all of your BenQ services (including X-Sign Manager) in one account. Follow the steps below to register an account and connect to X-Sign Manager.
I. Go to BenQ Service website https://service-portal.benq.com/login. Suggested browsers are Chrome, Firefox.
2. If you are an administrator, click Register(Admins only) to register an Administrator account for the company.
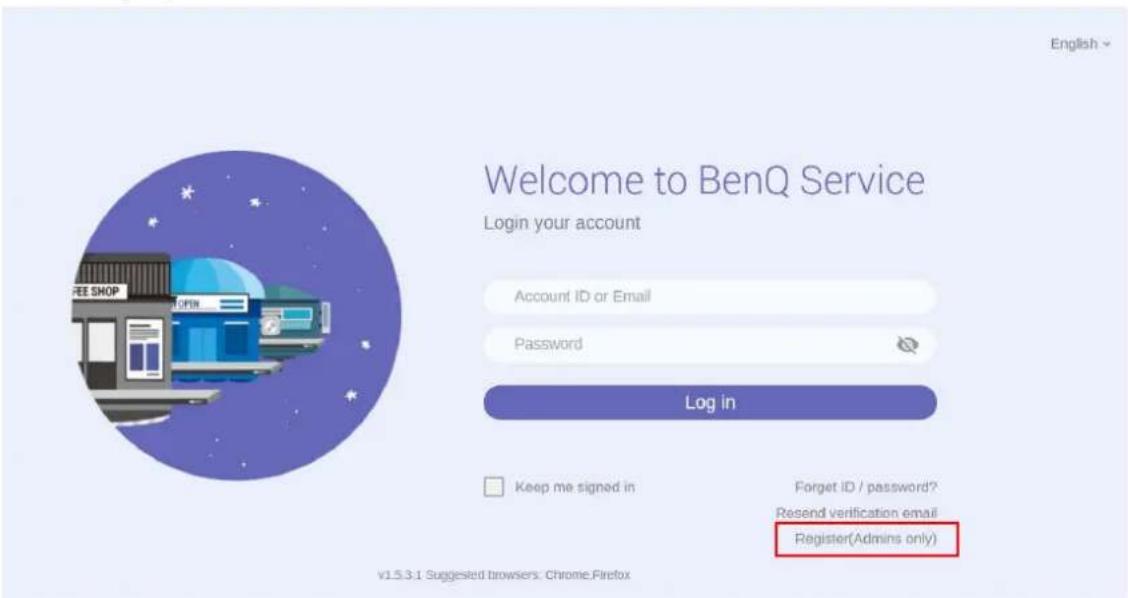
Note: If you are a regular user, ask your company's administrator to create a user account for you. After you receive the account, click Log in directly after verifying your email.
Message
×
The email has not been verified. We'll send the email from "BenQ", so you can quickly search for it. If it isn't in your inbox, check your folders. If a spam filter or email rule moved the email, it might be in the Spam, Junk, Trash, Deleted Items, or Archive folder.
Close
- After you click Register(Admins only), you will see the following message. Go to Click here to proceed.
Message
×
To create an administrator account, click here.
To create a user account, contact your administrator.
Exit
- Fill in the following fields and click Submit to create a new Administrator account.
Sign up
×
Use email as account ID
*Account ID
REMIND: Please do NOT using your personal data to fill the account name. It may increase the risk to reveal you privacy.
*Password
Submit
Cancel
Note:
- For the account ID, enter a value between 4 and 20 characters long. Only numbers (0-9), upper and lowercase alphabets (A-Z, a-z), and the following special characters (-)(.)(_) are allowed in the account ID and name.
- The password must be a combination of alphanumeric and must be between 6-12 characters. Passwords like “2945678” (all numbers), “eduabsc” (all alphabets), “12ab” (less than 6 characters), and “12abcd345678efg” (more than 12 characters) are unacceptable.
- Uppercase and lowercase letters don't need to be typed the same way every time you key in the password.
Accessing your account
Two ways are provided to access your account:
I. Go to BenQ Service website https://service-portal.benq.com/login. Log in and choose X-Sign.
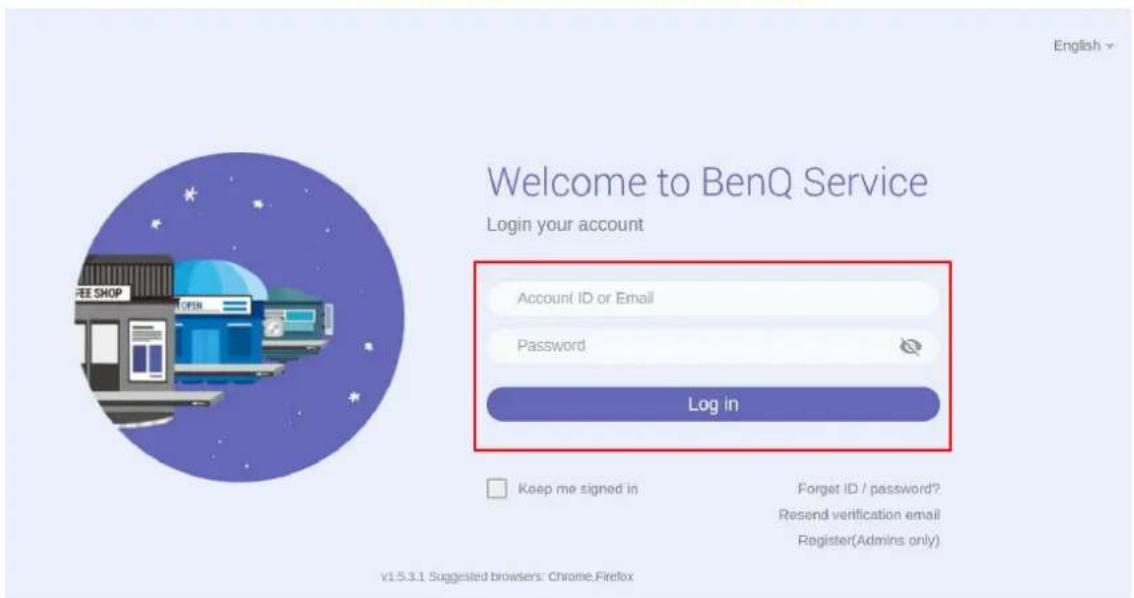
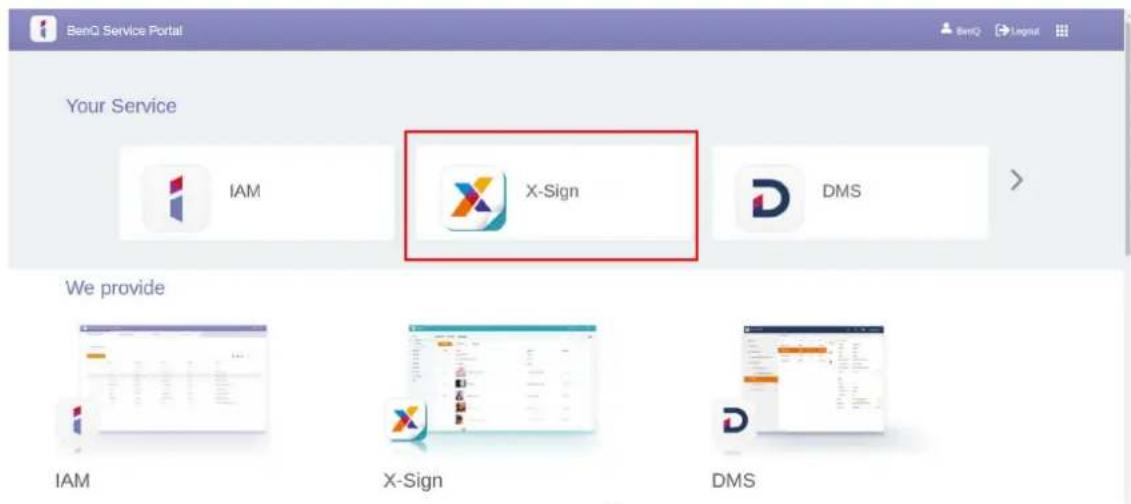
- Go to BenQ display website https://x-sign.benq.com/. Click Login to go to the X-Sign Manager page.
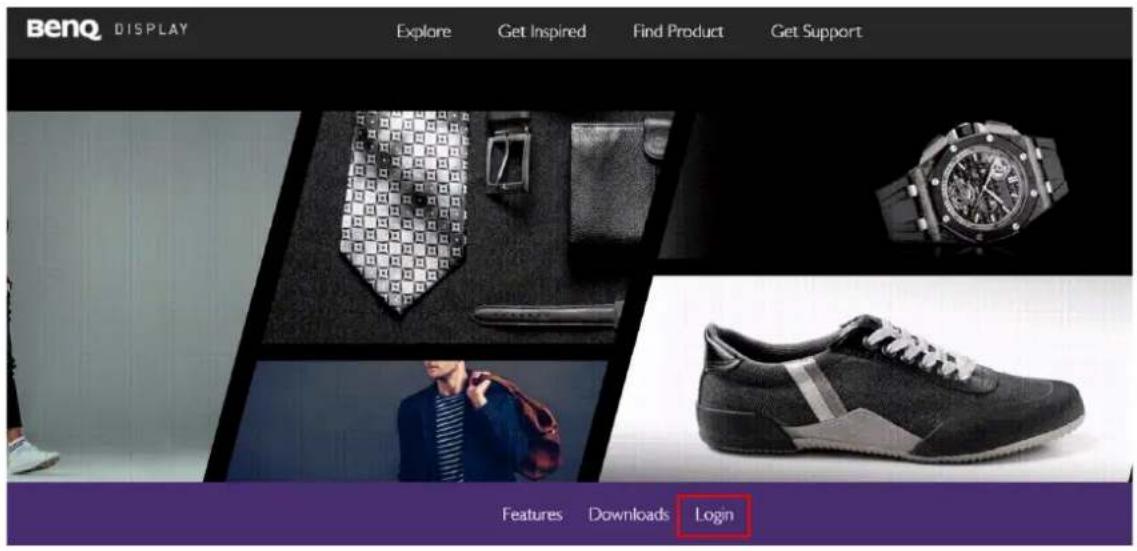
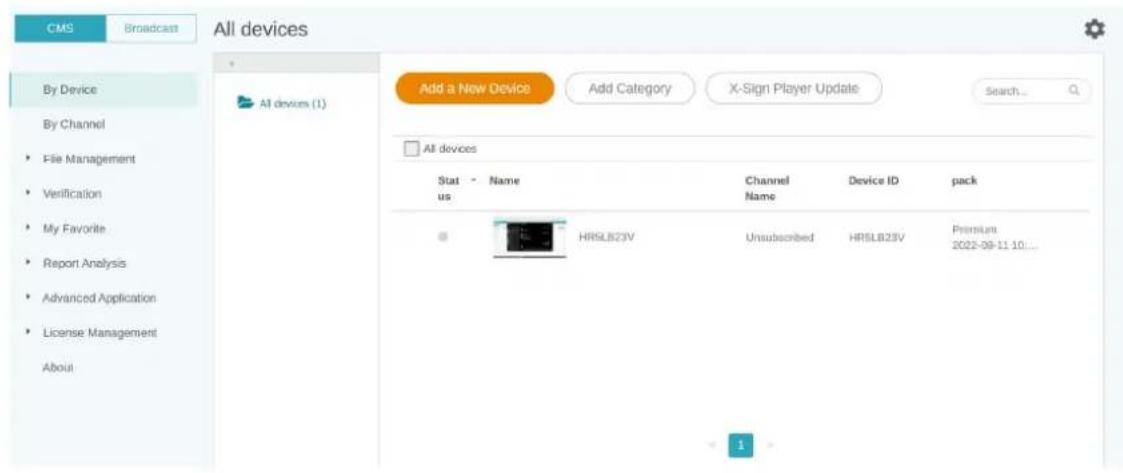
Setting the permission for users
I. To set the permission for users, log in and choose IAM.
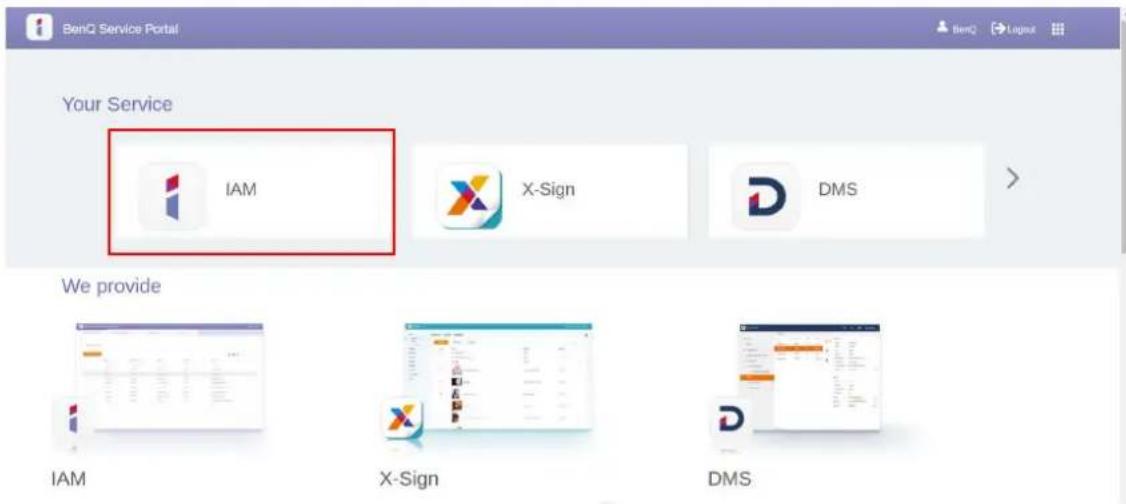
- Select Role Management > X-Sign, then choose the account you want to set the permission to. Click to continue.
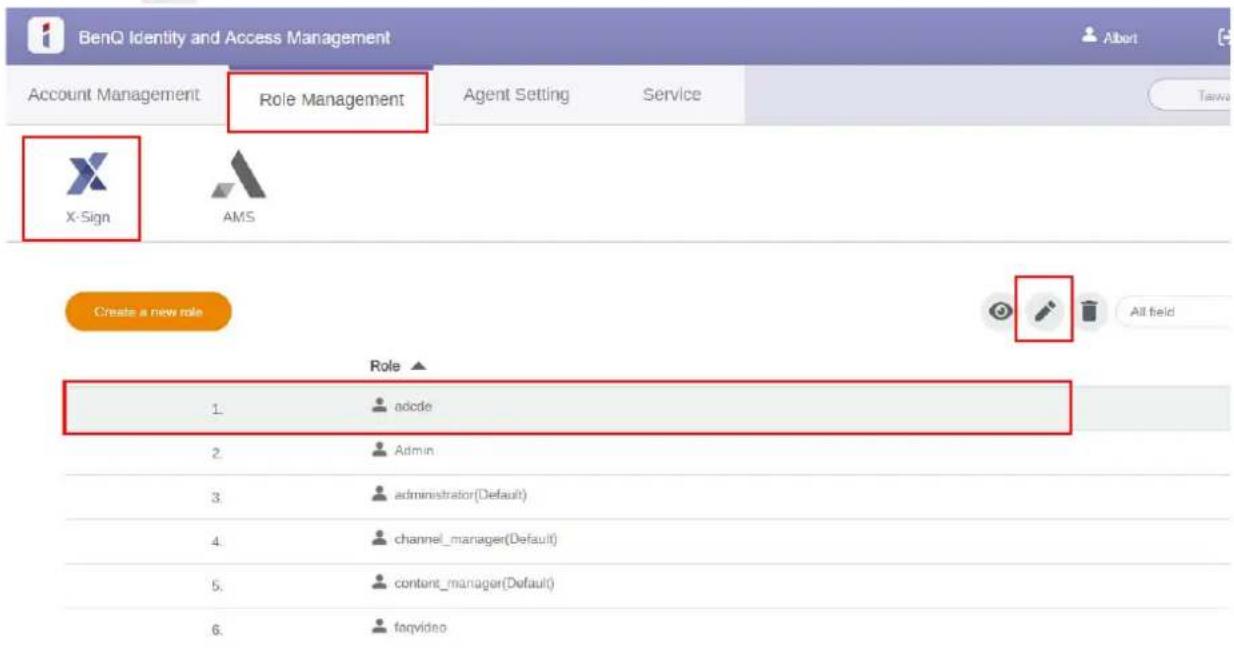
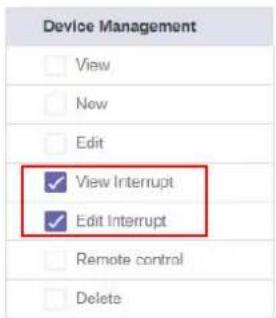
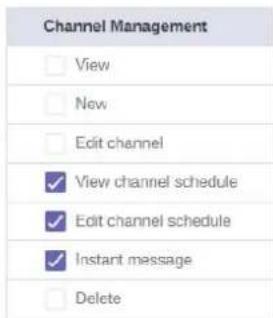
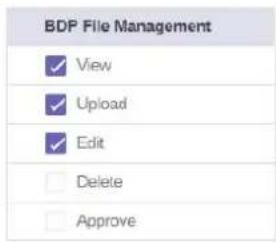
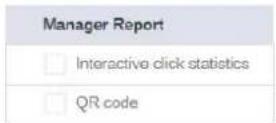
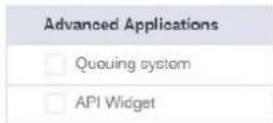
- You can set the permission to the account by checking the boxes. Click Submit to proceed. Edit role settings
Role Name adcde
Permission
Authorizing other users as admins
Watch demonstration video:

The administrator can authorize other users to manage X-Sign Manager. Please be noted that there can only be THREE admins in the same company, i.e. the original admin with two substitute admins.
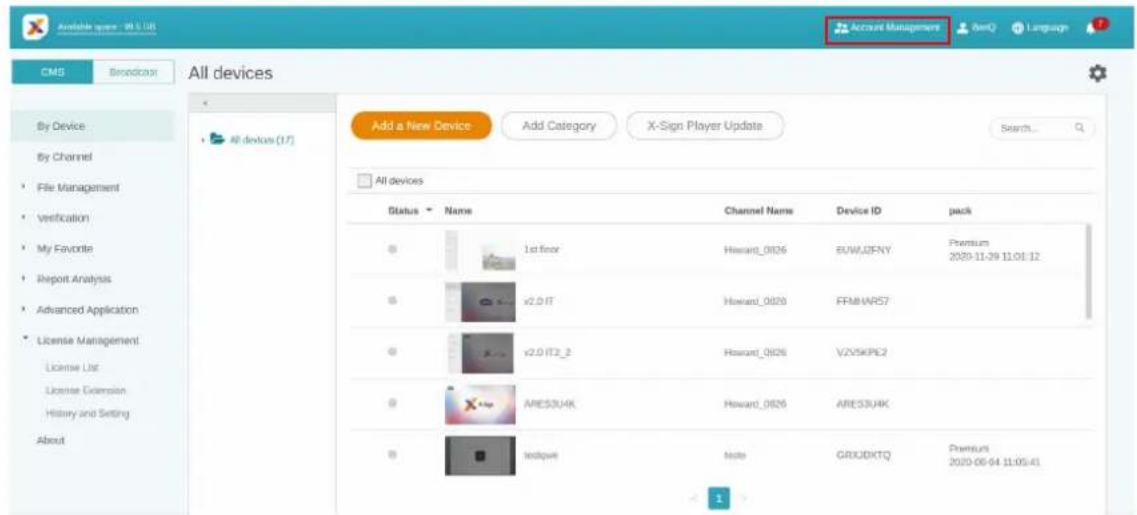
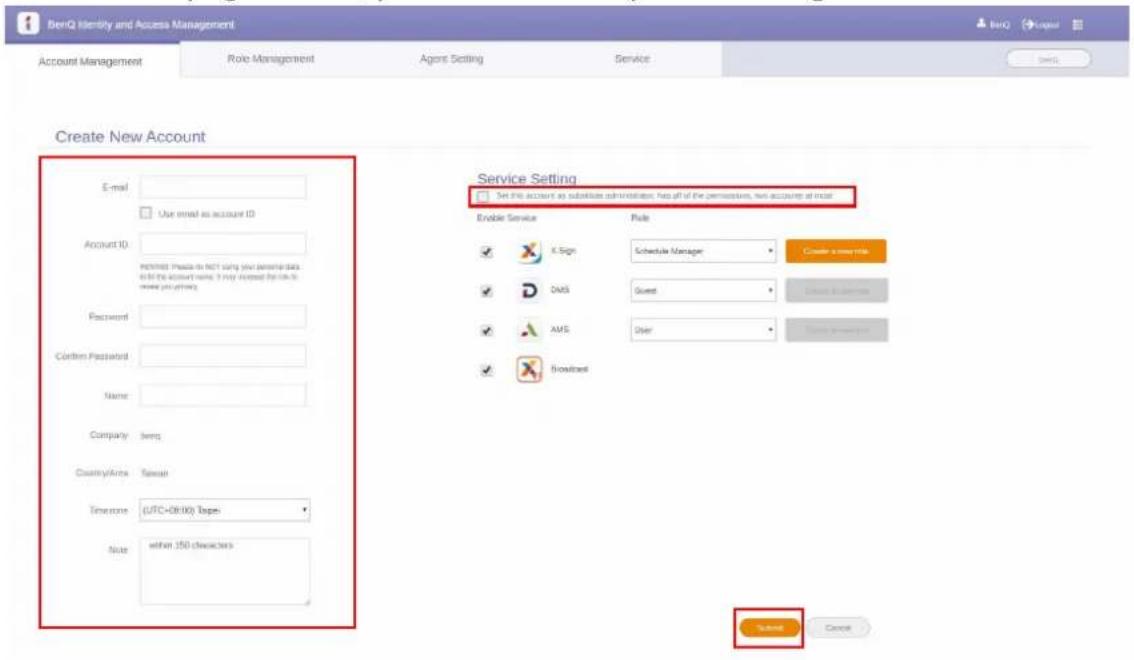
I. To authorize agents, go to Account Management.
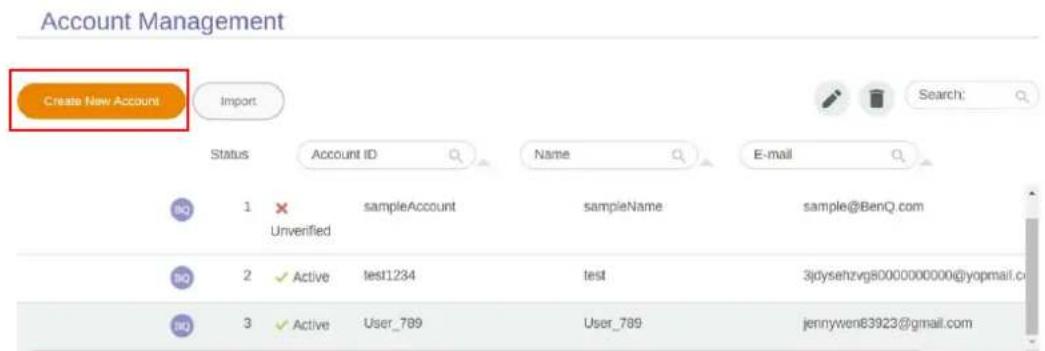
2. Click Create New Account to proceed.

Note: If the user already has an account under the original admin, there is no need to create a new account, just select
to edit.
- Fill in the account information, check the box, and click Submit. You will receive a verification email. After verifying the email, you have successfully authorized agents.
License
Purchasing the license from X-Sign Manager
Watch demonstration video:

You can purchase the license from X-Sign Manager in License Management > License Extension.
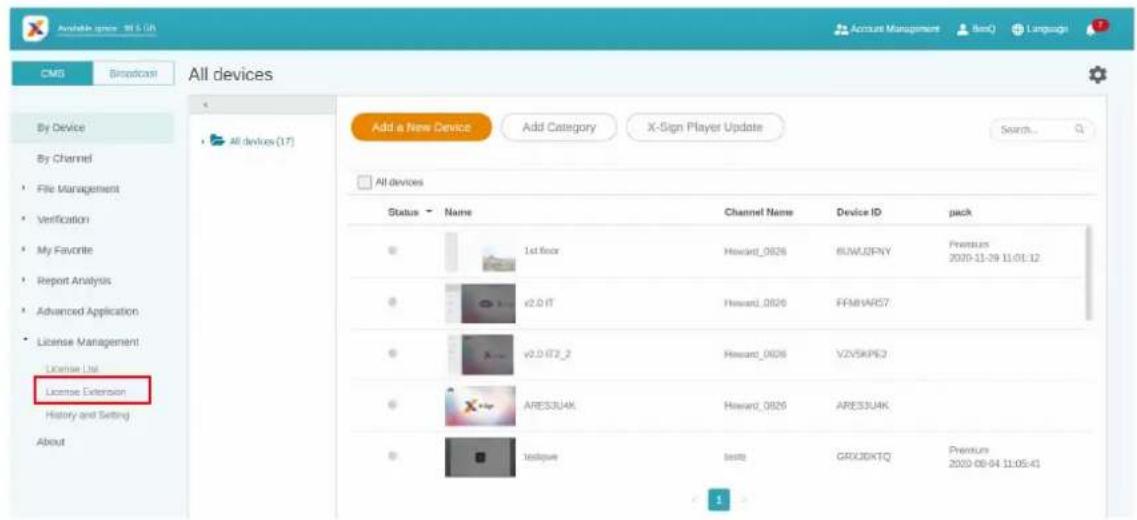
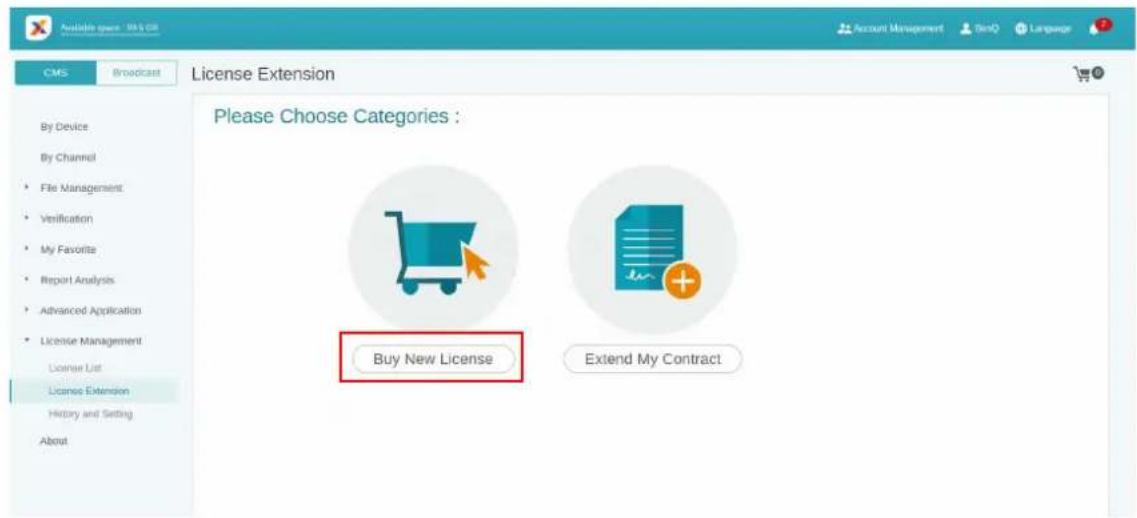
After clicking Buy New License,
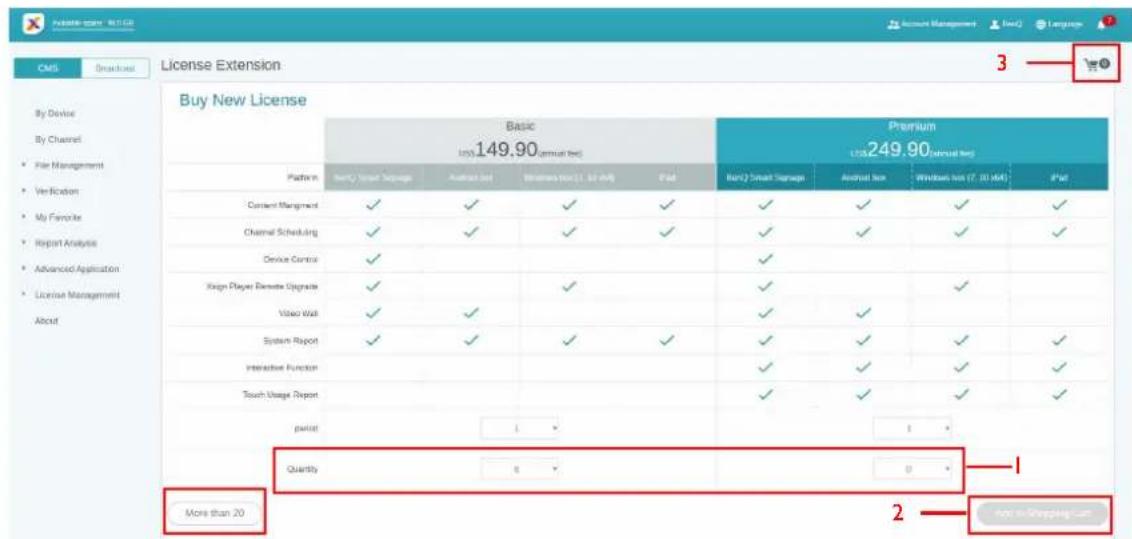
I. Choose the quantity of license which you want to purchase. There are two types: Basic and Premium.
2. Select Add to Shopping Cart.
3. Click the shopping cart icon to access to the checkout page.
Note: If the quantity is more than 20, it is highly suggested that you select More than 20.
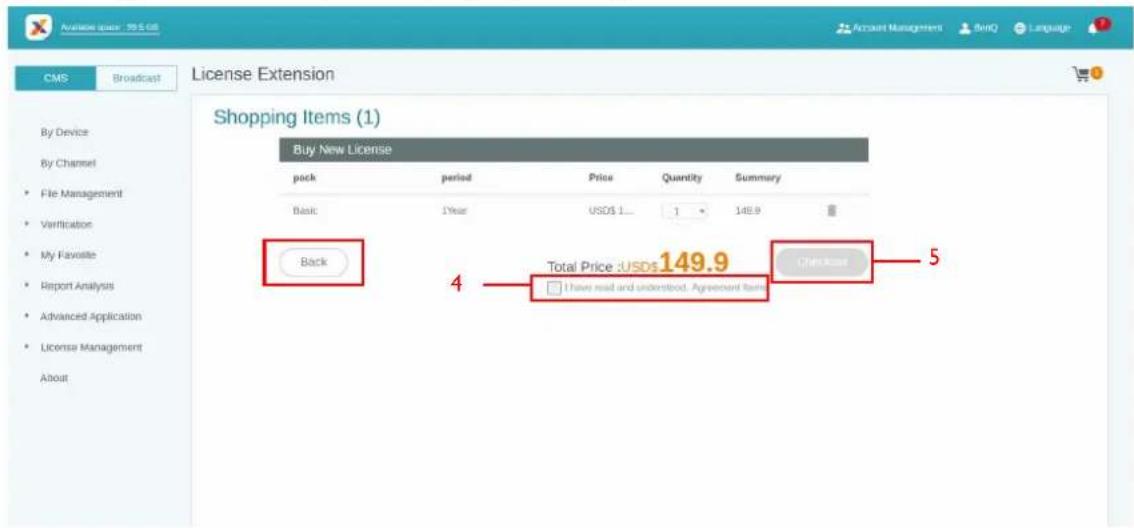
- After reading the agreement terms, click the checkbox.
- Click Checkout to go to the payment page.
Note: You can go back to the previous page by clicking the button Back.
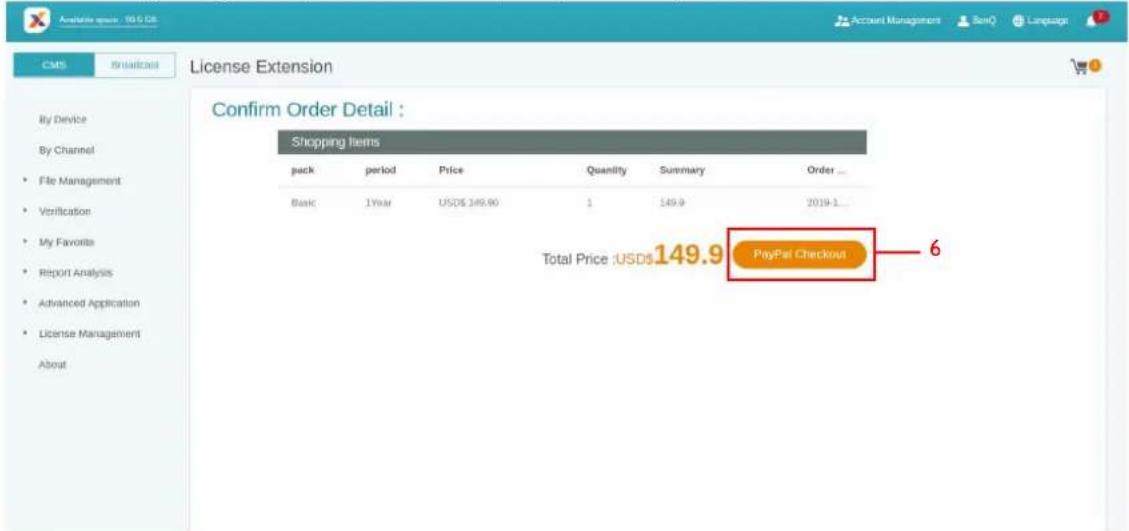
6. After checking the quantity and the total price, click PayPal Checkout.
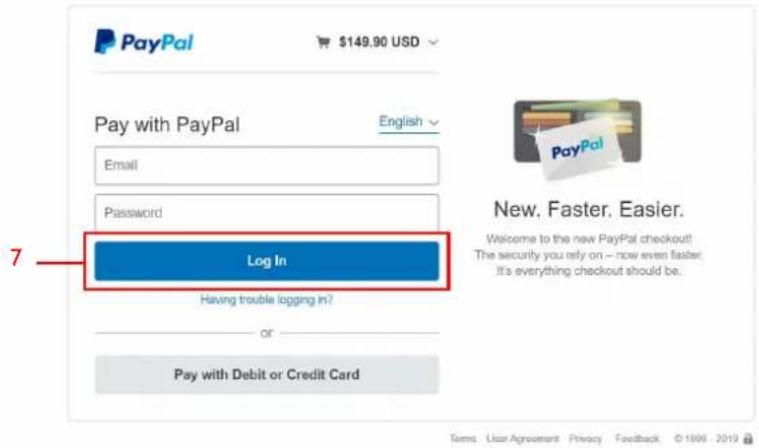
7. Log in the Paypal Account and finish the payment.
BenQ DCC's Test Store
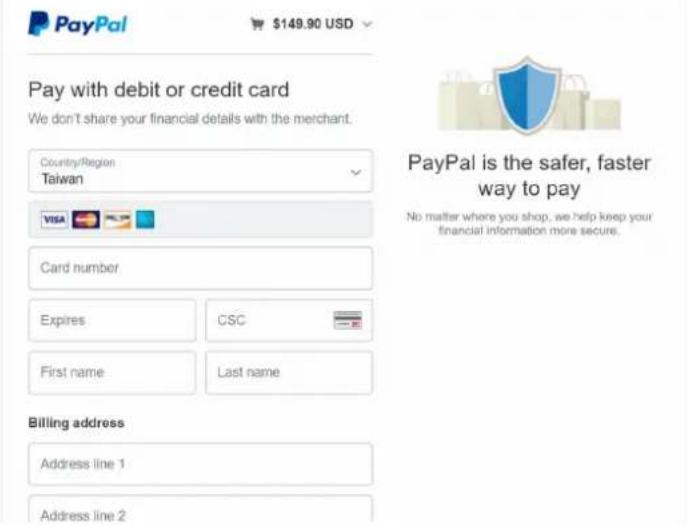
8. You can also pay by your credit card.
Importing the license(s) to X-Sign Manager
Before controlling your device or playing the content remotely, you must pair the device with the license in X-Sign Manager.
I. You have to buy license(s) from Manager directly or from BenQ reseller. If you buy from Manager, the license will be sent to your Manager account directly. If you buy from the reseller, you have to import license(s) yourself.
2. Go to License Management > License List and click Import License Code.
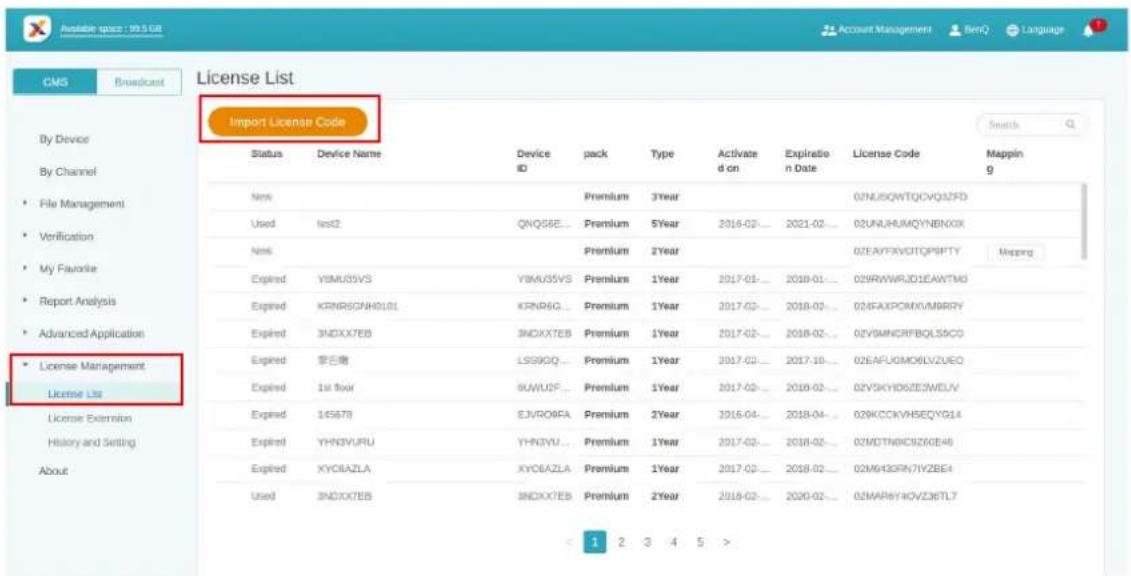
- Enter the license code here. Click Add to import multiple licenses at one time.
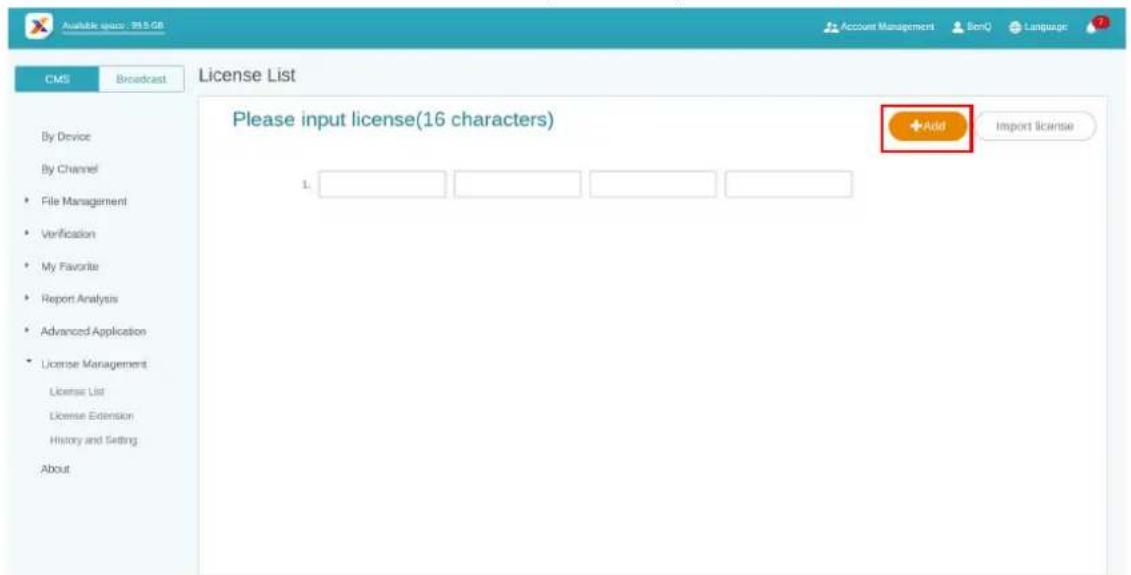
- After entering the license code, click Import license.
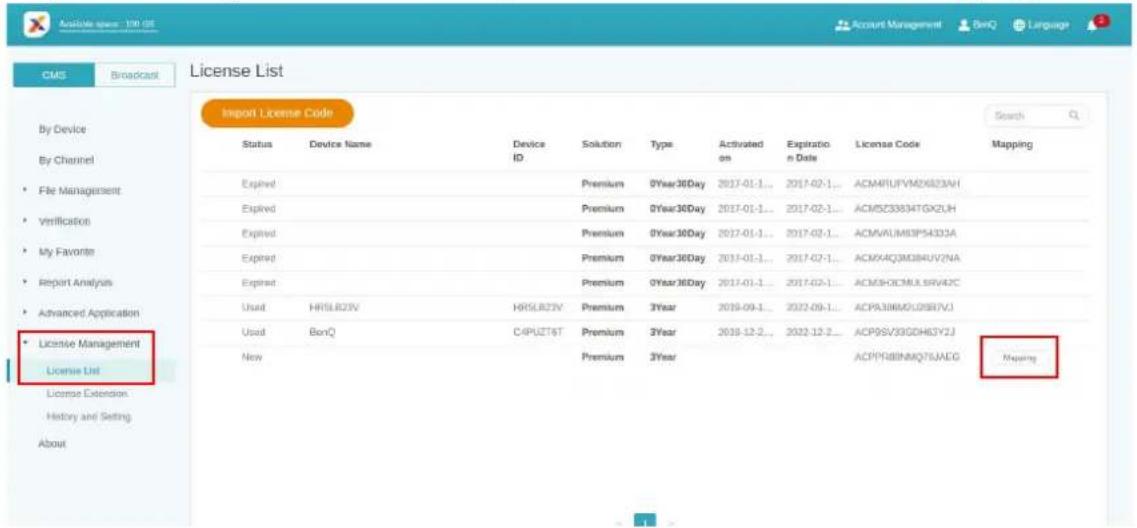
- You will see the imported licenses on the license list.
- Now you can start to pair your devices.
Mapping the license
I. To map the license, go to License Management > License List. Click Mapping to continue.
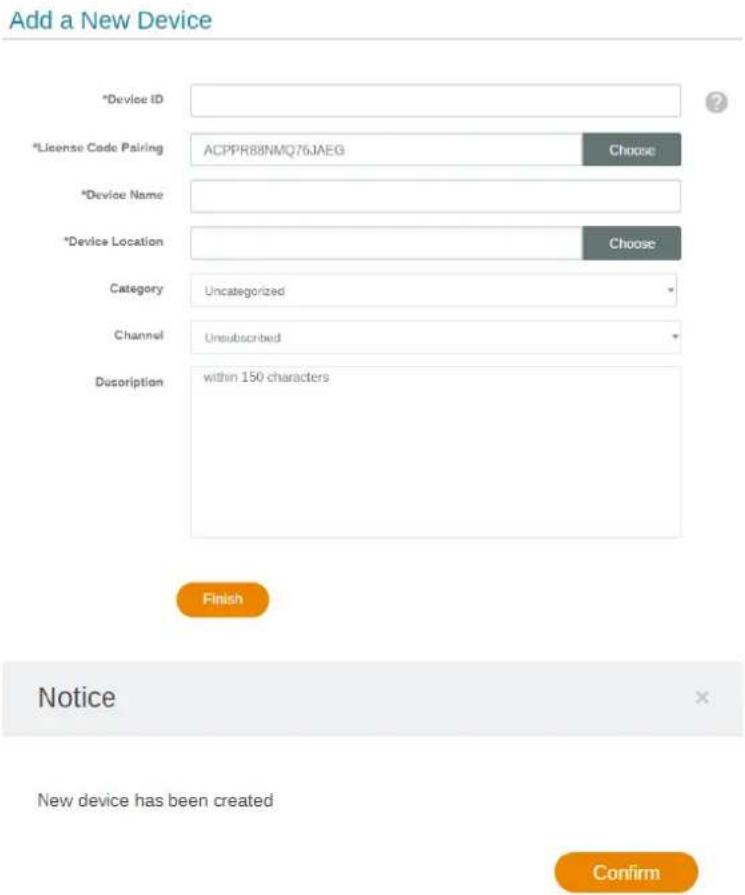
2. Fill in the following fields and click Finish to map the license.
Checking the License upgrade notice
- To check the license upgrade notice, click at the top right corner.
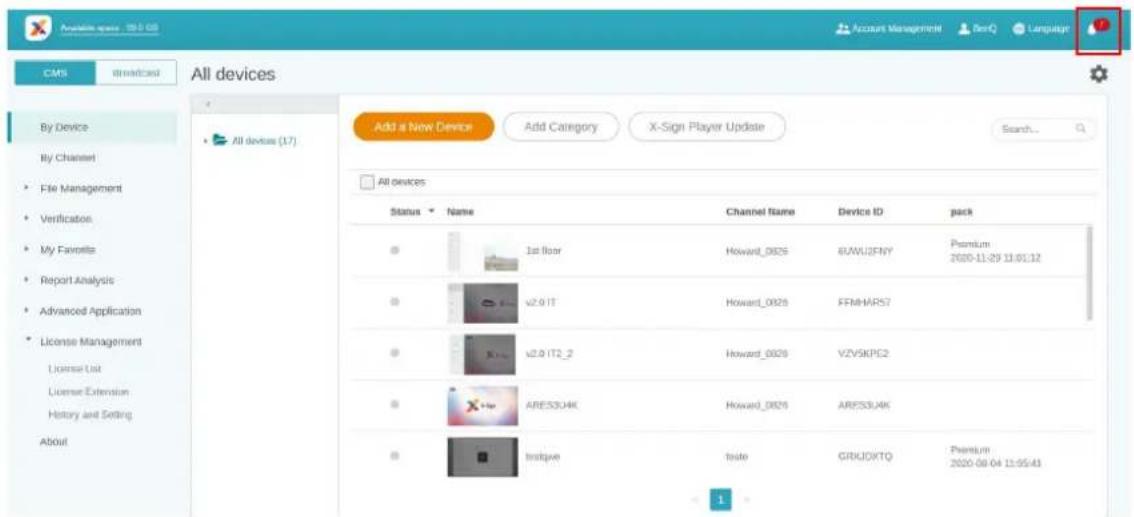
- You can see the notification(s). Click to see more information.
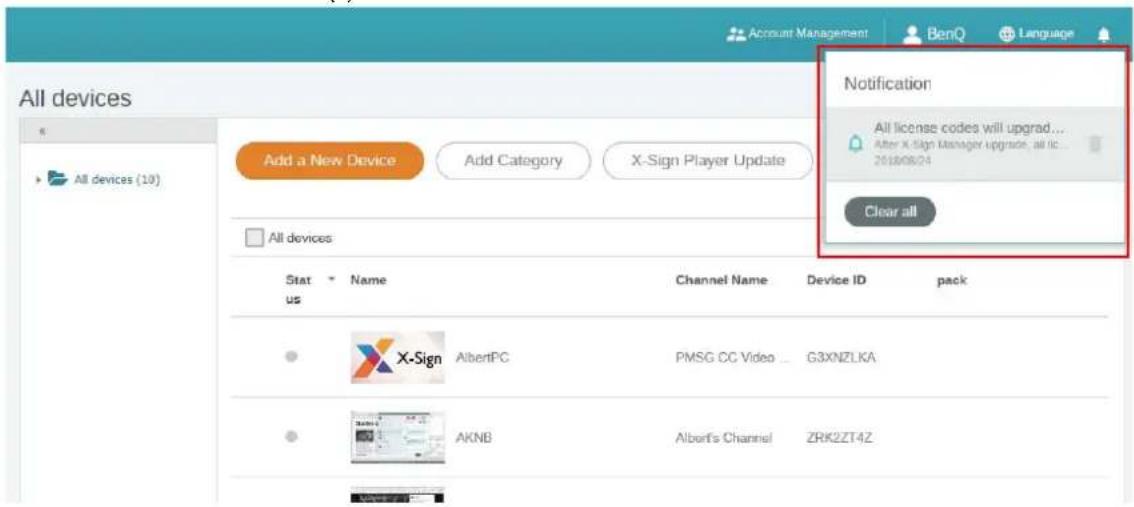
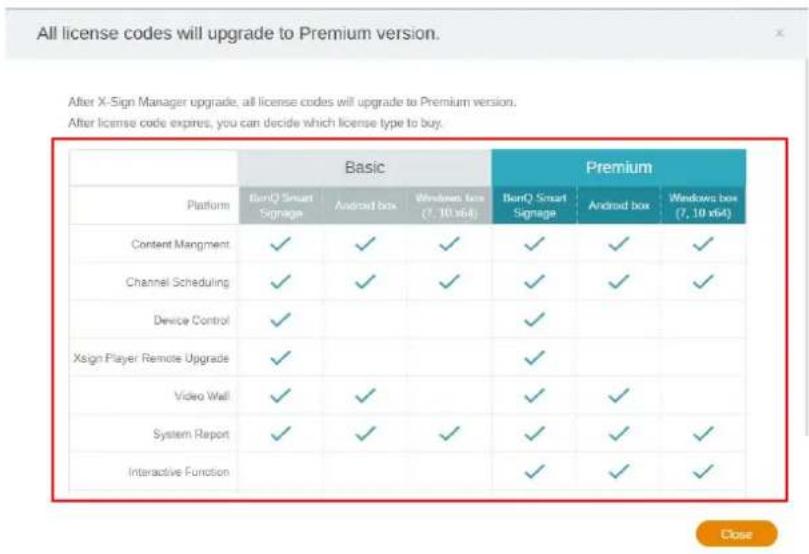
Note: You can delete the notification by clicking the trash can icon . Click Clear all to delete all notifications.
Manager
Pairing the device with X-Sign Manager
Watch demonstration video:
If you want to play the content from Internet or control multiple devices remotely, you have to pair the device with X-Sign Manager.
I. Launch X-Sign Player.
2. Press Esc button on Windows Player or MENU on the device remote controller to see the menu bar.
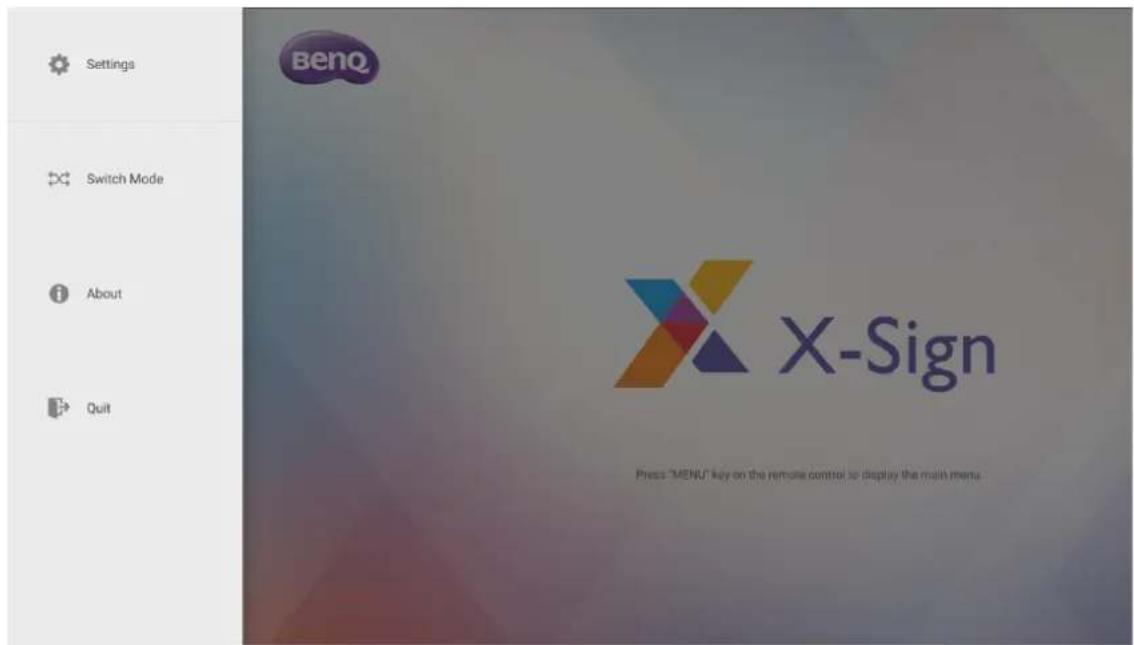
- Choose Switch Mode to switch to Manager mode.
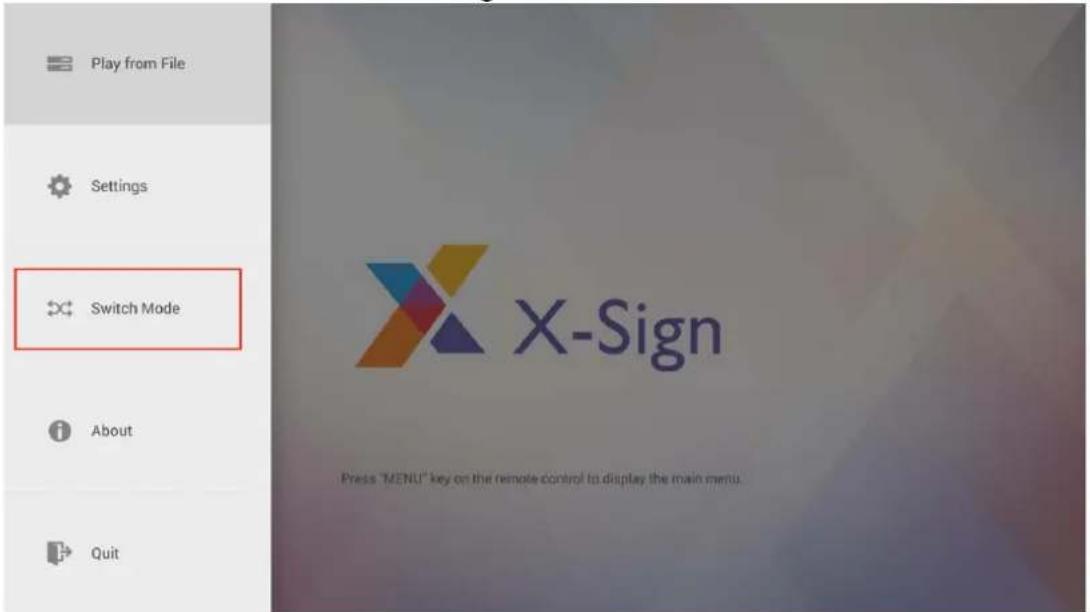
4. Choose Pair to start pairing.
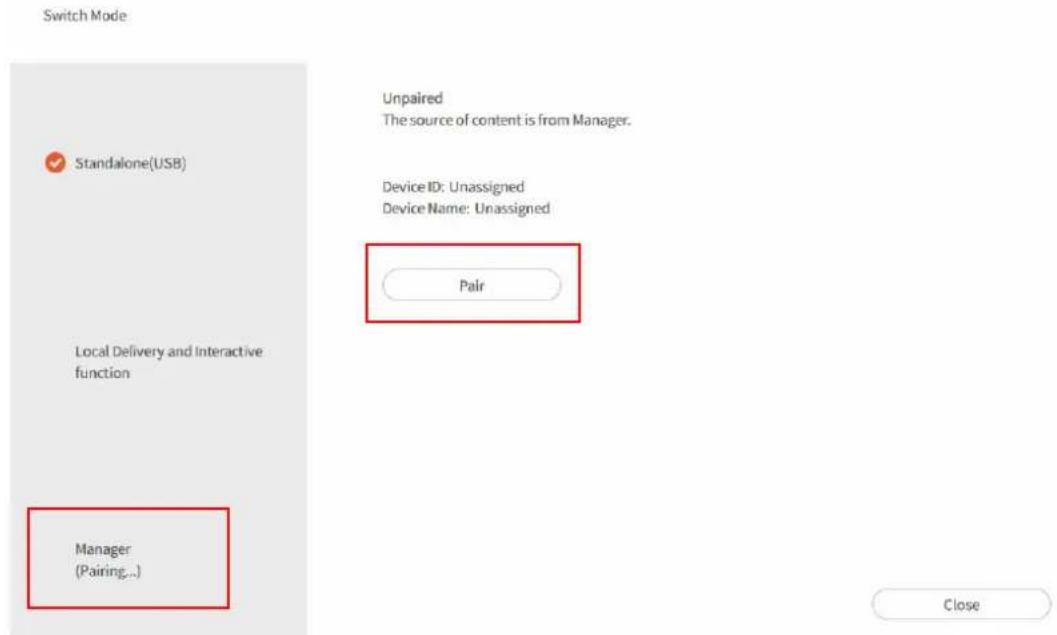
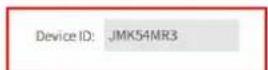
5. Get the Device ID on this page then go to X-Sign Manager to pair the license.
New Device
- Please check the network status.
- Please bind the Device ID and pairing code to activate the feature of X-Sign Manager.
Status: Pairing..
Back
6. Go to X-Sign Manager. Then go to By Device and choose Add a new Device.
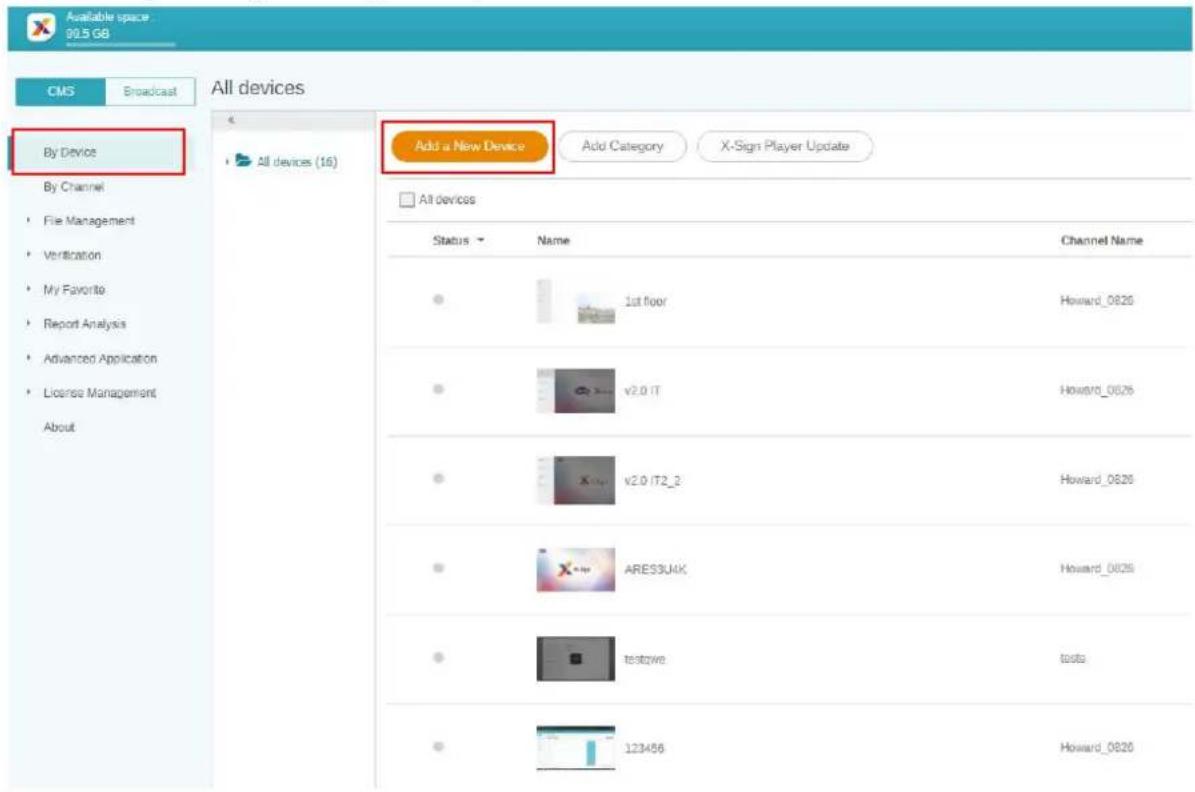
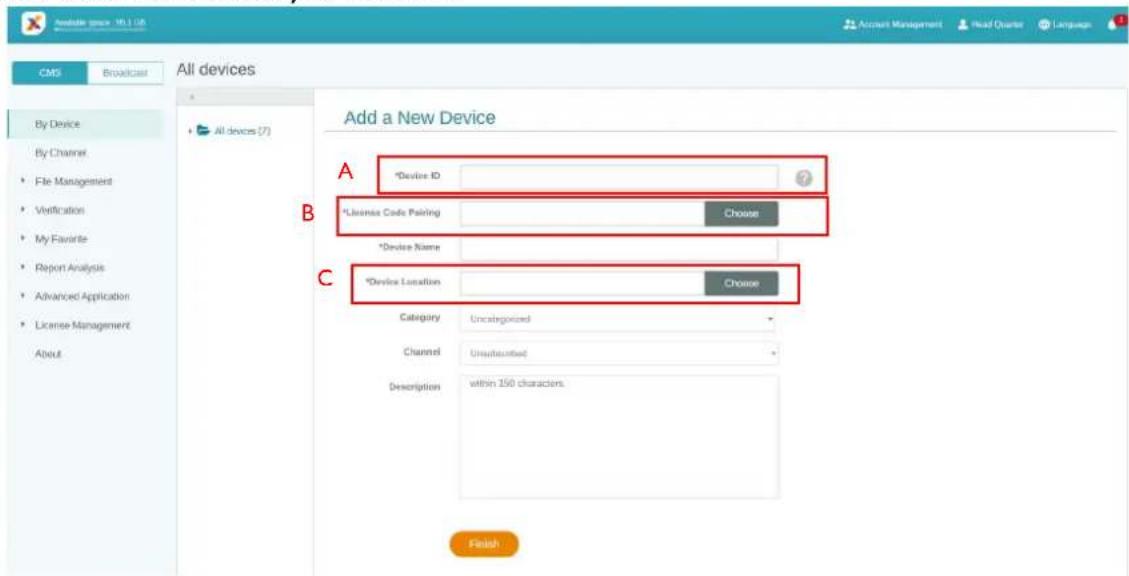
7. Enter required information as below.
- Device ID: the device information from X-Sign Player.
New Device
Device ID: JMK54MR3
- Please check the network status.
- Please bind the Device ID and pairing code to activate the feature of X-Sign Manager.
Status: Pairing...
Back
- Mapping license code: Choose the license you want to pair with the device. You have to make sure you already buy the license and import to X-Sign Manager.
- Device location: Choose the city where your device lies in. Time zone of the device (Android) needs to be the same as you set here.
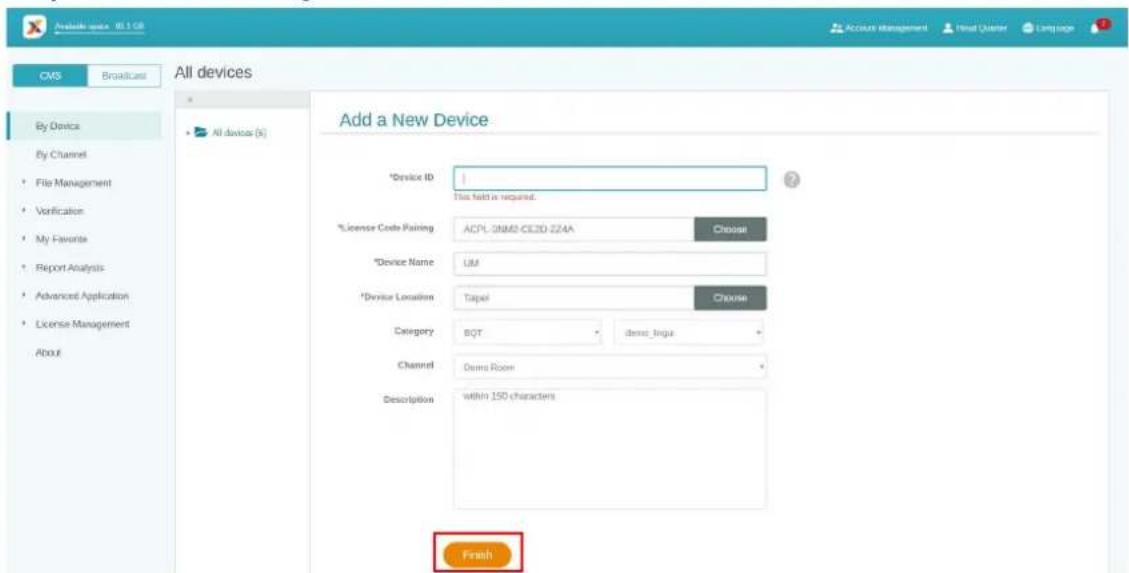
- After you finish the setting, click Finish to continue.
- A message, "New device has been created", will show up on the screen when the signage is successfully paired with X-Sign Manager.

New device has been created
- You will also see the message shown on the signage.
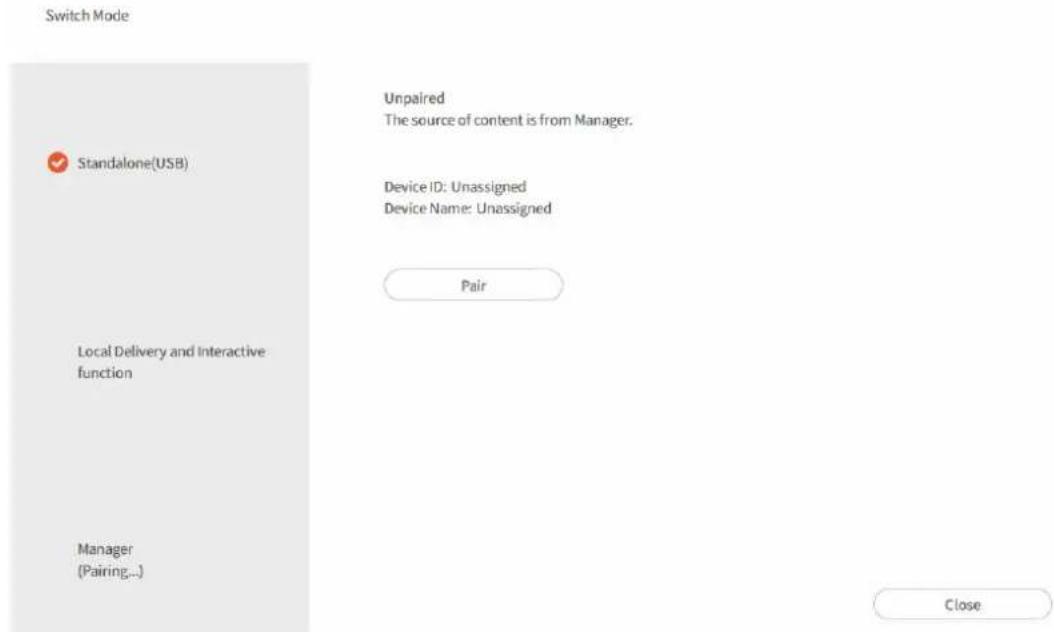
II. Now you can control your device and play content remotely from X-Sign Manager.
Creating the channel
Watch demonstration video:
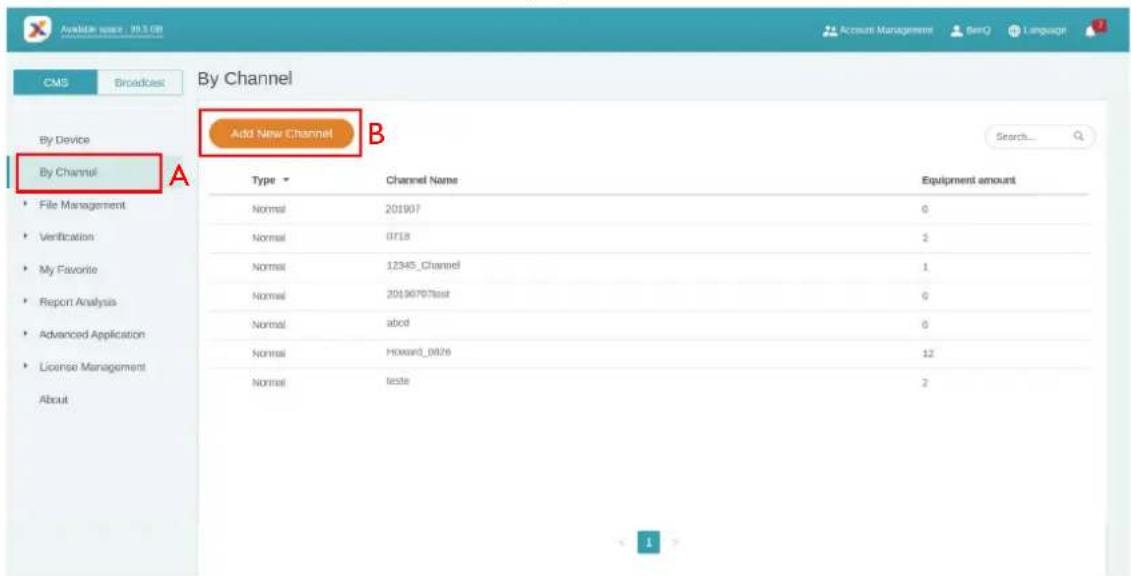
Follow the steps A to N to create the channel.
• A. Click By Channel.
• B. Click Add New Channel to the creation page.
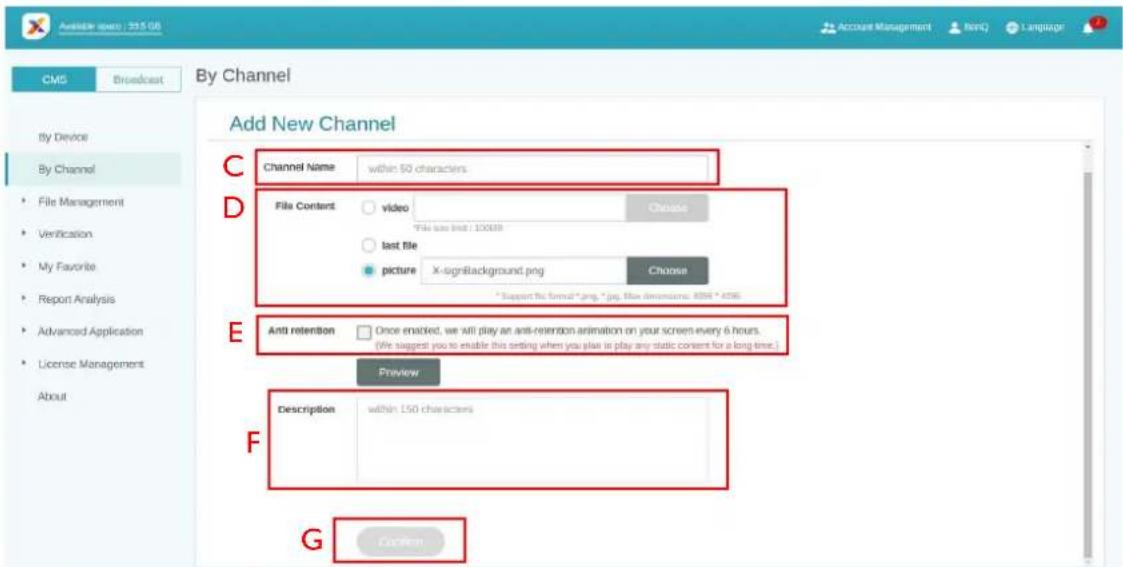
• C. Enter the channel Name.
• D. Select the default playing content when there is no schedule in this channel.
• E. Choose to enable anti-image retention.
• F. Fill in the description of the channel.
• G. Click Confirm to finish the creation page.
• H. Select to finish the settings.
• I. Select to add the existing device to the channel.
Group Setting Finished
The channel is successfully created. Are you going to set equipment for this channel?
flowchart
graph LR
    A["Setting Finished"] --> B["Manage Device"]
• J. Re-edit the information of the channel.
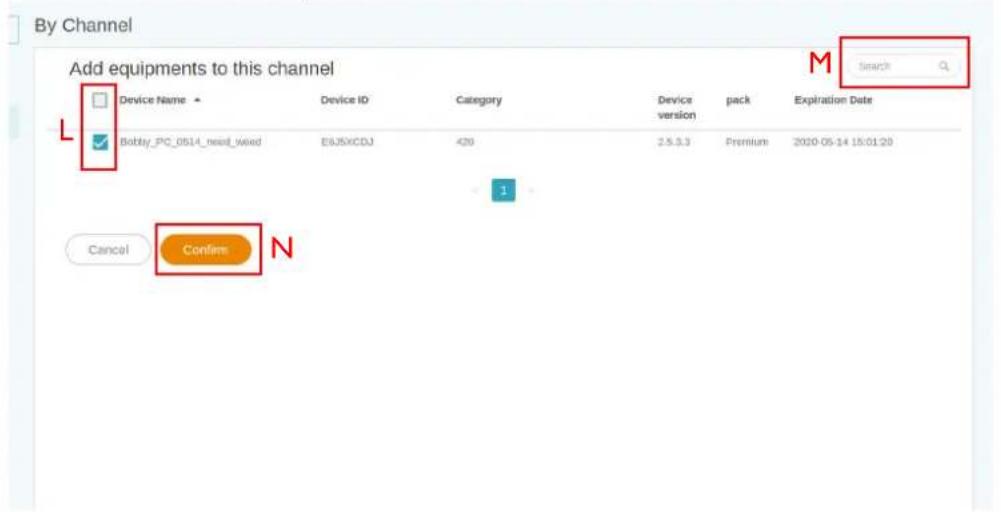
• K. Add the existing device to the channel, then you will see a new page.
By Channel
Channel Management
Channel Name BenQ
File Content picture
X-signBackground.png
Anti retention Disabled
Description None
K
Manage Device
Add unsubscribed devices to this channel.
Channel Traveler
Device Name
Device ID
Category
Device version
License Status
• L. Select multiple devices to add into the channel.
• M. You can search the name of the device in the search bar.
• N. Click Confirm to finish the operation.
Scheduling the content by channel
Watch demonstration video:
With X-Sign Manager, you can easily play the same content on multiple devices remotely. You can also play different content whenever you want.
I. Be sure that the device's license in the channel hasn't expired yet.
2. Go to By Channel, then choose the channel you want to play the content.
- Click 📁 and you will see the schedule management page of Channel. Click the time slice you want to set schedule.
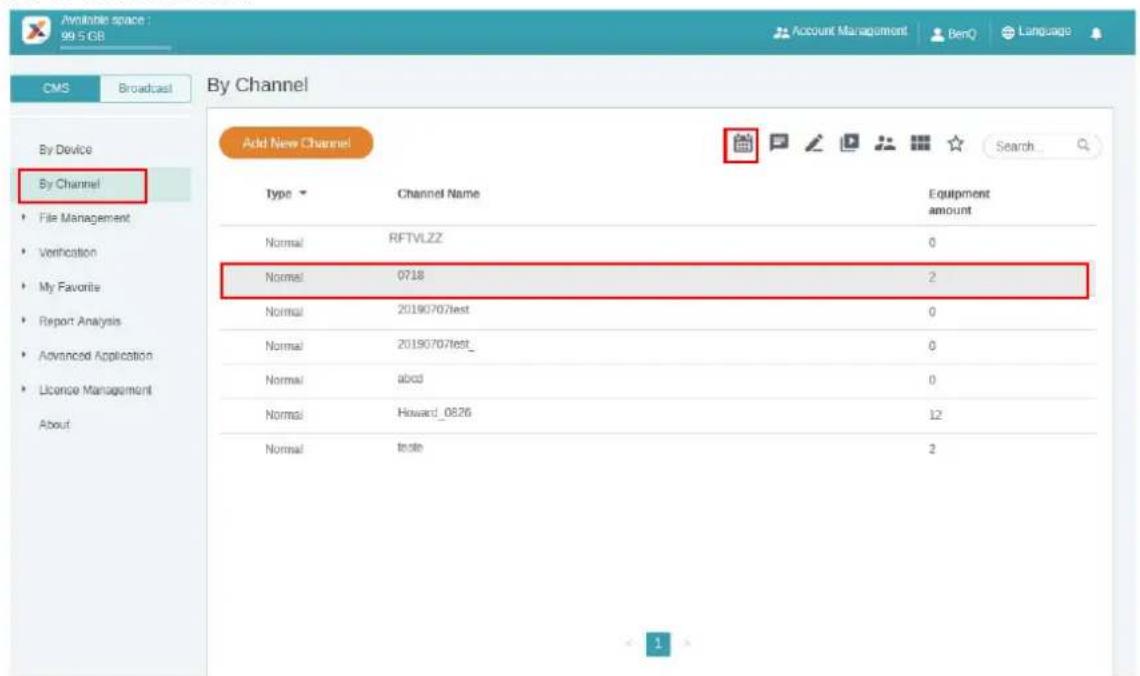
- You will see the schedule setup window. Below is some required information.
A. Select the project you want to play on the channel. Be sure to upload your project file to Manager first.
B. Set the schedule time you want to play the content.
C. Enable to play content all day long.
D. Select the priority of the project. If it is urgent, select High for interruption scheduling. High priority schedule can overwrite Normal priority schedule by overlapping time blocks.
E. Enable to play content periodically.
F. You can set time here. You have to set the end date and choose to repeat by day or week.
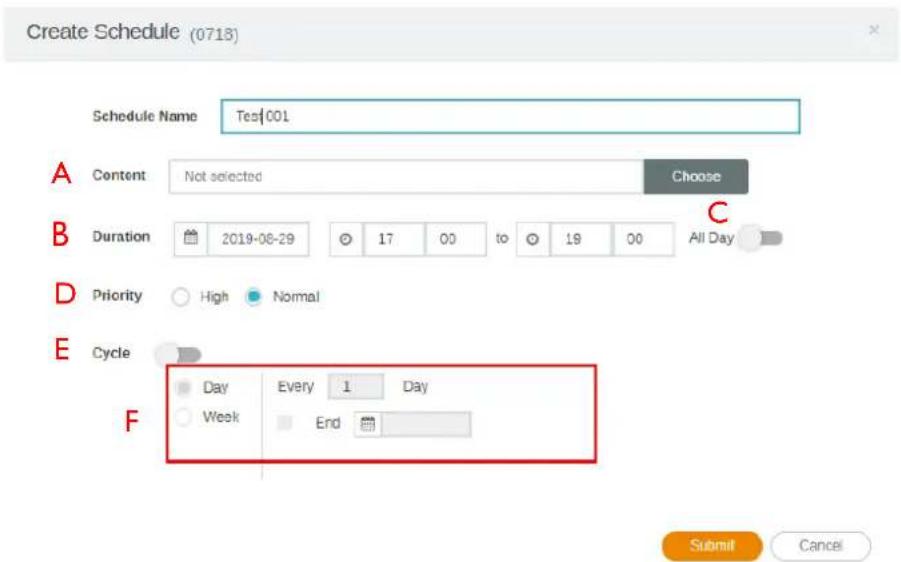
-
After all configuration is set, click Submit.
-
You will see the schedule on the management page.
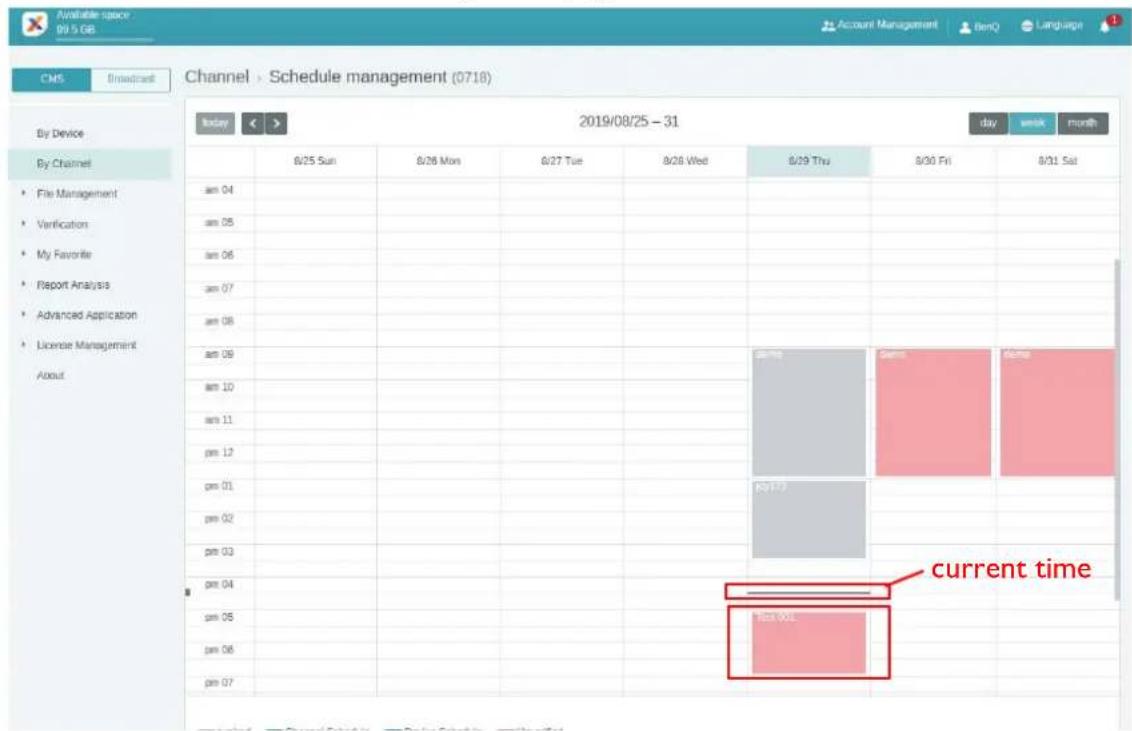
- Double click the schedule event, and you can see the status of devices in the channel.
- No matter by device or by channel, you can create and edit time blocks in the timetable by clicking and dragging.
Scheduling the content by device
Watch demonstration video:

I. Go to By Device, then choose the device you want to play the content. Click 📁 to go to the schedule management page.
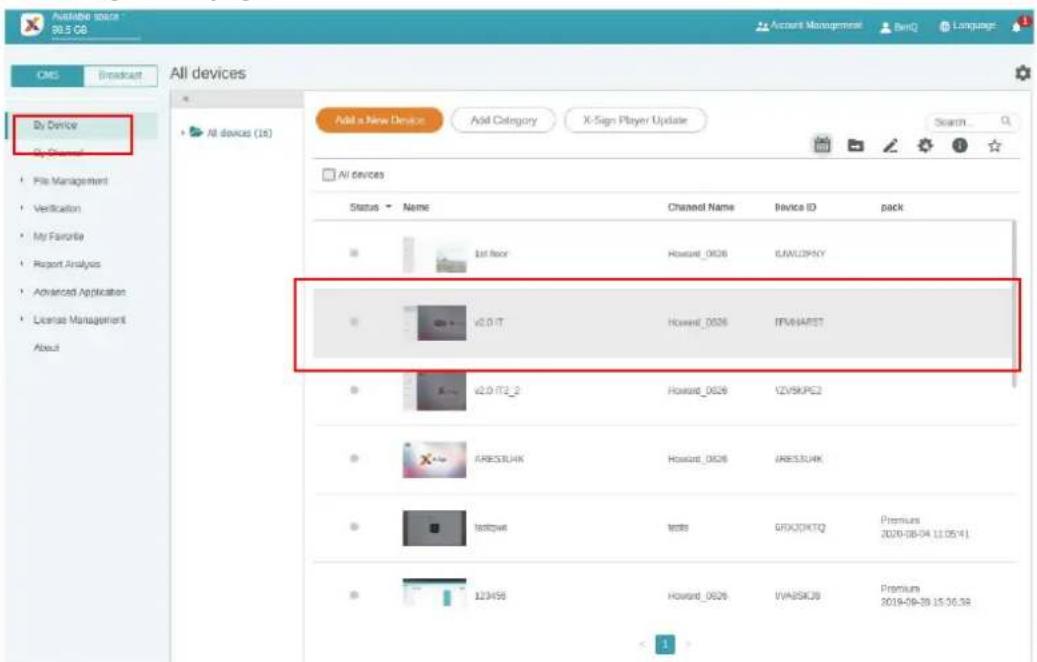
- Click the time slice you want to set schedule.
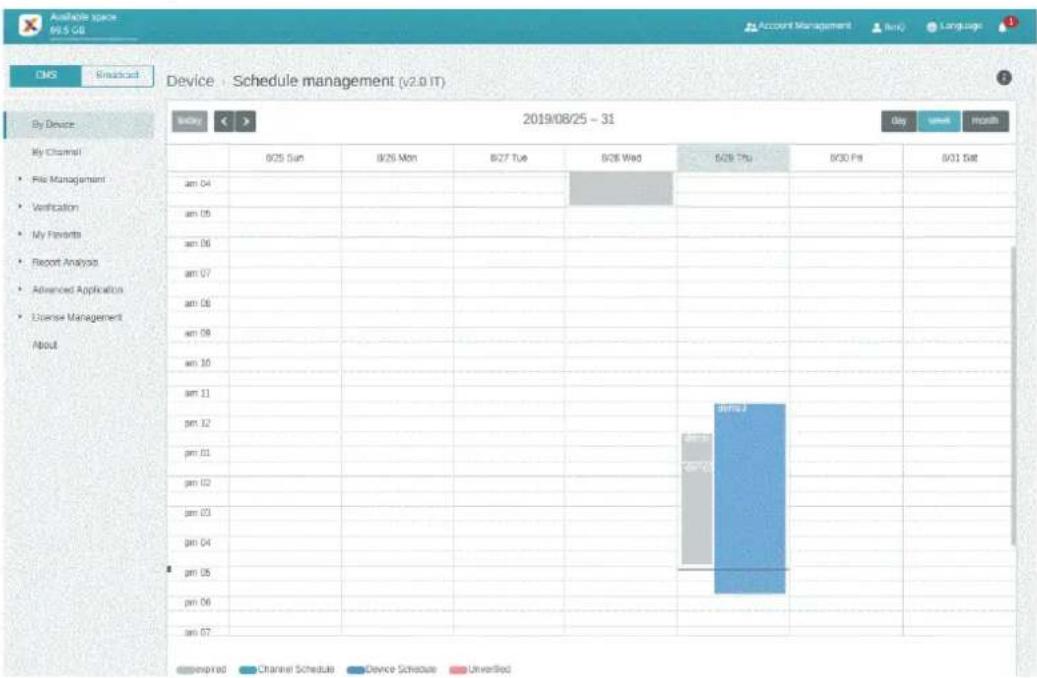
bar
| Time | Company | Channel Schedule | Device Schedule | Unverified | |---|---|---|---|---| | 04 | am 04 | | | | | 05 | am 05 | | | | | 06 | am 06 | | | | | 07 | am 07 | | | | | 08 | am 08 | | | | | 09 | am 10 | | | | | 10 | am 11 | | | | | 11 | pm 12 | | | | | 01 | pm 01 | | | | | 02 | pm 02 | | | | | 03 | am 03 | | | | | 04 | pm 04 | | | | | 05 | pm 05 | | | | | 06 | pm 06 | | | | | 07 | am 07 | | | | 2019/08/25 - 31 Day week month 2019/08/25 - 31 Account Management Bank Language BOS BOS BOS BOS BOS BOS BOS BOS BOS BOS BOS BOS BOS BOS BOS BOS BOS BOS BOS BOS BOS BOS BOS BOS BOS BOS BOS BOS BOS BOS BOS BOS BOS BOS- You will see the schedule setup window. Refer to Scheduling the content by channel on page 24 for more information about A-F.
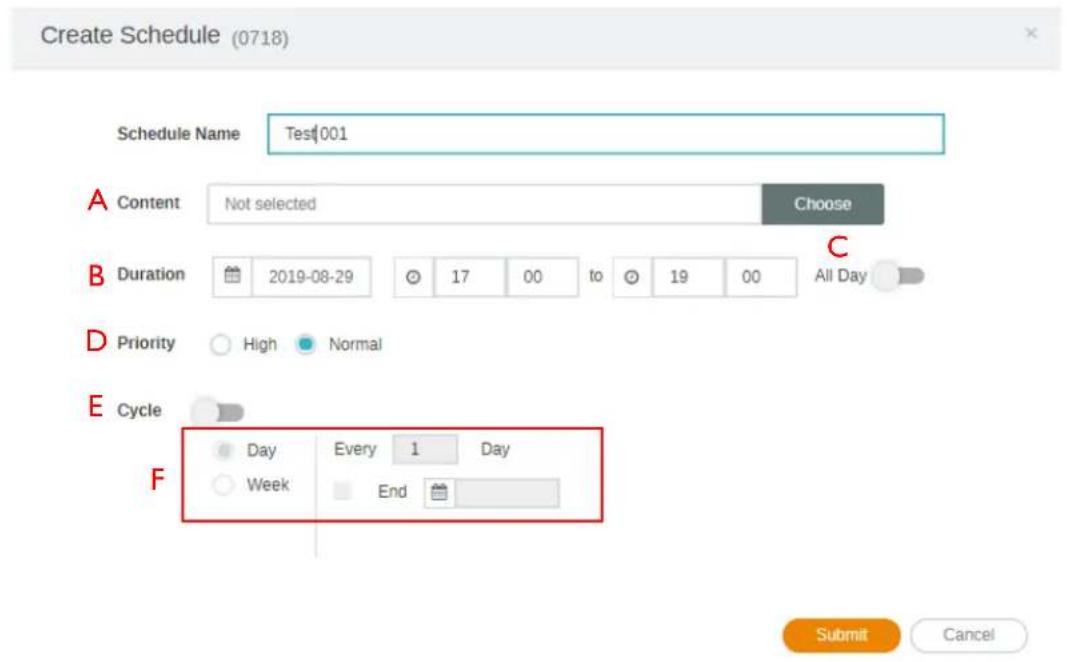
- After all configuration is set, click Submit.
- You will see the schedule on the management page.
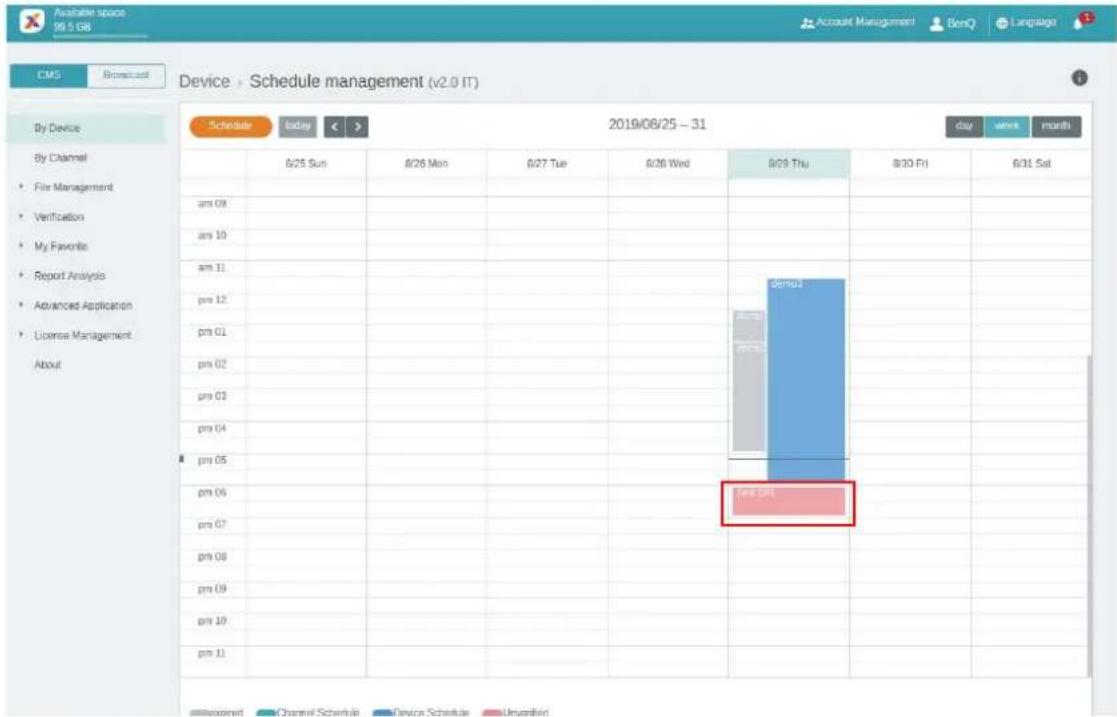
- No matter by device or by channel, you can create and edit time blocks in the timetable by clicking and dragging.
Editing the device management structure
Watch demonstration video:
In X-Sign Manager, you can manage devices with hierarchical structures which make you control multiple devices with ease.
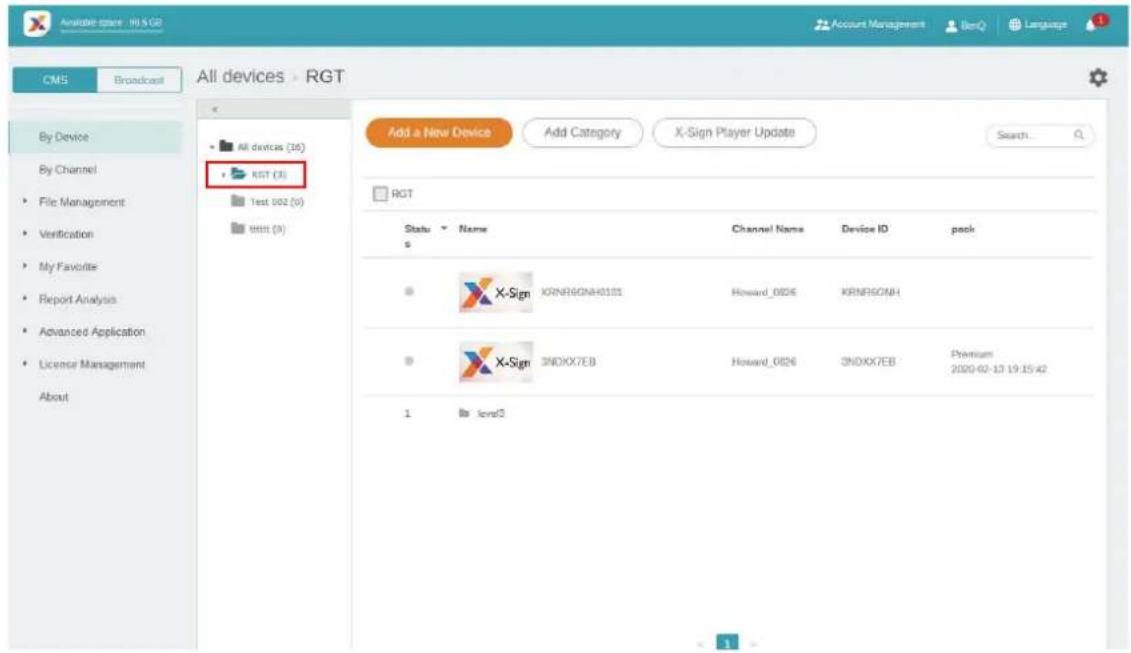
I. Click Add category to create a folder.
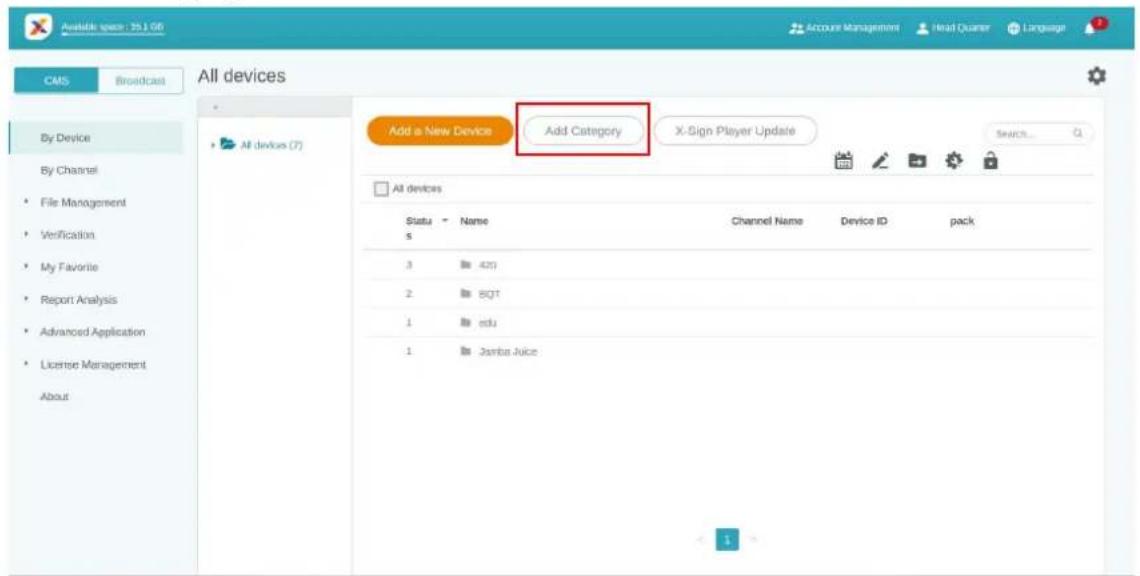
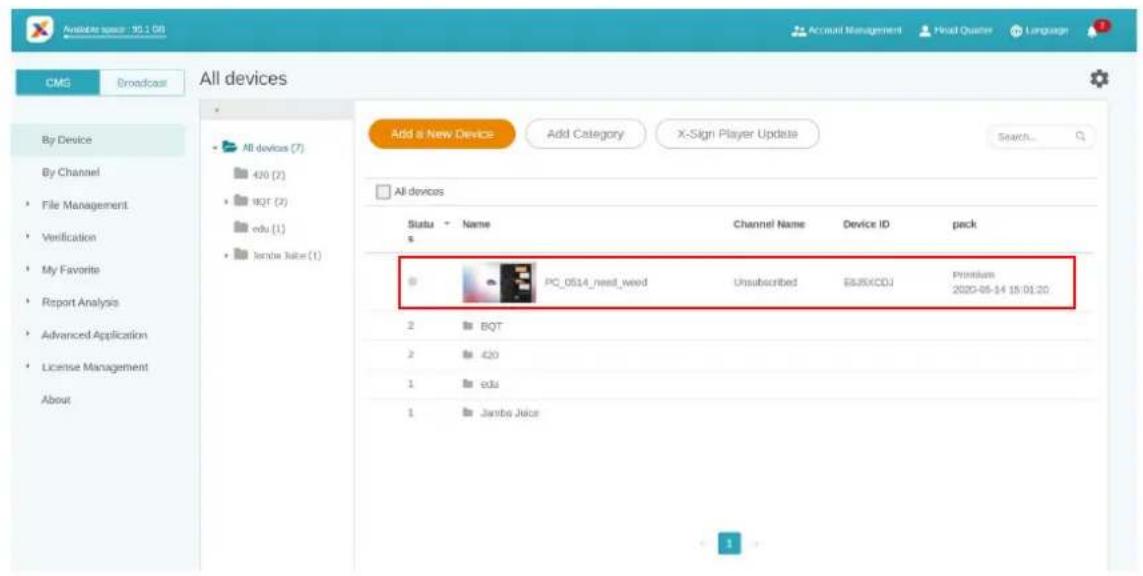
- You can see the folder structure on the left side. You can easily create a hierarchical folder structure.
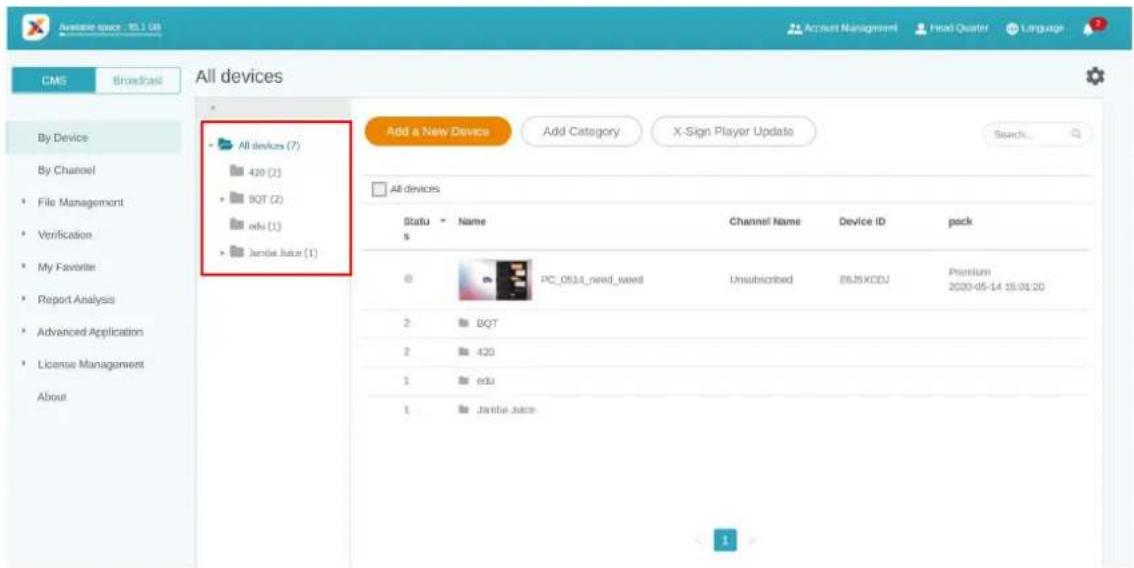
- Click Add a New Device then set it to the related category.
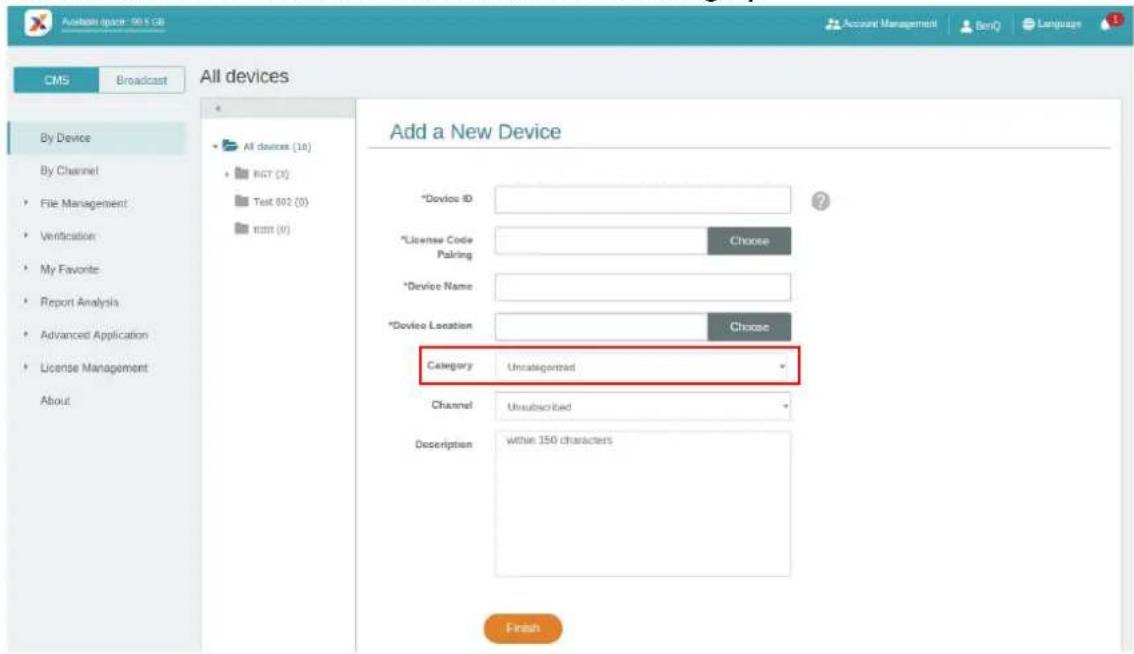
- You will see the device in the related folder.
- For existing device(s), click to transfer it to the correct folder.
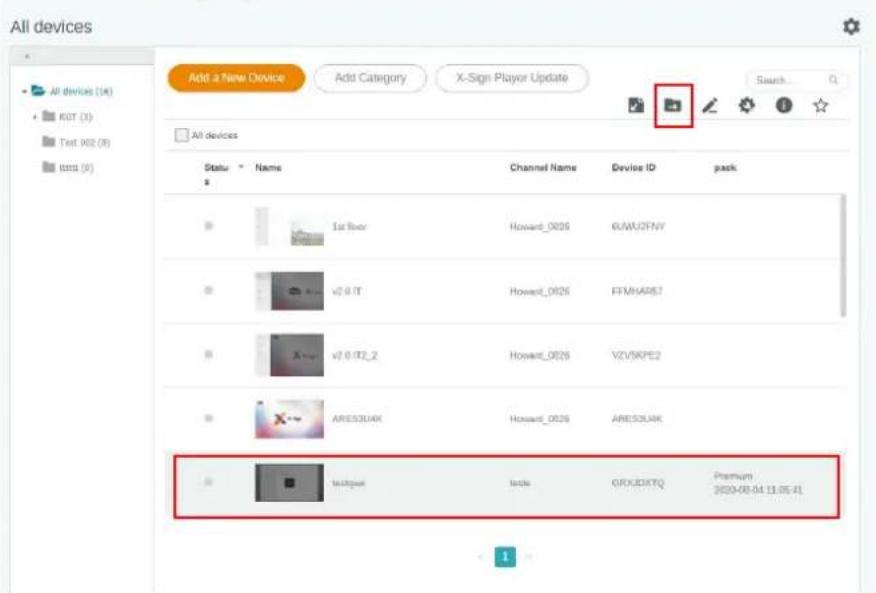
- Now you can start to customize your device structure.
Pushing Real-Time Message to your BenQ Smart Signage remotely
Watch demonstration video:
With Real-Time Message on By Channel, you can easily push instant message to single or multiple devices. You don't need to edit content again.
I. Make sure that the device has already paired with X-Sign Manager.
2. You must create one channel and move device(s) into it.
- Go to By Channel, select the channel you want to push the message to. Then click ☐.
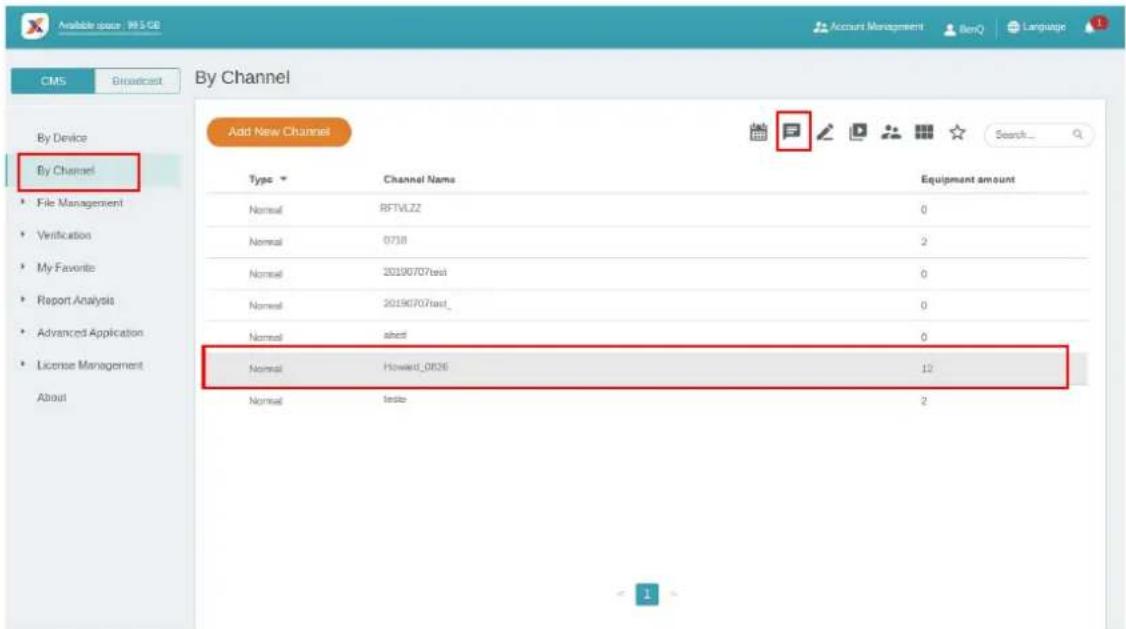
- You will see the message settings page.
A. Enter the message you want to push.
B. Choose the style and layout for the message.
C. Set the duration for playing the message. The maximum time to play the message is 24 hours.
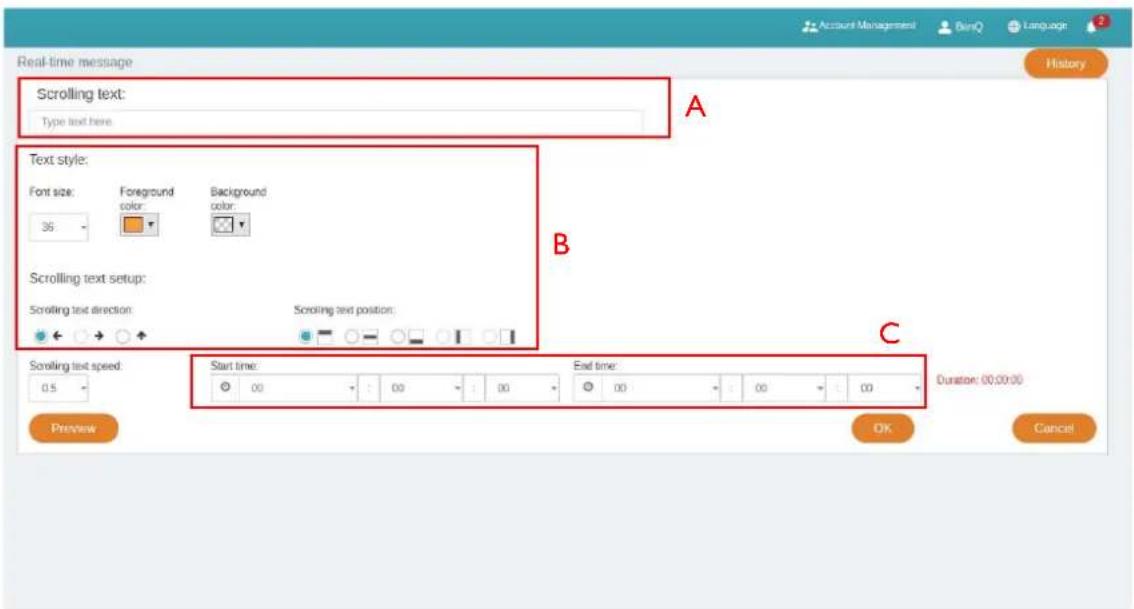
- You can click Preview to see what the effect looks like on your display.
-
After you finish the setting, click OK.
-
You can click History to see the record of each real-time message event.
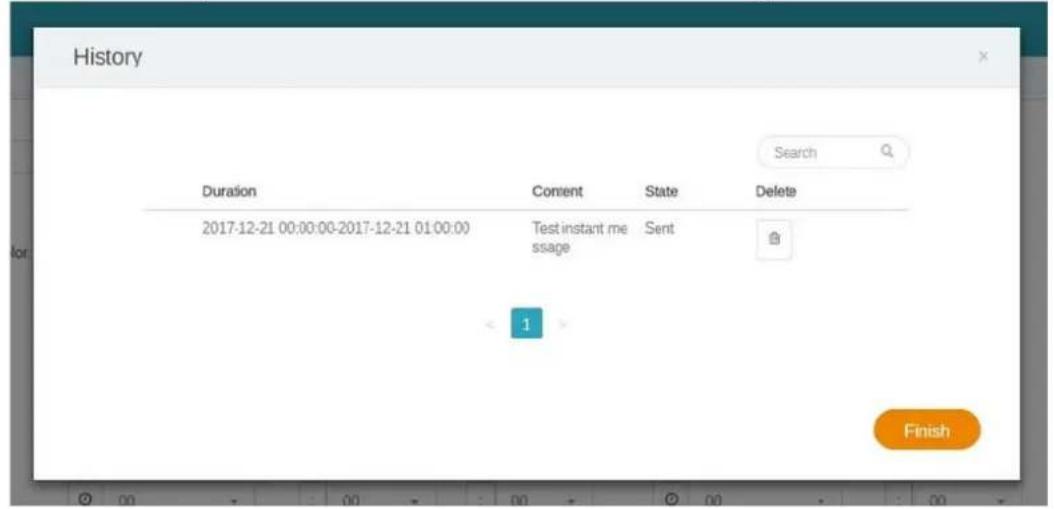
- You can also see the status or even delete it.
Controlling the device remotely
Watch demonstration video:

With X-Sign Manager, you can control your devices remotely. The function is only compatible with BenQ Smart Signage Series' hardware.
I. Make sure that your device is already paired with X-Sign Manager and is online.
2. Go to By Device, then choose the device you want to control, and click ✿.
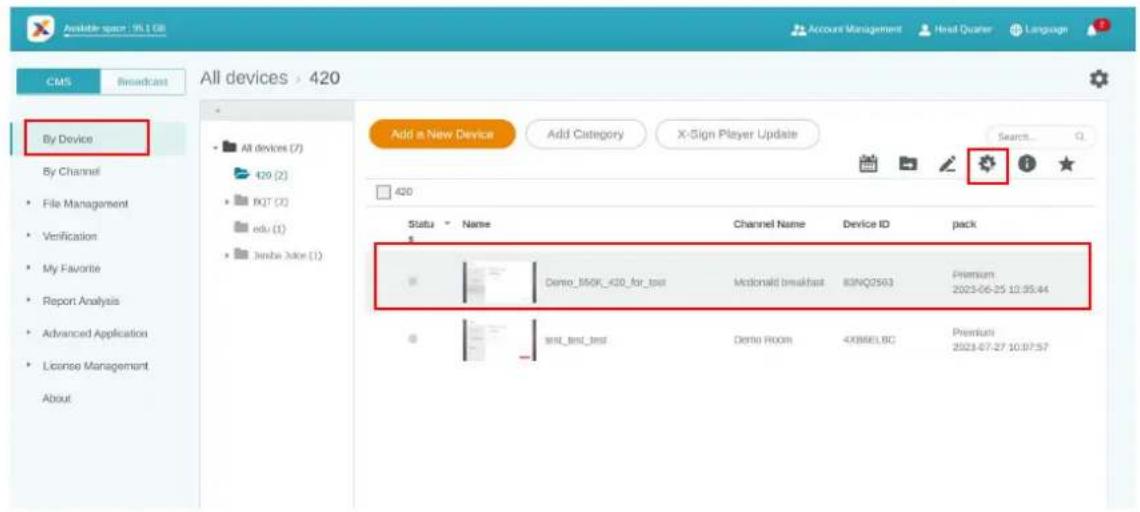
- You will see the Device control page. You can control Device status/Screen/Power/Voice/Others (Clear Data).
![Analog space : 85.1 OR CMS Broadcasts All devices > 420 By Device By Channel File Management Verification My Favorite Report Analysis Advanced Application License Management About Device Control ( Device Name : Demo_550K_420_for_test ) Device status Offline (Last Synchronized 2019-12-17 12:00:27) Screen The screen can be turned on or off manually/automatically for power saving. Screen Preview Last Synchronized 2016-08 (23:12:45:48) Off Automatic switch mode Off Power After reboot, the system will log into X-Signs interface automatically. After reboot, please click [Refresh] or tap [FS] to reload. Package](/content/2026/05/804600/images/150ce30b94088c48a1570e290c593384107da7f14300eb7d0f6834d5e47aeb63.jpg)
- You have to reload this page after setting the device to get the latest status.
Updating device Player remotely
Watch demonstration video:

With X-Sign Manager, you can easily update X-Sign Player on your devices remotely.
I. Go to By Device, then click X-Sign Player Update.
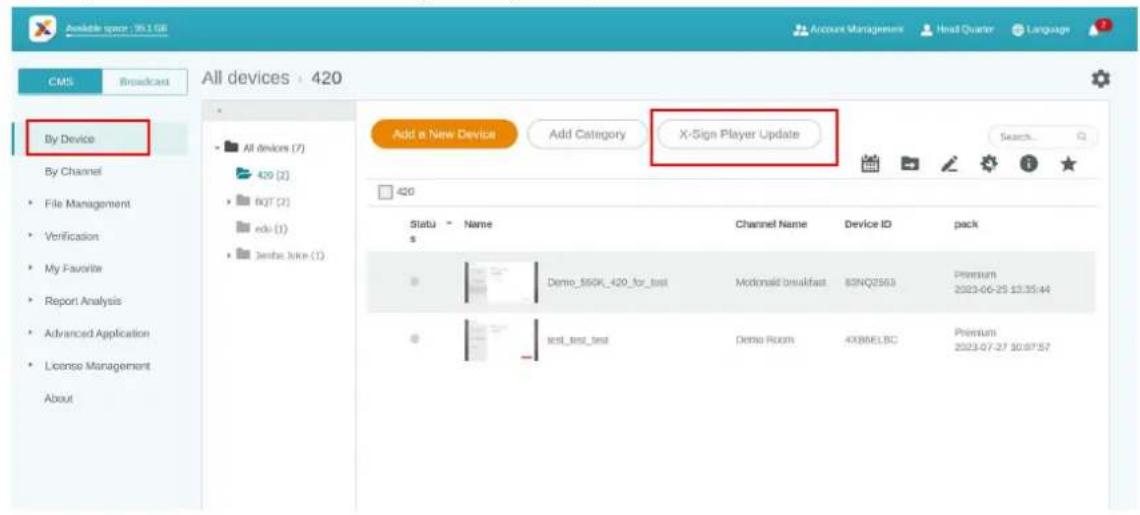
- You will see a list of devices available to be updated. Select the device(s) you want to update.
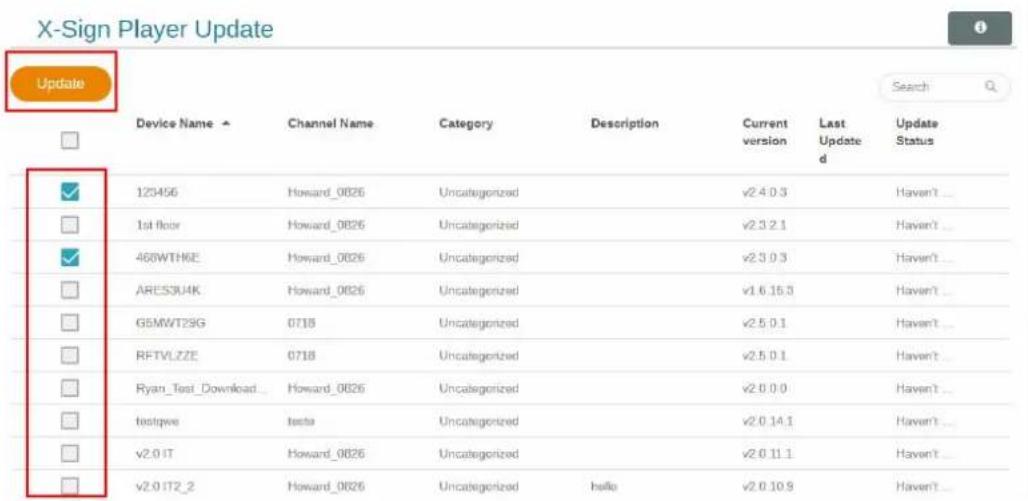
- During updating, the playing process will temporarily be stopped.
- After the device is updated successfully, it will be removed from the list. The device will be updated to the latest version of Player.
- If the device is offline, the system will wait until the device is online and send the update request.
- If you want to update Player, you have to reboot the device or the device can't play content normally. Go to Device control page and press Reboot under Power. Refer to Controlling the device remotely on page 32 for more information.
Managing the calling system
I. To manage the calling system, select Advanced Application > Calling System.
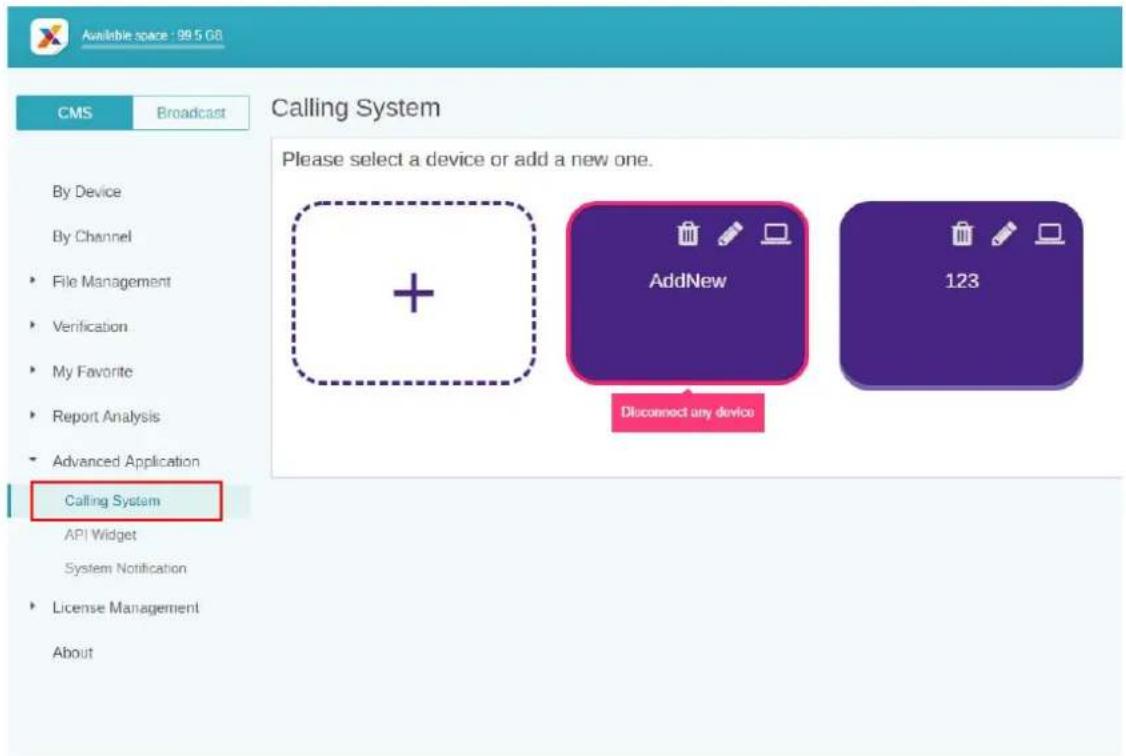
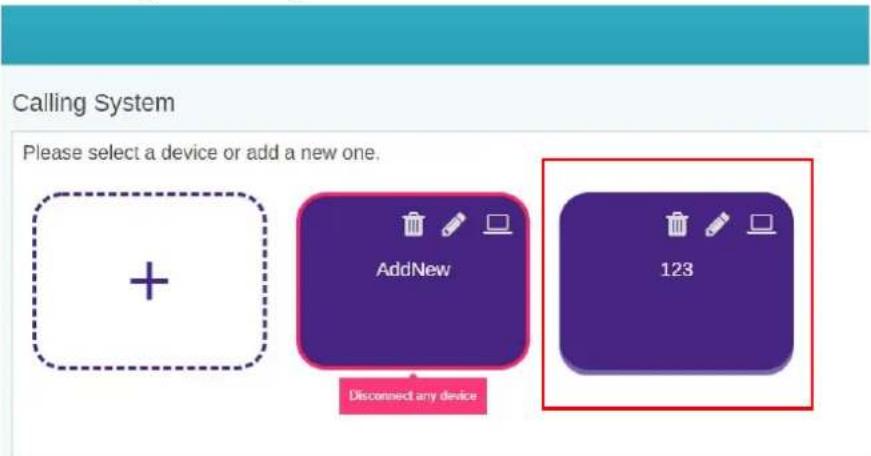
- Click the panel to manage the calling number.
- Enter the corresponding number on the queuing widget in X-Sign Designer for the panel and click Next.
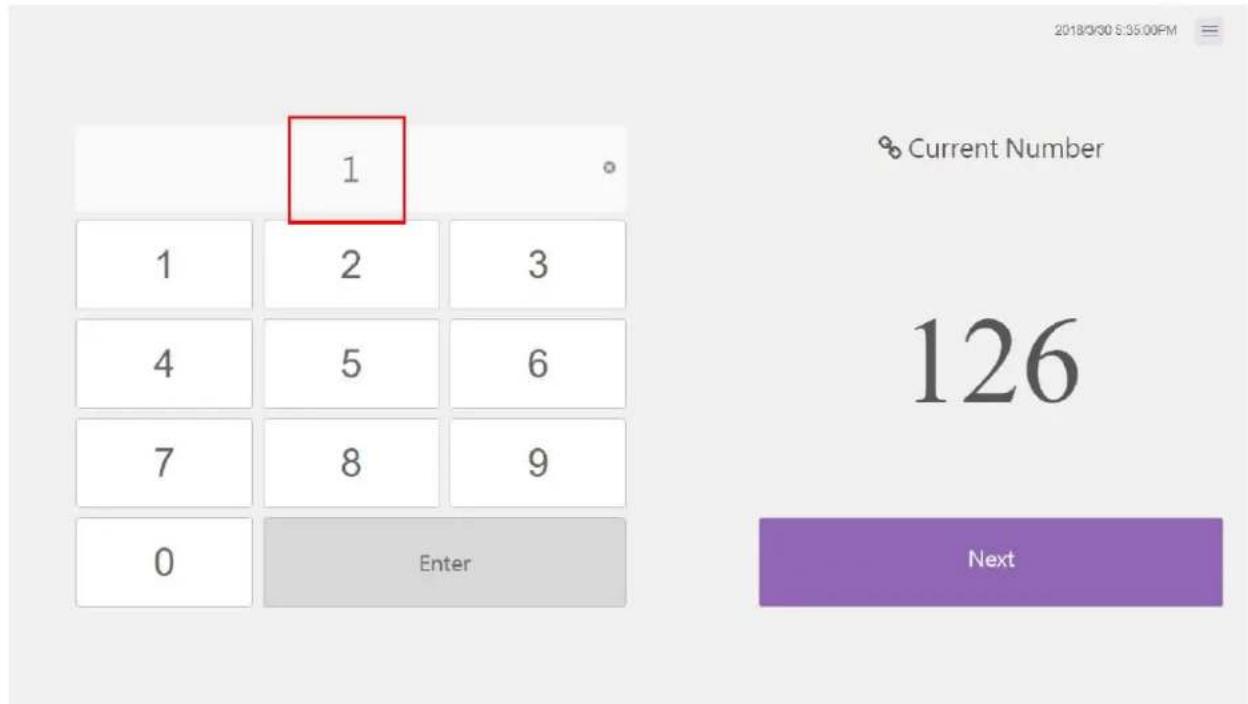
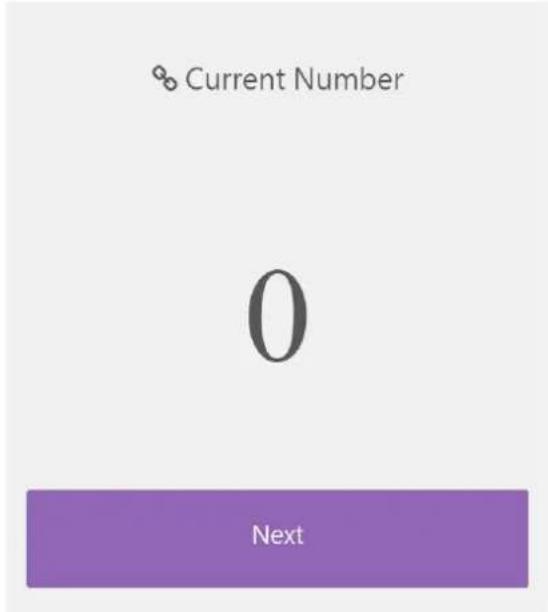
- The current number to the panel is shown on the screen.
Current Number
127
Next
- You can also edit the number by clicking other function buttons alert sound, there will be a sound when the number changed.

. By selecting Setting
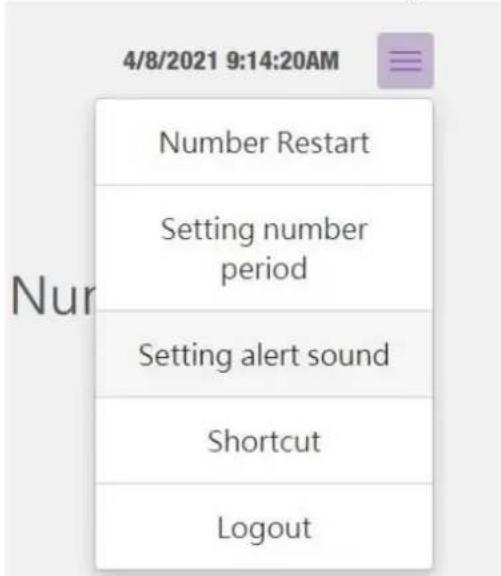
- To restart the queuing number, select Number Restart and click OK.
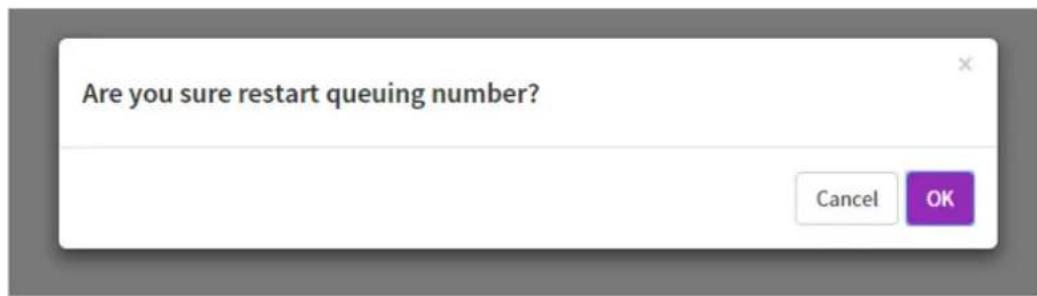
- The queuing number is restarted.
- To set the period for the next queuing number, select Setting number period, input the number, and click OK.
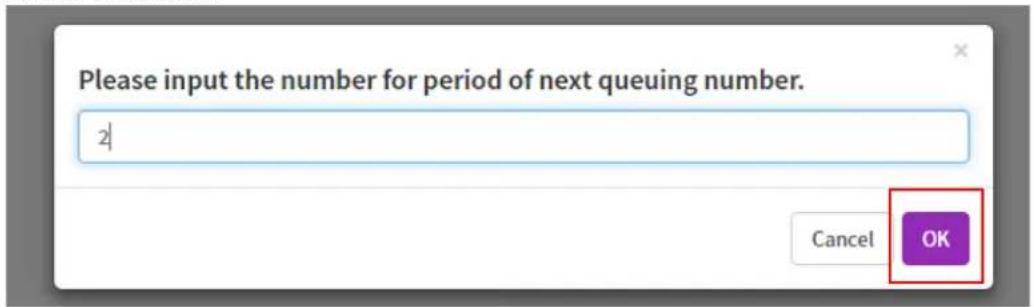
- The number period is set.
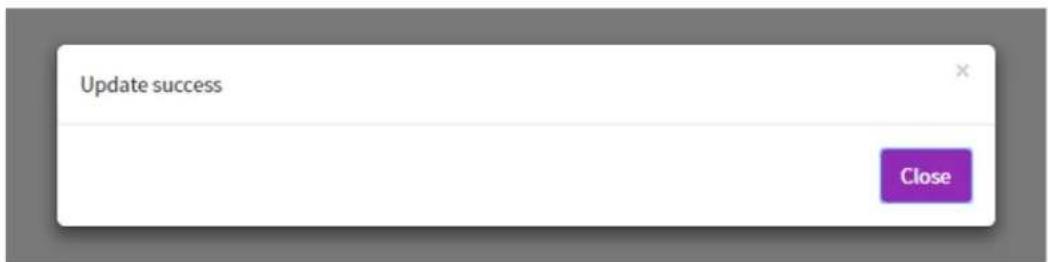
- Select Shortcut for more information about how to add a shortcut to the desktop.
II. To log out, select Logout and click OK.
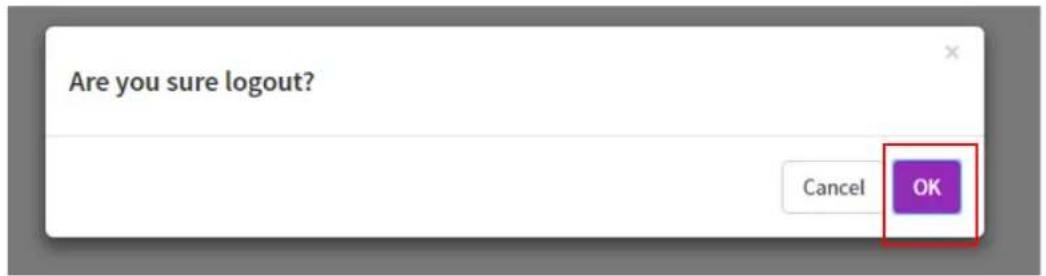
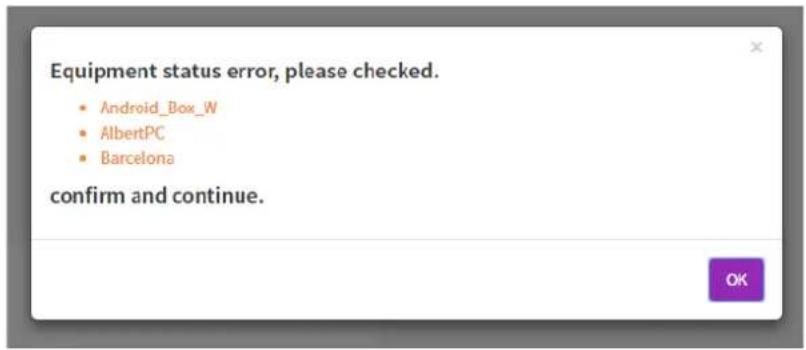
Note:
"Equipment status error" message occurs when the equipment is not online.
Creating an API table in X-Sign Manager
I. To create an API table, select Advanced Application > API Widget.
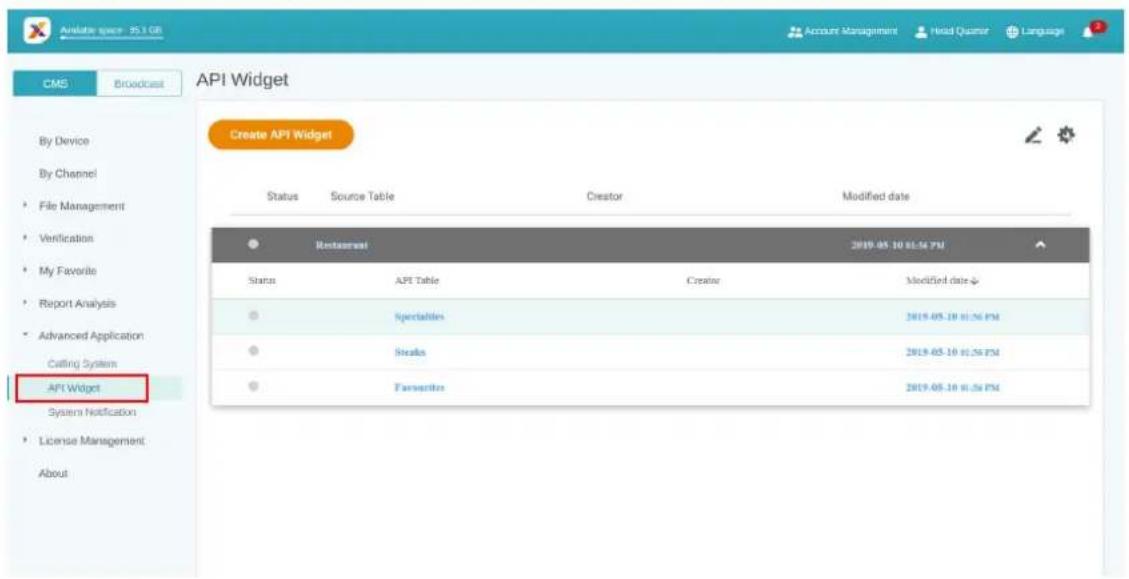
2. Create the API Widget configuration.
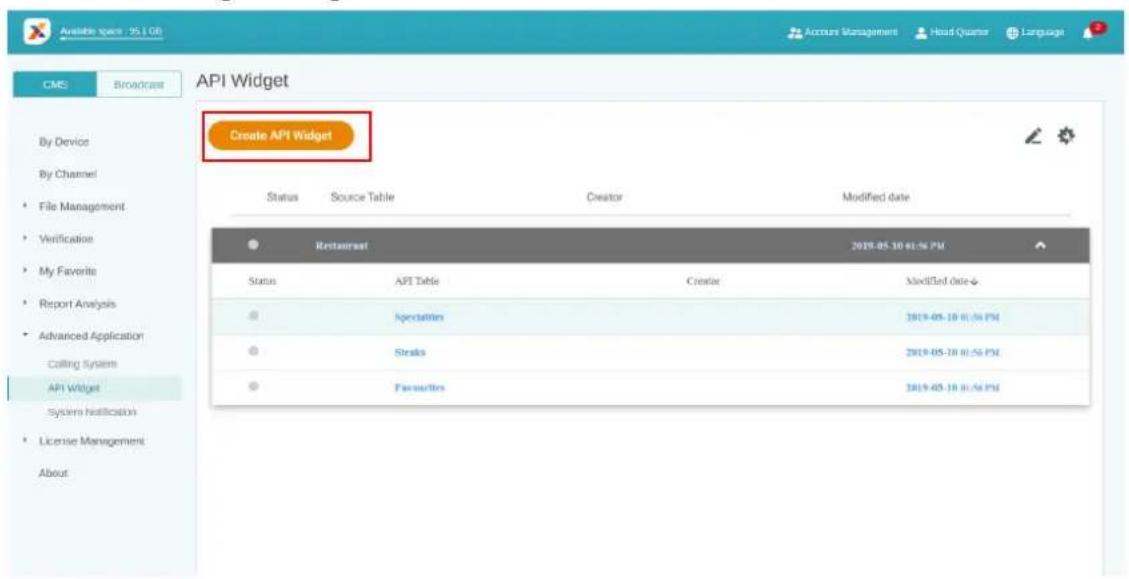
- Enter the settings of the configuration.
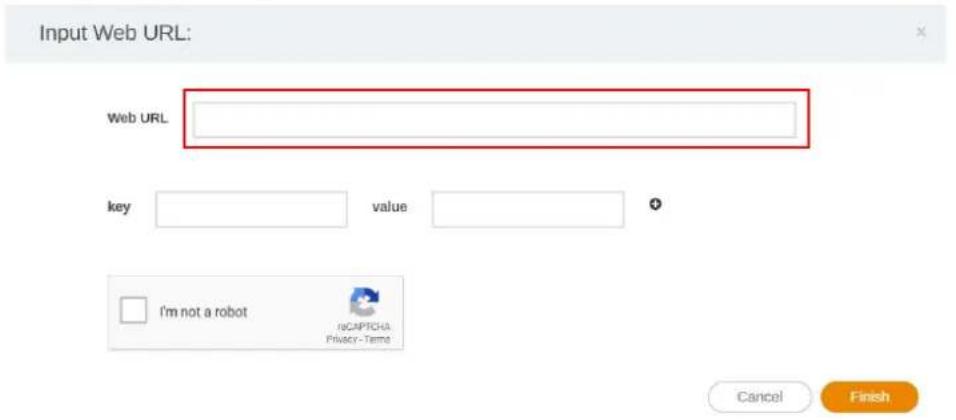
- Create a source table for API.
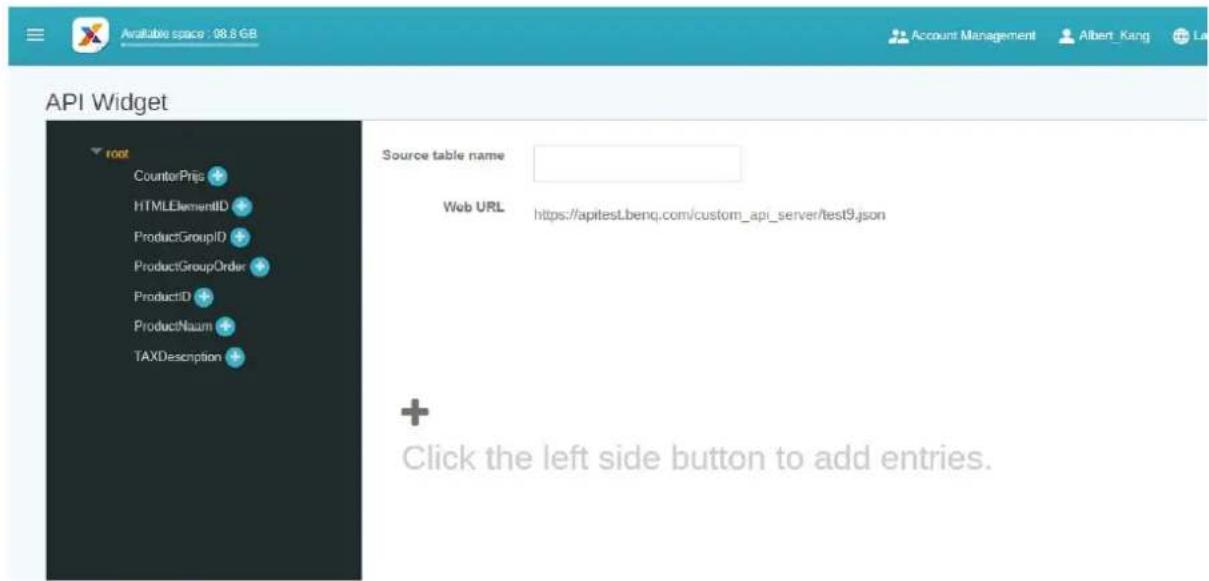
- Select the tags from Json to the source table. Click Save to continue the creating process.
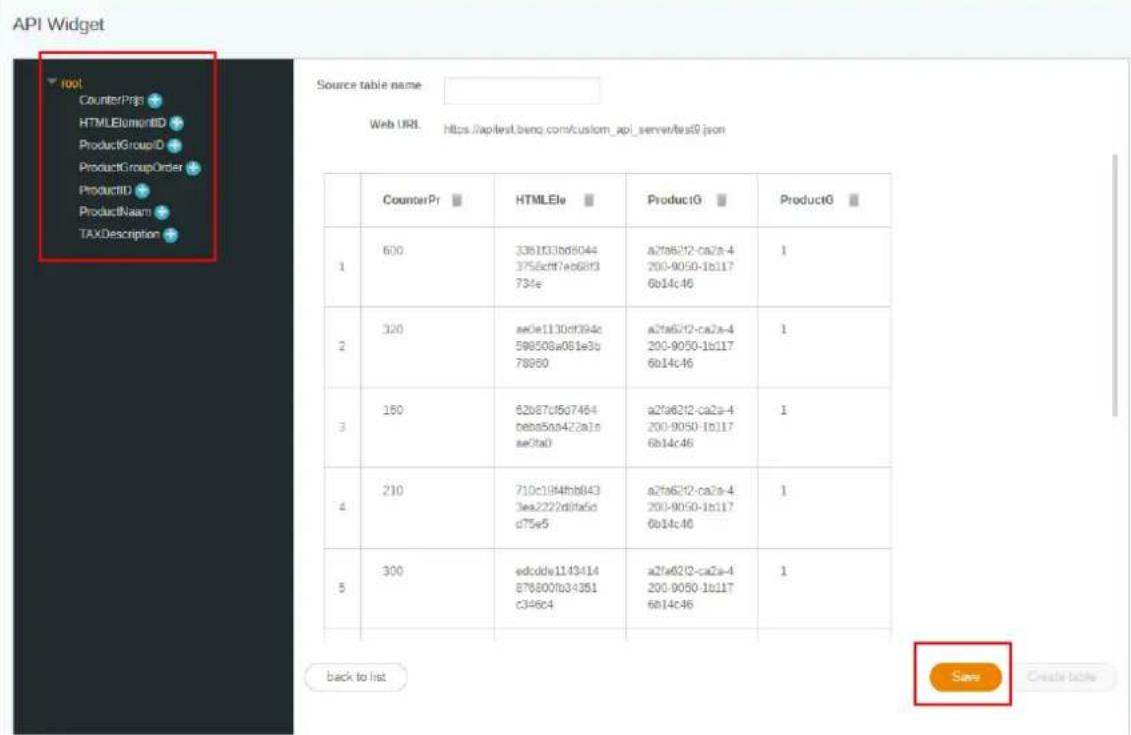
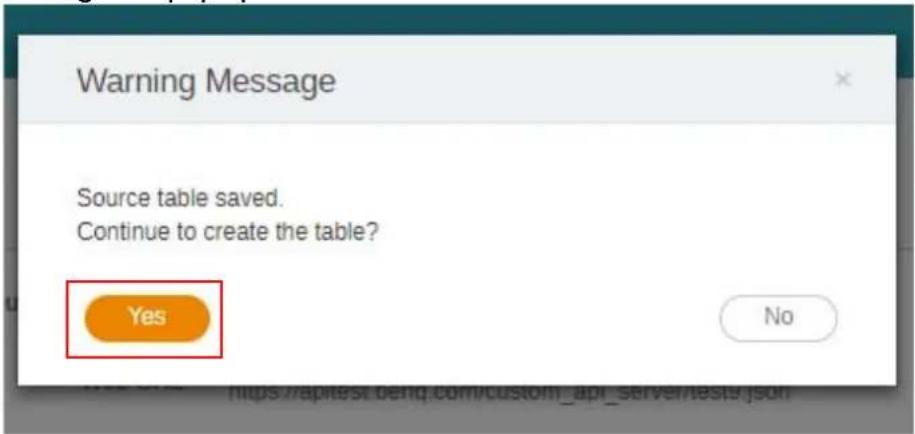
- A warning message will pop up. Click Yes to continue.
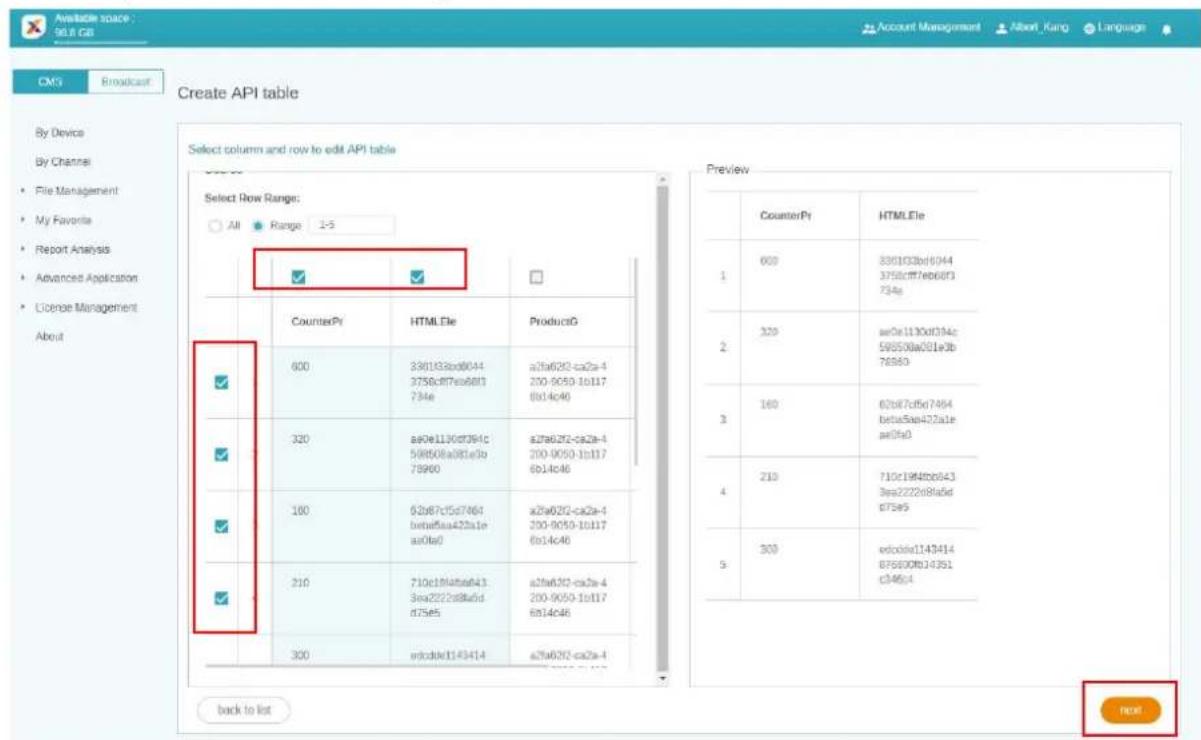
- You can preview the selected range of the table. Click next to continue.
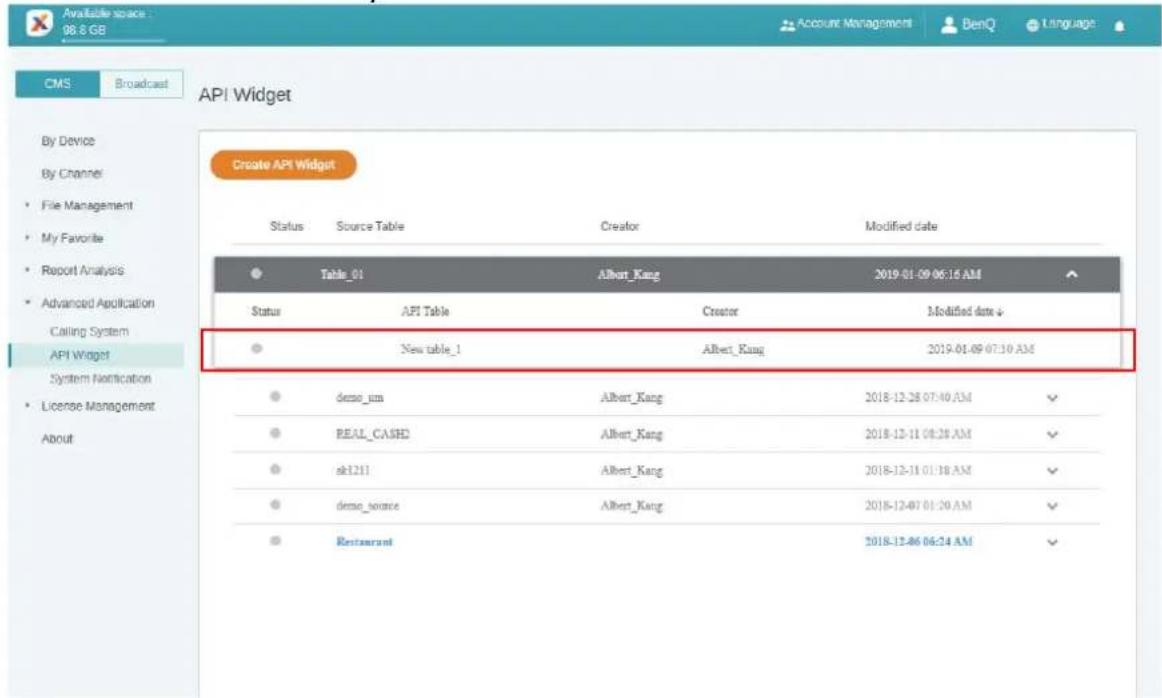
8. The source table is successfully created.
Setting Verification
Watch demonstration video:
Verification in X-Sign Manager functions to control content and schedules to be played on X-Sign Player.
Files
Before a file is delivered publicly, it has to be checked by the administrator. Only when the administrator clicks Approve can the file be added to the schedule.
To verify a file:
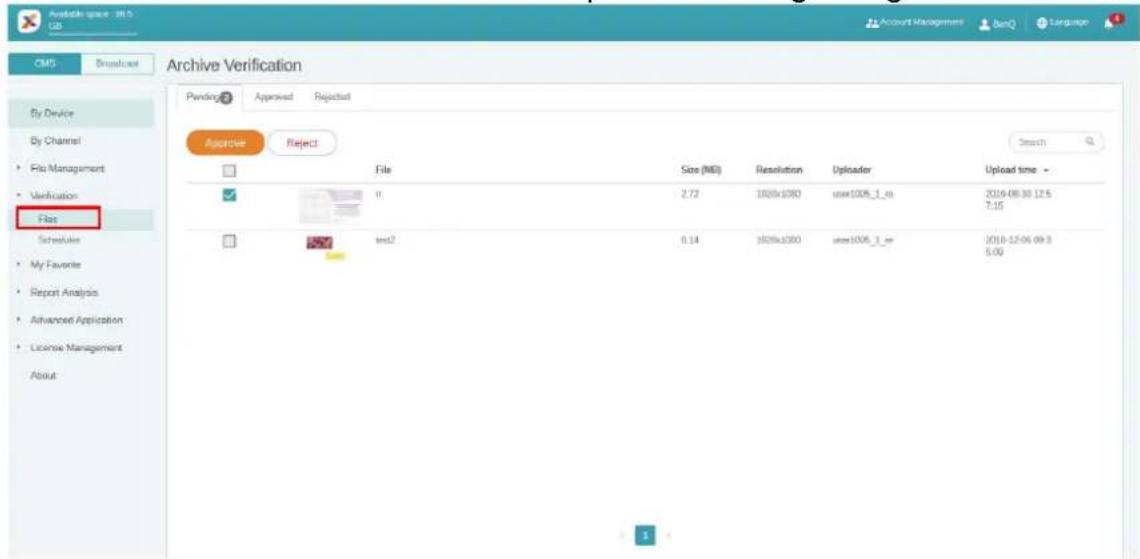
I. Go to Verification > Files to check the files uploaded via X-Sign Designer.
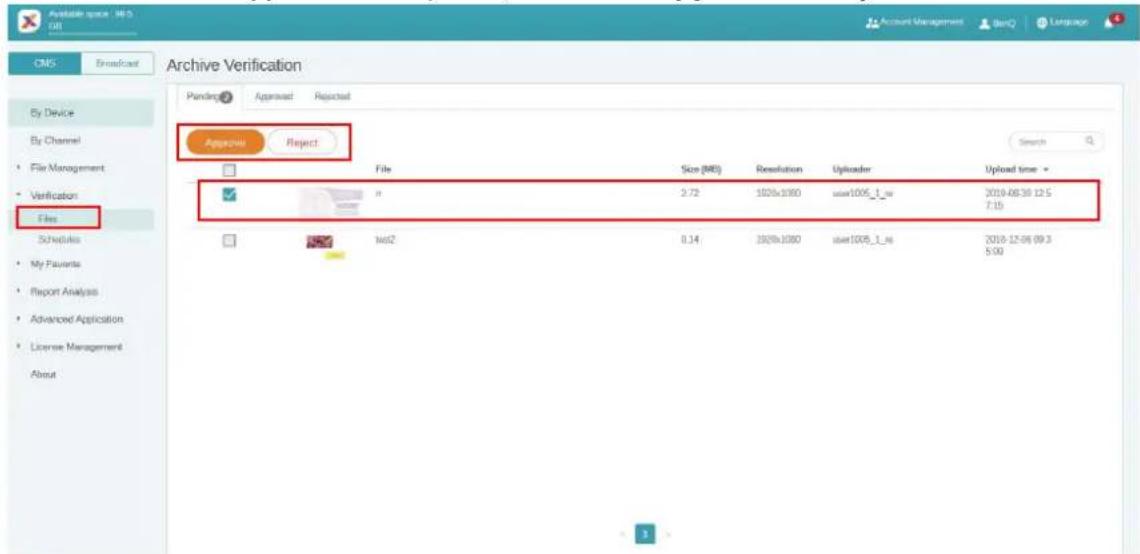
2. Select the file to be approved or rejected, then click Approve or Reject.
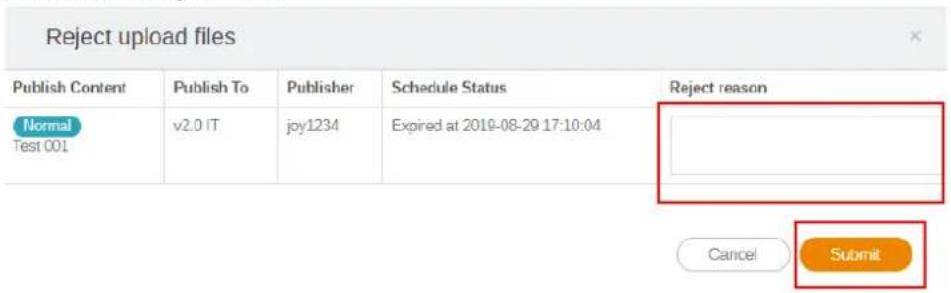
3. You need to fill in the reason you reject the file to be added to the schedule. This is a required field. Click Submit to proceed.
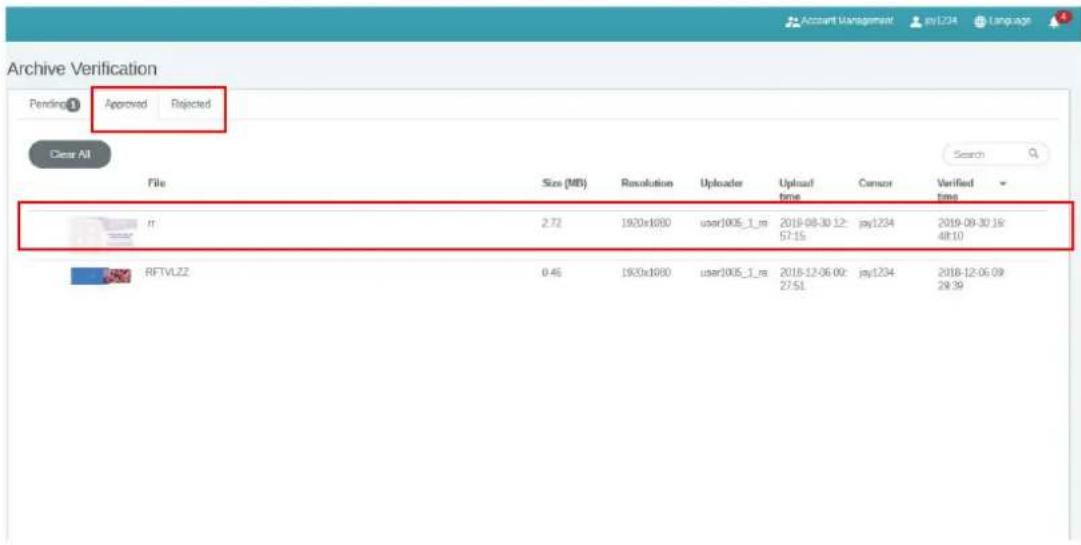
- The file now is under the approved (or rejected) section.
Schedules
After a scheduled time is set, it has to be checked by the administrator. If the scheduled time is not appropriate, the administrator can reject the schedule. Only when the administrator clicks Approve can the file be played at the scheduled time on X-Sign Player.
To verify a schedule:
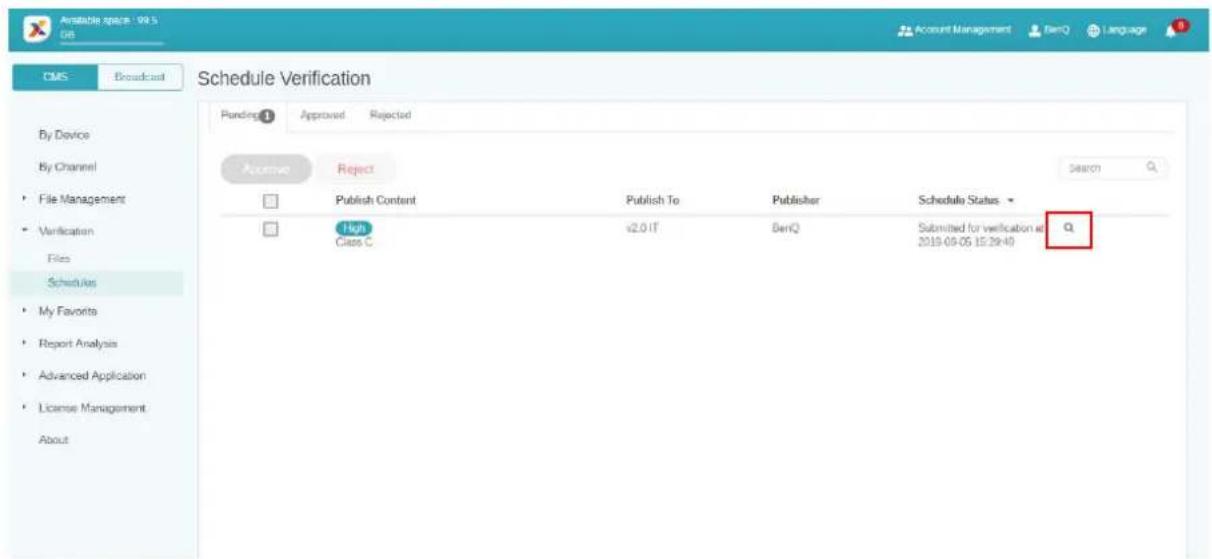
I. Go to Verification > Schedules to check the schedule(s).
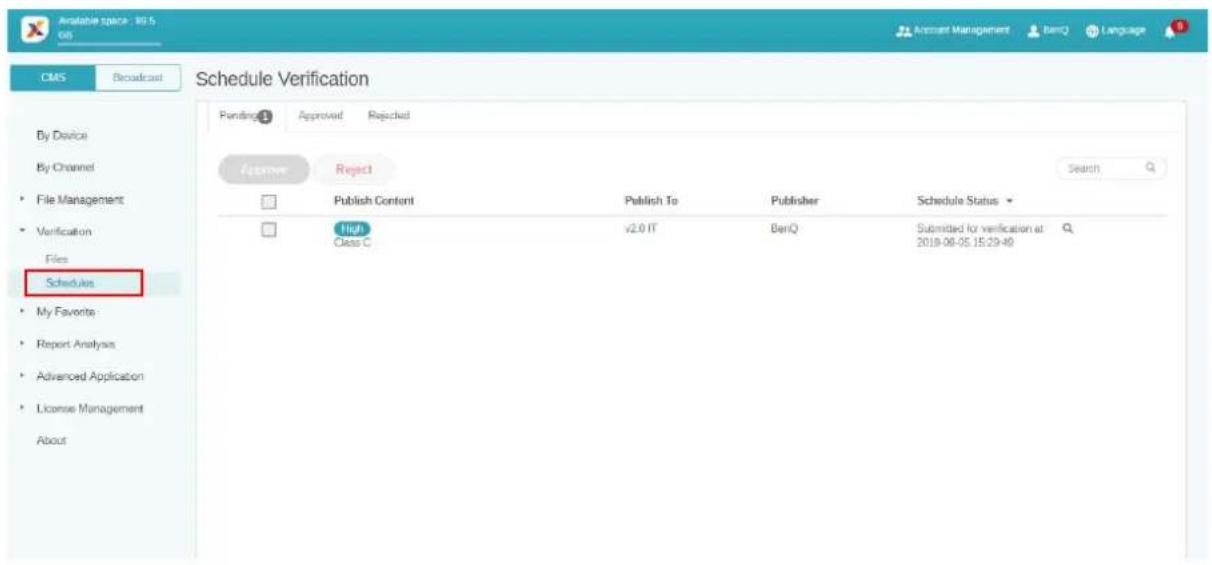
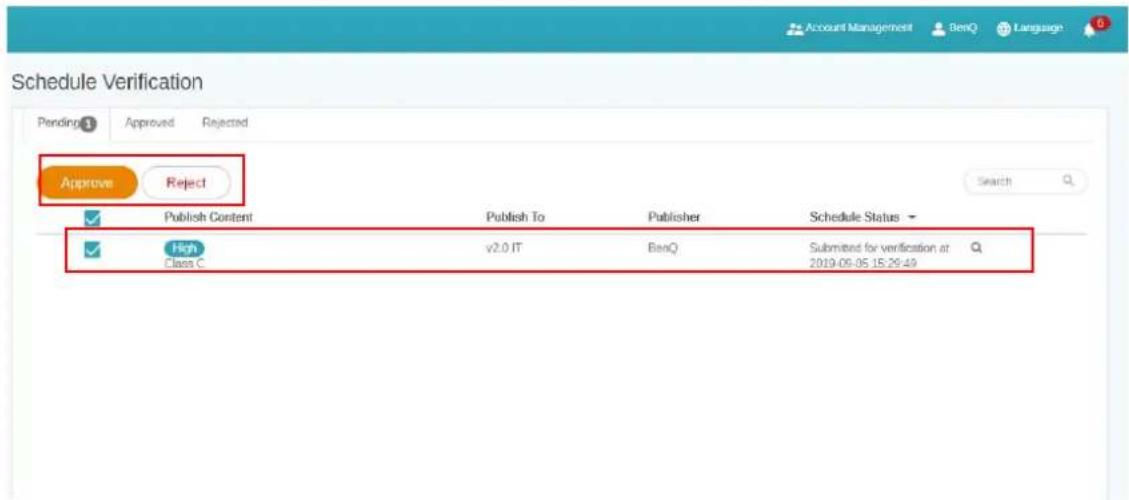
- Select the schedule to be approved or rejected, then click Approve or Reject.
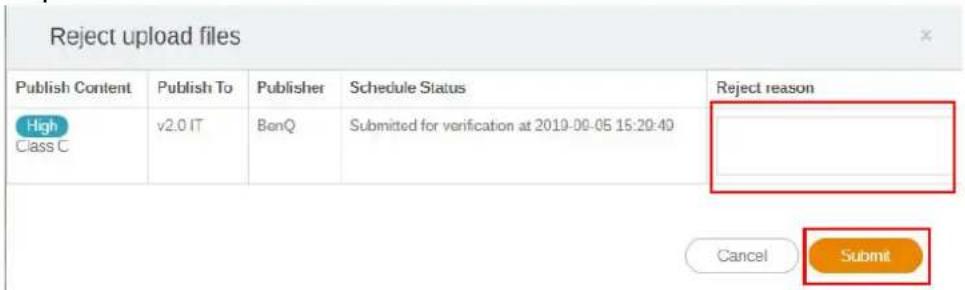
- You need to fill in the reason you reject the scheduled time. This is a required field. Click Submit to proceed.
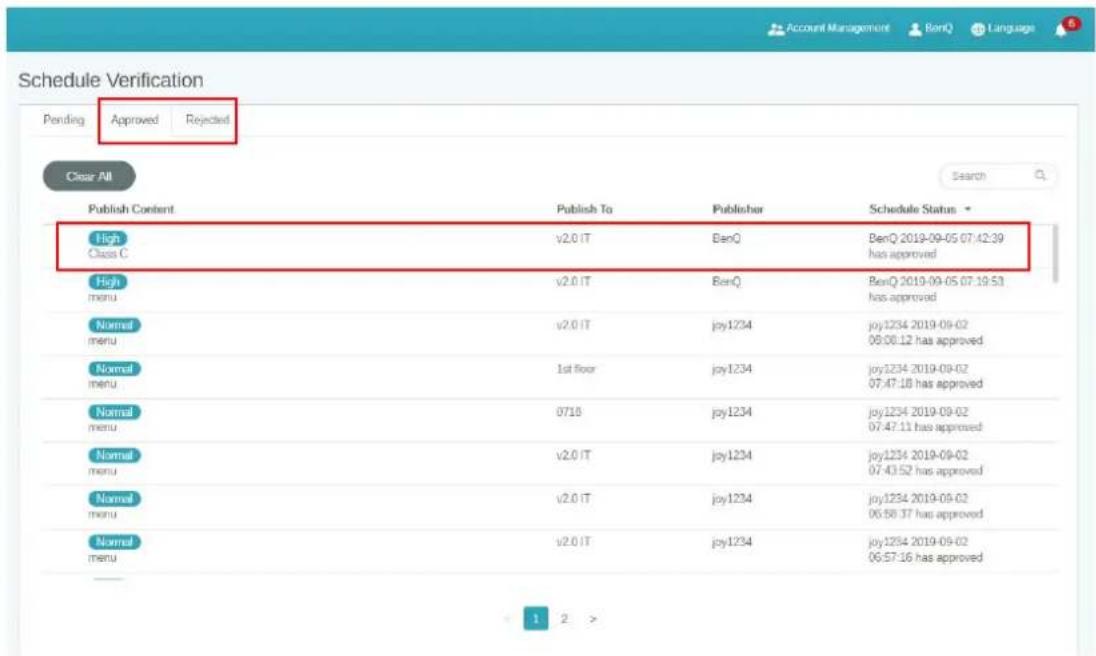
- The file now is under the approved (or rejected) section.
- You can click to preview the file uploaded from X-Sign Designer.
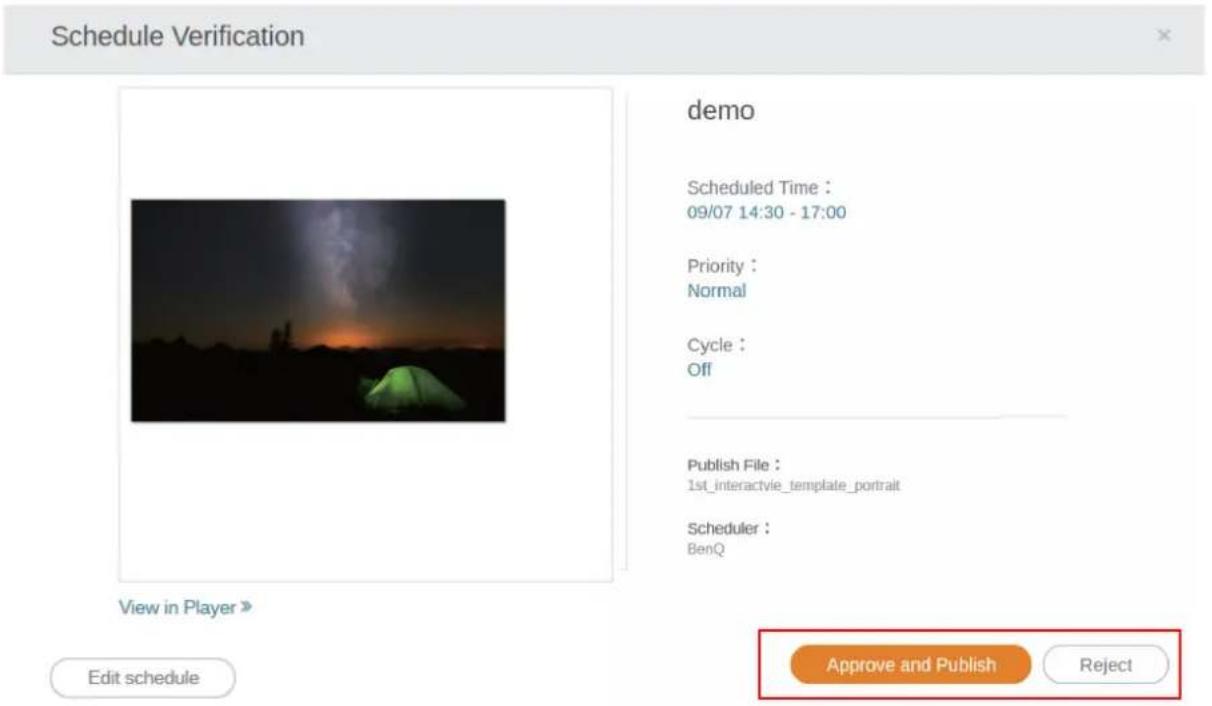
- You can view the file on X-Sign Player and edit schedule. Click Approve and Publish or Reject to proceed.
Getting the system notification
I. Go to Advanced Application > System Notification.
2. Enable System Notification.
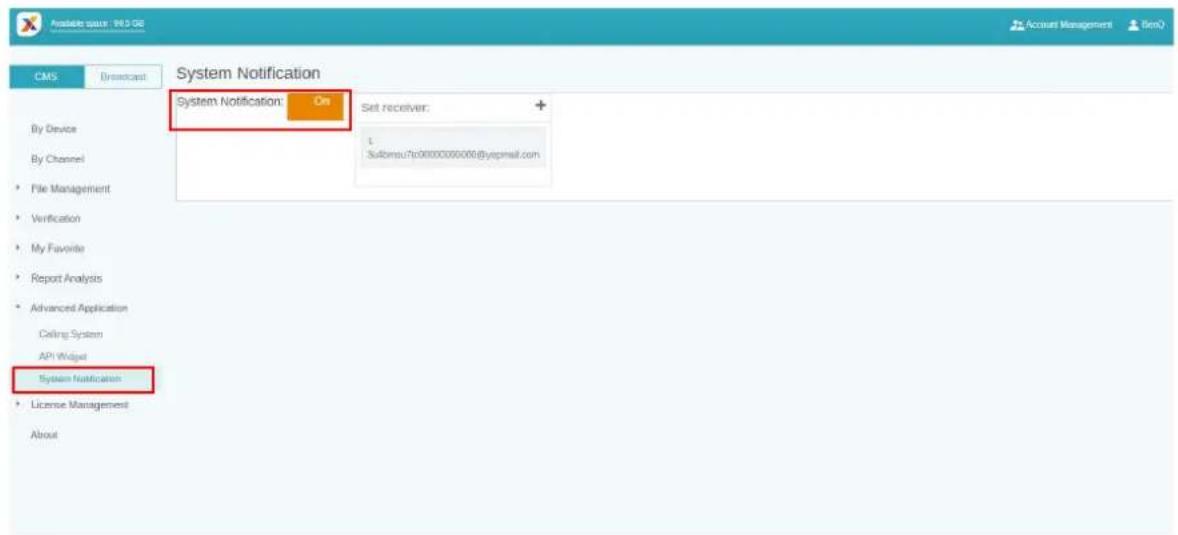
Then you will get notice when your device is under the following situations.
- When the device time can't sync with the Manager system time, the device can't play content normally.
a. It is highly recommended you enable auto time sync service on your device.
b. Make sure to set the same location on both Manager and the device.

[X-Sign System Notice] Unable to play due to unusual device status

Please kindly be advised that your device(s) with current schedule are in the abnormal status now and may be not able to play the content correctly.
Device name

Category
Uncategorized
Device status
Error - Time Error
Regards,
X-Sign Manager Service Team
- When the device is under schedule but not online, the device can't play content normally.
![[X-Sign System Notice] Unable to play due to unusual device status Dear BenQ, Please kindly be advised that your device(s) with current schedule are in the abnormal status now and may be not able to play the content correctly. Device Name Category Device status Uncategorized Offline Regards, X-Sign Manager Service Team](/content/2026/05/804600/images/552ae6ed3c71869c135b819b5fa907d95d150f4044fbf11ad2948ca6bcae781c.jpg)
• The device license is going to expired.


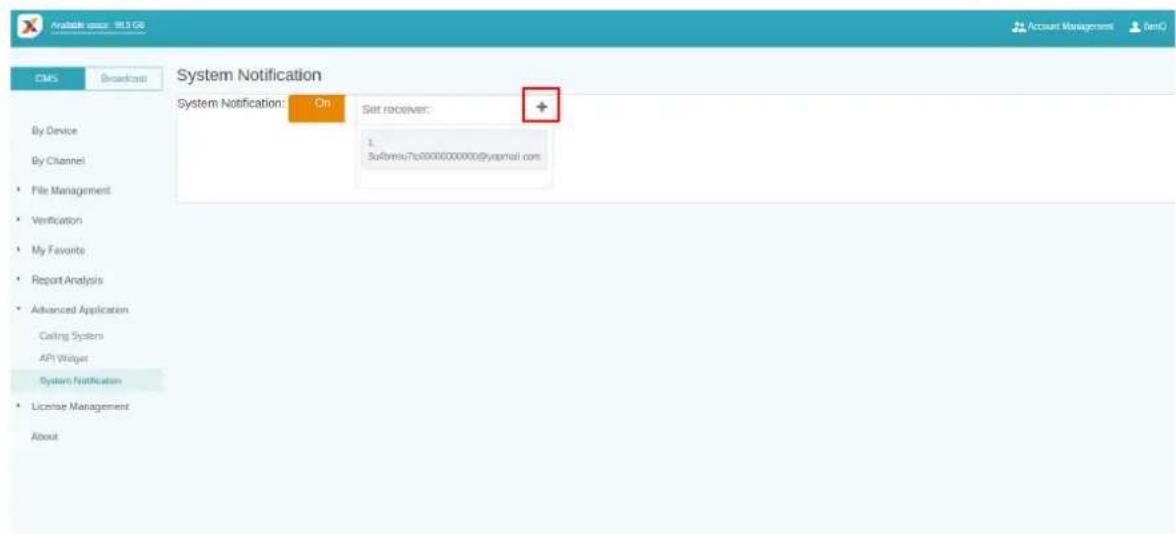
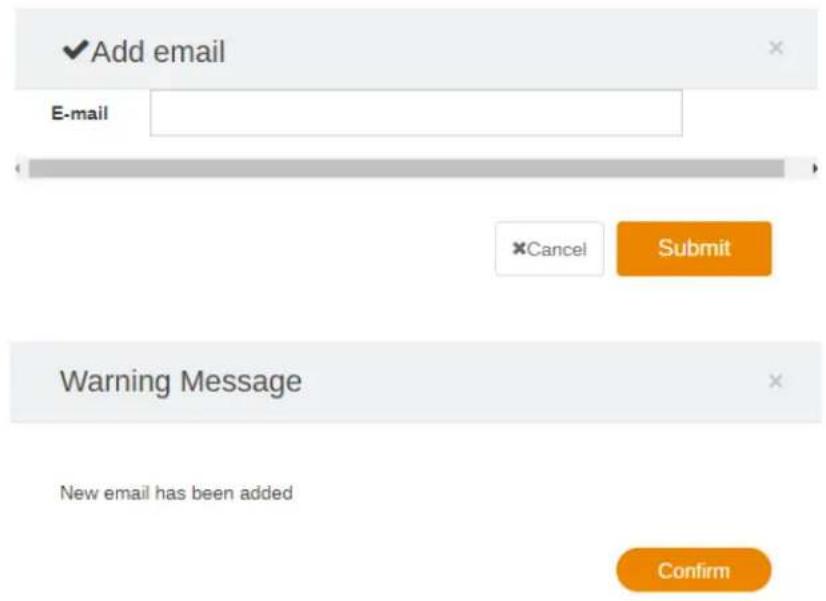
- Press + to add more receivers. The default will be the administrator only.
Updating device status immediately
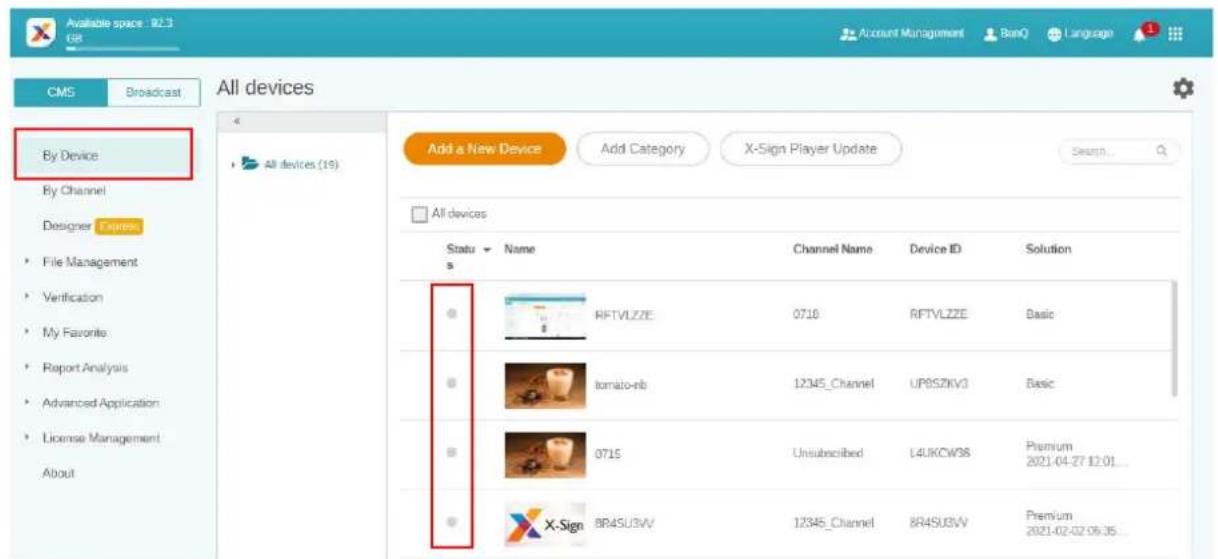
The pages on X-Sign Manager will automatically do partial refresh if device status changes. Below are three parts that will do partial refresh automatically:
I. Active status of device: Go to By Device, the online/offline status will be shown automatically on the page.
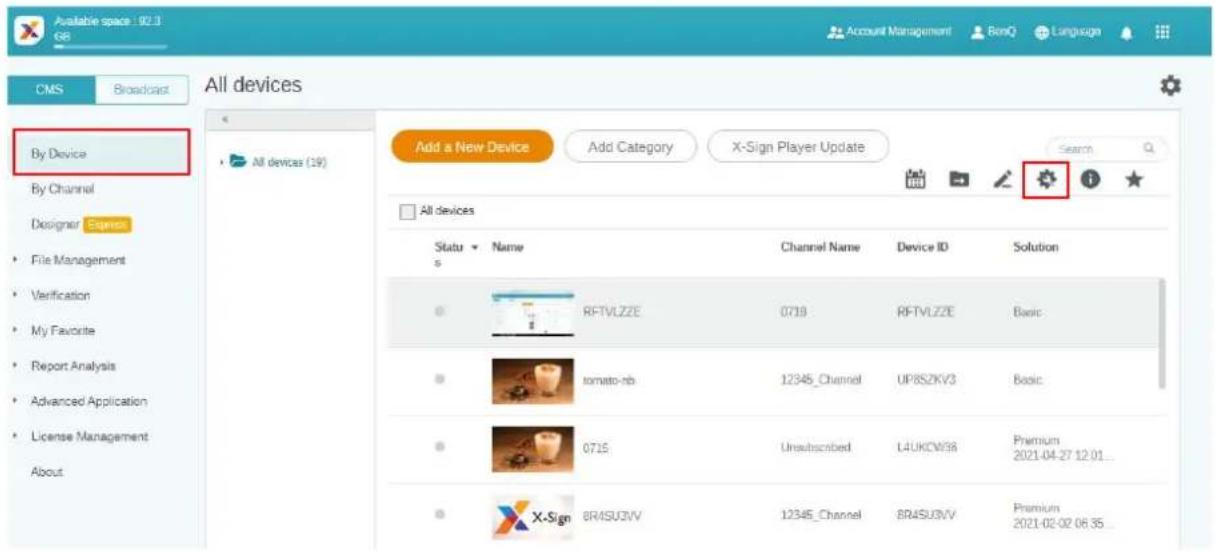
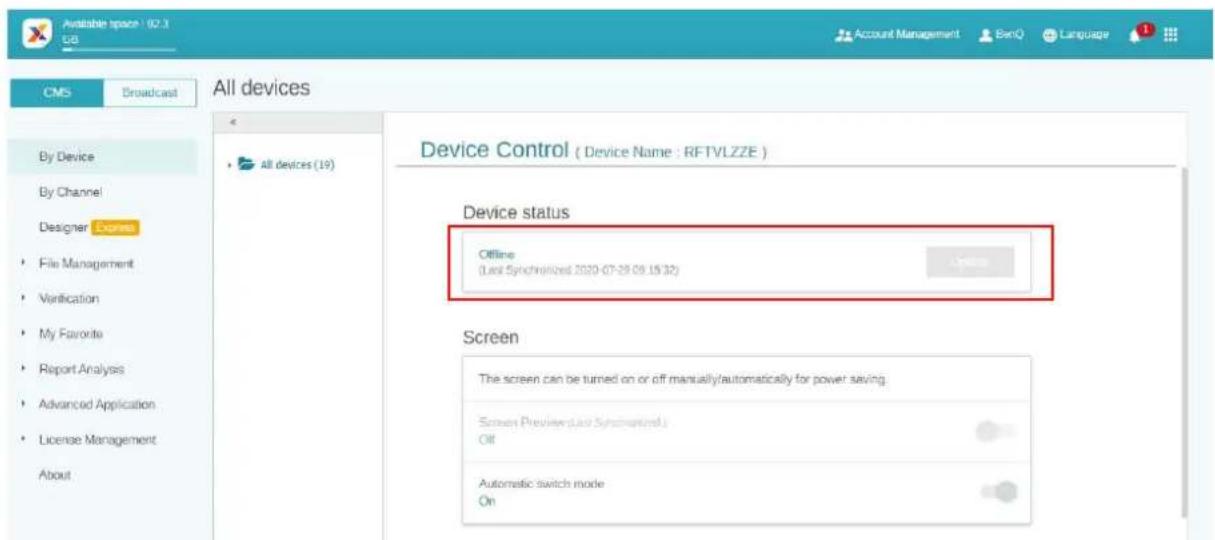
- Status of device control: Go to By Device, select the device you want to see the status, and click the online/offline status will be shown automatically on the page.
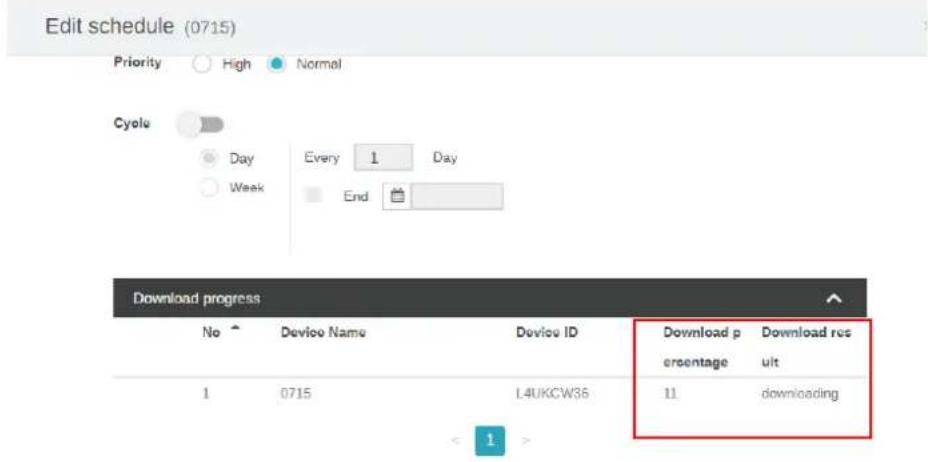
- Schedule downloading progress: Download percentage and result will refresh automatically.
Player report (proof-of-play)
I. Go to File List, select a file, and click .
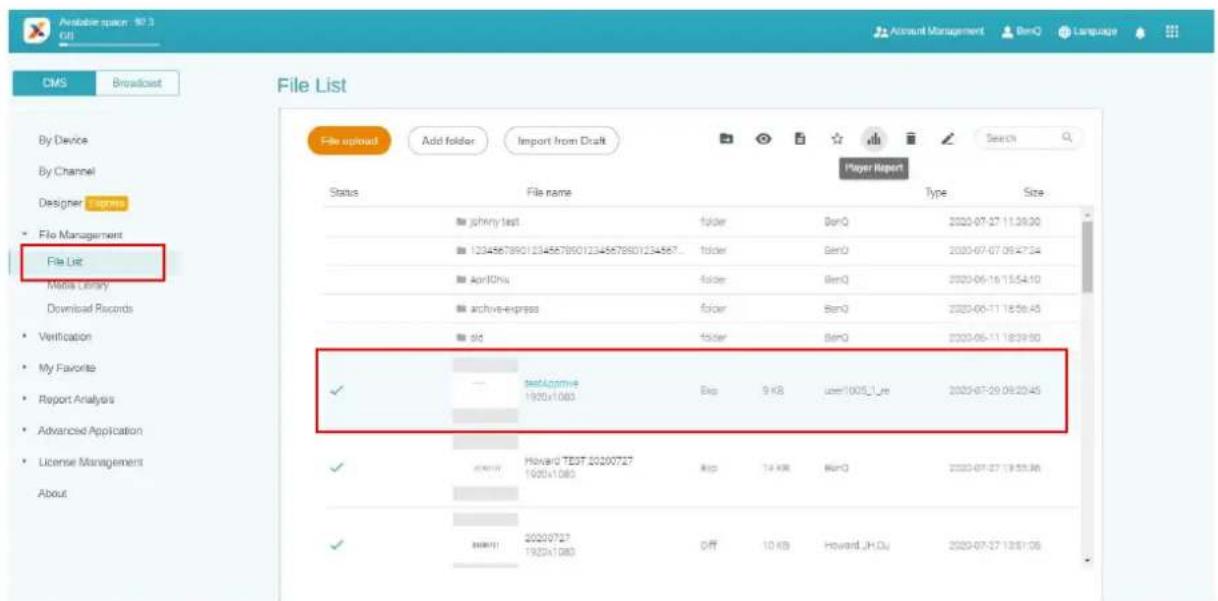
2. X-Sign records the playback history of each file on each device. Click Export, then the Player report is exported as an .xls or an .xlsx file type.

Using Designer Express
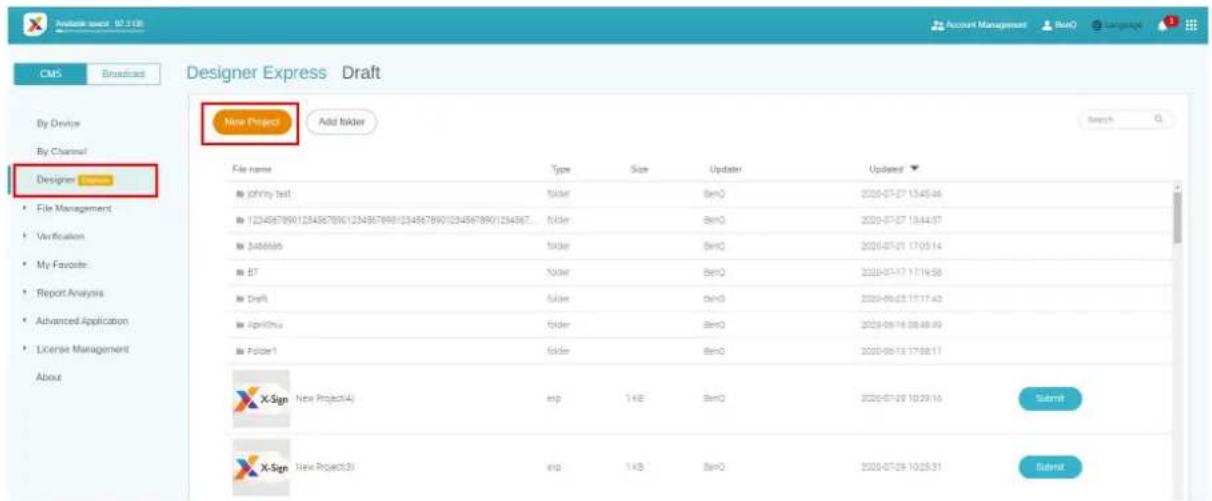
I. All the projects you create with Designer Express will store in the draft list. Media Library, which store the assets, can accelerate your design. Click New Project to go to the designer express template editing page.
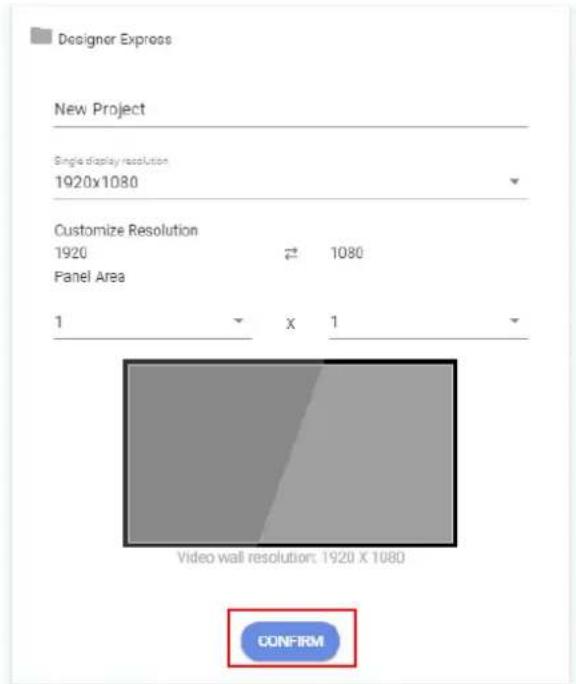
2. Click Confirm to proceed.
3. To add a new page, click +Add Page.
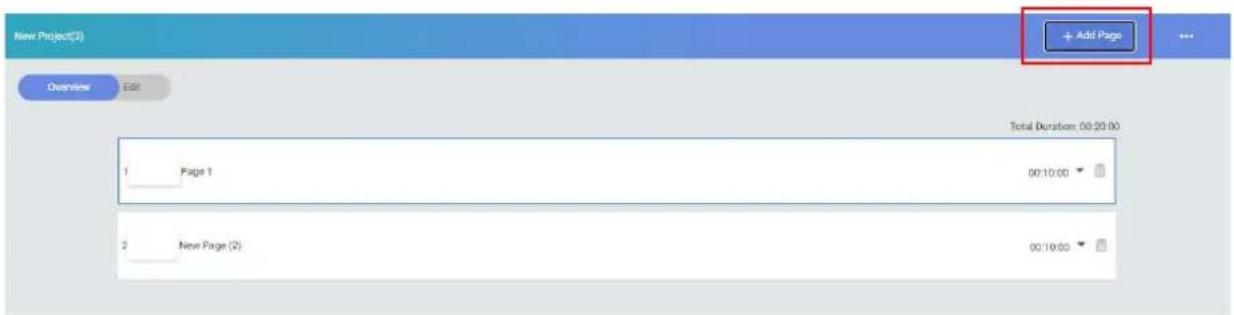
4. Add an image from Local File for the first page.
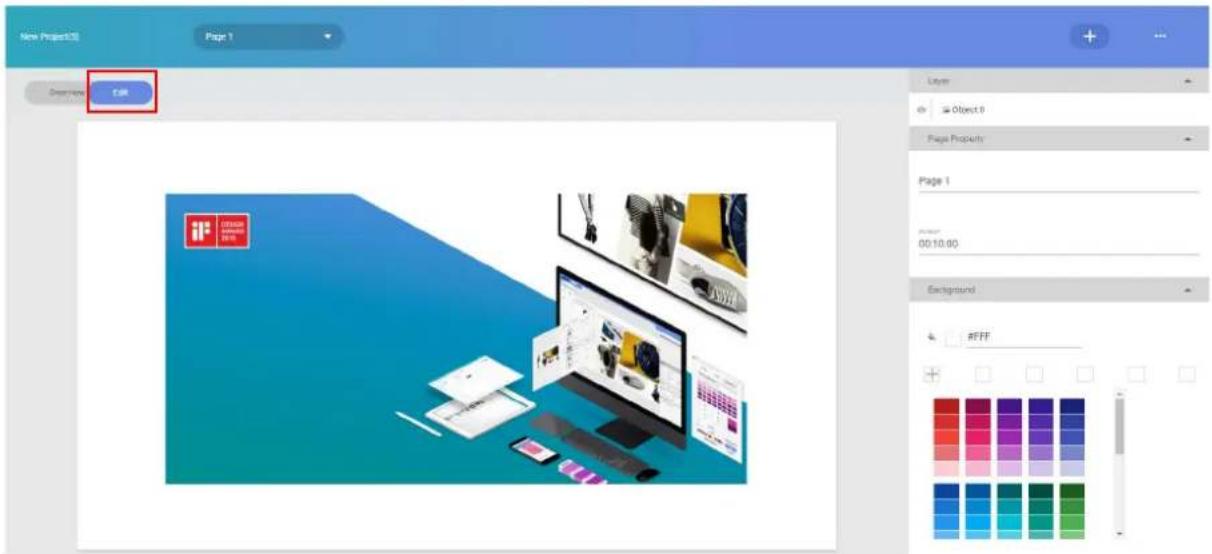
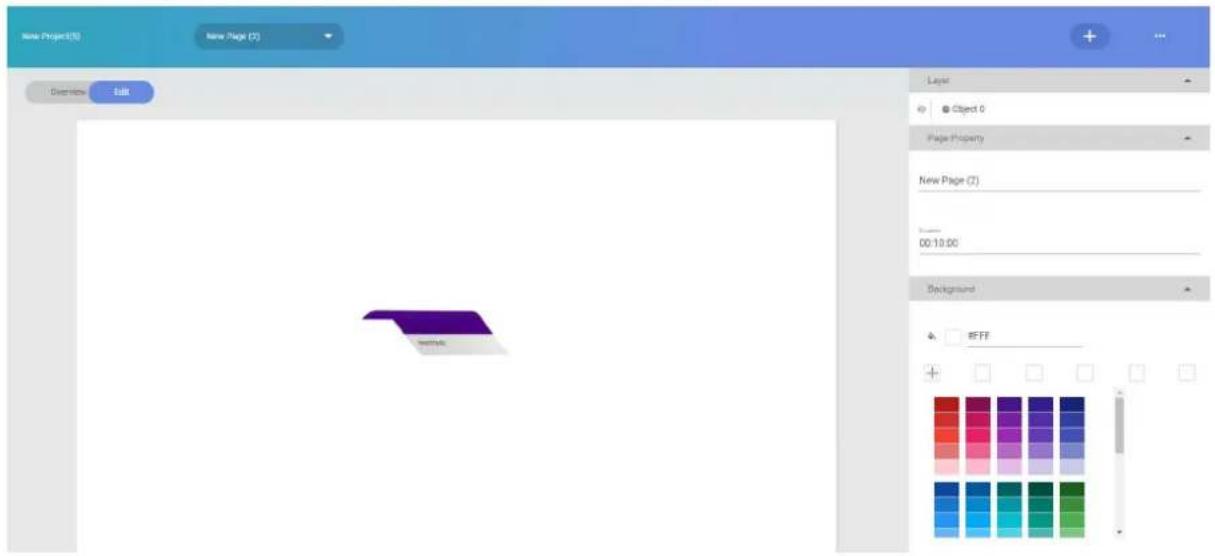
- Add an image from Media Library for the second page.
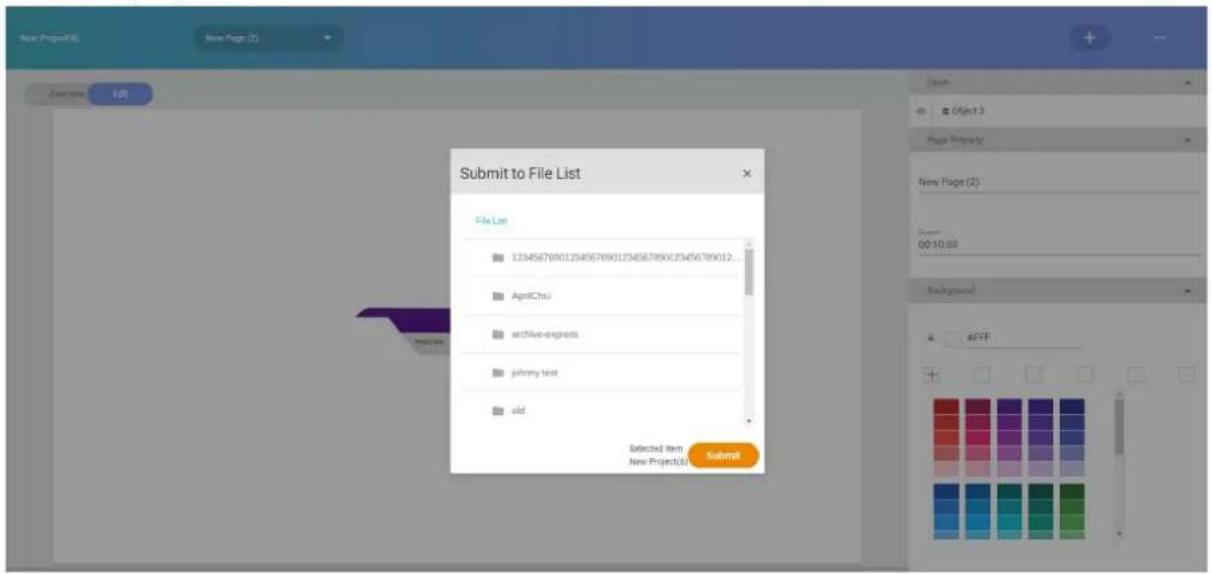
- Save this project in the draft list and submit to File List. Then, just wait for the admin's approval.
- The project you have just created will show the approval status on File List.
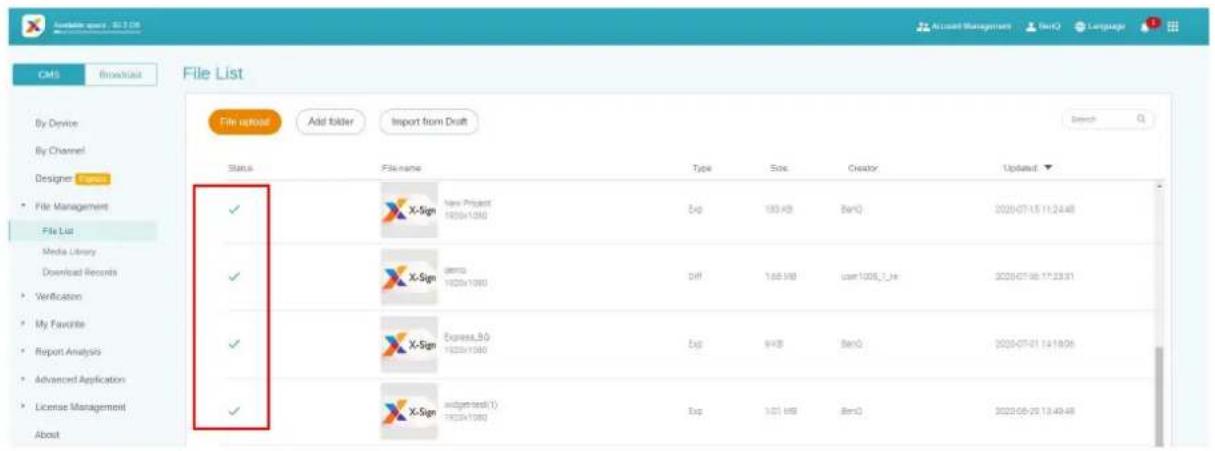
- Then, you can set the schedule with this project.
Designer
Creating a new project file in X-Sign Designer
Watch demonstration video:

In X-Sign Designer you can create your own project with customizable features.
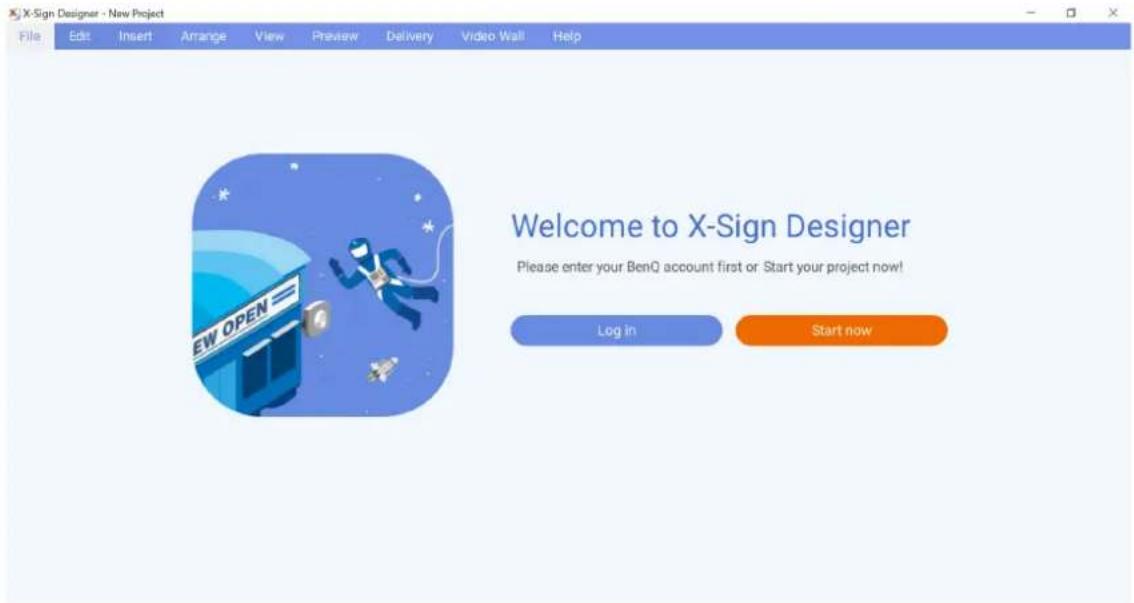
- By logging in the account, you can upload content on X-Sign Manager.
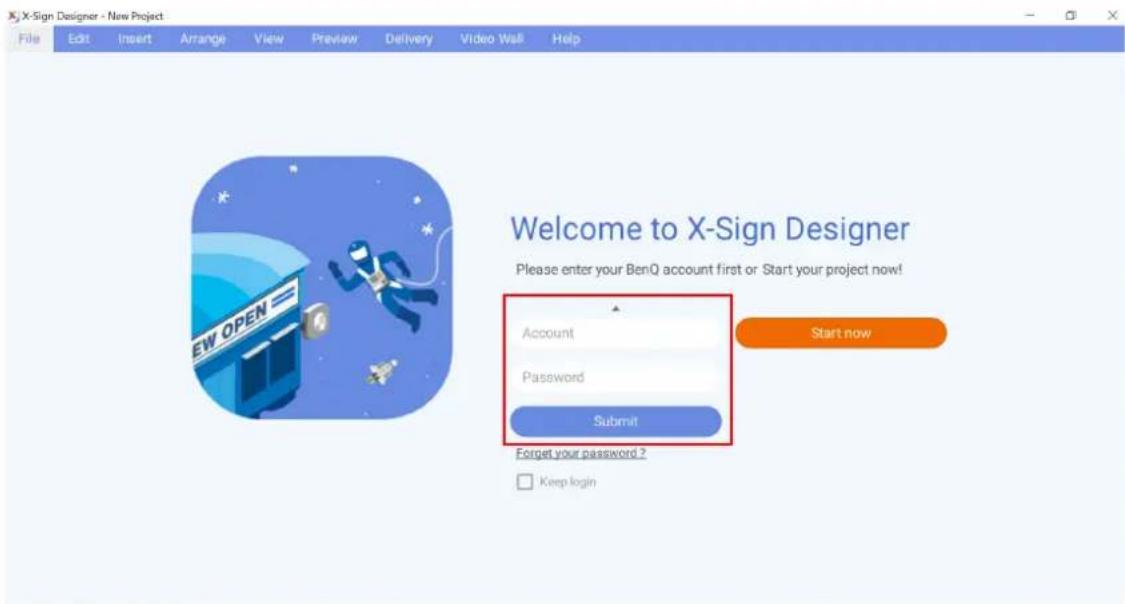
- You can also use X-Sign Designer without logging in the account by clicking Start now. You cannot upload content on X-Sign Manager only after logging in the account. Read Uploading your content from Designer on page 55 for more information.
To create a new project file in X-Sign Designer:
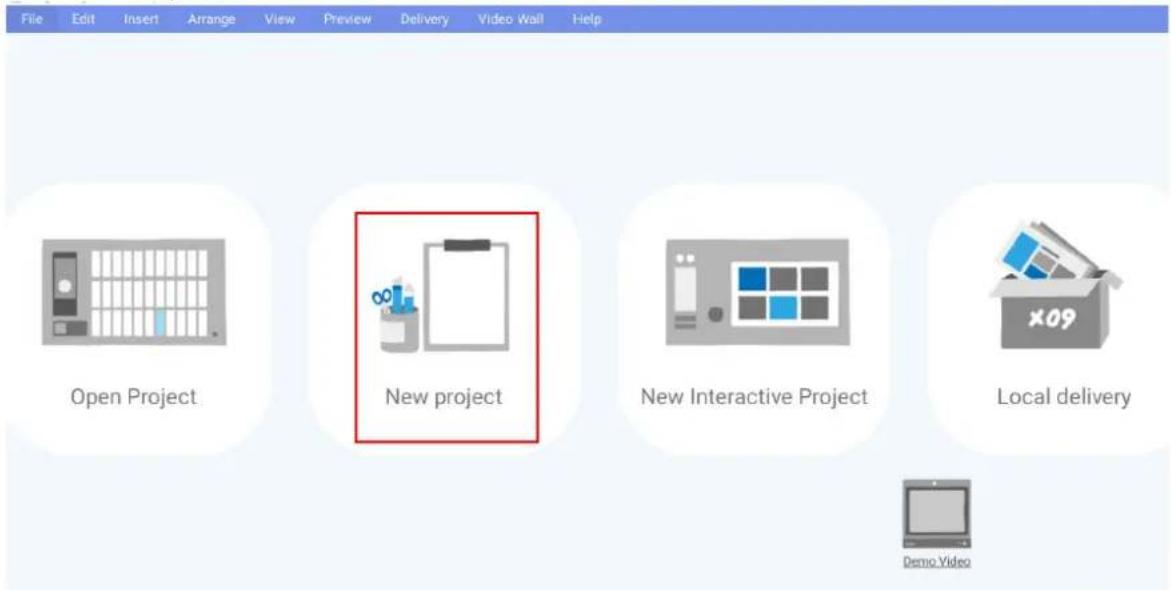
I. Launch the software and click New project.
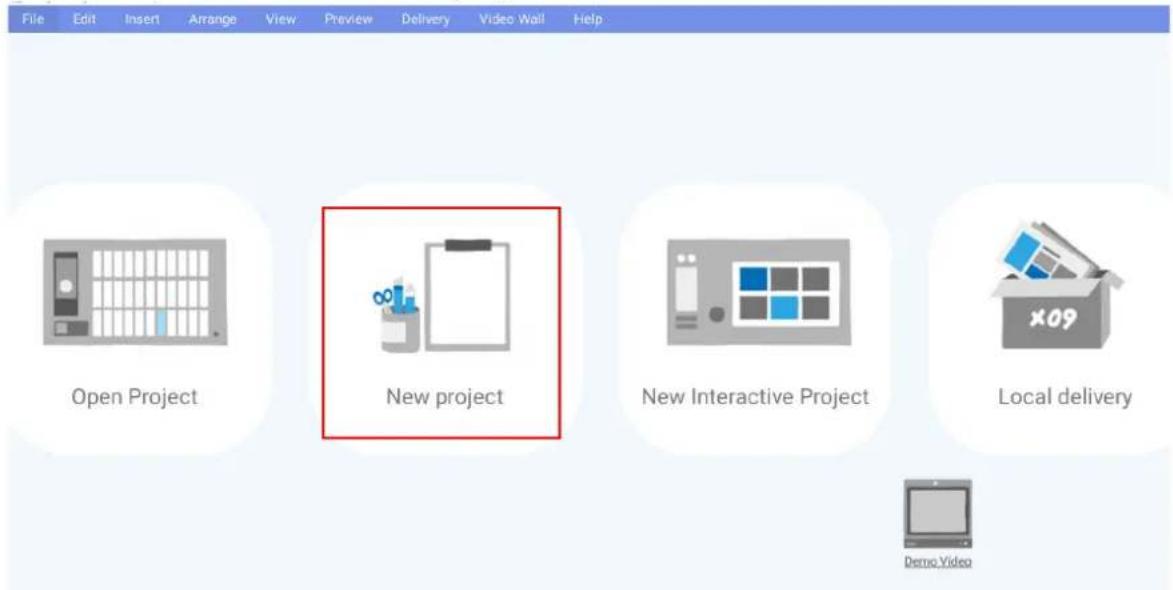
2. To customize the project settings, configure the following items:
A. Project Location - Select the folder where your project will be saved.
B. Project Name - Create a name for your project.
C. Project Orientation and Resolution - Choose the layout and size of your project.
D. Panel Area - Adjust this setting for creating a Video Wall project.
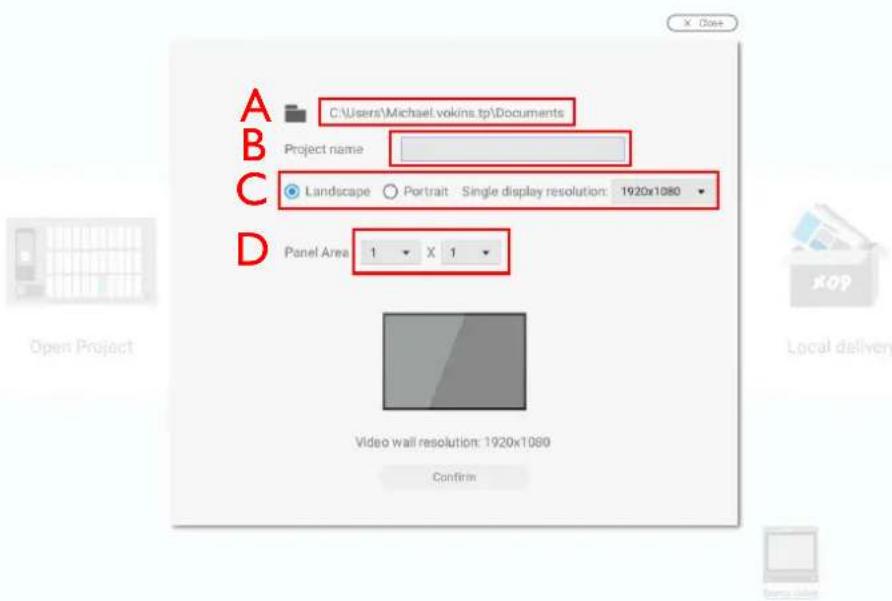
3. Select Confirm to create the new project file.
- To adjust the project settings after a project has been created, click Modify in the Page panel.
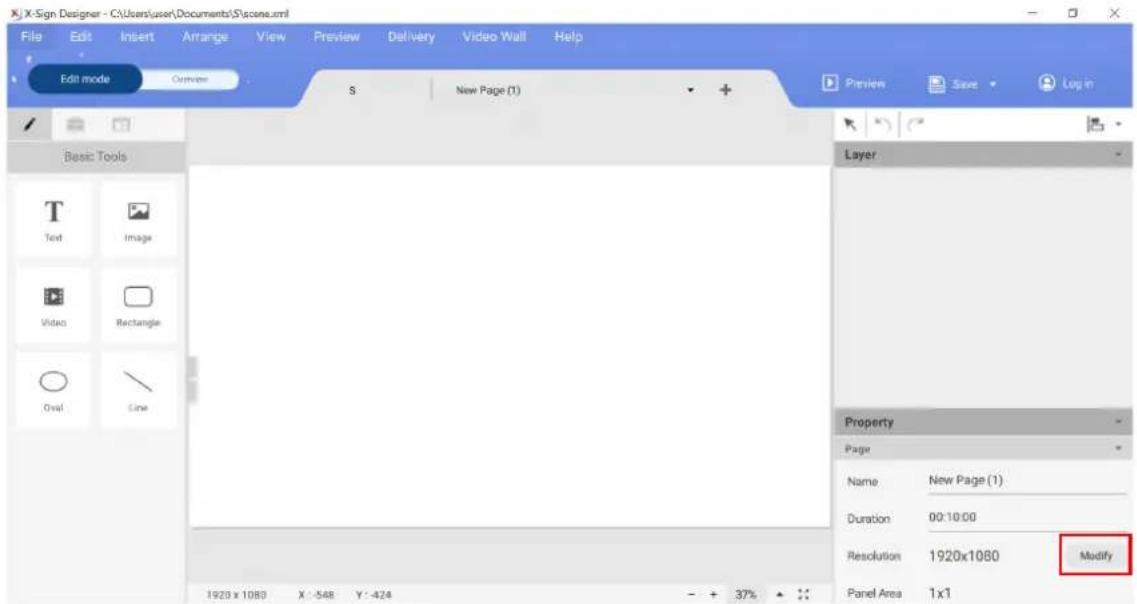
- To import media into your project, click the Image or Video button in the Basic Tool panel.
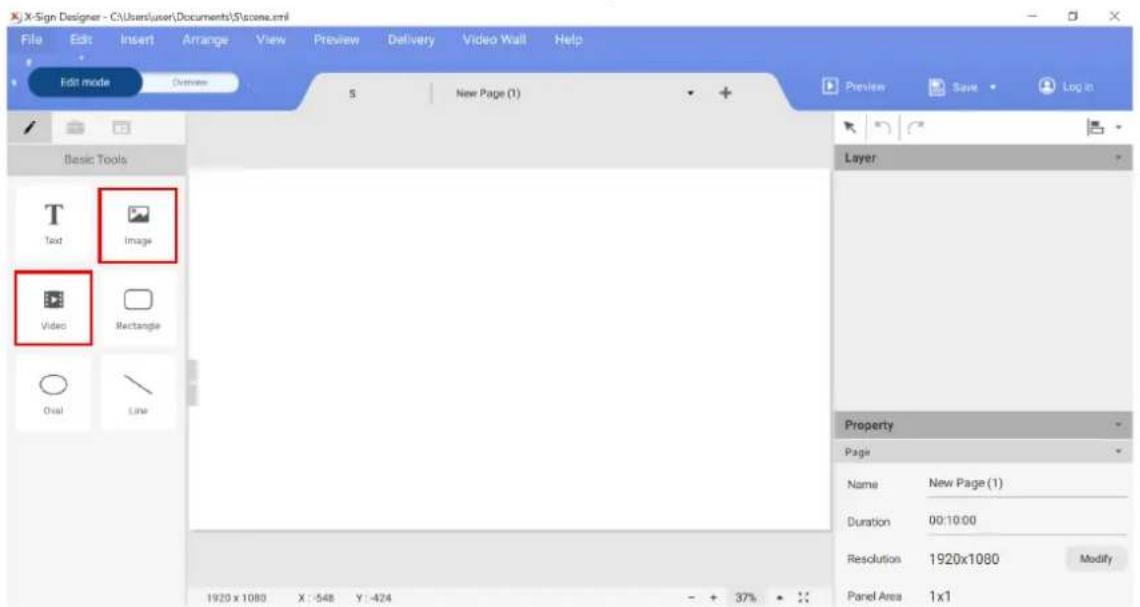
- Select the media file to import and click Open.
Uploading your content from Designer
Watch demonstration video:
With X-Sign Designer, you can directly upload your content to Manager. You don't need to save the project and upload it separately.
Note:
- You need to have an account on X-Sign Manager. Refer to Registering an account for X-Sign Manager (Admin) on page 5 for more information.
• Make sure your account has the authority to upload files.
I. You can also use X-Sign Designer without logging in the account by clicking Start now. You cannot upload content on X-Sign Manager only after logging in the account.
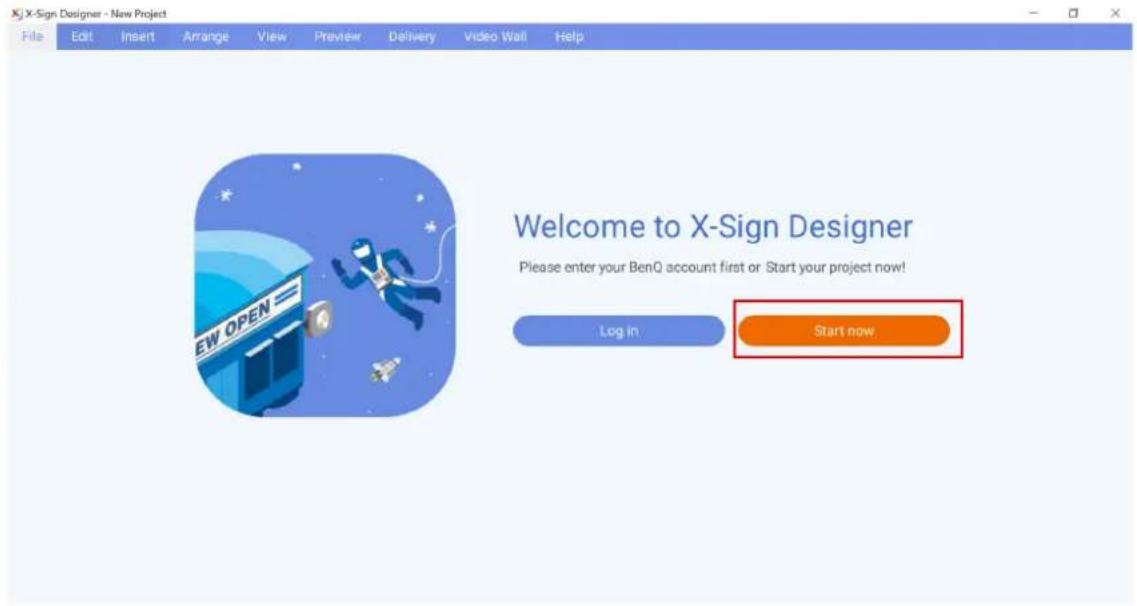
- Press Log in to log in the X-Sign Manager account.
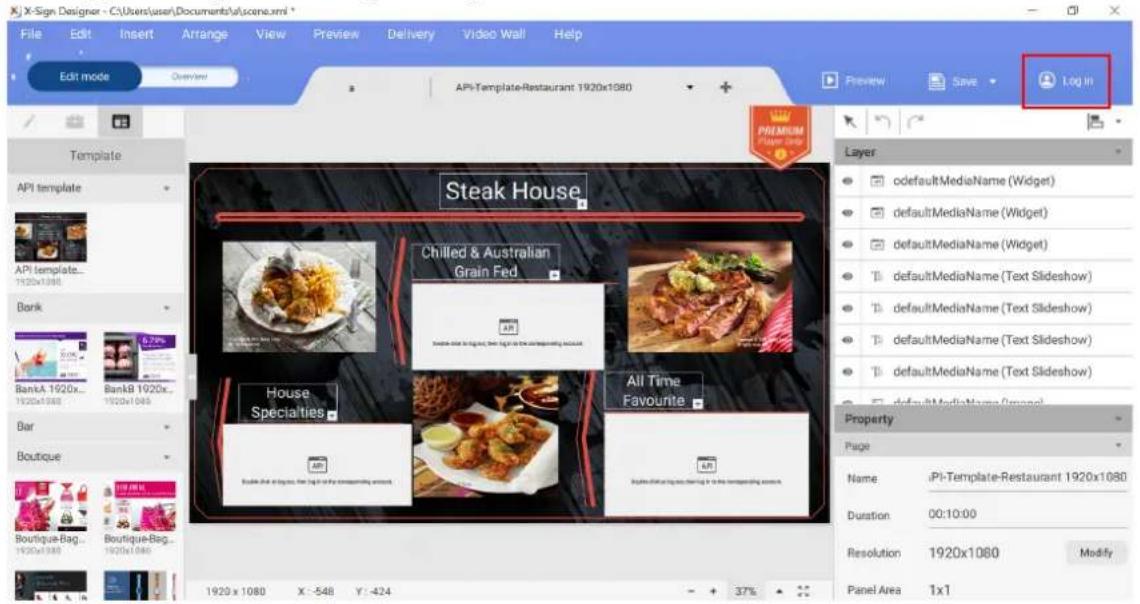
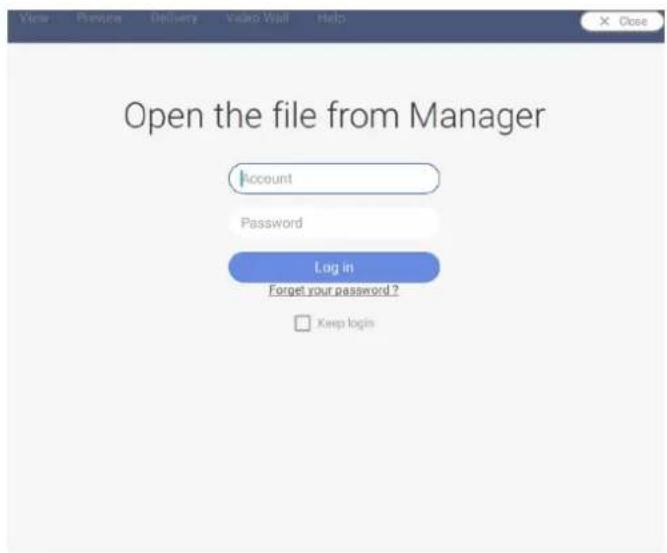
- Once you have successfully logged in, you can see your account information.
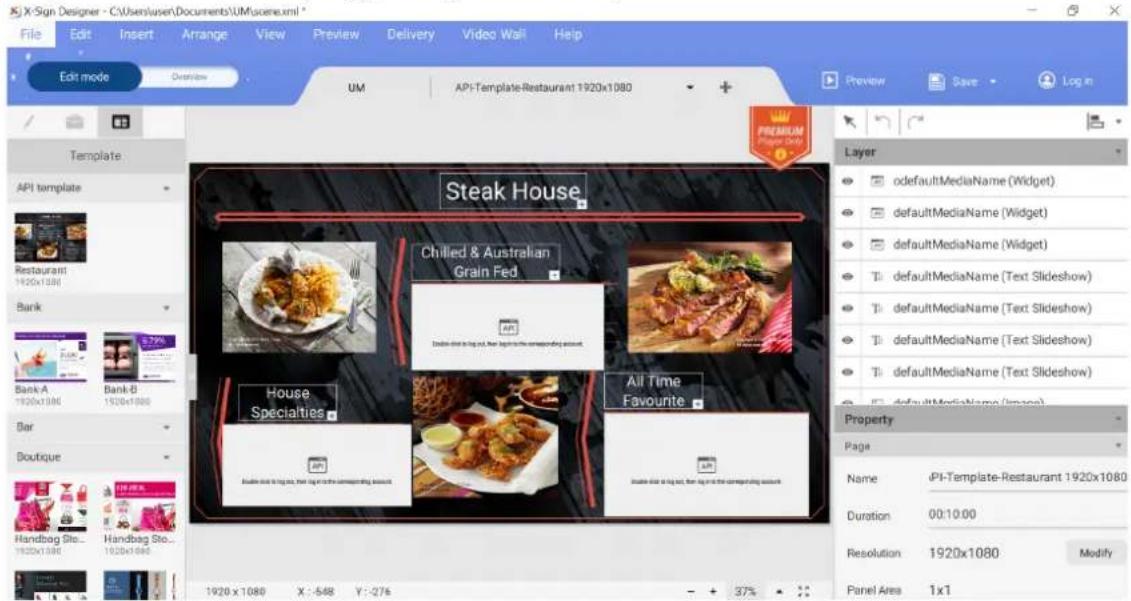
- As soon as you finish making the content, press Save and Upload.
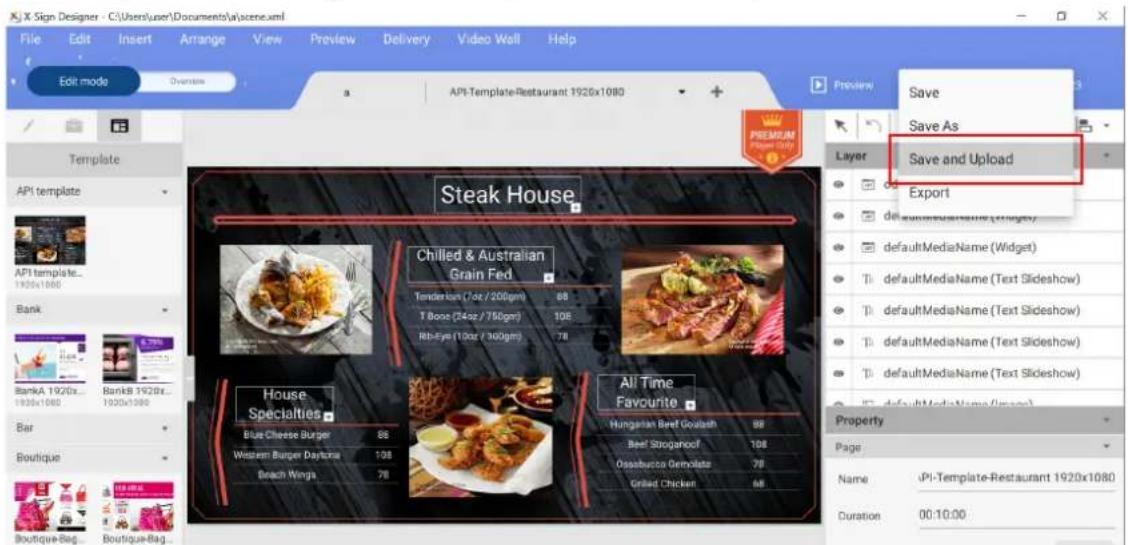
- The file list on Manager will be shown automatically. Choose the path to store the file, then press Confirm.
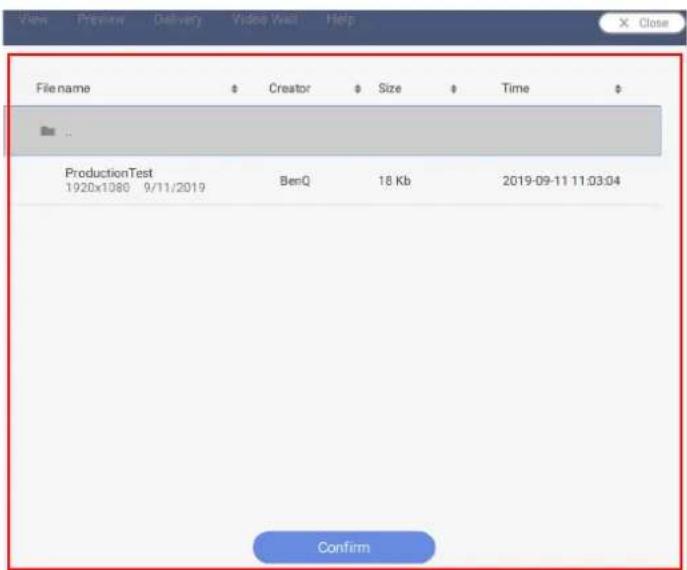
- Designer will automatically upload the file to Manager.
Note: If you want to modify a file, you have to choose the same path and upload the file again. Designer will only upload the changes rather than the whole file.
- Only when the administrator approves the file can the file be added to the schedule. Refer to Setting Verification on page 41 for more information.
Now you can go to X-Sign Manager to schedule your content.
Creating content in X-Sign Designer
Once you have opened a new project, you can begin to customize the content for your project. The following is an introduction to the basic settings used to create content in X-Sign Designer.
To create content in X-Sign Designer:
I. Click the ✿ button to open the Basic Tools panel. The Basic Tools panel allows you to add text, media and shapes to a page. Click on one of the following icons to add a new element to the canvas:
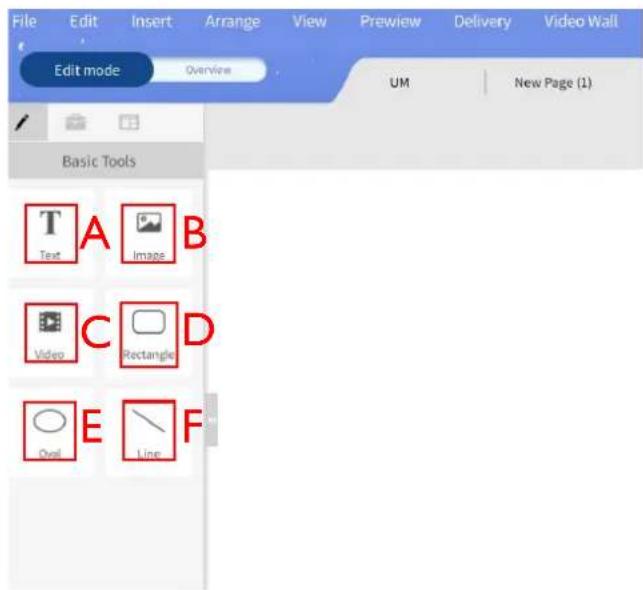
A. Text – Add a new text box to a page. Double-click on the text box to change the text.
B. Image – Add a new image bounding box to a page. A window will automatically appear to select an image from your hard drive, then click Open.
C. Video – Add a new video bounding box to a page. A window will automatically appear to select a video from your hard drive, then click Open.
D. Rectangle – Add a new rectangular bounding box to a page. Adjust the color, border and shadow in the Content panel.
E. Oval – Add a new circular bounding box to a page. Adjust the color, border and shadow in the Content panel.
F. Line – Add a new straight line to a page. Adjust the color in the Content panel.
- Click the 📋 button to open the Widgets panel. The Widgets panel allows you to add specific widgets to a page. Click on one of the following icons to add the respective widget to the canvas:
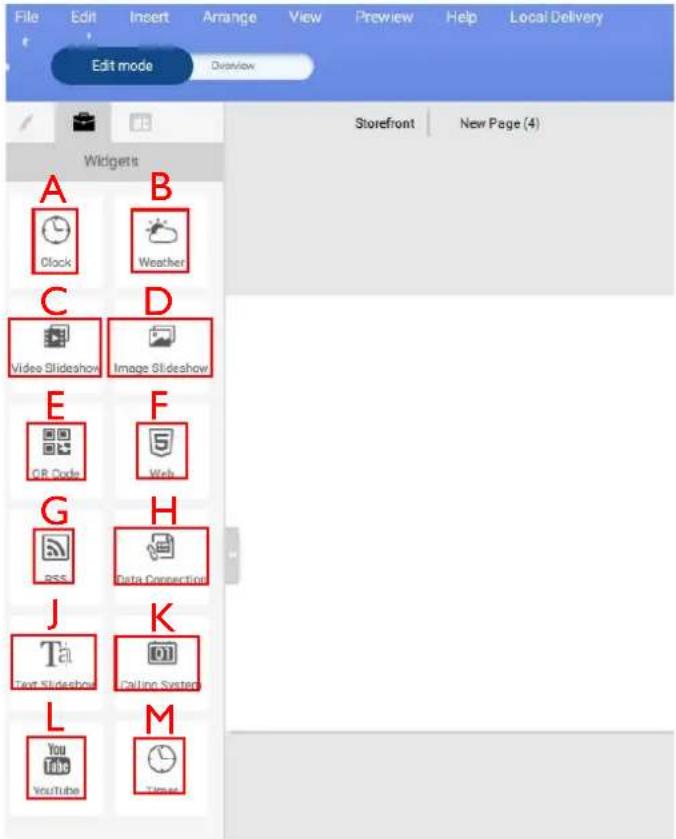
A. Clock – Add a clock to a page. The time is based on your device's region setting. Adjust the settings in the Clock panel and the Content panel.
B. Weather – Add a weather forecast to a page. Weather forecast is based on your device's region setting. Adjust the settings in the Weather panel and the Content panel.
C. Video Slideshow – Add a new video slideshow to a page. Refer to Creating an Image or Video slideshow on page 69 for more information.
D. Image Slideshow – Add an image slideshow to a page. Refer to Creating an Image or Video slideshow on page 69 for more information.
E. QR Code – Add a QR Code to a page to link to an external website. Adjust the settings in the QR Code panel and the Content panel.
F. Web – Add a website to a page. Adjust the settings in the Web panel and the Content panel.
G. RSS – Add an RSS Feed to a page. Adjust the settings in the RSS panel, the Content panel and the RSS Config panel.
H. Data Connection – Add a data document to a page. Data is based on a csv document saved online. Adjust the settings in the Database Connection panel, the Setting panel and the Content panel.
J. Text Slideshow – Add marquee text to a page. Adjust the settings in the Marquee panel, the Content panel, the Carousel panel, and the Transition panel.
K. Calling System – Add a waiting number window to a page. A waiting number system can be created by logging in to your X-Sign Manager account and going to Advanced Application >
Queuing System. Once created, return to X-Sign Designer and adjust the settings in the Waiting Number panel and the Content panel.
L. YouTube – Add a YouTube video to a page. Adjust the settings in the YouTube panel and the Content panel.
M. Timer – Add a timer to a page. Adjust the settings in the Timer panel, the Settings panel and the Appearance panel.
- In Edit mode, you can add and customize different pages:
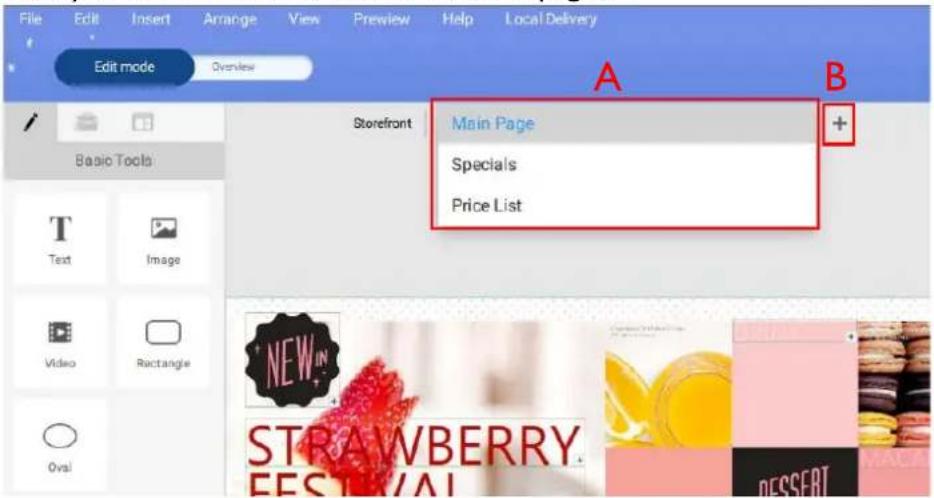
A. Pages Drop-down menu – Navigate to different pages by selecting ▼ at the top of the canvas.
B. + - Add a new page by clicking on the + Button at the top of the canvas.
- Click the Overview button to configure the project layout and order.
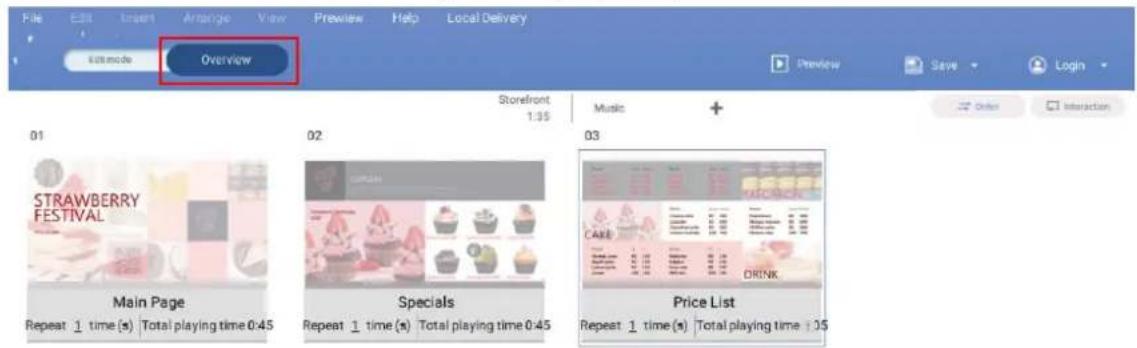
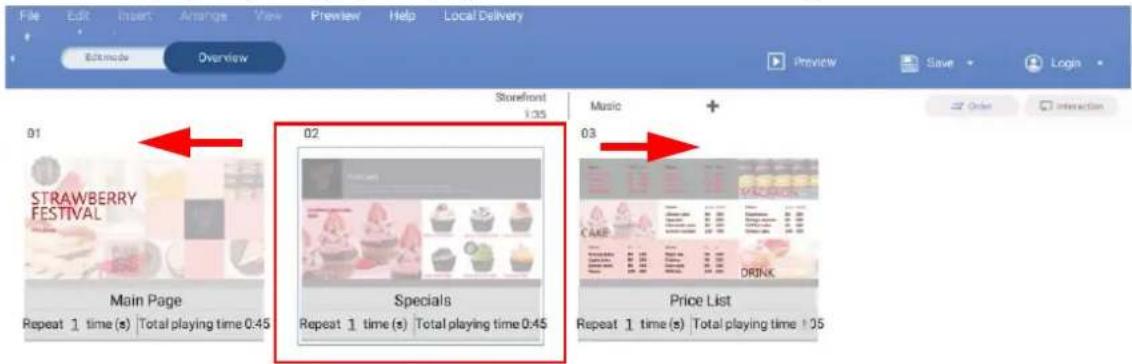
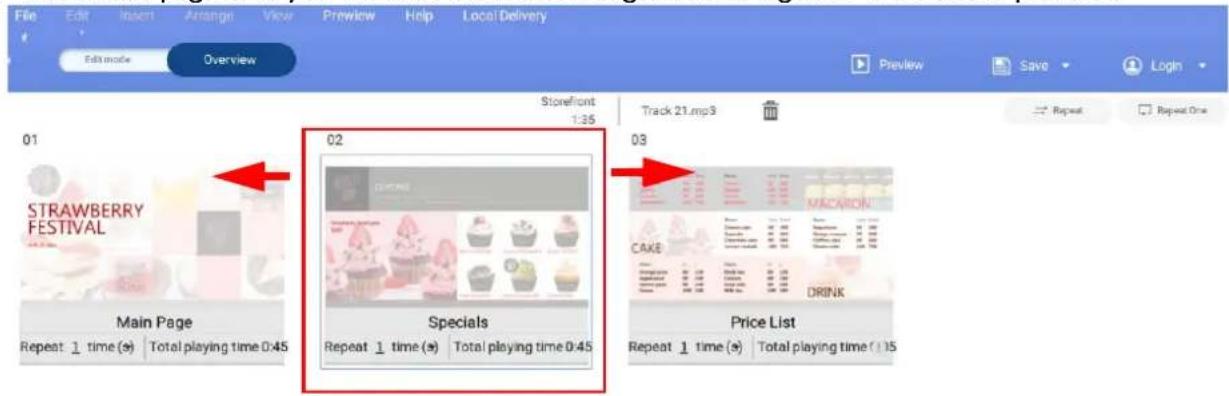
- You can move pages by dragging the page icon to the left or the right.
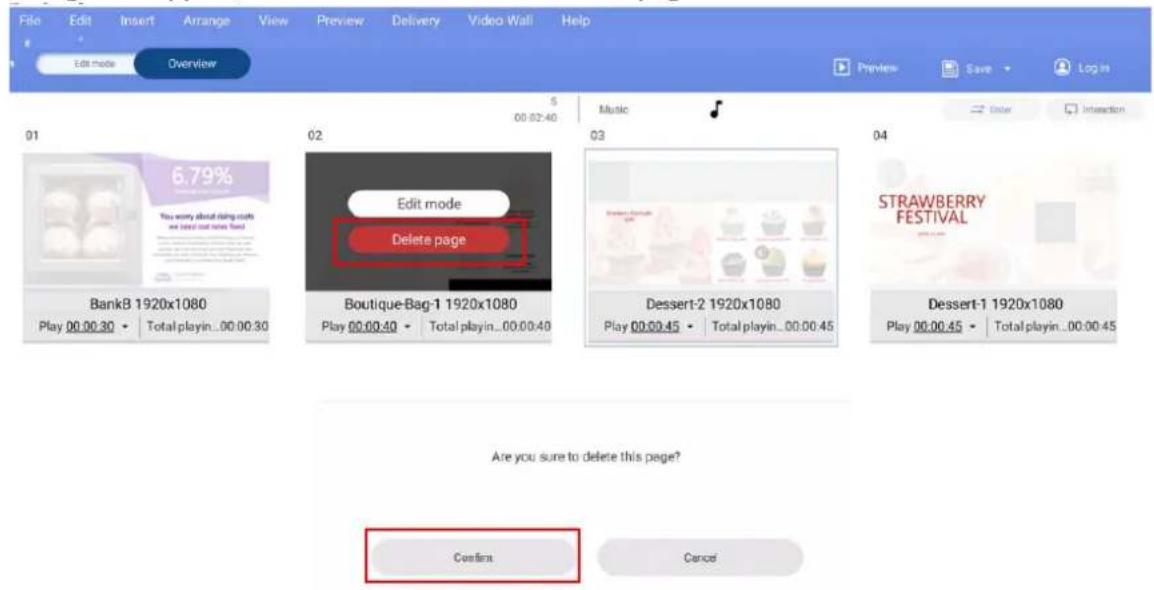
- To delete pages, hover your cursor over the page icon and click Delete page. A warning message will appear, select Confirm to delete the page.
- Select ▼ on the page icon and click Set Repeat Time(s) or Set Total Playing Time to have the page repeat or change the time duration for a page.
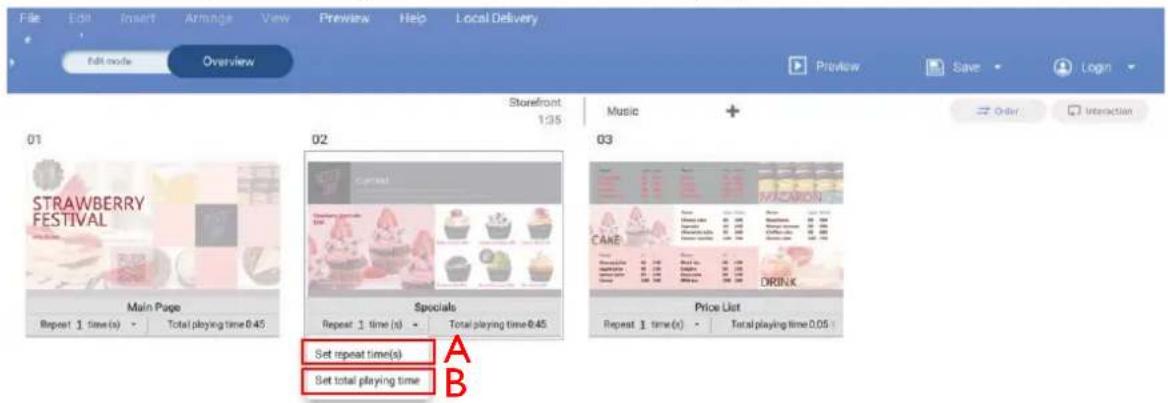
A. Repeat _ Time(s) – Double-click the number to change the amount of times a page plays.
B. Play 0:00 – Double-click the run time to change the time duration for a page.
- Click Order or Interaction to choose the play sequence for a project:
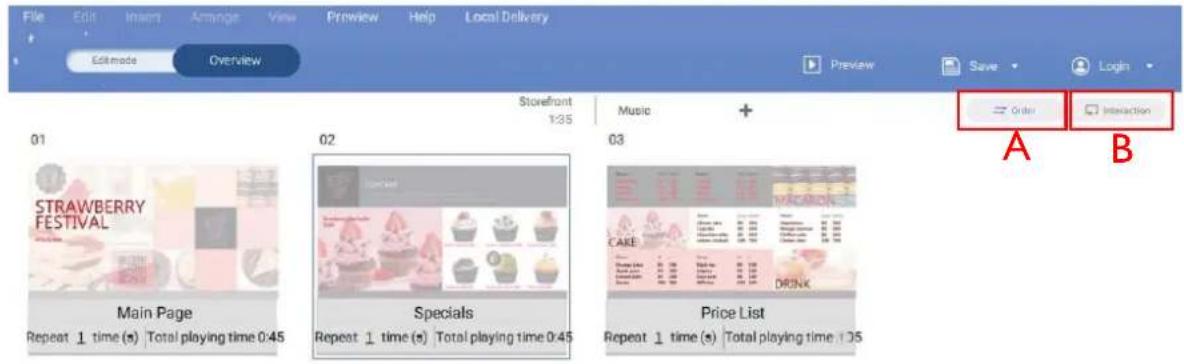
A. Order – To play all pages in order in a continuous loop, click Order.
B. Interaction – To play a single page or selected pages in a continuous loop, click Interaction.
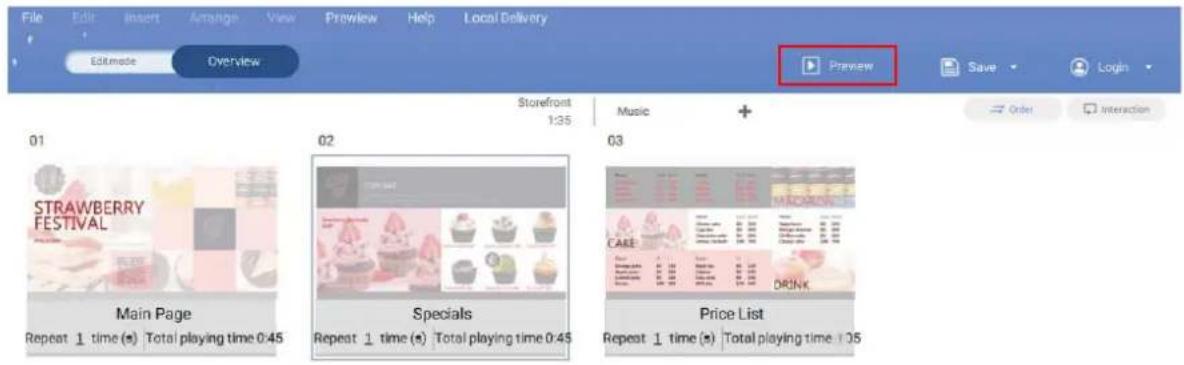
- You can preview your project by clicking the Preview button. This will play the current project on X-Sign Player. Click ESC to return to X-Sign Designer.
Creating content from Designed Templates
Watch demonstration video:

Once you have opened a new project, you can use Designed Templates to quickly generate content. X-Sign Designer has numerous Designed Templates of varying orientations and resolutions for the user to easily access.
To create content in X-Sign Designer using a Designed Template:
I. Click the button to open a list of templates.
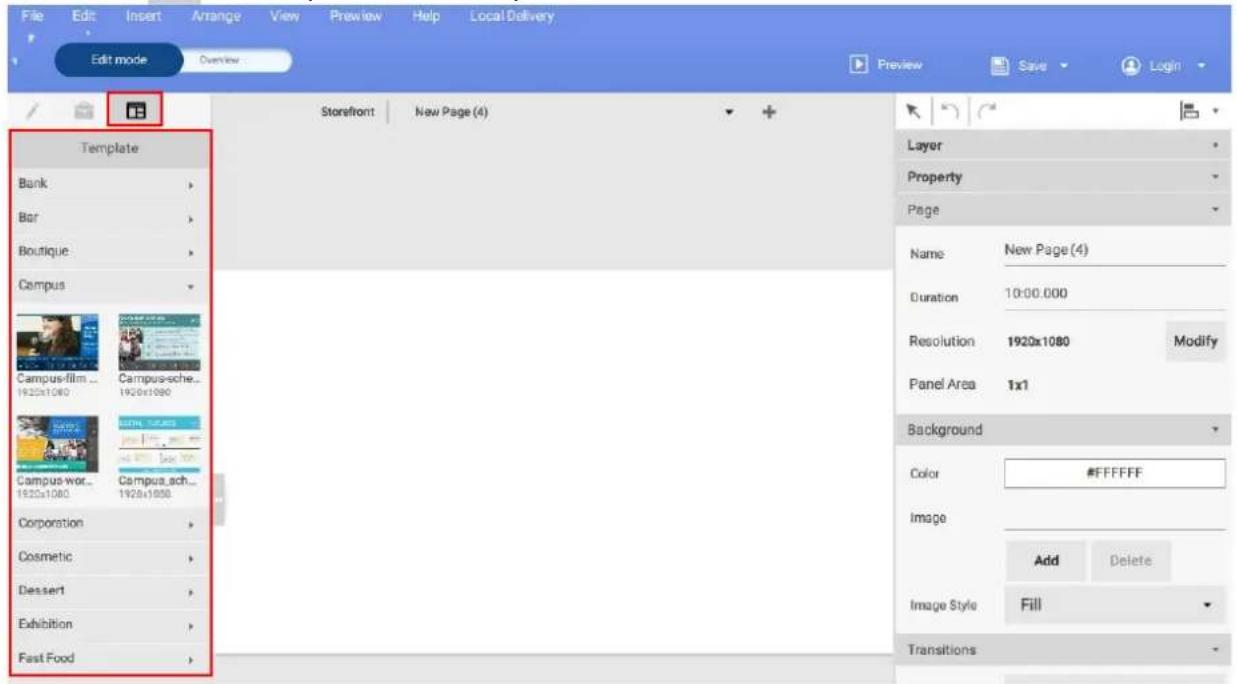
- Click the drop-down menu for the type of template you want to use and then click icon for the template you want to use for your project. A new page with the template will automatically be added to the project and displayed in the canvas window.
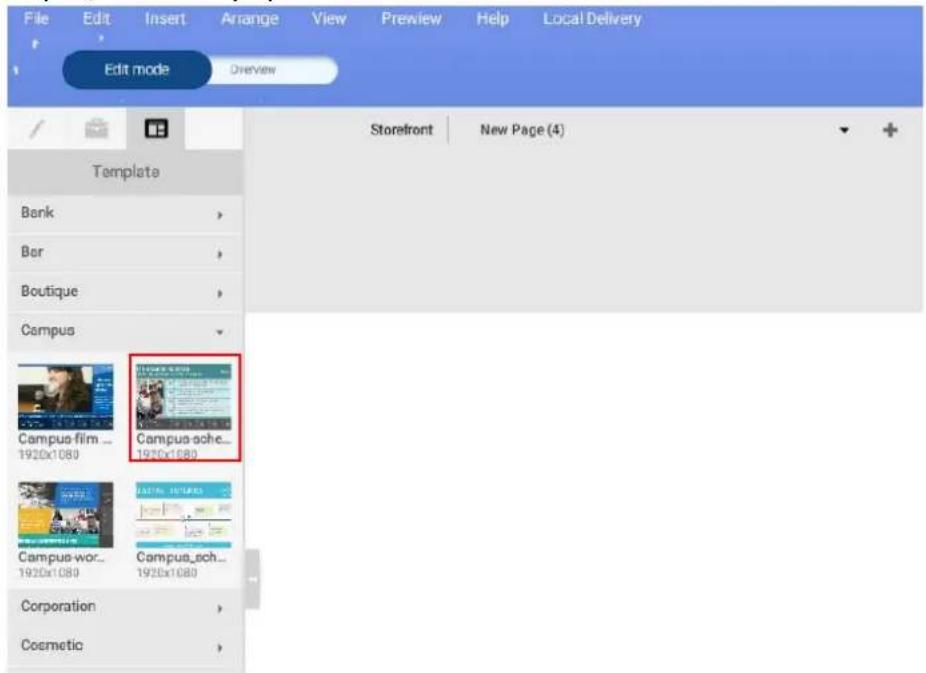
Note: The template must match the orientation and resolution of your project settings. To modify your project settings, refer to Opening an X-Sign 1.x project file on page 89 for more information.
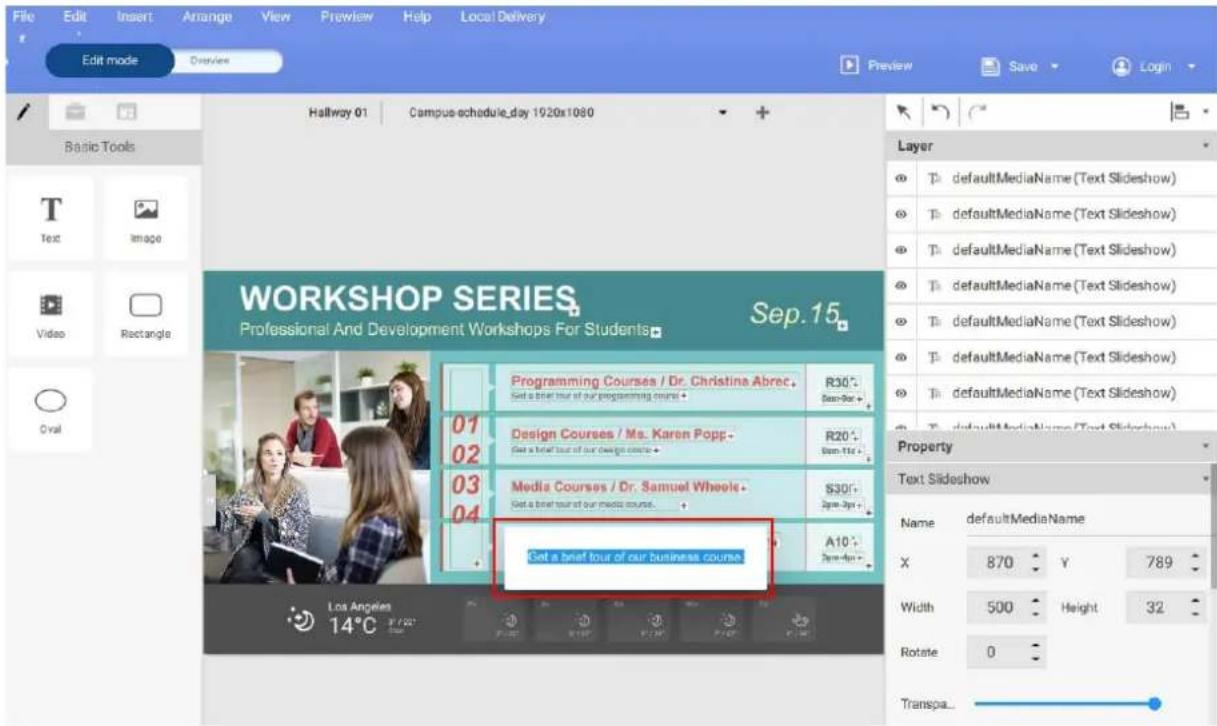
- Alter text in the template by double-clicking the text box in the canvas and typing in your own text.
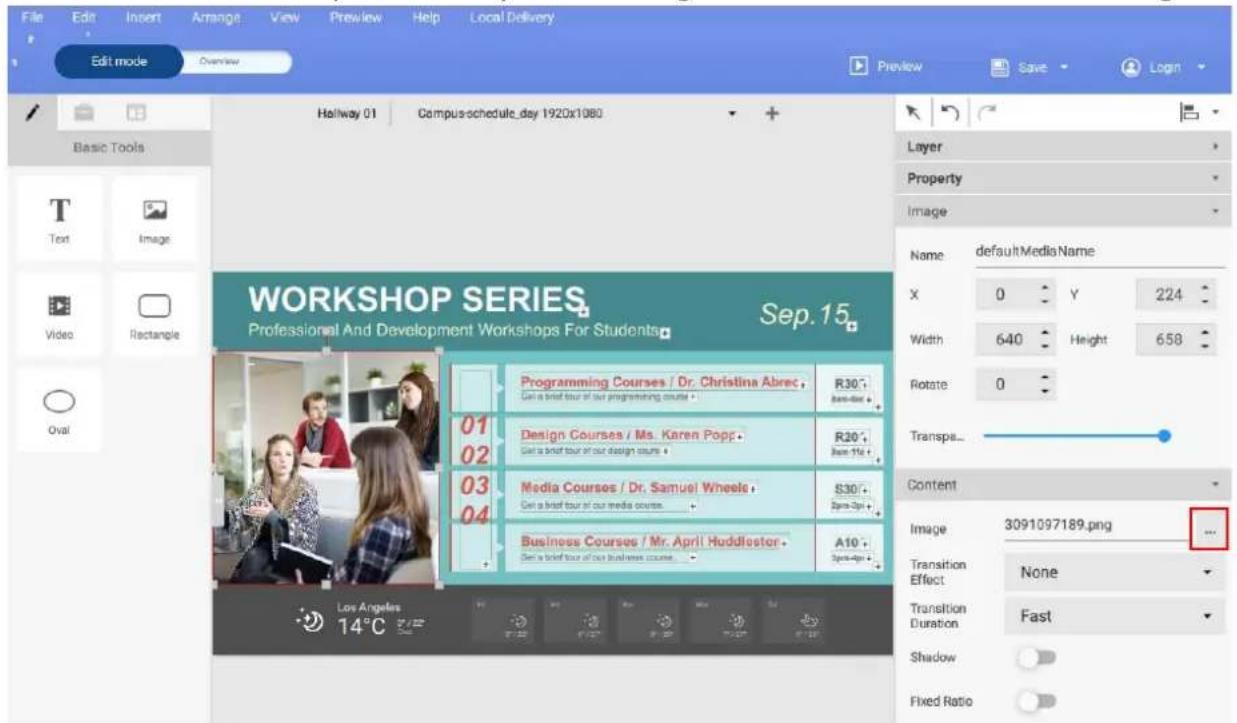
- You can replace images or video files by selecting the item in the canvas, then click on the ... Button in the Content panel. Select your own image or video to insert into the bounding box.
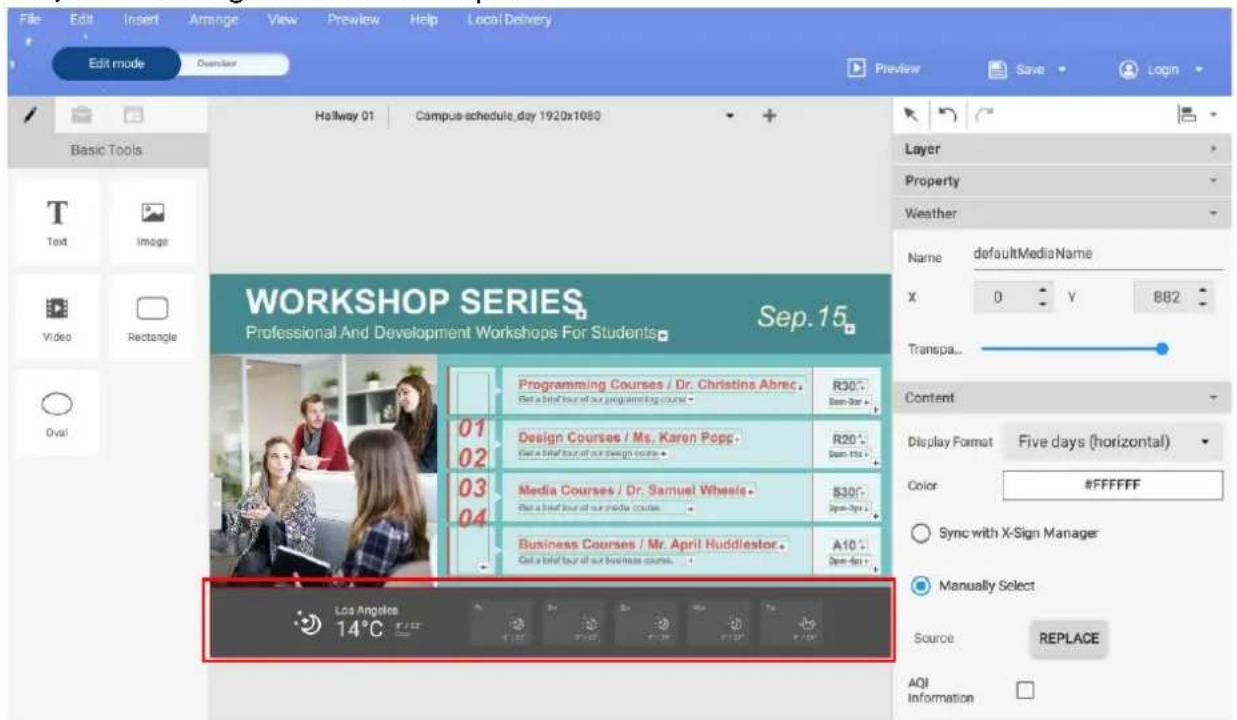
- You can customize widget information by selecting the respective widget in the canvas, then adjust the settings in the Content panel.
- You can move objects on a page by selecting on the bounding box in the canvas and dragging it to the desired location.
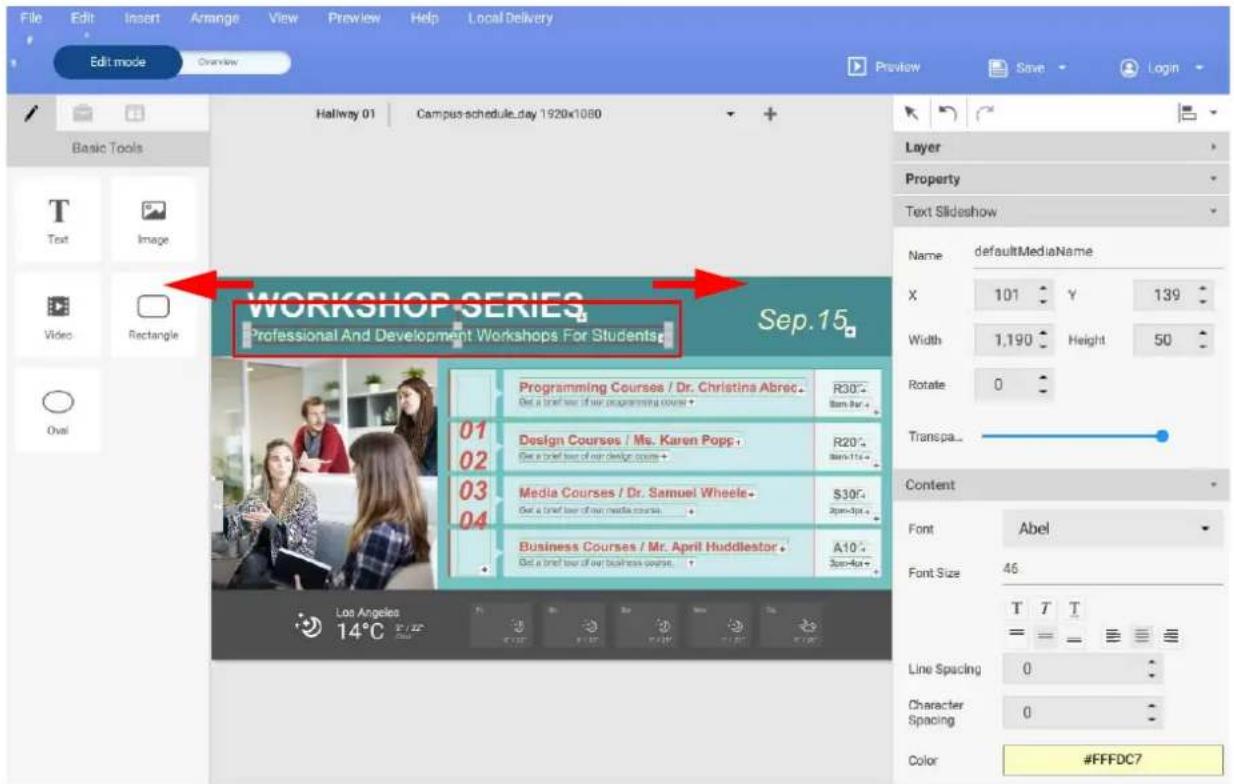
Creating a clock widget in X-Sign Designer
- In X-Sign Designer, click on the icon ⏱ to add a clock widget, and you will be prompted to place the clock widget.
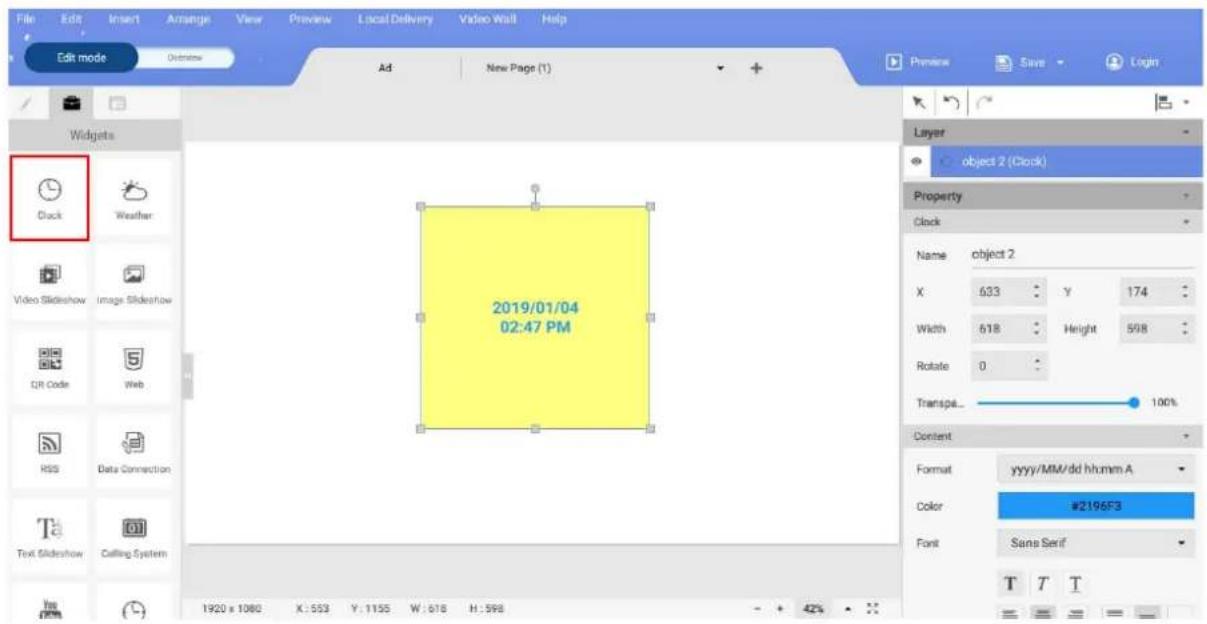
-
You can drag the clock widget anywhere in the template.
-
You may set the properties of the clock widget in the editing area on the right panel.
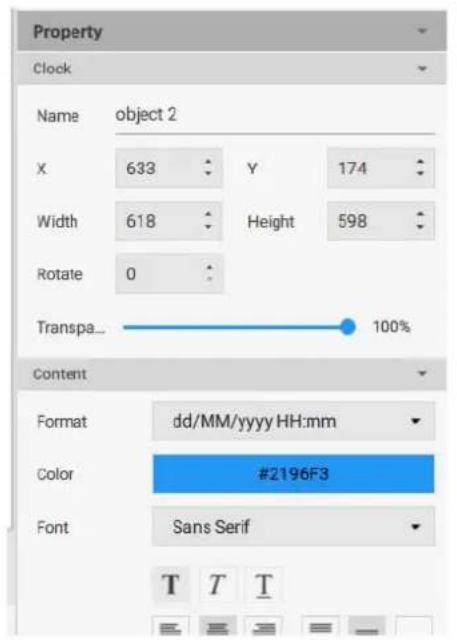
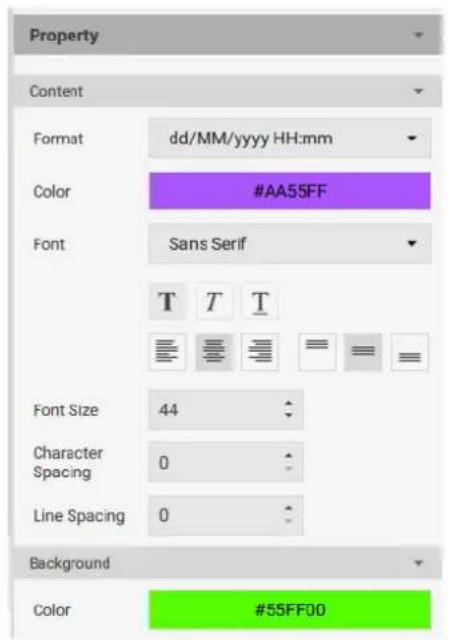
- You can switch the format of the time/date layout. You can choose to display both the date and time, or only display either the date or the time.
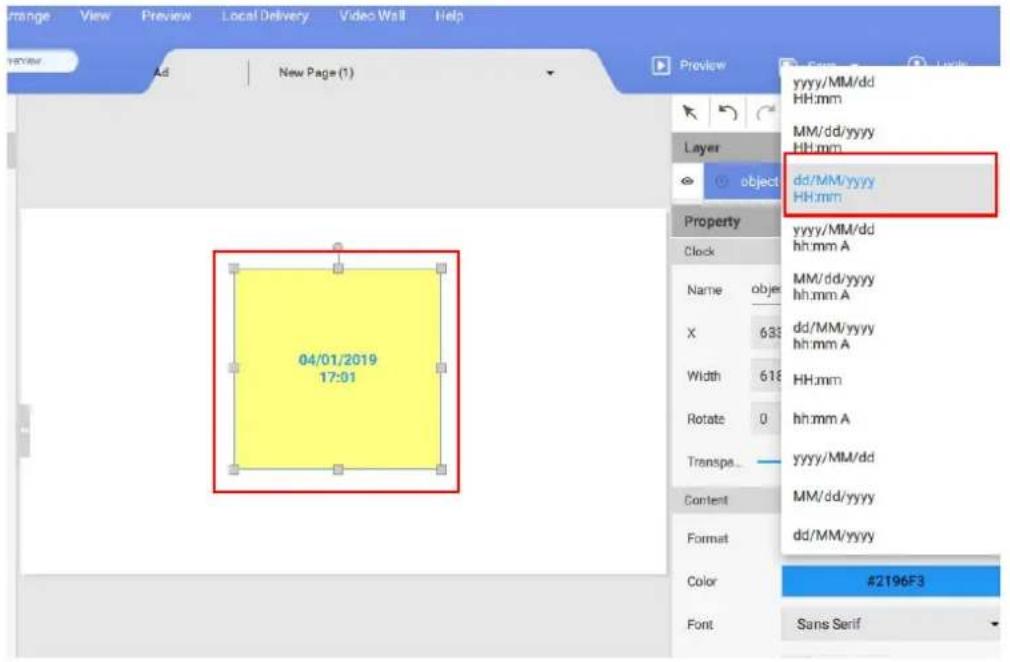
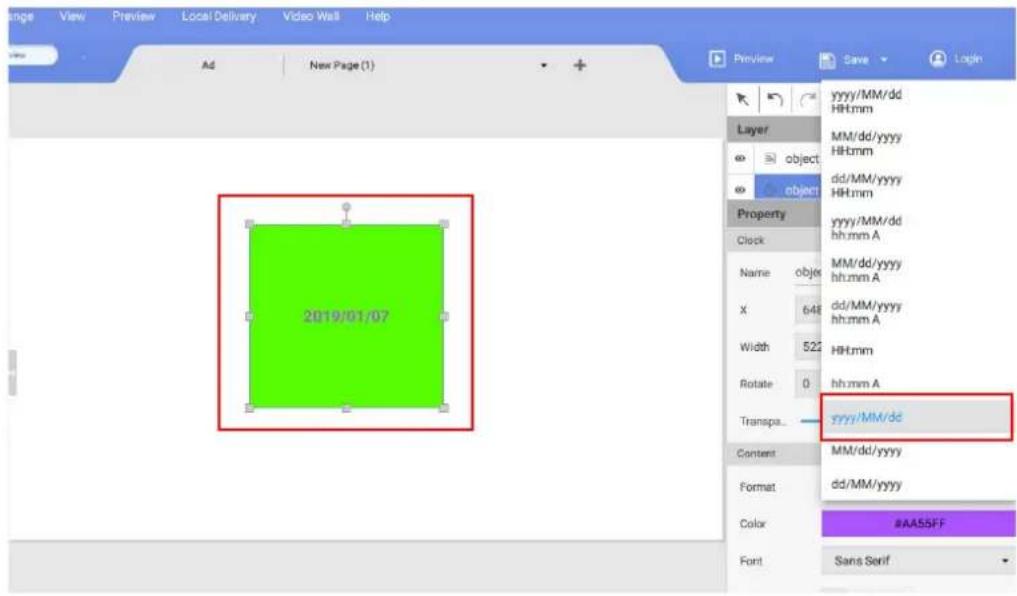
Setting a weather widget
- In X-Sign Designer, click on the icon 📋 to add a weather widget, and you will be prompted to place the weather widget.
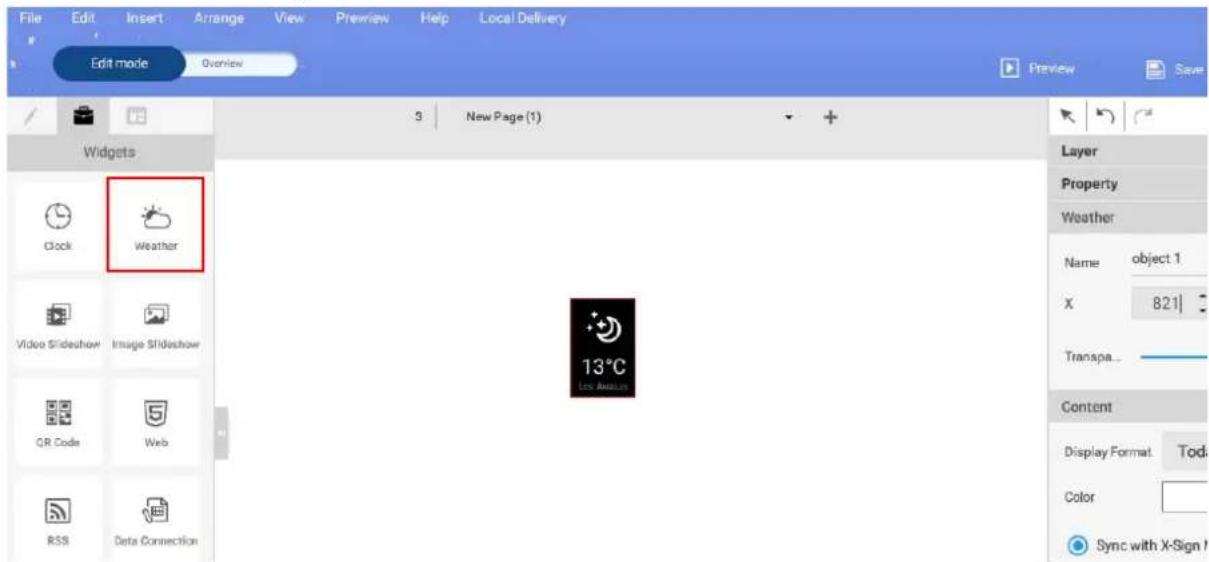
-
Click on the icon 📋 to add more weather widgets. You can drag the weather widget anywhere in the template.
-
You may set the properties of each weather widget. You can set the title layout, text color, and background color.
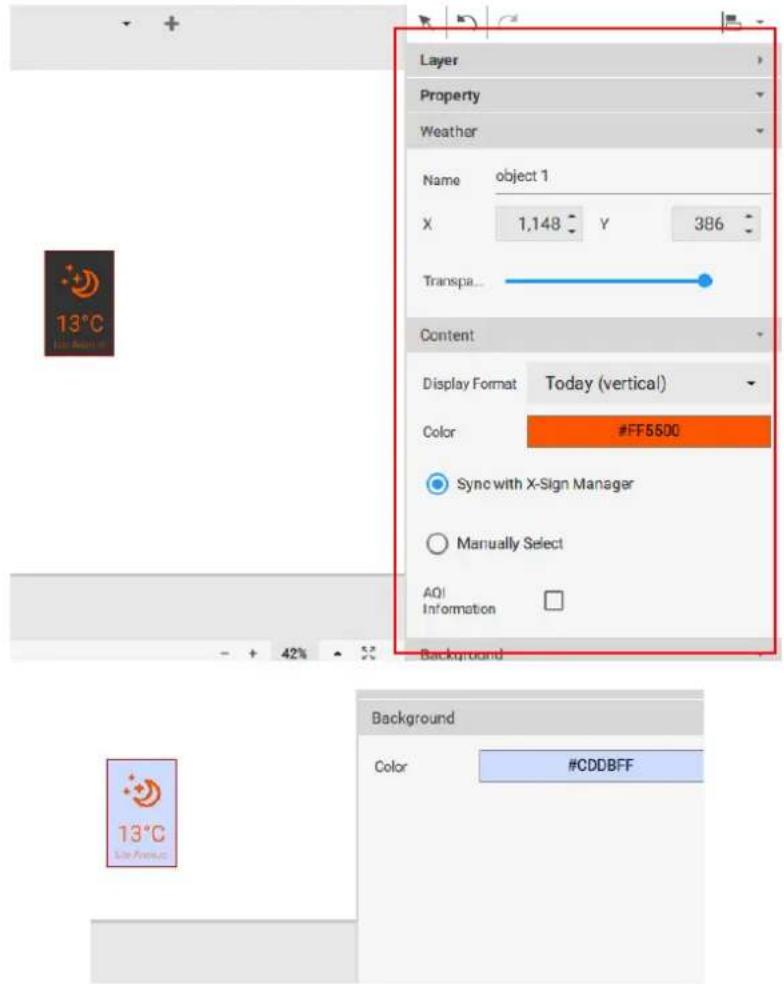
- You can also change the display format.
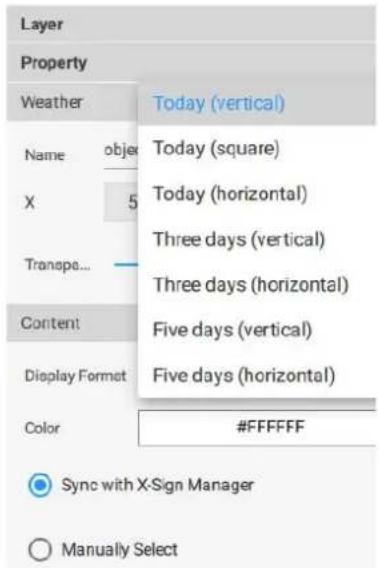
- To set the city, first identify the city in the device management section of the online X-Sign Manager. You can check Sync with X-Sign Manager to sync the city information with the device on X-Sign Manager, or you can check Manually Select to select the city yourself.
Creating an Image or Video slideshow
You can use the Image slideshow or Video slideshow widget to play multiple media files in succession within one window of the project. The following is an introduction to creating an image or video slideshow.
To create an image or video slideshow in X-Sign Designer:
- Click the 📋 button to open the Widget panel and click either the Image slideshow or the Video slideshow widget.
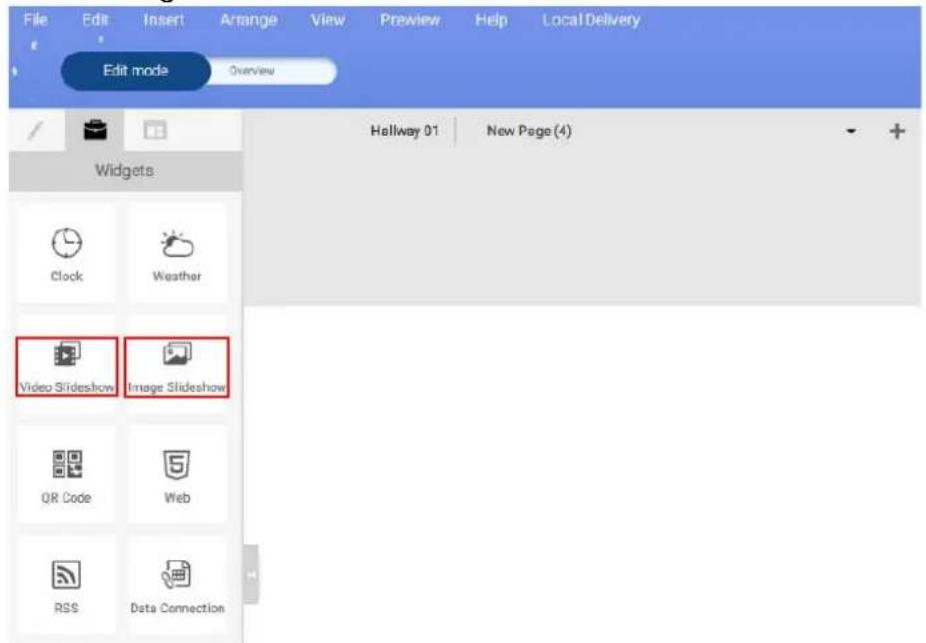
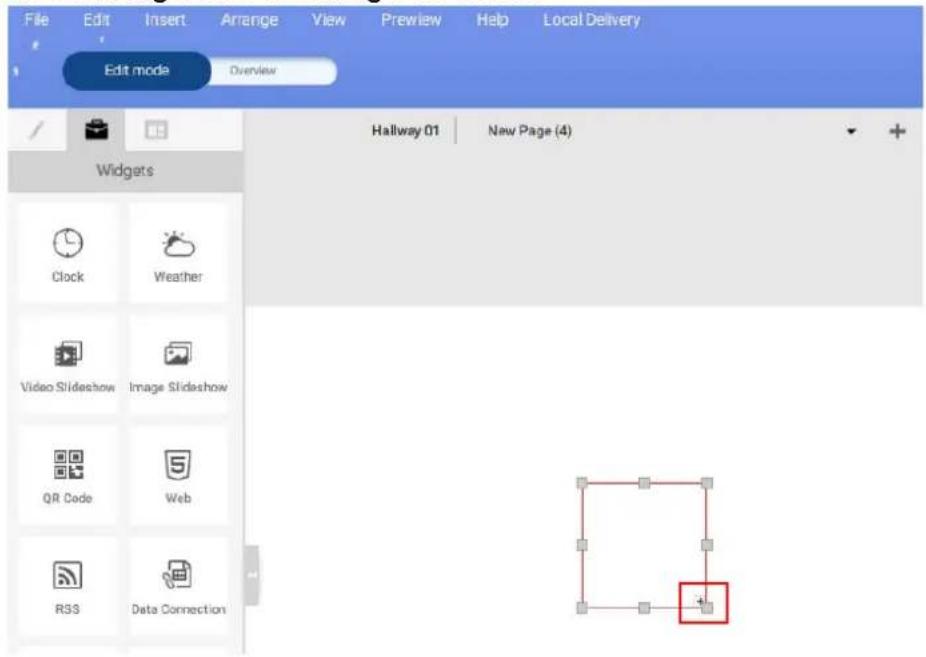
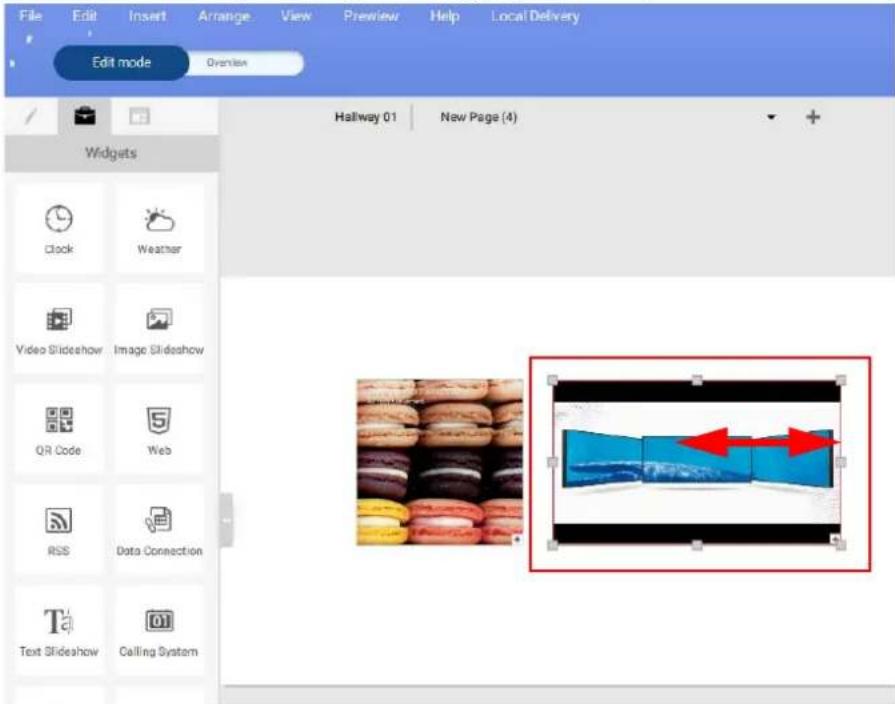
- A new bounding box will appear in the canvas area. Select the + button on the lower right corner of the bounding box to add images or videos.
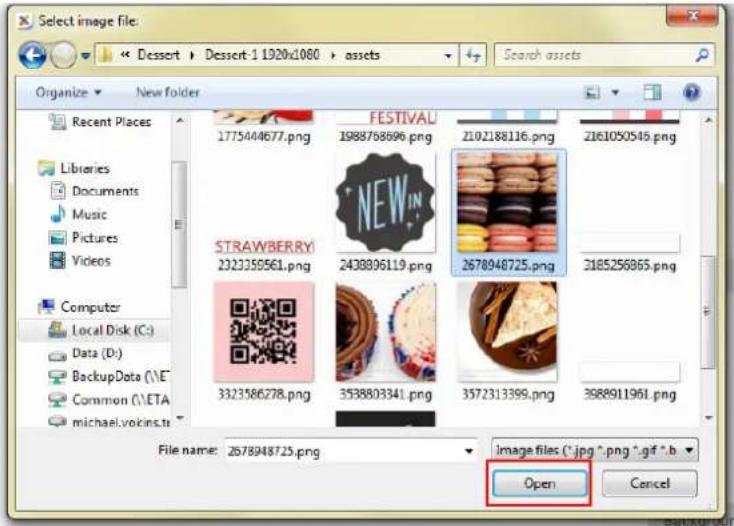
- Select one or more images or videos to import and click Open.
- You can resize the slideshow by clicking and dragging on the square nodes of the bounding box.
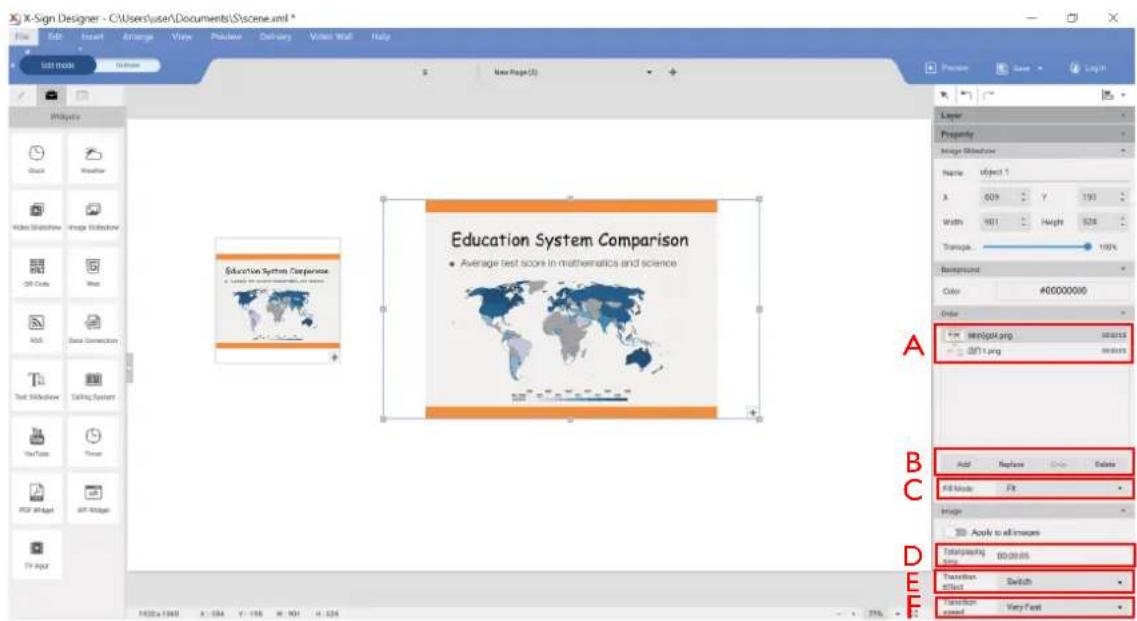
- To customize the Image slideshow settings, adjust the following items in the Order panel and the Transition panel:
A. Image Slideshow Order – Select the image and drag it upwards or downwards to re-order the slideshow.
B. Add, Replace, Crop, Delete – Select an image to add, replace, crop, and delete.
C. Fill Mode – Select an image to adjust the fill mode. The options include Fit, Fill, Part.
D. Total playing time – Select an image and type in the total playing time.
E. Transition effect – Select a transition effect for the entire slideshow from the menu.
F. Transition speed – Select a transition speed for the entire slideshow from the menu.
- To customize the Video slideshow settings, adjust the following items in the Order panel and the Transition panel:
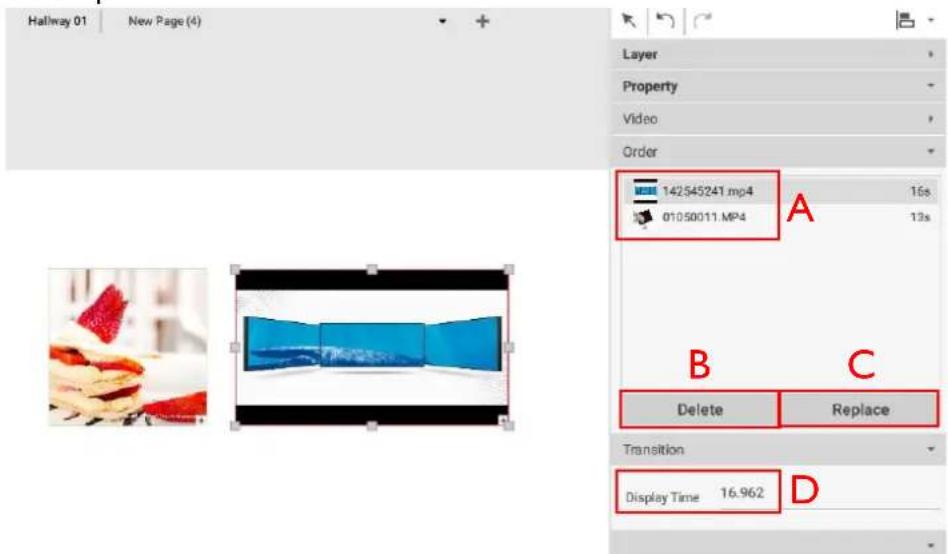
A. Video Slideshow Order – Select the video and drag it upwards or downwards to re-order the slideshow.
B. Delete – Select a video to delete and click the Delete button.
C. Replace – Select a video to replace and click the Replace button.
D. Display Time – Select a video and type in the duration time and press Enter.
Rotating an image or video
The following is an introduction of how to rotate images or video on X-Sign Designer and X-Sign Player.
To rotate an image on X-Sign Designer:
- Click and hold the rotation tab located at the top of an image or video file in a project. Drag to the left or right and release at the desired degree of rotation.
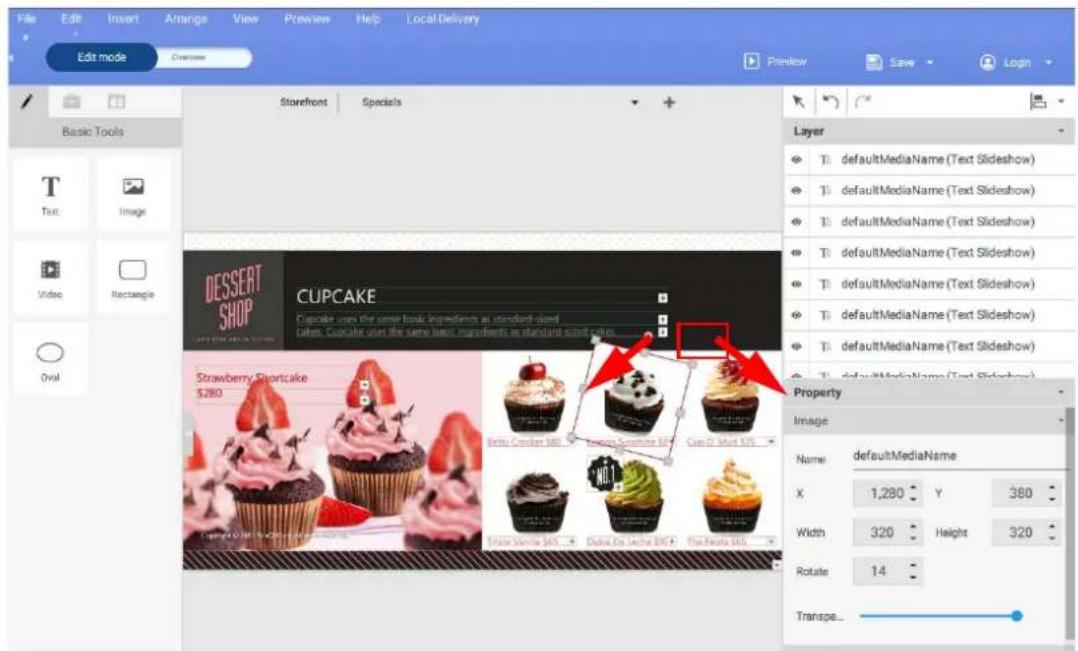
- You can also rotate an image or video by manually changing the value in the Image or Video panel.
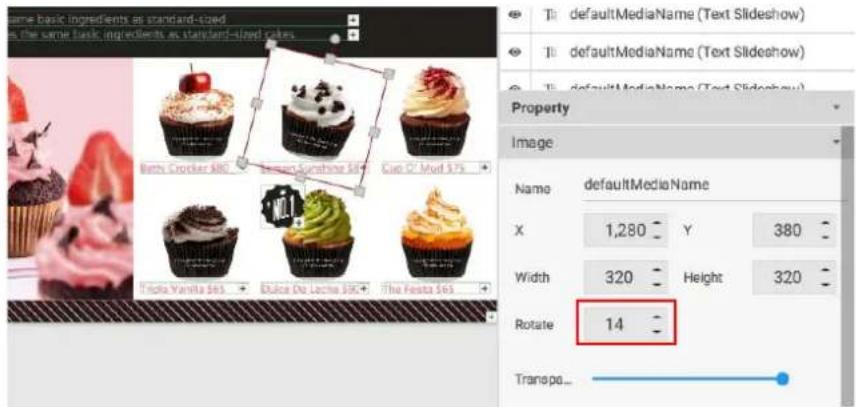
- You may set the properties in the editing area on the right panel.
Generating a QR Code
- In X-Sign Designer, click on the icon 📋 to add a QR code, and you will be prompted to enter the URL corresponding to the QR code.
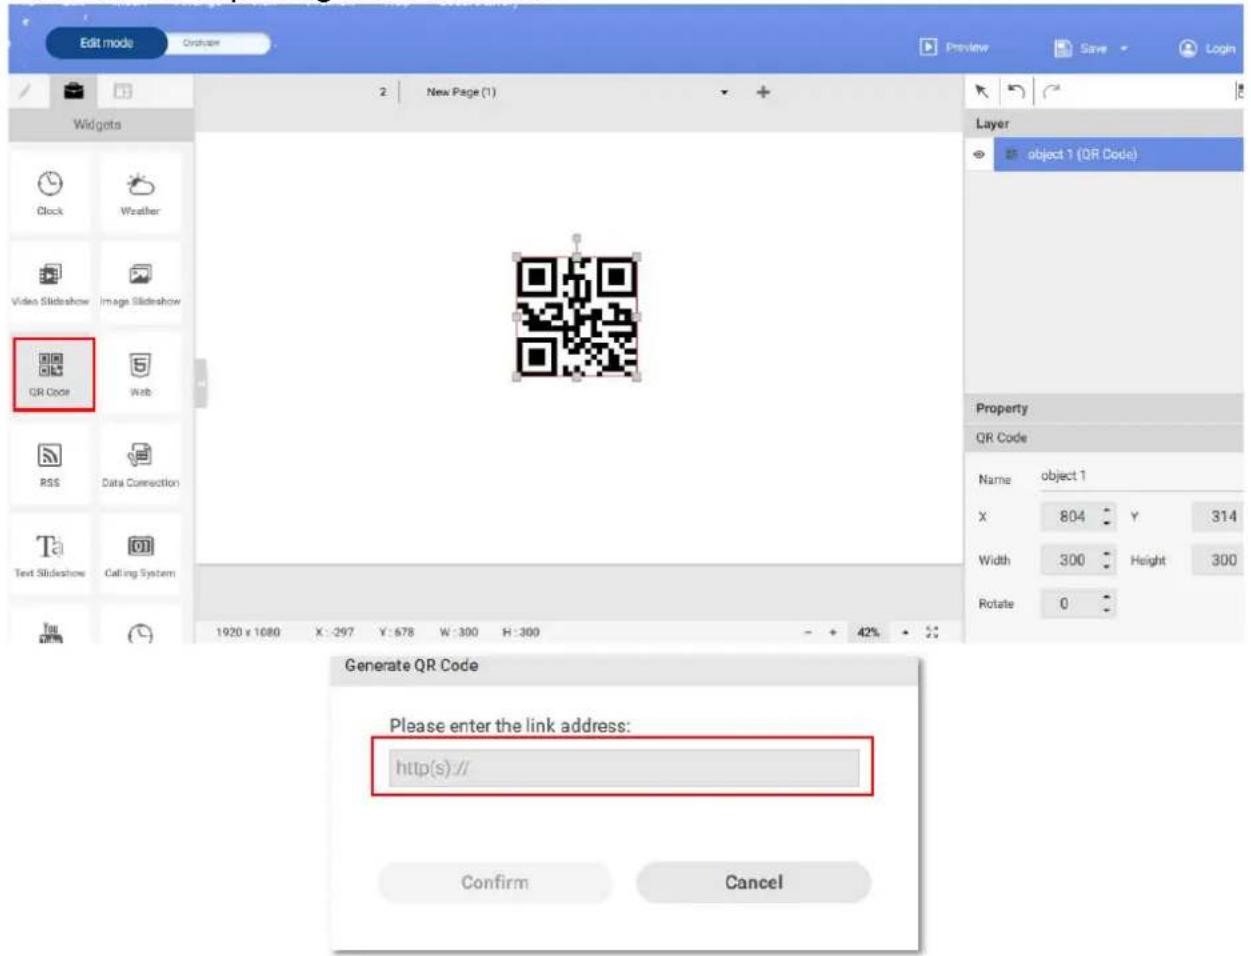
- Click on the icon 📄 to add more QR codes. You can drag the QR code anywhere in the template. You can also edit the QR code or the link in the editing area on the right panel.
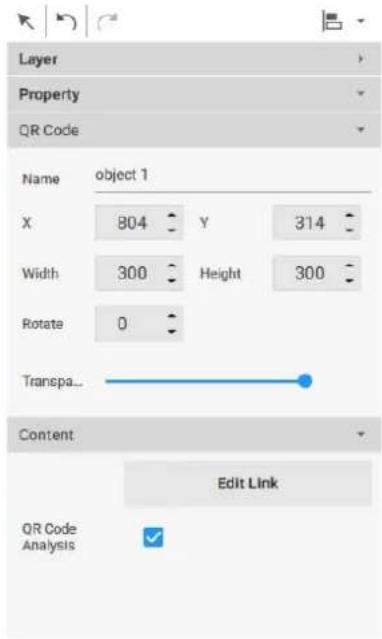
Note:
• Each added QR code has its own carousel controls to be edited independently from others.
• QR code can contain up to 256 words.
Adding a data connection
I. Before adding a data connection to BenQ X-Sign Designer, create the data in Google sheets.
| Movie chart File Edit View Insert Format Data Tools Add-ons Help All changes saved in Drive | ||||||||
| NTS % 0.00 123 - Arial - 10 B I S A - □ □ □ □ □ □ □ □ □ □ □ □ □ □ □ □ □ □ □ □ □ □ □ □ □ □ □ □ □ □ □ □ □ □ □ □ □ □ □ □ □ □ □ □ □ □ □ □ □ □ □ ▢ ▢ ▢ ▢ ▢ ▢ ▢ ▢ ▢ ▢ ▢ ▢ ▢ ▢ ▢ ▢ ▢ ▢ ▢ ▢ ▢ ▢ ▢ ▢ ▢ ▢ ▢ ▢ ▢ ▢ ▢ ▢ ▢ ▢ ▢ ▢ ▢ ▢ ▢ ▢ ▢ ▢ ▢ ▢ ▢ ▢ ▢ ▢ ▢ ▢ ▩ | ||||||||
| A | B | C | D | E | F | G | H | |
| 1 | Sunday | Monday | Tuesday | Wednesday | Thursday | Friday | Saturday | |
| 8:30~10:30 | ||||||||
| 3 | ||||||||
| 4 | 10:40~12:40 | |||||||
| 5 | ||||||||
| 6 | 12:50~14:50 | |||||||
| 7 | ||||||||
| 8 | 15:00~17:00 | |||||||
| 9 | ||||||||
| 10 | 17:10~19:10 | |||||||
| 11 | ||||||||
| 12 | 19:20~21:20 | |||||||
| 13 | 21:30~23:30 | |||||||
| 14 | ||||||||
| 15 | ||||||||
| 16 | ||||||||
- Select File and choose Publish to the web.
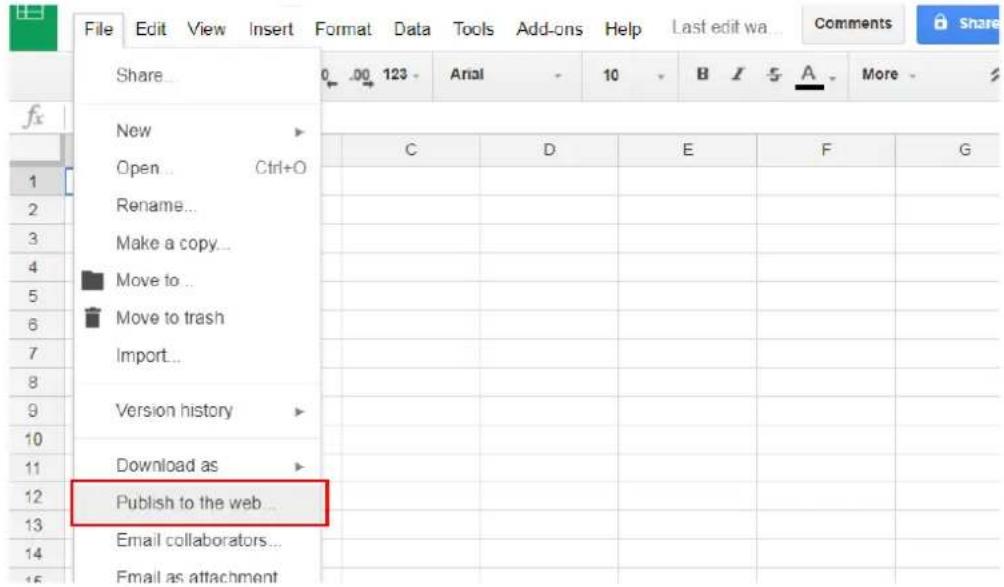
- Make sure the file is saved in CSV format.
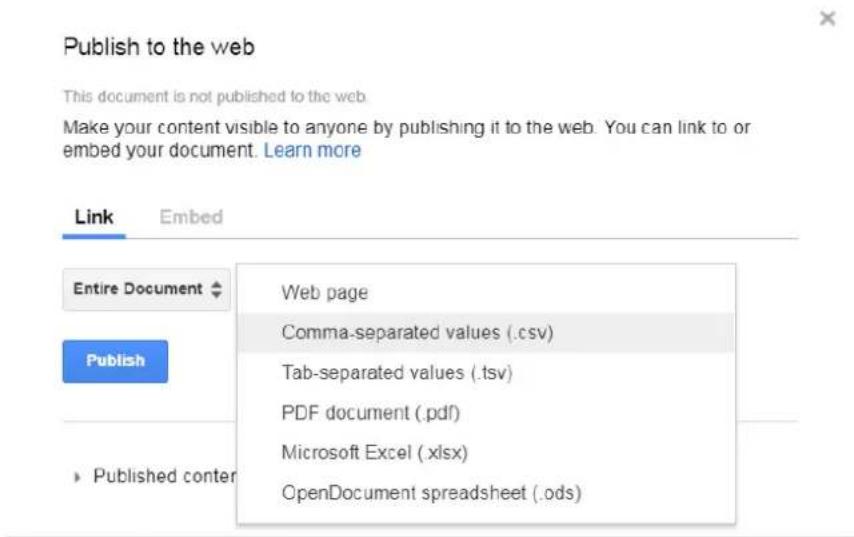
Note: It may take about five minutes for Google data to synchronize with X-Sign Designer.
- Click on the icon 📋 to add a data connection, and you will be prompted to enter the Input Web URL corresponding to the data in Google sheets. Then enter the information for the column, row, and update frequency. You can create the data connection with one single table instead of creating a cell one by one.
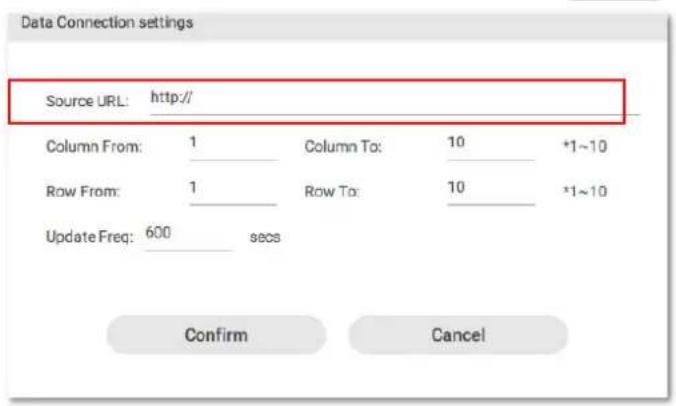
Setting a timer widget
- In X-Sign Designer, click on the icon 📊 to add a timer widget, and you will be prompted to place the timer widget.
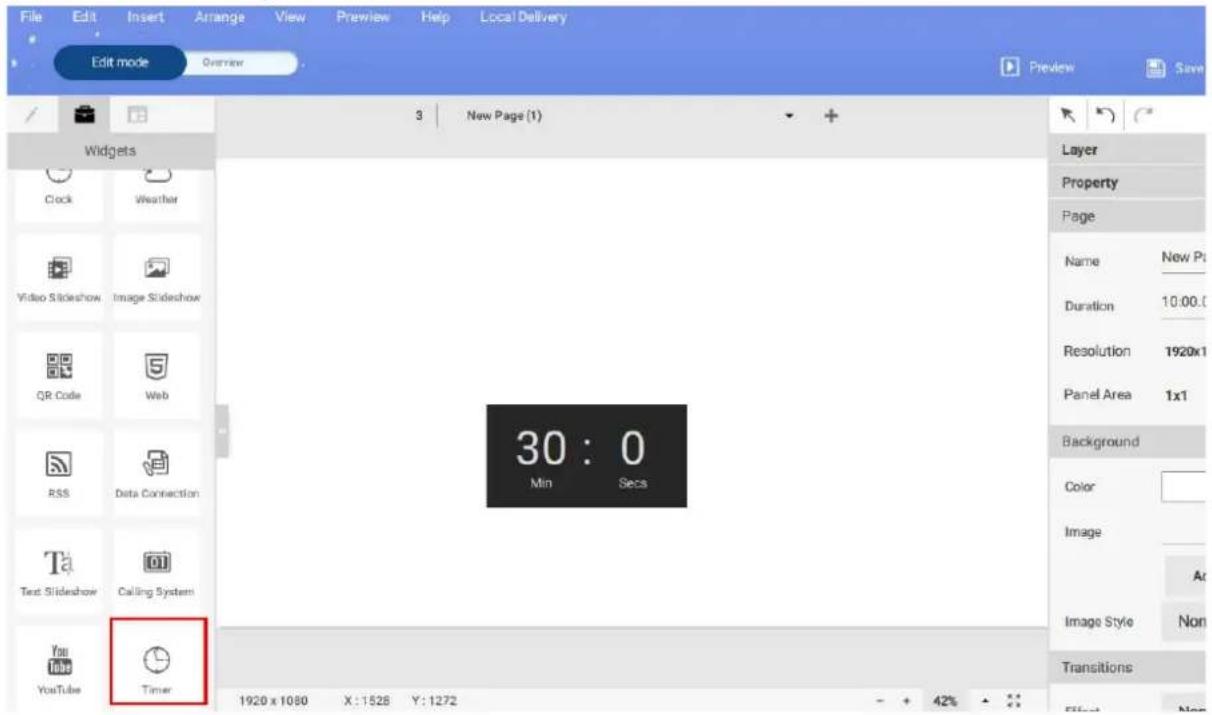
- You can drag the timer widget anywhere in the template.
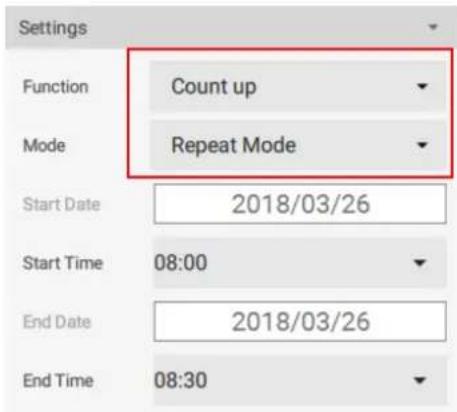
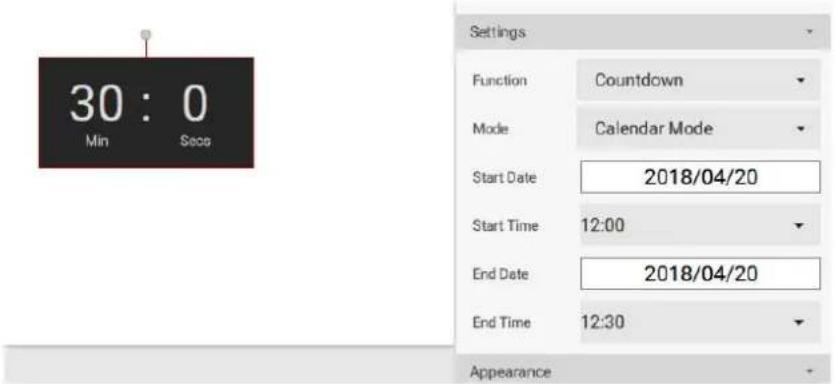
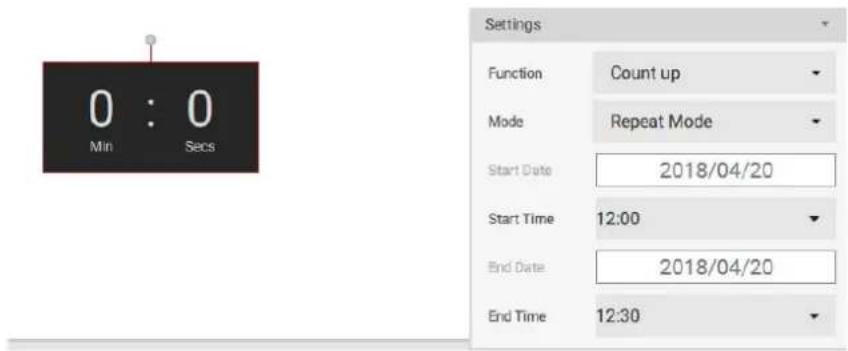
- You may set the properties of the timer widget in the editing area on the right panel. You can switch the count mode to Countdown and Count up. You can also switch mode to Calendar Mode and Repeat Mode.
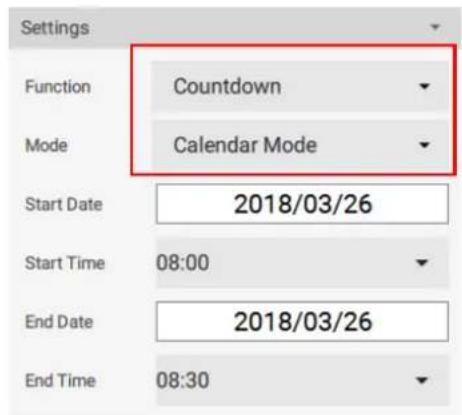
- Countdown shows a sequence of backward counting to indicate the time remaining before your scheduled end time.
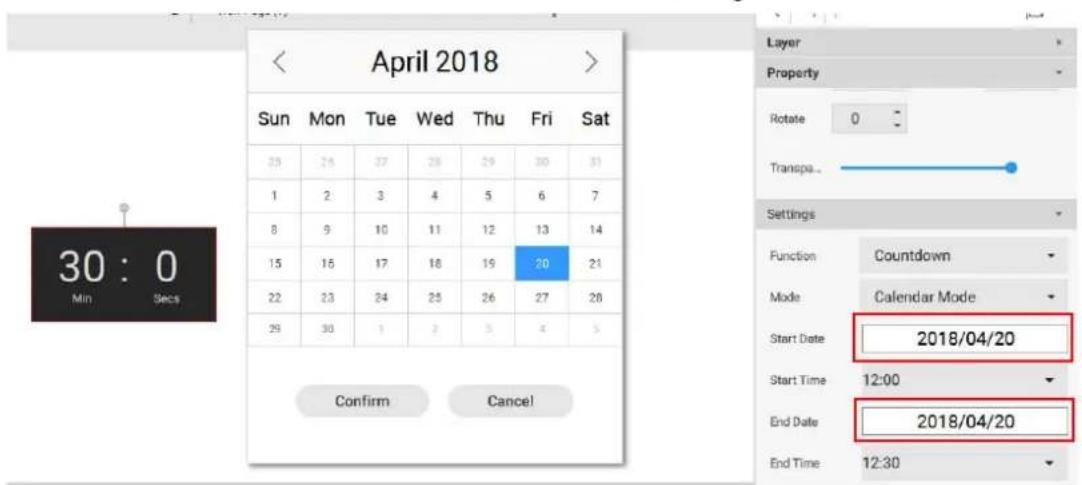
- With Calendar Mode, you can select start time and end time. Open calendar by clicking the start time or end time button. Click Confirm to finish setting.
- Countup shows the adding of time. It starts at 0:0 (minutes: seconds) and counts up to your scheduled end time. With Repeat Mode, the counting will occur everyday between the start and end time repeatedly.
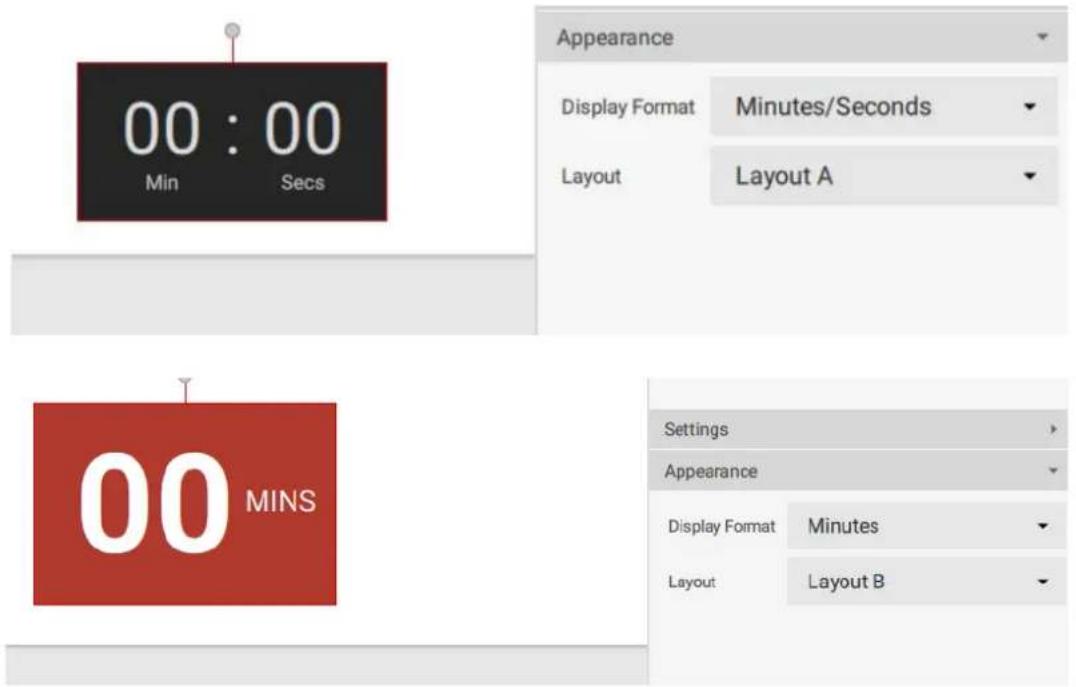
- You can change the display format (Minutes/Seconds or Minutes) and layout (A or B).
Creating an API template using the demo kit
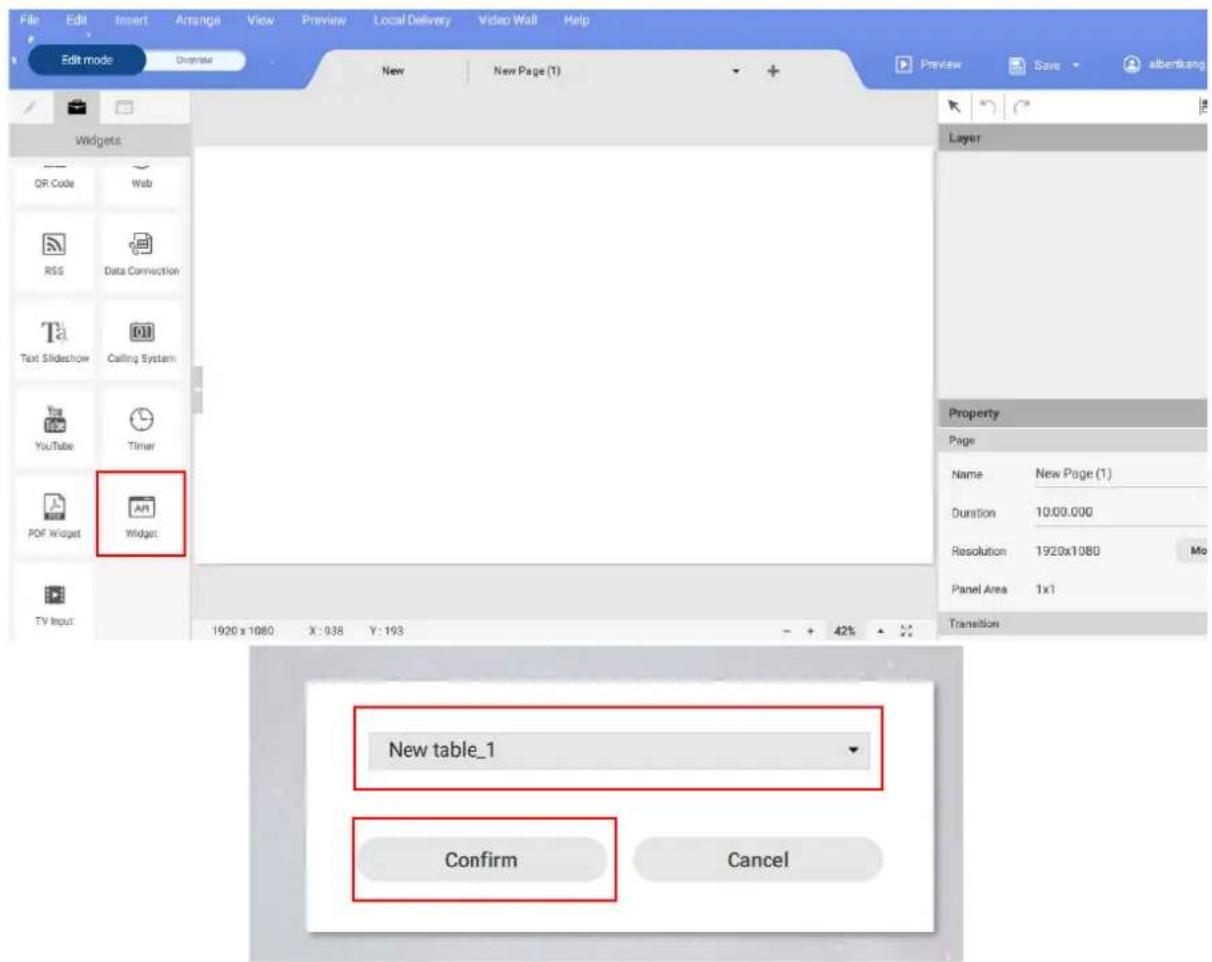
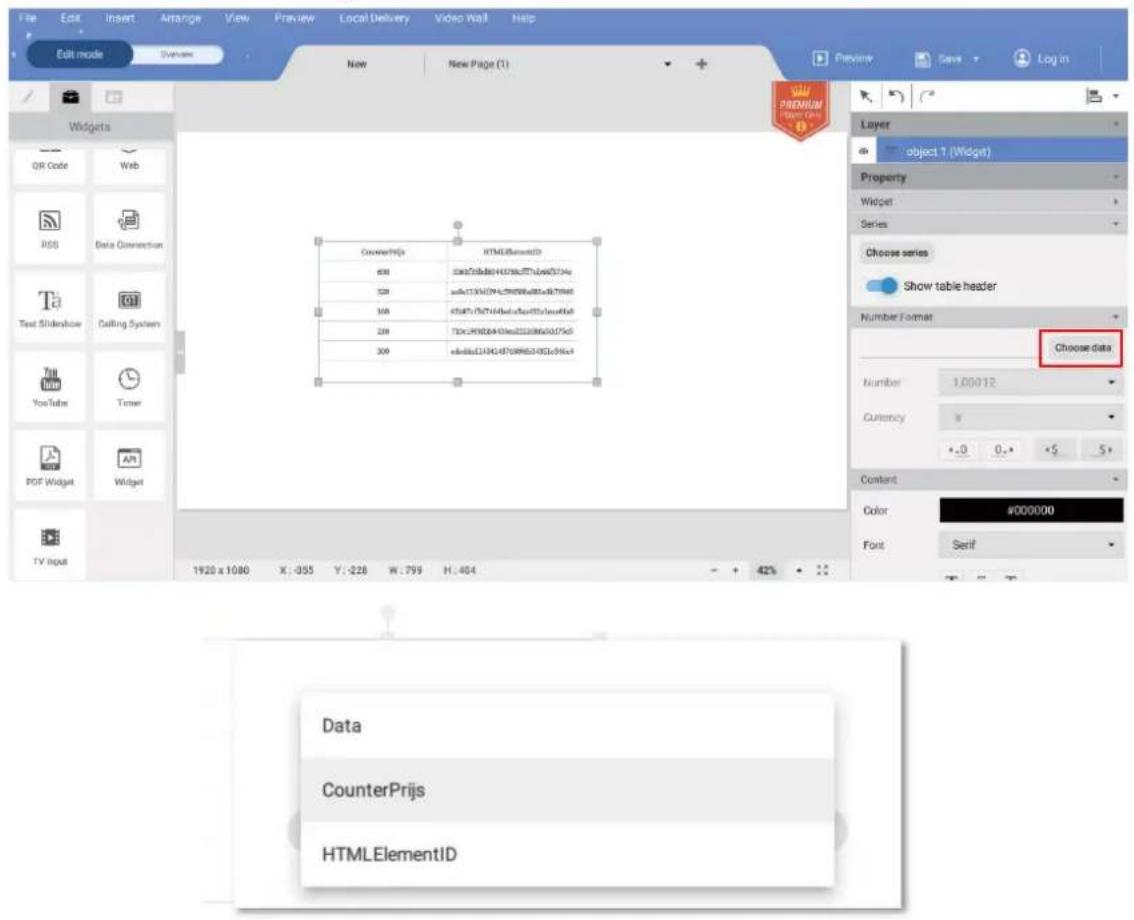
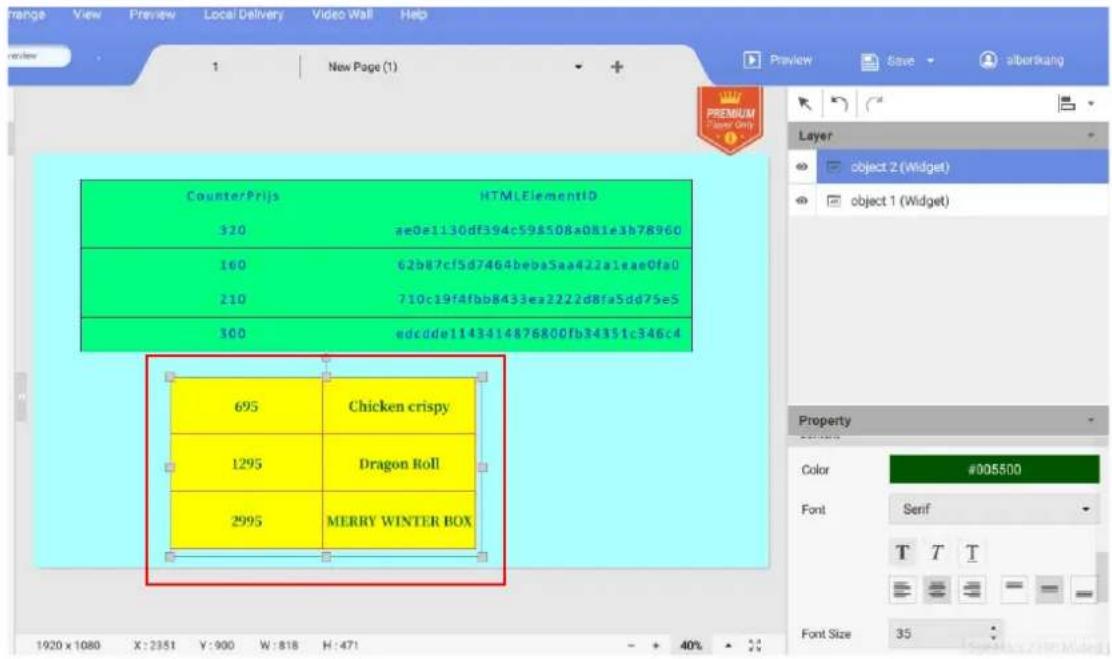
- In X-Sign Designer, click on the icon API to add an API widget, and you will be prompted to select the name of the API table(s) you have created in X-Sign Manager. See Creating an API table in X-Sign Manager on page 38 for more information.
- You can drag the API widget anywhere in the template.
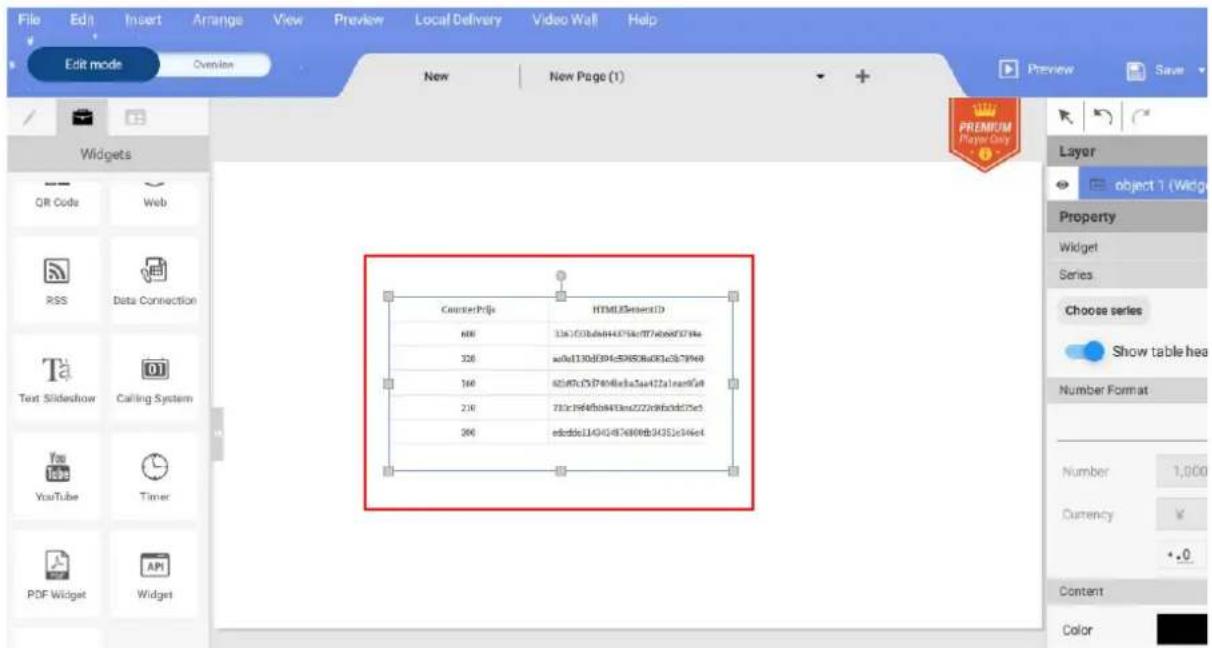
- You can resize the table by double-clicking the table. An editing window will pop up. You can change the current column width or all row height.
| 600 | 3361f33bd60443758cff7eb68f3 734e |
| 320 | ae0e1130df394c598508a081e3b 78960 |
| 160 | 62b87cf5d7464beba5aa422ale ae0fa0 |
| 210 | 710c19f4fbb8433ea2222d8fa5dd75e5 |
| 300 | edcdde1143414876800fb34351c 346c4 |
- You may set the properties of the API widget in the editing area on the right panel.
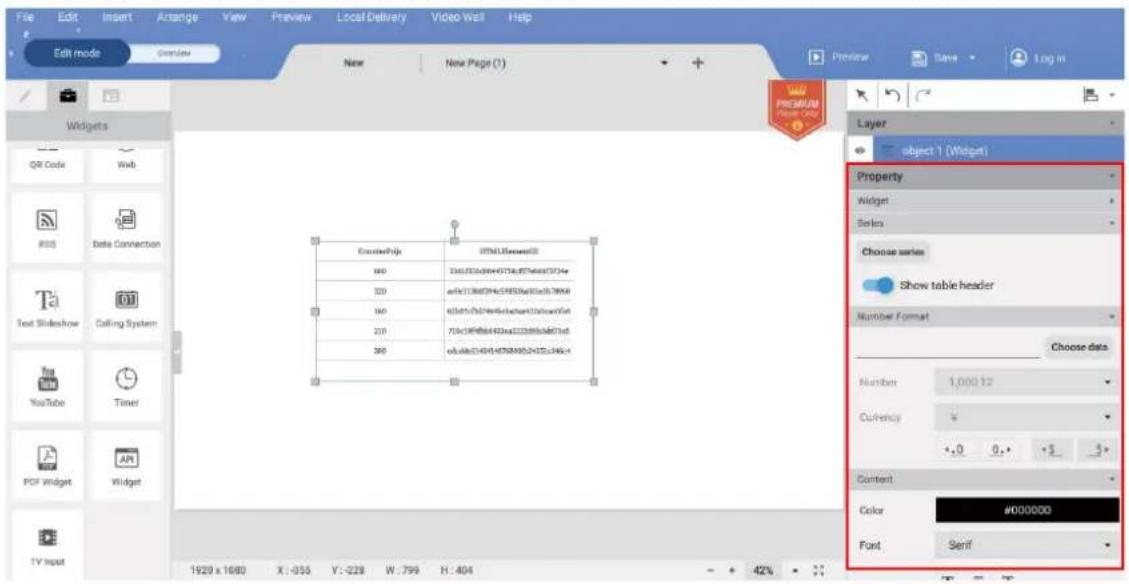
- Click Choose data to arrange the data format. Choose the format and click Confirm.
- You can edit number and currency under Number Format.
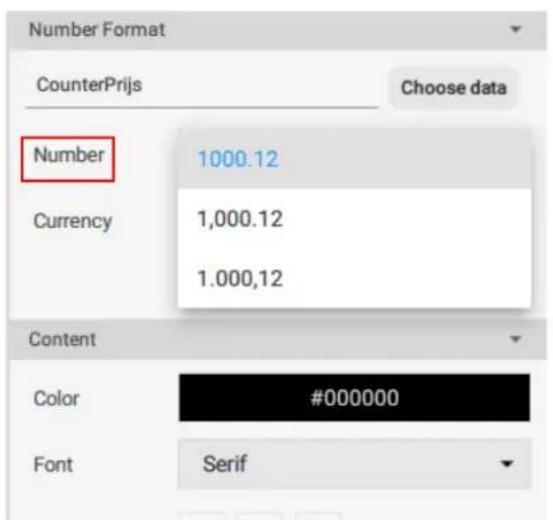
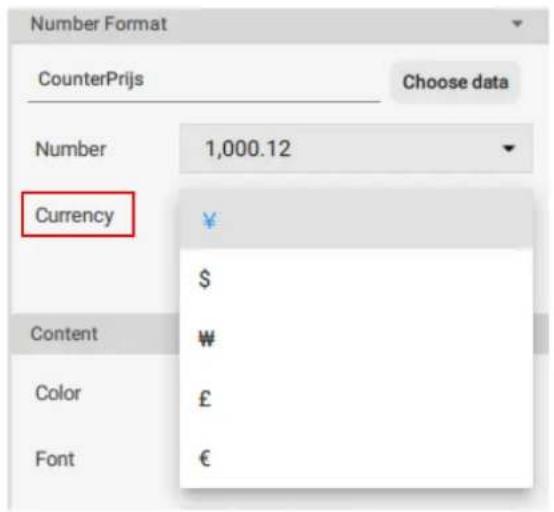
-
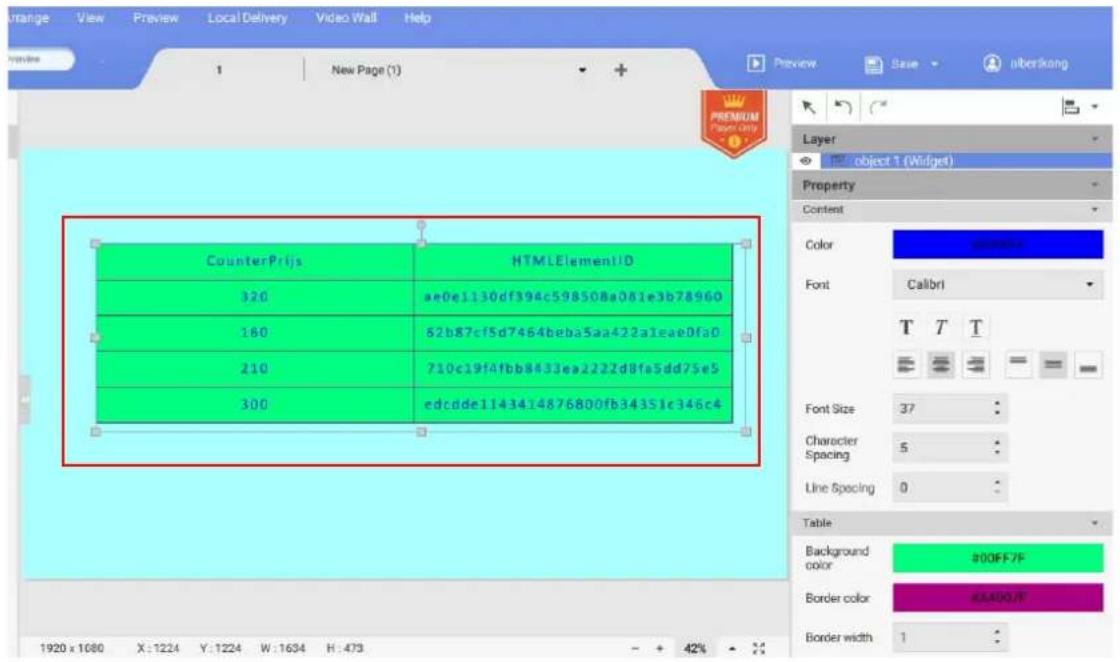
You can choose to display the table header by setting Show table header to on.
-
After setting the format and properties, you will see the changed outline.
- You can also add another API table to the existing template.
Creating a TV Input source widget in X-Sign Designer
- In X-Sign Designer, click on the icon 📋 to add a TV Input widget, and you will be prompted to place the TV Input widget. The TV Input source is transmitted through an HDMI cable.
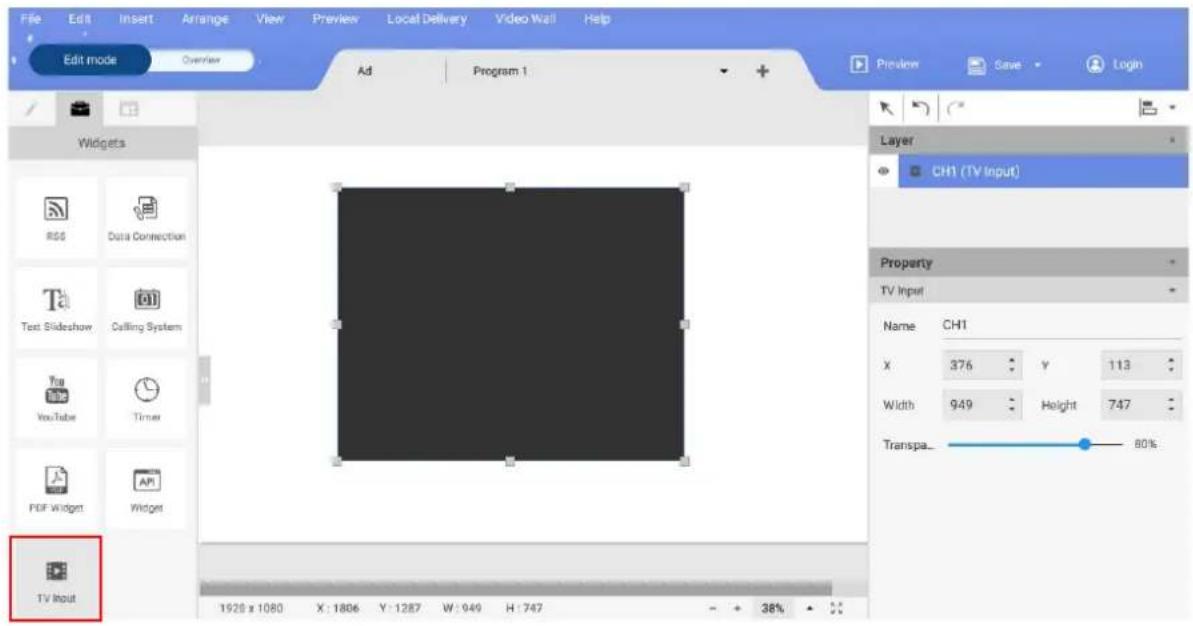
- You can drag the clock widget anywhere in the template.
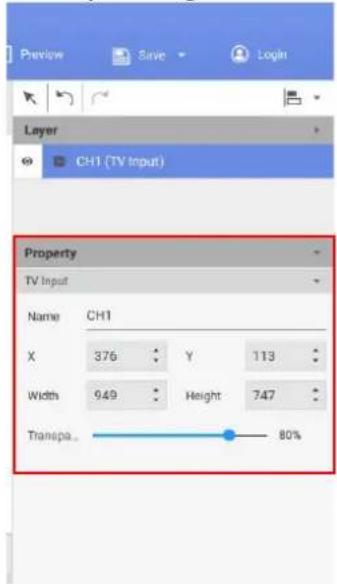
- You may set the properties of the TV Input widget in the editing area on the right panel.
Setting background music in X-Sign Designer
Once you have completed a project, you can add a music file to play in the background when the project is displayed. The following is an introduction to adding music to the background of a project.
To add music to a single page in X-Sign Designer:
I. While the project is in Edit Mode, go to the Audio panel and toggle the With Background Audio switch to the on position.
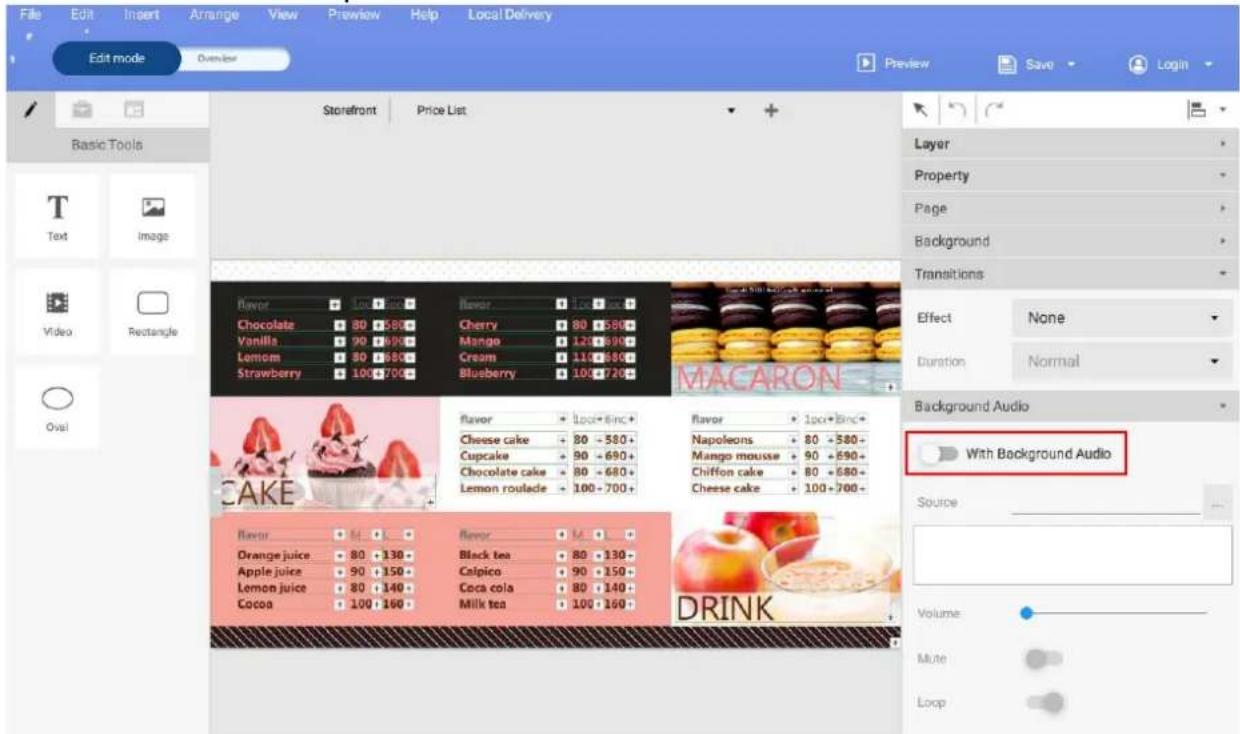
Note: Make sure no bounding boxes are selected in the canvas in order to access the Audio panel.
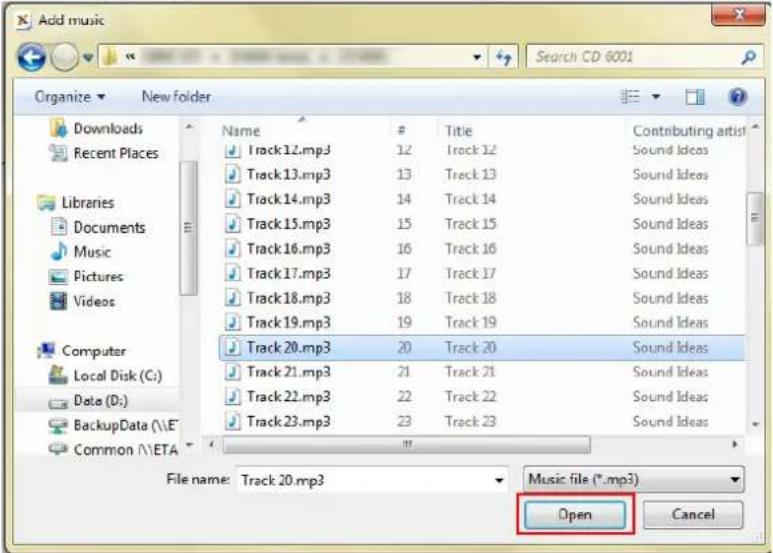
- Select the ... Button to import a music file. Choose the mp3 file from your hard drive and click Open.
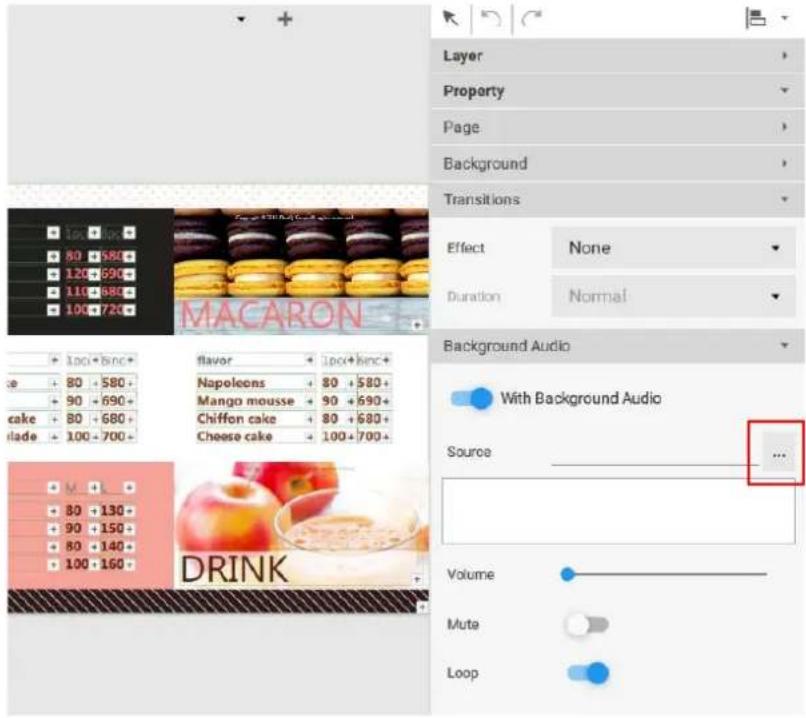
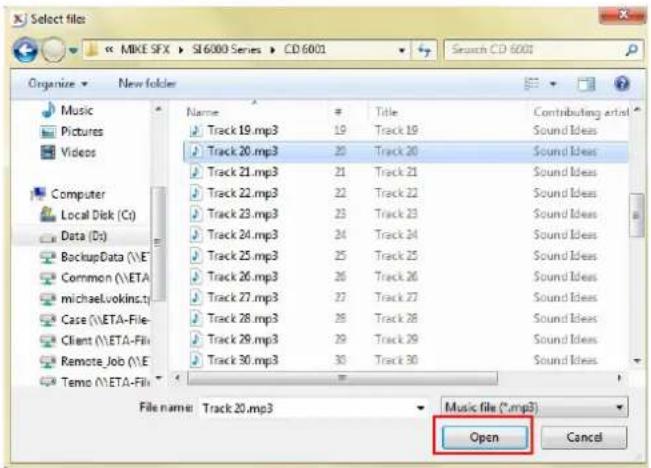
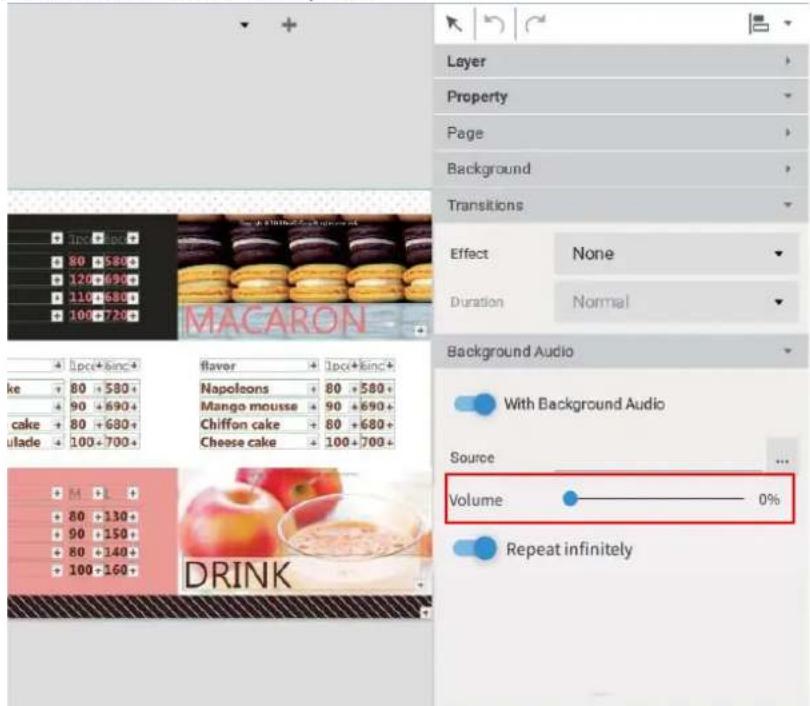
3. You can adjust Volume in the Audio panel.
To add music to an entire project in X-Sign Designer:
I. While the project is in Overview Mode, click the music button at the top of the canvas.
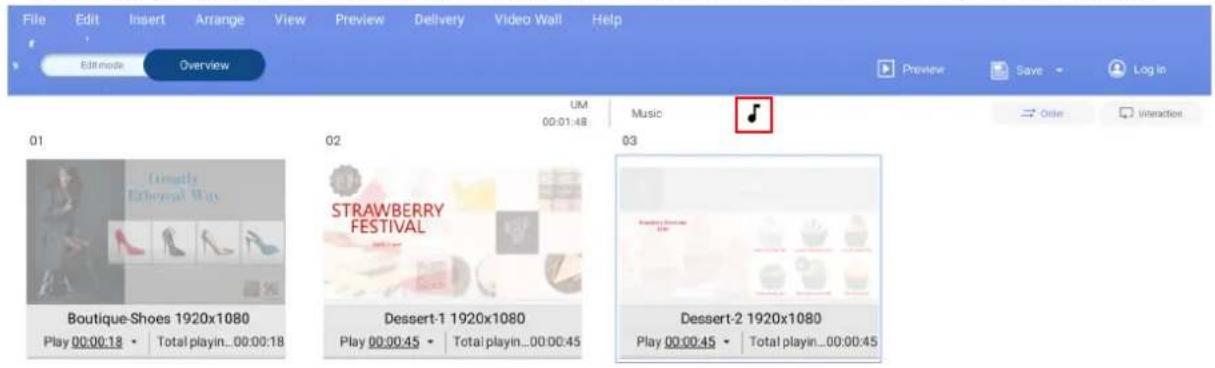
2. Choose the mp3 file from your hard drive and click Open.
3. You can replace or delete the mp3 file by selecting the following:
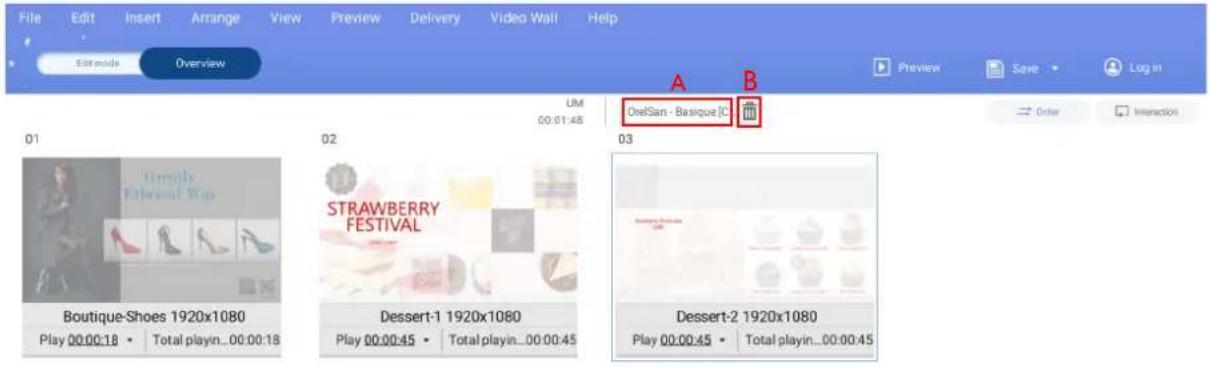
A. Replace - You can replace the audio file by clicking on the file name and selecting another file from your hard drive.
B. Delete - You can delete the audio file by selecting the trash icon.
Note: The audio file will play on a continuous loop for the entire duration of all the pages.
Changing the playing order of pages
Once all your project pages are completed in X-Sign Designer you can change the playing order for the final content.
To change the page order of a project:
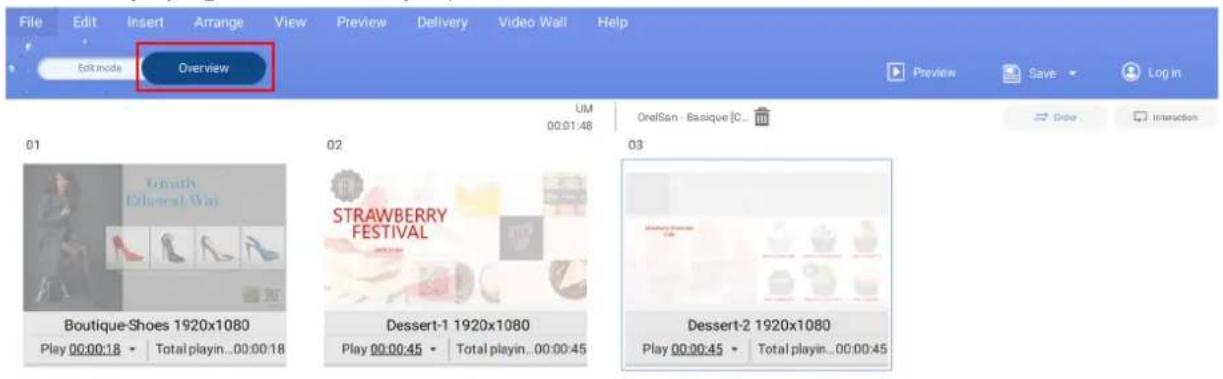
I. Select the Overview button to see the page layout of the project, the order page icons represent the playing order for the project.
- Select the page icon you want to move and drag it left or right to the desired position.
Encrypting a project in X-Sign Designer
Watch demonstration video:
You can encrypt your project using X-Sign Designer. The main purpose of project encryption is to prevent others from playing your file.
To encrypt a project in X-Sign Designer:
I. Go to File > Encrypt Project.
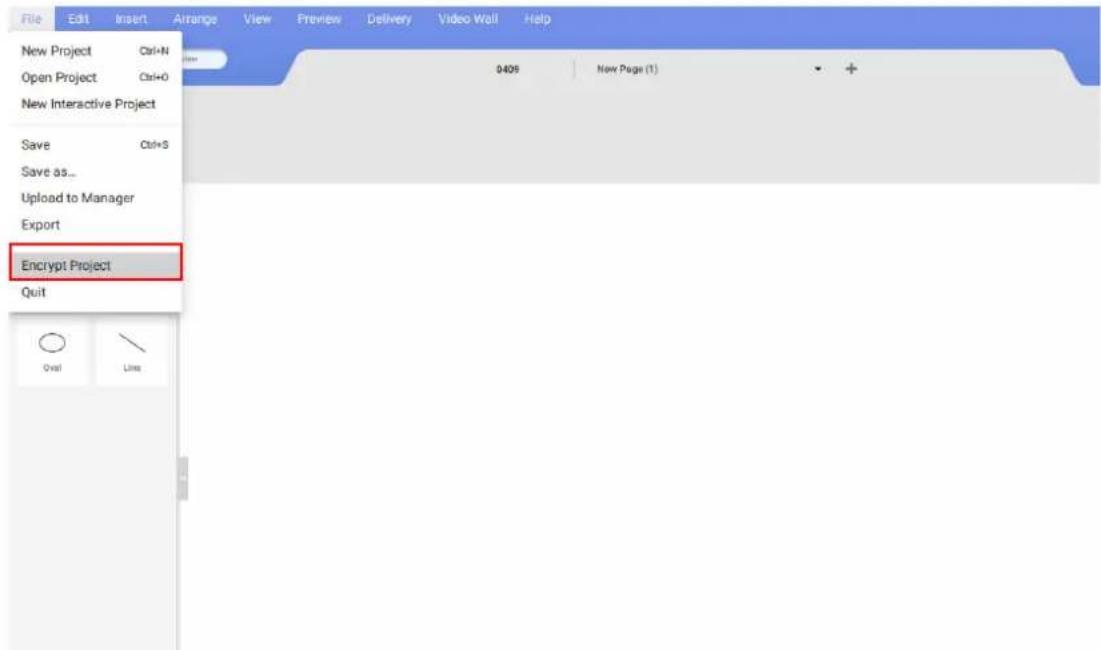
2. Select the file you want to encrypt. Enter six-digit code as your verification code, then click Confirm.
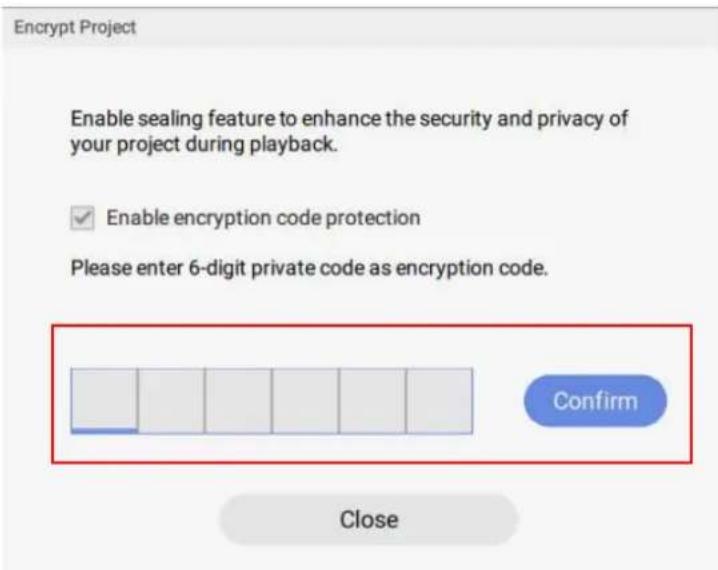
Note: Use numbers (0-9) or upper and lowercase alphabets (A-Z, a-z) only. Special characters (.)()(_) are unacceptable.
- You can have your encrypted project delivered in X-Sign Player using Local Delivery or Standalone(USB).
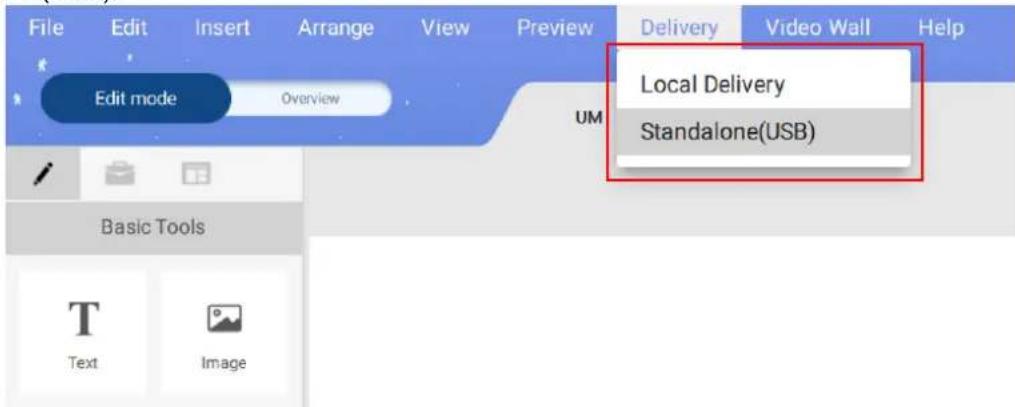
- For more information about playing encrypted projects, please refer to Playing encrypted projects on X-Sign Player on page 101.
Opening an X-Sign I.x project file
X-Sign Designer 2.x can open projects created in X-Sign Designer 1.x. The following is an introduction of opening and saving an X-Sign Designer 1.x file.
To open an X-Sign Designer I.x project:
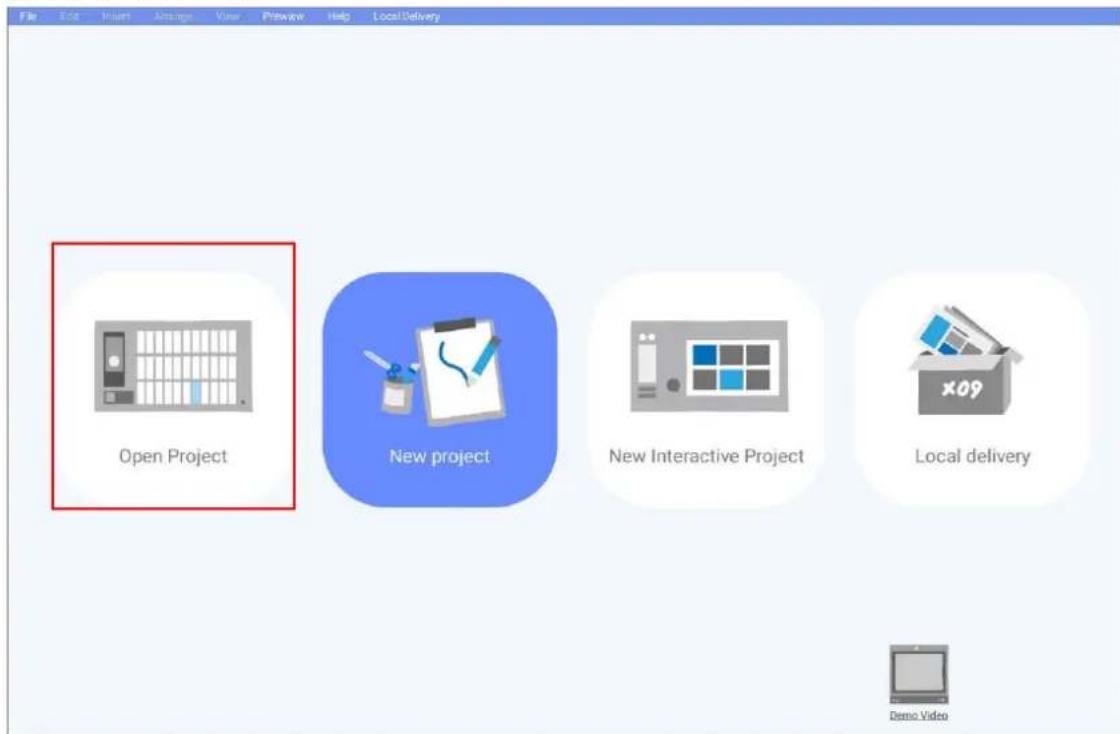
- Launch the X-Sign Designer software and click Open Project (You can also select File > Open Project or Ctrl + O).
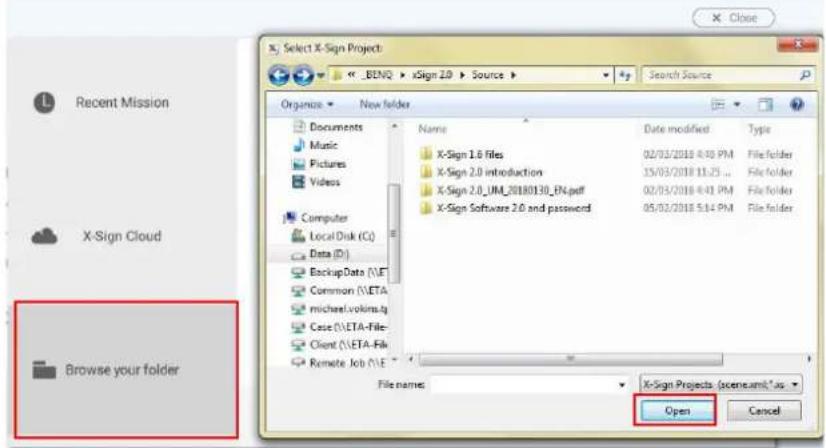
- Click Browse your folder. Locate the I.x project file on your hard drive and click Open.
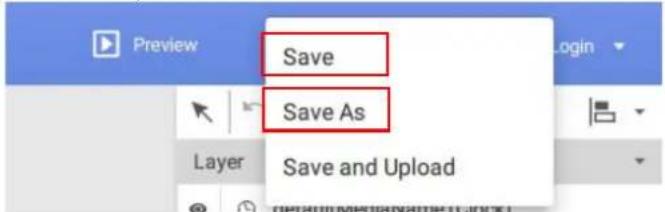
- Once opened in X-Designer, X-Designer 1.x project files will be automatically saved to a 2.x project file. To save the project as an X-Sign Designer 2.x file, click either the Save or Save As button in the top right corner (You can also select File > Save or File > Save As).
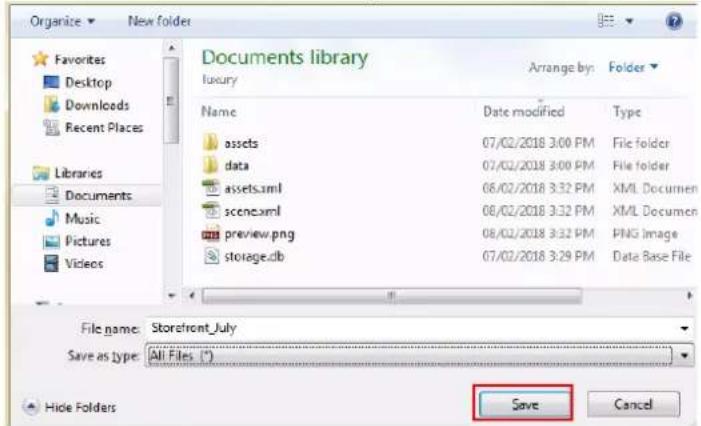
- Rename the project and choose the location on your hard drive, then select Save.
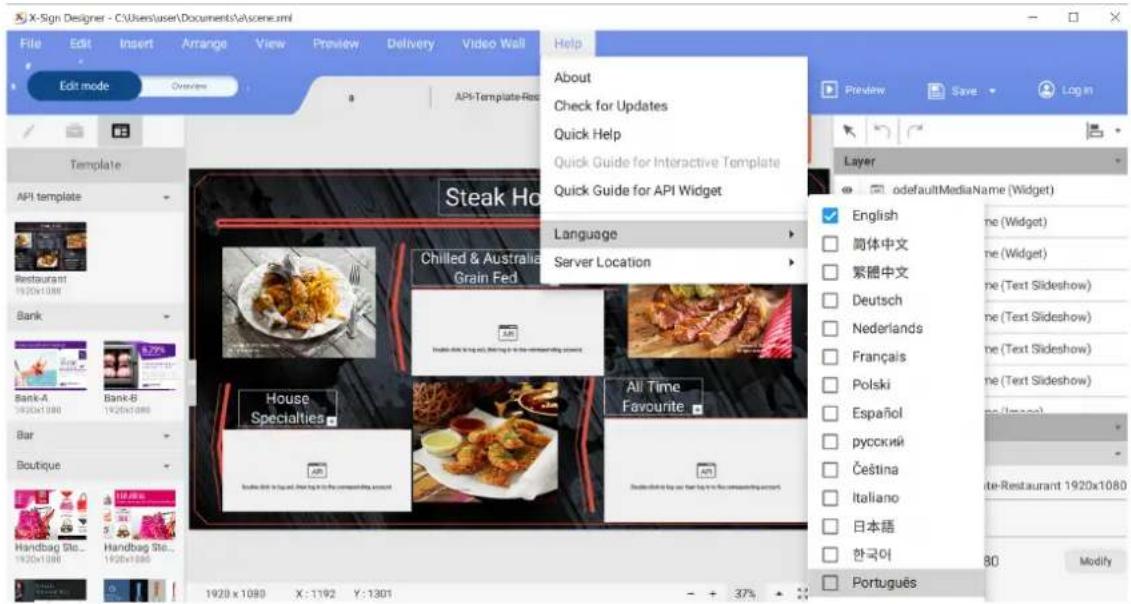
Changing your language in X-Sign Designer
I. Open your X-Sign Designer, then click Help.
2. Scroll down and click Language.
3. Choose your language from the language menu.
Player
Switching the mode of Player
There are three modes for Player to play the content:
• Standalone (USB): Directly play the content from USB.
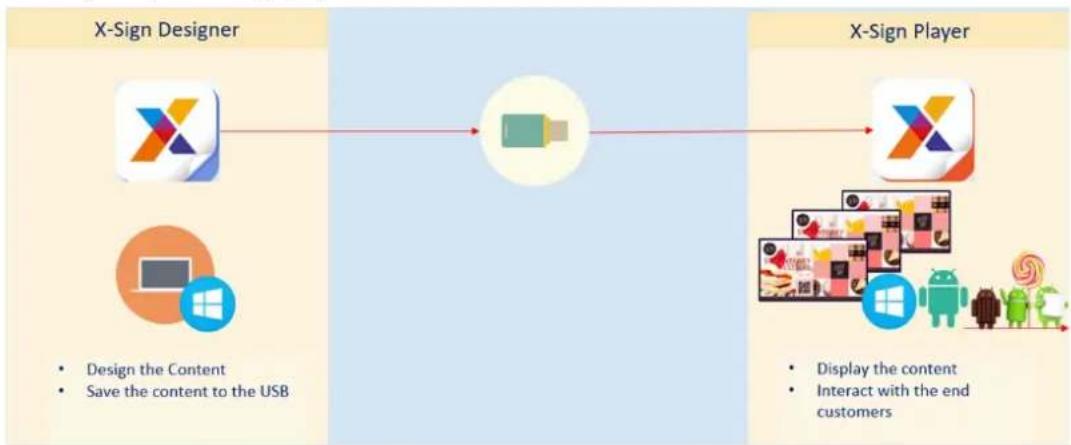
flowchart
graph LR
    A["X-Sign Designer"] --> B["Design the Content\nSave the content to the USB"]
    C["X-Sign Player"] --> D["Display the content\nInteract with the end customers"]
- Local Delivery (need the license): Play the content from Designer connected in the same subunit with Player.
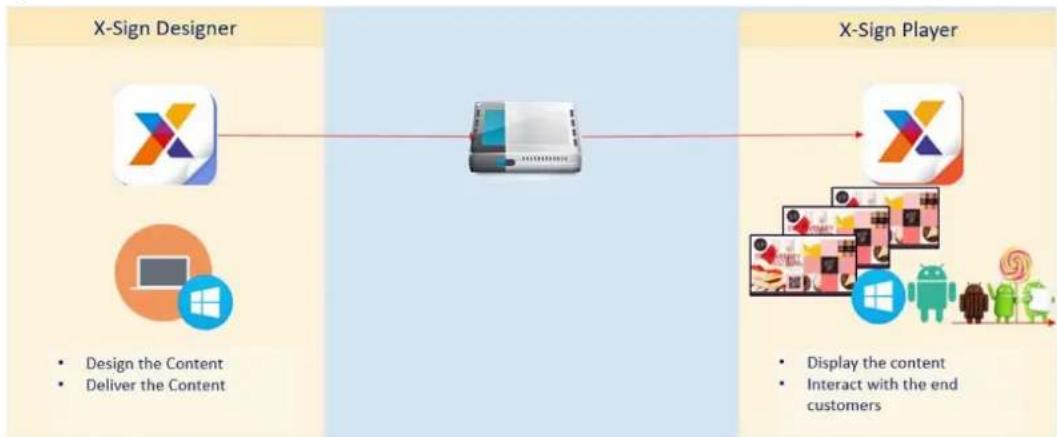
flowchart
graph LR
    A["X-Sign Designer"] --> B["Controller"]
    B --> C["X-Sign Player"]
    D["Design the Content\nDeliver the Content"] --> B
    E["Display the content\nInteract with the end customers"] --> C
• Manager (need the license): Play the content from Internet. Player has to pair with Manager.
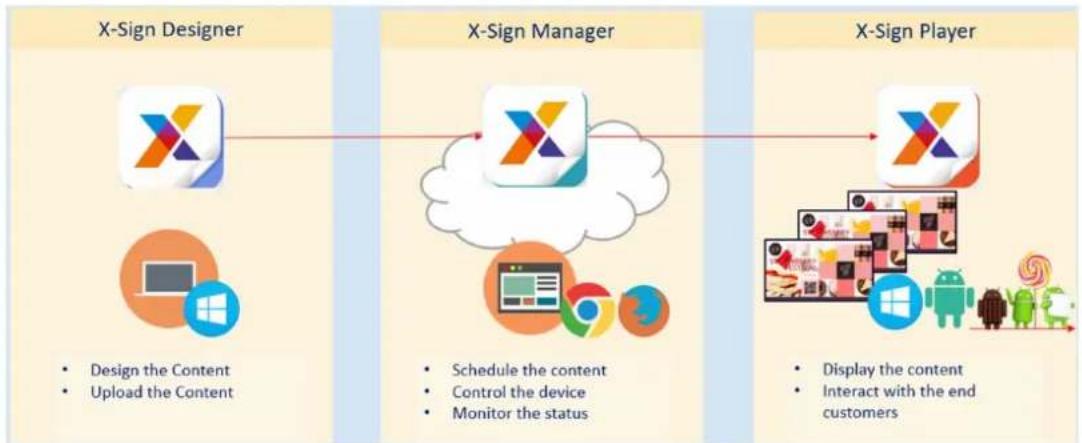
flowchart
graph LR
    A["X-Sign Designer"] --> B["X-Sign Manager"]
    B --> C["X-Sign Player"]
    style A fill:#f9f,stroke:#333
    style B fill:#ccf,stroke:#333
    style C fill:#cfc,stroke:#333
I. Press Esc button on Windows Player or MENU on BenQ Smart Signage remote controller to see the menu bar.
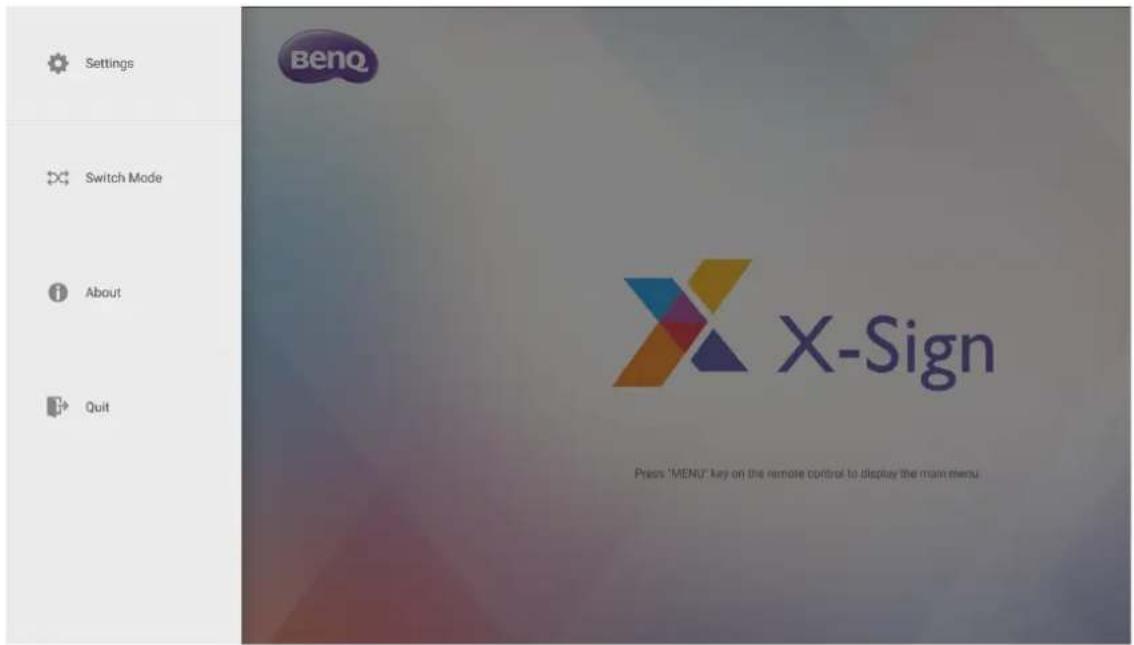
- Choose Switch Mode.
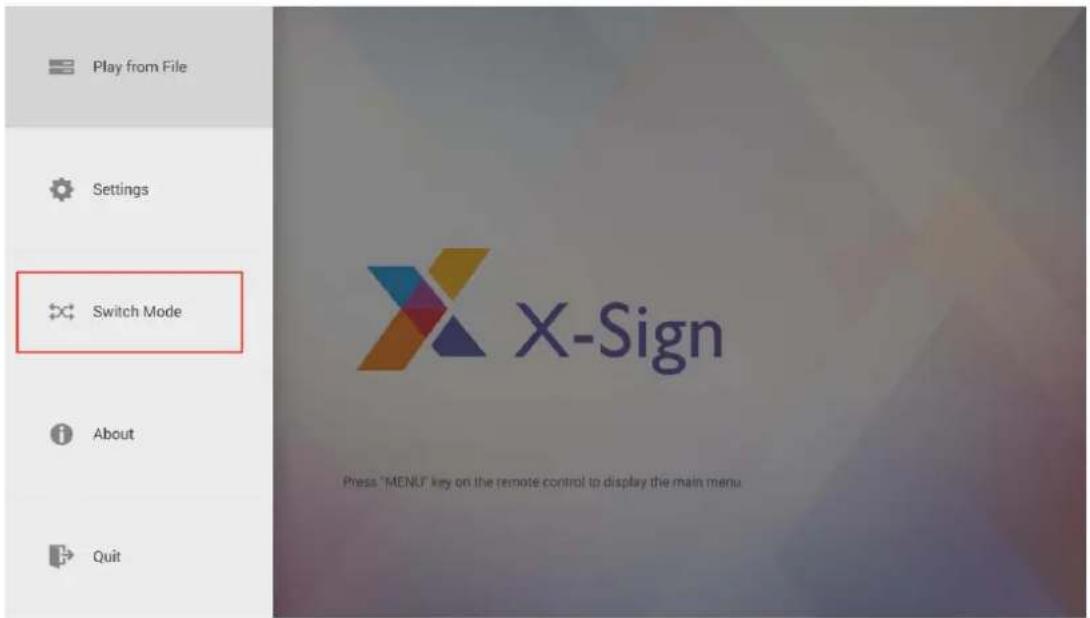
- Select the mode you want to play the content.
Playing files with USB
Watch demonstration video:
In X-Sign Player, for standalone function you can play files with your local storage or everywhere with your USB. The file in the USB can be played automatically once the USB is connected to the device. Set the auto play to off if you want to select specific files. The following is an introduction of how to play file from USB.
How to pack .xplan file
- Standalone(USB)
I. For Standalone(USB), fill in the schedule name, choose the project you want to play in the schedule and select the start and end time. Press Save to continue.
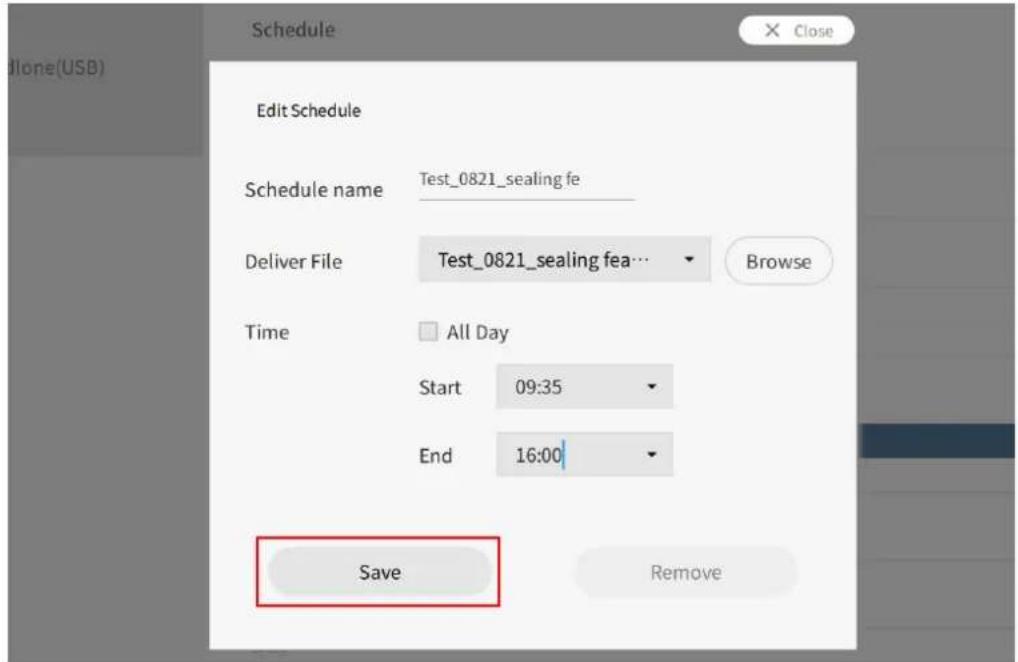
2. Select Standalone(USB) to play the file.
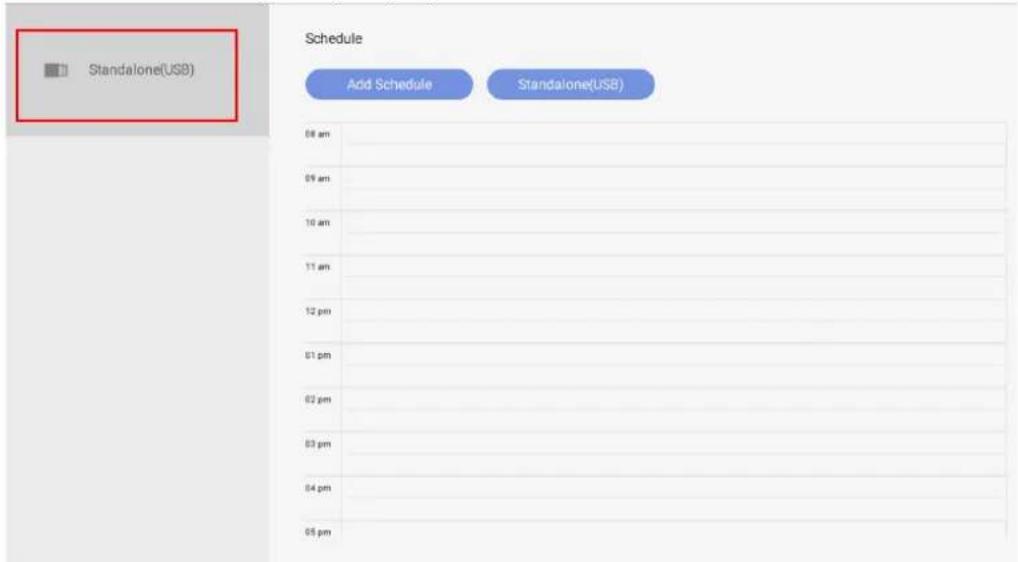
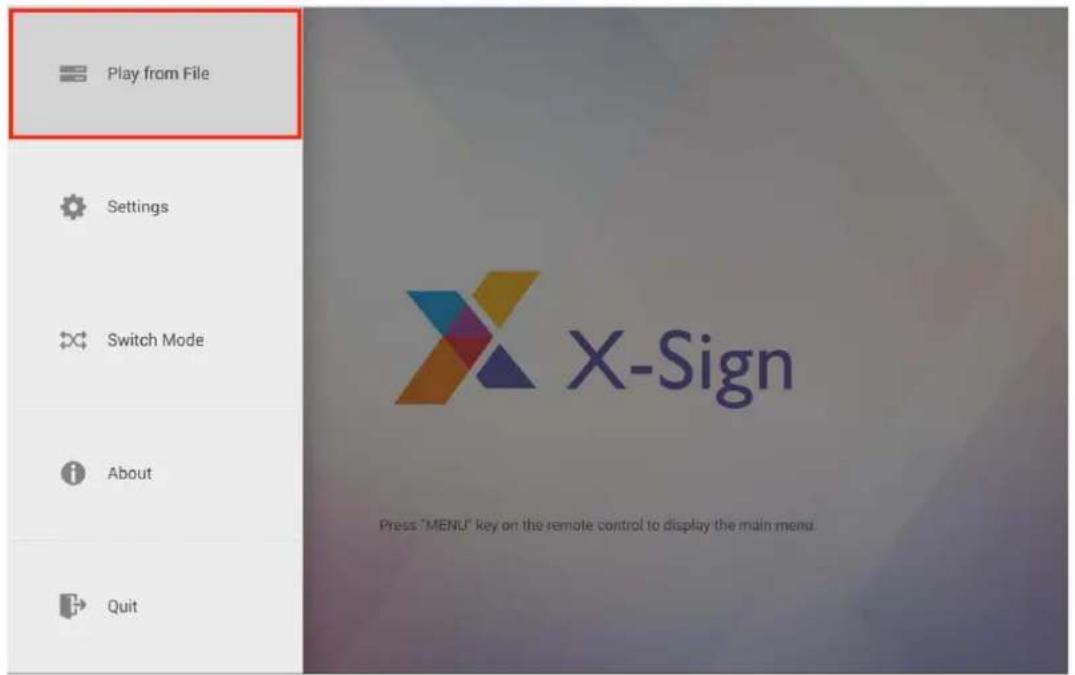
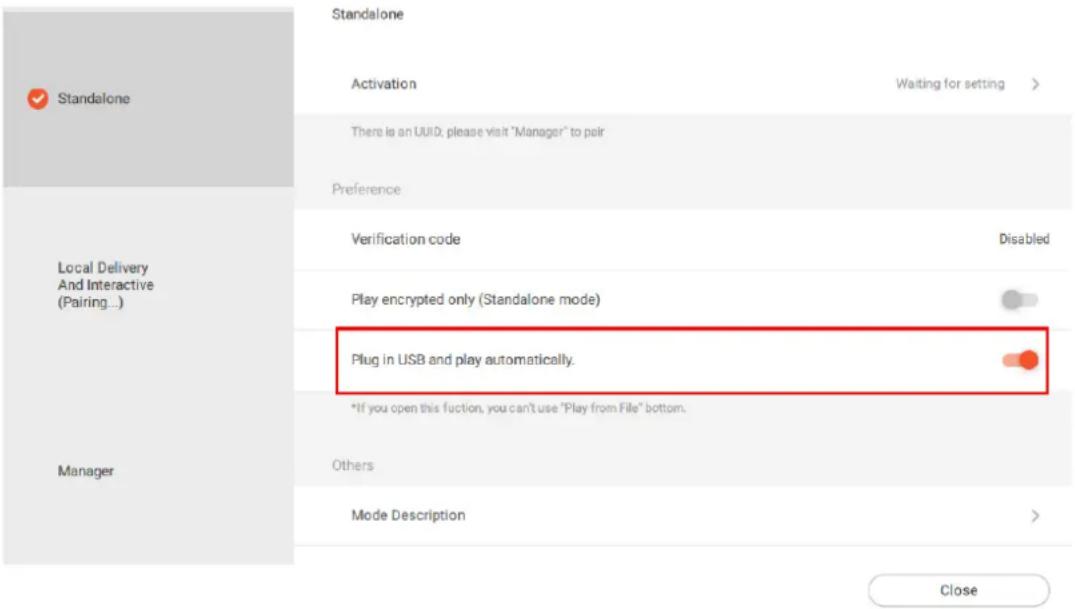
If you want to use Play from File to display your content, you should turn off Plug in USB and play automatically in Standalone mode first. Therefore, Play from File will show on the menu.
I. Tab the menu bar again, and press Play from File.
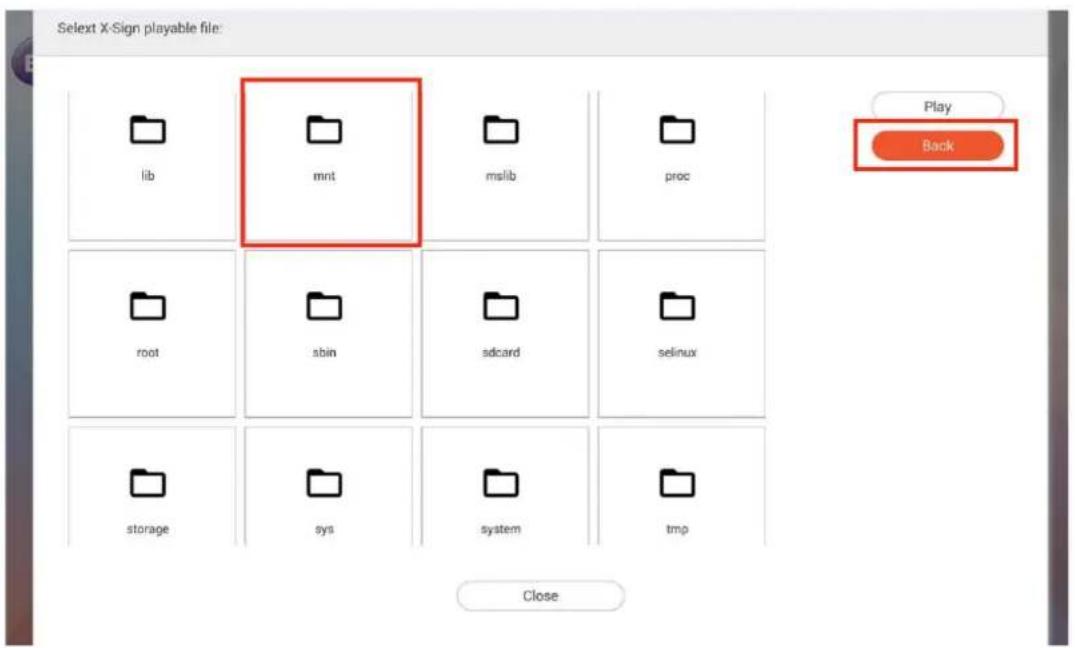
- Keep pressing Back to go back to the root folder. Then go to the "mnt" folder.
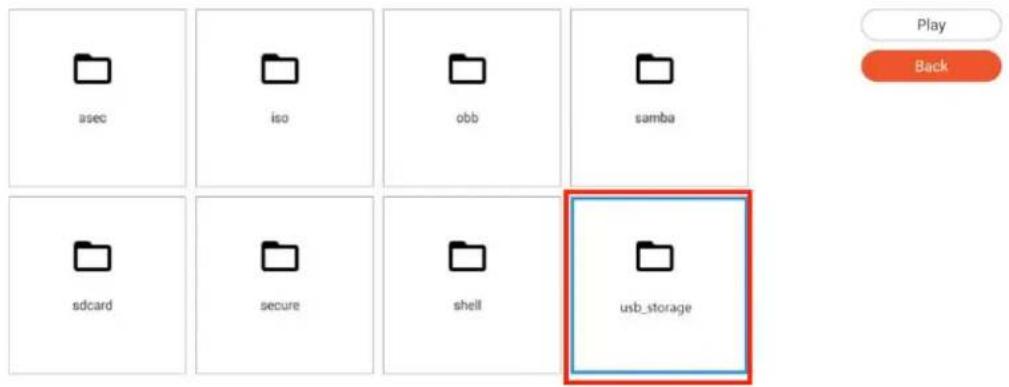
3. Select the "usb\_storage" folder.
Selext X-Sign playable file:
4. Choose the file you want to play, then press Play.
Selext X-Sign playable file:
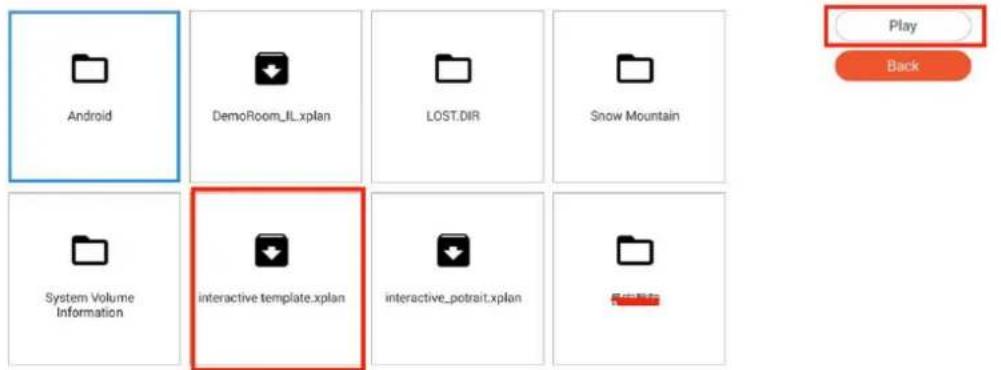
5. Now you can enjoy your content.
Note: Once you play files successfully, the path will be remembered. You don't have to choose the path again next time you play files.
While turn on Plug in USB and play automatically in Standalone mode, you can play content with your USB. Please be noted that if USB contains both .xplan files and other media files, X-Sign Player will play .xplan files. However, if you would like to play media files, you need to delete .xplan files from your USB to ensure your USB only contains media files which you would like to play.
Watch demonstration video:

If you would like to play the latest .xplan file automatically, please turn on Plug in USB and play automatically in Standalone mode.
If you would like to play the media files in the root folder of your usb automatically, please turn on Plug in USB and play automatically in Standalone mode and make sure your USB doesn't contain any .xplan files. Please delete .xplan files from your USB to ensure your USB only contains media files which you would like to play.
Note: X-Sign Player can read and play the media files in the root folder of USB. Only X-Sign Player (Android, iOS, Windows) version 2.6 and above support this function.
To use USB autoplay, switch to Standalone(USB) mode and open the toggle Plug in USB and play automatically.
- Play Rules
| Item Supported format | |
| Image duration 5 seconds | |
| Supported Image format .jpeg, .jpg, .png, .gif, .bmp, .svg | |
| Video duration Depends on video length | |
| Supported Video format .avi, .mp4, .m4v, .rmvb, .mov, .mkv, .mpg, .3gp, .webm | |
| Play order Alphabetical order | |
| Maximum play items 30 (including images and videos) | |
| Priority of Standalone(USB) features | .xplan > media files |
• Specific rules for BenQ Smart Signage
I. 811 platform (SL4302K, SL5502K, SL6502K): USB autoplay supports 4K videos
- Non-811 platform: USB autoplay doesn't support 4K videos; special 4K is incompatible with USB autoplay.
Note: the codec limitation on each platform can be found on BenQ eSupport.
Activating an Interactive function in Standalone mode
You can activate your license both in Standalone mode and Local Delivery mode.
- Activate license in Standalone mode:
I. Choose Standalone > Activation.
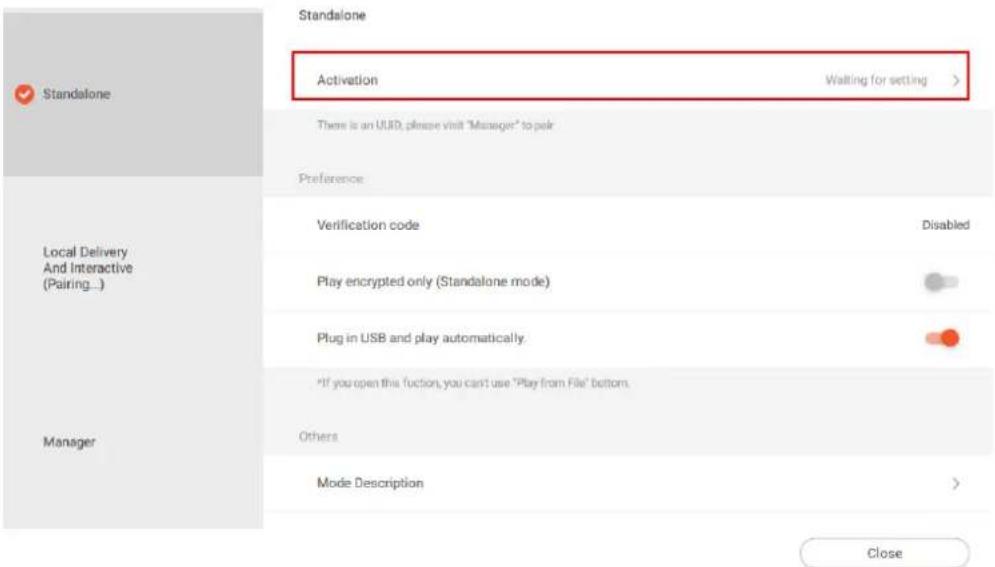
2. Here you can find the Activation Code.
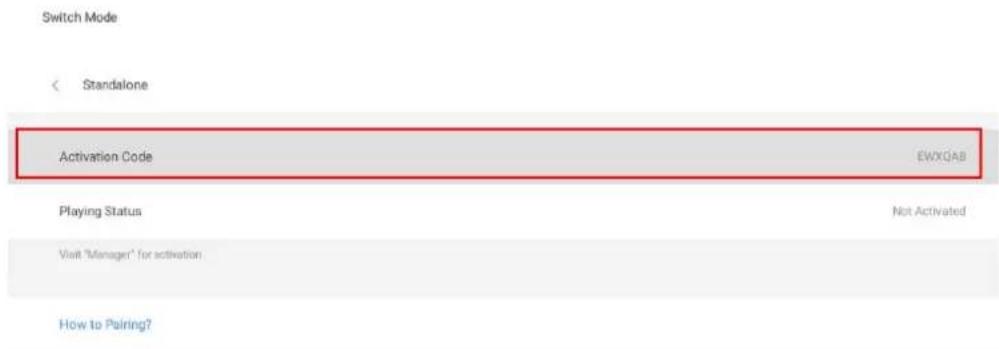
- Activate license in Local Delivery mode:
I. Choose Local Delivery > Activation.
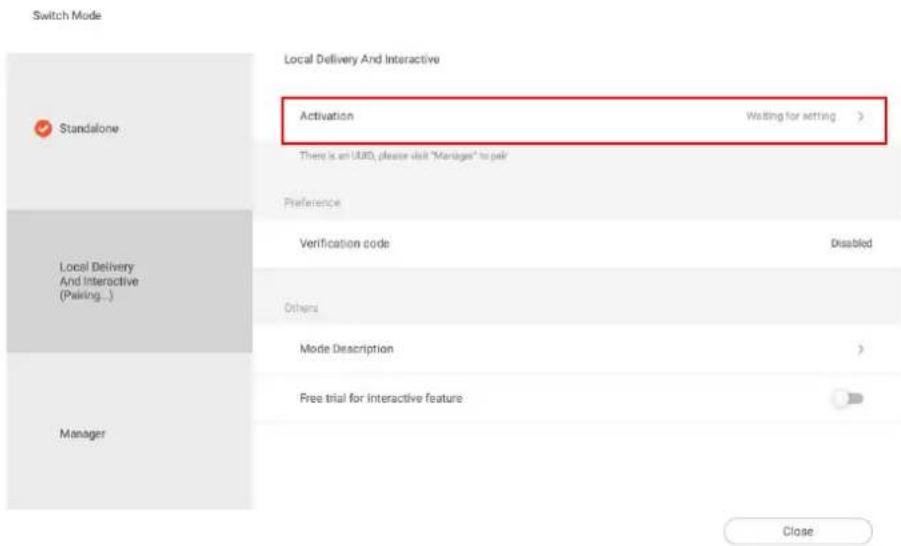
2. Here you can find the Activation Code.
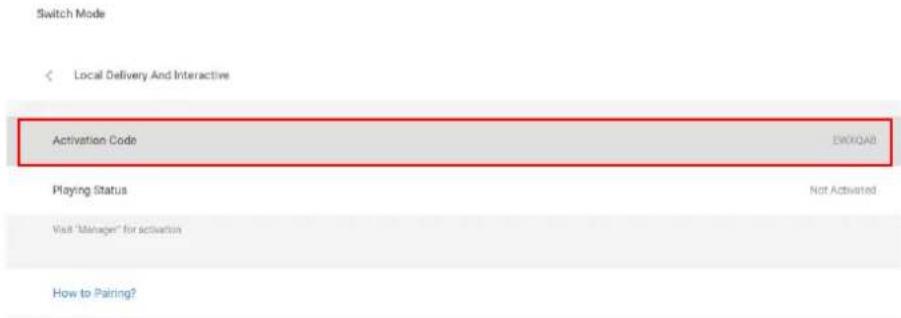
Once you have purchased an Standalone Premium License, you can configure your device. The following is an introduction for activating an Interactive License in X-Sign Player.
To activate your standalone premium license in X-Sign Player:
I. Select unpaired licenses, then click Mapping.
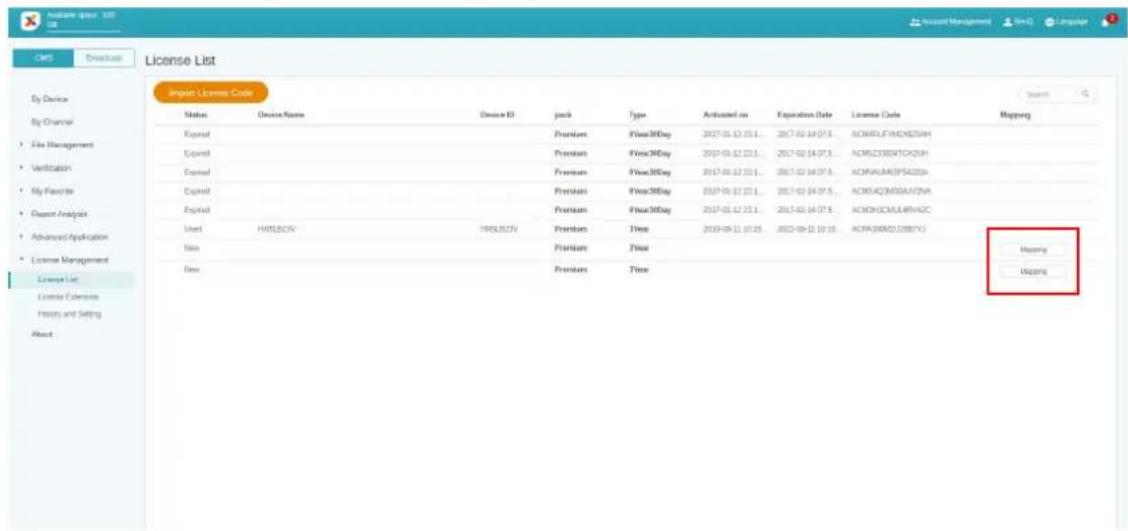
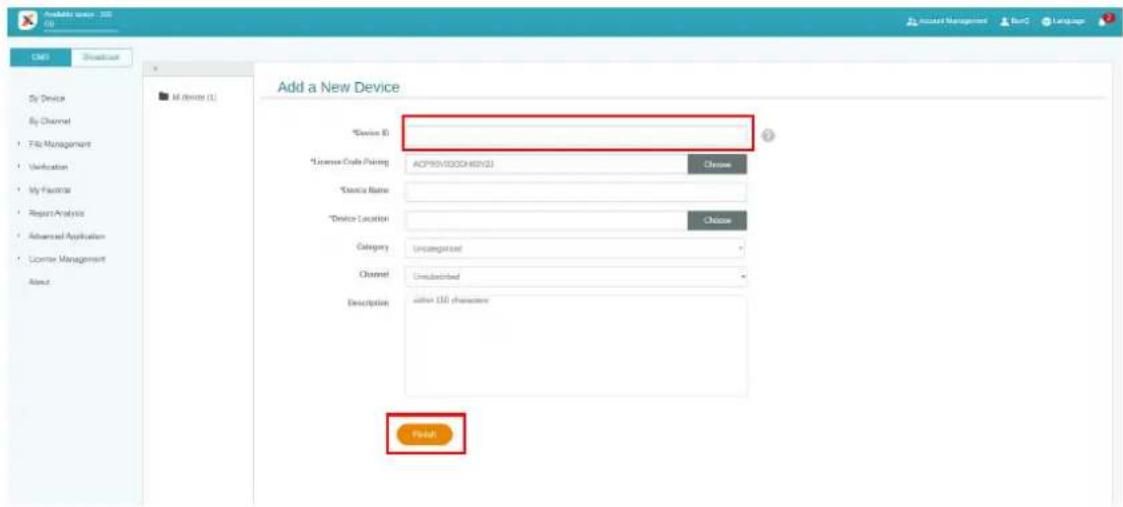
2. After mapping licenses, fill in the activation code which shows on your X-Sign Player, then click Finish to complete pairing.
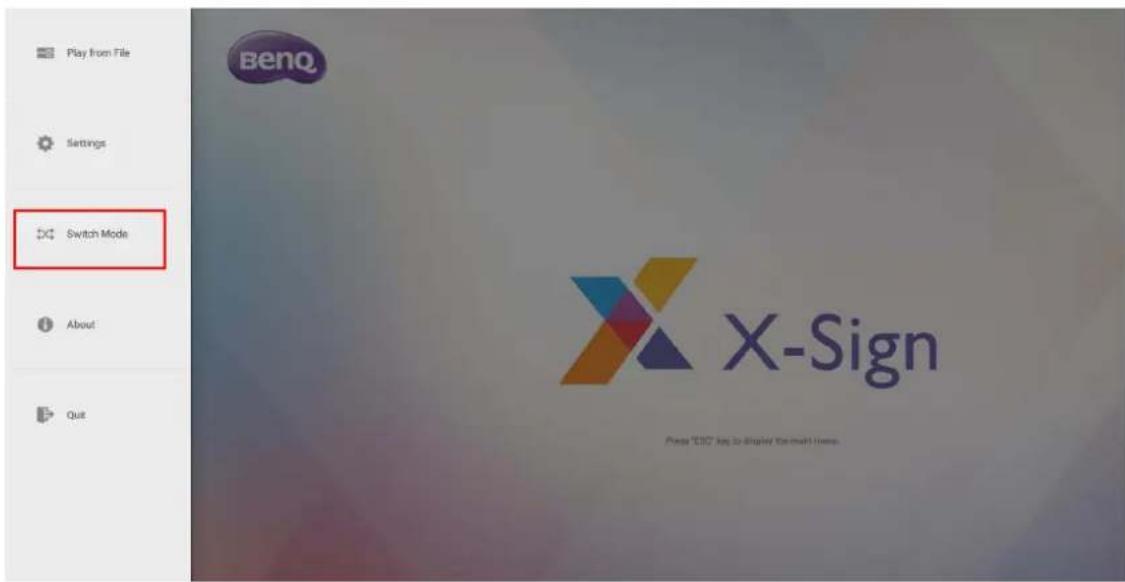
3. Choose Switch Mode.
- When the pairing is done on X-Sign Manager, you can start to set schedules. Set schedules with Standalone(USB) mode or Local Delivery mode.
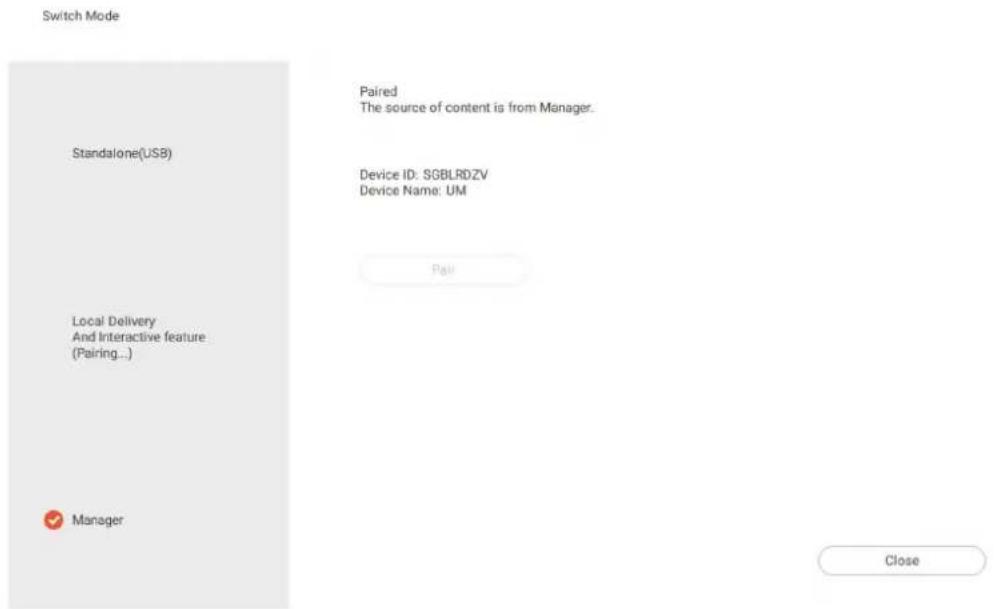
- On the Local Delivery page, you can see that the device's license has been paired.
Playing encrypted projects on X-Sign Player
Once you have sealed the file in X-Sign Designer, you can play the file in X-Sign Player following the steps below.
I. Select Settings.
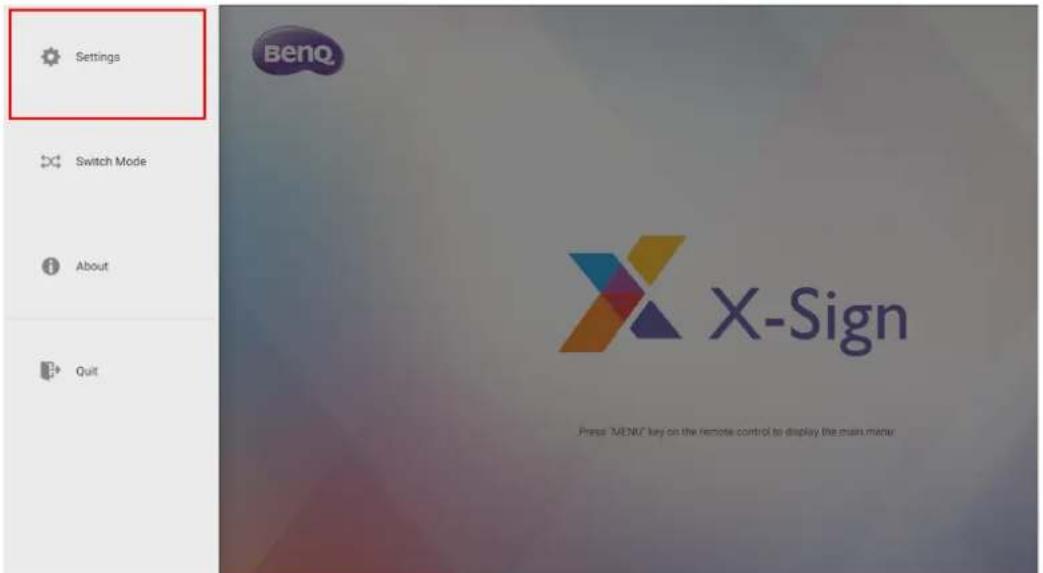
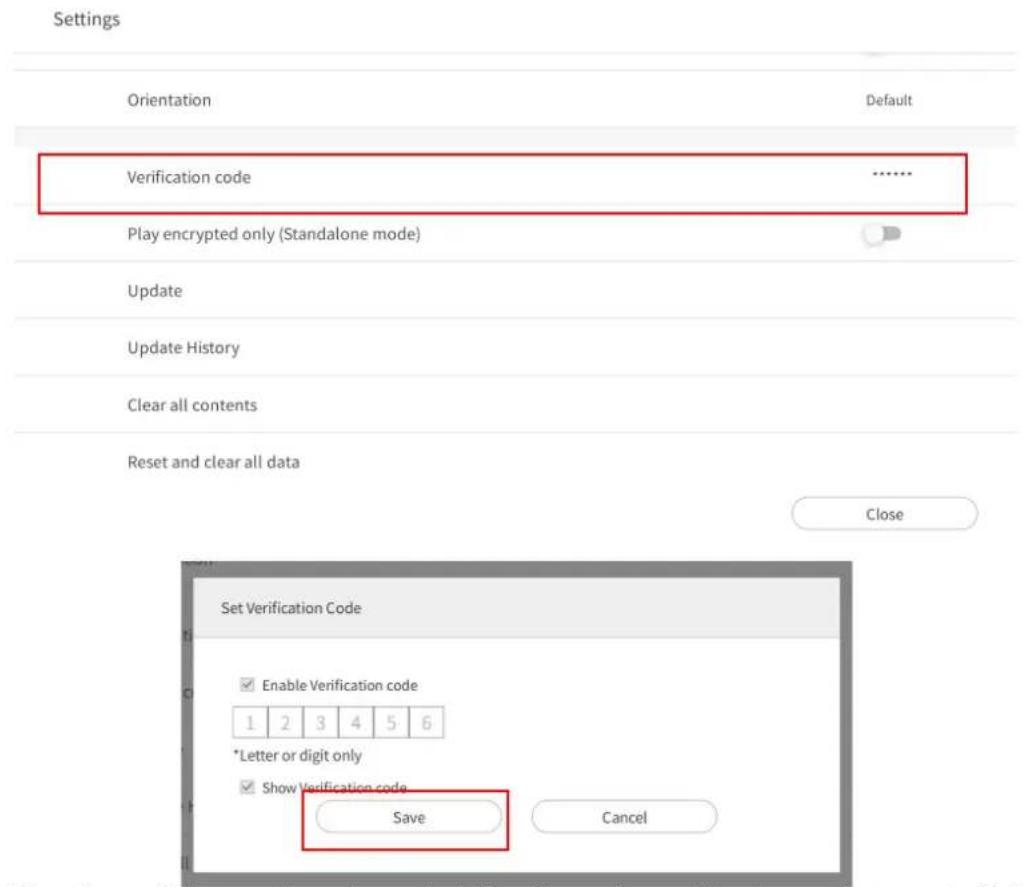
- Go to Verification code to enter the six-digit code. Click Save to continue.
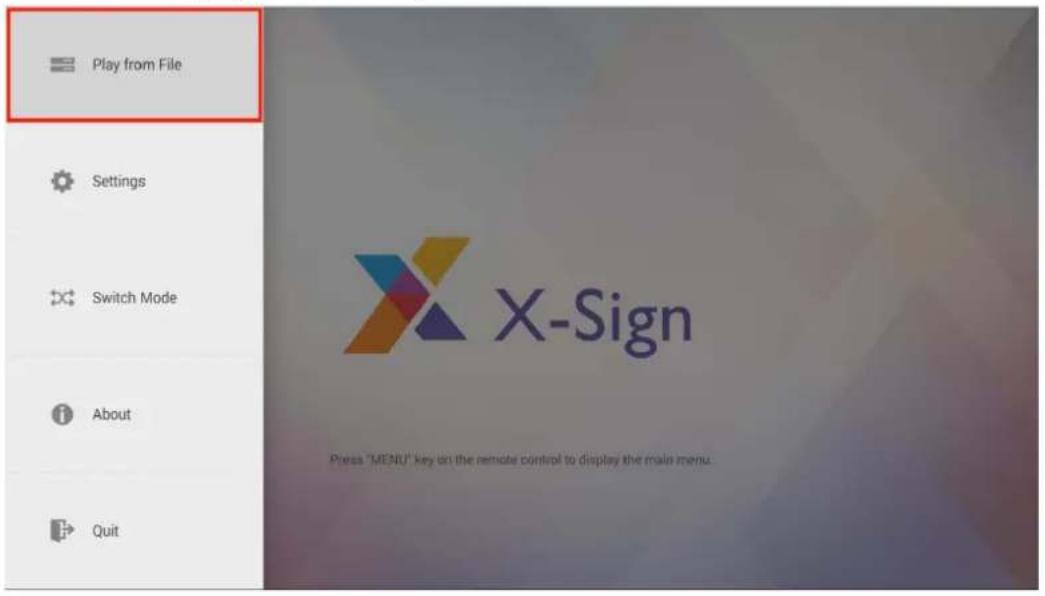
- Go to Play from File to select the sealed file. Once the verification code is set in X-Sign Player, the sealed file can be played successfully.
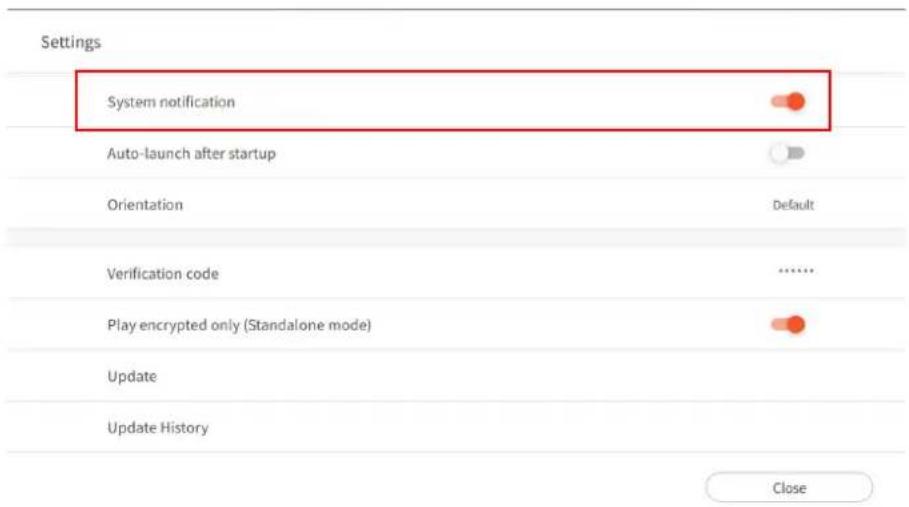
- If the verification code is not set in X-Sign Player, the encrypted project cannot be played. A notification will kindly pop up: "Load failed because of broken seal." To have the notification work, go to Settings and set System notification to on. The notification function is off by default.
Changing Picture Settings in X-Sign Player (SL4302K/L5502K/SL6502K/SL7502K/SL8502K)
This feature only works on SL4302K/L5502K/SL6502K/SL7502K/SL8502K. To change Picture Settings in X-Sign Player, select Picture Settings.
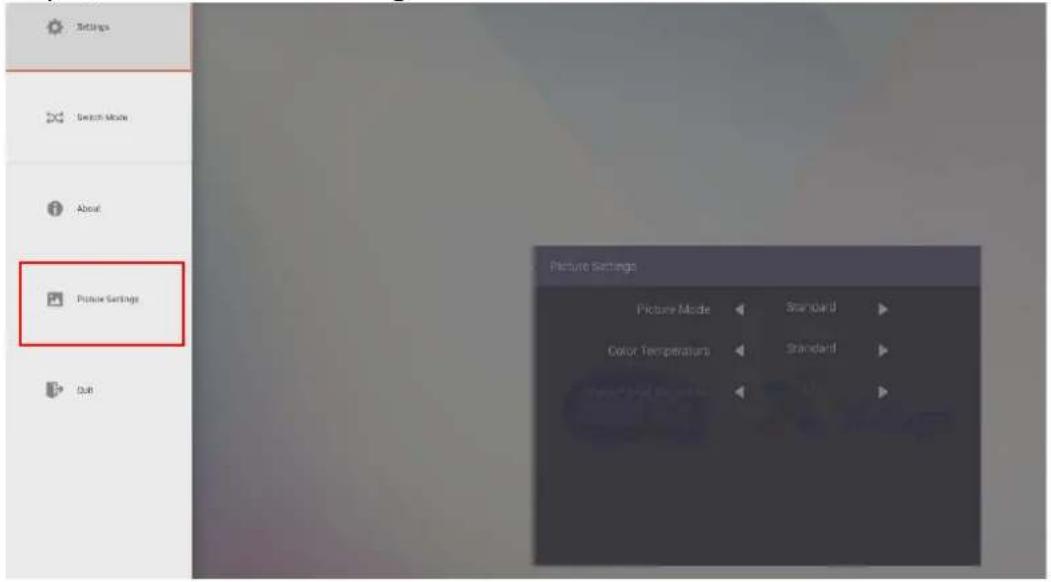
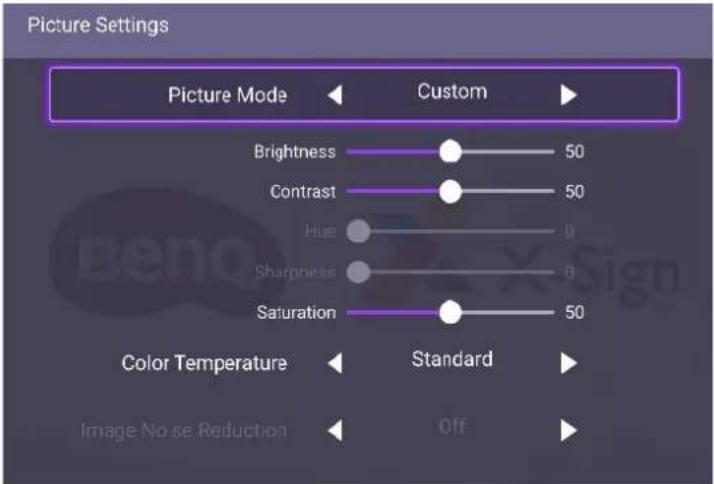
| Menu Description | |
| Picture Mode | Presson the remote control to adjust the picture mode. Options are PANTONE®Color, M-Book, Cinema, Photo, Custom. |
| Brightness | Presson the remote control to adjust the brightness. This feature only works underCustomin Picture Mode. |
| Contrast | Presson the remote control to adjust the contrast. This feature only works underCustomin Picture Mode. |
| Saturation | Presson the remote control to adjust the saturation. This feature only works underCustomin Picture Mode. |
| Color temperature | Presson the remote control or click a preset color temperature for the image. Options areCool, Warm, Standard. |
Note: Hue, Sharpness, and Image Noise Reduction cannot work on Android input.
Local Delivery
Playing content with Local Delivery
With X-Sign Local Delivery, you only have to connect your PC (Designer) with BenQ Smart Signage in the same subnet. Then you can play and schedule the content with the device(s) without other servers or Internet.
Note: The maximum number of devices that can be played by Local Delivery is 16.
I. Switch to Local Delivery and Interactive feature, then press Close. Refer to Creating a new project file in X-Sign Designer on page 53 for more information.
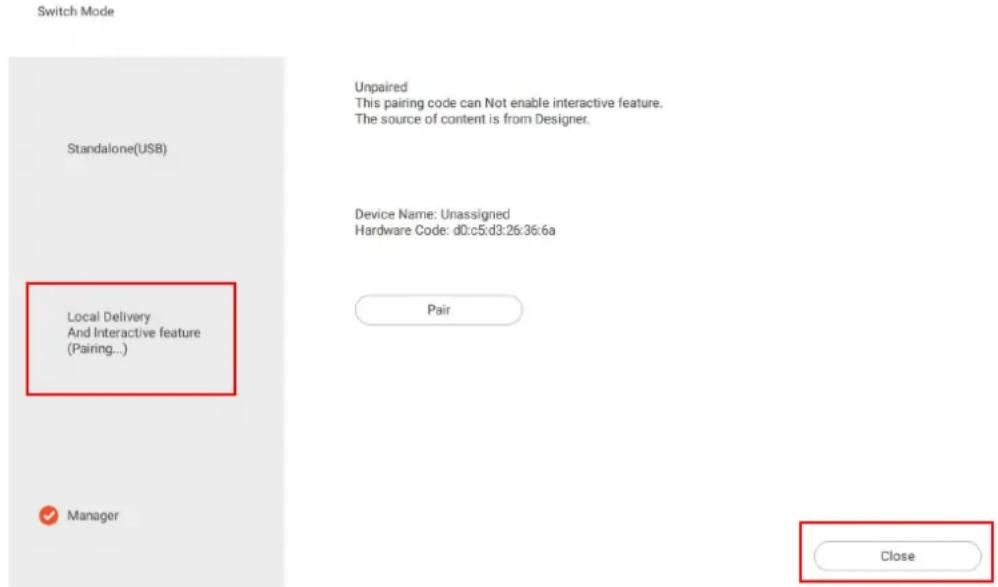
- Make sure your PC and devices are in the same subnet. Open X-Sign Designer on your PC.
- You can press Delivery on the main page or on the top function bar. You can choose Local Delivery to deliver files.
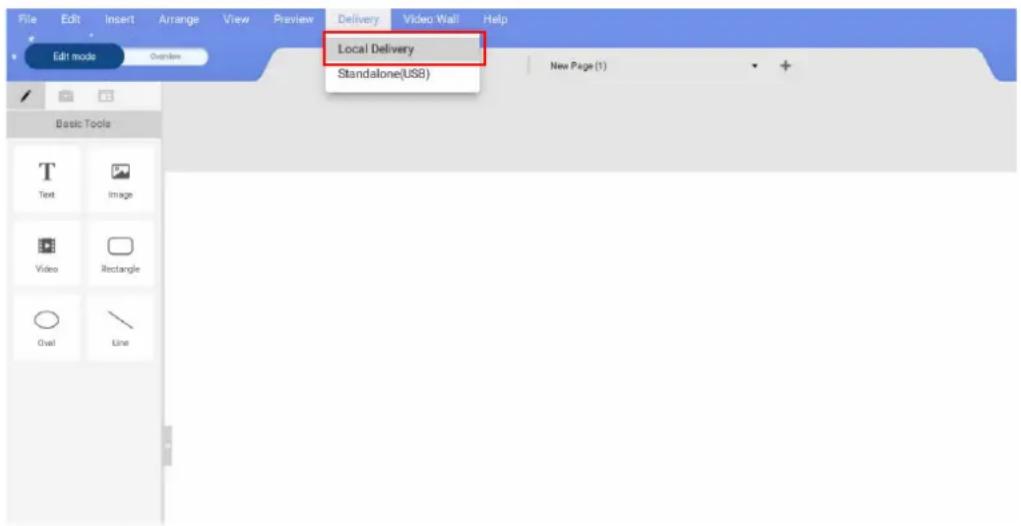
Local Delivery
- On the Devices page, you will see all devices which are in the same subnet and in Local Delivery and Interactive function mode.

: Change the name for the device.

: Stop current playing content of the device.

: Device screen has the flash effect to let you distinguish which device is being used now.
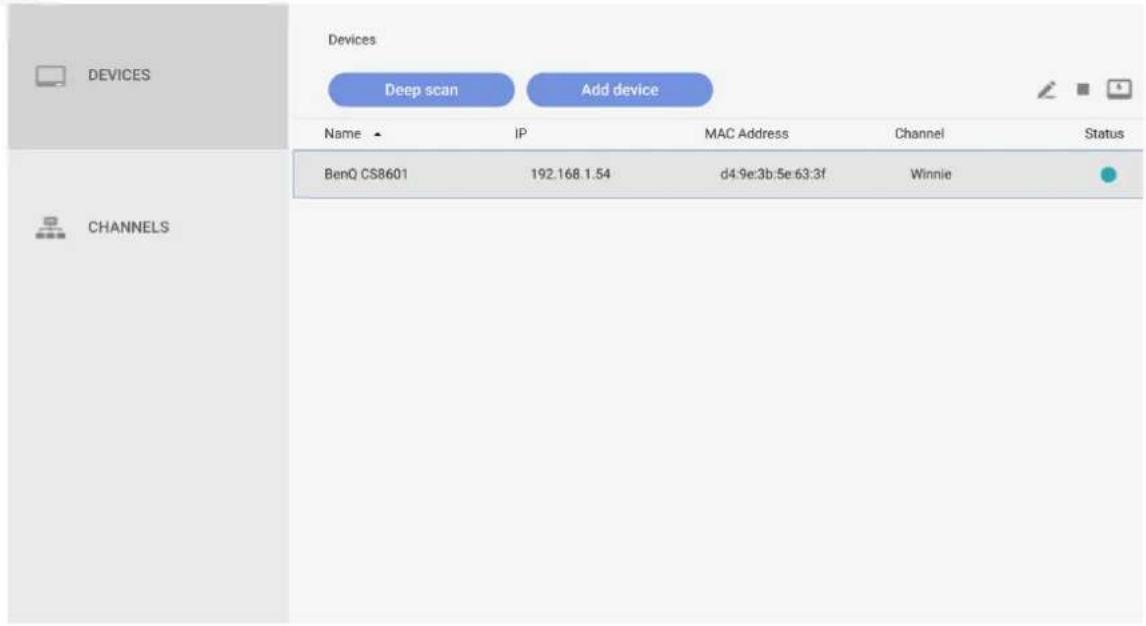
- Before setting schedule and playing content, you must add the device into the channel.
- Go to CHANNELS, then press Add Channel.
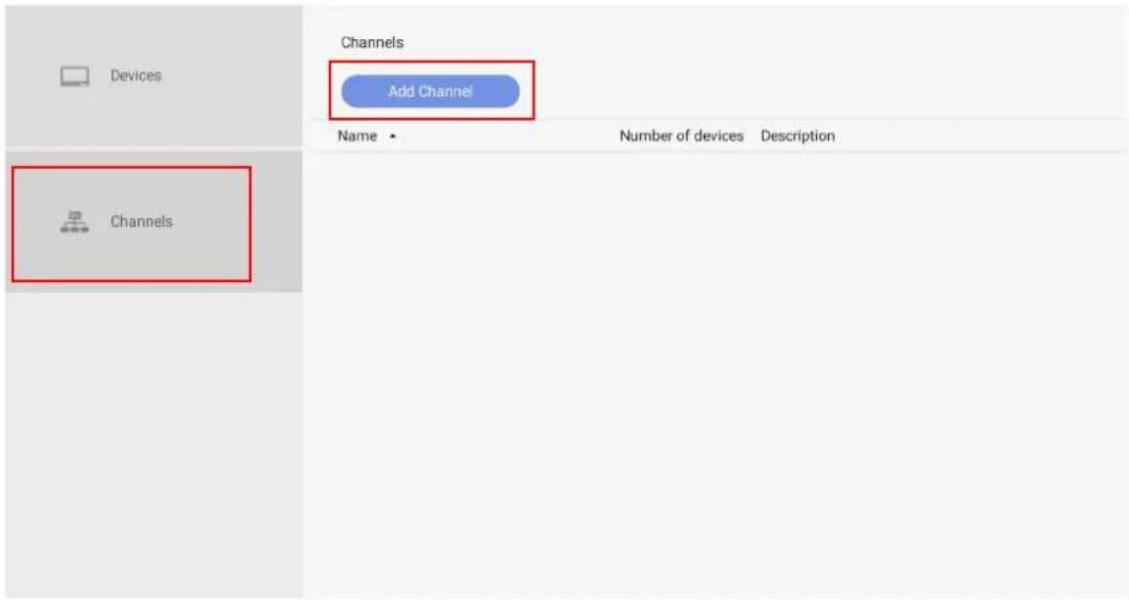
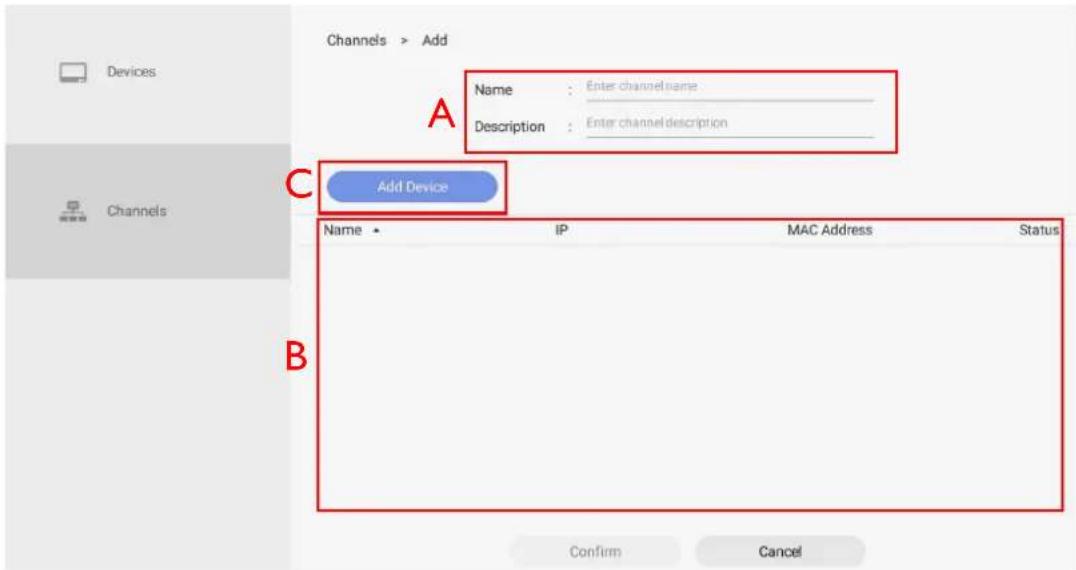
- For creating the channel:
A. Enter the basic information of the channel.
B. The device list is already in the channel.
C. Add a new device into this channel.
- Select the device you want to add to the channel, then press Confirm.
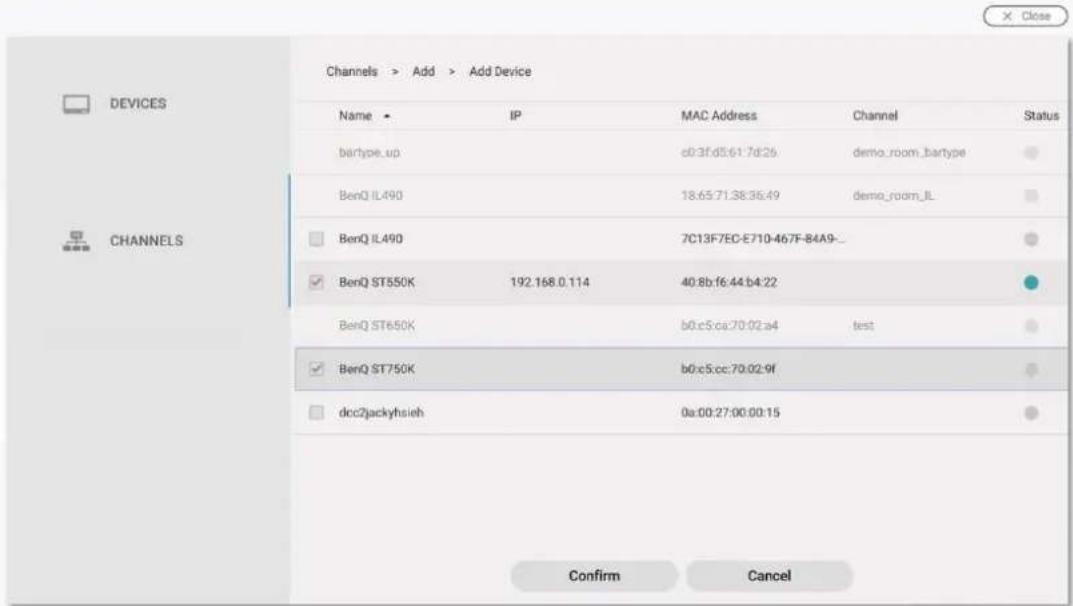
Note: A device which is already added to one channel can't be added to another channel. You have to remove it from its channel first.
- You can also press to remove devices from the channel.
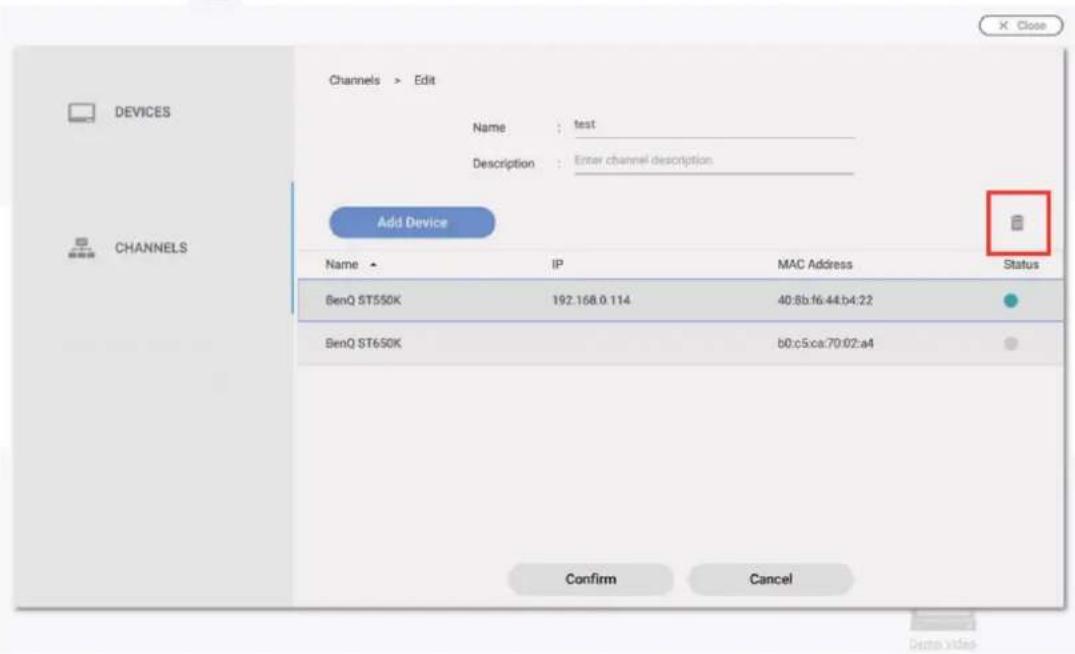
- After the channel is created successfully, you can control channels as below.

: Set Schedule for the channel.

: Edit the channel for the basic information and the devices in it.

: Stop the current playing content of the channel.

: Delete the channel.
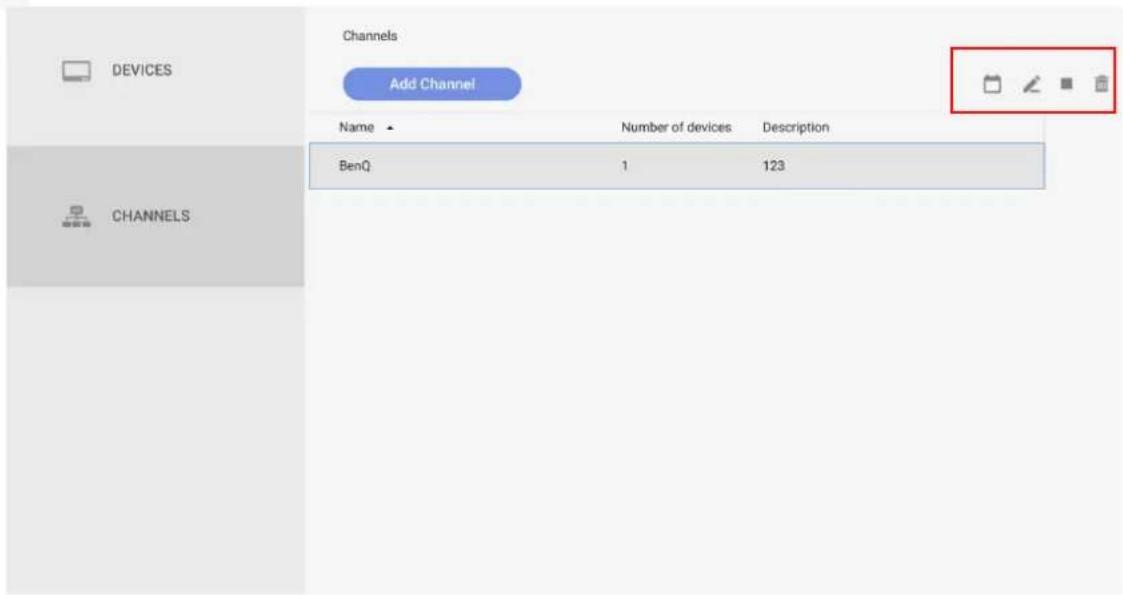
- Press □ and you can set schedule for the channel. Press Add Schedule to create a new schedule for the channel. You can also double click the time table to create it based on the time you choose.
| Devices | Channels > Schedule Add Schedule Local delivery | |
| Channels | 00 am | |
| 01 am | ||
| 02 am | ||
| 03 am | ||
| 04 am | ||
| 05 am | ||
| 06 am | ||
| 07 am | ||
- After pressing Add Schedule, you can start to set the schedule.
A. Choose the project you want to play in the schedule. Press ▼ and you can see the recent file. Press Browse to select the file from the file explorer.
B. Choose the project you want to play in the schedule and select the start and end time. Press Save to continue.
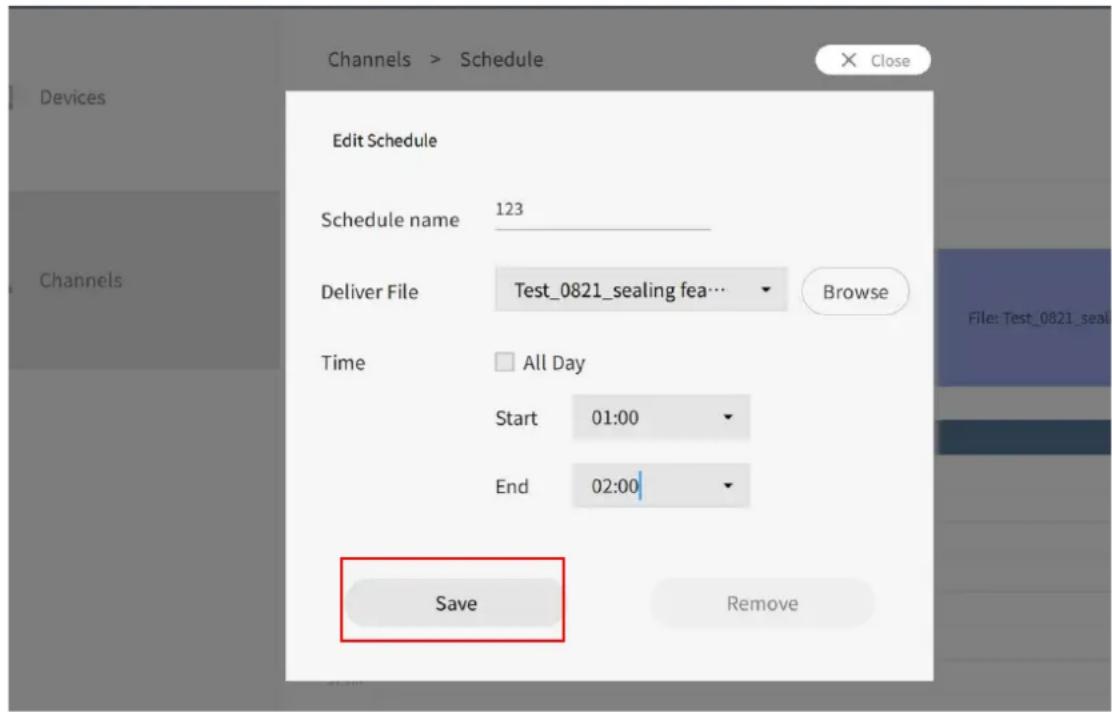
10. Select Local delivery to play the file.
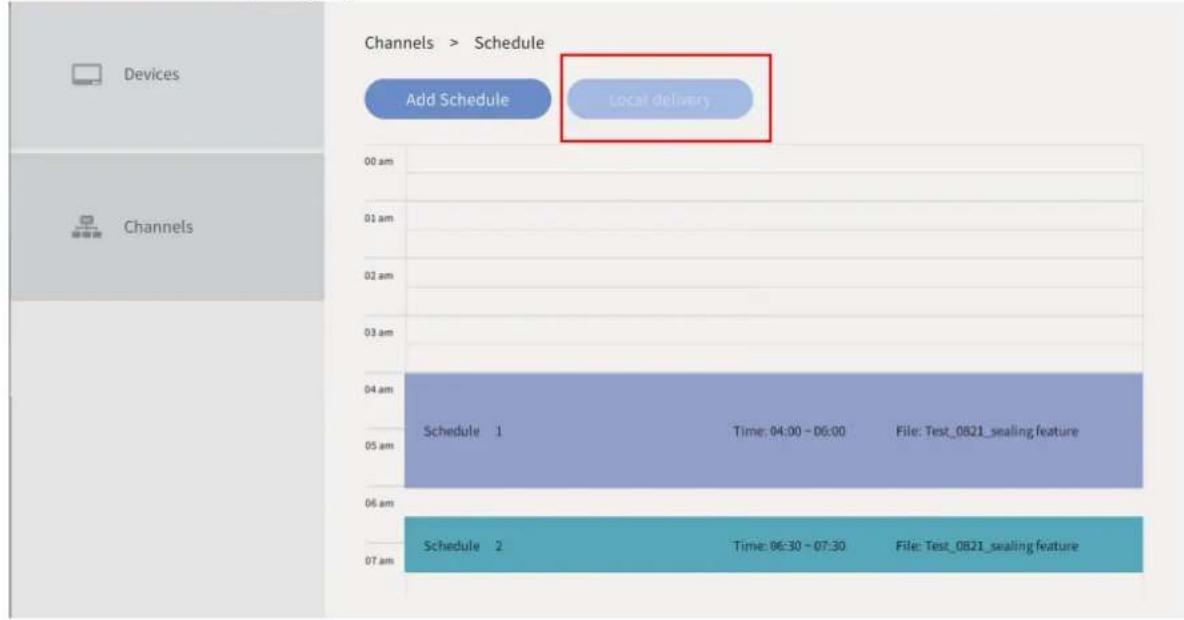
Searching for devices in Local Delivery Mode
Watch demonstration video:
Local Delivery allows different displays to be connected over the same local network. This is an introduction to viewing devices in Local Delivery Mode.
To open Local Delivery Mode:
I. Launch X-Sign Designer and select Local delivery.
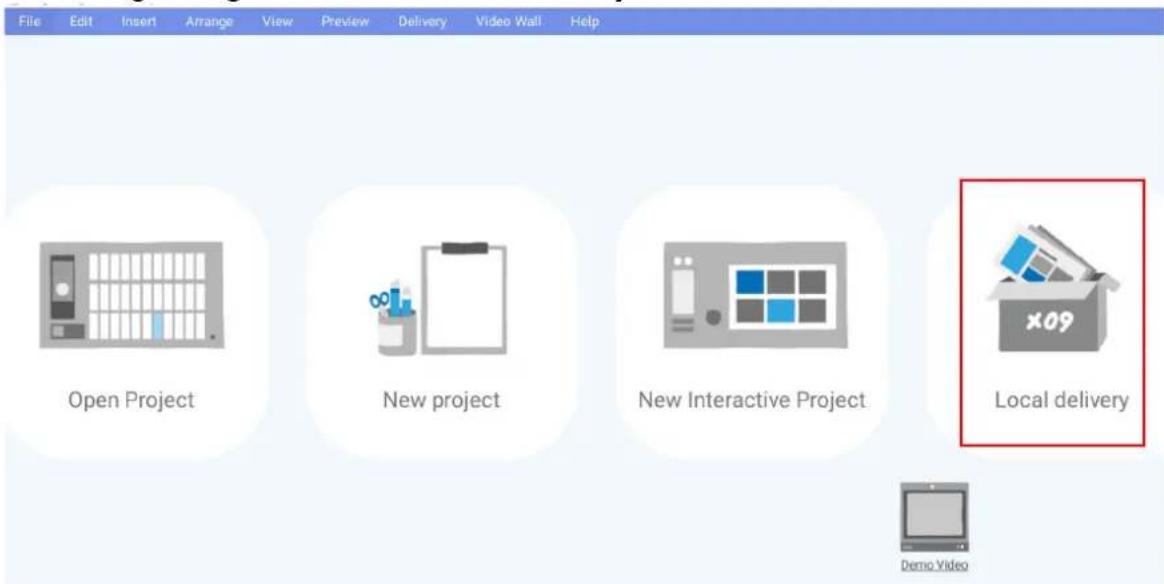
Note: If X-Sign Designer is already open, you can select Delivery > Local Delivery from the top menu.
- The Device window will appear showing all the local devices currently connected to the network.
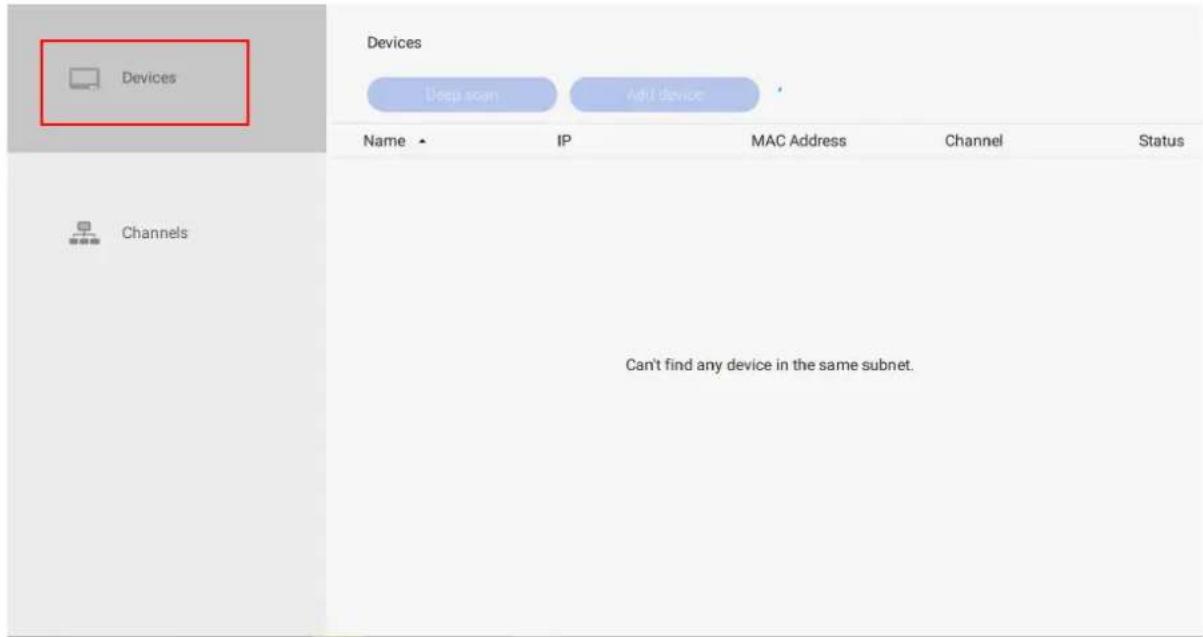
- Select the device you want to edit from the list and then select any of the following items.
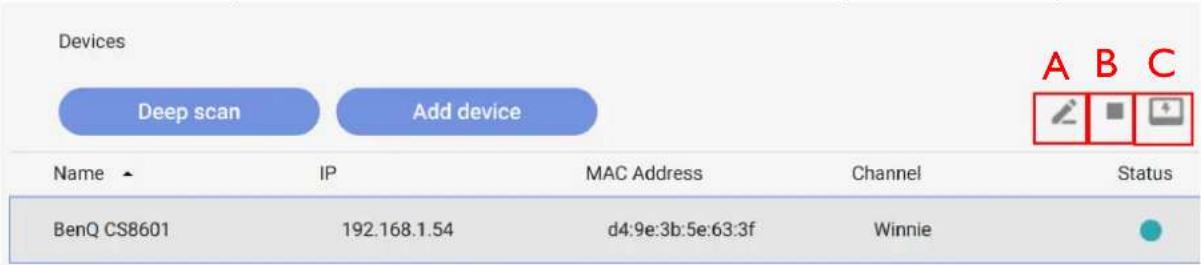
A. - Click this button to bring up the device name window. Click the text and enter the new name for your device.
B. - Click this button to stop the content on the current device.
C. ☐ – Click this button so that the device will flash a black screen. This function will help you identify a specific display when multiple devices are connected to the local network.
Setting a schedule for Local Delivery Mode
When operating several devices in Local Delivery Mode, you can set different schedules for each display to broadcast content. Devices are first added to a channel and then a schedule is set for that channel. Below is an introduction to setting a schedule in Local Delivery Mode.
To create a channel in Local Delivery mode:
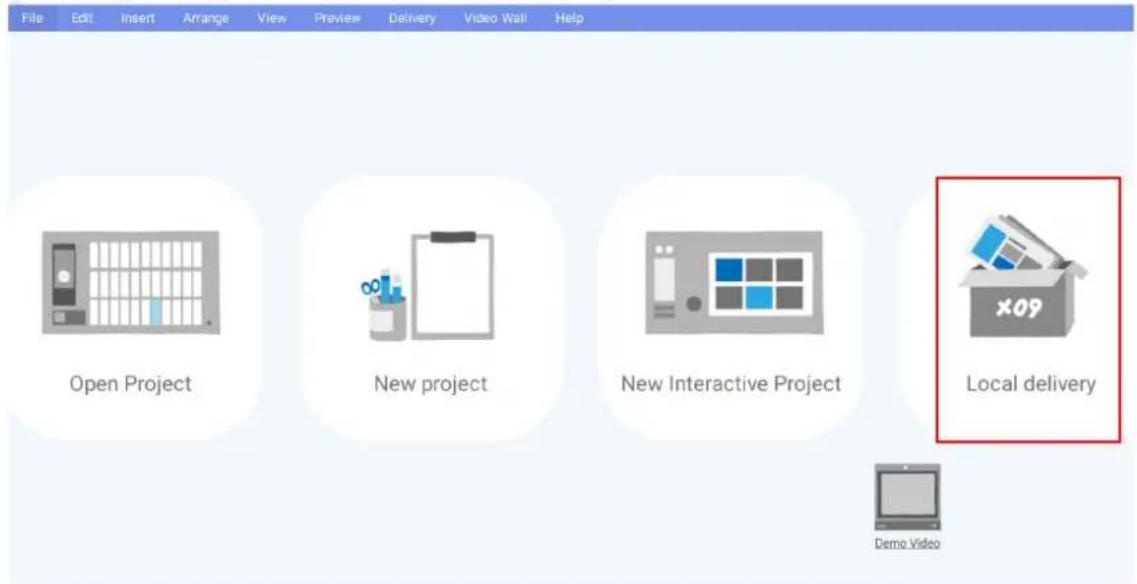
I. Launch X-Sign Designer and select Local delivery.
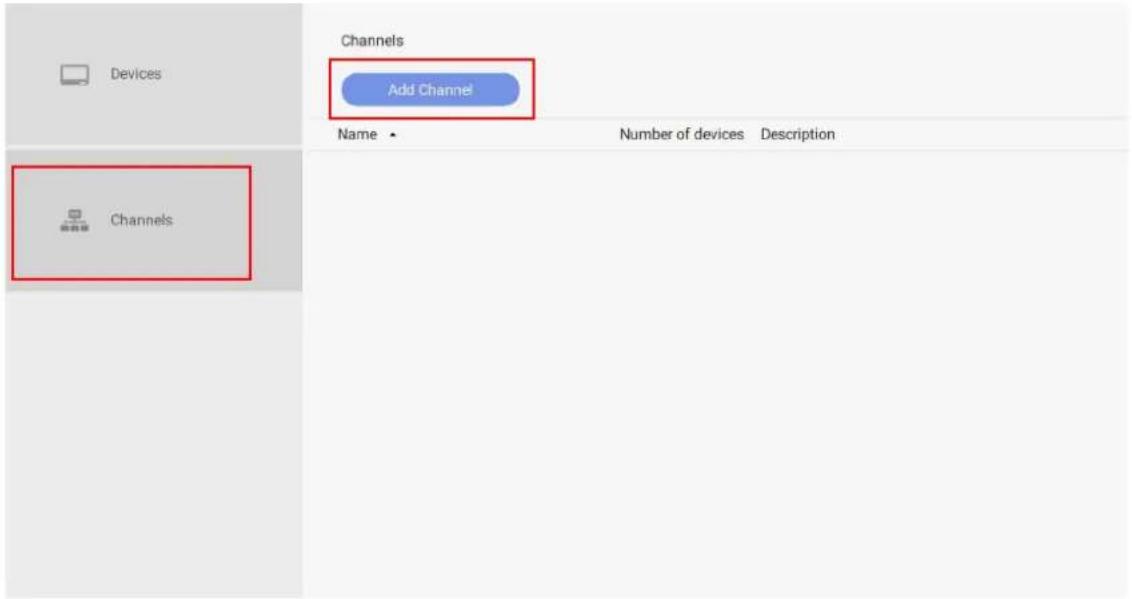
2. In the Device Window click CHANNELS, then click Add Channel to create a new schedule.
- In the Add Channel window you can select the following:
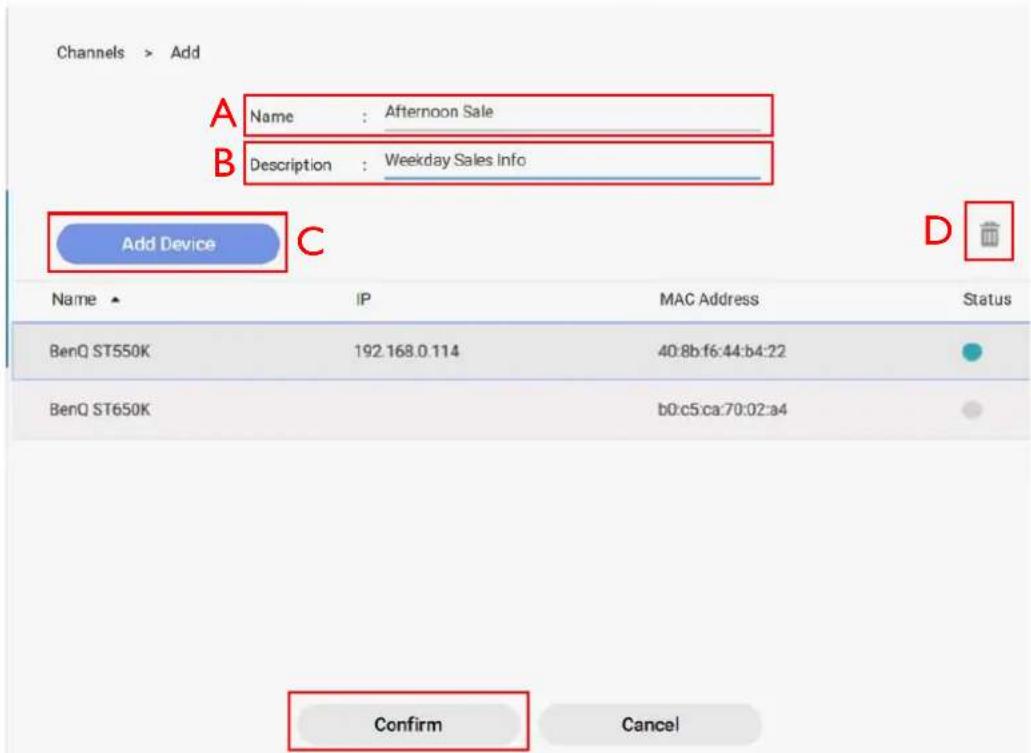
A. Name – Enter a name for the channel to be broadcast.
B. Description – Enter a description for the channel to be broadcast.
C. Add Device – Click Add Device to add displays to this channel. In the pop-up window select the checkbox next to the device(s) you want to add and click Confirm.
D. — Select the device you wish to delete from the channel and click this icon.
- Click Confirm to create the channel and click OK.
To set a schedule for a channel in Local Delivery mode:
- In the CHANNELS window, select the channel you want and click the button to add a schedule.
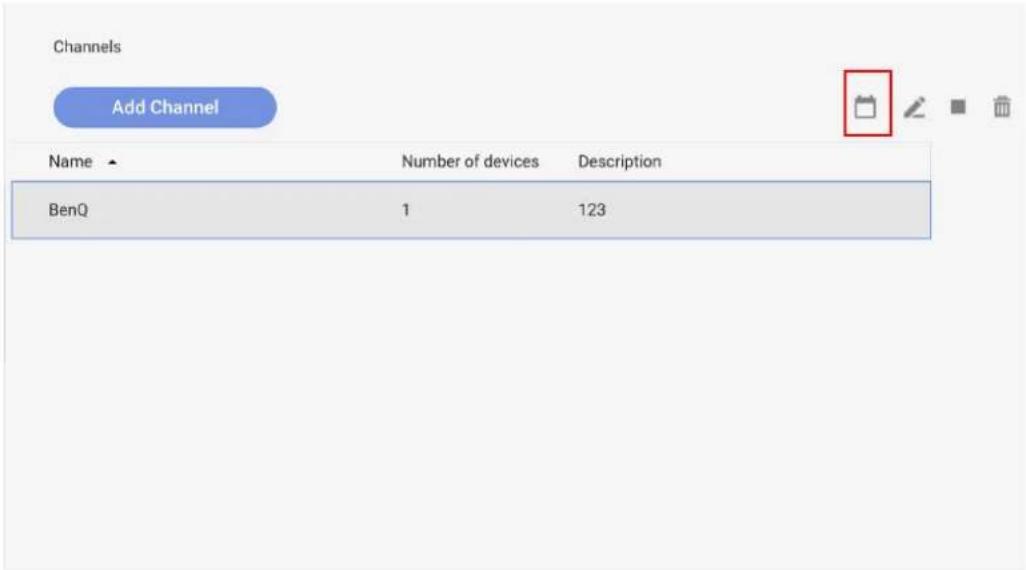
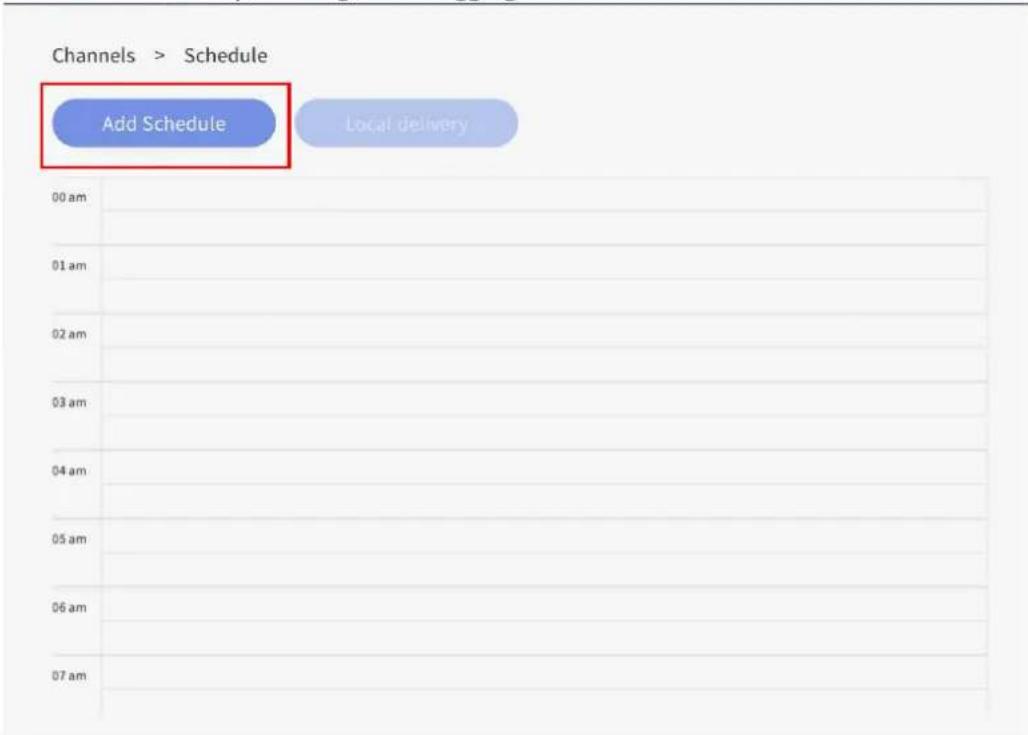
- Click Add Schedule to create a new schedule for the channel. You can create and edit time blocks in the timetable by clicking and dragging.
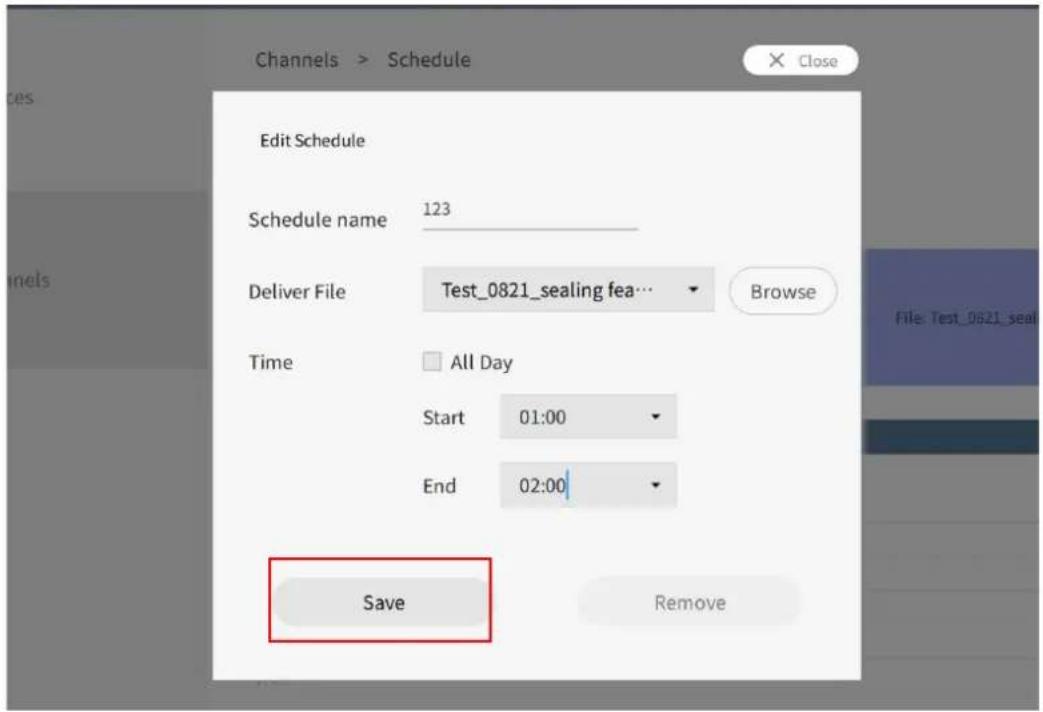
- Choose the project you want to play in the schedule and select the start and end time. Press Save to continue.
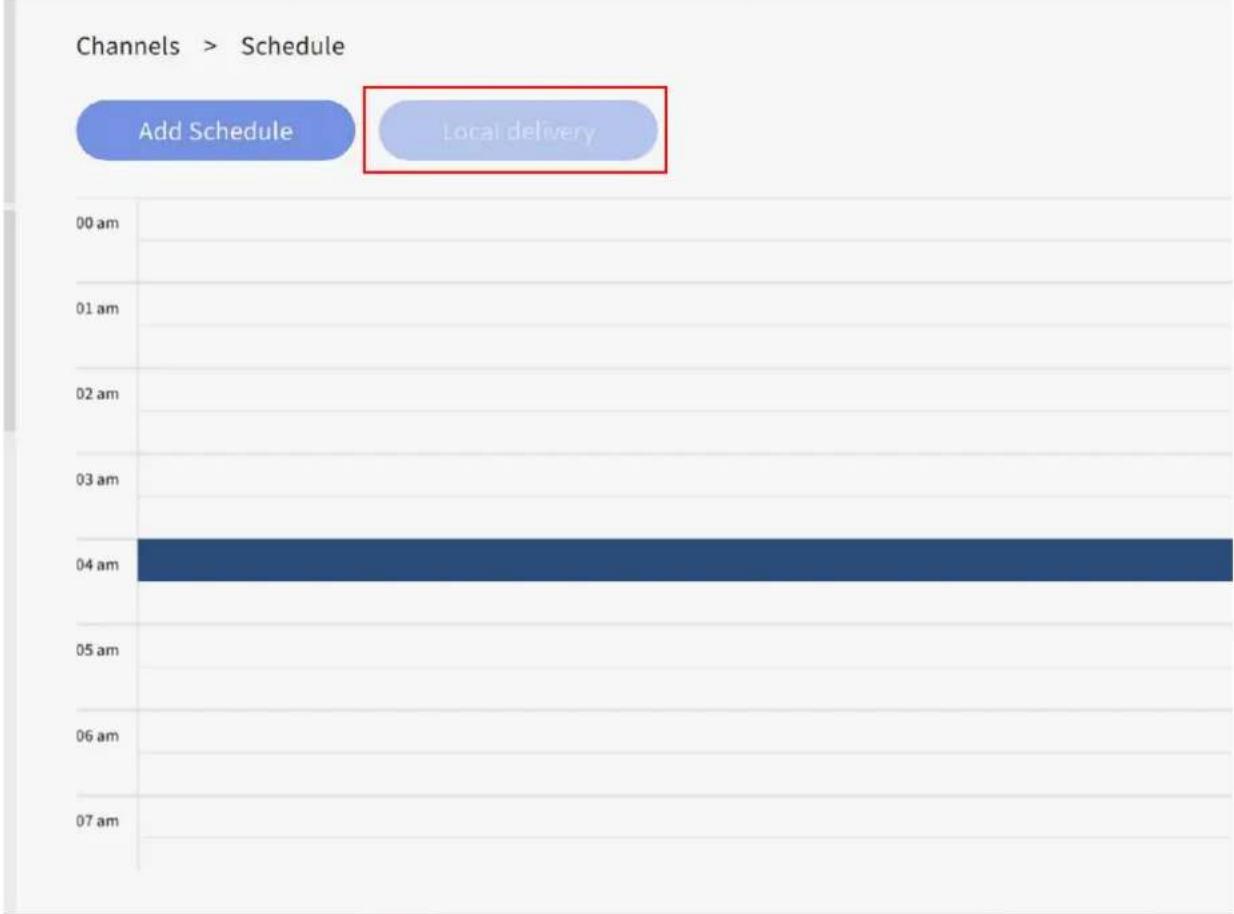
- Click Local delivery to deliver the schedule to the assigned devices in the channel.
bar
Channels > Schedule | Time | Add Schedule | Local delivery | |---|---|---| | 00 am | | | | 01 am | | | | 02 am | | | | 03 am | | | | 04 am | 100 | | | 05 am | | | | 06 am | | | | 07 am | | |Report
Getting the activity report of X-Sign Manager
I. To access the activity report of X-Sign Manager, go to Report Analysis > X-Sign Manager Report.
- Choose start time and end time, then click Export.
- The activity report is exported as an .xls or an .xlsx file type.
| A | B | C | D | E | |
| 1 | Time Stamp(GMT +00:00) | Event | Account(Authority) | Action | Detail |
| 2 | 2018-03-15 05:59:45 | Device Activity | AlbertKang(Administrator) | Remove | Device(W_PC)(SFRQ6ZSQ) |
| 3 | 2018-03-15 05:59:59 | Device Activity | AlbertKang(Administrator) | Remove | Device(WPC)(BNJ8GYCR) |
| 4 | 2018-03-15 06:02:04 | Device Activity | AlbertKang(Administrator) | Add | Device(demoroomwriter)(8MVRSPHZ) with City(Taiwan) Channel(Uncategorized) |
| 5 | 2018-03-15 06:34:46 | File Activity | AlbertKang(Administrator) | Upload | File Name(test03333333) |
| 6 | 2018-03-15 13:02:21 | Device Activity | AlbertKang(Administrator) | Remove | Device(11f)(DHFFGB7P) |
| 7 | |||||
| 8 | |||||
| 9 | |||||
| 10 | |||||
| 11 | |||||
| 12 | |||||
| 13 | |||||
| 14 | |||||
| 15 | |||||
| 16 | |||||
| 17 | |||||
| 18 | |||||
| 19 | |||||
| 20 | |||||
| 21 | |||||
Downloading player content report
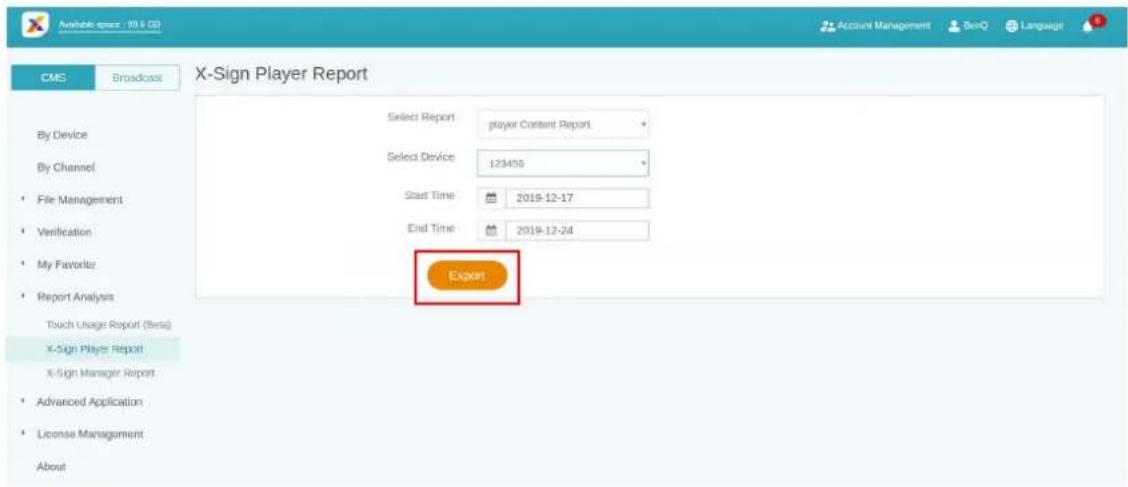
I. To access the player content report, click Report Analysis > X-Sign Player Report > player Content Report.
2. Choose start time and end time, then click Export.
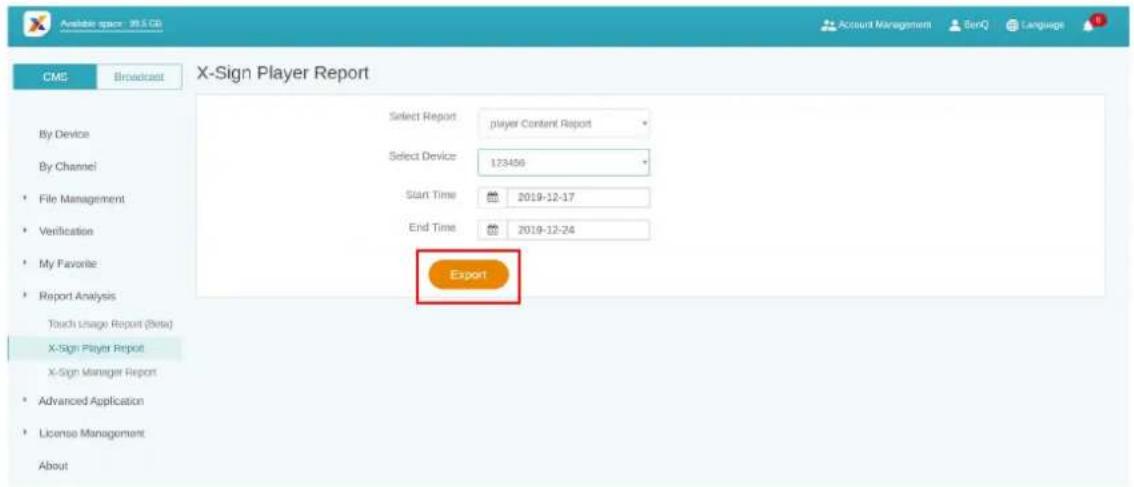
3. The report is exported as an .xls or an .xlsx file type.
| A | B | C | D | E | F | G | H | I | J | K | L | M | N | O | |
| 1 | Play status | Play type | Play name | Play start at | Schedule name | Device name | Logged at | Logged at UTC | |||||||
| 2 | start play | interrupt | PJT_land | 2018-12-21 13:55:34 | test | AKNB_Drt_MV | 2018-12-21 13:55:34 | ||||||||
| 3 | end play | interrupt | PJT_land | 2018-12-21 13:55:34 | test | AKNB_Drt_MV | 2018-12-21 13:58:05 | ||||||||
| 4 | start play | interrupt | 1234 2018-12-21 13:58:05 | test | AKNB_Drt_MV | 2018-12-21 13:58:05 | |||||||||
| 5 | end play | interrupt | 1234 2018-12-21 13:58:05 | test | AKNB_Drt_MV | 2018-12-21 13:58:12 | |||||||||
| 6 | start play | interrupt | 1234 2018-12-21 13:18:55 | test | AKNB_Drt_MV | 2018-12-21 15:18:55 | |||||||||
| 7 | playing | interrupt | 1234 2018-12-21 15:18:55 | test | AKNB_Drt_MV | 2018-12-21 15:28:55 | |||||||||
| 8 | playing | interrupt | 1234 2018-12-21 15:18:55 | test | AKNB_Drt_MV | 2018-12-21 15:38:55 | |||||||||
| 9 | playing | Interrupt | 1234 2018-12-21 15:18:55 | test | AKNB_Drt_MV | 2018-12-21 15:48:55 | |||||||||
| 10 | |||||||||||||||
| 11 | |||||||||||||||
| 12 | |||||||||||||||
| 13 | |||||||||||||||
| 14 | |||||||||||||||
| 15 | |||||||||||||||
| 16 | |||||||||||||||
| 17 | |||||||||||||||
| 18 | |||||||||||||||
| 19 | |||||||||||||||
| 20 | |||||||||||||||
| 21 | |||||||||||||||
| 22 | |||||||||||||||
| 23 | |||||||||||||||
| 24 | |||||||||||||||
| 25 | |||||||||||||||
| 26 | |||||||||||||||
| 27.0.0.0.0.0.0.0.0.0.0.0.0.0.0.0.0.0.0.0.0.0.0.0.0.0.0.0.0.0.0.0.0.0.0.0.0.0.0.0.0.0.0.0.0.0.0.0.0.0.0. | |||||||||||||||
Video Wall
Setting up the environment for video wall
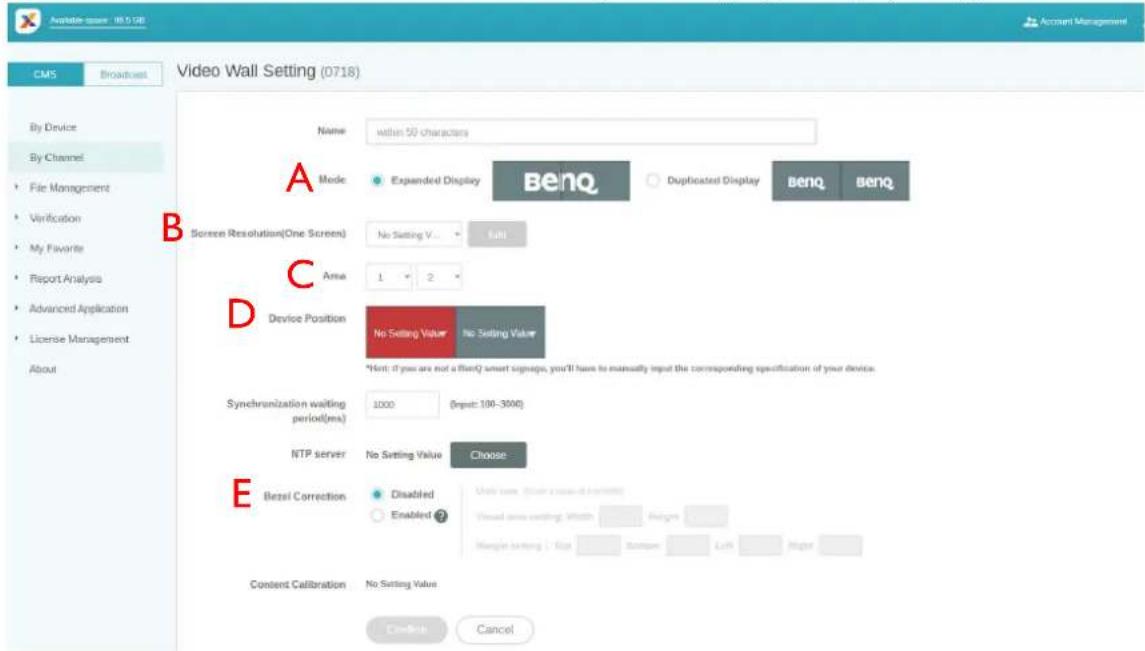
With X-Sign Manager and Player, you can easily set up the video wall environment with BenQ Smart Signage. You can see the following 1x3 video wall for example.
I. Pair all devices which are used for video wall with X-Sign Manager.
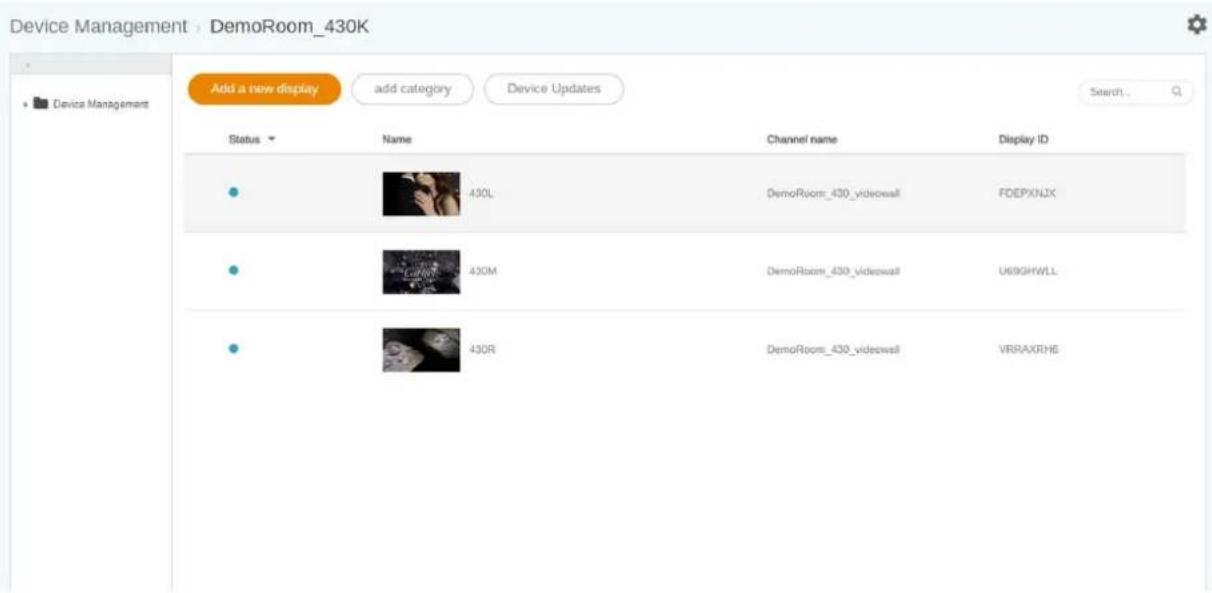
- Go to Channel Management to create a channel to add these devices to the channel.
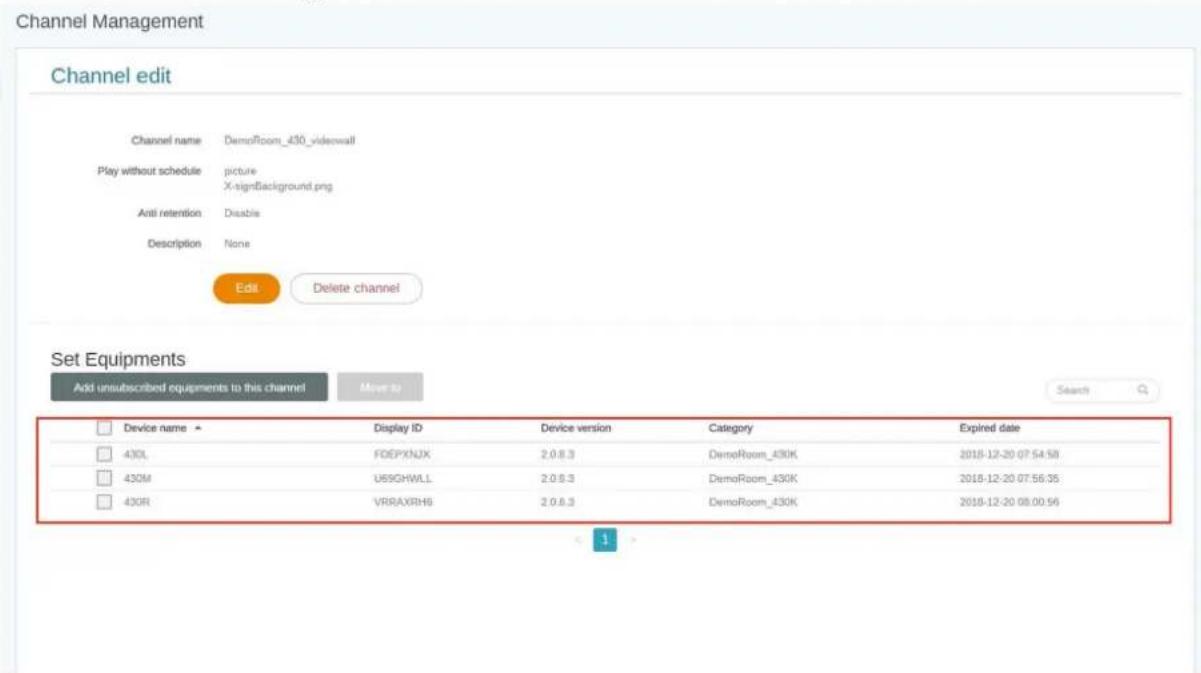
- After the channel is created, select the channel and choose

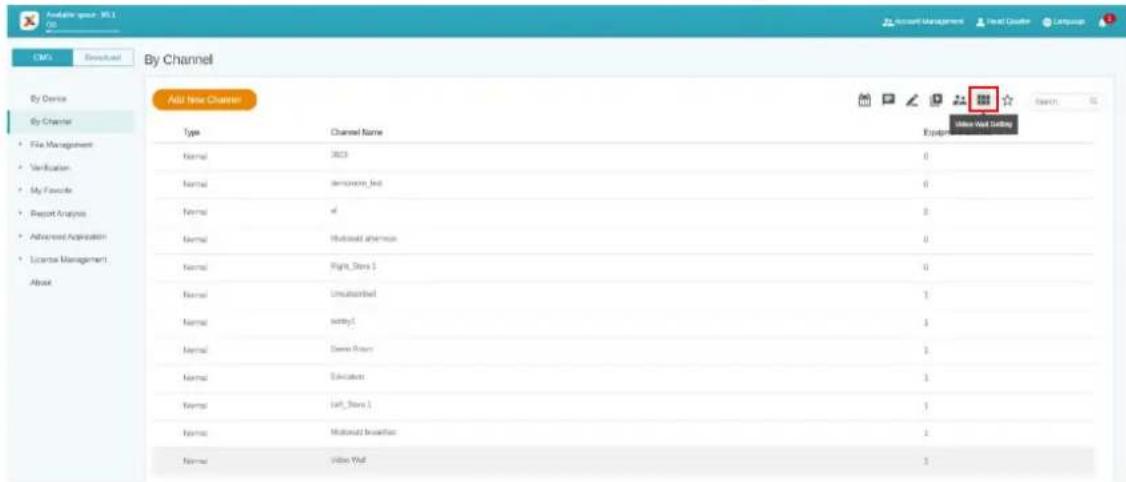
- Below is a brief introduction for creating the Video Wall.
A. Extend the content to all devices or set each device to play the same content mode.
B. Set the resolution for each device. You can also customize the resolution yourself.
C. Decide the Panel Area, H (Horizontal) x V (Vertical).
D. Assign each display's position in the Video Wall.
E. Enable the bezel correction function for BenQ Smart Signage's display margin.
-
After all configuration is set, click Confirm.
-
Set one Android box for installing VideoWallController apk. Then put the Android box and all devices in the same subnet.
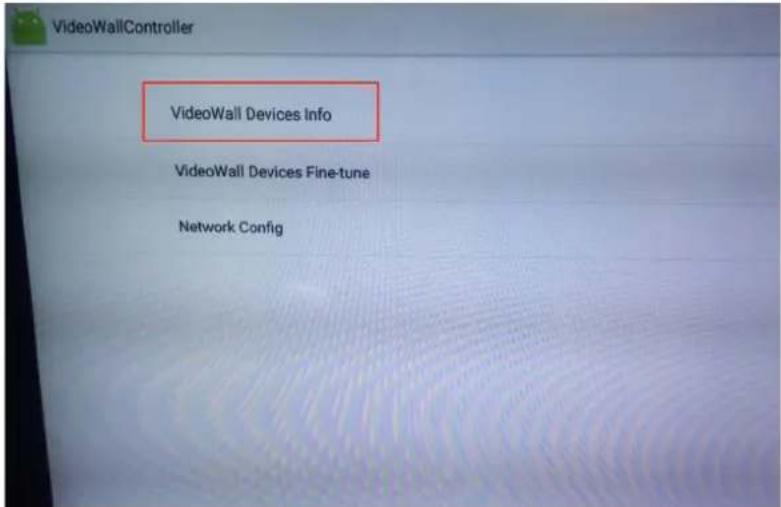
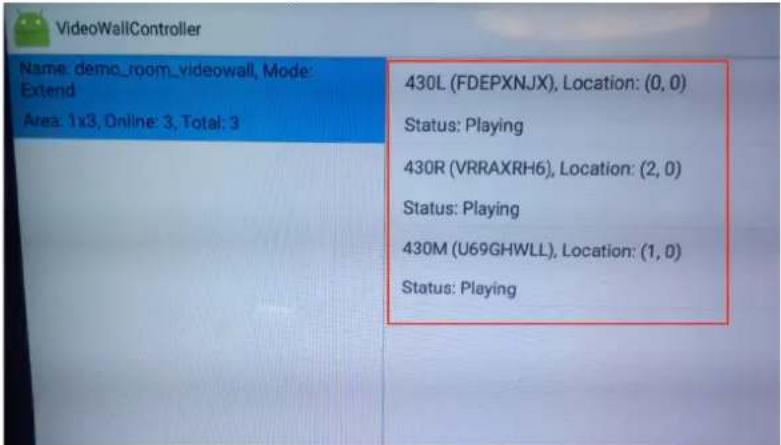
- Select VideoWall Devices Info, and you will see all devices for Video Wall on the list.
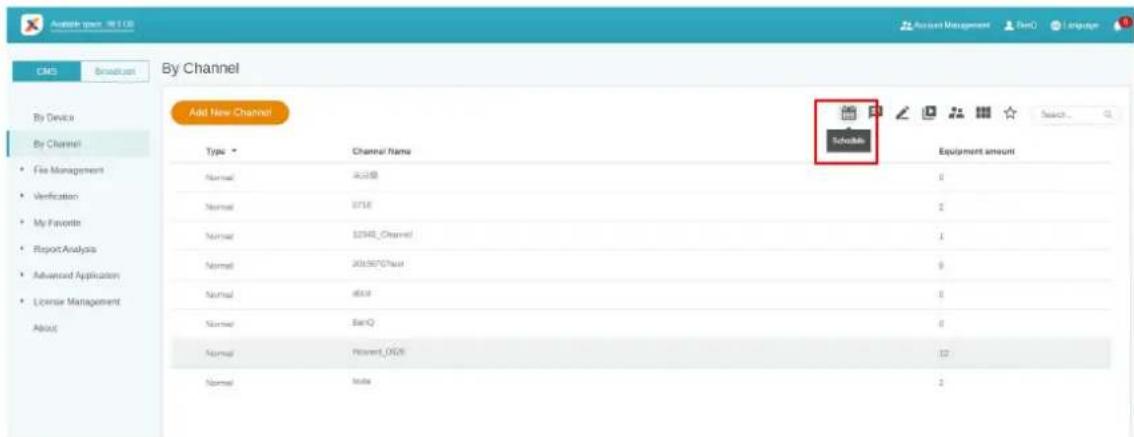
- Now you can use the Video Wall channel to schedule for playing the content.
Creating the Video Wall content from X-Sign Designer
With X-Sign Designer, you can easily create content for the Video Wall display.
I. Create a new project.
2. Below is a brief introduction for Video Wall setting.
A. You can set the device in landscape or portrait mode.
B. You can choose the resolution of each device.
C. This shows the Panel Area (Horizontal x Vertical).
D. This shows the simulation of the Video Wall and the overall resolution.
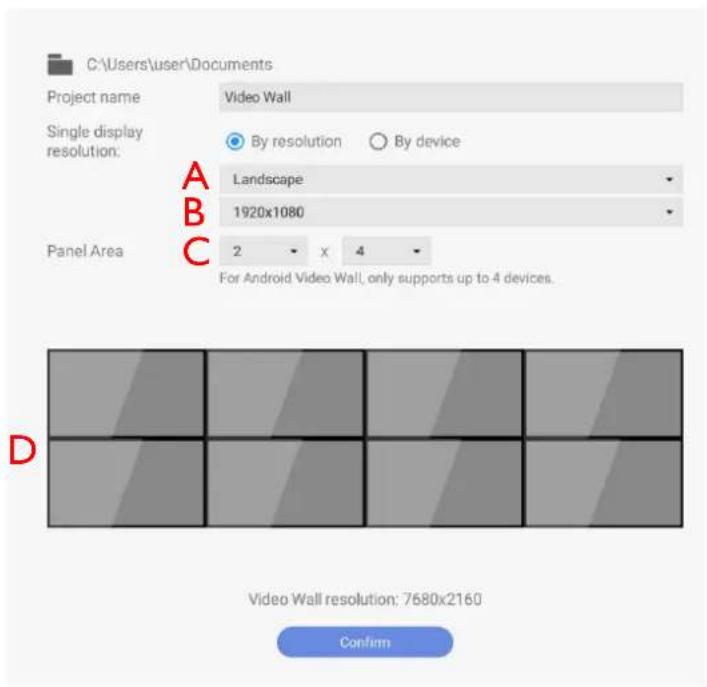
Note: Android Video Wall only supports up to 4 devices.
3. After all configuration is set, press Confirm.
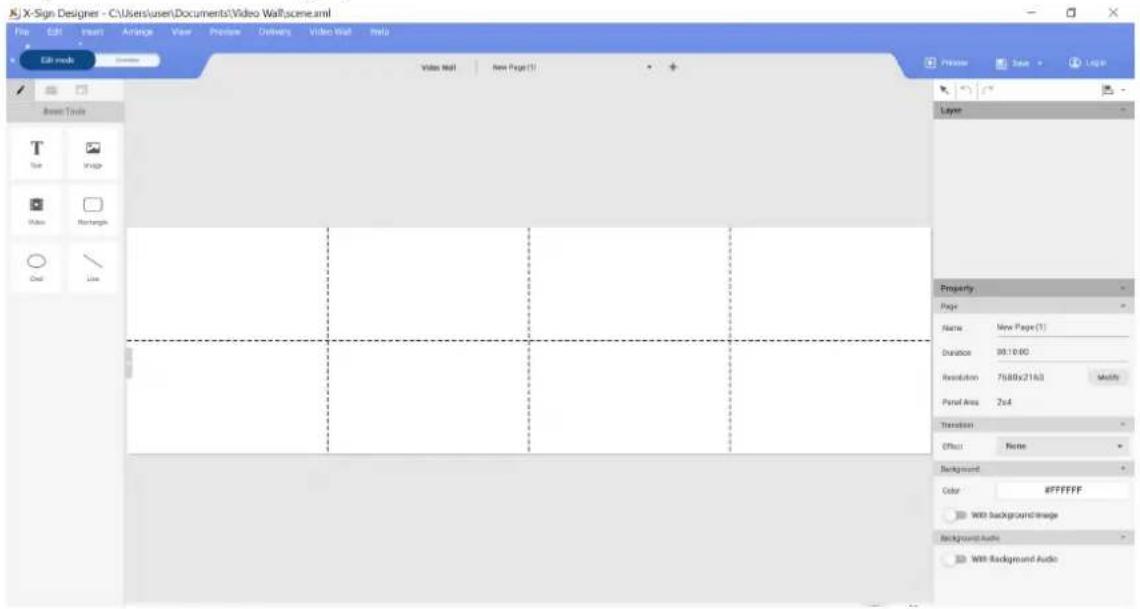
4. Now you can start to design your content.
Fine-tuning the Video Wall from X-Sign Designer
X-Sign Designer offers vertical and horizontal micro-adjustment for the Video Wall display. The feature is designed to perform fine-tune when there is minor difference introduced during installation. If there is a significant gap between screens, please adjust the physical installation instead.
I. To access the fine-tune adjustment, select Video Wall.
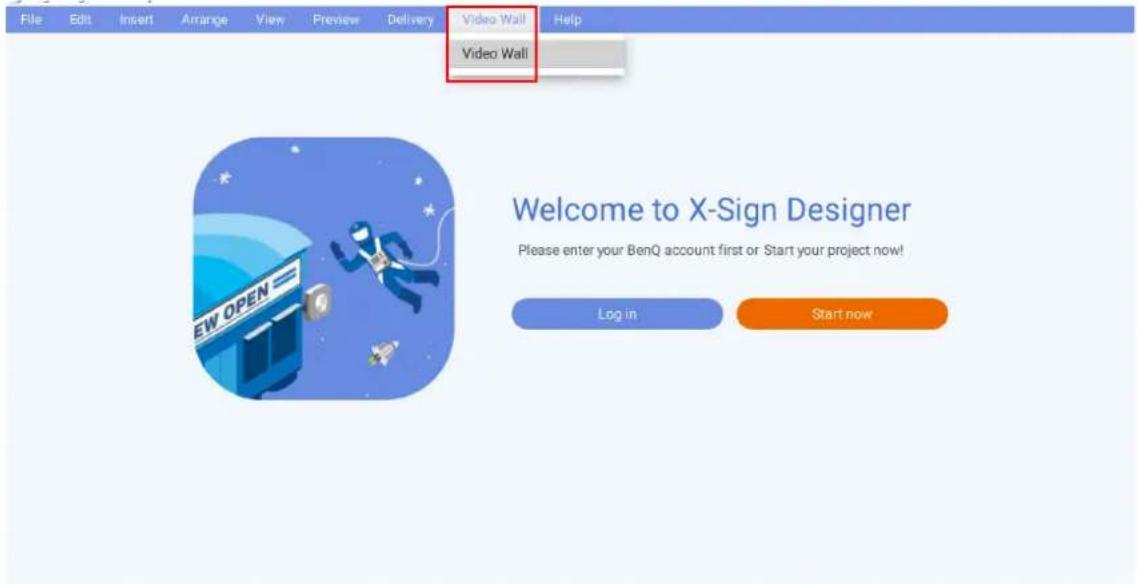
- Click FINE TUNE to check the channel list. Then click the Video Wall display to have minor adjustment.
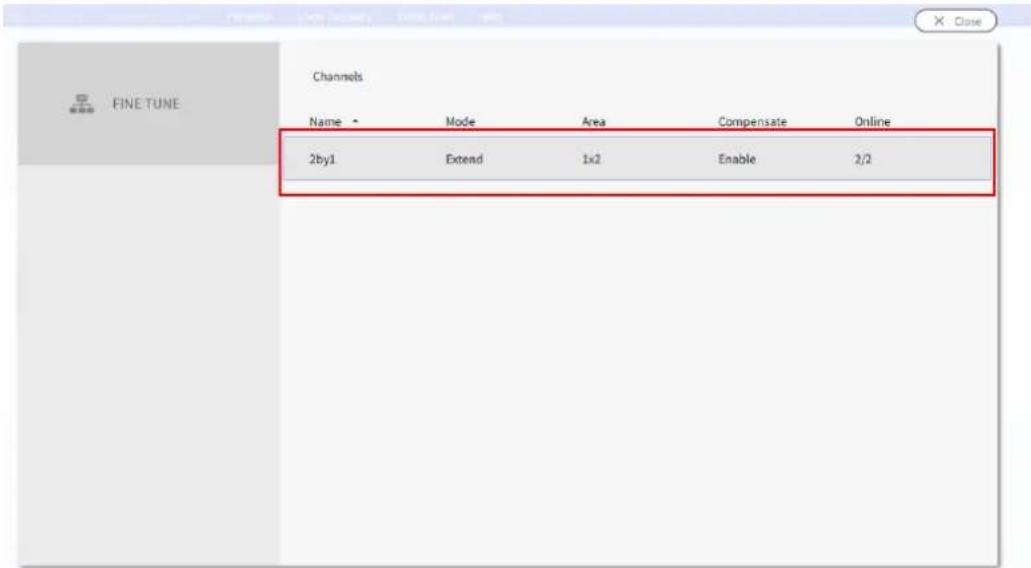
- With FINE TUNE, the selected Video Wall display(s) can be micro-adjusted along the X and Y axis. Click Save to complete the adjustment. The unit of measurement is millimeter.
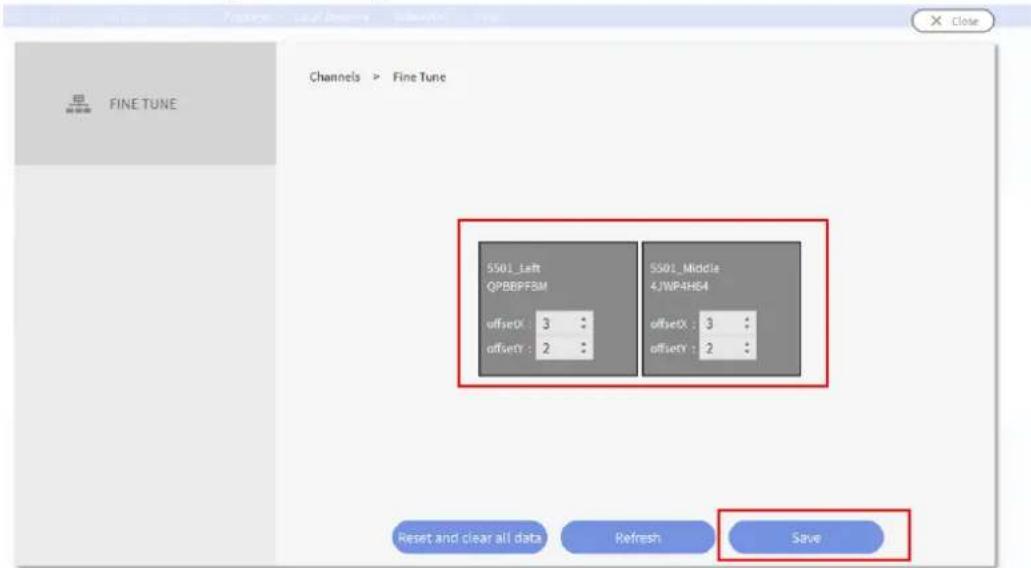
Note: For the fine-tune adjustment, the maximum number of Video Wall devices supported is four.
Premium
Interactive
Creating interactive content with Interactive template
X-Sign Designer Interactive template can help you create interactive content in a few steps. It will be the best solution for BenQ smart signage IL series (with touch function).
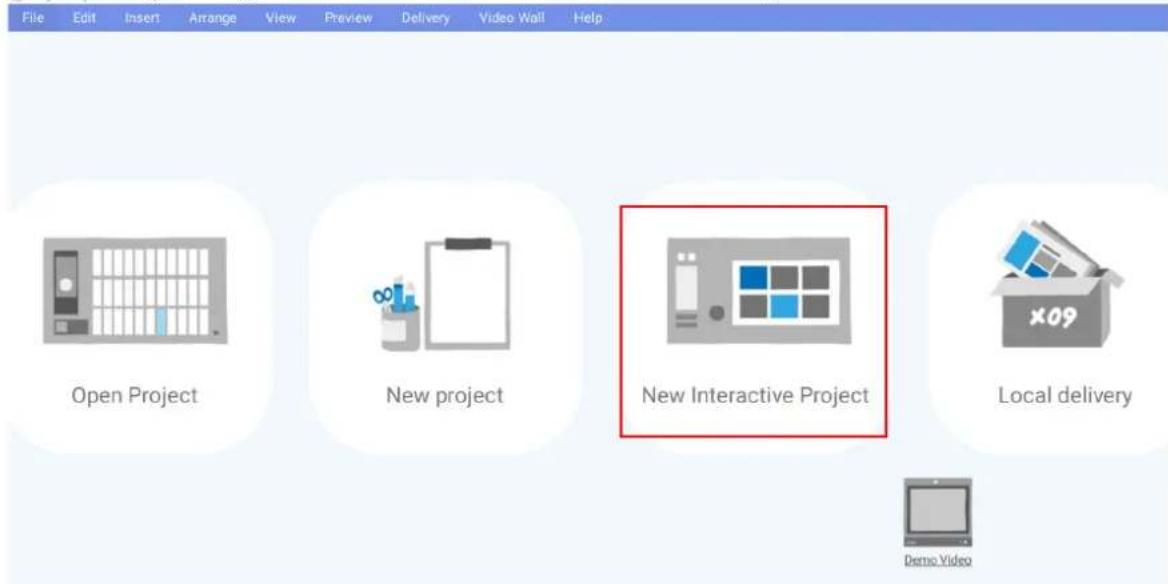
I. Launch X-Sign Designer, then choose New Interactive Project.
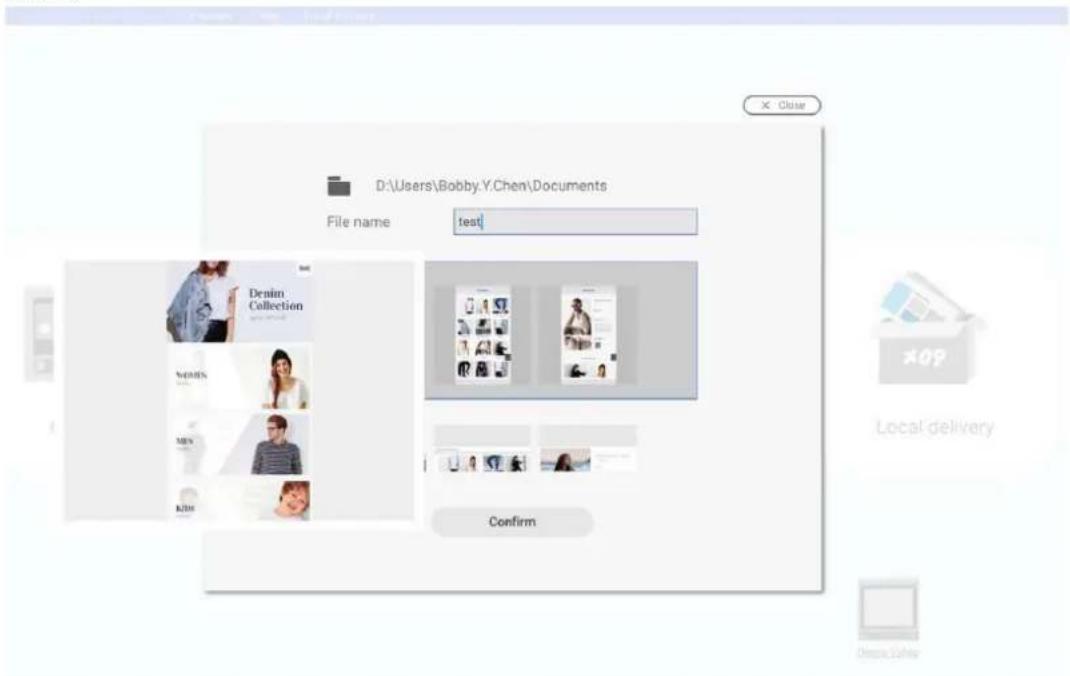
- Choose the template style you want to use. Set the name and path for the file, then press Confirm.
- Press Map View, and you can see the structure of the template.
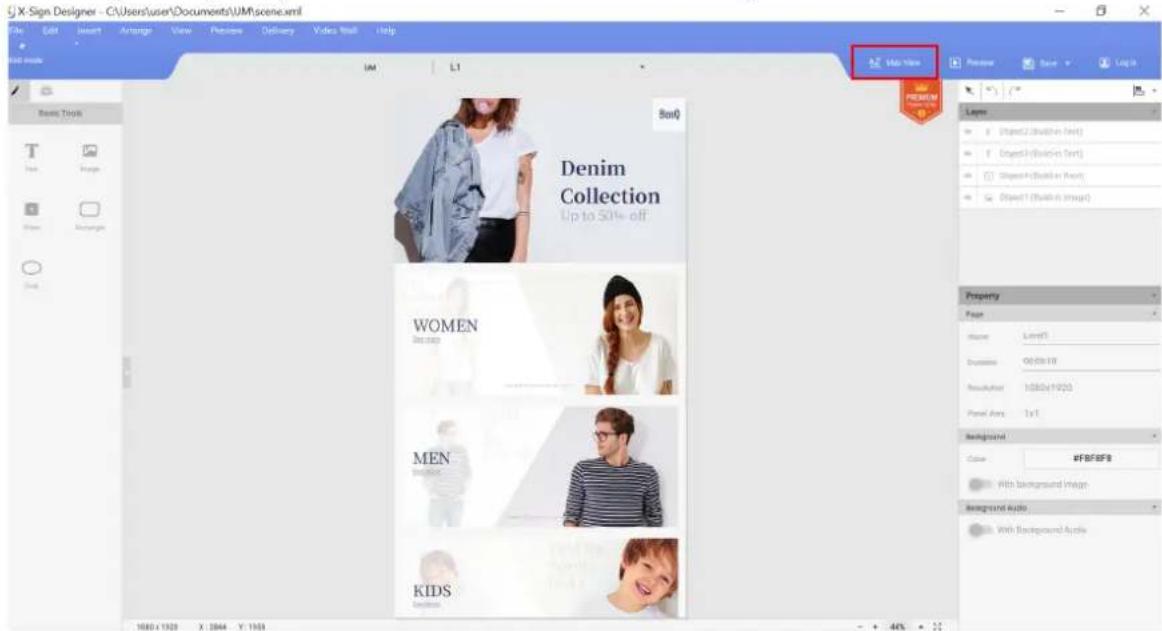
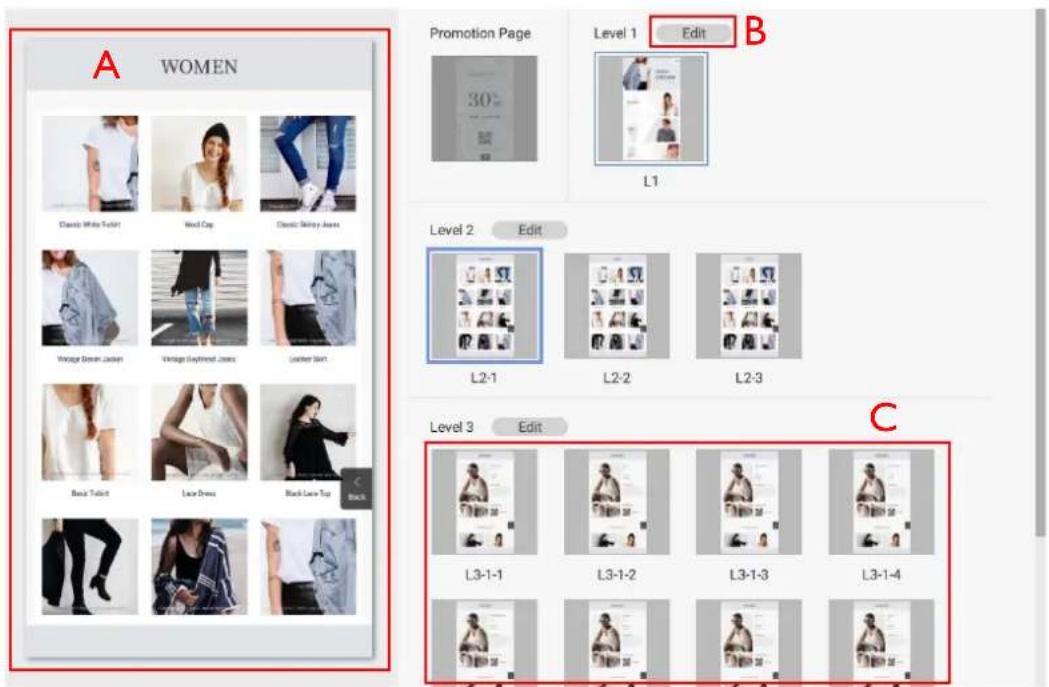
- Below are the basic functions of Map View.
A. Choose the page and you can see the preview on the left side.
B. Choose Edit to go to Layout page (Level X) to change the layout.
C. Choose the page and you can see related subpages. Hold down the page then drag and drop to change the page order. Double click to go to the content page (LX) directly to edit.
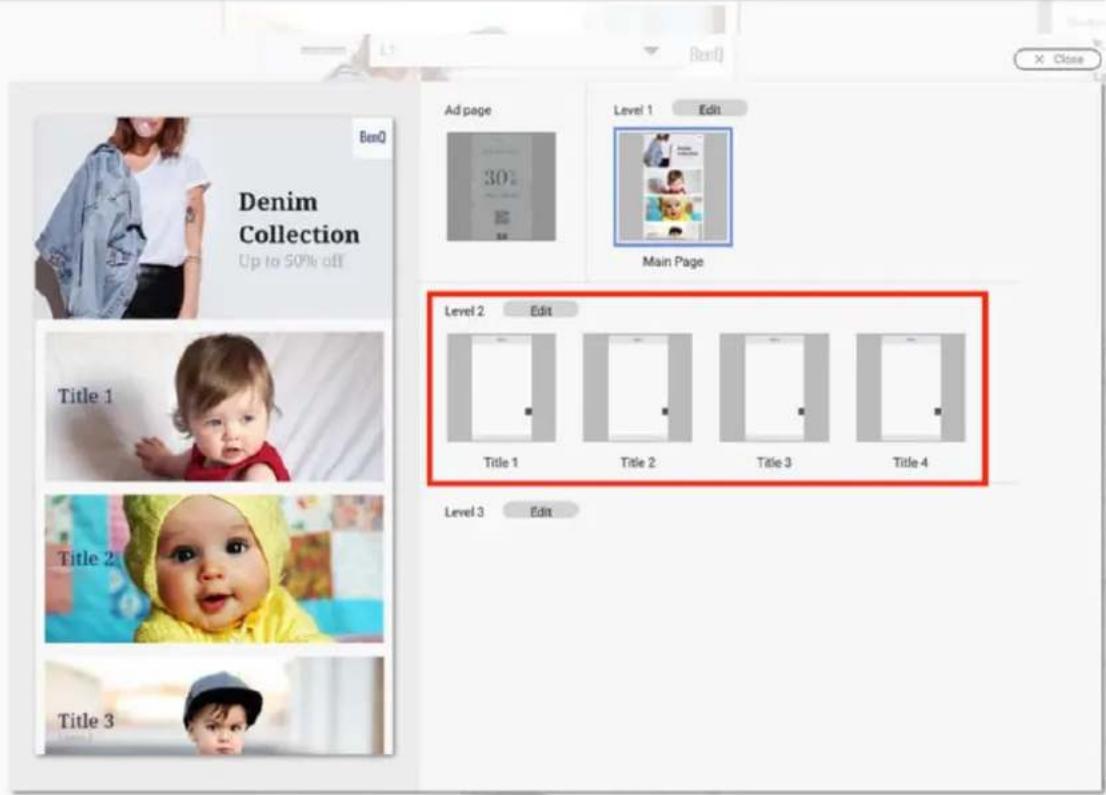
• There are three layers' structures:
Level I: Main page
Level 2: Category
Level 3: Item/ Product
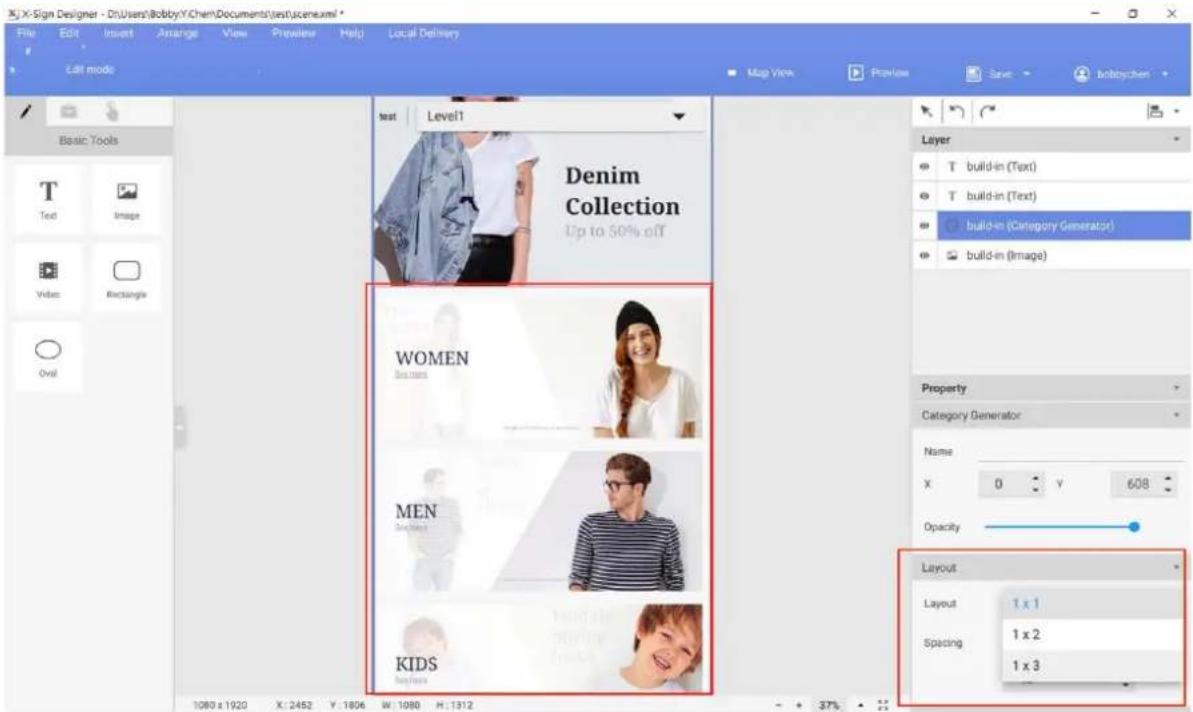
- On Layout page (Level X), click Category Generator to change the layout.
- On Content page (LX), double click Import images to import the content to Category Generator.
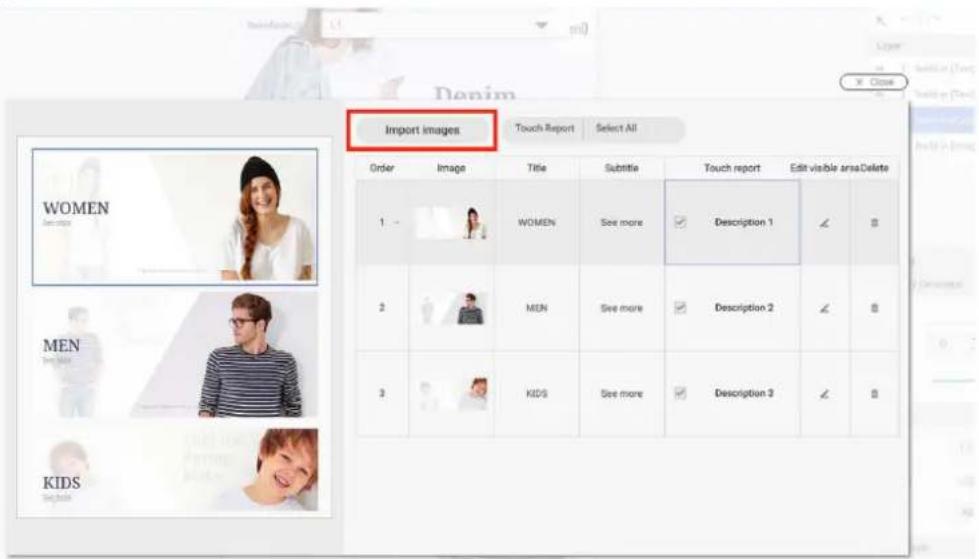
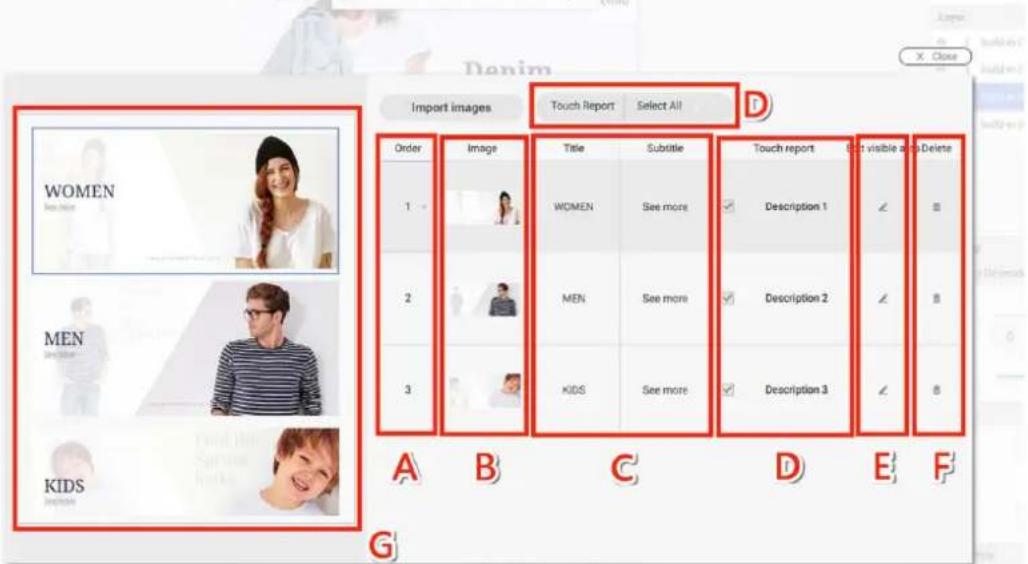
- Below are other functions of Category Generator.
A. Change the order of the items. Drag and drop the item to change the order.
B. Change the image source.
C. Change the display strings here.
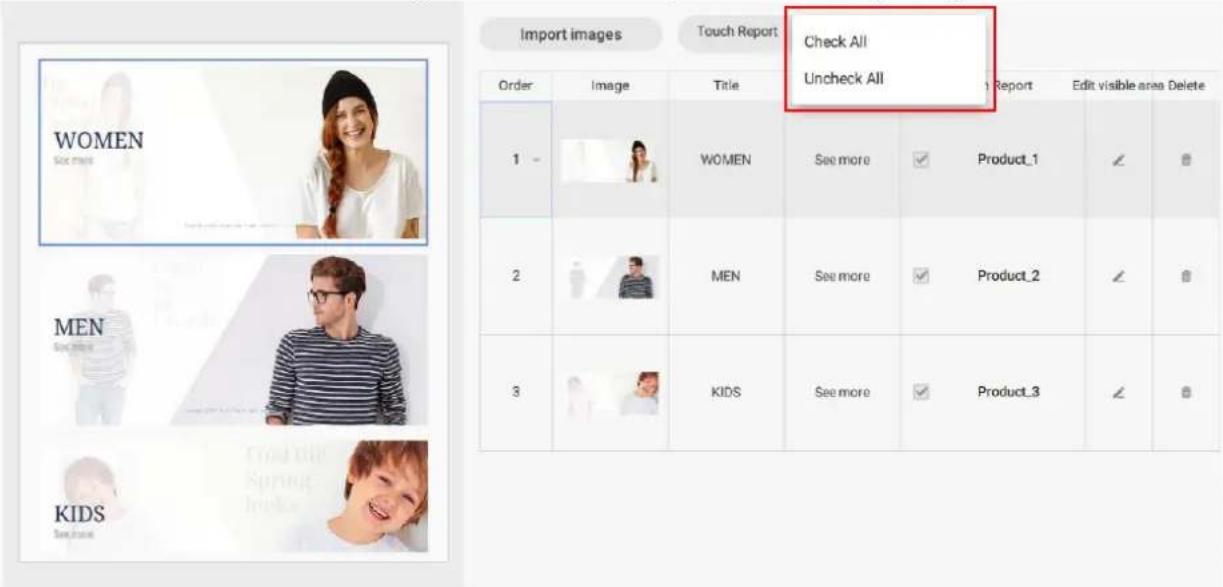
D. Enable Touch Report to see the touch analysis report on Manager. You can enable/disable all by pressing the top-right button.
E. Set the visible area for the picture of items.
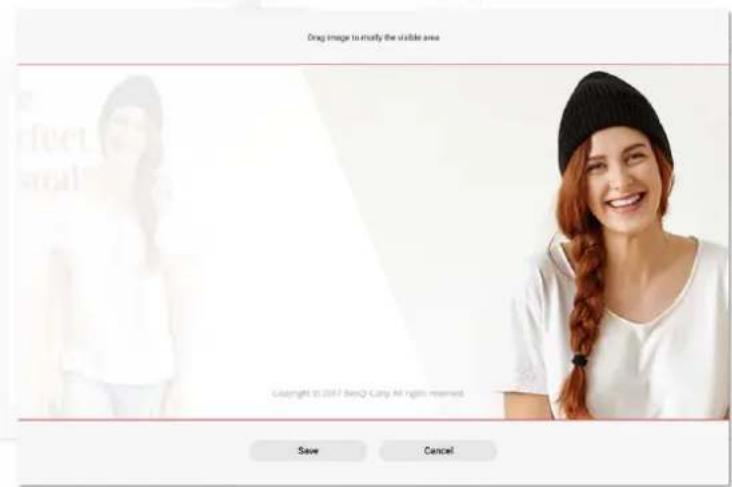
F. You can also right click mouse to delete it. Once you delete the item, you also delete related subpage(s) which can't be recovered.
G. You can preview the page. You can scroll to see the whole page.
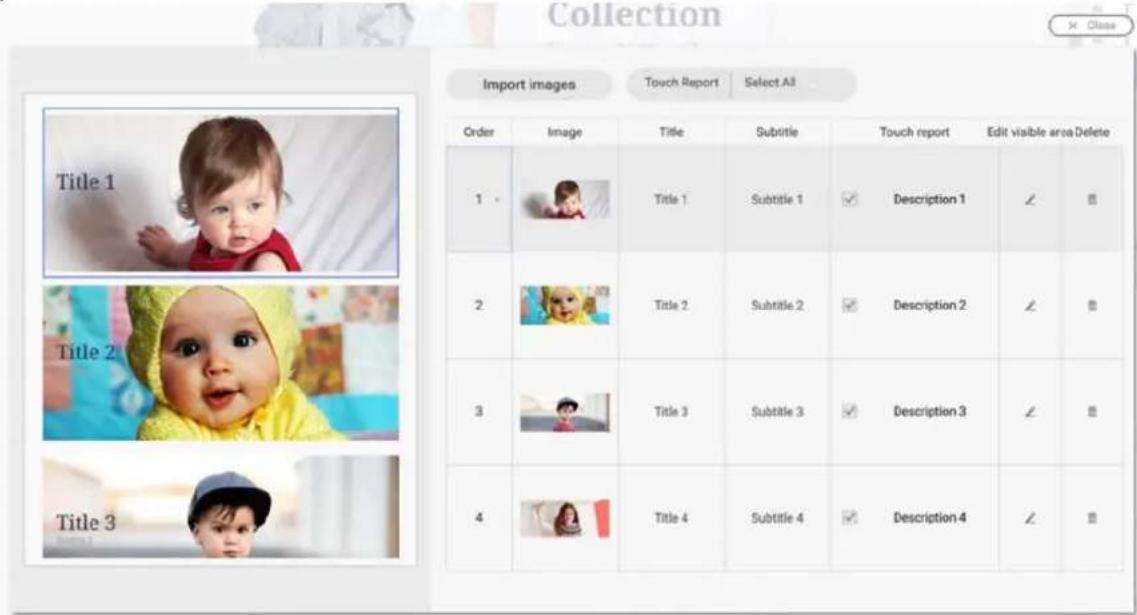
- The number of items you import into the template will automatically generate the related next layer.
- On Layout page (Level X), you can insert a widget. It will apply to all related Content pages (LX). You can't insert any widgets in Content page (LX) separately.
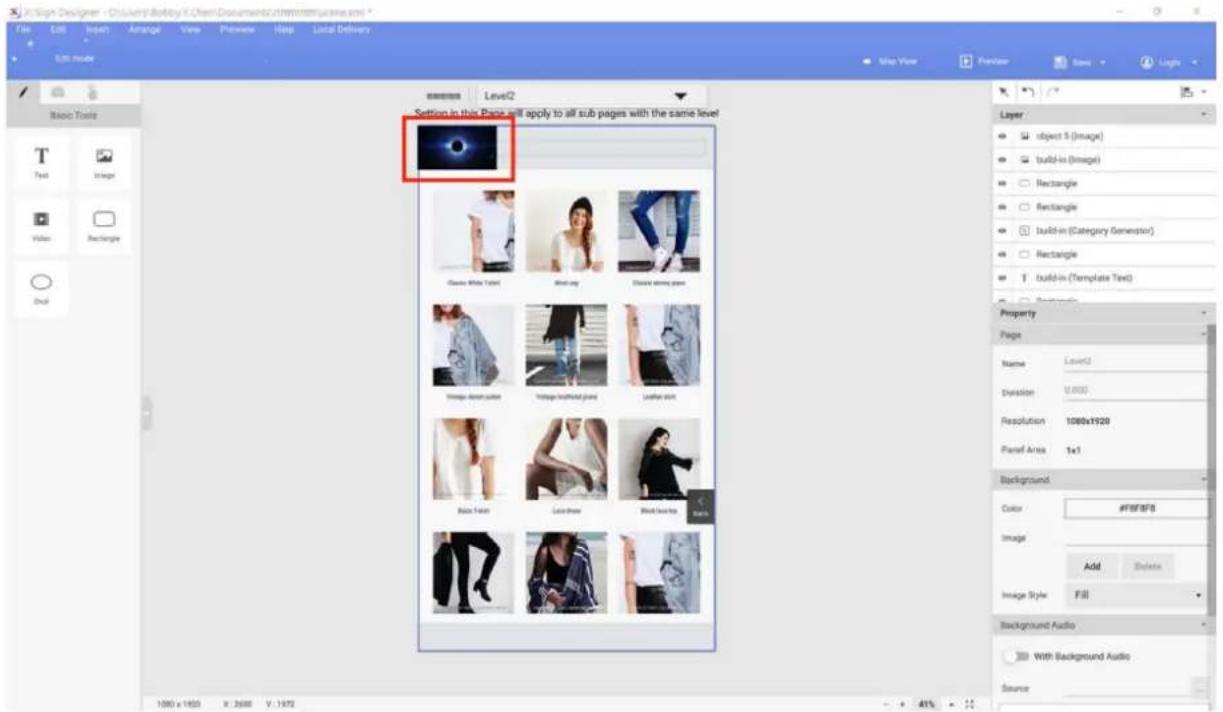
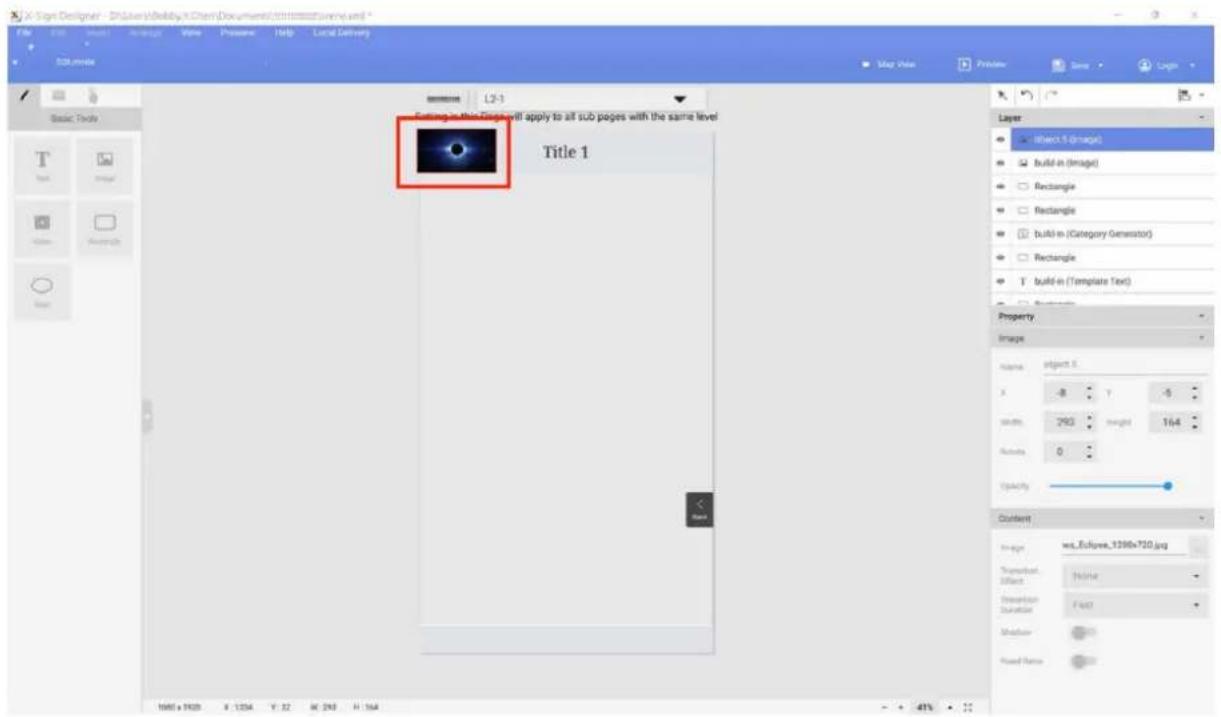
- On Layout page (Level X), you can also remove a built-in widget in the interactive template. Once the widget is removed, it can't be recovered.
II. On Content page (LX), you can set the content for a built-in widget.
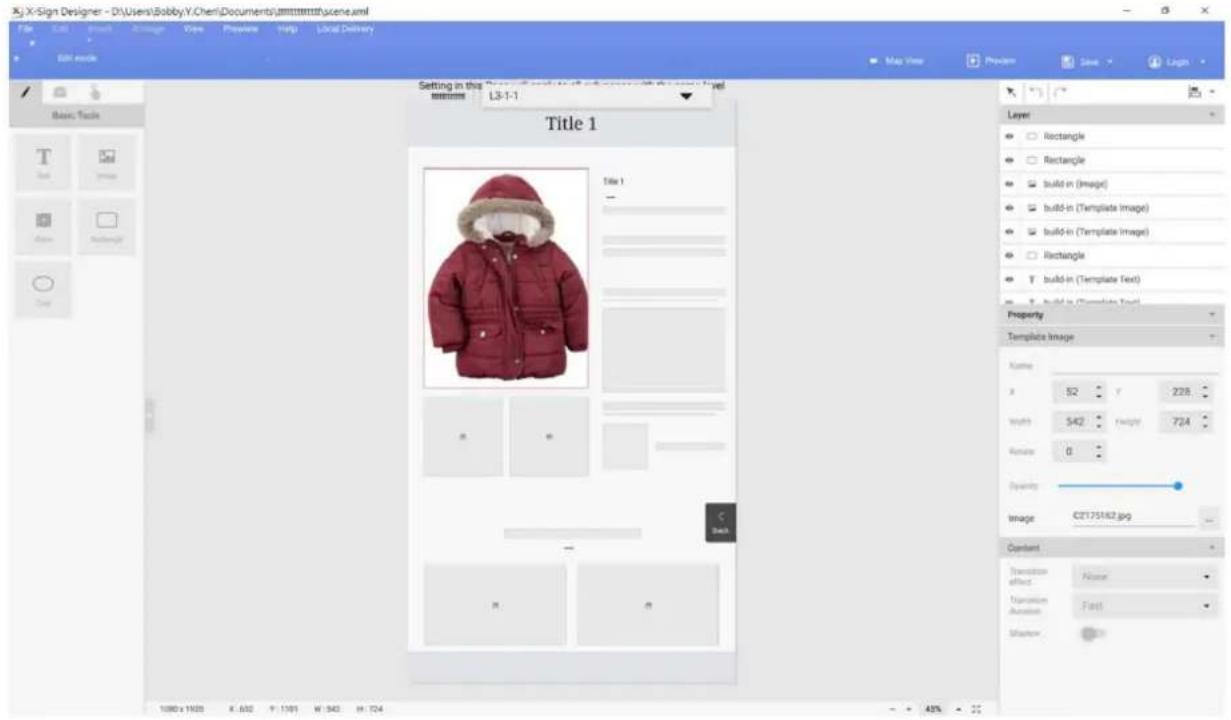
12. Enjoy creating your interactive project with our interactive content.
Creating interactive content from designed templates with Area Link
Watch demonstration video:

There are two ways to create interactive content in X-Sign Designer.
- Interactive Template: Three layers' structures designed by BenQ Designer which make you change your content easily. Refer to Creating interactive content with Interactive template on page 124 for more information.
- Area Link: For you to customize the link relation yourself. You can easily use it to turn the original project into the interactive project as you wish.
The following is an introduction of how to create an interactive content with Area Link.
Note: Be sure that your smart signage has successfully imported with the interactive content otherwise the touch function may not work.
- Open the project you want to change to the interactive content, then select Overview mode.
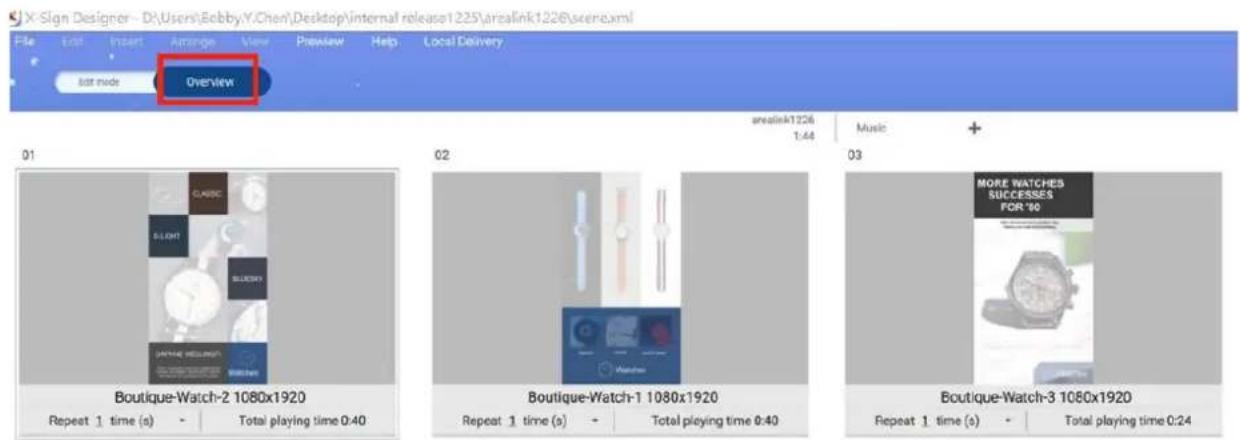
- Choose the page you want to set the link, then press Set Link Area.
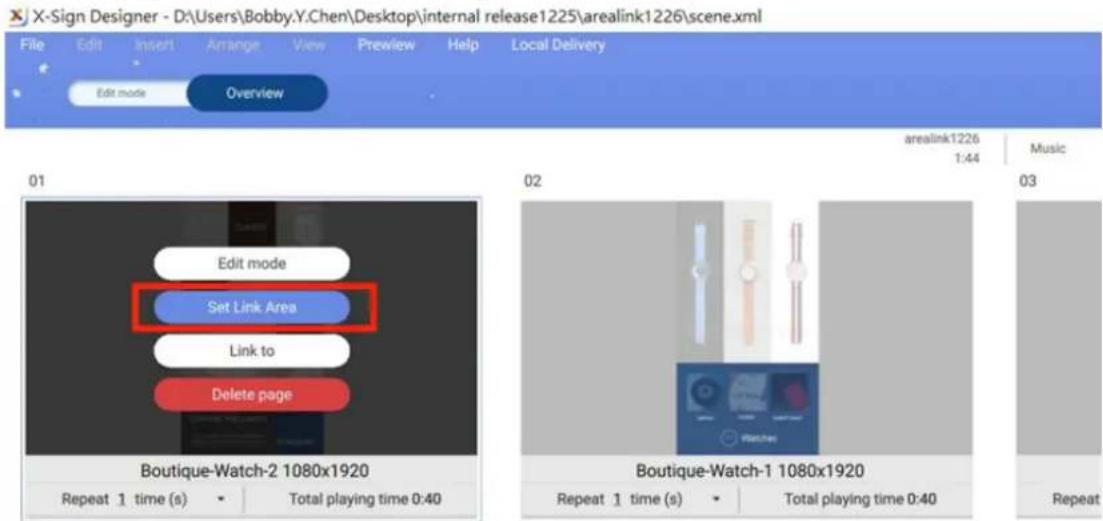
- You will see Link Area setting wizard. Drag an area to create an Area Link.
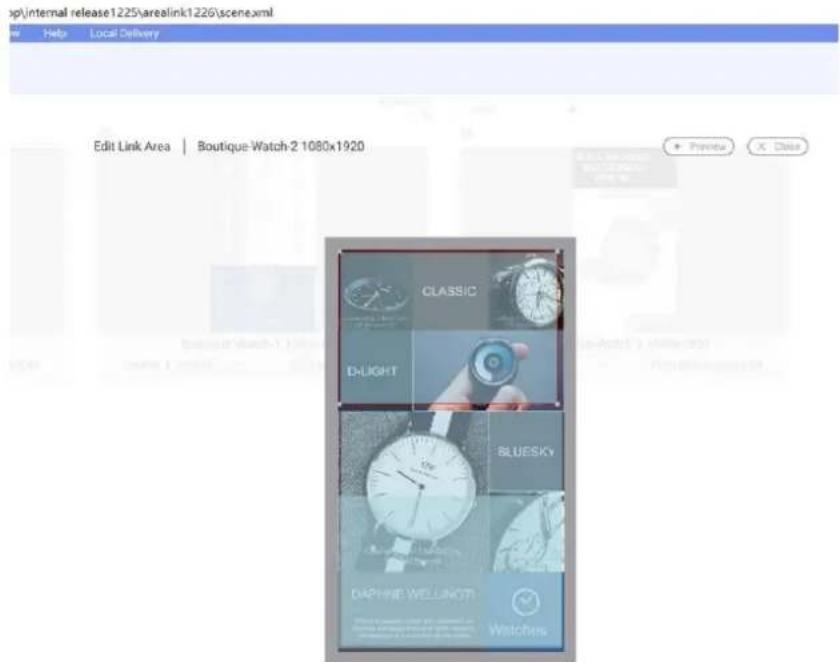
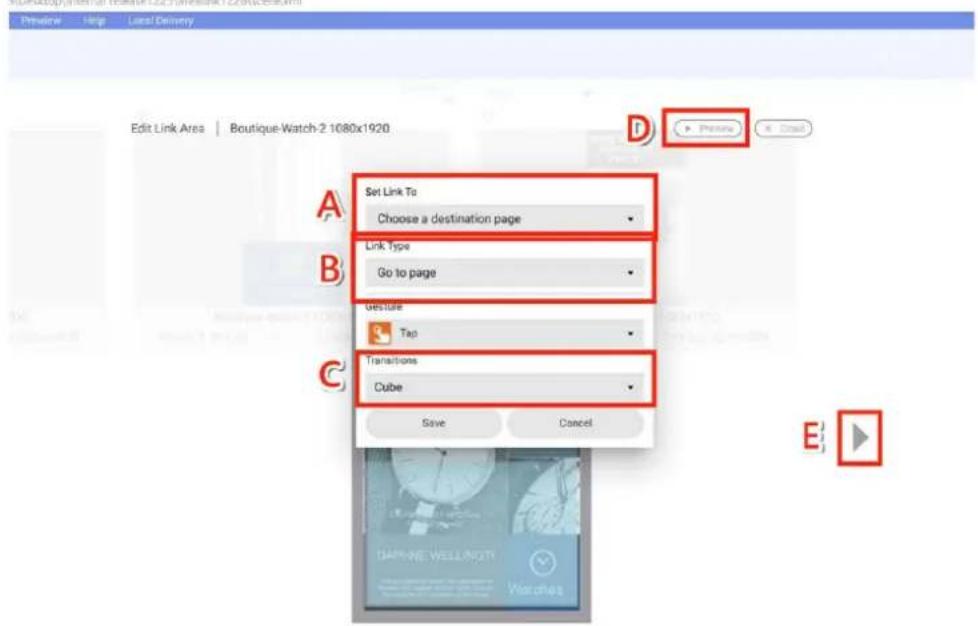
- In Area Link configuration, you can set:
A. Set the page you want to link to. After tabbing the area, you can see the related page.
B. Set the link effect. You can go to the link page directly or to the link page overlapping the original one.
C. Set the transition effect.
D. After you finish the setting, you can preview the effect.
E. Go to and edit other pages.
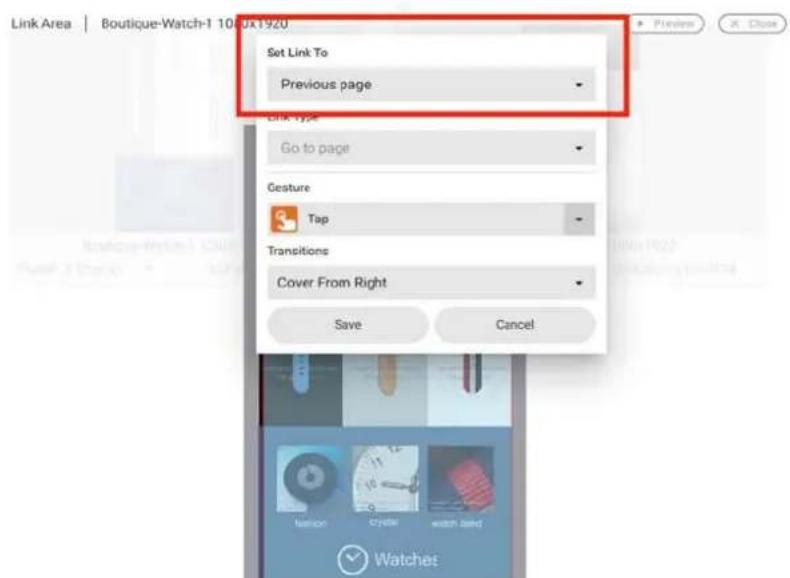
- Set link to the previous page, then you can go back to the previous page.
- After you finish the setting, press Save.
- Now you can enjoy creating interactive content.
Viewing the structure of an Interactive Template
Watch demonstration video:

You can use Interactive Templates in X-Sign Designer to create interactive projects for your touchscreen display. The following is an introduction to working with Interactive Templates.
Note: This feature is for BenQ members who have purchased a Premium License only. To open an Interactive Template in X-Sign Designer:
I. Launch the software and click New Interactive Project.
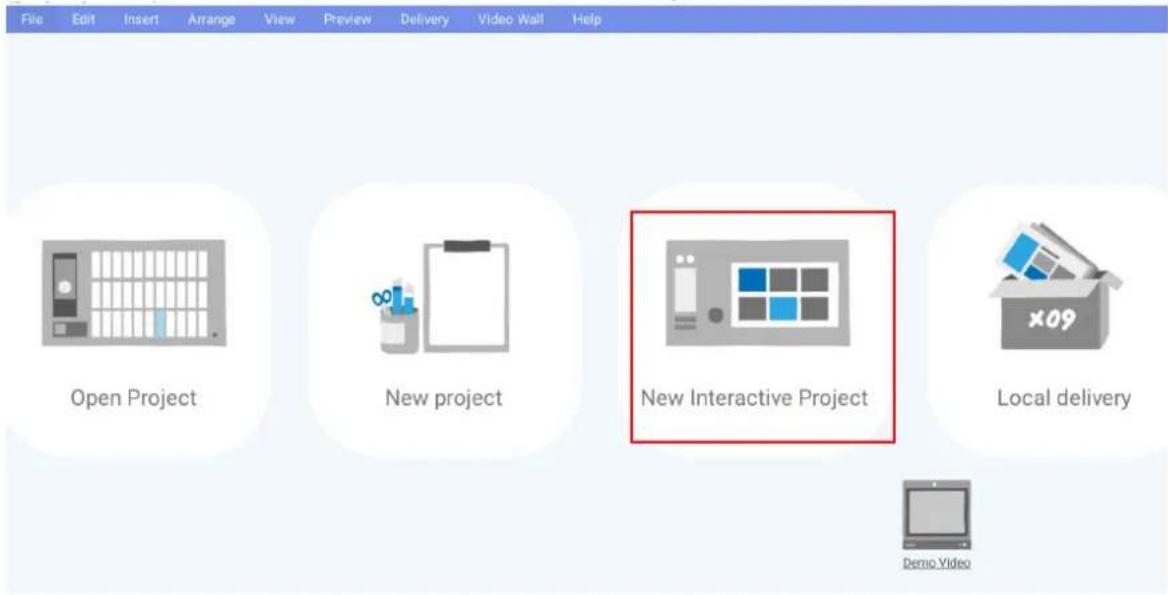
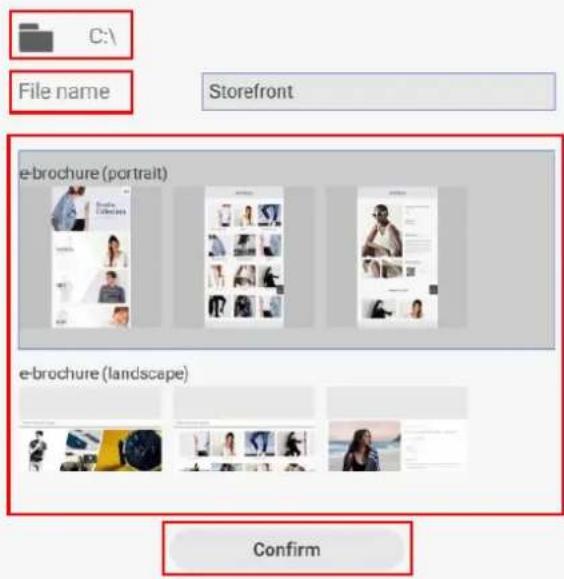
- Choose a location on your hard drive to save the project and create a File name. Select the e-brochure template you want to use and click Confirm.
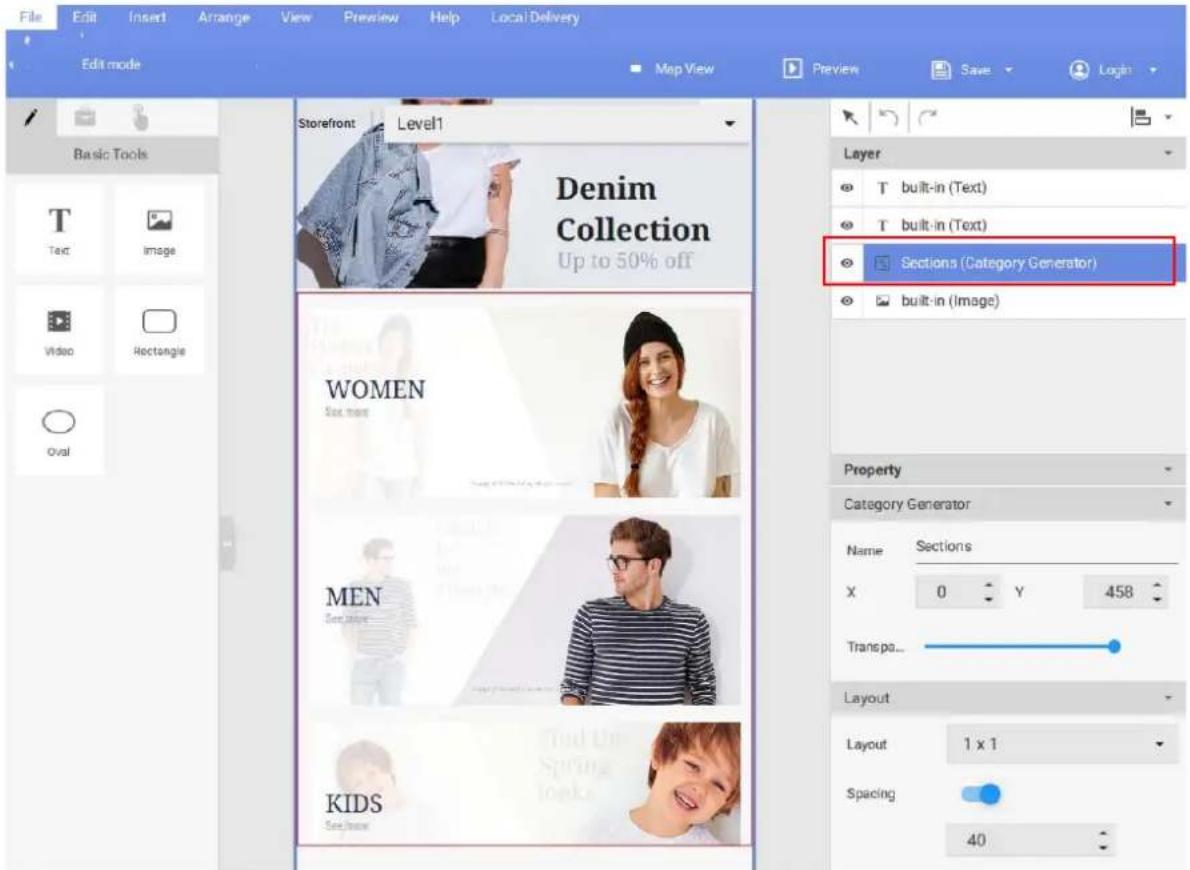
3. You can preview the layout of the Interactive project by clicking on Map View.
![File Edit Insert Arrange View Preview Help Local Delivery Edit mode Map View Preview Save Login Basic Tools T Text Image Video Rectangle Dual Storefront L1 Denim Collection Up to 50% off! WOMEN Sensory MEN Tactress KIDS Escape Layer T built-in (Text) T built-in (Text) [SL] Sections (Category Generator) built-in (Image) Property Page Name: Level1 Duration 0.000 Resolution 1080x1920 Panel Area 1x1 Background Color #F8F8F8](/content/2026/05/804600/images/832cb1ac079b5f32fc7dfef27472f89ee73326eab9c5dd0d19de91e47255f17b.jpg)
4. Each interactive project consists of 3 Levels, and each level consists of a Template Page and Content Pages:
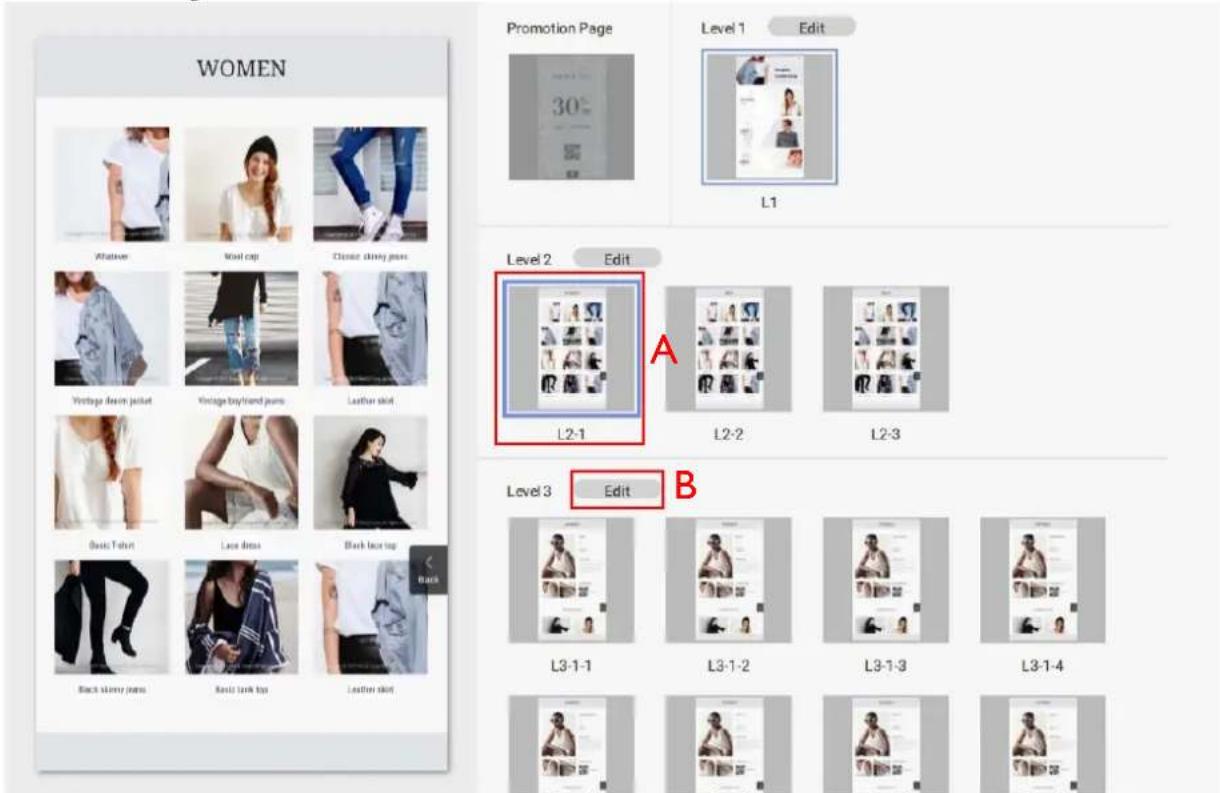
A. To preview a specific Content Page, click on its icon on the right side. To edit the selected Content Page, double-click the icon.
B. To edit a Template Page (which will affect the layout of your Content Pages), click the Edit button next to the Level you want to adjust.
- You can also navigate to each Template Page and Content Page by clicking the button at the top of the canvas and selecting the page from the drop-down list.
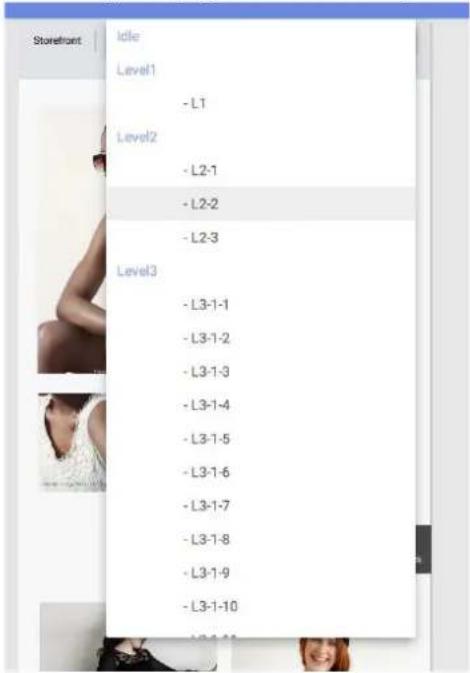
To customize a Content Page in Level 3:
I. You can change each image displayed in a Content Page by selecting it in the canvas, then going to the Template Image panel on the right and click the ... button.
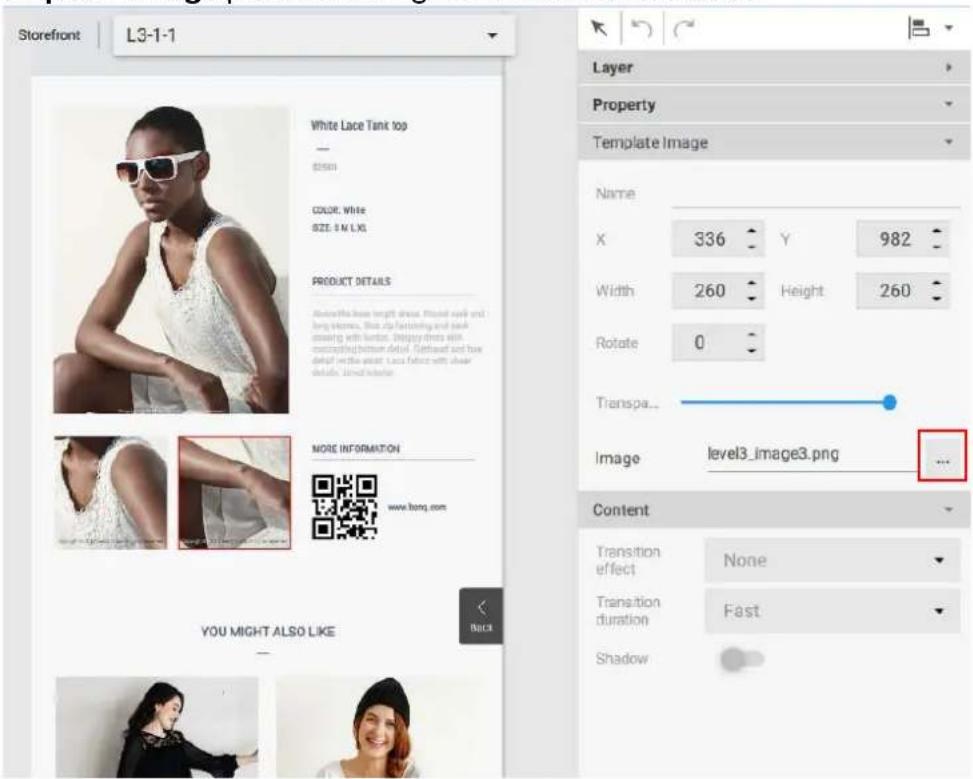
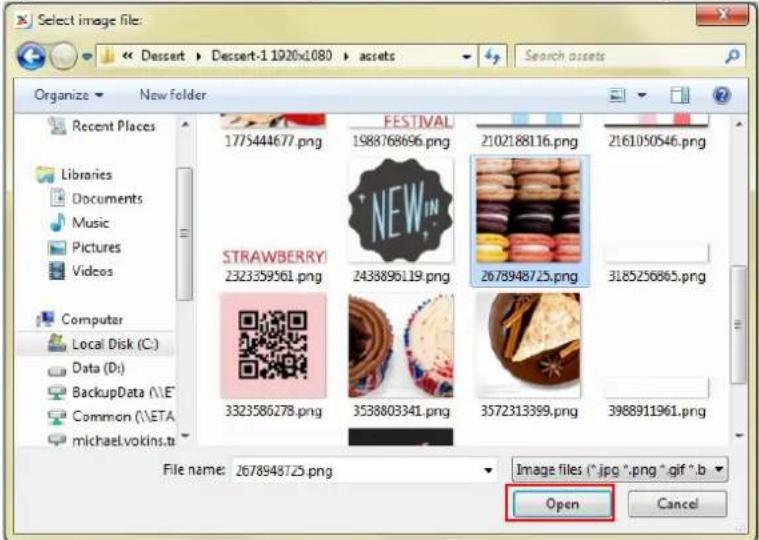
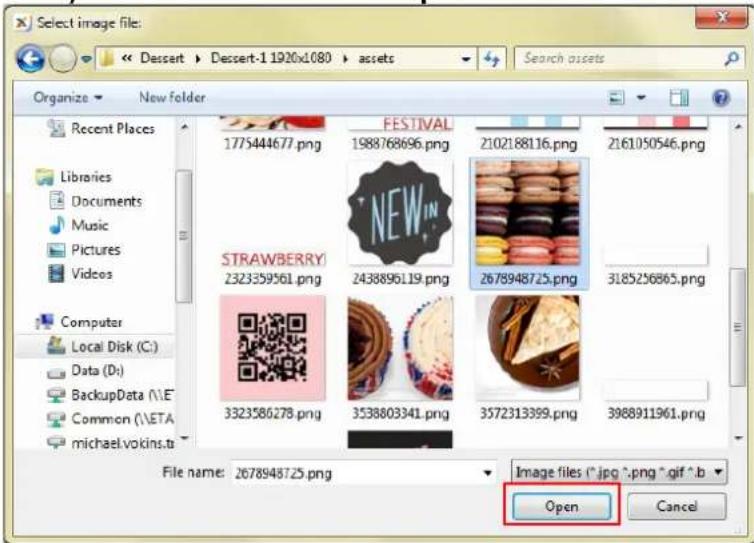
- Choose the image you want to use from your hard drive and click Open.
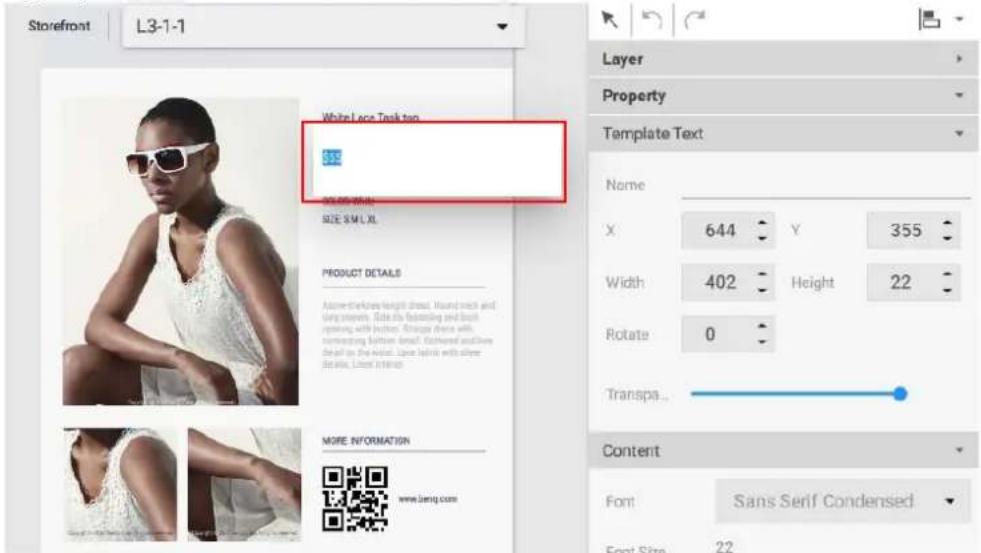
- You can change the text displayed in a Content Page by double-clicking it in the canvas, and then typing in your own text.
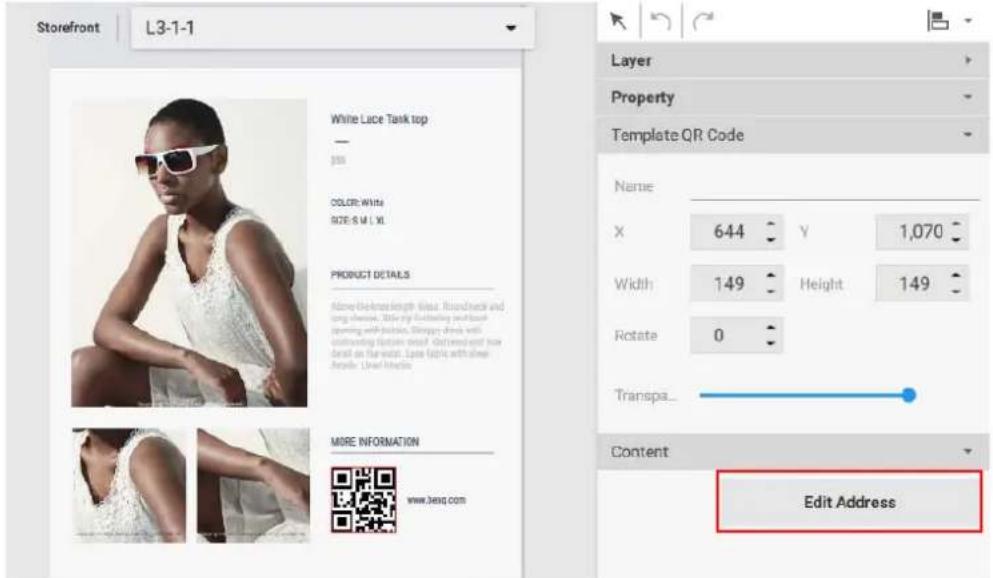
- You can edit the URL for a QR code in a Content Page by selecting it in the canvas, then going to the Content panel on the right and clicking Edit Address. Enter the QR code link and click Confirm.
To customize a Template Page in Level 3:
- You can customize the layout of a Template Page for Level 3 by selecting any of the following items in the canvas:
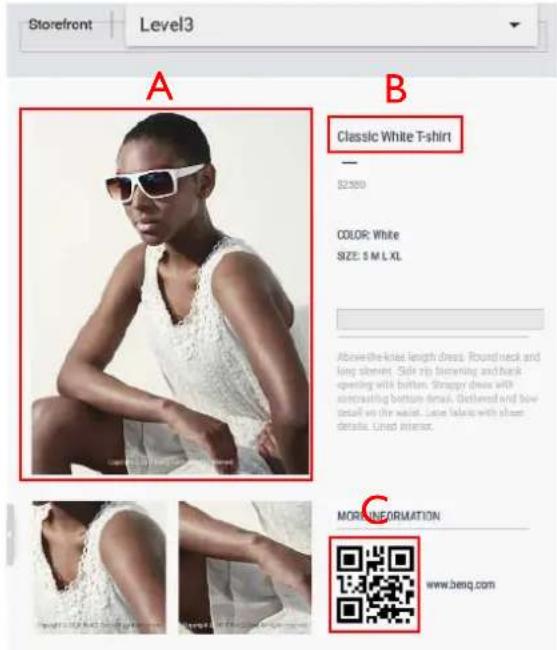
A. Template Image – Select the image in the canvas and then customize the settings in the Template Image panel and the Content panel.
B. Template Text – Select the text in the canvas and then customize its settings in the Template Text panel and the Control panel.
C. Template QR Code – Select the QR code in the canvas and then customize its settings in the Template QR Code panel and the Control panel.
- If you want to delete any Template images or text from the Template page, select the item in the canvas and press delete. A warning message will appear, click Yes to delete or No to exit.
This component can not be added after the deletion, do you want to continue?

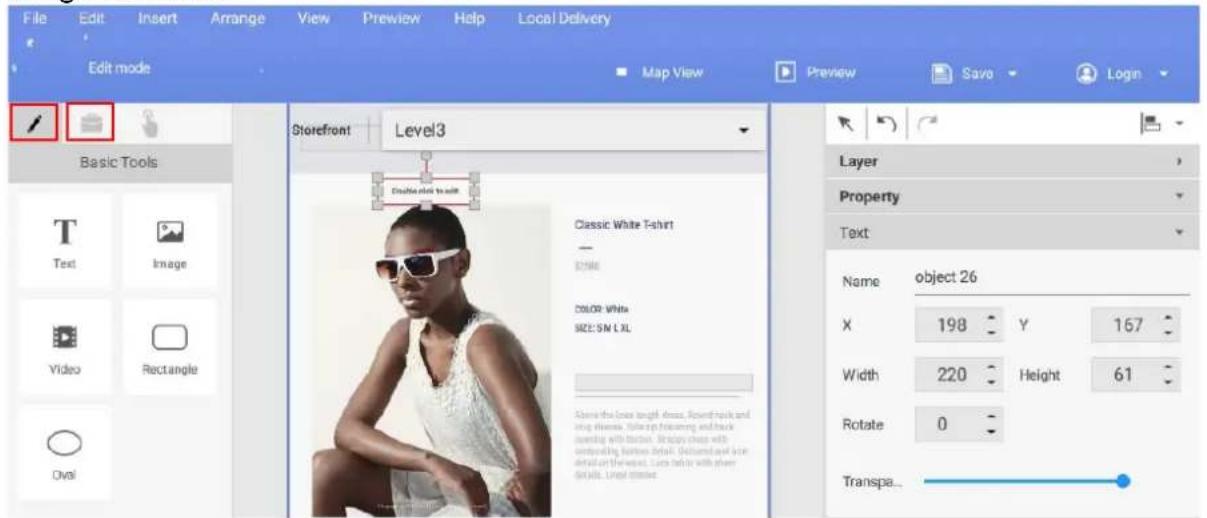
- You can add new images, text or widgets to the Template Page by using either the Basic tool or Widget panel. Click 📋 to access the Basic tool panel or click 📋 to access the Widget panel. Refer to Creating content in X-Sign Designer on page 58 for more information about using these tools.
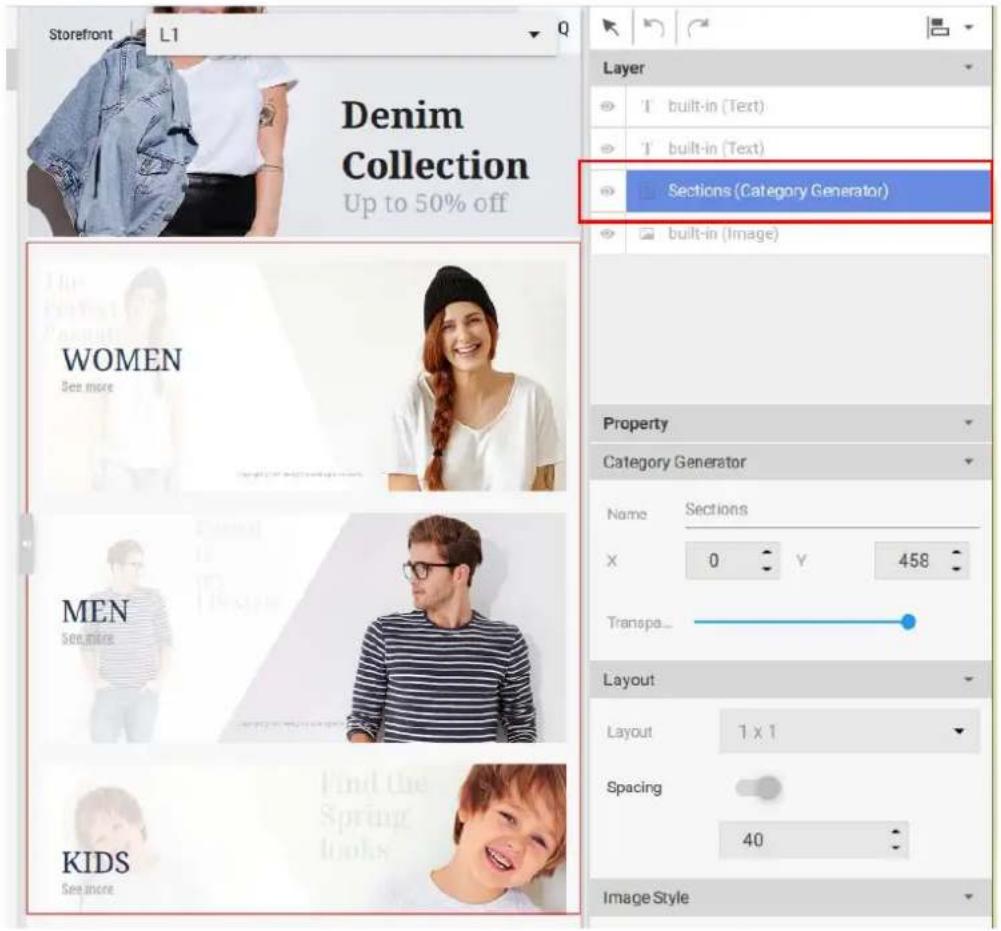
For Level 1 and Level 2 Template Pages and Content Pages, you can add or delete pages, and customize images and text in the Category Generator window. To access the Category Generator window:
I. Navigate to the desired Content Page in Level 1 or Level 2, and then double-click the Category window in the canvas.
- You can edit the following items in the Category Generator window:
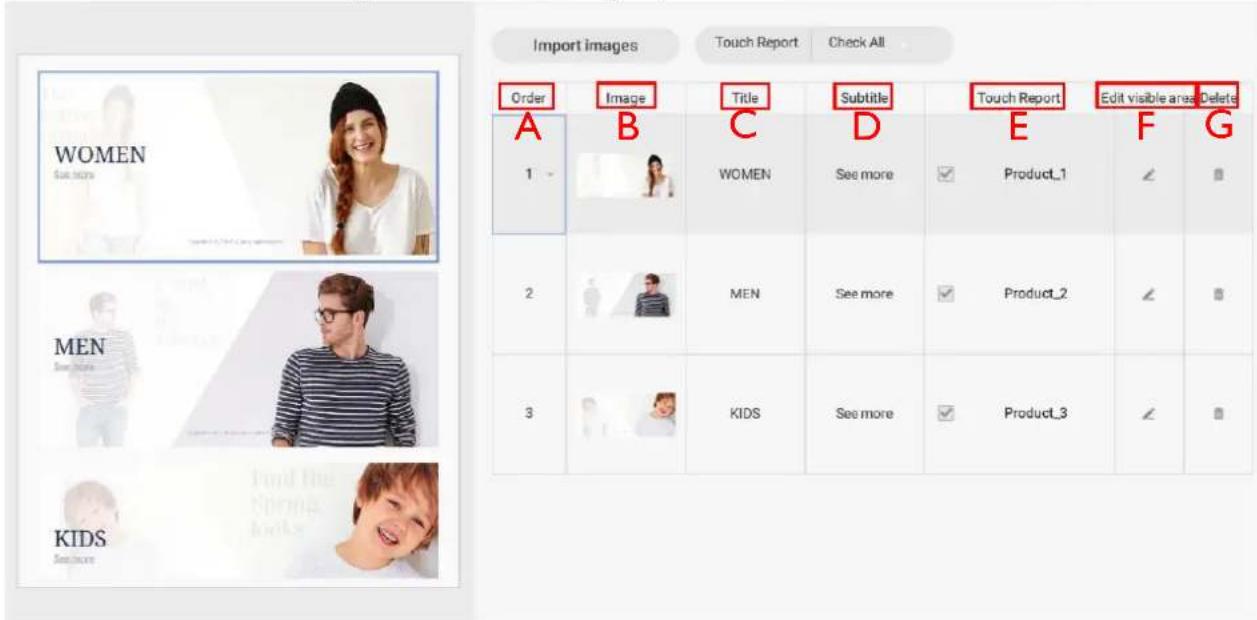
A. Order – Click and hold, then drag a category row upwards or downwards to change the order of the items.
B. Image – Click the image icon and choose a new image from your hard drive. Click Open when finished.
C. Title – To change the Title text, select the text in the category row and type in your new text.
D. Subtitle – To change the Subtitle text, select the text in the category row and type in your new text.
E. Touch Report – Touch Report allows you to track the touchscreen data of specific pages or categories. Check the box to generate Touch Report data for the category.
F. Edit Visible Area – Click to change the positioning of the category image.
G. Delete – Click to delete the category and all its sub-pages.
3. You can add new Category pages by clicking Import images.

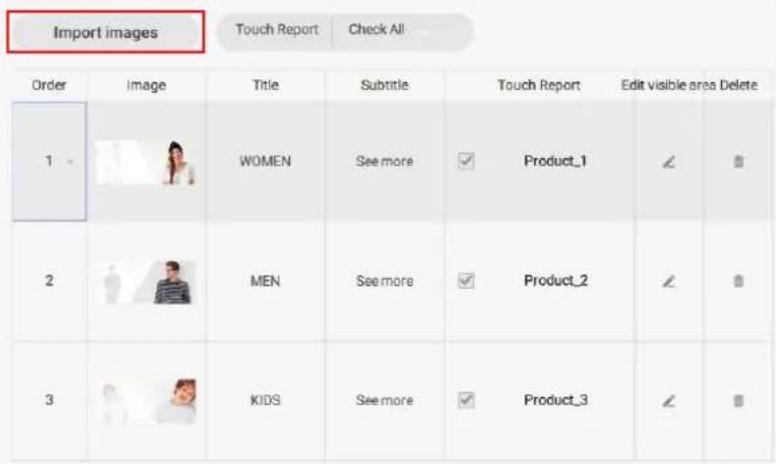
4. Select the image from your hard drive and click Open.
5. You can change the Touch Report settings for all categories by clicking ✅. Refer to Enabling Interactive Statistics on page 140 for more information.
Enabling Interactive Statistics
For X-Sign Designer, interactive projects can record the touch statistics of each page within an interactive project. The following is an introduction to enabling and reviewing interactive statistics.
Note: This feature is for BenQ members who have purchased a Premium License only.
To enable the interactive statistics for an interactive project:
- Navigate to the desired Content Page in Level 1 or Level 2, then double-click the Category window on the canvas.
- Under the Touch Report column in the Category Generator window, select the checkbox next to each item you wish to track touch data.

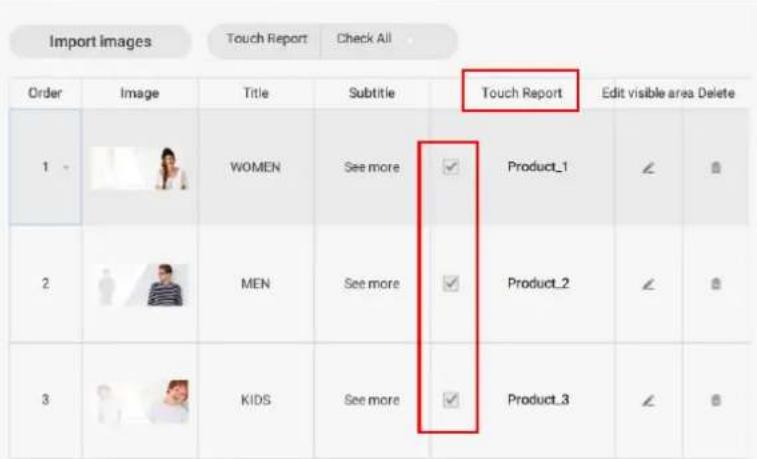
- You can also change the Touch Report settings for all categories by clicking in the Touch Report drop-down menu. Select Check All to generate Touch Report data for all categories or select Uncheck All to not generate Touch Report data for any categories.
Note: To review the interactive statistics, refer to Viewing an Interactive Report on page 142 for more information.
Viewing an Interactive Report
Once you have enabled interactive statistics for an interactive project, you can view the data for your statistics in X-Sign Manager. The following is an introduction to viewing and reviewing interactive reports.
To review the interactive statistics for an interactive project:
- Log in to your X-Sign Manager account. Go to Report Analysis > Touch Usage Report (Beta).
- In the Touch Usage Report (Beta) page you can review statistics using the following items.

Display item: Product - All
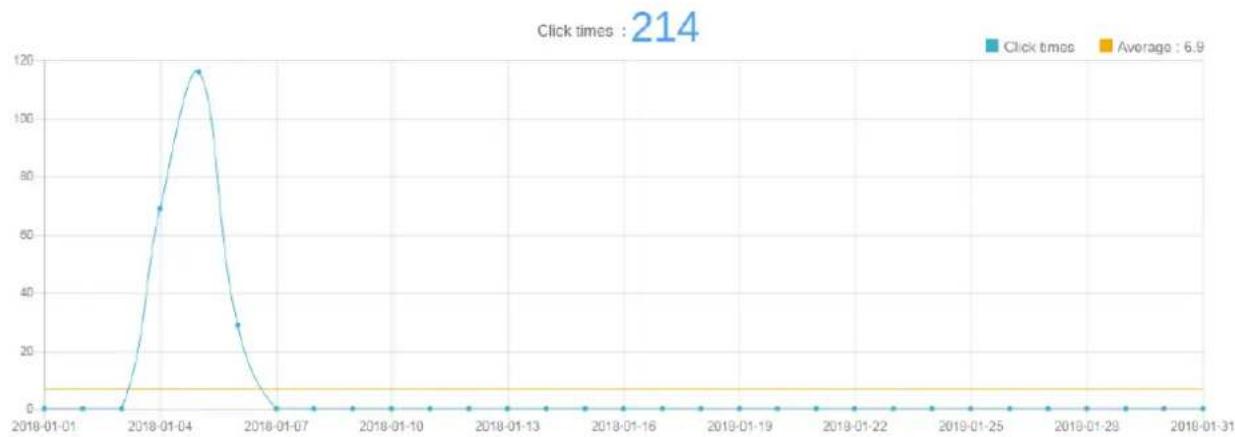
line
| Date | Click times | | ---------- | ----------- | | 2018-01-01 | 0 | | 2018-01-04 | 70 | | 2018-01-05 | 118 | | 2018-01-06 | 30 | | 2018-01-07 | 0 | | 2018-01-10 | 0 | | 2018-01-13 | 0 | | 2018-01-16 | 0 | | 2018-01-19 | 0 | | 2018-01-22 | 0 | | 2018-01-25 | 0 | | 2018-01-29 | 0 | | 2018-01-31 | 0 |A. Type of Report – Click ▼ to choose one of the following data sets to display: Click, Product, Channel, Category, or Device.
B. Export Data – Click ▼ to choose an export setting from the dropdown list. You can select All Data (CSV) to export all interactive data to a csv-file format, or you can select Data in this page (PDF) to export the data displayed on the page to a PDF.
C. Date From – Choose the start date for the data you want to display in your report.
D. To – Choose the end date for the data you want to display in your report.
E. OK - Select OK to confirm the selections and generate the report in the window below.
F. Product - Select Product to choose the data for specific products (i.e. - categories) you would like to display in your report.
G. Channel - Select Channel to choose the data for specific channel(s) you would like to display in your report.
H. Device - Select Device to choose the data for specific device(s) you would like to display in your report.
Setting the device group control
I. To control the device group, go to X-Sign Manager and click By Device.
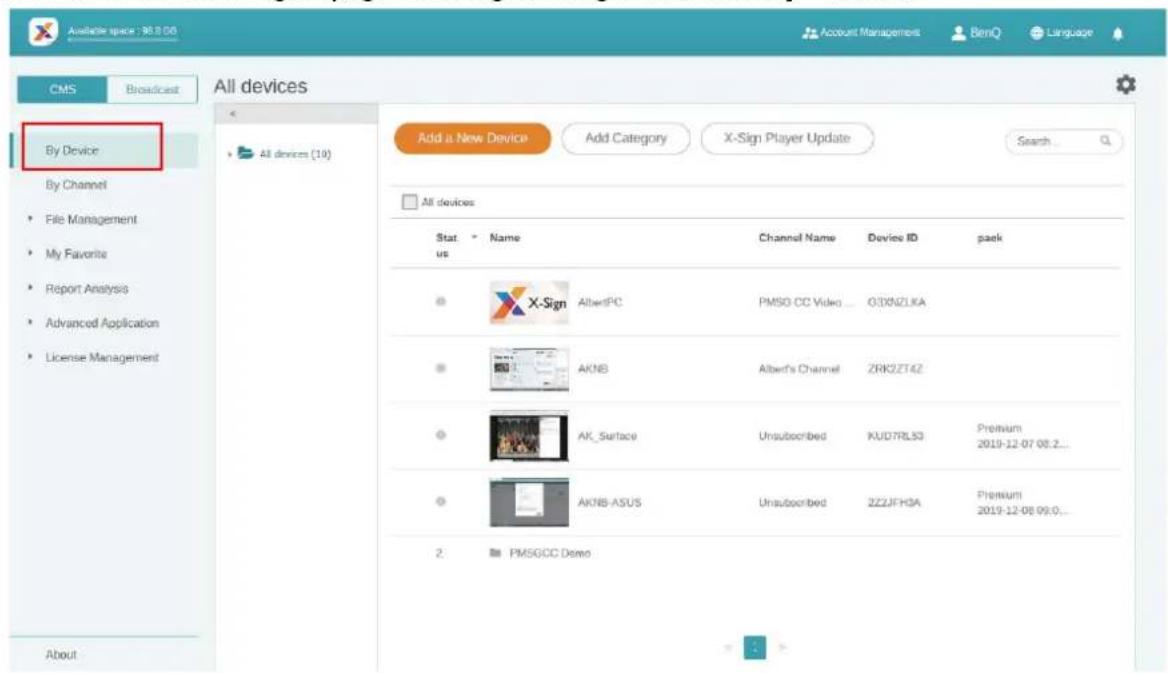
- You can select the device(s) you want to control, then click Screen Settings 📄.
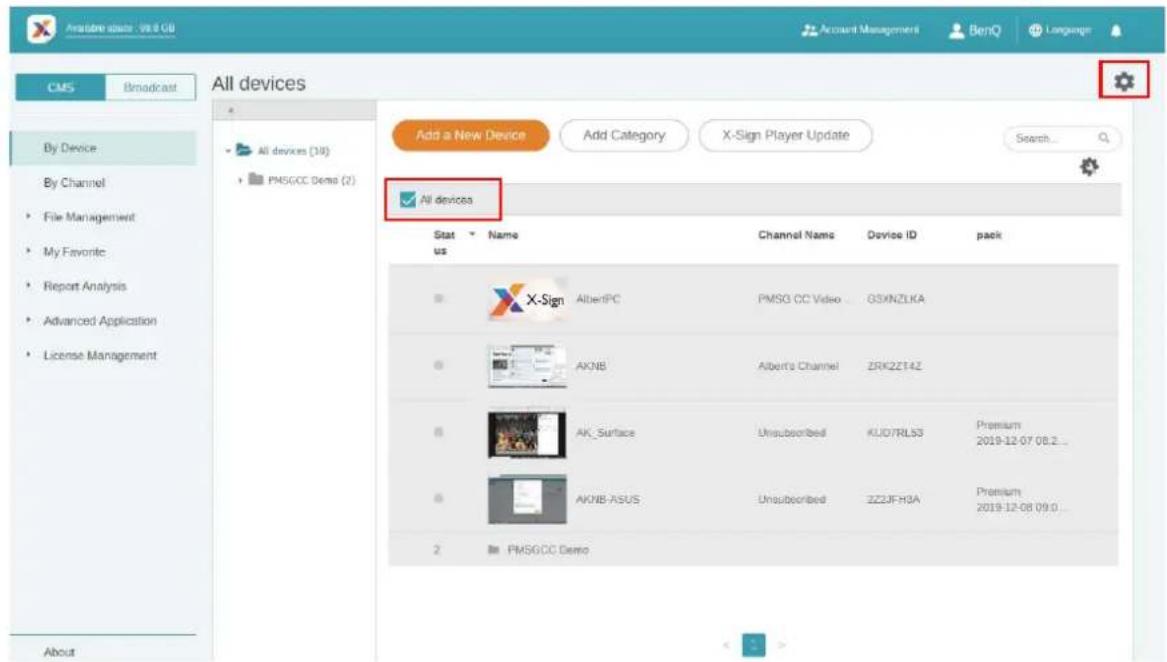
- You can select the playing time and the content will be played everyday between the start and end time repeatedly.
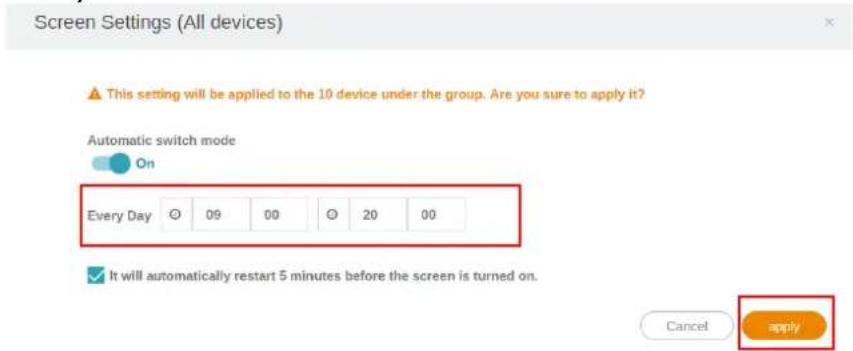
- You can set the automatic switch mode to On or Off, then click apply.
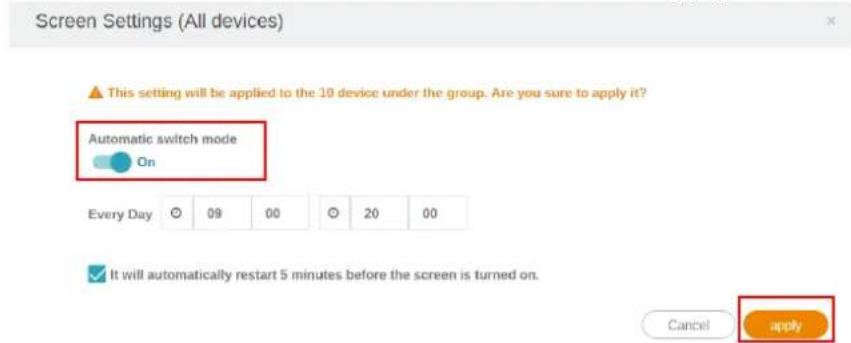
- Check the box if you want the device to automatically restart five minutes before the screen is turned on. If you don't want the automatic restart, uncheck the box. Click apply.
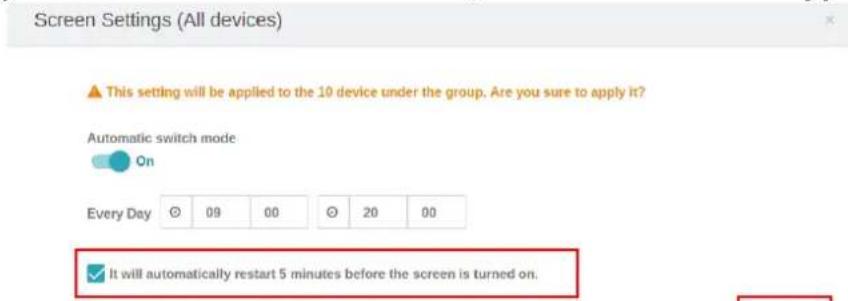
API
Creating an API template using the designed template
I. In X-Sign Designer, click on the icon go to the template page.
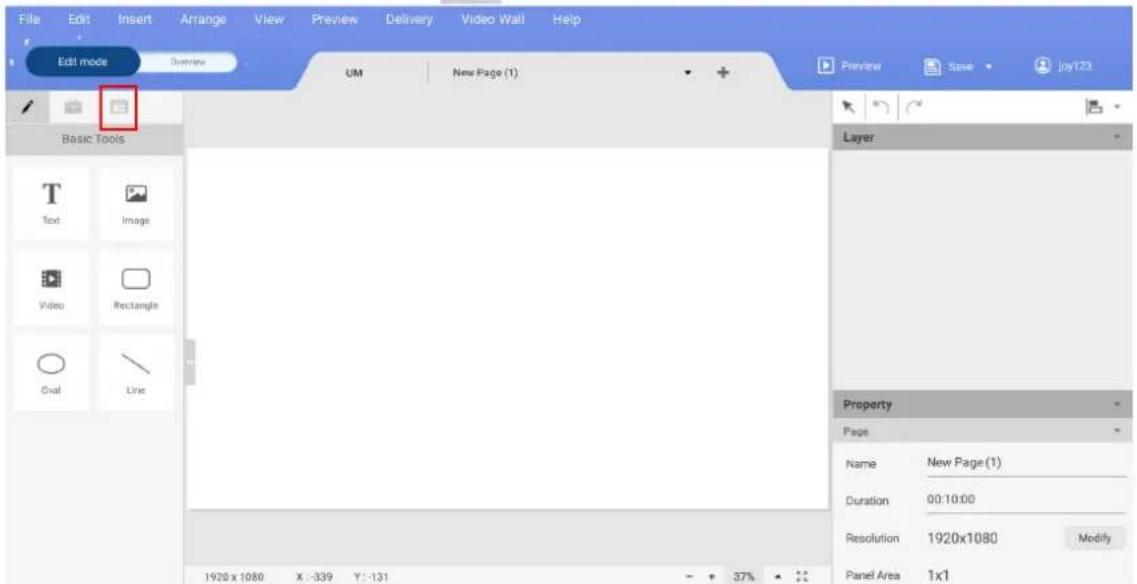
2. Click on the API template to open the designed template.
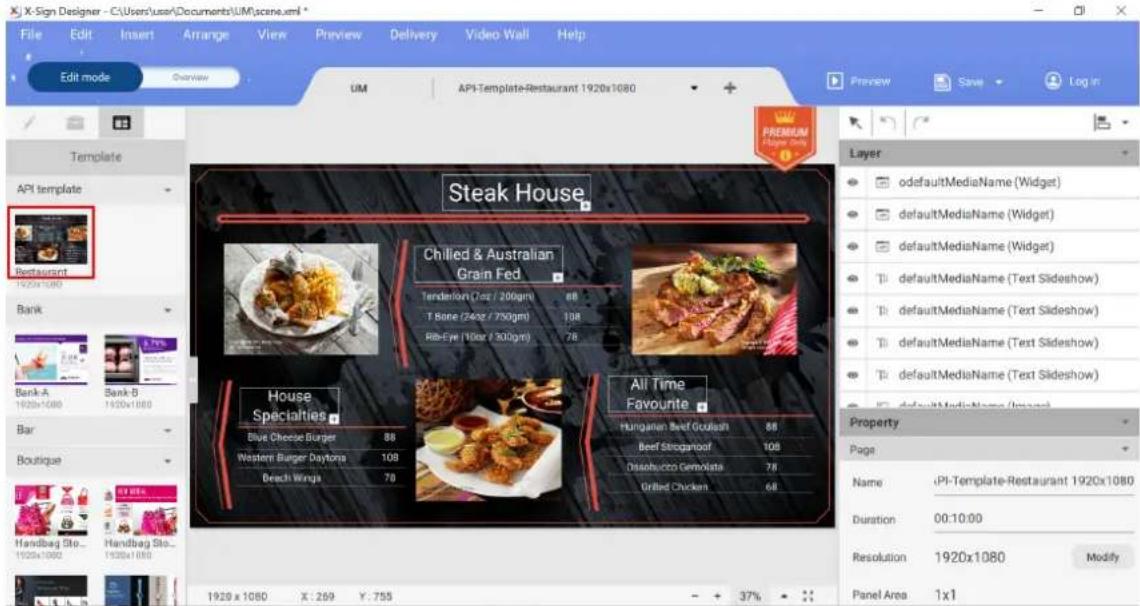
3. You can click on the template to import new images. You can also edit the designed template in the editing area on the right panel. See Encrypting a project in X-Sign Designer on page 87.
GPL/LGPL Software Licenses Used by X-Sign
X-Sign Player for Android is a commercial app that contains LGPL libs, including:
• [Qt] https://www.qt.io/download for Android
• [FFmpeg] https://www.ffmpeg.org/
• [KArchive] https://github.com/KDE/karchive
- [libqrencode] https://github.com/fukuchi/libqrencode
- Android player 2.6.6.1 LGPL release: https://cmota.s3-ap-northeast-1.amazonaws.com/XSIGN_LGPL/XSignPlayer-lgpl-android-arm-2.6.6.1.zip
- Qt 5.12.7 source code release: https://cmota.s3-ap-northeast-l.amazonaws.com/XSIGN_LGPL/qt-android-arm.zip
X-Sign Player is created by using statically-linked library for better performance and compatibility.
In order to meet LGPL requirement, these Packages are provided to allow user to rebuild X-Sign Player apk with modified LGPL libs. By downloading and using the Packages, you are acknowledging and accepting all risk and liability associated with the usage of the Packages, as well as agreeing to comply with the GPL/LGPL included with each Package.
Disclaimer:
BENQ PROVIDES THE PACKAGES AND THIS DOWNLOAD SERVICE "AS IS" WITHOUT WARRANTY OF ANY KIND AND ALL SUCH WARRANTIES, EXPRESS OR IMPLIED, ARE HEREBY DISCLAIMED, INCLUDING, WITHOUT LIMITATION, WARRANTIES OF MERCHANTABILITY, FITNESS OR USEFULLNESS FOR ANY PARTICULAR PURPOSE, ACCURACY, AVAILABILITY, QUALITY OF THE PACKAGES, PERFORMANCE OR NON-INFRINGEMENT. BENQ does not provide nor is obligated to provide support for the usage of the Packages. BENQ is not responsible for any copyright or trademark infringement.
- Copyright
- Disclaimer
- Table of contents
- BenQ X-Sign 5
- Basic 5
- Account 5
- License 12
- Manager 18
- Designer 53
- Player 92
- Local Delivery.... 105
- Report.... 116
- Video Wall.... 118
- Premium 124
- GPL/LGPL Software Licenses Used by X-Sign 147
- BenQ X-Sign
- Basic
- Account
- Message
- Sign up
- Note:
- Accessing your account
- Setting the permission for users
- Authorizing other users as admins
- To authorize agents, go to Account Management.
- Click Create New Account to proceed.
- License
- After clicking Buy New License,
- After checking the quantity and the total price, click PayPal Checkout.
- Log in the Paypal Account and finish the payment.
- You can also pay by your credit card.
- Importing the license(s) to X-Sign Manager
- Mapping the license
- To map the license, go to License Management > License List. Click Mapping to continue.
- Fill in the following fields and click Finish to map the license.
- Checking the License upgrade notice
- Manager
- Choose Pair to start pairing.
- Get the Device ID on this page then go to X-Sign Manager to pair the license.
- Go to X-Sign Manager. Then go to By Device and choose Add a new Device.
- Enter required information as below.
- Creating the channel
- Scheduling the content by channel
- Click Add category to create a folder.
- Managing the calling system
- Creating an API table in X-Sign Manager
- To create an API table, select Advanced Application > API Widget.
- Create the API Widget configuration.
- The source table is successfully created.
- Setting Verification
- Files
- Go to Verification > Files to check the files uploaded via X-Sign Designer.
- Select the file to be approved or rejected, then click Approve or Reject.
- You need to fill in the reason you reject the file to be added to the schedule. This is a required field. Click Submit to proceed.
- Schedules
- Enable System Notification.
- Updating device status immediately
- Player report (proof-of-play)
- Go to File List, select a file, and click .
- X-Sign records the playback history of each file on each device. Click Export, then the Player report is exported as an .xls or an .xlsx file type.
- Using Designer Express
- All the projects you create with Designer Express will store in the draft list. Media Library, which store the assets, can accelerate your design. Click New Project to go to the designer express template editing page.
- Click Confirm to proceed.
- To add a new page, click +Add Page.
- Add an image from Local File for the first page.
- Designer
- Launch the software and click New project.
- To customize the project settings, configure the following items:
- Select Confirm to create the new project file.
- Creating content in X-Sign Designer
- Creating content from Designed Templates
- Creating a clock widget in X-Sign Designer
- Setting a weather widget
- Creating an Image or Video slideshow
- Rotating an image or video
- Generating a QR Code
- Adding a data connection
- Setting a timer widget
- Creating an API template using the demo kit
- Creating a TV Input source widget in X-Sign Designer
- Setting background music in X-Sign Designer
- You can adjust Volume in the Audio panel.
- While the project is in Overview Mode, click the music button at the top of the canvas.
- Choose the mp3 file from your hard drive and click Open.
- You can replace or delete the mp3 file by selecting the following:
- Changing the playing order of pages
- Go to File > Encrypt Project.
- Select the file you want to encrypt. Enter six-digit code as your verification code, then click Confirm.
- Changing your language in X-Sign Designer
- Choose your language from the language menu.
- Player
- Switching the mode of Player
- How to pack .xplan file
- - Standalone(USB)
- Select Standalone(USB) to play the file.
- Select the "usb\_storage" folder.
- Choose the file you want to play, then press Play.
- Now you can enjoy your content.
- Activating an Interactive function in Standalone mode
- - Activate license in Standalone mode:
- Choose Standalone > Activation.
- Here you can find the Activation Code.
- - Activate license in Local Delivery mode:
- Choose Local Delivery > Activation.
- Select unpaired licenses, then click Mapping.
- After mapping licenses, fill in the activation code which shows on your X-Sign Player, then click Finish to complete pairing.
- Choose Switch Mode.
- Local Delivery
- Playing content with Local Delivery
- Select Local delivery to play the file.
- Searching for devices in Local Delivery Mode
- Launch X-Sign Designer and select Local delivery.
- Setting a schedule for Local Delivery Mode
- In the Device Window click CHANNELS, then click Add Channel to create a new schedule.
- Report
- Downloading player content report
- Choose start time and end time, then click Export.
- The report is exported as an .xls or an .xlsx file type.
- Video Wall
- Create a new project.
- Below is a brief introduction for Video Wall setting.
- After all configuration is set, press Confirm.
- Now you can start to design your content.
- Fine-tuning the Video Wall from X-Sign Designer
- To access the fine-tune adjustment, select Video Wall.
- Premium
- Interactive
- On Content page (LX), you can set the content for a built-in widget.
- Enjoy creating your interactive project with our interactive content.
- Viewing the structure of an Interactive Template
- You can preview the layout of the Interactive project by clicking on Map View.
- Each interactive project consists of 3 Levels, and each level consists of a Template Page and Content Pages:
- To customize a Template Page in Level 3:
- You can add new Category pages by clicking Import images.
- Select the image from your hard drive and click Open.
- You can change the Touch Report settings for all categories by clicking ✅. Refer to Enabling Interactive Statistics on page 140 for more information.
- Enabling Interactive Statistics
- Viewing an Interactive Report
- Setting the device group control
- API
- Creating an API template using the designed template
- In X-Sign Designer, click on the icon go to the template page.
- Click on the API template to open the designed template.
- You can click on the template to import new images. You can also edit the designed template in the editing area on the right panel. See Encrypting a project in X-Sign Designer on page 87.
- GPL/LGPL Software Licenses Used by X-Sign
Brand : BENQ
Model : X-Sign 2.0
Category : Software