
E340 - Exercise bike TUNTURI - Free user manual and instructions
Find the device manual for free E340 TUNTURI in PDF.


| Product Type | Exercise Bike |
| Brand | Tunturi |
| Model | E340 |
| Dimensions (L x W x H) | 87 cm x 61 cm x 127 cm (34" x 24" x 50") |
| Weight | 31 kg (69 lbs) |
| Power Supply | 4 x 1.5V AA batteries |
| Max User Weight | 110 kg (243 lbs) |
| Resistance Type | Magnetic, adjustable (1-8) |
| Display Functions | Speed, Distance, Time, Calories, Pulse, Watt (E340) |
| Heart Rate Monitoring | Hand pulse sensors + Polar uncoded receiver (E340) |
| Recovery Pulse Test | Yes |
| Transport Wheels | Yes, integrated at front |
| Intended Use | Home use only |
| Assembly Required | Yes, with included tools |
| Maintenance | Clean with damp cloth; do not use solvents |
| Battery Replacement | Replace 4 AA batteries when display fades or low battery symbol shows |
| Adjustable Seat | Height, horizontal position, and inclination |
| Adjustable Handlebar | Distance via grey knob |
| EMC Compliance | CE marked |
Frequently Asked Questions - E340 TUNTURI
User questions about E340 TUNTURI
0 question about this device. Answer the ones you know or ask your own.
Ask a new question about this device
Download the instructions for your Exercise bike in PDF format for free! Find your manual E340 - TUNTURI and take your electronic device back in hand. On this page are published all the documents necessary for the use of your device. E340 by TUNTURI.
USER MANUAL E340 TUNTURI
OWNER'S MANUAL P. 2-6
THE MOTOR - it's you.
OWNER'S MANUAL F 330/E 340
INFORMATION AND
WARNINGS
Please read this owner's manual through carefully before assembling, using and servicing the workout cycle! Follow the instructions described in this manual carefully. The equipment has been designed for home use. Please notice that the warranty does not cover any damages due to negligence of assembly, adjustment or maintenance instructions described in this manual!
NOTE ABOUT YOUR HEALTH
● Before you start any training, consult a physician to check your state of health.
- If you experience nausea, dizziness or other abnormal symptoms while exercising, stop your workout at once and consult a physician.
- To avoid muscular pain and strain, begin each workout by warming up and end it by cooling down (slow pedalling at low resistance). Don't forget to stretch at the end of the workout.
NOTE ABOUT THE EXERCISING
ENVIRONMENT
- The device is not to be used outdoors.
- Place the cycle on a firm, level surface. Place the machine on a protective base.
- Make sure that the exercising environment has adequate ventilation. To avoid catching cold, do not exercise in a draughty place.
NOTE ABOUT USING THE EQUIPMENT
- If children are allowed to use the cycle, they should be supervised and taught to use the cycle properly, keeping in mind the child's physical and mental development and their personality.
- Before you start using the cycle, make sure that it functions correctly in every way. Do not use a faulty device.
- Only one person may use the cycle at a time.
- Hold the handlebar for support when getting on or off the cycle.
- Wear appropriate clothing and shoes when exercising.
- Press the key with the tip of your finger; your nails may damage the key membrane.
- Protect the meter from sunlight and always dry
the surface of the meter if there are any drops of sweat on it.
- Do not attempt any servicing or adjustment other than those described in this manual.
- The device must not be used by persons weighing over 110 kg.
- F 330 / E 340 is designed for household use only. The warranty of 24 months applies only for faults in household use.
WELCOME TO THE WORLD
OF TUNTURI EXERCISING!
Your choice shows that you really want to invest in your well-being and condition; it also shows you really value high quality and style. With Tunturi Fitness Equipment, you've chosen a high quality, safe and motivating product as your training partner. Whatever your goal in training, we are certain this is the training equipment to get you there. You'll find information about using your exercise equipment and what makes for efficient training at Tunturi's website at www.tunturi.com.
ASSEMBLY
Check that the following parts are in the package:
- Frame
- Rear support
- Handlebar support tube
- Meter
- Pedals (2)
- Seat
- Assembly kit (contents marked with in the spare part list): keep the assembly tools, as you may need them e.g. for adjusting the equipment
- F330 Workout kit (fi tness mat, dumbbells, exercise band, water bottle, exercise guide poster)
If necessary, contact the dealer and give the model, serial number and the needed spare part number from the spare part list in the back of the manual. The package includes a silicate bag for absorbing moisture during storage and transportation. Left, right, front and back are as seen from the exercising position. It is recommended that that installation is carried out by two people.
REAR SUPPORT
Lift the equipment frame e.g. on to the top of the package and attach the rear support to the frame with the four black washers and four black Allen screws. Tighten the screws carefully crosswise. Check after one hour of use that the screws are tight.
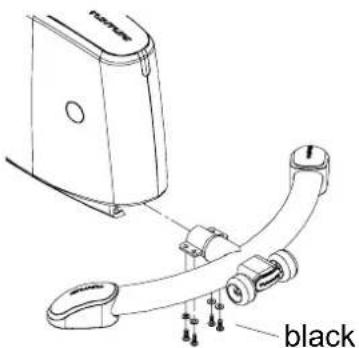
UPRIGHT POST
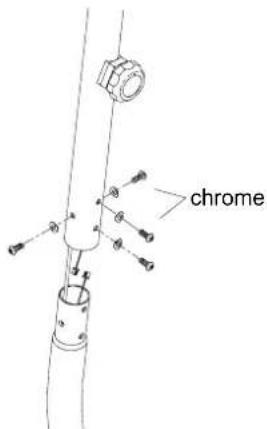
Connect the upper and lower meter wires together and push the tension cable into the upright post prior to fl tting the upright post to the main frame. Secure the upright post to the main frame with four chromed washers and Allen screws. Ensure that the concave side of the washer faces the handlebar support tube. First turn all the screws loosely into place and then tighten them.
RESISTANCE KNOB
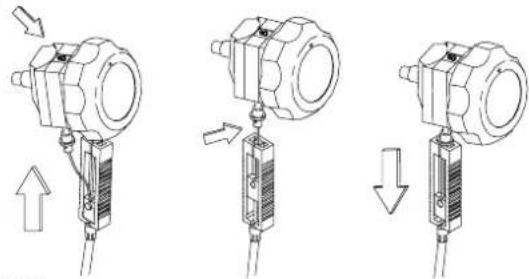
Make sure the display window shows 8 on the knob. Remove the attachment screw and pull out the resistance knob from upright post. Pull the end of the resistance wire out from the handlebar support tube and connect the resistance wire to the lower end of the brake wire. Make sure the resistance wire is tightly inserted. Push the wire inside the handlebar support tube, place the resistance knob over the hole in the tube and attach it with the screw.

natural_image
Technical line drawing of a medical or industrial device with labeled component E340 (no readable text or symbols beyond label)8
METER
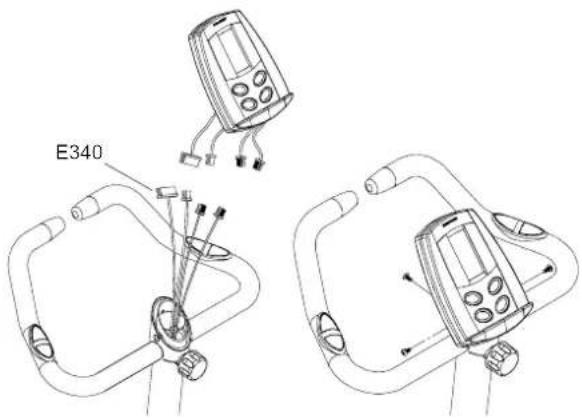
Pop open the battery cover at the back of the meter to assemble batteries. Close the cover. Remove the cable ties from the wires of the handlebar support. Connect the wires to the respective connectors on the meter and then thread the wires into the handlebar. Be careful not to damage the wires when attaching the interface. Slide the meter on the top of the handlebar support tube and attach it with three locking screws through the plastic sleeve.
SEAT
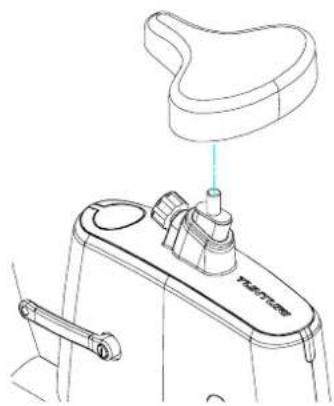
Attach the seat to the seat support: tighten the locking nuts in opposite directions. Please note that you can adjust both seat inclination and the distance of the seat from the handlebar. Once the distance and inclination are set how you want, tighten the locking nuts carefully.
natural_image
Line drawing of a mechanical device with a handle and base, showing no text or symbolsFOOT PEDALS
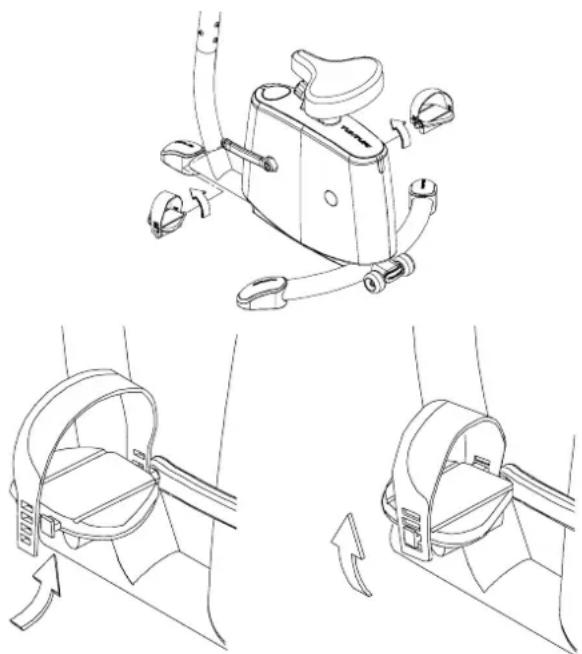
The pedals and pedal straps are marked R for right and L for left. Fasten the right pedal to the right pedal crank turning clockwise and left pedal to the left pedal crank turning anti-clockwise. Attach the pedal straps so that there are 4 grooves on the outer edge of the pedal. Choose the strap tightness, set the appropriate strap hole on the retainer from below and pull forcibly upward. Especially when the cycle is new, the fastening of the strap may seem relatively tight.
natural_image
Technical line drawing of a mobility device with three views showing mechanical components and motion (no text or symbols)USE
ADJUSTING THE REAR SUPPORT
Fix the adjustment screw on the rear support prior to using the equipment; this ensures that the equipment stands solidly on its base. Position the exercise cycle to the where you intend to use it. Never forget to protect the base from possible scratching. Unlock the adjustment screw by turning the locking ring anti-clockwise, and then turn the adjustment screw clockwise; it is now in its initial position. Turn the adjustment screw anti-clockwise until the rubber pad touches the floor. Lock the adjustment screw by turning the locking ring clockwise, carefully step on the cycle and make sure that it is stable.
CORRECT EXERCISING POSITION
The seat height should be set so that the middle part of the foot reaches the pedal with the leg almost straight and the pedal at its lowest point. To raise or lower the seat, first turn the locking knob counterclockwise, then pull the locking knob out so that the seat tube can be moved freely up and down. When the height is right, let go of the knob. The seat locks into place. Tighten the locking knob clockwise. To adjust the horizontal seat position forward and back, loosen the locking screws under the seat. You can also adjust inclination from here.
NOTE! Always make sure that the locking screws under the seat are properly fastened before starting to exercise.
NOTE! Always make sure that the locking knob is fastened properly before starting to exercise.
ADJUSTING THE HANDLEBAR
Loosen the grey adjustment knob at the handlebar support tube and adjust the handlebar distance so that you can pedal with the arms almost straight in comfortable position. The design of the handlebar allows you to exercise either in an upright position or with the upper body leaning forward. Remember, however, always to keep your back straight. Retighten the adjustment knob.
ADJUSTING PEDALLING RESISTANCE
To increase or decrease resistance, turn the adjustment knob at the top of the handlebar support tube clockwise (+ direction) to increase resistance and counterclockwise (- direction) to decrease resistance. The scale above the knob (1-8) helps you find and reset a suitable resistance.
EXERCISING
Working out using an exercise cycle is excellent aerobic exercise, the principle being that the exercise should be suitably light, but of long duration. Aerobic exercise is based on improving the body's maximum oxygen uptake, which in turn improves endurance and fitness. The ability of the body to burn fat as a fuel is directly dependent on its oxygen-uptake capacity. Aerobic exercise should above all be pleasant. You should perspire, but you should not get out of breath during the workout. You must, for example, be able to speak and not just pant while pedalling. You should exercise at least three times a week, 30 minutes at a time, to reach a basic fitness level. Maintaining this level requires a few exercise sessions each week. Once the basic condition has been reached, it is easily improved, simply by increasing the number of exercise sessions.
Exercise is always rewarding for weight loss, because it is the only way of increasing the energy spent by the body. This is why it is always worthwhile to combine regular exercise with a healthy diet. A dieter should exercise daily - at first 30 minutes or less at a time, gradually increasing the daily workout time to one hour.
You should start slowly at a low pedalling speed and low resistance, because for an overweight person strenuous exercise may subject the heart and circulatory system to excessive strain. As fitness improves, resistance and pedalling speed can be increased gradually. Exercise efficiency can be measured by monitoring the pulse. The pulse meter helps you monitor your pulse easily during exercise, and thus to ensure that the exercise is sufficiently effective but not over-strenuous.
F 330 comes with exercise gear that makes your training options really versatile. The enclosed guidebook provides tips for exercising with the equipment.
METER
NOTE! Protect the meter from direct sunlight, as it may damage the liquid crystal display. Protect the meter from water and avoid severe impacts, as these may also damage the meter. Never lean on the meter!
The meter switches on automatically when you start pedalling or press any key on the meter, and switches off when you have not pedalled or pressed a key for about 4 minutes. The readings accumulated during your workout will be automatically reset when the meter is switched off. You can also reset the readings by pressing the RESET key.
METER KEYS
SET: Select the function to be preset.
RESET: Reset all the displays to zero.
+: Press to increase the preset values of TIME, KM /MILES (DISTANCE), KCAL or PULSE.
- : Press to reduce the preset values of TIME, KM/MILES (DISTANCE), KCAL or PULSE.
DISPLAYS
SPEED
Displays the current speed in MPH, km/h, or RPM (0-99)
KCAL
Displays an estimate of kilocalories consumed (0-999.9). This is an approximate calculation.
PULSE
Displays the pulse value during exercise (40-220 bpm). The heart symbol beside the reading fl ashes in time with the user's heartbeat. The pulse value will start fl ashing when the pulse limits are exceeded.
NOTE! Pulse is measured by sensors in the
handlebars. Pulse is measured when the user of F 330 / E 340 is touching both sensors simultaneously. Reliable pulse measurement requires that the skin is constantly touching the sensors and that the skin is slightly moist. Too dry or too moist skin weakens the reliability of hand pulse measurement.
NOTE! The E 340 meter has a heart rate receiver compatible with Polar equipment, so you can also use Polar uncoded heart rate belts for heart rate measurement.
When selecting training attire, please note that some fibers used in clothes (e.g. polyester, polyamide) create static electricity which may prevent reliable heart rate measurement.
Please note that a mobile phone, television and other electrical appliances form an electro-magnetic fi eld around them which will cause problems in heart rate measurement.
KM / MILES (DISTANCE)
Displays the distance traveled in miles or in kilometers (0-99.9).
TIME
Displays the elapsed time of the exercise session (00:00-99:59). If TIME is not preset, it will count up in one-second increment.
WATT (E 340 METER)
Shows the effort in watts (0-995). Exercising at the correct level is important, as is exercising at the correct pulse level. If you exercise at too low an effort level for your fitness level, you will not necessarily achieve the desired results even if you exercise regularly. With this function you can easily monitor your effort level during workout.
SELECTING SPEED AND
UNIT OF DISTANCE
You can select the unit to be displayed on the meter by the switch on the bottom of the battery casing. Open the lid of the battery casing at the back of the meter housing. There are two switches on the bottom of the battery casing - one for selecting either kilometers or miles as the unit of distance, and the other for selecting either pedalling revolutions per minute or km/h or mph. Change the position of the switch and push the lid of the battery casing back into place. Press RESET to confirm.
HOW THE PRESET TIME, DISTANCE,
CALORIE AND PULSE:
Press SET key until the window which is going to be preset is flashing. Press + or - until desired number is displayed.
Press SET key until you return to the main to the main display and start the exercise. The monitor will begin to count down.
The preset value will start flashing to indicate the completion of workout.
With the F 330 / E 340 meter you can set both an upper and lower pulse limit, which helps you to keep within the desired pulse range during your workout. The pulse value will start flashing when the pulse limits are exceeded.
MEASUREMENT OF RECOVERY PULSE
Measure your recovery pulse rate at the end of the workout. In order to improve the reliability of recovery pulse measurement, always try to standardize the measurement situation as accurately as possible; start measuring at the same heart rate level as precisely as possible. Press + and - keys simultaneously until the display moves to the recovery pulse measuring mode. The measurement takes two minutes, during which the elapsed time and the heart rate are displayed. Try not to move during the measurement. At the end of the period the recovery ratio percentage are displayed. The smaller the reading the fi tter you are. Note that results are dependent on the starting pulse level, they are individual and not directly comparable with those of others. Return to the main display by pressing the RESET key.
TOTAL EXERCISE VALUES
Information about the total exercise distance and time is stored in the meter's memory. To view the details, keep the SET and RESET keys simultaneously pressed down for 2 seconds. Please note that the RESET key resets all the other values displayed. Press RESET to exit.
MAINTENANCE
The equipment requires very little maintenance. Check, however, from time to time that all screws and nuts are tight. Clean the cycle with a damp cloth. Do not use solvents.
NOTE! Never remove the protective covers.
NOTE! The brake forms a magnetic field which may damage the mechanism of a watch or the magnetic identification tape of a credit or cash card if they come into immediate contact with the
magnets. Never attempt to detach or remove the magnet fork of the magnetic brake.
If you notice a malfunction during use, contact the dealer. Always give the model and serial number of your device, please state also the nature of the problem conditions of use and purchase date. In spite of continuous quality control, individual defects and malfunctions may occur in individual components. It is in most cases unnecessary to take the whole cycle for repair, as it is usually sufficient to replace the defective part.
CHANGING BATTERIES
If the meter display shows low battery symbol or fades considerably, change the batteries. Detach the lid of the battery casing at the back of the meter and remove the old batteries. Place the new batteries in the holder (4 x 1.5 V AA) and push the battery casing lid back into place.
TRANSPORT AND STORAGE
The cycle is easy to move by pushing along on the integrated transport wheels. Tilt the cycle from the front and push along the floor on the wheels at the front support. To prevent malfunctioning of the cycle, store in a dry place with as little temperature variation as possible, protected from dust.
DIMENSIONS
Length.... 87 cm / 34"
Width 61 cm / 24"
Height..... 127 cm / 50"
Weight 31 kg / 69 lbs
All Tunturi models are designed to meet the electromagnetic compatibility directive, EMC and are affixed with the CE conformity marking.
NOTE! The instructions must be followed carefully in the assembly, use and maintenance of your equipment. The warranty does not cover damage due to negligence of the assembly, adjustment and maintenance instructions described herein. Changes or modifications not expressly approved by Tunturi Oy Ltd will void the user's authority to operate the equipment!
Due to our continuous policy of product development we reserve the right to change specifications without notice.
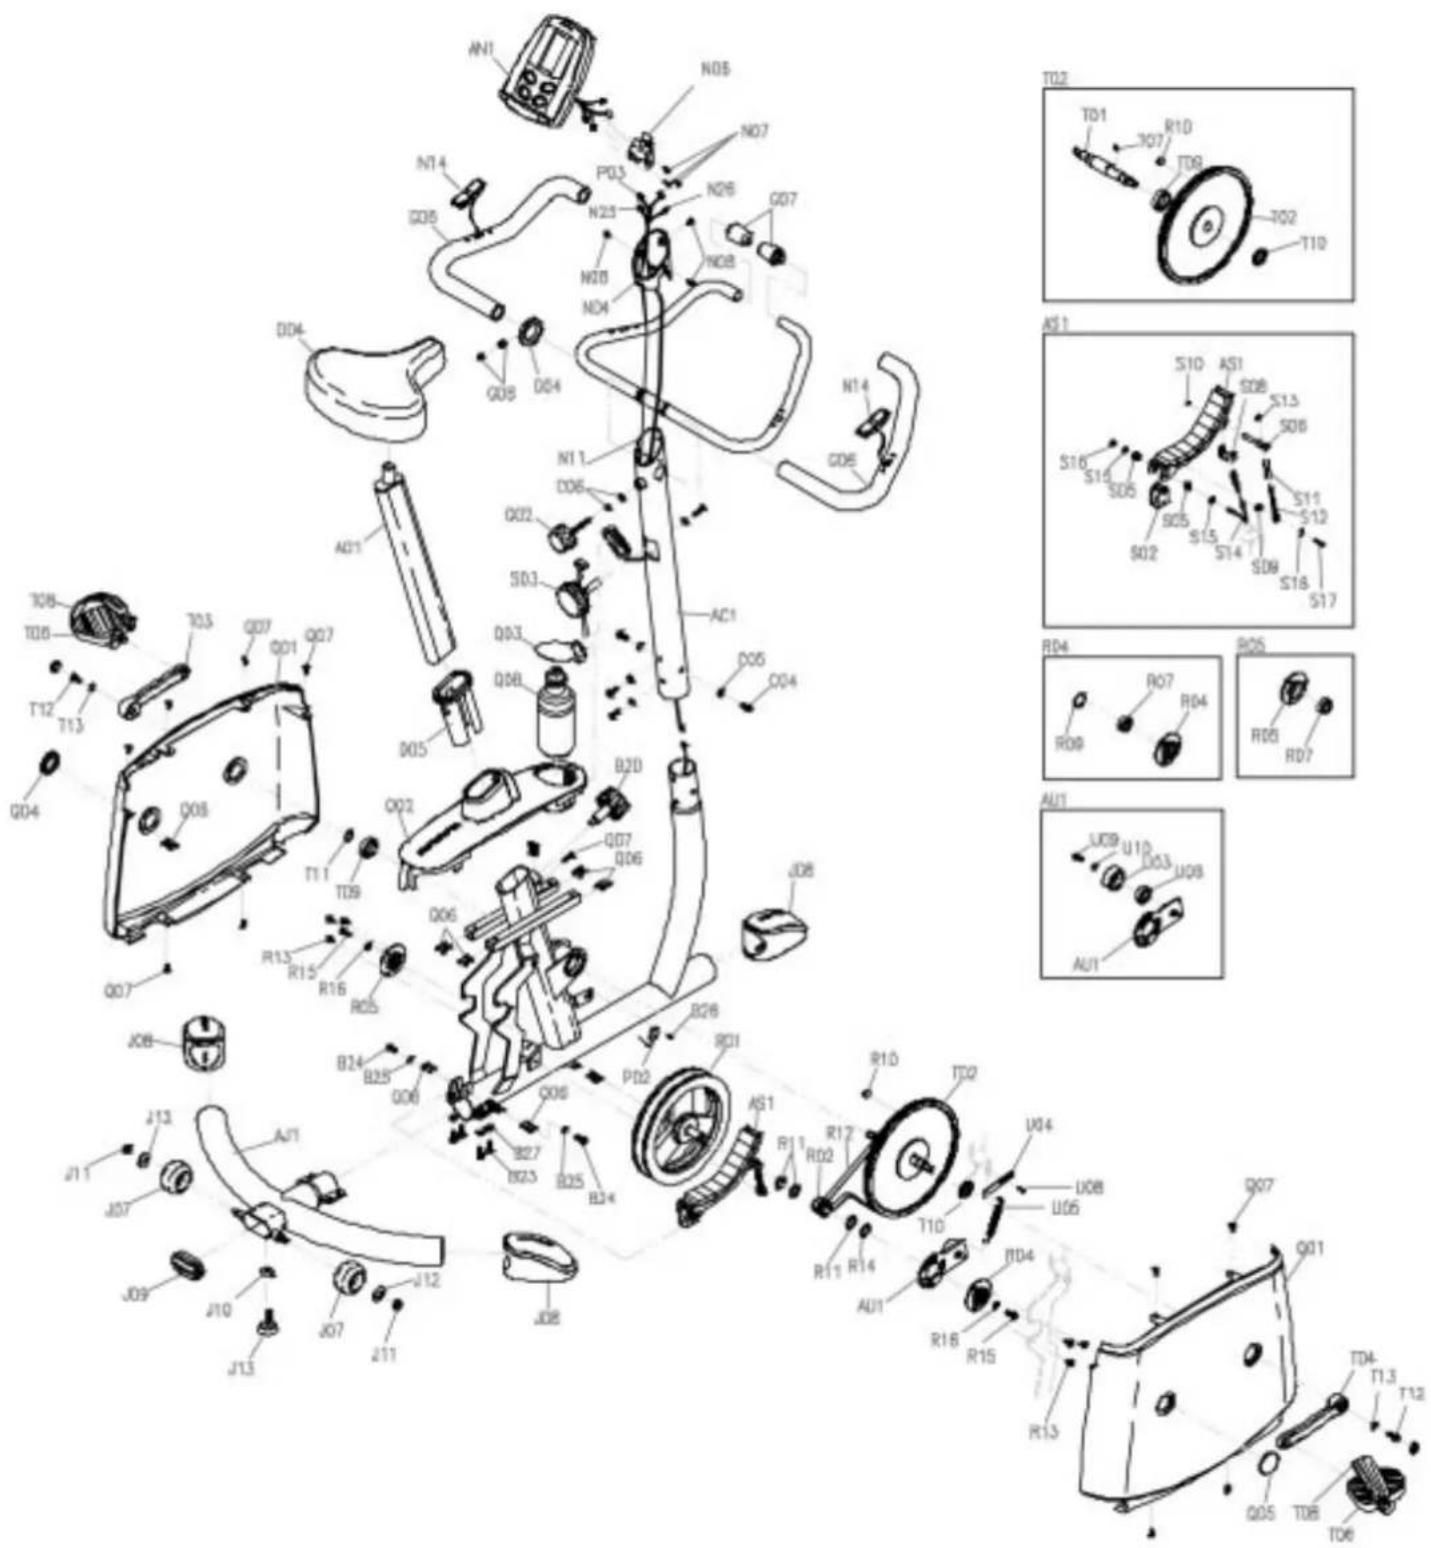
103 0011 Main frame 1
AC1 203 0012
Handle bar tube 1
N14 403 0041 Pulse grip unit (incl. C08) 2
G04 503 0017 Fixing sleeve 1
G08 M3x3 DIN 914 Screw 2
G06 213 0003 Handle grip, pair (incl. G07) 2
G07 533 End cap for handle bar 2
G02 653 0077 Locking knob 2
C06 M10 DIN 125 Washer 2
- 173 0020 Upper cover, E340 1
Q03 173 0021 Adorment cover, F330 1
Q03 173 0022 Adorment cover, E340 1
Q04 533 0033 Cap, F330 2
Q05 533 0034 Cap, E340 2
Q06 M4 DIN 955 C-Clip 11
Q07 KB 40x12 WN1442 Screw 11
Q08 453 9002 Bottle 1
• 453 0004 1
• 453 0005 1
• 453 0006 1
• 553 0016 Assembly kit (incl. *) 1
• 553 101 Screw - shaped 1
• 553 100 88 Multi purp. wrench 1
• 556 031 Allen key 5 mm 1
- 583 0011
Owner's manual 1
TUNTURI®
THE MOTOR - it's you.
TUNTURI OY LTD
P.O.BOX 750, FIN-20361
Turku, Finland
Tel. +358 (0)2 513 31
Fax +358 (0)2 513 3323
www.tunturi.com
- OWNER'S MANUAL F 330/E 340
- INFORMATION AND
- WARNINGS
- NOTE ABOUT YOUR HEALTH
- NOTE ABOUT THE EXERCISING
- ENVIRONMENT
- NOTE ABOUT USING THE EQUIPMENT
- WELCOME TO THE WORLD
- OF TUNTURI EXERCISING!
- ASSEMBLY
- REAR SUPPORT
- UPRIGHT POST
- RESISTANCE KNOB
- METER
- SEAT
- FOOT PEDALS
- USE
- ADJUSTING THE REAR SUPPORT
- CORRECT EXERCISING POSITION
- ADJUSTING THE HANDLEBAR
- ADJUSTING PEDALLING RESISTANCE
- EXERCISING
- METER KEYS
- DISPLAYS
- SPEED
- KCAL
- PULSE
- KM / MILES (DISTANCE)
- TIME
- WATT (E 340 METER)
- SELECTING SPEED AND
- UNIT OF DISTANCE
- HOW THE PRESET TIME, DISTANCE,
- CALORIE AND PULSE:
- MEASUREMENT OF RECOVERY PULSE
- TOTAL EXERCISE VALUES
- MAINTENANCE
- CHANGING BATTERIES
- TRANSPORT AND STORAGE
- DIMENSIONS
- TUNTURI®
Brand : TUNTURI
Model : E340
Category : Exercise bike