
J3F - Treadmills TUNTURI - Free user manual and instructions
Find the device manual for free J3F TUNTURI in PDF.


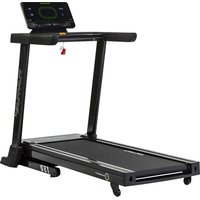
| Product Type | Treadmill |
| Brand | Tunturi |
| Model | J3F |
| Dimensions (L x W x H) | 175 x 85 x 140 cm |
| Running Surface | 135 x 45 cm |
| Weight | 85 kg |
| Max User Weight | 130 kg |
| Motor Power | 2.5 HP DC |
| Speed Range | 0.8 - 18 km/h |
| Incline Range | 0 - 12% |
| Display | LCD with time, distance, speed, calories, pulse |
| Programs | 12 preset programs, 3 user programs, heart rate control |
| Safety Key | Emergency stop with magnetic key |
| Heart Rate Monitor | Hand pulse sensors and chest belt compatible |
| Foldable | Yes, with soft drop system |
| Transport Wheels | Yes |
| Power Requirements | 220-240 V, 50/60 Hz |
| Maintenance | Lubricate belt every 6 months; clean after use |
| Spare Parts | Motor, belt, deck, control board, safety key available |
| Warranty | 2 years motor, 1 year parts |
Frequently Asked Questions - J3F TUNTURI
User questions about J3F TUNTURI
0 question about this device. Answer the ones you know or ask your own.
Ask a new question about this device
Download the instructions for your Treadmills in PDF format for free! Find your manual J3F - TUNTURI and take your electronic device back in hand. On this page are published all the documents necessary for the use of your device. J3F by TUNTURI.
USER MANUAL J3F TUNTURI
THE MOTOR - it's you.
OWNER'S MANUAL J3F
IMPORTANT SAFETY
INSTRUCTIONS
This Owner's Manual is an essential part of your training equipment: reading all instructions in this manual before you start using this appliance. The following precautions must always be followed:
WARNING
- Never use extension cords between the treadmill and your wall outlet. The device's maximum power consumption is 10 A. Outlets with fluctuating voltage of more than 5% may result in erratic performance or cause damage to treadmill electronics. Using electrical power other than that, which has been specified in this manual will ultimately void any warranty, implied or otherwise.
WARNING : to reduce any risk to persons:
- Keep hands clear of any moving parts. Never place hands, feet or any other objects into any opening or under the treadmill.
- Never leave the treadmill unattended when plugged in. Unplug from outlet when not in use, before putting on or taking off parts. To disconnect, turn all controls to the off position, then remove plug from outlet.
- Close supervision is necessary when the treadmill used by, on, or near children, invalids, or disabled persons.
- Use the treadmill only for its intended use as described in this manual. Do not use attachments not recommended by Tunturi.
- Before you start using the treadmill, make sure that it functions correctly in every way. Do not use a faulty device.
- Keep the cord away from heated surfaces.
- J3F must not be used outdoors. J3F tolerates an environment measuring +10°C to +35°C. Air humidity must never exceed 90%.
- Do not attempt any servicing or adjustment other than those described in this manual. The given instructions must be followed carefully.
- Never operate this treadmill if it has a damaged cord or plug, if it has been dropped or damaged, or dropped into water. Return the treadmill to a service center for repair.
- Never operate the appliance with the air opening blocked. Keep the air openings free of lint, hair, and the like.
-
Do not operate where aerosol (spray) products are being used or where oxygen is being administered.
-
The device must not be used by persons weighing over 110 kg (245 lbs).
- J3F is designed for household use only. The warranty of 12 months applies only for faults in household use.
SAVE THESE INSTRUCTIONS!
Welcome to the world of Tunturi exercising!
Your choice shows that you really want to invest in your well-being and condition; it also shows you really value high quality and style. With Tunturi Fitness Equipment, you've chosen a high-quality, safe and motivating product as your training partner. Whatever your goal in training, we are certain this is the training equipment to get you there.
ASSEMBLY
Before assembling the device, insure all parts are present:
- Frame
- Handlebars (2)
- Horizontal handlebar
- Meter
- Power cord
- Assembly kit (contents are marked with an * in the spare part list)
In case of problems contact your Tunturi dealer. The directions left, right, front and back are defined as seen from the exercising position.
To avoid injury, you must fold up the deck prior to lifting the treadmill out of the box.
HANDRAILS
Connect the wires before you assemble the handrails. Secure each handrail with four washers and bolts. NOTE : Do not tighten these bolts until the horizontal handlebar and monitor have been secured.
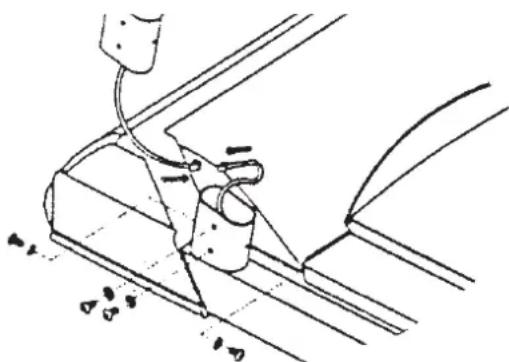
natural_image
Line drawing of a mechanical device with a tool and component, no text or symbols presentHORIZONTAL HANDLEBAR
The horizontal handlebar (rod) is tapered on one side. Insert the tapered end of the rod into the right handrail before fitting the rod into the
left side. NOTE: the left side is secured with the long bolt while the right ride is secured with the short bolt. Do not tighten these bolts until the monitor has been secured.

natural_image
Diagram of two mechanical clamps with attached wires, no text or symbols presentMONITOR
Connect the wires then push the monitor onto the handrails. You may have to shake the handrails from side to side to get the monitor to fit. Once you have the monitor in place, secure and tighten the bolts on the monitor. Tighten all bolts. Remove the protective film from the display.

natural_image
Technical line drawing of a mechanical component with no visible text or symbolsPOWER CORD AND GROUNDING
INSTRUCTIONS
Plug the socket end of the power cord into the treadmill at the lower right front corner. Before connecting the device to a power source, make sure that local voltage matches that indicated on the type plate. The treadmill operates at 230 V. Turn on the power using the switch next to the socket on the treadmill.
This treadmill must be grounded. If it should malfunction or breakdown, grounding provides a path of least resistance for electrical current to reduce the risk of electrical shock. This product is equipped with a cord having an equipment-grounded conductor and a grounding plug. The plug must be plugged into an appropriate outlet that is properly installed and grounded in accordance with all local codes and ordinances. Do not use extension cables when connecting the equipment to the power source.
DANGER! Improper connection of the equipment-grounding conductor can result in a risk of electric shock. Check with a qualified electrician or serviceman. If you are in doubt as to whether the product is properly grounded. Do not modify the plug provided with the product - if it will not fit the outlet, have a proper outlet installed by a qualified electrician.
SAFETY TETHER KEY
The treadmill cannot be used if the tether key is not properly installed on the meter; if the key is removed from its place, the treadmill will immediately stop. Insert the safety tether key into the key holder at the left side of the meter. Ensure that the clip of the safety tether key is properly attached to your clothing; as the cord tightens, make sure the clip does not detach itself from your clothing before the safety tether key disconnects from the user interface.
EXERCISING
ABOUT YOUR HEALTH
● Before you start any training, consult a physician to check your state of health.
- If you experience nausea, dizziness or other abnormal symptoms while exercising, stop your workout at once and consult a physician.
- To avoid muscular pain and strain, begin and end each workout by stretching.
ABOUT THE EXERCISE ENVIRONMENT
- J3F is designed for household use only.
- Make sure the exercise environment has adequate ventilation. To avoid catching cold, do not exercise in a draughty place.
- Place the treadmill on a firm, level surface. Allow 120 cm or 4 feet of clearance behind the treadmill and 60 cm or 2 feet on either side and in front of the treadmill.
- We recommend that the equipment is placed on a protective base.
ABOUT USING THE EQUIPMENT
● Always unplug the treadmill from the electrical outlet after each training session.
- Only one person may use the equipment at a time.
- Keep hands clear of any moving parts. Never place hands, feet or any other objects under the treadmill.
- Wear appropriate clothing and shoes when exercising. Make sure your shoelaces are properly tied. To avoid injury and unnecessary wear on your treadmill, be sure your shoes are free of any debris such as gravel and small pebbles.
ADJUSTING THE ELEVATION
There are three elevation levels ( 2^ = 3.5% , 3.5^ = 6.1% , 5^ = 8.7% ). Support deck with your left
hand while you pull out the adjustment knob with your right hand. Snap the knob back into the desired position. Check to make sure it is secured in position.
BEGINNING AN EXERCISE SESSION
- To avoid muscular pain and strain, begin and end each workout by stretching.
- Stand on the landing rails to the left and right of the running belt. Do not stand on the running belt.
- Always hold the handrail for support when getting on or off the treadmill and when changing the speed during exercise. Do not jump off the running belt while it is moving!
- If you experience nausea, dizziness or other abnormal symptoms while exercising, stop your workout at once and consult a physician.
FINISHING AN EXERCISE SESSION
- Never leave the safety tether key in the treadmill.
- Use the main power switch to turn the unit off.
- Unplug the electrical cord from the wall outlet and from the treadmill.
- If necessary clean the treadmill from sweat with a damp cloth. Do not use solvents.
- Store the electrical cord where it is clear from all pathways and out of childrens' reach.
HOW TO MOTIVATE YOURSELF
TO CONTINUE
In order to reach the goals you have set, you'll need to keep finding the motivation to continue so you achieve your ultimate goal: life-long health and a new quality of living.
- Set yourself realistic targets.
● Progress step-by-step according to your schedule. - Keep a fitness diary and write down your progress.
- Change your way of exercising from time to time.
- Use your imagination.
- Learn self-discipline.
One important aspect of your training is versatility. Varying your training exercises different muscle groups and helps maintain motivation.
No matter what your goal, you'll get the best results by training at the right level of effort, and the best measure is your own heart-rate. First find your maximum heart-rate i.e. where the rate doesn't increase with added effort. If you don't know your maximum heart-rate, please use the following formula as a guide:
These are average values and the maximum varies from person to person. The maximum heart-rate diminishes on average by one point per year. If you belong to one of the risk groups mentioned earlier, ask a doctor to measure your maximum heart-rate for you. We have defined three different heart-rate zones to help you with targeted training.
BEGINNER : 50-60 % of maximum heart-rate Also suitable for weight-watchers, convalescents and those who haven't exercised for a long time. Three sessions a week of at least a half-hour each is recommended. Regular exercise considerably improves beginners' respiratory and circulatory performance and you will quickly feel your improvement.
TRAINER : 60-70 % of maximum heart-rate Perfect for improving and maintaining fi tness. Even reasonable effort develops the heart and lungs effectively, training for a minimum of 30 minutes at least three times a week. To improve your condition still further, increase either frequency or effort, but not both at the same time!
ACTIVE TRAINER :
70-80 % of maximum heart-rate
Exercise at this level suits only the fittest and presupposes long-endurance workouts.
FUNCTION KEYS
STOP Slows the running belt gradually to a complete stop.
SPEED CONTROL KEYS Speed control keys (Tortoise/Hare) are located below the display. Hare key increases the belt speed in 0,1 km/h increments, the tortoise key decreases it in 0,1 km/h increments. Pressing these keys longer makes the speed change faster. Track speed ranges from 1,0-12 km/h.
SELECT Before you press the green start key, it selects the preset programs. P1-Easy walking, P2-weight loss, P3-strength training. Once you have pressed the green start key, you may select the display value of either distance or calories.
START Activates and slowly increases the speed of the running belt until it reaches your set training speed.
DISPLAYS
TIME 0:00 to 59:59, 1 second increment
DISTANCE 0-19.9 km, 1 km increment
CALORIES 0-999 calories, 1 calorie increment
SPEED 1-12 km/h, 0,1 km/h increment
TRAINING WITHOUT PRESET PROGRAM
Once the power is turned on and the safety key is secured in place, you will see all values display zero. Simply press the speed up key to the desired training speed. The minimum training speed is 1.0 km/h. Once you have input the training speed, press the green start button. Time will count down from three seconds before the running belt will pick up speed. You may increase or decrease speed at any time during your workout by pressing the speed arrow key up or down.
You can also start the training by pressing the green START-key. The belt starts moving at the speed of 1.0 km/h. After this, you can set the speed with the HAR E / TORTOISE -keys.
TRAINING WITH PRESET PROGRAM
Once the power is turned on and the safety key is secured in place, you may press SELECT to choose any one of the three pre-set programs.
P1- easy walking
P2- weight loss
P3 - strength training
Once you have made your selection, press START key to activate the treadmill. Each program is set for a thirty minute workout. Each segment is one minute long. During any segment if you feel the speed difficult to maintain, you may adjust the speed to the desired level by pressing the down arrow key. This change will only affect the current segment. For the next segment, the belt speed will automatically go back to the pre-set speed according to the program profile.
MAINTENANCE
CAUTIO N! Do not attempt any servicing or adjustment other than those described in this manual. Any other servicing must be performed by an authorized service representative. Check the tightness of all fixing screws once a year. Do not overtighten.
LUBRICATING THE RUNNING DECK
Lubrication is the most important service activity for the treadmill. This is absolutely essential, if the friction of the running deck increases noticeably or the motor begins to heat up; increased friction is indicated by jerky movement of the belt. Insufficient lubrication will cause the belt, running deck and motor to wear out and break. The need for re-lubrication depends to a great extent on the running styles and weight of the user: heavy user weight and slow speed put particular strain on the device and therefore demand greater lubrication. The running deck require periodic lubrication. With average usage (30 minute workout session 3 times a week for two people) lubricate with silicon every four to six months. You may adjust the timing of the lubrication based on the intensity of the treadmill use level. To check the lubrication level, simply lift the running belt, and put your hand as far into the center of the belt as you can reach. If your hand shows signs of lubricant (some wetness), then it does not need additional lubrication. If the board feels dray and there is very little evidence of silicone on your hand, then additional lubrication should be added as instructed:
- Stop running belt so belt seam is located on the top and in the center of the deck.
- Insert nozzle into spray head of lubricant can.
- Lift running belt.
- Position nozzle between the belt and the board approximately 200mm (8") from the front of the treadmill.
- Apply T-Lube from the front to the rear of the treadmill on each side of the treadmill. Try to reach the spray as far into the center of the running deck as possible.
- The treadmill is instantly ready for use.
NOTE! Lubricate your treadmill only with T-Lube lubricant. Contact your local Tunturi distributor for further supplies of T-Lube.
CLEANING THE TREADMILL
Wipe the treadmill surfaces, especially the handlebars and meter from dust with a damp cloth or towel. Do not use solvents. Use a small vacuum nozzle to carefully vacuum around all visible components (belt, running deck, side rails etc.). To clean the underside of the treadmill, lift the running deck to the storage position.
ALIGNING THE RUNNING BELT
Monitor belt tracking during exercise and make adjustments as needed. The belt should run in the centre of the treadmill. Alignment is not usually needed, provided
● the treadmill is placed on an even, solid and horizontal surface and the belt is correctly tensioned
- the alignment of the belt is correct
It is, however, possible for the belt to be pushed to one side due to the user's running style (e.g. more weight on one foot). The alignment of the belt is adjusted by turning the two bolts at the back of the treadmill.
Align the belt according to the following instructions:
- Turn the power switch on and increase the treadmill's speed to 5 km/h (3 mph).
- If the belt drifts to the left, turn the left adjustment bolt 14 turn clockwise and the right adjustment bolt 1/8 turn anti-clockwise. If the belt drifts to the right, turn the right adjustment bolt 14 turn clockwise and the left adjustment bolt 14
turn anti-clockwise.
- If the belt remains centered the adjustment is correct. If not, continue to make small adjustments as above until the belt is correctly aligned. If the belt is allowed run across to one side for long periods of time the edges of the belt may be damaged and the treadmill may not continue to operate correctly. Any damage to the belt caused by the lack of necessary adjustment will not be covered by the warranty.
ADJUSTING THE BELT TENSION
The belt must be tensioned if it begins to slip on the rollers. In normal use, however, keep the belt as loose as possible! The belt tension is adjusted by turning the same screws as used for aligning the running belt. If turning the screws will not effect the belt tension, please contact your local Tunturi dealer.
- Increase the treadmill's speed to 5 km/h (3 mph).
- Turn both adjustment screws an equal amount, 14 turn clockwise.
- Try to slow the belt down by holding onto the handrails and braking as you walk (as if you were walking downhill). If the belt slips, turn another 14 turn and repeat the test. When braking heavily the belt may slip. If the belt keeps slipping despite repeated adjustments, please contact your local Tunturi dealer.
MALFUNCTIONS
NOTE ! Despite continuous quality control, defects and malfunctions caused by individual components may occur in the equipment. In most cases it's unnecessary to take the whole device in for repair, as it's usually sufficient to replace the defective part. Always give the model, serial number of your equipment and in case of malfunctions also conditions of use, nature of malfunction and any error code.
When you encounter unusual behavior from the treadmill, simply turn the power switch off, wait 1 minute and turn the power switch on to reset the treadmill. This should clear incidental errors and ready the treadmill for normal operation again. If after you have reset the treadmill by turning the power switch off and on again, and the treadmill is still not operational, contact your local Tunturi dealer for service.
If you require spare parts, always give the model, serial number of your equipment and the spare part number for the part you need. The spare part list is at the back of this manual. Use only spare parts mentioned in the spare part list.
ERROR CODES
The user interface will display information about any operational faults. An error code begins with the abbreviation Err.
ERR 1: speed sensor error. Turn the power switch off and on again to reset the treadmill. If treadmill recovers to normal operation, you may continue to use the treadmill. If treadmill does not recover to normal operation, then call the dealer for service.
ERR 2 : over speed error.
Call your dealer for service.
ERR 3: safety key error. Secure the safety key in place and continue training.
PROTECTIVE CIRCUIT
To protect your safety, this treadmill is designed and equipped with run away protection.
If the admissible operating speed of the trainer is exceeded or fallen below, the protective circuit will shut off the treadmill to protect you and the equipment. The treadmill will flicker all display values to alert the user to the condition. Reset the treadmill by turning the power switch off for 1 minute and then on again. This will return the treadmill back to normal operating mode.
MOVING AND STORAGE
Folding and unfolding of this treadmill is made easy with the assistance of gas cylinder. After the treadmill has come to a complete stop, unplug the power cord from the wall and the treadmill. Fold up the deck; when you hear a click, the deck is locked in place. The folding lock mechanism is located on the lefthand rail. To release the folding lock, support the deck with your right hand while you release the lock with your left hand. Deck is ready to be positioned horizontally on the ground.
NOTE ! Please handle with caution although it is designed with the gas cylinder taking most of the weight off the deck.
Before moving J3F, be sure the power cord is unplugged from the wall and the treadmill. Fold up the running deck until it is locked and push the equipment on the transportation wheels. Lower the treadmill carefully onto the floor.
NOTE ! Transport the treadmill with extreme caution over uneven surfaces, for example over a step. The treadmill should never be transported upstairs using the wheels over the steps, instead it must be carried.
NOTE! The running belt needs to be realigned and centered after moving.
To prevent malfunctioning of the treadmill, store it in a dry place with as little temperature variation as possible, protected against dust. Always unplug the treadmill from the electrical outlet when not in use.
TECHNICAL DATA
LENGTH (storage position) 160 cm (64 cm)
HEIGHT (storage position) 137 cm (155 cm)
WIDTH 76 cm
WEIGHT 68 kg
RUNNING SURFACE 40 x 128 cm
SPEED 1,0 -12 km/h
ELEVATION RANGE
2^ = 3.5% , 3.5^ = 6.1% , 5^ = 8.7%
MOTOR 1,5 HP (continuous duty)
J3F treadmill meets the requirements of the EU's EMC Directives on electromagnetic compatibility (89/336/EEC) and electrical equipment designed for use within certain voltage limits (73/23/EEC). This product therefore carries the CE label. J3F treadmill meets EN precision and safety standards (Class B, EN-957, parts 1 and 6).
Due to our continuous policy of product development, Tunturi reserves the right to change specifications without notice.
CAUTIO N! The instructions must be followed carefully in the assembly, use and maintenance of your equipment. The warranty does not cover damage due to negligence of the assembly, adjustment and maintenance instructions described herein. Changes or modifications not expressly approved by Tunturi Oy Ltd will void the user's authority to operate the equipment!
We wish you many enjoyable trainings with your new Tunturi training partner!
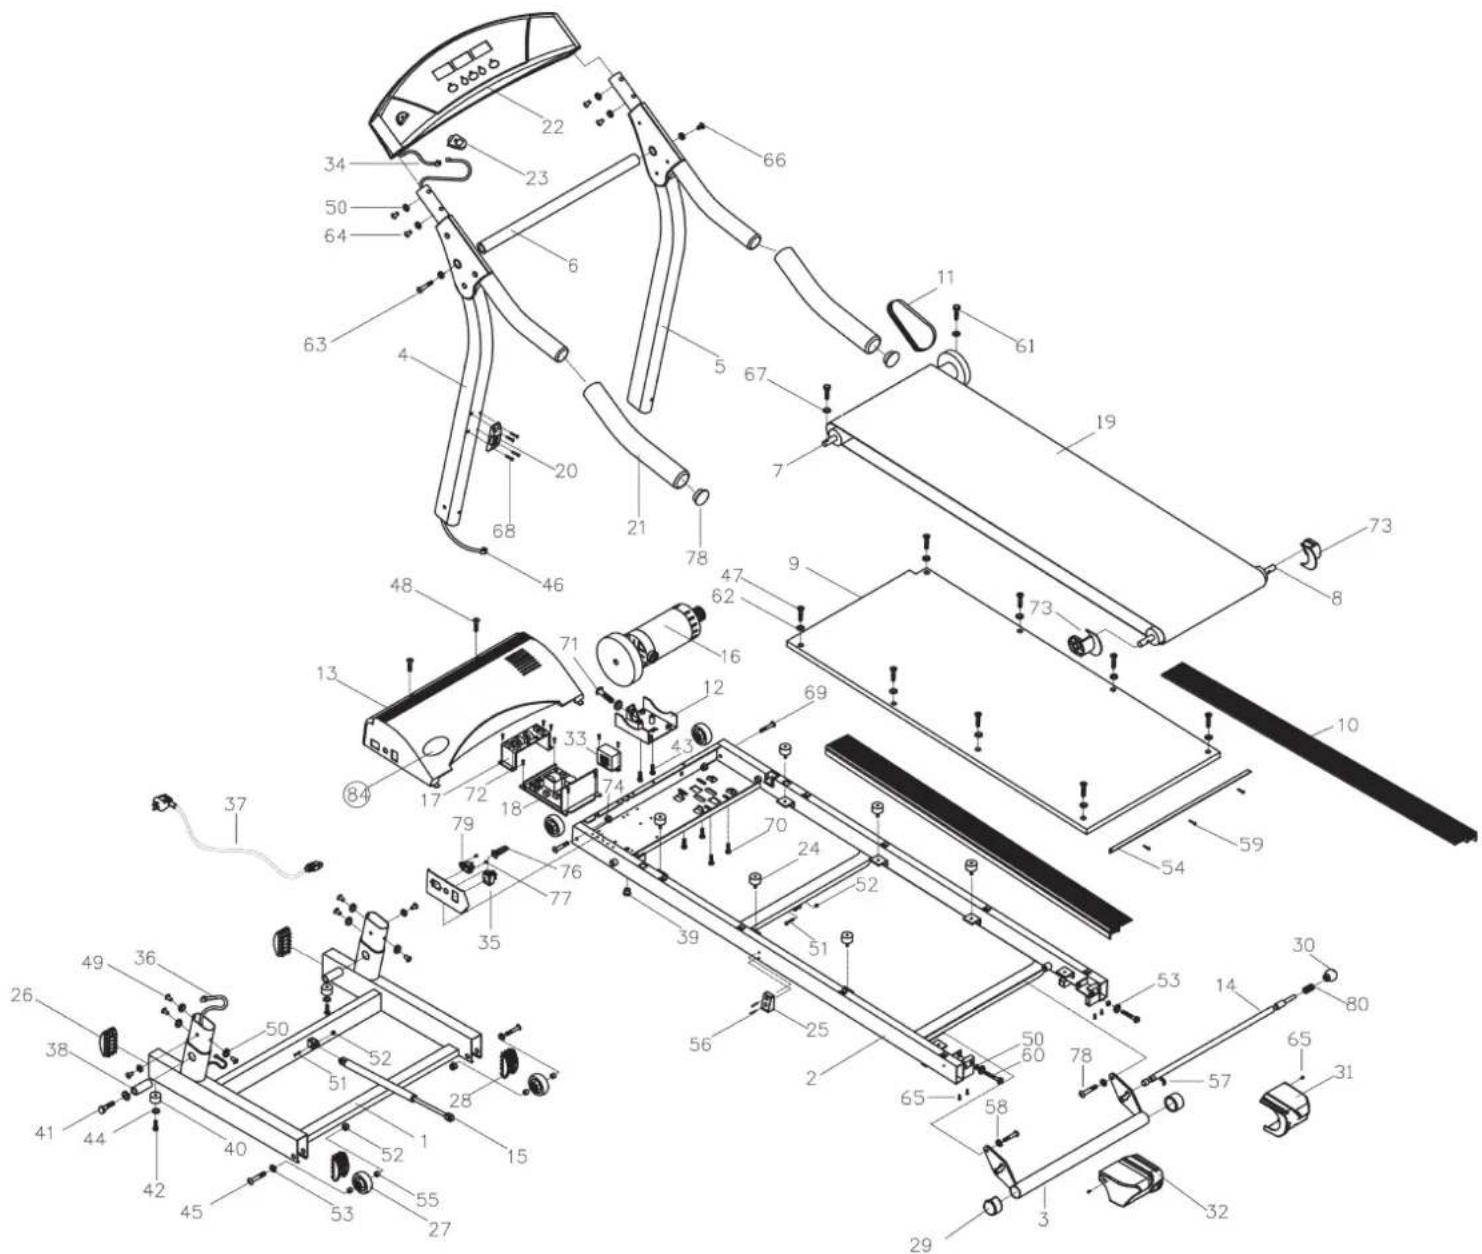
1 103 4039 Front support 1
2 103 4038 Main frame 1
3 103 4040 Lift arm 1
4 203 4033 Hand rail, L 1
5 203 4032 Hand rail, R 1
6 203 4034 Handlebar 1
7 523 4035 Front roller 1
8 523 4036 Rear roller 1
9 433 4028 Running deck 1
10 433 4029 Side landing 2
11 443 4013 Drive belt 1
12 503 4041 Motor bracket 1
13 173 4061 Motor cover 1
14 343 4012 Elevation shaft 1
15 153 4006 Gas spring 1
16 813 4022 DC motor 1
17 403 4101 EMI filter 1
18 403 4100 Power board 1
19 443 4014 Running belt 1
20 373 4007 Locking devise (incl. 25) 1
21 213 4013 Handle grip 2
22 233 4022 User interface 1
23 403 4099 Safety key 1
24 533 4053 Rubber bumper 6
26 533 4054 Front end cap, pair 1
27 533 4055 Moving wheel 4
28 503 4042 Moving wheel bracket 2
29 533 4056 Lift arm end cap 2
30 533 4057 Incline adjustment knob 1
31 173 4062 Right rear end cap 1
32 173 4063 Left rear end cap 1
33 813 4023 Choke 1
34 403 4102 Cable set (incl. 36, 46) 1
35 403 4103 Mains switch 1
37 403 4104 Power cable 1
38 523 4037 Pivot spacer 2
39 533 4060 Cable clip 1
40 533 4058 Front stabilizer rubber foot 2
41 M12x60 Hex bolt 2
42 M4x20 Tapping screw 2
43 M8 Round head Allen key bolt 2
44 M5x12 Washer 2
45 M8x50 Allen head bolt 2
47 M6x20 Machine screw 8
48 M5x10 Machine screw 2
*49 M8x15 Allen head bolt 8
*50 M8 Star washer 14
51 M8x25 Allen head bolt 2
52 M8 Nut nylon lock 4
53 M8x22 Washer 4
54 433 4030 Extension plate 1
55 523 4038 Moving wheel spacer 4
56 M4x8 Machine screw 2
57 Dia 16 E-clip 1
58 Spring washer 2
59 Machine screw 2
60 M8 Allen key adjusting bolt 2
61 M8 Round head Allen key bolt 2
62 M7x12 Washer 8
*63 M8x50 Allen head bolt 1
*64 M8x15 Allen head bolt 4
65 5/32" x 1/2 Screw 11
*66 M8x15 Allen head bolt 1
67 M8x22 Curve washer 2
68 M4x20 Machine screw 4
69 M8x40 Allen head bolt 2
70 M8x20 Hex head bolt 4
71 M8x50 Hex head bolt 1
72 M4x8 Machine screw 4
73 173 4064 Cover, rear roller 2
74 M8 Nylon lock nut 2
76 403 4105 Circuit breaker 1
77 M4x6 Phillips head screw 2
78 533 4059 Handlebar end cap 2
79 403 4016 Mains cable socket 1
80 643 4006 Spring 1
81 403 4106 Sensor cable 1
82 403 4107 Wire harness set (4 wires) 1
84 423 4074 Label set 1
* 553 4017 Assembly kit (incl. *) 1
* Wrench 1
- 563 4004 T-Lube bottle 1
- 583 4025 Owner's manual 1
| P1 | P2 | P3 | |||
| MIN. | KM/H | MIN. | KM/H | MIN. | KM/H |
| 0 | 2 | 0 | 3 | 0 | 4 |
| 1 | 2 | 1 | 3 | 1 | 4 |
| 2 | 2 | 2 | 3 | 2 | 4 |
| 3 | 3 | 3 | 6 | 3 | 8 |
| 4 | 3 | 4 | 6 | 4 | 8 |
| 5 | 3 | 5 | 6 | 5 | 8 |
| 6 | 4 | 6 | 10 | 6 | 10 |
| 7 | 4 | 7 | 10 | 7 | 10 |
| 8 | 4 | 8 | 10 | 8 | 10 |
| 9 | 5 | 9 | 8 | 9 | 12 |
| 10 | 5 | 10 | 8 | 10 | 12 |
| 11 | 5 | 11 | 8 | 11 | 12 |
| 12 | 6 | 12 | 10 | 12 | 10 |
| 13 | 6 | 13 | 10 | 13 | 10 |
| 14 | 6 | 14 | 10 | 14 | 10 |
| 15 | 6 | 15 | 6 | 15 | 8 |
| 16 | 6 | 16 | 6 | 16 | 8 |
| 17 | 6 | 17 | 6 | 17 | 8 |
| 18 | 5 | 18 | 10 | 18 | 12 |
| 19 | 5 | 19 | 10 | 19 | 12 |
| 20 | 5 | 20 | 10 | 20 | 12 |
| 21 | 4 | 21 | 8 | 21 | 8 |
| 22 | 4 | 22 | 8 | 22 | 8 |
| 23 | 4 | 23 | 8 | 23 | 8 |
| 24 | 3 | 24 | 6 | 24 | 6 |
| 25 | 3 | 25 | 6 | 25 | 6 |
| 26 | 3 | 26 | 6 | 26 | 6 |
| 27 | 2 | 27 | 3 | 27 | 4 |
| 28 | 2 | 28 | 3 | 28 | 4 |
| 29 | 2 | 29 | 3 | 29 | 4 |
natural_image
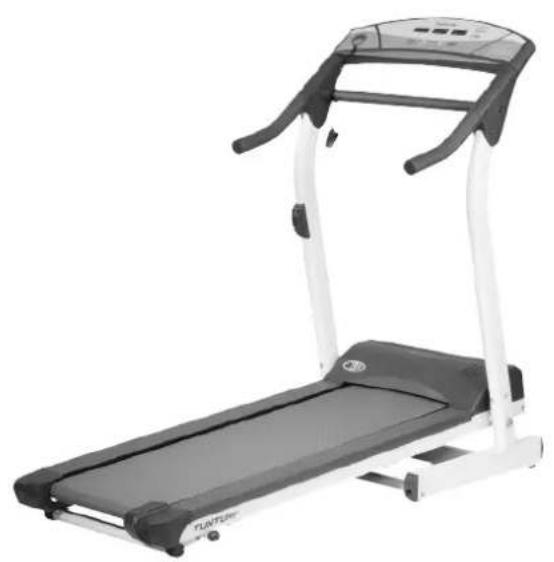
Black and white treadmill with black handle and white frame, no visible text or symbolsTUNTURI®
THE MOTOR - it's you.
TUNTURI OY LTD
P.O.BOX 750, FIN-20361
Turku, Finland
Tel. +358 (0)2 513 31
Fax +358 (0)2 513 3323
www.tunturi.com
- OWNER'S MANUAL J3F
- IMPORTANT SAFETY
- INSTRUCTIONS
- WARNING
- SAVE THESE INSTRUCTIONS!
- Welcome to the world of Tunturi exercising!
- ASSEMBLY
- HANDRAILS
- HORIZONTAL HANDLEBAR
- SAFETY TETHER KEY
- EXERCISING
- ABOUT YOUR HEALTH
- ABOUT THE EXERCISE ENVIRONMENT
- ABOUT USING THE EQUIPMENT
- ADJUSTING THE ELEVATION
- BEGINNING AN EXERCISE SESSION
- FINISHING AN EXERCISE SESSION
- HOW TO MOTIVATE YOURSELF
- TO CONTINUE
- ACTIVE TRAINER :
- 70-80 % of maximum heart-rate
- FUNCTION KEYS
- DISPLAYS
- TRAINING WITHOUT PRESET PROGRAM
- TRAINING WITH PRESET PROGRAM
- MAINTENANCE
- LUBRICATING THE RUNNING DECK
- CLEANING THE TREADMILL
- ALIGNING THE RUNNING BELT
- Align the belt according to the following instructions:
- ADJUSTING THE BELT TENSION
- MALFUNCTIONS
- ERROR CODES
- PROTECTIVE CIRCUIT
- MOVING AND STORAGE
- TECHNICAL DATA
- ELEVATION RANGE
- TUNTURI®
Brand : TUNTURI
Model : J3F
Category : Treadmills