
T60F - Treadmills TUNTURI - Free user manual and instructions
Find the device manual for free T60F TUNTURI in PDF.


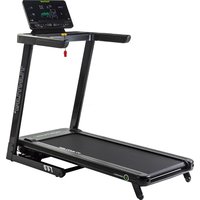
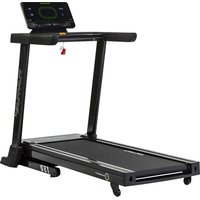
| Type of product | Motorized treadmill for home use |
| Brand | Tunturi |
| Model | T60F |
| Dimensions (in use) | 202 x 94 x 138 cm (79 x 37 x 54 in) |
| Dimensions (folded) | 115 x 94 x 175 cm (45 x 37 x 69 in) |
| Weight | 105 kg (231 lbs) |
| Running surface | 54 x 138 cm (21.3 x 54.3 in) |
| Speed range | 0.5 - 16.0 km/h (0.3 - 10 mph) |
| Elevation range | 0 - 10% |
| Motor power | 2.0 HP (1.49 kW) |
| Maximum user weight | 135 kg (298 lbs) |
| Power requirements | 10 A max, voltage as per type plate; grounded outlet required |
| Display | Heart rate, kcal, time, distance, speed, graphic/text display |
| Preset programs | 8 profiles: Hill Walk, Hill Jog, Hill Run, Rolling Hills, Fatburner 1 & 2, Cardio, Fit |
| Heart rate control | Yes, via telemetric belt (Polar T41 required) |
| Fitness tests | 2 km walking test and 12-minute Cooper run test |
| Position Speed Control (PSC) | Adjusts speed by changing position on the belt |
| Memory function | Saves up to 5 workouts per user (up to 4 users) |
| Safety features | Safety key with clip, emergency stop, grounded cord |
| Maintenance | Lubrication with T-Lube S; belt alignment and tension adjustment |
| Assembly | Requires two people; tools included |
| Warranty | 24 months for household use |
| Certifications | CE, EN 957 Class HA, EMC, FCC |
Frequently Asked Questions - T60F TUNTURI
User questions about T60F TUNTURI
0 question about this device. Answer the ones you know or ask your own.
Ask a new question about this device
Download the instructions for your Treadmills in PDF format for free! Find your manual T60F - TUNTURI and take your electronic device back in hand. On this page are published all the documents necessary for the use of your device. T60F by TUNTURI.
USER MANUAL T60F TUNTURI
IMPORTANT SAFETY INSTRUCTIONS .....2
ASSEMBLY 2
BASICS ON EXERCISING ....3
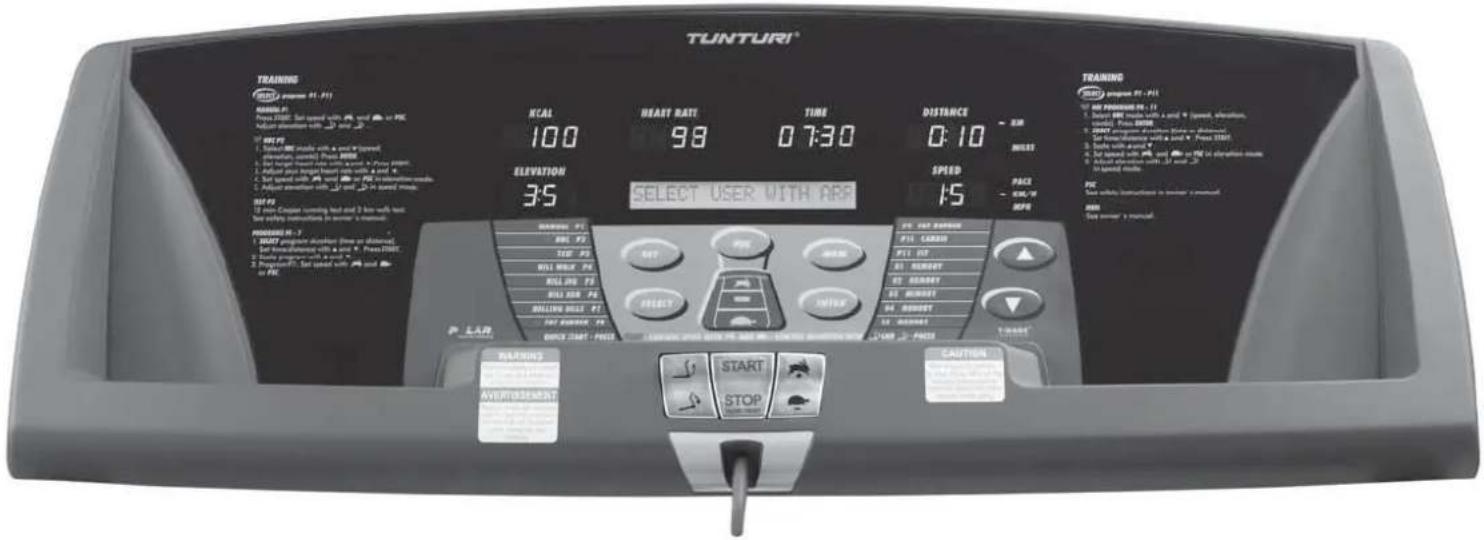
CONSOLE 5
POSITION SPEED CONTROL (PSC) 6
CHOOSING AN EXERCISE ....7
MANUAL EXERCISE ....7
HEART RATE CONTROLLED EXERCISE ....7
FITNESS TEST 7
EXERCISE PROFILES 9
MEMORY FUNCTION ....10
MAINTENANCE 11
MALFUNCTIONS 11
MOVING AND STORAGE 12
TECHNICAL DATA 12
IMPORTANT SAFETY INSTRUCTIONS
This Owner's Manual is an essential part of your training equipment: reading all instructions in this manual before you start using this appliance. The following precautions must always be followed:
WARNING
- Never use extension cords between the treadmill and your wall outlet. The device's maximum power consumption is 10 A. Outlets with fluctuating voltage of more than 5% may result in erratic performance or cause damage to treadmill electronics. Using electrical power other than that, which has been specified in this manual will ultimately void any warranty, implied or otherwise.
WARNING: to reduce any risk to persons:
- Keep hands clear of any moving parts. Never place hands, feet or any other objects into any opening or under the treadmill.
- Never leave the treadmill unattended when plugged in. Unplug from outlet when not in use, before putting on or taking off parts. To disconnect, turn all controls to the off position, then remove plug from outlet.
- Close supervision is necessary when the treadmill used by, on, or near children, invalids, or disabled persons.
- Use the treadmill only for its intended use as described in this manual. Do not use attachments not recommended by Tunturi.
- Before you start using the treadmill, make sure that it functions correctly in every way. Do not use a faulty device.
- Keep the cord away from heated surfaces.
- T60F must not be used outdoors. T60F tolerates an environment measuring +10°C to +35°C. Air humidity must never exceed 90%.
- Do not attempt any servicing or adjustment other than those described in this manual. The given instructions must be followed carefully.
- Never operate this treadmill if it has a damaged cord or plug, if it has been dropped or damaged, or dropped into water. Return the treadmill to a service center for repair.
- Never operate the appliance with the air opening blocked. Keep the air openings free of lint, hair, and the like.
- Do not operate where aerosol (spray) products are being used or where oxygen is being administered.
● The device must not be used by persons weighing over 135 kg (298 lbs).
● T60F is designed for household use only. The warranty of 24 months applies only for faults in household use.
SAVE THESE INSTRUCTIONS!
WELCOME TO THE WORLD OF TUNTURI EXERCISING!
Your choice shows that you really want to invest in your well-being and condition; it also shows you really value high quality and style. With Tunturi Fitness Equipment, you've chosen a high-quality, safe and motivating product as your training partner. Whatever your goal in training, we are certain this is the training equipment to get you there. You'll find information about using your exercise equipment and what makes for efficient training at Tunturi's website at WWW.TUNTURI.COM.
ASSEMBLY
Before assembling the device, insure all parts are present:
- Frame
- Handrails
- Horizontal handlebar
- Console
- Power cord
- Assembly kit (contents are marked with an * in the spare part list): keep the assembly tools, as you may need them e.g. for adjusting the equipment
The directions left, right, front and back are defined as seen from the exercising position. In case of problems contact your Tunturi dealer. Two people are needed for the installation. Assemble the equipment as follows:
HANDRAILS

natural_image
Two technical diagrams showing mechanical assembly steps, no text or symbols presentNOTE! Do not remove the fastening screws on the handrails! Please note that there is a wire coming out of the left handrail: be careful not to let the wire slide inside the handrail! Place the handrails into position at the sides of the frame: when placing the left handrail, gently pull the wire coming out of the handrail upward so that it won't be damaged between the handrail and the frame. Do not tighten the fastening screws until the horizontal handlebar and console have been secured.
HORIZONTAL HANDLEBAR
natural_image
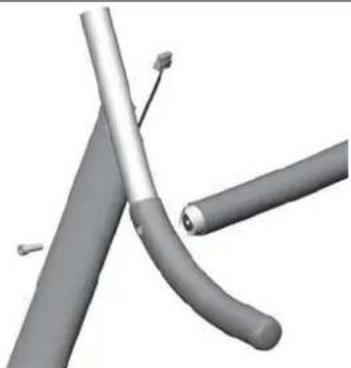
3D rendered image of two curved metallic rods with pins, no text or symbols visiblePlace the horizontal handlebar between the handrails so that it is curved towards the rear of the treadmill. Secure the horizontal handlebar to the handrails on both sides with a hex screw. To facilitate the mounting, set the fastening screw on the tip of the allen key before inserting it through the hole in the handrail.
CONSOLE

natural_image
3D rendered image of a car trunk with attached lever and handle, no visible text or symbolsConnect the wire coming out of the left handrail with the connector in the console wire and push the connected wire inside the handrail. Push the console onto the handrail ends and secure with four hex screws at the back of the console. If necessary, you can facilitate the console securing by loosening the horizontal handlebar; however, do not loosen the end with the black rubber nut.
Secure now both handrails with two hex screws. Tighten the two fastening screws by pushing the Allen key through the hole in the handrail to the screw head. NOTE! Tighten the fastening screws by turning them anti-clockwise! Be careful not to over tighten. Push the plastic end caps onto the holes in the handrails. Remove the protective film from the display. To facilitate the mounting, gently push the handrails forward when fastening the screws.
SAFETY KEY
The treadmill cannot be used if the key is not properly installed on the console; if the key is removed from its place, the treadmill will immediately stop. Insert the safety key into the key holder at the left side of the console. Ensure that the clip of the safety key is properly attached to your clothing; as the cord tightens, make sure the clip does not detach itself from your clothing before the safety key disconnects from the user interface.
POWER CORD AND
GROUNDING INSTRUCTIONS
Plug the socket end of the power cord into the treadmill at the left front corner. Before connecting the device to a power source, make sure that local voltage matches that indicated on the type plate. Turn on the power using the switch next to the socket on the treadmill. This treadmill must be grounded. If it should malfunction or breakdown, grounding provides a path of least resistance for electrical current to reduce the risk of electrical shock. This product is equipped with a cord having an equipment-grounded conductor and a grounding plug. The plug must be plugged into an appropriate outlet that is properly installed and grounded in accordance with all local codes and ordinances. Do not use extension cables when connecting the equipment to the power source.
DANGER! Improper
connection of the equipment-grounding conductor can result in a risk of electric shock. Check with a qualified electrician or serviceman, if you are in doubt as to whether the product is properly grounded. Do not modify the plug provided with the product - if it will not fit the outlet, have a proper outlet installed by a qu

BASICS ON EXERCISING
Before training on a motor-driven treadmill, you should familiarise yourself with its functions and operation.
Working out with this equipment is excellent aerobic exercise, the principle being that the exercise should be suitably light but of long duration. Aerobic exercise is based on improving the body's maximum oxygen uptake, which in turn improves endurance and fitness.
Aerobic exercise should above all be pleasant. You should perspire, but your heart rate should stay at a comfortable level. This will allow for a longer training session. Three 30 to 60 minute sessions a week is recommended, depending on your goals, fitness level and schedule.
If you prefer a walking exercise, you can increase the versatility and effort level of your workout by adjusting the elevation. For a more versatile walking exercise, you can also use light dumbbells to work your arm muscles. Remember to pay attention to safety concerns, such as maintaining your balance.
You'll find information about using your exercise equipment and what makes for efficient training at Tunturi's website at www.tunturi.com.
ABOUT THE EXERCISE ENVIRONMENT
● Make sure the exercise environment has adequate ventilation. To avoid catching cold, do not exercise in a draughty place.
- Place the treadmill on a firm, level surface. Allow 200x100 cm of clearance behind the treadmill and 100 cm on either side and in front of the treadmill. Make sure that children and pets stay away from this area while the treadmill is in use.
- We recommend that the equipment is placed on a protective base.
ABOUT USING THE EQUIPMENT
● Always unplug the treadmill from the electrical outlet after each training session.
- Only one person may use the equipment at a time.
- Keep hands clear of any moving parts. Never place hands, feet or any other objects under the treadmill
● Never leave the treadmill unattended when plugged in.
- Wear appropriate clothing and shoes when exercising. Make sure your shoelaces are properly tied. To avoid injury and unnecessary wear on your treadmill, be sure your shoes are free of any debris such as gravel and small pebbles.
BEGINNING AN EXERCISE SESSION
- To avoid muscular pain and strain, begin and end each workout by stretching.
- Stand on the landing rails to the left and right of the running belt. Do not stand on the running belt.
- Begin each workout at a low speed, and gradually increase your speed and/or treadmill elevation to a comfortable level according to your condition.
● Always hold the handrail for support when getting on or off the treadmill and when changing the speed during exercise. Do not jump off the running belt while it is moving! - To avoid numbness and pain in the neck, shoulder and back area, maintain an upright posture. Try to run in the middle of the track, within comfortable reach of the console.
- If you encounter any operational faults during exercise, grip the handlebar for support and stand on the landing rails to the left and right of the running belt. Turn the power switch off and see the instructions under Malfunctions.
- If you experience nausea, dizziness or other abnormal
symptoms while exercising, stop your workout at once and consult a physician.
FINISHING AN EXERCISE SESSION
- Finish each workout by gradually reducing the speed. Don't forget to stretch at the end of the workout.
- Never leave the safety key in the treadmill.
- Use the main power switch to turn the unit off.
- Unplug the electrical cord from the wall outlet and from the treadmill.
- If necessary clean the treadmill from sweat with a damp cloth. Do not use solvents.
- Store the electrical cord where it is clear from all pathways and out of childrens' reach.
HEART RATE
No matter what your goal, you'll get the best results by training at the right level of effort, and the best measure is your own heart rate. The most reliable heart rate measurement is achieved with a telemetric device, in which the electrodes of the transmitter fastened to the chest transmit the pulses from the heart to the console by means of an electromagnetic field.
NOTE! If you are fitted with a pacemaker, please consult a physician before using a wireless heart rate monitor.
If you want to measure your heart rate this way during your workout, moisten the grooved electrodes on the transmitter belt with saliva or water. Fasten the transmitter just below the chest with the elastic belt, firmly enough so that the electrodes remain in contact with the skin while exercising, but not so tight that normal breathing is prevented. If you wear the transmitter and belt over a light shirt, moisten the shirt slightly at the points where the electrodes touch the shirt. The transmitter automatically transmits the heart rate reading to the console up to a distance of about 1 m.
If the electrode surfaces are not moist, the heart-rate reading will not appear on the display. If the electrodes are dry, they must be moistened again. Allow the electrodes warm up properly to ensure accurate heart rate measurement. If there are several telemetric heart rate measurement devices next to each other, the distance between them should be at least 1.5 m. Similarly, if there is only one receiver and several transmitters in use, only one person with a transmitter should be within transmission range. The transmitter is switched to an active state only when it is being used for measurement. Sweat and other moisture can, however, keep the transmitter in an active state and waste battery energy. Therefore it is important to dry the electrodes carefully after use.
When selecting training attire, please note that some fibers used in clothes (e.g. polyester, polyamide) create static electricity, which may prevent reliable heart rate measurement.
Please note that a mobile phone, television and other electrical appliances form an electromagnetic field around them, which will cause problems in heart rate measurement.
First find your maximum heart rate i.e. where the rate doesn't increase with added effort. If you don't know your maximum heart rate, please use the following formula as a guide:
208 - 0,7 X AGE
These are average values and the maximum varies from person to person. The maximum heart-rate diminishes on average by one point per year. If you belong to a risk group, ask a doctor to measure your maximum heart rate for you.
We have defined three different heart-rate zones to help you with targeted training.
BEGINNER: 50-60 % of maximum heart-rate
Also suitable for weight-watchers, convalescents and those who haven't exercised for a long time. Three sessions a week of at least a half-hour each is recommended. Regular exercise considerably improves beginners' respiratory and circulatory performance and you will quickly feel your improvement.
TRAINER: 60-70 % of maximum heart-rate
Perfect for improving and maintaining fitness. Even reasonable effort develops the heart and lungs effectively, training for a minimum of 30 minutes at least three times a week. To improve your condition still further, increase either frequency or effort, but not both at the same time!
ACTIVE TRAINER: 70-80 % of maximum heart-rate
Exercise at this level suits only the fittest and presupposes long-endurance workouts.
CONSOLE
FUNCTION KEYS
START
Starts the selected training and activates the running belt.
SPEED CONTROL KEYS (Rabbit / Turtle)
Rabbit key increases the belt speed in 0,1 km/h / mph increments, the turtle key decreases it in 0,1 km/h / mph increments. Pressing these keys longer makes the speed change faster. Track speed ranges from 0,5-16 km/h / 0,3-10 mph.
ELEVATION CONTROL KEYS
Click the elevation up key to increase elevation in 0,5 % increments, and the elevation down key to decrease it in 0,5 % increments. Pressing these keys longer makes the speed change faster. Track elevation ranges from 0 % (horizontal) to 10 %.
ARROW KEYS
In user settings, you can adjust the values with the arrow keys. In HRC mode, you can set and scale the target HR with the arrow keys. In exercise profiles, you can set and scale the effort level with the arrow keys. Pressing the “arrow up” key will increase the effort, and pressing the “arrow down” key will decrease the effort.
STOP / PAUSE / RESET
Press STOP once and the treadmill stops and moves into its waiting state for 5 minutes. You can restart the interrupted exercise by pressing the START key within 5 minutes. Press STOP twice to end your exercise. Keep the STOP key pressed down for 2 seconds to reset the console. The console then switches to its initial state.
SELECT
Before you press the START key, SELECT key selects the training modes. During training, SELECT key selects the profile displays.
ENTER
Confirm your selections (training mode or program, user set-ups)
MEMORY
You can use the MEM key to save your completed exercise in the console's memory. To save your data, you need to choose a user code. A total of 5 workouts can be saved under each user code.
PSC
Position Speed Control (PSC) allows you to adjust the track speed without touching the console by changing your position on the track during exercise. The PSC function requires the use of a heart rate monitor. PSC can be used in manual exercises, HRC exercises with elevation adjustment, the Rolling Hills profile, as well as both fitness tests.
SET
Press the SET key to choose a user code, enter user details, select display values, and to display the total training distance in kilometres and the total training time in hours.
DISPLAYS
HEART RATE
45-220 bpm. The heart rate light always blinks when the console is receiving a heart rate signal.
KCAL (estimated energy consumption)
0-9999 kcal, 1 kcal increment
ELEVATION
Exercise duration at 1 second intervals 00:00-99:59, and at 1 minute intervals thereafter h1:40-h9:59
DISTANCE
0.00-99.99 km, 0,01 km increment
SPEED
running deck speed (0,5-16 km/h / 0,3-10 mph), 0,1 km / mph increment. A signal light indicates the selected measurement unit (km/h, mph, pace = minutes/ kilometre).
GRAPHIC / TEXT DISPLAY
T60F features a combined text and profile display that provides instructions when you switch to an exercise and during the exercise itself.
ENTERING USER DETAILS
We recommend that you choose a user code and save your personal details: these details are needed e.g. for a more accurate estimation of your energy consumption. At the same time, you can set the units to be displayed and check the total training values. Choosing a user code will also allow you to save your exercise data.
- Press SET. Use the arrow keys to select a user code (1-4). Press ENTER to confirm your selection. NOTE! The NO USER option displays device settings, showing e.g. the total training time and distance.
- Set the measurement units (Metric = metric system, Imperial = avoirdupois). Use the arrow keys to change the setting, and press ENTER to confirm your selection. You will then move to the next setting.
- Set the user weight. Use the arrow keys to change the setting, and press ENTER to confirm your selection. This information is needed for estimating energy consumption. You will then move to the next setting.
- Set gender (male, female). Use the arrow keys to change the setting, and press ENTER to confirm your selection. This information is needed for estimating energy consumption. You will then move to the next setting.
- Set the age of the user. Use the arrow keys to change the setting, and press ENTER to confirm your selection. This information is needed for estimating energy consumption. You will then move to the next setting.
- Set the audio signal (ON = signals on, OFF = signals off). Use the arrow keys to change the setting, and press ENTER to confirm your selection. You will then move to the next setting. NOTE! In profile workouts, the console gives an audio signal in advance of any changes in profile.
- Set the units to be displayed (km/h, min/km, mph, min/mile). Use the arrow keys to change the setting, and press ENTER to confirm your selection. You will then move to the next setting. NOTE! You can set the units during exercise: press SET once and use the arrow keys to change the setting, and press ENTER to confirm your selection.
- Set the maximum speed for PSC and HRC workouts with the arrow keys: since PSC and HRC adjust the speed level according to your heart rate, a maximum speed limit is needed to keep the speed at a suitable level. The default is 12 km/h. Use the arrow keys to change the setting, and press ENTER to confirm your selection. You will then move to the next setting.
- The TOTAL TIME display shows a user specific total training time on the treadmill. Press ENTER to move to the next display.
- The TOTAL DIST display shows a user specific
total training distance on the treadmill. Press ENTER to return to user settings or press START to exit user settings.
Once you have set the user details, you can start exercising by selecting your own user code. The selected user code will remain in the console's memory until it is replaced with a new one, the safety key is removed from its place, or the power cord is unplugged.
POSITION SPEED CONTROL (PSC)
Position Speed Control (PSC) allows you to adjust running track speed by changing your position on the track. Move to the front of the track and it accelerates, and as you move back the track itself slows down. When you are walking or running in the middle section of the track the speed stays steady.
NOTE! You must wear a Polar T41 heart rate belt when you use PSC! A blinking square in the Heart Rate display indicates that heart rate measurement is in operation.
NOTE! Attach the holder of the safety key carefully to your shirt whenever you are using PSC. Adjust the length of the safety key wire so that it will be detached from the console, if you move too far back.
NOTE! If you are exercising with PSC, there must not be another heart rate transmitter near the treadmill (minimum distance 2 m); the simultaneous signals of two transmitters endanger user safety by interfering with the PSC.
PSC SETTINGS
PSC settings should be done with the treadmill at a complete stop.
- Start the use of PSC by setting the speed zone limits. Press the PSC key.
- Depending on the previous settings, either PSC ON or PSC OFF will be displayed. Use the arrow keys to change the setting to PSC ON and press ENTER.
- PRESS ENTER TO CALIBRATE PSC OR START TO EXIT will be displayed. Position yourself in the middle of the track. The acceleration zone begins approximately 10 cm ahead of the measurement point, while the deceleration zone begins approximately 20 cm behind the measurement point. Press ENTER and the text PLEASE WAIT 8 will be displayed. The console will now measure your distance on the basis of the heart rate signal. Measurement takes 8 seconds, and after that CALIBRATION READY PRESS START is displayed.
- If the console cannot receive the heart rate signal or there are problems in measuring the distance, the console will return to the CALIBRATE display. In case of such an error, the text CHECK TRANSMITTER is displayed. You should then make sure that you have properly followed the instructions on the use of the heart rate belt.
If the speed zone limits are suitable for you, the next time you start exercising you can start PSC just by selecting PSC ON and pressing ENTER and START,
and then select the desired training mode. If you want to change the speed zone limits, repeat steps 1-4 and move to a more suitable position on the track before the measurement.
TRAINING WITH PSC
- Select Manual exercise, Rolling Hills profile, a condition test or the standard heart rate exercise with automatic elevation adjustment. In these exercises you can adjust the track speed with PSC. The PSC signal light indicates that the feature is in operation. T60F is equipped with three PSC signal lights that show in which speed zone you are currently running (Rabbit = speed increases, - = constant speed, Turtle = speed decreases).
- Start the selected exercise by pressing the START key, and adjust track speed by moving forward or back on the track. Please note that the speed adjustment keys (Turtle/Rabbit) are also in operation during a PSC exercise. NOTE! If you have not tried the PSC feature before, we recommend you start at slow speed.
CHOOSING AN EXERCISE
Press SELECT until the signal light indicates the desired exercise. You can choose between:
- Manual exercise in which you adjust both speed and elevation yourself during the exercise.
- Heart rate controlled HRC exercise in which the treadmill adjusts the speed / elevation automatically, so that your heart rate stays at the level set. You always need to wear a heart rate belt while doing HRC exercises.
- Fitness tests feature with two test options: a 2-kilometre walking test and a 12-minute Cooper run test.
- Preset exercise profile in which speed/elevation or heart rate level vary according to the preset program.
MANUAL EXERCISE
QUICK START
- Manual exercise is the treadmill default setting. You can start the exercise directly by pressing the START key. The belt starts moving at 1,5 km/h / 1,0 mph.
STARTING WITH THE USER DETAILS SETUP
- If you want to use user details or save your workout, set your user details or select your user code (1-4). Press START to confirm your selection.
- Press SELECT until the signal light shows next to the Manual text.
- Press START. The belt starts moving at 1,5 km/h / 1,0 mph. Use the Rabbit/Turtle keys or the PSC function to adjust the speed and the elevation control keys to adjust the elevation.
- Press START. The belt starts moving at 1,5 km/h / 1,0 mph. Use the Rabbit/Turtle keys or the PSC function to adjust the speed and the elevation control keys to adjust the elevation.
- Press STOP and the treadmill stops and moves into waiting state for 5 minutes. You can restart the interrupted exercise by pressing the START key within 5 minutes. You can use the waiting state to save
your workout in the console's memory (see Memory Function). Press the STOP key twice to end exercising and display feedback on your workout. The console then switches to its initial state.
HEART RATE CONTROLLED
EXERCISE
Heart rate controlled exercises enable training at a selected heart rate level. Heart rate controlled exercises always require the use of a heart rate belt. If heart rate measurement is not working correctly, the error message CHECK TRANSMITTER will be displayed. You should then make sure that you have properly followed the instructions on the use of the heart rate belt.
- If you want to use user details or save your workout, set your user details or select your user code (1-4). Press START to confirm your selection.
- Press SELECT until the signal light shows the HRC text. Press ENTER to confirm your selection.
- Select the HRC mode with the arrow keys:
a) Speed = heart rate control is based on changing belt speed. If you wish, you can change the inclination angle of the belt during training.
b) Elevation = heart rate control is based on changing treadmill inclination. In this mode you have to adjust the speed by yourself using either PSC or the Turtle and Rabbit keys.
c) Combination = automatic equal adjustment of both the inclination angle and the speed of the belt. - Press ENTER to confirm your selection.
- Set the desired heart rate (80-180) with the arrow keys.
- Press START to start constant heart-rate exercise. You can adjust the heart rate level with the arrow keys during the exercise.
- The profile display collects the exercise details at one minute intervals. After 20 minutes, the display will shift to the left to show the speed details from the last 20 minutes. Pressing SELECT during the exercise will display speed, elevation and heart rate profiles for the exercise.
- Press STOP and the treadmill stops and moves into waiting state for 5 minutes. You can restart the interrupted exercise by pressing the START key within 5 minutes. You can use the waiting state to save your workout in the console's memory (see Memory Function). Press the STOP key twice to end exercising and display feedback on your workout. The console then switches to its initial state.
FITNESS TESTS
The treadmill features two different fitness tests. The fast-paced 2 km walking test requires a lower level of effort, while the 12-minute Cooper run test is better suited to those who are fit. You can use PSC to adjust the speed during the tests.
- Select your user code (1-4) with the arrow keys. Press ENTER to confirm your selection.
-
Press SELECT until the signal light shows next to the text TEST. Press ENTER to confirm your selection..
-
Press SELECT to choose between the 2 km walking test and the Cooper test. Press ENTER to confirm your selection.
2 KM WALKING TEST
The walking test requires the use of a heart rate monitor. The test measures your fitness level on the basis of your heart rate level during the exercise and the time taken to complete the 2 km distance. The test is preceded by a 3-minute warm-up period. We also recommend you continue walking slowly after the test, so that your heart rate returns smoothly to normal. On the basis of your performance, the console will display an estimate of your maximum oxygen uptake capacity.
BEGINNING THE WALKING TEST:
- The display prompts for user height: enter your height with the arrow keys. Press ENTER to confirm your setting.
- The display prompts for the user's sex: enter your sex with the arrow keys. Press ENTER to confirm your setting.
- The display prompts for user weight: enter your weight with the arrow keys. Press ENTER to confirm your setting.
-
The display prompts for the user's age: enter your age with the arrow keys. Press ENTER to confirm your setting.
-
The display reads WARM UP to indicate you can begin the 3-minute warm-up period. Begin the warm-up period by pressing START.
-
The running deck elevation is adjusted at 1 % to simulate air resistance. Adjust speed using the speed control keys or the PSC function. We recommend that you warm up by walking at a slightly faster pace than normally.
-
During the warm-up period, time will count down from three minutes. When the time displays 0:00, the console gives an audio signal and the actual test will begin (TEST STARTED!).
PERFORMING THE WALKING TEST:
- The goal is to walk the 2 km distance as quickly as possible. Adjust the speed yourself by using the speed control keys or the PSC function. Do not run during the test!
- If the heart rate measurement is not working correctly, the display will show the alert CHECK TRANSMITTER. You should then make sure that you have properly followed the instructions on the use of the heart rate belt.
- Once the 2 km distance is covered, the console gives an audio signal. The test is automatically followed by a 5-minute cooldown period, after which the treadmill will stop. The display gives the test result as your maximum oxygen uptake capacity and shows an estimate of your fitness level. Compare your results to the fitness level categories for different age groups, shown in the table.
COOPER TEST
The Cooper test is used to calculate your fitness level on the basis of the distance you run in a period of 12 minutes: the longer the distance you cover, the better your fitness level. The test is preceded by a 3-minute warm-up period. We also recommend you continue walking slowly after the test, so that your heart rate returns smoothly to normal. On the basis of your performance, the console will display an estimate of your maximum oxygen uptake capacity.
- The display reads COOPER SELECTED. Press START to confirm your selection.
- The display prompts for the user's sex: enter your sex with the arrow keys. Press ENTER to confirm your setting.
- The display prompts for the user's age: enter your age with the arrow keys. Press ENTER to confirm your setting.
- The display reads WARM UP to indicate you can begin the 3-minute warm-up period. Begin the warm-up period by pressing START.
- The running deck elevation is adjusted at 1 % to simulate air resistance. Adjust speed using the speed control keys. We recommend that you warm up by walking at a slightly faster pace than normally.
- During the warm-up period, time will count down
| MEN / MAXIMAL OXYGEN UPTAKE (VO2MAX)1 = VERY POOR - 7 = EXCELLENT | ||||||||
| AGE 1 2 | 3 4 5 6 | 7 | ||||||
| 18-19 <33 | 33-38 | 39-44 | 45-51 52 | 57 58-63 | >63 | |||
| 20-24 <32 | 32-37 | 38-43 | 44-50 51 | 56 57-62 | >62 | |||
| 25-29 <31 | 31-35 | 36-42 | 43-48 49 | 53 54-59 | >59 | |||
| 30-34 <29 | 29-34 | 35-40 | 41-45 46 | 51 52-56 | >56 | |||
| 35-39 <28 | 28-32 | 33-38 | 39-43 44 | 48 49-54 | >54 | |||
| 40-44 <26 | 26-31 | 32-35 | 36-41 42 | 46 47-51 | >51 | |||
| 45-49 <25 | 25-29 | 30-34 | 35-39 40 | 43 44-48 | >48 | |||
| 50-54 <24 | 24-27 | 28-32 | 33-36 37 | 41 42-46 | >46 | |||
| 55-59 <22 | 22-26 | 27-30 | 31-34 35 | 39 40-43 | >43 | |||
| 60-65 <21 | 21-24 | 25-28 | 29-32 33 | 36 37-40 | >40 | |||
| WOMEN / MAXIMAL OXYGEN UPTAKE (VO2MAX)1 = VERY POOR - 7 = EXCELLENT | ||||||||
| AGE 1 2 | 3 4 5 6 | 7 | ||||||
| 18-19 <28 | 28-32 | 33-37 | 38-42 43 | -47 | 48-52 | >52 | ||
| 20-24 <27 | 27-31 | 32-36 | 37-41 42 | -46 | 47-51 | >51 | ||
| 25-29 <26 | 26-30 | 31-35 | 36-40 41 | -44 | 45-49 | >49 | ||
| 30-34 <25 | 25-29 | 30-33 | 34-37 38 | -42 | 43-46 | >46 | ||
| 35-39 <24 | 24-27 | 28-31 | 32-35 36 | -40 | 41-44 | >44 | ||
| 40-44 <22 | 22-25 | 26-29 | 30-33 34 | -37 | 38-41 | >41 | ||
| 45-49 <21 | 21-23 | 24-27 | 28-31 32 | -35 | 36-38 | >38 | ||
| 50-54 <19 | 19-22 | 23-25 | 26-29 30 | -32 | 33-36 | >36 | ||
| 55-59 <18 | 18-20 | 21-23 | 24-27 28 | -30 | 31-33 | >33 | ||
| 60-65 <16 | 16-18 | 19-21 | 22-24 25 | -27 | 28-30 | >30 | ||
from three minutes. When the time displays 0:00, the console gives an audio signal and the actual test will begin (TEST STARTED!).
PERFORMING THE COOPER TEST:
-
The goal is to run as long a distance as possible in a period of 12 minutes. Adjust the speed yourself by using the speed control keys or the PSC function. The display shows the time elapsed and your estimated results throughout the test.
-
Once the 12 minutes are up, the console gives an audio signal. The test is automatically followed by a 5-minute cool-down period, after which the treadmill will stop. The display gives the test result as your maximum oxygen uptake capacity and shows an estimate of your fitness level. Compare your results to the fitness level categories for different age groups, shown in the table.
EXERCISE PROFILES
Tunturi has developed different preset exercise profiles in order to ensure versatile, pleasant and goal-oriented training. The console gives an audio signal in advance of changes in a profile. The profile display shows the shape of the profile and the details of the next profile bar. If you want to use user details or save your workout, set your user details or select your user code (1-4). Press ENTER to confirm your selection.
A. Combination profiles 1-3 are exercise profiles with different effort levels and preset speed and elevation. You can programme the speed to a desired level and set the duration of the exercise to be displayed either in time or distance. These profiles do not require the use a heart rate belt, but that provides interesting additional information about your performance.
- Press SELECT until the signal light shows the profile (1-3) you want. Press ENTER to confirm your selection.
- Set profile distance/time. Press SELECT to move to profile duration (time / distance) setting. The previous duration set is shown on the display. Use the SELECT key to alternate between different setting values. You can change the value using the arrow keys (limit 10 minutes (10:00) – 3 hours (h3:00), adjusting at 5 minute steps / 3 km – 42 km, adjusting at 1 km steps). Press ENTER to confirm your selection.
- Press START. The exercise begins and the belt starts moving. You can scale the profile speed level up and down at 1 % steps using the arrow keys. Pressing SELECT during the exercise will display speed, elevation and heart rate profiles for the exercise.
- Press STOP and the treadmill stops and moves into waiting start for 5 minutes. You can restart the interrupted exercise by pressing the START key within 5 minutes or you can save your workout in the console's memory (see Memory Function). Press the STOP key twice to end exercising and display feedback on your workout. The console then switches to its initial state.
- The cool-down period will automatically start once you have completed the profile. After the cool-down the treadmill will stop. You can save your workout in the console's memory (see Memory Function).
B. Rolling Hills is an interval exercise in which you can determine track speed yourself and set the distance to be run or the duration of the exercise. Rolling Hills allows you to regulate your speed using the PSC function. Unless you use PSC, this profile does not require the use of a heart rate belt. However, a heart rate belt will provide you with interesting additional information about your performance.
- Press SELECT until the signal light shows the profile
- Press ENTER to confirm your selection.
- Press SELECT to move to profile duration (time / distance) setting. The previous duration set is shown on the display. Use the SELECT key to alternate between different setting values. You can change the value using the arrow keys (limit 10 minutes (10:00) – 3 hours (h3:00), adjusting at 5 minute steps / 3 km – 42 km, adjusting at 1 km steps).
- Press START. The exercise begins and the belt starts moving. Use the speed control keys or PSC to adjust the speed. Pressing SELECT during the exercise will display elevation and heart rate profiles for the exercise.
- You can scale the program elevation profile up and down using the arrow keys.
- Press STOP and the treadmill stops and moves into waiting start for 5 minutes. You can restart the interrupted exercise by pressing the START key within 5 minutes or you can save your workout in the console's memory (see Memory Function). Press the STOP key twice to end exercising and display feedback on your workout. The console then switches to its initial state.
-
The cool-down period will automatically start once you have completed the profile. After the cool-down the treadmill will stop. You can save your workout in the console's memory (see Memory Function).
c. Heart rate controlled HRC profiles (5-8) are heart rate controlled exercise profiles with different effort levels that allow you to set the duration of the exercise. The heart rate controlled profiles always require the use of a heart rate belt. If heart rate measurement is not working correctly, the error message CHECK TRANSMITTER will be displayed. You should then make sure that you have properly followed the instructions on the use of the heart rate belt. -
Press SELECT until the signal light shows next to the profile (5-8) you want. Press ENTER to confirm your selection.
- Select the HRC mode with the arrow keys. Press ENTER to confirm your selection.
-
Press SELECT to move to profile duration (time / distance) setting. The previous duration set is shown on the display. Use the SELECT key to alternate between different setting values. You can change the value using the arrow keys (limit 10 minutes (10:00) – 3 hours (h3:00), adjusting at 5 minute steps / 3 km – 42 km, adjusting at 1 km steps).
-
Press START. The exercise begins and the belt starts moving.
-
You can scale the profile speed level up and down at 1% steps using the arrow keys.
-
Press STOP and the treadmill stops and moves into waiting start for 5 minutes. You can restart the interrupted exercise by pressing the START key within 5 minutes or you can save your workout in the console's
memory (see Memory Function). Press the STOP key twice to end exercising and display feedback on your workout. The console then switches to its initial state. 7. The cool-down period will automatically start once you have completed the profile. After the cool-down the treadmill will stop. You can save your workout in the console's memory (see Memory Function).
PROFILES
(profile figures are at the back fold of the manual)
PROFILE 1 (Hill Walk). This profile is based on regular changes in elevation, combined with a fairly steady, brisk walking pace. The profile is suited to beginners and active walkers. The default values are preset to an average speed of 5.2 km/h and a top speed of 5.8 km/h, with an average elevation of 2.7%.
PROFILE 2 (Hill Jog). This profile is based on irregular changes in elevation, combined with a fairly steady, light jogging pace. The profile is suited to beginners as well as to those who want to maintain their fitness. The default values are preset to an average speed of 6.9 km/h and a top speed of 7.2 km/h, with an average elevation of 1.9%.
PROFILE 3 (Hill Run). This profile is based on a consistent, low elevation, combined with a brisk running pace with regular variation. The profile is suited to active runners. The default values are preset to an average speed of 11.6 km/h and a top speed of 12.5 km/h, with an average elevation of 1.8%.
PROFILE 4 (Rolling Hills). A distance profile where you can set the distance to be covered in kilometres. The profile is specifically designed for regular training, but also allows for varied routines in fitness training. The maximum distance is 42 km, with the default value preset to 3 km, adjusting at 1 km steps. The profile features interval type elevation settings, with an average elevation of 2.4%.
PROFILE 5 (Fatburner 1). A heart rate profile with a low level of effort, based on a regular rise and fall in the heart rate. The profile is suited to weight control. The default values are preset to an average heart rate of 114 bpm and a maximum heart rate of 125 bpm.
PROFILE 6 (Fatburner 2). A heart rate profile with a medium level of effort, based on an interval type rise and fall in the heart rate. The profile is suited to fitness training and weight control. The default values are preset to an average heart rate of 122 bpm and a maximum heart rate of 136 bpm.
PROFILE 7 (Cardio). A heart rate profile with a medium level of effort, based on a regular rise and fall in the heart rate. The heart rate level remains at around 130-140 bpm almost throughout the entire exercise. The profile is ideal for fitness training. The default values are preset to an average heart rate of 129 bpm and a maximum heart rate of 145 bpm.
PROFILE 8 (Fit). A heart rate profile with a high level of effort, based on a regular rise and fall in the heart rate. The heart rate level remains at around 135-145 bpm almost throughout the entire exercise. The profile is suited to demanding fitness training and improvement. The default values are preset to an average heart rate of 133 bpm and a maximum heart rate of 150 bpm.
MEMORY FUNCTION
The Memory function requires the use of a user code: the exercise is saved under the selected user code. You can save 5 exercises under each user code.
SAVING YOUR OWN PROFILE:
- You can save preset profiles once the exercise is completed, or after finishing the exercise by pressing STOP once. If you want to save your Manual or HRC workouts, finish the exercise by pressing STOP once. Save your exercise by pressing MEM.
- The display prompts for a memory slot (SAVE AS OWN 1-5). Select the desired memory slot with the arrow keys and press ENTER to confirm your selection: your workout is now saved to the desired slot.
- If there are no empty memory slots, replace a previous profile with a new one. The display then prompts you to confirm (REPLACE OWN 1-5). Press ENTER to confirm your selection: your workout is now saved to the desired slot.
- SAVED AS OWN 1-5 is displayed to confirm your save. The console will automatically switch to its initial state.
NOTE! A total of 30 speed or elevation changes can be saved in each profile. To save a profile, you need to exercise for 10 minutes or more.
USING YOUR OWN PROFILE:
- Select your user code.
- Press MEM
- Press SELECT until the signal light indicates the desired own profile (-1-5 MEMORY). Press ENTER to confirm your selection. Select RERUN (to use the profile without adjustments) or RACE (to use the profile as a basis for the Race function) with the SELECT key.
- Press ENTER to confirm your selection.
- Press START to begin the profile.
- The RERUN function allows you to scale your own profile and save the changes.
RACE FUNCTION
To race against a previously saved speed/elevation profile exercise, select RACE in the Own Profile menu. The goal is to complete the profile as fast as possible.
- Press START. The exercise begins and the belt starts moving.
- Adjust the speed according to your fitness level either manually or using the PSC function.
- The console display shows information on profile progress and any changes ahead, and also shows how your performance compares to the previously saved session: when you fall behind your previously saved session, the display will read "YOU ARE x.xx
BEHIND". When you are ahead of your previously saved session, the display will read "YOU ARE x.xx AHEAD".
- Once the profile has been completed, the treadmill will automatically stop. You can save your workout in the console's memory (see Memory Function).
MAINTENANCE
The equipment is safe to use only when periodically maintained and inspected for faults and wear. Do not attempt any servicing or adjustment other than those described in this manual. Any other servicing must be performed by an authorized service representative. Check the tightness of all fixing screws once a year. Do not overtighten. Defective components must be immediately replaced: the equipment must not be operated with any defective components.
CLEANING AND LUBRICATING THE TREADMILL
Wipe the treadmill surfaces, especially the handlebars and console from dust with a damp cloth or towel. Do not use solvents. Use a small vacuum nozzle to carefully vacuum around all visible components (belt, running deck, side rails etc.). To clean the underside, lift the running deck to the storage position.
NOTE! Also keep the area near the treadmill clean. While in use, the treadmill gathers dust that may cause problems in the operation of the equipment.
In average domestic use (a maximum of 60 minutes a day), you should check the lubrication approximately after every 300 hours of use. The console is equipped with a counter for measuring total values, thus allowing you to monitor your total training time on the treadmill. If there is any jerky movement of the belt, always check the lubrication level. To do this, let the treadmill come to a complete stop, then simply lift the running belt to feel the running deck; if the deck feels dry and there is very little evidence of lubricant on your hand, lubricate the running deck according to the following instructions:
-
Attach the nozzle to the lubricant container.
-
Let the treadmill come to a complete stop, and then lift the running belt.
-
Position nozzle between the belt and the board approximately 200 mm (8") from the front of the treadmill.
-
Apply T-Lube from the front to the rear of the treadmill on each side of the treadmill, spraying as far into the center of the running base as possible. One T-Lube container will be sufficient for two re-lubrications.
-
The treadmill is instantly ready for use.
NOTE! When lubricating the treadmill, you should let it run at least five minutes before lifting the running deck to the storage position. This will prevent the lubricant from spilling.
NOTE! Lubricate your treadmill only with T-Lube S silicon lubricant. Contact your local Tunturi distributor for further supplies of T-Lube.
ALIGNING THE RUNNING BELT
Monitor belt tracking during exercise and make adjustments as needed. The belt should run in the center of the treadmill. Alignment is not usually needed, provided
● the treadmill is placed on an even, solid and horizontal surface and the belt is correctly tensioned
● the alignment of the belt is correct
It is, however, possible for the belt to be pushed to one side due to the user's running style (e.g. more weight on one foot). The alignment of the belt is adjusted by turning the two bolts at the back of the treadmill.
- Turn the power switch on and increase the treadmill's speed to 5 km/h (3 mph).
- If the belt drifts to the left, turn the left adjustment bolt 14 turn clockwise and the right adjustment bolt 1/8 turn anti-clockwise. If the belt drifts to the right, turn the right adjustment bolt 14 turn clockwise and the left adjustment bolt 14 turn anti-clockwise.
- If the belt remains centered the adjustment is correct. If not, continue to make small adjustments as above until the belt is correctly aligned. If the belt is allowed run across to one side for long periods of time the edges of the belt may be damaged and the treadmill may not continue to operate correctly. Any damage to the belt caused by the lack of necessary adjustment will not be covered by the warranty.
ADJUSTING THE BELT TENSION
The belt must be tensioned if it begins to slip on the rollers. In normal use, however, keep the belt as loose as possible! The belt tension is adjusted by turning the same screws as used for aligning the running belt. If turning the screws will not effect the belt tension, please contact your local Tunturi dealer.
- Increase the treadmill's speed to 5 km/h (3 mph).
- Turn both adjustment screws an equal amount, 14 turn clockwise.
- Try to slow the belt down by holding onto the handrails and braking as you walk (as if you were walking downhill).
If the belt slips, turn another 14 turn and repeat the test. When braking heavily the belt may slip. If the belt keeps slipping despite repeated adjustments, please contact your local Tunturi dealer.
MALFUNCTIONS
NOTE! Despite continuous quality control, defects and malfunctions caused by individual components may occur in the equipment. In most cases it's unnecessary to take the whole device in for repair, as it's usually sufficient to replace the defective part. Always give the model, serial number of your equipment and in case of malfunctions also conditions of use, nature of malfunction and any error code.
When you encounter unusual behavior from the treadmill, simply turn the power switch off, wait 1
minute and turn the power switch on to reset the treadmill. This should clear incidental errors and ready the treadmill for normal operation again. If after you have reset the treadmill by turning the power switch off and on again, and the treadmill is still not operational, contact your local Tunturi dealer for service.
If you require spare parts, always give the model, serial number of your equipment and the spare part number for the part you need. The spare part list is at the back of this manual. Use only spare parts mentioned in the spare part list.
ERROR CODES
The user interface will display information about operational faults.
SYSTEM CHECK FAILED. Possible motor controller fault. Turn the power switch off, wait 1 minute and turn the power switch on again. If treadmill recovers to normal operation, you may continue to use the treadmill. Otherwise, call the dealer for service.
SPEED SENSOR ERROR. Call the dealer for service.
MOTOR SPEED ERROR. Ensure correct usage of the treadmill. Do not push the belt with your feet. Turn the power switch off, wait 1 minute and turn the power switch on again. If treadmill recovers to normal operation, you may continue to use the treadmill. Otherwise, call the dealer for service.
MOTOR OVERLOAD. Ensure correct usage of the treadmill. Do not brake the belt. Turn the power switch off, wait 1 minute and turn the power switch on again. If treadmill recovers to normal operation, you may continue to use the treadmill. Ensure the lubrication is sufficient, re-lubricate the running deck if needed. Otherwise, call the dealer for service.
LIFT MOTOR ERROR. Call the dealer for service.
LIFT MOTOR OVERLOAD. Ensure correct usage of the treadmill. Do not overload the lift motor by continuously changing the elevation. Turn the power switch off, wait 1 minute and turn the power switch on again. The lift motor will be automatically calibrated when the power switch is turned on. If treadmill recovers to normal operation, you may continue to use the treadmill. Otherwise, call the dealer for service.
MAINTENANCE CODE
CHECK LUBRICATION. Ensure the lubrication is sufficient, re-lubricate the running deck only if needed. Remove the code by pressing the ENTER key twice.
MOVING AND STORAGE
The T60F can be folded up to space saving storage position. Always let the treadmill come to a complete stop before lifting the running deck into the storage position. Turn off the power switch and unplug the power cord from the wall and the treadmill. Take hold of the rear end of the running base and lift up until the
running base is locked in place. NOTE! The gas spring is designed to make lifting the running base easier. Always remember to ensure that the running base is locked in the storage position. When in storage position, the treadmill will automatically rest on the transportation wheels. Push the equipment on the transportation wheels. To release the folding lock, press the left gas spring lightly with your foot on the sticker indicating the folding mechanism and pull the running base down. Lower the treadmill carefully onto the floor.
NOTE! Transport the treadmill with extreme caution over uneven surfaces, for example over a step. The treadmill should never be transported upstairs using the wheels over the steps, instead it must be carried. We recommend that you use a protective base when transporting the equipment. The running belt needs to be realigned and centered after moving.
To prevent malfunctioning of the treadmill, store it in a dry place with as little temperature variation as possible, protected against dust. Always unplug the treadmill from the electrical outlet when not in use.
TECHNICAL DATA
| Length | 202 cm / 79" |
| (storage position | 115 cm / 45") |
| Height | 138 cm / 54" |
| (storage position | 175 cm / 69") |
| Width | 94 cm / 37" |
| Weight | 105 kg / 231 lbs |
| Running surface | 54 x 138 cm |
| Speed | 0,5-16,0 km/h / |
| Elevation range | 0-10 % |
| Motor | 2,0 HP (1,49 kW) |
T60F treadmill meets the requirements of the EU's EMC Directives on electromagnetic compatibility (EN 61000-6-1, EN 61000-6-3, 61000-3-3. FCC: CFR 47 part 15, UL 1647, CAN/CSA-C22.2 No. 68-92) and electrical equipment designed for use within certain voltage limits (EN 60335-1). This product therefore carries the CE label. T60F treadmill meets EN precision and safety standards (Class HA, EN-957, parts 1 and 6).
Due to our continuous policy of product development, Tunturi reserves the right to change specifications without notice.
CAUTION! The instructions must be followed carefully in the assembly, use and maintenance of your equipment. The warranty does not cover damage due to negligence of the assembly, adjustment and maintenance instructions described herein. Changes or modifications not expressly approved by Tunturi Oy Ltd will void the user's authority to operate the equipment!
We wish you many enjoyable trainings with your new Tunturi training partner!
T60F

OWNER'S MANUAL ●T60F
T60F
1 233 4037 User interface, (incl. 2, 3) 1
2 173 4098 Lower cover 1
- KB 30x12 WN1411PT - screw 22
3 403 4138 Safety switch 1
- M4x30 DIN 912 Screw 2
- M4 DIN 934 Nut 2
*4 403 4055 Safety key 1
5 233 4039 Silicone keyboard 1
6 233 4038 Membrane 1
7 203 4058 Horizontal tube (incl. 8, 10) 1
*- M8x35 DIN 912 Hexagon socket cap screw 1
8 653 4061 Nut 1
*9 533 4108 Plug 2
10 213 4020 Handle grip 1
11 213 4022 Handle grip 2
12 533 4084 Handlebar end cap 2
13 653 4062 Screw 1
14a 403 4144 Cable 1
14b 403 4161 Cable 1
15 203 4056 Handlebar RH, (incl. 11, 12) 1
16 203 4057 Handlebar LH, (incl. 11, 12) 1
*- M6x20 ISO 7380 Screw 4
17 533 4097 Front support end cap, RH 1
- 533 4098 Front support end cap, LH 1
- M5x10 DIN 7500 CScrew 2
18 103 4067 Front support frame 1
- M10x25 ISO 7380Screw 4
- M6x16 DIN 912 Hexagon socket cap screw 2
- M6 DIN 985 Locking nut 2
19 523 4029 Sleeve 6
20 533 1029 Moving wheel 3
- M8x60 ISO 7380 Hexagon socket cap screw 3
- M8 DIN 125A Washer 3
- M8 DIN 985 Locking nut 3
21 533 4099 Moving wheel 2
22 653 132 83 Washer 4
- M8x50 DIN 7984 Hexagon socket cap screw 2
- M8 DIN 985 Locking nut 2
23 533 4094 Rubber bumper 2
- M6x30 DIN 7991 Screw 2
24 653 4062 Screw 2
25 502 1027 Cable fastener 1
- M4x8 DIN 7500 CScrew 1
26 533 4095 Stand foot, L 1
- 533 4096 Stand foot, R 1
- M6 DIN 125 Washer 4
- M6x20 ISO 7380 Hexagon socket cap screw 4
27 533 4047 Through-leading rubber 1
29 103 4066 Fulcrum bar 2
- M8x45 ISO 7380 Hexagon socket cap screw 2
- M8 DIN 985 Locking nut 2
30 343 4020 Incline structure frame axle 1
- M8 DIN 9021 Washer 2
- M8x14 ISO 7380 Hexagon socket cap screw 2
31 523 4060 Fulcrum bar sleeve 2
32 533 4107 Gas spring plastic sleeve 4
33 103 4065 Incline structure frame (incl.34) 1
35 533 4101 Bushing slide 2
34 533 4100 Plain bearing 2
37 533 4106 Plastic sleeve 4
- M8 DIN 985 Locking nut 2
- M8x45 ISO 7380 Hexagon socket cap screw 2
40 163 4009 Gas spring 1
41 163 4010 Gas spring lockable 1
- M8x45 ISO 7380 Hexagon socket cap screw 2
- M8 DIN 985 Locking nut 2
42 173 4095 Rear roller cover 2
- M6x20 ISO 7380 Hexagon socket cap screw 4
44 813 4034 Lift motor 1
45 653 4057 Screw 2
46 343 4008 Axle 1
- 10 DIN 471 Retaining 2
47 173 4096 Front roller cover 1
- M5x16 ISO 7380 Hexagon socket cap screw 4
49 403 4140 Power board, 230V 1
- 403 4141 Power board, 110V 1
- M4x8 DIN 7500 C Screw 4
50 503 4072 Motor bracket 1
- M8x20 DIN 912 Screw 2
51 652 133 74 Washer 5
- M8x14 ISO 7380 Hexagon socket cap screw 4
- M8x40 DIN 912 Screw 1
- M8x25 DIN 912 Screw
52 813 4032 Motor 2 HP 230V, (incl.53,54,56) 1
- 813 4033 Motor 2 HP 110V, (incl.53,54,56) 1
- M5 DIN 6798 I Star washer 1
- M4x8 DIN 7500 C Screw 1
74 173 4094 Motor cover 1
- M5x16 ISO 7380 Hexagon socket cap screw 4
76 403 4134 EU Power cable 1
- 403 4134 USA Power cable 1
- 403 4134 GB Power cable 1
- 403 4134 ISR Power cable 1
- 403 4134 SUI Power cable 1
- 403 4134 AUS Power cable 1
77 423 4119 Lable set 1
* 553 4026 Assembly kit (incl *) 1
* 556 031 00 Hex wrench, 5mm 1
* 556 032 00 Hex wrench, 6mm 1
* 563 4005 T-Lube S 1
- 553 0017 Screw set 1
- 453 202 Transmitter belt 1
- 583 4031 Owner s manual 1
PROFILES

bar
| Hill Run / Profile 3 | km/h + % | | --------------------- | -------- | | 1 | 5.0 | | 2 | 6.0 | | 3 | 2.0 | | 4 | 3.0 | | 5 | 5.0 | | 6 | 5.0 | | 7 | 6.0 | | 8 | 1.0 | | 9 | 3.0 | | 10 | 5.0 | | 11 | 6.0 | | 12 | 2.0 | | 13 | 3.0 | | 14 | 5.0 | | 15 | 4.0 | | 16 | 5.0 | | 17 | 2.0 | | 18 | 4.0 | | 19 | 3.0 | | 20 | 1.0 |
bar
| Rolling Hills / Profile 4 | km/h + % | | ------------------------- | -------- | | 1 | 6.5 | | 2 | 6.5 | | 3 | 6.5 | | 4 | 7.0 | | 5 | 7.0 | | 6 | 7.0 | | 7 | 7.0 | | 8 | 6.5 | | 9 | 6.5 | | 10 | 6.5 | | 11 | 5.0 | | 12 | 7.0 | | 13 | 7.0 | | 14 | 7.0 | | 15 | 7.0 | | 16 | 7.0 | | 17 | 7.0 | | 18 | 6.5 | | 19 | 6.5 | | 20 | 6.5 |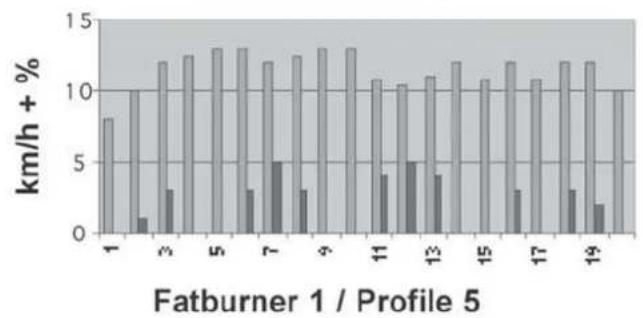
bar
| Fatburner 1 / Profile 5 | km/h + % | | ---------------------- | -------- | | 1 | 8 | | 2 | 10 | | 3 | 3 | | 4 | 12 | | 5 | 13 | | 6 | 13 | | 7 | 5 | | 8 | 3 | | 9 | 13 | | 10 | 13 | | 11 | 4 | | 12 | 5 | | 13 | 4 | | 14 | 12 | | 15 | 11 | | 16 | 3 | | 17 | 12 | | 18 | 3 | | 19 | 2 |
bar
Fatburner 2 / Profile 6 | Category | Value (%) | |---|---| | 1 | 1.0 | | 2 | 1.0 | | 3 | 2.0 | | 4 | 3.0 | | 5 | 2.0 | | 6 | 3.0 | | 7 | 1.0 | | 8 | 2.0 | | 9 | 3.0 | | 10 | 5.0 | | 11 | 3.0 | | 12 | 4.0 | | 13 | 2.0 | | 14 | 1.0 | | 15 | 3.0 | | 16 | 5.0 | | 17 | 2.0 | | 18 | 3.0 | | 19 | 1.0 | | 20 | 1.0 |
bar
| Cardio / Profile 7 | BPM | | ------------------ | ---- | | 1 | 100 | | 2 | 105 | | 3 | 108 | | 4 | 110 | | 5 | 112 | | 6 | 115 | | 7 | 120 | | 8 | 122 | | 9 | 118 | | 10 | 115 | | 11 | 120 | | 12 | 122 | | 13 | 125 | | 14 | 123 | | 15 | 120 | | 16 | 118 | | 17 | 115 | | 18 | 112 | | 19 | 110 | | 20 | 108 |
bar
| Fit / Profile 8 | BPM | | --------------- | ---- | | 1 | 105 | | 2 | 115 | | 3 | 120 | | 4 | 125 | | 5 | 125 | | 6 | 120 | | 7 | 125 | | 8 | 130 | | 9 | 140 | | 10 | 130 | | 11 | 125 | | 12 | 120 | | 13 | 125 | | 14 | 130 | | 15 | 125 | | 16 | 130 | | 17 | 125 | | 18 | 120 | | 19 | 115 | | 20 | 110 |
bar
| Category | BPM | |---|---| | 1 | 105 | | 2 | 112 | | 3 | 124 | | 4 | 128 | | 5 | 132 | | 6 | 134 | | 7 | 138 | | 8 | 146 | | 9 | 138 | | 10 | 146 | | 11 | 138 | | 12 | 146 | | 13 | 146 | | 14 | 146 | | 15 | 140 | | 16 | 138 | | 17 | 132 | | 18 | 128 | | 19 | 122 | | 20 | 112 |
bar
| Category | BPM | |---|---| | 1 | 108 | | 2 | 117 | | 3 | 126 | | 4 | 133 | | 5 | 139 | | 6 | 148 | | 7 | 149 | | 8 | 143 | | 9 | 143 | | 10 | 150 | | 11 | 150 | | 12 | 148 | | 13 | 148 | | 14 | 150 | | 15 | 150 | | 16 | 146 | | 17 | 138 | | 18 | 129 | | 19 | 122 | | 20 | 114 |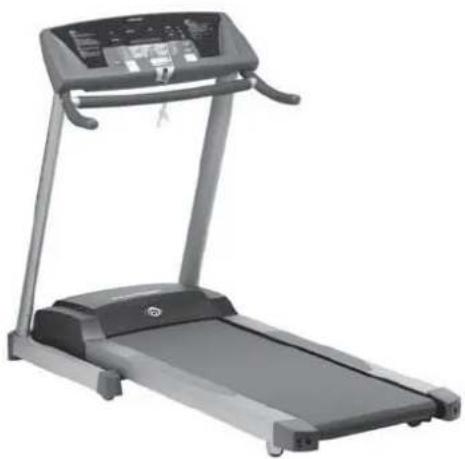
natural_image
R displayed on a treadmill with control panel and display screen (no visible text or symbols)TUNTURI®
THE MOTOR - it's you.
TUNTURI OY LTD
P.O.BOX 750, FIN-20361
Turku, Finland
Tel. +358 (0)2 513 31
Fax +358 (0)2 513 3323
www.tunturi.com
- IMPORTANT SAFETY INSTRUCTIONS
- WARNING
- SAVE THESE INSTRUCTIONS!
- WELCOME TO THE WORLD OF TUNTURI EXERCISING!
- ASSEMBLY
- HORIZONTAL HANDLEBAR
- CONSOLE
- SAFETY KEY
- POWER CORD AND
- GROUNDING INSTRUCTIONS
- DANGER! Improper
- BASICS ON EXERCISING
- ABOUT THE EXERCISE ENVIRONMENT
- ABOUT USING THE EQUIPMENT
- BEGINNING AN EXERCISE SESSION
- FINISHING AN EXERCISE SESSION
- HEART RATE
- - 0,7 X AGE
- FUNCTION KEYS
- START
- SPEED CONTROL KEYS (Rabbit / Turtle)
- ELEVATION CONTROL KEYS
- ARROW KEYS
- STOP / PAUSE / RESET
- SELECT
- ENTER
- MEMORY
- PSC
- SET
- DISPLAYS
- KCAL (estimated energy consumption)
- ELEVATION
- DISTANCE
- SPEED
- GRAPHIC / TEXT DISPLAY
- ENTERING USER DETAILS
- POSITION SPEED CONTROL (PSC)
- PSC SETTINGS
- TRAINING WITH PSC
- CHOOSING AN EXERCISE
- MANUAL EXERCISE
- QUICK START
- STARTING WITH THE USER DETAILS SETUP
- HEART RATE CONTROLLED
- EXERCISE
- FITNESS TESTS
- KM WALKING TEST
- BEGINNING THE WALKING TEST:
- PERFORMING THE WALKING TEST:
- COOPER TEST
- PERFORMING THE COOPER TEST:
- EXERCISE PROFILES
- PROFILES
- MEMORY FUNCTION
- SAVING YOUR OWN PROFILE:
- USING YOUR OWN PROFILE:
- RACE FUNCTION
- MAINTENANCE
- CLEANING AND LUBRICATING THE TREADMILL
- ALIGNING THE RUNNING BELT
- ADJUSTING THE BELT TENSION
- MALFUNCTIONS
- ERROR CODES
- MAINTENANCE CODE
- MOVING AND STORAGE
- TECHNICAL DATA
- T60F
- TUNTURI®
Brand : TUNTURI
Model : T60F
Category : Treadmills