
G-Shock MRG-G1000D-1ADR - Wristwatch CASIO - Free user manual and instructions
Find the device manual for free G-Shock MRG-G1000D-1ADR CASIO in PDF.


| Product Type | Analog-Digital Wristwatch |
| Model Number | MRG-G1000D-1ADR |
| Brand | Casio G-Shock MR-G |
| Case Material | Titanium with diamond-like carbon coating |
| Crystal | Sapphire crystal with anti-reflective coating |
| Band Material | Titanium |
| Dimensions (mm) | 54.7 × 49.8 × 16.5 |
| Weight | 153 g |
| Water Resistance | 200 meters (20 bar) |
| Power Source | Tough Solar (solar-charging system) |
| Battery | Rechargeable lithium-ion battery, not user-replaceable |
| Accuracy | ±15 seconds per month (without radio signal) |
| Timekeeping Features | Radio-controlled (Multi-Band 6); Bluetooth smartphone link; world time (29 time zones) |
| Stopwatch | 1/1000 second, up to 24 hours |
| Countdown Timer | Up to 24 hours |
| Alarm | 5 daily alarms (with snooze), hourly time signal |
| Other Functions | Full auto-calendar; dual LED light; hand home position correction; power saving mode |
| Connectivity | Bluetooth Smart (iOS/Android) via G-Shock Connected app |
| Care and Cleaning | Wipe with a soft, dry cloth. Avoid solvents and harsh chemicals. |
| Safety Precautions | Not intended for saturation diving; avoid impact on glass and buttons |
| Spare Parts and Repairability | Contact Casio service center; battery replacement by authorized technician |
| General Information | Made in Japan; limited lifetime warranty |
Frequently Asked Questions - G-Shock MRG-G1000D-1ADR CASIO
User questions about G-Shock MRG-G1000D-1ADR CASIO
0 question about this device. Answer the ones you know or ask your own.
Ask a new question about this device
Download the instructions for your Wristwatch in PDF format for free! Find your manual G-Shock MRG-G1000D-1ADR - CASIO and take your electronic device back in hand. On this page are published all the documents necessary for the use of your device. G-Shock MRG-G1000D-1ADR by CASIO.
USER MANUAL G-Shock MRG-G1000D-1ADR CASIO
Operation Guide 5411
CASIO®
Basic Operations
This section provides an overview of the watch and its operations.
Note
- The illustrations included in this manual have been created to facilitate explanation. An illustration may differ somewhat from the item it represents.
General Guide
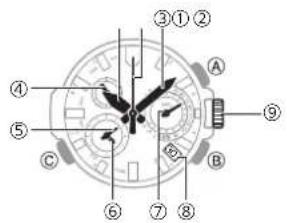
① Hour hand
② Second hand
③ Minute hand
④ 24-hour hand
⑤ Small minute hand
⑥ Small hour hand
⑦ Mode hand
⑧ Day indicator
⑨ Crown
Watch Face Items
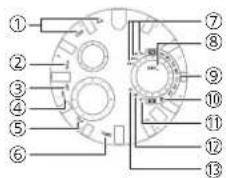
① Signal receive result
② Alarm off
③ Alarm on
④ Time calibration reception in progress
⑤ GPS signal time information and position information acquisition in progress
⑥ GPS signal time information reception in progress
⑦ Summer time setting
⑧ Approximate latitude (N side: North latitude, S side: South latitude)
⑨ Day of the week
⑩ Airplane Mode
⑪ Stopwatch Mode
⑫ Timer Mode
⑬ Alarm Mode
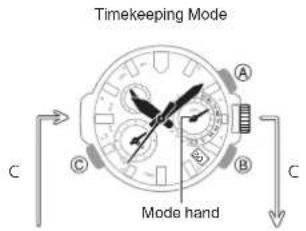
Navigating Between Modes
Your watch has four modes.
You tell which mode the watch is currently in by checking the position of the mode hand.
• Timekeeping Mode (normal timekeeping): Current day of the week
- Stopwatch Mode: ST (STW)
- Timer Mode: TR
- Alarm Mode: AL
Alarm Mode
Stopwatch Mode
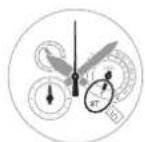
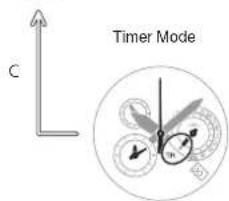
Use the (C) button to navigate between modes.
- Hold down (C) for at least two seconds to return to the Timekeeping Mode.
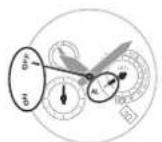
- Holding down (C) for four seconds or longer will enter or exit the Airplane Mode. The mode hand points to while the watch is in the Airplane Mode.
Using the Watch on an Aircraft
Using the Crown
The watch's crown is a screw-in (screw lock) type. To use the crown, you first need to rotate it towards you (leftwards) to loosen it.
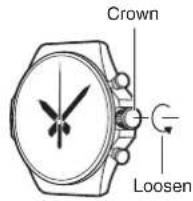
Important!
• To prevent loss of water resistance and/or damage due to impact, be sure to push the crown in and lock it when not in use.
- When pushing the crown back in, take care not to apply too much force.
● Fast Forward/Fast Reverse
flowchart
graph LR
    A["Normal position"] --> B["First click"]
    B --> C["Crown"]
    D["Second click"] --> E["First click"]
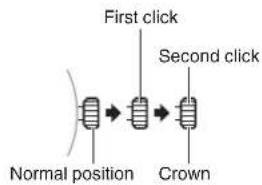
After pulling out the crown to the first or second click, rotating it quickly in succession in either direction will start a fast forward or fast reverse operation. While a fast forward operation is in progress, quickly rotating the crown in succession again will increase the speed even further.
- The fast reverse operation speed is fixed and cannot be changed.
● Stopping Fast Forward/Fast Reverse
Rotate the crown in the direction opposite that of the ongoing operation or press any button.
Note
- If you do not perform any operation for about two minutes after pulling out the crown, crown operations will automatically become disabled. If that happens, push the crown back in and then pull it out again.
Operation Guide 5411
CASIO®
Solar Charging
What is solar charging?
This watch runs on power supplied from a rechargeable (secondary) battery that is charged by a solar panel. The solar panel is integrated into the face of the watch, and power is generated whenever the face is exposed to light.
• This watch uses a special rechargeable (secondary) battery.
- The watch's battery will not charge if the watch's temperature is less than approximately -10^ (14°F) or greater than approximately 60^ (140°F).
- Over-discharge will occur if the watch is not charged within approximately three months after it stops operation due to low battery power. Charging may not be possible after over-discharge occurs.
Charging the Watch
When you are not wearing the watch, put it in a location where it is exposed to bright light.
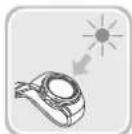
While you are wearing the watch, make sure that its face (solar panel) is not blocked from the light by the sleeve of your clothing. Power generation efficiency is reduced even when the face of the watch is blocked only partially.
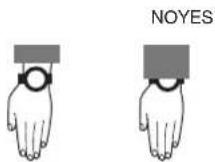
Important!
- If the second hand stops for some time after the watch is continuously exposed to light, it could mean that charging is not possible due to over-discharge. Request chargeable (secondary) battery replacement by your original retailer or authorized CASIO service center.
- Depending on light intensity and local conditions, the watch may become hot to the touch when exposed to light for charging. Take care to avoid burn injury after charging. Also, avoid charging the watch under high-temperature conditions like the ones described below.
On the dashboard of a vehicle parked in the sun
Nearan incandescent light bulb or other source of heat - Under direct sunlight or in other hot areas for long periods
Note
- Exposing the watch face to light after the battery goes dead will cause the second hand to revolve counterclockwise until it stops at second 57. This indicates charging has started.
- A fully charged watch can operate for approximately seven months without further charging. Watch operation will stop approximately 20 days after the battery goes low.
Charging Time Guidelines
The table below shows guidelines for approximate charging times.
Required Charging Time for 1-day Use
| Light Intensity | Approximate Charging Time | |
| High↓Low | 1 | 8 minutes |
| 2 | 30 minutes | |
| 3 | 48 minutes | |
| 4 | 8 hours | |
Time Required to Achieve Next Charge Level
| Light Intensity | Approximate Charging Time | ||
| Charge Level 1 | Charge Level 2 | ||
| High ↓ Low | 1 | 8 hours 37 hours | |
| 2 | 26 hours 139 hours | ||
| 3 | 40 hours 225 hours | ||
| 4 | 449 hours - | ||
Light Intensity
① Sunny day, outdoors (50,000 lux)
② Sunny day, near a window (10,000 lux)
③ Overcast day, near a window (5,000 lux)
④ Indoor fluorescent lighting (500 lux)
Charge Level 1 :
Time from dead battery until hand movement starts
Charge Level 2 :
Time from hand movement starts until a full charge
Note
• Actual charging time depends on the local charging environment.
| Checking the Charge Level
The charge level is indicated by watch hand movement. Functions become disabled as battery power goes low.
Important!
- Should battery go low or go dead, expose the face (solar panel) to light as soon as possible.
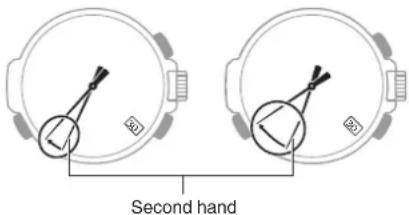
Immediately after pressing (C) to enter to the Timekeeping Mode, the second hand will move to one of the positions below to indicate the battery charge level.
● Battery Charged
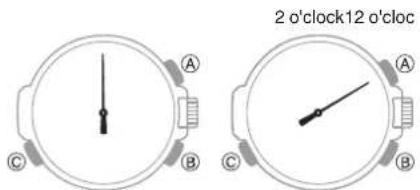
● Low Battery Power
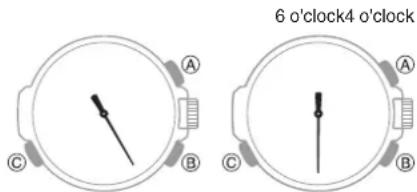
Also, the second hand jumps at two-second or five-second intervals.
Two-second intervals Five-second intervals
-
Above right figures indicate a lower battery charge.
-
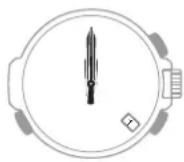
Dead Battery
All hands are stopped.
Power Saving Function
Leaving the watch in a dark location for about one hour between the hours of 10 p.m. and 6 a.m. will cause the second hand to stop, and the watch will enter Level 1 power saving. If the watch is left in this condition for six or seven days, all hands will stop and the watch will enter Level 2 power saving.
Level 1 :
Basic timekeeping functions are operational.
Level 2 :
Only the day indicator is operational.
Note
- Note that the watch also may enter the power saving state if its face is blocked from light by your sleeve while you are wearing it.
- The watch will enter power saving from the Timekeeping Mode only.
● Recovering from Power Saving Operation
Press any button or place the watch in a well-lit area to recover from power saving.
Time Adjustment (GPS, Time Calibration Signal)
The watch's time, day, and Home City (time zone) settings can be configured in accordance with a received GPS signal or time calibration signal.
• GPS signal position information: Used to update Home City (time zone), time, and day settings.
• GPS signal time information: Used to update time and day settings.
- Time calibration signal: Used to update time and day settings.
Important!
- Before trying to receive GPS signal time information and/or a time calibration signal, first use GPS to acquire position information and configure Home Time (time zone) settings.
- Put the watch into the Airplane Mode whenever you are inside an aircraft or in any other area where radio wave reception is prohibited or restricted.
Using the Watch on an Aircraft
Note
- Areas where time calibration signal reception is supported are limited. When the watch in an area where time calibration signal reception is not supported, adjust time and day settings based on GPS signals.
Time Calibration Signal Reception Ranges
Time Adjustment Using GPS
Appropriate Signal Reception Location
GPS signal reception is possible outdoors where the sky is visible and not blocked by buildings, trees, or other objects.

natural_image
Silhouette of a person using a smartwatch with satellite signal waves and cityscape background (no text or symbols)Note
• In areas where reception is poor, keep the watch face oriented upwards and do not move the watch.
- When the watch is set up for auto receive, take care to avoid covering the watch face with the sleeve of your clothing.
• GPS signal reception is not possible in the areas described below.
- Where the sky is not visible
- Indoors (Reception may be possible near a window.)
- Near wireless communication equipment or other devices that generate magnetism.
- You may experience GPS signal reception problems in the areas described below.
Where the view of the sky above is narrow
Near trees or buildings
- Near a train station, airport, or other congested areas
Acquiring GPS Position Information Manually
You can use a button operation to acquire GPS position information and adjust your Home City (time zone), time, and day settings in accordance with your current location.
Note
• GPS signal reception requires large amounts of power. Perform it only when necessary.
Getting ready
The receive operation is performed only while the watch is in the Timekeeping Mode (normal timekeeping).
- Normally the mode hand points to the current day of the week.
Navigating Between Modes
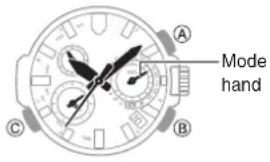
- Move to a location appropriate for signal reception and orient the watch so its display is pointed straight up at the sky.
-
Hold down (B) for at least three seconds. Release the button as soon as the second hand points to "T+P".
-
The second hand will move in the following sequence: "Y(YES)" or "N(NO)" → "T (TIME)" → "T+P".
- This indicates that position information acquisition has started. The mode hand will rotate a number of times while information acquisition is in progress.
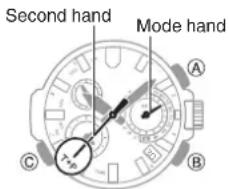
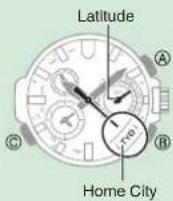
- If position information acquisition is successful, the second hand will move to "Y(YES)" and then the watch will automatically adjust its time and day settings. The watch will also display the acquired Home City (time zone) and the approximate latitude of your current position.
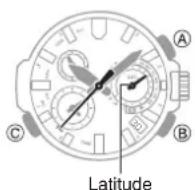
- If position information acquisition fails for some reason, the second hand will move to "N(NO)" and then the watch will indicate the current time and day without adjusting them.
Note
- Reception takes anywhere from about 30 seconds to about two minutes.
- It can take as long as 13 minutes when leap second information is included.
- You may experience location information acquisition problems when you are in the vicinity of a time zone borderline.
The watch's time and day will not be indicated correctly if the Home City (Time Zone) setting is not right for your location. Perform position information acquisition in a representative city in your time zone or in a location that is well within the time zone. Or you can perform a time information receive operation to adjust time and day settings after configuring Home City (Time Zone) and summer time settings manually.
Selecting a Time Zone
Acquiring GPS Time Information Manually
Acquiring GPS Time Information Manually
You can use a button operation on the watch to receive GPS signal time information. When the receive operation is successful, the watch's Home City (time zone), day, and time settings will be adjusted accordingly.
Note
• GPS signal reception requires large amounts of power. Perform it only when necessary.
Getting ready
The receive operation is performed only while the watch is in the Timekeeping Mode (normal timekeeping).
- Normally the mode hand points to the current day of the week.
Navigating Between Modes
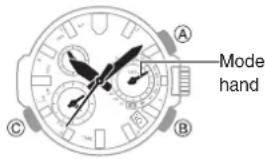
- Move to a location appropriate for signal reception and orient the watch so its display is pointed straight up at the sky.
- Hold down (B) for at least one second. Release the button as soon as the second hand points to "T (TIME)".
- The second hand will move in the following sequence: "Y(YES)" or "N(NO)" "T(TIME)".
- This indicates that time information receipt has started.
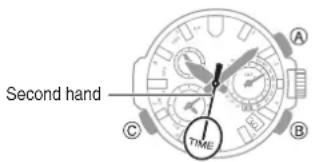
- If information acquisition is successful, the second hand will move to "Y(YES)", and then the watch will automatically adjust its time and day settings.
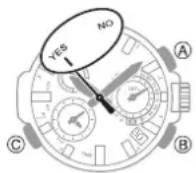
- If reception fails for some reason, the second hand will move to "N(NO)" and then the watch will indicate the current time and day without adjusting them.
Note
- Reception takes anywhere from about seven seconds to about one minute.
- It can take as long as 13 minutes when leap second information is included.
Auto GPS Signal Receive
When the conditions below are satisfied, the watch will automatically receive a GPS signal. If any time information receive is successful, the watch will no longer attempt to receive a signal for the rest of the day.
● Time information
- Watch is in the Timekeeping Mode (normal timekeeping).
- Currenttime is between 6:00 a.m. and 10:00 p.m.
• Light (near a window on a clear day) continually shining on the face of the watch for about one to two minutes. - Time calibration signal reception was not successful during the previous evening.
Note
• The time information receive operation takes anywhere from about seven seconds to one minute.
• The receive operation can take as long as 13 minutes when leap second information is included.
Leap Second Reception
GPS signal reception each year on June 1 or later and on December 1 or later also receives leap second information.
Note
- It can take as long as 13 minutes to complete leap second information reception.
- Leap second information receive is repeated until information receipt is complete.
- Once leap second information receive is complete, the watch will not make any attempt to receive it again until the following June 1 or December 1.
Time Adjustment Using a Time Calibration Signal
Appropriate Signal Reception Location
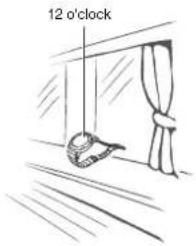
A time calibration signal can be received while the watch is near a window.
- Keep metal objects away from the watch.
- Do not move the watch.
- Do not perform any operation on the watch.
Note
- You may experience time calibration signal reception problems in the areas described below.
- Among or near buildings
- While riding in a vehicle
- Near household appliances, office machines, mobile phones, etc.
- On a construction site, in an airport, or any other location where radio wave interference occurs
- Near high-voltage lines
In mountainous areas or behind a mountain
Time Calibration Signal Reception Ranges
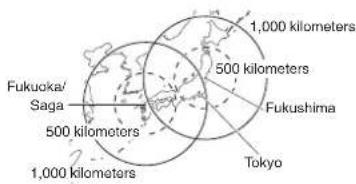
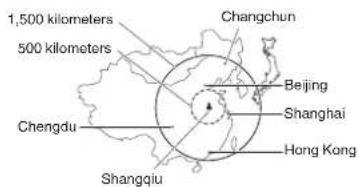
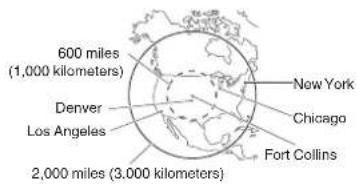
Time calibration signal reception is supported in the areas shown below.
● Japan Time Calibration Signal (JJY)
● Chinese Time Calibration Signal (BPC)
● U.S. Time Calibration Signal (WWVB)
● U.K. (MSF) and German (DCF77) Time Calibration Signal
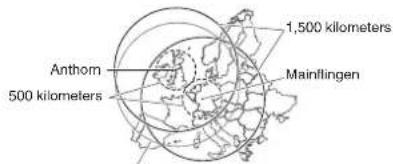
The Anthom signal is receivable within this area.
Note
- Even if you are within the normal reception range of a time calibration signal, reception may be made impossible by the following factors: geographic contours, weather, the season, the time of day, wireless noise.
Auto Time Calibration Signal Receive
An automatic time calibration signal receive operation is performed and the time and day settings are adjusted between midnight and 5:00 a.m. Once a signal receive operation is successful, no more auto receive operations are performed that day.
The receive operation is performed only while the watch is in the Timekeeping Mode (normal timekeeping).
• Normally the mode hand points to the current day of the week.
Navigating Between Modes
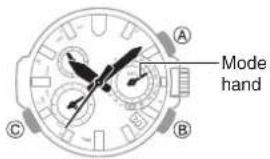
Place the watch near a window or some other location appropriate for signal reception.
- The second hand points to "RC" while time calibration reception in progress.
- When the receive operation is successful, the time and day settings will be adjusted automatically.
Note
- Reception takes anywhere from about two minutes to about 10 minutes. It can take as long as 20 minutes.
Checking the Receive Operation Result
You can use the procedure below to check the result of the last GPS or time calibration signal receive operation.
Getting ready
Enter the Timekeeping Mode.
Navigating Between Modes
1. Press (B).
The second hand will move and indicate the receive operation result.
"Y (YES)": Receive successful "N (NO)": Receive failed
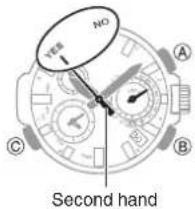
- Press (B) or do not perform any operation for one or two seconds to return to the current time.
Note
- Even if there was a successful receive operation, the second hand will point to "N(NO)" if you adjusted the time setting manually.
- If you do not perform any watch operation for about one or two secondsafter position information is acquired, the watch will display the acquired Home City (time zone) and the rough latitude of your current position.
Signal Reception Precautions
• GPS signal and time calibration signal reception will not be possible under any of the watch conditions described below.
- While battery power is low - While the watch is in the Airplane Mode, Stopwatch Mode, Timer Mode, or Alarm Mode
- When power saving is at Level 2 (GPS signal reception also is not possible at Level 1.)
- While the crown is pulled out - While a stopwatch elapsed time measurement and/or timer countdown operation is in progress - While the temperature of the watch is less than approximately -10°C (14°F) or greater than approximately 60°C (140°F)
- Note that an internal decoding process the watch performs after it receives a signal may cause the time setting to be slightly off (by less than one second).
- If the receive operation is successful, the time and day settings will be adjusted automatically in accordance with the Home City (time zone) and summer time settings. Summer time will not be applied correctly in the cases described below.
- When the summer time start date and time, end date and time, or other rules are changed by authorities
- When position information cannot be acquired correctly
- When position information can be acquired, but it is wrong because the watch is located near a time zone boundary, etc.
• As of December 2013, China does not observe summer time. If China starts to observe summer time in the future, the time displayed by the watch for China may not be correct.
- When the watch is unable to adjust its time in accordance with a calibration signal for some reason, average timekeeping accuracy is within ± 15 seconds per month.
Operation Guide 5411
CASIO®
Using the Watch on an Aircraft
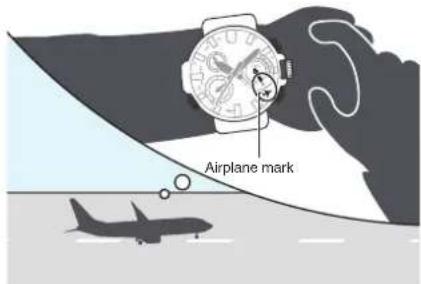
Enter the Airplane Mode when in an aircraft or anywhere else where GPS or time calibration signal reception is restricted.
Entering the Watch Airplane Mode
Holding down (C) for about four seconds to enter the watch's Airplane Mode. The mode hand will move to the Airplane mark.
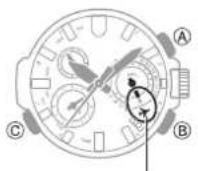
Airplane mark
• Each time (C) is held down for about four seconds, the watch enters or exits the Airplane Mode.
World Time
World Time lets you look up the current time in any one of 27 cities and 40 time zones around the globe.
Getting ready
Enter the Timekeeping Mode.
Navigating Between Modes
Checking the Time in Another Zone
- Pull out the crown to the first click.
The second hand will move to the time zone of the currently selected World Time City.
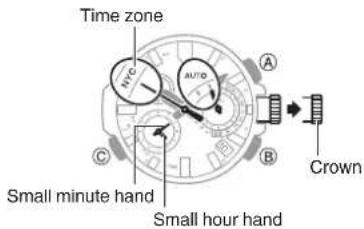
- Rotate the crown to change the time zone.
The small hour hand and small minute hand indicate the current time in the selected time zone.
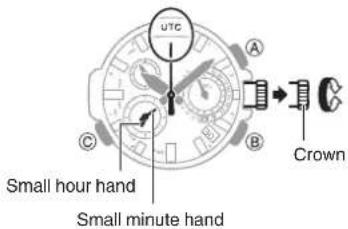
- Hold down (B) for about one second to display UTC (Coordinated Universal Time) time.
- Hold down the (A) button for about one second to change the summer time setting.
• Each press of (A) cycles through available settings in the sequence shown below.
$$ " \mathrm{AT} (\mathrm{AUTO})" \rightarrow " \mathrm{STD}" \rightarrow " \mathrm{DST}" $$
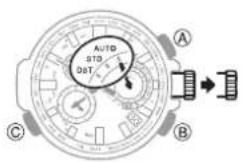
• "AT (AUTO)"
The watch switches between standard time and summer time automatically.
- "STD"
The watch always indicates standard time.
• "DST"
The watch always indicates summer time.
- Push the crown back in.
Note
- When a time zone for which there is no city name displayed is selected, use "STD" or "DST" for the summer time setting.
- You cannot switch between "STD" and "DST" while "UTC" is selected as the Home City (time zone).
Stopwatch
The stopwatch measures elapsed time in units of 1/20 (0.05) seconds up to 23 minutes, 59.95 seconds (24 minutes).
Getting ready
Enter the Stopwatch Mode.
Navigating Between Modes
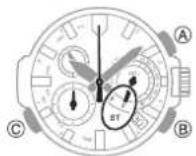
Interpreting Indicated Stopwatch Values
Example: When elapsed time is 10 minutes, 45.10 seconds
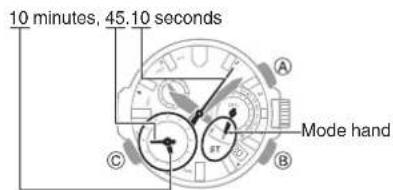
- In the Stopwatch Mode, the small hour hand indicates minutes, the small minute hand indicates seconds, and the second hand indicates 1/20 seconds.
- The hands complete a full rotation as follows: Small hour hand: 24 minutes, Small minute hand: 1 minute, Second hand: 1 second.
Measuring Elapsed Time
- Use the operations below to measure elapsed time.
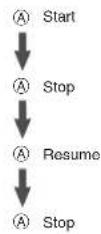
- The stopwatch 1/20 (0.05)-second hand will move for the first 30 seconds after an elapsed time measurement operation is started, and then stop. When the elapsed time measurement operation is stopped, the hand will move to the appropriate position to indicate the final 1/20 (0.05)-second count.
- After you are finished with an elapsed time measurement operation, press (B) to reset the stopwatch.
- Press (C) three times to return to the Timekeeping Mode.
Timer
The timer counts down from a start time specified by you. A beeper sounds when the end of the countdown is reached.
- The beeper is muted in the cases described below.
- When battery power is low
- When watch is at Level 2 power saving
Power Saving Function
Getting ready
Enter the Timer Mode.
Navigating Between Modes
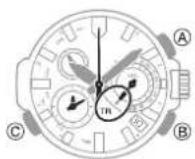
Setting the Timer Start Time
- Pull out the crown to the first click.
- Rotate the crown to change the countdown start time setting.
• The countdown start time can be set in 1-minute units up to 24 hours.
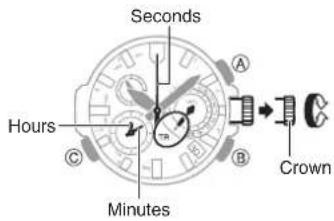
- Push the crown back in.
Note
- When the small hour hand and small minute hand are at 12 o'clock, a countdown start time of 24 hours is specified.
Using the Timer
- Press (A) to start the countdown.
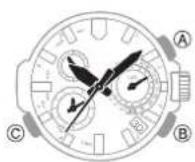
A beeper will sound for 10 seconds to let you know when the end of a countdown is reached.
- To pause an ongoing countdown, press (A). To reset a paused countdown to the start time, press (B).
- Press any button to stop the tone.
- Press (C) twice to return to the Timekeeping Mode.
Alarms
The watch will beep when the alarm time is reached.
- The beeper is muted in the cases described below.
- When battery power is low
- When watch is at Level 2 power saving
Power Saving Function
Getting ready
Enter the Alarm Mode.
Navigating Between Modes
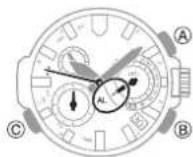
Configuring Alarm Settings
- Pull out the crown to the first click. This turns on the alarm.
- Rotate the crown to change the alarm time setting.
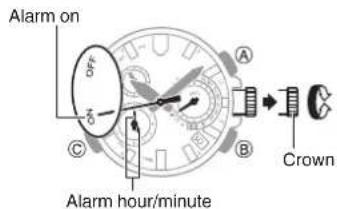
-
Push the crown back in.
-
Press (C) once to return to the Timekeeping Mode.
Note
• A beeper will sound for 10 seconds to let you know when the alarm time is reached.
Enabling/Disabling the Alarm
Press (B) to toggle the alarm between on and off.
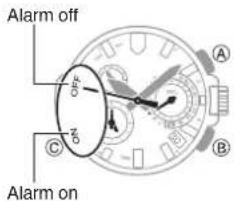
Stopping an Alarm
While the alarm is sounding, press any button to stop it.
Illumination Light
The watch has an LED light that you can turn on for reading in the dark. When you turn on the LED light, it gradually becomes brighter. After about two seconds, it gradually becomes dimmer until it turns off.
Getting ready
Enter the Timekeeping Mode or Alarm Mode.
Navigating Between Modes
Turning On the Illumination Light
Pressing (A) turns on the light.
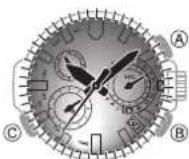
- The LED light will turn off automatically if the alarm starts to sound.
- The LED light is disabled while the hands are moving at high speed.
Adjusting Time Settings Manually
You can use the procedure below to adjust the watch's time and day settings when GPS and time calibration signal reception is not possible for some reason.
Selecting a Time Zone
Use the procedure in this section to select a city (time zone) to use as your Home City. If you are in an area that observes summer time, you can also enable or disable summer time.
Note
- The initial factory default summer time setting for all cities (time zones) is "AT (AUTO)". With this setting, the watch automatically switches between summer time and standard time as required. The "AT (AUTO)" setting lets you use the watch without worrying about changing the summer time setting.
- When performing a manual operation to select a time zone for which there is no city name displayed, use "STD" or "DST" for the summer time setting.
- In the cases described below, receiving GPS position information will automatically cause "AT (AUTO)" to be selected for the summer time setting.
When the time zone of the current receive operation is different from the watch's time zone setting prior to the receive operation.
- When the time zone is unchanged, but the acquired position information is for a geographic area with different summer time rules (start date, end date)
- Pull out the crown to the second click. The second hand will move to the currently selected time zone.
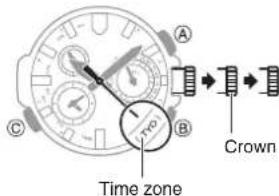
-
Rotate the crown to change the time zone.
-
You can also select a time zone whose name is not indicated on the face of the watch.
-
For information about time zones, see the "City (Time Zone) List".
-
Hold down (A) for about one second to change the summer time setting.
• Each press of (A) cycles through available settings in the sequence shown below.
$$ " A T (A U T O)" \rightarrow " S T D" \rightarrow " D S T" $$
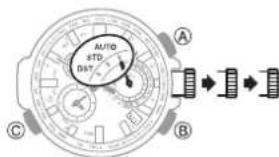
- "AT (AUTO)"
The watch switches between standard time and summer time automatically.
- "STD"
The watch always indicates standard time.
• "DST"
The watch always indicates summer time.
- Push the crown back in to its normal position.
Summer Time
Summer time, which is also known as Daylight Saving Time (DST), advances the time setting one hour, 30 minutes, or some other amount of time from standard time (STD) during the summer months. Whether or not and how summer time is used depends on your country or local area. Summer time is not used in some countries and local areas.
Adjusting the Time and Day Setting
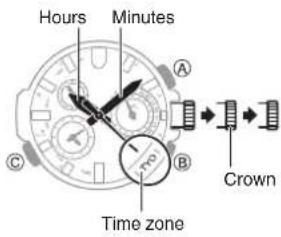
- Pull out the crown to the second click. The second hand will move to the currently selected time zone.
-
Hold down (C) for about 10 seconds. This causes the second hand to move to 12 o'clock and enables the hour and minute setting operation.
-
Rotate the crown to adjust the hour and minute settings.
-
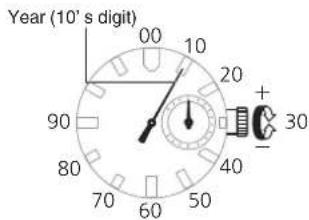
Press (C). This enables the year 10's digit setting operation.
-
Rotate the crown to move the second hand to the desired setting for the year ten's digit.
-
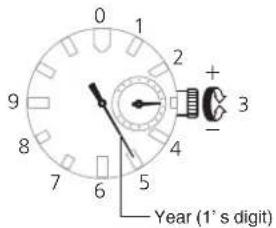
Press (C).
This enables the year one's digit setting operation.
-
Rotate the crown to move the second hand to the desired setting for the year one's digit.
-
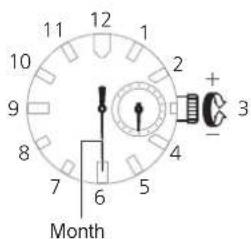
Press (C).
This changes to the month setting operation.
-
Rotate the crown to change the month.
-
Press (C).
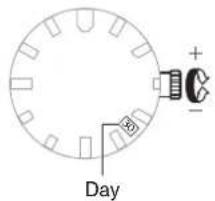
This changes to the day setting operation.
-
Rotate the crown to change the day.
-
On a time signal at the top of a minute, push the crown back in.
Adjusting Hand and Day Indicator Alignment
Strong magnetism or impact can cause the time indicated by the hands and the day indicator to go out of alignment. If this happens, adjust hand and day indicator alignment.
- The watch performs alignment of the hour hand, minute hand, second hand, and 24-hour hand automatically.
Adjusting Hand and Day Indicator Alignment
-
Pull out the crown to the second click.
-
Hold down (B) for about five seconds, until the second hand moves to 12 o'clock.
This will start auto alignment of the hour hand, minute hand, second hand, and 24-hour hand.
• After auto alignment is complete, the hands should be in the positions shown below.
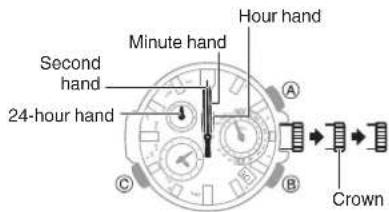
- If the 24-hour hand is off by 12 hours, hold down (A) for about two seconds. The 24-hour hand will move to 12 o'clock.
- Press (C).
Confirm that the small hour hand and small minute hand are stopped at 12 o'clock.
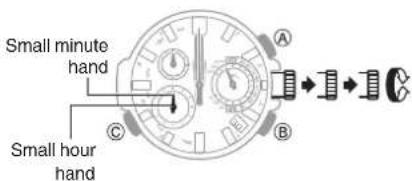
- If the small hour hand and small minute hand are not at 12 o'clock, rotate the crown to align them correctly.
5. Press (C).
Confirm that the mode hand is stopped at 12 o'clock.
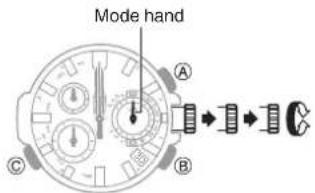
- If the mode hand is not at 12 o'clock, rotate the crown to align it correctly.
7. Press (C).
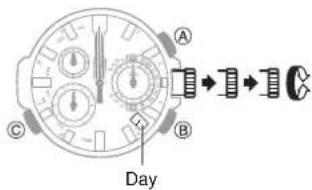
Confirm that the day indicator shows 1.
-
If 1 is not shown for the day, rotate the crown until 1 is shown for the day.
-
Push the crown back in.
Note
• Leaving the crown pulled out for more than approximately 30 minutes without performing any operation will automatically cause the adjustment operation to become disabled. If this happens, push the crown back in to its normal position and then pull it out again to restart the procedure from the beginning. Pushing the crown in to its normal position part way through the alignment procedure will cause the hands to return to their normal position. Any alignment you performed up to that point will be applied.
Moving To Another Time Zone
Use the procedure below to easily change day and time settings of the watch to a destination location.
- Any time you perform a GPS signal receive operation, the watch may try to acquire leap second information. A leap second information receive operation can take as long as 13 minutes. Make sure the watch is sufficiently charged before performing a GPS signal receive operation after you arrive at your destination.
● Prior to Takeoff
- Enter the watch's Airplane Mode when instructed to do so by airline personnel.
● After Arriving
- Exit the Airplane Mode.
- Perform a GPS signal position acquisition operation, which will adjust the watch's time setting to your current location.

natural_image
Silhouette of a person in a suit standing beside the Statue of Liberty silhouette against a city skyline background (no text or symbols)Using the Watch on an Aircraft
Acquiring GPS Position Information
Manually
Other Information
City (Time Zone) List
A time zone for which no city name is displayed by the watch is indicated in the table below by a hyphen (-) in the "City Code" column. The "City Name" column will contain the name of a representative city in that zone.
| City code | City Name | Second Hand Position | UTC Offset |
| UTC | Coordinated Universal Time | Second 0 0 | |
| LON | London Second 2 | 0 | |
| PAR | Paris Second 4 +1 | ||
| ATH | Athens Second 6 | +2 | |
| JED | Jeddah Second 8 | +3 | |
| - | (Tehran) Second 9 +3.5 | ||
| DXB | Dubai Second 10 | +4 | |
| - | (Kabul) Second 11 +4.5 | ||
| - | (Karachi) Second 12 | +5 | |
| DEL | Delhi Second 13 +5.5 | ||
| - | (Kathmandu) Second | 14 +5.75 | |
| DAC | Dhaka | Second 15 | +6 |
| - | (Yangon) | Second 16 +6.5 | |
| BKK | Bangkok | Second 17 +7 | |
| HKG | Hong Kong | Second 19 | +8 |
| - | (Eucla) | Second 21 +8.75 | |
| TYO | Tokyo | Second 22 | +9 |
| - | (Adelaide) | Second 23 +9.5 | |
| SYD | Sydney Second 24 | +10 | |
| - | (Lord Howe Island) | Second 25 | +10.5 |
| NOU | Noumea | Second 26 | +11 |
| - | (Norfolk Island) | Second 27 +11.5 | |
| WLG | Wellington | Second 28 +12 | |
| - | (Chatham Islands) | Second 30 | +12.75 |
| TBU | Nuku'alofa | Second 31 | +13 |
| CXI | Kiritimati | Second 33 +14 | |
| BAR | Baker Island | Second 36 -12 | |
| PPG | Pago Pago | Second 38 -11 | |
| HNL | Honolulu | Second 40 -10 | |
| - | (Marquesas Islands) | Second 41 | -9.5 |
| ANC | Anchorage | Second 42 | -9 |
| LAX | Los Angeles | Second 44 -8 | |
| DEN | Denver Second | 46 -7 | |
| CHI | Chicago | Second 48 | -6 |
Operation Guide 5411
CASIO®
| City code | City Name | Second Hand Position | UTC Offset |
| NYC New York Second 50 -5 | |||
| - (Caracas) Second 51 -4.5 | |||
| SCL Santiago Second 52 -4 | |||
| - (St. John's) Second 53 -3.5 | |||
| RIO | Rio de Janeiro | Second 54 -3 | |
| FEN | Fernando de Noronha | Second 56 -2 | |
| RAI Praia Second 58 -1 | |||
• The contents of the above table are current as of December 2013.
Summer Time Table
When "AT (AUTO)" is selected for a city that observes summer time, switching between standard time and summer time will be performed automatically at the timing shown in the table below.
Note
- If the summer time start and end dates for your current location have been changed from those indicated in the table, you will need switch between "STD" and "DST" manually.
- In the case of a time zone for which no city name is displayed, you can automatically switch between standard time and summer time by acquiring GPS position information.
| City Name | Summer Time Start | Summer Time End |
| London | 01:00, last Sunday in March | 02:00, last Sunday in October |
| Paris | 02:00, last Sunday in March | 03:00, last Sunday in October |
| Athens | 03:00, last Sunday in March | 04:00, last Sunday in October |
| Sydney | 02:00, first Sunday in October | 03:00, first Sunday in April |
| Wellington | 02:00, last Sunday in September | 03:00, first Sunday in April |
| Anchorage | 02:00, second Sunday in March | 02:00, first Sunday in November |
| Los Angeles | 02:00, second Sunday in March | 02:00, first Sunday in November |
| Denver | 02:00, second Sunday in March | 02:00, first Sunday in November |
| Chicago | 02:00, second Sunday in March | 02:00, first Sunday in November |
| New York | 02:00, second Sunday in March | 02:00, first Sunday in November |
| Santiago | 24:00, second Saturday in October | 24:00, second Saturday in March |
| Rio de Janeiro | 00:00, third Sunday in October | 00:00, third Sunday in February or 00:00, fourth Sunday in February |
- The contents of the above table are current as of December 2013.
Function Limitations
● How temperature affects watch functions
This functions below are disabled while the temperature of the watch is less than approximately -10^ ( 14^ ) or greater than approximately 60^ ( 140^ ).
• GPS signal and time calibration signal receive operation
- Solar charging
- Hand and day indicator alignment adjustment
Troubleshooting
Signal Reception (GPS)
Q1 The watch cannot perform a receive operation.
Is the watch's battery charged?
Signal reception is not possible while battery power is low. Keep the watch exposed to light until it recharges sufficiently.
Is the watch in the Timekeeping Mode (not Airplane Mode)?
Signal reception is possible only while the watch is in the Timekeeping Mode (not Airplane Mode).
After checking the above, the watch still cannot perform a receive operation.
GPS signal reception is not possible under the conditions described below.
- During power saving
• While the crown is pulled out - While the watch temperature is less than approximately -10^ (14°F) or more than approximately 60^ (140°F)
Q2 The second hand remains at "T+P" or "T(TIME)" during the signal receive operation.
The watch may be receiving leap second information.
Leap Second Reception
Operation Guide 5411
CASIO®
Q3 The signal receive operation always fails.
Is the watch in a location that is appropriate for signal reception?
Check your surroundings and move the watch to a location where signal reception is better.
Appropriate Signal Reception Location
Is the face of the watch pointed straight upwards at the sky?
Minimize movement of the watch while the receive operation is in progress.
When the watch is set up for auto receive, take care to avoid covering the watch face with the sleeve of your clothing.
An alarm started sounding while the receive operation was in progress.
Receive stops if an alarm operation starts while it is being performed. Disable the alarm.
Enabling/Disabling the Alarm
Q4 Signal reception should have been successful, but the watch's time and/or day is wrong.
Is your Home City (time zone) setting correct for your location?
Change your Home City (time zone) setting so it correctly indicates your location.
Acquiring GPS Position Information Manually
Selecting a Time Zone
After checking the above, the time and/or day settings is still wrong.
Adjust time and day settings manually.
Signal Reception (Time Calibration Signal)
Q1 The watch cannot perform a receive operation.
Is the watch's battery charged?
Signal reception is not possible while battery power is low. Keep the watch exposed to light until it recharges sufficiently.
Is the watch in the Timekeeping Mode (not Airplane Mode)?
Signal reception is possible only while the watch is in the Timekeeping Mode (not Airplane Mode).
Is your Home City (time zone) setting correct for your location?
The watch will not indicate the correct time if the Home City (time zone) setting is wrong. Change your Home City (time zone) setting so it correctly indicates your location.
Acquiring GPS Position Information Manually
Selecting a Time Zone
After checking the above, the watch still cannot perform a receive operation.
Time calibration signal reception is not possible under the conditions described below.
- When watch is at Level 2 power saving - When the crown is pulled out
- While the watch temperature is less than approximately -10^ (14°F) or more than approximately 60^ (140°F)
If successful reception is not possible for some reason, you can adjust the time and day settings manually.
Q2 The signal receive operation always fails.
Is the watch in a location that is appropriate for signal reception?
Check your surroundings and move the watch to a location where signal reception is better.
Appropriate Signal Reception Location
Did you avoid touching the watch while the receive operation was in progress?
Minimize movement of the watch and do not perform any watch operation while a receive operation is in progress.
Is there an alarm configured to sound during the same period that the signal receive operation is performed?
Receive stops if an alarm operation starts while it is being performed. Disable the alarm.
Enabling/Disabling the Alarm
Is the signal transmitter in your area transmitting a signal?
The transmitter of the time calibration may not be transmitting a signal. Try again later.
Alarms
Q1 The alarm does not sound.
Is the watch's battery charged?
Keep the watch exposed to light until it recharges sufficiently.
The crown is pulled out.
The alarm will not sound while the crown is pulled out. Push the crown back in to its normal position.
Operation Guide 5411
Hand Movement and Indications
Q1 I don't know what mode the watch is in.
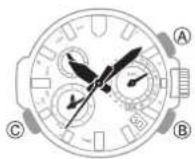
Hold down (C) for at least two seconds to return to the Timekeeping Mode.
• Take care not to hold down (C) too long. Holding down (C) for about four seconds will enter or exit the Airplane Mode.
Navigating Between Modes
Q2 The second hand is jumping at two-second or five-second intervals.
Battery power is low. Keep the watch exposed to light until it recharges sufficiently.
Charging the Watch
Q3 All hands are stopped and buttons do not work.
The battery is dead. Keep the watch exposed to light until it recharges sufficiently.
Charging the Watch
Q4 The hands suddenly start moving at high speed.
This is due to one of the reasons below, and does not indicate malfunction. Simply wait until normal hand movement resumes.
• The watch is recovering from a power saving state.
Power Saving Function
- The hands are moving to their new positions following a GPS signal or time calibration signal receive operation.
Time Adjustment (GPS, Time Calibration Signal)
Q5 Hands are stopped and buttons do not work.
The watch is in the charge recovery mode. Wait until the recovery process is complete (for about 15 minutes). The watch will recover more quickly if you place it in a brightly lit location.
Q6 The current time displayed by the watch is off by a few hours.
The city (time zone) setting is not correct. Select the correct setting.
Acquiring GPS Position Information Manually
Selecting a Time Zone
Q7 The current time indicated by the watch is off by one hour or 30 minutes.
The summer time setting is not correct. Select the correct setting.
Acquiring GPS Position Information Manually
Selecting a Time Zone
Q8 Hands and/or the day indicator is out of alignment.
Strong magnetism or impact may cause the hands of the watch to go out of alignment. Correct hand position alignment.
Adjusting Hand and Day Indicator Alignment
Crown Operations
Q1 Nothing happens when I rotate the crown.
If you do not perform any operation for about two minutes after pulling out the crown (approximately 30 minutes in the case of hand and day indicator alignment operations), crown operations will automatically become disabled. Push the crown back in to its normal position and then pull it out again.
Using the Crown
- Operation Guide 5411
- CASIO®
- Basic Operations
- Note
- General Guide
- Watch Face Items
- Navigating Between Modes
- Using the Crown
- Important!
- ● Stopping Fast Forward/Fast Reverse
- Solar Charging
- What is solar charging?
- Charging the Watch
- Charging Time Guidelines
- Light Intensity
- Charge Level 1 :
- Charge Level 2 :
- | Checking the Charge Level
- Power Saving Function
- Level 1 :
- Level 2 :
- ● Recovering from Power Saving Operation
- Time Adjustment (GPS, Time Calibration Signal)
- Time Adjustment Using GPS
- Appropriate Signal Reception Location
- Acquiring GPS Position Information Manually
- Getting ready
- Acquiring GPS Time Information Manually
- Auto GPS Signal Receive
- ● Time information
- Leap Second Reception
- Time Adjustment Using a Time Calibration Signal
- Time Calibration Signal Reception Ranges
- Auto Time Calibration Signal Receive
- Checking the Receive Operation Result
- Press (B).
- Signal Reception Precautions
- Using the Watch on an Aircraft
- Entering the Watch Airplane Mode
- World Time
- Checking the Time in Another Zone
- Stopwatch
- Interpreting Indicated Stopwatch Values
- Measuring Elapsed Time
- Timer
- Setting the Timer Start Time
- Using the Timer
- Alarms
- Configuring Alarm Settings
- Enabling/Disabling the Alarm
- Stopping an Alarm
- Illumination Light
- Turning On the Illumination Light
- Adjusting Time Settings Manually
- Selecting a Time Zone
- Summer Time
- Adjusting the Time and Day Setting
- Adjusting Hand and Day Indicator Alignment
- Press (C).
- Press (C).
- Moving To Another Time Zone
- ● Prior to Takeoff
- ● After Arriving
- Other Information
- City (Time Zone) List
- Summer Time Table
- Function Limitations
- ● How temperature affects watch functions
- Troubleshooting
- Signal Reception (GPS)
- Signal Reception (Time Calibration Signal)
- Hand Movement and Indications
- Crown Operations
Brand : CASIO
Model : G-Shock MRG-G1000D-1ADR
Category : Wristwatch