
VIVE Pro Eye - VR headset HTC - Free user manual and instructions
Find the device manual for free VIVE Pro Eye HTC in PDF.


| Product Type | VR Headset (Virtual Reality Headset) |
| Brand | HTC |
| Model | VIVE Pro Eye |
| Dimensions (HMD) | Approx. 29 x 22 x 14 cm |
| Weight (HMD) | Approx. 800 g |
| Power Supply | Via Link Box: AC adapter (100-240V, 50/60Hz) to link box, then to headset |
| Display | Dual AMOLED 3.5" (1440 x 1600 per eye, 90 Hz) |
| Field of View | 110 degrees (approx.) |
| Tracking | SteamVR Base Station 2.0 (laser-based, 150° horizontal, 110° vertical) |
| Eye Tracking | Integrated, requires calibration per user |
| Audio | Integrated earphones with volume and mute controls; 3.5mm or USB-C alternative |
| Connectivity | USB 3.0, DisplayPort 1.2+ to link box; USB-C on headset for accessories |
| Front Camera | Dual cameras for passthrough (requires Windows 10 for full performance) |
| IPD Adjustment | Manual knob, range approx. 59-73 mm |
| Lens Distance Adjustment | Button-operated slider for glasses |
| Headset Cable Length | 5 m (attached) |
| Minimum System Requirements | CPU: Intel i5-4590/AMD FX 8350; GPU: NVIDIA GTX 970/AMD R9 290; RAM: 4GB; USB 3.0; DisplayPort 1.2; OS: Windows 7 SP1, 8.1, 10 |
| Care & Cleaning | Clean lenses with provided cloth; face cushion washable with cold water; avoid direct sunlight |
| Repairability | Replaceable face cushion, earphones, head pad; firmware updates via SteamVR |
| Included Accessories | Headset, link box, 2x controllers, 2x base stations 2.0, cables, adapters, mounting kit |
| Warranty | Standard HTC warranty (accidental damage not covered) |
Frequently Asked Questions - VIVE Pro Eye HTC
User questions about VIVE Pro Eye HTC
0 question about this device. Answer the ones you know or ask your own.
Ask a new question about this device
Download the instructions for your VR headset in PDF format for free! Find your manual VIVE Pro Eye - HTC and take your electronic device back in hand. On this page are published all the documents necessary for the use of your device. VIVE Pro Eye by HTC.
USER MANUAL VIVE Pro Eye HTC
What are the system requirements? 5
How can I check if my PC meets the minimum system requirements for VIVE? 6
Can I still use VIVE if my PC doesn't meet the system requirements? 6
What's inside the box? 6
Headset and link box
Headset 7
Link box 23
Eye tracking 25
Product care and repair 28
Common solutions 34
Base stations
About SteamVR Base Station 2.0 39
Installing SteamVR Base Station 2.0 40
Tips for setting up SteamVR Base Station 2.0 42
How many SteamVR Base Stations 2.0 can I use in a single setup? 43
What things should I consider when installing more than two SteamVR Base Stations 2.0? 43
Setting up additional base stations 44
What are the minimum and maximum play area when using more than two SteamVR Base Stations 2.0?
My available space has an irregular shape. Can I still set up more than two SteamVR Base Stations 2.0? 45
Can I use an odd number of SteamVR Base Stations 2.0? 45
Configuring the base station channels 45
How can I check which base stations are currently in use? 46
Using the mounting kit 46
Cleaning the base stations 47
Updating base station firmware via Bluetooth 48
What does the status light on the base stations mean? 49
What should I do if any of the base stations is not detected? 49
Can I use the older version of the base stations together with SteamVR Base Station 2.0? 49
Which VIVE hardware is compatible with my base stations? 49
Are the base stations covered by warranty if accidentally damaged? 50
Controllers
About the VIVE Controllers (2018) 51
Charging the controllers 52
Turning the controllers on or off 52
Pairing the controllers with the headset 52
Attaching the lanyards to the controllers 5.3
Updating controller firmware 5.3
What does the status light on the controllers mean? 54
What should I do if any of the controllers is not tracked? 54
How do I know which of the controllers is not being tracked? 54
What can I do if the controller's trackpad is oversensitive? 5.5
What should I do if my controller won't turn on? 5.5
The controller automatically turns off. What should I do? 55
My controller won't turn on after I accidentally unplugged it during firmware update. What should I do?
56
Play area
What is the play area? 57
Planning your play area 57
Choosing the play area 57
Setting up VIVE Pro Eye for the first time 58
Setting up a standing-only play area 59
Setting up a room-scale play area 60
Resetting the play area 60
Verifying your setup 61
After setting up, how do I turn the VIVE system on? 61
What is the recommended space for the play area? 62
Can I include space occupied by furniture for the play area? 62
Will VR apps for seated/standing-only experiences work with room-scale setup? 62
How do I resolve download errors during VIVE Setup installation? 62
I can't complete the room setup. What should I do? 62
Settings
Audio settings 63
System Dashboard settings 64
Phone notifications 65
SteamVR 67
Trademarks and copyrights
Index
About this guide
We use the following symbols to indicate useful and important information:

This is a note. It provides detailed information for setup, common questions, and what to do in specific situations.

This is a tip. It will give you an alternative way to do a particular step or procedure that you may find helpful.

This indicates important information that you need in order to accomplish a certain task or to get a feature to work properly.

This is a warning. Take note to avoid potential problems or prevent damage to your hardware.
Information contained in this guide may have changed. For the most updated information, including the latest version of this guide, go to VIVE Enterprise Support.
System requirements
What are the system requirements?
To use VIVE Pro Eye, your computer must meet the following system requirements.
To find out if your computer is ready for VR, download and run the Vive Quick Compatibility Check.
| Component Recommended system requirements | Minimum system requirements | |
| Processor Intel | ® CoreTM i5-4590/AMD FXTM 8350 equivalent or better | Intel Core i5-4590/AMD FX 8350 equivalent or better |
| GPU NVIDIA | ® GeForce® GTX 1070/Quadro P5000 equivalent or better, AMD RadeonTM Vega 56 equivalent or better | NVIDIA GeForce GTX 970, AMD Radeon R9 290 equivalent or better |
| Memory 4 GB RAM or more 4 GB RAM or more | ||
| Video output DisplayPort 1.2 or newer DisplayPort 1.2 or newer | ||
| USB port 1x USB 3.0 or newer 1x USB 3.0 or newer | ||
| Operating system | Windows® 10 Windows 7 SP1, Windows 8.1 or later, Windows 10 | |

Before using VIVE Pro Eye with Windows 7 SP1, you're required to download and install the latest driver updates.
- For the best experience with the dual camera's see-through feature, it is highly recommended that you upgrade your OS to Windows 10.
How can I check if my PC meets the minimum system requirements for VIVE?
To find out if your computer is ready for VR, download and run the Vive Quick Compatibility Check.
Can I still use VIVE if my PC doesn't meet the system requirements?
In order for you to enjoy the VIVE ^™ experience, it is recommended that you at least have a PC that meets the minimum system requirements. For details, see What are the system requirements? on page 5.
What's inside the box?
Your VIVE Pro Eye comes with the following items, which you'll use to experience immersive VR environments:
| Main component | Accessories |
| VIVE Pro Eye HMD▪ Headset cable (attached) | |
| ▪ Face cushion (attached) | |
| ▪ Cleaning cloth | |
| ▪ Earphone hole cap (2) | |
| Link box▪ Power adapter | |
| ▪ DisplayPortTM cable | |
| ▪ USB 3.0 cable | |
| ▪ Mounting pad | |
| VIVE Controllers (2018) x 2▪ Power adapters (2) | |
| ▪ Lanyards (2 attached) | |
| ▪ Micro-USB cables (2) | |
| SteamVR Base Station 2.0 x 2▪ Power adapters (2) | |
| ▪ Mounting kit (2 mounts, 4 screws, and 4 wall anchors) | |
You can also find documentation in the box, such as the Safety and regulatory guide and warranty card.
Headset and link box
Headset
About the VIVE Pro Eye HMD
The headset is your window to the VR environment.
The headset has sensors that are tracked by the base stations.

The sensors on the headset are sensitive. Do not cover or scratch the sensor lenses, including the proximity sensor.
Front and side
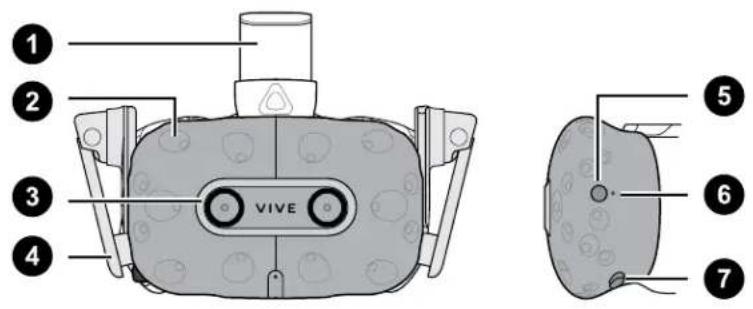
1 Headset strap
2 Tracking sensor
3 Camera lens
4 Earphone
5 Headset button
6 Status light
7 Lens distance button
Back
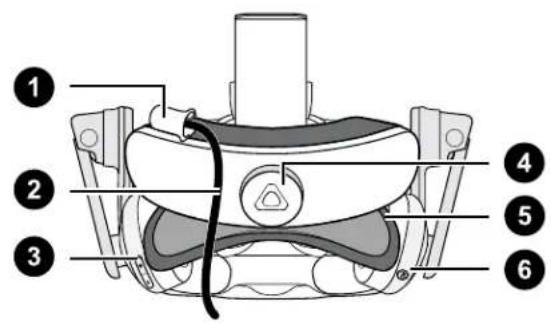
1 Headset cable clip
2 Headset cable
3 Volume button
4 Adjustment dial
5 Head pad
6 Mic mute button
Bottom and inner
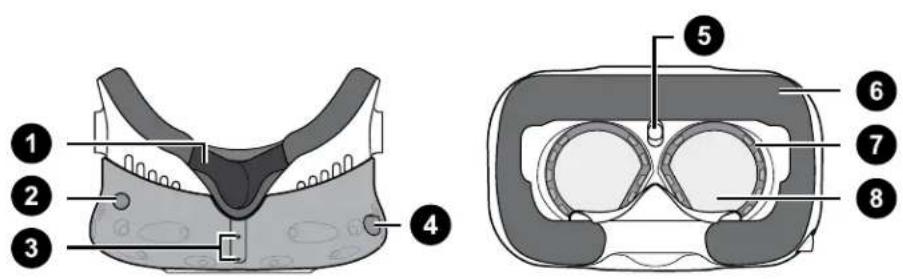
1 Nose rest
2 Lens distance button
3 Mic
4 Interpupillary distance (IPD) knob
5 Face cushion
6 Proximity sensor
7 Eye trackers
8 Lenses
Putting on the VIVE Pro Eye HMD

Before putting on the headset, make sure to remove the protective film or paper cover from the lenses. Keep it in a safe place so you can protect your headset during storage or shipping.
- Loosen the strap by rotating the adjustment dial counter-clockwise, and then detach the velcro fastener on the top band.
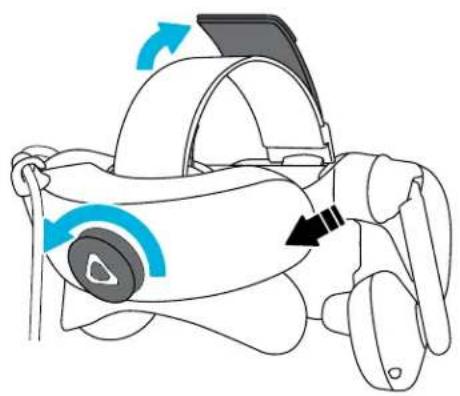
natural_image
Diagram of a robotic device with directional arrows indicating motion or movement (no text or symbols)- Press the headset towards your eyes, and then slide the strap around the back of your head.
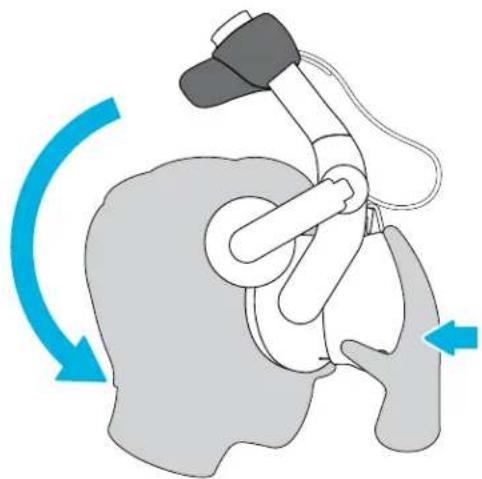
natural_image
Illustration of a human head with a medical device and blue directional arrows indicating rotation (no text or symbols)10 Headset and link box
- Rotate the adjustment dial clockwise until the headset fits snugly, and then reattach the velcro fastener on the top band.
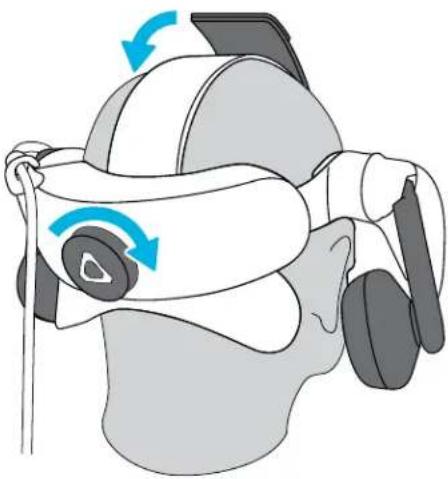
natural_image
Illustration of a person wearing a VR headset with blue directional arrows indicating motion (no text or symbols)11 Headset and link box
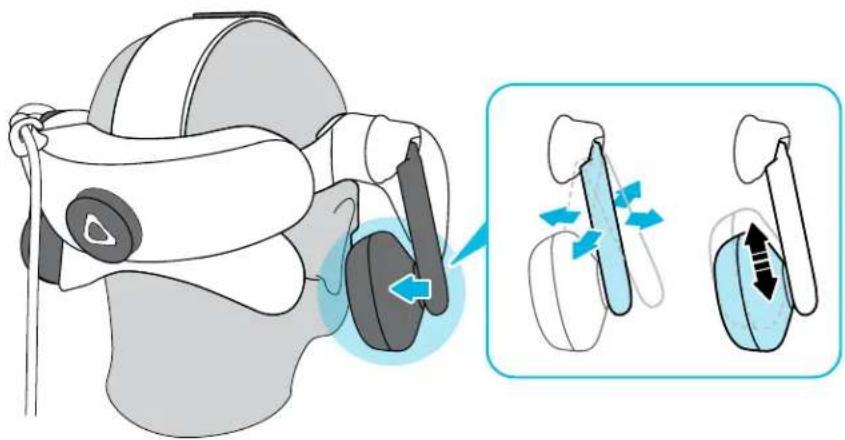
- Adjust the earphones to a comfortable position over your ear, and then press the earphones towards your ears until they're properly in place.
- Make sure that the headset cable passes through the cable clip at the back of the headset, and is positioned straight down your back.
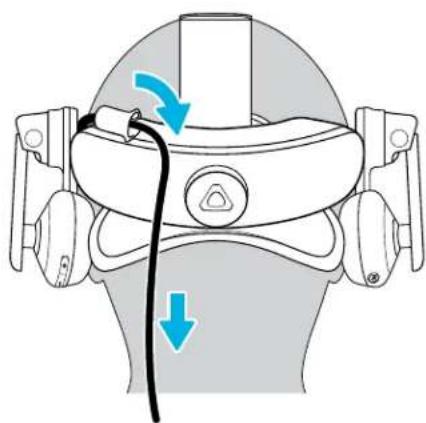
natural_image
Diagram of a person wearing a VR headset with a cable and directional arrows indicating motion (no text or symbols)When taking the headset off, remember to loosen the strap first by rotating the adjustment dial counter-clockwise.
Adjusting the IPD on the headset
Interpupillary distance (IPD) is the distance between the centers of your pupils. A quick way to get an estimate is by facing a mirror and holding a millimeter ruler against your brow. Use this measurement as a guide to adjust the distance between the lenses of the headset so that you'll have a better viewing experience.
To increase the distance between the lenses, rotate the IPD knob clockwise. To decrease, rotate the IPD knob counterclockwise.
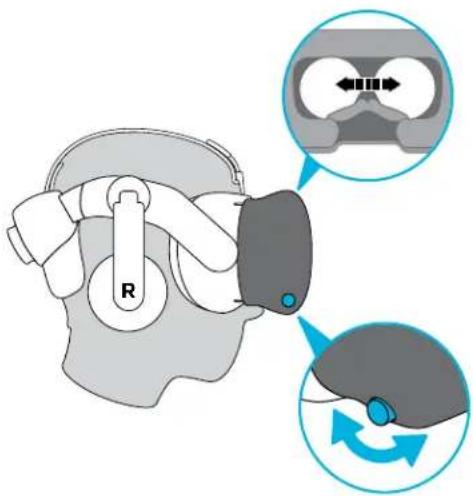
As you adjust the IPD, you'll see a prompt indicating the current distance between the centers of the lenses.
Can I wear my prescription glasses while using VIVE Pro Eye?
Most glasses fit inside the headset. If you wear large prescription glasses, adjust the lens distance to increase the space in the headset.

Make sure that no part of your glasses scratch the headset lenses.
Adjusting the lens distance on the headset
If you wear large prescription glasses or have long eyelashes, you may need to increase the lens distance further from your face. Only increase this distance as necessary, as the closer the lenses are to your eyes, the better your field of view will be while wearing the headset.

■ Make sure that no part of your glasses scratch the headset lenses.
- Do not attempt to adjust the visor without pressing the lens distance button.
Press and hold the lens distance button on the headset, and then pull or push the visor to adjust the lens farther or closer to your face.
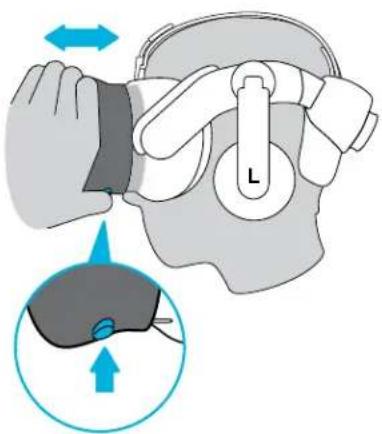
Replacing the face cushion
You can remove the face cushion to clean it. For more information, see Cleaning the face cushion on page 29.
- To remove the face cushion, peel off starting from both ends of the face cushion until it detaches from the headset.
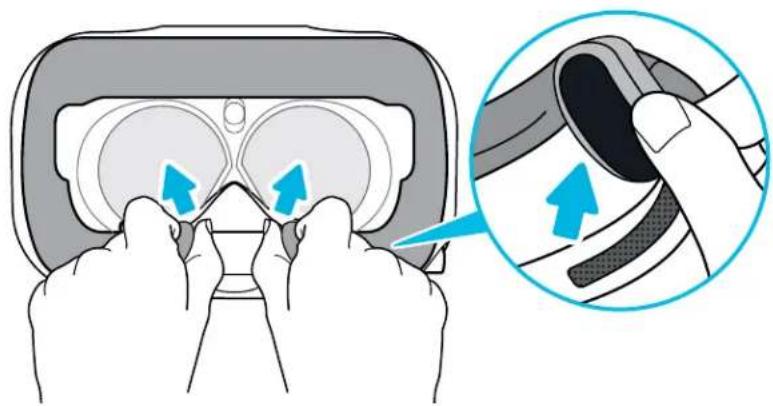
natural_image
Illustration of hands adjusting a VR headset with blue directional arrows indicating motion (no text or symbols)- To replace the face cushion, insert the tab on the face cushion into the slot on the headset, and then align the hook and loop strips.
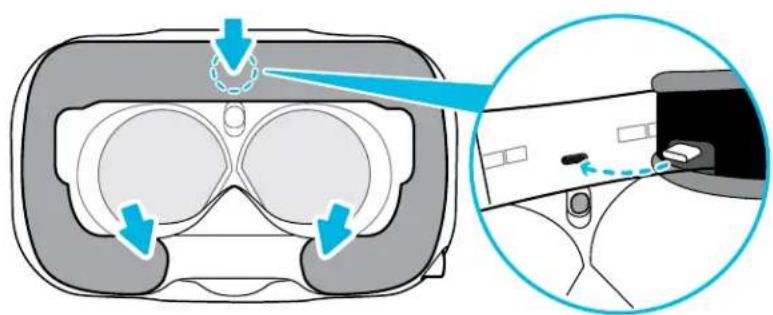
Connecting a USB device to the VIVE Pro Eye HMD
You can connect a USB Type-C compatible third-party device to VIVE Pro Eye HMD using a USB cable.
- Peel off the face cushion starting from both ends until it detaches from the headset.
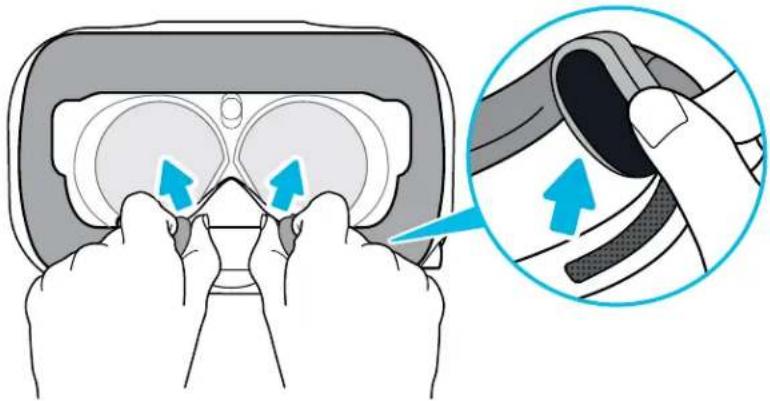
natural_image
Illustration of hands adjusting a VR headset with blue arrows indicating the process (no text or symbols present)- Carefully pry open the compartment cover from its flap. Pull the cover out to access the ports on the headset.
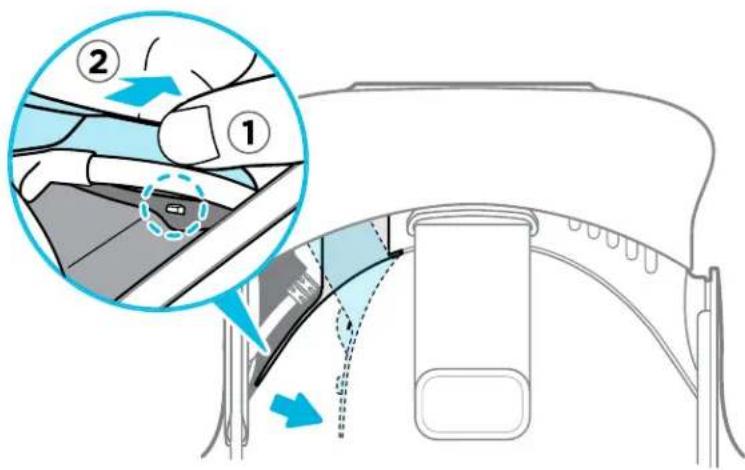
- Insert the cable connector of the device to the USB Type-C port on the headset.
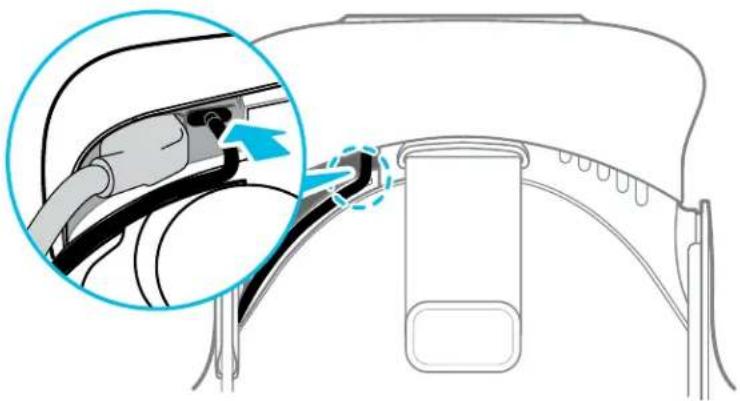
natural_image
Diagram of a car intake manifold showing a cable being inserted into the intake compartment, with no text or symbols present.- Align and push the tabs of the compartment cover onto their corresponding holes.
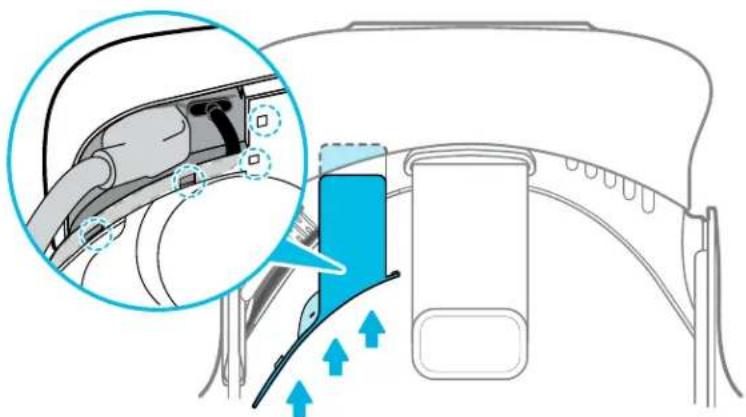
natural_image
Diagram of a car charging plug with airflow indicators and a blue internal component (no text or symbols)- Replace the face cushion by inserting its tab into the slot on the headset, and then aligning the hook and loop strips.
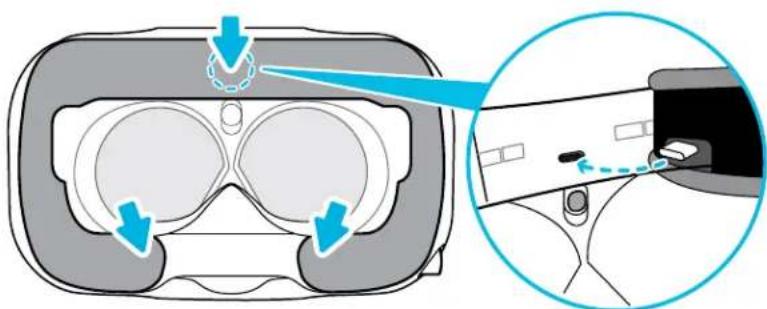
- Connect the other end of the USB cable to the third-party device.
Removing the headset earphones
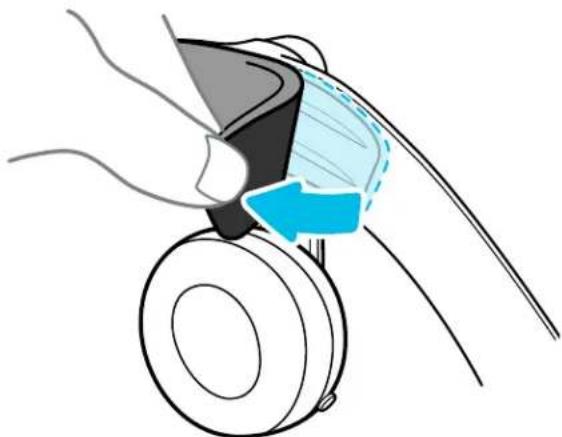
If you need to, you can remove the headset earphones.
- Peel off the side cushions on the strap near the earphones.
natural_image
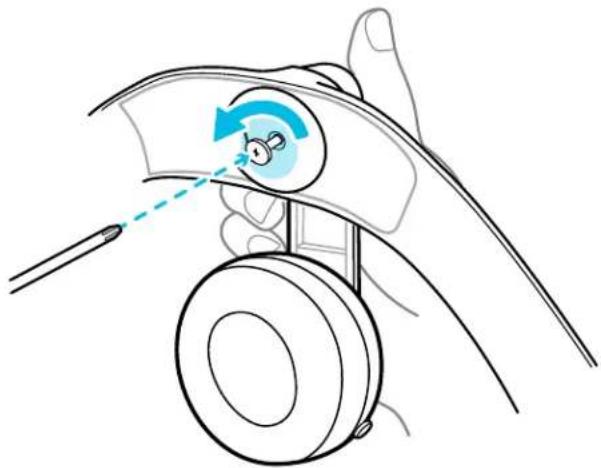
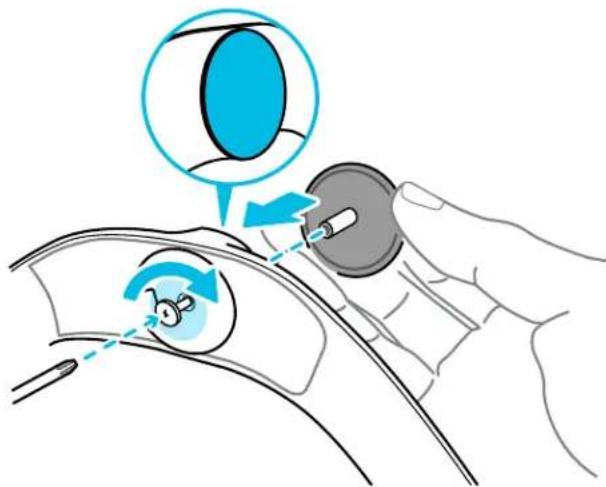
Diagram of a mechanical device with a blue arrow indicating motion or force direction (no text or symbols)- Use a cross-shaped screwdriver (PH00) to detach the earphone from the strap.
natural_image
Line drawing of a hand operating a car wheel with a blue circular dial and arrow indicating rotation (no text or symbols)18 Headset and link box
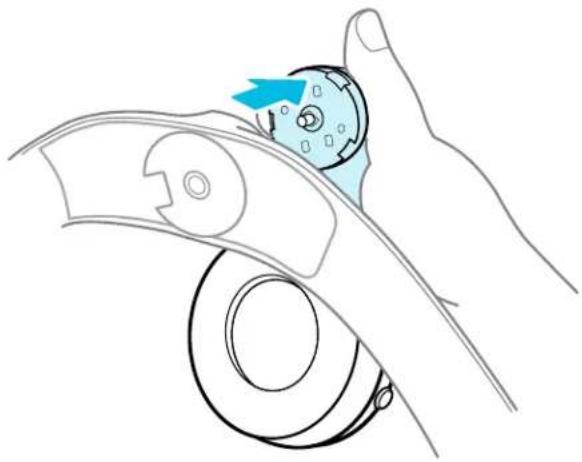
- Gently pull each earphone until it detaches from the strap and then set it aside.
natural_image
Line drawing of a hand holding a mechanical component with a blue arrow indicating rotation (no text or symbols)- Replace the cap with the screw you removed earlier.
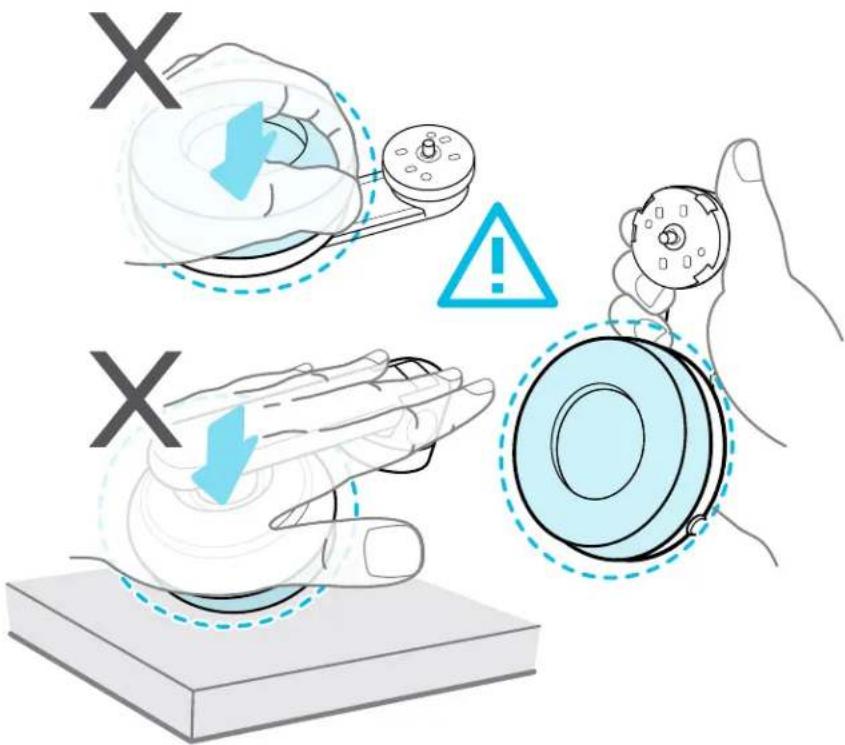
After detaching the earphones, make sure to put it in a safe place. Do not squeeze or press down the earphones. When storing, do not put the earphones under a heavy object that could press or squeeze them down.
Replacing the headset earphones
You can use your own USB Type-C compatible audio earphones with the VIVE Pro Eye HMD. If you want to use compatible 3.5mm audio earphones, you'll need a type-C to 3.5mm audio adapter.
- Remove the headset earphones first, otherwise audio will still come out from it. For details, see Removing the headset earphones on page 17.
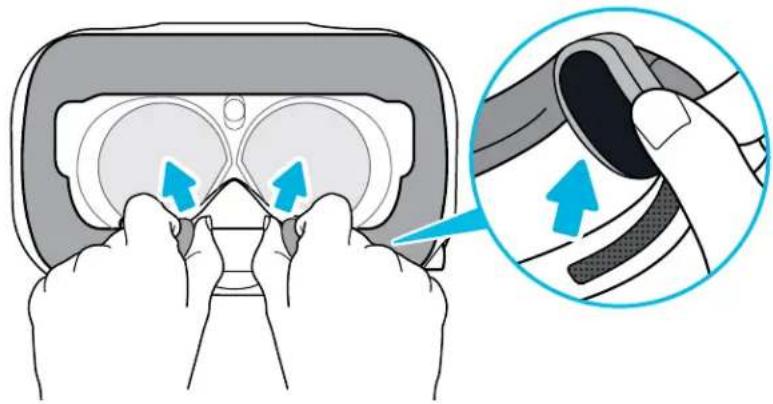
- Peel off the face cushion starting from both ends until it detaches from the headset.
natural_image
Illustration of hands adjusting a VR headset with blue arrows indicating the process (no text or symbols present)20 Headset and link box
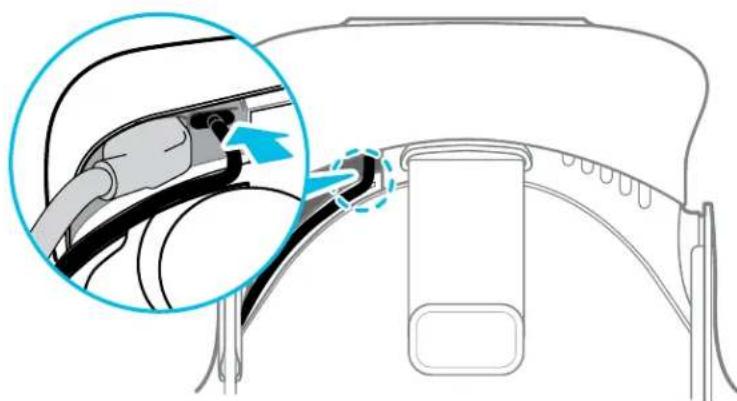
- Carefully pry open the compartment cover from its flap. Pull the cover out to access the ports on the headset.
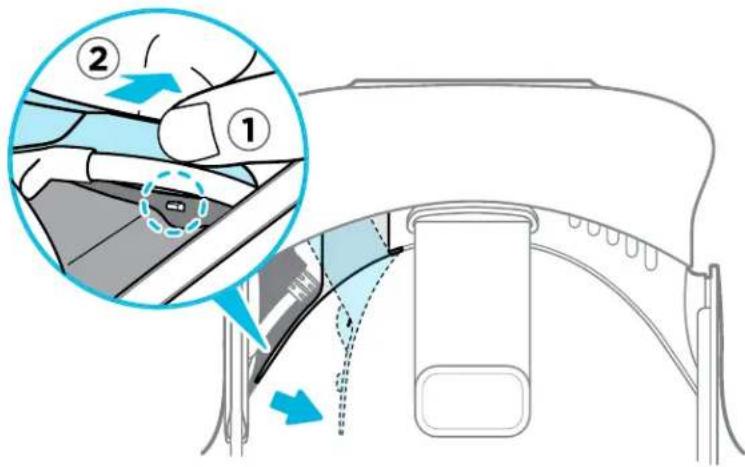
- Insert the cable connector of your earphones on the USB Type-C port.
natural_image
Diagram of a car door handle assembly with a magnified inset showing the cable being inserted (no text or symbols present)21 Headset and link box
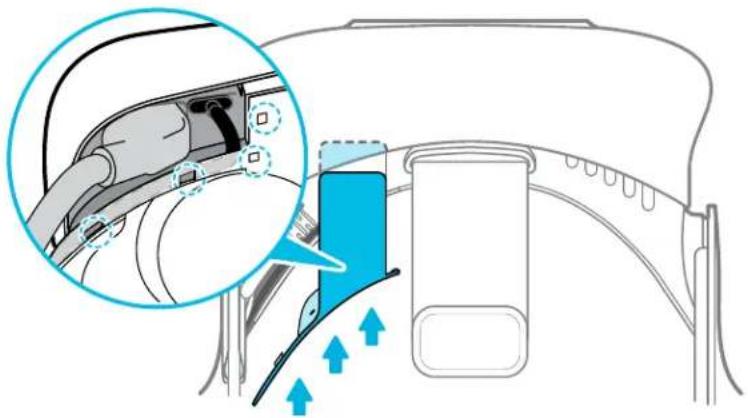
- Align and push the tabs of the compartment cover onto their corresponding holes.
natural_image
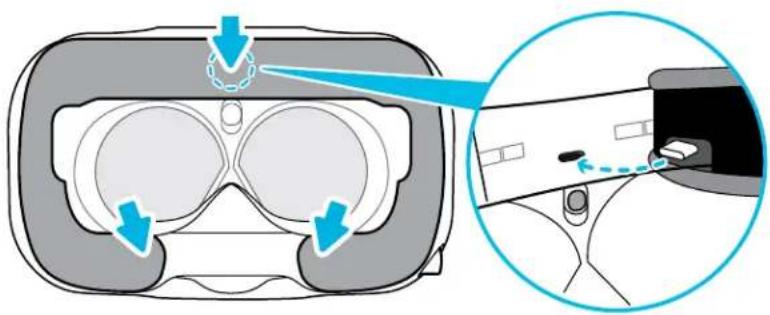
Diagram showing a car charging plug inserted into a container, with an inset magnified view highlighting the plug's internal structure (no text or symbols present)- Replace the face cushion by inserting its tab into the slot on the headset, and then aligning the hook and loop strips.
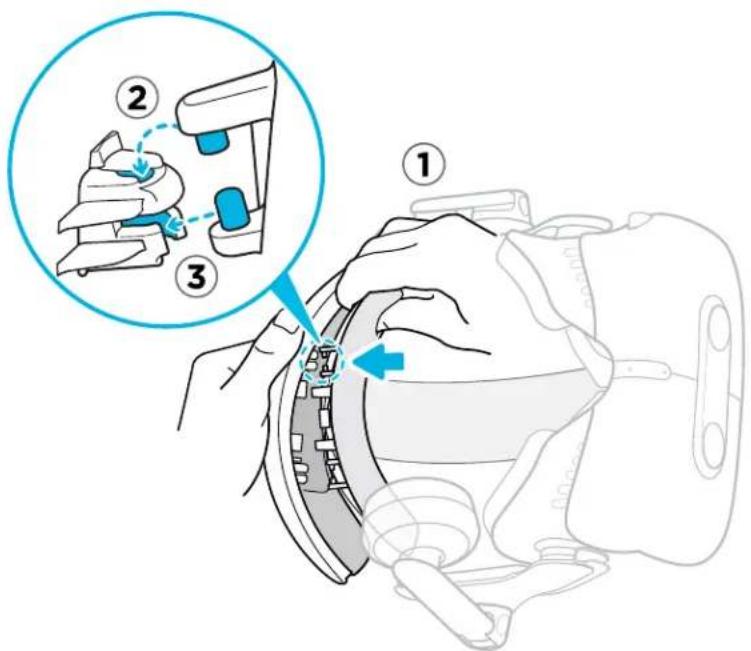
Reattaching the head pad on the headset strap
Always make sure that the head pad is attached to the headset.
-
Hold the headset upside down.
-
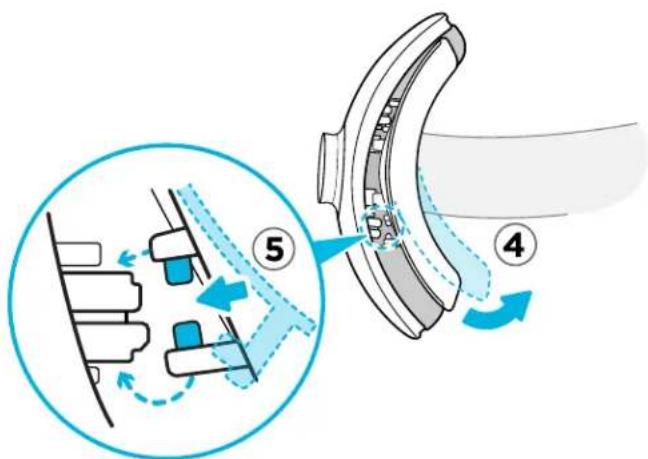
Pin the head pad's right-most tab with its corresponding slot on the headset strap.
-
Press the tabs on the head pad's right side into the slots on the headset strap to lock the tabs in place.
-
Gently bend the base of the head pad's left side to align its tabs with the slots on the headset strap.
-
Press the tabs on the head pad's left side into the slots on the headset strap to fully attach the head pad.
Updating the headset firmware
-
From your computer, open the SteamVR app.
-
If you see the icon, mouse over it to check if the firmware is out of date.
-
Click Update headset firmware. The firmware update will start automatically.
!
Do not unplug any cables from the headset, link box, or your computer any time before the firmware update is complete. Doing so could result in a firmware error.
- When the update is complete, click Done.
What does the status light on the headset mean?
The status light shows:
■ Green when the headset is in normal mode
- Dim green when the headset is on standby
- Red when an error is encountered (with cables, display, or the like)
What is the dual camera used for?
The dual camera brings real world into VR. Some VR content use the dual camera to scan your room and integrate it with the VR experience.
Whenever you're in the System Dashboard, you'll also see a window showing your actual room.
To activate the dual camera, see Activating the dual camera on page 67.
Link box
About the link box
Use the link box to connect the headset to your computer.
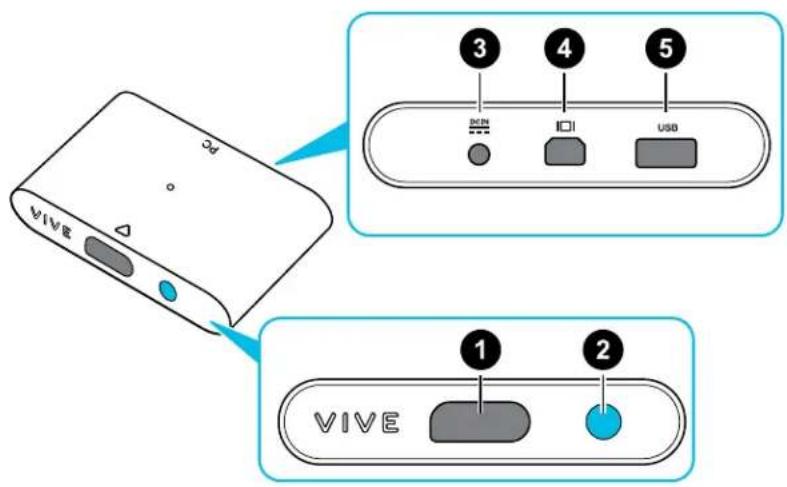
1 Headset cable port
2 Power button
3 Power port
4 DisplayPort port
5 USB 3.0 port
Connecting the headset to your computer
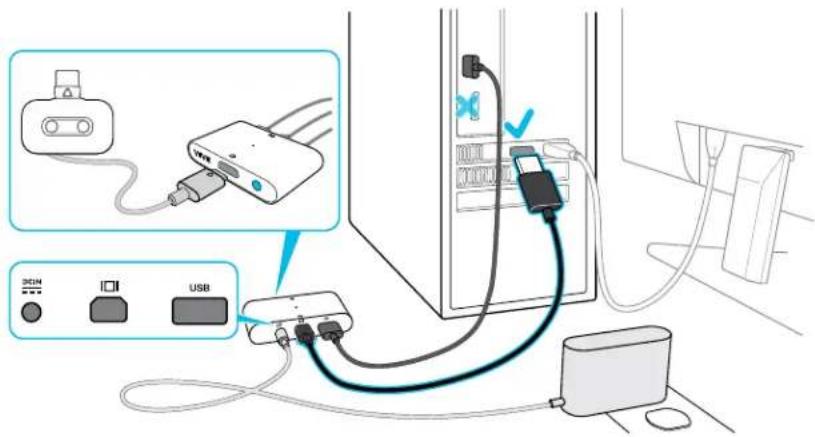
- Connect the USB 3.0 cable, DisplayPort cable, and power adapter cable on their corresponding slots on the link box.
- Plug the power adapter into an electrical outlet.
- Insert the opposite end of the USB 3.0 cable on your computer's USB port.
- Insert the DisplayPort cable end to the DisplayPort port on your computer's graphics card where the monitor is also connected. Do not connect the DisplayPort cable to ports on the motherboard.
- Insert the headset cable connector (side with triangle mark up) to the port on the link box with the corresponding triangle mark.
- Press the Power button to turn the link box on.
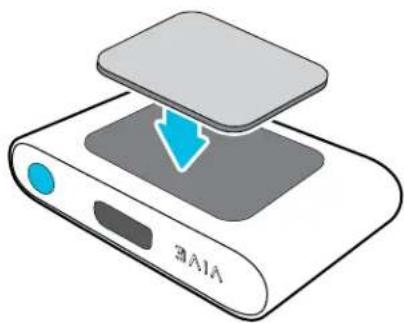
- To secure the link box in a permanent position, peel the covers from the mounting pad and firmly press one side of the adhesive surface on the bottom part of the link box, and then attach the link box on the area where you want it installed.
natural_image
Illustration of a device with a blue download arrow and 'DATA' label, no readable text or symbols beyond the label.Can I use a laptop with VIVE Pro Eye?
As long as your laptop meets the system requirements, you can use it with VIVE Pro Eye.
If your laptop does not have a DisplayPort port but has a Mini DisplayPort port instead, you can purchase a Mini DisplayPort-to-Mini DisplayPort 1.2 or newer cable, and then connect it to the link box and to your laptop. Make sure that the cable you purchase supports Ultra High Definition (UHD) 4K @ 60Hz or higher.
This workaround does not guarantee compatibility. Contact your computer or accessory manufacturer if you have questions.
Restarting the link box
If you need to restart the link box, follow these steps.
- Close all Steam apps on your computer, including the SteamVR app.
- Press the Power button to turn the link box off, and then press the Power button again to turn it back on. On your computer, you might see a notification that drivers are being installed. Wait for the installation to finish.
- To verify that VIVE hardware is detected, restart SteamVR on your computer.
Eye tracking
Calibrating eye tracking
Before you can use eye tracking, you need to calibrate the software.
- From the System Dashboard, select VIVE Pro Eye.

If you don't see VIVE Pro Eye in the System Dashboard, make sure the eye tracking software has been installed correctly. See Installing the eye tracking software on page 26.
- Make sure Use eye tracking is enabled, and then select Calibrate.
- Follow the instructions to complete the calibration process.

- Eye tracking must be recalibrated for each user.
- Eye tracking may need to be recalibrated if you change your IPD setting or the position of the headset on your face.
- If you installed the eye tracking software separately, you will need to agree to the terms and conditions the first time you run the software.
Installing the eye tracking software
The eye tracking software installs automatically when you install the VIVE software. If you already have a VIVE product installed, you may need to install the eye tracking software separately.
Download and install the VIVE Pro Eye tracking software from:
https://dl.vive.com/SRSDK/runtime/VIVE_SRanipallnstaller.msi
Running the eye tracking software for the first time
The first time you run the eye tracking software, you'll need to open it manually.
- Make sure VIVE Pro Eye is connected to your computer. See Connecting the headset to your computer on page 24.
- Launch SR_Runtime. The icon should appear in the system tray.
- Start SteamVR if it isn't already running.
- Put on your headset.
- From the System Dashboard in VR, select VIVE Pro Eye.
- Read and agree to the license agreement. You need to agree to be able to use eye tracking.
From now on, the eye tracking software will launch automatically.
What can I do if eye tracking calibration fails?
Here are some troubleshooting tips for eye tracking calibration:
■ Make sure the headset lenses and eye trackers are clean.
- Make sure that the lens distance is set appropriately, and that nothing is touching the headset lenses or eye trackers.
■ If you wear glasses, make sure that they are clean.

Some glasses or contact lenses may disrupt eye tracking.
- During calibration, point the controllers downward so they don't distract you.
What can I do if eye tracking isn't accurate?
Here are some troubleshooting tips for eye tracking problems:
- Make sure that the lens distance and IPD settings have not been changed since calibration. If you need to change the lens distance or IPD settings, make sure to recalibrate.
- If you wear glasses, make sure you wear them during calibration and while using VR. If you don't intend to wear them while using VR, don't wear them during calibration.
What can I do if I have trouble with the eye tracking software?
If you have trouble with eye tracking, you can restart your headset and the tracking software. This might be helpful if you encounter a sudden loss of eye tracking, related error messages, or are unable to run the calibration tool.
- From your computer system tray, right-click the SR_Runtime tray icon and then click Exit.
- Turn off your headset by pressing the Power button on the link box.
- Wait at least five seconds, and then press the Power button on the link box again to your headset back on.
- On your computer, restart SR_Runtime.

If you can't find the eye tracking software, make sure it's been installed correctly. See Installing the eye tracking software on page 26.
What does the icon in the system tray mean?
When the eye tracking software is running, you will see an icon in the system tray on your computer.
The icon shows:
■ When eye tracking is either disabled or not supported on the attached headset.
■ when eye tracking is idle.
■ when eye tracking is in use.

If you don't see the icon in the system tray, make sure the eye tracking software is installed and SR_Runtime is running. See Installing the eye tracking software on page 26.
Product care and repair
Caring for your VIVE Pro Eye
Follow these tips to properly care for your VIVE Pro Eye.
- Keep the headset lenses away from sharp objects, including cable tips. This will prevent the headset lenses from being scratched.
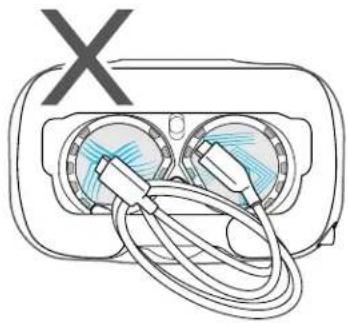
natural_image
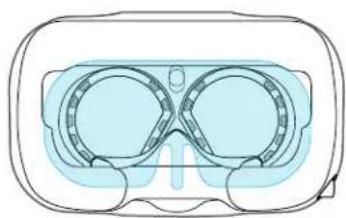
Line drawing of a device with two lenses and a coiled cable, no text or symbols present- When not in use, store the headset with the lenses pointed away from direct sunlight. Failure to do so may damage the headset display.
- When storing the headset, it is recommended to cover the lenses with the protective film or paper cover to help prevent accidental scratches.
natural_image
Illustration of a VR headset with two lenses and a transparent visor (no text or symbols)Cleaning the face cushion
-
Before cleaning the face cushion, remove it first from the VIVE Pro Eye headset. For details, see Replacing the face cushion on page 14.
-
When cleaning the face cushion, remember to:
-
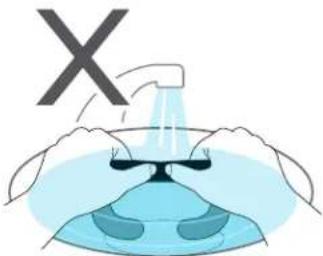
Dampen a clean smooth cloth with cold water and gently wipe the area you want to clean.
- Air dry at room temperature. Don't tumble dry, iron, or expose it to direct sunlight.
■ Don't scrub, wring, or bleach. - Don't dip or soak in water.
Cleaning the headset lenses and eye trackers
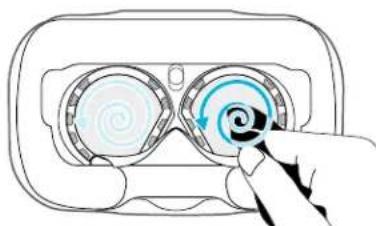
- Use the cleaning cloth provided in the box to wipe the lenses and eye trackers.
- Wipe in a circular motion from the center to the outer edges of the lenses and eye trackers.
While cleaning the lenses, do not scratch the lenses nor disassemble other parts of the headset.
natural_image
Line drawing of a hand interacting with a device's screen, showing a spiral pattern and a blue spiral icon (no text or symbols)How do I prepare the headset if I'm returning it for repair?
Before sending in the headset for repair, remove the following accessories and store them for safekeeping:
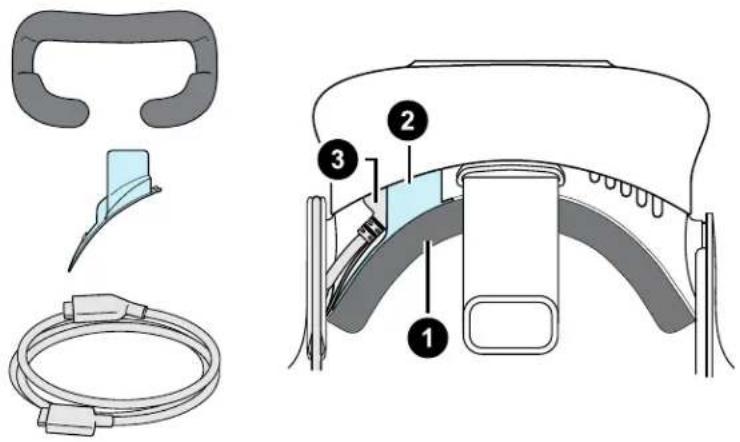
1 Face cushion
2 Compartment cover
3 Headset cable
Follow these steps to properly detach the accessories from the headset:
- Peel off the face cushion starting from both ends until it detaches from the headset.
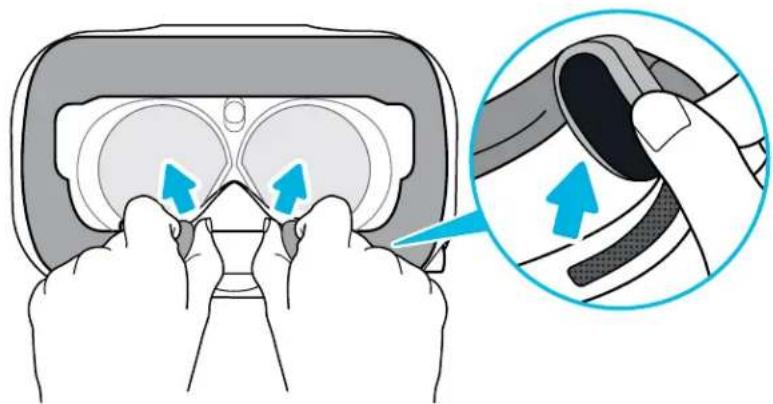
natural_image
Illustration of hands adjusting a VR headset with blue arrows indicating the process (no text or symbols present)- Carefully pry open the compartment cover from its flap. Pull the cover out to access the ports on the headset.
31 Headset and link box
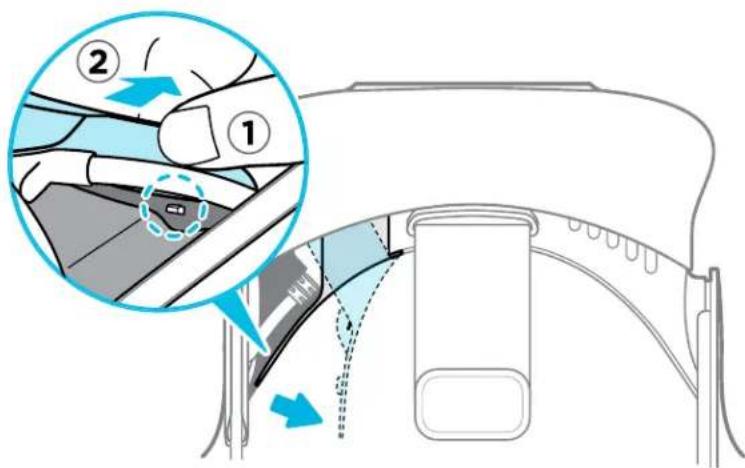
■ Unplug the headset cable.
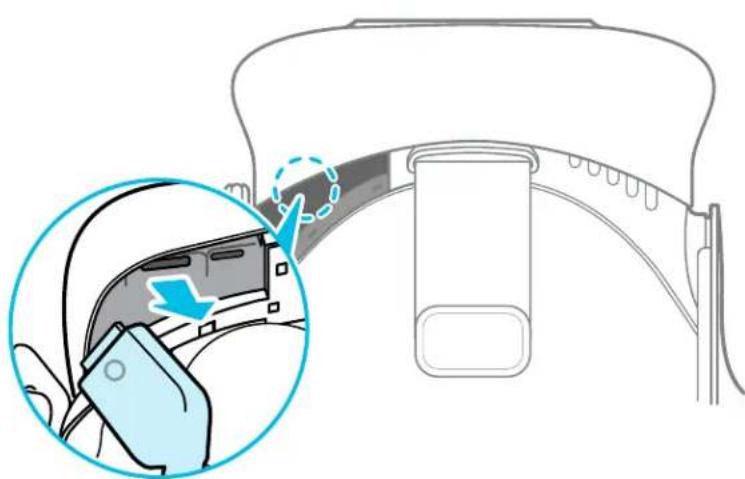
natural_image
Diagram showing a device's internal structure with an inset close-up of its component (no text or symbols)After removing the accessories, the headset you'll send for return should look like the following:
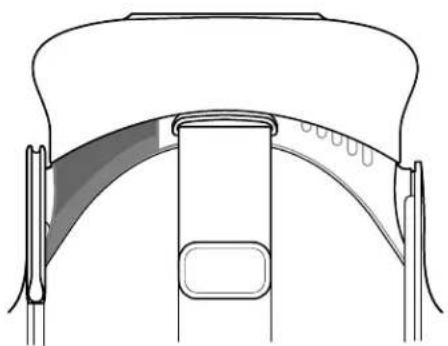
natural_image
Technical line drawing of a mechanical component or bracket (no text or symbols)How do I reassemble the headset after repair?
After receiving your repaired headset, properly attach the accessories before using your headset again.
■ Reconnect the headset cable.
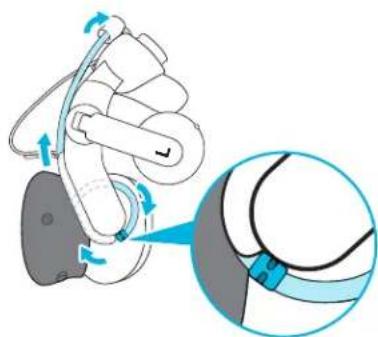
- Press and hold the lens distance button on the headset, and then pull out the visor to its farthest point. For an easier access to the connector slots, pull up the headset strap.
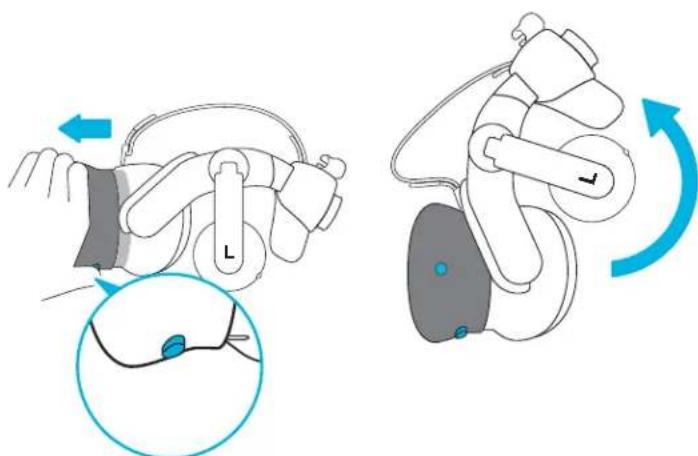
natural_image
Illustration of a robotic device with blue arrows indicating rotation and adjustment, showing mechanical components and a close-up of the interior (no text or symbols)- Align and reinsert the headset cable connector (side with round mark up) to the port with the corresponding round mark. You'll hear a click when the connector is fully inserted.
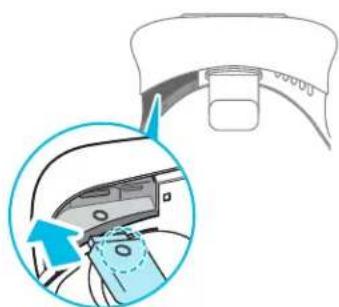
natural_image
Diagram showing a device with a magnified inset highlighting a component (no text or symbols present)-
Press and hold the lens distance button on the headset, and then push the visor back to the starting point.
-
Make sure that the headset cable connector is secured and that the cable is set before the edge of the compartment.
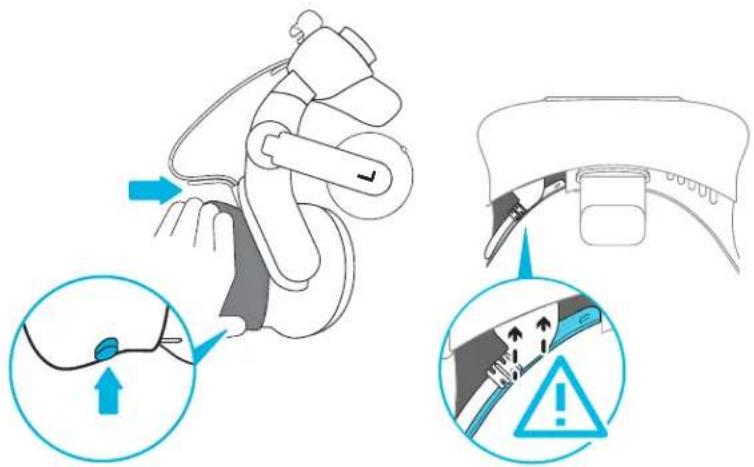
- Loop the cable around the band of the strap next to it. The stopper on the headset cable should be positioned before the ridge. Make sure that the headset cable passes through the ridge and the cable clip at the back of the headset.
natural_image
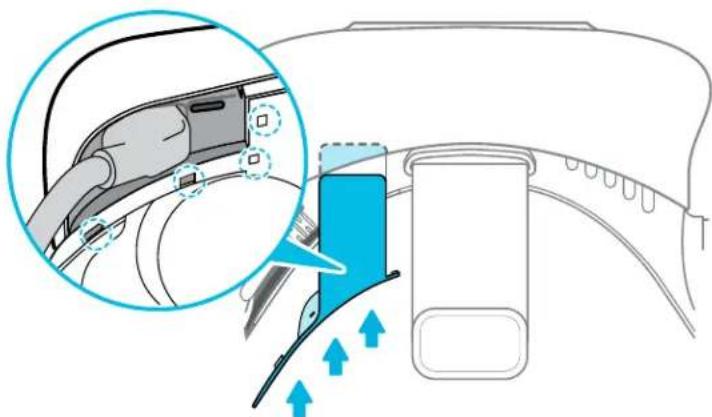
Illustration of a medical device with blue arrows indicating motion, showing internal components and a magnified inset (no text or symbols)- Replace the compartment cover. Align the tabs on the cover with the holes on the compartment, and then push the cover until it snaps in place.
natural_image
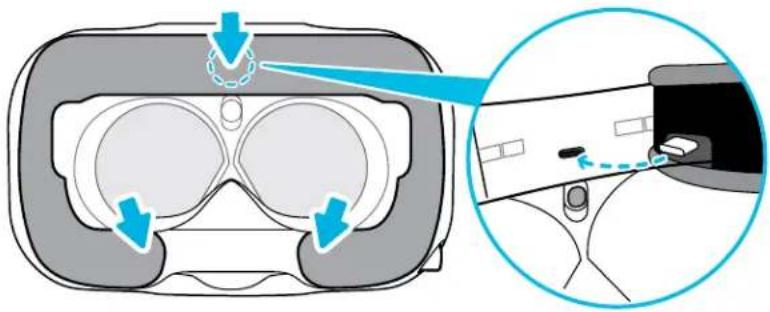
Diagram showing a car interior with a close-up of the door panel and a blue plastic container, no text or symbols present.- Reattach the face cushion. Insert the tab on the face cushion into the slot on the headset, and then align the hook and loop strips.
Common solutions
What can I do to troubleshoot the headset?
Try these troubleshooting suggestions.
| Option Description | |
| Check the headset's LED status | If the LED is not lit, try connecting the link box to a different power outlet.If the LED is dim green, the headset is on standby mode. Activate it by moving the headset or starting a VR app.If the LED is red, check if you're encountering a cable connection or driver error.For more information, you may refer to thisSteamVR Troubleshooting article. |
| Reboot the headset | From your computer, open the SteamVR app.Settings>Developer, and then make sure that Direct Mode is enabled.Right-click theicon, and then click Reboot Vive headset.Wait for the reboot process to complete. |
| Check the cable connections | Make sure that your cable connections are securely attached on both ends.Check that the correct cables are connected to the corresponding side of the link box.Connect the DisplayPort cable end to the DisplayPort port on your computer's graphics card where the monitor is also connected. Do not connect the DisplayPort cable to ports on the motherboard.Try connecting to a different USB port. |
| Restart the link box | For details, see Restarting the link box on page 25.For more information, you may refer to thisSteamVR Troubleshooting article. |
What can I do when the status light on the headset indicates an error?
If you see that the status light is red, try these methods to resolve the issue:
- Disconnect and reconnect the headset cable on the link box.
- Check that the cables between the link box and your computer are properly connected. Disconnect and reconnect the cables as needed.
- Restart the link box by pressing the Power button to turn it off, and then pressing the Power button again to turn it back on.
For more information, you may refer to the SteamVR Troubleshooting page.
What should I do if the headset is not tracked?
Try the following methods to troubleshoot the issue:
■ Make sure that the headset is placed inside the play area.
- Restart the link box by pressing the Power button to turn it off, and then pressing the Power button again to turn it back on. You need to also restart the SteamVR app.
- Try to disconnect and reconnect the DisplayPort cable to the DisplayPort port on your computer's graphic card.
- Restart the SteamVR app. If you still get an error, reboot your computer and reopen the SteamVR app.
For more information, you may refer to the SteamVR Troubleshooting page.
My headset display is blurry. What should I do?
Try these troubleshooting suggestions:
■ Make sure that you've removed the protective film on the headset lenses.
- Check that the lenses are clean. Use the cleaning cloth provided in the box to wipe the lenses.
■ Make sure that you're wearing the headset properly.
The headset's bottom edge should rest on your cheekbones, while the standard strap should cup the back of your head. You should feel comfortable bending down without the headset slipping off.
If the headset is too low on your face, your display will appear blurry.
For more information, you may refer to the SteamVR Troubleshooting page.
What can I do to resolve the "headset not found" error?
Do the following steps to troubleshoot the issue:
- Close all Steam apps on your computer, including the SteamVR app.
-
Check that the cables between the link box and your computer are properly connected. Disconnect and reconnect the cables as needed.
-
Restart the link box by pressing the Power button to turn it off, and then pressing the Power button again to turn it back on. On your computer, you might see a notification that drivers are being installed. Wait for the installation to finish.
- Restart the SteamVR app.
If you still get a similar error, repeat the steps again. You can also check if you're encountering a USB-related issue. For more details, see My headset can't be detected due to a USB port issue. What should I do? on page 36.
For more information, you may refer to the SteamVR Troubleshooting page.
My headset can't be detected due to a USB port issue. What should I do?
Do the following steps to troubleshoot the issue:
- Plug the USB cable into a different USB port to confirm if the error is due to a USB port-related issue.
- Plug the USB cable into a generic USB 3.0 port.
- Open the SteamVR app, and then tap >Create system report.
- Make sure that VIVE Pro Eye devices connect via a USB xHCI port rather than to a port from a specific manufacturer, which might have a compatibility issue with VIVE Pro Eye.
If the error is not resolved, your issue may not be due to USB port compatibility.
- Manually update the USB driver on your computer. You can also download and install official driver updates from the website of your motherboard or USB port manufacturer.
If updating your USB driver doesn't solve the error, purchase and use another PCI-Express USB card (with Intel chipset). Based on our tests, this USB card works well with VIVE Pro Eye:
Inateck® 2-Port USB3.0 PCI-Express Card (Serial: KTU3FR-2O2I)
For more information, you may refer to the SteamVR Troubleshooting page.
After upgrading to Windows 10, VIVE shows as the computer's main monitor. What should I do?
Try the following steps to troubleshoot the issue:
- Disconnect the headset cable on the link box.
- Restart your computer.
- Reconnect the headset cable on the link box.
I'm experiencing skipped frames. What could I do?
If you've installed software in your computer that automatically adjusts the display (such as for night mode), it may be causing the conflict.
To resolve the issue, disable the software that may cause the conflict (such as f.lux or Prismatik) when using VIVE.
I'm seeing drifting motion or floating objects in VR. What could I do?
Try these troubleshooting suggestions.
■ Make sure that there are no reflective surfaces (such as mirrors) within your play area.
- If there are Bluetooth ^ devices in the room, turn them off so that they don't interfere with hardware pairing.
- Check if you're having CPU performance issues. On the SteamVR app, click Settings > Performance > Display Frame Timing. If there are spikes in the graph, it means that the issue is with your CPU.
Can I use the type-C USB earphones that came with my HTC phone?
Type-C USB earphones such as from HTC U11 are compatible with Vive.
However, HTC accessories such as the type-C to 3.5mm adapter currently only works with smart phones.
Is there a way to also hear from the computer what's in VR?
You can duplicate the audio from VIVE Pro Eye to your computer. You may use another pair of headphones or speakers.
- From your computer, open the SteamVR app.
- Click, and then select Settings Audio.
- On the Mirror audio to device drop-down list, choose the audio device where you want to send the additional audio.
What can I do if the headset's dual camera won't turn on?
If you are using Windows 10, disable the power saver settings.
- From your computer, open the Device Manager.
- Under Universal Serial Bus controllers, find and right-click Generic SuperSpeed USB Hub RI, and then select Properties.
- To make sure that this is the VIVE Pro Eye device, click the Details tab, and then confirm that the VID/PID value contains the string 0BB4/030E.
- Click the Power Management tab, and then de-select Allow the computer to turn off this device to save power option.
What should I do if there's cracking noise from the headset earphones?
When this happens after the headset reactivates from standby mode, unplug and replug the USB 3.0 cable on the link box.
What can I do if the headset connection status is unstable?
Make sure that you're not connecting to a USB port on your computer that's labeled for a specific function, such as for USB BIOS Flashback, by its manufacturer. When the issue happens, try connecting to another USB 3.0 port on your computer.
The headset display suddenly turns blank. What can I do?
If you're using an NVIDIA graphics card and you've recently updated your driver, rollback to an older version of the driver (such as 388.xx) to resolve the issue.
How do I install the driver updates for the VIVE Pro Eye dual camera on Windows 7?
If you are using Windows 7, you'll need to install driver updates to use the dual cameras.
You can download the driver updates from this link.
- From your computer, open the Device Manager.
- Under Imaging devices, find and right-click VIVE Pro Multimedia Camera, and then select Properties.
- Click Update driver software.
- When prompted, click Browse my computer for driver software.
- Browse to the file folder where you've downloaded the driver updates, and then select AITDrvWDF.inf.
- When prompted, confirm the installation. Once the update has been applied, the string in Device Manager will change to VIVE Pro Camera.
Base stations
About SteamVR Base Station 2.0

To purchase additional or replacement hardware, click the Accessories tab on www.vive.com/product/. Product availability may vary; please contact customer care for concerns.

- The base stations beam signals to the headset and controllers. Do not cover the front panel with any material.
- When the base stations are turned on, they may affect some nearby infrared sensors, such as those used by an IR TV remote control.
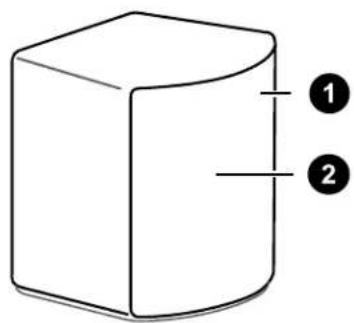
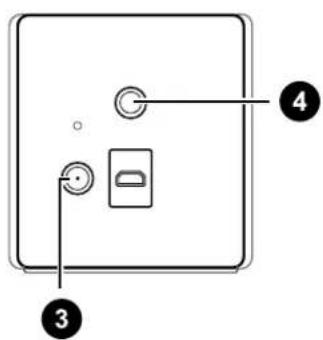
1 Status light
2 Front panel
3 Power port
4 Threaded mounting hole

- Do not attempt to pry open the base stations as doing so could injure you or damage the product.
- If the front panel is cracked or damaged, stop using the base stations and contact HTC Support.
Installing SteamVR Base Station 2.0

To purchase additional or replacement hardware, click the Accessories tab on www.vive.com/product/. Product availability may vary; please contact customer care for concerns.
Before installing the base stations, decide first whether you want to set up a room-scale or seated/standing-only play area. See Planning your play area on page 57.

- Make sure that the base stations are installed outside the play area and securely set up from being accidentally struck, dropped, or bumped to avoid damage or compromised performance.
-
Remember to peel off the protective film from the front panel after you've mounted the base stations.
-
Mount the base stations diagonally at opposite corners of your space and near power outlets.
For details on how to use the mounting kit, see Using the mounting kit on page 46.
You can also use tripods, light stands, or cargo poles when mounting the base stations, or even place it on stable book cases. Just avoid using unstable mounting solutions or surfaces that are prone to vibration.
-
Adjust the base stations so that the front panels are facing toward the center of the play area.
-
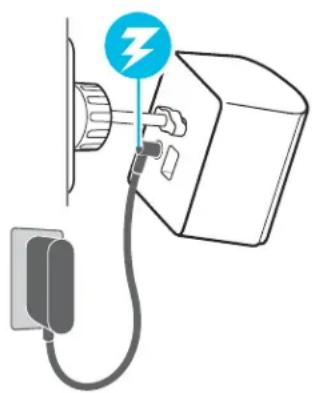
Attach the power cables to the base stations, and then plug each of the adapter into a power outlet to turn them on.

Use only the power cables and adapters that came with your base stations.
natural_image
Diagram of an electric vehicle charging station with a battery and plug, showing no text or symbols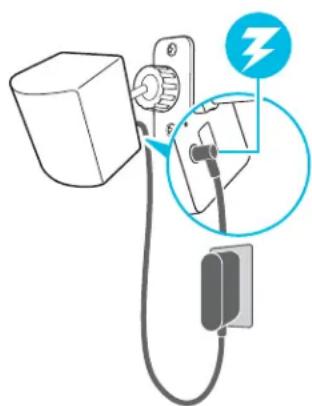
natural_image
Diagram of a wall-mounted power plug connected to a battery, with a magnified inset showing a lightning bolt (no text or symbols present)Depending on the variant of your hardware, the status lights should be white or green.

Once turned on, do not move or adjust the angles of the base stations as it could disrupt the tracking process. Otherwise, you will need to set up the play area again.
Tips for setting up SteamVR Base Station 2.0

To purchase additional or replacement hardware, click the Accessories tab on www.vive.com/product/. Product availability may vary; please contact customer care for concerns.
You may set up the base stations in a way that's suitable for your place. For best results, you may follow these recommendations:
- Mount your base stations diagonally, at opposite corners of your space.
- Each base station has a 150-degree horizontal field of view and a 110-degree vertical field of view. To maximize your play area, set up at above head height (ideally more than 2 m or 6.5 ft from the floor), with the angle of each base station adjusted between 25 and 35 degrees.
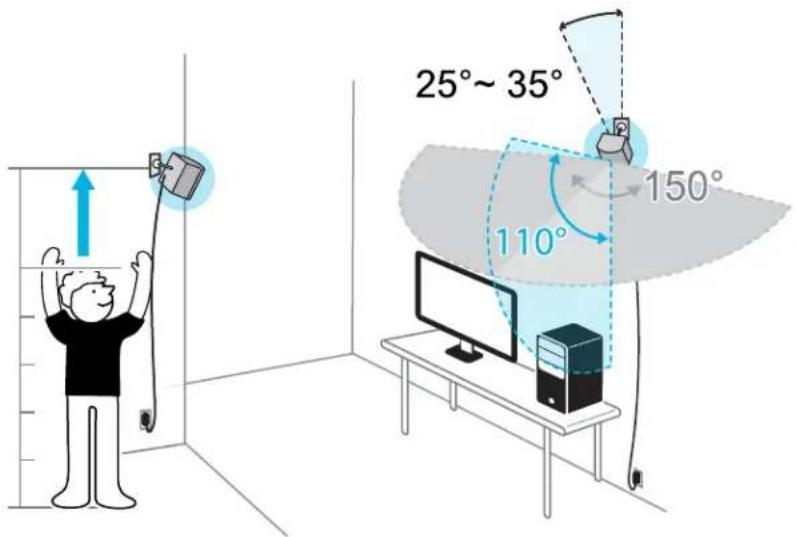
If your space doesn't allow for this kind of setup, you can also mount the base stations on tripods and light stands, or place them on stable surfaces such as a table.
For proper tracking, set each base station at a lowest height of 0.5 m (1.6 ft). Depending on how high you set them up, you need to adjust the angle of the base stations upward or downward to fully cover the play area.
- Secure the base stations in a location where they can't be easily jostled or moved.
- For best performance, trackable objects should be at least 0.5 m (1.6 ft) away from a base station.
- Avoid setting up in an area with bright light, which may negatively affect the performance of the base stations.
How many SteamVR Base Stations 2.0 can I use in a single setup?
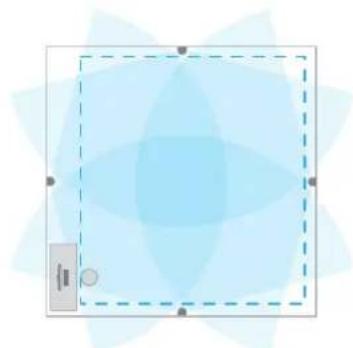
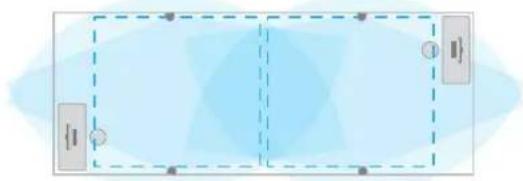
You can use up to four base stations in a single room covering 10 m x 10 m (32 ft 10 in x 32 ft 10 in).
What things should I consider when installing more than two SteamVR Base Stations 2.0?
You can use up to four base stations in a single room covering 10 m x 10 m (32 ft 10 in x 32 ft 10 in).
- Each base station in the same play area will need to be set to a different channel. This will be handled by the SteamVR software automatically.
- Each base station has a 150-degree horizontal field of view. Rotate the angle of the base stations left or right to fine tune and fully cover the play area.
Single user setup
natural_image
Abstract geometric design with a central lens-like shape surrounded by light blue radial lines and small circular elements (no text or symbols)Multi-user setup
natural_image
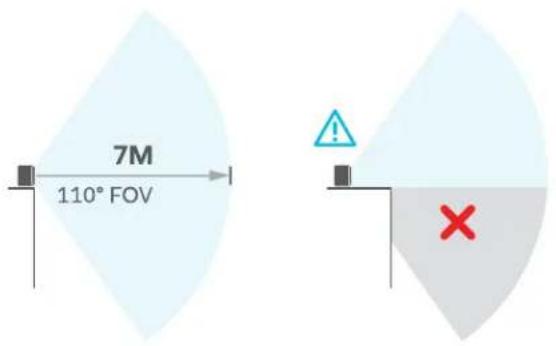
Pure diagram of a rectangular shape with dashed lines and circular elements, no text or symbols present- For proper tracking, make sure that the distance between any base station and the headset and controllers are within a range of 7 m (23 ft). Make sure that there are no physical barriers (such as protruding shelves) where you place the base stations, so that it can fully cover its field of view and its signals won't be obstructed.
Setting up additional base stations
You can add more SteamVR Base Stations 2.0 to the standard setup. Follow these procedures in the order below to complete the process:
■ Installing SteamVR Base Station 2.0 on page 40.
- Configuring the base station channels on page 45.
■ Resetting the play area on page 60.
What are the minimum and maximum play area when using more than two SteamVR Base Stations 2.0?
The minimum play area remains to be at 2 m x 1.5 m (6 ft 6 in x 5 ft), and could support sitting/ standing setup with four base stations in a row. The maximum area with four base stations is up to 10 m x 10 m (32 ft 10 in x 32 ft 10 in).
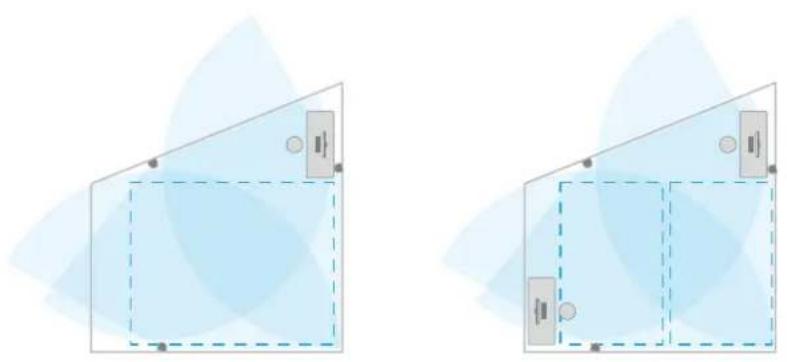
My available space has an irregular shape. Can I still set up more than two SteamVR Base Stations 2.0?
Yes, there are nearly unlimited ways to setup multiple base stations to cover most asymmetric and irregular spaces within the range of SteamVR Base Station 2.0.
Here are some examples:
natural_image
Two identical geometric shapes with shaded translucent regions and circular elements, no text or symbols present.Can I use an odd number of SteamVR Base Stations 2.0?
Yes. Each base station works independently of the others, and there is no pairing requirement between them.
Configuring the base station channels
If you're using more than two SteamVR Base Stations 2.0 in your play area, you can change the channel of the additional base stations.
- From your computer, open the SteamVR app.
- Click ≡, and then select Settings > Bluetooth.
-
Make sure that Enable Bluetooth Communication is selected.
-
Under Base Station 2.0, click Configure Base Station Channels. SteamVR will scan for base stations in the play area. Once complete, you'll see a list of base stations. If you have base stations that have not been detected, click Scan for More.
- To change its channel, click on a base station link. Select an unused channel, and then click Apply.

You can also click Automatic Configuration to let SteamVR set the channels.
If you're prompted that there is a channel conflict, click Continue to resolve the error.
- When you're finished making the changes, click Done.
How can I check which base stations are currently in use?
SteamVR automatically detects the base stations in your play area. If you have more than 2 SteamVR Base Stations 2.0, you can check which of these are used in your VIVE VR system.
- From your computer, open the SteamVR app.
- Do one of the following:
- Click ≡, and then select Settings > Developer > Room Overview.
In the window that opens, the base stations that are tracked by the headset are displayed.
- Click and then select Create System Report.
From the log, you'll see the device names of the base stations that are currently used.
Using the mounting kit
For best results, install SteamVR Base Station 2.0 using a mounting kit, which is provided as an in-box item in VIVE Pro Eye full kit. If you bought more SteamVR Base Station 2.0 units, you can separately purchase a similar mounting kit from a third-party supplier.

- You will need a screwdriver or drill to install the mounts. Ask a professional for help when using power tools.
-
Remember to peel off the protective film from the front panel after you've mounted the base stations.
-
Mark where you want to install each of the mounts on your wall, and then screw the mounts in.
When mounting on concrete or drywall, first drill 14 inch holes and insert anchors before screwing mounts in.
-
Rotate the base station to screw it onto the threaded ball joint. Do not screw the base station all the way in, only enough to be stable and oriented correctly.
-
Tighten the wingnut to the base station to secure it in place.
123
-
To adjust the angle of the base station, loosen the clamping ring while carefully holding the base station to prevent it from falling.
-
Tilt the base station toward the play area. To fix the angle of the base station, tighten the clamping ring back in.
-
Attach the power cable to each base station.
4
5
6
Cleaning the base stations
To purchase additional or replacement hardware, click the Accessories tab on www.vive.com/product/. Product availability may vary; please contact customer care for concerns.
Always keep the base stations and its power adapters dry and away from liquids to avoid shock hazard.
- Unplug and unmount the base stations.
- Use a lightly moistened non-abrasive cloth to clean the base stations. Do not use cleaning chemicals.
- While cleaning the base stations, do not scratch the front panel nor disassemble any of its parts.
Updating base station firmware via Bluetooth

To purchase additional or replacement hardware, click the Accessories tab on www.vive.com/product/. Product availability may vary; please contact customer care for concerns.
-
From your computer, open the SteamVR app.
-
If the Bluetooth driver for the link box needs to be updated, click > Settings> Bluetooth> Update Bluetooth driver.
After installing the Bluetooth driver, restart the computer and relaunch the SteamVR app.
-
Click > Settings > Bluetooth > Enable Bluetooth communication.
-
Do one of the following:
-
Click ≡ > Devices. Click Update Firmware, and then select the base stations.
-
If you see the icon, mouse over it to check if the firmware is out of date. If so, click Update base station firmware.
-
Follow the on screen instructions to complete the process.

Do not unplug the power cable any time before the firmware update is complete. Doing so could result in a firmware error.
What does the status light on the base stations mean?

To purchase additional or replacement hardware, click the Accessories tab on www.vive.com/product/. Product availability may vary; please contact customer care for concerns.
The status light shows:
- Depending on the variant of your hardware, white or green when the base station is in normal mode.
- Blue or blinking blue when the base station is waiting to stabilize. If it remains in this state, check if it is mounted securely or on a surface that's not prone to vibration.
■ Blinking red when there is an error.
What should I do if any of the base stations is not detected?

To purchase additional or replacement hardware, click the Accessories tab on www.vive.com/product/. Product availability may vary; please contact customer care for concerns.
Try the following methods to troubleshoot the issue:
■ Turn the base station off and on again.
- Make sure that you've installed your base stations correctly. For details, see Installing SteamVR Base Station 2.0 on page 40.
- Restart the SteamVR app. If you still get an error, reboot your computer and reopen the SteamVR app.
For more information, you may refer to the

eamVR Troubleshooting page.
Can I use the older version of the base stations together with SteamVR Base Station 2.0?

To purchase additional or replacement hardware, click the Accessories tab on www.vive.com/product/. Product availability may vary; please contact customer care for concerns.
No, they are not compatible. SteamVR Base Station 2.0 has a different method of syncing. Use only the same versions of the base stations in your play area so that your setup will work correctly.
Which VIVE hardware is compatible with my base stations?

Use only the same version of base stations together. Different base station versions are not interchangeable.
Check the table below to see which VIVE hardware you can use with your base stations:
Base station version Compatible VIVE hardware
1.0 ■ VIVE headset
■ VIVE Pro headset
■ VIVE Pro Eye headset
■ VIVE controllers
■ VIVE controllers (2018)
■ VIVE Tracker (2018)
2.0 ■ VIVE Pro headset
■ VIVE Pro Eye headset
■ VIVE controllers (2018)
■ VIVE Tracker (2018)
Are the base stations covered by warranty if accidentally damaged?

To purchase additional or replacement hardware, click the Accessories tab on www.vive.com/product/. Product availability may vary; please contact customer care for concerns.
Please follow the recommended setup instructions for the base stations carefully, since product warranty does not cover accidental damage.
Stop using the base stations if they are damaged, especially if its front panels are cracked.
Controllers
About the VIVE Controllers (2018)

To purchase additional or replacement hardware, click the Accessories tab on www.vive.com/product/. Product availability may vary; please contact customer care for concerns.
Use the controllers to interact with objects in the VR world.
The controllers have sensors that are tracked by the base stations.

The sensors on the controllers are sensitive. Do not cover or scratch the sensor lenses.
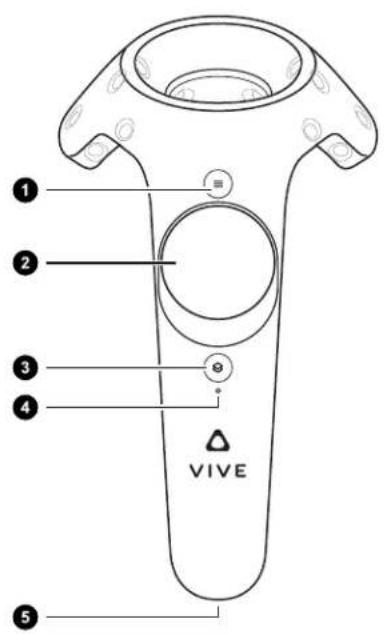
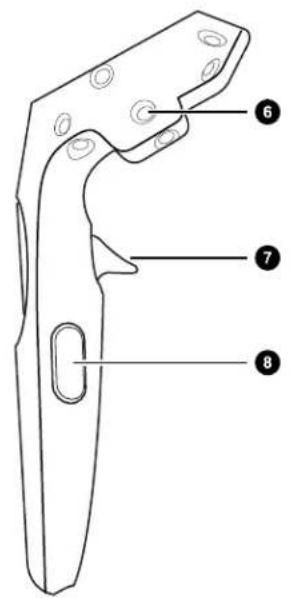
1 Menu button
2 Trackpad
3 System button
4 Status light
5 Micro-USB port
6 Tracking sensor
7 Trigger
8 Grip button
Charging the controllers

To purchase additional or replacement hardware, click the Accessories tab on www.vive.com/product/. Product availability may vary; please contact customer care for concerns.
You can check the battery level of the controllers when no apps are running, or when the System Dashboard is up. When the battery is low, the indicator will show a single red dot .
Charge each controller using the provided power adapters and USB cables.
When the controller is plugged in and fully charged, its status light shows green if the controller is on or white if the controller is off.
Turning the controllers on or off
- To turn the controller on, briefly press the System button.
- To turn the controller off, press and hold the System button until you hear a beeping sound.
When you quit the SteamVR app, the controllers will automatically turn off. The controllers will also automatically turn off after being idle for a period of time.
Pairing the controllers with the headset
- Turn the controllers on by briefly pressing the System button.
- Launch the SteamVR app, tap ≡, and then select Devices >Pair Controller. Follow the on-screen instructions to complete the process.
The status light shows as blinking blue while the pairing is in progress. The status light turns solid green when the controllers are paired with the headset.
Attaching the lanyards to the controllers

To purchase additional or replacement hardware, click the Accessories tab on www.vive.com/product/. Product availability may vary; please contact customer care for concerns.
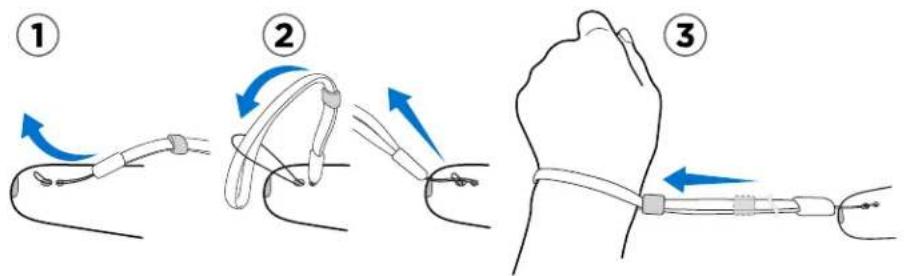
Using the lanyards may help prevent the controllers from accidentally being dropped; however, please do not fling or violently throw the controller because the lanyard may break.
- While holding the controller, insert the lanyard's thread from the top to the bottom hole.
- Loop the lanyard through the thread, and then tug the lanyard to fasten it in place.
- Place the lanyard on your wrist, and then adjust the lock to tighten the lanyard comfortably around your wrist.
Updating controller firmware

To purchase additional or replacement hardware, click the Accessories tab on www.vive.com/product/. Product availability may vary; please contact customer care for concerns.
- From your computer, open the SteamVR app.
- If you see the icon, mouse over it to check if the firmware is out of date. If so, click Update controller firmware.
- Using a micro-USB cable, connect the controllers to one of your computer's USB ports one at time.
Once the controller is detected by the SteamVR app, the firmware update will start automatically.

Do not unplug the micro-USB cable any time before the firmware update is complete. Doing so could result in a firmware error.
- When the update is complete, click Done.
What does the status light on the controllers mean?

To purchase additional or replacement hardware, click the Accessories tab on www.vive.com/product/. Product availability may vary; please contact customer care for concerns.
The status light shows:
■ Green when the controller is in normal mode
■ Blinking red when battery is low
- Blinking blue when the controller is pairing with the headset
■ Blue when the controller is connecting with the headset
- Orange when charging
What should I do if any of the controllers is not tracked?

To purchase additional or replacement hardware, click the Accessories tab on www.vive.com/product/. Product availability may vary; please contact customer care for concerns.
Try the following methods to troubleshoot the issue:
■ Make sure that the controller is placed inside the play area.
- Turn the controller off and on again to reactivate the tracking.
- Restart the SteamVR app. If you still get an error, reboot your computer and reopen the SteamVR app.
For more information, you may refer to the

teamVR Troubleshooting page.
How do I know which of the controllers is not being tracked?

To purchase additional or replacement hardware, click the Accessories tab on www.vive.com/product/. Product availability may vary; please contact customer care for concerns.
If one of your controllers is not being tracked and you want to find out which one, follow these steps.
- On your computer, open the SteamVR app.
- Hover your cursor on the icon of the controller that's not tracked.
- Click Identify controller.
The status light on the controller rapidly flashes white.
For more information, you may refer to the

teamVR Troubleshooting page.
What can I do if the controller's trackpad is oversensitive?

To purchase additional or replacement hardware, click the Accessories tab on www.vive.com/product/. Product availability may vary; please contact customer care for concerns.
Check if there's a firmware update available for the controllers. After which, re-calibrate the controller by doing these steps:
- From your computer, open the SteamVR app.
- Right-click on the icon, and then click Calibrate controller.
- Follow the onscreen prompts to complete the calibration process.
For more information, you may refer to the SteamVR Troubleshooting page.
What should I do if my controller won't turn on?

To purchase additional or replacement hardware, click the Accessories tab on www.vive.com/product/. Product availability may vary; please contact customer care for concerns.
Try these troubleshooting suggestions:
- Press and hold the System button for at least 5 seconds and see if the controller turns on.
- Charge the controller using the other cable and adapter, and plug the adapter to a different power outlet.
- On the SteamVR dashboard, check if the controllers are detected. If controllers are detected but the LED light is off, it may indicate an issue with the LED.
- Check if you have a firmware update that failed. To recover from this error, see My controller won't turn on after I accidentally unplugged it during firmware update. What should I do? on page 56.
The controller automatically turns off. What should I do?

To purchase additional or replacement hardware, click the Accessories tab on www.vive.com/product/. Product availability may vary; please contact customer care for concerns.
Do the following steps to troubleshoot the issue:
- Make sure that the controller is charged.
-
Check that the status light on the controller shows as green, which means that it is paired with the headset.
-
Plug the USB cable from the link box into another USB 3.0 port on the computer.
- Manually update the USB driver on your computer. You can also download and install official driver updates from the website of your motherboard or USB port manufacturer.
My controller won't turn on after I accidentally unplugged it during firmware update. What should I do?

To purchase additional or replacement hardware, click the Accessories tab on www.vive.com/product/. Product availability may vary; please contact customer care for concerns.
Do the following steps to recover your controller from bootloader mode.
- Using a micro-USB cable, connect the controller to one of your computer's USB ports.
- From your computer, open the SteamVR app.
- Once the controller is detected by the SteamVR app, follow the onscreen prompts to complete the firmware update.
57 Play area
Play area
What is the play area?
The play area sets the virtual boundaries of VIVE Pro Eye. Your interaction with VR objects happen within the play area.
VIVE Pro Eye is designed for room-scale setup, but you can also use it for standing and seated experiences.
Planning your play area
Before choosing your setup, make sure that you have enough space.
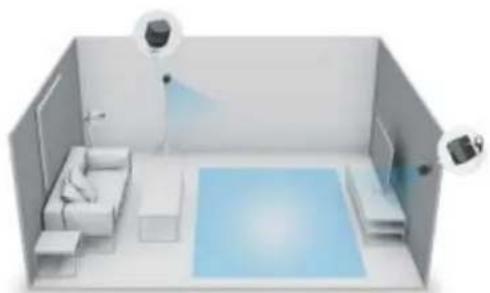
Room-scale setup needs a minimum play area of 2 m x 1.5 m (6 ft 6 in x 5 ft). Examples of room-scale setup:
natural_image
Interior layout diagram of a modern living room with sofa, bathtub, and wall-mounted devices (no text or symbols)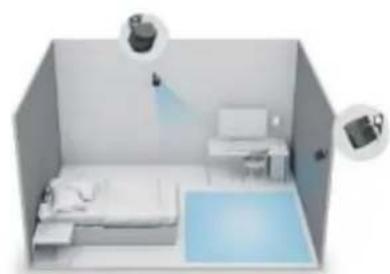
natural_image
Interior view of a modern room with a bed, desk, lamp, and wall-mounted equipment (no text or symbols visible)Seated and standing experiences do not have space requirements. Examples of seated/standing setup:
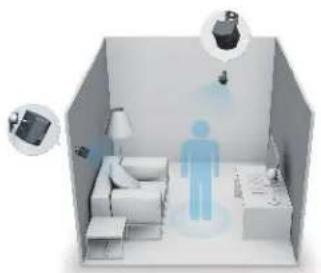
natural_image
Interior view of a modern living room with a person silhouette, lamp, and wall-mounted devices (no text or symbols visible)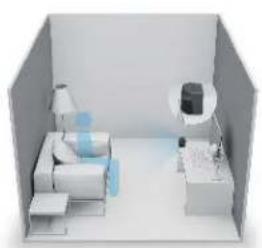
natural_image
3D interior rendering of a minimalist living room with sofa, lamp, and desk (no text or symbols)Choosing the play area
Find a space that you will designate as the play area. For best results, do the following:
■ Move furniture and other obstacles (like pets) out of the play area.
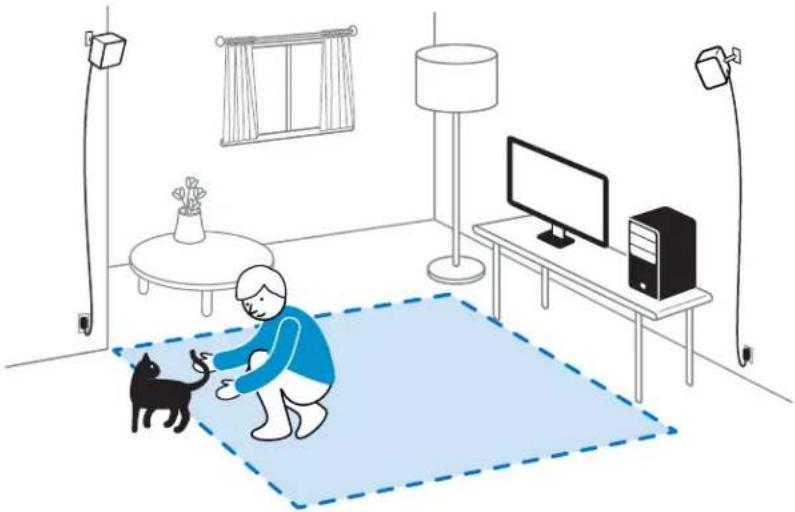
natural_image
Illustration of a person interacting with a cat in a room with TV, lamp, and wall (no text or symbols)- Place your computer next to your play area. The headset cable extends around 5 m (16 ft 4 in) from your computer.
- Make sure that there are power outlets close to where you mount the base stations. Use 12V extension cords as needed.
- Do not leave your headset in direct sunlight, as it may damage your headset display.
Setting up VIVE Pro Eye for the first time
Before you can use VIVE Pro Eye, you'll need to complete the setup process, which includes installing VIVE and SteamVR software, setting up the hardware, and defining your play area.
To start the setup process, download the setup file on your computer from:
www.vive.com/setup/vive-pro
Run the setup file and follow the prompts to complete the process.

Once you've completed the room setup, you need to run it again if you moved or adjusted the angles of the base stations or if you transfer your VIVE Pro Eye VR system to a different room.
59 Play area
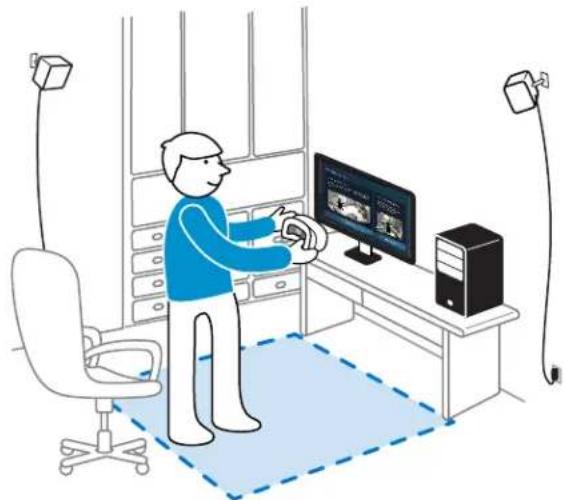
Setting up a standing-only play area
Choose this option if you only want to experience VR in a seated or standing position.
- From your computer, open the SteamVR app.
- Click ≡, and then select Run Room Setup > Standing only.
- Review the prompts and follow the on-screen instructions to complete the process.
natural_image
Illustration of a person working at a desk with computer monitors and server equipment (no text or symbols visible)60 Play area
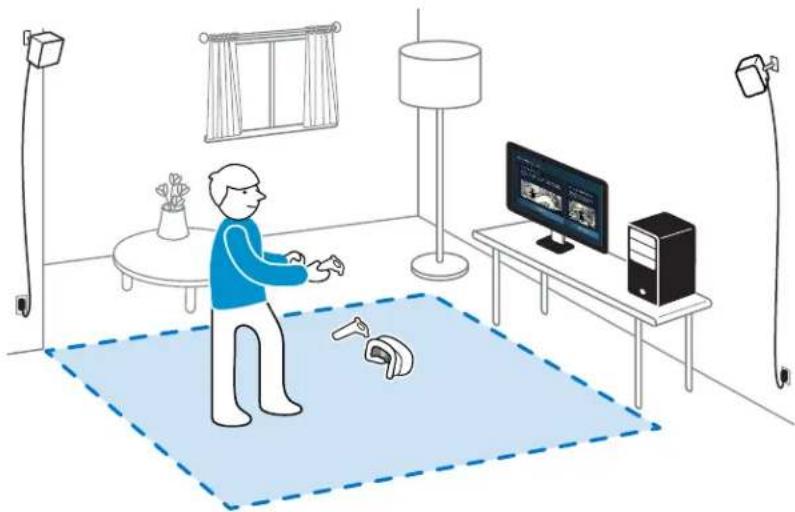
Setting up a room-scale play area
Choose to set up a room-scale play area to enjoy moving around and fully engage with the VR experience.
-
From your computer, open the SteamVR app.
-
Click≡, and then select Run Room Setup > Room-scale.
-
Review the prompts and follow the on-screen instructions to complete the process.
natural_image
Illustration of a person using VR equipment in a room with monitor, tower, and wall-mounted lighting (no text or symbols)When tracing the boundaries of the play area, make sure that the floor is cleared. Do not trace across space occupied by things (such as a table or a chair) since this may cause you to trip into the object while in VR.
Resetting the play area
- From your computer, open the SteamVR app.
- Click, and then select Run Room Setup.
- Follow the prompts to complete the process.
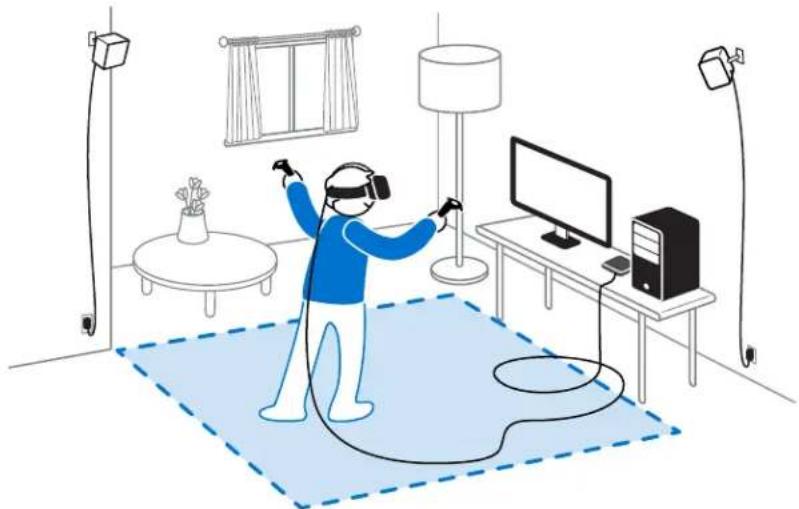
Verifying your setup
Once you've completed the VIVE setup process, you can now put on the headset and hold the controllers to start exploring VR.
natural_image
Illustration of a person using VR headset in a smart home setting with monitor, tower, and wall-mounted equipment (no text or symbols)While you're in the play area, the headset and the controllers should remain at least 0.5 m (1 ft 7 in) away from a base station. This will ensure that the devices are properly tracked within the base station's 150-degree horizontal field of view and 110-degree vertical field of view.
!
For health and safety warnings, please refer to the Safety and regulatory guide, which is periodically updated for accuracy and completeness. For the latest version, check www.vive.com/.
After setting up, how do I turn the VIVE system on?
- From your computer, open the SteamVR app.
- Make sure your base stations are powered.
- Make sure that your headset is connected to the computer via the link box. For details, see Connecting the headset to your computer on page 24.
- Turn the controllers on.
- Check that VIVE hardware is tracked. The status icons on the SteamVR app and the status lights on the hardware should all be green.
- Put the headset on. For details, see Putting on the VIVE Pro Eye HMD on page 9.
- Grab your controllers.
To bring up the System Dashboard, press the System button on either controller.
What is the recommended space for the play area?
For room-scale setup, a minimum play area of 2 m x 1.5 m (6 ft 6 in x 5 ft) is required, while the maximum size is 7 m x 7 m (23 ft x 23 ft).
There's no minimum for seated and standing experiences.
Can I include space occupied by furniture for the play area?
It is not recommended to do so. When setting the boundaries of the play area, make sure that the floor is cleared. Do not trace across space occupied by things (such as a table or a chair) since this may cause you to trip into the object while in VR.
Will VR apps for seated/standing-only experiences work with room-scale setup?
Even if you have a room-scale setup, you can still use VR apps that are designed for seated or standing-only experiences. Just make sure that your headset and controllers are tracked within the play area.
To set or reset the seated position while in VR, do the following:
- Press the System button to bring up the System Dashboard.
- Select >General.
- Select Reset seated position, and then follow the prompts to complete the process.
How do I resolve download errors during VIVE Setup installation?
Download errors are usually caused by incorrect network settings. For example, due to wrong DNS, the download server address is unresolved by the host. Some network destinations may be inaccessible, even as connection to other websites seems normal. Please make sure that your network settings are correct, or ask your network administrator for support.
I can't complete the room setup. What should I do?
Check if you're using special characters (such as à or é) in your local Windows user name, which could cause the problem.
As a workaround, you can add a new Windows account using basic Latin alphabet for its user name. After logging in with the new user name, reinstall VIVE Setup and complete the process.
Settings
Audio settings
What are the audio settings?
Take control of how you experience sound while you're in VR.
Change the Audio mode to suit your context. You can select either of the following options:
Default Choose this to revert to the original settings.
Conversational Choose this if you need to talk and listen to other people even while in VR. The sound source in VR will be directed to foreground, while the headset mic will be active to let you hear conversations in the room.
Ambient Choose this if you want to hear background sound from your room while you're in VR. This setting is helpful if you're expecting someone to call your phone or ring your door bell. The sound volume will be lower, while the headset mic will be active to detect tones in the room.
Meanwhile, enable Sound Boost to enhance the sound quality should you choose to use your own third-party earphones with the headset.
Changing the audio mode
Choose a predefined audio mode to change the headset's sound quality. To learn more about the different modes, see What are the audio settings? on page 63.
-
While in VR, go to the Vive Dashboard.
-
On the right panel, under , subject .

- Select Audio mode, and then choose the mode you prefer.

Once you change to another audio mode, the setting will be applied to the next VR content that you'll launch. To revert to the original settings, choose Default.
Enhancing the sound quality of third-party earphones
Enable Sound Boost to enhance the sound output while you're using third-party high-impedance earphones with the headset.

- Remove the built-in earphones from the headset before using your own earphones. To find out how, see Removing the headset earphones on page 17.
- You need a type-C to 3.5mm adapter to use third-party earphones.

- While in VR, go to the Vive Dashboard.
- On the right panel, under, subject.
- Select Sound Boost.
- To preview the changes to the sound, click Test sound.
- Toggle between Enable and Disable to choose whether to apply the setting.

Listening at a high volume for an extended period of time may damage your hearing.
System Dashboard settings
System Dashboard
The System Dashboard serves as your central point of entry in VR.
While in the dashboard, some of the things you can do are:
■ Launch or close a VR app
■ Control sound volume and mic access
- Change settings, such as style of the collision bounds in Chaperone or the in-headset background
■ Turn the VIVE Pro Eye system off
To bring up the dashboard, press the System button on either controller.
Changing the Chaperone settings
The Chaperone shows a grid whenever you're close to the bounds of your play area. You can change how the grid looks.

- From the System Dashboard, select .
- Select Chaperone.
-
Choose the style of the collision bounds that you prefer.
-
Drag the sliders to change the color and opacity.
- To show a constant visual reference of your floor while in VR, select Floor bounds always on.
Changing the default background display
When you turn on the VIVE system, the first you'll see is a default background display. It's the same background that shows when you select Room view in System Dashboard.

- From the System Dashboard, select .
- Select In-Headset.
- Under Background style, select Image.
- Choose which image you want from the options. If want to use an image from your computer, select Open image folder.
- Exit the current app to apply the changes.
Phone notifications
Downloading and installing the VIVE phone app



Before downloading the VIVE app, please make sure that your phone meets the minimum system requirements indicated on the VIVE app's download page.
- On your phone, open the Play Store or App Store apps.
- Search for Vive.
- Download and install the VIVE app.
Pairing your phone with VIVE
Pair your phone with the VIVE system to start receiving notifications while you're on VR.
- On your computer's VIVEPORT app, click 🔒, and then select Set up a Phone.
- On your phone, open the VIVE app. The first time that you open the VIVE app, review the prompts and tap Allow.
- On both your computer and phone, click Get started. Make sure that Bluetooth is turned on and that your phone is discoverable.
-
From the list of discovered devices on your computer, select your phone, and then click Next.
-
When prompted, accept the pairing request or enter the pairing code on your phone.
- Once pairing is complete, click OK and Done on your computer and phone respectively.
Choosing which notifications to receive on VR
Manage which notifications you get while using VIVE.
- On your phone, open the VIVE app.
-
Do one of the following:
-
Android™ users: Tap : >Settings.
-
iOS users: Switch to the Settings tab.
-
Choose which types of notifications you'd like to receive.
Receiving notifications while in VR
Don't worry about missing important notifications. While you're in any VR app, you'll see a notification when you have an incoming call, message, or upcoming calendar event.

To receive notifications while in VR, you need to pair your phone with VIVE Pro Eye first. To find out how, see Pairing your phone with VIVE on page 65.
To receive or open the notification, press the System button.
If you choose to ignore the incoming notification, you can always check it later on the VIVE tab. For details, see Checking your notifications on page 66.
Checking your notifications
Conveniently review notifications from your phone without leaving VR.

To receive notifications while in VR, you need to pair your phone with VIVE Pro Eye first. To find out how, see Pairing your phone with VIVE on page 65.
From the VIVE tab's Notifications panel, you can:
■ View a missed call or text message
■ View an upcoming calendar event
- Call back a contact
■ Reply with a text message (Android users only)
Editing or adding message replies (Android users)
If you're using an Android phone, customize the messages that you can quickly send to your contacts.
- On your phone, open the VIVE app.
-
Tap Settings.
-
Tap Quick replies.
-
Select a predefined message to edit or tap to add a custom message.
Unpairing your phone with VIVE
You can only use one phone at a time with your VIVE Pro Eye. Unpair your current phone first if you need to use another phone with VIVE Pro Eye.
- On your phone, open the VIVE app.
-
Do one of the following:
-
Android users: Tap : >Settings, and then tap Unpair.
- iOS users: Switch to the Settings tab, and then tap Forget this device.

You can also unpair your phone through your computer's VIVEPORT app. Click , and then click Unpair under Phone.
What types of phone notifications can I receive on VIVE Pro Eye?
While in VR, you may receive phone calls, text messages, and calendar reminders. To do so, you need to install the VIVE app on your phone and complete the pairing process with the VIVE Pro Eye system. You can choose which notifications you want to get on your phone's VIVE app settings.
Can I receive notifications from more than one phone on VIVE Pro Eye?
Currently, only one phone is supported if you want to receive notifications while in VR. If you want to use another phone with your VIVE Pro Eye, unpair the previous phone first.
What features of the VIVE phone app are not supported in the iOS version?
Currently, editing or adding personalized replies for calls or messages are not supported in the app's iOS version.
SteamVR
Activating the dual camera
You need to enable the settings for the dual camera of VIVE Pro Eye before you can use it in VR.
- From your computer, open the SteamVR app.
- Click ≡, and then select Settings > Camera.
- Click Enable Camera.
- Close and reopen the SteamVR app.
- Click ≡, and then select Settings > Camera.
- Select Allow Camera in Dashboard.
Checking for firmware updates
Firmware updates include improved features and bug fixes.
-
From your computer, do one of the following:
-
On the SteamVR status window, mouse over on any of the hardware icons to check if the firmware is out of date, and then select to update the firmware.
-
On the SteamVR app, click ≡, and then click Devices > Update Device.
-
Follow the prompts on the screen.
If the update is for the controllers or base stations, you'll be asked to connect them to your computer using a micro-USB cable.
!
While firmware updates are in progress, do not unplug the micro-USB or power cables that connect your hardware to your computer. Doing so could result in a firmware error.
How can I capture screenshots in VR?
While in VR, press the System button and the trigger at the same time. You'll see a notification when the screenshot is saved.
You can access screenshots directly from the Steam client by clicking View > Screenshots.
To find screenshots from apps downloaded in VIVEPORT, navigate to the Steam installation folder. The default location on 64-bit versions of Windows is:
C:\Program files (x86)\Steam\userdata[Steam user number]\760\remote\0\screenshots
If you have chosen a custom installation folder, navigate to it and find the following subfolder:
...\Steam\userdata[Steam user number]\760\remote\0\screenshots
Screenshots from other apps can be found in their respective folder:
...\Steam\userdata[Steam user number]\760\remote[app folder]\screenshots
What can I do if I'm having issues with the SteamVR app?
The problem could be due to missing or corrupt files in the SteamVR app. Make sure that your installation is intact.
- From your computer, close the SteamVR app.
- Open the Steam app, and then click Library > Tools.
- Right-click SteamVR, and then and select Properties.
- Click the Local Files tab, and then select Verify integrity of tool cache.
For more information, you may refer to the SteamVR Troubleshooting page.
How do I resolve SteamVR Error 208?
If you encounter the SteamVR Error 208 (Monitor not Found) issue, check if the troubleshooting details on What can I do to troubleshoot the headset? on page 34 can resolve the problem.
If you're using Windows 8 or later, the issue might be caused by enhancements in power management settings. Do these steps as a workaround:
- On your computer, go to Control Panel > System and Security > System.
- Click Device Manager, and then click to expand the list under Universal Serial Bus controllers.
- Right-click Generic USB Hub (there may be more than one with the same label), and then select Properties.
- Click the Power Management tab, and then de-select Allow the computer to turn off this device to save power.
- Unplug and re-plug the power cable on the link box.
- Restart the SteamVR app.
For more information, you may refer to the SteamVR Troubleshooting page.
How can I opt-in to SteamVR Beta?
- From your computer, open the Steam app.
- Under Library, right-click SteamVR, and then click Properties.
- Select the Betas tab.
- Under Select the beta you would like to opt into drop-down list, select beta - SteamVR Beta Update.

If you'd like to opt out in the future, select None – Opt out of all beta programs.
- Close the window, and then wait for SteamVR to finish updating.
Trademarks and copyrights
©2019 HTC Corporation. All Rights Reserved.
VIVE, the VIVE logo, VIVEPORT, the VIVEPORT logo, HTC, the HTC logo, and all other HTC product and service names are trademarks and/or registered trademarks of HTC Corporation and its affiliates in the U.S. and other countries.
Steam, the Steam logo and SteamVR are trademarks and/or registered trademarks of Valve Corporation in the U.S. and/or other countries.
All other trademarks and service marks mentioned herein, including company names, product names, service names and logos, are the property of their respective owners and their use herein does not indicate an affiliation with, association with, or endorsement of or by HTC Corporation. Not all marks listed necessarily appear in this User Guide.
Screen images contained herein are simulated. HTC shall not be liable for technical or editorial errors or omissions contained herein, nor for incidental or consequential damages resulting from furnishing this material. The information is provided “as is” without warranty of any kind and is subject to change without notice. HTC also reserves the right to revise the content of this document at any time without prior notice.
No part of this document may be reproduced or transmitted in any form or by any means, electronic or mechanical, including photocopying, recording or storing in a retrieval system, or translated into any language in any form without prior written permission of HTC.
Index
A
Audio mode 63
B
Base stations
- about 39
-channel configuration 45 - cleaning 47
- installing 40
- mounting with the kit 46
- multiple setup 43, 44
- setup tips 42
- updating firmware 48
C
Chaperone 64
Controllers
- about 51
- attaching lanyards 53
- charging 52
- pairing with the headset 52
- turning on or off 52
F
Firmware updates 68
H
Headset
- about 7
- adjusting the IPD 12
-adjusting the lens distance 13 - connecting a USB device 15
- product care 28
- putting on 9
- replacing the face cushion 14
L
Link box
- about 23
- connecting the headset 24
P
Phone notifications
-checking 66
- choosing 66
-editing replies 66
-receiving 66
- about 57
- choosing 57
-room-scale 60
- setting up 57
- standing/seated experience 59
- verifying the setup 61
Play area
R
Room-scale
- setting up 60
S
Settings
- audio 63
- Chaperone 64
- front-facing camera 67
- in-headset display image 65
Sound Boost 64
Standing/seated experience
- setting up 59
System Dashboard 64
V
Vive phone app
- downloading 65
-pairing 65 - unpairing 67
72 Index
Vive system
- turning on 61
- Headset and link box
- Base stations
- Controllers
- Play area
- Settings
- Trademarks and copyrights
- Index
- About this guide
- System requirements
- What are the system requirements?
- How can I check if my PC meets the minimum system requirements for VIVE?
- Can I still use VIVE if my PC doesn't meet the system requirements?
- What's inside the box?
- Headset
- About the VIVE Pro Eye HMD
- Front and side
- Back
- Bottom and inner
- Putting on the VIVE Pro Eye HMD
- Adjusting the IPD on the headset
- Adjusting the lens distance on the headset
- Replacing the face cushion
- Connecting a USB device to the VIVE Pro Eye HMD
- Removing the headset earphones
- Replacing the headset earphones
- Reattaching the head pad on the headset strap
- Updating the headset firmware
- Link box
- About the link box
- Connecting the headset to your computer
- Can I use a laptop with VIVE Pro Eye?
- Restarting the link box
- Eye tracking
- Calibrating eye tracking
- Installing the eye tracking software
- Running the eye tracking software for the first time
- What can I do if eye tracking calibration fails?
- What can I do if eye tracking isn't accurate?
- Product care and repair
- Caring for your VIVE Pro Eye
- Cleaning the face cushion
- Cleaning the headset lenses and eye trackers
- How do I reassemble the headset after repair?
- Common solutions
- What can I do when the status light on the headset indicates an error?
- What should I do if the headset is not tracked?
- My headset display is blurry. What should I do?
- What can I do to resolve the "headset not found" error?
- About SteamVR Base Station 2.0
- Installing SteamVR Base Station 2.0
- Tips for setting up SteamVR Base Station 2.0
- How many SteamVR Base Stations 2.0 can I use in a single setup?
- What things should I consider when installing more than two SteamVR Base Stations 2.0?
- Setting up additional base stations
- What are the minimum and maximum play area when using more than two SteamVR Base Stations 2.0?
- My available space has an irregular shape. Can I still set up more than two SteamVR Base Stations 2.0?
- Can I use an odd number of SteamVR Base Stations 2.0?
- Configuring the base station channels
- How can I check which base stations are currently in use?
- Using the mounting kit
- 123
- Cleaning the base stations
- Updating base station firmware via Bluetooth
- What does the status light on the base stations mean?
- What should I do if any of the base stations is not detected?
- Can I use the older version of the base stations together with SteamVR Base Station 2.0?
- Which VIVE hardware is compatible with my base stations?
- Base station version Compatible VIVE hardware
- ■ VIVE headset
- ■ VIVE Pro headset
- Are the base stations covered by warranty if accidentally damaged?
- About the VIVE Controllers (2018)
- Charging the controllers
- Turning the controllers on or off
- Pairing the controllers with the headset
- Attaching the lanyards to the controllers
- Updating controller firmware
- What does the status light on the controllers mean?
- What should I do if any of the controllers is not tracked?
- How do I know which of the controllers is not being tracked?
- What can I do if the controller's trackpad is oversensitive?
- What should I do if my controller won't turn on?
- The controller automatically turns off. What should I do?
- My controller won't turn on after I accidentally unplugged it during firmware update. What should I do?
- What is the play area?
- Planning your play area
- Choosing the play area
- Setting up VIVE Pro Eye for the first time
- Setting up a standing-only play area
- Setting up a room-scale play area
- Resetting the play area
- Verifying your setup
- After setting up, how do I turn the VIVE system on?
- What is the recommended space for the play area?
- Can I include space occupied by furniture for the play area?
- Will VR apps for seated/standing-only experiences work with room-scale setup?
- How do I resolve download errors during VIVE Setup installation?
- I can't complete the room setup. What should I do?
- Audio settings
- What are the audio settings?
- Changing the audio mode
- Enhancing the sound quality of third-party earphones
- System Dashboard settings
- System Dashboard
- Changing the Chaperone settings
- Changing the default background display
- Phone notifications
- Downloading and installing the VIVE phone app
- Pairing your phone with VIVE
- Choosing which notifications to receive on VR
- Receiving notifications while in VR
- Checking your notifications
- Editing or adding message replies (Android users)
- Unpairing your phone with VIVE
- What types of phone notifications can I receive on VIVE Pro Eye?
- Can I receive notifications from more than one phone on VIVE Pro Eye?
- What features of the VIVE phone app are not supported in the iOS version?
- SteamVR
- Activating the dual camera
- Checking for firmware updates
- How can I capture screenshots in VR?
- What can I do if I'm having issues with the SteamVR app?
- How do I resolve SteamVR Error 208?
- How can I opt-in to SteamVR Beta?
- A
- B
- C
- Chaperone 64
- F
- H
- L
- P
- R
- Room-scale
- S
- Sound Boost 64
- Standing/seated experience
- System Dashboard 64
- V
- Vive phone app
Brand : HTC
Model : VIVE Pro Eye
Category : VR headset