
Super Scorpion - Remote control toy FMS - Free user manual and instructions
Find the device manual for free Super Scorpion FMS in PDF.


| Product Type | Remote control aircraft (EDF jet) |
| Brand | FMS |
| Model | Super Scorpion |
| Wingspan | 1140 mm (44.9 in) |
| Overall Length | 1320 mm (52 in) |
| Flying Weight | Around 3200 g (112.9 oz) |
| Wing Area | 29.4 dm² (455.7 sq in) |
| Wing Load | 108.8 g/dm² (0.25 oz/in²) |
| Motor | Brushless 3546-KV1900 |
| ESC | 130A with 10A UBEC |
| Fan | 90mm 12-blade EDF |
| Servos | 17g Servo x 4, 13g Servo x 5 (metal gear) |
| Recommended Battery | 22.2V 5000mAh 45C Li-Po |
| Landing Gear | CNC-processed shock-absorbed metal, front 50mm wheel, rear 68mm wheels |
| Functions | Flaps, retractable landing gear, LED lights, multi-connector for easy assembly |
| Control Throws (High Rate) | Elevator: 12mm up/down; Aileron: 16mm up/down; Rudder: 12mm left/right |
| Center of Gravity | 150-160mm from leading edge of main wing |
| Material | Foam (screw-together construction, no glue required) |
| Age Recommendation | Not for children under 14 years |
| Spare Parts Availability | Fuselage, wings, stabilizers, landing gear, electronic retracts, EDF unit, motor, ESC, servos, etc. |
| Maintenance | Use foam-safe adhesives; check screws before each flight |
Frequently Asked Questions - Super Scorpion FMS
User questions about Super Scorpion FMS
0 question about this device. Answer the ones you know or ask your own.
Ask a new question about this device
Download the instructions for your Remote control toy in PDF format for free! Find your manual Super Scorpion - FMS and take your electronic device back in hand. On this page are published all the documents necessary for the use of your device. Super Scorpion by FMS.
USER MANUAL Super Scorpion FMS
natural_image
Line drawing of a fighter jet with visible cockpit, fuselage, and landing gear (no text or symbols)
WARNING: Read the ENTIRE instruction manual to become familiar with the features of the product before operating. Failure to operate the product correctly can result in damage to the product, personal property and cause serious injury.
This is a sophisticated hobby product and NOT a toy. It must be operated with caution and common sense and failure to do so could result in injury or damage to the product or other property. This product is not intended for use by children without direct adult supervision.
This manual contains instructions for safety operation and maintenance. It is essential to read and follow all the instructions and warnings in the manual prior to assembly, setup or use, in order to operate and avoid damage or serious injury.
Safety Precautions and Warnings
As the user of this product, you are solely responsible for operating in a manner that does not endanger yourself and others or result in damage to the product or the property of others. This model is controlled by a radio signal subject to interference from many sources outside your control. This interference can cause momentary loss of control so it is advisable to always keep a safe distance in all directions around your model, as this margin will help avoid collisions or injury.
Age Recommendation: Not for children under 14 years. This is not a toy.
·Never operate your model with low transmitter batteries.
·Always operate your model in an open area away from cars, traffic or people.
·Avoid operating your model in the street where injury or damage can occur.
·Never operate the model in populated areas for any reason.
- Carefully follow the directions and warnings for this and any optional support equipment you use (chargers, rechargeable battery packs, etc.)
- Keep all chemicals, small parts and anything electrical out of the reach of children.
- Moisture causes damage to electronics. Avoid water exposure to all equipment not specifically designed and protected for this purpose.
·Never lick or place any part of your model in your mouth as it could cause serious injury or even death.
Safety
Lithium Polymer (Li-Po) Battery Warning
CAUTION: Always follow the manufacturer's instructions for safe use and disposal of batteries. Fire, property damage, or serious injury can result from the mishandling of Li-Po batteries.
By handling, charging or using a Li-Po Battery you assume all risks associated with lithium batteries.
If at any time the batteries begin to swell or balloon, discontinue use immediately!
Always store the batteries at room temperature in a dry area to extend the life of the battery. Always transport or temporarily store the battery at a temperature range of 40-120F. Do not store the battery or model in a car or in direct sunlight. If stored in a hot car, the battery can be damaged or even catch fire.
Never use a Ni-Mh Charger to charge Li-Po Batteries. Failure to charge the battery with a Li-Po compatible charger may cause fire resulting in personal injury and property damage.
▶Never discharge Li-Po Cells below 3V.
▶Never leave charging batteries unattended.
▶Never charge damaged batteries.
Use a battery charger that is designed to safely charge the Li-Po Battery. Read the charger instructions carefully before use. When charging the battery, make certain the battery is on a heat resistant surface. It is also highly recommended to place the Li-Po Battery inside a fire resistant charging bag readily available at hobby shops or online.
Table of Contents
Introduction 3
Contents of Kit 4
Model Assembly 5
Battery and radio installation 9
Connectors Diagram 9
Important ESC and model information 10
The transmitter and model setup 10
Check the control throws 11
Clevis Installation 12
Control Horn and Servo Arm Settings 12
Center of Gravity(CG) 13
Before flying the model....14
Flying your model 15
Troubleshooting 16
Spare parts list content 17
ESC instruction 18
Introduction
Inspired by the features of 70mm Super Scorpion, the higher level 90mm Super Scorpion is coming!
Super Scorpion is a collaborative venture bringing together original design and authorization from the Aviation Design Team from France with cutting-edge production methods from FMS in China.
The 90mm Super Scorpion keeps all superior features of the prior 70mm Super Scorpion, while improving the model structure, and adding a flap function. When working with the new power system, it performs excellently whether high-speed flying or standard-speed flying. In addition, it features the CNC-processed shock-absorbed metal landing gear set, a 50mm diameter front wheel and 68mm diameter rear wheels, these are excellent for taking off and landing on both paved and grass surface airfields.
The coming 90mm Super Scorpion is another example of FMS' quality. Incorporating many new and advanced construction and assembly features such as the optimized screw-based assembly, ball links and the new multi-connect technology, the Super Scorpion will assemble quickly. In addition, the power system utilizes our 90mm 12-blade EDF and the 3546-KV1900 motor system provides tremendous power and speed when coupled with a 6S battery. The vibrant orange color scheme makes this airplane look fantastic on the ground and in the air...
No matter whether you've had a Super Scorpion before or not, the coming FMS 90mm Super Scorpion is full of surprises.
Features:
- 90mm 12-blade EDF, 3546-KV1900 motor system
- High-quality Predator 130A ESC with 10A UBEC
- CNC-processed shock-absorbed metal landing gear set helps to withstand those less-than-perfect landings.
- Dia. 50mm front wheel and Dia. 68mm rear wheels
- Excellent Sound Effect.
- Function Flaps
- Metal Servos for excellent controlling capacity
- Multi-connector for easy assembly and disassembly
- Pre-installed, newly designed ball link style control horns for more throw
- No glue required. Screw-together construction
- Environmentally friendly water-based paint for better color and gloss
Specifications
Wingspan: 1140mm (44.9in)
Overall Length: 1320mm (52in)
Flying Weight: Around 3200g (112.9oz)
Motor Size: Brushless 3546-KV1900
Wing Load: 108.8 g/dm² (0.25oz/in²)
Wing Area: 29.4 dm² (455.7 sq.in)
ESC: 130A with 10A UBEC
Servo: 17g Servo x 4, 13g Servo x 5
Contents of Kit
Before assembly, please inspect the contents of the kit. The photo below details the contents of the kit and labels. If any parts are missing or defective, please indentify the name or part number (refer to the spare parts list near the end of the manual) then contact your local shop or email us: support@fmsmodel.com
A.

natural_image
Top-down technical line drawing of a missile or aircraft (no text or symbols present)B.

natural_image
Technical drawing of two gray structural panels with corner brackets and mounting holes, shown from different angles (no text or symbols)C.

natural_image
Two identical gray metal bracket components with mounting holes and mounting brackets (no text or symbols)D.
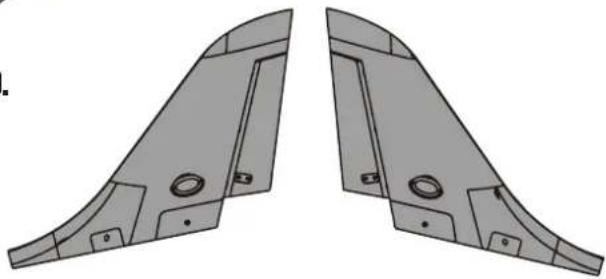
natural_image
Two identical gray metal structural panels with cutouts and mounting holes, shown side by side (no text or symbols)E
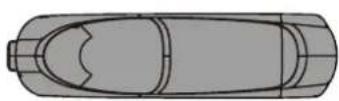
G.

A: Fuselage
B: Main Wing (Left and Right)
C: Horizontal Stabilizer (Left and Right)
D: Vertical Stabilizer (Left and Right)
E: Canopy Hatch
F: Fiber Pipe
G: Screws (4-HKM3.0*10mm, 4-HKM3.0*16, 4-HKM3.0*26, 2-HKM3.0*32)
Model Assembly
Main Wing Installation
- Slide the tube into the fuselage then install both wings over the wing tube and into the wing slot of the fuselage. (fig1)

natural_image
Technical line drawing of a three-bladed aircraft fuselage with internal components and two circular insets showing internal compartments (no text or symbols)Model Assembly
- Secure the both wings into the fuselage using the included 4 screws. (fig2) Note: The connectors on both sides should be attached precisely and firmly.

Model Assembly
Horizontal Stabilizer Installation:
- Connect the elevator servo connectors to the servo extensions in the fuselage.
- Insert the horizontal tail in the rear of the fuselage. Ensure the control horn faces down as shown. (fig3)
- Secure the horizontal tail in place using the included screws. (fig4)

natural_image
Technical line drawing of a mechanical assembly with labeled components (no text or symbols present)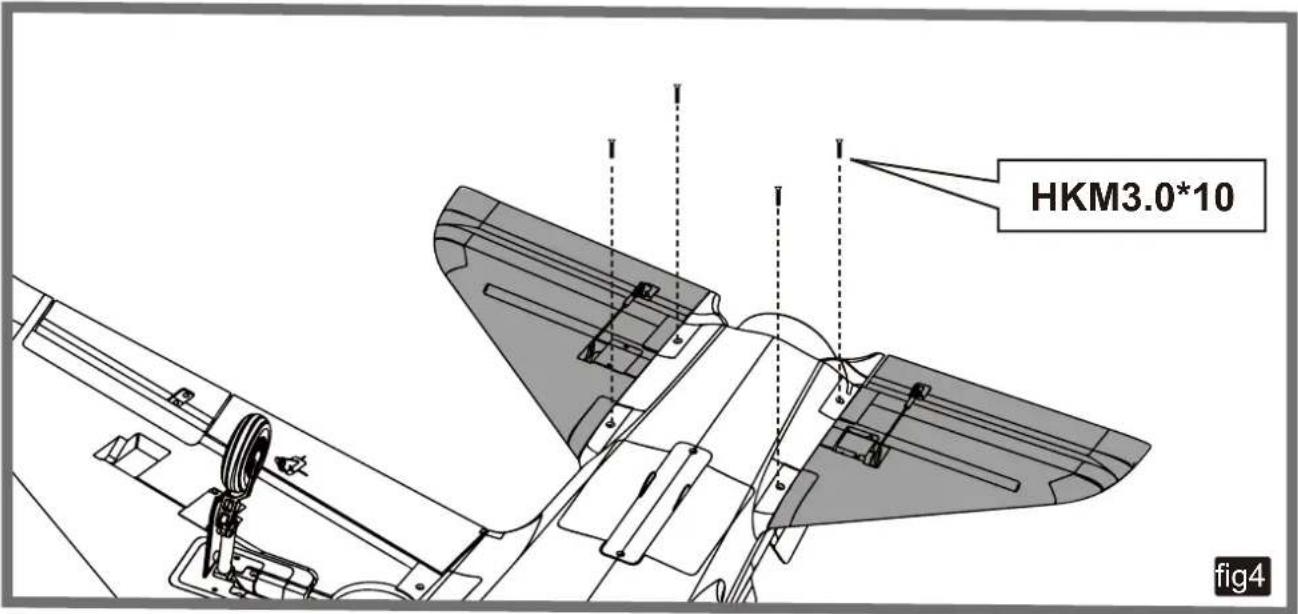
Model Assembly
Vertical Stabilizer Installation:
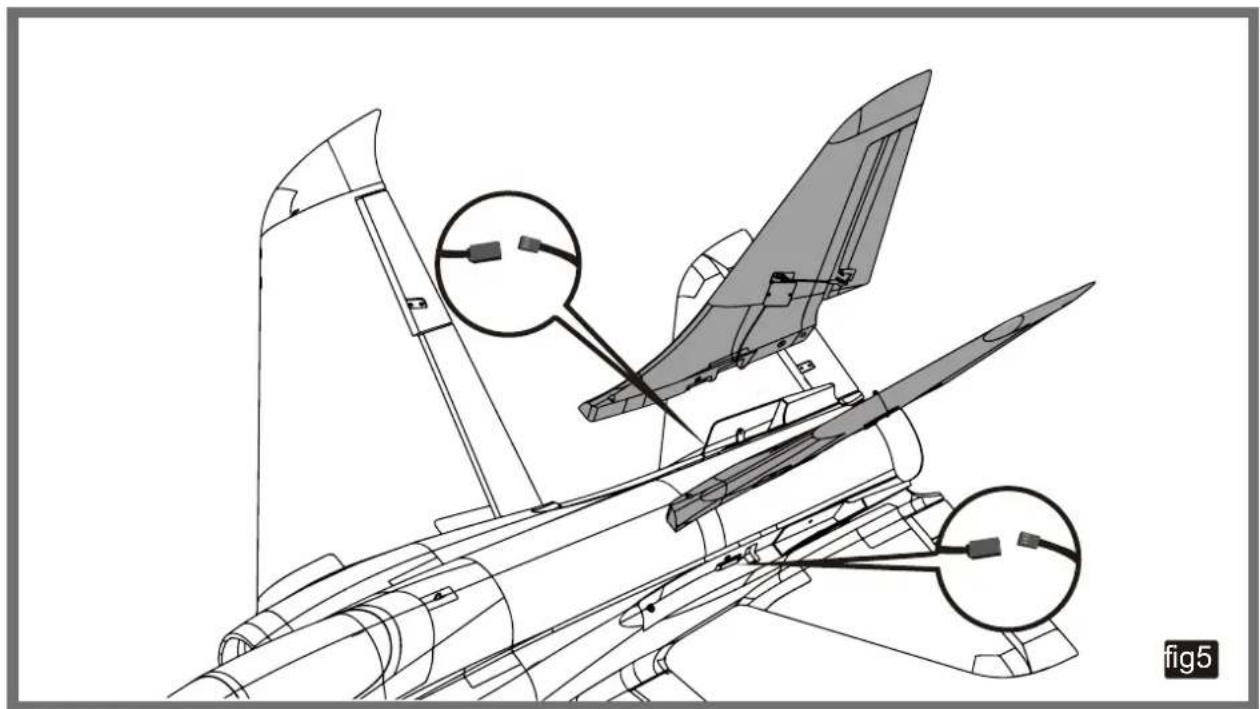
- Connect the rudder servo connectors to the servo extensions in the fuselage and then put it in the slot.
- Insert the vertical tail into the slots in the fuselage. (fig5)
3.Secure the vertical tail in place using the included screws. (fig6)
natural_image
Technical line drawing of a mechanical assembly with two labeled components (no text or symbols present)
Battery and radio installation
- Pull back on the release button and remove the battery hatch.
- Apply the loop side (soft side) of the hook and loop tape to the bottom of the battery and the hook side to the battery tray.
- Install the fully charged battery in the battery compartment with the power supply cable toward the nose end of the plane, and secure using the hook and loop straps.
Note: you may need to relocate the battery position to achieve the correct CG for your model.

natural_image
Technical line drawing of an aircraft fuselage with internal components and a zoomed-in detail view (no text or symbols)Connectors Diagram
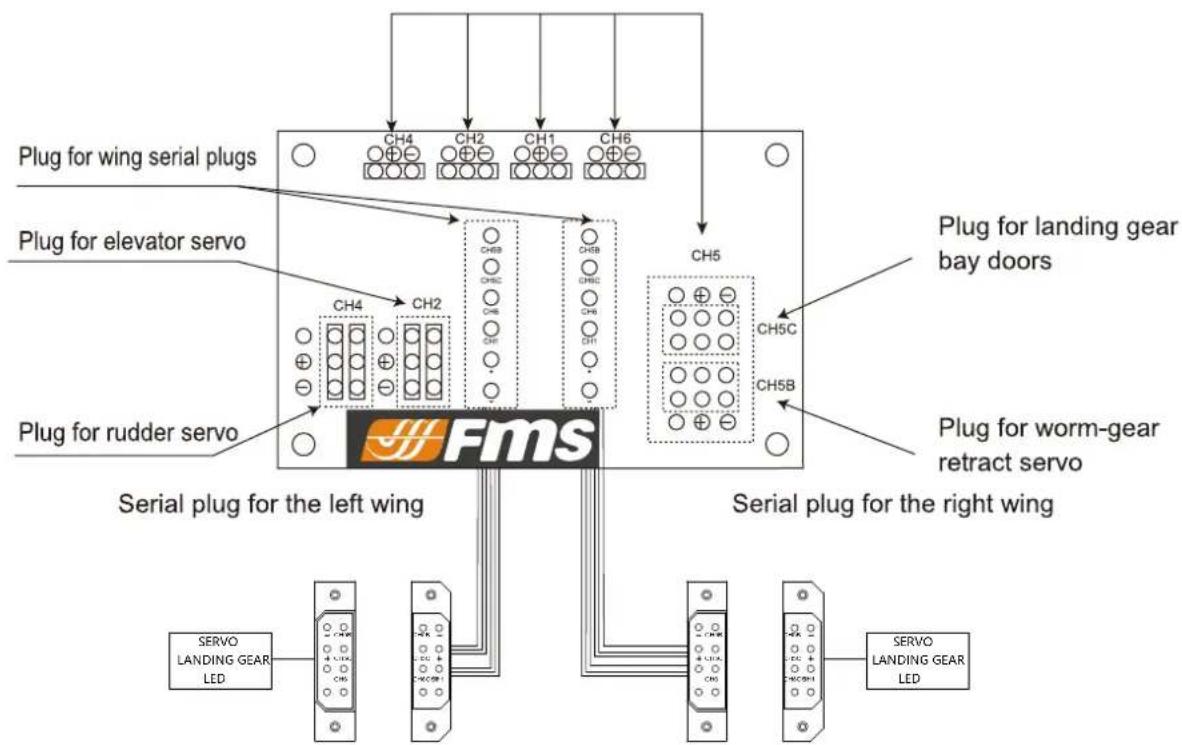
CAUTION: When connecting the single plug, make sure the positive and negative terminals are in the right direction. An incorrect connection will burn the electronic equipment.
Get your model ready to fly
Important ESC and model information
- The ESC included with the model has a safe start. If the motor battery is connected to the ESC and the throttle stick is not in the low throttle or off position, the motor will not start until the throttle stick is moved to the low throttle or off position. Once the throttle stick is moved to the low throttle or off position, the motor will emit a series of beeps. Several beeps with the same tune means the ESC has detected the cells of the battery. The count of the beeps equals the cells of the battery. The motor is now armed and will start when the throttle is moved.
- The motor and ESC come pre-connected and the motor rotation should be correct. If for any reason the motor is rotating in the wrong direction, simply reverse two of the three motor wires to change the direction of rotation.
- The motor has an optional brake setting. The ESC comes with brake switched off and we recommend that the model be flown with the brake off. However, the brake could be accidentally switched on if the motor battery is connected to the ESC while the throttle stick is set at full throttle. To switch the brake off, move the throttle stick to full throttle and plug in the motor battery. The motor will beep one time. Move the throttle stick to low throttle or the off position. The motor is ready to run and the brake will be switched off.
- Battery Selection and Installation. We recommend the 22.2V 5000mAh 45C Li-Po battery. If using another battery, the battery must be at least a 22.2V 5000mAh 45C battery. Your battery should be approximately the same capacity, dimension and weight as the 22.2V 5000mAh 45C Li-Po battery to fit the fuselage without changing the center of gravity significantly.
The transmitter and model setup
Before getting started, bind your receiver with your transmitter. Please refer to your Transmitter Manual for proper operation
CAUTION: To prevent personal injury, DO NOT install the propeller assembly onto the motor shaft while testing the control surfaces. DO NOT arm the ESC and do not turn on the transmitter until the Transmitter Manual instructs you to do so.
Tips: Make sure all control sticks on your radio are in the neutral position (rudder, elevator, ailerons) and the throttle is in the OFF position. Make sure both ailerons move up and down (travel) the same amount. This model tracks well when the left and right ailerons travel the same amount in response to the control stick.
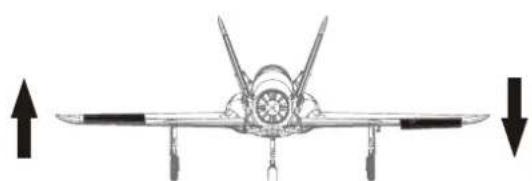
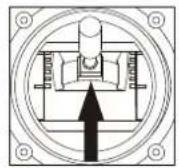
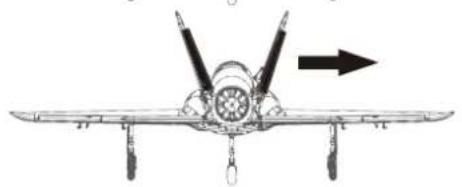
- Move the controls on the transmitter to make sure the aircraft control surface moves correctly. See diagrams below.

Bank Left
natural_image
Side profile diagram of a fighter jet with two wings and nose cone, showing flight direction arrows (no text or symbols)Aileron

Bank Right

natural_image
Diagram of a fighter jet with directional arrows indicating flight or movement (no text or labels)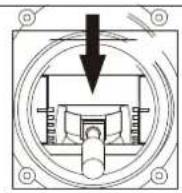
Climb

natural_image
Line drawing of a fighter jet with two wings and two propellers, no text or symbols presentElevator
Descend

natural_image
Top-down line drawing of a fighter jet with two wings and two missiles, showing structural details (no text or symbols)Steering Rudder

Steer Left

natural_image
Front view of a fighter jet with two propellers and an arrow indicating the nose (no text or symbols present)
Steer Right
natural_image
Front view line drawing of a military aircraft with two propellers and an arrow indicating direction (no text or symbols)Check the control throws
The suggested control throw setting for FMS MODEL are as follows (dual rate setting):
High Rate
| Elevator | 12mm up/down |
| Aileron | 16mm up/down |
| Rudder | 12 mm left/right |
Low Rate
| 10 mm up/down |
| 12 mm up/down |
| 10 mm left/right |
Tips: On first flight, fly the model in low rate. The first time you use high rates, be sure to fly at low to medium speeds. High rate, as listed, is only for EXTREME maneuvering.
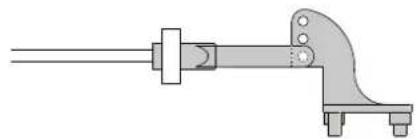
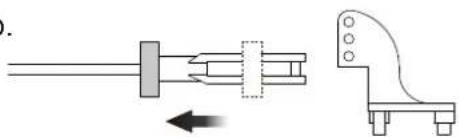
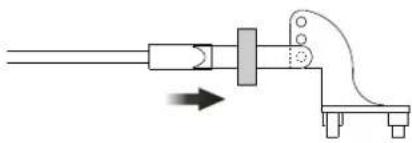
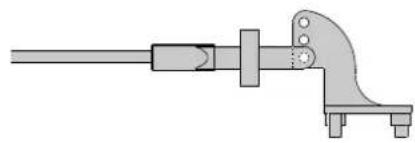
Clevis Installation
a. Pull the tube from the clevis to the linkage.
b. Carefully spread the clevis, then insert the clevis pin into the desired hole in the control horn.
c. Move the tube to hold the clevis on the control horn.
a.

natural_image
Technical diagram showing a mechanical component with rotation arrow and side profile view (no text or symbols)d.
natural_image
Pure mechanical linkage diagram without any text, numbers, or symbolsb.
natural_image
Pure electrical circuit lines without any symbolse.
natural_image
Pure mechanical diagram showing a lever and pivot mechanism without any text or symbolsC.

natural_image
Diagram showing a mechanical device with an arrow indicating upward motion, no text or symbols presentf.
natural_image
Mechanical component diagram showing a lever and bracket assembly (no text or symbols)Control Horn and Servo Arm Settings
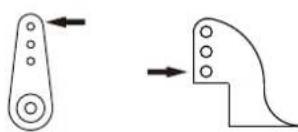
The table shows the factory settings for the control horns and servo arms. Fly the aircraft at the factory settings before making changes.
After flying, you may choose to adjust the linkage positions for the desired control response. See the table to the below
| Horns | Arms | |
| Elevator |  | 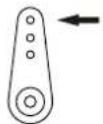 |
| Rudder |  |  |
| Ailerons |  |  |

natural_image
Pure mechanical component diagrams without any text, numbers, or symbolsCheck the C.G. (Center of Gravity)
When balancing your model, adjust the motor battery as necessary so the model is level or slightly nose down. This is the correct balance point for your model. After the first flights, the CG position can be adjusted for your personal preference.
- The recommended Center of Gravity (CG) location for your model is (150-160mm) from the leading edge of the main wing (as shown) with the battery pack installed. Mark the location of the CG on top of the wing.
- When balancing your model, support the plane at the marks made on the bottom of the main wing with your fingers or a commercially available balancing stand. This is the correct balance point for your model. Make sure the model is assembled and ready for flight before balancing.

Before flying the model
Find a suitable flying site
Find a flying site clear of buildings, trees, power lines and other obstructions. Until you know how much area will be required and have mastered flying your plane in confined spaces, choose a site which is at least the size of two to three football fields - a flying field specifically for R/C planes is best. Never fly near people - especially children, who can wander unpredictably.
Perform the range check for your plane
As a precaution, an operational ground range test should be performed before the first flight each time you go out. Performing a range test is a good way to detect problems that could cause loss of control such as low batteries, defective or damaged radio components, or radio interference. This usually requires an assistant and should be done at the actual flying site you will be using.
First turn on the transmitter, then install a fully-charged battery into the fuselage. Connect the battery and install the hatch.
Remember, use care not to bump the throttle stick. Otherwise, the propeller/fan will turn and possibly cause damage or injury.
Note: Please refer to your Transmitter Manual that came with your radio control system to perform a ground range check. If the controls are not working correctly or if anything seems wrong, do not fly the model until you correct the problem. Make certain all the servo wires are securely connected to the receiver and the transmitter batteries have a good connection.
Monitor your flight time
Monitor and limit your flight time using a timer (such as on a wristwatch or in your transmitter if available). When the batteries are getting low you will usually notice a performance drop before the ESC cuts off motor power, so when the plane starts flying slower you should land. Often (but not always) power can be briefly restored after the motor cuts off by holding the throttle stick all the way down for a few seconds.
To avoid an unexpected dead-stick landing on your first flight, set your timer to a conservative 4 minutes. When your alarm sounds you should land right away.
Flying your model
Take off
While applying power, slowly steer to keep the model straight. The model should accelerate quickly. As the model gains flight speed you will want to climb at a steady and even rate. It will climb out at a nice angle of attack (AOA).
Flying
Always choose a wide-open space for flying your plane. It is ideal for you to fly at a sanctioned flying field. If you are not flying at an approved site always avoid flying near houses, trees, wires and buildings. You should also be careful to avoid flying in areas where there are many people, such as busy parks, schoolyards, or soccer fields. Consult laws and ordinances before choosing a location to fly your aircraft. After takeoff, gain some altitude. Climb to a safe height before trying technical manoeuvres, including high speed passes, inverted flight, loops, and point rolls.
Landing
Land the model when you hear the motor pulsing (LVC) or if you notice a reduction in power. If using a transmitter with a timer, set the timer so you have enough flight time to make several landing approaches.
Recharge the battery and repair the model as needed. The model's three point landing gear allows the model to land on hard surfaces. Align model directly into the wind and fly down to the ground. Fly the airplane down to the ground using 1/4-1/3 throttle to keep enough energy for proper flare. Before the model touches down, always fully decrease the throttle to avoid damaging the propeller or other components. The key to a great landing is to manage the power and elevator all the way to the ground and set down lightly on the main landing gear. After a few flights you will find the model can be set down lightly on the mains and you can hold the nose wheel off balancing the model on the mains until it slows and gently settles the nose.
Maintenance
Repairs to the foam should be made with foam safe adhesives such as hot glue, foam safe CA, and 5min epoxy. When parts are not repairable, see the Spare Parts List for ordering by item number.
Always check to make sure all screws on the aircraft are tightened. Pay special attention to make sure the spinner is firmly in place before every flight.
Troubleshooting
| Problem | Possible Cause Solution | |
| Aircraft will not respond to the throttle but responds to other controls. | - ESC is not armed.- Throttle channel is reversed. | - Lower throttle stick and throttle trim to lowest settings.- Reverse throttle channel on transmitter. |
| Extra propeller noise or extra vibration. | - Damaged spinner, propeller, motor, or motor mount.- Loose propeller and spinner parts.- Propellor installed backwards. | - Replace damaged parts.- Tighten parts for propeller adapter, propeller and spinner. |
| Reduced flight time or aircraft underpowered. | - Flight battery charge is low.- Propeller installed backward.- Flight battery damaged. | - Remove and install propeller correctly.- Completely recharge flight battery.- Replace flight battery and follow flight battery instructions. |
| Control surface does not move, or is slow to respond to control inputs. | - Control surface, control horn, linkage or servo damage.- Wire damaged or connections loose. | - Replace or repair damaged parts and adjust controls.- Do a check of connections for loose wiring. |
| Controls reversed. | Channels are reversed in the transmitter. | Do the Control Direction Test and adjust controls for aircraft and transmitter. |
| - Motor loses power.- Motor power pulses then motor loses power. | - Dammage motor, or battery.- Loss of power to aircraft.- ESCuses default soft Low Voltage Cutoff(LVC). | - Do a check of batteries, transmitter, receiver,ESC, motor and wiring for damage(replace as needed).- Land aircraft immediately and recharge flight battery. |
| LED on receiver flashes slowly. | Power loss to receiver. | - Check connection form ESC to receiver.- Check servos for damage.- Check linkages for binding. |
Spare parts list content
| FMSRA101 | Fuselage |
| FMSRA102 | Main Wing Set |
| FMSRA103 | Vertical Stabilizer |
| FMSRA104 | Horizontal Stabilizer |
| FMSRA105 | Canopy |
| FMSRA106 | Cowl |
| FMSRA107 | Nozzel |
| FMSRA108 | Linkage Rod |
| FMSRA109 | Stickers |
| FMSRA110 | Screw Set |
| FMSRA111 | Control Horns |
| FMSRA112 | Wheel Set |
| FMSRA113 | Pipe |
| FMSRA114 | Front Landing Gear Set |
| FMSRA115 | Main Landing Gear Set |
| FMSRA116 | Front Landing Gear System |
| FMSRA117 | Main Landing Gear System |
| FMSRA118 | Front Landing Gear Door |
| FMSRA119 | Main Landing Gear Door |
| FMSRE033 | Electronic Retract (for front landing gear) |
| FMSRE027 | Electronic Retract (for main landing gear) |
| FMS90MM | 90MM Ducted Fan (12-blade) |
| FMSKV1900 | 3546-KV1900 motor |
| PRESC015 | 130A ESC with 10A UBEC |
| PRBEC01 | 10A UBEC |
| PR13MGAP | Predator 13g analog metal gear servo positive |
| PR13MGAR | Predator 13g analog metal gear servo reverse |
| FMSSER17MGD | 17g digital metal gear servo |
| FMSCON004 | Multi-connector System |
Visit our website to see photos of this product: www.fmsmodel.com
ESC instruction
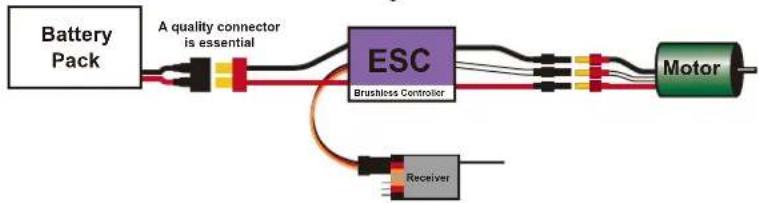
Wires Connection:
The electronic speed controller can be connected to the motor by soldering directly, or with high quality connectors.
Always use new connectors, which should be soldered carefully to the cables and insulated with heat shrink tubes.
The maximum length of the battery pack wires should be within 6 inches.
● Solder controller to the motor wires.
● Solder appropriate connectors to the battery wires.
● Insulate all solder connectors with heat shrink tubes.
● Plug the "JR" connector into the receiver throttle channel.
● Speed Controller Red and Black wires connect to battery pack Red and Black wires respectively.
Brushless Speed Controller
flowchart
graph LR
    A["Battery Pack"] --> B["A quality connector is essential"]
    B --> C["ESC\nBrushless Controller"]
    C --> D["Motor"]
    D --> E["Receiver"]
    E --> C
| Model# | Cont. Current(A) | Burst Current(A)10s | Battery cell NiXX/Lipo | Weight(g) | BEC Output | Size(mm) W*L*H | User Program |
| 6A | 6A | 8A | 5-10 NC \ 2-3 Lipo | 5 | 5volts / 2amps | 13 x 21 x 4 | yes |
| 12A | 12A | 16A | 5-12 NC \ 2-4 Lipo | 8 | 5volts / 1amps | 21 x 22 x 4 | yes |
| 20A | 20A | 30A | 5-12 NC \ 2-4 Lipo | 18 | 5volts / 3amps | 13 x 21 x 4 | yes |
| 30A | 30A | 40A | 5-12 NC \ 2-4 Lipo | 30 | 5volts / 3amps | 23 x 43 x 6 | yes |
| 35A | 35A | 45A | 5-12NC \ 2-4 Lipo | 47 | 5volts / 4amps | 28 x 38 x 8 | yes |
| 40A | 40A | 50A | 5-12 NC \ 2-4 Lipo | 44 | 5volts / 3amps | 28 x 38 x 8 | yes |
| 45A | 45A | 55A | 5-12 NC \ 2-4 Lipo | 42 | 5volts / 3amps | 31 x 58 x11 | yes |
| 50A | 50A | 70A | 5-18NC \ 2-6 Lipo | 45 | 5.5volts / 5amps | 31 x 58 x 11 | yes |
| 60A | 60A | 70A | 5-12NC \ 2-4Lipo | 50 | 5.5volts / 3amps | 36 x 50 x 8 | yes |
| 65A | 65A | 85A | 5-18NC \ 2-6Lipo | 58 | 5.5volts / 5amps | 30 x 56 x 11 | yes |
| 70A | 70A | 75A | 5-12NC \ 2-6 Lipo | 56 | 5.5volts / 5amps | 34 x 52 x 14 | yes |
| 85A | 85A | 100A | 5-18NC \ 2-6Lipo | 63 | 5.5volts / 5amps | 34 x 52 x 14 | yes |
Features:
◆ Extremely low internal resistance
◆ Super smooth and accurate throttle linearity
◆ Safety thermal over-load protection
◆ Auto throttle shut down in signal loss situation
◆ Supports high RPM motors
◆ Power arming protection (prevents the motor from accidentally running when switched ON)
◆ New advanced programming software
Our ESC allows you to program parameters to fit your specific needs:
- User programmable brake setting (we recommend using brake for only folding props applications)
- User programmable battery type (LiPo or NiCd/NiMh)
- User programmable low voltage cutoff setting
- User programmable factory default setting restore
- User programmable timing settings (to enhance ESC efficiency and smoothness)
- User programmable soft acceleration start ups (for delicate gearbox and helicopter applications)
- User programmable governor mode (for helicopter applications)
- User programmable motor rotation (clockwise\counterclockwise)
- User programmable switching frequency
- User programmable low voltage cutoff type (power reduction or immediate shutdown)
Settings:
1. Brake: ON/OFF
* ON-Sets the propeller to the brake position when the throttle stick is at the minimum position (Recommended for folding props).
* OFF-Sets the propeller to freewheel when the throttle stick is at the minimum position.
2. Battery type: LiPo or NiCad/NiMh
* NiCad/NiMh – Sets Low Voltage protection threshold for NiCad/NiMh cells.
* LiPo – Sets Low voltage protection threshold for LiPo cells and automatically detects the number of cells within the pack.
Note: Selecting the NiCad/NiMh option for the battery type, triggers the ESC to automatically set the cutoff threshold to the factory default of 65%. The cutoff threshold can then be subsequently altered through the Low Voltage protection function, if required. The ESC will read the initial voltage of the NiCad/NiMh pack once it is plugged in and the voltage read will then be used as a reference for the cutoff voltage threshold.
3. Low Voltage Protection Threshold (Cutoff Threshold):
Low / Medium / High
1) For Li-xx packs-number of cells are automatically calculated and requires no user input apart from defining the battery type. This ESC provides 3 setting options for the low voltage protection threshold; Low (2.8V)/ Medium (3.0V)/ High (3.2V). For example: the voltage cutoff options for an 11.1V/ 3 cell Li-Po pack would be 8.4V (Low)/ 9.0V (Med)/ 9.6V (High)
2) For Ni-xx packs-low / medium / high cutoff voltages are 50%/65%/65% of the initial voltage of the battery pack. For example: A fully charged 6 cell NiMh pack's voltage is 1.44V x 6=8.64V, when "LOW" cutoff voltage is set, the cutoff voltage is: 8.64V x 50%=4.3V and when "Medium" or "High" is set, the cutoff voltage is now 8.64V X 65%=5.61V.
4. Restore factory setup defaults:
Restore - Sets the ESC back to factory default settings;
Brake: Off
Battery type Detect: LiPo with Automatic Cell
Low voltage cutoff threshold: Medium (3.0V/65%)
Timing setup: Automatic
Soft Acceleration Start Up: Medium
Governor mode : OFF
Frequency : 16kHz
Low voltage cutoff type: Reduce power
5. Timing setup: Automatic / Low / High.
* Automatic – ESC automatically determines the optimum motor timing
* Low (7-22 deg) – Setting for most 2 pole motors.
* High (22-30 deg)-setting for motors with 6 or more poles.
In most cases, automatic timing works well for all types of motors. However for high efficiency we recommend the Low timing setting for 2 pole motors (general in-runners) and high timing for 6 poles and above (general outrunners). For higher speed, High timing can be set. Some motors require different timing setups therefore we suggest you follow the manufacturer recommended setup or use the automatic timing setting if you are unsure.
Note: Run your motor on the ground first after making any changes to your motor timing!
6. Soft Acceleration Start ups: Very Soft / Soft Acceleration/ Start Acceleration
* Very Soft – Provides initial slow 1.5 sec ramp-up from start to full rpm intended to protect delicate gears from stripping under instant load. This setting is recommended for either fixed wing models equipped with gearboxes and / or helicopters.
* Soft Acceleration- Provides initial slow 1 sec ramp-up from start to full rpm. This setting is recommended for either fixed wing models equipped with gearboxes and or helicopters.
* Start Acceleration – Provides quick acceleration start ups with a linear throttle response. This is recommended for fixed wing models fitted with direct drive setups.
7. Active RPM Control (Heli Governor Mode)
* RPM control off
* First range: There will be a 5-second delay from start to full rpm, but if the throttle is cutoff after starting, then the next start will be as normal start.
* Second range: There will be a 15-second delay from start to full rpm, but if the throttle is cutoff after starting, then the next start will be as normal start.
Note: Once the Governor Mode is enabled, the ESC's Brake and Low Voltage Cutoff Type settings will automatically be reset to No Brake and Reduce Power respectively regardless of what settings they were previously set.
8. Motor Rotation: Reverse
In most cases motor rotation is usually reversed by swapping two motor wires. However, in cases where the motor cables have been directly soldered to the ESC cables, motor rotation can be reversed by changing the value of setting on the ESC.
9. Switching Frequency: 8 kHz/16kHz
* 8 kHz – Sets ESC switching frequency for 2 pole motors, e.g. in-runners.
* 16 kHz – Sets ESC switching frequency for motors with more than 2 poles, e.g. out-runners.
Although 16 kHz is more efficient with our Thrust motors, the setup default is 8 kHz due to the higher RF noises caused at 16 kHz.
- Low Voltage Cutoff Type: Reduce Power / Hard cutoff
* Reduce Power – ESC reduces motor power when the pre-set (recommended).
* Hard Cutoff – ESC instantly cuts motor power when the pre-set Low Voltage Protection Threshold value is reached.
Programming Mode Audible Tones
Programming Mode Audible Tones
| Programming Mode Audible Tones | ESC Functions | |
| 0 Throttle Calibration | ||
| (within the first 4 Sec)● ● ● ● | ||
| 1 Brake | ||
| * * * * * | Brake On /Off | |
| 2 Battery type | ||
| ~ ~ ~ ~ | NiCad | |
| ~~ ~~~ ~~~ ~~~ | LiPo | |
| 3 Low Voltage Cutoff Threshold | ||
| * * * * * * * * * | Low2.8V/50% | |
| * * * * * * * * * * * | Medium3.0V/60% | |
| * * * * * * * * * * * * | High3.2V/65% | |
| 4 Restore Factory Setup Defaults | ||
| — — — — | Restore | |
| 5 Timing Setup | ||
| — — — — | Automatic (7-30° ) | |
| — — — — — — — | Low (7-22° ) | |
| — — — — — — — — | High (22-30° ) | |
| 6 Soft Acceleration Start Ups | ||
| VVVVVVVV | Very Soft | |
| V V V V | Soft Acceleration | |
| VVVVVVVVVVVV | Start Acceleration | |
| 7 Governor Mode | ||
| * * * * * | Rpm off | |
| ** ** ** ** | Heli first range | |
| *** *** *** *** | Heli second range | |
| 8 Motor Rotation | ||
| W W W W | Positive/Reverse | |
| 9 Switching Frequency | ||
| // // // // | 8kHz | |
| \ \ \ \ \ | 16kHz | |
| 10 Low Voltage Cutoff Type | ||
| — — — — | Reduce Power | |
| — — — — — | Hard Cut Off | |
Using Your New ESC
Improper polarity or short circuit will damage the ESC therefore it is your responsibility to double check all plugs for proper polarity and firm fit BEFORE connecting the battery pack.
Alert Tones
The ESC is equipped with audible alert tones to indicate abnormal conditions at power up.
If the ESC can't enter into working mode after powering up, it indicates that you have not setup throttle calibration.
- Continuous beeping tone (****) – Indicates that throttle stick is not in the minimum position.
- Single beeping tone followed by a one second pause ( ^ ^ ^* ) – Indicates that the battery pack voltage is not within the acceptable range. (The ESC automatically checks and verifies the battery voltage once the battery is connected).
- A single beeping tone followed by a short pause ( ^ ^ ^* ) – Indicates that the ESC is unable to detect the normal throttle signal from the receiver.
Built-in Intelligent ESC Safety Functions
- Over-heat protection: When the temperature of ESC exceeds 110 deg C, the ESC will reduce the output power to allow it too cool.
- Lost Throttle signal protection: The ESC will automatically reduces output power to the motor when it detects a lost of throttle signal for 2 seconds, a subsequent loss of throttle signal beyond 2 seconds, will cause the ESC automatically to cut power to the motor.
Powering up the ESC for the first time and setting the Automatic Throttle Calibration
The ZTW ESC features Automatic Throttle Calibration to attain the smoothest throttle response and resolution throughout the entire throttle range of your transmitter. This step is done once to allow the ESC to “learn and memorize” your Transmitter’s throttle output signals and only repeated if you change your transmitter.
- Switch your Transmitter ON and set the throttle stick to its maximum position.
- Connect the battery pack to the ESC. Wait for about 2 seconds, the motor will beep for twice, then put the throttle in the minimum position, the motor will also beep, which indicates that your ESC has got the signal range of the throttle from your transmitter.
The throttle is now calibrated and your ESC is ready for operation.
Normal ESC start up procedure:
- Switch your Transmitter ON and set the throttle to its minimum position.
- Connect the battery pack to the ESC.
- When the ESC is first powered up, it emits two sets of audible tones in succession indicating the status of its programming state.
* The first set of tones denotes the number of cells in the LiPo pack connected to the ESC. (Three beeps ( ^ ) indicates a 3 cell LiPo pack while 4 beeps ( ^* ) indicates a 4 cell LiPo pack).
* The second set denoting Brake status. One beep (*) for Brake “ON” and two beeps (**) for Brake “OFF”.
*The ESC is now ready for use.
Entering the Programming Mode:
- Switch your Transmitter ON and set the throttle to its maximum position.
- Connect the battery pack to the ESC.
- Wait until you hear two short beeps (_ _**) confirming that the ESC has now entered the program ming mode.
- If within 5 seconds, the throttle stick is lowered to its minimum position, an audible tone is emitted confirming that the throttle calibration setting has changed. If the throttle stick is left in the maximum position beyond 5 seconds, the ESC will begin the sequence from one function and its associated setting options to another. (Please refer to the table below to cross reference the functions with the audible tones).
- When the desired tone for the function and setting option is reached, move the throttle stick down to its minimum position. ESC will emit two beeps (**) confirming the new setting has been stored.
- The ESC only allows the setting of one function at a time.
Therefore should you require making changes to other function, disconnect the battery pack and wait 5 seconds to reconnect the battery and repeat the above steps.
General Safety Precautions
Do not install the propeller (fixed wing) or drive pinion (helicopter) on the motor when you test the ESC and motor for the first time to verify the correct settings on your radio. Only install your propeller or pinion after you have confirmed that the settings on your radio is correct.
- Never use ruptured or punctured battery cells.
- Never use battery packs that are known to overheat.
- Never short circuit battery or motor terminals.
●Always use proper insulation material for cable insulation.
●Always use proper cable connectors. - Do not exceed the number of cells or servos specified by the ESC.
Wrong battery polarity will damage the ESC and void the warranty.
- Install the ESC in a suitable location with adequate ventilation for cooling. This ESC has a built-in over heat cutoff protection feature that will immediately cut power to the motor once the ESC temperature exceeds the 230 Deg F/110 Deg C high temperature limit.
- Use only batteries that are supported by the ESC and ensure the correct polarity before connecting.
- Switch your Transmitter ON and ensure the throttle stick is in the minimum position before connecting the battery pack.
- Never switch your transmitter OFF while the battery is connected to your ESC.
- Only connect your battery pack just before flying and do not leave your battery pack connected after flying.
- Handle your model with extreme care once the battery pack is connected and keep away from the propeller at all times. Never stand in-line or directly in front of any rotating parts.
- Do not immerse the ESC underwater while powered up.
- Do fly at a designated flying site and abide by the rules and guidelines set by your flying club.
| Issue Possible Reason Action | ||
| Motor doesn't work, but there are audible tones of automatically detection of the number of cells after powering up ESC. | The ESC throttle calibration has not set up. | Set up the ESC throttle calibration. |
| Motor doesn't work and no audible tone emitted after connecting the battery. Servos are not working either. | Poor/loose Connection between battery Pack and ESC. | Clean connector terminals or replace connector. |
| No power | Replace with a freshly charged battery pack. | |
| Poor soldered connections (dry joints) | Re-solder the cable connections. | |
| Wrong battery cable polarity | Check and verify cable polarity. | |
| ESC throttle cable connected to receiver in the reverse polarity | Check the ESC cable connected to the ESC to ensure the | |
| Faulty ESC | Replace ESC | |
| Motor doesn't work and no audible tone emitted after connecting the battery BUT servos are working. | Poor / loose connection between ESC and motor | Clean connector terminals or replace connectors |
| Motor doesn't work after powering up the ESC. An alert tone with two beeping bones followed by a short pause (** ** ** **) is emitted. | Burnt motor coils | Replace motor |
| Poor soldered connections(dry joints) The battery pack voltage is not within the acceptable range. | Re-solder the cable connections Replace with a freshly charged battery pack Check battery pack voltage | |
| Motor doesn't work after powering up the ESC. An alert tone with a single beeping tone followed by a short pause (****) is emitted. | The ESC is unable to detect the normal throttle signal from the receiver | Check and verify that the ESC cable is connected to the Throttle channel on the receiver.Check the transmitter and receiver to verify that there is throttle signal output.(Connect a spare servo to verify throttle channel operation) |
| Motor doesn't work after powering up the ESC .An alert tone with continuous beeping tones (****) is emitted. | The throttle stick is not in the minimum position at power up. | Move the throttle stick to the minimum position. |
| Motor doesn't work after powering up the ESC. ESC emits two long audible tones followed by two short beeps( _ _ **) | Reversed throttle channel caused the ESC to enter the programming mode. | Enter the servo reverse menu on your transmitter and reverse the throttle channel.Note: For Futaba radios set the throttle channel to Reverse. |
| Motor runs in reverse rotation Motor stops running in flight. | Wrong cables polarity between the ESC and the motor. | Swap any two of the three cable connections between the ESC and the Motor or access the Motor Rotation function via the ESC programming mode and change the pre-set parameters. |
| Lost throttle signal | Check proper operation of the radio equipment.Check the placement of the ESC and the Receiver and check the route of the receiver's aerial and ESC cables to ensure there is adequate separation to prevent RF interference.Install a ferrite ring on the ESC's throttle cable. | |
| Motor stop running. | Battery Pack voltage has reached the Low Voltage Protection threshold. | Land the model immediately and replace the battery pack. |
| Possible bad cable connection | Check and verify the integrity of the cable connections | |
| Motor restarts abnormally ESC Overheats | Possible RF Interference at the flying field. | The normal operation of the ESC may be susceptible to surrounding RF interference. Restart the ESC to resume normal operation on the ground to verify recurrence. If the problem persists, test the operation of the ESC at a different flying field. |
| Inadequate Ventilation | Relocate the ESC to allow better ventilation | |
| Servos drawing too much current and over loading the ESC. | Use servos that are adequately sized for the ESC. The maximum BEC current drawn should be within the BEC limits. | |
| Over sized motor or prop | Prop down or resize the motor | |





- Safety Precautions and Warnings
- Safety
- Table of Contents
- Introduction
- Features:
- Specifications
- Contents of Kit
- Model Assembly
- Main Wing Installation
- Horizontal Stabilizer Installation:
- Vertical Stabilizer Installation:
- Battery and radio installation
- Get your model ready to fly
- Important ESC and model information
- The transmitter and model setup
- Check the control throws
- Clevis Installation
- Control Horn and Servo Arm Settings
- Check the C.G. (Center of Gravity)
- Before flying the model
- Find a suitable flying site
- Perform the range check for your plane
- Monitor your flight time
- Flying your model
- Take off
- Flying
- Landing
- Maintenance
- Troubleshooting
- ESC instruction
- Wires Connection:
- Our ESC allows you to program parameters to fit your specific needs:
- Settings:
- Brake: ON/OFF
- Battery type: LiPo or NiCad/NiMh
- Low Voltage Protection Threshold (Cutoff Threshold):
- Restore factory setup defaults:
- Timing setup: Automatic / Low / High.
- Soft Acceleration Start ups: Very Soft / Soft Acceleration/ Start Acceleration
- Active RPM Control (Heli Governor Mode)
- Motor Rotation: Reverse
- Switching Frequency: 8 kHz/16kHz
- Using Your New ESC
- Alert Tones
- Built-in Intelligent ESC Safety Functions
- Powering up the ESC for the first time and setting the Automatic Throttle Calibration
- The throttle is now calibrated and your ESC is ready for operation.
- Normal ESC start up procedure:
- Entering the Programming Mode:
- General Safety Precautions
Brand : FMS
Model : Super Scorpion
Category : Remote control toy