
WAP R - Access Point Mikrotik - Free user manual and instructions
Find the device manual for free WAP R Mikrotik in PDF.


| Product Type | Outdoor Access Point |
| Model | wAP R (RBwAPR-2nD) |
| Frequency Band | 2.4 GHz |
| Wireless Standards | 802.11b/g/n |
| Ethernet Port | 1 x 10/100 Ethernet (Auto MDI/X) |
| Power Input | 9-30 V DC via power jack or 802.3af/at PoE |
| Power Consumption | Max 6 W |
| Operating System | RouterOS v6 (factory installed) |
| Mounting Options | Wall, ceiling, pole (with included bracket) |
| IP Rating | IP54 |
| Reset Button | Yes (reset, CAP mode, Netinstall) |
| Expansion Slot | 1 x miniPCI-e (for modem) |
| Included Accessories | 24V/0.8A power adapter, PoE injector, zip tie, automotive cable, desktop stand, mount bracket, thermal pad |
| Safety Distance | 20 cm (indoor FCC/IC) / 35 cm (outdoor MPE) |
| Maintenance | Keep dry and clean; disconnect power before cleaning |
| Safety | Follow local electrical codes; professional installation required |
| Spare Parts | Not user-replaceable; contact MikroTik support |
| Reparability | Not user-serviceable; refer to qualified service personnel |
Frequently Asked Questions - WAP R Mikrotik
User questions about WAP R Mikrotik
0 question about this device. Answer the ones you know or ask your own.
Ask a new question about this device
Download the instructions for your Access Point in PDF format for free! Find your manual WAP R - Mikrotik and take your electronic device back in hand. On this page are published all the documents necessary for the use of your device. WAP R by Mikrotik.
USER MANUAL WAP R Mikrotik
natural_image
White wireless router device with 'AMTROCCOLED BOARD' branding and 'M-202' logo (no visible text beyond branding)Safety Warnings
Before you work on any equipment, be aware of the hazards involved with electrical circuitry, and be familiar with standard practices for preventing accidents.
Ultimate disposal of this product should be handled according to all national laws and regulations.
All installation methods for mounting an access point on any wall surface is subject to the acceptance of local jurisdiction.
The Installation of the equipment must comply with local and national electrical codes.
This product is intended to be mounted outdoors on a pole but can also be installed indoors. Please read the mounting instructions carefully before beginning installation. Failure to use the correct hardware and configuration or to follow the correct procedures could result in a hazardous situation to people and damage to the system.
Use only the power supply and accessories approved by the manufacturer, and which can be found in the original packaging of this product.
Read the installation instructions before connecting the system to the power source.
We cannot guarantee that no accidents or damage will occur due to the improper use of the device. Please use this product with care and operate at your own risk!
In the case of device failure, please disconnect it from power. The fastest way to do so is by unplugging the power plug from the power outlet.
It is the customer's responsibility to follow local country regulations, including operation within legal frequency channels, output power, cabling requirements, and Dynamic Frequency Selection (DFS) requirements. All Mikrotik radio devices must be professionally installed.
Exposure to Radio Frequency Radiation: This MikroTik equipment complies with the FCC, IC, and European Union radiation exposure limits set forth for an uncontrolled environment. This MikroTik device should be installed and operated no closer than 20 centimeters from your body, occupational user, or the general public.
Quickstart
- Use a Phillips head screwdriver to loosen the screw, which secures the bottom lid.
• Install your modem (optional). - Choose your powering solution, please see the section for possibilities.Powering
- Plug the included PoE injector into the ISP outlet and attach an Ethernet cable to it. Connect the other end of the Ethernet cable to this MikroTik router. Plug the provided power supply into the PoE injector.
- Wireless AP mode is enabled by default, you can connect from your computer to the SSID that begins with "MikroTik". The configuration interface is available via a web browser. The address is .https://192.168.88.
- Once connected to the wireless network, open https://192.168.88.1 in your web browser to start the configuration.
- User name: a card there is no password by default you will be logged in automatically to the Quick Set screen, (or, for some models, check user and wireless passwords on the sticker).
- We recommend clicking the "Check for updates" button on the right side and updating your RouterOS software to the latest version to ensure the best performance and stability.
- To personalize your wireless network, SSID can be changed in the fields "Network Name";
- Choose your country on the left side of the screen in the field "Country", to apply country regulation settings.
- Set up your wireless network password in the field "WiFi Password" the password must be at least eight symbols.
- Set up your router password in the bottom field "Password" to the right and repeat it in the field "Confirm Password", it will be used to login next time.
- Click on the "Apply Configuration" to save changes.
MikroTik mobile app
Use the MikroTik smartphone app to configure your router in the field, or to apply the most basic initial settings for your MikroTik home access point.

- Scan QR code and choose your preferred OS.
- Install and open application.
- By default, the IP address and user name will be already entered.
- Click Connect to establish a connection to your device through a wireless network.
- Choose Quick setup and application will guide you through all basic configuration settings in a couple of easy steps.
- An advanced menu is available to fully configure all necessary settings.
Mounting
The device can be mounted in several ways: wall, ceiling, pole or it can be placed in specially designed Mikrotik holder which comes with the package. The package includes a drill hole template with instructions, to help you with the Ethernet cable installation and attachment to a ceiling or a wall. The package also includes a steel bracket to put on the other side of a dropdown ceiling tile and two screws and wall anchors. The Unit can be attached to the pole using zip ties or steel clamp.
To prevent the bottom lid for opening the different screw can be used. One Torx T20 security screw is included for optional use. Use it with the included L-shaped wrench to fix it into the bottom lid. Detailed instructions of replacing screw are in the package.
The IP rating scale for this device is IP54.
When mounting outdoors, please ensure that any cable openings are directed downwards. Use POE injector and proper grounding. Recommended using Cat5/6 cable.
When using and installing this device please pay attention to Maximum Permissible Exposure (MPE) safety distance with a minimum of 35 cm between the radiator and your body.
Mounting on the mast or pole:
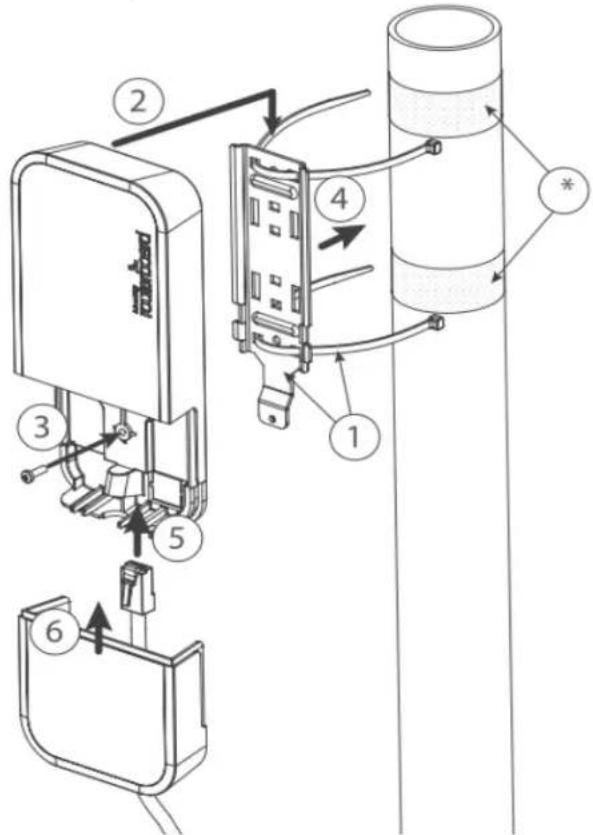
* It's recommended to use electrical tape to increase friction between materials.
- Mount plastic tie straps to steel brackets guiding them through holes.
- Mount bracket to the device.
- Secure them with a screw.
- Mount and align the device on the pole or mast.
- Guide Ethernet cable through the opening and connect to the Ethernet port.
- Close bottom latch and secure with a screw.

It's recommended to secure Ethernet cable to the pole using zip ties. With the distance from the device approximately 30 cm.
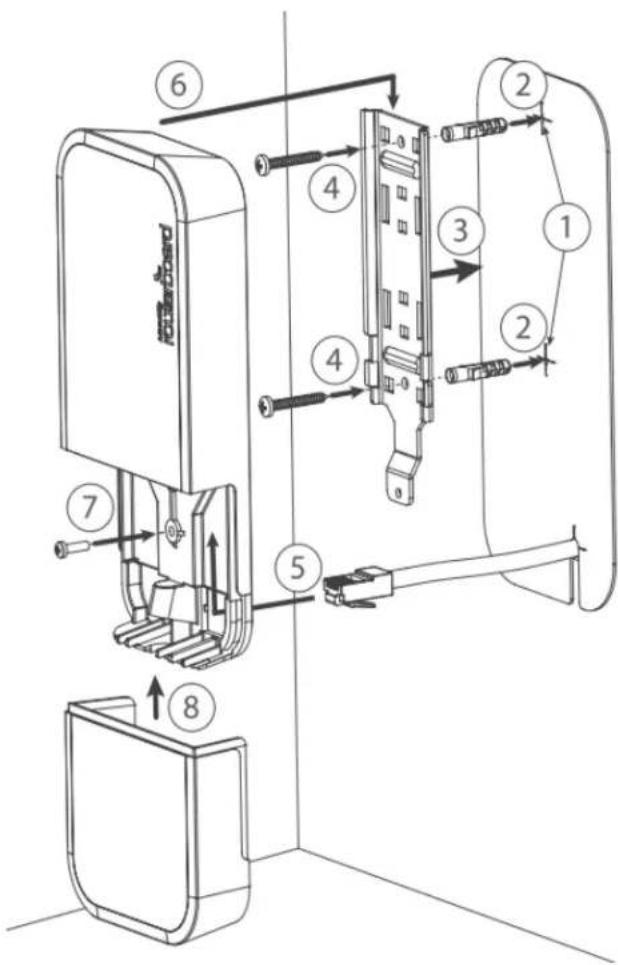
Mounting unit on the wall:
- Use included a template to mark spots for drilling holes. And if needed for Ethernet cable. Align accordingly, it will depend on how the device will be mounted finally.
- Insert dowels if needed, depends on wall structure and material.
- Place included a steel bracket on the wall.
- Use screws to secure it in the place.
- Extend your Ethernet cable through the opening and connect to the Ethernet port.
- Mount the device on the steel bracket
- Secure it in place with the screw.
- Close bottom latch.
Avoid mounting the device on the low ground spot, as you won't be able to attach and close the bottom latch. Mounting on the ceiling:
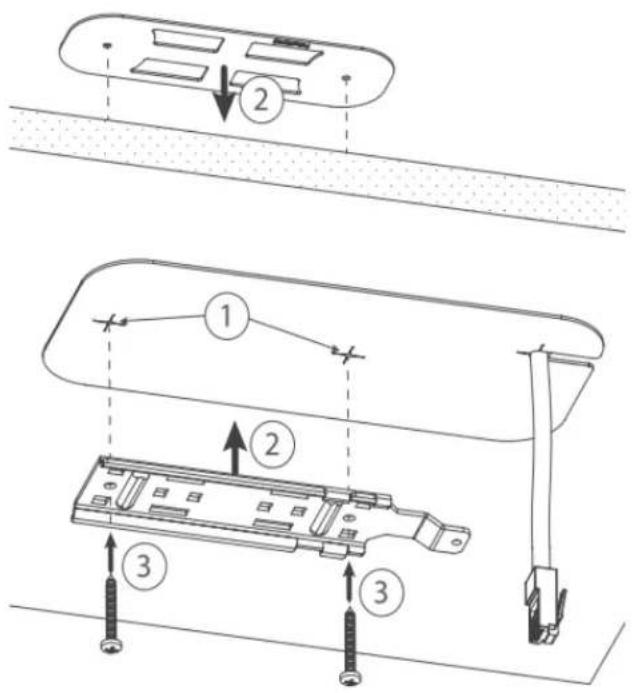
A Special bracket is included in the package to mount on the drop ceiling. As it consists of two parts, to be attached on both sides of the ceiling tile.
- Use the template to mark spots for holes.
- Place both mounting brackets on the spot.
- Secure them together using screws.
Continue assembling in the same manner if mounting on the wall.
- Extend your Ethernet cable through the opening and connect to the Ethernet port.
- Mount the device on the steel bracket.
- Secure it in place with the screw.
- Close bottom latch.
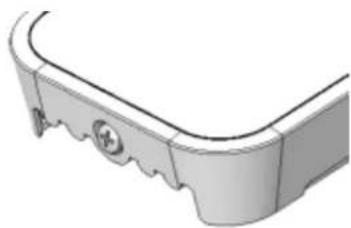
Bottom Lid
• The bottom lid is secured in place with the captive screw.
- Use the Philips PH2 screwdriver to unscrew it, but do not remove the screw completely.
natural_image
3D rendering of a curved mechanical component with mounting holes and a circular feature (no text or symbols)• Pull the cover in the opposite direction from the device to remove it.
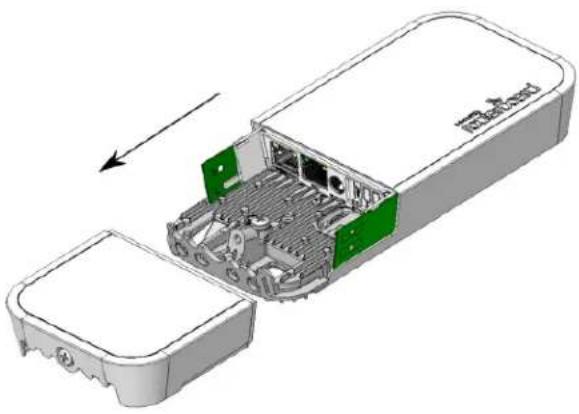
natural_image
3D diagram of an open electronic device casing with internal components and a green arrow indicating direction (no text or symbols)- Reassemble.
Powering
The device accepts power from the power jack or from the Ethernet port:
- Direct-input power jack (5.5 mm outside and 2 mm inside, female, pin positive plug) accepts 9-30 V DC;
- Ethernet port accepts 802.3af/at PoE 9-30 V DC.
The power consumption under maximum load can reach 6 W. Please attach ground (earth) wire to the screw under the bottom lid. Connecting to a PoE Adapter:
- Connect the Ethernet cable from the device to the PoE+DATA port of the PoE adapter;
- Connect an Ethernet cable from your local network (LAN) to the PoE adapter;
- Connect the power cord to the adapter, and then plug the power cord into a power outlet.
Expansion slots and ports
• Wireless module 2.4 GHz 802.11b/g/n.
- One 10/100 Ethernet ports, supporting automatic cross/straight cable correction (Auto MDI/X). Either straight or crossover cable can be used for connecting to other network devices.
- miniPCI-e slot for your desired modem.
Configuration
We recommend clicking the "Check for updates" button and updating your RouterOS software to the latest version to ensure the best performance and stability. RouterOS includes many configuration options in addition to what is described in this document. We suggest visiting the RouterOS documentation page to get yourself accustomed to the possibilities: .https://mt.lv/help
In case IP connection is not available, the Winbox tool (https://mt.lv/winbox2) can be used to connect to the MAC address of the device from the LAN side (all access is blocked from the internet port by default).
It is possible to boot the device from a network, for reinstalling RouterOS for recovery purposes. This can be done from the first Ethernet port. See above how to do this.
Buttons and jumpers
The reset button has three functions:
- Hold this button during boot time until LED light starts flashing, release the button to reset RouterOS configuration (total 5 seconds).
- Keep holding for 5 more seconds, LED turns solid, release now to turn on CAP mode. The device will now look for a CAPsMAN server (total 10 seconds).
- Or Keep holding the button for 5 more seconds until LED turns off, then release it to make the RouterBOARD look for Netinstall servers (total 15 seconds).
Regardless of the above option used, the system will load the backup RouterBOOT loader if the button is pressed before power is applied to the device. Useful for RouterBOOT debugging and recovery.
Operating system support
The device supports RouterOS software version 6. The specific factory-installed version number is indicated in the RouterOS menu /system resource. Other operating systems have not been tested.
Accessories
Package includes the following accessories that come with the device:
24V 0.8A power adapter
PoE injector
Plastic zip tie

0.35m 4pin Automotive adapter cable

wAP desktop stand
wAP mount bracket

Thermal pad
Notice
- The Frequency band 5.470-5.725 GHz isn't allowed for commercial use.
- In case WLAN devices work with different ranges than the above regulations, then a customized firmware version from the manufacturer/supplier is required to be applied to the end-user equipment and also prevent the end-user from reconfiguration.
- For Outdoor Usage: End-user requires approval/license from the NTRA.
- Datasheet for any device is available on the official manufacturer website.
- Products with the letters "EG" at the end of their serial number have their wireless frequency range limited to 2.400 – 2.4835 GHz, the TX power is limited to 20dBm (EIRP).
- Products with the letters "EG" at the end of their serial number have their wireless frequency range limited to 5.150 – 5.250 GHz, the TX power is limited to 23dBm (EIRP).
- Products with the letters "EG" at the end of their serial number have their wireless frequency range limited to 5.250 – 5.350 GHz, the TX power is limited to 20dBm (EIRP).

Please make sure the device has a lock package (firmware version from the manufacturer) which is required to be applied to the end-user equipment to prevent the end-user from reconfiguration. The product will be marked with country code "-EG". This device needs to be upgraded to the latest version to ensure compliance with local authority regulations! It is the end users responsibility to follow local country regulations, including operation within legal frequency channels, output power, cabling requirements, and Dynamic Frequency Selection (DFS) requirements. All MikroTik radio devices must be professionally installed.

To avoid pollution of the environment, please separate the device from household waste and dispose of it in a safe manner, such as in designated waste disposal sites. Familiarize yourself with the procedures for the proper transportation of the equipment to the designated disposal sites in your area.
Federal Communication Commission Interference Statement
Model FCC ID
RBwAPR-2nD TV7WAPR2ND
This equipment has been tested and found to comply with the limits for a Class B digital device, pursuant to Part 15 of the FCC Rules. These limits are designed to provide reasonable protection against harmful interference in a residential installation.
This equipment generates, uses, and can radiate radio frequency energy and, if not installed and used in accordance with the instructions, may cause harmful interference to radio communications. However, there is no guarantee that interference will not occur in a particular installation. If this equipment does cause harmful interference to radio or television reception, which can be determined by turning the equipment off and on, the user is encouraged to try to correct the interference by one of the following measures:

• Reorient or relocate the receiving antenna.
- Increase the separation between the equipment and receiver.
- Connect the equipment into an outlet on a circuit different from that to which the receiver is connected.
- Consult the dealer or an experienced radio/TV technician for help.
FCC Caution: Any changes or modifications not expressly approved by the party responsible for compliance could void the user's authority to operate this equipment.
This device complies with Part 15 of the FCC Rules. Operation is subject to the following two conditions: (1) This device may not cause harmful interference, and (2) this device must accept any interference received, including interference that may cause undesired operation. This device and its antenna must not be co-located or operation in conjunction with any other antenna or transmitter.
IMPORTANT: Exposure to Radio Frequency Radiation.
This equipment complies with the FCC RF radiation exposure limits set forth for an uncontrolled environment. This equipment should be installed and operated with a minimum distance of 20 cm between the radiator and any part of your body.
Innovation, Science and Economic Development Canada
Model IC
RBwAPR-2nD 7442A-WAPR2ND
This device complies with Industry Canada's licence-exempt RSS standard(s). Operation is subject to the following two conditions: (1) this device may not cause interference, and (2) this device must accept any interference, including interference that may cause undesired operation of the device.
This Class B digital apparatus complies with Canadian ICES-003.
IMPORTANT: Exposure to Radio Frequency Radiation.
This equipment complies with the IC radiation exposure limits set forth for an uncontrolled environment. This equipment should be installed and operated with a minimum distance of 20 cm between the radiator and any part of your body.
Eurasian Conformity Mark
The National Commission for the State Regulation of Communications and Informatization by Ukraine
CE Declaration of Conformity
Manufacturer: Mikrotikls SIA, Brivibas gatve 214i Riga, Latvia, LV1039.
Hereby, Mikrotikls SIA declares that the radio equipment type RBwAPR-2nD is in compliance with Directive 2014/53/EU. The full text of the EU declaration of conformity is available at the following internet address: https://mikrotik.com/products
Frequency bands terms of use
| Frequency range (for applicable models) | Channels used | Maximum Output Power (EIRP) | Restriction |
| 2400-2483.5 MHz | 1 - 13 | 20 dBm Without any restriction to use in all EU Member States |
* It is the customer's responsibility to follow local country regulations, including operation within legal frequency channels, output power, cabling requirements, and Dynamic Frequency Selection (DFS) requirements. All MikroTik radio devices must be professionally installed!

This MikroTik device meets Maximum WLAN transmit power limits per ETSI regulations. For more detailed information see Declaration of Conformity above / Dieses MikroTik-Gerät erfüllt die maximalen WLAN- Sendeleistung Grenzwerte gemäß ETSI-Bestimmungen. Weitere Informationen finden Sie oben unter Konformitätserklärung / Cet appareil MikroTik respecte les limites maximales de puissance de transmission WLAN conformément aux réglementations ETSI. Pour plus d'informations, voir la déclaration de conformité ci-dessus / Questo dispositivo MikroTik è conforme ai limiti massimi di potenza di trasmissione WLAN in conformità con le normative ETSI. Per ulteriori informazioni, consultare la dichiarazione di conformità sopra / Este dispositivo MikroTik cumple con los limites máximos de potencia de transmisión WLAN de acuerdo con las regulaciones ETSI. Para obtener más información, consulte la declaración de conformidad anterior / Это устройство MikroTik соответствует максимальным пределам мощности передачи WLAN в соответствии с правилами ETSI. Для получения дополнительной информации см. Декларацию соответствия выше.

Note. The information contained here is subject to change. Please visit the product page on www.mikrotik.com for the most up to date version of this document.

- Safety Warnings
- Quickstart
- MikroTik mobile app
- Mounting
- Bottom Lid
- Powering
- Expansion slots and ports
- Configuration
- Buttons and jumpers
- Operating system support
- Accessories
- Notice
- Federal Communication Commission Interference Statement
- Innovation, Science and Economic Development Canada
- Eurasian Conformity Mark
- The National Commission for the State Regulation of Communications and Informatization by Ukraine
- CE Declaration of Conformity
- Frequency bands terms of use
Brand : Mikrotik
Model : WAP R
Category : Access Point