
MM-VX200 - Mp3 player AIWA - Free user manual and instructions
Find the device manual for free MM-VX200 AIWA in PDF.


| Product Type | Portable MP3 Player |
| Brand | Aiwa |
| Model | MM-VX200 |
| Power Supply | 1 x AA (LR6) alkaline battery or optional AC adaptor (Aiwa AC-D302, DC 3V) |
| Battery Life | Approximately 6 hours of continuous playback (alkaline battery) |
| Internal Memory | 32 MB built-in Flash memory |
| Memory Expansion | SmartMedia-ID slot (supports 16 MB, 32 MB, or 64 MB cards) |
| Total Storage Capacity | Up to 64 MB (combined internal and SmartMedia) |
| Playback Formats | MP3 (downloaded), WAV (voice recordings) |
| Audio Output | Stereo headphones via remote control |
| Built-in Microphone | Yes, for voice recording |
| Connectivity | USB 1.1 (type B connector) |
| Software | VX200 Manager for Windows 98/98 SE |
| System Requirements | Pentium 200 MHz MMX, 32 MB RAM, USB port, CD-ROM drive |
| Equalizer Presets | Classic, Rock, Pop, Jazz |
| Playback Modes | Normal, Repeat, Repeat All, Random, Random Repeat All |
| Additional Features | Voice recording, A-B repeat, auto power off, HOLD switch |
| Display | LCD with track info, battery indicator, playback mode |
| Safety Notices | Do not expose to moisture; FCC Class B compliant |
| Accessories Included | USB cable, remote control, stereo headphones, installation CD, 32 MB SmartMedia-ID, carrying case |
Frequently Asked Questions - MM-VX200 AIWA
User questions about MM-VX200 AIWA
0 question about this device. Answer the ones you know or ask your own.
Ask a new question about this device
Download the instructions for your Mp3 player in PDF format for free! Find your manual MM-VX200 - AIWA and take your electronic device back in hand. On this page are published all the documents necessary for the use of your device. MM-VX200 by AIWA.
USER MANUAL MM-VX200 AIWA
For your convenience, record the model number (you will find it on the rear of your set) and the serial number (you will find it in the cassette holder of your set) in the space provided below.
Please refer them when you contact your Aiwa dealer in case of difficulty.
Model No.
Serial No.
For assistance and information,
call toll free 1-800-BUY-AIWA.
(United States and Puerto Rico)
8A-HZ1-911-01
000721AYO-O-K
Printed in Korea
WARNING
TO REDUCE THE RISK OF FIRE OR ELECTRIC SHOCK, DO NOT EXPOSE THIS APPLIANCE TO RAIN OR MOISTURE.
Copyright Notices
Under the copyright laws, neither the documentation nor the software for this product may be copied, photocopied, reproduced, translated, or reduced to any electronic medium or machine-readable form, in whole or in part, without the prior written consent of AIWA Co., Ltd.
Copyright © 2000 AIWA Co., Ltd. All rights reserved.
Microsoft and Windows are registered trademarks of Microsoft Corporation.
Pentium and MMX are registered trademarks of Intel Corporation.
SmartMedia™-ID
SmartMedia is a registered trademark of TOSHIBA Corporation.

Portions of this product are protected under copyright law and provided by Airs/Solana/4C.
RealPlayer and RealJukebox are trademarks of RealNetworks Inc.
Warning
You must be aware that distributing copies of MP3 files without permission is against the copyright laws. You must use the MP3 encoding software included on the supplied installation CD only for personal use.
MM-VX200 player is designed to be ready for the SDMI (Secure Digital Music Initiative).
TABLE OF CONTENTS
Chapter 1
PREPARATION BEFORE USE
1 SYSTEM REQUIREMENTS ..... 3
2 CONTENTS 3
3 PRECAUTIONS 4
4 INSERTING A BATTERY ..... 5
5 CONNECTING THE PLAYER TO YOUR PC 6
6 SmartMedia-ID INSTALLATION .... 6
Chapter 2
SOFTWARE INSTALLATION
1 INSTALLING THE VX200
MANAGER SOFTWARE .... 8
2 INSTALLING THE USB
DRIVER.... 10
3 INSTALLING THE WAVE DRIVER (ADPCM Driver) 10
4 UNINSTALLING THE VX200
MANAGER SOFTWARE ..... 11
5 UNINSTALLING THE WAVE
DRIVER (ADPCM Driver) ..... 11
Chapter 3
SOFTWARE OPERATION
1 OPENING VX200 MANAGER ... 12
2 PREPARING MP3 FILES ..... 12
3 OPERATING VX200 MANAGER .. 14
Chapter 4
PLAYER OPERATION
1 PLAYER OVERVIEW ..... 18
2 DISPLAY OVERVIEW ..... 20
3 PLAYER OPERATION ..... 21
Chapter 5
APPENDIX
1 SPECIFICATIONS 24
2 FAQ AND TROUBLESHOOTING GUIDE.... 24
Chapter 1
PREPARATION BEFORE USE
1 SYSTEM REQUIREMENTS ..... 3
2 CONTENTS 3
3 PRECAUTIONS 4
4 INSERTING A BATTERY ..... 5
5 CONNECTING THE PLAYER TO YOUR PC 6
6 SmartMedia-ID INSTALLATION .... 6
1 SYSTEM REQUIREMENTS
The VX200 manager software requires the following system:
- Windows 98, Windows 98 second edition*
• Pentium 200 MHz MMX or faster
• 1 available USB Port - CD-ROM drive supporting digital audio extraction
- 15MB free hard-disk space (may vary depending on the size of the MP3 files you wish to use)
• 32MB RAM
• Full duplex Sound card and speakers
• 16-bit color video card
* For use only PC systems in which Microsoft Windows 98 or Windows 98 Second Edition has been preinstalled by the manufacturer.
2 CONTENTS
The following are supplied with this player. Check to be sure all the items are in the package.
- Player

- USB cable
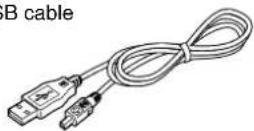
- Remote control
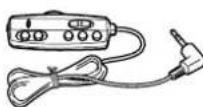
- Stereo headphones

• Installation CD-ROM

• 32 MB SmartMedia-ID
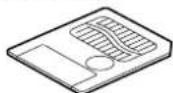
- Carrying case

- Operating instructions, etc.
3 PRECAUTIONS
The following are precautions that you should always keep in mind. Any violation of one or more of the following precautions may cause damage and will void the
4 INSERTING A BATTERY
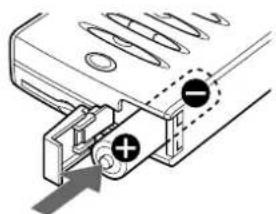
An alkaline battery is recommended for use with this player.
1 Open the cover of the battery compartment.

natural_image
Diagram of a device with slots and a button, showing no text or symbols2 Insert a size AA (LR6) alkaline battery with the + and ● marks correctly aligned, then close the cover.
natural_image
Technical diagram of a mechanical component with no visible text or symbolsBattery indicator
The battery indicator on the display changes depending on the remaining power of the battery.

Battery replacement
Replace the battery when of the battery indicator lights.
Note on dry cell battery
- Make sure that and marks are correctly aligned.
• To prevent the risk of electrolyte leakage or explosions, never recharge the battery, apply heat to it, or take it apart. - When not using the battery, remove it to prevent needless battery wear.
- If the liquid leaks out from the battery, wipe thoroughly to remove.
5 CONNECTING THE PLAYER TO YOUR PC
Use the supplied USB cable to connect this player to your PC, as follows: Connect the series B connector to the USB port connector of the player and the other plug to the USB port connector of your PC.

If a plug is already connected to the USB port connector of your PC, disconnect it before connecting this player. Do not disconnect the USB plug during downloading or uploading the files to prevent the error of your PC.
Connecting an AC adaptor
To use on AC house current, contact your nearest Aiwa service personnel and purchase an AC adaptor Aiwa AC-D302. Connect the AC adaptor:
① to the DC 3 V jack of the player ② to a wall outlet

6 SmartMedia-ID INSTALLATION
Before inserting a SmartMedia-ID, be sure to turn off the power of the player and disconnect the USB plug from the USB port connector.
Insert the SmartMedia-ID into the slot in the correct direction as follows.

natural_image
Diagram of a computer case with an attached file (no text or symbols present)To eject the SmartMedia-ID
Slide the EJECT switch as follows.

natural_image
Diagram of a device with two arrows indicating flow or movement, no text or symbols presentSupplied label for SmartMedia-ID

You can paste the supplied protecting label on the write protect area on the SmartMedia-ID.
Do not paste any label on the contact area on the SmartMedia-ID.
Note
- Insert the SmartMedia-ID completely into the slot. If it is not inserted completely, VX200 Manager will not recognize the data in the SmartMedia-ID.
- When using a SmartMedia-ID for the first time, initialize the SmartMedia-ID using the VX200 Manager software.
- The MP3 files in the SmartMedia-ID cannot be played back with other player by the security of copyright consideration. To use a SmartMedia-ID with other player, you need to initialize the SmartMedia-ID (See page 16).
Use for data storage
With up to 64MB memory, including 32MB in the SmartMedia-ID, you can store not only MP3 files but also any data files such as doc, gif, txt, bmp, wav, etc. files, as long as no file is larger than 32MB.
Chapter 2
SOFTWARE INSTALLATION
VX200 Manager is communication software that allows your computer to share information with the player. In order for the player to work properly, the VX200 Manager software must be installed correctly under Windows 98.
1 INSTALLING THE VX200
MANAGER SOFTWARE .... 8
2 INSTALLING THE USB
DRIVER.... 10
3 INSTALLING THE WAVE DRIVER (ADPCM Driver)....10
4 UNINSTALLING THE VX200
MANAGER SOFTWARE ..... 11
5 UNINSTALLING THE WAVE
DRIVER (ADPCM Driver) ..... 11
1 INSTALLING THE VX200 MANAGER SOFTWARE
Before installation, check your system matching to the system that you need again (see SYSTEM REQUIREMENTS in Chapter 1) and quit all application software in use.
1 Insert the installation CD into your CD-ROM drive.
2 Double-click on the CD-ROM drive icon to open it.

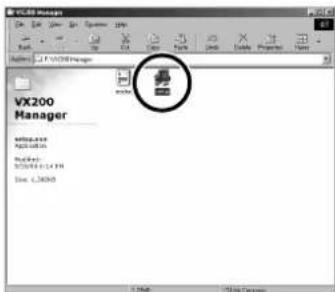
3 Double-click on the VX200 Manager folder to open it.

4 The setup file for the VX200 Manager software is setup. Double-click on setup to start installation of VX200 Manager software.
①In the Welcome! dialog box, click on the Next button to continue software installation.
②If you wish to change the destination folder to a folder other than the default folder shown in the dialog box, click on the Browse button to select the folder to which you wish to copy the VX200 Manager software files.
Next, click on the Next button to continue installation.
③You can click on the Back button to reconfigure the installation information. To continue installation, click on the Next button to start copying the necessary files into the installation folder.
④Wait until files for the VX200 Manager software are copied.
⑤Now, click on the Finish button. This completes VX200 Manager software setup.
⑥The VX200 will be created on the /Start/Programs/Vx200 menu on the Windows menu bar, and a VX200 icon will be created on your Windows desktop.
⑦ You can start VX200 Manager by either clicking on the VX200 icon or clicking on the Vx200 in the Start menu.
2 INSTALLING THE USB DRIVER
If the USB driver is not installed into your PC, you cannot download the MP3 files to the player.
To install the USB driver, connect the player with the supplied USB cable and insert the supplied CD-ROM into the CD-ROM drive of your PC.
1 Click "Next" on the "Add New Hardware Wizard."
2 Select "Search for best driver for your device" clicking the button of upper side and click "Next".
3 Check CD-ROM drive and click "Next".
4 Click "Next" according to the message.
5 After installation of the USB driver for MM-VX200, click "Finish".
3 INSTALLING THE WAVE DRIVER (ADPCM Driver)
You do not need to install this ADPCM Wave Driver if you have already installed the VX200 Manager software as described in the above section.
- The ADPCM Driver lets you play WAV files converted from voice files you have recorded using built-in microphone of the player.
- If you wish to send your voice recorded as WAV files to someone who does not have an MM-VX200 player, that person will have to install the ADPCM Wave Driver as described below.
If you need to install only the ADPCM Wave Driver, proceed as follows:
1 Insert the installation CD into your CD-ROM drive.
2 Double-click on the CD-ROM drive icon to open it.
3 Double-click on the ADPCM Drivers folder to open it.
4 Double-click on ADPCM Driver to start installation.
①In the Welcome! dialog box, click on the Next button to continue software installation.
②If you wish to change the destination folder to a folder other than the default folder shown in the dialog box, click on the Browse button to select the folder to which you wish to copy the ADPCM Driver files. Now, click on the Next button to continue installation.
③ You can click on the Back button to reconfigure the installation information. To continue installation, click on the Next button to start copying the necessary files into the installation folder.
④ Wait until the necessary files for the ADPCM Driver have been copied.
⑤Now, click on the Finish button. This completes ADPCM Driver setup.
⑥The Uninstall ADPCM Drivers item will be created on the /Start/Programs/ADPCM Drivers menu on the Windows menu bar.
4 UNINSTALLING THE VX200 MANAGER SOFTWARE
To uninstall the VX200 Manager software, choose the /Start/Programs/Vx200/Uninstall item from the Windows menu bar. This will remove all VX200 files and the VX200 folder.
5 UNINSTALLING THE WAVE DRIVER (ADPCM Driver)
If you wish to uninstall the ADPCM Driver from your system, choose the /Start/Programs/ADPCM Drivers/Uninstall ADPCM Drivers item from the Windows menu bar. This will automatically remove the ADPCM Wave Drivers from your PC.
Chapter 3
SOFTWARE OPERATION
VX200 Manager is software that interacts with the player and a PC. MP3 files and data files can be downloaded to this player. However, you can upload only data files or recorded voice files to the PC.
1 OPENING VX200 MANAGER ... 12
2 PREPARING MP3 FILES ..... 12
3 OPERATING VX200 MANAGER..14
1 OPENING VX200 MANAGER
Before you begin, make sure that the player is properly connected to the USB Port of your PC and the VX200 Manager software has been properly installed.
1 Double-click on the VX200 icon on the Windows desktop or choose the /Vx200 from the Start menu to activate the program.

2 PREPARING MP3 FILES
Before operating VX200 Manager, prepare your MP3 file on your PC.
On the supplied Installation CD, you can find RealJukebox Basic (version 1.0) in the RealJukebox folder. You can convert your audio CD data to MP3 data using the RealJukebox.
After preparing an MP3 file on your PC, download the MP3 file to the player to play back the MP3 files with the player (see Page 15).
Note
- Do not install the RealJukebox Basic onto a PC in which RealJukebox Plus has been already installed. The application will be replaced with RealJukebox Basic.
- The RealJukebox supplied in the installation CD-ROM does not have the function to communicate with MM-VX200.
- AIWA Co., Ltd. does not provide technical support for the RealJukebox software.
Access the following URL for details on operation, support, and other information on RealJukebox.
http://www.real.com/
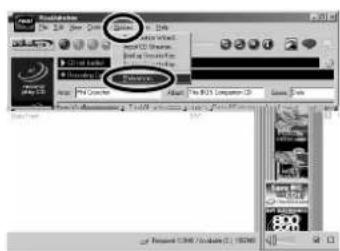
After installing the RealJukebox software, change the encoding options as follows.
↓

↓

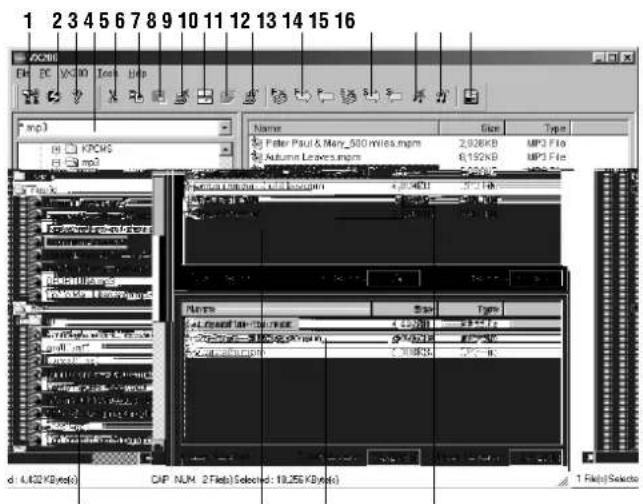
3 OPERATING VX200 MANAGER
17 18 19 20
1 Option button
The Option button brings up the Setup menu that allows you to specify the path for an MP3 player on your PC. You can also access the Setup dialog box from the Tools/Option menu.
Click the Browse button and select your preferred MP3 player, then click OK.

2 Firmware button
You need not use this button for usual operation. This button has a function for reprogramming the firmware. Aiwa will provide the updated firmware and the usage information for this button on the following URL when it is required.
Clicking on this button will display the version of VX200 Manager and its copyright information.
4 List of File Type box
The default file type argument *.mp3 can be used to display the MP3 files in the current folder.
Select the file type argument *.wav to display WAV files.
Select the file type argument *.* to display all types of files.
5-9 Cut, Copy, Paste, Delete, and Rename buttons
These buttons work the same as those of Microsoft Windows Explorer. You can cut, copy, paste, delete, rename or move the files you select in the display list box (local display list box) of the PC. However, folders will not be moved or copied.
If you wish to copy some files to a folder, select the files and drag and drop them while holding the Ctrl key pressed.
10 New Folder button
A new folder under the selected folder in the local display list box will be created.
11 Update button on the local display list box
If the information in the local display list box has been changed, click the Update button to refresh the local display list box.
12 Initialize, Download, and Upload buttons (Flash Memory)
Initialize button

This will initialize the Flash Memory in the player. All files stored in Flash Memory will be erased. You may need to initialize Flash Memory when for some reason the player is not being recognized by the VX200 Manager software.
Send to VX200 (Download) button

To copy MP3 files and data files from your PC to the player, drag and drop or use the Send to VX200 (Download) button. Using the mouse, just select the files you wish to download to the player. Then, drag and drop them into the display list box of Flash Memory.
Note
- VX200 Manager will not allow you to download the MP3 files more than 3 times.
- The file name of "xxx.mp3" will be changed to "xxx.mpm" after downloading.
- You can download the MP3 files only from the hard disc drive of your PC. For example, the MP3 files in the CD-R drive cannot be downloaded with the VX200 Manager.
- You cannot download any files during playback of voice recording. In this case, stop playback or voice recording and click the Update button (section 15) to download the files.
Send to PC (Upload) button

You can also copy data files and PCM (voice recording) files from the player to the selected folder on your PC. If you use the Send to PC (Upload) button F to copy them onto your PC, you must select one folder as a destination. The MP3 files stored in the player cannot be copied onto your PC.
ENGLISH 15
Note
- VX200 Manager will not allow you to upload MP3 files from the player to your PC because of copyright considerations. Only data files and voice files can be uploaded to your PC.
- If the player is turned off during a copy process on purpose or because of insufficient battery power, the transferred data might be corrupted. You might need to initialize the player.
- You cannot upload any files during playback of voice recording. In this case, stop playback or voice recording and click the Update button (section 15) to upload the files.
Caution
Before you copy a data file or an PCM file onto your PC, be sure to rename the file. If a file with the same filename already exists when you copy the files, the previous copied file will be erased automatically and the file will be replaced with a new one.
13 Initialize Download, and Upload buttons (SmartMedia-ID)
These buttons operate as described in section 12.
If you insert a new SmartMedia-ID, you must initialize the SmartMedia-ID by clicking on the Initialize button.
Note
- VX200 Manager will not allow you to download the MP3 files more than 3 times.
- You cannot copy any MP3 files from the player to your PC.
- The file name of "xxx.mp3" will be changed to "xxx.mpm" after downloading.
- The MP3 files in the SmartMedia-ID cannot be played back with other player due to SmartMedia-ID.
14 Delete button
A selected file in either Flash Memory or SmartMedia-ID will be highlighted in blue. Just click on the Delete button to remove a file highlighted in blue.
15 Update button (Flash Memory)
If the information in the display list box has been changed, click on the Update button to refresh the Flash memory display list box.
Note
You cannot download or upload any files during playback of voice recording. In this case, stop playback or voice recording and click this Update button to download or upload the files.
16 SmartMedia-ID format button
If you use the SmartMedia-ID formatted by VX200 Manager with a digital camera or other players, click this button to format.
17 Local Display list box
This list box shows the files stored on your PC, such as the MP3 files and data files that you want to copy to the player. The default file type argument *.mp3 will display only MP3 files in the current folder. You may also select the file type argument *.* to display all files or specify a type of file to be displayed.
You may also select *.wav to display the voice files you recorded. Even if you see the standard wave format files, however, you can play back only the voice file recorded with the MM-VX200 player.
To select multiple files
- While holding the Ctrl key on the keyboard pressed, click on the desired files. If you click on a highlighted file, the file will be unselected.
- If you click on a file while holding the Shift key pressed, the files between the first click and the release of the mouse button will be highlighted.
- The total size of the selected files in the local display list box will be displayed below the list box.
18 Flash Memory Display list box
The upper right list box of VX200 Manager is the Flash Memory display list box. All files in Flash Memory (built-in memory of the player) will be displayed in this list box.
The sizes of total and available memory in the player are displayed in kilobytes below the list box.
MP3 file info
You can modify file descriptions (ID3 tags) for any MP3 files selected in the local display list box. ID3 tag information can be changed by selecting the MP3 Info from the menu. Clicking on the Modify button will replace the ID3 tag information of the selected MP3 file with the ID3 tag information you have input.
Clicking on the Remove button will remove the ID3 tag information from the selected MP3 file.
Click on the Modify button to update the ID3 tag information after making a change. Otherwise, the information does not change even if you have input new data.

Note
The filename displayed on the display of the player will be the Title, Artist name and Album title if they are contained in the ID3 tag of the MP3 file. If the ID3 tag does not contain the Title, Artist name and Album title, only the MP3 filename, excluding the MP3 extension, will be displayed on the display.
Chapter 4
PLAYER OPERATION
This chapter provides an overview of the display and operation of the player.
1 PLAYER OVERVIEW ..... 18
2 DISPLAY OVERVIEW ..... 20
1 MP3 button
Press to enter MP3 mode, in which you can play MP3 files.
Press repeatedly to display the MP3 song information such as MPEG Type, Sampling Rate and Bit Rate.
2 ♩ jack
Connect the supplied remote control.
3 Display window
4 HOLD switch
Release before use to activate the buttons. When not in use, set it to the HOLD position to prevent unintentional operation.
5 POWER OFF button
Press to stop playback or recording. Keep pressed for 1 second to turn off the power.
6 ◀ button
Press to go back to the beginning of the current track or previous track. Keep pressed during playback to search for a desired point.
7 A-B button
Press to repeat a certain portion of the current track.
8 USB port connector
Connect the Series B connector of the supplied USB cable to connect the player to your PC.
9 VOLUME button
Press to adjust the volume. The volume level ranges from 0 to 20.
10 VOICE button
Press to enter Voice mode, in which you can create and play voice files. Press again to display the sampling frequency of the voice file for 3 seconds.
11 ERASE button
Press to erase the current MP3 or voice file.
12 Built-in microphone
Records your voice messages.
13 DC 3 V jack
Connect the AC adaptor Aiwa AC-D302 (not supplied).
14 ▶ II POWER ON button
Keep pressed for 1 second to turn on the power.
Press to start playback of an MP3 or voice file.
Press during playback to pause, and press again to resume.
15 ▶▶▶I button
Press to skip to the beginning of the next or succeeding track.
Keep pressed during playback to search for a desired point.
16 PLAY MODE button
Press repeatedly to select the playback mode.
17 DTP button
Press repeatedly to select the preset equalizer.
18 REC/STOP button
Press to start recording using the built-in microphone in Voice mode.
Press again to stop recording.
- You cannot start recording while any MP3 or voice file is being played.
19 Battery compartment
Insert an LR6 (size AA) alkaline battery.
20 SmartMedia-ID slot
Insert your SmartMedia-ID (16MB, 32MB, or 64MB) into this slot.
Remote control

1 VOL control
2 Headphone jack
3 ▶ II button
4 POWER OFF button
5 HOLD switch
6 DTP button
7 ▶▶▶I button
8 ◀◀ button
2 DISPLAY OVERVIEW
Display window

1 Battery Indicator
This displays the remaining battery power.
2 HOLD Icon
This indicates that the HOLD switch is set to the HOLD position.
3 Playback mode Icon
This indicates the selected playback mode.
(No Icon) Normal
Repeat
Repeat All
DC Random
CDC Random Repeat All
4 Segment Repeat (A-B)
This indicates the specified location (a portion being repeated) of the currently playing file.
5 Volume Icon
This indicates the volume level on a scale of 0 to 20.

6 Memory Icon
This indicates the remaining available memory in megabytes.
7 Elapsed playback/recording time
This indicates the elapsed time in minutes and seconds separated by a colon of the track currently being played or recorded.
8 Remaining recording time
This appears during voice recording.
9 Total number of tracks
This indicates the total number of MP3 files or voice files.
10 Current track number
This indicates the file number of the current MP3 or voice file.
11 Title
The MP3 title or voice file name is displayed during playback or voice files. A voice filename will look like PAGE xx; where xx is a file number from 0 to 99. If an MP3 file contains the Title, Artist name and Album title in its ID3 tag, the Title, Artist name and Album title will be displayed. If the MP3 file does not contain the Title, Artist name and Album title, only the MP3 filename excluding the extension (.MP3) will be displayed.
12 Status
This box shows information on the current status of play, pause and record.
3 PLAYER OPERATION
Turning the power on and off
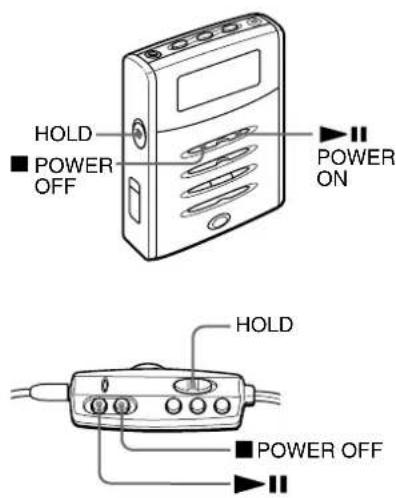
First, release the HOLD switch to activate the buttons of the player.
Press the ▶II POWER ON button to turn on the player.
The power will turned off automatically after about 3 minutes from the last operation (Auto Power Off function). To turn off the power before the Auto Power Off function turns off the power, keep the
■POWER OFF button pressed for 1 second.
When operating with the remote control Press the ▶■ button.
The power is turned on, and playback of MP3 files starts automatically.
After use, press the ■ POWER OFF button to stop playback. The power is turned off automatically.
MP3 playback

1 Connect the supplied remote control to the Ⓞ jack of the player and connect the supplied headphones to the remote control.
2 Press the MP3 button to select MP3 playback mode.
3 Press the ▶II button to start playback.
Playback starts from the MP3 file that you played last time.
4 Adjust the volume.
Press the ◀◀◀ or ▶▶▶ button to change the track number.
To stop playback, press the ■ POWER OFF button.
To select a preset equalizer
Press the DTP button repeatedly to select a desired equalizer mode.
Classic – Normal sound setting
Rock – Optimized sound setting for Rock music
Pop – Optimized sound setting for Pop music
Jazz – Optimized sound setting for Jazz music
To select other playback modes
Press the PLAY MODE button repeatedly to select a playback mode of the followings.
Each time the button is pressed, the playback mode changes in the following order.
Normal – Plays all stored MP3 songs in order, then stops after the last song.
Repeat – Plays the current song repeatedly.
Repeat All – Plays all stored MP3 songs repeatedly.
Random – Plays all stored MP3 songs in random order.
Random Repeat All
- Plays all stored MP3 songs in random order repeatedly.
To repeat a certain area
Procedure during MP3 playback
1 Press the A-B button at the beginning of the phrase to be repeated.
2 Press the A-B button again at the end of the phrase to be repeated. Playback starts between the marked locations repeatedly. When the end of the location is reached, playback starts again from the beginning of the marked location automatically.
To cancel repeat playback of the location, press the A-B button during repeat playback.
Note
You can specify a location to be repeated only in one MP3 file at a time. If the end of the current track is reached before you press the A-B button again, repeat playback is canceled automatically.
Voice recording
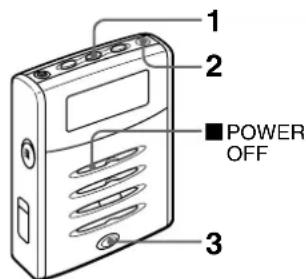
You can record your voice message in the built-in Flash Memory of the player.
1 Press the VOICE button to select voice mode.
2 Orient the built-in microphone to the sound source.
3 Press the REC/STOP button to start recording.
To stop recording, press the REC/STOP button or the ■ POWER OFF button.
Each time recording stops by pressing the REC/STOP button or the ■ POWER OFF button, the recording track number increases.
Note
You cannot record voice messages directly into the SmartMedia-ID in the player.
To playback a recorded voice message
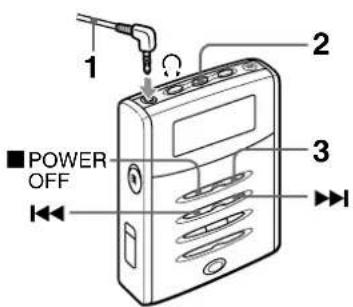
1 Connect the supplied remote control to the Ⓞ jack of the player and connect the supplied headphones to the remote control.
2 Press the VOICE button to select voice file playback mode.
3 Press the ▶II button to start playback.
Press the ▶II button to pause, and press it again to resume playback.
Press the ◀◀◀ or ▶▶▶ I button to change the track number.
To stop playback, press the ■ POWER OFF button.
Erasing Files
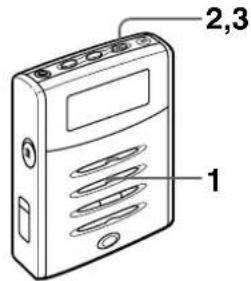
MP3 or voice files can be erased without using VX200 Manager.
1 During stop mode, press the ◀◀◀ or ▶▶◀ button to select a track to be erased from an MP3 file or voice file.
2 Press the ERASE button.
3 Press the ERASE button again to erase the current track.
To cancel erasing, press a button other than the ERASE button.
NOTE
FOR USE IN THE U.S.A.
This equipment has been tested and found to comply with the limits for a Class B digital device, pursuant to Part 15 of the FCC Rules. These limits are designed to provide reasonable protection against harmful interference in a residential installation.
This equipment generates, uses, and can radiate radio frequency energy and, if not installed and used in accordance with the instructions, may cause harmful interference to radio communications. However, there is no guarantee that interference will not occur in a particular installation. If this equipment does cause harmful interference to radio or television reception, which can be determined by turning the equipment off and on, the user is encouraged to try to correct the interference by one or more of the following measures:
– Reorient or relocate the receiving antenna.
– Increase the separation between the equipment and receiver.
- Connect the equipment into an outlet on circuit different from that to which the receiver is connected.
- Consult the dealer or an experienced radio/TV technician for help.
CAUTION
Modifications or adjustments to this product, which are not expressly approved by the manufacturer, may void the user's right or authority to operate this product.
DECLARATION OF CONFORMITY
AIWA AMERICA INC. declares, in sole responsibility, that the following product referred to in the declaration conforms to the following standard, tested on the basis of FCC standard with the Class B device.
Type of product : Portable MP3 Player
Brand Name : AIWA
Model Name : MM-VX200
ANSI C63.4 1992
This device complies with Part 15 of the FCC Rules. Operation is subject to the following two conditions: (1) This device may not cause harmful interference; and (2) this device must accept any interference received, including interference that may cause undesired operation.
AIWA AMERICA INC.
800 Corporate Drive, Mahwah NJ 07430-2048 U.S.A.
Tel: 201-512-3600
Fax: 201-512-3710
For assistance and information,
call toll free 1-800-BUY-AIWA. (United States and Puerto Rico)
AIWA CO.,LTD.
8A-HZ1-911-01
000721AYO-O-K
Printed in Korea
- WARNING
- Copyright Notices
- SmartMedia™-ID
- TABLE OF CONTENTS
- Chapter 1
- PREPARATION BEFORE USE
- Chapter 2
- SOFTWARE INSTALLATION
- Chapter 3
- SOFTWARE OPERATION
- Chapter 4
- PLAYER OPERATION
- Chapter 5
- APPENDIX
- SYSTEM REQUIREMENTS
- The VX200 manager software requires the following system:
- CONTENTS
- PRECAUTIONS
- INSERTING A BATTERY
- Battery indicator
- Battery replacement
- Note on dry cell battery
- CONNECTING THE PLAYER TO YOUR PC
- Connecting an AC adaptor
- SmartMedia-ID INSTALLATION
- To eject the SmartMedia-ID
- Supplied label for SmartMedia-ID
- Note
- Use for data storage
- INSTALLING THE VX200 MANAGER SOFTWARE
- Insert the installation CD into your CD-ROM drive.
- Double-click on the CD-ROM drive icon to open it.
- INSTALLING THE USB DRIVER
- INSTALLING THE WAVE DRIVER (ADPCM Driver)
- UNINSTALLING THE VX200 MANAGER SOFTWARE
- UNINSTALLING THE WAVE DRIVER (ADPCM Driver)
- OPENING VX200 MANAGER
- PREPARING MP3 FILES
- OPERATING VX200 MANAGER
- Option button
- Firmware button
- List of File Type box
- 5-9 Cut, Copy, Paste, Delete, and Rename buttons
- New Folder button
- Update button on the local display list box
- Initialize, Download, and Upload buttons (Flash Memory)
- Initialize button
- Send to VX200 (Download) button
- Send to PC (Upload) button
- Caution
- Initialize Download, and Upload buttons (SmartMedia-ID)
- Delete button
- Update button (Flash Memory)
- SmartMedia-ID format button
- Local Display list box
- To select multiple files
- Flash Memory Display list box
- MP3 file info
- Remote control
- DISPLAY OVERVIEW
- Display window
- PLAYER OPERATION
- When operating with the remote control Press the ▶■ button.
- Adjust the volume.
- To select a preset equalizer
- To select other playback modes
- Random Repeat All
- To repeat a certain area
- FOR USE IN THE U.S.A.
- DECLARATION OF CONFORMITY
- ANSI C63.4 1992
- AIWA AMERICA INC.
Brand : AIWA
Model : MM-VX200
Category : Mp3 player