15113902 - Razor Easy Home - Free user manual and instructions
Find the device manual for free 15113902 Easy Home in PDF.


| Product Type | Electric Shaver |
| Brand | Easy Home |
| Model | 15113902 |
| Power Source | Rechargeable Lithium-Ion Battery |
| Charging Time | 8 hours |
| Usage Time | Approximately 40 minutes |
| Dimensions (L x W x H) | 6.3 x 4.1 x 2.2 inches (16 x 10.5 x 5.5 cm) |
| Weight | 200 g (7.1 oz) |
| Shaving System | Rotary blades with pop-up trimmer |
| Water Resistance | IPX5 (washable under running water) |
| Wet & Dry Use | Yes |
| Display | LED indicator for battery level |
| Safety Features | Auto shut-off after 5 minutes of inactivity; overcharge protection |
| Cleaning | Rinse head under water; use included brush for foil |
| Maintenance | Replace foil & cutter every 12 months |
| Spare Parts Included | Protective cap, cleaning brush, charging cable |
| Repairability | Replacement heads available; user-replaceable battery |
| Warranty | 2 years limited |
Frequently Asked Questions - 15113902 Easy Home
User questions about 15113902 Easy Home
0 question about this device. Answer the ones you know or ask your own.
Ask a new question about this device
Download the instructions for your Razor in PDF format for free! Find your manual 15113902 - Easy Home and take your electronic device back in hand. On this page are published all the documents necessary for the use of your device. 15113902 by Easy Home.
USER MANUAL 15113902 Easy Home
Spend a little Live a lot.

MEN'S SHAVER BATTERY/MAINS

natural_image
Black and white electric shaver with digital display (no visible text or symbols)

QR codes take you where you want to go quickly and easily
Whether you require product information, spare parts or accessories, details on warranties or aftersales services, or if you want to watch a product demonstration video, our QR codes will take you there in no time at all.
What is a QR code?
A QR code (QR = Quick Response) is a type of matrix that can be read with a smartphone camera and that contains a link to a website or contact details, for example.
Advantage: You do not need to manually enter a website address or contact details.
This is how it works
To scan the QR code, all you need is a smartphone with QR code reader software and an internet connection.* This type of software can be downloaded for free from your app store.
Try it out now
Just scan the QR code with your smartphone and find out more about the Aldi product you have purchased.*
Your Aldi Service Portal
All details mentioned above can also be found in the Aldi Service Portal at www.aldi.co.uk.

Contents
Overview .... 4
Use....5
Scope of delivery/device parts 6
General information ...... 7
Reading and storing the instruction manual......7
Explanation of symbols 7
Safety....10
Proper use....10
Safety notes....10
First use ....16
Checking the shaver and product contents .....16
Charging the shaver for the first time 16
Displaying the status....17
Charging the rechargeable battery 18
Handling....18
Dry shave....18
Wet shave 19
Using the 3-day beard trimmer function ...... 20
Using the trimmer....21
Using the turbo function 22
Using the travel guard 23
Cleaning and care 24
Daily cleaning after a dry shave.... 24
Daily cleaning after a wet shave 25
Weekly cleaning 27
User maintenance for the shaving foils 29
Replacing wearable parts.... 29
Technical data 30
Declaration of conformity 32
Disposal 32
Disposing of the packaging 32
Disposing of the shaving foil unit and shaver blades .32
Disposing of old devices 33
Warranty Card 35
Warranty conditions 36



natural_image
Diagram of a kitchen sink with water flowing from a drain, showing internal components and a handle (no text or symbols)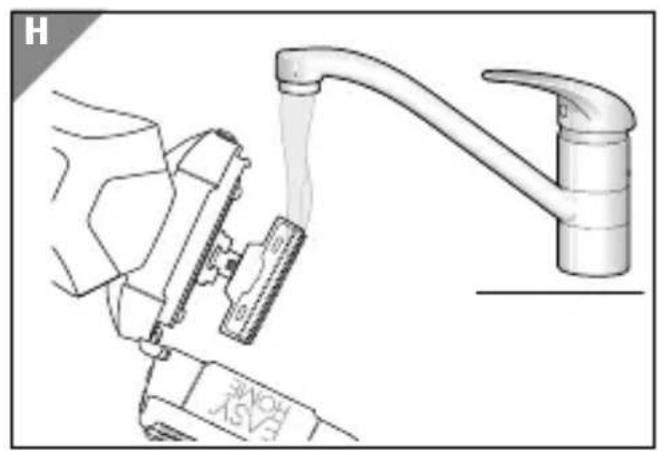
natural_image
Diagram of a kitchen sink with a hand holding a water bottle, showing mechanical components and a faucet (no text or symbols)
natural_image
Line drawing of a handheld electronic device with a black screwdriver and labeled 'EASY' (no text or symbols on the device itself)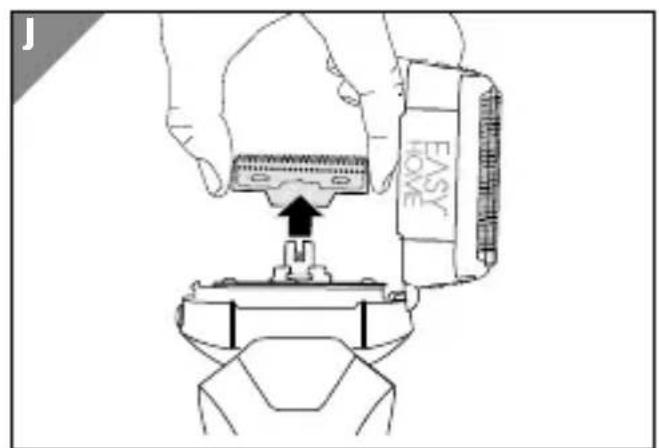
natural_image
Illustration of a hand using a tool to press or install a component labeled 'EASY' (no text or symbols on the diagram itself)

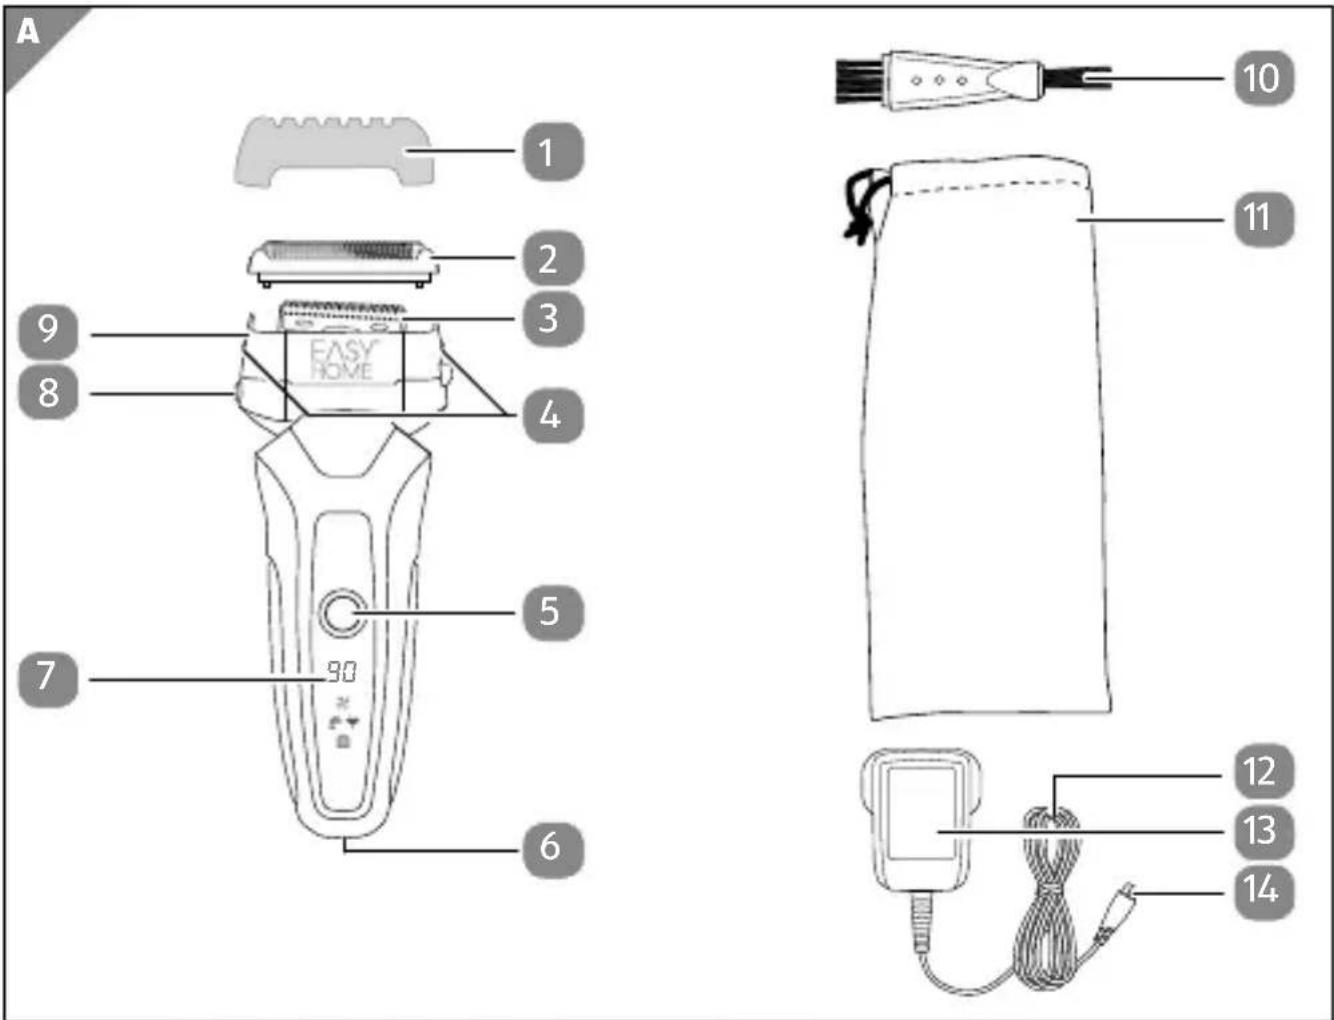
SCOPE OF DELIVERY/DEVICE PARTS
1 Protective cap with 3-day beard trimming function
2 Shaving foil unit
3 Shaver blades, 2x
4 Small release button, 2x
5 Electronic On/Off switch (with built-in travel lock and turbo function)
6 Female plug
7 Battery capacitance in %
8 Large release button
9 Shaver head (shaver head frame with shaving foil unit consisting of two shaving foils and an integrated trimmer)
10 Cleaning brush
11 Storage bag
12 Mains cord
13 AC adapter plug
14 5 V plug
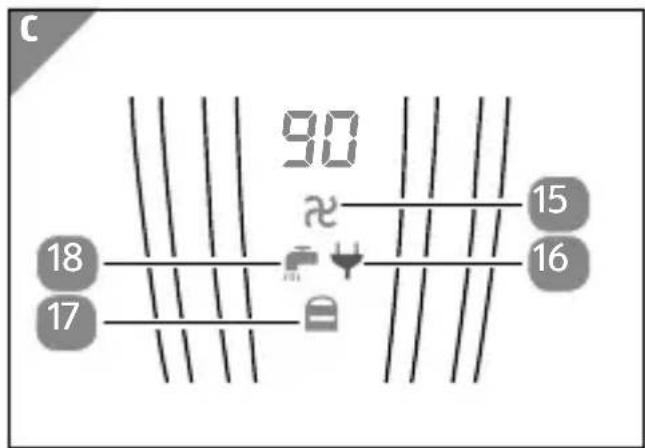
15 Turbo symbol
16 Mains symbol
17 Lock symbol
18 Tap symbol
19 Trimmer
20 Shaver head frame
General information
Reading and storing the instruction manual

This instruction manual accompanies this men's shaver battery/mains. It contains important information on start-up and handling.
For improved readability, the men's shaver battery/ mains will be referred to only as the “shaver” below.
Before using the shaver, read the instruction manual carefully. This particularly applies for the safety notes. Non-observance of this instruction manual may cause damage to the shaver.
The instruction manual is based on the standards and rules in force in the European Union. When abroad, you must also observe country-specific guidelines and laws.
Store the instruction manual for future use. If you pass the shaver on to third parties, please be absolutely sure to include this instruction manual.
Explanation of symbols
The following symbols and signal words are used in this instruction manual, on the shaver or on the packaging.
WARNING!
WARNING! This signal word designates a hazard with moderate degree of risk which may lead to death or severe injury if not avoided.
CAUTION!
CAUTION! This signal word designates a hazard with low risk that, if not avoided, may result in minor or moderate injury.
NOTICE!
NOTICE! This signal word warns against potential damages to property.

This symbol provides you with useful additional information on use.

Declaration of conformity (see chapter "Declaration of conformity"): Products marked with this symbol meet all applicable Community regulations for the European Economic Area.

This symbol identifies voltage and the current rating for direct current.

This symbol identifies electrical devices that belong to the protection class II (mains adapter).

This symbol identifies electrical devices that belong to the protection class III (shaver).

This symbol indicates the polarity of the current on the 5 V plug.

Devices marked with this symbol are only suitable for household use (dry indoor rooms).

This symbol identifies intrinsically safe transformers (with a fuse and thermo protection).

natural_image
Pure electrical circuit lines without any symbolsThe shaver is suitable for being cleaned under running water.
ATTENTION: The handheld part must be dis-connected from the connection line before being cleaned with water.
Safety
Proper use
The shaver is designed exclusively for dry and wet shaving of the face, but also for trimming beards. The shaver is only suitable for private use and not suitable for commercial purposes. The shaver may only be used in indoor spaces.
Only use the shaver as described in this instruction manual. Any other use is considered improper and may result in damage to property.
The manufacturer or vendor accepts no liability for damage caused by improper or incorrect use.
Safety notes
WARNING!
Risk of electric shock!
A faulty electrical installation, excessive mains voltage or incorrect operation may result in electric shocks.
- Only connect the shaver if the mains voltage of the socket corresponds to the nameplate specification of the mains adapter.
- Only use the shaver with the enclosed mains adapter. The shaver requires safety extra-low voltage (SELV) with the values specified in the chapter “Technical data”.
- Only connect the mains adapter to an easily accessible socket so that you can quickly disconnect it from the mains in case of a failure.
- If the mains cord, the mains adapter or the shaver exhibit visible damages or are defective, do not use them further.
- If the mains cord of the shaver is damaged, the manufacturer or its customer service team must replace it.
- Do not open the housing; instead, have a qualified professional perform the repairs. For this, contact the manufacturer at the service address specified on the warranty card.
- Electrical and mechanical parts, which are essential for providing protection against sources of danger, are located in this device.
- Keep the shaver, the mains cord and mains plug away from water and other liquids, open flames and hot surfaces.
- Never touch the mains plug with damp hands.
- Never pull the mains plug out of the socket by the mains cord; instead, always do so by taking hold of the mains plug.
- Never use the mains cord as a carrying strap.
- Lay the mains cord so that it does not pose a tripping hazard.
- Do not kink the mains cord and do not lay it over sharp edges.
- Never store the shaver such that there is a risk of it falling into a tub or a basin.
- Never reach to retrieve the shaver if it has fallen in water. In such a case, immediately disconnect the mains plug.
- Make sure that children do not insert any objects in the shaver.
- Always turn the shaver off and pull the mains plug out of the socket
- when you are not using the shaver,
- when you are cleaning the shaver,
• in the event of a fault or
• in the event of a storm.

WARNING!
Risk of explosion and fire!
Handling the rechargeable battery improperly may lead to an explosion or fire resulting in injury and damage to property.
- Protect the rechargeable battery against mechanical damage.
- Do not expose the shaver to excessive heat such as sunlight, fire or other heat sources. The ambient temperature should not fall below or exceed 5 - 35 °C.
- Do not use metallic objects to connect the charging contacts on the shaver.
- Only use the original accessories for the charging process.
- Only use the charging station with the enclosed shaver.
WARNING!
Danger for children and persons with impaired physical, sensory or mental capacities (e.g. partially disabled persons, older persons with reduced physical and mental capacities) or lack of experience and knowledge (e.g. older children).
- This shaver may be used by persons with impaired physical, sensory or mental capacities or those lacking experience and knowledge if they are supervised or have been instructed in how to safely use the shaver and have understood the risks associated with operating it. Children must not play with the shaver. Cleaning and user maintenance must not be performed by children.
- Keep children away from the shaver, mains adapter and mains cord.
- Do not leave the shaver unattended while in operation.
- Do not allow children to play with the packaging wrapper. They may get caught in it and suffocate.
CAUTION!
Risk of injury due to sharp edges and blades!
If you use the shaver with a damaged shaver head, without a shaver head or if you push down on the shaving foils, you could cut yourself on the sharp edges or blades.
- Do not push the shaving foils in with your fingers.
- Do not use the shaver if the shaver head, the integrated shaving foils or the trimmer are damaged.
- Do not use the shaver if the shaver head is not firmly mounted.
NOTICE!
Risk of damage!
Improper handling of the shaver may result in damage to the shaver.
- Only transport and store the shaver with the protective cap in place.
- Only transport the shaver with the transport guard engaged.
- Do not let the shaver fall down.
First use
Checking the shaver and product contents
NOTICE!
Risk of damage!
If you are not cautious when opening the packaging with a sharp knife or other pointy object, you may damage the shaver.
- Be careful when opening.
- Carefully take the shaver, the individual parts and the accessories out of the packaging.
- Check to make sure that the delivery is complete (see fig. A).
- Check whether the shaver, the individual parts or the accessories exhibit damage.
- If the delivery is incomplete or damaged, do not use the shaver. Contact the manufacturer at the service address specified on the warranty card.
Charging the shaver for the first time
Before you use the shaver for the first time in battery operation, you must charge the shaver's rechargeable battery for at least 90 minutes.
Displaying the status
The shaver has an indicator – the mains symbol 16 – that supplies information about the power supply or the charge level of the rechargeable battery (see fig. C):
| Symbol Meaning | |
| Battery, illuminated in blue (00 – 100 %) | Indicates the battery charge level in 10 % increments. |
| Turbo, flashing in blue The turbo function has been activated. | |
| Mains, illuminated in red The rechargeable battery is being charged. The battery charge level is shown in %. | |
| Mains, flashing in red The rechargeable battery is almost empty and must be charged. The mains symbol is shown flashing in red during shaving from a battery charge level of 10 %. The shaver switches off shortly after the indicator switches to 00 when the mains symbol is flashing. | |
| Mains, illuminated in red, battery capacitance, 100 | The rechargeable battery is fully charged. |
| Lock, flashing The travel guard is activated. | |
| Tap, illuminated in blue The shaver must be cleaned. | |
| No symbol indicator The shaver has been deactivated. | |
Charging the rechargeable battery

NOTICE!
The rechargeable battery takes approx. 90 minutes to charge fully. However, you can also use the shaver in mains operation without charging the rechargeable battery.
-
Insert the 5 V plug 14 in the female plug 6 on the bottom of the shaver (see fig. A and B).
-
Connect the AC adapter plug 13 in a properly installed socket.
The mains symbol 16 on the display illuminates in red to indicate that the battery is charging.
- To charge the shaver, place it on a dry and level surface or shave in mains mode.
Handling
Dry shave

NOTICE!
We recommend a dry shave before you wash. After washing, you skin is slightly swollen. As a result, shavers are often unable to reach the entire length of your beard hair so the shave will be less thorough.
For a dry shave, follow the steps below:
- Take the protective cap 1 off of the shaver (see fig. A).
- Use the electronic On/Off switch 5 to switch the shaver on.
- Use your free hand to stretch the part of your face you intend to shave.
- While applying gentle pressure, move the shaver head 9 perpendicular to the direction of hair growth.
- After a few strokes, use your free hand to check the results and repeat step 4 if necessary.
- Shave as described in steps 2 – 4.
- If necessary, use the trimmer 19 as described in the chapter "Using the trimmer" (see fig. D).
- After shaving, switch the shaver off by pushing the electronic On/Off switch twice.
- Clean the shaver as described in the chapter "Daily cleaning after a dry shave".
Wet shave
- Slightly dampen your face and apply shaving cream or gel to your face.
- Take the protective cap 1 off of the shaver (see fig. A).
-
Use the electronic On/Off switch 5 to turn the shaver on (see fig. A).
-
While applying gentle pressure, move the shaver head 9 perpendicular to the direction of hair growth.
- After a few strokes, use your free hand to check the results and repeat step 4 if necessary.
- Shave as described in steps 2 – 4.
- If necessary, use the trimmer 19 as described in the chapter "Using the trimmer" (see fig. D).
- After shaving, switch the shaver off by pushing the electronic On/Off switch twice.
- Clean the shaver as described in the chapter "Daily cleaning after a wet shave".
Using the 3-day beard trimmer function
You can use the protective cap of the shaver for trimming. To do so, proceed as follows:
- Use the electronic On/Off switch 5 to switch the shaver off (see fig. A).
- Place the protective cap 1 on the shaver head 9.
- Use the electronic On/Off switch 5 to turn the shaver on (see fig. A).
- Run the shaver over the part of your face you would like to shave.
Using the trimmer

NOTICE!
Keep in mind that the trimmer always generates a straight cutting edge. If you do not want a straight cutting edge, you must hold the shaver at an angle.
For hard-to-reach areas or for very precise cuts, use a comb to check the hair you intend to trim with the trimmer and the cut length.
Use the trimmer as follows:
-
Move the trimmer 19 all the way out until it audibly locks into place (see fig. D).
-
Use the electronic On/Off switch 5 to turn the shaver on (see fig. A).
-
Slowly guide the trimmer up to the hair you intend to cut.
-
Always use short strokes to cut your hair.
-
Switch the shaver off by pushing the electronic On/Off switch twice.
-
Clean the shaver as described in the chapter "Daily cleaning after a wet shave" or "Daily cleaning after a dry shave".
Using the turbo function
NOTICE!
Risk of damage!
Using the turbo function for prolonged periods accelerates the wear of the shaving foils.
- Only use the turbo function for short periods and not for the entire shave.
- Oil the shaving foils regularly to reduce frictional resistance.

NOTICE!
After switching the shaver off and back on, the shaver will be in standard mode again.
This shaver has a turbo function. Activating it increases the shaver speed. Proceed as follows to activate the turbo function:
- Take the protective cap 1 off of the shaver (see fig. A).
- Use the electronic On/Off switch 5 to switch the shaver on.
- Push the electronic On/Off switch again and hold it down for approx. 1.5 seconds.
The turbo function is activated and the blue turbo symbol will start flashing (see fig. C).
- Push and hold the electronic On/Off switch again for approx. 1.5 seconds to deactivate the turbo function again. The shaver will also be switched off when deactivating the turbo function.
Using the travel guard
The shaver is equipped with a travel guard that prevents the shaver from accidentally activating.
Activating the travel guard
- Hold the electronic On/Off switch 5 down for more than 3 seconds (see fig. A). The shaver will automatically switch off and the lock symbol 17 will flash blue several times (see fig. C).
The travel guard is now activated.
Deactivating the travel guard

NOTICE!
Connecting the shaver with the mains adapter and inserting the mains adapter in a socket will automatically deactivate the travel guard.
- Hold the electronic On/Off switch 5 down for more than 3 seconds. During this process, the lock symbol will flash blue several times.
The shaver will now automatically switch on.
- Briefly push the electronic On/Off switch twice to turn off the shaver.
The travel guard is now deactivated.
Cleaning and care
NOTICE!
Risk of short circuit!
Water that has penetrated the mains cord or the mains adapter may cause a short circuit. - Never immerse the mains adapter or the 5 V plug in water.
NOTICE!
Risk of damage!
Improperly cleaning the shaver may damage its surface, the shaving foils and the shaver blade.
- Do not use any aggressive cleaners, brushes with metal or nylon bristles, sharp or metallic cleaning utensils such as knives, hard scrapers and the like.
Daily cleaning after a dry shave
-
Use the electronic On/Off switch 5 to switch the shaver off (see fig. A).
-
Pull the 5 V plug 14 out of the shaver (see fig. A and B).
-
Hold the shaver over the sink.
-
Push the small release buttons 4 to release the shaving foil unit 2.
-
Pull the shaving foil unit up and off (see fig. K).
-
Knock the shaving foil unit out gently over a sink to remove stubble.
-
Place the shaving foil unit on a suitable base.
-
Depress the large release button 8 to open the shaver head 9 (see fig. A and E).
-
With the shaver head open, use the electronic On/Off switch 5 to switch the shaver on for approx. 5 – 10 seconds to dispel any stubble from the shaver blades 3 (see fig. A).
-
Switch the shaver back off with the electronic On/Off switch.
-
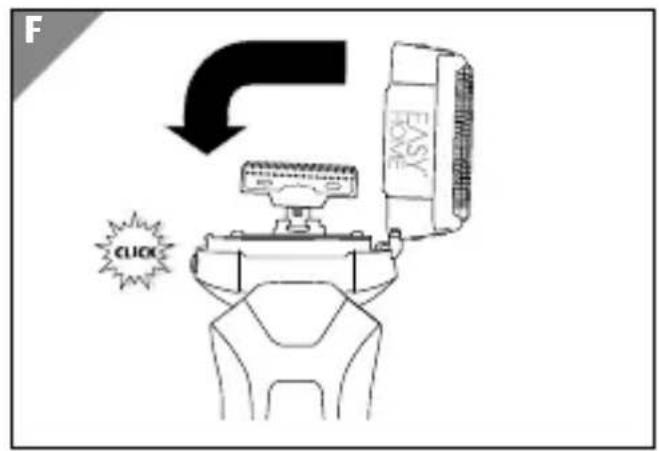
Close the shaver head and place the shaving foil unit on the shaver head so that the locking mechanism audibly engages (see fig. F and L).
-
Place the protective cap 1 on the shaver.
The shaver is now ready for use again.
Daily cleaning after a wet shave
-
Use the electronic On/Off switch 5 to switch the shaver off (see fig. A).
-
Pull the 5 V plug 14 out of the shaver (see fig. A and B).
-
Hold the shaver over the sink.
-
Push the small release buttons 4 to release the shaving foil unit 2.
- Pull the shaving foil unit up and off (see fig. K).
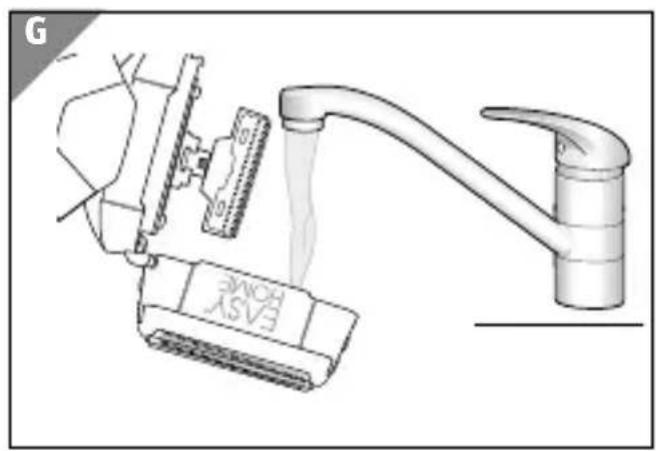
- Wash the shaving foil unit thoroughly under warm running water on the inside and outside (see fig. G).
- Place the shaving foil unit on a suitable base.
- Depress the large release button 8 to open the shaver head 9 (see fig. A and E).
- Thoroughly rinse off the top part of the shaver and the shaver blades 3 under warm running water (see fig. A and H).
- Use the electronic On/Off switch 5 to switch the shaver on with the shaver head open for approx. 5 – 10 seconds to dispel any drops of water from the shaver blades.
- Carefully dry the shaving foil unit with a lint-free cloth or a paper towel.
- Use a lint-free cloth or a paper towel to thoroughly dry off the shaver.
- Close the shaver head and place the shaving foil unit 2 on the shaver head so that the locking mechanism audibly engages (see fig. A, F and L).
- Oil the shaving foils as described in the chapter "User maintenance for the shaving foils".
- Place the protective cap 1 on the shaver. The shaver is now ready for use again.
Weekly cleaning
It is recommended that you perform a more thorough cleaning once a week, both for dry and wet shaving.
To do so, proceed as follows:
-
Use the electronic On/Off switch 5 to switch the shaver off (see fig. A).
-
Pull the 5 V plug 14 out of the shaver (see fig. A and B).
-
Hold the shaver over the sink.
-
Push the small release buttons 4 to release the shaving foil unit 2.
-
Pull the shaving foil unit up and off (see fig. A and K).
-
Knock the shaving foil unit out gently over a sink to remove stubble.
-
Place the shaving foil unit on a suitable base.
-
Depress the large release button 8 to open the shaver head 9 (see fig. A and E).
-
With the shaver head open, use the electronic On/Off switch to switch the shaver on for approx. 5 – 10 seconds to discharge any stubble from the shaver blades 3.
-
Briefly press the electronic On/Off switch twice to switch the shaver off again (see fig. A).
-
Use the cleaning brush 10 to completely remove all stubble from the shaver blades and the entire top part of the shaver (see fig. A and I).
-
Thoroughly wash the shaver head under warm running water from the inside and outside (see fig. G).
- Depress the large release button 8 to open the shaver head 9 (see fig. A and E).
- Thoroughly rinse off the shaver blades under warm running water (see fig. H).
- Use the electronic On/Off switch to switch the shaver on with the shaver head opened for approx. 5 – 10 seconds in order to discharge any drops of water off of the shaver blades.
- Carefully dry the top part of the shaver head with a lint-free cloth or a paper towel. In the process, do not push the shaving foils in.
- Use a lint-free cloth or a paper towel to thoroughly dry off the shaver.
- Use a lint-free cloth to dry the shaving foil unit 2.
- Close the shaver head and place the shaving foil unit on the shaver so that the locking mechanism audibly engages (see fig. F and L).
- Oil the shaving foils as described in the chapter "User maintenance for the shaving foils".
- Place the protective cap 1 on the shaver (see fig. A).
The shaver is now ready for use again.
User maintenance for the shaving foils
To maintain the performance of your shaver and increase the service life of the shaving foils, you should perform user maintenance on the shaving foils every week, but no less than once a month as follows:
- Put a drop of fine, non-resinous household oil on the tip of your finger.
- Distribute the oil evenly on the shaving foils.
- Without applying pressure, dab the shaving foils with a soft, lint-free cloth or paper towel.
Replacing wearable parts
Ordering wearable parts
You can order a new shaving foil unit and shaver blades to replace worn ones.
To place your order, contact the address provided on the order form.
Replacing the shaving foil unit
If the shaving foil unit is damaged, it must be promptly replaced. We generally recommend that you replace the shaving foil unit no later than after 12 months of daily use.
-
Use the electronic On/Off switch 5 to switch the shaver off (see fig. A).
-
Depress the small release buttons 4 to release the shaving foil unit 2 (see fig. A and K).
-
Pull the shaving foil unit up and off.
-
Dispose of the used shaving foil unit as described in the chapter "Disposal".
-
Gently push the shaving foil unit on the frame of the shaving foil unit onto the shaver until the locking mechanism audibly engages (see fig. L).
- Oil the shaving foils as described in the chapter "User maintenance for the shaving foils".
- Place the protective cap 1 on the shaver (see fig. A).
Your shaver is now ready for use again.
Replacing the shaver blades
We recommend replacing the shaver blades no later than after 12 months of daily use. The two shaver blades must always be replaced at the same time.
- Depress the large release button 8 to open the shaver head (see fig. A and E).
- Pull the shaver blades 3 straight up and out of their brackets (see fig. A and J).
- Dispose of the used shaver blades as described in the chapter "Disposal".
- Mount the new shaver blades on the brackets.
- Close the shaver head until the locking mechanism audibly locks into place (see fig. F).
- Place the protective cap 1 on the shaver (see fig. A). Your shaver is now ready for use again.
Technical data
Model: 15113902
Article number: 92739
Power supply: Mains adapter
Input 100 - 240 V/AC,
50 - 60 Hz, max. 0.2 A
Output 5 V/DC, 900 mA
Rechargeable battery: 1 x Li-Ion 800 mAh
Protected against overloading and deep discharge
Charging time: 90 min.
Operating time: max. 95 min
Motor: 3.7 V/DC
Protection class mains II adapter:
Protection class shaver: III
IP code mains adapter: IP 44, protection against debris with a diameter greater than 1 mm and entry with a wire
IP code shaver: IPX6, protected against pow erful water jets
Cable length: approx. 180 cm
Cutting blades: Stainless steel
Shaving foils: Nickel, brand: STORK
Dimensions (W x D x H): 63 x 40 x 158 mm
Weight (including 256 g
accessories):
Declaration of conformity

The EU declaration of conformity can be requested from the address specified on the warranty card (at the end of this instruction manual).
Disposal
Disposing of the packaging

Dispose of the packaging separated into single type materials. Dispose of cardboard and carton as waste paper and foils via the recyclable material collection service.

Dispose of the packaging in accordance with the applicable laws and regulations for your country.
Disposing of the shaving foil unit and shaver blades
Dispose of used or defective shaving foil units and shaver blades in accordance with the applicable regulations for your country.
Disposing of old devices
(Applicable in the European Union and other European states with systems for the separate collection of reusable waste materials)

natural_image
Symbol of a trash bin crossed with no text or numbers, representing waste sorting or restriction (no text present)Old devices must not be disposed of with household waste!
If the shaver is no longer operational, every consumer is required by law to dispose of used devices separately from household waste, e.g.
at a collection point run by the communal authority or borough. This ensures that old devices are recycled in a professional manner and also rules out negative consequences for the environment. For this reason, electrical equipment is marked with the symbol shown here.
Batteries and rechargeable batteries may not be disposed of with household waste!
nd user you are required by law to bring all batteries and rechargeable batteries, regardless whether they contain harmful substances* or not, to a collection point run by the communal authority or borough or to a retailer, so that they can be disposed of in an environmentally friendly manner. Bring the entire shaver (including the rechargeable battery) to your collection point and make sure that it is in an uncharged state!
* labelled with: Cd = cadmium, Hg = mercury, Pb = lead

WARRANTY CARD MEN'S SHAVER BATTERY/MAINS
Your details:
Name ____
Address
Date of purchase * ____
* We recommend you keep the receipt with this warranty card.
Location of purchase
Description of malfunction:

If after contacting the manufacturer you are requested to return the faulty product please return the completed warranty card together with it.
Docdata Fashion Services GmbH
Free Hotline. Call charges from a mobile phone may be incurred. Phone lines available Mondy to Friday, 8am - 6pm
YEARS WARRANTY
Warranty conditions
Dear Customer,
The ALDI warranty offers you extensive benefits.
Warranty period: 3 years from date of purchase.
6 months for wear parts and consumables under normal and proper conditions of use (e.g. rechargeable batteries).
Costs: Free repair/exchange. No transport costs.
Hotline: Toll free hotline.
ADVICE: Please contact our service hotline by phone, e-mail or fax before sending in the device. This allows us to provide support in the event of possible operator errors.
In order to make a claim under the warranty, please send us:
- the faulty item together with the original purchase receipt and the completed warranty card.
- the faulty product with all components included in the packaging.
The warranty does not cover damage caused by:
- Accident or unanticipated events (e.g. lightning, water, fire).
- Improper use or transport.
- Disregard of the safety and maintenance instructions.
- Other improper treatment or modification.
After the expiry of the warranty period, you still have the possibility to have your product repaired at your own expense. If the repair or the estimate of costs is not free of charge you will be informed accordingly in advance.
This warranty does not affect your statutory rights. In the event that a product is received for repair, neither the service company nor the seller will assume any liability for data or settings possibly stored on the product by the customer.
In order to send in defective devices during the warranty period free-of-charge and to ensure prompt as well as correct processing, it is imperative that you request an RMA (return material authorisation) number by phone or by e-mail via our customer service team before sending in a device

Spend a little Live a lot.
Great care has gone into the manufacture of this product and it should therefore provide you with years of good service when used properly. In the event of product failure within its intended use over the course of the first 3 years after date of purchase, we will remedy the problem as quickly as possible once it has been brought to our attention. In the unlikely event of such an occurrence, or if you require any information about the product, please contact us via our helpline support services, details of which are to be found both in this manual and on the product itself.

PRODUCED IN CHINA FOR:
visit us at www.aldi.com
AFTER SALES SUPPORT


00800 36463600

www.aquarius-service.com
Model: 15113902
Product code: 92739
11/2015
3
YEARS WARRANTY
- MEN'S SHAVER BATTERY/MAINS
- QR codes take you where you want to go quickly and easily
- What is a QR code?
- This is how it works
- Try it out now
- Your Aldi Service Portal
- Contents
- Overview .... 4
- Use....5
- Scope of delivery/device parts 6
- General information ...... 7
- Safety....10
- First use ....16
- Handling....18
- Cleaning and care 24
- Technical data 30
- Declaration of conformity 32
- Disposal 32
- Warranty Card 35
- Warranty conditions 36
- SCOPE OF DELIVERY/DEVICE PARTS
- General information
- Reading and storing the instruction manual
- Explanation of symbols
- WARNING!
- CAUTION!
- NOTICE!
- Safety
- Proper use
- Safety notes
- Risk of electric shock!
- Risk of explosion and fire!
- Risk of injury due to sharp edges and blades!
- Risk of damage!
- First use
- Checking the shaver and product contents
- Charging the shaver for the first time
- Displaying the status
- Charging the rechargeable battery
- Handling
- Dry shave
- Wet shave
- Using the 3-day beard trimmer function
- Using the trimmer
- Using the turbo function
- Using the travel guard
- Activating the travel guard
- Deactivating the travel guard
- Cleaning and care
- Risk of short circuit!
- Daily cleaning after a dry shave
- Daily cleaning after a wet shave
- Weekly cleaning
- User maintenance for the shaving foils
- Replacing wearable parts
- Ordering wearable parts
- Replacing the shaving foil unit
- Replacing the shaver blades
- Technical data
- Declaration of conformity
- Disposal
- Disposing of the packaging
- Disposing of the shaving foil unit and shaver blades
- Disposing of old devices
- Batteries and rechargeable batteries may not be disposed of with household waste!
- WARRANTY CARD MEN'S SHAVER BATTERY/MAINS
- Warranty conditions
- In order to make a claim under the warranty, please send us:
- Spend a little Live a lot.
- PRODUCED IN CHINA FOR:
- AFTER SALES SUPPORT
Brand : Easy Home
Model : 15113902
Category : Razor