
NexStar NST-D300S3-BK - Car Mount Vantec - Free user manual and instructions
Find the device manual for free NexStar NST-D300S3-BK Vantec in PDF.


| Product Type | SATA to USB 3.0 Hard Drive Dock |
| Brand | Vantec |
| Model | NexStar NST-D300S3-BK |
| Supported Drives | 2.5" or 3.5" SATA I/II Hard Drives |
| Interface | USB 3.0 (backward compatible with USB 2.0 and 1.1) |
| Maximum Transfer Rate | Up to 5 Gbps (USB 3.0) / 480 Mbps (USB 2.0) |
| Hard Drive Capacity | Up to 2TB |
| Dimensions (L x W x H) | 136 x 83 x 87 mm |
| Weight | Approx. 200 g (without power adapter) |
| Material | Plastic |
| Power Supply | AC adapter (included) |
| Operating Systems Supported | Windows XP/Vista/7 (32/64-bit), Mac OS X 10.4 & later |
| Key Features | Hot-swappable, plug and play, no screws needed, eject button, blue LED indicator, shielded USB 3.0 cable |
| Package Contents | Hard Drive Dock, USB 3.0 cable (3 ft), Power adapter, User manual |
| Warranty | 1 year limited (90 days parts) |
| Removal Safety | Always power off the dock before removing drive |
| Maintenance | Clean with dry cloth; avoid liquids |
Frequently Asked Questions - NexStar NST-D300S3-BK Vantec
User questions about NexStar NST-D300S3-BK Vantec
0 question about this device. Answer the ones you know or ask your own.
Ask a new question about this device
Download the instructions for your Car Mount in PDF format for free! Find your manual NexStar NST-D300S3-BK - Vantec and take your electronic device back in hand. On this page are published all the documents necessary for the use of your device. NexStar NST-D300S3-BK by Vantec.
USER MANUAL NexStar NST-D300S3-BK Vantec
All Registered Trademarks Belong To Their Respected Companies.

SATA to SuperSpeed USB 3.0
Copyright © 2010 Vantec Thermal Technologies. All Rights Reserved.
NexStar® HARD DRIVE DOCK
■ Table of Contents
- Introduction......2
- System Requirements....2
- Specifications/Features....3
- Installation 4
- Removal....7
- Creating a Partition....9
For Windows XP/Vista/7 Users....9
For Mac Users....10 - Warranty....12
NexStar® HARD DRIVE DOCK
1. Introduction
The Vantec NexStar® SuperSpeed USB 3.0 Hard Drive Dock is a complete and easy way to add or swap hard drives with your computer. Integrated with the latest USB 3.0 technology, performance is increased by 10 fold offering maximum speeds of up to 5 Gbps. The need of opening up your computer case or installing the hard drive into an enclosure is now a distant memory. Simply insert any 2.5" or 3.5" SATA I/II hard drive into the Hard Drive Dock and you are ready to transfer, copy, or backup files. The NexStar® SuperSpeed USB 3.0 Hard Drive Dock is the perfect solution to access any hard drives in seconds.
2. SystemRequirements
■ Microsoft Windows XP/Vista/7 (32/64bit)
■ Mac OS X 10.4 & Greater
■ For USB 2.0 speeds, the system must support USB 2.0 specifications
■ For USB 3.0 speeds, the system must support USB 3.0 specifications.
■ CD-ROM drive (if drivers are needed)
NexStar® HARD DRIVE DOCK
3. Specifications/Features
Features :
■ Install and Access Hard Drives in Seconds
■ Simple to Use Design; No Screws Needed
■ Eject Button for Easy Removal of Hard Drive
■ Compatible with 2.5" or 3.5" SATA I/II Hard Drive
■ Maximum Transfer Rates Up to 5 Gbps w/USB 3.0
■ Maximum Transfer Rates Up to 480 Mbps w/USB 2.0
■ Backwards-Compatible with USB 2.0 or 1.1
■ Hi-Quality Shielded USB 3.0 Cable Ensures Data
■ Integrity and Speed
■ Hot-Swappable: Plug & Play Without Rebooting
■ Attractive Blue LED Indicates Power & HDD Activity
Package Includes :
■ NexStar® SuperSpeed USB 3.0 Hard Drive Dock
■ USB 3.0 Cable (3ft)
■ Power Adapter
■ User's Manual
Specifications :
■ Model : NST-D300S3-BK
■ Device Support : SATA I/II Hard Drive
■ Device Size : 2.5" or 3.5"
■ Internal Interface : SATA
■ External Interface : USB 3.0
■ Material : Plastic
■ Dimension : 136 x 83 x 87mm
■ HDD Capacity : Up to 2TB
■ Power Supply : AC Adapter
NexStar® HARD DRIVE DOCK
4. Installation
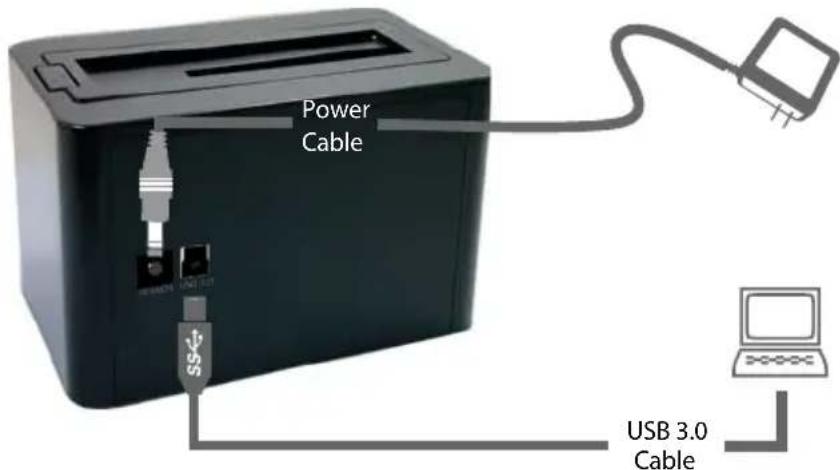
- Connect the power adapter to the NexStar® Hard Drive Dock.
- Connect the USB 3.0 Cable to the NexStar® Hard Drive Dock and attach the other end to your computer.
NexStar®
HARD DRIVE DOCK
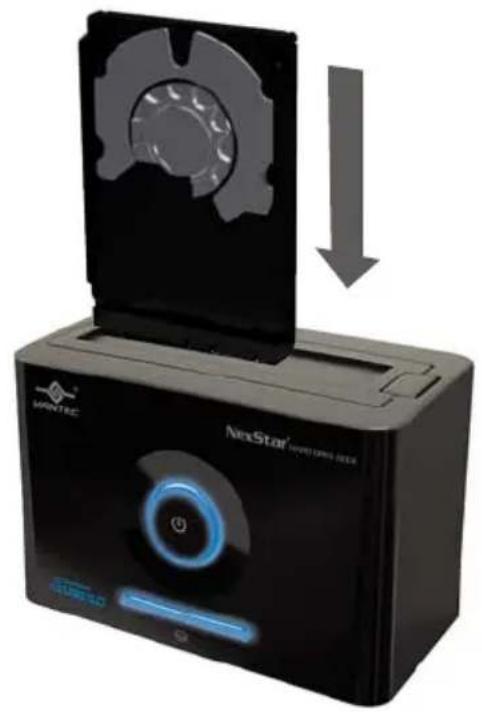
- Insert 2.5" or 3.5" SATA HDD into the slot.
natural_image
Black device labeled 'NewStar' with a gear-like top and blue indicator light, showing a downward arrow (no readable text or symbols)NexStar®
HARD DRIVE DOCK
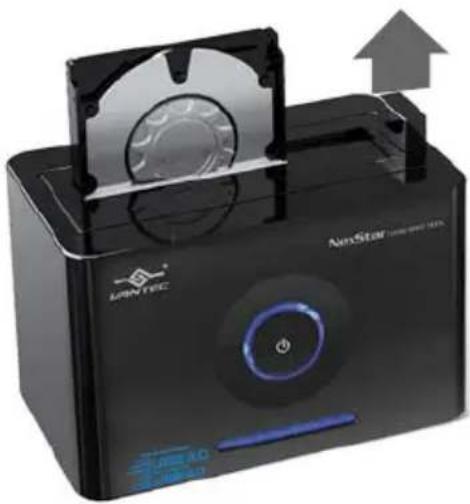
3-1. When the eject button is upright, the NexStar® Hard Drive Dock is ready for use.
natural_image
Black electronic device labeled 'ANSTEF' with a fan and power button, showing a circular button and indicator lights (no readable text beyond branding)NexStar® HARD DRIVE DOCK
4. Removal
Warning: Please push power button & turn off unit before removing the hard drive!
- First, safely remove the USB HDD device from your computer operating system.
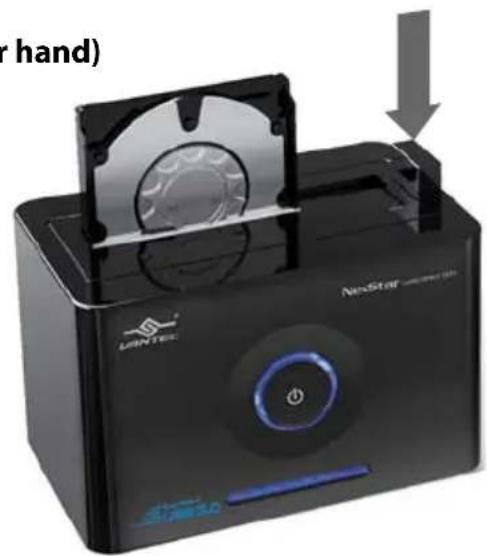
- Once safe removal has been completed, proceed to turn off the power to the Hard Drive Dock and eject the HDD.
(Stabilize the HDD with your hand)
NexStar® HARD DRIVE DOCK
- Remove the HDD from the Hard Drive Dock.
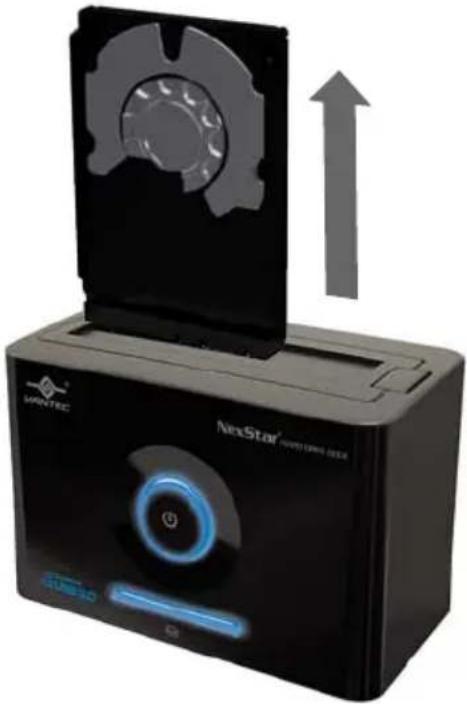
natural_image
Exterior view of a black ManTec device with a circular display and upward arrow, no visible text or symbols on the device itself.NexStar® HARD DRIVE DOCK
6.Creating a Partition
For Windows® XP/Vista/7 Users:
- Right click on "My Computer" and choose "Manage".
- Under "Storage" on the LEFT pane, select "Disk Management".
- Windows should now give you the option to initialize the disk. If not, locate the new disk, right-click on the new disk (where it reads "Disk #") and choose Initialize. This step may not be required for some hard drives.
- Go through the wizard.
- Once complete, locate your hard drive in the bottom right pane. Right-click on the area with a status bar (to the right of the "Disk#" area) and choose New Partition.

NOTE :
Most hard drives should come with a CD that includes an installation program. If not, a download should be available from the manufacturer's website. The best way to partition a new hard drive is by using the manufacturer's program. Please refer to your hard drive's documentation for further information on formatting or partitioning the hard drive.
NexStar® HARD DRIVE DOCK
WARNING: Doing the following setup will erase any existing data on the drive.
- Follow the directions of the wizard. The recommended type is "primary" and the recommended file system is "NTFS." Please note that Windows® XP/Vista/7 limits FAT32 partitions to only 32GB.
- Windows Disk Management will format and partition the disk according to your settings. Please allow some time for the partition and format to complete.
- Once completed, your drive will appear in My Computer or in Window Explorer.
For Mac Users:
- Connect the device to the computer. Once connected please turn on the device.
- Select Utilities from the Go menu in the Finder menu bar.
- Select Disk Utility which is in the Utilities Folder.
- When the Disk Utility window is open, select the volume you wish to partition from the list of available hard drives on the left side of the window.
- Select the Partition tab.
NexStar® HARD DRIVE DOCK
WARNING: Doing the following setup will erase any existing data on the drive.
- From the Volume Scheme menu, choose the desired number of partitions (Mac OS 10.x gives you the option of dividing the drive into at most 16 partitions). You may adjust the size of each partition using the slide bar between the partitions in the Volume Scheme area.
- In the Volume Information section, enter the desired name for each volume (partition). You may choose one of the following volume format (Mac OS Extended, Mac OS Standard, UNIX File System, or MS-DOS).
- Once you have finalized the volume options, click Partition. An alert message should appear, click Partition again.
- Mac Disk Utility will format and partition the disk according to your settings. When partitioning is complete, your drive will be ready for use.
NexStar® HARD DRIVE DOCK
7. Warranty
The NexStar® SuperSpeed USB 3.0 Hard Drive Dock comes with a 1 year limited warranty (90 day parts). If your unit becomes defective within that time frame, please go to http://www.vantecusa.com for information on how to receive warranty exchange or repair. Cosmetic defects and missing parts are not covered under this warranty. Please check the contents of the unit to make sure you received all parts. Also check for any cosmetic flaws. If any parts are missing or if there are cosmetic defects, please contact the retailer from which you purchased the unit immediately and ask for a replacement.
Vantec Thermal Technologies
43951 Boscell Rd. Fremont, CA 94538
tel: 510-668-0368 fax: 510-668-0367
website: www.vantecusa.com
- NexStar® HARD DRIVE DOCK
- ■ Table of Contents
- Introduction
- SystemRequirements
- Specifications/Features
- Features :
- Package Includes :
- Specifications :
- Installation
- NexStar®
- HARD DRIVE DOCK
- Removal
- Warning: Please push power button & turn off unit before removing the hard drive!
- 6.Creating a Partition
- For Windows® XP/Vista/7 Users:
- NOTE :
- For Mac Users:
- Warranty
- Vantec Thermal Technologies
Brand : Vantec
Model : NexStar NST-D300S3-BK
Category : Car Mount