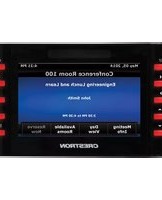
TPMC-4SM-B-S - Interface de contrôle domotique Crestron - Free user manual and instructions
Find the device manual for free TPMC-4SM-B-S Crestron in PDF.


| Product Type | Touch Screen Control Panel |
| Display Size | 4.3 inches |
| Display Type | TFT LCD |
| Resolution | 480 x 272 pixels |
| Touch Technology | Resistive |
| Connectivity | 10/100 Ethernet, USB 2.0 |
| Power Source | PoE (802.3af) or DC Power Adapter |
| Power Consumption | 5 W (max) |
| Mounting | Wall mount or desktop stand |
| Dimensions (W x H x D) | 4.5 x 2.8 x 1.1 in (114 x 71 x 28 mm) |
| Weight | 0.5 lb (227 g) |
| Operating System | Crestron Firmware |
| Memory (RAM) | 256 MB |
| Storage (Flash) | 1 GB |
| Audio | Built-in speaker and microphone |
| Video Support | Streaming video (H.264) |
| Operating Temperature | 32°F to 104°F (0°C to 40°C) |
| Humidity | 10% to 90% (non-condensing) |
| Certifications | CE, FCC |
| Warranty | 2 years |
| Maintenance | Clean with a soft, dry cloth |
Frequently Asked Questions - TPMC-4SM-B-S Crestron
User questions about TPMC-4SM-B-S Crestron
0 question about this device. Answer the ones you know or ask your own.
Ask a new question about this device
Download the instructions for your Interface de contrôle domotique in PDF format for free! Find your manual TPMC-4SM-B-S - Crestron and take your electronic device back in hand. On this page are published all the documents necessary for the use of your device. TPMC-4SM-B-S by Crestron.
USER MANUAL TPMC-4SM-B-S Crestron
The specific patents that cover Crestron products are listed at patents.crestron.com.
Crestron, the Crestron logo and Fusion RV are either trademarks or registered trademarks of Crestron Electronics, Inc. in the United States and/or other countries. Other trademarks and trade names may be used in this document to refer to either the entities claiming the marks and names or their products. Crestron disclaims any proprietary interest in the marks and names of others. Crestron is not responsible for errors in typography or photography.
This document was written by the Technical Publications department at Crestron.
©2014 Crestron Electronics, Inc.
Contents
Fusion RV Interface for TPMC-4SM 1
Introduction ...... 1
Touch Screen Configuration....2
Hard Button Controls....7
Main Screen Controls 8
Meeting Information Controls 9
Day View Controls 11
Add Appointment Controls....12
Add Appointment....12
Edit Subject 13
Available Rooms 14
Reserve - Menu Confirmation....15
Reserve - Menu Selection....16
Reserve - Please Wait....17
Reservation Confirmed....18
Emergency Broadcast 19
Tools....20
About....21
UI Configuration 22
Room Configuration....30
Fusion RV Interface for TPMC-4SM
Introduction
The Crestron® TPMC-4SM and TPMC-4SM-FD 4.3" Touch Screens work directly with Fusion RV® Remote Asset Management Software to provide a powerful enterprise-wide room scheduling solution. Installed outside the entrance to every meeting room, the touch screen provides an immediate view of each room's availability, with the ability to look up the calendar for any room on the network and even book the room right on the spot. The dual color buttons give a clear indication of a room's status at a glance, lighting green when the room is available and red when it is in use. The touch screen's contoured shape assures that even when mounted in a narrow hallway, the buttons remain clearly visible at a distance to either side.
For more information on the TPMC-4SM refer to the latest version of the TPMC-4SM Operations & Installation Guide (Doc. 6845). For more information on the TPMC-4SM-FD, refer to the latest version of the TPMC-4SM-FD Operations & Installation Guide (Doc 7173). Both are available at www.crestron.com/manuals.
For simplicity within this guide, the term “TPMC-4SM” is used except where noted.
Touch Screen Configuration
The TPMC-4SM touch screen supports a direct connection to Crestron's Fusion RV software application.
To connect to Fusion RV, first enter the "Panel Setup Options" screen by touching the screen while booting the touch screen. Set the desired Ethernet configuration for the touch screen using the "Ethernet Setup" screens and make note of the touch screen's IP address.
NOTE: For details on the setup options for the TPMC-4SM, refer to the "Configuring the Touch Screen" section of the latest version of the TPMC-4SM Operations & Installation Guide (Doc. 6845) or TPMC-4SM-FD Operations & Installation Guide (Doc 7173).
On the "Panel Setup Options" screen, the button on the lower right allows selection of either User Project Mode Off and User Project Mode On. The text on the button reflects which mode is currently selected. Touching the button toggles between modes. This must be set to User Project Mode Off in order to make the connection to Fusion RV. Refer to the following illustration. Touch Save & Exit to confirm the settings.
"Panel Setup Options" Screen

After the touch screen has updated, the screen displays a "Waiting for RoomView connection..." message, as shown in the following illustration.
"Waiting for RoomView connection..." Screen

The touch screen must now be added to the Fusion RV application and associated with a room. Using a web browser, navigate to the facility's Fusion RV website. The Fusion RV login window is displayed, as shown in the following illustration.
Fusion RV Login Window

NOTE: If the application has not yet been configured, the Username and Password are both "admin".
After login, the Fusion RV "Setup" screen is displayed, as shown in the following illustration.
Fusion RV "Setup" Window

First, a room must be added. Then, the touch screen can be associated with the room.
Select Add Room.
Fusion RV "Add Room" Window ("Room Details" Tab)

Enter a room name (e.g. Conference Room 100) and Location (e.g. Building 100).
NOTE: In order for the Available Rooms feature to work, the Location field must be populated. All rooms within the same location should have the same text in the field.
Select the Assets tab.
Fusion RV "Add Room" Window ("Assets" Tab)
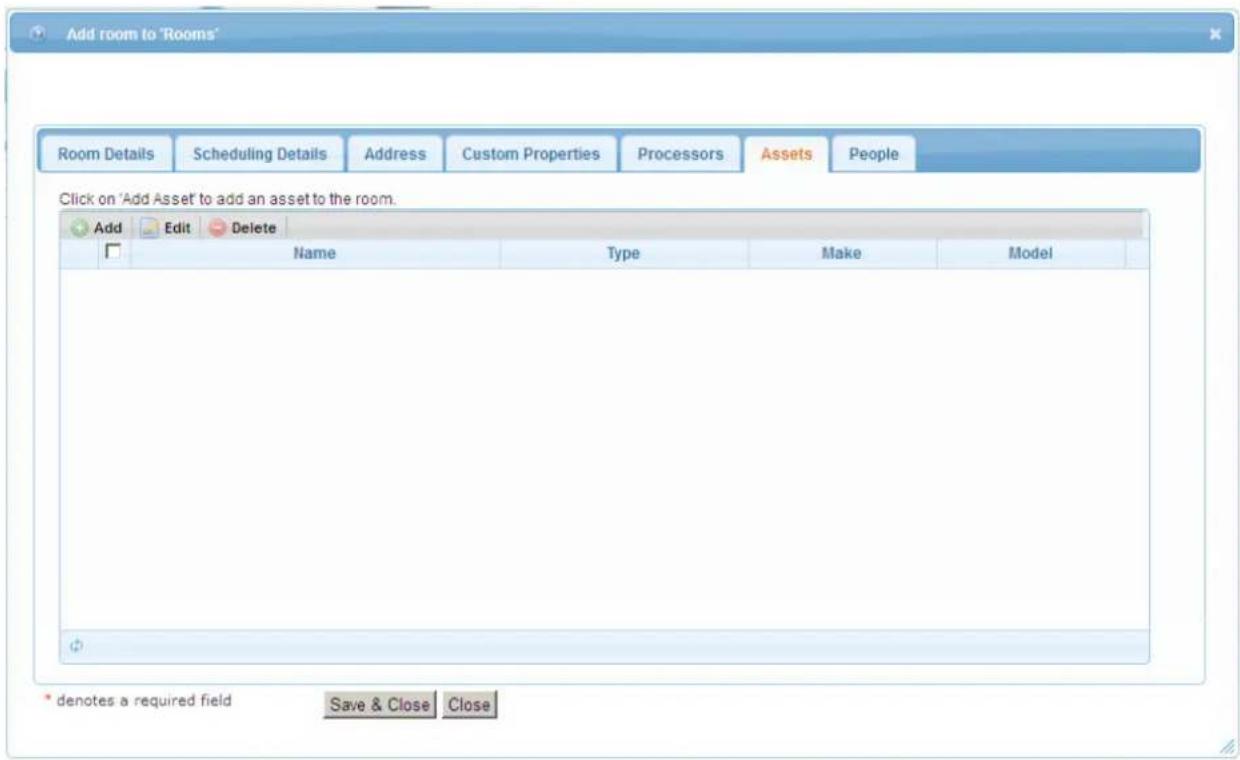
Enter a name for the touch screen.
From the Type dropdown list, select Touchpanel. Then, select the make (Crestron) and model (e.g., TPMC-4SM).
Fusion RV "Asset Details" Window

From the Connection Type dropdown list, select Network and enter the IP address of the touch screen in the IP Address/Hostname field.
Select Save to close the “Asset Details” window and return to the “Add Room” window. Then, select Save & Close to close the “Add Room” window.
Exit the setup menu by either closing the browser or, to monitor, click the monitoring button ( 🔍 ) in the upper right corner of the window.
Hard Button Controls
Once Fusion RV has successfully connected to the touch screen, the screen should look something like the following illustration.
Main Screen

The following table explains the function of the touch screen's hard button controls.
NOTE: For any button press that results in a page flip away from the main screen, the screen reverts to the main view after a timeout period.
| BUTTON | FUNCTION |
| TODAY | Displays the “Day View” screen and the current workday schedule. The time period shown is based on the current local time. |
| DAY ◀ | On first press, the touch screen displays the “Day View” screen. On second press, it displays the previous day schedule. The time period shown is based on the current local time. |
| DAY ▶ | On first press, the touch screen displays the “Day View” screen. On second press, it displays the next day schedule. The time period shown is based on the current local time. |
| TIME ▲ | On first press, the touch screen displays the “Day View” screen. On second press, it moves the time period up one page. If the first block is already at 12 AM, the period does not shift. |
| TIME ▼ | On first press, the touch screen displays the “Day View” screen. On second press, it moves the time period down one page. If the last block is already at 11 PM, the period does not shift. |
| CLOSE | Closes the current screen and returns to the previous screen. |
| MORE | Shows more information where applicable. |
| ▲ | Moves the user interface selection up where applicable. |
| ▼ | Moves the user interface selection down where applicable. |
| SELECT | Selects the currently selected item where applicable. |
Main Screen Controls
In addition to the hard button controls on the touch screen, there are four on-screen controls on the main screen.
Main Screen

The following table explains the function of the main screen controls.
| BUTTON | FUNCTION |
| Meeting Info | Displays the “Current Meeting Information” screen. If there is no active meeting, this button is not available. |
| Day View | Displays the “Day View” screen and the workday schedule. Other days can be selected from this screen and meetings can be reserved. |
| Reserve Now | Creates an ad hoc meeting reservation. The actual reservation duration is based on the start time of the next meeting and the maximum reserve now configuration value. If there is a current active meeting, this button is not available. |
| Available Rooms | If there are available rooms, displays the “Available Rooms” screen and shows a list of available rooms. During Fusion RV configuration of this room, the Location field must contain data or this button is not available. |
Meeting Information Controls
"Current Meeting Information" Screen

The following tables explain the function of the touch screen's CLOSE and MORE hard button controls, when the "Current Meeting Information" screen is displayed.
NOTE: The screen reverts to the main view after a timeout period.
| BUTTON | FUNCTION |
| CLOSE | Returns to the main screen. |
| MORE | Displays the next “Current Meeting Information” screen, showing Required Attendees and Optional Attendees. |
"Current Meeting Information" Screen After Pressing MORE
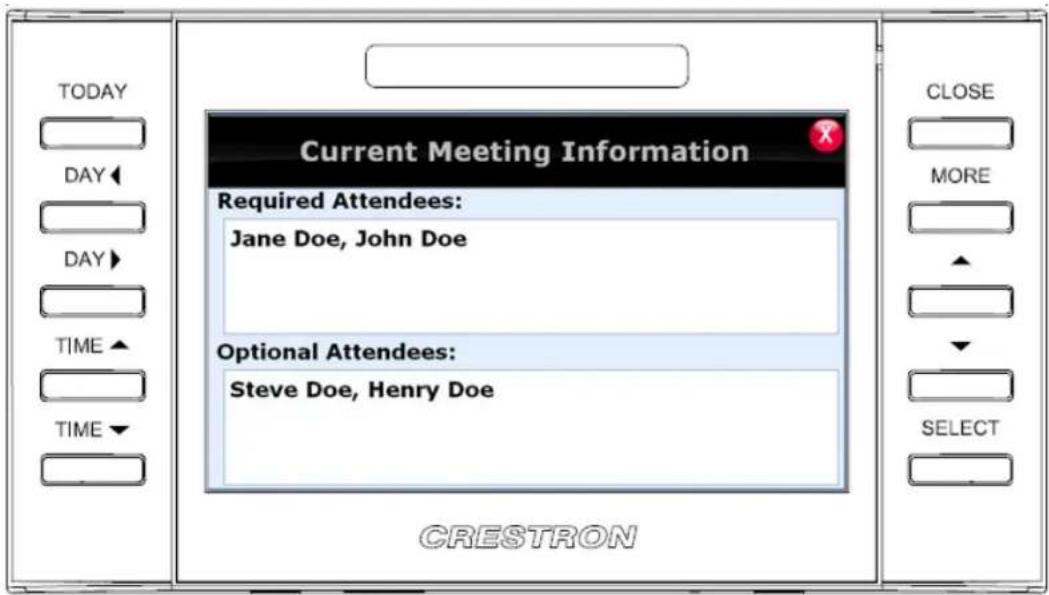
| BUTTON | FUNCTION |
| CLOSE | Returns to the previous “Current Meeting Information” screen. |
Day View Controls
"Day View" Screen
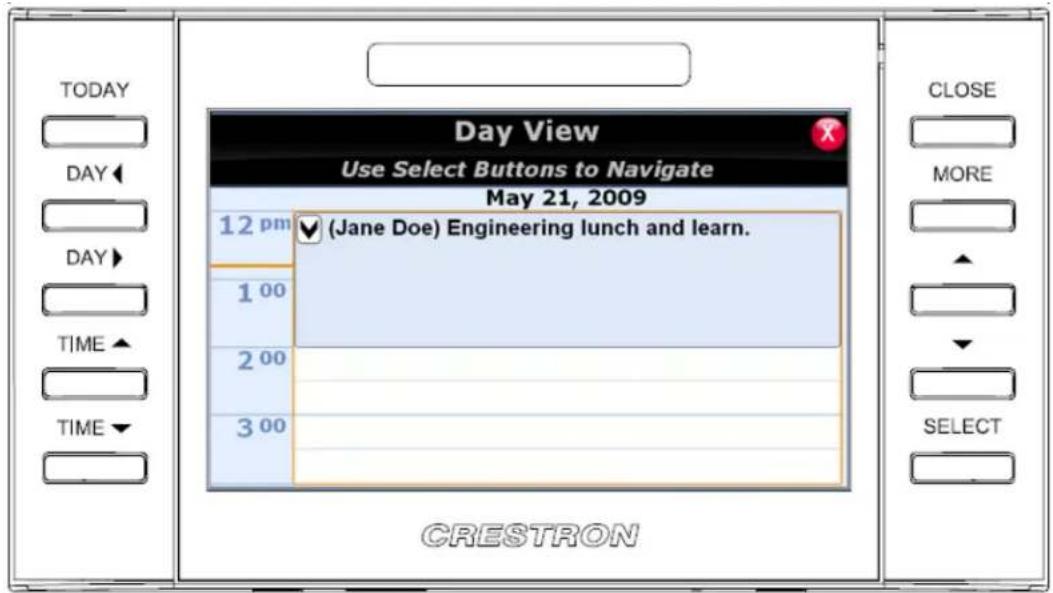
The following table explains the function of the touch screen's "Day View" screen controls.
| BUTTON | FUNCTION |
| TODAY | Displays the current workday schedule. The time period shown is based on the current local time. |
| DAY ◀ | Displays the previous day schedule. The time period shown is based on the current local time. |
| DAY ▶ | Displays the next day schedule. The time period shown is based on the current local time. |
| TIME ▲ | Moves the time period up one page. If the first block is already at 12 AM, the period does not shift. |
| TIME ▼ | Moves the time period down one page. If the last block is already at 11 PM, the period does not shift. |
| CLOSE | Closes the current screen and returns to the main screen. |
| MORE | N/A |
| ▲ | Moves the field selection up. |
| ▼ | Moves the field selection down. |
| SELECT | Selects the currently selected field. |
| Active Meeting Field | Displays the “Selected Meeting Information” screen. This feature is only available if the √ icon is visible next to the meeting text. |
| Inactive Meeting Field | Displays the “Add Appointment” screen. |
Add Appointment Controls
When an inactive meeting field (i.e. an open time slot) is selected from the "Day View" screen, the "Add Appointment" screen is displayed.
Add Appointment
"Add Appointment" Screen

The following table explains the function of the "Add Appointment" screen controls.
| BUTTON | FUNCTION |
| CLOSE | Returns to the “Day View” screen. The meeting is not added to the room calendar. |
| Edit | Displays the “Edit Subject” screen. |
| + | Increases the duration of the meeting in 30 minute increments. |
| - | Decreases the duration of the meeting in 30 minute increments. |
| Save | Adds the meeting to the room calendar. |
NOTE: By design, a meeting duration that extends into the next calendar day is not permitted.
Edit Subject
The Edit button on the "Add Appointment" screen displays the "Edit Subject" screen.
"Edit Subject" Screen

The following table explains the function of the touch screen's "Edit Subject" screen controls.
| BUTTON | FUNCTION |
| CLOSE | Returns to the “Add Appointment” screen. The subject text is not updated. |
| Save | Saves the current text as the subject and returns to the “Add Appointment” screen. |
Available Rooms
The Available Rooms button on the main screen displays the "Available Rooms" screen.
"Available Rooms" Screen
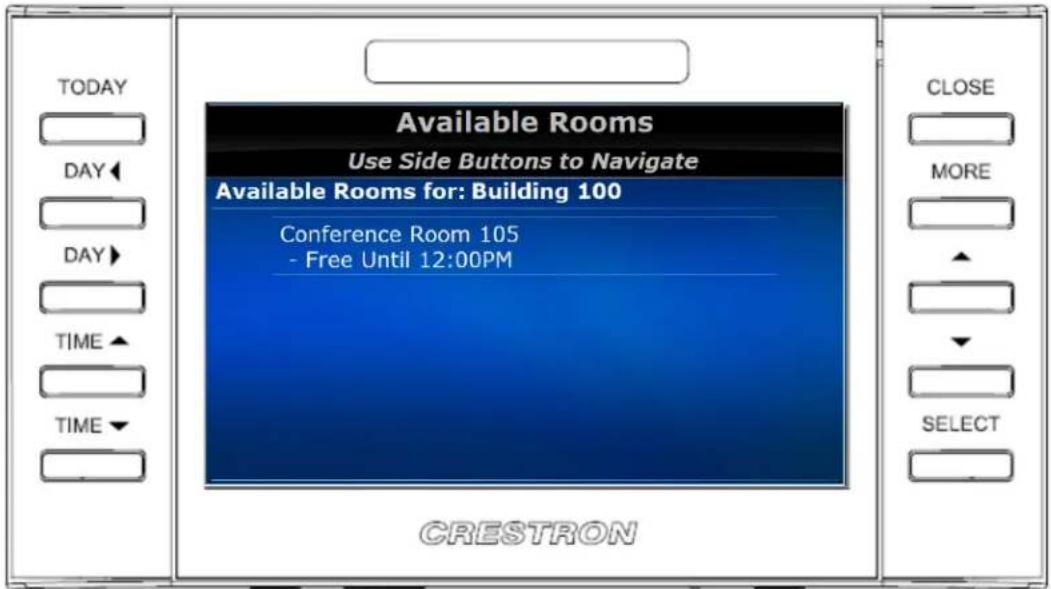
The following table explains the function of the touch screen's "Available Rooms" screen controls.
| BUTTON | FUNCTION |
| CLOSE | Closes the “Available Rooms” screen and returns to the main screen. |
| MORE | Displays the next “Available Rooms” screen, if there are multiple screens. |
| Available Rooms Field | Select the room to display the “Reserve” screen for that room. Depending on how the administrator has set up the system, either the menu confirmation screen (shown on page 15) or the menu selection screen (shown on page 16) is displayed. If Enable Time Selection is selected on the “Edit Reserve Now” screen (refer to page 27) the menu selection screen (shown on page 16) is displayed. Otherwise, the menu confirmation screen (shown on page 15) is displayed. |
Reserve - Menu Confirmation
Selecting a room from the "Available Rooms" screen displays the "Reserve" screen.
"Reserve" Screen
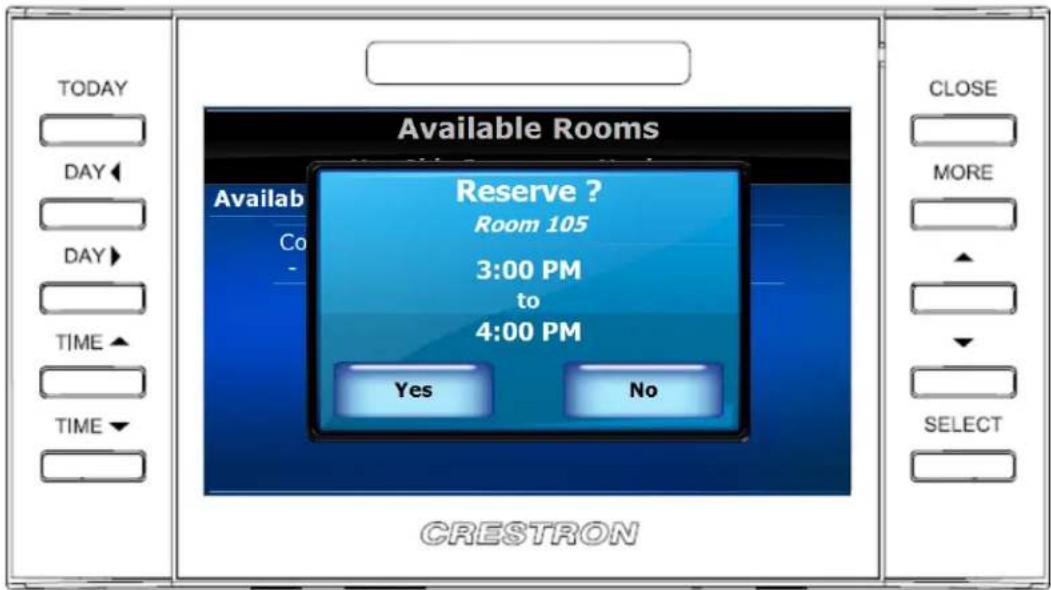
The following table explains the function of the touch screen's "Reserve" screen controls.
| BUTTON | FUNCTION |
| CLOSE | Closes the “Available Rooms” screen and returns to the main screen. |
| Yes | Makes the reservation for the room. |
| No | Cancels the reservation and closes the “Reserve” screen. |
Reserve - Menu Selection
Selecting a room from the "Available Rooms" screen displays the reserve - menu selection screen.
Reserve - Menu Selection Screen

The following table explains the function of the touch screen's reserve - menu selection screen controls.
| BUTTON | FUNCTION |
| CLOSE | Closes the “Available Rooms” screen and returns to the main screen. |
| 30 Min | Reserves the room for 30 minutes. |
| 60 Min | Reserves the room for 60 minutes. |
| 90 Min | Reserves the room for 90 minutes. |
Reserve - Please Wait
After entering a room reservation, the "Please Wait" screen is displayed.
"Please Wait" Screen
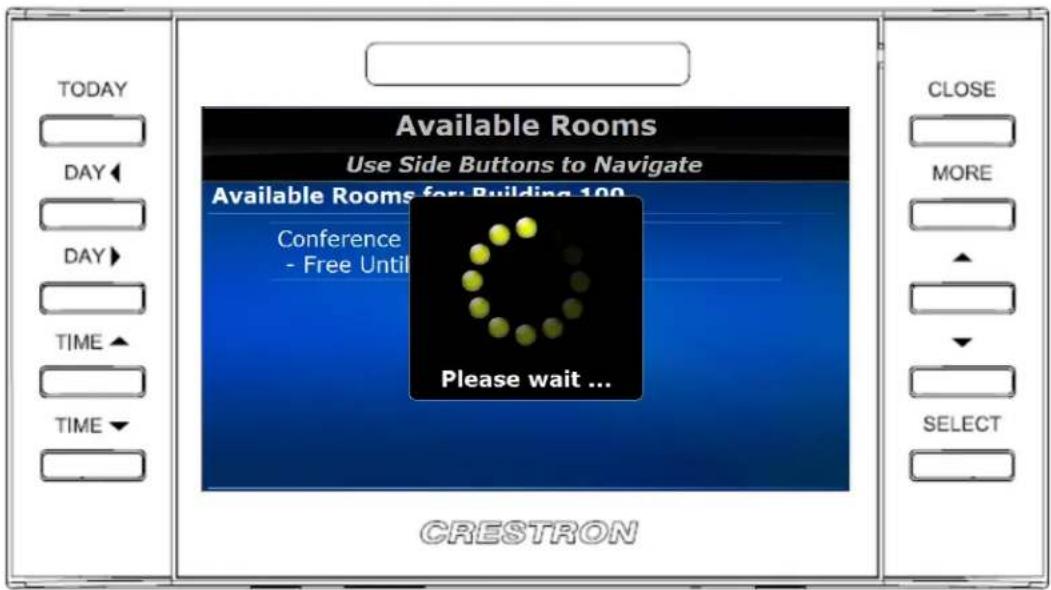
There are no user controls on this screen. The touch screen is waiting for confirmation of the reservation.
Reservation Confirmed
When the touch screen receives confirmation of the reservation, the "Reservation Confirmed" screen is displayed.
"Reservation Confirmed" Screen

The following table explains the function of the "Reservation Confirmed" screen control.
| BUTTON | FUNCTION |
| OK | Returns to the main screen. |
NOTE: If OK is not selected within five seconds, the display automatically returns to the main screen.
Emergency Broadcast
When the server sends an emergency message, the screen displays the "Emergency Broadcast" screen.
"Emergency Broadcast" Screen

There are no user controls on this screen.
Tools
A hidden "Tools Main Menu" screen is provided on the touch screen to display and configure features of the scheduling user interface. To access the "Tools Main Menu" screen, touch and hold the room name on the main screen for five seconds.
"Tools Main Menu" Screen
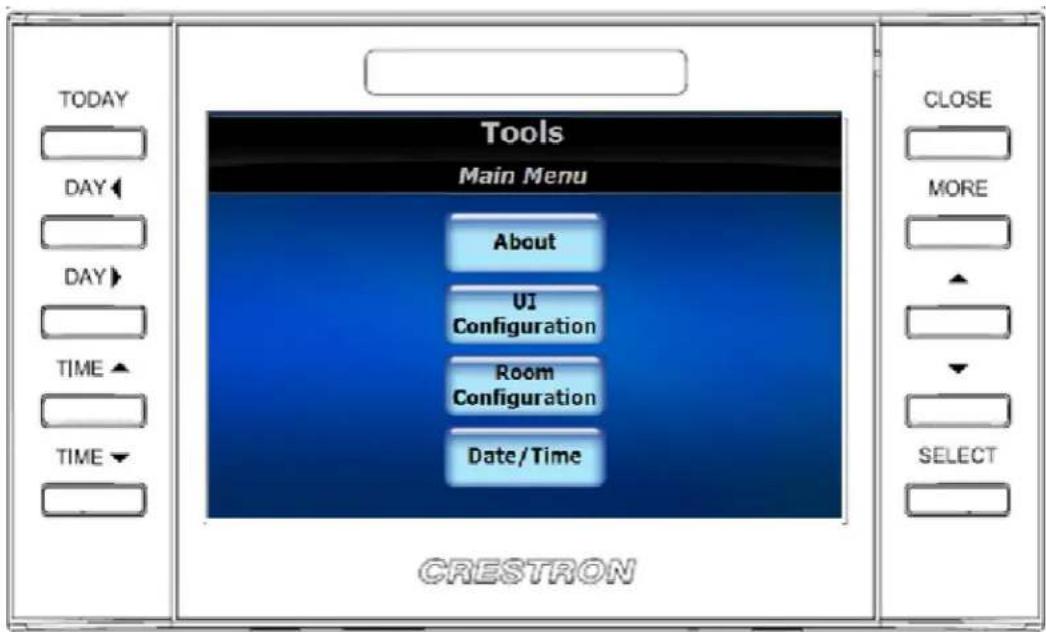
The following table explains the function of the touch screen's "Tools Main Menu" screen controls.
| BUTTON | FUNCTION |
| CLOSE | Returns to the main screen. |
| About | Displays the “About” screen. |
| UI Configuration | Displays the “UI Configuration” screen. |
| Room Configuration | Displays the “Room Configuration” screen. |
| Date/Time | Displays the “Date & Time” screen. |
About
"About" Screen
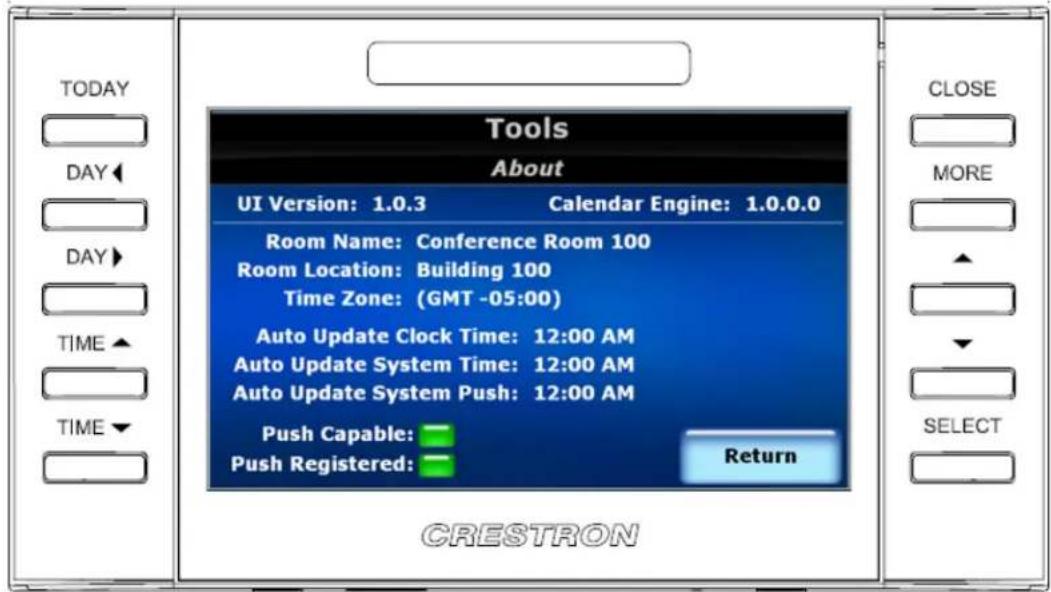
The following table explains the function of the touch screen's "About" screen controls.
| BUTTON | FUNCTION |
| CLOSE | Returns to the main screen. |
| Return | Returns to the “Tools Main Menu” screen. |
On the “About” screen, the Push Capable indicator is green if the touch screen has the capability to dynamically receive meeting events from Fusion RV. The Push Registered indicator is green if the touch screen has successfully notified Fusion RV that it is a push capable device. If a touch screen is not push registered, it must periodically send a request to Fusion RV for its calendar information.
UI Configuration
"UI Configuration (Page 1 of 2)" Screen
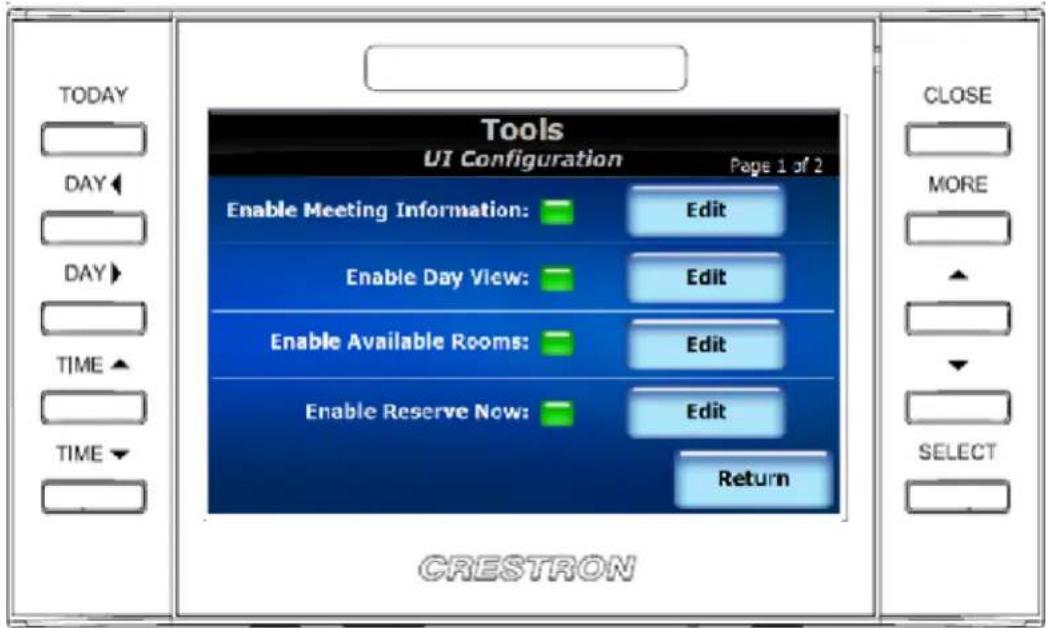
The following table explains the function of the touch screen's "UI Configuration (Page 1 of 2)" screen controls.
| BUTTON | FUNCTION |
| CLOSE | Returns to the main screen. |
| MORE | Displays the next “UI Configuration” screen. |
| Return | Returns to the “Tools Main Menu” screen. |
| Edit Enable Meeting Information | Displays the configuration screen for the Meeting Info button. |
| Edit Enable Day View | Displays the configuration screen for the Day View button. |
| Edit Enable Available Rooms | Displays the configuration screen for the Available Rooms button. |
| Edit Enable Reserve Now | Displays the configuration screen for the Reserve Now button. |
"UI Configuration (Page 2 of 2)" Screen

The following table explains the function of the touch screen's "UI Configuration (Page 2 of 2)" screen controls.
| BUTTON | FUNCTION |
| CLOSE | Returns to the main screen. |
| MORE | Displays the next “UI Configuration” screen. |
| Return | Returns to the “Tools Main Menu” screen. |
| Edit Available Time | Displays the “Edit Available Time” screen. |
| Edit Enable Panel Wake Up | Displays the “Edit Panel Wake Up” screen. |
Edit Meeting Info
"Edit Meeting Info" Screen

The following table explains the function of the touch screen's "Edit Meeting Info" screen controls.
| BUTTON | FUNCTION |
| CLOSE | Returns to the main screen. |
| Return | Returns to the “UI Configuration” screen. |
| Enable Show Button | Enables the Meeting Info button. |
| Enable Show Subject | Enables the Subject line to appear when a meeting is active. |
| Enable Show Organizer | Enables the Organizer line to appear when a meeting is active. |
| Enable Show Start & End Times | Enables the Start Time and End Time lines to appear when a meeting is active. |
Edit Day View
"Edit Day View" Screen

The following table explains the function of the touch screen's "Edit Day View" screen controls.
| BUTTON | FUNCTION |
| CLOSE | Returns to the main screen. |
| Return | Returns to the “UI Configuration” screen. |
| Enable Show Button | Enables the Day View button. |
| Enable Get Info | Enables the ability to get meeting information for a selected meeting on the “Day View” screen. |
| Enable Reserve Meeting | Enables the ability to reserve a meeting on the “Day View” screen. |
| Enable Previous Day Before Today | Enables the ability to view days before today on the “Day View” screen. |
| Edit Default Subject | Displays the “Edit Subject” screen and sets this field to the default subject. |
Edit Available Rooms
"Edit Available Rooms" Screen
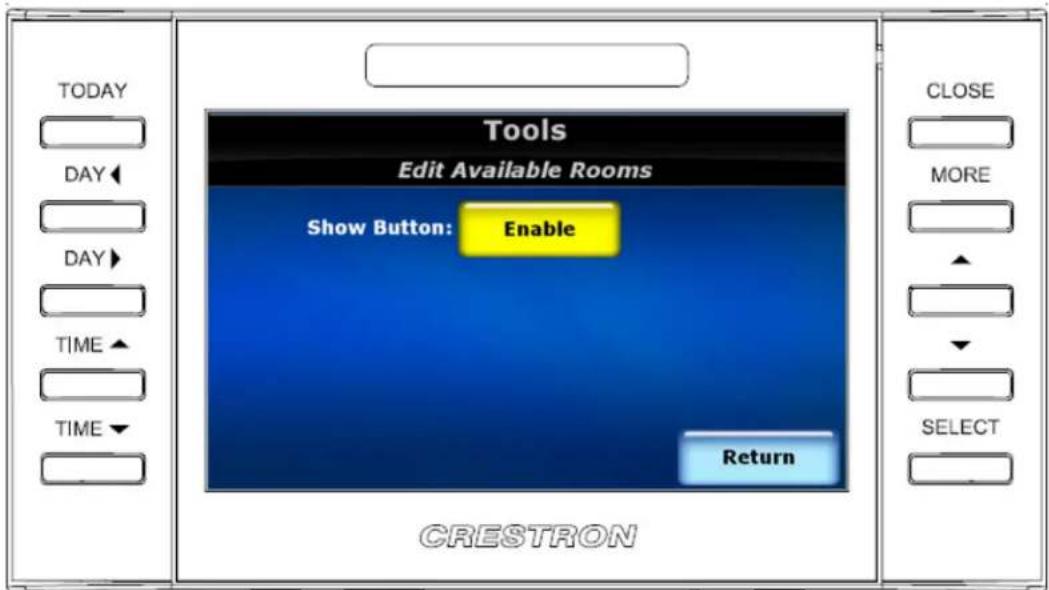
The following table explains the function of the touch screen's "Edit Available Rooms" screen controls.
| BUTTON | FUNCTION |
| CLOSE | Returns to the main screen. |
| Return | Returns to the “UI Configuration” screen. |
| Enable | |
| Show | Enables the Available Rooms button. |
| Button |
Edit Reserve Now
"Edit Reserve Now" Screen

The following table explains the function of the touch screen's "Edit Reserve Now" screen controls.
| BUTTON | FUNCTION |
| CLOSE | Returns to the main screen. |
| Return | Returns to the “UI Configuration” screen. |
| Enable Show Button | Enables the Reserve Now button. |
| + | Increases the maximum duration of the meeting in 30 minute increments. |
| - | Decreases the maximum duration of the meeting in 30 minute increments. |
| Enable Force Even End Time | Enables the reservation to end on the 0 or 30^th minute of the hour. |
| Enable Time Selection | Enables the user to select a 30, 60 or 90 minute reservation for the Reserve Now button. |
Edit Available Time
"Edit Available Time" Screen

The following table explains the function of the touch screen's "Edit Available Time" screen controls.
| BUTTON | FUNCTION |
| CLOSE | Returns to the main screen. |
| Return | Returns to the “UI Configuration” screen. |
| Enable Show Available Time | Enables the Available Time to appear when the room is available. |
Edit Panel Wake Up
"Edit Panel Wake Up" Screen

The following table explains the function of the touch screen's "Edit Panel Wake Up" screen controls.
| BUTTON | FUNCTION |
| CLOSE | Returns to the main screen. |
| Return | Returns to the “UI Configuration” screen. |
| Enable Wake Up Panel When Meeting Begins | Enables the panel to wake up from standby when a meeting begins. |
Room Configuration
"Room Configuration (Page 1 of 2)" Screen

The following table explains the function of the touch screen's "Room Configuration (Page 1 of 2)" screen controls.
| BUTTON | FUNCTION |
| CLOSE | Returns to the main screen. |
| Return | Returns to the “Tools Main Menu” screen. |
| Edit Enable Decline for No Show | Displays the “Edit Decline for No Show” screen. |
| Edit Privacy Level | Displays the “Edit Privacy Level” screen. |
| Edit Motion Sensor | Displays the “Edit Motion Sensor” screen. |
| Edit Enable End Meeting Early | Displays the “Edit End Meeting Early” screen. |
"Room Configuration (Page 2 of 2)" Screen

The following table explains the function of the touch screen's "Room Configuration (Page 2 of 2)" screen controls.
| BUTTON | FUNCTION |
| CLOSE | Returns to the main screen. |
| Return | Returns to the “Tools Main Menu” screen. |
| Edit Enable Start Meeting | Displays the “Edit Start Meeting” screen. |
| Edit Enable Broadcast Message | Displays the “Edit Broadcast Message” screen. |
Edit Decline for No Show
"Edit Decline for No Show" Screen

The following table explains the function of the touch screen's "Edit Decline for No Show" screen controls.
| BUTTON | FUNCTION |
| CLOSE | Returns to the main screen. |
| Return | Returns to the “Room Configuration” screen. |
| Enable Function | Enables the Decline for No Show function. |
| - Applies to Meetings... | Decreases the Applies to Meetings... value in 30 minute increments. |
| + Applies to Meetings... | Increases the Applies to Meetings... value in 30 minute increments. |
| - Decline Meetings After... | Decreases the Decline Meetings After... value in 1 minute increments. |
| + Decline Meetings After | Increases the Decline Meetings After... value in 1 minute increments. |
| Enable Check for No Show at the Exact Minute | Enables the Decline for No Show to check on the exact minute into the meeting rather than the first minute of the meeting. |
Edit Privacy Level
"Edit Privacy Level" Screen

Privacy settings allow the user to control how much information is displayed on the touch screen for each meeting. Privacy is a touch screen-wide setting and affects how all meetings are displayed. The privacy feature includes three levels: public, semi-private, and fully-private.
The following table explains the function of the touch screen's "Edit Privacy Level" screen controls.
| BUTTON | FUNCTION |
| CLOSE | Returns to the main screen. |
| Return | Returns to the “Room Configuration” screen. |
| Enable Room is Public | Sets the room privacy level to Public. When set to Public, the touch screen shows the meeting subject and the organizer. The organizer name is enclosed in square braces. At this level, the user can also view the meeting details and attendees from the day view. |
| Enable Room is Semi-Private | Sets the room privacy level to Semi-Private. When set to Semi-Private, the touch screen shows the meeting organizer but the subject is marked “Private”. At this level, the user cannot access the meeting details and attendees from the day view. |
| Enable Room is Fully-Private | Sets the room privacy level to Fully-Private. When set to Fully-Private, the touch screen simply shows “Private” without displaying the meeting subject or organizer. At this level, the user cannot access the meeting details and attendees from the day view. |
Edit Motion Sensor
"Edit Motion Sensor" Screen

The TPMC-4SM has connectors that allow for a motion sensor to be physically wired to the touch screen. Motion sensor settings on this screen specify how motion is detected and managed by the TPMC-4SM. There are two sensor types: basic and intelligent.
A basic sensor detects when motion occurs in a room and when motion no longer occurs. Every time motion is detected in the room, the sensor sends a signal to the touch screen that motion is detected. As soon as motion is no longer detected, the sensor sends a signal to the touch screen that motion is no longer detected. The touch screen itself is responsible for tracking the occupied state of the room based on receiving a motion or no-motion signal from the sensor. A basic sensor has no internal timeout, so the touch screen provides a timeout factor for use with a basic sensor. The touch screen will hold the occupancy state for the timeout value specified regardless of how many motion or no-motion signals are detected during the time interval. When no motion has been detected for the entire duration of the timeout period, the occupancy state will revert to unoccupied.
An intelligent sensor also sends motion and no-motion signals to the touch screen. With an intelligent sensor, the timeout for determining when to switch state from occupied to unoccupied is contained within the sensor. Therefore, the timeout value specified in the touch screen is not used with an intelligent sensor. An intelligent sensor will simply signal the touch screen once when motion is detected, causing the touch screen to set its state to occupied. The sensor will signal the touch screen once when motion is no longer detected, causing the touch screen to set its state to unoccupied. No additional touch screen logic is used.
The following table explains the function of the touch screen's "Edit Motion Sensor" screen controls.
| BUTTON | FUNCTION |
| CLOSE | Returns to the main screen. |
| Return | Returns to the “Room Configuration” screen. |
| Sensor Type | Sets the motion sensor to Intelligent or Basic mode. |
| Sensor Output | Sets the sensor outputs to normally open or normally closed. The sensor output setting specifies if the no-motion state is defined by an open contact closure or a closed contact closure in the sensor. |
| - Room Remains Occupied... | Decreases the Room Remains Occupied... value in 1 minute increments. |
| + Room Remains Occupied... | Increases the Room Remains Occupied... value in 1 minute increments. |
Edit End Meeting Early
"Edit End Meeting Early" Screen

The following table explains the function of the touch screen's "Edit End Meeting Early" screen controls.
| BUTTON | FUNCTION |
| CLOSE | Returns to the main screen. |
| Return | Returns to the “Room Configuration” screen. |
| Enable Function | Enables the End Meeting button. |
| Enable Use Minutes | Enables the End Meeting button by the minute of the meeting. |
| Enable Use Percent | Enables the End Meeting button by the percentage of the meeting. |
| - Enable button...min after meeting starts | Decreases the Enable button... value in 1 minute increments. |
| + Enable button...min after meeting starts | Increases the Enable button... value in 1 minute increments. |
Edit Start Meeting
"Edit Start Meeting" Screen

The following table explains the function of the touch screen's "Edit Start Meeting" screen controls.
| BUTTON | FUNCTION |
| CLOSE | Returns to the main screen. |
| Return | Returns to the “Room Configuration” screen. |
| Enable Function | Enables the Start Meeting button. |
| - Enable button... min after meeting starts | Decreases The Start button will appear... value in 1 minute increments. |
| + Enable button... min after meeting starts | Increases The Start button will appear... value in 1 minute increments. |
Edit Broadcast Message
"Edit Broadcast Message" Screen

The following table explains the function of the touch screen's "Edit Broadcast Message" screen controls.
| BUTTON | FUNCTION |
| CLOSE | Returns to the main screen. |
| Return | Returns to the “Room Configuration” screen. |
| Enable Function | Enables the emergency broadcast message. |
Edit Date & Time
"Edit Date & Time" Screen

The following table explains the function of the touch screen's "Edit Date & Time" screen controls.
| BUTTON | FUNCTION |
| CLOSE | Returns to the main screen. |
| Return | Returns to the “Room Configuration” screen. |
| Date Format | Formats the date to MM/DD/YYYY, DD/MM/YYYY or YYYY/MM/DD. |
| Time Format | Formats the time to regular (6:00 PM) or army (18:00) time. |

CRESTRON®
Crestron Electronics, Inc.
15 Volvo Drive Rockleigh, NJ 07647
Tel: 888.CRESTRON 01.14
Fax: 201.767.7576
www.crestron.com

Operations Guide - DOC. 6846C
(2024511)
Specifications subject to
change without notice.
- Contents
- Fusion RV Interface for TPMC-4SM 1
- Fusion RV Interface for TPMC-4SM
- Introduction
- Touch Screen Configuration
- Hard Button Controls
- Main Screen Controls
- Meeting Information Controls
- Day View Controls
- Add Appointment Controls
- Add Appointment
- Edit Subject
- Available Rooms
- Reserve - Menu Confirmation
- Reserve - Menu Selection
- Reserve - Please Wait
- Reservation Confirmed
- Emergency Broadcast
- Tools
- About
- UI Configuration
- Edit Meeting Info
- Edit Day View
- Edit Available Rooms
- Edit Reserve Now
- Edit Available Time
- Edit Panel Wake Up
- Room Configuration
- Edit Decline for No Show
- Edit Privacy Level
- Edit Motion Sensor
- Edit End Meeting Early
- Edit Start Meeting
- Edit Broadcast Message
- Edit Date & Time
- CRESTRON®
Brand : Crestron
Model : TPMC-4SM-B-S
Category : Interface de contrôle domotique