GT-FSI-07 - Radio Easy Home - Free user manual and instructions
Find the device manual for free GT-FSI-07 Easy Home in PDF.


| Product Type | Remote Controlled Wall Sockets |
| Brand | Easy Home |
| Model | GT-FSI-07 |
| Supply Voltage | 230 V~, 50 Hz |
| Maximum Load per Socket | 2990 W (13 A) |
| Wireless Range | Max. 40 m (line of sight) |
| Transmission Frequency | 433.92 MHz |
| Battery Type (Remote) | Alkaline 12 V, type A23 |
| Operating Temperature | 0 °C – 35 °C |
| Number of Sockets Included | 4 |
| Number of Channels | 4 (plus all on/off) |
| Indoor Use Only | Yes |
| Child Safety Mechanism | Yes (integrated) |
| Memory on Power Loss | Retains channels (except after short operation) |
| Cleaning Instructions | Wipe with dry cloth only; do not use water or solvents |
| Warranty Period | 3 years |
Frequently Asked Questions - GT-FSI-07 Easy Home
User questions about GT-FSI-07 Easy Home
0 question about this device. Answer the ones you know or ask your own.
Ask a new question about this device
Download the instructions for your Radio in PDF format for free! Find your manual GT-FSI-07 - Easy Home and take your electronic device back in hand. On this page are published all the documents necessary for the use of your device. GT-FSI-07 by Easy Home.
USER MANUAL GT-FSI-07 Easy Home
Spend a little Live a lot

REMOTE CONTROLLED WALL SOCKETS


QR codes take you where you want to go quickly and easily
Whether you require product information, spare parts or accessories, details on warranties or aftersales services, or if you want to watch a product demonstration video, our QR codes will take you there in no time at all.
What is a QR code?
A QR code (QR = Quick Response) is a type of matrix that can be read with a smartphone camera and that contains a link to a website or contact details, for example.
Advantage: You do not need to manually enter a website address or contact details.
This is how it works
To scan the QR code, all you need is a smartphone with QR code reader software and an internet connection*. This type of software can be downloaded for free from your app store.
Try it out now
Just scan the QR code with your smartphone and find out more about the Aldi product you have purchased.*
Your Aldi Service Portal
All details mentioned above can also be found in the Aldi Service Portal at www.aldi.co.uk.
* Depending on your tariff plan you may be charged for the connection.
Contents
Overview ....4
Use....5
Device parts/Product contents......6
General information....7
Reading and storing the instruction manual ......7
Explanation of symbols ......7
Safety 8
Proper use....8
Safety notes 8
Preparation 11
Checking the remote controlled wall sockets
and the product contents .....11
Inserting/changing batteries ....11
Selecting a location 12
Assigning channels 12
Operation....14
Connecting a device....14
Additional notes....15
Care and storage....16
Cleaning the remote controlled wall sockets......16
Storing the remote controlled wall sockets...... 17
Troubleshooting....18
Technical data 19
Declaration of conformity....19
Disposal....19
Warranty card....21
Warranty conditions....22
A


B


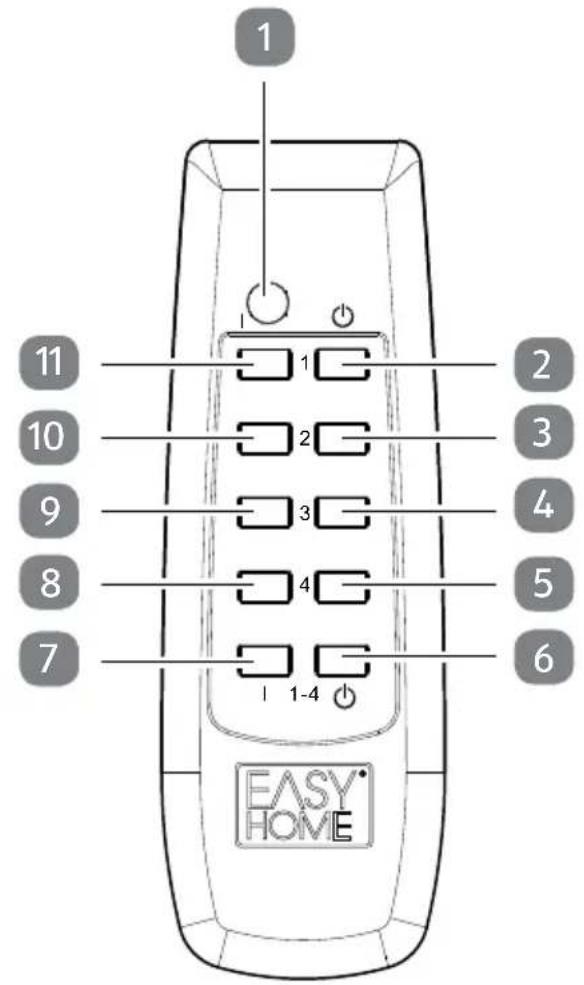
Device parts
1 Indicator light (remote control)
2 Off button channel 1
3 Off button channel 2
4 Off button channel 3
5 Off button channel 4
6 Off button for all channels
7 On button for all channels
8 On button channel 4
9 On button channel 3
10 On button channel 2
11 On button channel 1
12 Battery compartment
13 Indicator light (remote controlled wall socket)
Product contents
Remote control, 1x
Remote controlled wall socket, 4x
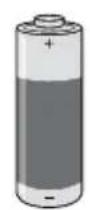
Alkaline battery (12 V, type A23), 1x
General information
Reading and storing the instruction manual

This instruction manual accompanies these remote controlled wall sockets. It contains important information on start-up and handling.
Before using the remote controlled wall sockets, read the instruction manual carefully. This particularly applies for the safety notes. Failure
to heed this instruction manual may result in severe injury or damage to the remote controlled wall sockets.
The instruction manual is based on the standards and rules in force in the European Union. When abroad, you must also observe country-specific guidelines and laws.
Store the instruction manual for future use. Make sure to include this instruction manual when passing the remote controlled wall sockets on to third parties.
Explanation of symbols
The following symbols and signal words are used in this instruction manual, on the remote controlled wall sockets or on the packaging.
WARNING!
This signal symbol/word designates a hazard with moderate degree of risk which may lead to death or severe injury if not avoided.
CAUTION!
This signal symbol/word designates a hazard with low risk that, if not avoided, may result in minor or moderate injury.
NOTICE!
This signal symbol/word warns against potential damages to property.

This symbol provides you with useful supplementary information on operation.

Declaration of conformity (see chapter “Declaration of conformity”): Products marked with this symbol meet all applicable Community regulations for the European Economic Area.

The remote controlled wall sockets are exclusively designed for indoor use.
Safety
Proper use
The remote controlled wall sockets are only designed for devices with a supply voltage of 230 V\~, 50 Hz and a nominal current of up to 13 A. It is only intended for private use and not suitable for commercial or medical purposes. The remote controlled wall sockets may only be used in indoor spaces.
Only use the remote controlled wall sockets as described in this instruction manual. Any other use is deemed improper and may result in damage to property or even personal injury. The remote controlled wall sockets are not a children's toy.
The manufacturer or vendor accepts no liability for damage caused by improper or incorrect use.
Safety notes
WARNING!
Risk of electric shock!
A faulty electrical installation or excessive mains voltage may result in an electric shock.
- Only connect the remote controlled wall sockets if the mains voltage of the socket corresponds to the specification on the nameplate.
- Do not use the remote controlled wall sockets if they exhibit visible damages.
- Do not open the housing; instead, have a qualified professional perform the repairs. Contact a qualified workshop for this. Liability and warranty claims are waived in the event of repairs performed by the user, improper connection of the device or incorrect operation.
- Only parts that comply with the original device data may be used for repairs. Electrical and mechanical parts, which are essential for providing protection against sources of danger, are located in these remote controlled wall sockets.
- The remote controlled wall sockets may not be operated with an external timer or separate telecontrol system.
- Do not touch the remote controlled wall sockets with wet hands.
- Keep the remote controlled wall sockets away from open fire and hot surfaces.
- Never store the remote control such that there is a risk of it falling in a tub or sink.
- Make sure that children do not insert any objects in the housing.
- Do not make any modifications to the remote controlled wall sockets.
- Do not connect multiple remote controlled wall sockets with one another (series circuit).
- Only use the remote controlled wall sockets with a properly installed socket with a properly connected protective conductor.

WARNING!
Danger for children and persons with impaired physical, sensory or mental capacities (e.g. partially disabled persons, older persons with reduced physical and mental capacities) or lack of experience and knowledge (e.g. older children).
- These remote controlled wall sockets may be used by persons with impaired physical, sensory or mental capacities or those lacking experience and knowledge if they are supervised or have been instructed in how to safely use the remote controlled wall sockets and have understood the risks associated with operating it. Cleaning and user maintenance must not be performed by children.
Safety
- Children may not play with the remote controlled wall sockets. Keep children away from the remote controlled wall sockets and the accessories.
- Do not allow children to play with the packaging wrapper. They may get caught in it when playing and suffocate.
WARNING!
Explosion and health hazard!
Using the batteries improperly increases the risk of explosion and risk to health.
- Batteries may explode if they are excessively heated up. Do not heat up the batteries, do not short circuit them and do not throw them in open fire. Do not expose the batteries to direct sunlight, radiators or similar.
- Do not attempt to charge the batteries.
- Only insert a battery of the same or equivalent type.
- Batteries that are swallowed may result in severe internal injury or death. Store both new and used batteries so that they are not accessible to children.
- If you suspect that a battery has been swallowed, promptly consult a physician.
- Do not allow leaky battery acid to come into contact with skin, eyes or mucus membranes. In the event of contact with battery acid, immediately flush the applicable areas with plenty of clean water and consult a physician.
- Immediately remove the empty battery from the remote control.
NOTICE!
Risk of damage!
Improper storage of the remote controlled wall sockets could damage them.
- Never place the remote control on or near hot surfaces (e.g. stovetops etc.).
- Stop using the remote controlled wall sockets if the plastic parts exhibit cracks or breaks or are deformed. Only replace damaged parts with corresponding original spare parts.
- Observe the technical data.
Preparation
Checking the remote controlled wall sockets and the product contents
NOTICE!
Risk of damage!
If you are not cautious when opening the packaging with a sharp knife or other pointed object, you may quickly damage the remote controlled wall sockets.
- Be very careful when opening.
-
Take the remote controlled wall sockets out of the packaging and check whether the remote controlled wall sockets or the individual parts exhibit damages. If this is the case, do not use the remote controlled wall sockets. Contact the manufacturer at the service address specified on the warranty card.
-
Check to make sure that the delivery is complete (see fig. A).
Inserting/changing batteries
- Push the battery compartment cover in the direction of the arrow to open it (see fig. B).
- If necessary, clean the contacts of the battery and the battery compartment 12.
- Insert the enclosed battery or a battery of the same type (A23/12 V) in the battery compartment. Be absolutely sure to take note of the polarity.
- Slide the battery compartment cover back onto the battery compartment.
Selecting a location
WARNING!
Risk of electric shock and damage!
A faulty electrical installation or excessive mains voltage may result in an electric shock.
- Only use the remote controlled wall sockets in indoor areas. Do not use them in wet rooms or in the rain.
- Only connect the remote controlled wall sockets to an easily accessible socket so that you can quickly disconnect it from the mains in case of a failure.
- The remote controlled wall sockets may heat up during operation. Make sure that the remote controlled wall sockets are not covered by curtains or other objects in the process; this will ensure that they are properly cooled.
- Never expose the remote controlled wall sockets to high temperatures (heaters etc.) or to the effects of the weather (rain etc.).
Assigning channels
- Connect one of the remote controlled wall sockets to a properly installed socket. The indicator light 13 of the remote controlled socket will blink for 30 seconds (learning mode).
- Push any button on the remote control. The indicator light on the remote control will blink.
- To assign a channel to the remote controlled wall socket control, push the On button 8 / 9 / 10 / 11 for the desired channel during learning mode. The indicator light of the remote controlled wall socket will illuminate continuously and the remote control wall socket is connected with the remote control.

Tip:
The learning mode is restricted to 30 seconds after you have inserted the remote controlled wall socket. If you are unable to assign a channel during learning mode, repeat steps 1 – 3.
-
Push the Off button 2 / 3 / 4 / 5 for the respective channel to switch the remote controlled wall socket off.
-
If you would like to assign multiple channels to a remote controlled wall socket,
-
first assign a channel to it by following steps 1 - 3.
- Then pull the remote-controlled wall socket out of the permanently installed socket and follow the steps 1 – 2 again.
- In step 3, assign another channel to it.
The remote controlled wall socket can now be controlled via both channels.
-
If you would like to change or delete an assignment,
-
first pull the remote controlled wall socket out of the permanently installed socket and wait approx. 2 seconds.
- Insert the remote controlled wall socket back in the permanently installed socket to reactivate learning mode.
- Push the Off button for the respective channel.
The indicator light for the remote controlled wall socket will then start to blink quickly. The current assignment has been deleted.
- Then the learning mode will be reactivated and the indicator light will blink slower again. Push the On button for the desired channel.
The indicator light of the remote controlled wall socket will then illuminate continuously and the new channel is assigned.

Tip:
The assignment of the channels is saved. Even if the remote controlled wall socket is disconnected from the mains, the programmed settings are saved.
Exception: If you pull the remote controlled wall socket out of the permanently installed socket after a very short operation time, the assignment may be lost and must be reconfigured.
- To check whether the channels have been properly assigned, push the respective On button for the respective channel.
The indicator light for the remote controlled wall socket will light up.
- Then switch the remote controlled wall sockets off again using the Off button for the respective channel.
The indicator light for the remote controlled wall socket will no longer be illuminated.

Tip:
You can switch all channels on or off at the same time with the On/Off button 6 / 7 for all channels.
You have successfully installed the remote controlled wall socket.
Operation
Before you are able to use the remote controlled wall sockets, insert the batteries in the remote control and assign the desired channels to the remote controlled wall sockets (see chapter “Inserting/changing batteries” and “Assigning channels”).
Connecting a device
NOTICE!
Risk of damage!
Improper use of the remote controlled wall socket and failure to observe the technical data may damage the remote controlled wall socket and the device to be connected.
- Only connect devices that are suitable for unattended operation to rule out any risks associated with switching errors.
- Do not operate any heavy AC adapters in the remote controlled wall sockets as the plugged contacts of the permanently installed wall socket could be mechanically overloaded.
- Do not insert any additional child safety mechanisms in the remote controlled wall socket as the plug connection between the plug of the device you intend to connect and the remote controlled wall socket could be affected and there is a risk of overheating.
- Only connect devices with a supply voltage of 230 V\~, 50 Hz and a nominal current of up to 13 A to the remote controlled wall socket.
- The remote controlled wall sockets have an integrated child safety mechanism that prevents access to live parts to a large extent. Make sure that the plug pins of the device to be connected do not tilt in the remote controlled wall socket.
- Make sure that the device you intend to connect and the corresponding mains adapter are suitable for operation with a remote controlled wall socket. Observe the notes in this chapter and in the chapter "Safety notes" in this respect.
- Connect the desired device to the remote controlled wall socket.
Switching the remote controlled wall socket on and off
- Use the On button 8 / 9 / 10 / 11 for the respective channel to switch the remote controlled wall sockets on.
- Switch the remote controlled wall socket off with the Off button 2 / 3 / 4 / 5 for the respective channel.
- You can switch all channels on or off at the same time with the On/Off button for all channels 6 / 7.
Additional notes
Power failure
After a power failure, the memory for the system code and the respective channel of the remote controlled wall socket may malfunction.
- In this case, pull the remote controlled wall socket out of the permanently installed socket and do not connect it to the mains for at least 6 hours.
- Reassign the channels (see chapter "Assigning channels").
Radio frequency interference
Radio frequency interference may disrupt wireless communication between the receiver and the transmitter. It is not possible to switch the remote controlled wall socket on or off during such a fault.
– Pull the remote controlled wall socket out of the permanently installed socket.
- Wait a few seconds and then connect it again.
Notes on range
The following factors may reduce the range:
- walls,
- room ceilings,
- garages,
- adjoining buildings,
• radio frequency interference,
• buildings of any kind and vegetation, - conductive metal parts located near the devices or inside or near the transmission path e.g. radiators, metallic insulated glass windows, reinforced concrete ceilings, metal plated walls of prefabricated houses etc.,
-
radiation behaviour of antennas associated with the distance between transmitters or receivers and conductive surfaces or objects (including the human body or ground),
-
broad-band disruptions in urban environments that reduce the signal-to-noise ratio; the signal is not recognised in case of such “noise”,
- radiation of insufficiently shielded electronic devices, e.g. openly operated computers or similar.
The effectively achievable distance between the transmitter and receiver in normal operation is therefore highly dependent on the installation location and environment. Generally, proper operation of all components without problems with respect to the receipt of wireless signals should be possible.
Under certain circumstances, problems with wireless communication between the receiver and transmitter may occur and you will not be able to switch the remote controlled wall sockets on or off.
- In this case, pull the remote controlled wall socket out of the permanently installed socket and insert it again.
Care and storage
Cleaning the remote controlled wall sockets
NOTICE!
Risk of short circuit!
Water that has penetrated the housing may cause a short circuit.
- Never submerge the remote controlled wall sockets in water.
- Make sure that no water penetrates the housing.
NOTICE!
Risk of damage!
Using unsuitable cleaners could damage the surface of the remote controlled wall sockets and the remote control.
- Do not use any aggressive cleaners, sharp or metallic cleaning utensils such as brushes with metal or nylon bristles.
-
Do not use any solvents or abrasives.
-
Pull the remote controlled wall socket out of the permanently installed socket.
- Only wipe the remote controlled wall socket and the remote control off with a dry cloth.
Storing the remote controlled wall sockets
NOTICE!
Risk of damage!
The batteries could leak and permanently damage the remote control if you store the remote control with the batteries inserted for a prolonged period of time. The battery fluid (electrolyte) is corrosive.
- If you do not use the remote control for a prolonged period, store the batteries separately.
- Do not remove the battery fluid with bare hands. Avoid contact between the battery fluid and your skin, eyes and mucus membranes. Use normal household washing gloves. If, however, your skin has come into contact with battery fluid, wash your hands immediately and consult a physician if necessary.
- Wipe up the leaky battery fluid with a damp cloth. You can wash and reuse the used cloth or dispose of it in the household waste.
If you do not use the remote controlled wall sockets for a prolonged period of time,
- take the battery out of the battery compartment 12 and store it separately,
- store the remote controlled wall sockets and the remote control so that they are protected from dust and direct sunlight.
Troubleshooting
Some problems may be caused by minor faults that you can fix yourself. To do so, follow the instructions in the following table.
If it is still not possible to resolve the problem with the remote controlled wall socket, contact customer service. Do not in any case repair the remote controlled wall socket yourself.
| Problem Possible cause Solution | ||
| The remote controlled wall socket cannot be switched on or off. | The range of the wireless signals of max. 40 m has been exceeded. | Reduce the distance between the remote control and the remote controlled wall socket. |
| The battery of the remote control is empty. | Replace the battery with a battery of the same type. | |
| The signal transmission is disrupted or the assignment of the channels was deleted. | Refer to the chapter “Additional notes”. | |
| Another remote controlled wall socket one has inadvertently responded to the command from the remote control. | The assignment is incorrect. | Assign the channels to the remote controlled wall sockets (see chapter “Assigning channels”). |
| One of the remote controlled wall sockets automatically switches off. | The assignment is incorrect. | Assign the channels to the remote controlled wall sockets (see chapter “Assigning channels”). |
Technical data
Model: GT-FSI-07-UK, GT-9000
Supply voltage: 230 V\~, 50 Hz
Maximum load/maximum
current for each socket receiver: 2990 W (13 A)
Range: Max. 40 m (only with visual contact between the re-
mote control and the remote controlled wall socket)
Operating temperature: 0 °C – 35 °C
Transmission frequency: 433.92 MHz
Battery: Alkaline, 12 V, type A23
(contained in the product contents)
As our products undergo continual development and improvement, technical changes and changes to the product design are possible.
This instruction manual can be downloaded as a PDF file from our homepage
www.gt-support.de.
Declaration of conformity

The product is guaranteed to conform with legally prescribed standards.
For the complete declaration of conformity, visit the website
www.gt-support.de.
Disposal
Disposing of the packaging

Dispose of the packaging separated into single type materials. Dispose of cardboard and carton as waste paper and foils via the recyclable material collection service.
Disposing of old devices
(Applicable in the European Union and other European states with systems for the separate collection of reusable waste materials)

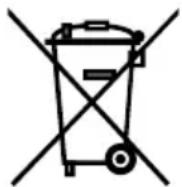
Old devices must not be disposed of with household waste!
If the remote controlled wall sockets can no longer be used, every user is required by law to dispose of old devices separately from their household waste, e.g. at a collection point in his community/borough. This ensures that old devices are recycled in a professional manner and also rules out negative consequences for the environment. For this reason, electrical devices are marked with the above symbol.
Batteries and rechargeable batteries may not be disposed of with household waste!
As a consumer, you are required by law to turn in all batteries and rechargeable batteries, regardless whether they contain harmful substances* or not, at a collection point in your community/ borough or in a retail outletso that they can be disposed of in an environmentally-friendly manner.
* labelled with: Cd = cadmium, Hg = mercury, Pb = lead
EASY * HOME
WARRANTY CARD
REMOTE CONTROLLED WALL SOCKETS
Your details:
Name ____
Address

E-mail 1
Date of purchase*
* We recommend you keep the receipt with this warranty card.
1 For status reports for repair.
Location of purchase
Description of malfunction:

If after contacting the manufacturer you are requested to return the faulty product please return the completed warranty card together with it.
Globaltronics Service Center c/o Bridges Logistics
PO Box 1125
Bromley
BR1 9TW
UNITED KINGDOM
AFTER SALES SUPPORT

GB
0800 / 328 6020
IRE
00800 / 4467 5888

info@globaltronicssupport.com
Model: GT-FSI-07-UK, GT-9000
PRODUCT CODE: 92770
11/2015
Free Hotline
YEARS WARRANTY
Warranty conditions
Dear Customer,
The ALDI warranty offers you extensive benefits in addition to your statutory rights:
Warranty period: 3 years from date of purchase.
Costs: Free repair/exchange. No transport costs.
Hotline: Free hotline.
ADVICE: Please contact our service hotline by phone, e-mail or fax before sending in the device. This allows us to provide support in the event of possible operator errors.
In order to make a claim under the warranty, please send us:
- the faulty item together with the original purchase receipt and the completed warranty card.
- the faulty product with all components included in the packaging.
The warranty does not cover damage caused by:
- Accident or unanticipated events (e.g. lightning, water, fire).
- Improper use or transport.
- Disregard of the safety and maintenance instructions.
- Other improper treatment or modification.
After the expiry of the warranty period, you still have the possibility to have your product repaired at your own expense. If the repair or the estimate of costs is not free of charge you will be informed accordingly in advance.
This warranty does not affect your statutory rights. In the event that a product is received for repair, neither the service company nor the seller will assume any liability for data or settings possibly stored on the product by the customer.
Great care has gone into the manufacture of this product and it should therefore provide you with years of good service when used properly. In the event of product failure within its intended use over the course of the first 3 years after date of purchase, we will remedy the problem as quickly as possible once it has been brought to our attention. In the unlikely event of such an occurrence, or if you require any information about the product, please contact us via our helpline support services, details of which are to be found both in this manual and on the product itself.
GB IRE
PRODUCED IN CHINA FOR:
Visit us at www.aldi.com
AFTER SALES SUPPORT


0800 / 328 6020

00800 / 4467 5888

Info@globaltronicssupport.com
MODEL: GT-FSI-07-UK, GT-9000
PRODUCT CODE: 92770
11/2015

YEARS WARRANTY
- REMOTE CONTROLLED WALL SOCKETS
- QR CODES TAKE YOU WHERE YOU WANT TO GO QUICKLY AND EASILY
- WHAT IS A QR CODE
- THIS IS HOW IT WORKS
- TRY IT OUT NOW
- YOUR ALDI SERVICE PORTAL
- CONTENTS
- OVERVIEW ....4
- USE....5
- DEVICE PARTS/PRODUCT CONTENTS......6
- GENERAL INFORMATION....7
- SAFETY 8
- PREPARATION 11
- OPERATION....14
- CARE AND STORAGE....16
- TROUBLESHOOTING....18
- TECHNICAL DATA 19
- DECLARATION OF CONFORMITY....19
- DISPOSAL....19
- WARRANTY CARD....21
- WARRANTY CONDITIONS....22
- DEVICE PARTS
- PRODUCT CONTENTS
- GENERAL INFORMATION
- READING AND STORING THE INSTRUCTION MANUAL
- EXPLANATION OF SYMBOLS
- WARNING
- CAUTION
- NOTICE
- SAFETY
- PROPER USE
- SAFETY NOTES
- RISK OF ELECTRIC SHOCK
- EXPLOSION AND HEALTH HAZARD
- RISK OF DAMAGE
- PREPARATION
- CHECKING THE REMOTE CONTROLLED WALL SOCKETS AND THE PRODUCT CONTENTS
- INSERTING/CHANGING BATTERIES
- SELECTING A LOCATION
- RISK OF ELECTRIC SHOCK AND DAMAGE
- ASSIGNING CHANNELS
- TIP
- OPERATION
- CONNECTING A DEVICE
- SWITCHING THE REMOTE CONTROLLED WALL SOCKET ON AND OFF
- ADDITIONAL NOTES
- POWER FAILURE
- RADIO FREQUENCY INTERFERENCE
- NOTES ON RANGE
- CARE AND STORAGE
- CLEANING THE REMOTE CONTROLLED WALL SOCKETS
- RISK OF SHORT CIRCUIT
- STORING THE REMOTE CONTROLLED WALL SOCKETS
- TROUBLESHOOTING
- TECHNICAL DATA
- DECLARATION OF CONFORMITY
- DISPOSAL
- DISPOSING OF THE PACKAGING
- DISPOSING OF OLD DEVICES
- OLD DEVICES MUST NOT BE DISPOSED OF WITH HOUSEHOLD WASTE
- BATTERIES AND RECHARGEABLE BATTERIES MAY NOT BE DISPOSED OF WITH HOUSEHOLD WASTE
- EASY * HOME
- WARRANTY CARD
- AFTER SALES SUPPORT
- WARRANTY CONDITIONS
- IN ORDER TO MAKE A CLAIM UNDER THE WARRANTY, PLEASE SEND US
- GB IRE
- PRODUCED IN CHINA FOR
Brand : Easy Home
Model : GT-FSI-07
Category : Radio