
VRX578RUSB - Uncategorized CLARION - Free user manual and instructions
Find the device manual for free VRX578RUSB CLARION in PDF.


| Product Type | Car Multimedia Receiver with USB |
| Brand | Clarion |
| Model | VRX578RUSB |
| Chassis Size | 2-DIN |
| Display Size | 7 inches (approx) |
| USB Port | 1 x USB (front) |
| Max Power Output | 4 x 50 Watts |
| Supported Audio Formats | MP3, WMA, WAV, FLAC |
| Supported Video Formats | MPEG, AVI, DivX |
| Radio Bands | FM/AM |
| Bluetooth | Yes (hands-free calling & audio streaming) |
| Rear View Camera Input | Yes |
| Dimensions (W x H x D) | 178 x 100 x 160 mm (approx) |
| Weight | 1.8 kg (approx) |
| Power Supply | 12V DC (negative ground) |
| Maintenance | Clean with soft dry cloth; avoid liquids |
| Safety | Do not disassemble; keep away from moisture |
| Spare Parts Availability | Contact Clarion service center for parts |
| Repairability | Serviceable by authorized technicians only |
Frequently Asked Questions - VRX578RUSB CLARION
User questions about VRX578RUSB CLARION
0 question about this device. Answer the ones you know or ask your own.
Ask a new question about this device
Download the instructions for your Uncategorized in PDF format for free! Find your manual VRX578RUSB - CLARION and take your electronic device back in hand. On this page are published all the documents necessary for the use of your device. VRX578RUSB by CLARION.
USER MANUAL VRX578RUSB CLARION
1-2 Expanding System 06
2. PRECAUTIONS 07
3. CONTROL 11
3-1 Button Functions 12
3-2 Remote Control 12
5-1 Liquid Crystal Panel/Generalities 22
5-2 Cleaning 22
6. DVD VIDEO SYSTEM
6-1 DVD Video Features 23
6-2 Discs 24
6-2-1 Playable Disc 24
6-2-2 CD Extra Disc 24
6-2-3 CD-R/CD-RW Disc (MP3, WMA) 24
6-2-4 DVD±R/RW Disc 24
6-2-5 Unsupported Disc Format 24
6-2-6 MP3/WMA Playback 24
6-2-7 DivX Playback 25
6-2-8 Region Number 25
6-3 Registered Trademark 25
7. OPERATIONS 26
7-1 DCP 26
7-2 Basic Operations 26
7-2-1 Power On/Off 26
7-2-2 Mode Selections 27
7-2-3 LCP Operations 27
7-2-4 Audio Operations 28
7-2-5 Adjust Operations 32
7-2-6 2-ZONE Function 35
7-3 Radio 37
7-4 RDS 39
7-4-1 Feature Explanation 39
7-4-2 RDS Menu 39
7-5 DVD Video Player 43
7-5-1 Size of the Screen 43
7-5-2 Country Code 44
7-5-3 Parental Level 45
7-5-4 Disc Loading 45
7-5-5 Setting the DVD Video 46
7-6 Other Function 49
7-6-1 CDDA 49
7-6-2 MP3 and WMA 49
8. USAGE OF PERIPHERAL DEVICES 52
8-1 Setting iPod 52
8-2 Setting USB 54
9. TROUBLESHOOTING 56
10. SPECIFICATIONS 57
11. INSTALLATION AND WIRE CONNECTION 59
11-1 Cautions on Installation 59
11-2 Main Unit Installation(Universal Mount) 61
11-3 Removing the Main Unit 62
11-4 Main Unit Installation(Fixed Mount) 63
11-5 Cautions on Wiring 64
11-6 Electrical Connection 65
1. DESCRIPTION
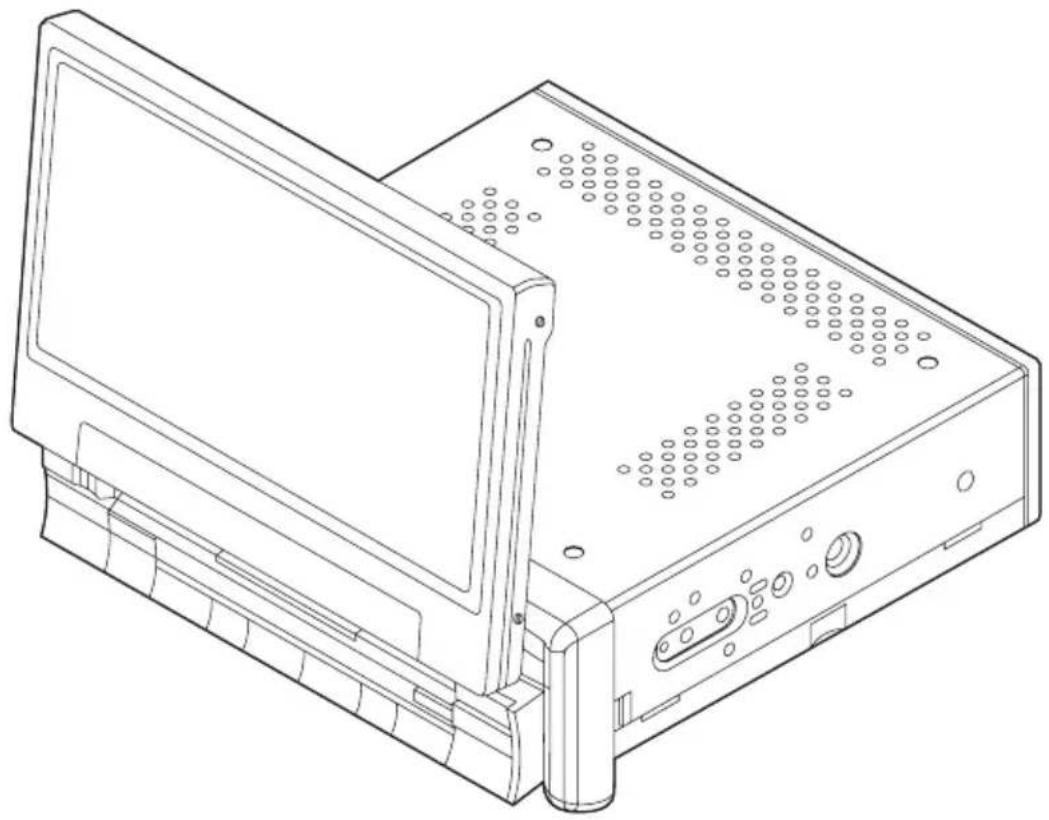
※ This image is main body with open LCP(Liquid Crystal Panel).
natural_image
Line drawing of a computer rack unit with ventilation slots and ports (no text or symbols)1- 1 Features
• Automatic 7" Wide Screen LCD
- Touch Panel Control
• DVD Video / CD / MP3 / WMA / DivX Play Capability
• RCA 6 (+2)-Channel (2-Zone) Output
• Built-in 50 W x 4 Amplifier
- CD-R/CD-RW/DVD ± R/DVD ± RW Compatible
• 2-ZONE Control
• USB Memory Playback(MP3/WMA/AAC)
- iPod® Control
“iPod” is for legal or rightholder-authorized copying only. Don’t steal music. “iPod” is a trademark of Apple Inc.

1-2 Expanding System
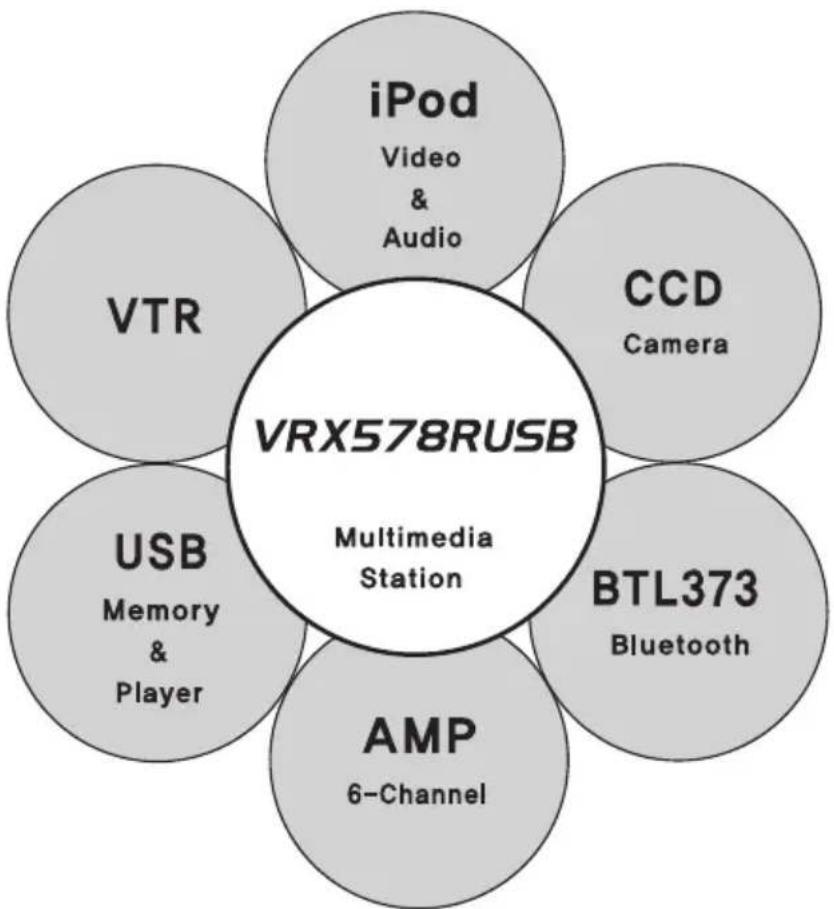
flowchart
graph TD
    A["VRX578RUSB"] --> B["VTR"]
    A --> C["iPod\nVideo & Audio"]
    A --> D["CCD\nCamera"]
    A --> E["BTL373\nBluetooth"]
    A --> F["AMP\n6-Channel"]
    A --> G["USB\nMemory & Player"]
2. PRECAUTIONS
WARNING
For your safety, the driver should not watch the DVD video/TV/VTR or operate the controls while driving. Please note that watching and operating the DVD video/TV/VTR while driving are prohibited by law in some countries. Also, while driving, keep the volume to a level at which external sounds can be heard.
① When the inside of the car is very cold and the player is used soon after switching on the heater, moisture may form on the disc (DVD/CD) or the optical parts of the player and proper playback may not be possible. If moisture forms on the disc (DVD/CD), wipe it off with a soft cloth. If moisture forms on the optical parts of the player, do not use the player for about one hour. The condensation will disappear naturally allowing normal operation.
② Driving on extremely bumpy roads which cause severe vibration may cause the sound to skip.
③ This unit uses a precision mechanism. Even in the event that trouble arises, never open the case, disassemble the unit, or lubricate the rotating parts.
And following the provisions of 2004/104/EC Directive, according to paragraph 3.2.9 of Annex I, meets the limits defined in paragraph 6.5, 6.6, 6.8 and 6.9 of Annex I
INFORMATION FOR USERS
CHANGES OR MODIFICATIONS TO THIS PRODUCT NOT APPROVED BY THE MANUFACTURE WILL VOID THE WARRANTY AND WILL VIOLATE FCC APPROVAL.
Handling Discs
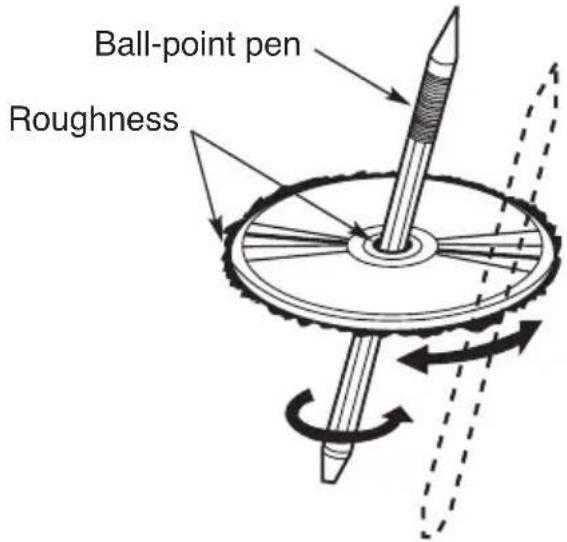
- • Handling
- New discs may have some roughness around the edges. If such discs are used, the player may not work or the sound may skip. Use a ball-point pen or the like to remove any roughness from the edge of the disc.
- Never stick labels on the surface of the disc or mark the surface with a pencil or pen.
- Never play a disc with any cellophane tape or other glue on it or with peeling off marks. If you try to play such a disc, you may not be able to get it back out of the DVD player or it may damage the DVD player.
- Do not use discs that have large scratches, are misshapen, cracked, etc. Use of such discs may cause misoperation or damage.
- To remove a disc from its storage case, press down on the centre of the case and lift the disc out, holding it carefully by the edges.
- Do not use commercially available disc protection sheets or discs equipped with stabilizers, etc. These may damage the disc or cause breakdown of the internal mechanism.
- • Storage
- Do not expose discs to direct sunlight or any heat source.
- Do not expose discs to excess humidity or dust.
- Do not expose discs to direct heat from heaters.
- • Cleaning
- To remove finger-marks and dust, use a soft cloth and wipe in a straight line from the centre of the disc to the circumference.
- Do not use any solvents, such as commercially available cleaners, anti-static spray, or thinner to clean discs.
- After using special disc cleaner, let the disc dry off well before playing it.
- • On Discs
- Exercise a good precaution when loading a disc with the panel open.
- Never turn off the power and remove the unit from the car with a disc loaded.
CAUTION
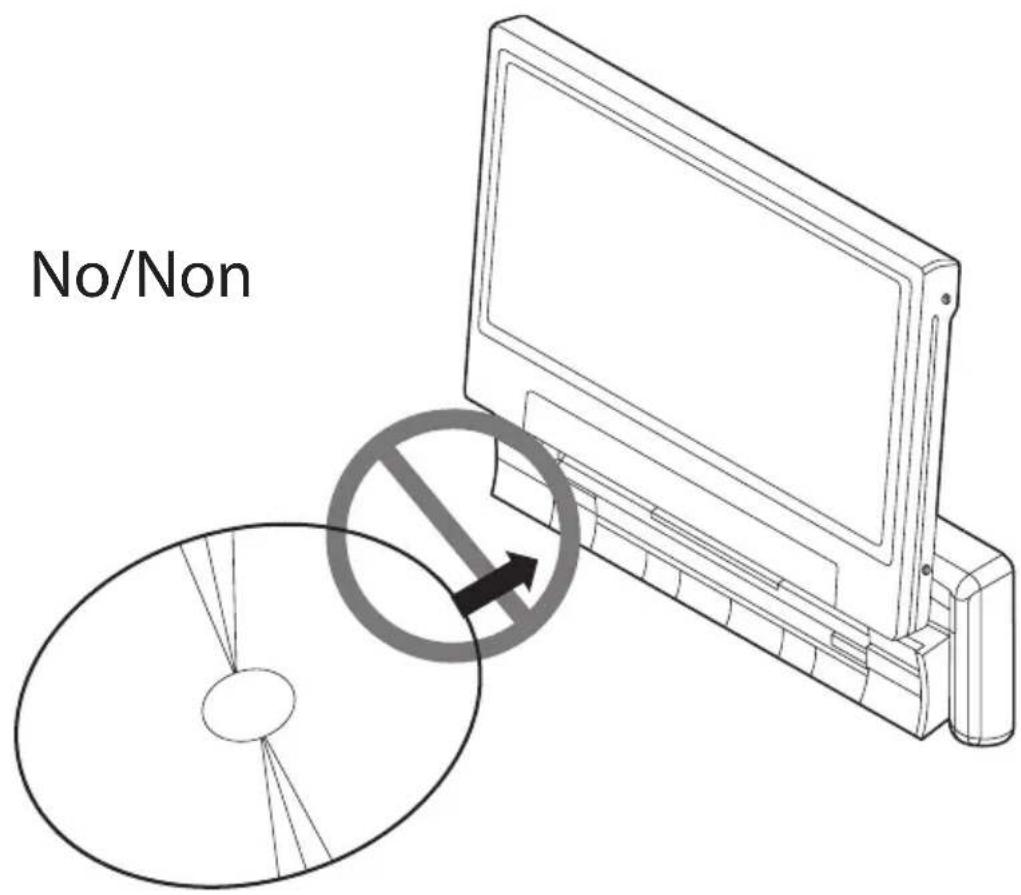
With the screen open, a driver may not be able to see the disc insertion slot. For your safety, insert a disc with the screen closed. Even when the screen is closed, however, the recessed disc slot may be difficult for a driver to see, care is needed whenever inserting discs.
3. CONTROL
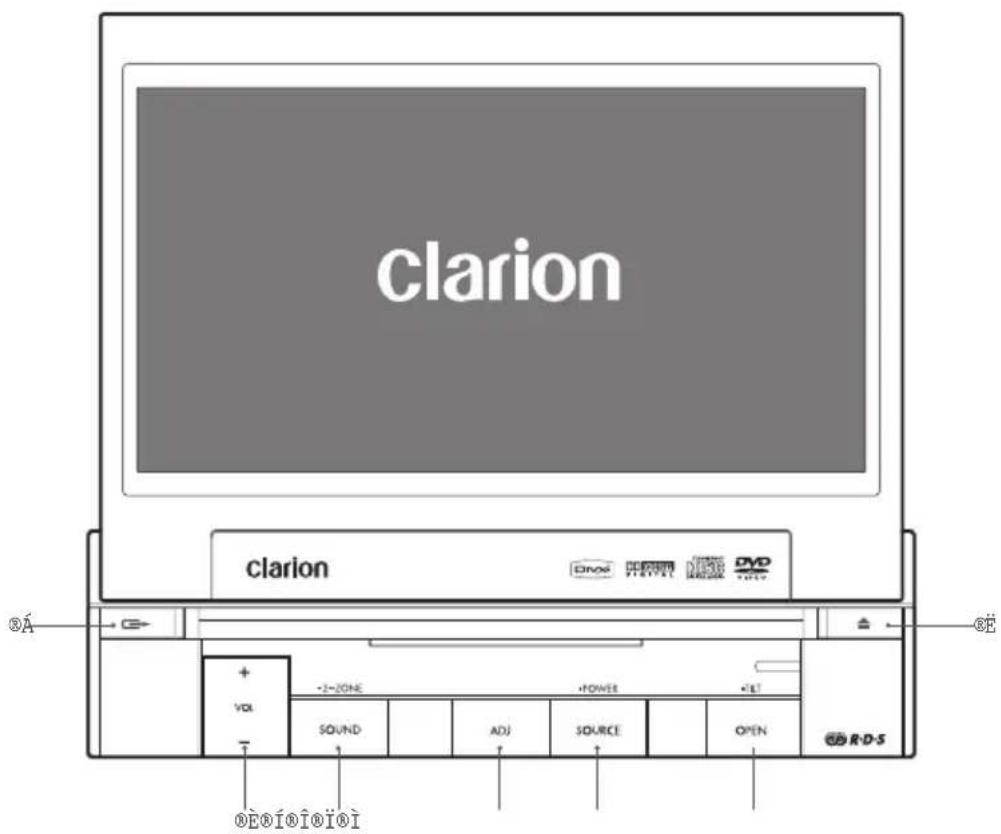
3-1 Button Functions
① : To remove the DCP (Detachable Control Panel)
② ▲ : To eject the disc (press this button more than a second if the unit is in middle of turning the power off)
③ [+ VOL -] : To increase/decrease the volume (in a range from 0min to 33max)
④[SOUND] : To enter/exit the SOUND mode
■ 2-ZONE : To enter the 2-ZONE mode (press the [SOUND] button more than a second) To exit the 2-ZONE mode (keep pressing this button again)
⑤ ADJ : To enter/exit the ADJUST mode changing the settings
⑥ [SOURCE] : To enter/exit the SOURCE mode
To change the operation mode when closing the LCP (such as TUNER mode)
■ POWER : To turn on the power (press the [SOURCE] button more than 2 seconds) To turn off the power (press this button more than 2 seconds)
※ If you press this button more than 2 seconds during turning the power off, the power of the unit will be turned on.
⑦[OPEN] : To open/close the LCP
■ TILT : To adjust the angle for the LCP, press and hold the [OPEN] button more than a second. The LCP is moved to forward or backward. (There are 5 adjustable angles available)
3-2 Remote Control
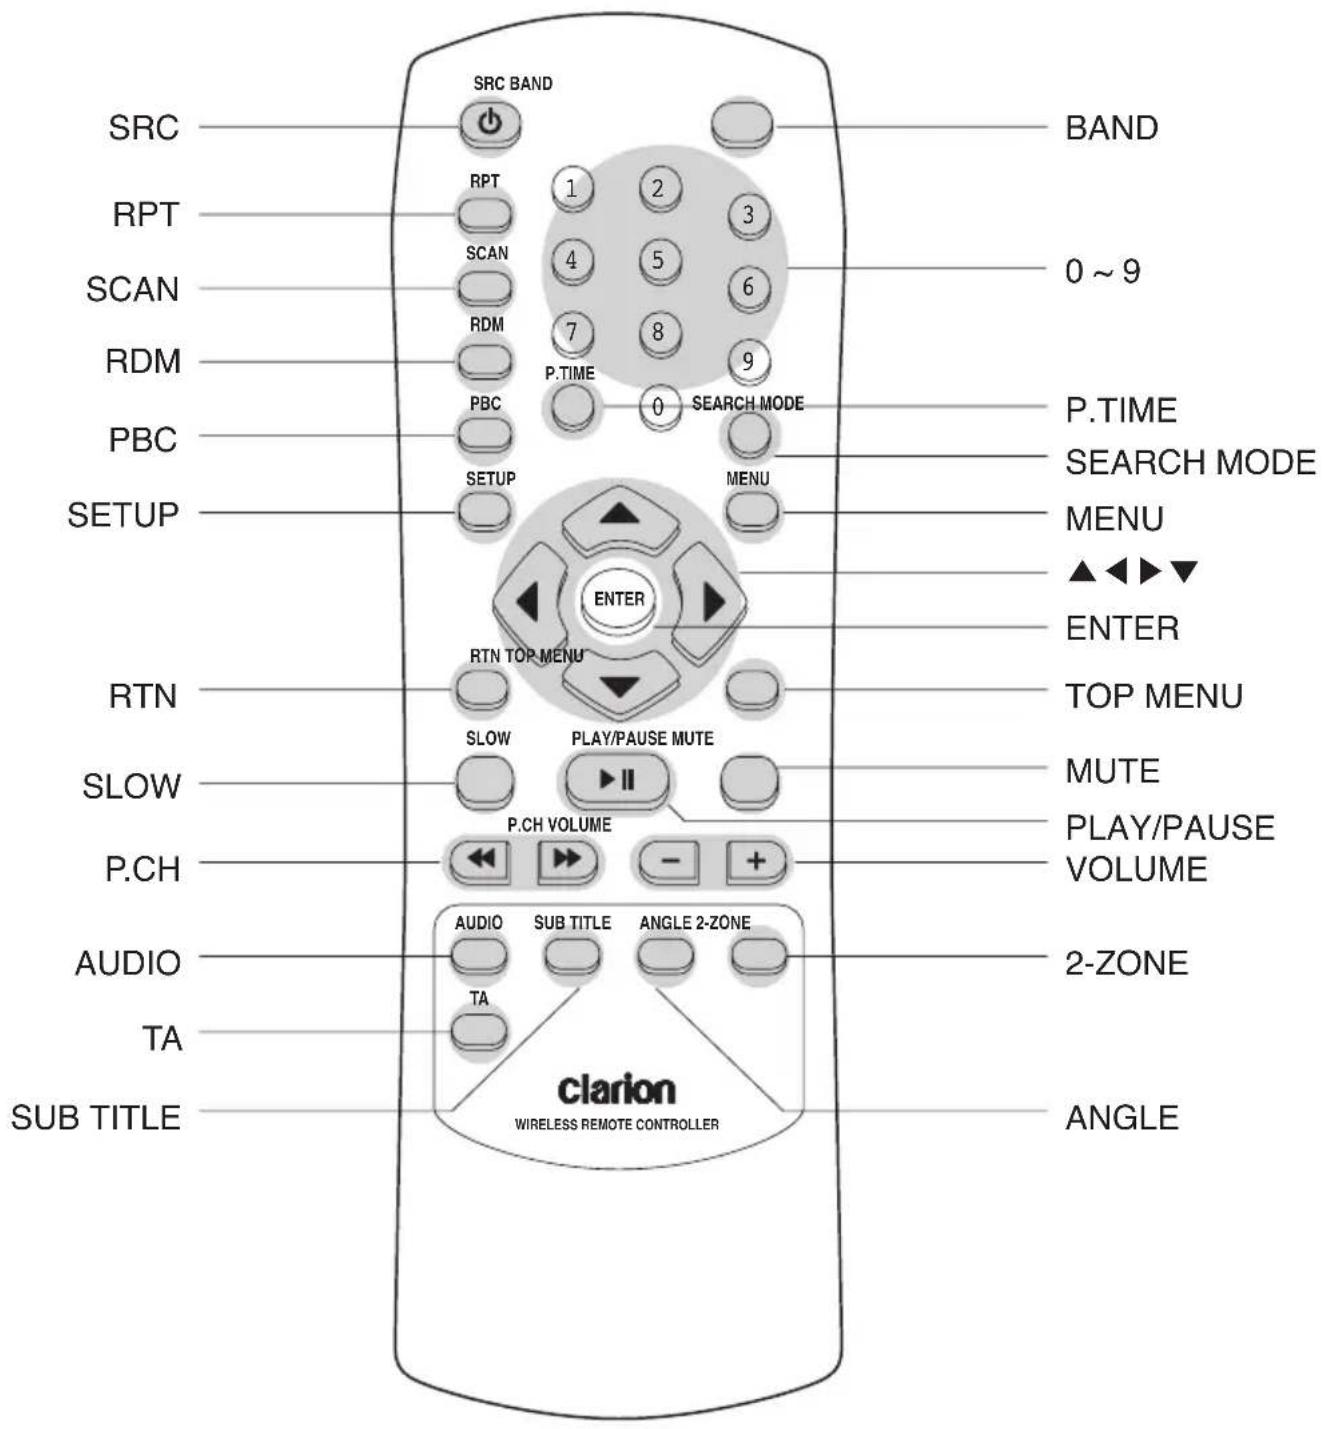
- Remote Control Unit (39 buttons)
- Inserting the Batteries
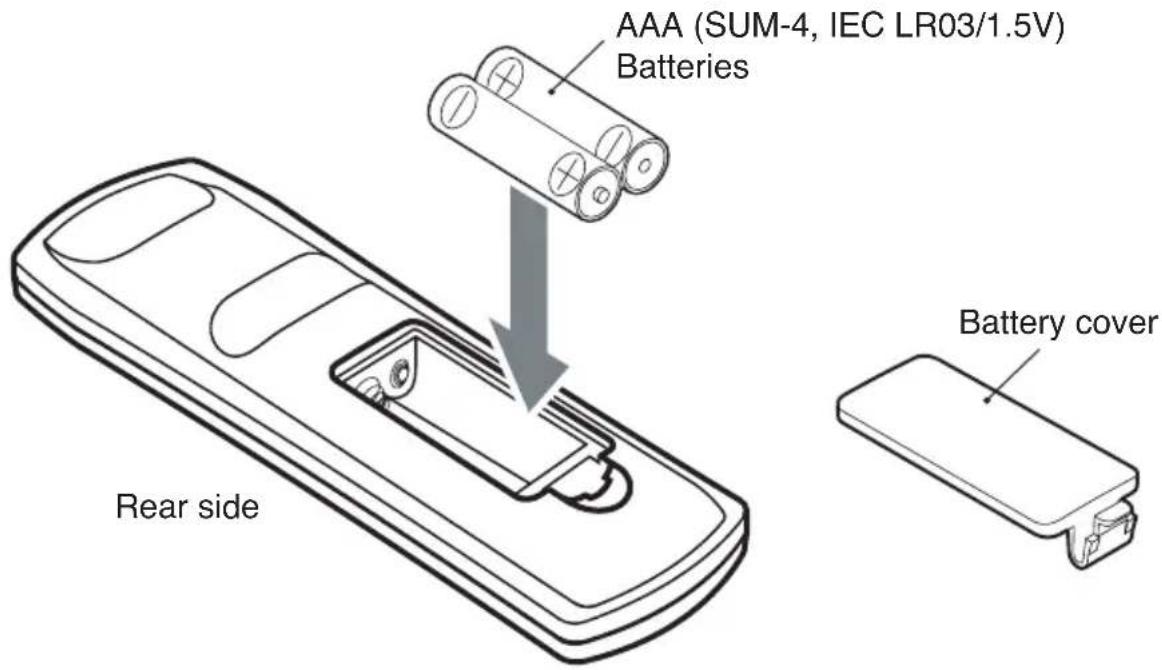
① Open the rear cover, and remove it and insert the AAA (SUM-4, IEC LR03/1.5V) batteries bundled with the remote control unit in the directions shown in the figure and then, close the rear cover.
② Using batteries improperly can cause them to explode. Take note of the following points:
- When replacing batteries, replace both batteries with new ones
- Do not short-circuit, disassemble or heat batteries.
- Do not dispose batteries into fire or flames.
- Dispose of spent batteries properly.
- Button Functions
You can use the remote control unit to control this unit. The steering wheel remote control operation work on the MAIN zone even when the SUB zone is selected.
① [SRC] : To switch the modes
② [BAND] : To switch reception band in TUNER mode
③ [RPT] : To repeat chapter in DVD mode or repeat track in CD/MP3 modes
To perform folder repeat in MP3 mode
④ [SCAN] : To scan tracks in USB mode
To scan chapters in DVD mode and tracks in CD/MP3 modes
To scan folders in MP3 mode (keep pressing more than a second)
⑤ [RDM] : To play tracks at random in CD/MP3 modes To play folders at random in MP3 mode (keep pressing more than a second)
⑥ [PBC] : To turn on/off PBC function in the Video CD mode
⑦ [0-9] : To select the preset number in the Preset List screen of the TUNER mode To input number of key pad screen in DVD mode
⑧ [P.TIME] : To turn on/off the playtime display in DVD mode
⑨ [SEARCH MODE] : To switch the search mode (keep pressing more than a second in DVD mode)
⑩ [SETUP] : To show the DVD SETUP screen while playing DVD
⑪ [MENU] : To display stored menu in DVD video disc
⑫ [▲][◀][▶][▼] : To select a menu
To scroll the track/folder list screen in MP3 modes (only ▲▼)
⑬ [ENTER] : To select track, file, folder or item in all modes
⑭ [RTN] : To return to the previous screen from the list or menu screens
To switch to the previous screen display while the menu screen is being displayed.
⑮ [TOP MENU] : To display top menu screen on DVD video disc
⑯ [SLOW] : To perform slow playback in DVD mode
⑰ [PLAY/PAUSE] : To play or pause the video / audio media
To stop video playback in DVD video (keep pressing more than a second)
⑱ [MUTE] : To turn mute on/off
When the mute is turned on, 📄 appears at the top right of the screen.
⑲ [P.CH] (◀◀,▶▶): To seek up/down in TUNER mode
To select the next higher or lower chapter number in DVD mode
To perform fast-forward and fast backward (Keep pressing) in DVD/ iPod modes.
To select the next higher or lower track in CD, MP3 modes
To select the next higher or lower track numbers in iPod mode.
⑳ [VOLUME] : To increase/decrease the volume
[AUDIO] : To switch the AUDIO function in DVD/CD modes
[SUB TITLE] : To display subtitle in DVD mode
[ANGLE] : To switch the ANGLE function in DVD mode when the ANGLE MARK is displayed (available only on multiple angles DVDs)
[2-ZONE] : To turn on/off 2-ZONE function To switch between main-zone and sub-zone when 2-Zone function is turned on
- When SUB zone is selected
SUB zone operations are supported, but button functions are limited as follows:
[VOLUME] buttons controls sound volume for MAIN zone source.
[MUTE] button controls audio mute function for MAIN zone source.
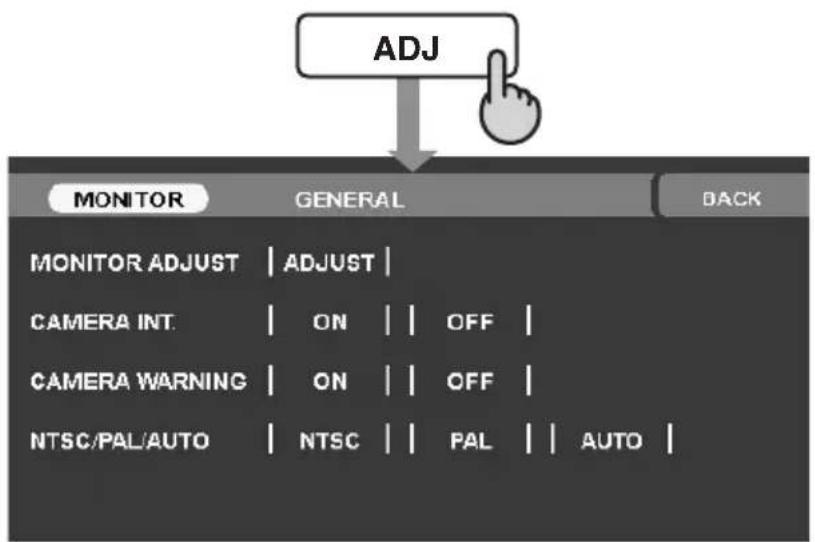
4-1-5 Adjust Mode : At Tuner, iPod, USB Mode
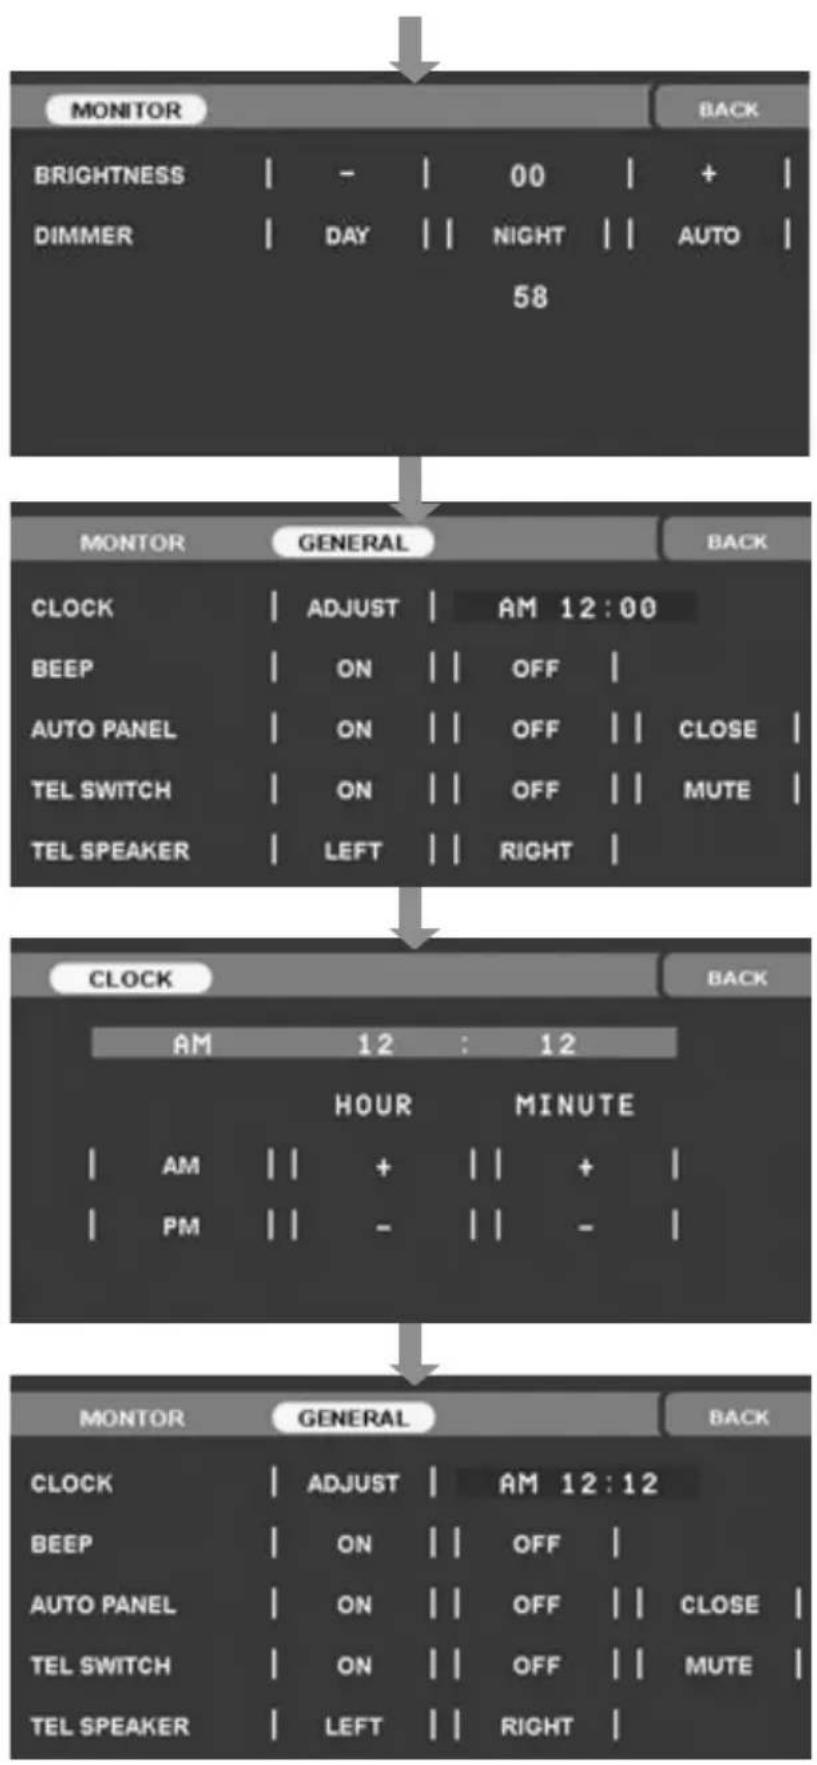
flowchart
graph TD
    A["MONITOR"] --> B["BRIGHTNESS"]
    A --> C["DIMMER"]
    A --> D["58"]
    E["GENERAL"] --> F["CLOCK"]
    E --> G["BEEP"]
    E --> H["AUTO PANEL"]
    E --> I["TEL SWITCH"]
    E --> J["TEL SPEAKER"]
    K["CLOCK"] --> L["AM 12 : 12"]
    K --> M["HOUR MINUTE"]
    K --> N["PM -"]
    O["GENERAL"] --> P["CLOCK"]
    O --> Q["BEEP"]
    O --> R["AUTO PANEL"]
    O --> S["TEL SWITCH"]
    O --> T["TEL SPEAKER"]
![[ADJUST] BACK [ADJUST] BACK](/content/2026/05/789717/images/70ef07065034f832dbb05883d1f109bbd3723e7f4935e87b25cfca95bb447be5.jpg)
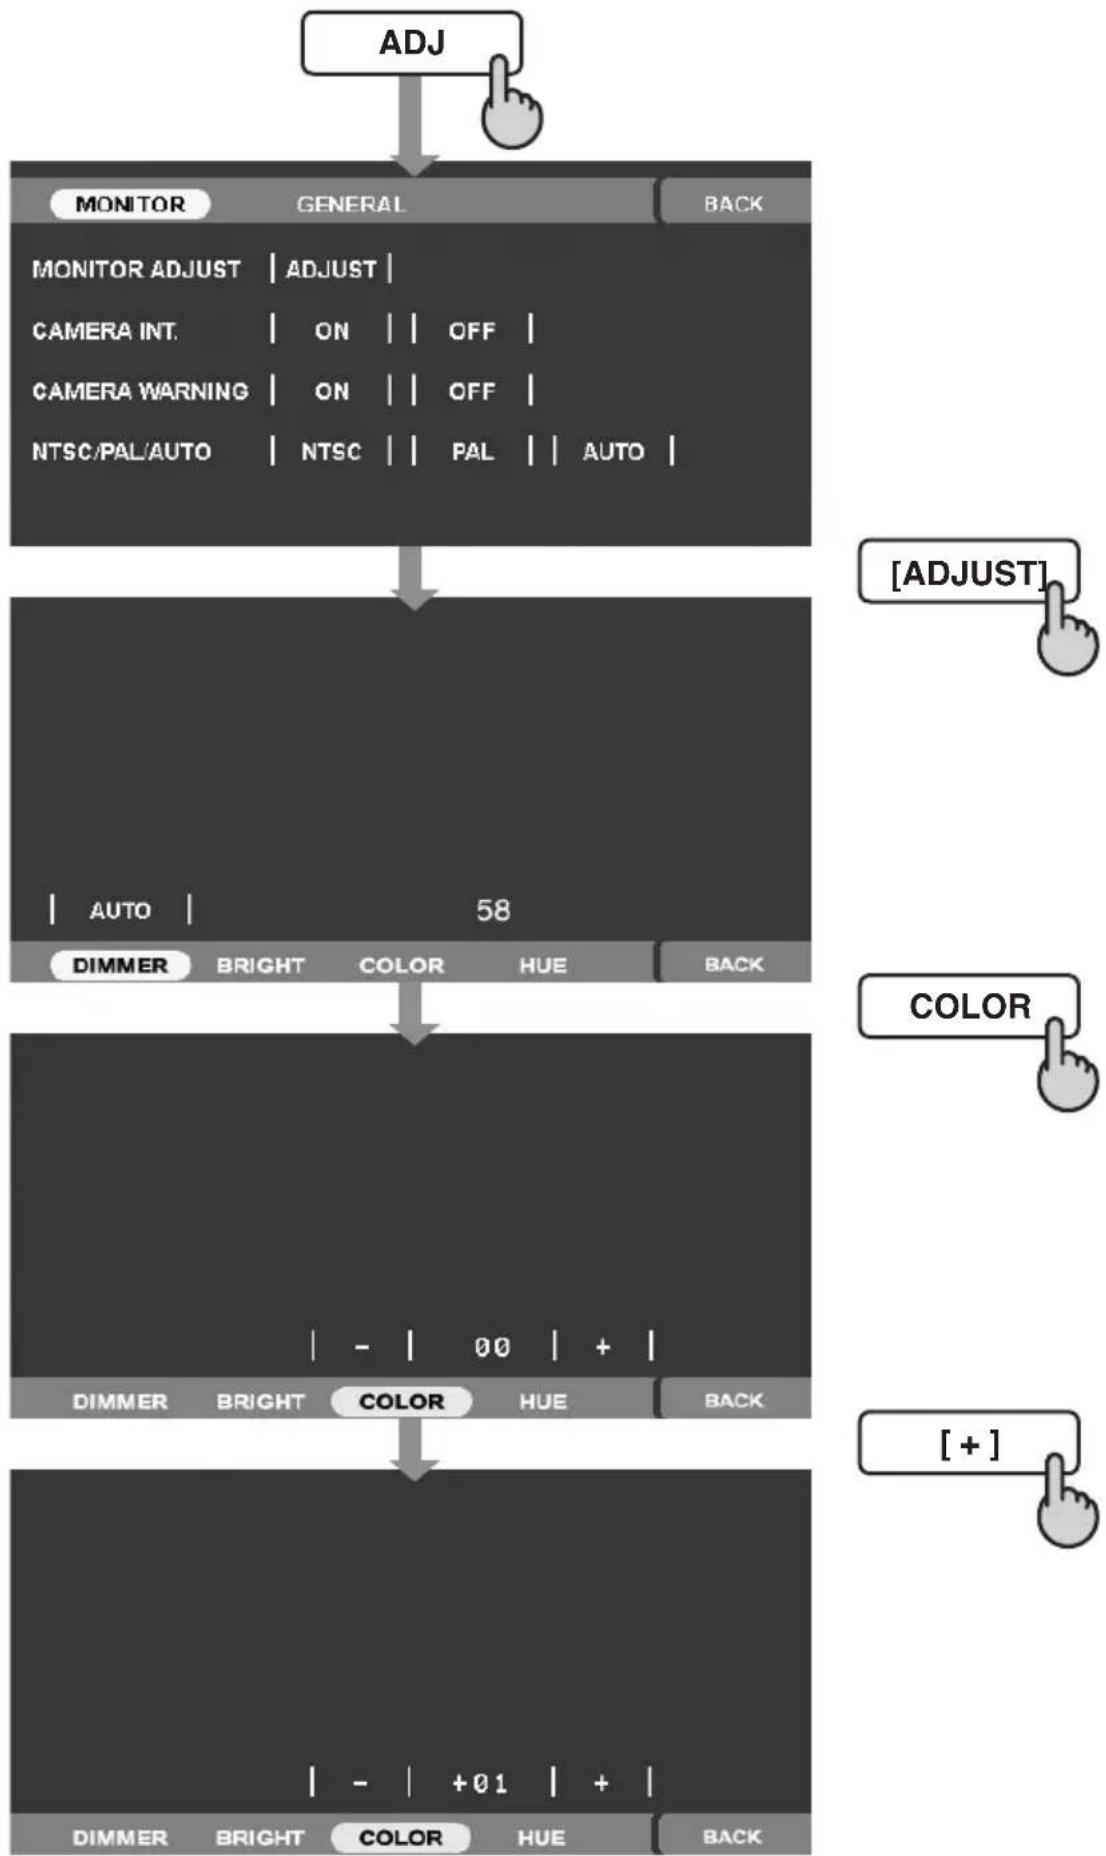
4-1-6 Adjust Mode : At AUX, DVD Mode
flowchart
graph TD
    A["ADJ"] --> B["MONITOR GENERAL BACK"]
    B --> C["MONITOR ADJUST | ADJUST |<br>CAMERA INT. ON OFF |<br>CAMERA WARNING ON OFF |<br>NTSC/PAL/AUTO NTSC PAL AUTO |<br>    C --> D[| AUTO | 58"]
    D --> E["DIMMER BRIGHT COLOR HUE BACK"]
    E --> F["| - | 00 + |<br>DIMMER BRIGHT COLOR HUE BACK"]
    F --> G["| - | +01 + |<br>DIMMER BRIGHT COLOR HUE BACK"]
5. CAUTIONS
5-1 Liquid Crystal Panel/Generalities
※ For a longer service life, be sure to read the following cautions.
- Be sure to house the liquid crystal panel inside the main unit when parking the car outdoors for long period of time. The liquid crystal panel will operate properly in a temperature range of 0 to 60^ .
- Do not allow any liquids on the set from drinks, umbrellas etc. Doing so may damage the internal circuitry.
- Do not disassemble or modify the set in any way. Doing so may result in damage.
- Do not draw the liquid crystal panel out and use it as a tray. Also, subjecting the liquid crystal panel to shocks may result in breakage, deformation or other damage.
- Do not let cigarettes burn the display. Doing so may damage or deform the cabinet.
- If a problem should occur, have the set inspected at your store of purchase.
- Do not insert objects or poke in the space between the liquid crystal panel and the main unit when the panel is tilted.
- Do not place anything on the display when the panel is tilted.
- The remote control unit may not work if the remote control sensor is exposed to direct sunlight.
- In extremely cold weather, the display movement may slow down and the display may darken, but this is not a malfunction. The display will work normally when the temperature increases.
- Small black and shiny spots inside the liquid crystal panel are normal for LCD products.
- The liquid crystal panel may stop temporarily when it opens or closes, when the engine stops or when it is cold.
- The touch keys on the display operate when slightly touched. Do not press the touch key screen with much force.
- Do not push the case surrounding the touch key panel with much force. This may cause malfunctioning of the touch keys.
5-2 Cleaning
- Cleaning the cabinet
For tough dirt, apply some neutral detergent diluted in water to a soft cloth, wipe off the dirt gently, wipe again with a dry cloth. Do not use benzene, thinner, car cleaner, etc., as these substances may damage the cabinet or cause the paint to peel. Also, leaving rubber or plastic products in contact with the cabinet for long periods of time may cause stains.
- Cleaning the liquid crystal panel
The liquid crystal panel tends to collect dust, so wipe it off occasionally with a soft cloth. The surface is easily scratched, so do not rub it with hard objects.
6. DVD VIDEO SYSTEM
DVD video is a high-quality digital video source that provides crisp and clear images. One 12cm disc contains either one film or four hours of music.
6-1 DVD Video Features
This unit provides the following functions in addition to the high image quality and sound quality of DVD video. The functions described in the section, "Features", for example, the recorded language, subtitles, angles, etc. differ with the DVD video disc. Refer to the instructions provided with the DVD video. Some disc functions may operate differently from described in this manual.
- Multi-Sound
DVD video can store up to 8 languages for one film; select the language of your preference. The languages stored on the disc are indicated by the icon shown below.

- Multi-Angle
A DVD video that is filmed from multiple angles allows you to select the angle of choice. The number of recorded angles is indicated by the icon shown below.
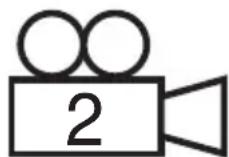
A DVD video can record subtitles for up to 32 languages and you can select the language of the subtitles you wish to see.
The number of recorded subtitle languages is indicated by the icon shown below.
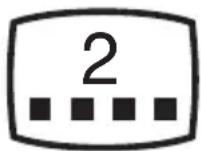
- Multi-Story
When a DVD video contains more than one story for a film, you can select the story you wish to enjoy. The operation procedures vary with the disc; observe the instructions for selecting a story provided during playback.
- Dolby Digital
Dolby Digital enables up to 5.1 independent multi-channel audio reproductions, the same type of surround system that is used in cinemas.
- Menu Screen
Menus can be called up during DVD video playback to perform menu setting.
To display the menu, touch the key in the following order:
※ SOURCE mode → [DVD] key → [CONTROL] key → [MENU] key
6-2 Discs
6-2-1 Playable Disc
This DVD video player can play the following discs.

6-2-2 CD Extra Disc
A CD Extra disc is a disc in which a total of two sessions have been recorded. The first session is Audio session and the second session is Data session. Your personally-created CDs with more than second data sessions recorded cannot be played on this DVD video player. When you play a CD Extra disc, only the first session will be recognized.
6-2-3 CD-R/CD-RW Disc (MP3, WMA)
This player can play audio CD format (MP3, WMA) on CD-R/CD-RW discs.
6-2-4 DVD ± R/RW Disc
This player can play MP3/WMA files recorded on DVD ± R/RW discs.
6-2-5 Unsupported Disc Format
This DVD video player cannot play back DVD Audio, DVD-RAM, Photo CDs, etc. It may also not be possible to play back CDs recorded on a CD-R unit and CD-RW unit. (Cause : disc characteristics, cracks, dust/dirt, dust/dirt on player's lens, etc.) If a CD-R or CD-RW disc that has not been finalized is played, it will take a long time to start playing. Also, it may not be possible to play depending on its recording conditions. You cannot play Super Audio CDs. Playback of the CD player is not supported even if it is a hybrid disc.
6-2-6 MP3/WMA Playback
This unit can play back CD-R/CD-RW, DVD-R/RW and DVD+R/RW discs on which MP3/WMA music data have been recorded.
6-2-7 DivX Playback
This player can play back DivX format file recorded on DVD±R/RW and CD-R/RW discs.
6-2-8 Region Number
The DVD video system assigns a region number to DVD video players and DVD discs by sales area. The DVD video region number is marked on the disc jacket as shown below.

6-3 Registered Trademark
- This product incorporates copyright protection technology that is protected by U.S. patents and other intellectual property rights. Use of this copyright protection technology must be authorized by Macrovision, and is intended for home and other limited viewing uses only unless otherwise authorized by Macrovision. Reverse engineering or disassembly is prohibited.
- Manufactured under licence from Dolby Laboratories. "Dolby", "Pro Logic", and the double-D symbol are trademarks of Dolby Laboratories.
- “iPod” is for legal or rightholder-authorized copying only. Don’t steal music. “iPod” is a trademark of Apple Inc.
- Windows Media ^TM , the Windows ^® logo are trademarks, or registered trademarks of Microsoft Corporation in the United States and/or other countries.
- DivX, DivX Certified, and associated logos are trademarks of DivX Inc and are used under license.
7. OPERATIONS
7-1 DCP
The control panel can be detached to prevent theft. When detaching the control panel, store it in the DCP (Detachable Control Panel) case to prevent scratches. Please take the DCP with you when leaving the car.
- Remove DCP
① Press the [SOURCE] button more than 2 seconds to turn off the power.
② Press button and pull the left side of the DCP toward you, and remove it.
- Attach DCP
① Hook the right side of the DCP to the right side of the main unit.
② Settle the left side of the DCP to the main unit.
- Cautions
- When the Auto Panel function (see AUTO PANEL of chapter I 7-2-5 Adjust Operations I) is set to "OFF" and you turn the power off, be sure to close the LCP for safe before removing the DCP.
- The DCP can easily be damaged by impact. After removing it, be careful not to drop or give impact.
- Remote control unit cannot be used when the DCP is removed.
- If the DCP is dirty, wipe it off by using a soft dry cloth.
7-2 Basic Operations
※ When the unit is turned on, starting and stopping the engine with its volume raised to the maximum level may harm your hearings. Be careful about adjusting the volume.
7-2-1 Power On/Off
(1) Start the engine before using this unit. Be careful about using this unit for a long time without running the engine. If you drain the car's battery too far, you may not be able to start the engine and this can reduce the service life of the battery.
(2) Press the [SOURCE] button more than 2 seconds. When the LCP is not open, press the [OPEN] button. The unit automatically memorizes its last operation mode and will automatically switch to display that mode.
7-2-2 Mode Selections
(1) When the LCP is open
① Press the [SOURCE] button to enter in the SOUCRE mode.
② Touch the desirable key.
(2) When the LCP is closed
① Press the [SOURCE] button to change operation mode.
② Each time you press the [SOURCE] button, the operation mode changes in the following order:
TUNER mode ▶ DVD/CD Play mode ▶ USB mode or iPod mode ▶ AUX mode
③ When 2-ZONE function is ON, the [SOURCE] button operates only for the MAIN zone.
To switch to a SUB zone source, specify from the Source menu screen, or use the remote control unit.
7-2-3 LCP Operations
(1) Cautions
To prevent the battery from going dead, operate this unit with the engine running if possible. When the liquid crystal panel is operating, be careful not to get your hand or finger caught between the panel and main unit or the instrument panel of the care. Do not move the liquid crystal panel by hand.
(2) Standing up the LCP
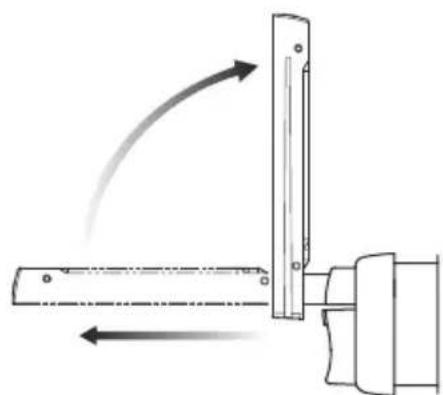
① Press the [OPEN] button. The LCP comes out and stands up automatically. The power of this unit will be turned on.
② Press the [OPEN] button more than a second to house LCP and press the button again to raise it, if the LCP stops in the middle of its operation. The unit will enter the same display mode as the display was in when last turned off.
natural_image
Diagram of a mechanical lever system with directional arrows indicating motion (no text or symbols)(3) Adjusting the angle of the LCP
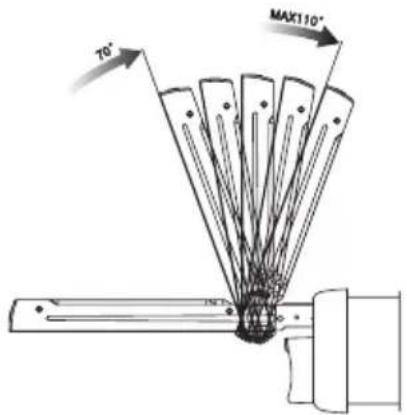
① Every touching the [OPEN] key more than a second tilts LCP forward or backward. The angle is changed the following order:
$$ 1 1 0 ^ {\circ} (\text { Default angle }) \rightarrow 1 0 0 ^ {\circ} \rightarrow 9 0 ^ {\circ} \rightarrow 8 0 ^ {\circ} \rightarrow 7 0 ^ {\circ} \rightarrow 8 0 ^ {\circ} \rightarrow 9 0 ^ {\circ} \rightarrow 1 0 0 ^ {\circ} \rightarrow 1 1 0 ^ {\circ} \rightarrow \dots $$
② If the LCP stops in error during the adjustment of the angle and you touch the [OPEN] key more than a second, the LCP operates With opposition direction.
The adjusted angle is stored in memory. There are 5 adjustable angles available within the range 70^ to 110^ .
(4) Housing the LCP
Press the [OPEN] button and the LCP is automatically housed. If you do not use the unit for a long time or leave the car, please house the LCP.
※ Open or Close function might not be working properly if ACC is off while opening or closing LCP or LCP is moved by manually.
7-2-4 Audio Operations
| SOUND | Z-ENHANCER | Z-ENHANCERBASS BOOSTIMPACTEXCITE | |
| CUSTOM DETAIL | BASS GAINBASS FREQBASS QTREBLE GAINTREBLE FREQ | ||
| BAL/FAD | |||
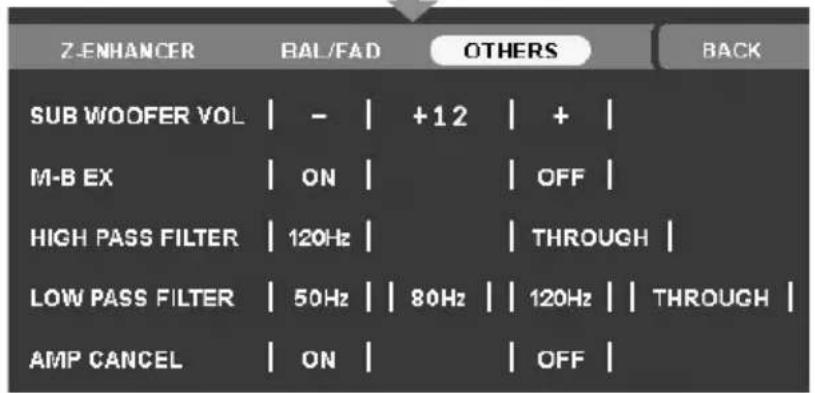
| OTHERS | SUB WOOFER VOLM-B EXHIGH PASS FILTERLOW PASS FILTERAMP CANCEL | ||
(1) Adjusting the Z-ENHANCER
① Press the [SOUND] button. (This button performs only when the panel is open.)
② Touch the desirable item key (Z-ENHANCER, BAL/FAD, OTHERS).
③ Perform the adjustment explaining in the following sections.
④ Touch the [BACK] key to return to the previous screen.
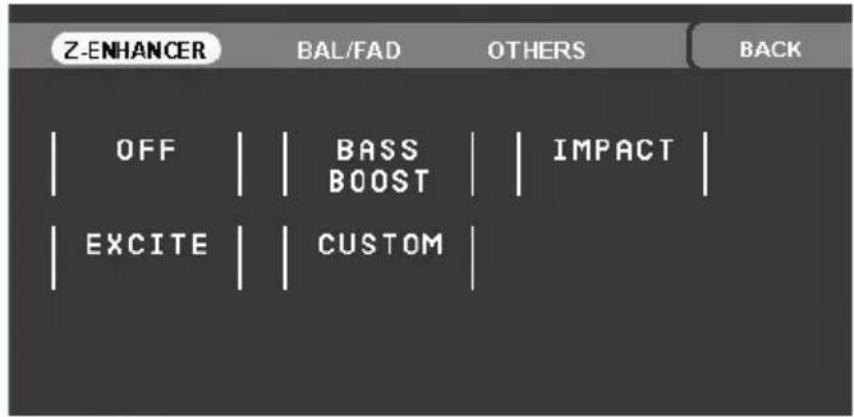
| ITEM DEFAULT SETTING RANGE | ||
| Z-ENHANCER | OFF | ON or OFF |
| BASS BOOST | 0 | -3 ~ +3 |
| IMPACT | 0 | -3 ~ +3 |
| EXCITE | 0 | -3 ~ +3 |
• BASS BOOST, IMPACT, EXCITE Setting
: Select favorite setting mode from these presets and touch respective the [- ] or [ + ] keys to adjust the level.
"BASS BOOST" emphasizes low sound.
"IMPACT" weakens intermediate sound and emphasizes both low sound and high sound.
“EXCITE” weakens intermediate sound and emphasizes both low sound and high sound.
※ BASS BOOST - detail adjustments
| SET BASS TREBLE | ||
| +3 F = 80Hz, G=+12dB, Q=1 | F=12KHz, G=4dB | |
| +2 F = 80Hz, G=+10dB, Q=1 | F=12KHz, G=4dB | |
| +1 F = 80Hz, G=+8dB, Q=1 | F=12KHz, G=4dB | |
| 0 F = 80Hz, G=+6dB, Q=1 | F=12KHz, G=4dB | |
| -1 F = 80Hz, G=+4dB, Q=1 | F=12KHz, G=4dB | |
| -2 F = 80Hz, G=+2dB, Q=1 | F=12KHz, G=4dB | |
| -3 F = 80Hz, G=+0dB, Q=1 | F=12KHz, G=4dB |
※ IMPACT - detail adjustments
| SET BASS TREBLE | ||
| +3 F = 80Hz, G=+10dB, Q=1 | F=8KHz, G= +6dB | |
| +2 F = 80Hz, G=+ 8dB, Q=1 | F=8KHz, G= +6dB | |
| +1 F = 80Hz, G=+ 8dB, Q=1 | F=8KHz, G= +4dB | |
| 0 F = 80Hz, G=+ 6dB, Q=1 | F=8KHz, G= +4dB | |
| -1 F = 80Hz, G=+ 6dB, Q=1 | F=8KHz, G= +2dB | |
| -2 F = 80Hz, G=+ 4dB, Q=1 | F=8KHz, G= +2dB | |
| -3 F = 80Hz, G=+ 4dB, Q=1 | F=8KHz, G= 0dB |
※ EXCITE - detail adjustments
| SET BASS TREBLE | ||
| +3 F = 50Hz, G=+ 10dB, Q=1 | F=12KHz, G= +8dB | |
| +2 F = 50Hz, G=+ 8dB, Q=1 | F=12KHz, G= +8dB | |
| +1 F = 50Hz, G=+ 8dB, Q=1 | F=12KHz, G= +6dB | |
| 0 F = 50Hz, G=+ 6dB, Q=1 | F=12KHz, G= +6dB | |
| -1 F = 50Hz, G=+ 6dB, Q=1 | F=12KHz, G= +4dB | |
| -2 F = 50Hz, G=+ 4dB, Q=1 | F=12KHz, G= +4dB | |
| -3 F = 50Hz, G=+ 4dB, Q=1 | F=12KHz, G= +2dB |
- Custom Setting
: Touch the [CUSTOM] key and then touch the [CUSTOM DETAIL] key. BASS controls low sound, TREBLE controls high sound.
| CUSTOM DETAIL | DEFAULT SETTING RANGE | |
| BASS GAIN | 0 | -6 ~ +8 |
| BASS FREQ | 50Hz | 50Hz or 80Hz or 120Hz |
| BASS Q | 1 | 1 or 1.25 or 1.5 or 2 |
| TREBLE GAIN | 0 | -6 ~ +6 |
| TREBLE FREQ | 8KHz | 8KHz or 12KHz |
(2) Adjusting the BAL/FAD
- Touch the [BAL/FAD] key.
- Touch the [FRONT] [LEFT] [RIGHT] [REAR] keys to control balance & fader.
They control a location adjustment of the sound. Their default settings are "CENTER".
| ITEM\SETUP | KEY | RANGE | FUNCTION |
| FADER | [FRONT] | 0 ~ 12 | Emphasize front speaker sound |
| [REAR] | 0 ~ 12 | Emphasize rear speaker sound | |
| BALANCE | [LEFT] | 0 ~ 13 | Emphasize left speaker sound |
| [RIGHT] | 0 ~ 13 | Emphasize right speaker sound |
(3) Adjusting the OTHERS
- Touch the [OTHERS] key
- Touch the value at right side to adjust the desirable function.
- "SUB WOOFER VOL" controls the volume level of the subwoofer.
- "M-BX ON" boosts low sound of below 50Hz.
- "HPF" controls the Output of POWER-AMP.
- "LPF" controls the Output of SUB-WOOFER.
- "AMP CANCEL" controls the using presence of built-in AMP.
If you use the external AMP, Built-in AMP is recommended to be turned off.
| OTHERS DEFAULT SETTING RANGE | ||
| SUB WOOFER VOL 0 -6 ~ | +6 | |
| M-B EX OFF ON or OFF | ||
| HIGH PASS FILTER THROUGH 120Hz or THROUGH | ||
| LOW PASS FILTER 50Hz | 50Hz or 80Hz or 120Hz or THROUGH | |
| AMP CANCEL | OFF ON or OFF | |
7-2-5 Adjust Operations
※ item table
| ADJ | MONITOR | ADJUST | BRIGHT COLOR HUE DIMMER |
| CAMERA INT. CAMERA WARNING NTSC/PAL/AUTO | |||
| GENERAL | CLOCK BEEP TEL SWITCH TEL SPEAKER | ||
(1) Adjusting the MONITOR
(1-1) Default Screen
① Press the [ADJ] button.
② Perform the adjustment.
③ Touch the [BACK] key to return to the previous screen.
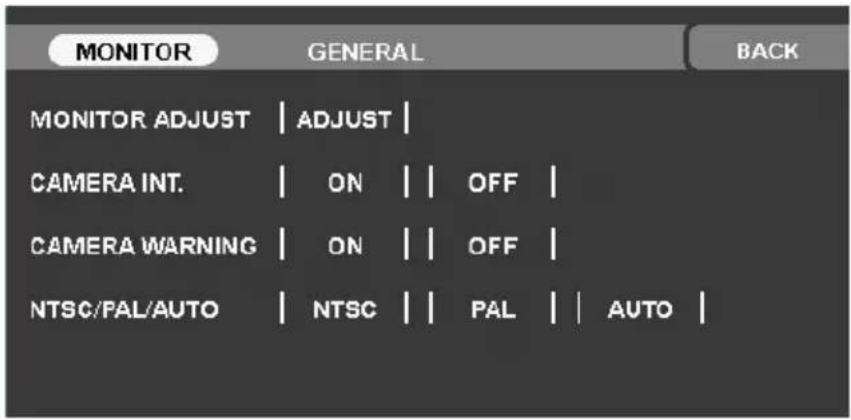
(1-2) MONITOR ADJUST : At Tuner, iPod, USB Mode
(1-2-1) Brightness
- Touch the [ADJUST] key to adjust brightness for display image.
- Touch the [- ] key and screen becomes dark
- Touch the [ + ] key and screen becomes bright
(1-2-2) Dimmer
- Touch the [ADJSUT] key to adjust the brightness of LCP when the car lights are on/off.
[DAY] : Brightness of LCP is always set to maximum level.
[NIGHT] : Brightness of LCP is always set to user setting level in adjust mode.
[AUTO] : According to the status of the car light, brightness of LCP is changed. (When the car light is off : Day color, when the car light is on : Night color, Only "NIGHT" setting can control the dimmer level by touching the [- ] or [ + ] key.)
(1-3) CAMERA INT.
- Touch the [ON] key to turn rear camera on when reverse line is activated.
- Touch the [OFF] key to ignore reverse line not to be interrupted by camera.
(1-4) CAMERA WARNING
- When you are using CCD camera, touch the [ON] key if you want to see the warning message
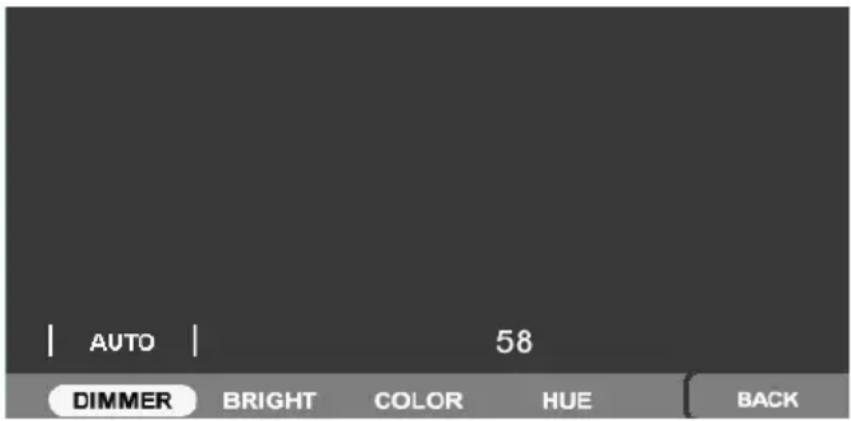
(2-1) Brightness
- Touch the [ADJUST] key to adjust brightness for display image.
- Touch the [ - ] key and screen becomes dark
- Touch the [+] key and screen becomes bright
(2-2) Dimmer
- Touch the [ADJUST] key to adjust the brightness of LCP when the car lights are on/off. [DAY]: Brightness of LCP is always set to maximum level.
[NIGHT] : Brightness of LCP is always set to user setting level in adjust mode. [AUTO] : According to the status of the car light, brightness of LCP is changed. (When the car light is off : DAY color, when the car light is on : NIGHT color Only "NIGHT" setting can control the dimmer level by touching the [-] or [+] key.)
(2-3) Color
• To adjust the color depth.
- If you touch the [- ] key, the color depth will decrease.
- If you touch the [ + ] key, the color depth will increase.
(2-4) Hue
- If you touch the [- ] key, red is emphasized.
- If you touch the [ + ] key, green is emphasized.
- Only NTSC, it can setup.
(3) Adjusting the GENERAL
(3-1) Default Screen
- Press the [ADJ] button, then touch the [GENERAL] key.
• Perform the adjustment. - Touch the [BACK] key to return to the previous screen.
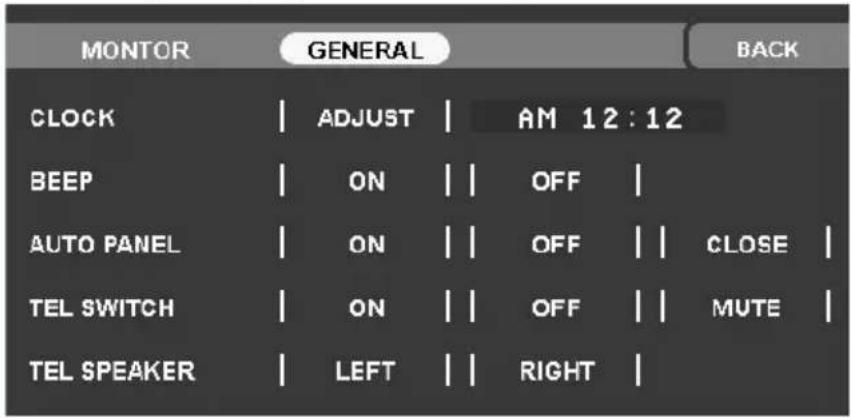
| GENERAL DEFAULT SETTING RANGE | ||
| BEEP ON ON or OFF | ||
| AUTO PANEL ON ON or OFF or CLOSE | ||
| TEL SWITCH OFF ON or OFF or MUTE | ||
| TEL SPEAKER RIGHT | LEFT or RIGHT | |
(3-2) CLOCK
- Touch the [ADJUST] key to set up the time.
- Touch the [AM] or [PM] key.
- Touch the [-] or [ + ] key to change the time.
(3-3) BEEP
- When pressing Button or Key, Beep Sounds
• To turn on/off Beep, touch the [ON] or [OFF] key. - In spite of "OFF" setting, the Warning sound comes out.
- When memorizing, Beep sounds longer.
(3-4) AUTO PANEL
- ON : The LCP houses automatically after removing the DCP. The LCP opens automatically after attaching the DCP. (Automatic OPEN/CLOSE of the LCP)
- OFF : Regardless of the removal or attaching of DCP, the LCP is worked by the settings of the user. (Passive OPEN/CLOSE of the LCP)
- CLOSE : Set up the LCP automatically only after removing the DCP. (Automatic CLOSE of the LCP)
(3-5) TEL SWITCH
- To set up the mobile phone interruption
- When you connect your mobile phone to this unit using a separately sold cable, you can listen to your telephone calls on your car speakers.
- ON : To listen to your telephone calls from the speakers connected to this unit (When listening to your car speakers, you can adjust the volume level.)
- OFF: To continue normal operation even when you use the telephone calls (When you set this function to "OFF", disconnect the mobile phone from the cable or turn off the power of the mobile phone.)
- MUTE : To mute the sound during your telephone (This function is not compatible with all mobile telephones. Contact your local authorized Clarion dealer for information on proper installation and compatibility.)
(3-6) TEL SPEAKER
- To change the output speaker for the mobile phone when TEL SWITCH is "ON"
- During the mobile phone interrupts, setting this function is disabled.
- [LEFT] : To hear your telephone calls from the left speaker connected to this unit
• [RIGHT] : To hear your telephone calls from the right speaker connected to this unit
7-2-6 2-ZONE Function
(1) Description
The 2-ZONE function is a function that outputs separate sounds/images from the MAIN zone and SUB zone (such as the rear monitor) by simultaneously operating two sources in the one centre unit. Thereby, plural listeners are allowed to enjoy separate audio/visual sources. The 2-ZONE function allows internal sources (TUNER, DVD, iPod) and external sources (AUX, etc.) to be played on MAIN zone and SUB zone. Controlling sources of MAIN zone and SUB zone can be made from the main unit and from the remote control unit. The source sounds of the MAIN zone are played back from the speakers of the vehicle side, and those of the SUB zone are from the wireless headphone. Sound volume control on the SUB zone is performed by the wireless headphone.
When you run the products for the first time, 2-ZONE function is set to the OFF, both of the main-zone and sub-zone are set to the main source. If you press the [SOUND] button more than a second, it will turn into the 2-ZONE source screen.
2-ZONE mode : OFF, DVD(CD), AUX, iPod
- The TUNER mode cannot be specified for the SUB zone.
- The steering wheel remote control operations work upon the MAIN zone even when the SUB zone is selected.
- If a mobile phone interrupt arises when an external equipment is specified for the SUB zone, the 2-ZONE function is automatically turned off, and it does not resume to the 2-ZONE ON status even when the interruption is finished.
- You cannot switch the MAIN and SUB zone when the front monitor locked screen or CCD camera screen is displayed.
- The ON/OFF of the 2-ZONE keeps up regardless of the OFF/ON of the engine and power.
(2) Display
- To display the 2-ZONE mode screen, press the [SOUND] button more than a second.
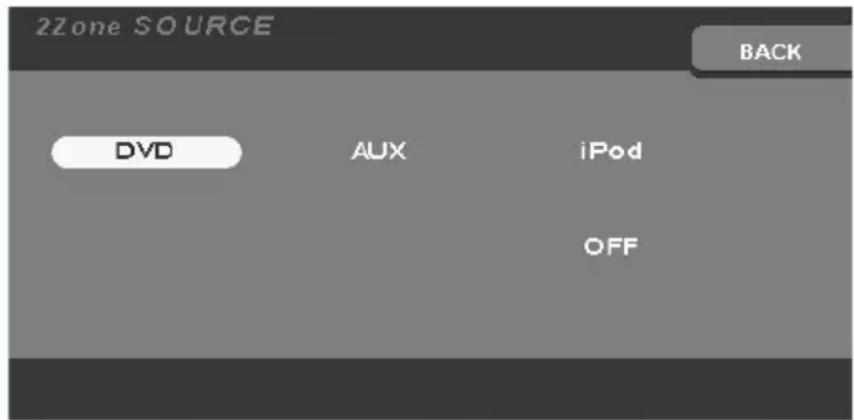
※ To select a source which you want
(3) Specification of conversion
- When the 2-ZONE function turns on, the source of the main-zone and the sub-zone is made up by the mixture besides of the external source.
- The source conversion of the main-zone is available when the 2-ZONE setting mode sets up to the main-zone.
- The source conversion of the sub-zone is available when the 2-ZONE setting mode sets up to the main-zone.
- The source conversion of the main-zone and sub-zone is like below.
| MAIN\SUB | ※3 DVD | VISUAL(AUX) | ※2 iPOD (VIDEO) | RADIO USB | |
| RADIO | ※1 Y | ※1 Y | ※1 Y | N | N |
| DVD | Y | Y | Y | N | N |
| VISUAL(AUX) | Y | Y | N | N | N |
| iPOD | Y | Y | Y | N | N |
| USB | Y | Y | Y | N | N |
NOTE
※1 : Receiving condition of some stations may be altered in 2-ZONE mode.
※2: To select the video mode of iPod when you watch in sub-zone.
※3 : DVD operation can be done only in the main-zone.
7-3 Radio
(1) Listening to the radio
① Press the [SOURCE] button and touch the [TUNER] key. The TUNER mode screen is displayed.
② Press the [BAND] button on the remote control unit, or touch the [BAND] key to select the radio band. Each time the key is touched, the radio reception band changes in the following order:
The default setting is "FM1".
③ Touch the [| ◀◀] or [▶▶ |] key to seek up or seek down. If you keep touching the [| ◀◀] key, manual tuning will be done in the direction of lower frequencies. If you keep touching the ▶▶ |] key, manual tuning will be done in the direction of higher frequencies.
④ FREQUENCY MAP
| AREA BANDBAND(Hz) | SEEK(KHz) | RECEIVING STEPMANU(KHz) | STEP | IF(Hz) | |
| EUROPE | FM1,2,3AM(MW/LW) | 87.5~108.0M 100LM 153~279 K 3 | 503 | 10.7M450K |
(2) Auto store
① The Auto Store is a function for storing up to 6 stations that are automatically tuned in sequentially. If 6 receivable stations cannot be received, a previously stored station remains at the memory position.
② Touch and hold the [AS] key more than 2 seconds. A beep sounds and the stations with good reception are stored automatically to the preset channels
※ In case of AF ON MODE whichever TA ON or OFF stations will be stored in FM3.
(3) Memorizing the preset
- By touching preset number, preferred preset memories stations between 1 \~ 6 can be selected.
- To memorized preferred station, keep touching preset number until beep sound(for more than 3 seconds).
※ The display of preset memoried channel will be the same indication as receiving station.
7-4 RDS
7-4-1 Feature Explanation
This unit has a built in RDS decoder system that supports broadcast stations transmitting RDS data. This system can display the name of the broadcast station being received (PS), and can automatically switch to the broadcast station with the best reception as you move long distances (AF switching).
Also, if a traffic announcement or programme type information is broadcast from an RDS station, this broadcast is received. Additionally, if EON information is received, this information enables automatic renewal of other preset stations on the same network and interruption of traffic announcement and/or chosen programme type from other stations (TP). This function is not available in some areas.
"AF": Alternative Frequency
"PS": Programme Service Name
"REG": Regional programme
"PTY": Programme Type
"EON": Enhanced Other Network
"TP": Traffic Programme
※ The RDS function doesn't operate during AM(MW/LW) radio reception.
7-4-2 RDS Menu
When using the RDS function, always set the radio band to an FM mode.
- To change the settings for RDS, touch the [OPTION] key in an FM mode.
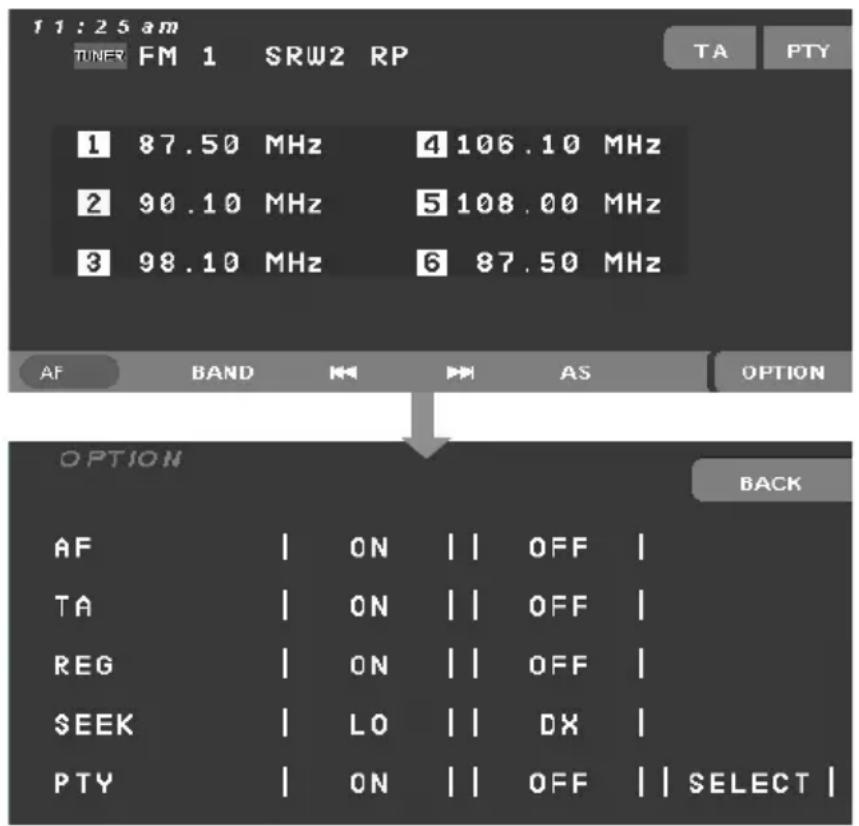
(1) AF
- The AF function switches to a different frequency on the same network in order to maintain optimum reception.
- Touch the [ON] key to turn the function on, and touch the [OFF] key to turn off.
- When the AF function is on, "AF" blinks on the screen if nothing is received.
- Default setting is "ON".
(2) TA
- TA is a function of the traffic announcement. When a traffic announcement broadcast starts, the traffic announcement broadcast is received as high priority regardless of the function mode (except rear camera and telephone interrupt), so you can listen to it.
- “ON”: With compulsion, it receives the traffic announcement in all modes automatically.
- "OFF": No TA function.
- Operation
- [TA] key on FM mode will change ON/OFF the TA function and to select the TA station (if TA service is available) by user.
- If Traffic Message is received when the mode is DVD, iPod (other than Radio), the mode is automatically switched into FM mode. If the Traffic Message is finished, the mode will be switched into previous mode.
- If [TA] key is selected at the FM mode, the unit starts to search new TA stations. If [TA] key is selected once more, TA function will be turned off.
※ “TA” is displayed at the bottom area when TA is ON.
※ “NO TP, TA” will be displayed if Traffic Message is not available and “NO TP, TA” will be disappeared if Traffic Message is available.
(3) REG
- When the REG function is ON, the optimum regional station can be received. When this function is OFF, if the regional station area is switched as you drive, a regional station for that region is received. This function is disabled when a national station such as BBC R2 is being received.
- REG can setup the adjustment only if AF is on.
- Touch the [ON] or [OFF] key to turn the REG function on/off.
- Default setting is "OFF".
(4) SEEK
- Select between the [DX] and [LO] key to change SEEK tuning.
- [DX] : seek tuning in to receivable broadcast stations
- [LO] : seek tuning in to only broadcast stations with a good reception condition
(5) PTY
- This function enables you to listen to a broadcast of the specified program type when the broadcast starts.
- Default setting of "PTY SELECT" is "AFFAIRS". In some countries, there is no PTY station.
- If [PTY] key is selected at the FM mode, the unit starts to search PTY station that has the selected program type. To turn off the PTY function, touch this key again.
※ “PTY NONE” will be displayed if PTY is not available.
- Touch the [SELECT] key on option screen to display the PTY SELECT menu and touch your desired PTY item key to select the program type.
- If you want to listen to different PTY items, touch the [▲] or [▼] key to scroll.
- NEWS : When NEWS is selected, NEWS station will be searched periodically and will be added if NEWS station is founded. During this function, “NEWS” will be displayed.
- Other than NEWS : Touch the PTY item to search the stations. This mode will be changed into OFF if searching station is not available and “PTY NONE” will be displayed.
※ The 29 Types of PTY list
| PRESET NUMBER ENGLISH CONTENTS | PTY ITEM | |
| 1 NEWS News | ||
| 2 AFFAIRS Current Affairs | ||
| 3 INFO Information | ||
| 4 SPORT Sport | ||
| 5 EDUCATE Education | ||
| 6 DRAMA Drama | ||
| 7 CULTURE | Culture | |
| 8 SCIENCE Science | ||
| 9 VARIED | Varied | |
| 0 POP M | Pop Music | |
| 1 ROCK M | Rock Music | |
| 2 EASY M | Easy Listening Music | |
| 3 LIGHT M | Light Classical Music | |
| 4 CLASSICS | Serious Classical Music | |
| 5 OTHER M | Other Music | |
| 6 WEATHER | Weather | |
| 7 FINANCE | Finance | |
| 8 CHILDREN | Children's Programmes | |
| 9 SOCIAL | Social Affairs | |
| 0 RELIGION | Religion | |
| 1 PHONE IN | Phone in | |
| 2 TRAVEL | Travel | |
| 3 LEISURE | Leisure | |
| 4 COUNTRY | Country Music | |
| 5 JAZZ Jazz Music | ||
| 6 NATION M | National Music | |
| 7 OLDIES | Oldies Music | |
| 8 FOLK M | Folk Music | |
| 9 DOCUMENT | Documentary | |
7-5 DVD Video Player
7-5-1 Size of the Screen
To change the screen size, touch the [OPTION] key,-then touch the [SCREEN] key on the DVD mode screen.
The [FULL], [NORMAL], [CINEMA] key is displayed on the screen.
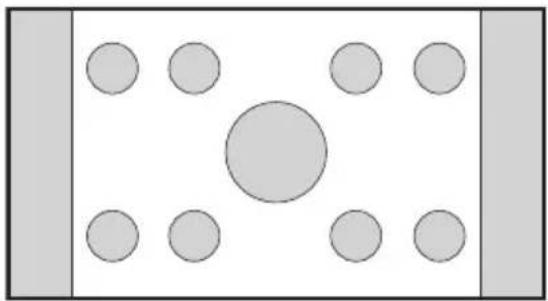
(1) Normal mode
Touch the [NORMAL] key to change the screen. There is a black zone at both left and right ends of the screen.
natural_image
Simple diagram with a central circle surrounded by eight surrounding circles, no text or symbols present.(2) Cinema mode
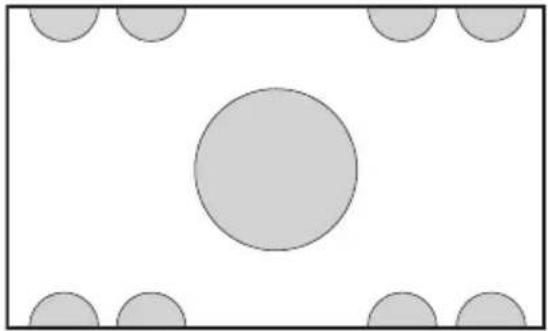
Touch the [CINEMA] key to change the screen. The top and bottom areas of the screen are cut off.
natural_image
Simple diagram with a large circle at center and surrounding smaller circles on the right (no text or symbols)(3) Full wide mode
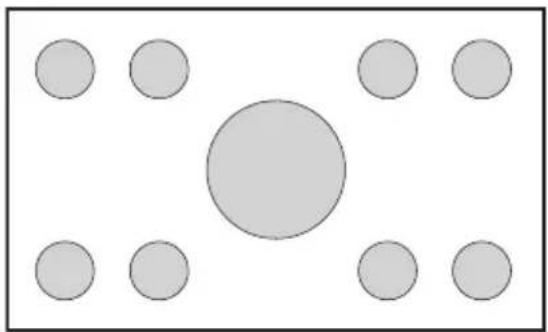
Touch the [FULL] key to change the screen. The whole image elongates horizontally.
natural_image
Simple diagram with a central circle surrounded by eight smaller circles arranged in a grid (no text or symbols)7-5-2 Country code
| COUNTRY | INPUT CODE | COUNTRY | INPUT CODE |
| ALBANIA 6576 SAUDI ARABIA 8365 | |||
| ANDORRA 6568 SLOVAKIA(Slovak Republic) | 8375 | ||
| AUSTRIA 6584 SLOVENIA 8373 | |||
| BAHRAIN 6672 SOUTH AFRICA 9065 | |||
| BELGIUM 6669 SPAIN 6983 | |||
| BOSNIA AND HERZEGOWINA 6665 SWAZILAND 8390 | |||
| BULGARIA 6671 SWEDEN | 8369 | ||
| CROATIA(local name: Hrvatska) | 7282 SWITZERLAND 6772 | ||
| CYPRUS 6789 SYRIAN ARAB REPUBLIC | 8389 | ||
| CZECH REPUBLIC | 6790 TURKEY 8482 | ||
| DENMARK | 6875 UN TED ARAB EMIRATES 6569 | ||
| EGYPT | 6971 UN TED KINGDOM 7166 | ||
| FINLAND 7073 Vatican City State | 8665 | ||
| FRANCE | 7082 YEMEN 8969 | ||
| (FRANCE,METROPOLITAN) 7088 | YUGOSLAVIA 8985 | ||
| GERMANY | 6869 FAROE ISLANDS 7079 | ||
| GREECE | 7182 GIB RALTAR 7173 | ||
| HUNGARY 7285 GREENLAND | 7176 | ||
| ICELAND | 7383 SV ALBARD AND JAN MAYEN ISLANDS 8374 | ||
| IRAN(ISLAMIC REPUBLIC OF) | 7382 MACEDONIA, THE FORMER YUGOSLAV REPUBLIC OF 7775 | ||
| IRAQ | 7381 MALTA 7784 | ||
| IRELAND | 7369 MONACO 7767 | ||
| ISRAEL | 7376 NETHERLANDS 7876 | ||
| ITALY | 7384 (NETHERLANDS ANTILLES) 6578 | ||
| JAPAN | 7480 NORWAY 7879 | ||
| JORDAN | 7479 OMAN 7977 | ||
| KUWAIT | 7587 POLAND 8076 | ||
| LEBANON | 7666 PORTUGAL 8084 | ||
| LESOTHO | 7683 QATAR 8165 | ||
| LIECHTENSTEIN | 7673 ROMANIA 8279 | ||
| LUXEMBOURG 7685 SAN MARINO | 8377 | ||
7-5-3 Parental Level
You can change the level of parental lock. This function allows cutting scenes that are unfavorable for children or replacing them automatically with other scenes prepared in advance. For example, by replacing scenes of radical violence or portrayals of sex with safe scenes, you can make a trouble-free story as if it were so from the beginning.
| LEVEL7 No Children,17 or older |
| LEVEL6 Under 17 Requires Accompanying Parent or Adult Guardian |
| LEVEL4 Parents Strongly Cautioned |
| LEVEL3 Parental Guidance Suggested |
| LEVEL1 General Audiences |
※ The standard differs to the countries.
※ Initial password is '0000'. You have to set a new password except '0000', before you change the level of parental lock.
7-5-4 Disc Loading
Insert the disc in the middle of the insert slot in view of the label. Disc is played automatically after loading.
Do no put the other things besides the disc into the disc insert slot. If you find out the inserting the disc is not easy, it has the possibility of having other disc inside of the slot or having problem to the product. You are not to use the 8cm disc.
※ The driver is not able to see the disc insert slot. Insert the disc when the LCP is closed for your safety.
(1) Watching the inserted disc
- Touch the [DVD] key on the SOURCE mode screen. The playback starts automatically.
! WARNING
Some videos can be played higher volume level than you wished. Turn it up a little at a time after playing the video.
For the safety, drivers can not watch the video or use the remote control while they are driving. Watching video and controlling it is illegal in some countries, so your caution is needed.
(2) Ejecting the disc
- If you press the ▲ button, the disc will come out.
- If you do not pull out the disc within 10 seconds after pressing the button, the disc will go inside automatically. (Auto reloads)
Disc can be damaged if you insert it by force before auto reloading.
7-5-5 Setting the DVD Video
(1) Way of watching video
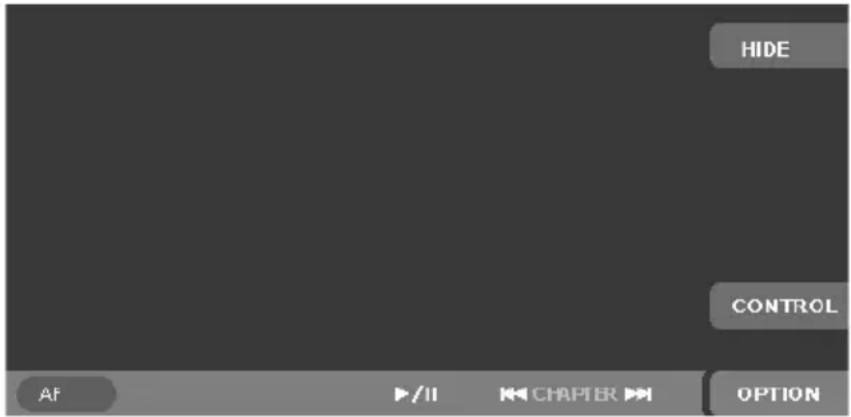
Playing mode is revitalized automatically after the disc loading, or touch the [DVD] key in SOURCE mode to enter the DVD mode. Then, the following screen is displayed when you touch the display.
(2) Playing function
- Touch the [▶/| |] key or the [▶ ||] button to play/pause the playback
→ Touch the [▶/| |] key or the [▶| |] button to resume the playback when in resume stop mode.
→ Touch and hold the [▶/| |] key or the [▶| |] button more than a second to resume stop.
→ Touch and hold the [▶/| |] key or the [▶ | |] button more than a second in resume stop mode to stop DVD.
- To operate menu items of the DVD menu, touch the [CONTROL] key, then touch the [MENU] key. Use the “Cross-Key Pad” (◀▶▲▼ENT) according to the disc contents menu.
- Touch the [CONTROL] key, then touch the [10KEY] key. The “Ten-Key Pad” screen is displayed. Input the chapter number that you want to play back with [0] to [9] key. Touch the [ENT] key to enter the desirable track. Touch the [BACK] key to display the previous screen.
- If you want to change the title, press the [SEARCH MODE] button on remote control unit to display the search mode. Then, press the desirable title number by using the [0] - [9] button and press the [ENTER] button.
(3) Repeat and random playback
- Touch the [OPTION] key to use the following operation
- CHAPTER REPEAT : Chapter repeat playback.
• TITLE REPEAT : Title repeat playback.
• TITLE RANDOM : Title random playback.
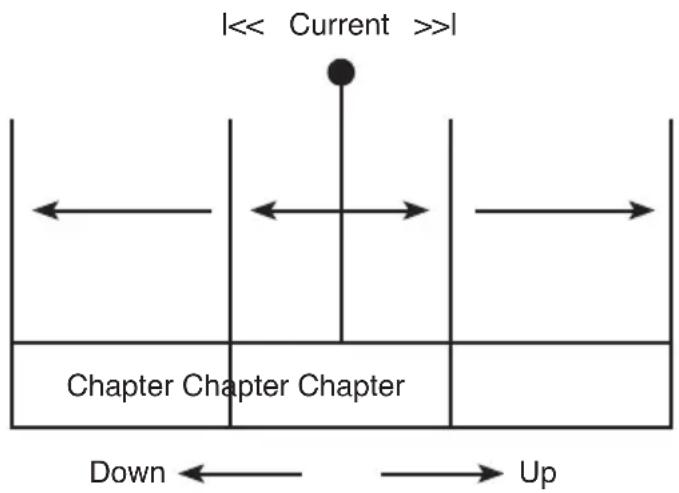
(4) Chapter skipping
- Touching the [▶▶|] key starts playback from the beginning of the next track.
- Touching the [◀◀] key starts playback from the beginning of the current track. When the key is touched again within about 2 seconds, playback starts from the beginning of the previous track.
- In the case of some discs furnished with PBC function, when PBC is set to "ON", this operation will cause the menu screen to be displayed.
flowchart
graph TD
    A["Current"] --> B["Chapter Chapter"]
    B --> C["Up"]
    style A fill:#f9f,stroke:#333
    style B fill:#ccf,stroke:#333
    style C fill:#cfc,stroke:#333
(5) DVD SETUP
| MODE ITEM | ||
| OSD Lang | ||
| Sub Title | ||
| Lang Audio | ||
| Disc | ||
| Version | ||
| TV Display | Display | |
| DVD SET UP | TV TYPE | |
| Screen Saver | Angle Mark | |
| Down Mix | ||
| Dynamic | Audio | Dual Mono |
| Change | Parental | Parent |
| Default | ||
(5-1) Lang
- OSD LANG - To set up the OSD language.
- Sub Title - To set up the subtitle language.
• Audio - To set up the audio language.
• Disc - To set up the disc language. - Version - To view an information. (DVD version, s/w version)
(5-2) Display
• TV display - To set up the screen size.
• TV type - To set up the TV type. (NTSC, PAL)
- Angle mark - To turn on/off the angle mark display.
• Screen saver - To turn on/off screen saver.
(5-3) Audio
- Down mix - LT/RT, stereo.
- Dual mono - stereo, L-mono, R-mono, MIX-mono.
• Dynamic - To set up the dynamic range.
(5-4) Parental
- Change - To set up a password for parental level.
- Parent - To set up the parental level control.
- Default - To load the initial factory settings.
7-6 Other function
7-6-1 CDDA
When playback is not started, press the [||▶] button or touch the [▶/||] key.
(1) Touch the [▶/| |] key to pause or resume the playback. Keep touching the [▶/| |] key more than a second to stop during the playback.
(2) Touching the ▶▶ |] key starts playback from the beginning of the next track.
Touching the [◀◀] key starts playback from the beginning of the current track. When this key is touched again within about 2 seconds, playback starts from the beginning of the previous track. In the case of some discs furnished with PBC function, when PBC is set to “ON”, this operation will cause the menu screen to be displayed.
(3) Touch the [OPTION] key to use three functions.
To cancel the play, touch the key of the function to cancel.
Touch the [BACK] key to return to previous screen.
TRACK REPEAT : Track repeat playback. This operation plays back the selected track recorded on the disc repeatedly.
DISC REPEAT : Disc repeat playback. This operation plays back all tracks recorded on the disc repeatedly.
DISC RANDOM : Disc random playback. This operation plays back all tracks on the disc in no particular order.
7-6-2 MP3 and WMA
- MP3 is the Audio compressed appliance and is classified by the Audio layer 3 MPEG of standards.
The compressed appliance is used helpfully by the PC users and also used broadly as a compressed standard. This MP3 makes possible to compress the original audio data to the 1/10 of the initial size with the high quality of the sound.
This means approximately 10 music CDs can be recorded in on CD-R disc and also we can listen to music for a long time without changing CD through CD-RW. - This DVD Player can not play the disc recorded by the CD-RW. Some CDs can not be used which recorded in CD-R mode.
(1) Cautions for making MP3 disc
① File extension
Always keep the ‘MP3’ file to have ‘MP3’ or ‘mp3’ by using single byte letters. If you are not specifying the extension like this or using another extension, you may not play. If users mix the capital letter and small letter, the normal playing may not be worked.
② Logical format(File System)
Select the "ISO9660 level 1 or level 2" as a software format used in MP3 file of the CD-R disc. The normal playing may not be performed if it recorded by the other format.
The name of the folder and file can be represented in title while MP3 is playing; however, the title is represented by the single byte alphabet and numbers of 31 and 27 to the name of the folder and file. The name may be represented in error if you input more letters and numbers than regulated.
③ Folder structure
The disc which has more than 8 level folders will conflict with the ISO9660 standard and the playing is impossible.
④ The number of the file or folder
Total 255 file and folders are allowed. If the numbers of the file and folder are more than 256, that files may not be plated.
Track is played according to the recording order by the user.
- Noise can be made to the encoder type of the software which is using during the record.
- To the damage of the file, the file may not be played or skipped to the next track. If it is damaged seriously, it will be stopped.
(2) Working method
① Touch the [▶/| |] key to pause or resume the playback.
Keep touching the [▶/| |] key more than a second to stop during the playback.
Touch the [|◀◀] or [▶▶ |] key to skip the track.
Keep touching the [▶▶ |] key to play at fast forward, the key [◀◀] to play at fast backward.
Touch the [ID3 TAG] key to display an information(artist, genre, composer, etc) has the selected file.
Touch the [-] or [+] key to display the track list of the previous or next folder.
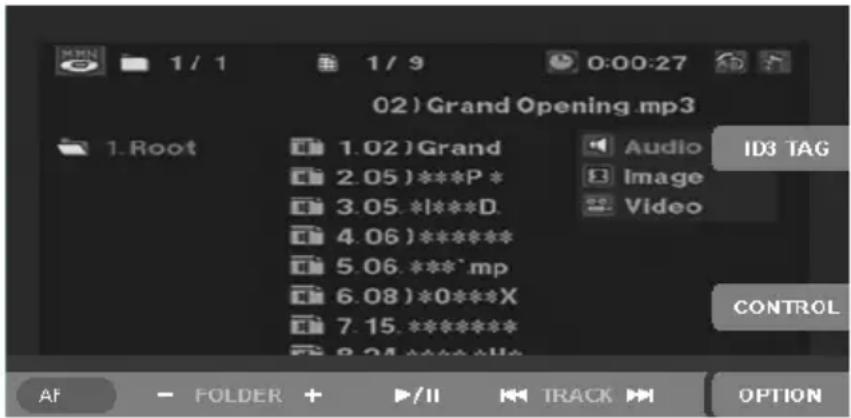
② Touch the [CONTROL] key to select the file or folder.
Touch the [◀] [▶] key to select the folder list or track list Touch the [▲] [▼] key to select the file in the selected folder Touch the [ENT] key to select the file Touch the [BACK] key to return to previous screen
③ Touch the [10KEY] key to display the screen selecting the desired track number.
The Key Pad screen appears with the track number input mode. Input the number for the track that you want to play back with [0] to [9] key, then touch the [ENT] key. Touch the [BACK] key to return to previous screen.
④ Touch the [OPTION] to use functions.
To cancel the play, touch the function key again. Touch the [BACK] key to return to the previous screen.
TRACK REPEAT : Track repeat playback. TRACK SCAN : Track scan playback. TRACK RANDOM : Track random playback. FOLDER REPEAT : Folder repeat playback. FOLDER SCAN : Folder scan playback. FOLDER RANDOM : Folder random playback.
8. USAGE OF PERIPHERAL DEVICES
8-1 Setting iPod
This unit can be used to control a Connected Apple iPod(iPod Mini, fourth generation, iPod nano, iPod with video). The iPod versions higher than those noted in side may not be playable. This unit will not operate, or may operate improperly with unsupported versions. First, second and third generation iPod cannot be used. When using an iPod, after connecting the iPod to the USB cable, select the iPod mode by touching the [iPod] key on the SOURCE mode screen. Depending on the iPod devices, iPod main screen displays can be different from others. The remote control unit cannot be used to perform scan, repeat or random play. This unit can display the Podcast titles, Artist names, Album titles, Song titles, Genre names, Playlist titles, Composer names registered on the iPod. Whether these functions are available or not depends on the iPod version. The iPod is used with the equalize function turned OFF. Don't connect an iPod to the unit with a headset connected to the iPod. During playback iPod with this unit, iPod operation might become impossible. In that case, please reset iPod. Please confirm the method of resetting iPod with the manual of iPod.
(1) Key operation
- Touch the [iPod] key to switch the iPod mode on the SOURCE screen.
- Touch the [▶/| |] key to pause or resume the playback.
- Keep touching the [▶/| |] key more than a second to stop during the playback.
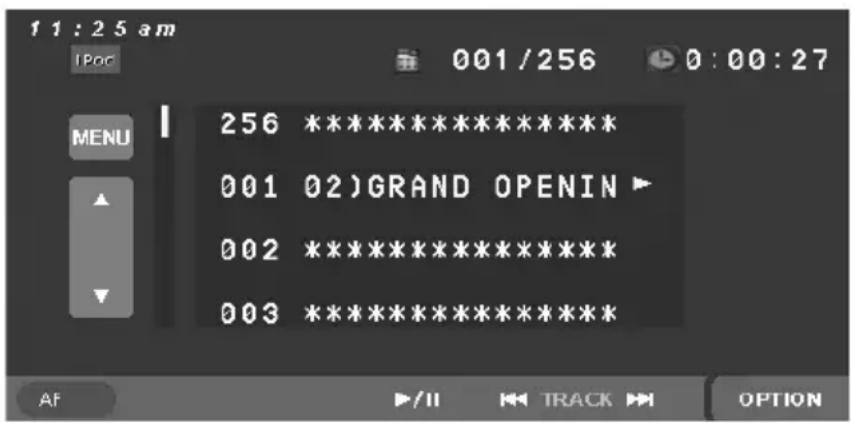
(2) Menu
- Touching the [MENU] button show the list like PODCASTS, PLAYLIST, ARTISTS, ALBUMS, GENRES, SONGS, COMPOSERS, MUSIC, PHOTOS, VIDEOS, EXTRAS etc. Lists are available from the iPod menu screen.
- Touch the [▲] [▼] key to scroll menu lists.
- Touch the [MENU] key, if you want to go back to the previous screen.
(3) Option
- If you touch the [OPTION] key, below screen is displayed. iPod option has three keys that works in toggle.
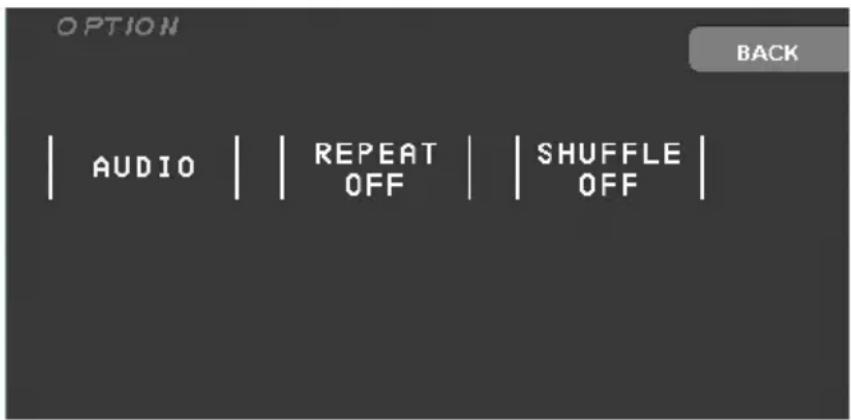
- Each time you touch the first key (AUDIO), You can switch between AUDIO mode and VIDEO mode.
If you want to play the audio mode, select the [AUDIO] key. If you want to play the video mode, select the [VIDEO] key.
- You can able to select the REPEAT(repeat play), SHUFFLE(random play) function.
- The [REPEAT] key use to switch the repeat mode, in the order:
→ REPEAT ALL → REPEAT ONE → REPEAT off.
- The [SHUFFLE] key use to switch the shuffle ON/OFF mode.
- Touch the [BACK] key, if you want to go back to the previous screen.
(4) Video mode
You can view video data stored in the iPod. But you cannot control and navigate with a CLARION device on iPod video mode. It only allows you to control with the iPod device. To enjoy the video data, you must operate in following order:
① Touch the [AUDIO] key works in toggle on the iPod option screen. You can change AUDIO mode to VIDEO mode.
② Select your desired video data in the iPod unit.
③ VIDEO screen is activated. When you touch the display and touch option key, you can get bellow menu screen.
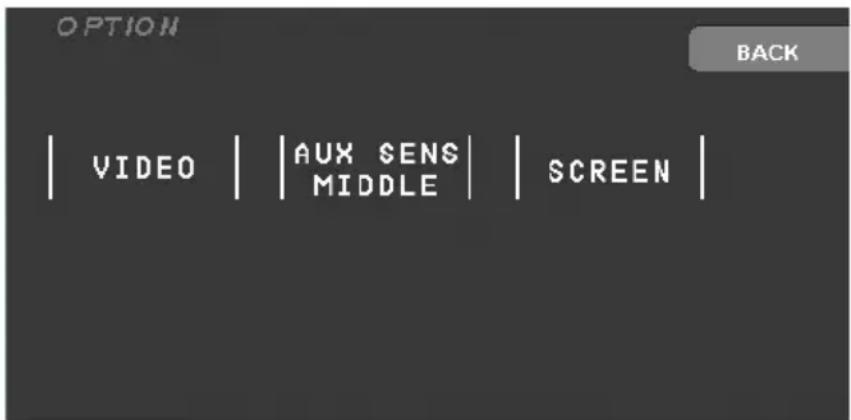
• Each time you touch the second key (AUX SENS MIDDLE), You can switch among (AUX SENS LOW, AUX SENS MIDDLE, AUX SENS HIGH) to change the AUX audio volume.
- AUX SENS LOW : Low volume.
- AUX SENS MIDDLE : Middle volume.
- AUX SENS HIGH : High volume.
• Each time you touch the third key (SCREEN), You can switch among (FULL SCREEN, NORMAL SCREEN, CINEMA SCREEN) to change the display size.
④ To return to the iPod menu screen, touch the [VIDEO] key on the iPod option screen.
8-2 Setting USB
USB(Universal Serial Bus) means the bus protocol to connect the optional devices. USB memory may be connected and controlled. Main unit supports USB mass storage class devices and plays back MP3, WMA files.
USB connector is in rear side of the unit.
- Touch the [USB] key on the SOURCE mode screen to display USB mode screen.
- Track number can be displayed from 001 to 999 on the USB mode screen.
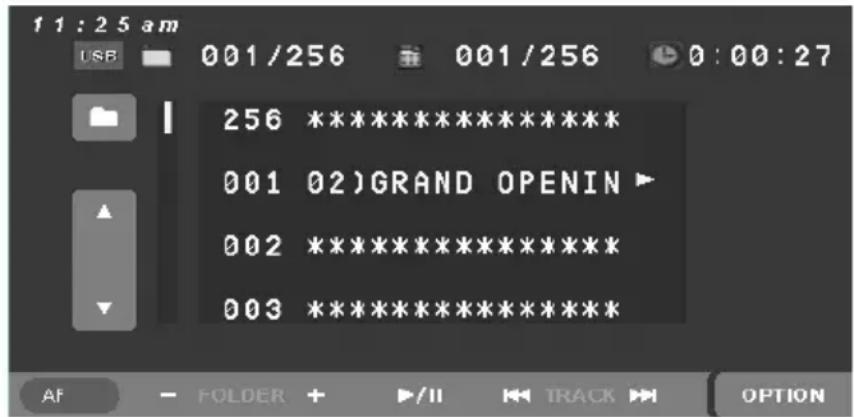
- Touch the [FOLDER] figure to view the folder list, then [BACK] letters is displayed.
Touch the [BACK] key to return to the previous screen.
Touch the [-] or [ + ] key to display the track list of the previous or next folder.
Touch the [▶/| |] key to pause or resume the playback.
Touch the [|◀◀] or [▶▶] key to skip the track.
Keep touching the [▶▶|] key to play at fast forward, the key [|◀◀] to play at fast backward.
- Touch the [OPTION] key.
TRACK REPEAT : Track repeat playback.
TRACK SCAN : Track scan playback.
TRACK RANDOM : Track random playback.
FOLDER REPEAT : Folder repeat playback.
FOLDER SCAN : Folder scan playback.
FOLDER RANDOM : Folder random playback.
About USB memory
- USB is an acronym for Universal Serial Bus, and refers to an external bus standard supporting data transfer rates of 12 Mbps.
- This unit is compatible with USB 1.1/2.0 with maximum data transfer rates of 12 Mbps.
- USB memory devices that can be played by connecting to the unit's USB cable are limited to those recognized as "USB mass storage class devices"; operation is not guaranteed with all USB memory devices.
- Devices compatible with “USB Mass Storage Class” can be used merely by connecting to the host device, without need for special drivers or application software.
- Consult the manufacturer of your USB memory device for information regarding whether it is supported by “USB Mass Storage Class” standards.
- Audio files playable on this unit are limited to MP3/WMA files. For details, see the section “7-6-2 MP3 and WMA”
- This unit isn't compatible USB Card-Reader (SD).
9. TROUBLESHOOTING
General
| PROBLEM CAUSE SOLUTION | ||
| No Power(no sound) | Disconnected fuse | Change the new fuse. If fuse is out again,please consult with the store. |
| Wrong Connection | ||
| No button activation Wrong Display | Wrong operation due to the interference from microprocessor | Turn the power off and remove the DCP. Press reset button. Please note that all the memory will be removed if the reset button is pressed. |
| Remote Controller is not working | Receiver is in the direct rays of the sun | Remote controller is not working if the receiver is in the direct sun rays. |
| Out of battery power | Check the batteries. | |
- DVD Player
| PROBLEM CAUSE SOLUTION | ||
| Unable to insert the disc | Another disk is already in the unit | Eject the disc from the unit |
| Foreign elements are in the disc insertion hole | Clean the disc insertion hole | |
| Noise sound and sound skipping | Dirty CD | Clean the CD with the soft fabrics |
| CD is damaged (scratched and damaged) | Do not use damaged CD | |
| Decreased sound quality after the power on | Moisture on can effect the performance while parking in the humid area | Dry the unit for 1 hours while the power is on |
| No video display | Parking brake is released | Check the power brake. |
| Error display “PARENTAL VIOLATION” | Limited view function | Release the View function or change the level of PARENTAL |
- iPod control
Because the noise occurs on the unit, don't connect audio/video to aux-in after connecting the iPod uses the cigar jack's power of your car. Make use of the aux-in and the USB cable.
※ Make use of the iPod that the battery is charged.
※ When an iPod is connected to the unit, some iPod may not be charged. In that case, turn off and on the POWER of the unit.
- About the noise
If portable audio-visual device is connected to this monitor in the state where you connected with the vehicles power supply for charge etc., a noise may occur rarely.
In this case, please use portable audio-visual devices without connecting with a vehicles power supply. Please use it with in the internal battery of devices etc.
10. SPECIFICATIONS
| FM TUNER | Frequency range 87.50MHz to 108.0MHz | |
| Quieting sensitivity 20dBf | ||
| Limiting sensitivity 15dBf | ||
| Stereo separation 20dB (1kHz) | ||
| Frequency response 100Hz to 7kHz |
| AM TUNER | Frequency range MW(531kHz to 1602kHz)LW(153kHz to 279kHz) | |
| Usable sensitivity | 40dBuV |
| DVD PLAYER | System CDDA capable | Digital versatile disc system with |
| Usable discs | DVD video disc, Compact disc | |
| Frequency response 17Hz to 20kHz(CD)(+3/-3dB) | ||
| Separation | 60dB | |
| Distortion | 0.5% | |
| MP3 / WMA | MPEG1 44.1kHz/48kHz/Sampling rateMPEG2 22.05kHz/24kHz/16kHz | 32kHz |
| MPEG1 32kbps to 320kbpsBit rate MPEG2 8kbps to 160kbps(VBR) | ||
| ISO9660 level1, 2Logical FormatJOLIET or Romeo | ||
| AUDIO AMPLIFIER | Maximum power output 50W x 4ch | |
| Power output 27W x 4 (DIN 45324, +B = 14V) | ||
| Speaker impedance 4 ohm (4 to 8 ohm) | ||
| LCD MONITOR | Screen size154.0 mm Width x 86.6 mm Height | 7-inch wide type |
| Display method | Transmission typeTN QVGA TFT LCD | |
| Drive methodactive matrix driving | TFT(thin-film transistor) | |
| Pixels | 336,960 (1440 x 234) | |
| GENERAL | 14.4V DCPower source voltage(10.8 to 15.6V allowable) | |
| Ground Negative | ||
| Current consumption 4.0A(1W) | ||
| Auto antenna rated current 500mA less | ||
| Dimension of the Main Unit 178(W) x 50(H) x 160(D) | ||
| Weight of the Main Unit 2.5kg | ||
| Dimension of the Remote Control Unit 53(W) x 21(H) x 165(D) | ||
| Weight of the Remote control Unit 90g (including battery) |
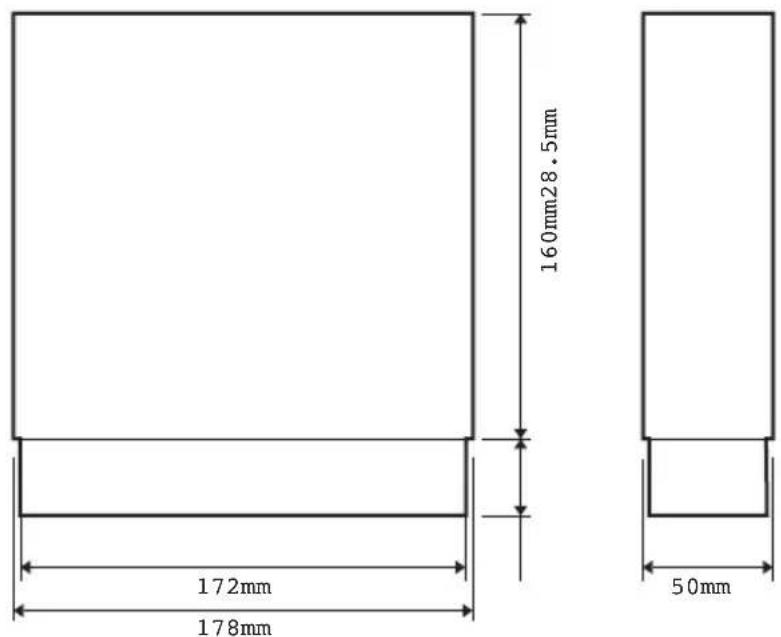
(Unit : mm)
※ Specifications and design are subject to change without notice for further improvement.
11. INSTALLATION AND WIRE CONNECTION
11-1 Cautions On Installation
(1) BEFORE STARTING
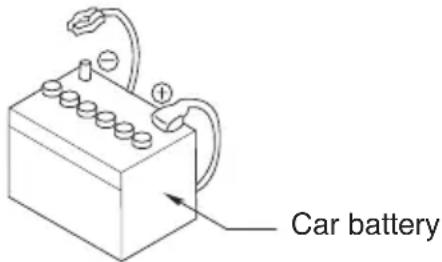
This set is exclusively for use in cars with a negative ground 12 V power supply. Read these instructions carefully. Be sure to disconnect the battery “-” terminal before starting. This is to prevent short circuits during installation.
(2) PACKAGE CONTENTS
① Main unit
② Manuals
- Owner's manual & Installation manual 1
- Warranty card 1
③ Power supply lead (For the main unit) 1
④ RCA lead 1
⑤ Bag for accessories of the main unit (No. 1)
Flat head screw (M5' 8) 4
Sems hexagonal bolt (M5' 8) 5
Electro tap 1
Machine screw (M4' 3) 4
⑥ Bag for accessories of the main unit (No. 2)
Hook plate 2
Cord clamp 1
Special screw 1
⑦ Universal mounting bracket 1
⑧ Remote control unit 1
⑨ Battery (for remote control unit) 2
⑩ Outer Escutcheon 1
⑪ DCP Case 1
(3) GENERAL CAUTIONS
① Do not open the case. There are no user serviceable parts inside. If you drop anything into the unit during installation, consult your dealer or an authorized CLARION service
② Use a soft, dry cloth to clean the case. Never use a rough cloth, thinner, benzine, or alcohol, etc. For tough dirt, apply a little cold or warm water to a soft cloth and wipe off the dirt gently.
(4) CAUTIONS ON INSTALLATION
① Prepare all articles necessary for installing the main unit before starting.
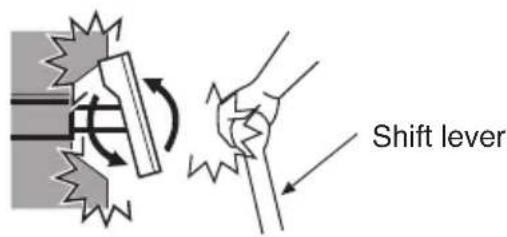
② This model is used with the LCD panel slide forwards (shell loading system). On some types of cars, the LCD panel may touch the dashboard or shift lever, in which case it cannot be installed. Check that the set will not hamper operation of the shift lever before choosing the place of installation.
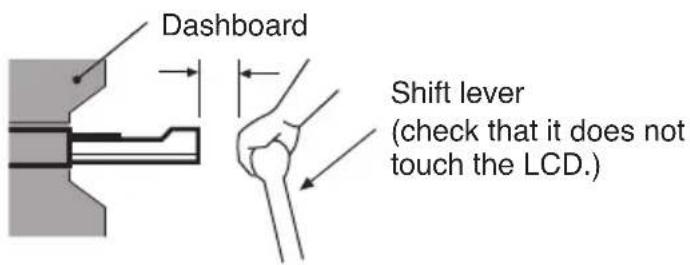
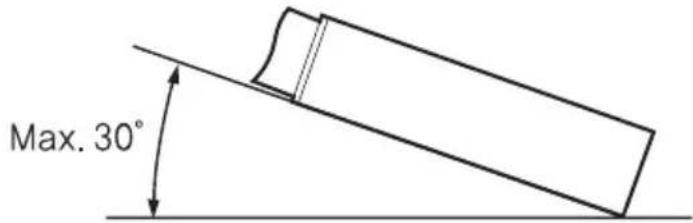
③ Install the unit within 30^ of the horizontal plane.
④ If you have to do any work on the car body, such as drilling holes, consult your car dealer beforehand.
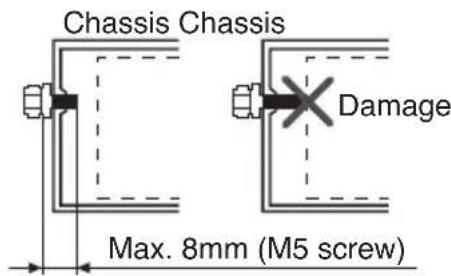
⑤ Use the enclosed screws for installation. Using other screws can cause damage.
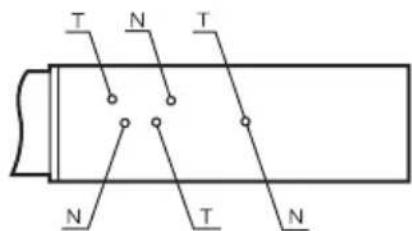
⑥ The source unit has mounting screw holes for NISSAN (N marks) and TOYOTA(T marks) vehicles.
11-2 Main Unit Installation (Universal Mount)
(1) Place the universal mounting bracket into the instrument panel, use a screwdriver to bend each stopper of the universal mounting bracket inward, then secure the stopper.
(2) Wire as shown in 11-6.
(3) Insert the main unit into the universal mounting bracket until it locks.
(4) Mount the outer escutcheon so that all the hooks are locked.
- Console opening dimensions
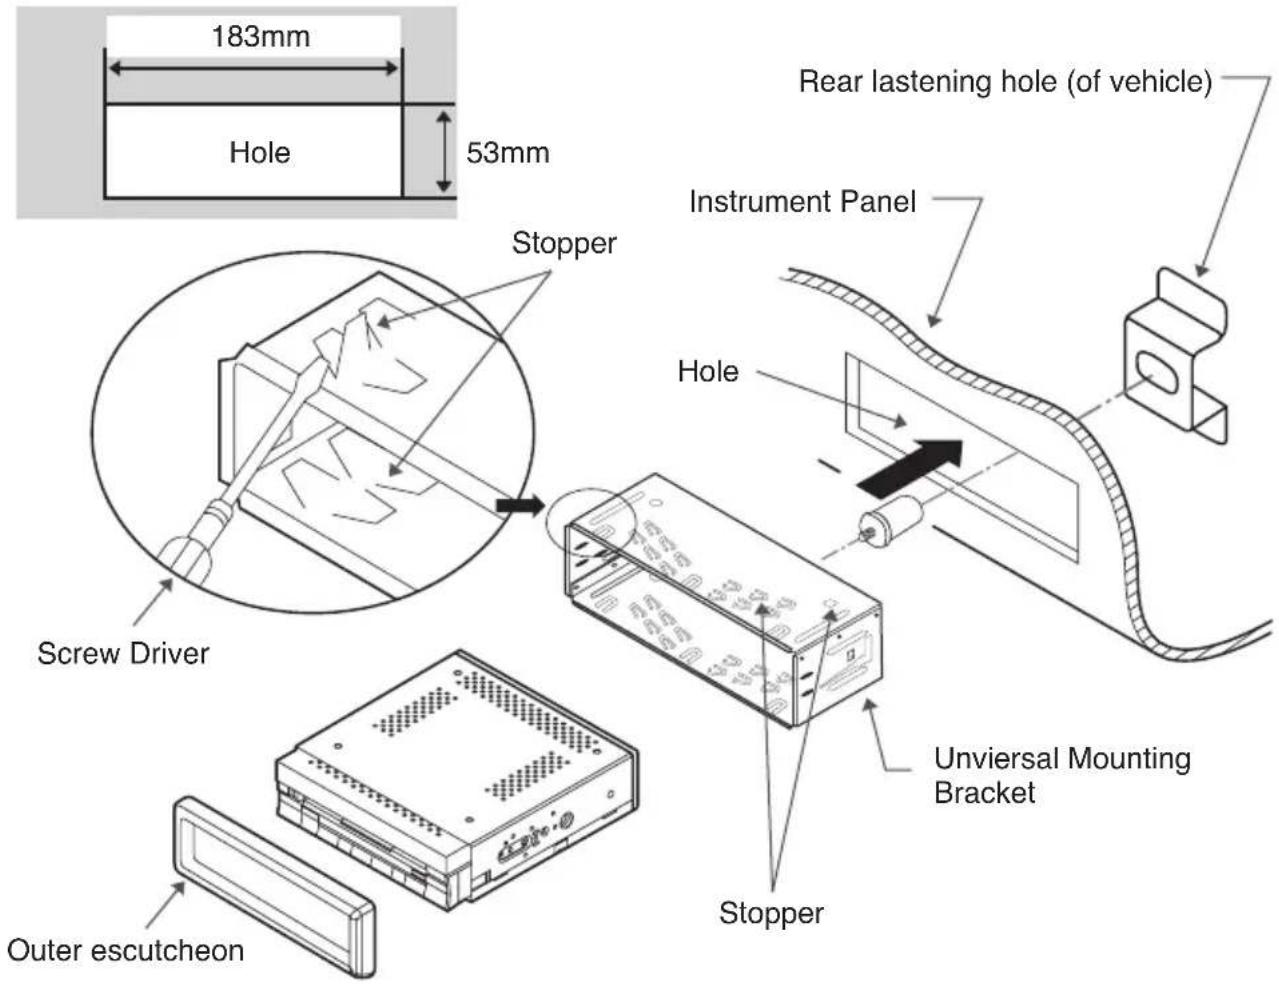
※ Some car models require special mounting kits for proper installation. Consult your Clarion dealer for details.
※ Fasten the front stopper securely to prevent the main unit from coming loose.
11-3 Removing The Main Unit
(1) When the rear of the main unit has been secured with the method shown in the follow figure unfasten the special screw.
(2) Remove the outer escutcheon.
(3) Insert the hook plate into the universal mounting bracket, then pull the main unit out by the hook plate. (Insert both the right and left edges of the hook plate.)
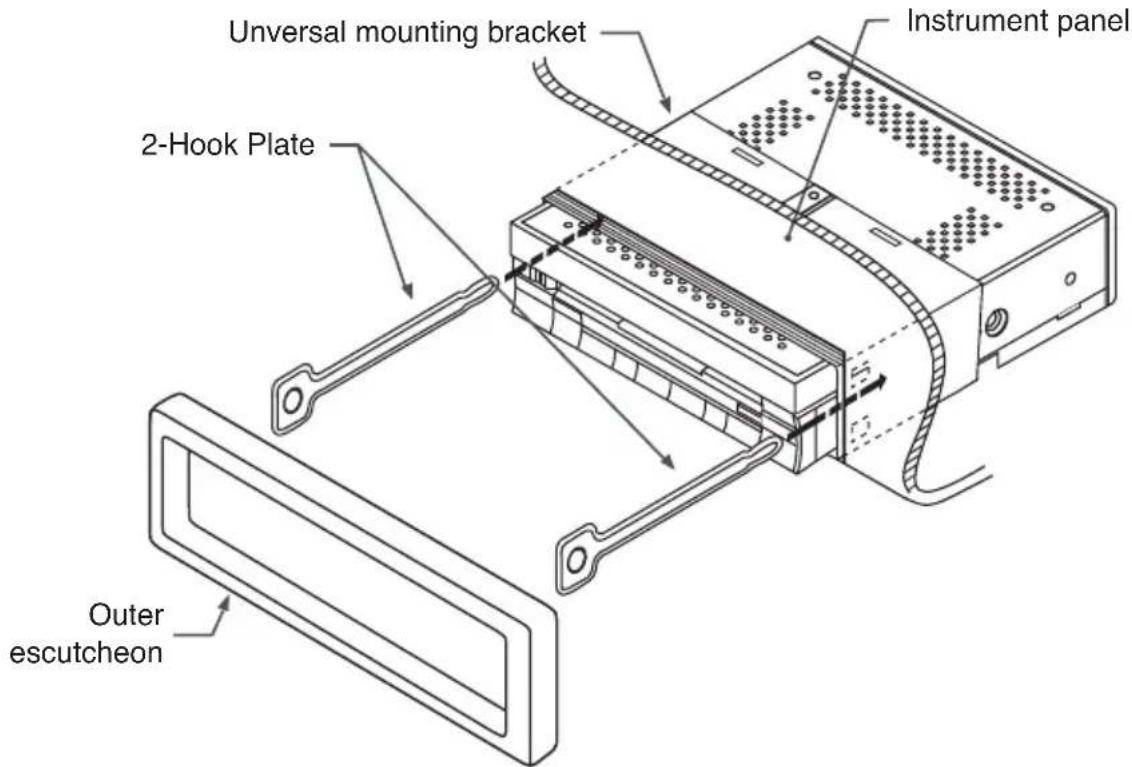
※ Keep the hook plate. You cannot remove the main unit without disengaging the hook plate.
11-4 Main Unit Installation (Fixed Mount) (TOYOTA, NISSAN and other ISO/DIN equipped vehicles)
This unit is designed for fixed installation in the dashboard.
If the vehicle is equipped with a factory-installed radio, install the main unit with the parts and screws marked (*).
If the vehicle is not equipped with a factory-installed radio, obtain an installation kit to install the main unit in the following procedure.
(1) Bend all of side stoppers with a nipper.
(2) Secure the mounting brackets to the chassis as shown in the follow figure. Holes are pre-tapped for TOYOTA and NISSAN vehicles; modification, such as drilling new holes, of the mounting brackets may be required for other models.
(3) Wire as shown in chapter 11-6.
(4) Secure the unit in the dashboard, and then reassemble the dashboard and the centre panel.
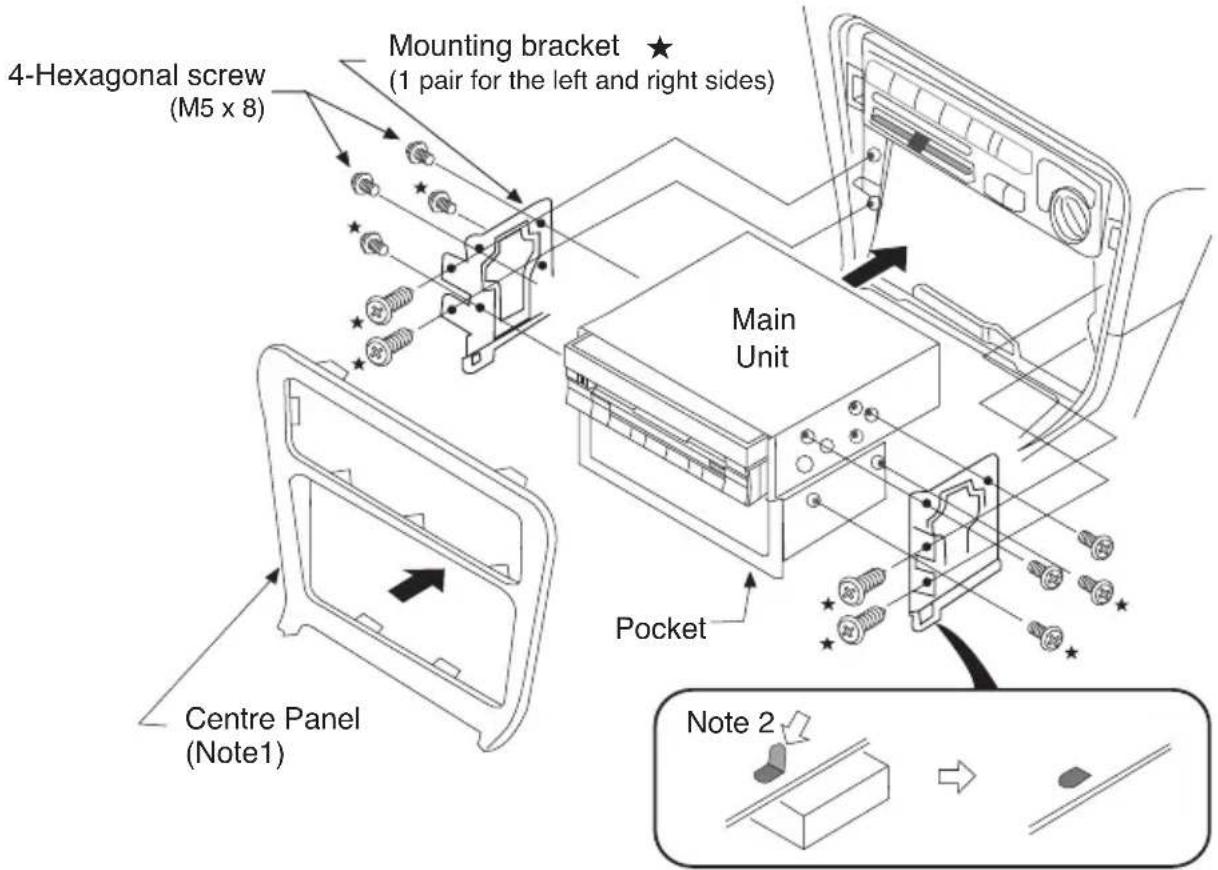
※ : The screws with this mark are enclosed in this set.
★ : The parts and screws with this mark are used to install radio or included in the installation kit.
Note 1: In some cases, the centre panel may require some modification (trimming, filling, etc.).
Note 2: If a hook on the installation bracket interferes with the unit, bend and flatten it with a nipper or a similar tool.
11-5 Cautions On Wiring
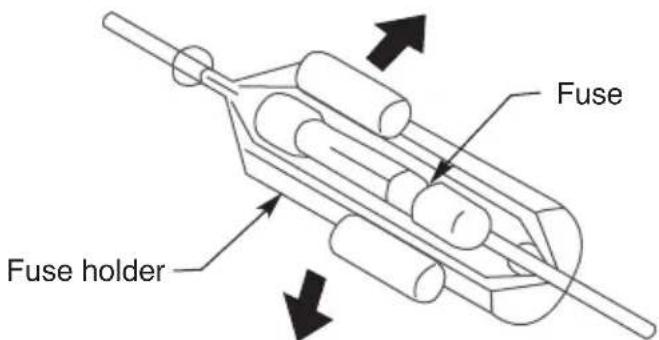
Be sure to turn the power off before wiring. Be particularly careful where you route the wires. Keep them well away from the engine, and exhaust pipe, etc. Heat may damage the wires. If the fuse should blow, check to see if the wiring is correct. If it is, replace the fuse with a new one with the same amperage rating as the original.
To replace the fuse, remove the old fuse of the power supply lead and insert the new One.
※ Power supply lead for the tuner amp unit : 15A FUSE
※ Power supply lead for the main unit : 3A FUSE
※ There are various types of fuse holder. Do not let the battery side touch other metal parts.
※ After the connection, fix the lead by a clamp or insulation tape for protection.
11-6 Electrical Connection
(1) Wire connection
* Disconnect the Negative(-) power cable from the battery before installation.
※ RCA pins and connector cables are sold separately.
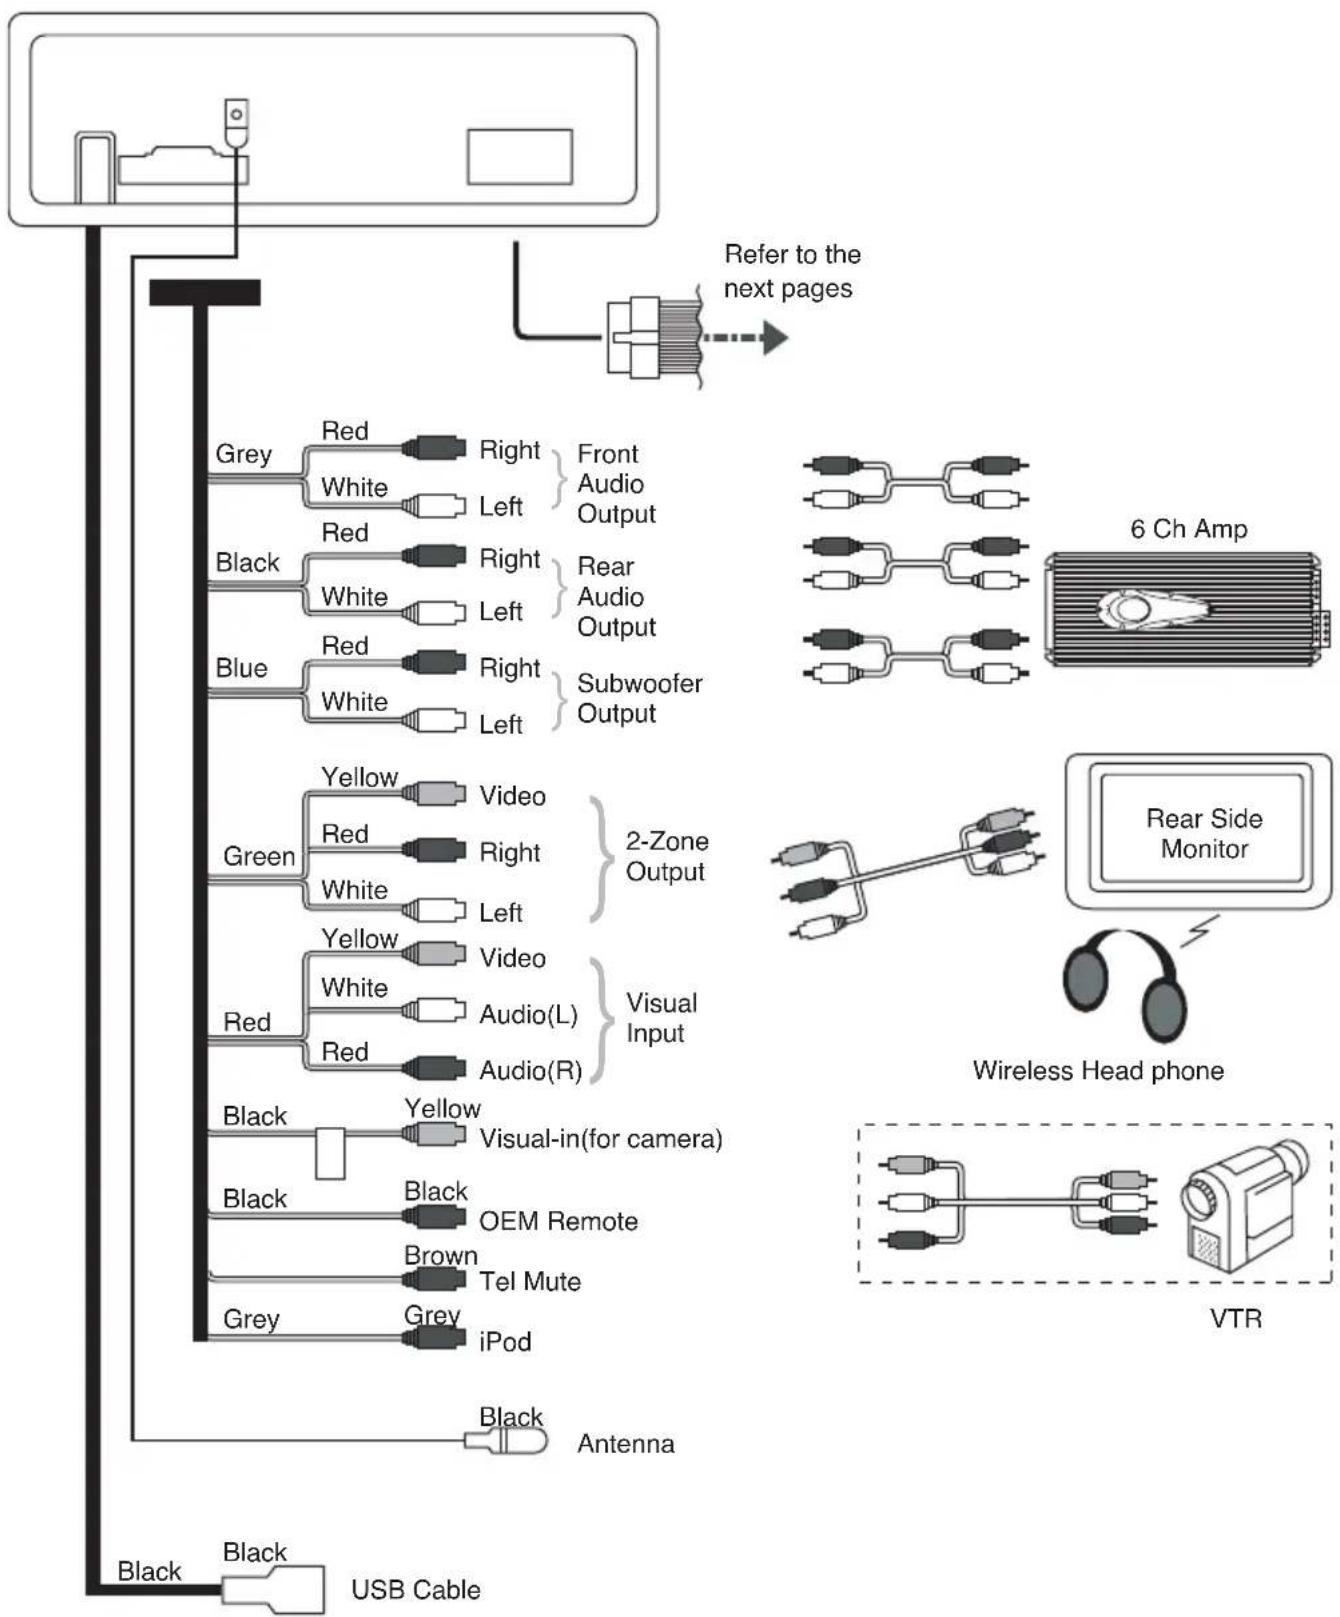
flowchart
graph TD
    A["Sensor"] --> B["Refer to the next pages"]
    B --> C["6 Ch Amp"]
    C --> D["Wireless Head phone"]
    D --> E["VTR"]
    A --> F["Black"]
    A --> G["Blue"]
    A --> H["Green"]
    A --> I["Red"]
    A --> J["Black"]
    A --> K["Gray"]
    F --> L["Red"]
    F --> M["White"]
    G --> N["Yellow"]
    G --> O["White"]
    H --> P["Red"]
    H --> Q["White"]
    I --> R["Yellow"]
    I --> S["Red"]
    I --> T["Black"]
    I --> U["Grey"]
    J --> V["Yellow"]
    J --> W["Audio(L)"]
    J --> X["Audio(R)"]
    K --> Y["Visual in camera"]
    K --> Z["OEM Remote"]
    K --> AA["Tel Mute"]
    K --> AB["iPod"]
    K --> AC["Antenna"]
    K --> AD["USB Cable"]
    style A fill:#f9f,stroke:#333
    style B fill:#ccf,stroke:#333
    style C fill:#cfc,stroke:#333
    style D fill:#fcc,stroke:#333
    style E fill:#ffc,stroke:#333
    style F fill:#fcc,stroke:#333
    style G fill:#fcc,stroke:#333
    style H fill:#fcc,stroke:#333
    style I fill:#fcc,stroke:#333
    style J fill:#fcc,stroke:#333
    style K fill:#fcc,stroke:#333
    style L fill:#cff,stroke:#333
    style M fill:#cff,stroke:#333
    style N fill:#cff,stroke:#333
    style O fill:#cff,stroke:#333
    style P fill:#cff,stroke:#333
    style Q fill:#cff,stroke:#333
    style R fill:#cff,stroke:#333
    style S fill:#cff,stroke:#333
    style T fill:#cff,stroke:#333
    style U fill:#cff,stroke:#333
    style V fill:#cff,stroke:#333
    style W fill:#cff,stroke:#333
    style X fill:#cff,stroke:#333
    style Y fill:#cff,stroke:#333
    style Z fill:#cff,stroke:#333
(2) Power supply lead
To activate "Auto Mute-On when receiving phone call", connect right wire to the dedicated connector in the vehicle.
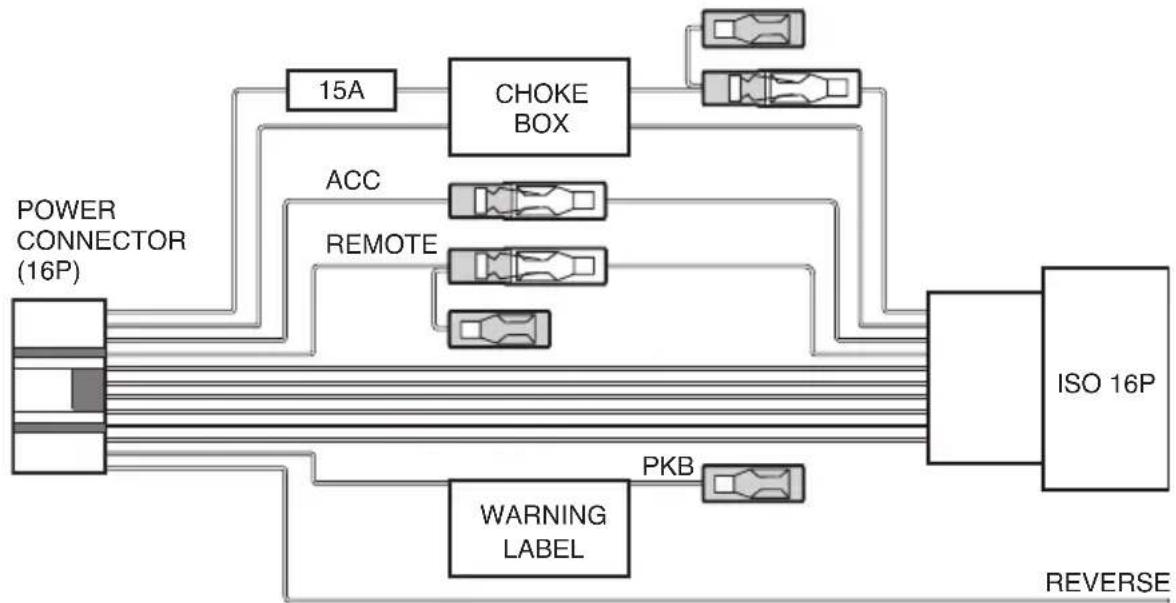
flowchart
graph TD
    A["POWER CONNECTOR (16P)"] --> B["15A"]
    B --> C["CHOKE BOX"]
    C --> D["ISO 16P"]
    D --> E["REVERSE"]
    A --> F["ACC"]
    A --> G["REMOTE"]
    A --> H["WARNING LABEL"]
    H --> I["PKB"]
    I --> D
| PIN NO (ISO) (PWR CON.) | NAME COLOR | PIN NO | |
| 1 REAR RIGHT + | PURPLE 7 | ||
| 2 REAR RIGHT - | PURPLE/BLACK STRIPE | 6 | |
| 3 | FRONT RIGHT + | GRAY | 15 |
| 4 | FRONT RIGHT - | GRAY/BLACK STRIPE | 14 |
| 5 FRONT LEFT + | WHITE | 13 | |
| 6 FORNT LEFT - | WHITE/BLACK | STRIPE 12 | |
| 7 REAR LIGHT + | GREEN 5 | ||
| 8 | REAR LIGHT - | GREEN/BLACK STRIPE | 4 |
| PARKING BRAKE | YELLOW/GREEN 2 | ||
| REVERSE PURPLE/WHITE | STRIPE 3 | ||
| 10 | |||
| 12 | BATTERY | YELLOW | 16 |
| 13 | AMP REMOTE ON | BLUE/WHITE STRIPE | 11 |
| 14 | ILLUMINATION | ORANGTE/WHITE STRIPE | 1 |
| 15 | +12V MAIN POWER | RED | 9 |
| 16 EARTH | BLACK | 8 | |
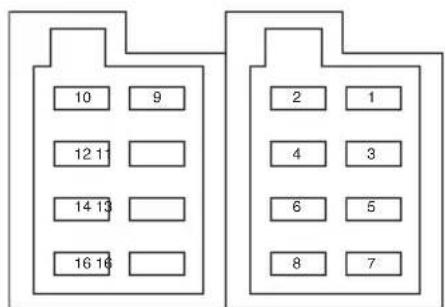
NOTE
When you detach the power supply connector, please pull it out after release the lock part with a minus driver etc.
(3) Connecting the Accessories
① Connection to the external amplifier
The external amplifier can be connected unless the MCP (Multiple Channel Processor) is connected. For detailed information, refer to the instruction manual of the MCP.
② Connection to the CCD camera for vehicle
The CCD camera for vehicle can be connected to the system expansion terminal on the main unit.
For detailed information, refer to the instruction sheet or manual for the CCD camera.
③ If the specified lead of the cellular phone is connected to the phone mute lead of the source unit, the audio mute is available when the cellular telephone is used.
(4) Connecting the parking brake lead
Connect the lead to parking brake lamp earth in the meter panel.
Connecting the parking brake lead to lamp earth allows you to watch VTR/DVD video when the parking brake is engaged.
※ When the parking brake lead is not connected, the monitor will stay off.
Parking brake lamp
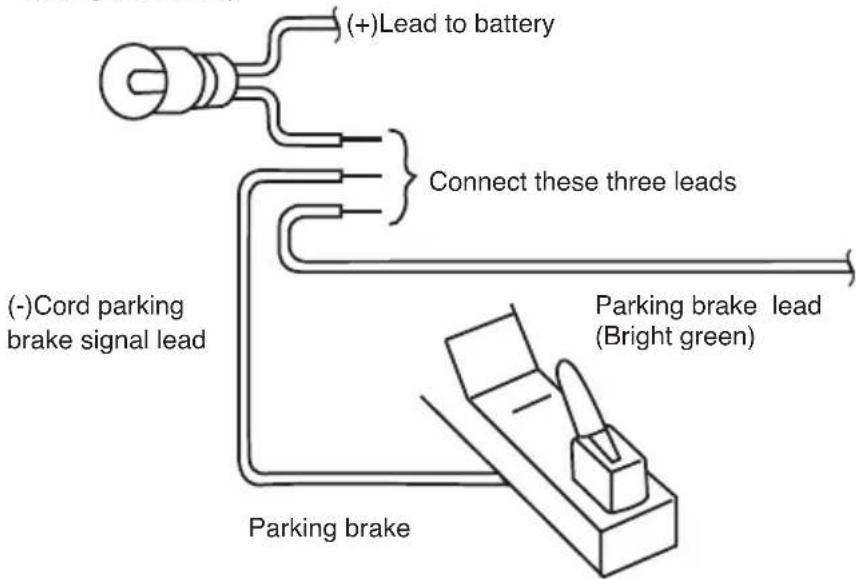
(5) Sample System
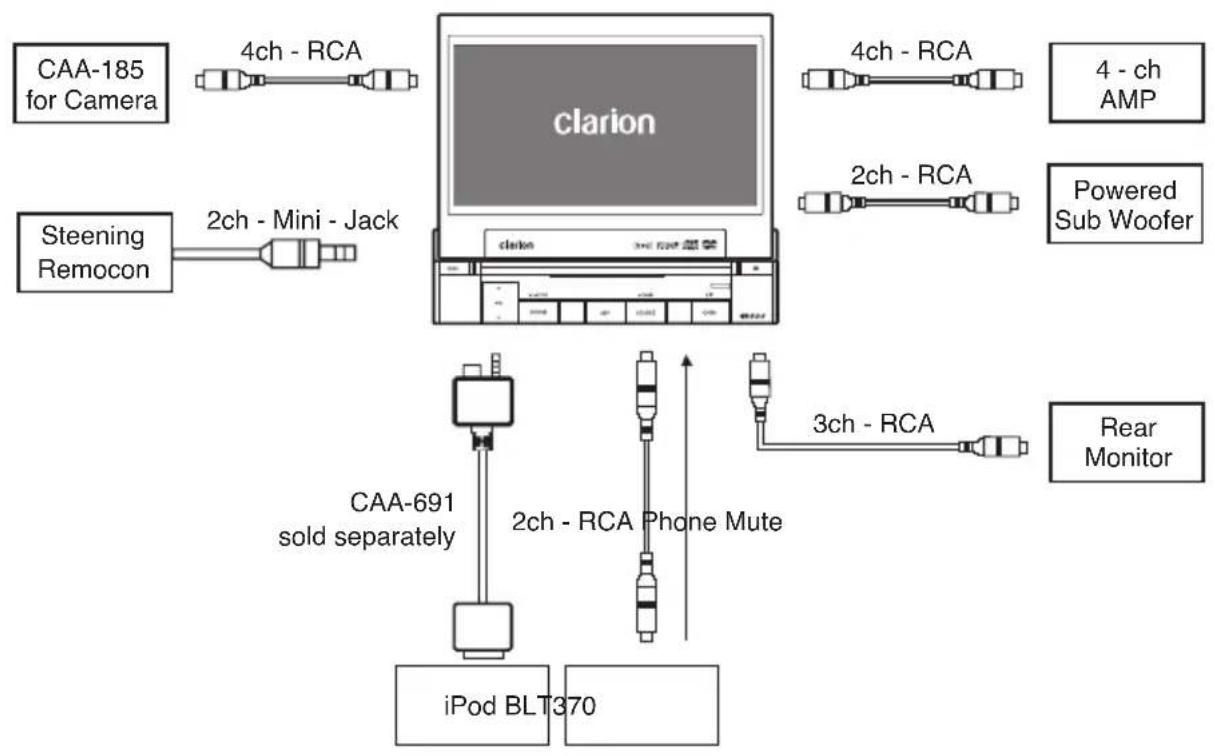
flowchart
graph TD
    A["CAA-185 for Camera"] --> B["4ch - RCA"]
    C["Steening Remocon"] --> D["2ch - Mini - Jack"]
    E["clarion"] --> F["4ch - RCA"]
    G["CAA-691 sold separately"] --> H["iPod BLT370"]
    I["2ch - RCA Phone Mute"] --> J["3ch - RCA"]
    K["4-ch AMP"] --> L["Powered Sub Woofer"]
    M["Rear Monitor"] --> N["3ch - RCA"]
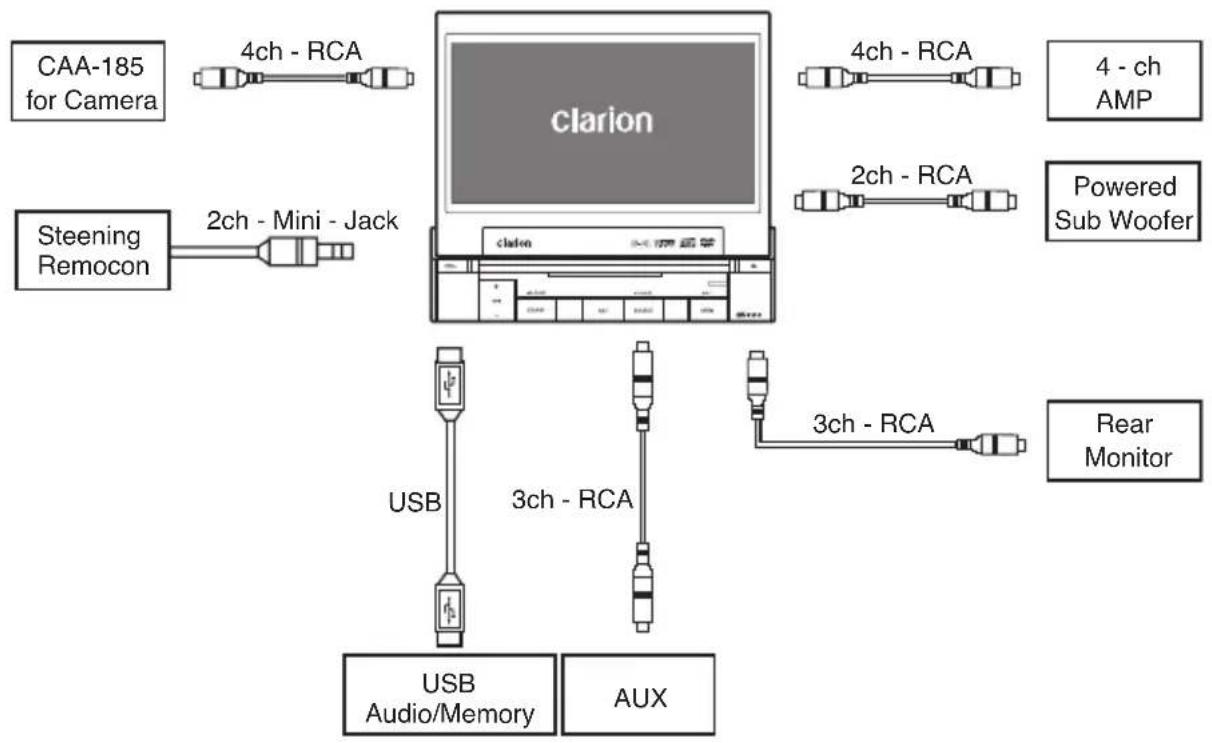
flowchart
graph TD
    A["CAA-185 for Camera"] --> B["4ch - RCA"]
    B --> C["clarion"]
    D["Steening Remocon"] --> E["2ch - Mini - Jack"]
    E --> F["USB Audio/Memory"]
    G["4ch - RCA"] --> H["4-ch AMP"]
    I["2ch - RCA"] --> J["Powered Sub Woofer"]
    K["3ch - RCA"] --> L["Rear Monitor"]
    M["AUX"] --> N["USB Audio/Memory"]
Clarion Co., Ltd.
All Rights Reserved. Copyright © 2007:Clarion Co., Ltd.
Printed in Korea / Gedruckt in Korea / Impreso en Corea / Imprimé en Corée
Stampato in Corea / Gedrukt in Zuid-Korea / Impresso em Coreia / Tryckt i Sydkorea
- PRECAUTIONS 07
- CONTROL 11
- DVD VIDEO SYSTEM
- OPERATIONS 26
- USAGE OF PERIPHERAL DEVICES 52
- TROUBLESHOOTING 56
- SPECIFICATIONS 57
- INSTALLATION AND WIRE CONNECTION 59
- DESCRIPTION
- 1- 1 Features
- 1-2 Expanding System
- PRECAUTIONS
- WARNING
- INFORMATION FOR USERS
- Handling Discs
- - • Handling
- - • Storage
- - • Cleaning
- - • On Discs
- CAUTION
- CONTROL
- 3-1 Button Functions
- 3-2 Remote Control
- - Inserting the Batteries
- - Button Functions
- - When SUB zone is selected
- 4-1-5 Adjust Mode : At Tuner, iPod, USB Mode
- 4-1-6 Adjust Mode : At AUX, DVD Mode
- CAUTIONS
- 5-1 Liquid Crystal Panel/Generalities
- 5-2 Cleaning
- - Cleaning the cabinet
- - Cleaning the liquid crystal panel
- 6-1 DVD Video Features
- - Multi-Sound
- - Multi-Angle
- - Multi-Story
- - Dolby Digital
- - Menu Screen
- 6-2 Discs
- 6-2-1 Playable Disc
- 6-2-2 CD Extra Disc
- 6-2-3 CD-R/CD-RW Disc (MP3, WMA)
- 6-2-4 DVD ± R/RW Disc
- 6-2-5 Unsupported Disc Format
- 6-2-6 MP3/WMA Playback
- 6-2-7 DivX Playback
- 6-2-8 Region Number
- 6-3 Registered Trademark
- OPERATIONS
- 7-1 DCP
- - Remove DCP
- - Attach DCP
- - Cautions
- 7-2 Basic Operations
- 7-2-1 Power On/Off
- 7-2-2 Mode Selections
- 7-2-3 LCP Operations
- Adjusting the Z-ENHANCER
- • BASS BOOST, IMPACT, EXCITE Setting
- - Custom Setting
- Adjusting the BAL/FAD
- Adjusting the OTHERS
- 7-2-5 Adjust Operations
- Adjusting the MONITOR
- (1-1) Default Screen
- (1-2) MONITOR ADJUST : At Tuner, iPod, USB Mode
- (1-2-1) Brightness
- (1-2-2) Dimmer
- (1-3) CAMERA INT.
- (1-4) CAMERA WARNING
- (2-1) Brightness
- (2-2) Dimmer
- (2-3) Color
- (2-4) Hue
- Adjusting the GENERAL
- (3-1) Default Screen
- (3-2) CLOCK
- (3-3) BEEP
- (3-4) AUTO PANEL
- (3-5) TEL SWITCH
- (3-6) TEL SPEAKER
- 7-2-6 2-ZONE Function
- Description
- Display
- Specification of conversion
- NOTE
- 7-3 Radio
- Listening to the radio
- Auto store
- Memorizing the preset
- 7-4 RDS
- 7-4-1 Feature Explanation
- 7-4-2 RDS Menu
- AF
- TA
- - Operation
- REG
- SEEK
- PTY
- 7-5 DVD Video Player
- 7-5-1 Size of the Screen
- Normal mode
- Cinema mode
- Full wide mode
- 7-5-3 Parental Level
- 7-5-4 Disc Loading
- Watching the inserted disc
- ! WARNING
- Ejecting the disc
- 7-5-5 Setting the DVD Video
- Way of watching video
- Playing function
- Repeat and random playback
- Chapter skipping
- (5-1) Lang
- (5-2) Display
- (5-3) Audio
- (5-4) Parental
- 7-6 Other function
- 7-6-1 CDDA
- 7-6-2 MP3 and WMA
- Cautions for making MP3 disc
- Working method
- USAGE OF PERIPHERAL DEVICES
- 8-1 Setting iPod
- Key operation
- Menu
- Option
- Video mode
- 8-2 Setting USB
- About USB memory
- TROUBLESHOOTING
- - iPod control
- - About the noise
- SPECIFICATIONS
- INSTALLATION AND WIRE CONNECTION
- 11-1 Cautions On Installation
- BEFORE STARTING
- PACKAGE CONTENTS
- GENERAL CAUTIONS
- CAUTIONS ON INSTALLATION
- 11-2 Main Unit Installation (Universal Mount)
- 11-3 Removing The Main Unit
- 11-4 Main Unit Installation (Fixed Mount) (TOYOTA, NISSAN and other ISO/DIN equipped vehicles)
- 11-5 Cautions On Wiring
- 11-6 Electrical Connection
- Wire connection
- Power supply lead
- Connecting the Accessories
- Connecting the parking brake lead
- Clarion Co., Ltd.
Brand : CLARION
Model : VRX578RUSB
Category : Uncategorized